Humax AGC-1035BU CAR AUDIO User Manual SilverBox RDS 111124
Humax Automotive Co., Ltd. CAR AUDIO SilverBox RDS 111124
Humax >
Users Manual

Infotainment System 0
Infotainment System
User’s Manual
[Style of each level]
Level 1 : Arial Bold
16
Level 2 : Arial Bold 14
Level 3 : Arial Bold 12
Level 4 : Arial Bold 10
Main text (Item title) : Arial Bold 9
Main text (Description) : Arial Normal 9
Notes : Arial Normal 8

1 Infotainment System
Infotainment System
[Level 1]
Introduction ...................... 1
Radio ............................... 18
Audio Players ................. 27
Personalization .............. 42
Phone .............................. 48
Infotainment System 2
Introduction [Level 2]
Introduction [Level 3]
General Information [Level 4]
The Infotainment system provides
Infotainment in your car, using the
latest technology.
The radio can be easily used by
registering up to 36 FM or AM radio
stations with the PRESET buttons [1~6]
per every six pages.
The integrated CD player can play
audio CD and MP3 (WMA) discs, and
the USB player can play connected
USB storage devices or iPod products.
The Bluetooth phone connection
function allows for the use of wireless
hands-free phone calls, as well as a
phone music player.
Connect a portable music player to the
exterior sound input to and enjoy the
rich sound of the Infotainment system.
The digital sound processor provides a
number of preset equalizer modes for
sound optimization.
The system can be easily adjusted with
the carefully designed adjusting device,
smart displayer, and multifunctional
menu dial regulator.
■ The "Overview" section provides a
simple overview of Infotainment
system's functions and summary of
all regulatory devices.
■ The "Operation" section explains the
basic controls for the Infotainment
system.
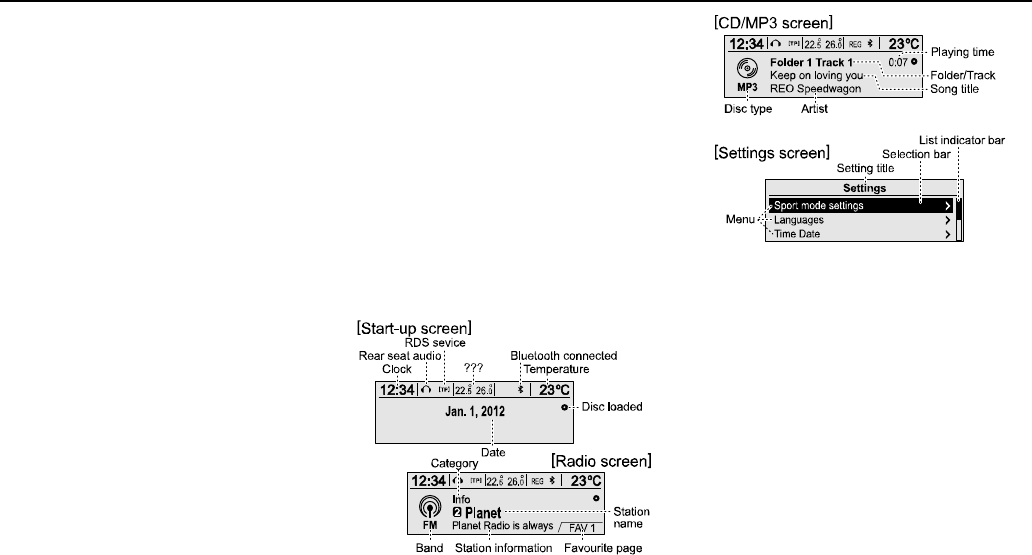
Screen Display [Level 4]
The screen display may differ from the
manual display since most screen
displays differ according to the device's
setup and vehicle specification.
Theft-Deterrent Feature
[Level 3]
The Infotainment system has an
electronic security system installed to
prevent theft.
The Infotainment system only works in
the vehicle in which it was first installed,
and cannot be used by the people that
have stolen it.

3 Infotainment System
FCC Information to User
This equipment has been tested and
found to comply with the limits for a
Class B digital device, pursuant to Part
15 of the FCC Rules. These limits are
designed to provide reasonable
protection against harmful interference
in a residential installation. This
equipment generates, uses and can
radiate radio frequency energy and, if
not installed and used in accordance
with the instructions, may cause
harmful interference to radio
communications. However, there is no
guarantee that interference will not
occur in a particular installation. If this
equipment does cause harmful
interference to radio or television
reception, which can be determined by
turning the equipment off and on, the
user is encouraged to try to correct the
interference by one of the following
measures:
• Reorient or relocate the receiving
antenna.
• Increase the separation between the
equipment and receiver.
• Connect the equipment into an outlet
on a circuit different from that to which
the receiver is con-nected.
• Consult the dealer or an experienced
radio/TV technician for help.
Caution
Modifications not expressly approved
by the party responsible for compliance
could void the user’s authority to
operate the equipment.
FCC Compliance Information : This
device complies with Part 15 of the
FCC Rules. Operation is subject to the
following two conditions: (1) This device
may not cause harmful interference,
and (2) this device must accept any
interference received, including
interference that may cause undesired
operation
WARNING:
TO REDUCE THE RISK OF FIRE OR
ELECTRIC SHOCK,
DO NOT EXPOSE THIS PRODUCT
TO RAIN OR
MOISTURE.
TO REDUCE THE RISK OF FIRE OR
ELECTRIC SHOCK,
AND ANNOYING INTERFERENCE,
USE ONLY THE
INCLUDED COMPONENTS.
CAUTION:
THIS PRODUCT IS A CLASS 1 LASER
PRODUCT.
USE OF CONTROLS OR
ADJUSTMENTS OR
PERFORMANCE OF PROCEDURES
OTHER THAN

Infotainment System 4
THOSE SPECIFIED HEREIN MAY
RESULT IN
HAZARDOUS RADIATION
EXPOSURE.
DO NOT OPEN COVERS AND DO
NOT REPAIR BY
YOURSELF.
REFER SERVICING TO QUALIFIED
PERSONNEL.
When Driving
Keep the volume level low enough to
be aware of road and
traffic conditions.
When Washing Your Car
Do not expose the product, including
the speakers and
CDs, to water or excessive moisture.
This could cause
electrical shorts, fire, or other damage.
When Parked
Parking in direct sunlight can produce
very high
temperatures inside your car. Give the
interior a chance to
cool down before switching the unit on.
Use the Proper Power Supply
This product is designed to operate
with a 14 V DC,
negative-ground battery system.
Disc Mechanism
Do not insert coins or other small
objects.
Keep screwdrivers and other metallic
objects away from
the disc mechanism and disc.
Use Authorized Service Centres
This product is made of precision parts.
Do not attempt to
disassemble or adjust any parts.
Please refer to the
Service Centre list included with this
product for service
assistance.
For Installation
This product should be installed in a
horizontal position
with the front end up at a convenient
angle, but not more
than 30°.
Note:
- The preset memory is cleared to
return to the original factory setting
when the power connector or battery is
disconnected.
5 Infotainment System
Overview [Level 3]
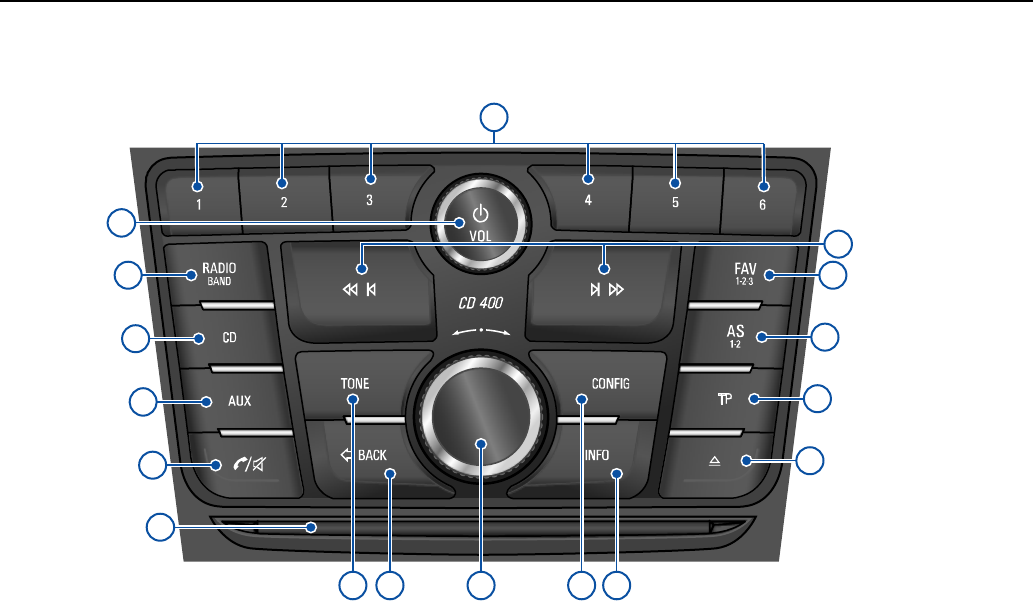
Type 1 [Level 4]
3
2
4
5
6
7
16
17
15
14
13
98 1110 12
1

Infotainment System 6
(1) PRESET [1 ~ 6 ] buttons
Hold down any these buttons to add the
current radio station to the current
Favourites page.
Press any of these buttons to select the
channel linked to that button.
(2) POWER button with VOLUME dial
Turn the power on/off by pressing this
button.
Turn the dial to adjust the overall volume.
(3) RADIO/BAND button
Toggle between FM or AM band radio.
(4) CD button
Press button to select CD/MP3 disc play
function.
(5) AUX button
Press button to select AUX/USB/iPod or
Bluetooth audio function
(6) PHONE/MUTE button
Press this button to activate Bluetooth
mode.
Hold down the button to turn the mute
function on or off.
(5) Disc slot
This is the slot in which compact disc is
inserted or taken out.
(8) TONE button
Press this button to adjust/select the
sound setup mode.
(9) BACK button
Cancel input content or return to the
previous menu.
(10) MENU button with TUNE dial
Press this button to display the currently
functioning menu or select/practice setup
content and setup values.
Turn the dial to move/change setup
content or setup values.
In the Bluetooth hands-free mode, take a
call by pressing the button. You can turn
the dial to answer or reject the call, and
then press the button to confirm.
(11) CONFIG button
Press this button to enter the system
setup menu.
(12) INFO button
Press this button to view file information
when using the CD/MP3/USB/iPod play
modes.
View information about a radio station and
the currently playing song when using the
radio function.
(13) EJECT button
Press this button and take out the disc.
(14) TP button
While using the FM RDS function, turn the
TP (Traffic Programme) function on or off.
(15) AS 1-2 button
Hold down this button to store the radio
stations automatically to the AS-Station
page 1/2.
Press this button to select the AS-Station
page 1 or 2.
(16) FAV1-2-3 button
Press this button to select the page of
saved favourite channels.
(17) I/SEEK/I buttons
Press these buttons while using the radio
to automatically seek stations with clear
reception. You can manually set the
broadcasting frequency by holding down
these buttons.
Press these buttons while using the CD/
MP3/USB/iPod play modes to instantly
play the previous or next track.
You can hold down these buttons to
quickly rewind/forward through the
currently playing songs.
7 Infotainment System
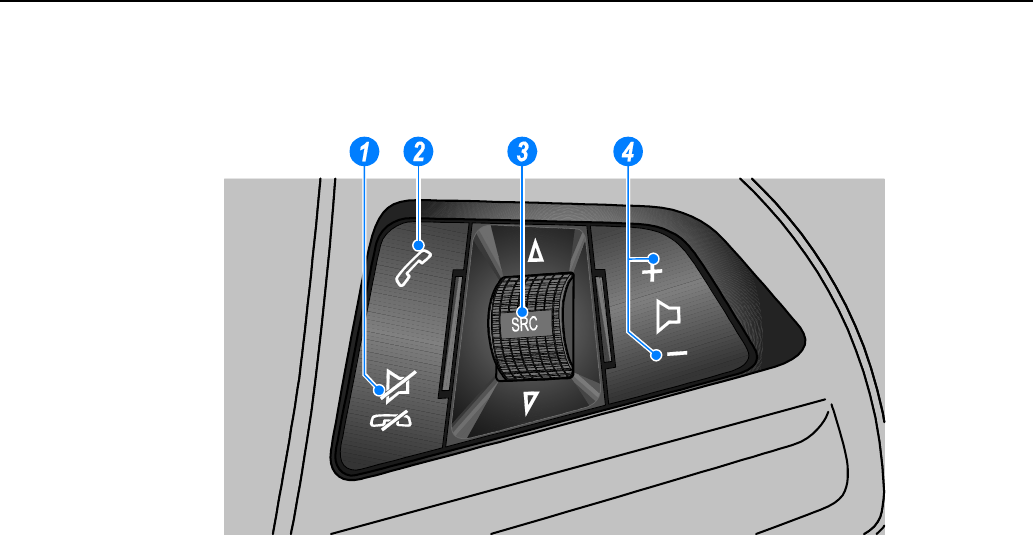
Steering wheel audio control Type
1 : option [Level 4]

Infotainment System 8
(1) Mute/Hang up button
Press the button in any music play mode
to turn the mute function on and off. In
engaged mode, you can press this button
to reject calls to finish the call.
(2) Call button
Press the button to answer the call or
enter the re-dial selection mode.
Hold down the button to enter the dialled
call log or to move back and forth from
hands-free mode and private call mode
during a call.
(3) SRC button with / dial
Press the button to select a sound play
mode.
Turn the dial to change the registered
radio stations or change the music being
played.
(4) Volume +/- buttons
Press the + button to increase the volume.
Press the - button to decrease the volume.
9 Infotainment System
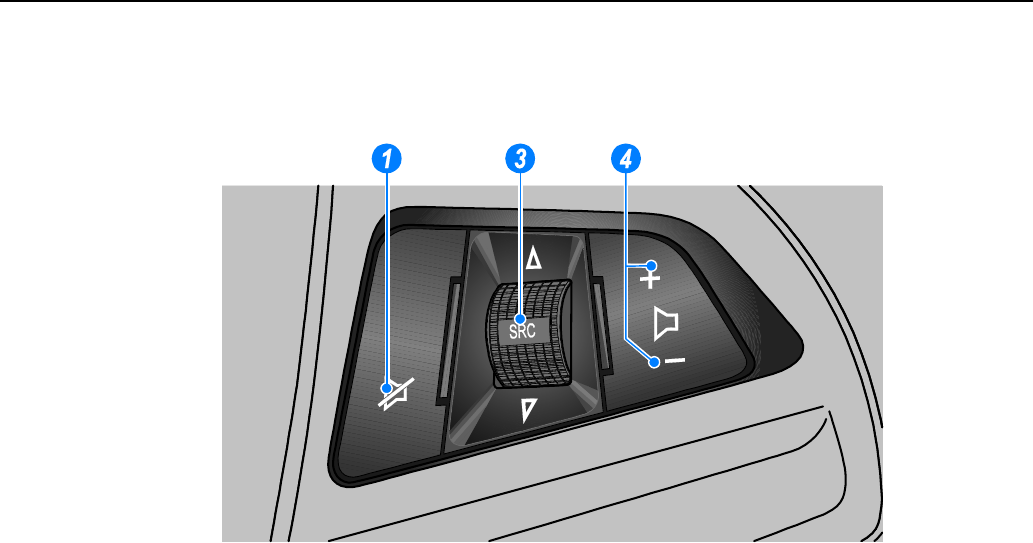
Steering wheel audio control Type
2 : option [Level 4]

Infotainment System 10
(1) Mute/Hang up button
Press the button to turn the mute function
on and off
(3) SRC button with / dial
Press the button to select a sound play
mode.
Turn the dial to change the registered
radio stations or change the music being
played.
(4) Volume +/- buttons
Press the + button to increase the volume.
Press the - button to decrease the volume.
11 Infotainment System
Operation [Level 3]
Buttons and controlling device
[Level 4]
The Infotainment system is operated by
using the function buttons,
multifunctional dial, and the menu
indicated on the screen display.
The buttons and control devices used
in the system are as follows.
The Infotainment system buttons and dial
Steering wheel remote control buttons
System on/off [Level 4]
Press the POWER button to turn the
power on.
Once the power is turned on, the
previously used function will be executed
after the time, date, temperature, and the
function are ready.
Press the POWER button to turn the
power off.
Turning off automatically [Level 4]
When the ignition switch (car ignition
key) is in the off position, turning on the
Infotainment system by using the
POWER button will automatically turn
the Infotainment system off after ten
minutes from the user’s last operation.
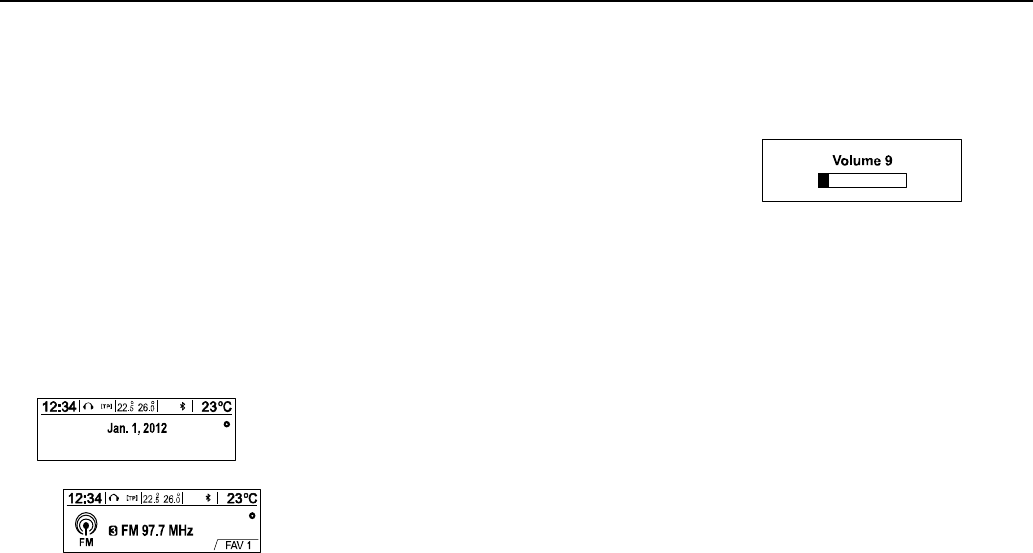
Volume control [Level 4]
Turn the VOLUME dial to adjust the
volume.
Using the steering wheel remote control,
press the VOLUME +/- buttons to adjust
the volume.
The current sound volume is indicated.
Turning on the Infotainment system power
will set the volume level to its previous
selection (when it is less than the
maximum starting volume)
When turning the power on, the maximum
starting volume value can be separately
set (when the previous volume level is less
than the maximum starting volume).
Infotainment System 12
Auto volume control [Level 4]
Once the speed-compensating sound
volume setup starts operating, the
volume will automatically be controlled
according to the vehicle’s speed to
offset the noise from the engine and
tires. (Refer to Settings Radio
settings Auto volume control)
Volume limit by high temperature
[Level 4]
If the inside temperature of the radio is
very high, the Infotainment system will
limit the controllable maximum volume.
If necessary, the volume will
automatically decrease.
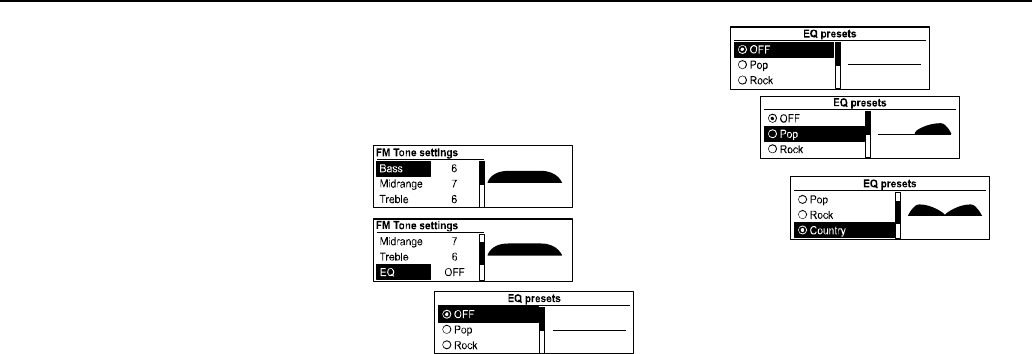
Tone settings [Level 4]
From tone setup menu, sound features
can be setup differently according to
the FM/AM/DAB tuner and each audio
player’s functions.
Press the TONE button when using the
relevant functioning mode.
Turn the TUNE dial to select desired
tone control mode, and then press the
MENU button.
Turn the TUNE dial to select the
desired tone control value, and then
press the MENU button.
Tone setting menu
Bass: Adjust the bass level from -12 to +12.
Midrange: Adjust the midrange level from -
12 to +12.
Treble: Adjust the treble level from -12 to
+12.
EQ (Equalizer): Select or turn off the sound
style (OFF Pop Rock Country Talk
Classical)
Fader: Adjust the front/rear speaker
balance from front 15 to rear 15 in the six
speaker system model.
Balance: Adjust the left/right speaker
balance form left 15 to right 15.
13
Infotainment System
Select function
FM /DAB/AM radio
Press the RADIO/BAND button to
select FM, AM or DAB radio.
Press the MENU button to open the
FM/AM/DAB menu that includes options
for selecting broadcast stations.
CD/MP3 disc player
Insert an Audio CD or MP3/WMA disc
to be played with printed surfacing
upward in the disc slot.
When a disc is already inserted, press
the CD button to select CD/MP3 player.
From the steering wheel remote control,
press SRC button to select the CD/MP3
player.
Press the MENU button to open the menu
with options for the relevant function or the
menu of the relevant device.
Infotainment System
14
USB/iPod/Bluetooth audio play or
exterior sound (AUX) input
Connect the USB/ iPod with music files
to be played to the USB connecting
terminal. Or connect the audio output of
the external audio equipment to be
listened to AUX input terminal.
When the USB, iPod or AUX device are
already inserted, repeatedly press the
AUX button to select the desired
function. (AUX USB or iPod
Bluetooth audio AUX ....)
From the steering wheel remote control,
press SRC button to select the desired
mode.
Press the MENU button to open the menu
with options for the relevant function or the
menu of the relevant device.
Bluetooth hands-free phone device
Press the PHONE/MUTE button to
select the Bluetooth hands-free phone
function.
Press the MENU button to open the
Bluetooth with options for the relevant
function.

15 Infotainment System
Radio [Level 2]
FM/DAB/AM Radio [Level 3]
Before using AM-FM Radio [Level 4]
Main buttons/dial
(3) RADIO/BAND button
Toggle between FM, DAB or AM band
radio.
(10) MENU button with TUNE dial
Turn this dial to manually find a
broadcasting frequency.
Press this button to access the menu
screen from the current mode.
(9) BACK button
Cancel the input item or return to the
previous screen/menu.
(17) I/SEEK/I buttons
Press this button to automatically search
for available radio stations.
Hold down this button to change the radio
frequency as desired, and then let the
button go to stop at the current frequency.
(16) FAV1-2-3 button
Press this button to move through the
pages of saved favourite radio stations.
(1) PRESET [1 ~ 6] buttons
Hold down any of these PRESET buttons
to register the current radio station to that
button.
Press this button to select the station
registered to the PRESET button.
(15) AS 1-2 button
Hold down this button to store the radio
stations automatically to the AS-Station
page 1/2.
Press this button to select the AS-Station
page 1 or 2.
(14) TP button
While using the FM RDS function, turn the
TP (Traffic Programme) function on or off.
(12) INFO button
View the information for broadcast radio
stations.
Infotainment System
16
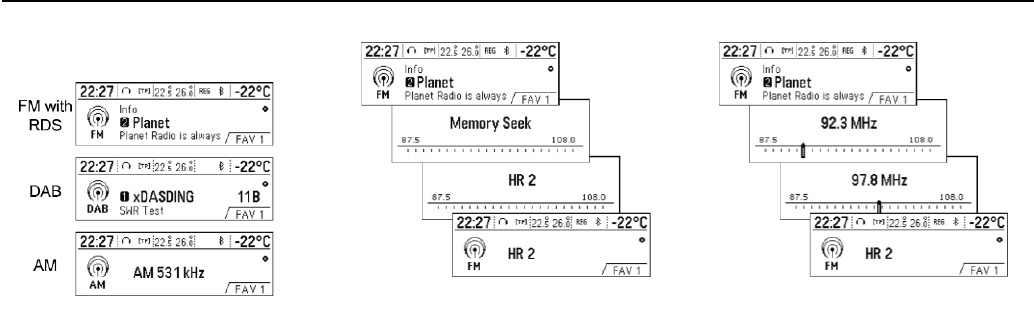
Listening to radio station [Level 4]
Radio band selecting
Repeatedly press the RADIO/BAND
button to toggle between FM, DAB or
AM broadcasting
The previously chosen broadcasting
station will be received.
Automatic station search
Press the I/SEEK/I buttons
to automatically search for available
radio stations with good reception.
Seeking
Hold down the I/SEEK/I
buttons to quickly change the frequency,
and then release the button at the
desired frequency.
17
Infotainment System
Searching for broadcasting manually
Turn the TUNE dial to manually find the
desired broadcasting frequency.
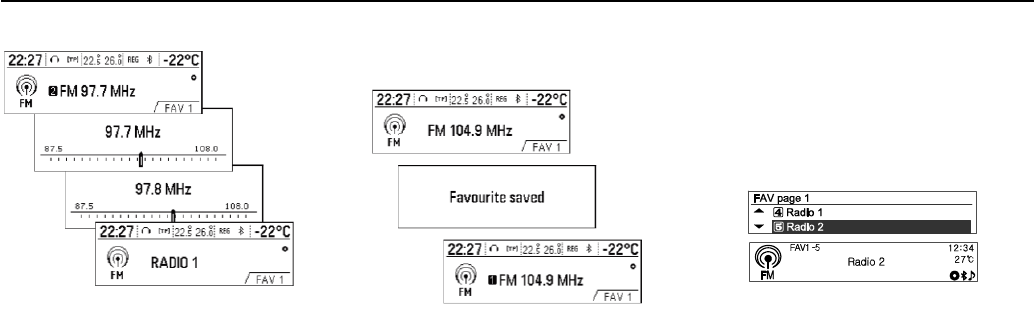
Using the PRESET buttons [Level 4]
Registering PRESET button
Press the FAV
1-2-3
button to select the
desired page of saved favourites.
Hold down any of PRESET [1 ~ 6] buttons
to register the current radio station to that
button of the selected Favourites page.
Up to Favourites pages can be saved, and
each page can store up to six radio
stations.
It is possible to setup the number of the
Favourites pages being used in "System
setup Radio Setup Radio favourites
(Max. number of favourite page)".
If a new radio station is registered to a
PRESET [1 ~ 6] previously registered
button, its previous content will be deleted
and be replaced with the new radio station
that is saved.
Listening to PRESET button directly
Repeatedly press the FAV
1-2-3
button
to select the desired FAV (Favourites)
preset page.
The number 1 broadcasting information of
the selected FAV (Favourites) preset page
will be displayed.
Press a PRESET [1 ~ 6] buttons to
directly listen to the radio station saved
to that button.
Infotainment System
18
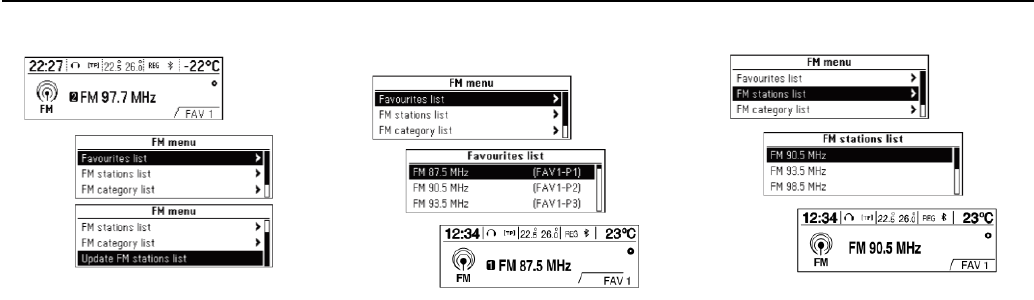
Using the FM/DAB/AM radio menu
Press the MENU button to display the
FM/DAB/AM radio menu.
Turn the TUNE dial to move to the
desired menu item, and then press
MENU button to select the relevant
item or to display the item's detailed
menu.
FM/DAB/AM menu FM/DAB/AM
Favourites list
From FM/DAB/AM menu item, turn the
TUNE dial to move to the Favourites list,
and then press MENU button.
The Favourites list information will be
displayed.
Turn the TUNE dial to move to the
desired Favourites list, and then press
MENU button to receive relevant
broadcasting channel.
FM/AM menu FM/AM station list
From the FM/AM menu, turn the TUNE
dial to move to the FM/AM stations list,
and then press the MENU button.
The Station list information will be
displayed.
Turn the TUNE dial to move to the
desired list, and then press the MENU
button to receive the relevant
broadcasting channel.
19
Infotainment System
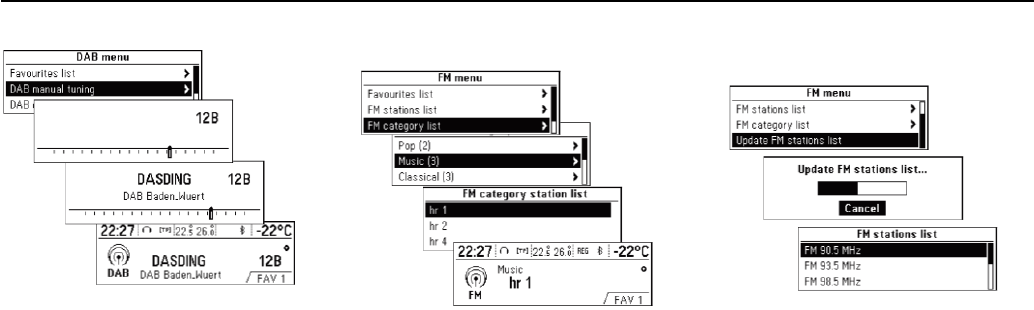
DAB menu DAB manual tuning
From the DAB menu, turn the TUNE
dial to move to the DAB manual tuning,
and then press the MENU button.
Turn the TUNE dial to move to the
desired station, and then press the
MENU button to receive the relevant
broadcasting.
FM/DAB menu FM/DAB category
list
From the FM/DAB menu, turn the
TUNE dial to move to the FM/DAB
category list, and then press the MENU
button.
The FM/DAB category list will be displayed.
Turn the TUNE dial to move to the
desired list, and then press the MENU
button to receive the relevant
broadcasting frequency.
FM/DAB/AM menu Update
FM/DAB/AM stations list
From the FM/DAB/AM menu, turn the
TUNE dial and move to the Update
FM/DAB/AM stations list, and then
press MENU button.
The FM/DAB/AM broadcasting list update
will proceed.
During the FM/DAB/AM broadcasting list
update, press the MENU button or the
previous BACK button to stop it from
saving changes.
Infotainment System
20
RDS (Radio Data System)
[Level 3]
The Radio Data System (RDS) is a service
by FM stations that considerably makes it
easier to find radio stations with fault-free
reception.
RDS stations are indicated by the
programme name instead of the
broadcasting frequency.
View RDS broadcasting
information [Level 4]
While receiving RDS broadcasting,
press the INFO button to check RDS
broadcasting information that is being
received.
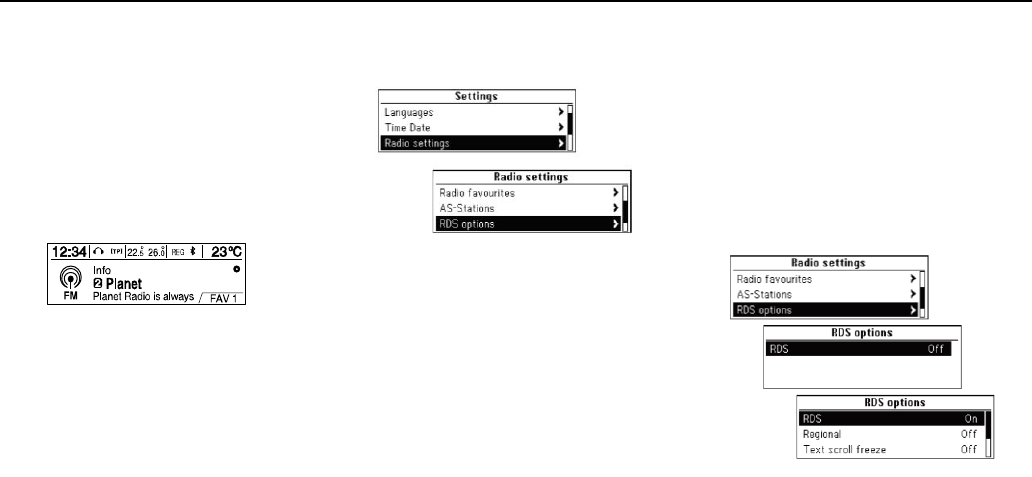
Configuring RDS [Level 4]
Press the CONFIG button to enter the
Setting menu.
Turn the TUNE dial to move to the
Radio settings, and then press the
MENU button.
Turn the TUNE dial to move to RDS
options, and then press the MENU
button.
Switching RDS on and off [Level 4]
Set the option RDS to On or Off.
The following advantages result
through activating RDS:
On the display the programme name of the
set station appears instead of its frequency.
The Infotainment system always tunes into
the best receivable broadcasting frequency
of the set station by means of AF.
(Alternative Frequency)
From Settings Radio settings
RDS options menu, turn the TUNE dial
to move to RDS: Off, and then press
the MENU button to turn on the RDS
function.
21
Infotainment System
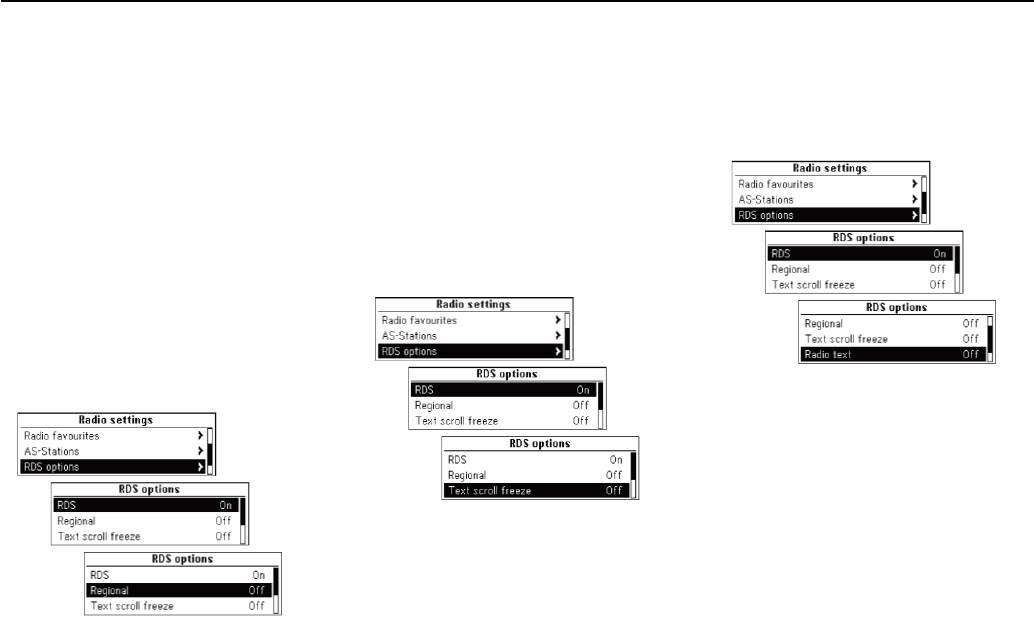
Switching regionalization on and
off [Level 4]
RDS must be activated for
regionalization.
At certain times some RDS stations
broadcast regionally different
programmes on different frequencies.
Set the option Regional (REG) to On or
Off.
Only alternative frequencies (AF) with
the same regional programmes are
selected.
If regionalization is switched off,
alternative frequencies of the stations
are selected without regard to regional
programmes.
From Settings Radio settings
RDS options menu, turn the TUNE dial
to move to Regional: Off, and then
press the MENU button to turn on the
Regional function.
Switching the Text scroll freeze on
and off [Level 4]
To switch the text scroll freeze function
(for displaying the information of
programme service) on or off.
From Settings Radio settings
RDS options menu, turn the TUNE dial
to move to Text scroll freeze: Off, and
then press the MENU button to turn on
the Text scroll freeze function.
Switching the Radio text function
on and off [Level 4]
To switch the radio text function (for
displaying the information of
programme service) on or off.
From Settings Radio settings
RDS options menu, turn the TUNE dial
to move to Radio text : Off, and then
press the MENU button to turn on the
Radio text function.
Volume of the traffic
announcements (TA) [Level 4]
The minimum volume of the traffic
announcements (TA) can be preset.
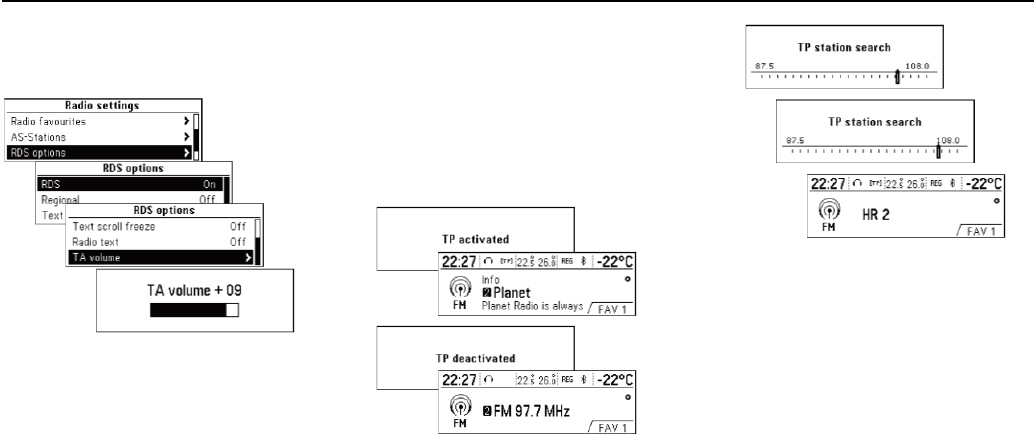
Infotainment System
22
The minimum volume of the traffic
announcements can be increased or
reduced in comparison to the normal
audio volume.
From the RDS settings menu, turn the
TUNE dial to move to TA volume, and
then press the MENU button.
Turn the TUNE dial to adjust the TA
volume level, and then press the MENU
button.
Radio traffic service [Level 4]
(TP = Traffic Programme)
Radio traffic service stations are RDS
stations that broadcast traffic news.
Switching the Traffic Announcement
Standby Facility of the Infotainment
System On and Off:
Outside of Phone mode, press the TP
button to turn the Traffic programme
service function on or off.
If the radio traffic service is switched on,
then [ ] is displayed in the radio main menu.
If the current station is not a radio traffic
service station, then a search is
automatically started for the next radio
traffic service station.
Once a radio traffic service station has
been found, [TP] is displayed in the radio
main menu.
If the radio traffic service is switched on,
then CD/MP3/USB/iPod/Bluetooth music
or AUX replay is interrupted for the
duration of the traffic announcement.
23
Infotainment System
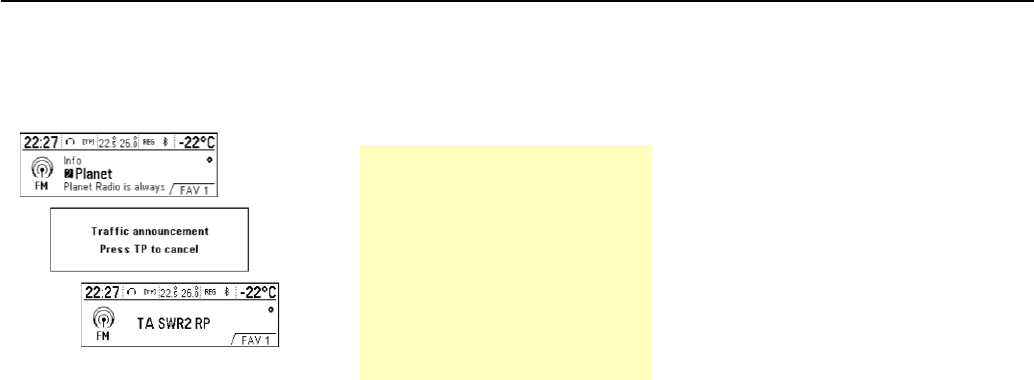
Blocking out Traffic
Announcements [Level 4]
To block out a traffic announcement, e.g.
during CD/MP3 replay or radio reception:
Outside of Phone mode, press the TP
button.
Switch on the radio traffic service and
fully turn down the volume of the
Infotainment system.
The traffic announcement is aborted, but
the radio traffic service remains switched
on.
Blocking out current Traffic
Announcements [Level 4]
To block out a current traffic
announcement e.g. during TA radio
reception:
Outside of Phone mode, press the TP
button.

Infotainment System 24
Audio Players [Level 2]
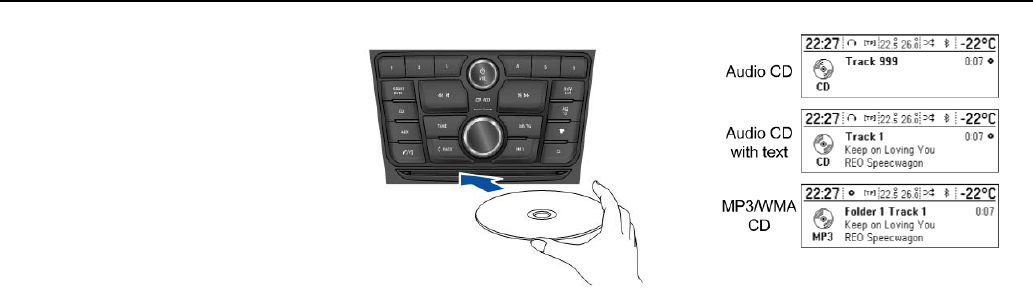
CD Player [Level 3]
The CD/MP3 player of this system can
play audio CD and MP3 (WMA) disc.
Before using CD player [Level 4]
Important information about audio
CD and MP3(WMA) disc
CAUTION
In any case, do not insert any DVDs, mini
discs with a diameter of 8cm, or discs
with abnormal surfaces in this CD/MP3
(WMA) player.
Do not put any stickers on the disc
surface. Such discs may be stuck in the
CD player and damage the drive device.
If this occurs, then the device will need to
be replaced at high cost.
An audio CD disc with an anti-piracy
function with no compatibility with the
audio CD standard may not work properly
or at all.
CD-R and CD-RW discs that are manually
recorded are easier to be handled with
carelessness than the original CD discs.
Manually recorded CD-R and CD-RW
discs should especially be handled with
care. Please refer to the following.
Manually recorded CD-R and CD-RW
discs many not play properly or at all.
In such cases, this is not a problem with
the device.
When changing discs, take care to not
smear any fingerprints on the playing side.
After removing the disc from the CD/MP3
player, make sure to immediately put the
disc into a disc sleeve to prevent it from
being damaged or smeared with dust.
If the disc is smeared with dust or liquid,
then this may cause problems by
contaminating the lens of the CD/MP3
player inside the device.
Protect the disc from heat and exposure to
direct light.
Usable disc type
This product can play Audio CD/MP3
(WMA) discs.
- CD-DA : CD-R/CD-RW
- MP3(WMA) : CD-R/CD-RW/CD-ROM
MP3 (WMA) files below cannot be played.
- File encoded in MP3i (MP3 interactive)
or MP3 PRO standards
- MP3 (WMA) file encoded in non-
standards
- MP3 files that are not in MPEG1 Layer3
format
Caution for using disc
Do not use any of the discs described
below. Excessive use of these discs in the
player may cause problems.
- Discs with stickers, labels, or a
protective cell attached.
- Discs affixed with a label printed with an
inkjet printer
- Discs that are made by over-burning,
thus holding data exceeding the
standard capacity
- Discs with cracks or scratches or are
bent will not be played properly.
- An 8 cm disc or a non-circular disc
(quadrangle, pentagon, oval)

25 Infotainment System
Do not put anything other than discs in the
disc slot since this may cause trouble or
damage.
The disc player may not work properly if
the heater is turned on in cold weather due
to moisture created inside the device. If
this is a concern, keep the product off for
about one hour before use.
Play may be stopped due to the vehicle
shaking while driving on rugged roads.
Do not forcefully take out or insert the disc
or block it with your hand while it is being
ejected.
Insert the disc with the printed side facing
up. It cannot be played if it is inserted
upside down.
Do not touch the recording side with your
hand while handling the disc (the side
without any print or decoration).
Place discs that are not being used in
cases, and keep them in a place not
exposed to direct light or high temperature.
Do not smear any chemical substances on
the disc. Clean discs of dirt with a moist,
soft cloth, wiping from the centre to the
edge.
Caution for using CD-R/RW disc
When using CD-R/CD-RW discs, only the
discs that has been "finalized" can be used.
Discs that are created with a PC may not
play according to the application program
setup and environment.
CD-R/CD-RW discs, especially bulk discs,
may not be work if they are directly
exposed to direct light or high temperature,
or if they are kept inside your car for a long
time.
The title and other text information
recorded on CD-R/CD-RW discs may not
be displayed on this device.
CD-RW discs may have longer loading
times than CDs or CD-R discs.
Damaged music files may not be played or
will be cut off while playing
Folders and music files are displayed in
the order of: symbol → number →
Korean → English
Some anti-piracy discs may not be played.
An MP3 (WMA) disc can have maximum of
512 files for each of the 10 folder levels,
and a maximum number of 999 files can
be played.
The folder and file names are not arranged,
and are indicated in the order in which they
are recorded on the disc.
This system can only recognize MP3
(WMA) discs made in ISO-9660 level 1/2
or in the Joliet file system. (It does not
support the UDF file system.)
MP3/WMA files are not compatible with
packet writing data transmission.
The disc on which MP3/WMA files and
audio data (CDDA) are written may not be
played if it is a CD-Extra or Mixed-Mode
CD.
The file/folder names that can be used per
disc storage type are as follows, including
the four-digit file name extensions (.mp3).
- ISO 9660 Level 1: Maximum of 12
characters
- ISO 9660 Level 2: Maximum of 31
characters
- Jouliet: Maximum of 64 characters (1
byte)
- Windows long file name: Maximum of 28
Characters (1 byte)

Infotainment System 26
Caution for using MP3/WMA music
files
This product can play MP3 (WMA) files
with .mp3, .wma (lower case letters)
or .MP3 and .WMA (capital letters) file
name extensions.
MP3 files that can be played by this
product are as follows.
- Bit rate: 8 kbps ~ 320 kbps
- Sampling frequency: 48 kHz, 44.1 kHz, 32
kHz (for MPEG-1), 24 kHz, 22.05 kHz, 16
kHz (for MPEG-2)
While this product can play files with a
8kbps ~ 320kbps bit rate, files with a bit
rate above 128kbps will result in high
quality sound.
This product can display ID3 Tag (Version
1.0, 1.1, 2.2, 2.3 or 2.4) information for
MP3 files, such as the album name and
the artist.
To display album (disc title), track (track
title), and artist (track artist) information,
the file should be compatible with the ID3
Tag V1 and V2 formats.
This product can play MP3 files using VBR.
When playing an MP3 file of this VBR type,
the remaining time displayed may be
different from the real time.
Order of playing music files
27
Infotainment System
Playing CD/MP3 [Level 4]
Main buttons/Control
(4) CD button
Select the CD/MP3 disc player.
(10) MENU button with TUNE dial
Turn the button/dial to move to the track
list, menu, or MP3 (WMA) track
information item.
Press the button/dial to display the menu
screen for the current item or current
mode.
(8) I/SEEK/I buttons
Press these buttons to play the previous
or next track.
Hold down these buttons to rewind or fast
forward through the track, and release the
button to resume playing at normal speed.
(13) EJECT button
Eject the disc.
(12) INFO button
Display the information for the track being
played.
Insert/Eject disc
Insert the disc to be played with printed
surface facing upward in the disc
inserting slot.
Once the reading of disc information is
completed, it will automatically play from
track 1.
When a non-readable disc is inserted, he
disc will automatically be ejected with the
display of a disc error message, and then
the system will switch to the previously
used function or the FM radio.
When a disc to be played is already
inserted, repeatedly press CD button to
select CD/MP3 disc play.
If there is no disc to be played, "no disc"
will be displayed on the screen and the
function will not be selected.
The track that was previously played will
automatically play.
Infotainment System
28
Ending CD/MP3 play
To end play, press the EJECT button to
take out the disc.
When the disc comes out, it automatically
switches to the previously used function or
the FM radio.
The disc will automatically be inserted
back again if it is not taken out for some
time.
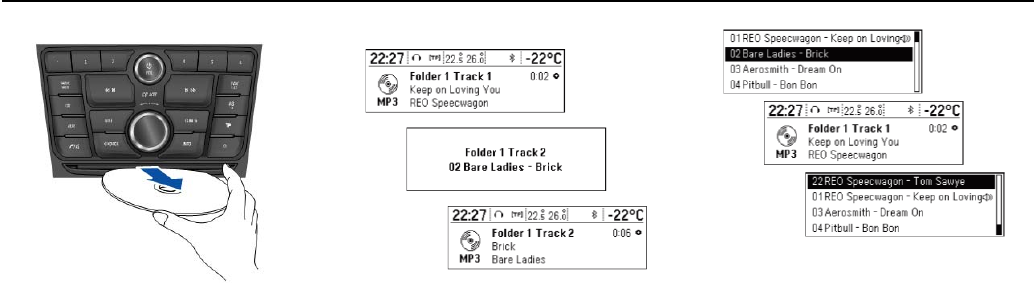
Changing playing track
Press the I/SEEK/I buttons
in play mode to play the previous or
next track.
Using the steering wheel remote dial,
tracks can be easily changed by turning
the Source [△SRC▽] dial.
For MP3 (WMA) tracks, turn the TUNE
dial to move to the play track list, and
then press MENU button to instantly
change it.
29
Infotainment System
Changing playing position
Hold down the I/SEEK/I
buttons during play mode to rewind or
fast-forward through the song.
Release the button to resume playing
the song at normal speed.
The volume is slightly reduced during
rewinding and fast-forwarding, and the
playing time will be displayed.
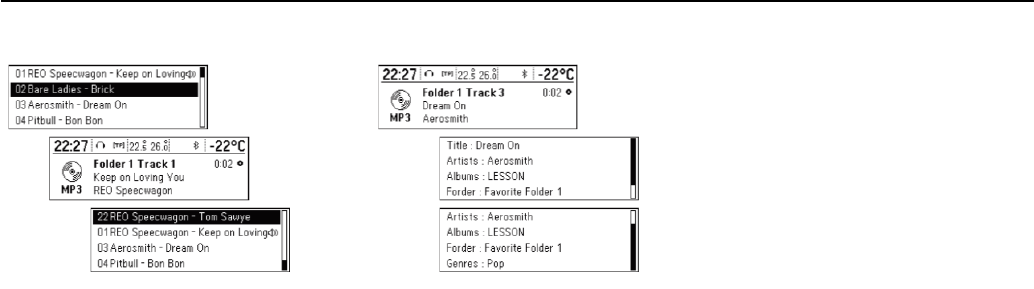
View information on playing track
Press the INFO button in play mode to
the display information about the track
being played.
If there is no information on the playing
track for audio CDs, then the system will
display "No info."
For MP3 (WMA) tracks, more
information can be viewed by turning
the TUNE dial from the track
information display.
The information displayed includes the file
name, folder name, and ID3 Tag
information saved with the song.
If incorrect ID3 Tag information (e.g. artist,
song title) was added to MP3 (WMA) files
before they are burnt to disc, this
information will be displayed as is by the
Infotainment system.
Incorrect ID3 Tag information cannot be
modified or corrected on the Infotainment
system (ID3 Tags can only be corrected
on a PC).
The information for songs expressed in
special symbols or in unavailable
languages may be displayed as “----” or
are not displayed at all.
Infotainment System
30
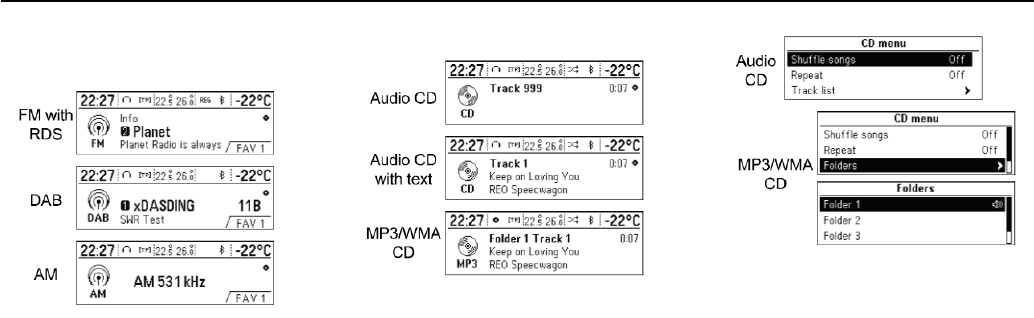
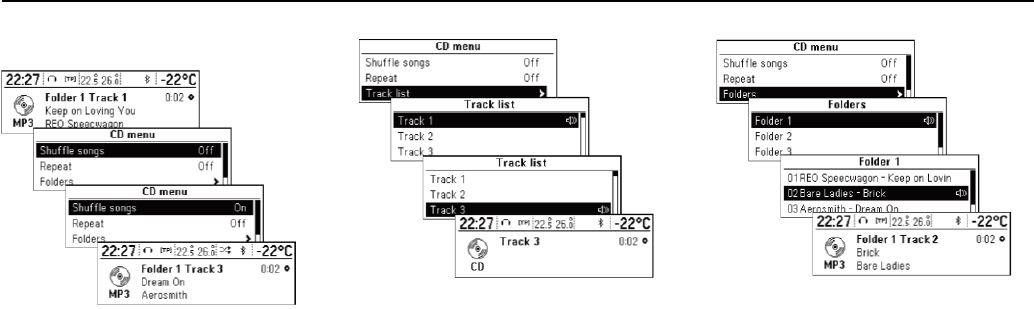
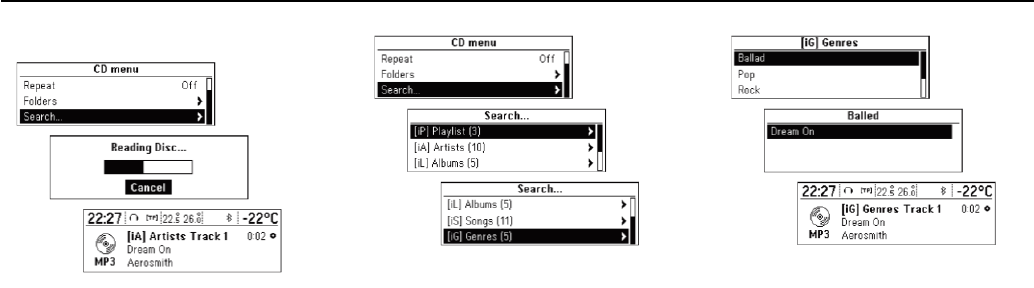
Using CD menu [Level 4]
Changing the playback mode
From the play mode, press the MENU
button to display the CD menu.
Turn the TUNE control to select the
shuffle or repeat playback functions,
and then press the MENU button to
turn the relevant functions on or off.
CD menu Track list
For Audio CD discs, turn the TUNE dial
from the CD menu to move to the track
list, and then press the MENU button.
Turn the TUNE dial to find the desired
track list, and then press the MENU
button to play the selected track.
CD menu Searching Folders
For MP3 (WMA) discs, turn the TUNE
dial from the CD menu to move to the
desired folder, and then press MENU
button.
Turn the TUNE dial to move to the
desired folder, and then press MENU
button.
Turn the TUNE dial to find the desired
track, and then press MENU button to
play the selected track from the
selected folder.
31
Infotainment System
CD menu Search …
For MP3 [WMA] discs, turn the TUNE
dial from the CD menu, move to the
desired item, and then press the MENU
button.
After the system reads the disc information,
the first song of the playlist [iP] will be
displayed.
If there are no music files in the playlist [iP],
the first song for each artist [iA] will be
displayed.
Press the MENU button again, and
from the displayed search item, turn the
TUNE dial to select the desired play
mode.
The number of relevant songs will be
displayed by Playlist [iP]/Artist [iA]/Album
[iL]/Title [iS]/Genre [iG].
Turn the TUNE dial to move to the
detailed classification item, and then
press the MENU button.
Turn the TUNE dial to find the desired
track/title, and then press the MENU
button to play the selected track.

Infotainment System 32
Auxiliary Devices [Level 3]
USB player [Level 4]
Cautions for using USB devices
Operation cannot be guaranteed if the
HDD built-in USB mass storage device or
CF or SD memory card is connected by
using a USB adaptor. Use a USB or flash
memory type storage device.
Take caution to avoid static electricity
discharge when connecting or
disconnecting the USB. If connection and
disconnection are repeated many times in
a short time, this may cause a problem in
using the device.
Operation is not guaranteed if the
connecting terminal of the USB device is
not metal.
Connection with i-Stick Type USB storage
devices may be faulty due to vehicle
vibration, so their operation cannot be
guaranteed.
Be careful not to touch the USB connecting
terminal with an object or any part of your
body.
The USB storage device can only be
recognized when it is formatted in
FAT16/32 file format. Only devices with an
allocated unit size of 512Byte/Sector or
2,048 Byte/Sector can be used. NTFS and
other file systems cannot be recognized.
According to the type and capacity of the
USB storage device and the type of the
stored file, the time it takes to recognize
the files may differ. This is not a problem
with the product in this case, so please
wait for the files to be processed.
Files in some USB storage devices may
not be recognized due to compatibility
problems, and connections with a memory
reader or a USB hub are not supported.
Please check the device’s operation in the
vehicle before use.
When devices such as an MP3 player,
mobile phone, or digital camera are
connected through a mobile disc, it may
not operate normally.
Do not disconnect the USB storage device
while it is being played.
This may cause damage to the product or
the performance of the USB device.
Disconnect the connected USB storage
device when the vehicle ignition turned off.
If the ignition is turned on while the USB
storage device is connected, the USB
storage device may be damaged or may
not operate normally in some cases.
USB storage devices can only be
connected to this product for the purpose
of playing music files.
The product’s USB terminal should not be
used to charge USB accessory equipment
since the heat generation using the USB
terminal may cause performance issues
or damage to the product.
When the logical drive is separated from a
mass USB storage device, only the files
from the top-level logical drive can be
played for USB music files. This is the
reason that the music files to be played
should be stored in the top-level drive of
the device. Music files in particular USB
storage devices may also not be normally
played if an application is loaded by
partitioning a separate drive inside the
USB device.
Music files to which DRM (Digital Right
Management) is applied cannot be played.
This product can support USB storage
devices that are up to 16 Gigabytes in
capacity with a limit of 999 files, 512
folders, and 10 stages of folder structure.
Normal usage cannot be guaranteed for
storage devices that exceed this limit.

33 Infotainment System
Caution for using USB music files
Damaged music files may be cut-off during
playback or may not be played at all.
Folders and music files are displayed in
the order of Symbol Number
Korean
A maximum of 64 Korean/English
characters can be recognized for folder or
file names written in the Joliet file system.
About MP3 (WMA) music files
The MP3 files that can be played are as
follows.
- Bit rate : 8 kbps ~ 320 kbps
- Sampling frequency :
48 kHz, 44.1 kHz, 32 kHz (for MPEG-1)
24 kHz, 22.05 kHz, 16 kHz (for MPEG-2)
This product displays MP3 (WMA) files
with the mp3, .wma (lower case letters)
or .MP3 or .WMA (capital letters) file name
extensions.
This product can display ID3 tag (Version
1.0, 1.1, 2.2, 2.3, 2.4) information about
album, artist, etc. for MP3 files.
The file/folder names that can be used
according to storage type are as follows,
including the four character file name
extensions (.mp3).
- ISO 9660 Level 1: Maximum of 12
characters
- ISO 9660 Level 2: Maximum of 31
characters
- Joliet: Maximum of 64 characters (1 byte)
- Windows long file name: maximum of 28
characters (1 byte)
This product can play MP3 files which use
VBR. When a VBR type MP3 file is being
played, the remaining time displayed may
be different from the actual time remaining.
Main buttons/Dial
The following main buttons and controls
are used to play USB music files.
(9) CD/AUX button
Press the button repeatedly when the
USB device is connected to select the
USB play mode.
(14) MENU button with control
Turn the dial to move to the track list,
menu or MP3 (WMA) track information.
Press the button to display the menu
screen provided by the current item or
current mode.
(8) ISEEKI buttons
Press these buttons to play the previous
or next track.
Hold down these buttons to rewind or fast
forward, and then release to play at
normal speed.
(7) INFO button
Display the information of the track being
played.
(16) ⇦BACK button
Cancel the input item or return to the
previous menu.
Infotainment System
34
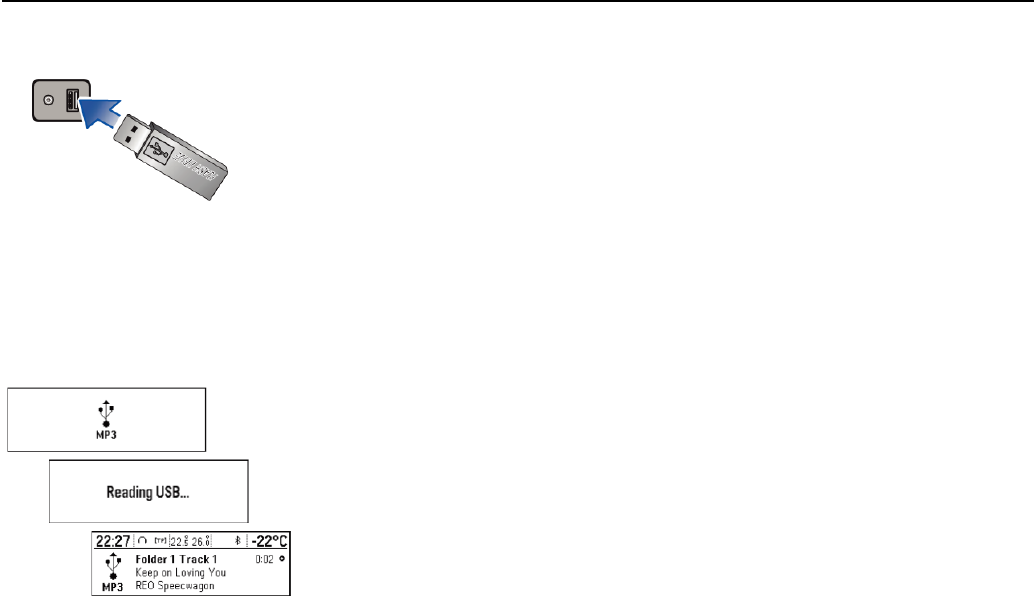
Connecting the USB storage device
Connect the USB storage device in
which music files are stored to the USB
connection terminal located inside the
glove box of the passenger seat.
Once the product finishes reading the
information on the USB storage device, it
will automatically play from Track 1.
If a non-readable USB storage device is
connected, then an error message will
appear and the product will automatically
switch to the previously used function or
the FM radio function.
If the USB storage device to be played
is already connected, repeatedly press
the AUX button to select the USB
player.
It will automatically play from the previous
playing point. Afterwards, the functions of
the USB player are operated similarly to
CD/MP3 playback.
Afterwards, the functions of the USB
player are operated similarly to
CD/MP3 playback.
Ending USB music files playback
Press the RADIO/BAND or CD button
to select other functions.
To end play and disconnect the USB
storage device, use the USB menu →
USB removal function to safely remove the
USB storage device.
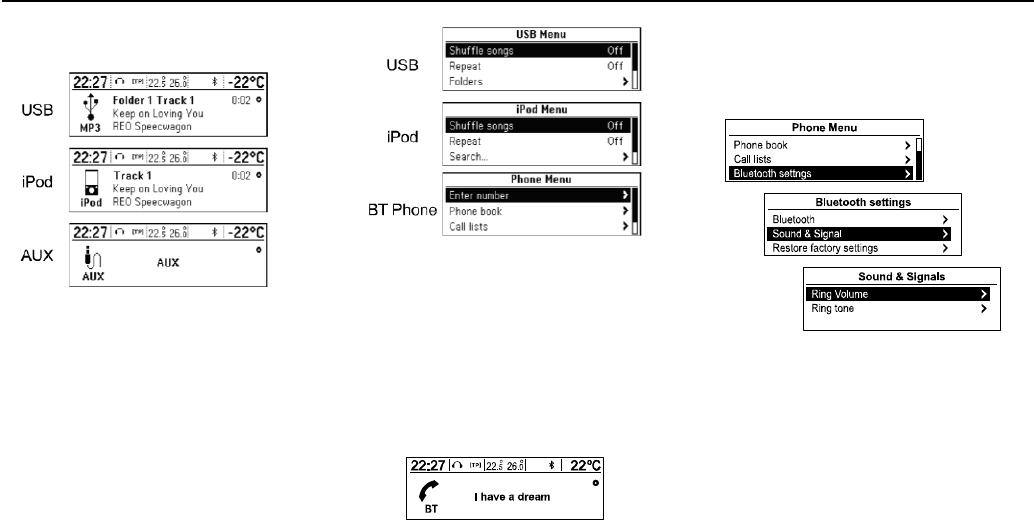
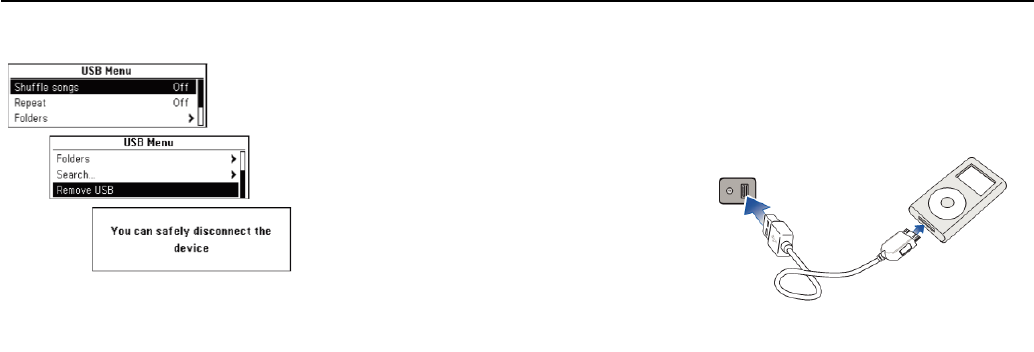
Using the USB menu
The instructions for "random/repeat/
folder/MP3 music box" from the USB
menu are similar to the CD/MP3
player's CD menu; only the "USB
removal item" has been added.
Refer to the CD/MP3 player functions
from the CD menu.
35
Infotainment System
USB menu Remove USB
Press the MENU button from play
mode to display the USB menu.
Turn the TUNE dial to move to the
Remove USB, and then press the
MENU button to display the message
notifying you that is safe to remove the
USB device.
Disconnect the USB device from the
USB connection terminal.
Return to the previously used function.
iPod player [Level 4]
Limited to models supporting the iPod
connection
Main buttons/Dial
The following main buttons and controls
are used to play the iPod music files.
(9) CD/AUX button
Press this button repeatedly when the
iPod is connected to select the iPod play
mode.
(14) MENU button with control
Turn the button/dial to move and display
the track list that is playing.
Press the button/dial to display the menu
screen provided by the current item or
current mode.
(8) I/SEEK/I buttons
Press these buttons to play the previous
or next track.
Hold down these buttons to rewind or fast
forward, and then release to play at
normal speed.
(7) INFO button
Display the track being played.
(16) BACK button
Cancel the previous item or return to the
previous menu.
Connecting iPod player
Connect the iPod device in which the
music files are stored to the USB
connection terminal located inside the
glove box of the passenger seat.
The iPod product models that are
connected/supported by this product are
as follows.
- iPod 2G Nano/iPod 3G Nano/iPod 4G &
5G Nano
- iPod 120GB & 160GB Classic
- iPod 1G, 2G, & 3G Touch
- iPhone 3G & 3GS
Infotainment System
36
Only connect the iPod to this product with
connection cables supported by iPod
products. Other connection cables cannot
be used.
In some cases, the iPod product may be
damaged if the ignition is turned off when it
is connected to the product.
When the iPod product is not being used,
keep it separately from this product with
the car ignition turned off.
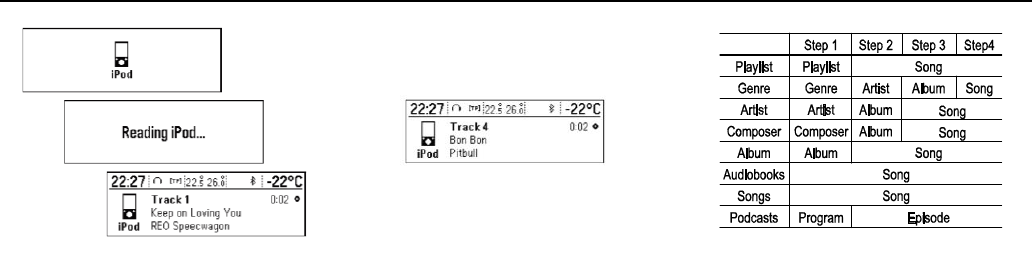
Once the product finishes reading the
information on the iPod device, it will play
automatically from Track 1 or previously
played track.
If a non-readable iPod device is connected,
then the relevant error message will
appear and the product will automatically
switch to the previously used function or
the FM radio function.
If the iPod device to be played is
already connected, repeatedly press
AUX button to select the iPod player.
It will automatically play from the
previously played point.
The playback functions and the information
display items of the iPod player used with
this product may be different from the iPod
in terms of play order, method, and the
information displayed.
Refer to the following table for the
classification items related to the search
function provided by the iPod product.
Afterwards, the functions to play the
iPod are operated similarly to
CD/MP3 playback.
Log-off iPod playback
To end playback, press the RADIO/
BAND or CD/AUX button to select
other functions.

37
Infotainment System
Using the iPod menu
From the iPod menu, the instructions
for "Shuffle songs/Repeat/Search...
(including Audio books and
Composers)" are similar to CD/MP3
player's CD menu; only the "iPod
removal item" has been added.
Refer to each item of CD/MP3 for use.
iPod menu Eject iPod
Press the MENU button from play
mode to display the iPod menu.
Turn the TUNE dial to move to the
Eject iPod function, and then press the
MENU button to display the message
notifying you that it is safe to remove
the device.
Separate the iPod device from the USB
connection terminal.
Return to the previously used function.
Infotainment System
38
Exterior Sound (AUX) Input [Level
4]
Limited to models supporting external
sound connection
Main buttons/Dial
The following main buttons and controls
are used to enjoy the rich sound of the
Infotainment system from the sound
output of a connected exterior sound
device.
(9) CD/AUX button
When an exterior sound device connected,
press the button repeatedly to select the
exterior sound (AUX) input mode.
(2) POWER/VOLUME dial
Turn the dial to adjust the volume.
(17) PHONE/MUTE button
Hold down this button to turn the mute
function On or Off.
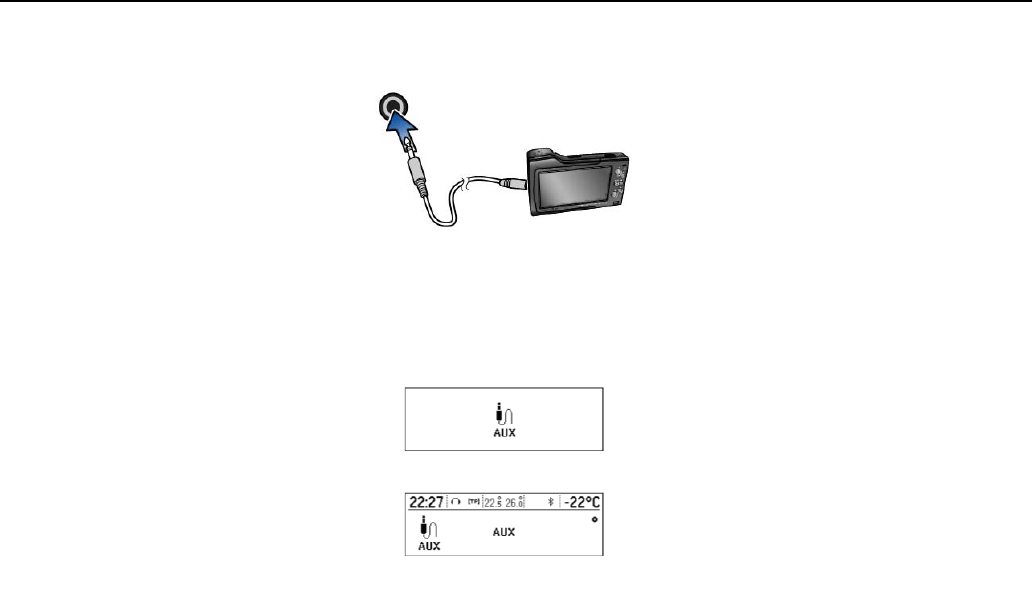
Connecting an exterior sound
Connect the audio output of the
external audio equipment to AUX input
terminal.
AUX input terminal is positioned inside
the glove box of the passenger seat
The Infotainment system will automatically
switch to the exterior sound (AUX) input
mode when the exterior sound device is
connected.
Press the AUX button to switch to the
exterior sound input mode if the exterior
sound system has already been
connected.
Turn the VOLUME dial clockwise to
adjust the volume.
39
Infotainment System
Personalization [Level 3]
Personalization [Level 4]
Main buttons/dial
The buttons and dial used in the system
setup are as follows.
(11) CONFIG button
Press this button to enter the system
setup menu.
(10) MENU button with TUNE dial
Turn the dial to move to the menu or
setup item.
Press the button to select/enter the
detailed control screen provided by the
current menu or setup item.
(9) BACK button
Cancel the input item or return to the
previous screen/menu.
How to use the setup menu for
personalization
Access the Infotainment system setup
with the car ignition turned off.
Setup menus and functions may differ
according to car model.
Reference: Table of formation for setup
menu on the next page
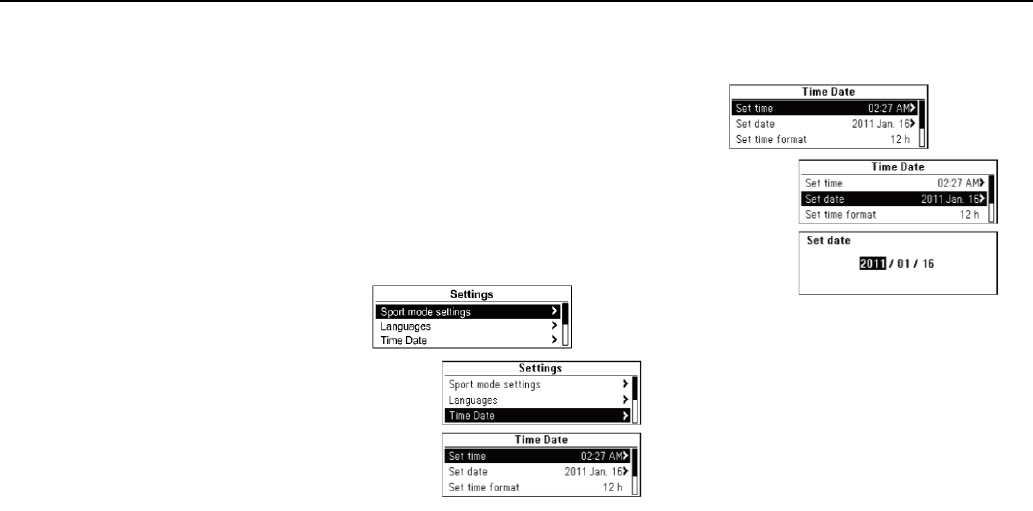
[Example] System Setup Setup
Time and date Time Setup:
January 25
th
2012
Press the CONFIG button for the
system setup menu.
After referring to the table of formation
for setup menu on the next page, turn
the TUNE dial to move to the desired
setup menu, and then press MENU
button.
Indicates the detailed list for the relevant
setup menu or functioning state
If there is another detailed list from the
relevant detailed list, you can repeat this
action.
Infotainment System
40
Turn the TUNE dial to attain the desired
setup value or functioning state, and
then press MENU button.
If the relevant detailed list is made of
several items, then repeat this action.
Set/enter the relevant setup value or the
functioning state will change.
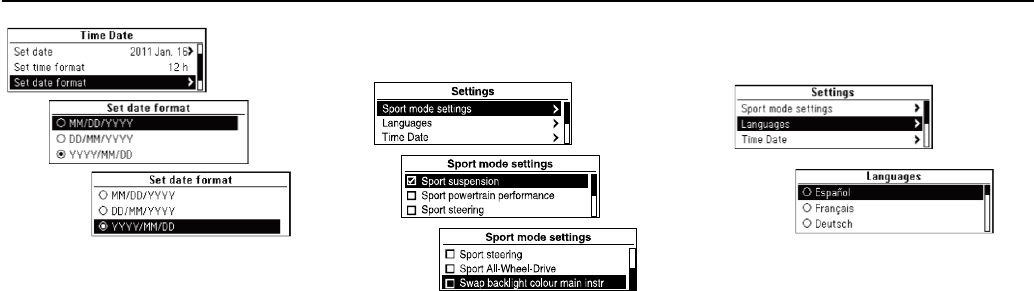
Table of formation for settings
[Sport mode settings]
Select the desired Sport mode as
below;
Sport suspension
Sport powertrain performance
Sport steering
Sport All-Wheel-Drive
Swap backlight colour main inst
[Language]
Select the desired Language for
displaying.
41
Infotainment System
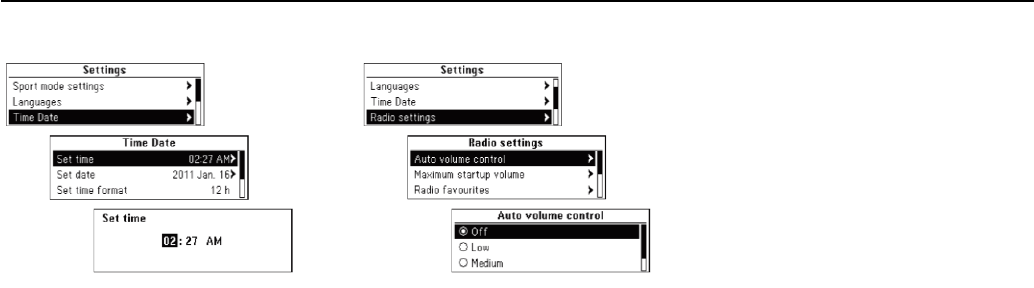
[Time Date]
Set time: Manually set the hours
and minutes for the current time.
Set date: Manually set the current
year/month/date.
Set time format: Select 12h or 24h
time display.
Set date format: Set the date is
display format.
MM/DD/YYYY: Jan. 23, 2012
DD/MM/YYYY: 23 Jan. 2012
YYYY/MM/DD: 2012 Jan. 23
RDS clock synchronization: Select
On or Off
[Radio settings]
Auto volume control: Set Off/Low/
Medium/High
Maximum startup volume: Manually
set maximum limit for the start-up
volume.
Radio favourites: Manually set your
favourites page numbers.
AS-Stations: Set the AS-Staions for
each band.
AM: Select On or Off.
FM: Select On or Off.
DAB: Select On or Off.
RDS options: Set the RDS options.
RDS: Select On or Off.
Regional: Select On or Off.
Text scroll freeze: Select On or
Off.
Radio text: Select On or Off.
TA volume: Set the TA volume.
DAB settings: Manually set DAB
options.
Auto ensemble linking: Select On
or Off.
Auto linking DAB-FM: Select On
or Off.
Dynamic audio adaption: Select
On or Off.
Band selection: Set Both/L-
Band/Band III.
Infotainment System
42
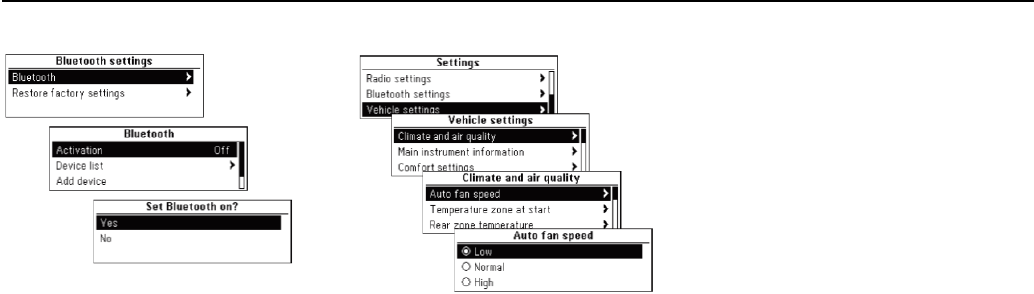
[Bluetooth settings]
Bluetooth: Enter the Bluetooth
menu.
Activation: Select On or Off.
Device list: Select the desired
device and select/connect/
separate or delete.
Add device: Try pairing a new
Bluetooth device.
Change bluetooth code: Manually
change/set the Bluetooth code.
Restore factory settings: Restore
the initial setup values back to the
default settings.
[Vehicle settings]
Climate and air quality: Enter the
Climate and air setting menu.
Auto fan speed: Select Low,
Normal or High.
Temperature zone at start: Select
Single zone, Dual zone or Last
setting.
Rear zone temperature: Select
Rear zone off, Rear mimic front or
Rear last known.
Automatic air recirculation:
Select Off, Low sensitivity or High
sensitivity.
Climate control mode: Select On
or Off.
Auto demist: Select On or Off.
Auto rear demist: Select On or Off.
Auto cooled/vented seats: Select
On or Off.
Auto heated seats: Select On or
Off.
Warm seats at remote start:
Select On or Off.
Main instrument informations:
Enter the Main instrument information
setting menu.
Indication Hybrid eco mode: Select
On or Off.
Comfort settings
Chime volume: Select Normal or
High.
Easy exit steering column: Select
Off, Column in, Column up or
Column in & up.
Easy exit driver seat: Select Off
or On.
Auto mirror tilt in reverse: Select
Off or On.
Comf. closing mirror fold: Select
Off or On.
Personalization by driver: Select
Off or On.
Rear auto wipe in reverse :
Select On or Off.
Park assist/Collision detection
Park assist: Select On or Off.

43 Infotainment System
Sider blind zone alert: Select On
or Off.
Exterior ambient lighting
Exterior lighting by unlocking :
Select On or Off.
Duration upon exit of vehicle :
Select Off/30 Seconds/1 Minute/2
Minute.
Power door locks
Auto door unlock : Select All
Doors/Driver Door /Off
Auto door lock : Select On or Off
Stop door lock if door open :
Select On or Off.
Delayed door lock : Select On or
Off.
Remote locking, unlocking,
starting
Passive door unlock: Select All
doors or Driver door only.
Passive door lock: Select Horn on
passive door lock, On or Off.
Unlock sliding door: Select Unlock
all doors with sliding door or
Security.
Remote unlock feedback: Select
On or Off.
Remote lock feedback: Select
Lights & Horn/Lights only/Horn
only/Off.
Remote door unlock: Select Driver
Door or All Doors
Auto relock doors: Select On or Off.
Vehicle remote start: Select On or
Off.
Remote left in vehicle alarm:
Select On or Off.
Restore factory settings: Select No
or Yes.
Infotainment System
44
Phone [Level 2]
Bluetooth [Level 3]
Main buttons/dial [Level 4]
The following main buttons and controls
are used to play music files or use the
call functions via a Bluetooth device.
(5) AUX button
When a Bluetooth device with a music
player function is connected, press this
button repeatedly to select Bluetooth
audio play mode.
(10) MENU button with TUNE dial
Press this button from Bluetooth phone
mode to display the menu screen.
Turn this dial to move to the menu or
setup value.
(8) I/SEEK/I buttons
Press these buttons in Bluetooth audio
play mode to play the previous or next
track.
Hold down these buttons to rewind or fast
forward, and release to play at normal
speed.
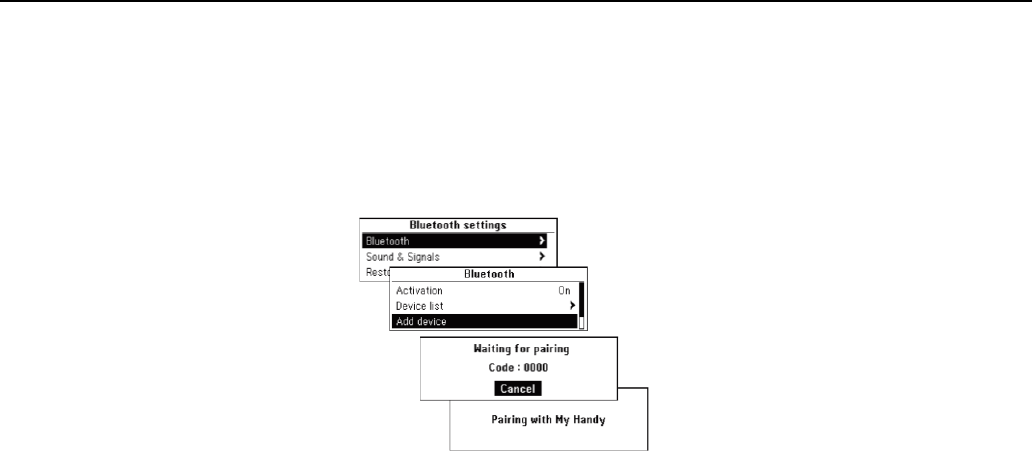
Connecting Bluetooth [Level 4]
Registering the Bluetooth device
Register the Bluetooth device to be
connected to the Infotainment system
with the car ignition turned off.
Firstly, set up the Bluetooth device to be
connected from the Bluetooth setup menu
to enable other devices to search for the
Bluetooth device.
Press the CONFIG button, and use the
MENU button with TUNE dial to move
to Settings Bluetooth settings
Bluetooth Add device, and then
press the MENU button.
Bluetooth devices can be registered not
only by using CONFIG button, but also by
using Phone menu Bluetooth settings
Bluetooth Add device.
If there already is a Bluetooth device
connected to the Infotainment system, the
"Bluetooth in use" message will appear.
Connection standby will be displayed with
a message and a security code. (The initial
value is 0000, and can be changed from
Settings Bluetooth settings Bluetooth
Changing Bluetooth code.)
The Infotainment system can be found
by searching the to-be-connected
Bluetooth device.
Enter the security code for the
Infotainment system through the
Bluetooth device
If the registration of device to be
connected to the Infotainment system is
successful, then the screen will display
the information of the Bluetooth device
45
Infotainment System
The Infotainment system can register up to
five Bluetooth devices.
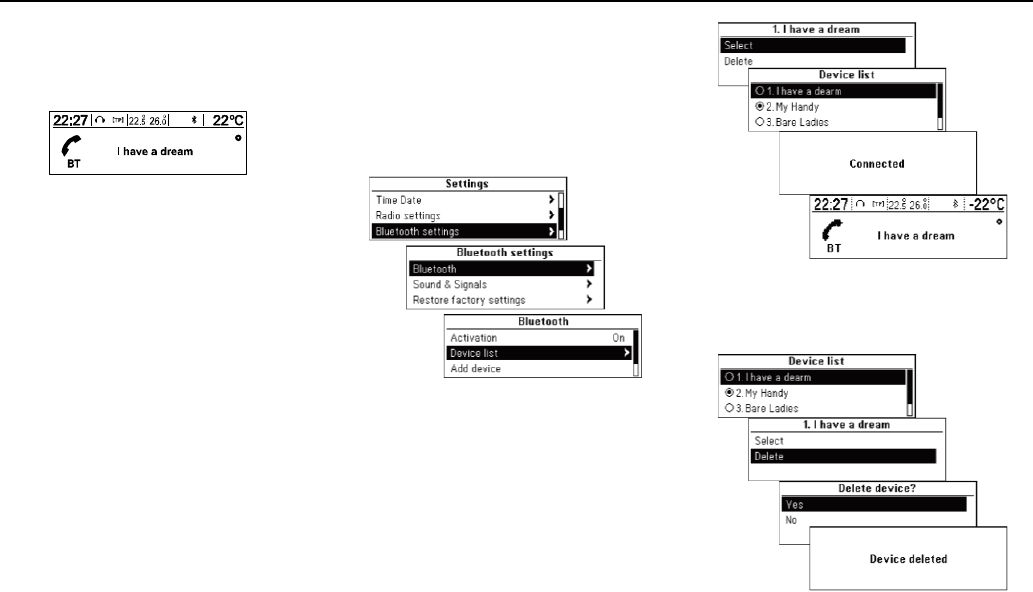
Connecting/Deleting/Separating the
Bluetooth Devices
Firstly, set up the Bluetooth device to
be connected from the Bluetooth setup
menu to enable other devices to search
for the Bluetooth device.
Press the CONFIG button, and use the
MENU button with TUNE dial, to move
to Settings Bluetooth settings
Bluetooth Device list, and then press
the MENU button.
Use the MENU button with TUNE dial
to move from the registered Bluetooth
device to the device to be connected,
and then press the MENU button.

Infotainment System
46
You can delete by using the MENU
button with TUNE dial, moving to select
the item, moving to delete the item to
delete, and then pressing the MENU
button.
Disconnecting the Currently Connected
Bluetooth Device, From the device list
screen, select the connected device, which
will display Disconnect item, and then
press the MENU button.
Cautions for registering/connecting
Bluetooth
When it is not possible to connect to
Bluetooth, delete the entire device list from
the Bluetooth to be connected, and try
again. If deleting the entire device list does
not work, then remove the battery and
reconnect.
If there is a problem after the Bluetooth
device is connected, use the MENU button
with TUNE dial to carry out Settings
Bluetooth Settings Restore factory
settings.
Initialize the device with the problem
caused by an error that occurred with the
connection of the Bluetooth device and
the Infotainment system.
Sometimes, Bluetooth can only be
connected through hands-free or the
Bluetooth audio play functions despite a
stereo headset being connected. In this
case, try and reconnect the Infotainment
system using the Bluetooth device.
For Bluetooth devices that do not support
stereo headsets, the Bluetooth audio play
function cannot be used.

47 Infotainment System
Bluetooth audio [Level 4]
How to play Bluetooth audio
A mobile phone or Bluetooth device that
supports A2DP (Advanced Audio
Distribution Profile) versions over 1.2 must
be registered and connected to the product.
From the mobile phone or Bluetooth device,
find the Bluetooth device type to set/
connect the item as a stereo headset.
A musical note icon [♪] will appear at the
bottom right of the screen if the stereo
headset is successfully connected.
Do not connect the mobile phone to
Bluetooth connection terminal. An error
may occur if it is connected during the
CD/MP3 and Bluetooth audio play mode.
Playing Bluetooth audio
Press the AUX button repeatedly to
select the connected Bluetooth audio
play mode.
If the Bluetooth device is not connected,
then this function cannot be selected.
Activating the mobile phone or
Bluetooth device will play the music
files.
The sound played by the Bluetooth device
is delivered through the Infotainment
system.
For Bluetooth audio to play, the music
must at least be played once from the
music player mode of the mobile phone or
Bluetooth device after connecting as a
stereo headset. After being played at least
once, the music player will automatically
play upon entering play mode, and it will
automatically stop when the music player
mode ends. If the mobile phone or
Bluetooth device is not in the waiting
screen mode, some devices may not
automatically play in Bluetooth audio play
mode.
Press the I/SEEK/I buttons
to switch to the previous or next track,
or hold down these buttons to fast
forward or rewind.
This function only operates with Bluetooth
devices that support AVRCP (Audio Video
Remote Control Profile) version 1.0 or
above. (Depending on the Bluetooth
device options, some devices may display
AVRCP being connected for the initial
connection.)
The information about playing track and
track position will not be displayed on the
Infotainment system screen.

Infotainment System 48
Cautions for playing Bluetooth audio
Do not change the track too quickly when
playing Bluetooth audio.
It takes some time to transmit data from
the mobile phone to the Infotainment
system.
The Infotainment system transmits the
order to play from the mobile phone in the
Bluetooth audio play mode. If this is done
in a different mode, then the device
transmits the order to stop. Depending on
the mobile phone’s options, this order to
play/stop may some take time to activate.
If the mobile phone or Bluetooth device is
not in the waiting screen mode, it may not
automatically play despite being carried
out from the Bluetooth audio play mode.
If Bluetooth audio playback is not
functioning, then check to see if the
mobile phone is in the waiting screen
mode.
Sometimes, sounds may be cut off during
the Bluetooth audio playback.
The Infotainment system outputs the
audio from the mobile phone or Bluetooth
device as it is transmitted.
Bluetooth error messages and
measures
Bluetooth deactivated
Check if Bluetooth activation is setup as
ON. The Bluetooth function can be used
upon turning on Bluetooth activation.
Bluetooth is busy
Check if there are any Bluetooth devices
connected. To connect another device,
disconnect any other connected devices
first, and then reconnect.
Device list is full.
Check if there are less than 5 registered
devices. No more than 5 devices can be
registered.
No phone book available
This message will be displayed if the
mobile phone does not support contacts
transmission. If this message appears after
several attempts, then the device does not
support contacts transmission.
Caution: The message will be displayed
when the transmission of contacts is
supported while information with a device
error is also transmitted. Update the device
again if this occurs.
Phone book is empty
This message is displayed if no phone
numbers are stored in the mobile phone.
This will also be displayed if the phone log
transmission is supported, but in a way
that is not supported by the Infotainment
system.
49 Infotainment System
Hands-free phone [Level 3]
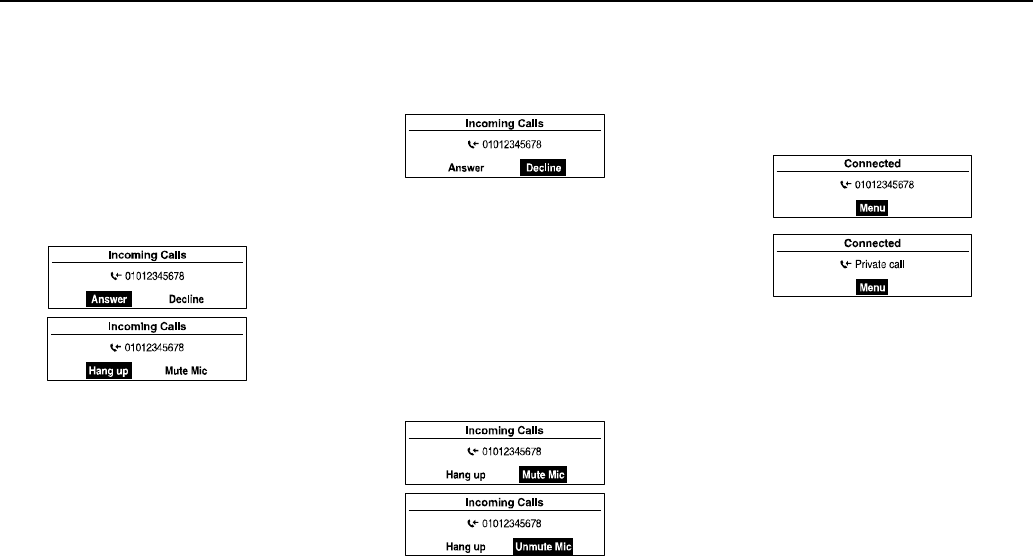
Taking calls [Level 4]
When a phone call comes through the
connected Bluetooth mobile phone, the
playing track will be cut off and the
phone will ring with the relevant
information displayed.
To talk on the phone, press Call button
on the steering wheel remote control or
turn the TUNE dial to move to the
Answer function, and then press the
MENU button.
To reject the call, press the Mute/Hang up
button on the steering wheel remote
control or use the MENU button with TUNE
dial and select Decline.
While conversing, it is possible to block the
transmitted sound by selecting the Mute
Microphone item by using the MENU
button with TUNE dial.
While conversing, hold down the Call
button from the steering wheel remote
control to switch to the Private call mode
(some phones may not support the private
call mode depending on the phone’s
options).
When a call is received with the
Infotainment System and Bluetooth is
being connected, there are mobile phones
that do not automatically change to the
private call mode. This depends on the
original specifications of each mobile
phone.
Infotainment System 50
When it is possible to use services related
to a third-party conversation supported by
the communications service provider
through an application, it is possible to
make calls during a call through the
Infotainment system.
While third or more-party conversing,
displaying contents may differ from
practical information.
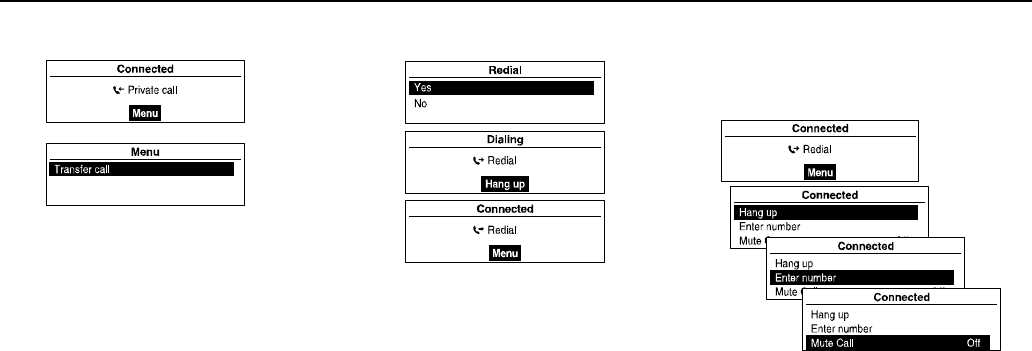
Calling by Re-dial [Level 4]
From the steering wheel remote
controller, press the Call button to
display the redial guidance screen, or
hold down the button to display the
caller log screen.
Turn the TUNE dial to select Yes, and
then press the MENU button to make a
call.
If the mobile phone is not in waiting mode,
your phone might not support the redial
function. This depends on the mobile
phone’s options.
When making redialing a number, the
connected phone number will not be
displayed.
Depending on the mobile phone, there are
cases in which the call is made through the
call history of the received or missed calls
instead of the redial mode. This depends
on the mobile phone’s options.
Press the MENU button while the
phone is connected to display the
connecting functions as shown below.
Use MENU button with TUNE dial to
use the functions in the menu that
appears.
51 Infotainment System
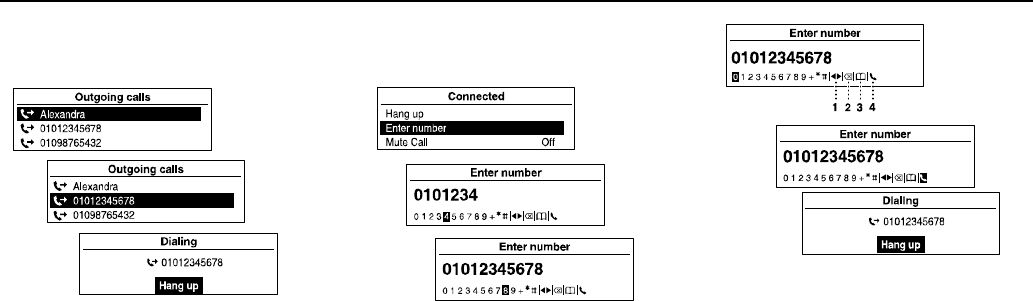
Calling by Outgoing call log [Level
4]
To make a call by the Outgoing call log,
hold down the Call button on the
steering wheel remote control and turn
the TUNE dial to select the desired call
list, then press the MENU button.
Calling by Entering numbers [Level
4]
To make a call by entering the phone
number, press the MENU button and
turn the TUNE dial to select Enter
number, and then press the MENU
button.
Turn the TUNE dial to select the
desired numbers, and then press the
MENU button to enter the number.
Repeat this item to enter all telephone
numbers.
Press the ⇦BACK button to delete a letter
one by one, or hold down the button to
delete all content that has been entered.
Refer to the following contents to edit the
input contents.
1 Move: Move input position
2 Delete: Delete input character
3 Phone book: Search contacts (usable
after updating the phone numbers)
4 Dial: Start dialing
After the telephone number has been
fully entered, turn the TUNE dial to
select begin dial, and then press the
MENU button to make a call.
To cancel the dialing during the dial, press
Infotainment System 52
the MENU button.
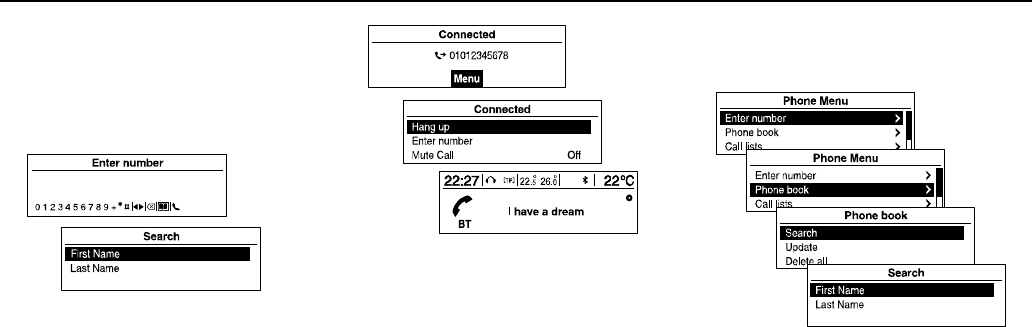
Note : How to use the Phone book for
entering the phone number
Turn the TUNE dial to select the Phone
book icon, then press the MENU button to
enter the Search function. (refer to next
section: Phone menuPhone book)
To end a call, turn the TUNE dial to
choose the Hang up, and then press
the MENU button.
Using the Phone menu [Level 4]
Phone Menu Phone book
Search
Press the MENU button, turn the TUNE
dial to select Phone book, and then
press the MENU button.
A notification will appear on screen, with
no contacts to use, and you will be
returned to the previous menu.
Turn the TUNE dial to select Search,
and then press the MENU button.
Turn the TUNE dial to select First or
Last Name, and then press MENU
button.
53 Infotainment System
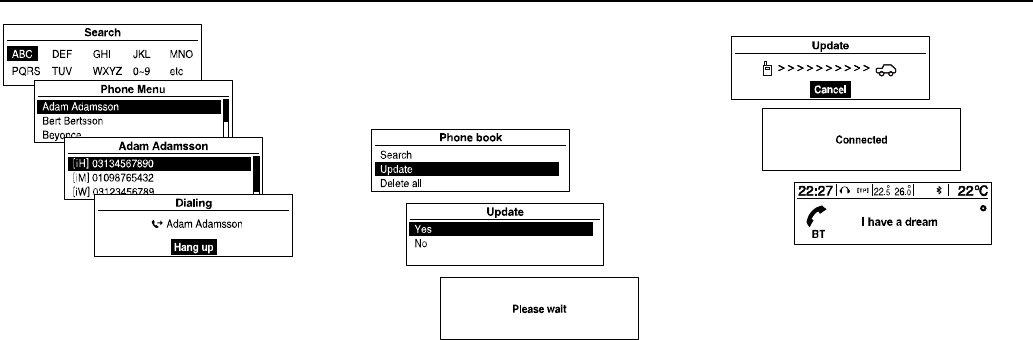
Turn the TUNE dial to select search
terms/range, and then press the MENU
button.
Turn the TUNE dial from the search
results screen to select the desired item,
and then press the MENU button to
view the details for that item.
Display number types
[iH] Home [iM] : Moble
[iW] : Work [iO] : Other
To call the relevant number, press the
MENU button.
For more directions, refer to the making
phone calls item.
Phone Menu Phone book
Update
Update the contacts of the connected
mobile phone to the system's contacts.
Using the MENU button with TUNE dial,
select the Phone Menu Phone book
Update, and then press the MENU
button.
Turn the TUNE dial to select Yes or No,
and then press the MENU button to
activate or cancel the update.
Notice for updating contacts
This function can be used with mobile
phones that support contacts update and
the call history transmission function. (If
the product is connected to a mobile phone
that does not support these functions, the
call history can be displayed through the
Infotainment system.)
Update is not supported for more than
1,000 contact numbers.
Be aware that hands-free and Bluetooth
audio playback will be cut-off while
proceeding with updates for contacts.
(Other functions except for hands-free
and Bluetooth audio playback can be
used.)
To update your contacts, it is possible to

Infotainment System 54
request for the transmission certification for
contacts. If the waiting screen does not
change for a long time, you can check
whether the mobile is requesting for
certification. When requesting for
certification of the mobile phone, all
Bluetooth connections will be cut off if it is
not accepted, and then the device will be
reconnected.
When receiving the call history, it is
possible to request for the transmission
certification for the call history from the
mobile phone. If the waiting screen does
not change for a long time, check whether
the mobile is requesting for certification.
When requesting for the certification of
the mobile phone, all Bluetooth
connections will be cut off if it is not
accepted, and then the device will be
reconnected.
If there is a problem in the stored
information of the mobile phone, the
contacts may not be updated.
The Infotainment system only uses
information coded in UTF-8 format.
If other operations (game, map search,
navigation, etc.) are activated during the
contacts update or call history transmission
progress, the update/ transmission process
may not work.
This is because other operations running
on the mobile phone are affecting the data
transmission.
When the contacts update or call history
transmission is completed, all hands-free
and Bluetooth audio play modes will be
automatically disconnected and then
reconnected.
If the Infotainment system gets turned off
while conversing on the phone, the call will
be transmitted to the mobile phone. Some
phones may need to setup a call
transmission function beforehand,
depending on the type of the phone.
If the user disconnects the connection
directly (using the Infotainment or mobile
phone), the auto connection function does
not take place. Auto-connection: This
function automatically finds and connects
the device that was last connected.
The contacts may not always display all
the lists on the phone when selected. The
Infotainment system only displays what
has been transmitted from the mobile
phone.
The contacts update can only receive four
numbers per contacts directory (Mobile
Phone, Office, Home, and Other).
Changing the language setup during the
contacts update will delete all previous
updates.
If the mobile phone is not set with a waiting
screen, calls may not be made to this
Infotainment system
If the OS of the mobile phone gets updated,
it may change how the phone’s Bluetooth
function works.
Special characters and unsupported
languages will be displayed as "____".
Calls registered in the contacts without any
name will be indicated as "No number in
contact."
The Infotainment system will display
contacts, call history, and redial
information as it is transmitted from the
mobile phone.
55 Infotainment System
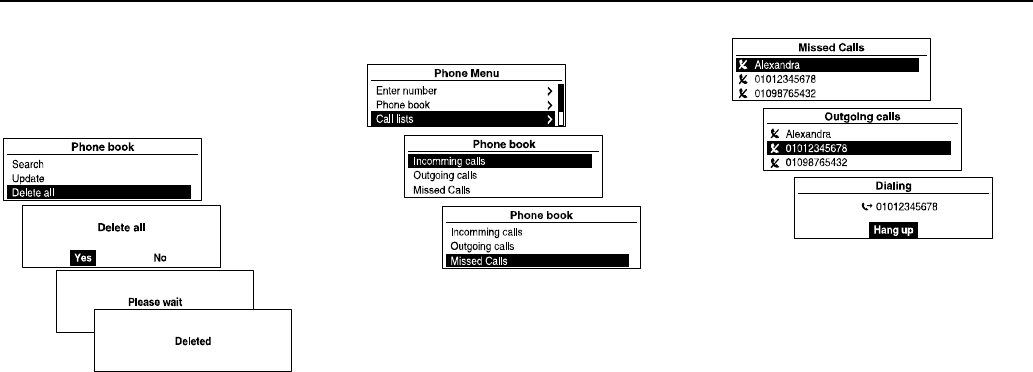
Phone Menu Phone book Delete
all
Every single phone number that has
been stored in the system contacts will
be deleted.
Use the MENU button with TUNE dial
to select Phone Menu Phone book
Delete All, and then press the MENU
button.
Turn the TUNE dial to select Yes or No,
and then press the MENU button to
delete all contacts or to cancel.
Phone Menu Call lists
Use the MENU button with TUNE dial
to select Phone Menu Call lists, and
then press the MENU button.
Use the MENU button with TUNE dial
to select the detailed call history, and
then press the MENU button.
Turn the TUNE dial to check the call
history and to make a call.
Press the MENU button to call the
selected number from the call history.
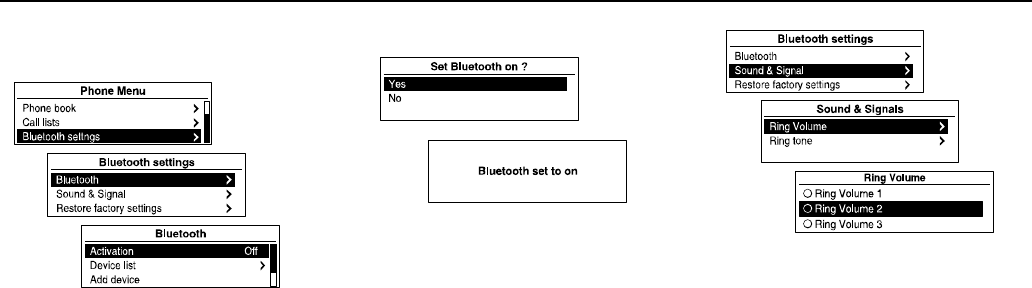
Infotainment System 56
Phone Menu Bluetooth settings
Setup Bluetooth function.
Using the MENU button with TUNE dial,
select the Phone Menu Bluetooth
Settings, and then press the MENU
button.
To activate the Bluetooth function,
register/connect/delete the Bluetooth
device or change the Bluetooth code,
choose Bluetooth by using the MENU
button with TUNE dial, and then use
the MENU button with TUNE dial to set
up the desired item.
To set up the ring tone and its volume
used by the Bluetooth function, use the
MENU button with TUNE dial to select
Sound & Signal, and then set up the
desired items with the MENU button
with TUNE dial.
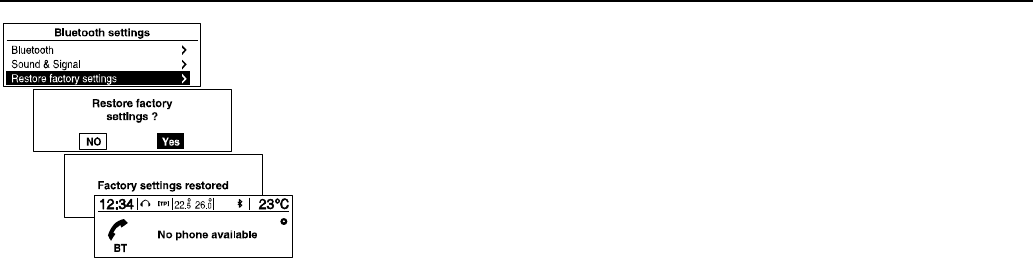
57 Infotainment System
To reinitialize the Bluetooth settings to
their default values, use the MENU
button with TUNE dial to select the
initial setup restoration item, and then
select Yes with the MENU button.