Humax D11 DIRECTV Satellite Receiver User Manual D11 MUG indb
Humax Co., Ltd. DIRECTV Satellite Receiver D11 MUG indb
Humax >
Contents
- 1. Users Manual 1 of 2
- 2. Users Manual 2 of 2
Users Manual 1 of 2

2Welcome
4Making the Right Connections
6Safety & Care
9Hardware Reference
12 Getting Familiar
16 Choose Your Setup
26 Guided Setup & Activation
28 Programming Your Remote Control
Chapter 1

Welcome
With its astounding variety of channels and choices, crisp digital-quality picture and sound and
one-of-a-kind sports and events… DIRECTV®service offers everything you’d want in your
television experience. With the DIRECTV Receiveryou can expect more than ever before,
with access to over 225 channels, including over 30 premium movie channels, with all the
convenience of DIRECTV service. DIRECTV®Pay Per View offers a handy choice in recent
hit movies, plus exciting live sports, concerts and specials. There’s exclusive sports subscriptions
for every taste and team. Even access to 36 commercial-free music channels!
To deliver this unique programming and enhance your entertainment experience, the
DIRECTV®System has been designed to be simple and user-friendly. You’ll find that most
features are self-explanatory, with onscreen directions to lead you through them.
So, welcome to the family.
You can find
additional
information and the
latest updates at
DIRECTV.com.
TIP
Welcome
Getting Started
2
Making the Right Connections
AreyoureadytoconnectyourDIRECTV
®Receiver and your other components?
Whether you’re having your system professionally installed or handling it yourself, be sure to read
overthefollowingfewpagestofamiliarizeyourselfwithsomeimportanttipsforsafetyandcare.
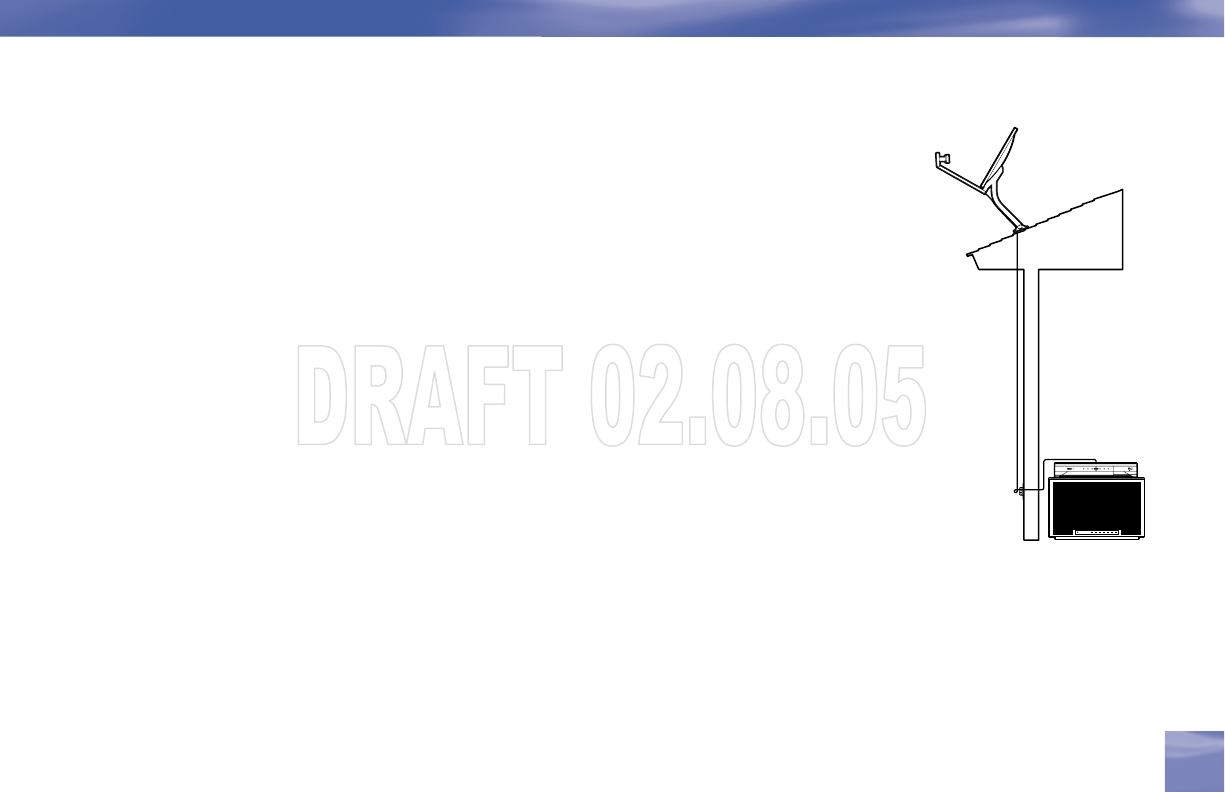
Before you begin
Yoursatellitedishantennamustbeinstalledbeforeyoucanbeginfollowingtheproceduresinthis
User Guide. (Professional installation is highly recommended.) Your dish needs to be mounted in
apositionwhereithasaccesstothesatellitesignals,andRG-6coaxialcablesmustberunintothe
room(s) where your receiver(s) will be located. If you choose to install the dish yourself, see the
separateinstructionmanualthatcamewithyoursatellitedishantenna.
3
Chapter 1
Making the Right Connections

4
Important
Note to Satellite Dish Installer
This reminder is provided to call your attention to articles 810 and 820 of the 2002 National Electrical Code. Refer to
article 810, in particular 810-1 and 810-15, for required grounding of the metal structure of the dish antenna. Refer
also to the 810-2 which, by reference to article 820, requires that the satellite dish coaxial cable shield be connected
to the grounding system of the building as close to the point of cable entry as practical.
Package Contents
The following items are included with your DIRECTV Receiver:
A/Vcables(RCAtype) Access card
S-Video cable User Guide
Phone cord Remote Control & batteries
Power cord
Getting Connected
Making the Right Connections
4
5
Safety & Care
Chapter 1 5
Safety & Care
YourDIRECTVSystemhasbeendesignedandmanufacturedtostringentqualityandsafety
standards.Youshould,however,beawareofthefollowingimportantprecautionsforsafeandoptimal
use of the equipment.
Be sure to…
• Read and follow all installation and operating instructions.
• Keep instructions for future reference.
• Heed all warnings on the equipment and in the instructions for your protection.
Cautions…
• Avoid moisture to reduce the risk of fi re or electric shock. e DIRECTV Receiver should not be
used near water (for example, kitchen sink, bathtub, pool, damp basement). Also, never spill liquid
on the receiver, and do not place vases or other vessels containing liquid on top of it.
• CAUTION: Electric Shock — never attempt to disassemble the DIRECTV Receiver yourself;
always take it to a qualifi ed service person when repair is required. Opening or removing covers
may expose dangerous voltage or other risks, and incorrect reassembly can cause shock when
receiver is subsequently used. Attempted self-repair may also void your warranty. Changes or
modifi cations not expressly approved by the party responsible for compliance (by the warranty or
by the manufacturer) could void the user’s authority to operate the equipment.
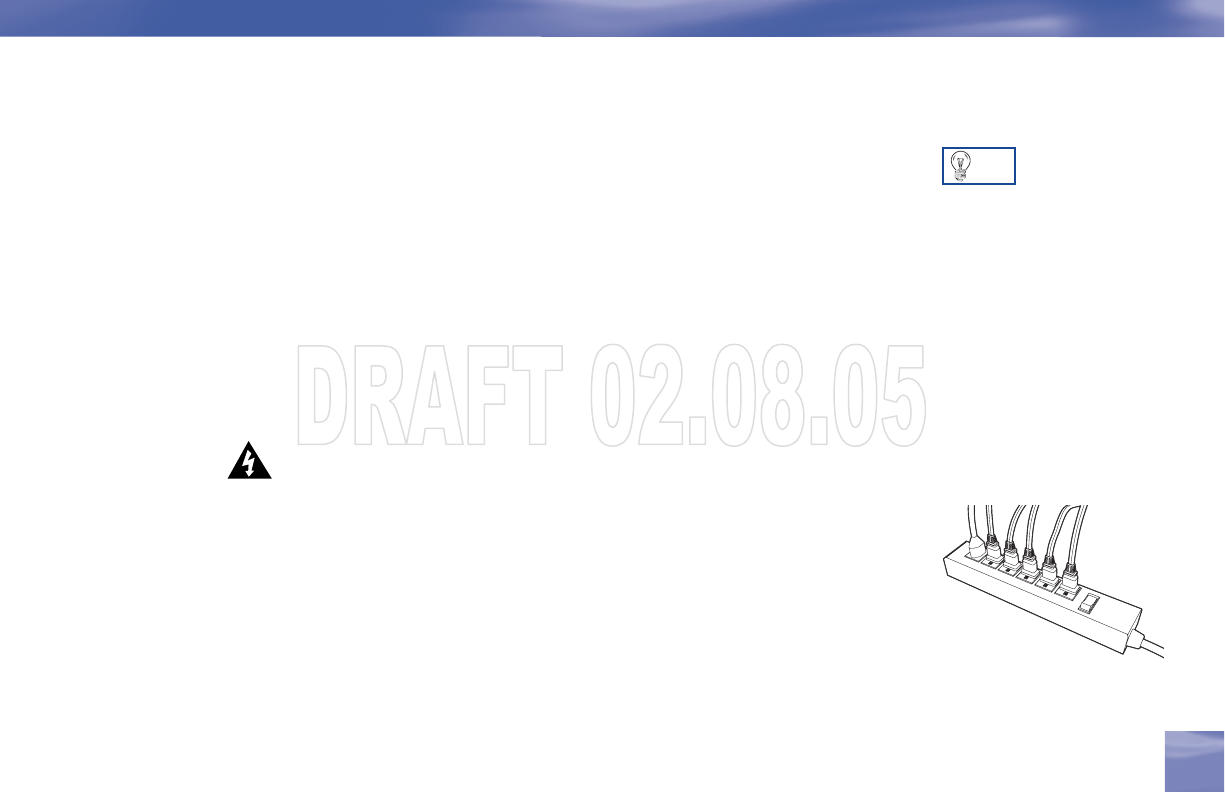
TIP
We highly recommend
plugging the DIRECTV
Receiver into a surge
protector to prevent
damage from fl uctuations
in your power supply.

6
• Have your DIRECTV Receiver professionally serviced (do not attempt to service it yourself) if:
Thepowersupplycordorplugisdamagedorfrayed
Liquid has spilled into the product or it has been exposed to water
The receiver has been dropped or damaged
The receiver exhibits a distinct change in performance
The receiver does not operate normally when you follow operating instructions as described in this
manual and its Troubleshooting section.
• Protect your components from power surges by connecting all the components before plugging
any power cords into the wall outlet. Use of a surge protector is also recommended.
• Don’t overload power outlets or extension cords, which can result in the risk of fi re or shock.
It’s also important to use only the type of power source indicated on the marking label or in this
manual.
• Always unplug the DIRECTV Receiver, TV and other equipment before you connect or
disconnect any cables.
• Always unplug your DIRECTV Receiver before moving it. Also, unplug it during lightning
storms or when unused for long periods of time.
• Protect power cords by routing them so they will not be walked on or pinched in any way.
• Avoid audio hum or interference by inserting all cable plugs fi rmly into their jacks. Also, place
Audio/Video (A/V) cables to the sides of the TV back panel rather than down the middle once
connected. Try not to coil any twin-lead cables and keep them away from A/V cables as much as
possible.
IMPORTANT: Be sure not
to place your DIRECTV
Receiver near anything
WET or HOT!
'5)$% -%.5 2%# !#4)6% ).&/0/7%2
3%,%#4
/0%. /0%.
Getting Connected
Safety & Care

7
7
Chapter 1
Safety & Care
• Do not drop your DIRECTV Receiver and always move it with care.
• Place it on a fl at, hard surface — do not operate the DIRECTV Receiver on a carpet or other
padded surface. Ensure that the rack or cabinet the receiver is placed on is stable, and not subject to
being tipped over.
• Ensure proper ventilation — the slots on top of the DIRECTV Receiver must be left uncovered
to allow proper airfl ow to the unit. Blocking the airfl ow to the unit could impair performance or
damage your receiver and other components.
• Do not stack electronic components or other objects on top of the DIRECTV Receiver. Also, do
not stack the receiver on top of a “hot component ” such as an audio power amplifi er.
• Avoid heat — do not place the DIRECTV Receiver near heat sources such as radiators, heat
registers, stoves or other appliances.
• Never insert objects of any kind into any openings in the DIRECTV Receiver (other than the
DIRECTV® Access Card as detailed in this chapter).
• Clean your receiver with a soft cloth or the dusting attachment of your vacuum cleaner, removing
dust from the ventilation holes on the top and bottom. Avoid alcohol or
oil-based furniture solvents — a non-abrasive, anti-static cleaner/polisher is recommended.
• Use only manufacturer authorized accessories and parts.
Important
This device incorporates an anticopy process technology that is protected by U.S. patents and other intellectual property
rights. The anticopy process is licensed for non-commercial, home use only. Reverse engineering or disassembly is
prohibited. Unauthorized changes or modifications to this equipment may void the user’s authority to operate it.
8
Hardware Reference
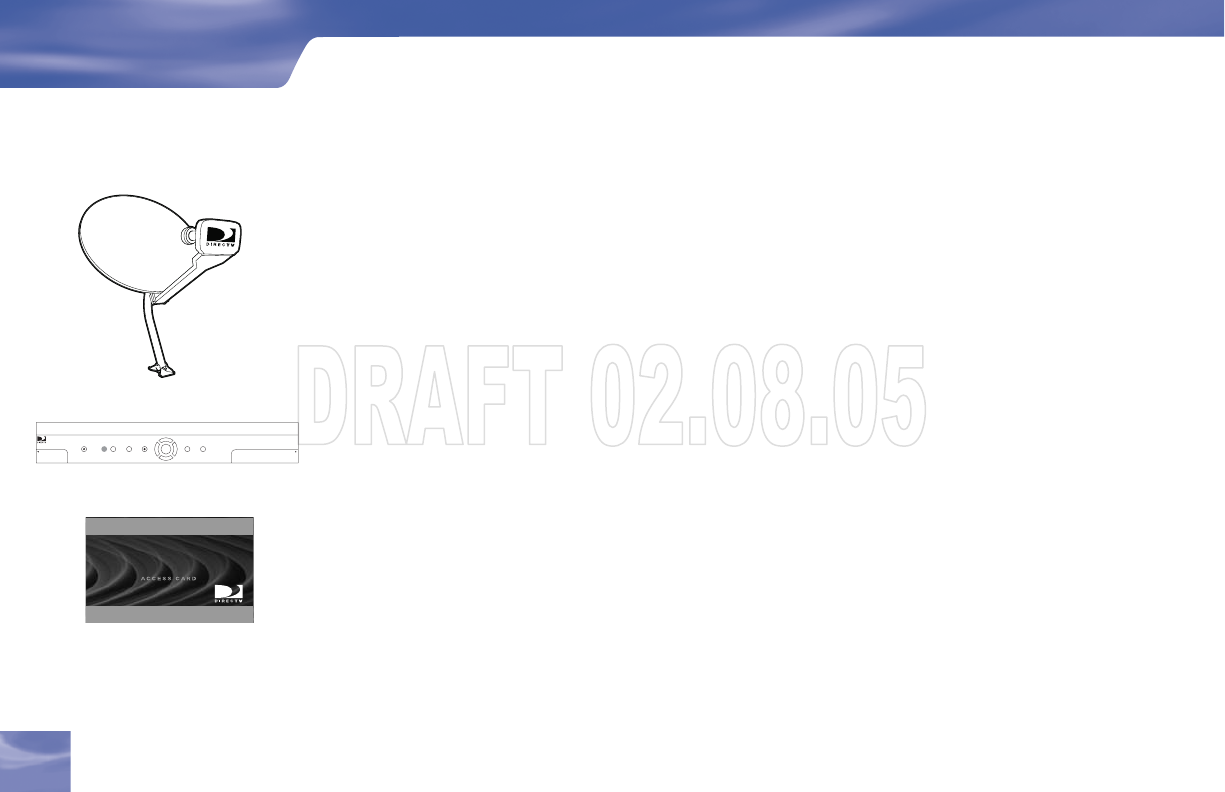
General
Satellite Dish Antenna
This is your “dish” and related hardware, affixed to your roof or other surface, which picks up the
broadcast signals from our satellites.
DIRECTV Receiver (or Satellite Receiver)
Your DIRECTV Receiver picks up the signal from your satellite dish antenna and translates it into
viewable TV programming.
Access Card
Contains information about your DIRECTV®service. It must be properly inserted for your receiver
toworkandtoactivateyourprogramming.
DIRECTV
GUIDE MENU REC ACTIVE INFOPOWER
SELECT
OPEN OPEN
Hardware Reference
Getting Connected
8
9
Chapter 1
Hardware Reference
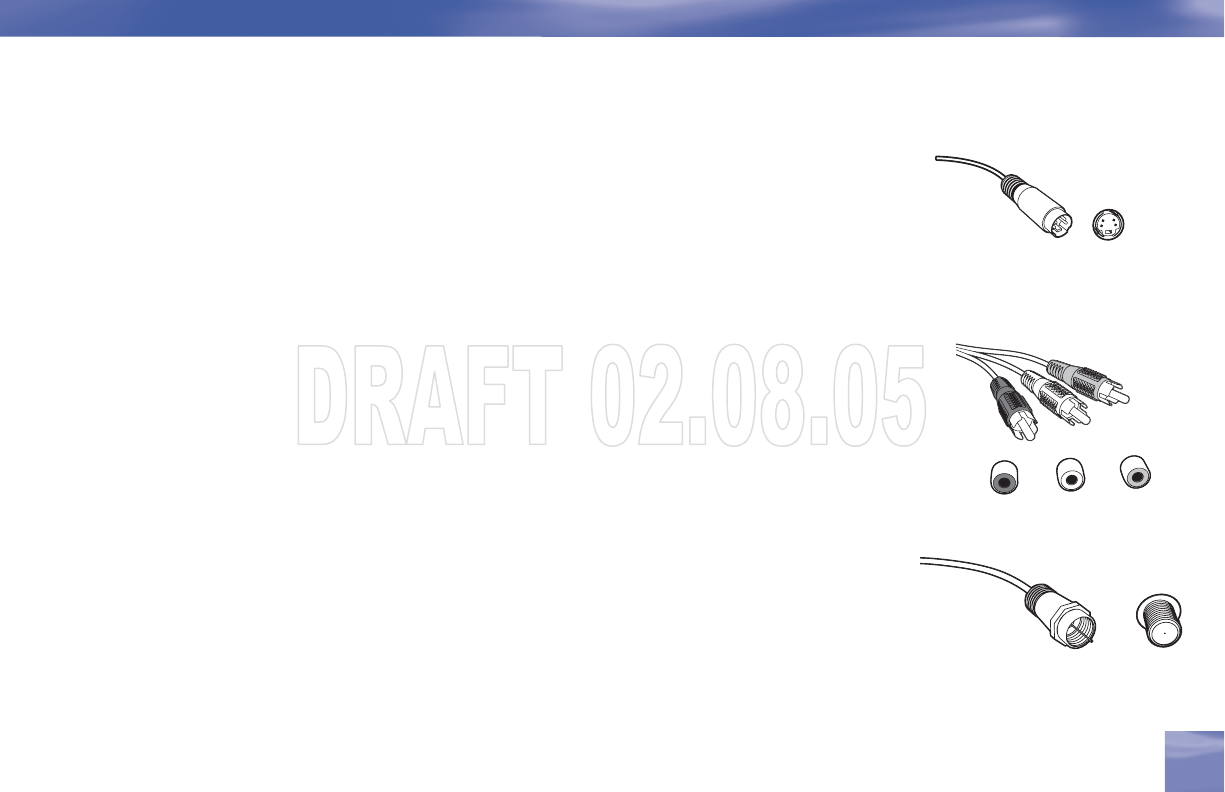
Cables & Connections
Best Video: S-Video Jack and Cable
S-videojacksandcablesprovidethebestpicturequality.Youwillstillneedtoconnecttheleftand
right audio cables to the TV, or optical audio cable to your stereo, because the S-Video cable only
carriesthepicturesignal,notsound.
Audio/Video (A/V) Jack and Cable
Audio/Video (A/V) cables provide very good picture quality and stereo sound, and should be used if
your TV does not have S-video jacks. The DIRECTV Receiver’s A/V jacks are color coded (yellow for
video, red for right audio and white for left audio). If your TV has only one input for audio (mono),
connect it to the left (white) audio jack on the DIRECTV Receiver.
RF Jack and Coaxial Cable (F-type)
RF jacks and coaxial cables provide good picture and mono sound quality. They should be used
ifA/VconnectionsarenotavailableonyourTV.RFjacksareusedtoconnecttoyourTVand
satellite dish, off-air antenna and cable feed connections. The RF jacks on the receiver are labeled
SATELLITEIN,OFF-AIRINandOUTTOTV.Note:BesuretouseRG-6coaxialcablewhen
connecting from the satellite dish to the DIRECTV Receiver.
L
R
R
Video
S-Video Jack
RF Jac
k

10
Helpful Hardware R
e
10
Telephone Jack and Cord
The telephone line cord is required to connect your DIRECTV Receiver to a land-based telephone
line if you choose to subscribe to DIRECTV programming. The phone line connection is used to
periodicallycallDIRECTV.YouwillneedanRJ11-typemodulatorjack(themostcommontype
of phone jack). Note: Do not connect your receiver to a digital PBX phone system — doing so may
permanentlydamageyourequipmentandvoidyourwarranty.
Phone
Jack
Note: Not all cables come with your
digital satellite receiver; you may
need to purchase additional cables
depending on your setup.
Cables & Connections
Getting Connected
11
Chapter 1
e
ference Getting Familiar
11
Getting Familiar
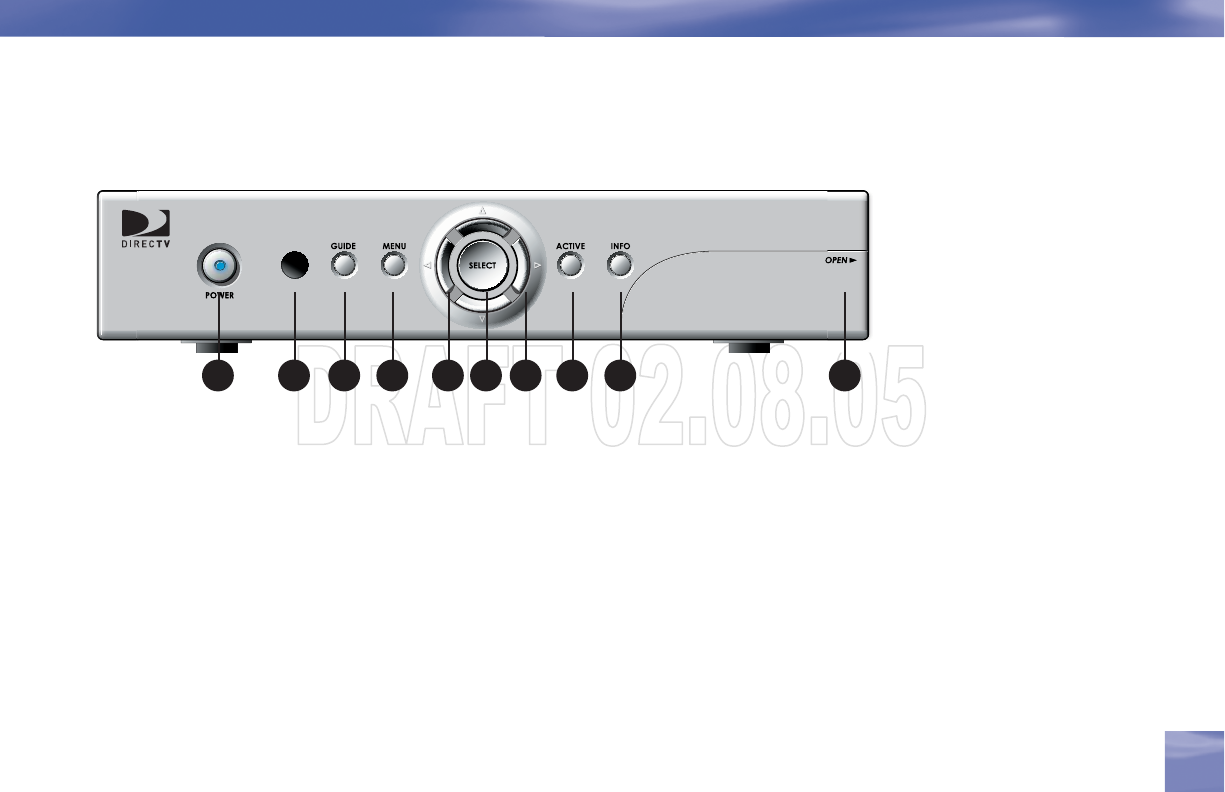
DIRECTV Receiver Front Panel
1) POWER – Turns your DIRECTV Receiver on or off. Your DIRECTV Receiver still tunes and
receives messages when powered off.
2) REMOTE SENSOR –Theinfraredsensorpicksupcommandsfromtheremotecontrol.
3)GUIDE– Displays the onscreen program guide.
4) MENU –BringsuptheQuickMenutoaccesssettingsandservices.
5) ARROWS –Movetheonscreenhighlightup,down,leftorright.
6) SELECT –Selectstheitemhighlighted.
7) ACTIVE –Displays the DIRECTV Interactive Home Page—local weather and more!
8) INFO – Displays channel banner or info to a highlighted program or channel cell.
9) DOOR PANEL –TheaccesscardslotandRESETbuttonarelocatedbehindthedoorpanel.
1 2 3 4 5 6 7 8 95
12
etting Connected
Getting Familiar
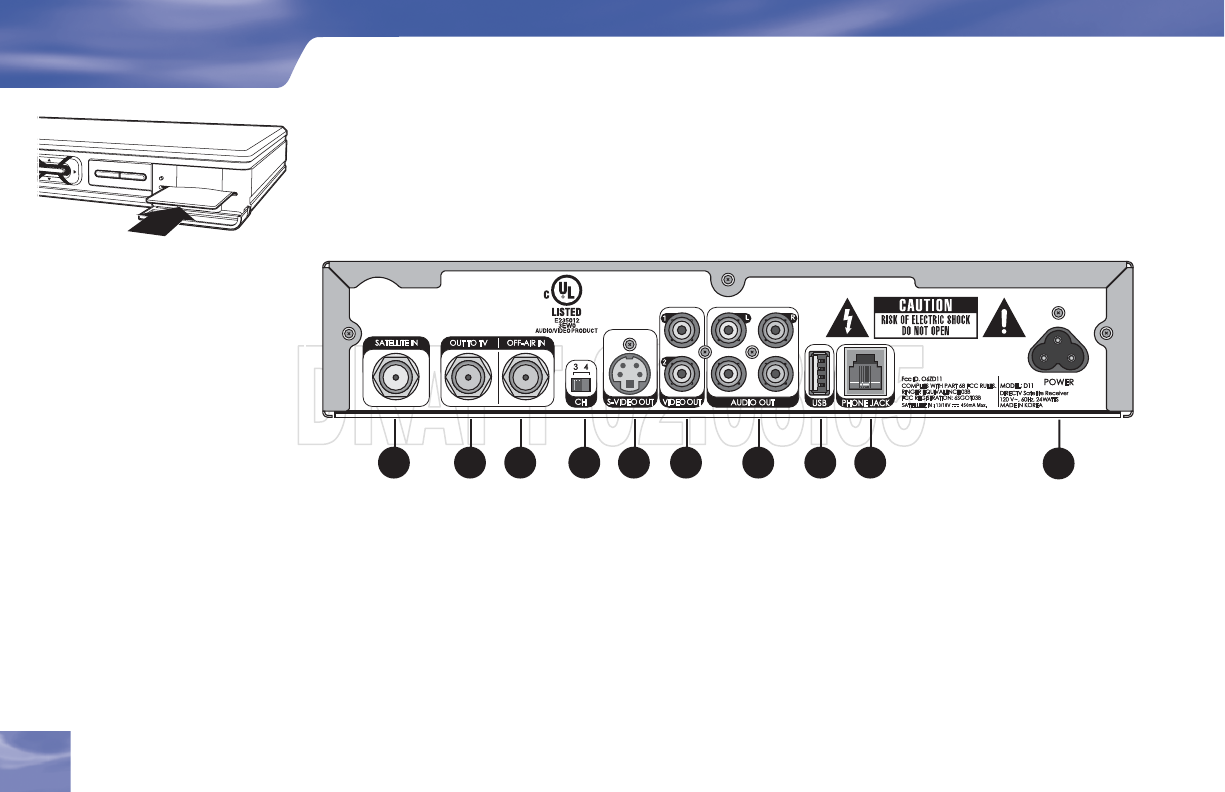
Insert your DIRECTV Access Card
Locate the access card that came packed with your DIRECTV Receiver materials and insert the card,
facingupward,fullyintotheslot.
DIRECTV Receiver Rear Panel
1) SATELLITE IN – Use to connect the DIRECTV Receiver to the satellite dish antenna.
2) OUTTOTV– Connects the DIRECTV Receiver to your TV or VCR using RF coaxial cable.
This jack provides the most basic connection, carrying good sound and video quality.
3) OFF-AIR IN – Connect a standard TV antenna or cable feed to the DIRECTV Receiver using
this jack. You can then switch between the DIRECTV Receiver’s signal and the TV/cable feed.
4) 3/4 CHANNEL SWITCH –Allowsuserstochoosethechannelthatisnotusedinyourarea(3
or 4) when the receiver is connected to TV using RF coaxial cable from the DIRECTV Receiver’s
OUTTOTV.
12
Your equipment may not look exactly like the model illustrated.
Acti veInfo
SELECT
1 2 3 4 5 6 7 8 9 10

13
Chapter 1
Getting Familiar
13
5) S-VIDEO –Providesthebestpicturequality,betterthanVIDEORCA-typeorRFcoaxialcable
jacks.IfyourTVhasanS-Videojack,useitalongwiththeaudiojacks(S-Videoonlycarries
pictureinformation,notsound)toconnecttoyourTV.
6) VIDEO (Yellow) –ProvidesbetterpicturequalitythantheOUTTOTVjack.Connectthe
secondRCA-typecompositeVIDEOjacktoanotherdevice,suchasaVCR.Youmustalso
connecttheAUDIOcableswhenusingtheVIDEOconnection.
7) AUDIO(R-RedandL-White)– Audio cables offer better sound quality than RF coaxial cables.
Youcanconnectasecondsetofaudiocablestoanothercomponent,suchasaVCRorstereo.
8) USB PORT –Forfutureuse.
9) PHONE – Connects the DIRECTV Receiver to a telephone wall jack. We require a land-based
telephone connection to communicate periodically with your DIRECTV Receiver.
10) AC POWER INLET – Connects the DIRECTV Receiver to an electrical outlet. We recommend
you use a surge protector to safeguard your DIRECTV Receiver from power spikes.

14
Getting Connected
Getting Familiar
14
Choose Your Setup
There are several ways to connect your receiver to match your particular equipment setup and to gain
optimum signal quality. The basic steps are as follows:
• Connect the satellite dish cable to your receiver.
• Connect the receiver audio and video to your TV or VCR.
• If you connected the receiver to a VCR, connect the VCR to your TV.
• Connect the receiver to a telephone line.
• Plug in all power cords.
Thefollowingpagesgivedetailedinstructionsonthetypesofconnectionsyoucanmake,depending
ontheequipmentyouhave,inordertogetthebestpictureandsoundquality.Notethattheback
panels of your TV and other equipment may not exactly match those illustrated.
Connecting Your DIRECTV Receiver to the Satellite Dish
ConnecttheRG-6RFcoaxialcablefromyoursatellitedishtothejacklabeledSATELLITEINon
the DIRECTV Receiver.
When working with
cables, be sure to
connect corresponding
outputs and inputs (Video
OUT to Video IN, Right
Audio OUT to Right Audio
IN, etc.). Never connect
an IN to an IN or an OUT
to an OUT.
All A/V jacks and inputs
are color coded. Always
match the color of the
plug to the same color of
the jack.
OUT IN
TIP

15
Chapter 1
Choose Your Setup
15
Connecting Your DIRECTV Receiver to your TV or VCR
DependingontheconnectionsonthebackofyourTVorVCR,youhavethefollowingoptions:
• S-Video&A/VAudioConnection(BestQuality)
• A/V Connection (Better Quality)
• RF Coaxial Connection (Good Quality)
Theseconnectionsaredescribedonthefollowingpages.

16
Getting Connected
Choose Your Setup
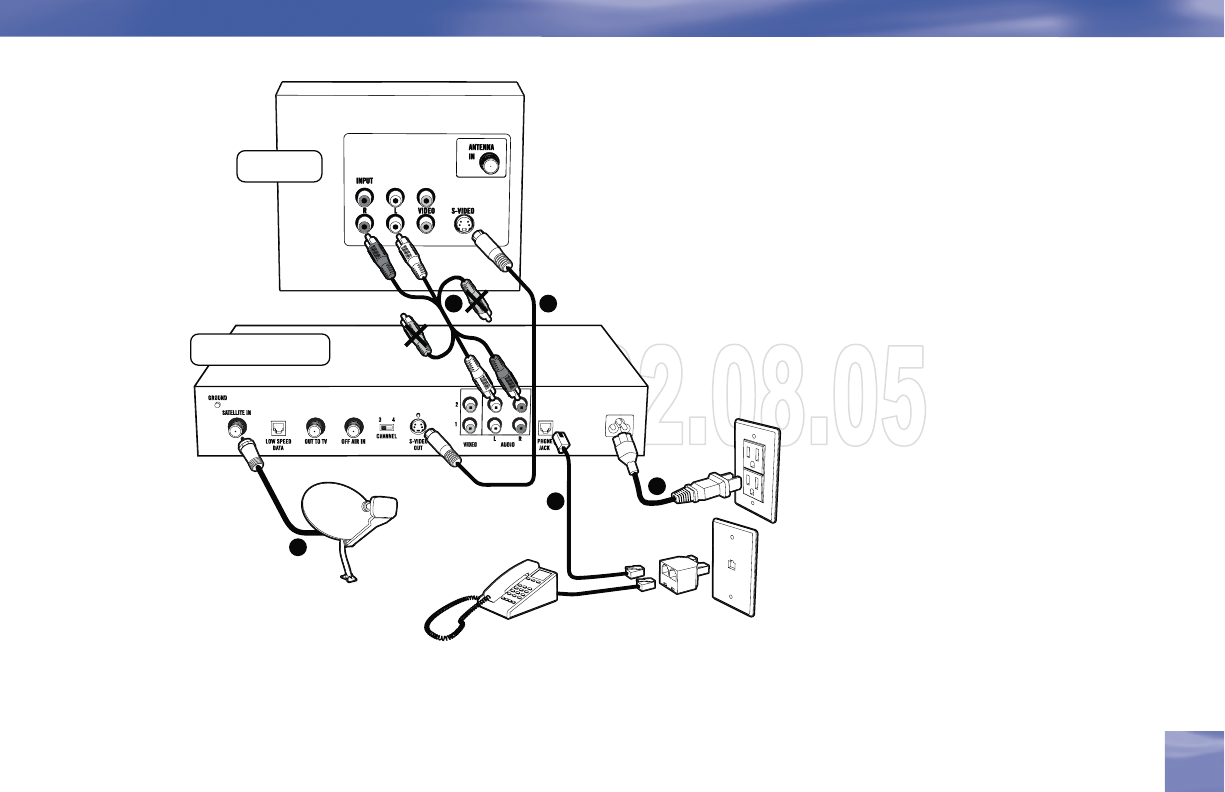
S-Video&A/VAudioConnection(BestQuality)
Using the S-Video cable, connect one end to the S-VIDEO output jack on the DIRECTV Receiver
andtheotherendtotheS-VIDEOinputjackontheTV.
UsingtheA/Vcable,connectthewhiteandredplugsfromoneendoftheA/VcabletotheAUDIO
L (white) and R (red) jacks on the back of the DIRECTV Receiver. Connect the plugs from other
endoftheA/VcabletothecorrespondingaudioINPUTjacksonyourTVorVCR.Donotplugthe
video (yellow) into either the DIRECTV Receiver or the TV.
If hooking up a VCR, use another A/V cable to connect the white and red plugs from one end of the
A/V cable to the AUDIO L (white) and R (red) and VIDEO (yellow) OUTPUT jacks on the back of
the VCR. Connect the plugs from the other end of the A/V cable to the corresponding INPUT jacks
on your TV. en, use another A/V cable to connect the white and red plugs from one end of the
A/V cable to the AUDIO L (white) and R (red) and VIDEO (yellow) OUTPUT jacks on the back
of the DIRECTV Receiver. Connect the plugs from other end of the A/V cable to the corresponding
INPUT jacks on your VCR.
Now, continue on page 20, “Connecting Your DIRECTV Receiver to Your Telephone Line.”
16
17
Chapter 1
Choose Your Setup
17
3 2
Television
DIRECTV®Receiver
1
5
4
BEST QUALITY
CONNECTION –
S-Video & A/V Audio
Thebackpanelsofyour
equipment may not look ex-
actly like those illustrated.

18
18
TIP
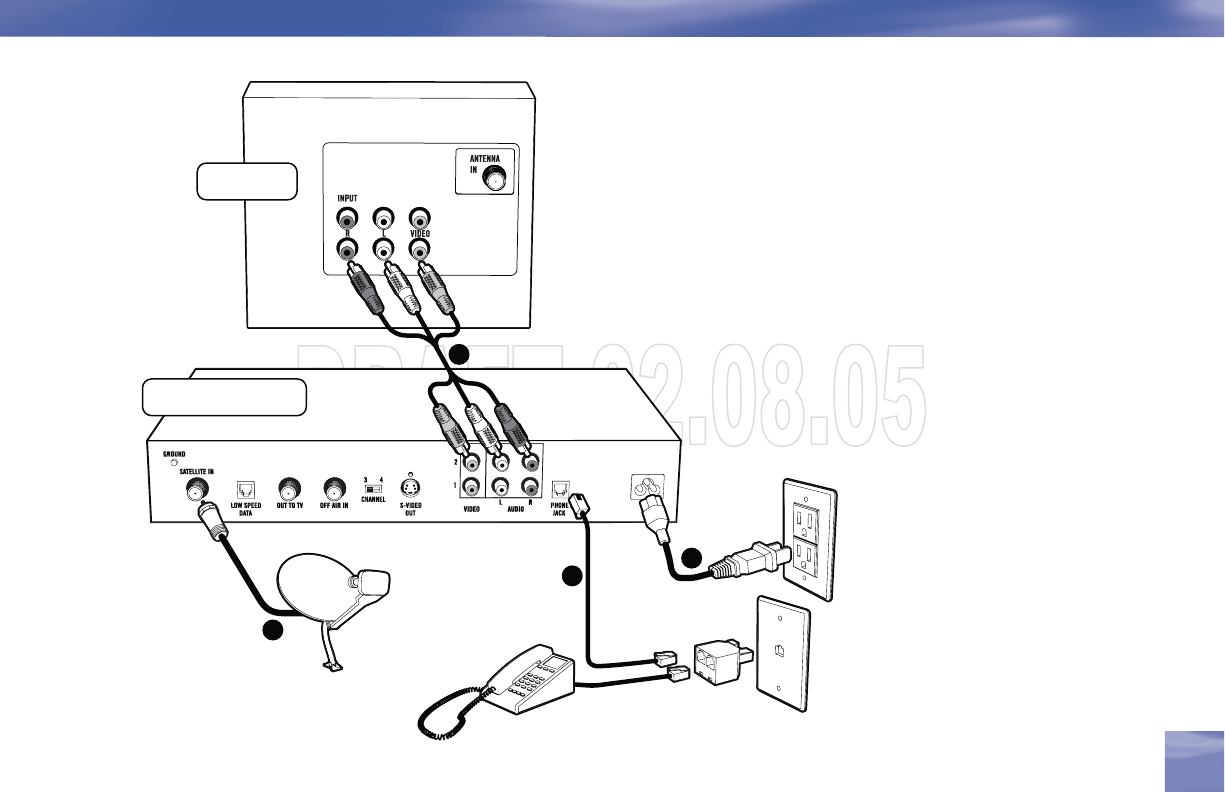
A/V Connection (Better Quality)
UsingtheA/Vcable,connectthewhite,redandyellowplugsfromoneendoftheA/Vcableto
theAUDIOL(white)andR(red)andVIDEO(yellow)outputjacksonthebackoftheDIRECTV
Receiver. Connect the other end of the A/V cable to the corresponding A/V input jacks on your TV.
IfhookingupaVCR,usinganotherA/Vcable,connectthewhite,redandyellowplugsfromoneend
oftheA/VcabletotheAUDIOL(white)andR(red)andVIDEO(yellow)outputjacksontheback
of the DIRECTV Receiver. Connect the other end of the A/V cable to the corresponding input jacks
on your VCR.
Then,runanA/VcablefromtheVCR’sA/VoutputtotheTV’sA/Vinputs.Thiswillallowyouto
watchvideotapes.NOTE:IfyourTVonlyhasonesetofA/Vinputjacks,thisconnectioncanalsobe
made by running a RF cable from the VCR’s OUT TO TV jack to the TV’s ANTENNA IN input.
Now, continue on page 20, “Connecting Your DIRECTV Receiver to Your Telephone Line.”
Getting Connected
Choose Your Setup
To switch between watching your
VCR and watching video from your
receiver, you may need to program
the INPUT key on your DIRECTV
remote. (See page 26 for info.)
Some TVs also have a MENU button
that allows you to change the video
source using an onscreen menu. If
you have trouble changing the video
source, refer to the instructions that
came with your TV.
Note
IfyourTVonlyhasoneaudioinputjackuseAUDIOL(white)jackonthebackoftheDIRECTVReceivertomake
the connection.
19
Chapter 1
Choose Your Setup
19
VERY GOOD QUALITY
CONNECTION – A/V
Thebackpanelsofyourequipment
may not look exactly like those il-
lustrated.
2
Television
DIRECTV®Receiver
1
4
3

20
20
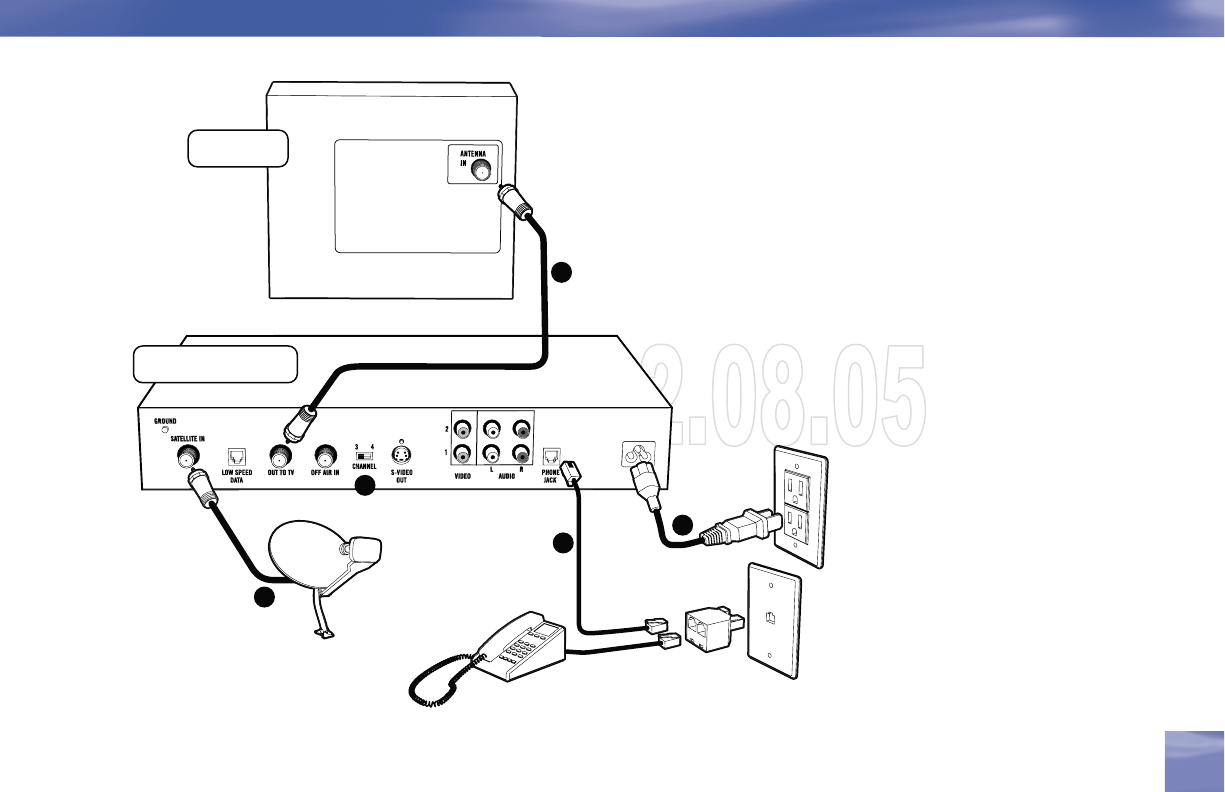
RF Coaxial Connection (Good Quality)
Using an RF coaxial cable, connect one end to the OUT TO TV jack on the DIRECTV Receiver
andtheotherendtotheANTENNAINjackontheTVorVCR.IfhookingupaVCR,useanother
RFcoaxialcabletoconnectoneendtotheOUTTOTVjackontheVCRandtheotherendtothe
ANTENNAINjackontheTV.
Set the 3/4 switch on the back of the DIRECTV Receiver to the “blank” local channel for in your
area.Forexample,ifyouhavealocalchannel3inyourarea,thenmovethe3/4switchtochannel4.
Ifyouhavealocalchannel4,thensettheswitchtochannel3.TowatchDIRECTVprogramming,
tuneyourTVtochannel3or4(dependingonthepositionofthe3/4switchinstep3above).
Connecting Your DIRECTV Receiver to Your Telephone Line
Plug one end of the telephone cord into a phone jack on your wall (or into a phone splitter that is
pluggedintoaphonejack)andtheotherendintothePHONEJACKonthebackoftheDIRECTV
Receiver.
Completing the Connections
Plugallpowercordsintoelectricalsockets.
Getting Connected
Choose Your Setup
To switch between watching your
VCR and watching video from your
receiver, you may need to program
the INPUT key on your DIRECTV
remote. (See page 26 for info.)
Some TVs also have a MENU button
that allows you to change the video
source using an onscreen menu. If
you have trouble changing the video
source, refer to the instructions that
came with your TV.
TIP
Note
NOTE: The Good Quality connection can also be made using A/V cables if your VCR has A/V inputs. To connect
using the A/V cables, connect the audio L (white), R (red) and video (yellow) plugs from one end of the A/V cable to the
AUDIO1LandRandVIDEO1jacksonthebackoftheDIRECTVReceiver.ConnecttheotherendoftheA/Vcable to
the corresponding jacks on your VCR.
21
21
Choose Your Setup
Chapter 1
GOOD QUALITY CONNECTION
–RFCoaxial
Thebackpanelsofyourequipment
may not look exactly like those il-
lustrated.
TelevisionTelevision
DIRECTV®ReceiverDIRECTV®Receiver
44
33
11
22
55

22
22
Getting Connected
Guided Setup & Activation
Now that your receiver and equipment are all hooked up and plugged in, you’re ready to
finishallthedetailstobeginreceivingyourDIRECTVservice.
1) MakesuretheMODESWITCHontheremotecontrolissettoDIRECTV.
2) Press TV POWER ON. The DIRECTV Receiver will turn on.
3) Thefirstscreenwillallowyoutoselectalanguage.Usingthearrowkeysontheremotecontrol,
move to the language you prefer and press SELECT.
4) YouwillseeaWelcome screen.
Now, let us lead the way…
Simplyfollowtheonscreendirectionstocompleteyoursetupfunctions.Ifyou’veinstalledyour
satellitedishandsystemyourself,you’llbeguidedthoughvariousfunctionsforoptimizingyour
signalandsetup—includingpositioningyourdishandasystemtest.If,likemostpeople,youhad
your system professionally installed, these functions already have been completed.
Guided Setup & Activation
Important
InordertoprotectyourTVscreenfromburn-in(aside-effectcausedwhenastationaryimageisdisplayedfortoolong),
the DIRECTV Receiver interface automatically goes into screen saver mode, and displays a black screen with a moving
logowhennokeyispressedfor5minutesormorewhileastationaryimageisdisplayedontheTV.Todismissthe
screen saver and return to what you were doing, press any key on the remote. Burn-in may cause permanent damage to
y
our TV and DIRECTV is not liable for an
y
dama
g
es that ma
y
be caused to
y
our TV.
TIP
SELECT
MENU
You may decide to set up,
change or adjust some of the
settings later. When you’re
ready, press MENU on your
remote, press SELECT on
Settings then select Setup.

23
23
Chapter 1
Guided Setup & Activation
After these setup procedures are complete, you’ll see the Satellite Data Acquisition screen, as the
receiver gathers information from the satellite for the onscreen program guide.
Next,you’llbegiventheopportunitytosetupyourphoneconnection,aswellasprogramyour
remote to control other equipment such as your TV and/or DVD player. Just follow the screen
instructionsandyou’llbereadytowatchinnotime!
Activate Your DIRECTV Service
Onceallthesetupprocessesarecomplete,allthat’slefttodoisactivateyourDIRECTVservice.
Beforeyoumakethecall,besureto:
TunetoChannel100andbesureyou’repickingupasatellitesignal(DIRECTVchannel).
Have on hand your service address, social security number and a valid major credit card.
Note your access card and receiver ID numbers (find these by pressing MENU, then go to
Settings andpressSELECT.ThengotoSetup andpressSELECT.HighlightInfo & Test and press
SELECT.
When you’re ready, just call 1-800-DIRECTV (1-800-347-3288)andpicktheprogrammingpackage
that’s right for you.

24
24
Getting Connected
Programming Your Remote Control
Programming Your Remote Control
You can program the DIRECTV remote control to operate your TV power, volume and mute,
additional equipment such as a DVD, VCR, stereo, or second TV or DIRECTV Receiver.
1) Press MENU to display the Quick Menu.
2) Highlight Settings and press SELECT.
3) Highlight Setup and press SELECT.
4) Press SELECT on Remote in the left menu.
5) Follow the onscreen instructions to program your remote for your TV or additional equipment
(AV1 and AV2).
Once your remote is programmed to work with your TV, the VOL and MUTE key control the TV
regardless of the slide switch position. If you would like to change the VOL and MUTE to work with
another component, you can. Simply set up your remote to work with the component, and then move
the slide switch to the position you would like to lock the VOL and MUTE keys to. Point the remote
away from your DIRECTV Receiver and press and hold MUTE and SELECT until the light near
the slide switch blinks twice (about 5 seconds). Enter 9-9-3. e light will blink twice, indicating the
VOL and MUTE are now locked to the chosen component, no matter what position the slide switch
is in.

25
Programming Your Remote Contro
l
Chapter 1 25
Factory Defaults
To reset all the functions of the remote control to the factory defaults, follow these steps:
1) Point the remote away from your DIRECTV Receiver and components. Press and hold MUTE
and SELECT until the light above the slide switch on the remote fl ashes twice (about 5 seconds).
2) Enter 9-8-1. e light on the remote will fl ash twice, indicating you have cleared AV1, AV2 and
TV modes.

26
Getting Connected

28 Watching TV
30 The Guide
32 The Mini Guide
32 Autotune
34 Pay Per View
Chapter 2
What’s On
28
Watching TV
Now that everything’s set up, you’re ready to grab your remote and start surfi ng!
With the MODE SWITCH to the left (under the DIRECTV logo), press TV POWER ON. To
access the channel of your choice, simply key in its numbers on your remote (the channel will appear
in a few seconds, or press ENTER after the numbers and it will appear right away). You can also
navigate to diff erent channels through the Guide, covered in detail starting on page 30. Keep in
mind, either way, you’ll only be able to access those channels in your chosen DIRECTV® p r o g r a m m i n g
package.
Use the black keys on the left side of your remote control to adjust volume up or down (VOL) or mute
the sound ( MUTE). e black keys on the right side can take you to the next channel numerically up
or down (CHAN), or jump to the previous channel you watched (PREV).
Use the Channel
Lineup (included in
your Welcome pack-
age) to get familiar
with our channel
numbers.
TIP
Watching TV
29
Chapter 2
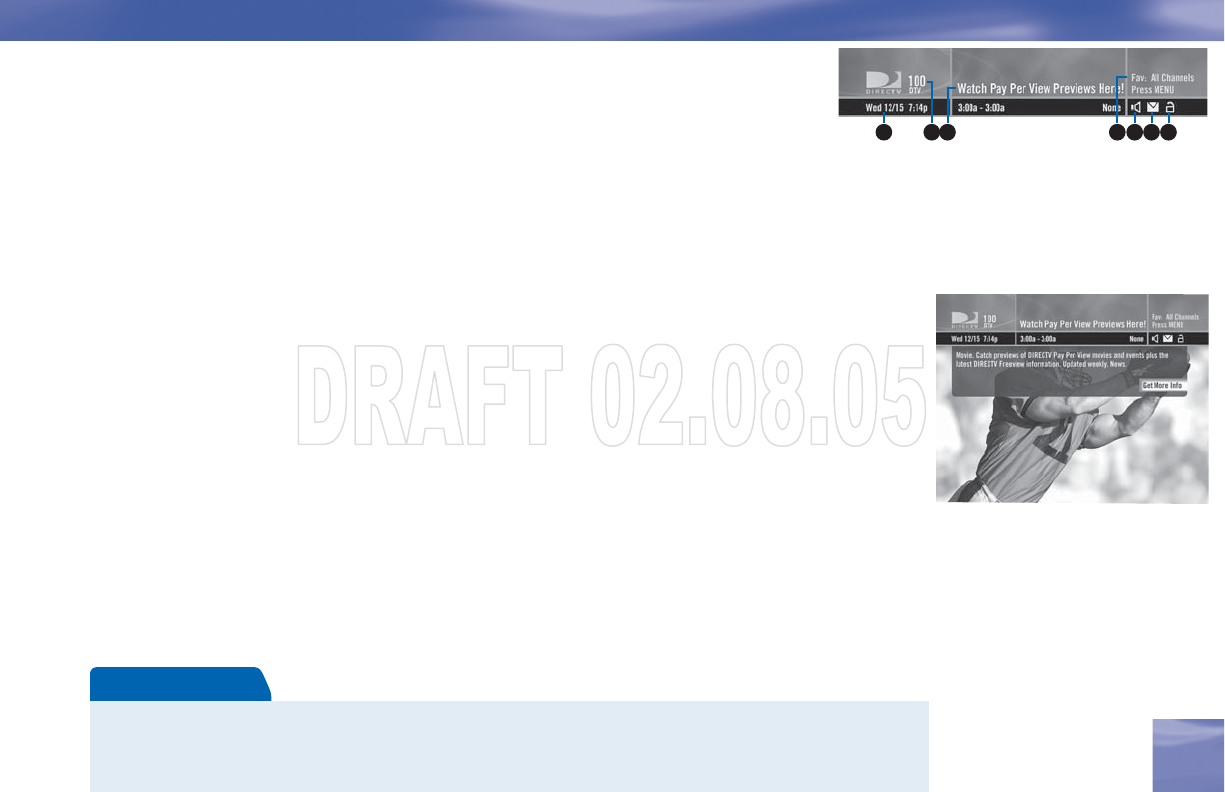
The Channel Banner
Any time you tune to a channel, you’ll see the channel banner appear across the top of the screen. is
banner displays the following useful information:
1) Current date & time
2) DIRECTV Channel – Channel logo, number and call letters of the station you’re currently
viewing.
3) Program – Program title, stop and start time and rating of the current program.
4) Current Favorites – Favorite Channels list currently in use.
5) Audio options – Two states: bright and dim. If displayed brightly, alternate audio options are
available.
6) Messages – Two states: bright and dim. If displayed brightly, there are new DIRECTV messages
in Caller ID & Messages.
7) P a r e n t a l C o n t r o l s – Parental Controls lock status. ree states: Locked, unlocked and
temporarily unlocked.
Music Channels
Your DIRECTV service includes dozens of enjoyable, continuous, commercial-free music channels with something for every
taste.Tunetothesejustasyouwouldtoanychannel.You’llseeaspecialChannelBannerthatinitiallydisplaysthechannel
description (for example, “Alternative,” “Today’s Country”). As each song is played, its info will appear in the banner,
including song title, artist and record company..
The channel banner gives you
infoonthechannelandshow
you are currently watching.
1 2 3 4 5 6 7
To see program details at
anytimepressINFOonyour
remote (press a second time
to clear). Select More Info
button to see additional op-
tions.
Watching TV
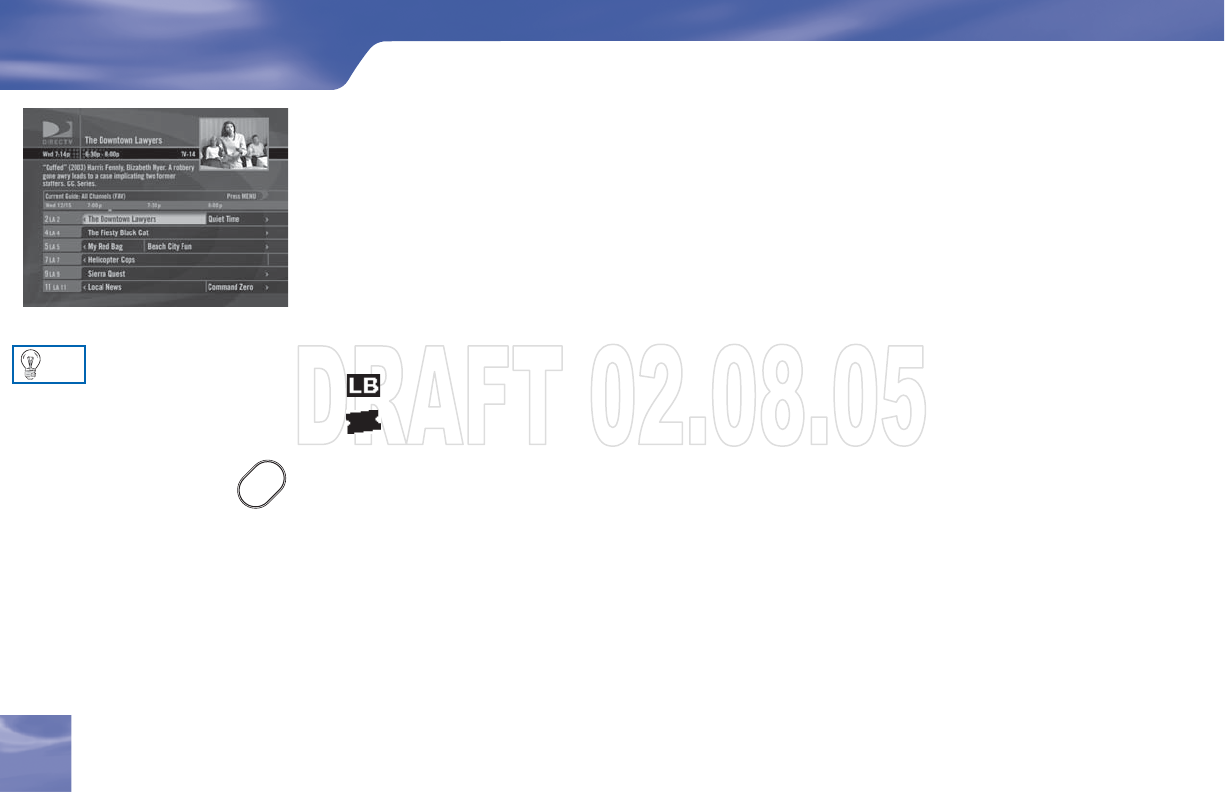
The Guide
Overview of the DIRECTV Advanced Program Guide®
e Guide displays listings of current and upcoming programs for up to 3.5 days in advance. Find
out what’s on (now or later), change the channel, fi nd and purchase a pay per view movie or event, or
search for a program you’re interested in.
Icons you may see in the Guide:
– Broadcast in letterbox (16:9 or widescreen) format
– All Day Ticket Pay Per View showings (pay once, watch all day)
Press the GUIDE key twice
to skip the Category Sort
screen.
GUIDE
TIP
The Guide
What’s On
30
Getting Around in the Guide
Press the GUIDE key on your remote, then choose how you want to fi lter the Guide. Select All
Channels, or channels in a specifi c category.
Moving through the Guide is simple:
e UP, DOWN, LEFT and RIGHT arrow keys move you through listings and time slots.
Highlight a program or channel cell to view its description.
Use the CHAN key up or down to scroll a full page.
Press the RED or GREEN keys to move forward or back in time.
To tune to a program that is on now, highlight the program and press SELECT. Selecting a future
program displays program information.
Press INFO when you’ve highlighted a show in the Guide to view a more in-depth description and
options. Pressing INFO when you’ve highlighted the channel name displays the channel’s listing
for up to 14 days.
Press SELECT when you’ve highlighted a channel cell (far left) to view that channel in the TV
window.
Press MENU to see Guide options, change your Favorites list, or jump to a desired date and time.
Press RECORD to record the program.
MENU
INFO
BACK
EXIT
LIST
GUIDE
ACTIVE
SELECT
Highlightanitembyusing
the arrow keys to move
LEFT,RIGHT,UPorDOWN.
PressSELECTtoaccessthe
information or channel.
The Guide
31
Chapter 2

What’s On
32
The Mini Guide
ProgramListingsWhileYouWatchTV
e Mini Guide is a special version of the Guide that displays only one channel at a time, and appears
over full-screen TV. To display the Mini Guide, press the BLUE key on the remote while watching
TV. Just as you can with the Guide, you can scroll through channels and times, set programs to
record, access program info, and other Guide features.
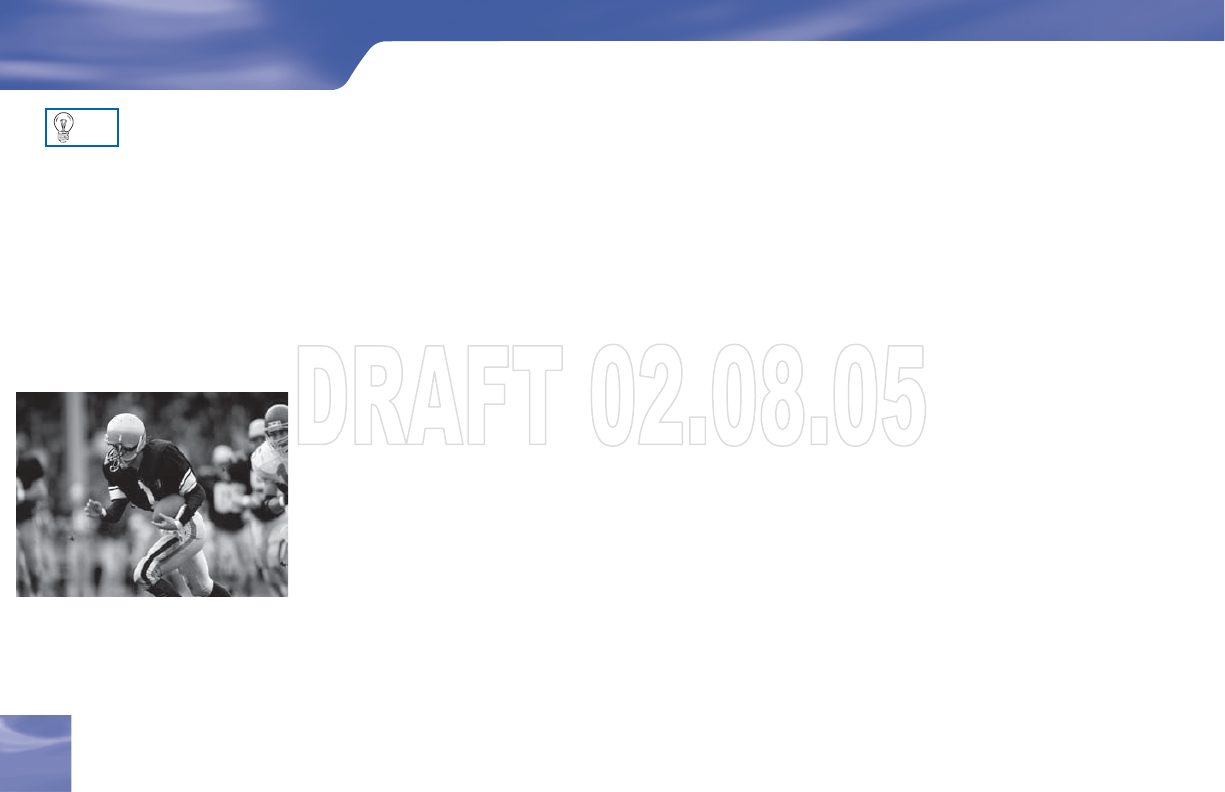
Autotune
An even better way to catch all your favorites
Autotune is a great way to see your favorite programs on your schedule. You won’t miss your favorite
series because it moved to a diff erent day or time, or miss your team’s playoff game because you had to
work late. Just set a program to autotune and your DIRECTV will tune to it automatically when it
starts.
To schedule a program for autotuning with specifi c options:
1) Highlight a program that interests you and press INFO.
2) Highlight and select Autotune. A screen is displayed where you can set Autotune options for that
program. Follow the onscreen instructions to set the program to autotune as you wish.
The Mini Guide

33
Chapter 2
3) Select the Set Autotune button, then OK on the confi rmation screen.
If a program you select to autotune confl icts with another program, you will be notifi ed of the confl ict
at the time and given a choice of which autotune to cancel.
Changing Autotune Options/Canceling an Autotune
Once you have scheduled a program to autotune, you can change the autotune options or cancel the
autotune by selecting the program in the Guide or the To Do List (press LIST, then YELLOW);
then, select the Autotune item in the left menu, and follow the onscreen instructions to change the
program’s options or cancel the Autotune completely.
You can change the following Autotune options:
• For all programs, you can extend Autotune start and stop times (for example, start 1 minute before
the program; stop 5 minutes after the scheduled end of the program).
• For programs with multiple episodes, you can select whether to Autotune fi rst run programs and
repeats or just fi rst runs.
Recording to VCR
To record a program on your VCR, make sure you’ve connected your VCR properly to your
DIRECTV Receiver, then set up your VCR to record at the same time as a scheduled autotune and
you’re set. See your VCR User’s Guide for information on how to set it up for scheduled or manual
recording.
The Mini Guide

What’s On
34
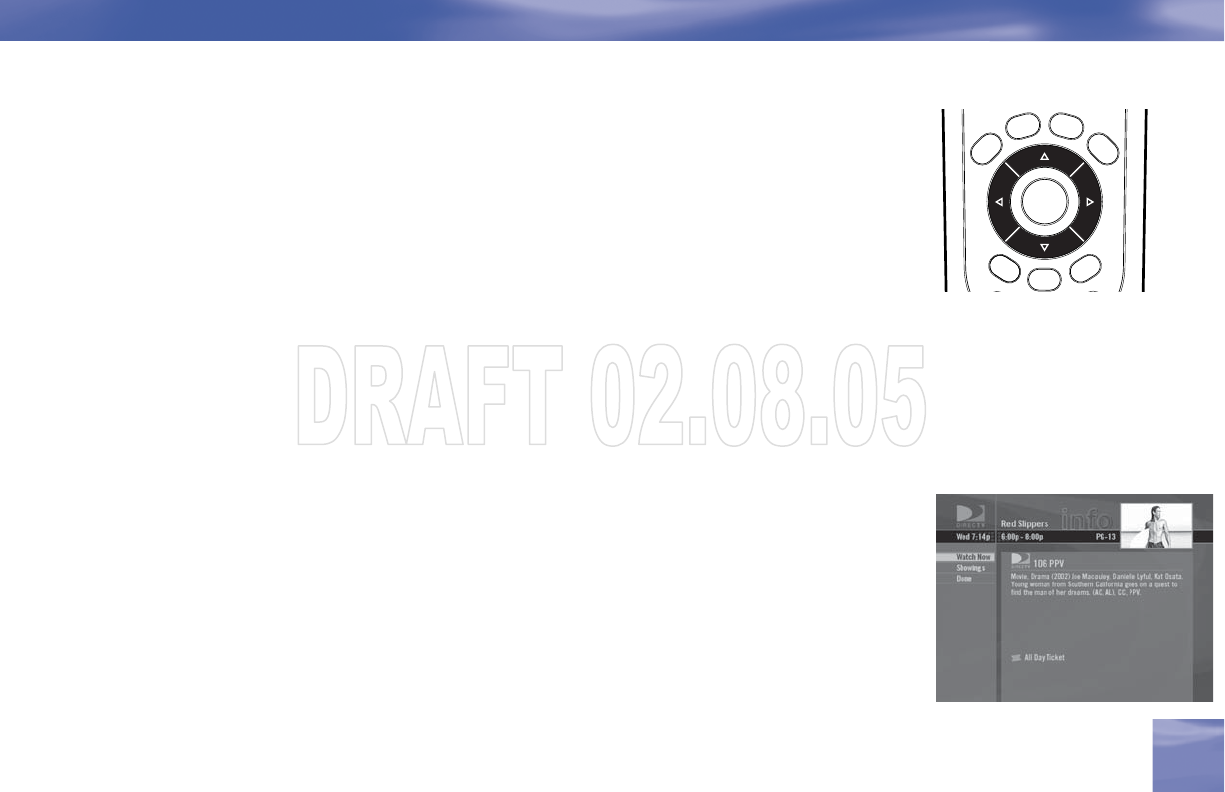
Pay Per View
The Latest Movies, 24 Hours a Day
You don’t have to go out for the best and biggest movies and special events! Recent hits and events like
sports, comedy and more are available 24 hours a day on DIRECTV® Pay Per View. You’ll fi nd them
listed in the Guide in the 100s, with previews on channel 100.
Tune to a pay per view program or press INFO on a highlighted pay per view program. Select a Buy
option and follow the onscreen instructions. As long as your receiver has been connected to a land-
based phone line, you can use your remote to order. You’ll get a reminder a few minutes before the pay
per view’s start time.
You can cancel your pay per view order for any reason as long as none of the program has been
viewed. Press LIST, then YELLOW to display the To Do List. Press SELECT on the Purchase item in
the left menu. Select the desired program and follow the onscreen instructions.
You can also order DIRECTV
Pay Per View movies and
events on the Internet at
DIRECTV.com or over the
phone at 1-800-531-5000.
Keep in mind, though, there
is an ordering fee for those
purchases placed over the
phone.
TIP
Pay Per View