Humax F2-1003 Digital Satellite Setup-Top Box User Manual
Humax Co., Ltd. Digital Satellite Setup-Top Box
UserManual.wiki
>
Humax
>
F2 1003 User Manual
User Manual
Navigation menu
Upload a User Manual
Namespaces
Wiki Guide
HTML
PDF
Info
Views
User Manual
Discussion / Help
Navigation
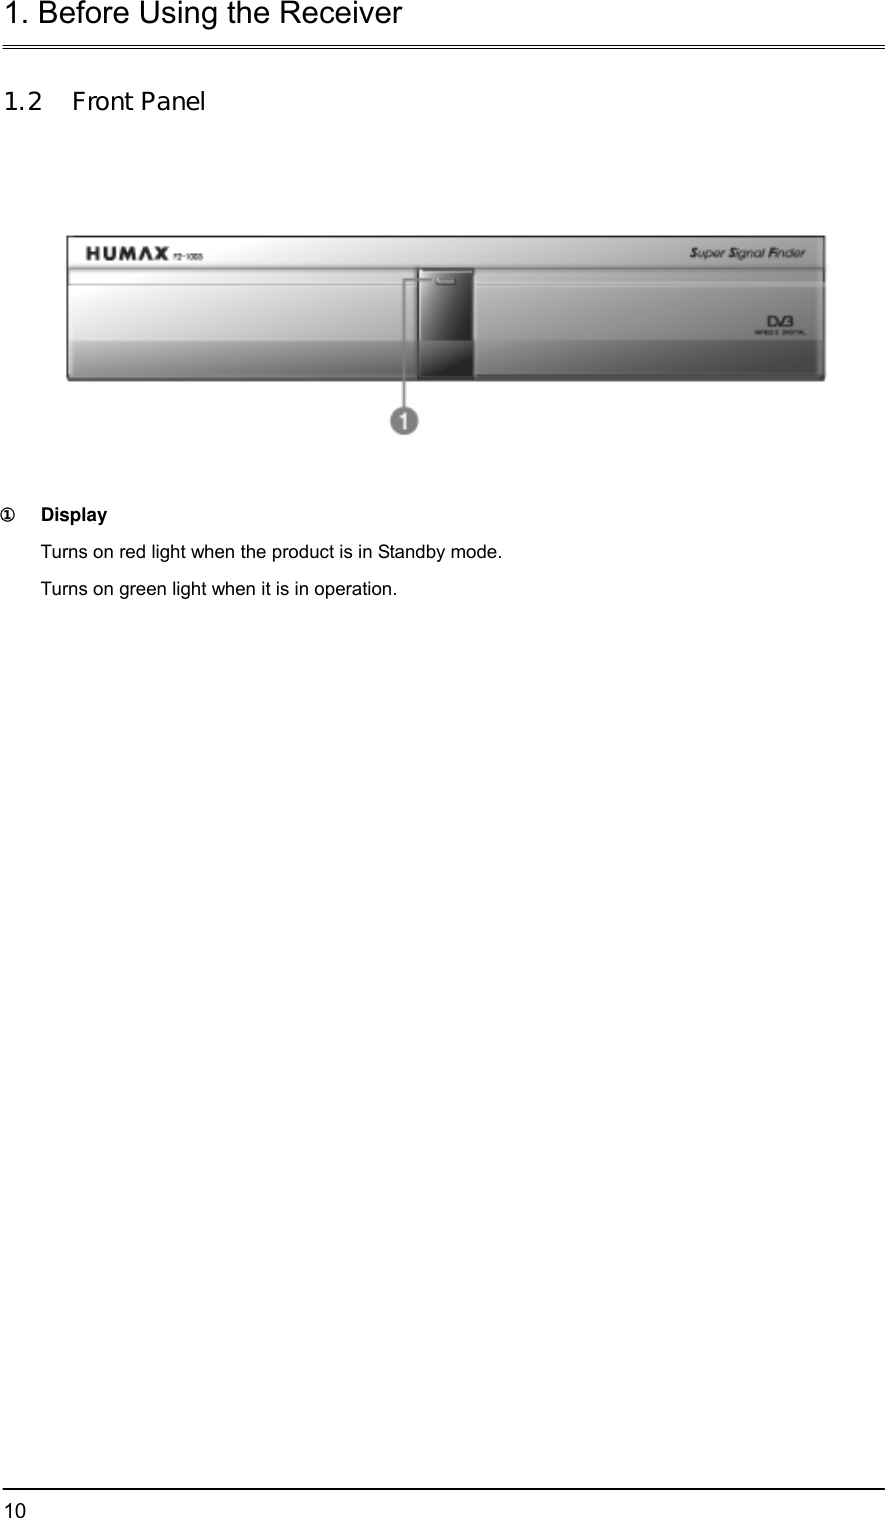
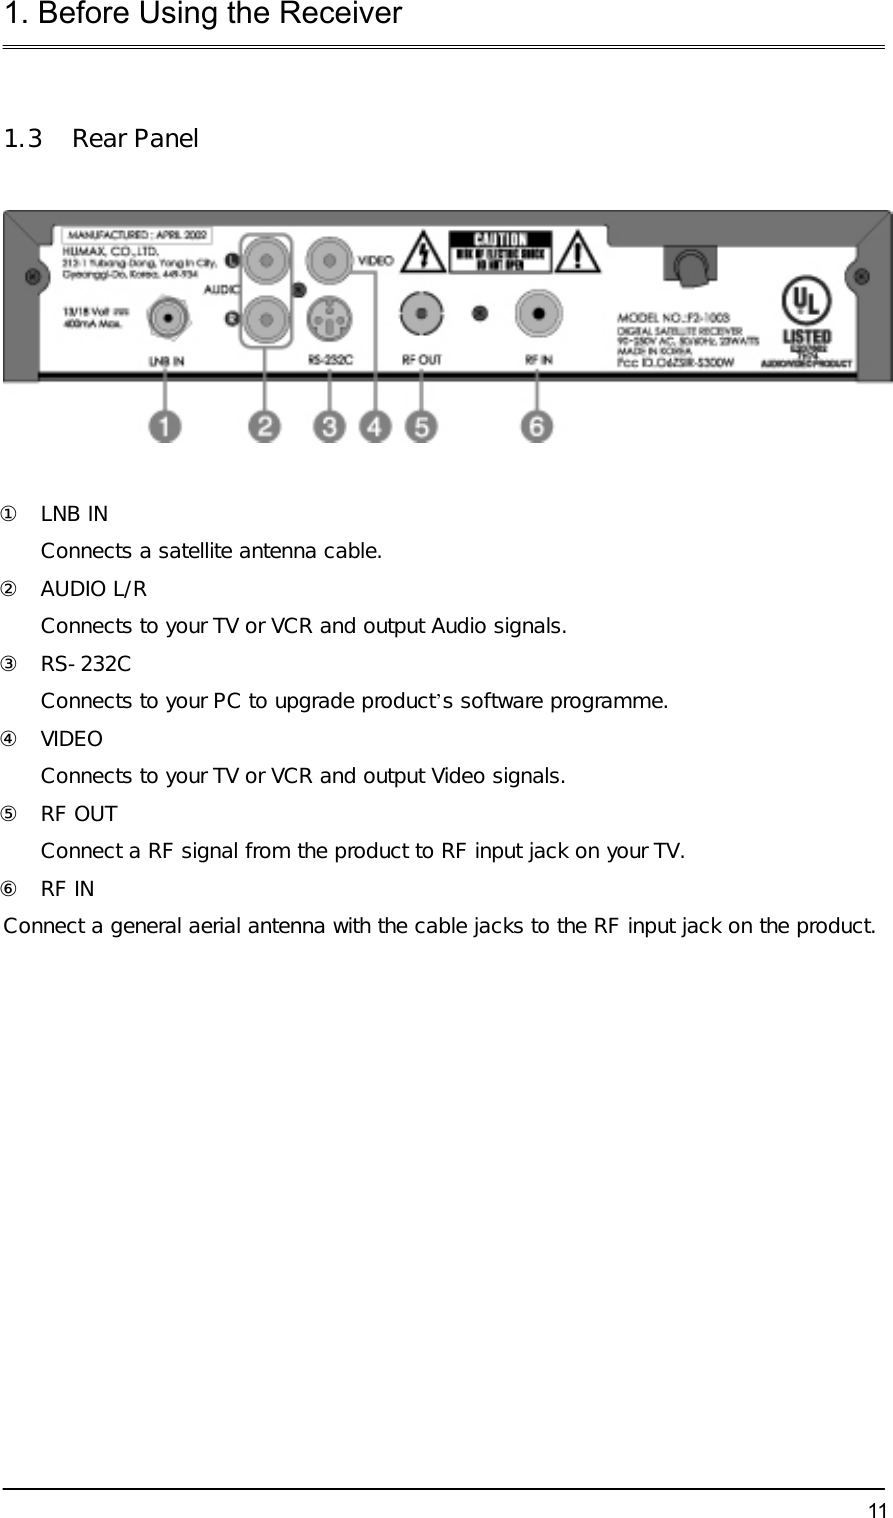
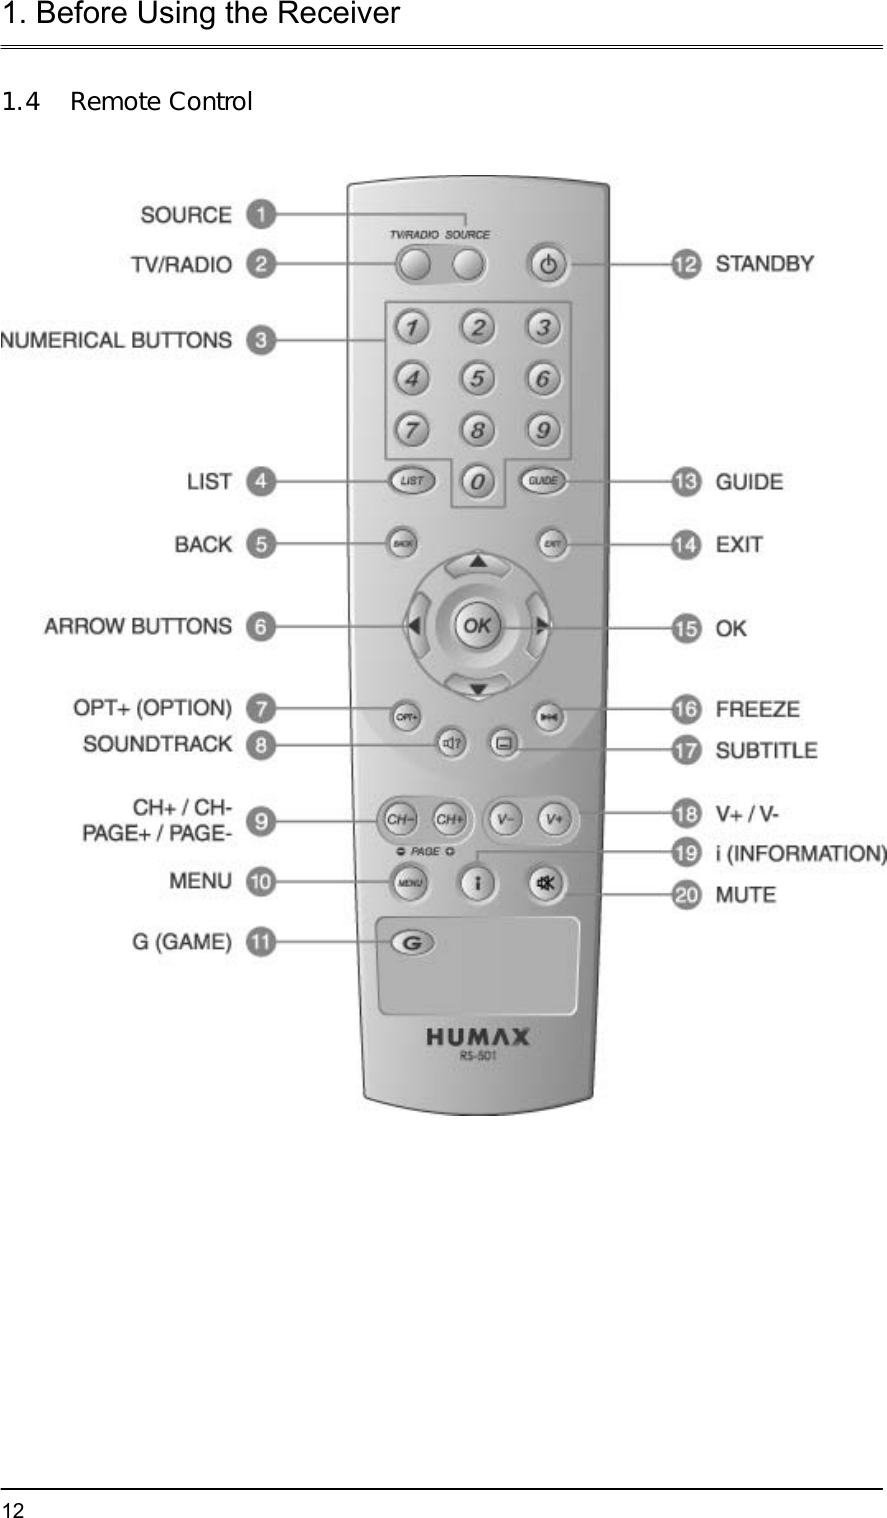
![1. Before Using the Receiver 9This chapter provides detailed instructions on the product and its accessories. 1.1 Package Contents Please check all package contents before using your product. Receiver user’s Manual Remote Control Unit (1) Batteries (2) RCA A/V Cable (1) [Note] Since faults may occur if the remote controller is being left without a battery for a long time, always keep the battery inserted in the remote controller.](https://usermanual.wiki/Humax/F2-1003/User-Guide-317981-Page-9.png)
![2. Setup 14This chapter describes how to set up the receiver. Select the most appropriate procedure depending on your requirements. [Note] If you encounter any problem when setting up the receiver, please contact your local product distributor. 2.1 Connecting the Antenna (1) Connecting TV This is the most simple set-up mode. (2) Connecting Hi-Fi System Connect the outputs on this receiver to corresponding inputs on your Hi-Fi system. (left audio out to left audio in, right audio out to right audio in)](https://usermanual.wiki/Humax/F2-1003/User-Guide-317981-Page-14.png)
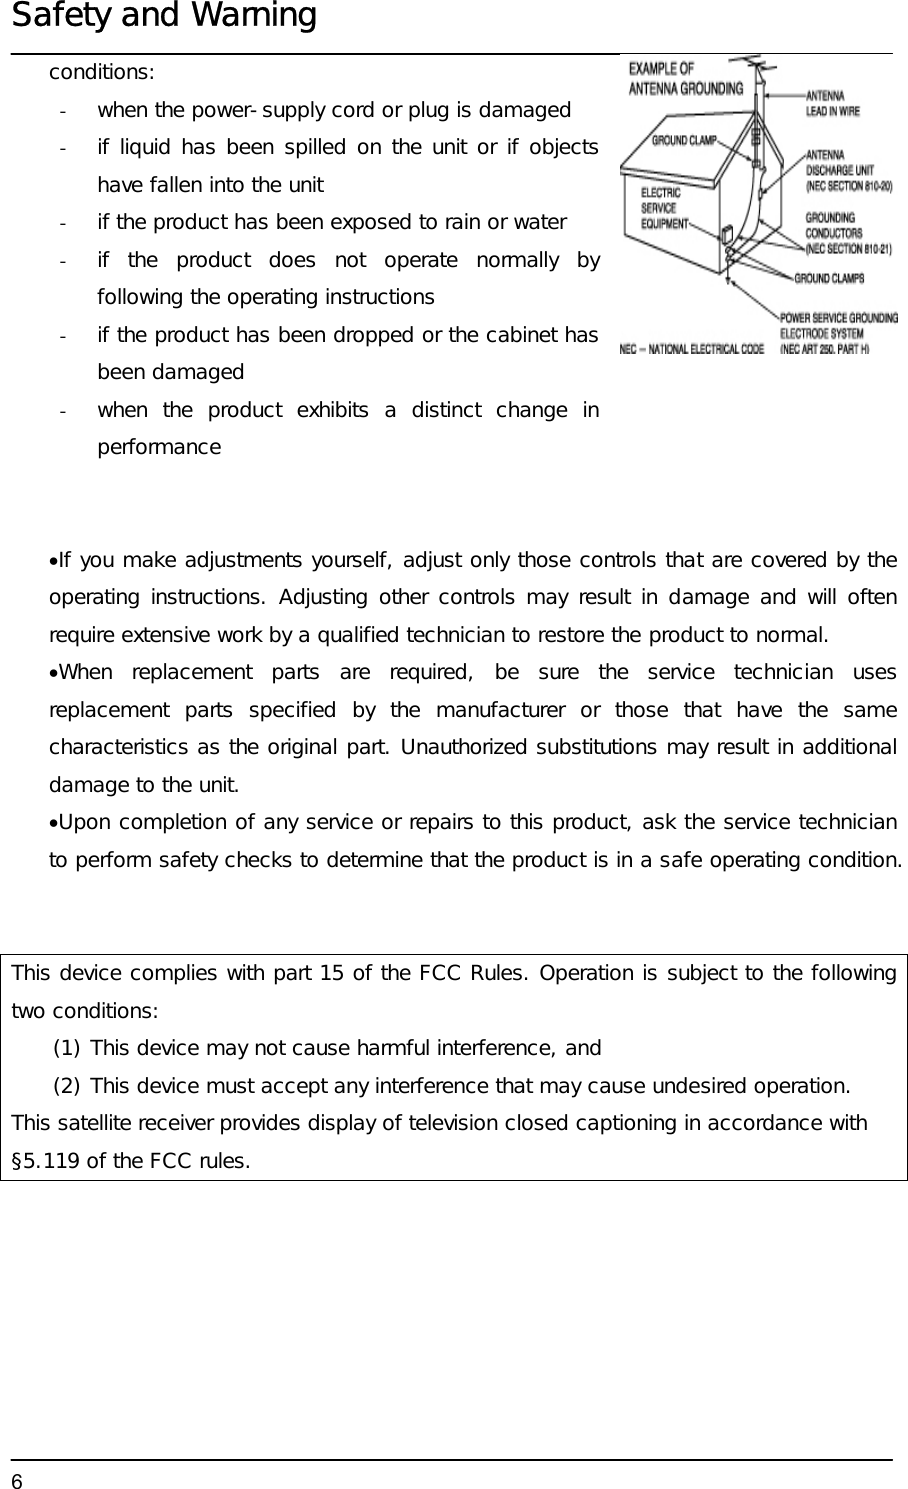
![3. Installation Wizard 16When powering on your receiver for the first time after purchasing, the Installation Wizard is automatically started. You can easily set-up using simple organisation and options, and watch the broadcasting after completing the set-up procedure. You can select items using the <Numerical> buttons. [Note] If you press the <Back> button or select Back and press the <OK> button while running the Installation Wizard, you can return to the previous screen 3.1 Language You can select Menu, Audio, and the subtitle language. Select the appropriate language from the list using the ▲▼ button and press the <OK> button to save the selected language as a default language and move to the next step 'Antenna Setting.' 3.2 Area Setting You can select area. Select the appropriate area from the list using the ▲▼ button and press the <OK> button. 3.3 Antenna Setting You can set the antenna's properties to watch the programme. ① Select the Satellite which the antenna points to. Press the <OK> or <X> button to display satellites list. Select satellite using the ▲▼ button, and press the <OK> button. ② Set the LNB Frequency. Press the <OK> or <X> button to display LNB frequency list. Select LNB frequency using the ▲▼](https://usermanual.wiki/Humax/F2-1003/User-Guide-317981-Page-16.png)
![3. Installation Wizard 17button, and press the <OK> button. If you cannot find the LNB frequency value from the list, select User Define, manually enter the frequency using the <numerical> button, and then press the <OK> button. [Note] When using Universal LNB, select Universal for LNB Frequency which is 9750/10600(MHz). Also, if you select Universal, 22KHz tone value is disabled. ③ Set up 22kHz Tone. Select 22kHz Tone using the ▲▼ button, and press the <OK> or <X> button to change the setting. When using 22kHz tone switch, select Enable. Otherwise, select Disable. ④ Select DiSEqC switch. Select DiSEqC using the ▲▼ button, and press the <OK> or <X> button to display DiSEqC Switch List. Select DiSEqC Switch using the ▲▼ button and then press the <OK> button. ⑤ When you complete the setting, select Next using the ▲▼ button and press the <OK> button to start Automatic Search. [Note] 1. If the antenna is correctly set up, the level at signal strength bar and quality bar, which are located at](https://usermanual.wiki/Humax/F2-1003/User-Guide-317981-Page-17.png)
![3. Installation Wizard 18the bottom of the screen, are generally moved up. 2. If you encounter any problems or questions when setting up the antenna, please contact your local product installer or distributor. 3.4 Automatic Search You can automatically search for satellites according to the Antenna Setting. Please wait for finishing the Automatic Search. If you want to stop the Automatic Search, press the <OK> button. If the Automatic Search is stopped or finished, the searched result is automatically saved and go to the next step. 3.5 Time Setting You can set the current time. Press the <OK> or <X> button to display the values for GMT Offset. Select the appropriate GMT Offset value using the ▲▼ button and press the <OK> button to set the current time. Check the current time at the bottom of the screen to see if it's correctly set up. Then select Next using the ▲▼ button and press the <OK> button to finish Installation Wizard. [Warning] Press the <EXIT> button to save the previous input information and exit the Installation Wizard when running the Installation wizard. If you exit the Install Wizard without fully completing the setting procedures, you may not watch any broadcasting normally. In this case, you can use the Menu-Installation-Antenna Setting and Channel Search menu to configure your receiver as you like.](https://usermanual.wiki/Humax/F2-1003/User-Guide-317981-Page-18.png)
![4. Basic Operation 19This chapter describes functions such as switching channel, volume control, and basic features for watching programmes. 4.1 Switching Channel You can switch the current channel using one of the following methods. (1) Press the CH-/CH+ button. (2) Enter your desired channel numeric using the Numerical button<0~9> to move to the channel directly. (3) Press the <TV/Radio> button to switch between TV channel and Radio channel. [Note] You can switch channel using the channel list or programme guide. Please refer to Chapter 5 and 6 for more information. 4.2 Volume Control (1) Press the <V-/V+> buttons to adjust the audio volume. (2) Press the <Mute> button to stop the sound temporarily. [Note] The mute function keeps enabled while you change the channel. 4.4 Change the Subtitle Language If the current programme provides Subtitle information, you can select the language for the Subtitle. ① Press the <Subtitle> button to display the subtitle language list. ② Select your desired subtitle language using the ▲▼button, and press the <OK> button. Then the subtitle will be displayed in the selected language at the bottom of the screen. ③ Select OFF from the subtitle language list not to display subtitle from the screen. [note] You can select a default subtitle language by selecting MENU – Preferences – Language Setting – Subtitle Language. 4.5 Change a Audio Language If the current programme is available in multiple audio languages, you can select the language that you wish to listen in.](https://usermanual.wiki/Humax/F2-1003/User-Guide-317981-Page-19.png)
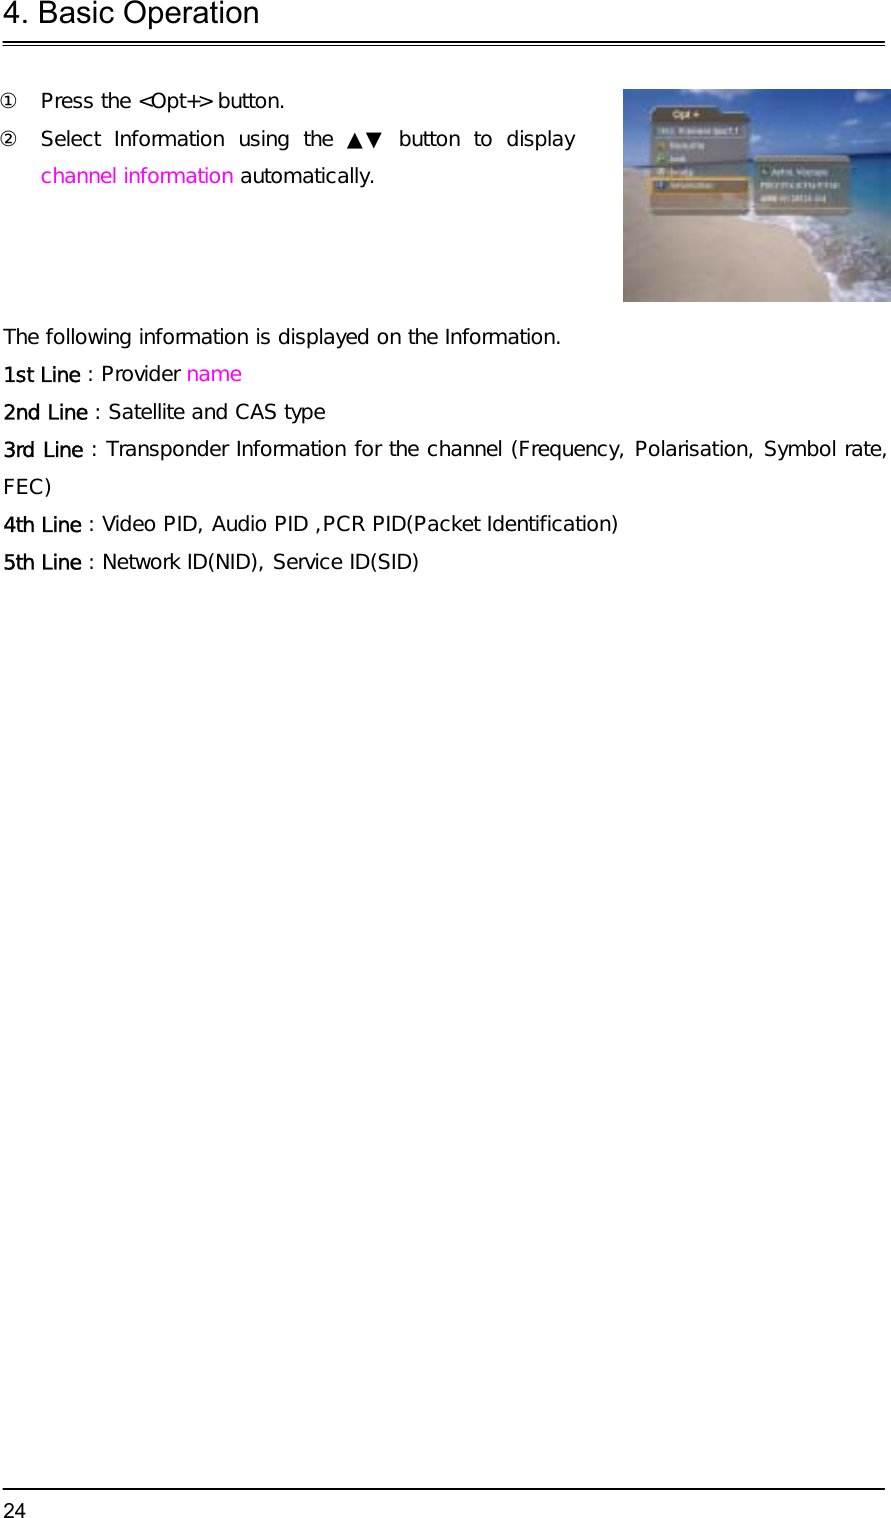
![4. Basic Operation 20① Press the <Soundtrack> button to display soundtrack list. ② Select your desired audio language using the ▲▼button to change Audio immediately. ③ Select Audio Direction(left, right, stereo) using the WX button. [Note] 1. you can select your desired default audio language by selecting MENU – Preferences – Language Setting –Audio Language. 2. If the programme is Dolby digital one, you cannot set the audio direction such as left, right, and stereo. 3. If you select Dolby by selecting MENU – Preferences – Language Setting – Audio Priority, Dolby Digital programme is automatically broadcasted with Dolby digital audio without considering default audio language. 4.6 Program Information (I- plate) Programme information is always displayed for a specific period of time whenever you switch channels. You can view the programme information by pressing the <i> button while watching a programme. Press the <EXIT> button to hide the I-plate. (1) General Information The General Information is displayed as following on the screen. ① Channel number and channel name ② Programme name ③ Icons Displayed only if this programme is reserved. Represents parental level. It indicates the minimum level of ages that the](https://usermanual.wiki/Humax/F2-1003/User-Guide-317981-Page-20.png)
![4. Basic Operation 21programme is targeted at. Displayed only when the channel is a locked channel. Displayed only when the channel is a scrambled channel. Displayed only when subtitle information is available. Displayed only when there is any teletext information. Displayed only when the programme is a dolby digital one. ④ Current time ⑤ Detailed programme information: displayed if detailed programme information is provided. ⑥ Signal strength and signal quality : indicates signal level. ⑦ Satellite name or channel change mode : If you select All channels by selecting MENU - Edit channels – Channel Change Mode, the Satellite name, which the current channel is belonged to, is displayed; if you select Within the current channel list, the channel list, which you selected, is displayed. ⑧ Programme broadcasting time and progress bar : displays programme playing time and progress bar. ⑨ Next programme Information : displayed if next programme information is provided. Press the <X> button to display the next programme information. [Note] If there is no available programme information, programme information is not displayed. (2) Detailed Programme Information You can see detailed information about the current programme. Press the <i> button where I-plate is displayed to view detailed information. [Note] 1. Press the <i> button again to hide the information box. 2. If the detailed programme information is more than one page, use <▲▼> button to move to the previous or next page. 4.7 Option List you can view and confirm detailed information about the current channel and change the information in necessary. [Note] Press the <opt+> button when the channel list is displayed to view option list. Then the following functions in the option list are performed to the channel where cursor is located.](https://usermanual.wiki/Humax/F2-1003/User-Guide-317981-Page-21.png)
![4. Basic Operation 22(1) Add a channel to favourite group. You can add current channel to the favourite group immediately. Also, you can add a channel to multiple Favourite groups. ① Press the <Opt+> button. ② Select Favourite using the ▲▼ button, and press the <OK> or <X> button. ③ Select favourite group using the ▲▼ button and press the <OK> button to register for favourite group. ④ Press the <OK> button again on the selected favourite group to release the registered channel. ⑤ Move to the parent menu using the <W> button to save the changes automatically. [Note] For detailed information about how to change Favourite Group's name and how to register Favourite Channel for the whole channels, refer to Chapter 5. (2) Lock/Unlock a Channel You can lock or unlock the current channel while watching a programme. ① Press the <Opt+> button. ② Select Lock using the ▲▼ button, and press the <OK> or <X> button. ③ Select Lock option using the ▲▼ button, and press the <OK> button.](https://usermanual.wiki/Humax/F2-1003/User-Guide-317981-Page-22.png)
![4. Basic Operation 23 ④ Select Unlock option using the ▲▼ button, and press the <OK> button. ⑤ You will be prompted to enter your password. Enter your password to unlock the channel. ⑥ Move to the parent menu using the <W> button to save the changes automatically. [Note] When switching to the locked channel, you must enter the password to watch a programme. (3) Delete a Channel You can delete the current channel while watching a programme. ① Press the <Opt+> button. ② Select Delete using the ▲▼ button, and press the <OK> or <X> button. ③ Select Yes in the confirmation message and press the <OK> button. ④ Enter your password using the <numerical> button to delete the current channel. (4) Channel Information You can display detailed information about the current channel while watching a programme.](https://usermanual.wiki/Humax/F2-1003/User-Guide-317981-Page-23.png)
![5. Channel List 25 5 types of channel lists are provided for easy and quick channel finding. TV : The list of all TV channels with 2 subgroups: one is sorted by channel number, the other is sorted by channel name. Radio : The list of all Radio channels with 2 subgroups: one is sorted by channel number, the other is sorted by channel name. Favourite : : The list of the favourite channels with 5 subgroups that you can organise channels by your private taste. Satellite : The lists of channels classified by satellites. The number of subgroup is decided by the result of channel search.. 5.1 Displaying and Switching Channel List You can display channel list using <List> button and switch into other channel on the channel list. ① Press the <List> button while watching a programme to display the channel list. ② Select your desired channel using the ▲▼ button and press the <OK> button to change the channel. ③ Enter the channel numeric directly using <Numerical> button to move cursor into your desired channel. And then press the <OK> button to change into the selected channel. [Note] 1. If there are multiple channels, press the <page -/+> button to move by page. 2. Whenever you press the <TV/RADIO> button while the channel list is displayed, the channel list will be switched between TV and Radio channel list. 5.2 Changing Channel List Group You can select channel list by group.](https://usermanual.wiki/Humax/F2-1003/User-Guide-317981-Page-25.png)
![5. Channel List 26① Press the ▶ button while the channel list is displayed to view the group list. ② Select your desired channel group using the ▲▼button. ③ Press the <OK> or <X> button, select your desired subgroup using the ▲▼ button, and then press the <OK> button. ④ The channel list for the selected subgroup is displayed. [Note] 1. The subgroup of favourite channel list may exist or not depending on your configuration. And The subgroup of Satellite channel list may exist or not depending on the result of Channel Search. 2. If Within the current channel list option is selected from MENU – Edit channels – Channel Change Mode menu, you can only change programme within the selected channel list using the <CH+/CH-> while your watching a programme. 5.3 Edit Channels You can edit all channels or each channel by channel list group. ① Press the <Menu> button. ② Select Edit Channels using the ▲▼ button, and press the <ok> or <right> button. ③ Select Edit Channel List using the ▲▼ button, and press the <ok> or <right> button. ④ You will be prompted to enter your password. Enter your password using <numerical> button. [Note] 1. Press the <back> or <Left> button to save the changes and return to the previous menu, press the <Menu> or <exit> button to exit the menu screen. 2. You can easily navigate all menus using the assigned numeric for each menu. Press the <MENU> - <2> – <1> in order at remote controller to select Edit Channel List menu.](https://usermanual.wiki/Humax/F2-1003/User-Guide-317981-Page-26.png)
![5. Channel List 27order at remote controller to select Edit Channel List menu. (1) Select a Channel Group You can select the channel list group to edit. TV or Radio, and the subgroups from the channel search for satellite channel lists are included as channel list groups. ① Press the <OK> or <Right> button in Group to display channel list group. ① Select your desired channel list group using the ▲▼button, and press the <OK> button. [Note] 1. Press the <TV/RADIO> button to move to TV or RADIO channel list directly. 2. For editing Favourite channel list, move to MENU – Edit Channels – Edit Favourite Channels menu. (2) Delete Channels You can delete one or more channels. ① Move the cursor to the channel list using the ◀▶button. ② Select your desired channel, and then press the <OK> button. You can select multiple channels. ③ Select Delete in the right using the ▶ button, and press the <OK> button. (3) Lock/Unlock Channels You can lock or unlock one or more channels. ① Move the cursor to the channel list using the ◀▶ button. ② Select your desired channel, and then press the <OK> button. You can select multiple channels. ③ Select Lock in the right using the ▶ button, and press the <OK> button.](https://usermanual.wiki/Humax/F2-1003/User-Guide-317981-Page-27.png)
![5. Channel List 28 [Note] 1. Only if all selected channels are locked, Lock is switched into Unlock. When you press Unlock, locked channel is switched into unlocked channel. 2. Enter password using the <numerical> button to watch locked channel. (4) Move Channels You can move one or more channels into your desired location, which changes the channel number accordingly. ① Move the cursor to the channel list using the ◀▶button. ② Select your desired channel, and then press the <OK> button. You can select multiple channels. ③ Select Move in the right using the ▶ button, and press the <OK> button. Then the selected channel(s) disappears from the channel list for a while. ④ Move the cursor to the desired location in the channel list using the ▲▼ button, and press the <OK> button.⑤ The selected channel(s) is moved to the selected location in order. [Note] "Move" is available only for TV or radio channel list. (5) Rename a Channel](https://usermanual.wiki/Humax/F2-1003/User-Guide-317981-Page-28.png)
![5. Channel List 29You can change the channel name as you like. ① Move the cursor to the channel list using the ◀▶button. ② Select your desired channel, and then press the <OK> button. You can select only one channel ③ Select Rename in the right using the ▶ button, and then press the <OK> button. ④ Enter a channel name directly using the keyboard displayed on the screen. ⑤ When finishing entering channel name, select OK, and press the <OK> button. (6) Select/Unselect All Channels You can select/unselect all channels at a time. ① Select Select All in the right and press the <OK> button to select all channels. ② Select Unselect All in the right and press the <OK> button to unselect all the selected channels. ③ 5.4 Edit Favourite Channels You can edit Favourite channel or Favourite channel list. ① Press the <menu> button. ② Select Edit Channels using the ▲▼ button, and press the <OK> button. ③ Select Edit Favourite Channels using the ▲▼ button, and press the <OK> or <Right> button. [Note] 1. Press the <BACK> or <Left> button to save the changes and return to the previous menu. Press the <MENU> or <EXIT> button to exit the Menu screen. 2. You can easily navigate all menu items using the assigned numerical button for each menu. Press the <MENU> - <2> – <2> in order on the remote controller to select the Edit Favourite Channels menu. The buttons for editing the Favourite channel list are described in the following table.](https://usermanual.wiki/Humax/F2-1003/User-Guide-317981-Page-29.png)
![5. Channel List 30 Add Remove TV/Radio Fav.Group Move Rename Sort Unselect All Adds Favourite channel. Removes from the Favourite channel. Switches between TV and Radio channel list. Changes Favourite channel list group. Moves the order of channel list within the Favourite channel list.Renames the name of Favourite channel list. Sorts channels by number or name in all TV/Radio channel list.Unselect all the selected channel. (1) Add/Remove favourite channels You can add favourite channel(s) to a specific Favourite channel list or remove the added favourite channel(s) from the list. ① Select Favourite Group using “그림(Fav.Group)”. ② Select your desired channel(s) in all TV/Radio channel list, and press “그림(Add)” to add Favourite channel(s). ③ Select your desired channel(s) in Favourite channel list, and press “그림(Remove)” to remove Favourite channel(s) [Note] You can switch between TV and Radio channel list using <TV/Radio> button at remote controller or “그림(TV/Radio)”. (2) Move favourite channels You can move favourite channel(s) to your desired location within the Favourite channel list. ① Select Favourite Group using “그림(Fav.Group)”. ② Select your desired channel to move within the Favourite channel list and press the <OK> button. ③ Select “그림(Remove)”, and press the <OK> button. ④ Move the cursor to your desired location using the ▲▼button, and press the <OK> button. ⑤ The selected channel(s) is moved into desired location](https://usermanual.wiki/Humax/F2-1003/User-Guide-317981-Page-30.png)
![5. Channel List 31you selected. (3) Rename a favourite channel list You can rename Favourite channel list. ① Select Favourite group using “그림(Fav.Group)”. ② Select “그림(Rename)”, and press the <OK> button. ③ Enter the Favourite channel list name using the keyboard displayed on the screen. ⑥ When finishing entering the favourite channel list name, select OK, and press the <OK> button. (4) Additional Features Additional Features provides many useful functions which are necessary to add Favourite Channel. Change between TV and Radio channel list You can add not only TV channel(s) but also Radio channel(s) to Favourite channel list. Press “그림(TV/Radio)” to switch TV or Radio channels. [Note] You can also change into TV or Radio channel by pressing <TV/Radio> button at remote controller. Select a favourite channel list You can select your desired Favourite channel list to edit. Press “그림(Fav.Group)” to display the Favourite channel list. Then select your desired channel list using the ▲▼button, and press the <OK> button. Sort a channel list You can sort all TV or Radio channel list by channel number or name for easy Favourite channel searching.](https://usermanual.wiki/Humax/F2-1003/User-Guide-317981-Page-31.png)
![5. Channel List 32If channel lists are sorted by channel number, “그림(abc)” is displayed. When you press this button, all the channel lists are sorted by name. Or, if channel lists are sorted by channel name, “그림(abc)” is switched into “그림(123)”. Press this button to order channels by number Unselect all the selected channels Press “그림(Unselect All)” button to unselect all the selected channel. 5.5 Channel Change Mode You can change the channel either in the group or in the entire channels while watching a programme. ① Press the <Menu> button. ② Select Channel Change Mode using the ▲▼ button, and press the <OK> or <Right> button. ③ Select All Channels or Within the current channel list using the ▲▼ button, and press the <OK> button. [Note] When Within the current channel list is selected, you can only change the channel within the current channel list using the <CH+/CH-> buttons. To change the channel in another channel list in which the current channel list is not located, change the channel list group or select All channels option.](https://usermanual.wiki/Humax/F2-1003/User-Guide-317981-Page-32.png)
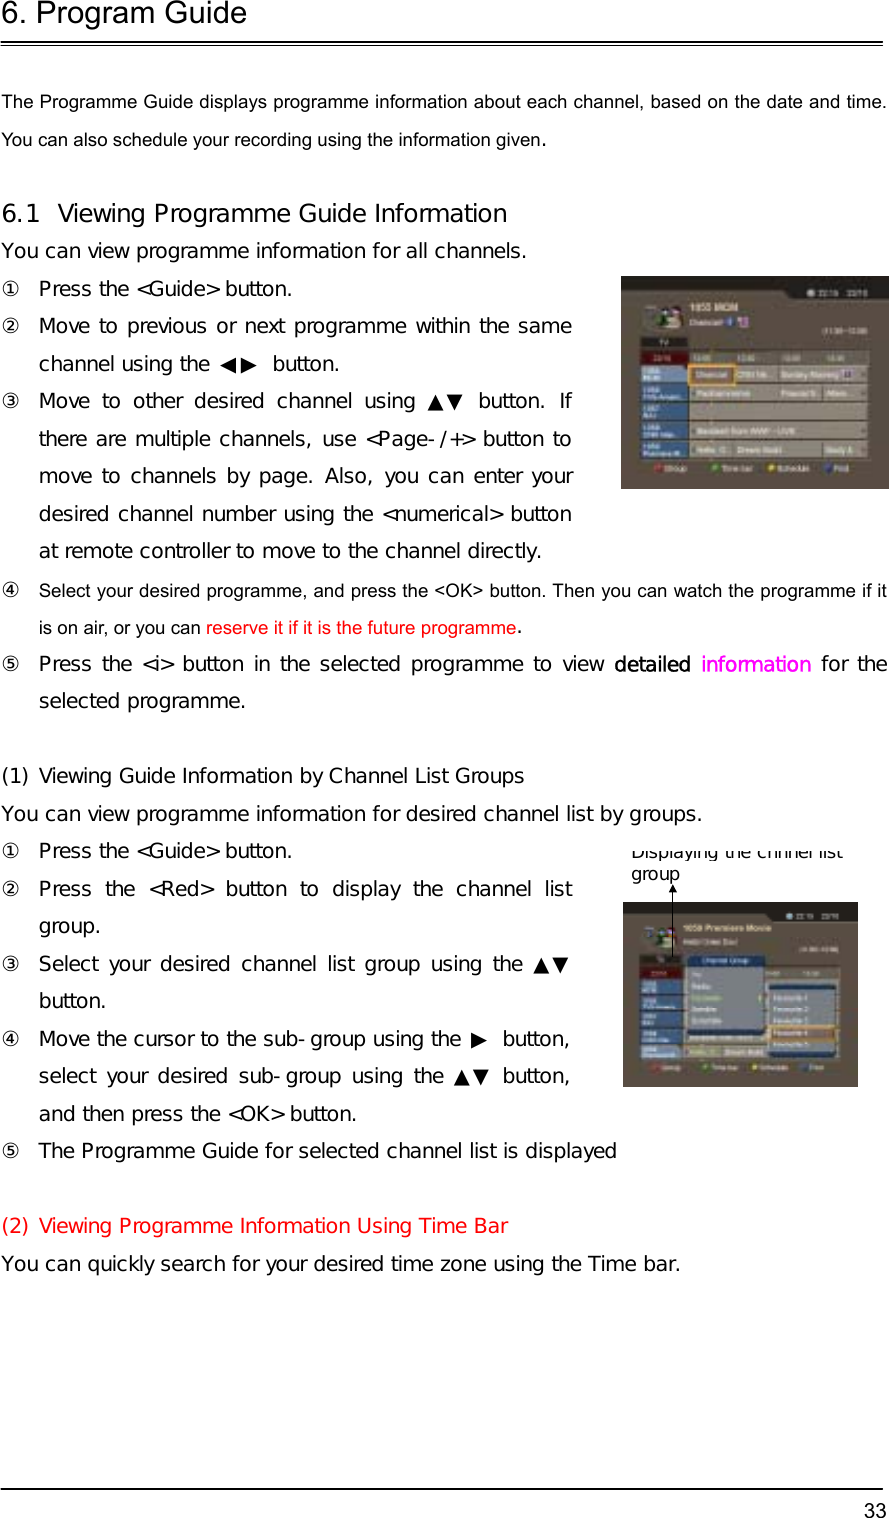
![6. Program Guide 34① Press the <Guide> button. ② Press the <Green> button to display Time Bar. ③ Select the each button using the ◀▶ button, and press the <OK> button to move as your desired amount of time. If you press the button repeatedly, the same operation is repeated. ④ Each button functions as follows. Now Moves to the current programme where the cursor is located. ◀ Moves to the previous programme or 30 minutes before. ▶ Moves to the next programme or 30 minutes after. Moves to 2 hours before. Moves to 2 hours after. ◀Day Moves to one day before. Day▶ Moves to one day after. ⑤ Select “” and press the <OK> button to exit the Time Bar. [Note] Guide provides programme information from the previous day to the next 7 days. (3) Reserving a Recording You can automatically reserve your desired programme by selecting the scheduled programme and pressing the <OK> button. ① Select the desired programme and press the <OK> button. The following message will be displayed. ② Select Yes and press the <OK> button to reserve the programme. When reservation has been completed, the “그림(예약)” is displayed on the reserved programme. ③ Select No and press the <OK> button not to reserve the programme. ④ If the channel is locked, parental controlled or restricted by watching time, you will be prompted to enter your Password. Enter your Password to complete the reservation. 6.2 Finding a Programme You can find your desired programme by programme name or genre easily. ① Press the <Guide> button. ② Press the <Blue> button to display Find screen.](https://usermanual.wiki/Humax/F2-1003/User-Guide-317981-Page-34.png)
![6. Program Guide 35③ Enter the programme name directly using the keyboard displayed on the screen. [Note] If you select Previous or Next on the Keyboard displayed on the screen and press <ok>button, the keyboard layout is switched. ④ When completing entering programme name, select the Find, and press the <OK> button. ⑤ Select By Genre and press the <OK> button to search programme by genre. ⑥ Select your desired genre and press the <OK> button. ⑦ If you select your desired programme from the Found Programme List screen and press the <OK> button, you can watch the programme if it is on air, or you can reserve your recording if it is the future programme.](https://usermanual.wiki/Humax/F2-1003/User-Guide-317981-Page-35.png)
![6. Program Guide 36[Note] The Found Programme List may differ depending on the provided programme information. 6.3 Viewing Reserved Programme You can add or edit watching-reserved programme by schedule screen. ① Press the <Guide> button. ② Press the <Yellow> button to display the Schedule screen. ③ Select the reserved programme and press the <OK> button to edit the reservation information. ④ Select a blank list and press the <OK> button to add a new watching schedule. (1) Editing Reserved Programme ① Change the reserved Start Time using the ◀▶ button and the <Numerical> button. ② Change the reserved End Time using the ◀▶ button and the <Numerical> button. ③ Change the Repeat mode using the ◀▶ button. The options are Once, Daily, and Weekly. ④ Change the Lock mode using the ◀▶ button. ⑤ Select the Delete and press the <OK> button to delete the reserved programme. ⑥ Select the Cancel and press the <OK> button to cancel the editing. ⑦ Select the Save and press the <OK> button to complete the editing. [Note] Lock mode is displayed only for the product with hard disk drive. (2) Adding Reservation ① Enter your desired channel number using the <Numerical> button. The channel name is automatically displayed by channel number. ② Enter your desired Start Time using the ◀▶ button and the <Numerical> button. ③ Enter your desired End Time using the ◀▶ button](https://usermanual.wiki/Humax/F2-1003/User-Guide-317981-Page-36.png)
![6. Program Guide 37and the <Numerical> button. ④ Select one of Repeat mode options among Once, Daily, and Weekly using the ◀▶ button. ⑤ Select Lock mode using the ◀▶ button. ⑥ Select the Save and press the <OK> button to complete entering. ⑦ Select the Cancel and press the <OK> button to cancel the reservation. ⑧ If the channel is locked, restricted by watching time, you will be prompted to enter your Password to complete the reservation. [Note] 1. Lock mode is displayed only for the product with hard disk drive. 2. You can reserve up to 20 programmes. 3. If your desired programmed is already reserved programme, adjust the reservation appropriately.](https://usermanual.wiki/Humax/F2-1003/User-Guide-317981-Page-37.png)
![7. Setting Preferences 38You can set censorship, watching time, and all other items suitable for your environment. [Note] 1. Press the <BACK> or <Left> button to save the changes and return to the previous menu. Press the <MENU> or <EXIT> button to exit the Menu screen. 2. You can easily select all menu items using the assigned numerical button for each menu. 7.1 Parental Control You can set parental control for each programme and watching time. You can also change your password. ① Press the <Menu> button. ② Select the Preferences using the ▲▼ button, and press the <OK> or <Right>button. ③ Select the Parental Control using the ▲▼ button, and press the <OK> or <Right>button. ④ When prompting message is displayed to ask Password, enter the Password using the <numerical> button. (1) Setting Censorship Censorship Classification allows you to block programmes according to the age level you have set. ① Select the Censorship Classification using the ▲▼ button, and press the <OK> or <▶>button. ② Select your desired Age Level using the ▲▼ button, and press the <OK> button](https://usermanual.wiki/Humax/F2-1003/User-Guide-317981-Page-38.png)
![7. Setting Preferences 39View All :All programmes can be watched because there is no age limitation. 7 :Programmes are blocked under the age of 7. 12 :Programmes are blocked under the age of 12. 15 :Programmes are blocked under the age of 15. 18 :Programmes are blocked under the age of 18. Lock All :All Programmes are blocked without considering the age level. [Note] You have to enter Password to watch the programme which is blocked by the age level. (2) Setting Allow Watch Time You can block programmes according to the watching time for all the channels. ① Select the Allow Time Control using the ▲▼ button. ② Select Enable or Disable the Allow Time Control using the <OK> or <▶> button. Disable You can watch whenever you want regardless of Allow Time Enable You can watch only while the time specified by Allow Time. ③ When you have selected Enable, set the Start and End Time using the Numerical buttons, and select OK and press the <OK> button ④ If you wish to cancel the entered time, select Cancel, and press the <OK> button. [Note] Once the setting has been completed, you can watch programme only while the time specified by Allow Time. Or you should enter the Password to watch any programme during unspecified time. (3) Change Password You can change the current password into new one.](https://usermanual.wiki/Humax/F2-1003/User-Guide-317981-Page-39.png)
![7. Setting Preferences 40① Select Change Password using the ▲▼ button, and press the <OK> or <X> button. ② Enter New Password using the <Numerical> button, and select OK and press <OK> button. ③ Enter the New Password again to confirm the Verify Password, and select OK and press the <OK> button. [Note] The Default Password is "0000". If you have forgotten your Password, please contact your local product distributor. 7.2 Language Setting You can set Language for Menu, Audio, and Subtitle. ① Press the <MENU> button. ② Select Preferences using the ▲▼ button, and press the <OK> or <▶> button. ③ Select Language Setting using the ▲▼ button, and press the <OK> or <▶> button. (1) Menu/Audio/Subtitle Language You can set the language for Menu, Audio and Subtitle. Default language is English. ① Select Menu/Audio/Subtitle Language using the ▲▼ button. ② Press the <OK> or <X> button to display the available Language List. ③ Select your desired language using the ▲▼ button, and press the <OK> button. (2) Audio Priority This receiver doesn’t provide this function. (3) Subtitle Display You can select whether or not to display the Subtitle automatically if provided. ① Select Subtitle Display using the ▲▼ button. ② Select your desired option using the <OK> or <▶> button. Auto Subtitles are displayed automatically in the predefined subtitle language.Manual Subtitles are displayed in the language when you select the subtitle language by pressing the <Subtitle> button at remote controller.](https://usermanual.wiki/Humax/F2-1003/User-Guide-317981-Page-40.png)
![7. Setting Preferences 41 (4) Subtitle Font You can select the Subtitle font. ① Select Subtitle Font using the ▲▼ button. ② Select your desired option using the <OK> or <▶> button. Variable Uses the horizontally variable Subtitle Font. Fixed Uses the fixed Subtitle Font. 7.3 Time Setting You can specify the current time and Power On/Off time. ① Press the <MENU> button. ② Select Preferences using the ▲▼ button, and press the <OK> or <▶> button. ③ Select Time Setting using the ▲▼ button, and press the <OK> or <▶> button. (1) Setting Current Time You can set the GMT Offset for current time. ① Select GMT Offset using the ▲▼ button. ② Press the <OK> or <X> button to display GMT list. GMT is changed by from 30 minutes to 1 hour. ③ Select your GMT offset using the ▲▼ buttons, and press the <OK> button. [Note] The current time is set automatically whenever GMT Offset changes. (2) Power On Control You can set the time when the product is automatically powered on. ① Select Power On Control using the ▲▼ button. ② Select either Enable or Disable the Power On Control using the <right> or <OK> button. Enable Uses the Power On Control and sets the Power on time.](https://usermanual.wiki/Humax/F2-1003/User-Guide-317981-Page-41.png)
![7. Setting Preferences 42Disable Not uses the Power On Control. ③ When you have seleted Enable, enter the Channel No and Time using the <Numerical> buttons, and select OK and press the <OK> button. (3) Power Off Control You can set the time when the product is automatically powered off. ① Select Power Off Control using the ▲▼ button. ② Select either Enable or Disable the Power Off Control using the <OK> or <▶>button.. Enable Uses the Power Off Control and sets the Power Off time. Disable Not uses the Power Off Control. ③ When you have selected Enable, enter the Time using the <Numerical> buttons, and select OK and press the <OK> button. [Note] Once Power On/Off Control is specified, it is repeated everyday. 7.4 Schedule You can reserve a programme to watch programme at your desired time. ① Press the <menu> button. ② Select Preferences using the ▲▼ button, and press the <OK> or <▶> button. ③ Select Schedule using the ▲▼ button, and press the <OK> or <▶> button. ④ Reserved Pregoramme List is displayed on the screen. To edit the existing reservation, select your desired reservation, and press the <OK> button. To add a new reservation, select a blank list and press the <OK> button. [Note] 1. For detailed information about how to edit or add a reservation, refer to Chapter 6 Programm Guide. 2. This menu is enabled only for the product without hard disk drive.](https://usermanual.wiki/Humax/F2-1003/User-Guide-317981-Page-42.png)
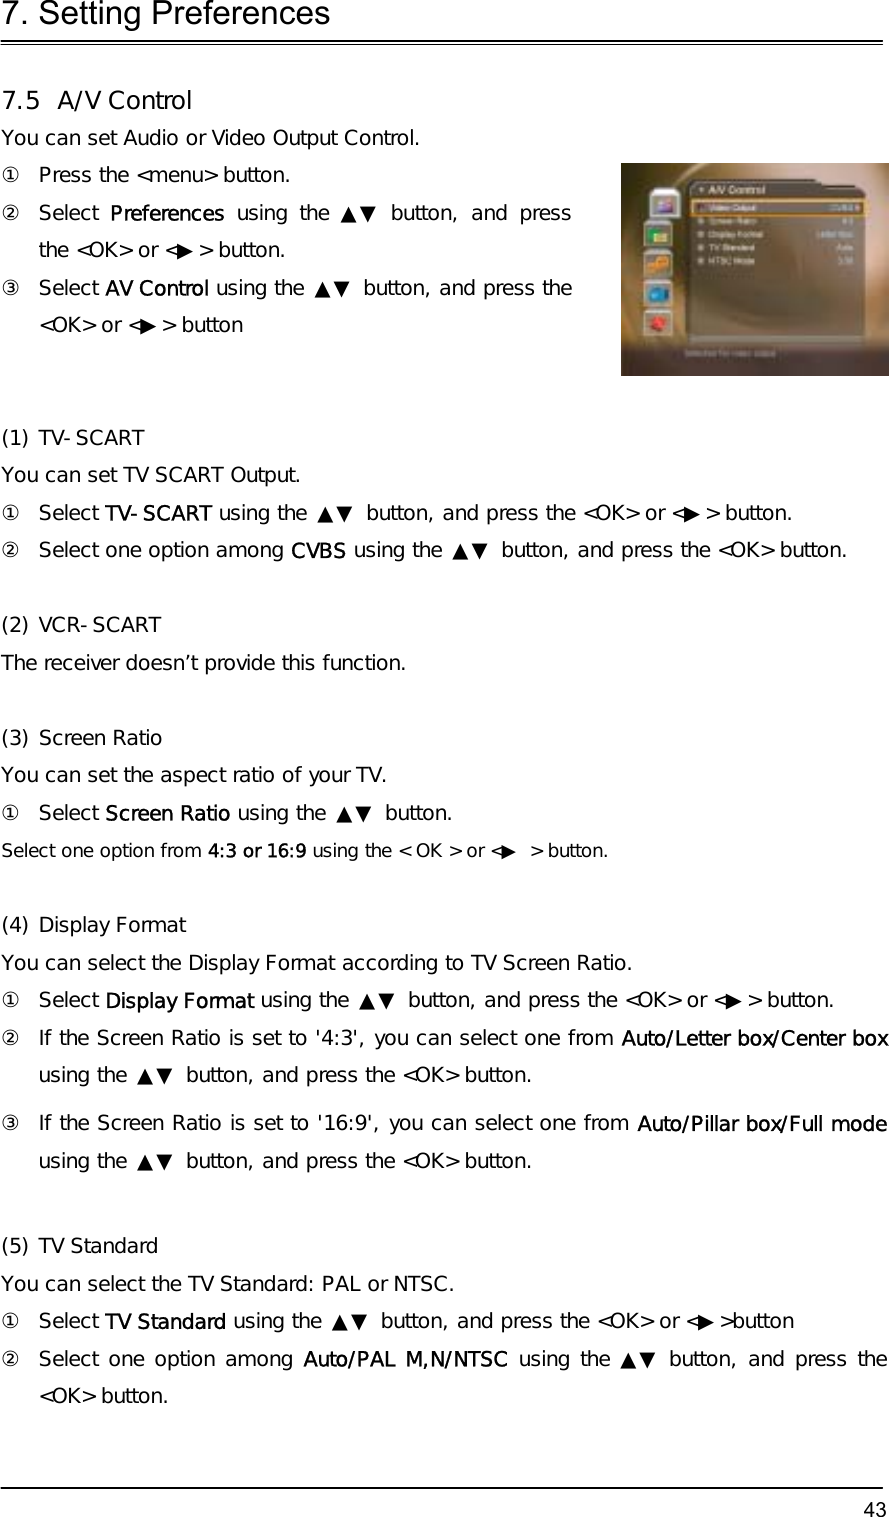

![7. Setting Preferences 457.7 Miscellaneous ① Press the <MENU> button. ② Select Preferences using the ▲▼ button, and press the <OK> or <▶>button. ③ Select Miscellaneous using the ▲▼ button, and press the <OK> or <▶>button. (1) i-Plate Display Time You can set the duration during which the Information box is to be automatically displayed when you switch the channel. ① Select i-Plate Display Time using the ▲▼ button, and press the <OK> or <▶>button. ② Select a value between 0 ~ 20 seconds using the ▲▼ button, and press the <OK> button. [Note] When it is set to '0', the i-Plate will not be displayed when you switch the channel. (2) OSD Transparency You can set the transparency of On Screen Display. ① Select OSD Transparency using the ▲▼ button, and press the <OK> or <▶>button. ② Select one option among Disable/25/50/75 using the ▲▼ button, and press the <OK> button. Disable Fully opaque screen 25, 50, 75 As the number is bigger, the screen is more transparent. (3) Option in Channel List This receiver doesn’t provide this function.](https://usermanual.wiki/Humax/F2-1003/User-Guide-317981-Page-45.png)
![8. Installation 46This chapter describes how to search for channels and a series of procedures. 8.1 Antenna Setting You can set Antenna and LNB Information for channel search. If antenna is not correctly set, you cannot search channel, therefore, you cannot watch a programme, either. ① Press the <MENU> button. ② Select Installation using the ▲▼ button, and press the <OK> or <▶>button. ③ Password is required to use Installation Menu. Enter Password to directly move to Installation Menu. ④ Select Antenna Setting using the ▲▼ button, and press the <OK> or <▶>button to enter Antenna Setting. [Note] If no satellite is registered from Antenna Setting menu, Channel Search such as Automatic Search, Manual Search, Multiple Manual Search, Advanced Search is not available. Satellite You can select satellite for Channel Search. ① Select Satellite using the ▲▼ button, and press the <OK> or <▶>button ② Select the satellite that is the antenna heads for from the alphabetically sorted satellite list using the ▲▼button, and press the <OK> button. ③ If no desired satellite exists in the list, select User Define Satellite item. When you are prompted to select whether or not to edit User Define Satellite, select Yes, and press the <OK> to display keyboard to edit the Name. Enter Satellite Name directly, select OK, and press the <OK> button.](https://usermanual.wiki/Humax/F2-1003/User-Guide-317981-Page-46.png)
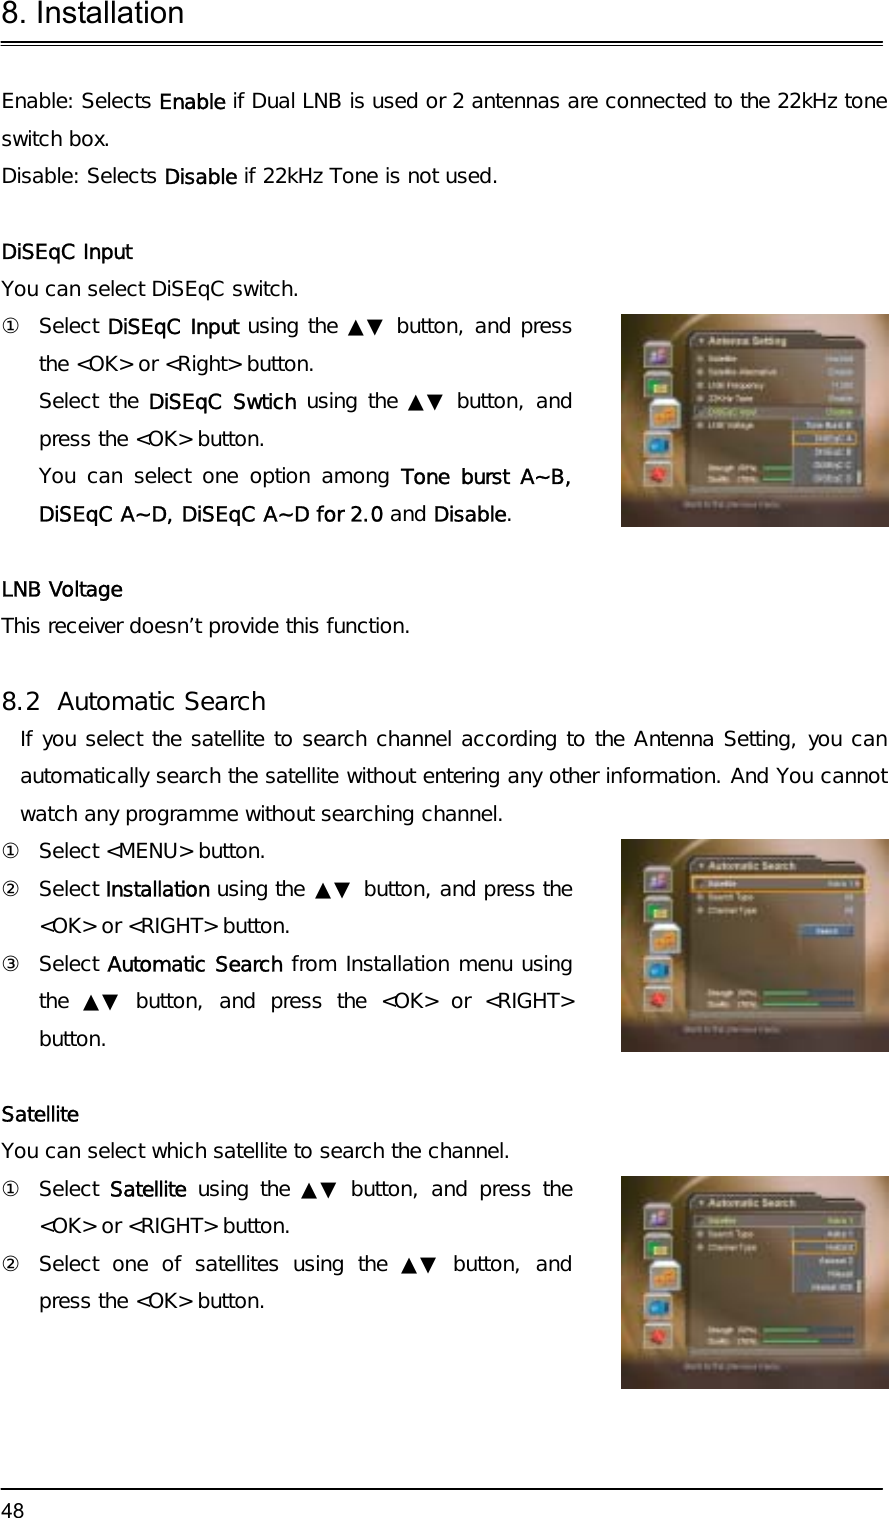
![8. Installation 47 Satellite Alternative You can search and watch a programme by using the antenna headed for the selected satellite. ① Select Satellite Alternative using the ▲▼ button, and press the <OK> or <Right> button. ② Then, you can change into one of the following options. Disable Does not search the selected satellite. Enable Searches the selected satellite. [Note] If there is no satellite that Satellite Alternative is set to Enable, Channel Search is not available. LNB Frequency (MHz) You can enter LNB Frequency. ① Select LNB Frequency using the ▲▼ button, and press the <OK> or <Right>button. ② Select one value from Universal ,9750,10600, 5150, 11475, User Define using the ▲▼ button. If you have selected User Define, enter LNB Frequency value directly, and press the <Ok >button. [Note] If you have selected Universal, select 9750/10600. In this case, the 22kHz tone value is disabled. 22kHz Tone You can select whether or not to use 22kHz Tone. ① Select 22kHz Tone using the ▲▼ button. ② Select whether or not to use 22kHz Tone using the <OK> or <▶> button.](https://usermanual.wiki/Humax/F2-1003/User-Guide-317981-Page-47.png)
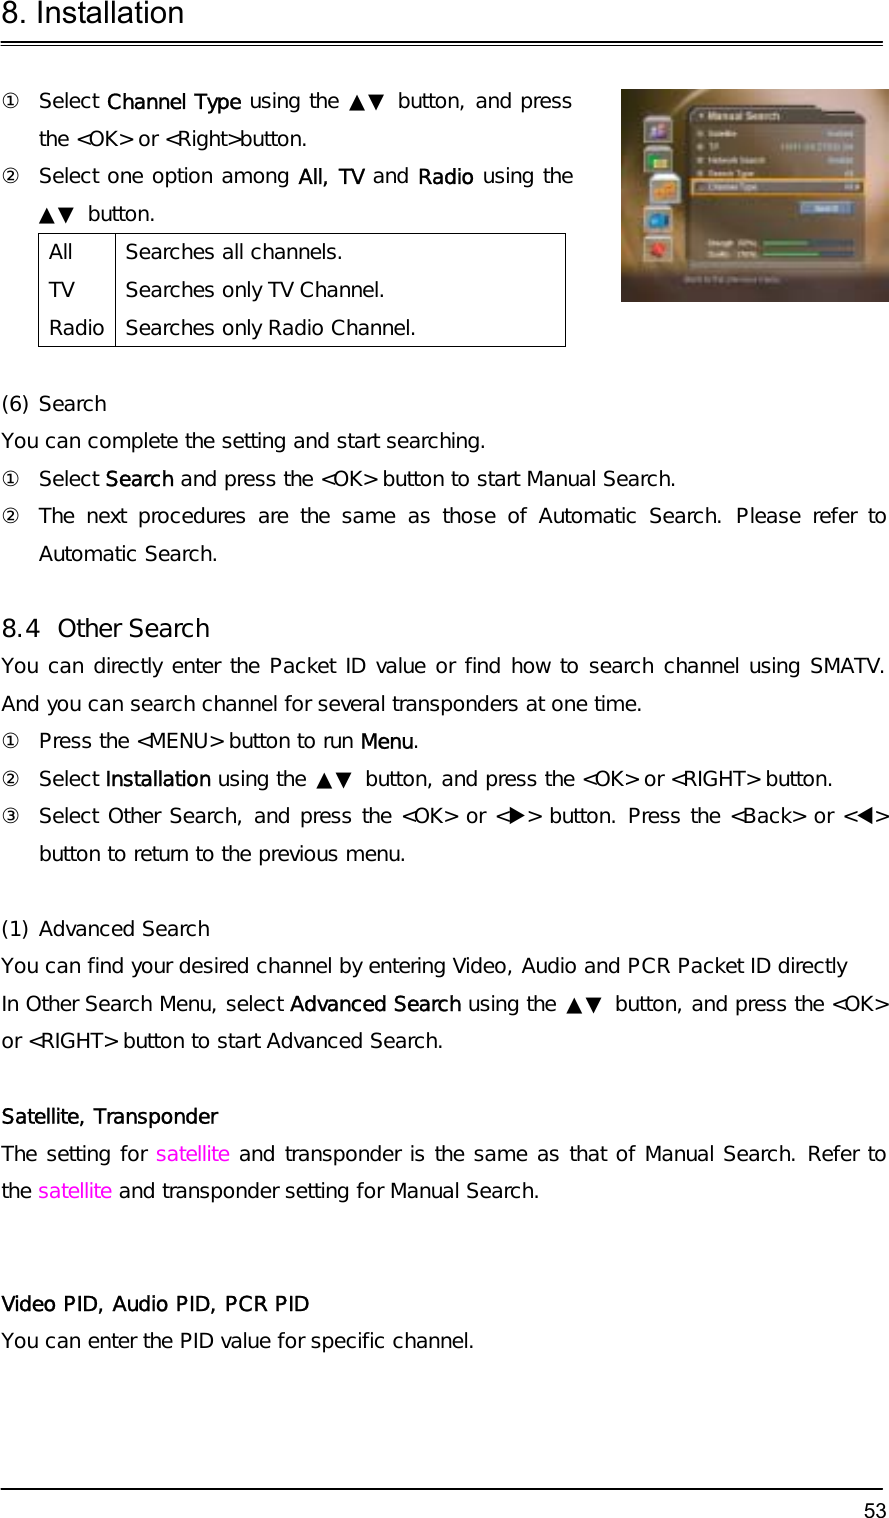
![8. Installation 49[Note] Channel Search is performed only for the satellites that have been set to Enable in Antenna Setting-Satellite Alternative menu. If you wish to search channels for satellites, which is not listed on the Satellite List of Automatic Search, move to Antenna Setting and set the Satellite Alternative item as Enable. Scrambled Type You can set scrambled type to search by free channel. ① Select Scrambled Type using the ▲▼ button, and press the <OK> or <Right> button. ② Select All or Free using the ▲▼ button, and press the <OK> button. All Searches all channels. Free Searches only free channels. Channel Type You can search by TV or Radio channel. ① Select Channel Type using the ▲▼ button, and press the <OK> or <RIGHT> button. ② Select one option among All, TV and Radio using the▲▼ button. All Searches all channels. TV Searches only TV Channel. Radio Searches only Radio Channel. Search You can complete the setting and start searching.](https://usermanual.wiki/Humax/F2-1003/User-Guide-317981-Page-49.png)
![8. Installation 50① Select Search, and press the <OK> button to start Automatic Search. ② During operating search, the cursor is located at Stop. Therefore, if you press the <OK> button during searching, the operation is stop and the channels found until then will be displayed. ③ Even if search operation is completed, and the channel does not exist, press the <OK> button and try to reset the search operation again if necessary. ④ You can delete unnecessary channels from the searched channels. Select your desired channels to delete and press the <OK> button. Then select Delete and press the <OK> button. To delete all channels, select Select All to select all channels, select Delete, and press the <OK> button. ⑤ When completing Channel Search and deleting unnecessary channels, select Save to save the changes. 8.3 Manual Search You can search channels of the selected satellites by transponders if you know the Transponder information. (1) Satellite Selects a satellite to search from the satellites set in Antenna setting. ① Select Satellite using the ▲▼ button, and press the <OK> or <Right> button. ② Select one of the Satellite names to search channel using the ▲▼ button, press the <OK> button. [Note] If the satellite scheduled to search channel is not exist in the Satellite list, move to Antenna Setting menu, set Antenna for the Satellite, and then try again. (2) Transponder Sets transponder value for the satellite.](https://usermanual.wiki/Humax/F2-1003/User-Guide-317981-Page-50.png)
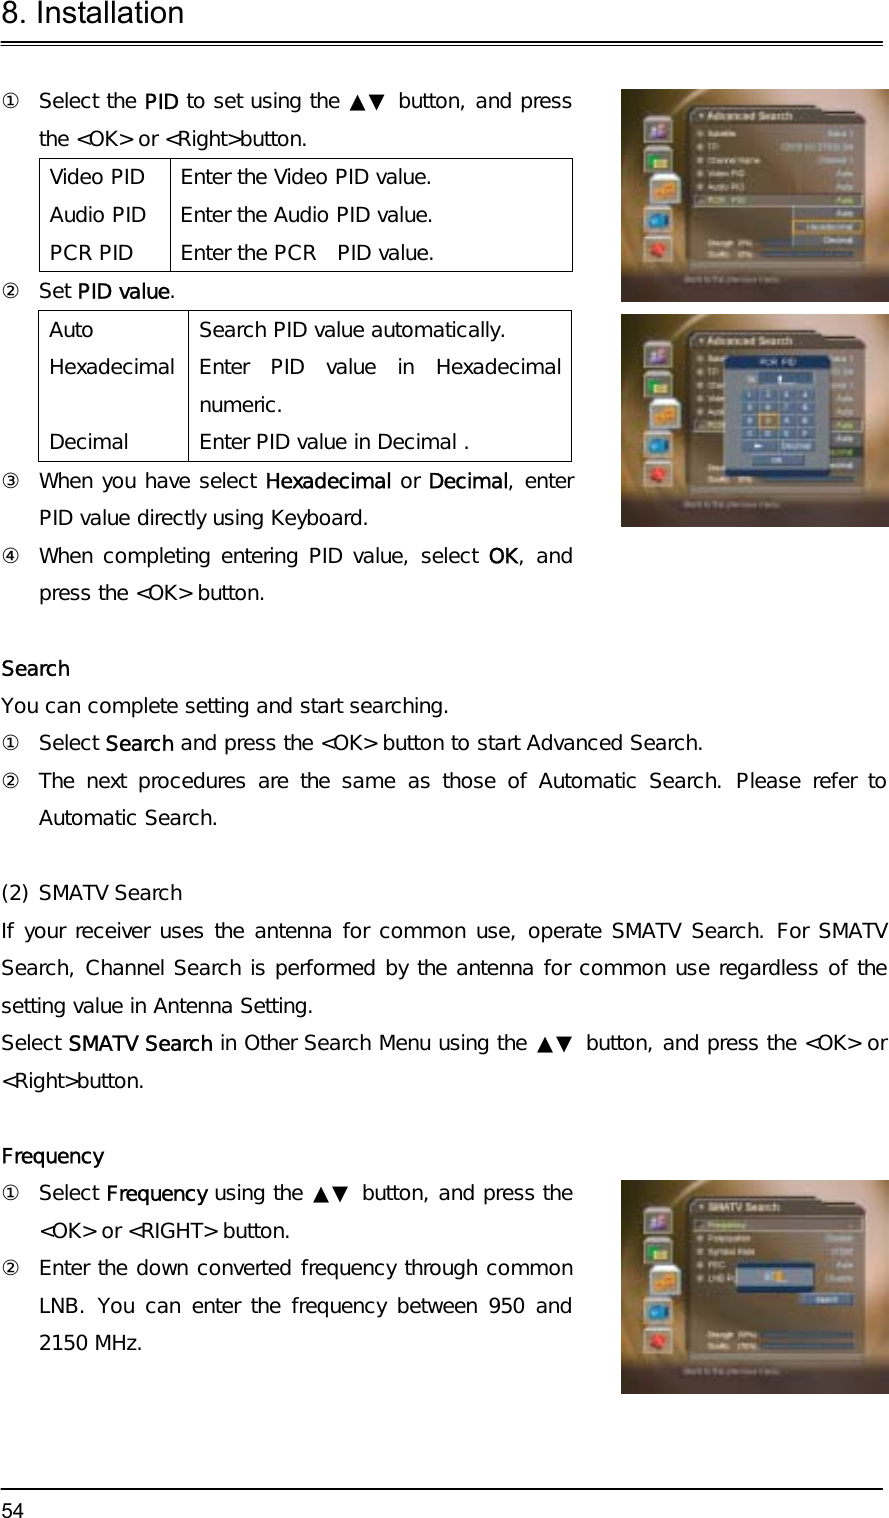
![8. Installation 51① Select TP using the ▲▼ button and press the <OK> or <Right> button. ② Select one value from the transponder value using the ▲▼ button, and press the <OK> button. ③ If you cannot find your desired Transponder information form the Transponder List, select User Define, and press the <OK> button to change the Transponder information as follows. 1 Enter Transponder frequency using the <Numerical> button. 2 Select Polarisation and press the <OK> or <RIGHT> button to select one option among Auto/Horizontal/Vertical. [Note] Horizontal outputs 18V, and Vertical outputs 13V through LNB line. 3 Select Symbol Rate(ks/s) and press the <OK> or <RIGHT> button to select one Symbol Rate value from 27500/26000/ 22000. If your desired value does not exist, select User Define to enter Symbol Rate value directly using the <Numerical> button. 4 Select FEC (Forward Error Correction) option and press the <OK> or <RIGHT> button to select one option among Auto, 1/2, 2/3, 3/4, 5/6, and 7/8. 5 When completing entering Transponder information, select Done and press the <OK> button to finish entering User Define Transponder value.](https://usermanual.wiki/Humax/F2-1003/User-Guide-317981-Page-51.png)
![8. Installation 52 [Note] 1. For channel transponder information, you can find your desired information from Satellite channel magazine, Satellite channel related home pages, news release and home page of broadcasting company, etc. 2. If you have correctly completed setting the Transponder information, Strength bar and Quality bar should represent as High. If the Level is close to 0, please try to reset. (3) Network Search If your desired transponder provides the information of other transponder, you can determine whether or not to search the channel for other transponder. ① Select Network Search using the ▲▼ button. ② Select either Enable or Disable using the <OK> or <▶> button. Select Enable to run Network Search. (4) Scrambled Type You can determine whether or not to search channel by free. ① Select Search Type using the ▲▼ button, and press the <OK>or <Right>button. ② Select one option among All or Free using the ▲▼button, and press the <OK> button. All Searches all types of channel. Free Searches only Free Channel. (5) Channel Type You can search by TV or Radio Channel.](https://usermanual.wiki/Humax/F2-1003/User-Guide-317981-Page-52.png)
![8. Installation 55Polarisation ① Select Polarisation using the ▲▼ button, and press the <OK> or <RIGHT> button. ② Select one from Disable/Auto/Horizontal/Vertical and press the <OK> button. [Note] Horizontal outputs 18V, and Vertical outputs 13V through LNB line. Select Disable when LNB Power is not necessary. Symbol Rate ① Select Symbol Rate using the ▲▼ button, and press the <OK> or <RIGHT> button. ② Select the symbol rate of the transponder. If the rate does not exist in the list, select User Define and enter the value directly. FEC ① Select FEC using the ▲▼ button, and press the <OK> or <RIGHT> button. ② Select one option among Auto,1/2,2/3,3/4,5/6,7/8, and press the <OK> button. Search You can complete setting and start searching. ① Select Search and press the <Ok>button to start SMATV Search. ② The next procedures are the same as those of Automatic Search. Please refer to Automatic Search. (3) Multiple Manual Search](https://usermanual.wiki/Humax/F2-1003/User-Guide-317981-Page-55.png)
![8. Installation 56If you wish to search multiple transponder at the same time, you can run Multiple Manual Search. This function is useful when repeating Manual Search. ① Select Multiple Manual Search from Other Search Menu using the ▲▼ button, press the <OK> or <Right> button to enable the Multiple Manual Search. ② Select one option among Satellite, Edit TP List, Scrambled Type, Channel Type using the ▲▼ button, and press the <OK> or <Right> button. ③ Set the selected item. [Note] Settings for Satellite, Scrambled Type, and Channel Type is the same as those of Manual Search. Refer to Manual Search. Edit TP List You can edit TP list to search at a time and change the setting for Transponder. ① Select Edit TP List from Multiple Manual Search, and press the <OK> or <RIGHT>button. ② Select Add and press the <OK> button to add a new Transponder data. ③ Select a specific transponder from the transponder list, press the <OK> button, select Edit, and then press the <OK> button to edit Transponder data. ④ Select a specific transponder from the transponder list, press the <OK> button, select Delete, and then press the <OK> button to delete Transponder data. You can select multiple transponders to delete. ⑤ When completing configuring transponder list, select Save and press the <OK> button to save the result and exit. [Note] When you select Default List and press <ok>, default transponder list is displayed. 8.5 Motor Antenna If you use Motor Antenna, which is operated by motor, you should set the antenna as Motor before Channel Search.](https://usermanual.wiki/Humax/F2-1003/User-Guide-317981-Page-56.png)
![8. Installation 58⑥ Set My Latitude. 1 Select My Latitude using the ▲▼ button, and press the <OK> or <RIGHT> button. 2 Enter Latitude value using the <Numerical> button 3 Set North/South using the <RIGHT>/<LEFT> button 4 When completing setting, press the <OK> button. (2) Edit Satellite Data You can set the position of the Satellite, which the Motor Antenna heads for, and decide whether or not to use the satellite. ① Select Edit Satellite Data from Motor Antenna Menu using the ▲▼ button. ② Move to Edit Satellite Data by pressing the <OK> button. ③ Select Satellite using the ▲▼ button, and press the <OK> button. ④ Select a satellite to edit, and press the <OK> button. ⑤ Select Satellite Alternative using the ▲▼ button and press the <OK> button to decide whether or not to use the selected Satellite. Enable Channel Search is available. Disable Currently selected Satellite is regarded as out of existence. Channel Search is unavailable. ⑥ Select Satellite Longitude using the ▲▼ button, and press the <OK> button. ⑦ Enter the Longitude value for Satellite using the <Numerical> button. Change East/West value using the <RIGHT>/<LEFT> button. [Note] Satellite Longitude item is able to edit only for User Define Satellite (3) Motor Setting You can set Motor Antenna for Channel Search and watching.](https://usermanual.wiki/Humax/F2-1003/User-Guide-317981-Page-58.png)
![8. Installation 59① Select Motor Setting from Motor Antenna using the ▲▼ button, and press the <OK> or <RIGHT> button. ② Select Satellite. 1 Select Satellite using the ▲▼ button, and press the <OK> or <RIGHT> button. 2 Select the satellite which the Antenna heads for. 3 Press the <OK> button. ③ Select transponder using the ▲▼ button, and press the <OK> or <RIGHT> button. ④ Set Motor Driving. 1 Select Motor Driving using the ▲▼ button, and press the <OK> or <RIGHT> button. 2 Select Motor Driving Type, and press the <OK> button. :. Continuous Motor moves continuously Step Motor moves by specified unit. Time Motor moves during specified time. 3 Adjust Driving Size using the <RIGHT>/<LEFT> button in case of Step or Time. Step by Impulse Time by Second 4 Select [OK], and press the <OK> button. ⑤ Move the Antenna to the position of the selected Satellite. 1 Select Go to Stored Position using the ▲▼ button. 2 Press the <OK> button to move Antenna to the position of the Satellite. Please wait during the Antenna is moving.](https://usermanual.wiki/Humax/F2-1003/User-Guide-317981-Page-59.png)
![8. Installation 60⑥ Confirm Signal Strength and Quality Level and fine-tune the Antenna direction. 1 Select Go to Stored Position using the ▲▼ button. 2 Move the Antenna to East/West by pressing <RIGHT>/<LEFT> button. Adjust Signal Level to maximum/ ⑦ Save the adjusted position of Satellite. 1 Select Store Current Position using the ▲▼ button. 2 Press the <OK> button to save the Antenna position headed for the selected Satellite. ⑧ You can set antenna position by satellite by repeating the above procedure. ⑨ You can recalculate positions for all other satellite based on one satellite. Adjust position of antenna by satellite based on one set position without setting each position of antenna by satellite. 1 Select Recalculation using the ▲▼ button. 2 Press the <OK> button. 3 To adjust all positions again, select Yes and press the <OK> button. [Note] You cannot perform ~ steps in case of USALS Motor (4) Installer Menu You can set default setting and operation limit for Motor Antenna. ① Select Installer Menu from Motor Antenna Menu using the ▲▼ button. ② Press the <OK> button to move to Installer Menu. Motor Limit Setting You can set the maximum Motor Limit both East and West to prevent damage to the antenna.](https://usermanual.wiki/Humax/F2-1003/User-Guide-317981-Page-60.png)
![8. Installation 61① Select Motor Limit using the ▲▼ button. ② Set Motor Limit to Disable by pressing the <OK> or <RIGHT> button. Enable Motor Limit is already set. Motor does not move more than the amount of limit. Disable Motor Limit is disabled. Setting is released. [Note] When newly setting Motor Limit, set the value to Disable. ③ Select Limit Position using the ▲▼ button. ④ Select the Direction of Limit by pressing the <OK> or <RIGHT> button. East Motor sets East limit to move. West Motor sets West limit to move. ⑤ Select Set Limit using the ▲▼ button. ⑥ Move antenna to the limit position to set using <RIGHT> or<LEFT> button. ⑦ Press the <OK> button to set limit. ⑧ If limit is set, Motor Limit option is automatically changed into Enable. Reset Position You can restore the position saved at Motor Antenna to the default setting. ① Select Reset Positions using the ▲▼ button. ② Press the <OK> button. ③ Select Yes and press the <OK> button to restore all saved value at Motor Antenna to the default setting. ④ Please wait during the Motor Antenna is restored. [Note] Motor Antenna may not be reset depending on Antenna condition. In this case, please repeat the](https://usermanual.wiki/Humax/F2-1003/User-Guide-317981-Page-61.png)
![8. Installation 62above procedure again. 8.6 Default Setting Default Setting restores the receiver to the default settings [Warning] Please note that once you perform Default Setting, all data such as Antenna Setting information Channel List, and User Configured data are deleted. To perform Factory Default: ① Press the <menu> button. ② Select Installation using the ▲▼ button, and press the<OK> or <Right> button. ③ Enter password using the <Numerical> button. ④ Select Default Setting using the ▲▼ button, press the <OK> or <Right> button. ⑤ Select Yes and press the <OK> button to restore all setting to Factory Default. Select No and press the <OK> or <Back> button to return to the previous menu. ⑥ Confirm again to start loading default setting. Enter password using the <Numerical> button to perform restoring. ⑦ When completing the default setting, press the <OK> button to automatically run the Installation Wizard. When default setting is completed, Installation Wizard is automatically displayed, which helps Channel Search. For detailed information about Installation Wizard, refer to 3. Installation Wizard.](https://usermanual.wiki/Humax/F2-1003/User-Guide-317981-Page-62.png)
![9. Software Update 63In order to maintain proper performance of this product, it is essential to have the most up-to-date software. The latest news and release of software versions may be found at the Humax website – http://www.humaxdigital.com. It is recommended that you periodically check for the availability of software update. 9.1 OTA (Over the Air) OTA, an abbreviation of "over–the-air", means that downloads the software can be downloaded where the manufacturer reserves the right to decide when and where to release through Antenna system. Over the Air(OTA) is simply an alternative method for downloading software versions. However, the manufacturer reserves the right to decide when and where this software update can take place by “beaming” latest software versions over the air via antenna systems. Note that OTA is only limited to certain geographical regions mainly due to different antennas having different footprints(area where the signal can be received). The software update via satellite system will only occur under the following circumstances. 1 The equipment should have appropriate loader software. [Caution] Please note that if you don't have normal loader software, the equipment may not be updated or work after software update. 2 The manufacturer decides to release software downloading via a designated antenna system 3 The equipment must be “tuned” properly to the same antenna that the manufacturer uses. 4 Update software when the quality of receiving signal strength is high. If the weather is not so good that the quality of receiving signal strength is not recommendable, perform the software update later. [Caution] 1. Please be careful to keep the power on and the power cord plugged in during software update. If the power is off during software update, it may cause fatal damage to the product. 2. Please be careful not to pull out the signal line (LNB Cable) during software update. Update may be interrupted and the product may not work. [Note] 1. The other functions of product cannot work at all during software update. 2. It may take 5 ~10 minutes to update software.](https://usermanual.wiki/Humax/F2-1003/User-Guide-317981-Page-63.png)
![9. Software Update 65② Automatically search for new software. ③ When detecting update software, the following result is displayed. If new software is not found by Automatic, use Manual Update. ④ Select "Yes" and press the <OK> button to start updating. Select "No" and press the <OK> button to return to the previous menu without updating. ⑤ When completing the software update, the product is automatically powered off and on again. [Note] Software Update Sites of HUMAX are listed in the following table. Satellite Transponder data Astra1 12669 (V) 22000 5/6 Sirius 12054 (V) 27500 3/4 Hispasat 11811 (H) 27500 3/4 Nilesat 11765 (H) 27500 3/4 Hotbird 11623 (V) 27500 3/4 Among the Software Update Sites of HUMAX, the software search operation is performed only for the satellites that have been set to Enable in Installation -Antenna Setting-Satellite Alternative menu and that have all other Antenna Setting correct. Manual Update You can perform Manual Update only if you know which satellite has new software and the Transponder information correctly.](https://usermanual.wiki/Humax/F2-1003/User-Guide-317981-Page-65.png)
![9. Software Update 66① Select Manual Update from Software Update screen using the ▲▼ button, and press the <ok> or <right> button. Select the the Satellite which provides update software. Satellite list contains the satellites that have been set to Enable in Installation -Antenna Setting-Satellite Alternative menu. For unlisted satellite, start with Antenna Setting. ② Enter Transponder Frequency in which updated software is provided. ③ Enter Polarisation value. ④ Select Symbol Rate value. If it is not found in the List, select User Define and enter manually. ⑤ Select FEC value. [Note] How to setting Satellite and Transponder for Manual Update Sites is the same as how to edit User Define Transponder data in Manual Search. Refer to Manual Search. ⑥ Select Search and Press the <OK> button to search software. ⑦ It is displayed whether or not New Software exist. If new software does not exist, press the <OK> button to return to the Manual Update Menu. ⑧ Select Yes and press the <OK> button to start updating. Select No and press the <OK> button to return to the previous menu. ⑨ Performs Software Update. Please wait until it is completed. ⑩ When completing the software update, the product is automatically powered off and on again.](https://usermanual.wiki/Humax/F2-1003/User-Guide-317981-Page-66.png)
![11. Games 69This product provides various games for user’s entertainment. ① Press the <Menu> button. ② Select Game using the ▲▼ button, and press the <ok> or <X> button. ③ According to the instruction displayed on screen, you can enjoy the game using <up/down/left/right> and <OK> button. [Note] 1. Game menu is available only for the product without hard disk drive. You can enjoy a game for the product with hard disk drive using the <G> button at remote controller. 2. Press the <Exit> or <BACK> button to exit the game.](https://usermanual.wiki/Humax/F2-1003/User-Guide-317981-Page-69.png)
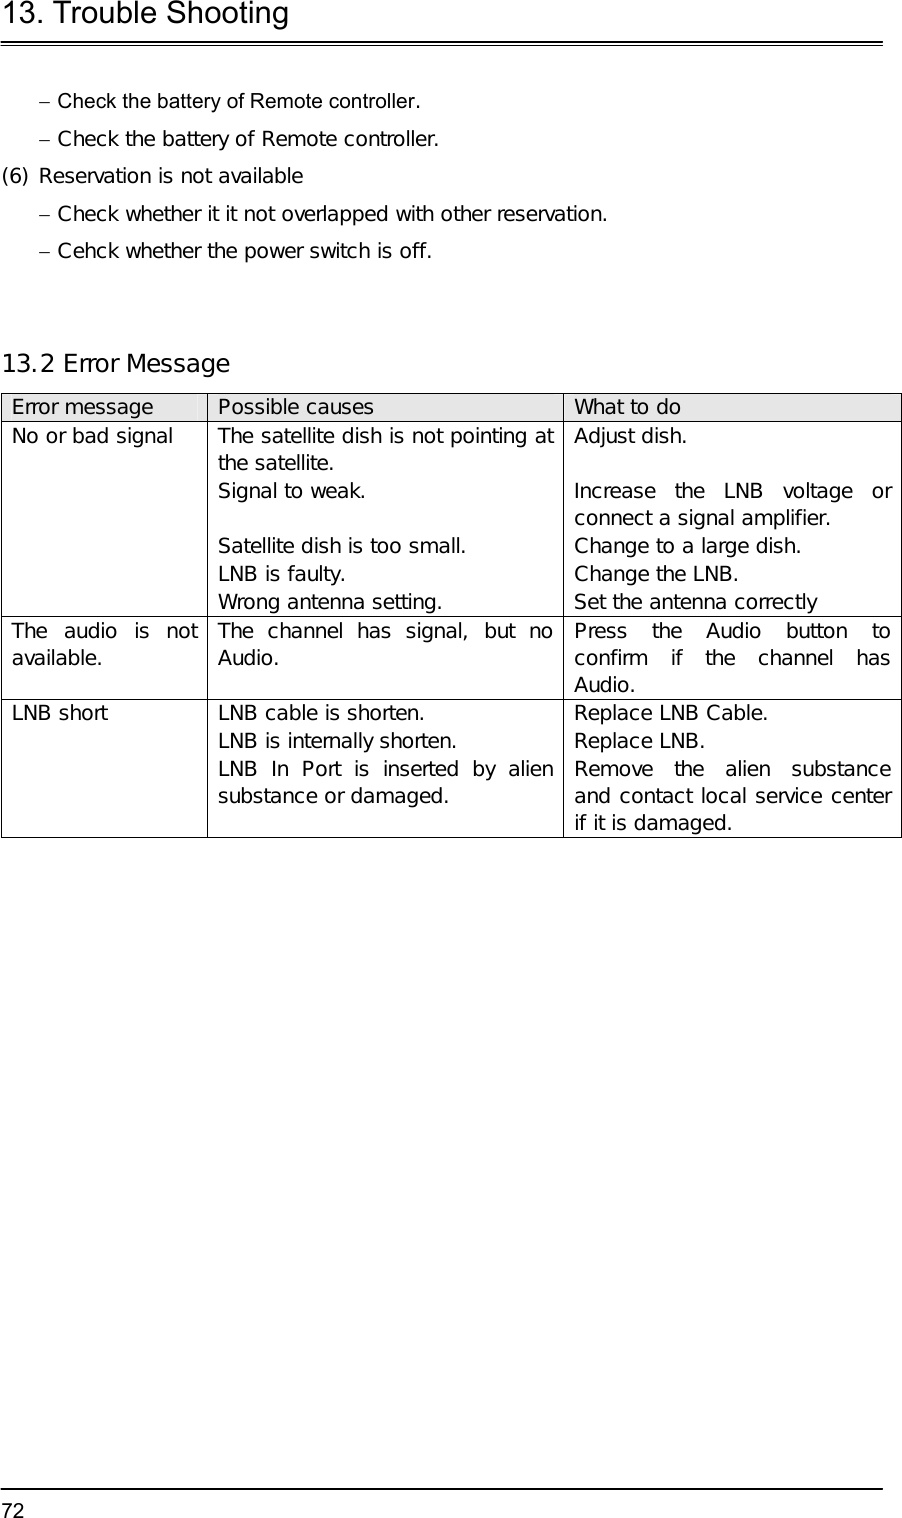
![13. Trouble Shooting 7113.1 Trouble Shooting Before contacting your local service, please make sure following instructions. If the product does not work normally after completing the following trouble shooting, please contact your local product distributor or service centre. (1) No message is displayed on the front panel or product has no power − Check the main power cable and check that it is plugged into a suitable power outlet. − Check whether the Power Switch is On. (2) No picture − Make sure that the product is in Operation Mode. − Make sure that the AV Cable is firmly connected to the TV. − Make sure that Antenna line is correctly connected to the equipment. − Make sure that Antenna Setting is correct. − Check the brightness level of TV. − Check the channel is on air. (3) Poor picture & sound quality − Install the antenna in a place where there is no obstacle. − Make sure there is no mobile phone or microwave oven near the equipment. − Use 75 Ω coaxial cable to connecting TV and antenna. − Keep the product and the antenna cable for satellite far away from each other. − Make sure the receiving level, and adjust antenna if the level is low. The receiving level cad be influenced by weather. [Note] If the CS Antenna is covered with snow or the RF is weaken by heavy rain, sound and picture may temporarily be poor. However, these poor sound and picture quality because of weather conditions cannot be not accepted as a malfunction of equipment. − Change satellite dish into bigger one if satellite dish is small. − Replace LNB with the one with low nise factor if the noise factor is high. − Replace LNB with new one if it is damaged or out of order. (4) No or poor sound − Check the volume level of the TV and Receiver. − Check the Mute status of the TV and product. − Press the Audio button to change the Sound Track type. (5) Remote controller does not operate − To control the equipment with the remote controller, the remote controller's top end should directly point towards the receiving part of receiver's remote controller.](https://usermanual.wiki/Humax/F2-1003/User-Guide-317981-Page-71.png)