Humax HAMT4002 Car Audio User Manual
Humax Automotive Co., Ltd. Car Audio
UserManual.wiki
>
Humax
>
HAMT4002 User Manual
User Manual
Navigation menu
Upload a User Manual
Namespaces
Wiki Guide
HTML
PDF
Info
Views
User Manual
Discussion / Help
Navigation

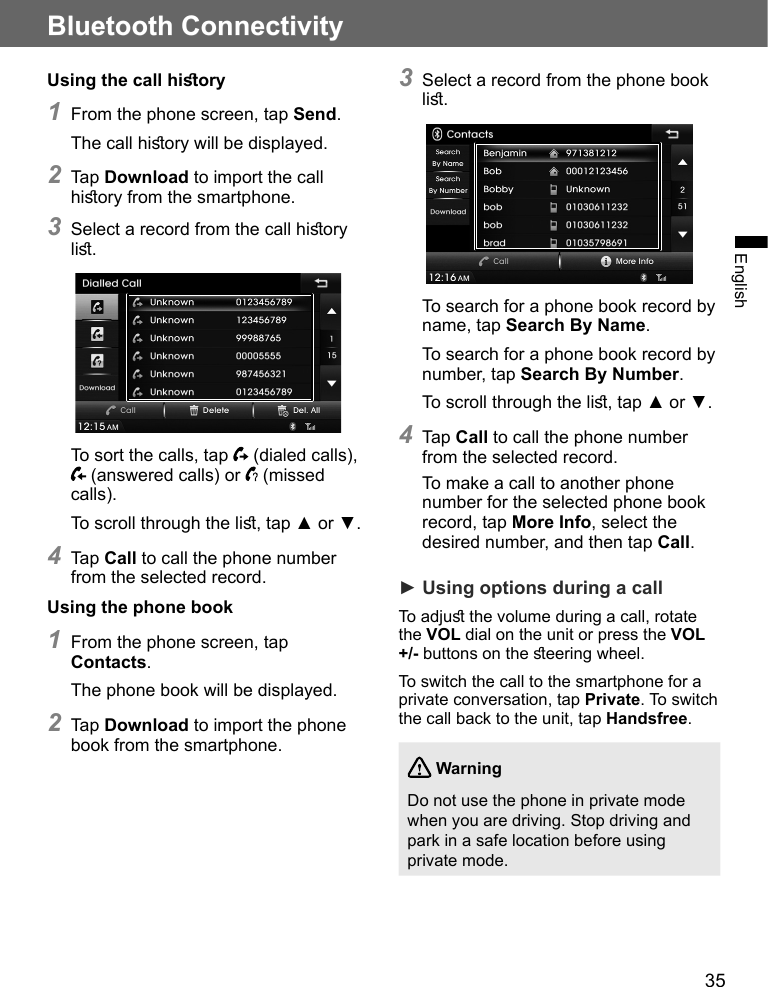
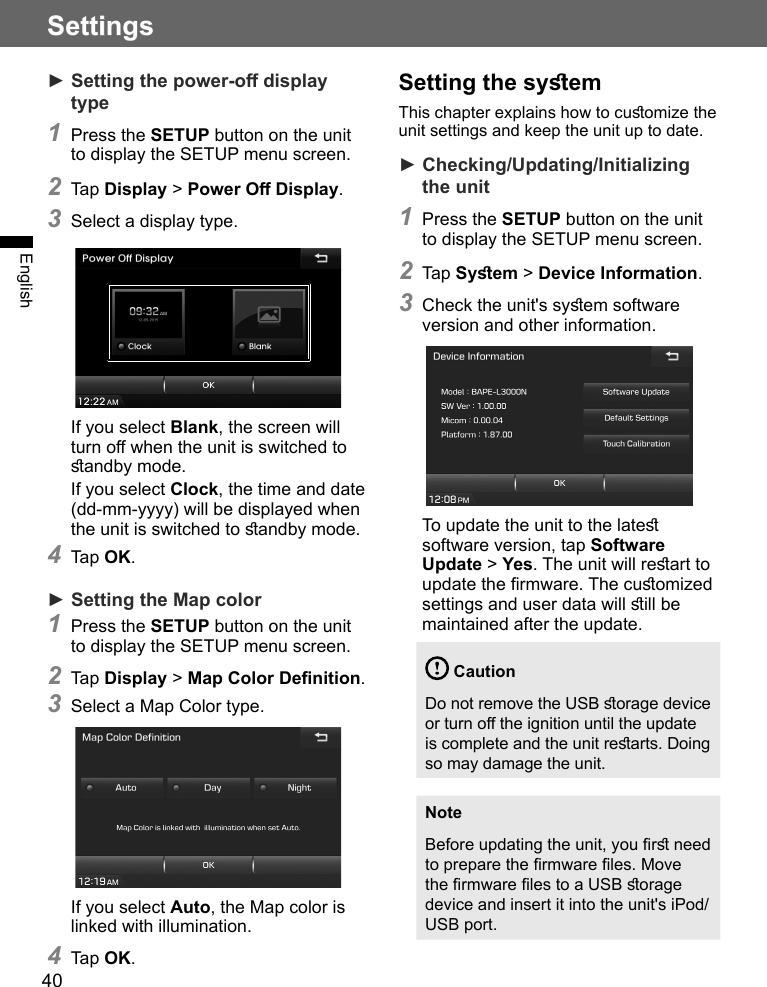
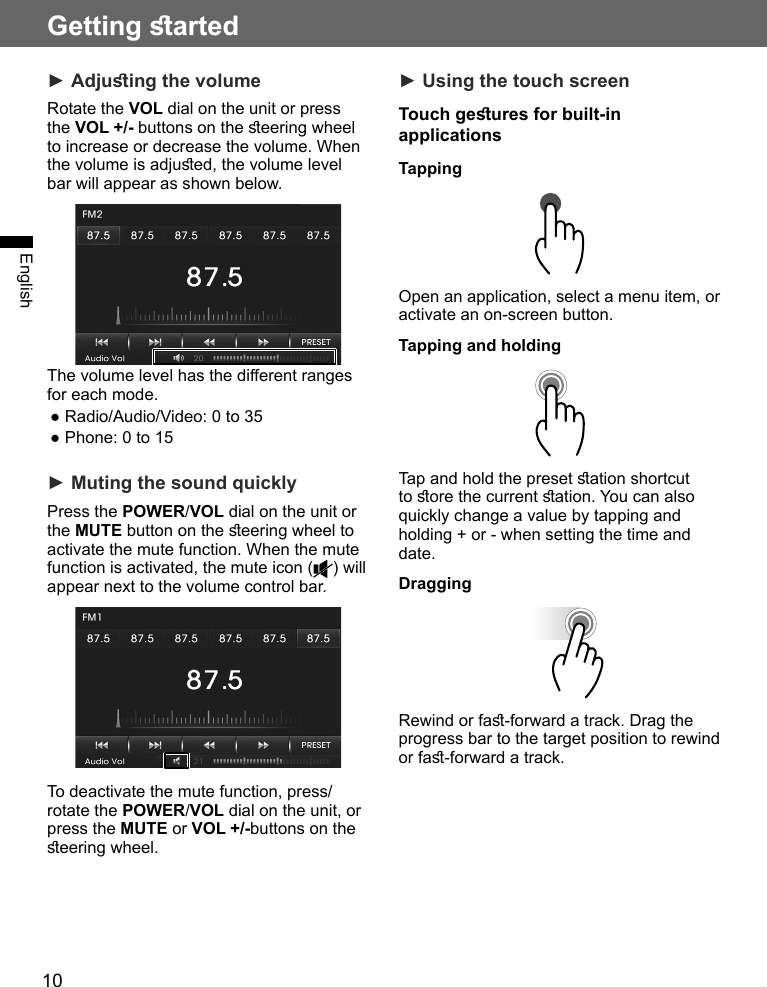
![7EnglishGetting artedControl buttons, functions and device connectionsThis unit can be controlled by using the buttons on the unit or the controls on the eering wheel. It also provides connections for media devices. This section explains the buttons and functions that are available on the unit and the eering wheel and provides information about connecting media devices.► Control unit buttons and functions (A/V syem)FM/AM PHONE SETUPPOWERPUSHVOLAUDIOPUSHTUNEFM/AM PHONE SETUPPOWERPUSHVOLAUDIOPUSHTUNE➊➌➋ ➍ ➎ ➏ ➐ ➑ ➒➊ POWER button / VOL dial● Press and hold to switch to andby mode.● In andby mode, press to switch to the mode you used previously.● Press to activate or deactivate the mute function.● Rotate the dial to adju the volume.➋ Reset button for syem rebootingIf the unit fails to operate properly, press this button with a pen tip or another pointed inrument.➌ Microphone● Detects voice during phone conversations.➍ FM/AM button● Press to turn on the radio.● In the radio, press to change the radio band.➎ HOME [ ]/VOICE [ ] button● Press to display the Home menu screen.● Press and hold to activate the Google voice or the Siri function when yourAndroid phone or iPhone is connected to the unit. (optional)➏ PHONE button● Press to switch to phone mode.➐ SETUP button● Press to display the Setup menu screen.➑ USB port● Connect USB device or iPod.➒ AUDIO button / FILE dial● Press to display the audio or video information bar and rotate to select a le to play.● When there is no device connected, rotate to ne-tune the radio frequency.Note ● Apple CarPlay or Android Auto may not be supported depending on your vehicle’s options and which region the unit is being used in.](https://usermanual.wiki/Humax/HAMT4002/User-Guide-3307738-Page-9.png)
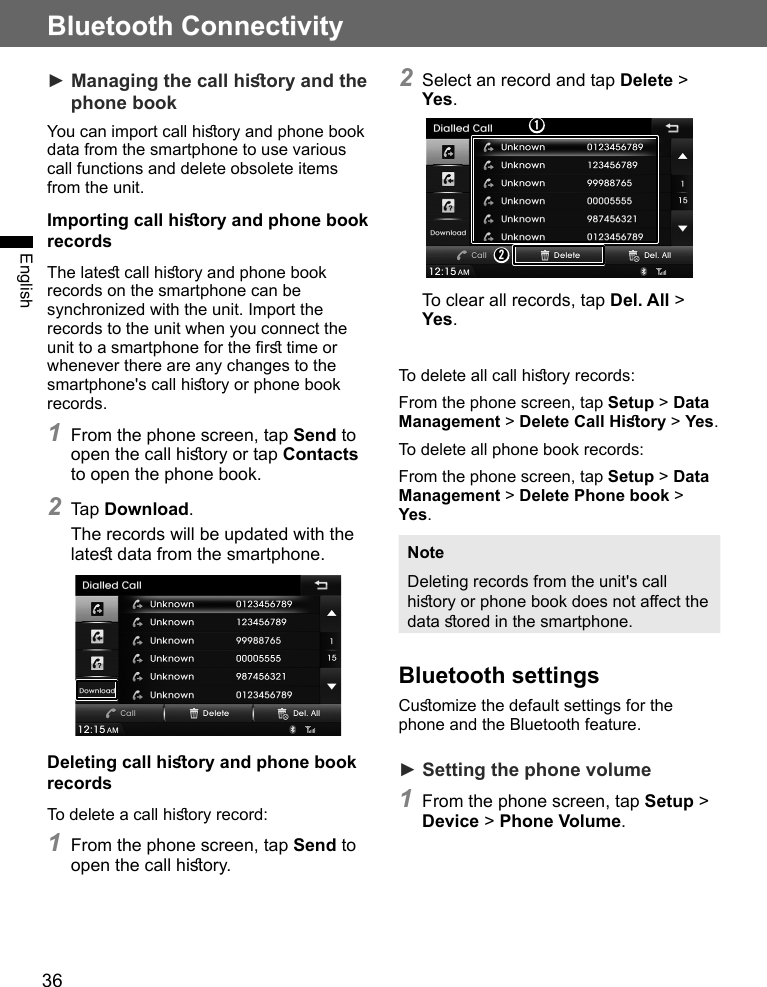
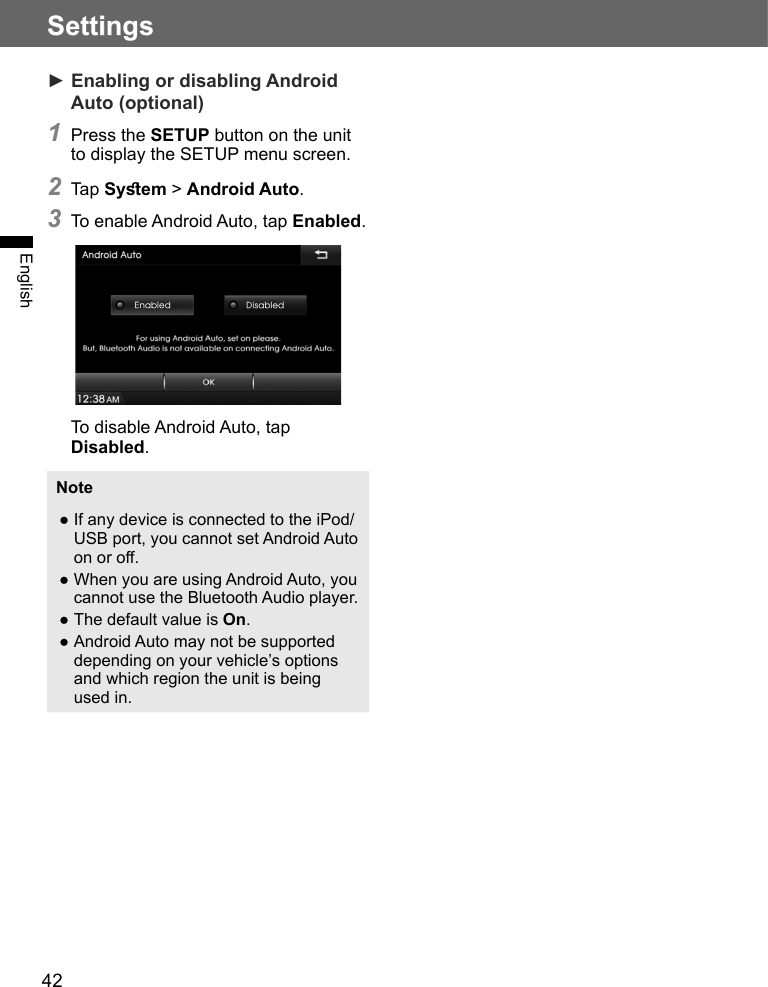
![8Getting artedEnglish► Steering wheel remote control and functionsMODEMUTEVOLVOLTRIPRESET➊➋➎➏➌➍➊ VOL +/- buttons● Press to adju the volume.➋ MUTE button● Press to turn the mute function on or o.➌ MODE button● Press to change the unit's mode. The mode type loops each time the button is pressed in the following order. FM1 → FM2 → AM → USB (Music) or iPod → Bluetooth Audio → Apple CarPlay → Android Auto.● Press and hold to activate the Google voice or the Siri function when your Android phone or iPhone is connected to the unit. (optional)Note ●USB, iPod, and Bluetooth Audio are not available if there is no device connected. ●Apple CarPlay or Android Auto may not be supported depending on your vehicle’s options and which region the unit is being used in.➍ Skip / button● Press to move to the previous or next le, track, or preset ation.● Press and hold to automatically search for available ations.● Press and hold to fa-forward or rewind the media le in Media Mode.➎ Call [ ] button● Press to receive an incoming call.● Press and hold to make a call via la call (press and hold).➏ End [ ] button● Press to ends/rejects a call.](https://usermanual.wiki/Humax/HAMT4002/User-Guide-3307738-Page-10.png)


![13EnglishAudio and Video SyemHome menu screenThis section explains each menu on the Home screen.To open the Home menu screen, press the HOME []/VOICE [ ] button on the unit. The following screen will be displayed. Select the desired menu from this screen.➊ ➍➋➎➌➏➐➑➊USB Music: Plays music from anexternal USB device.➋USB Video: Plays video from anexternal USB device.➌USB Image: Shows images ored onan external USB device.➍iPod: Plays music from an iPodconnected to the unit.➎Android Auto: Provides directions,makes calls and plays music from anAndroid phone connected to the unit(optional).➏Apple CarPlay: Provides directions,makes calls, send and receive messages, and, plays music from an iPhone connected to the unit (optional).➐Bluetooth Audio: Plays audio from aBluetooth-enabled device paired withthe unit.➑Setup: Enter the Setup menu screen.NoteApple CarPlay or Android Auto may not be supported depending on your vehicle’s options and which region the unit is being used in.RadioThis section explains how to use radio and access various radio frequencies (FM1, FM2, and AM). Also, it covers automatically or manually locating and oring your favorite radio ations.► FM/AM radio screenTo turn on the radio, press the FM/AM button on the unit or press the MODE button on the eering wheel several times until the FM/AM radio screen appears.➊➌ ➍➎➏➐➑➒ ➓ ➋➊Frequency band: Displays the currentradio frequency band.➋Preset ation shortcuts: Tap to recallthe indicated frequency. Tap and holdone of the shortcuts to ore the currentation.➌Category name: Displays the categoryof the current ation (The category name may not be displayed depending on radio ations. optional).➍Stereo: Indicates when FM ereoreception is available.➎Radio frequency: Displays the currentation's radio frequency.➏: Indicates the ation search modeis activated.➐Radio ation name: Displays the nameof the current radio ation (The ationname may not be displayed dependingon radio ations. optional).](https://usermanual.wiki/Humax/HAMT4002/User-Guide-3307738-Page-15.png)
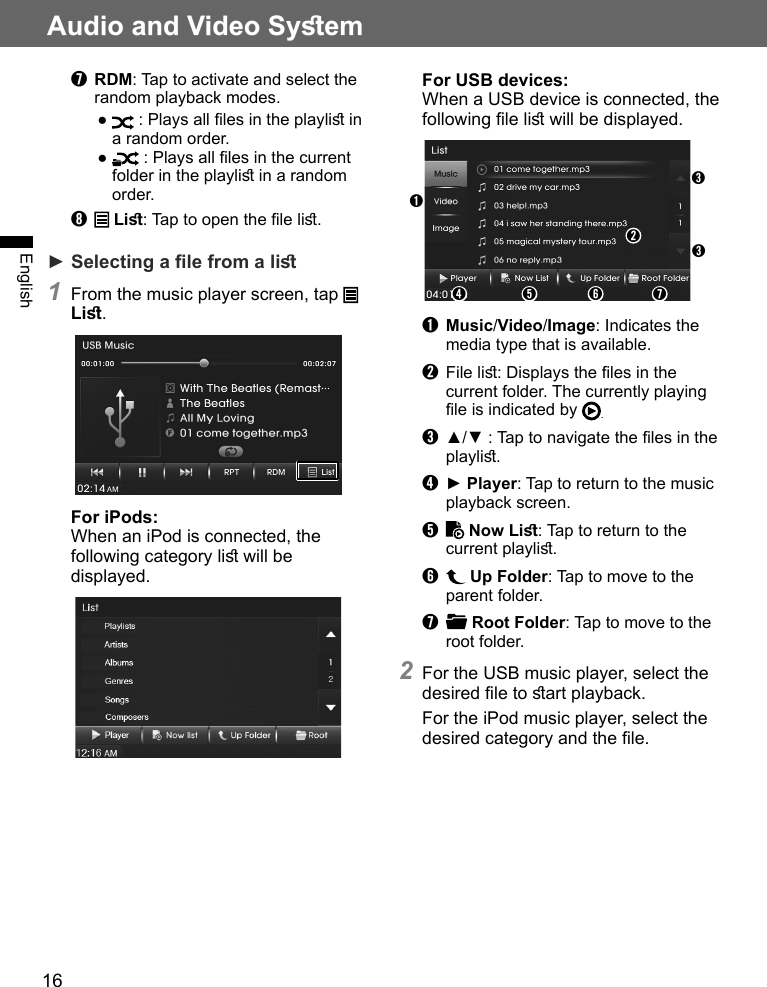
![15Audio and Video SyemEnglish► Selecting a preset radio ation1 Press the FM/AM button to change to the desired frequency band.2 Tap PRESET to show the li of preset ations.3 Tap a ation in the li.To recall a preset ation on the radio screen, tap the desired preset ation shortcut.USB or iPod music playerThis section explains how to use the USB or iPod music player. You can play MP3, WMA, WAV, and OGG les that are ored on a USB device, and any music les that are ored on an iPod.► Connecting a USB device or iPod to the iPod/USB portConnect a USB device or iPod to the iPod/USB port as shown below.Music, video, or image playback will art automatically after the data on the USB device or iPod is recognized.NoteIf a USB device with no music, video, or image les is connected, the USB music, video and image players cannot be opened.► USB or iPod music player screenTo open the USB or iPod music player screen:1 Press the HOME [ ]/VOICE [ ] button on the unit to display the Home menu screen.2 Tap USB Music to open the USB music player or iPod to open the iPod music player.The music player screen will be displayed.➋➌➊➐ ➑➏➍➎➍➊ Progress bar: Displays the progress bar for the current song. Drag the progress bar to the target position to rewind or fa-forward a track.➋ Thumbnail: Displays the current album art.➌ Song information: Displays the album, arti, song title, and le name.➍ / : Tap to skip to the previous or next le.➎ / : Tap to pause or resume playback.➏ RPT : Tap to change the repeat mode.● : Repeats the current le.● : Plays and then repeats all les in the current folder (USB only).● : Plays and then repeats all les on a device.](https://usermanual.wiki/Humax/HAMT4002/User-Guide-3307738-Page-17.png)
![18Audio and Video SyemEnglish●If high capacity USB devices are used,there may be situations that requirethe logical drive to be partitioned foruser convenience. In these situations,it will only be possible to play music ona USB device from the top level of thedrive. When using partitioned drives,save songs to play on the deviceonly in the top level of the logicaldrive. Also, certain USB devices arecongured with a separate drive forinstalling application programs, playingmusic les from a separate drivemay not be possible for the reasonsdescribed above.●The unit may not operate properlywhen accessing les from HDD, CF, orSD memory.● The unit will not support locked DRM(Digital Rights Management) les.●iPod is a registered trademark of theApple Corporation in the United Statesand other countries.●The unit supports iPod Nano, iPodTouch, and iPhone models. Otherdevices are not supported.●Some iPod and iPhone modelsmay not be supported or providecompatible connection.● Only connect the iPod and the unitusing approved iPod cables. Otherconnection cables cannot be used.●The playback functions and thedisplayed items on iPods may dierwhen they are connected to the unit.This can aect play order, method,and information displays on the iPod.USB video playerThis section explains how to use the USB video player.You can play AVI, MP4, WMV, and MKV les that are ored on a USB device.► USB video player screenTo open the USB video player screen:1 Connect a USB device to the iPod/USB port.2 Press the HOME []/VOICE []button on the unit to display the Home menu screen.3 Tap USB Video to open the USBvideo player.The USB video player screen will be displayed.➌➋➍ ➎ ➍ ➏ ➐ ➑➊➊ Progress bar: Indicates the time elapsed and duration of the le being played. Drag the progress bar to the target position to rewind or fa-forward the video.➋Full screen playback: Tap theplayback area on the screen todisplay playback on a full screen andhide the control panel. To unhide thecontrol panel, tap the playback areaagain.➌File name: Displays the name of thecurrent le.➍/ : Tap to skip to the previous ornext le.](https://usermanual.wiki/Humax/HAMT4002/User-Guide-3307738-Page-20.png)
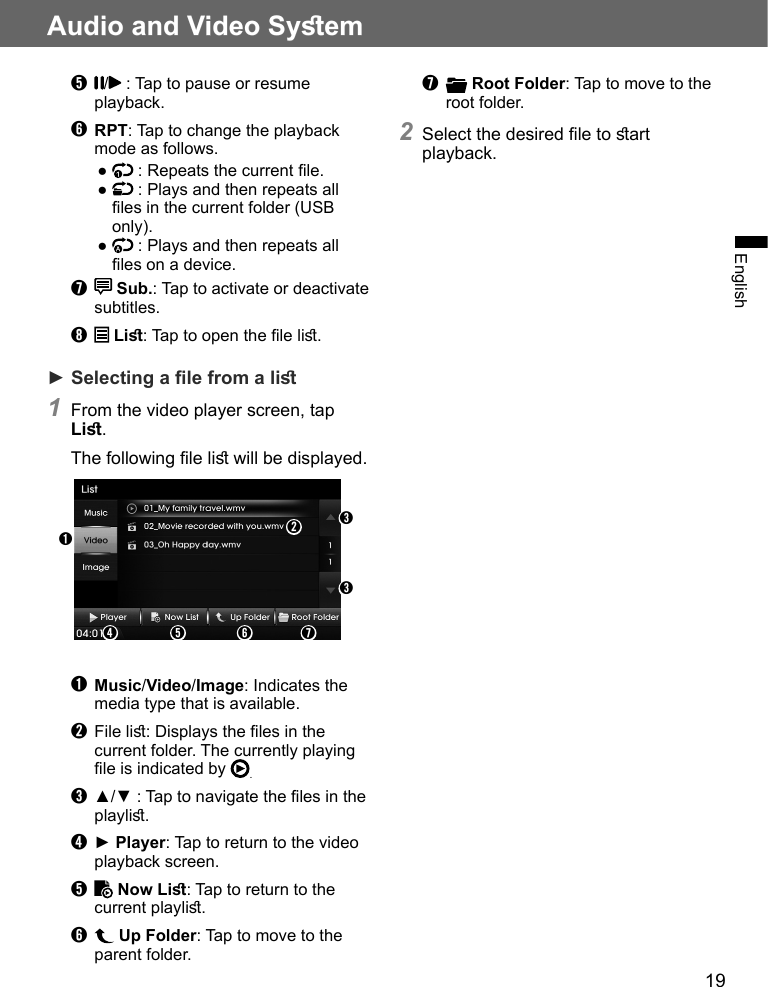
![20Audio and Video SyemEnglishUSB image playerThis section explains how to use the USB image player.You can view JPG, BMP, and PNG les that are ored on a USB device.► USB image player screenTo open the USB image player screen:1 Connect a USB device to the iPod/USB port.2 Press the HOME [ ]/VOICE [ ] button on the unit to display the Home menu screen.3 Tap USB Image to open the USB image player.The USB image player screen will be displayed.➊➌➌➋➍➐➏➎➊ Slideshow interval: Tap to select the time interval between slides.➋ Full screen playback: Tap the playback area on the screen to display playback on a full screen and hide the control panel. To unhide the control panel, tap the playback area again.➌ / : Tap to skip to the previous or next le.➍ File name: Displays the name of the current le.➎ Slideshow: Tap to run the slideshow in full screen mode.➏ / : Tap to rotate the image in a clockwise or counterclockwise direction.➐ Li: Tap to open the le li.► Selecting a le from a li1 From the image player screen, tap Li.The following le li will be displayed.➊➋➌➌➍ ➎ ➏ ➐➊ Music/Video/Image: Indicates the USB media type that is available.➋ File li: Displays the les in the current folder. The currently playing le is indicated by .➌ ▲/▼ : Tap to navigate the les in the playli.➍ ► Player: Tap to return to the image playback screen.➎ Now Li: Tap to return to the current playli.➏ Up Folder: Tap to move to the parent folder. ➐ Root Folder: Tap to move to the root folder. 2 Select the desired le to art playback.](https://usermanual.wiki/Humax/HAMT4002/User-Guide-3307738-Page-22.png)
![21Audio and Video SyemEnglishBluetooth audio playerThis section explains how to use the Bluetooth audio player.This unit supports the A2DP (Advanced Audio Diribution Prole). If your Bluetooth mobile phone or music player supports this prole, then music can be played through this unit and the car's speakers.Also, this unit supports the AVRCP (Audio Video Remote Control Prole). If your Bluetooth mobile phone or music player supports this prole, then it is possible to advance to the next track or replay previous tracks by using the buttons on the unit or the eering wheel (if tted).► Pairing and connecting with a Bluetooth deviceFor information on how to pair and connect the unit with a Bluetooth device, refer to "Connecting a Bluetooth device" on page 32.► Bluetooth audio player screenTo open the Bluetooth audio player screen:Press the HOME [ ]/VOICE [ ] button on the unit to display the Home menu screen and then tap Bluetooth Audio. The Bluetooth audio player screen will be displayed.➋➊➌ ➍ ➌➊ Thumbnail: Displays the current album art. In A2DP, the unit does not support album art display.➋ Song information: Displays the album, arti, and song details.➌ / : Tap to skip to the previous or next le.➍ : Tap to pause or resume playback.](https://usermanual.wiki/Humax/HAMT4002/User-Guide-3307738-Page-23.png)
![22EnglishApple CarPlay (optional)About Apple CarPlayApple CarPlay integrates your iPhone’s apps with your car’s media syem, allowing you to access the applications and your device more easily. You can get directions, make calls, send and receive messages, and lien to music.Apple CarPlay is available for all Lightning-enabled iPhones (currently supported iPhones are 5, 5C, 5S, 6/6 plus).NoteApple CarPlay may not be supported depending on your vehicle’s options and which region the unit is being used in.Accessing Apple CarPlay1 Plug your iPhone into the iPod/USB port via a Lightning cable.When your iPhone is successfully connected to the iPod/USB port, the Apple CarPlay home screen will appear.Note ●If your iPhone is locked, you need to enter the passcode to unlock the iPhone. To access Apple CarPlay while the iPhone is locked, on your iPhone, tap Settings > General > CarPlay and set your iPhone to Allow CarPlay While Locked. ●If your iPhone is not successfully connected, a pop-up message will appear. Then, reconnect the iPhone to the iPod/USB port.2 Tap a desired app to open it.To end Apple CarPlay, unplug the Lightning cable from the iPod/USB port.Returning to the Apple CarPlay home screenTo return to the Apple CarPlay home screen, press the HOME [ ]/VOICE [ ] button on the unit and tap Apple CarPlay.Or, press the MODE button on the eering wheel several times until the Apple CarPlay home screen appears.To return to the Apple CarPlay home screen while using any application in Apple CarPlay, tap at the bottom left of the screen.](https://usermanual.wiki/Humax/HAMT4002/User-Guide-3307738-Page-24.png)
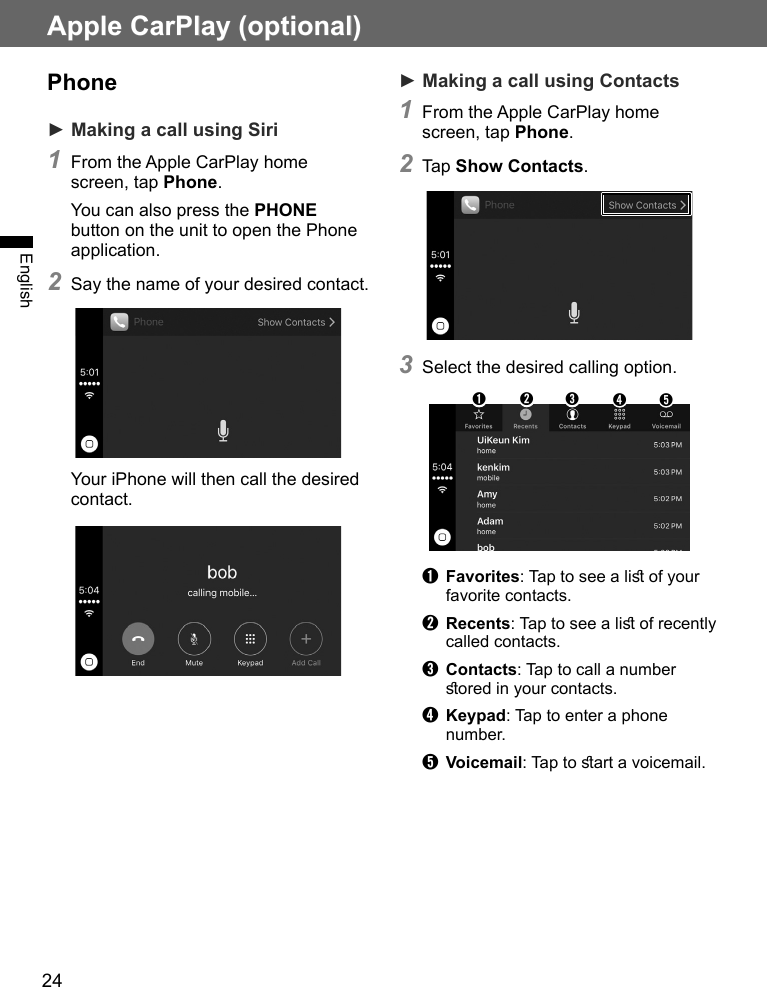
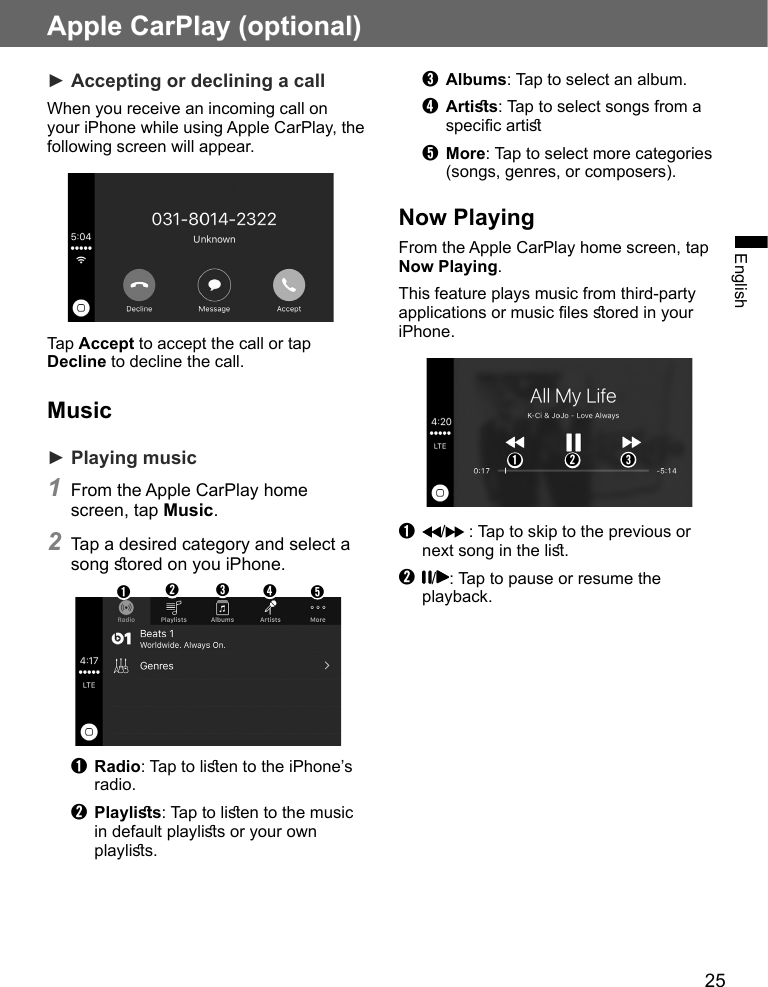
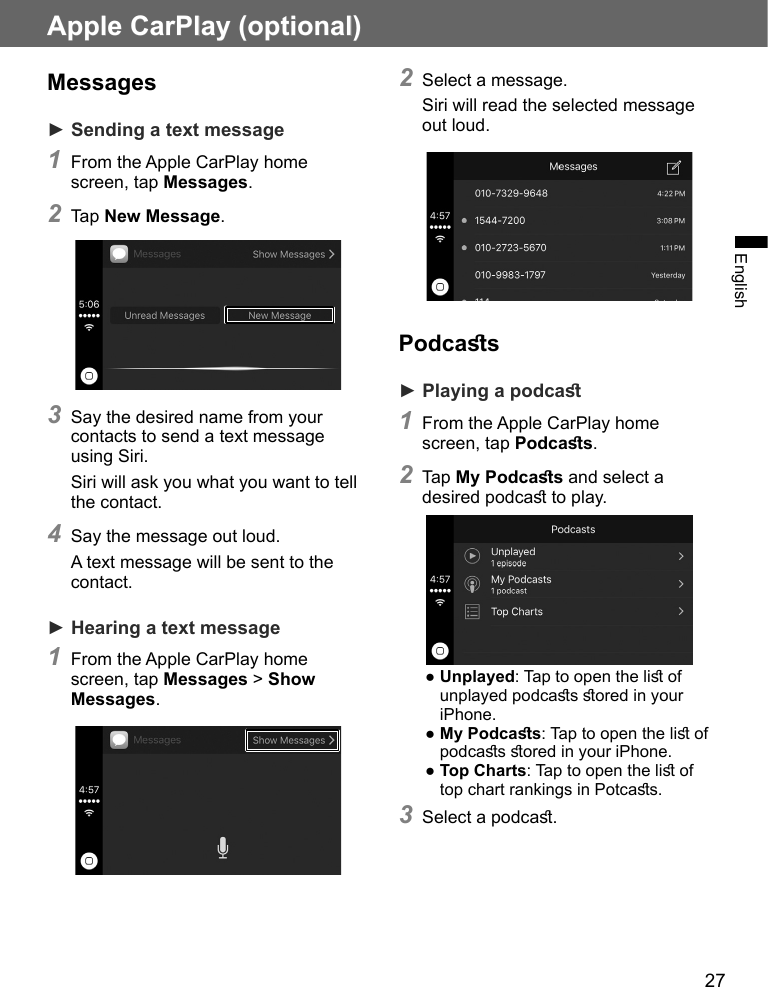
![23Apple CarPlay (optional)EnglishApple CarPlay home screenThe following are the main applications available on the Apple CarPlay home screen.➊➎➋➏➌➐➍➑➒➊Phone: Tap to make a call.➋Music: Tap to play music ored on youriPhone.➌Maps: Tap to view the map or search fora location.➍Messages: Tap to hear or send a textmessage using Siri.➎Now Playing: Tap to play reamingmusic or a music le that are previouslyplayed or currently playing.➏HYUNDAI: Tap to display the the Homemenu screen.➐Podcas: Tap to play podcas oredon your iPhone.➑Audiobooks: Tap to play audio booksroed on your iPhone.➒Home: Tap to return to the AppleCarPlay home screen.Note● Applications not shown in the AppleCarPlay home screen are notsupported by Apple CarPlay. Theapplications supported by AppleCarPlay may change in the future.● Apple CarPlay is optimized for iOS8.4. Application features may varydepending on your iOS version.Activating Siri1 Tap and hold the Home button on theApple CarPlay home screen or press and hold the HOME []/VOICE [] button on the unit.2 Say the desired command loudly.NoteWhen using Siri, say commands loudly so that Apple CarPlay can properly recognize your voice.](https://usermanual.wiki/Humax/HAMT4002/User-Guide-3307738-Page-25.png)


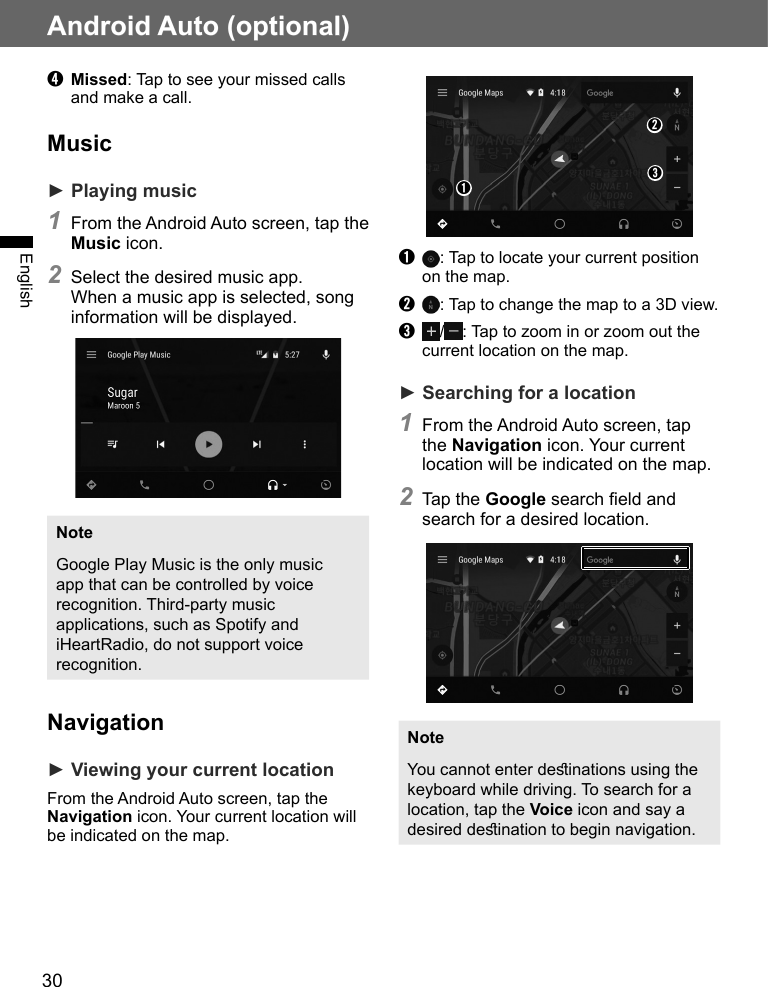
![29Android Auto (optional)EnglishAndroid Auto screenThe following are the main menu options available on the Android Auto screen.➊ ➋ ➌ ➍ ➎➏➊Navigation: Tap to view a map andoperate the navigation feature. You canonly use this syem or the pre-inallednavigation syem to set a deinationwith routing guidance.➋Phone: Tap to make phone calls or hearyour voicemail.➌Google Now (Home): Tap to displayuseful information when required.➍Music: Tap to play music fromcompatible apps. Also, tap this icon toswitch between music apps.➎Vehicle info: Tap to check your vehicleinfo or call roadside assiance.➏Voice: Tap to use voice commands tooperate Android Auto. You can alsopress and hold the PHONE button onthe unit to use Google voice commands.With Google voice recognition, you canmake phone calls, view maps, and playmusic.Note●To return to the Home menu screen,tap the Vehicle info icon > Return toHYUNDAI MOTORS.● You can use compatible third-partyapps. Refer to the Android Autowebsite for a list of compatible apps.Phone► Making a call using Google voicerecognition1 From the Android Auto screen, tapthe Voice icon or press and hold the HOME []/VOICE [] button on the unit.2 Say the name of your desired contact.Android Auto will then call the desired contact.►Making a call using phoneoptions1 From the Android Auto screen, tap theVoice icon > Phone.2 Select the desired calling option.➊➋➌➍➊Voicemail: Tap to hear your voicemail.➋Dial number: Tap to dial a number andmake a call.➌Call Hiory: Tap to see your callhiory and make a call.](https://usermanual.wiki/Humax/HAMT4002/User-Guide-3307738-Page-31.png)
![34Bluetooth ConnectivityEnglishPhone functionsAfter connecting the unit to a smartphone, you can use various call functions that are available on the connected smartphone from the unit.►Phone screenPress the PHONE button on the unit to open the phone screen.➊➋➌➍ ➎ ➏➐ ➑ ➒ ➓➊Phone name: View the name of thecurrently connected smartphone.➋Phone atus: View the battery level andthe signal rength of the smartphone.➌Keypad: Tap to enter a phonenumber. Tap and hold "0" to enter theinternational prex.➍Send: Tap to make a call. When there isno entered number, the call hiory liopens.➎End: Tap to end the current call.➏Delete: Tap to delete an entered digit orcharacter. Tap and hold to clear all digitsor characters.➐Contacts: Tap to open thesmartphone's contact li.➑Recent: Tap to display the call hiory.➒Private/Handsfree: During a call,switch the call between the smartphoneand the unit.➓Setup: Tap to open the phone setupscreen.►Accepting a callWhen a call is received at the unit, theIncoming Call screen will appear.1 Tap Accept on the screen or pressthe Call [ ] button on eering wheel to accept the call.To reject the call, tap Reject on the screen or press the End [ ] button on eering wheel.2 Talk with the other party throughthe speaker and the unit's built-in microphone.3 Tap End on the screen or press theEnd [ ] button on eering wheel to end the call.►Making a callUsing the keypad1 From the phone screen, tap thebuttons on the keypad to enter a phone number.2 Tap Send on the screen to make acall.](https://usermanual.wiki/Humax/HAMT4002/User-Guide-3307738-Page-36.png)