Humax S50-C3 Satellite Redio Receiver (Dock Unit) User Manual
Humax Co., Ltd. Satellite Redio Receiver (Dock Unit)
Humax >
Contents
- 1. Users Manual
- 2. Installation Note
Users Manual
DETAILS
PERSONAL SATELLITE RADIO + CAR KIT
S-M50
[ Table of Contents ] 3
Table of Contents
TABLE OF CONTENTS ...........................3
WARNING AND SAFETY INFORMATION ...................5
FCC Warning. . . . . . . . . . . . . . . . . . . . . . . . . . . . . . . . 5
FCC Compliance . . . . . . . . . . . . . . . . . . . . . . . . . . . . . . 5
General Precautions . . . . . . . . . . . . . . . . . . . . . . . . . . . . . 6
END USER LICENSE AGREEMENT (EULA) ..................8
PREFACE ............................... 12
Copyrighted Broadcast Material . . . . . . . . . . . . . . . . . . . . . . . . 12
Copyrights & Trademarks . . . . . . . . . . . . . . . . . . . . . . . . . . . 12
PACKAGE CONTENTS .......................... 13
CONTROLS............................... 16
Sirius S50 Reference Guide . . . . . . . . . . . . . . . . . . . . . . . . . . 16
Remote Control Reference Guide. . . . . . . . . . . . . . . . . . . . . . . . 22
GETTING STARTED . . . . . . . . . . . . . . . . . . . . . . . . . . . 24
Installing the Sirius S50. . . . . . . . . . . . . . . . . . . . . . . . . . . . 24
Installing the Antenna . . . . . . . . . . . . . . . . . . . . . . . . . . . . 26
Installing the Battery . . . . . . . . . . . . . . . . . . . . . . . . . . . . . 29
Turning the Sirius S50 On and Off . . . . . . . . . . . . . . . . . . . . . . . 30
Demonstration Mode . . . . . . . . . . . . . . . . . . . . . . . . . . . . . 30
Selecting an FM Frequency . . . . . . . . . . . . . . . . . . . . . . . . . . 31
Subscribing to the SIRIUS Service . . . . . . . . . . . . . . . . . . . . . . . 31
OPERATION . . . . . . . . . . . . . . . . . . . . . . . . . . . . . . 33
Learning the Features . . . . . . . . . . . . . . . . . . . . . . . . . . . . 33
Listening Environments . . . . . . . . . . . . . . . . . . . . . . . . . . . . 33
Navigating Menus and Lists . . . . . . . . . . . . . . . . . . . . . . . . . . 35
Listening to Live Broadcasts . . . . . . . . . . . . . . . . . . . . . . . . . . 36
Channel Presets . . . . . . . . . . . . . . . . . . . . . . . . . . . . . . 37
[ Table of Contents ]
4[ Warning and Safety Information ] 5
Pausing a Live Broadcast . . . . . . . . . . . . . . . . . . . . . . . . . . . 39
Saving Songs and Shows . . . . . . . . . . . . . . . . . . . . . . . . . . . 42
FM Transmitter . . . . . . . . . . . . . . . . . . . . . . . . . . . . . . . 45
Back/Jump Feature . . . . . . . . . . . . . . . . . . . . . . . . . . . . . 47
Listening to Saved Songs, Shows, and MP3s . . . . . . . . . . . . . . . . . . . 48
Saving Songs or Shows with a Scheduled Recording. . . . . . . . . . . . . . . . 54
Game Alert.................................56
Sports Ticker ................................58
Sleep Timer ................................60
Auto Shutdown . . . . . . . . . . . . . . . . . . . . . . . . . . . . . . . 61
Parental Control. . . . . . . . . . . . . . . . . . . . . . . . . . . . . . . 62
Hide Channels . . . . . . . . . . . . . . . . . . . . . . . . . . . . . . . 65
Auto Dimming . . . . . . . . . . . . . . . . . . . . . . . . . . . . . . . 66
PC SOFTWARE ............................. 67
SETUP MENU. . . ........................... 68
Setup Menu Navigation . . . . . . . . . . . . . . . . . . . . . . . . . . . . 68
Shut-Down Device . . . . . . . . . . . . . . . . . . . . . . . . . . . . . 69
Content Management . . . . . . . . . . . . . . . . . . . . . . . . . . . . 69
Sport Settings . . . . . . . . . . . . . . . . . . . . . . . . . . . . . . . 72
Jump Settings . . . . . . . . . . . . . . . . . . . . . . . . . . . . . . . 73
Device Settings . . . . . . . . . . . . . . . . . . . . . . . . . . . . . . . 73
Factory Defaults . . . . . . . . . . . . . . . . . . . . . . . . . . . . . . 75
Display Settings . . . . . . . . . . . . . . . . . . . . . . . . . . . . . . 77
Audio Settings . . . . . . . . . . . . . . . . . . . . . . . . . . . . . . . 78
Time Settings . . . . . . . . . . . . . . . . . . . . . . . . . . . . . . . 80
Parental Controls . . . . . . . . . . . . . . . . . . . . . . . . . . . . . . 81
OPTIONAL ACCESSORIES . . . . . . . . . . . . . . . . . . . . . . . . 82
TROUBLESHOOTING .......................... 83
SPECIFICATIONS ............................ 84
WARRANTY . . . . . . . . . . . . . . . . . . . . . . . . . . . . . . 85
SIRIUS ID . . . . . . . . . . . . . . . . . . . . . . . . . . . . . . . 87
Warning and Safety Information
FCC Warning
This equipment may generate or use radio frequency energy. Changes or modifications to this
equipment may cause harmful interference unless the modifications are expressly approved in
this owners guide. The user could lose the authority to operate this equipment if an unauthor-
ized change or modification is made.
FCC Compliance
This equipment has been tested and found to comply with Part 15 of the FCC Rules. These
rules are designed to provide reasonable protection against harmful interference. This equip-
ment may cause harmful interference to radio communications if it is not installed and used in
accordance with these instructions. However, there is no guarantee that interference will not
occur in a particular installation. If this equipment does cause harmful interference to radio
reception, which can be determined by turning the equipment off and on, the user is encour-
aged to try to correct the interference by one of more of the following measures:
Reorient or relocate the receiving antenna.
Increase the separation between the other equipment and the Receiver.
Connect the other equipment to a different circuit from that to which the Receiver is con-
nected.
Consult the dealer or an experienced radio technician for help.
•
•
•
•
[ Warning and Safety Information ]
6
[ Warning and Safety Information ] 7
General Precautions
Liquid Crystal Precautions
If the LCD screen on the Sirius S50 is damaged, do not to touch the liquid crystal fluid. If any
of the following situations happen, take the action indicated:
If the liquid crystal fluid comes in contact with your skin, wipe the skin area with a cloth
and then wash the skin thoroughly with soap and running water.
If the liquid crystal fluid gets into your eye, flush the eye with clean water for at least 15
minutes. Seek medical care.
If the liquid crystal fluid is ingested, flush your mouth thoroughly with water. Drink large
quantities of water and induce vomiting. Seek medical care.
Safety Precautions
Be sure to observe the following warnings. Failure to follow these safety instructions and
warnings may result in a serious accident.
Do not operate the unit in a way that might divert your attention from driving safely. As a
driver, you alone are responsible for safely operating your vehicle in accordance with traf-
fic safety laws at all times.
Be sure the unit is installed as described in the installation instructions in this guide. When
installing the unit using a Home Kit or Executive Kit, follow the installation instructions
included with those kits.
Failure to follow these safety instructions and warnings may result in a serious accident.
To avoid short circuits, do not open the unit, and never put or leave any metallic objects
(coins, tools, etc.) inside the unit.
If the unit emits smoke or unusual odors, turn the power off immediately, and disconnect
the unit from any power source.
Do not drop the unit or subject it to strong shocks.
If the unit doesn’t seem to be working properly, turn the unit off, wait 5 – 10 seconds, then
turn it on again.
1.
2.
3.
•
•
•
•
•
•
•
SIRIUS PC Software
The SIRIUS PC Software included with the Sirius S50 will allow you to connect it to your PC.
It is important that only this software be used to ensure that the operating system software
essential to the Sirius S50’s operation is not removed or damaged. Should this essential
software be removed or damaged, the Sirius S50 will no longer function.
The PC software also provides for upgrading features and functionality as they become avail-
able. Be sure to periodically connect the Sirius S50 to your PC to load the latest updates.
Cigarette Lighter Adapter
Do not use any other power adapter for the Sirius S50, or connect it directly to the vehicle’s
power. Doing so will damage the unit.
The vehicle dock operates on 5 VDC, 2A. Using anything other than the supplied cigarette
lighter adapter to power the vehicle dock will void the warranty.
Cleaning and Maintenance
If the Sirius S50 becomes dirty, turn the power off and wipe it clean with a soft dry cloth. Do
not use hard cloths, paint thinner, alcohol, or other volatile solvents to clean. These may cause
damage to the unit.
[ Important ]
8
[ Important ] 9
End User License Agreement (EULA)
This section contains an end user license agreement which you agree to accept and be bound
by when you use the products described in this section. Please read and understand this
agreement before using the Sirius S50 or the SIRIUS PC software.
This End User License Agreement (this “EULA”) sets forth the agreement between you and Sirius Satellite Radio Inc. (“Sirius”) for
the use of the software in the Sirius S-50 Sirius satellite radio receiver (the “Receiver Software”), the Sirius S-50 computer software
(the “Computer Software” and, together with the Receiver Software, the “Software”) and their use with Sirius S50 Sirius satellite radio
receiver and accessories (the “Receiver”) and Sirius’ satellite radio service (the “Sirius Service”).
In addition, for your use of the Sirius Service, you agree to be bound by the “Terms & Conditions of Service” set forth at: http://www.
sirius.com/serviceterms (the “Terms and Conditions”).
YOU ACKNOWLEDGE AND AGREE THAT YOU HAVE READ AND UNDERSTAND THIS EULA. BY USING THE RECEIVER AND
THE RECEIVER SOFTWARE, CLICKING ON THE “ACCEPT” BUTTON TO INSTALL THE COMPUTER SOFTWARE, AND/OR
INSTALLING, COPYING OR OTHERWISE USING THE COMPUTER SOFTWARE, YOU AGREE TO BE BOUND BY THE TERMS
OF THIS EULA. IF YOU DO NOT AGREE TO THE TERMS OF THIS EULA, CLICK ON THE “CANCEL” BUTTON IF YOU ARE
INSTALLING THE COMPUTER SOFTWARE SO THAT IT IS NOT INSTALLED, AND DO NOT USE THE RECEIVER.
1. GRANT OF LICENSE. Sirius hereby grants to you a non-exclusive, limited, license to use the Software and any related documen-
tation (the “Documentation”). You may: (a) use the Computer Software on any single computer; (b) use the Computer Software on
DVHFRQGFRPSXWHUVRORQJDVWKH¿UVWDQGVHFRQGFRPSXWHUVDUHQRWXVHGVLPXOWDQHRXVO\DQGFFRS\WKH&RPSXWHU6RIWZDUHIRU
back-up and archival purposes; provided that any copy must contain all of the original Software’s proprietary notices. You may use
the Receiver Software only as part of the Receiver. Sirius and its suppliers retain all rights not expressly granted herein.
2. LICENSE RESTRICTIONS. (a) You must be at least 18 years old to assume the obligations set forth in this EULA. Minors may use
the Software and the Documentation only if a parent or legal guardian assumes the obligations set forth in this EULA and thereby
assumes full responsibility for the minor’s use of the Software and the Documentation.
(b) You may not: (i) permit other individuals to use the Computer Software; (ii) modify, translate, reverse engineer, decompile,
disassemble (except to the extent that this restriction is expressly prohibited by law) or create derivative works based upon the
Software or the Documentation; (iii) copy the Software or the Documentation (except as permitted by Section 1(c)); (iv) rent, lease,
transfer, or otherwise transfer rights to the Software or the Documentation and/or (v) remove any proprietary notices or labels on the
Software or the Documentation. Any violations of this Section 2(b) will immediately terminate your license to the Software and the
Documentation.
(c) You may use the Software and the Documentation only in a manner that complies with all applicable laws in the jurisdictions in
which you use the Software and the Documentation, including without limitation, applicable restrictions concerning copyright and
other intellectual property rights.
(d) You may use the Software only for your private, non-commercial use. You may not use the Software in any way to provide, or as
SDUWRIDQ\FRPPHUFLDOVHUYLFHRUDSSOLFDWLRQ&RSLHVRIFRQWHQW¿OHVLQFOXGLQJZLWKRXWOLPLWDWLRQVRQJVDQGRWKHUDXGLRUHFRUGLQJV
which are stored and/or transferred using the Software, and which are protected by the copyright laws or related laws of any jurisdic-
tion, are for your own personal use only and you may not publicly perform them or distribute them to third parties.
(e) By storing content on the Receiver, you are making a digital copy. You may not use the Receiver or the Software in an attempt to,
or in conjunction with, any device, program or service designed to circumvent technological measures employed to control access to,
RUWKHULJKWVLQDFRQWHQW¿OHRURWKHUZRUNSURWHFWHGE\WKHFRS\ULJKWODZVRIDQ\MXULVGLFWLRQ
(f) The Software embodies a serial copying management system required by the laws of the United States. You may not circumvent
or attempt to circumvent this system by any means.
3. AUTOMATIC COMMUNICATIONS FEATURES; USE OF INFORMATION. (a) The Computer Software includes functionality
that may automatically communicate information to Sirius over the Internet as part of its normal operation. These communications
features may be enabled by default. You may opt out of these communications by changing the settings in preferences menu of the
Computer Software. An initial list of the communications features is listed below. The communications features may be changed in
any updates of the Computer Software that you install. By installing and/or using the Computer Software and any related updates,
you agree to permit the communications features. You are responsible for any telecommunications or other connectivity charges
incurred through use of the Computer Software.
(i) Once you install the Computer Software and connect the Receiver, the Computer Software may provide Sirius with user informa-
WLRQLQFOXGLQJHOHFWURQLFLGHQWL¿FDWLRQQXPEHURIWKH5HFHLYHUWKH³(61´
(ii) The Computer Software may provide Sirius with the following information from time to time: the channels of the Sirius Service that
you listen to on the Receiver and the amount of time which you listen, the content that you store on the Receiver, and the channels of
the Sirius Service that you have set as presets on the Sirius Receiver.
E6LULXVPD\PDWFKWKH(61DQGRWKHULQIRUPDWLRQLWUHFHLYHVWRSHUVRQDOO\LGHQWL¿DEOHLQIRUPDWLRQSURYLGHGE\\RXDVSDUWRI\RXU
subscription to the Sirius Service. Sirius may use the information it receives to keep statistics on the aggregated anonymous use
of the Software and/or the Sirius Service and to provide you with additional content. . You may opt out of receiving any additional
content by changing the settings in preferences menu of the Computer Software.
4. DIGITAL RIGHTS MANAGEMENT. The Software includes Windows Media Audio (“WMA”) digital rights management (“DRM”)
software (the “DRM Software”). The WMA DRM Software is designed to manage and enforce intellectual property rights in digital
content. You may not take any action to circumvent or defeat the security or content usage rules provided or enforced by the WMA
DRM Software. Sirius is not responsible for the operation of the WMA DRM Software in any way, including without limitation, revoca-
tion of your content. Sirius is not responsible for any communications to or from any third party content provider, or for the collection
or use of information by third party content provider. You agree to the communications enabled and/or performed by the WMA DRM
Software, including without limitation, automatic updating of the WMA DRM Software without notice to you.
5. OWNERSHIP. All title, ownership, rights, and intellectual property rights in and to the Software and the Documentation shall remain
in the property of Sirius and its licensors. The Software is protected by the copyright laws of the United States and international
copyright treaties.
6. WARRANTIES. (a) Sirius warrants that for a period of 90 days from the date of your acquisition the Software if operated as
directed, will substantially achieve the functionality described in the Documentation and will be free from defects in material and
workmanship. This warranty shall immediately terminate if the Software is used on or in conjunction with hardware or software
RWKHUWKDQWKHXQPRGL¿HGYHUVLRQRI5HFHLYHUZKLFKWKH6RIWZDUHZDVGHVLJQHGWREHXVHGDVGHVFULEHGLQWKH'RFXPHQWDWLRQDQ\
PRGL¿FDWLRQVDUHPDGHWRWKH6RIWZDUHE\\RXGXULQJWKHZDUUDQW\SHULRGLIWKHPHGLDLVVXEMHFWHGWRDFFLGHQWDEXVHRULPSURSHU
use, and/or you violate the terms of this EULA. Sirius does not warrant that your use of the Software will be uninterrupted or that the
operation of the Software will be error-free or secure.
(b) TO THE MAXIMUM EXTENT PERMITTED BY APPLICABLE LAW SIRIUS HEREBY DISCLAIMS ALL OTHER WARRANTIES
EITHER EXPRESS OR IMPLIED, INCLUDING WITHOUT LIMITATION IMPLIED WARRANTIES OF MERCHANTABILITY AND
FITNESS FOR A PARTICULAR PURPOSE WITH REGARD TO THE SOFTWARE AND THE DOCUMENTATION. THIS LIMITED
WARRANTY GIVES YOU SPECIFIC LEGAL RIGHTS; YOU MAY HAVE OTHER RIGHTS THAT VARY FROM STATE/JURISDIC-
TION TO STATE/JURISDICTION.
(c) Sirius’ sole liability for a breach of its warranties shall be in Sirius’ sole discretion: (i) to replace your defective media, (ii) to advise
you how to achieve substantially the same functionality with the Software as described in the Documentation through a procedure
different from that set forth in the Documentation and/or (iii) if the above remedies are impracticable, to refund the license fee, if any,
you paid for the Software. Repaired, corrected or replaced copies of the Software and the Documentation shall be covered by the
[ Important ]
10
[ Important ] 11
same limited warranty for the period remaining under the warranty that covered the original copy of the Software or if longer for 30
days after the date Sirius either provided you with the repaired or replaced copy of the Software or advised you as to how to operate
the Software so as to achieve the functionality described in the Documentation, whichever is applicable. Sirius will be obligated
to honor its obligations in this Section 6(c) only if you inform Sirius of the problem with the Software during the applicable warranty
period and provide evidence of the date you acquired the Software.
,1'(01,),&$7,21D<RXVKDOOGHIHQGLQGHPQLI\DQGKDUPOHVV6LULXVLWVRI¿FHUVGLUHFWRUVDQGHPSOR\HHVIURPDQGDJDLQVW
DQ\ORVVHVGDPDJHV¿QHVDQGH[SHQVHVLQFOXGLQJZLWKRXWOLPLWDWLRQDWWRUQH\V¶IHHVDQGH[SHQVHVDULVLQJRXWRIRUUHODWLQJWRDQ\
claims that you have: (i) viewed, downloaded, encoded, compressed, copied or transmitted any in connection with the Software in
violation of another party’s rights or in violation of any law, or (ii) violated any terms of this EULA and/or the Terms and Conditions.
(b) If you are importing the Software from the United States, you shall defend, indemnify and hold harmless Sirius from and against
any import and export duties or other claims arising from such importation.
8. LIMITATION OF LIABILITY. SIRIUS IS NOT RESPONSIBLE FOR ANY SPECIAL, INCIDENTAL, OR CONSEQUENTIAL
DAMAGES OR LOSSES RELATING TO THE USE AND/OR PURCHASE OF THE SOFTWARE, THE DOCUMENTATION, THE
RECEIVER AND/OR THE SIRIUS SERVICE, INCLUDING WITHOUT LIMITATION, COMPUTER FAILURE AND/OR MALFUNC-
TION, WHETHER BASED ON NEGLIGENCE OR OTHERWISE, AND WHETHER OR NOT SIRIUS HAS BEEN ADVISED OF
THE POSSIBILITY THEREOF. SIRIUS TOTAL LIABILITY TO YOU AND ANY OTHER PERSONS USING THE RECEIVER, THE
SOFTWARE AND/OR THE DOCUMENTATION, REGARDLESS OF THE CAUSE, WILL IN NO EVENT EXCEED THE AMOUNTS
THAT YOU HAVE PAID TO SIRIUS FOR THE RECEIVER, THE SOFTWARE AND THE DOCUMENTATION. THIS ALLOCATION
OF RISK AND THE DISCLAIMER OF WARRANTIES IS REFLECTED IN SIRIUS’ PRICES AND IS A FUNDAMENTAL ELEMENT
OF SIRIUS AGREEMENT TO PROVIDE YOU WITH THE SOFTWARE AND THE DOCUMENTATION. YOU MAY HAVE GREATER
RIGHTS THAN DESCRIBED ABOVE UNDER YOUR STATE’S LAWS.
9. TERMINATION. (a) This EULA will automatically terminate without notice if you fail to comply with any of its terms
(b) You may terminate this EULA at any time by providing Sirius with written notice of termination to: Sirius Satellite Radio Inc., 1221
Avenue of the Americas, 36th Floor, New York, New York 10020, Attention: SIRIUS Software Termination.
(c) Upon any termination of this EULA, you shall immediately discontinue use of the Software and shall within three days return to
Sirius, or certify destruction of, all full or partial copies of the Software, documentation and related materials provided by Sirius. Your
obligation to pay accrued charges and fees shall survive any termination of this License Agreement.
10. RESOLVING DISPUTES. In order to expedite and control the cost of disputes, you agree that any legal equitable claim (a
“Claim”) relating to the Software, the Documentation and/or this EULA, will be resolved as follows:
D,QIRUPDO5HVROXWLRQ<RXDQG6LULXVZLOO¿UVWWU\WRUHVROYHDQ\&ODLPLQIRUPDOO\$FFRUGLQJO\QHLWKHU\RXQRU6LULXVPD\VWDUWD
IRUPDOSURFHHGLQJH[FHSWIRU&ODLPVGHVFULEHGLQ6HFWLRQGIRUDWOHDVWGD\VDIWHURQHRIXVQRWL¿HVWKHRWKHURID&ODLPLQ
writing. To initiate a Claim, you must send notice by U.S. mail to: Sirius Satellite Radio Inc., 1221 Avenue of the Americas, 36th Floor,
1HZ<RUN1HZ<RUN$WWHQWLRQ*HQHUDO&RXQVHO,I6LULXVLQLWLDWHVD&ODLPQRWLFHZLOOEHVHQWWR\RXUDGGUHVVRQ¿OHZLWK
Sirius.
(b) Formal Resolution. Except as provided in Section 10(d), if you and Sirius cannot resolve a Claim informally, any Claim either of
you or Sirius asserts will be resolved only by binding arbitration. The arbitration will be conducted under the Commercial Arbitration
Rules of the American Arbitration Association (the “AAA Rules”) that are in effect at the time the arbitration is initiated and under
WKHUXOHVVHWIRUWKLQWKLV(8/$,IWKHUHLVDFRQÀLFWEHWZHHQWKH$$$5XOHVDQGWKLV(8/$WKLV(8/$ZLOOJRYHUQ$5%,75$7,21
MEANS THAT YOU WAIVE YOUR RIGHT TO A JURY TRIAL. If you initiate an arbitration, you agree to pay a fee of $125 or, if less
and you notify Sirius in writing, the amount that you would pay to initiate a lawsuit against Sirius in the appropriate court of your state.
6LULXVDJUHHVWRSD\DQ\DGGLWLRQDOIHHRUGHSRVLWUHTXLUHGE\WKH$PHULFDQ$UELWUDWLRQ$VVRFLDWLRQLQH[FHVVRI\RXU¿OLQJIHH6LULXV
also agrees to pay the costs of the arbitration proceeding up to a maximum of one-half day (four hours) of hearings. Other fees, such
as attorney’s fees, expenses, travel to the arbitration and the costs of a proceeding that goes beyond one-half day, will be paid in ac-
cordance with the AAA Rules. The arbitration will be held at a location within 100 miles of your residence unless you and Sirius both
agree to another location. To start the arbitration, you or Sirius must do the following things:
(i) Write a demand for arbitration. The demand must include a description of the Claim and the amount of damages sought to be
recovered;
LL6HQGWKUHHFRSLHVRIWKHGHPDQGIRUDUELWUDWLRQSOXVWKHDSSURSULDWH¿OLQJIHHWR$PHULFDQ$UELWUDWLRQ$VVRFLDWLRQ3HQQV\OYD-
nia Avenue, N.W., Suite 700, Washington, D.C. 20004; and
(iii) Send one copy of the demand for arbitration by U.S. mail to Sirius Satellite Radio Inc., 1221 Avenue of the Americas, 36th Floor,
1HZ<RUN1HZ<RUN$WWHQWLRQ*HQHUDO&RXQVHORUWR\RXUDGGUHVVRQ¿OHZLWK6LULXVLI6LULXVVWDUWVWKHDUELWUDWLRQ
(c) Binding Effect. In the arbitration proceeding, the arbitrator must follow applicable law, and any award may be challenged if the
arbitrator fails to do so. The arbitrators shall not have the power, jurisdiction or authority to waive, amend and/or modify any of the
terms or provisions of this EULA. The arbitrators shall enforce this EULA in accordance with its terms and provisions.
2WKHUZLVHWKHDUELWUDWRU¶VGHFLVLRQLV¿QDODQGELQGLQJRQDOOSDUWLHVDQGPD\EHHQIRUFHGLQDQ\IHGHUDORUVWDWHFRXUWWKDWKDV
MXULVGLFWLRQ$FRXUWPD\VHYHUDQ\SRUWLRQRIWKLV6HFWLRQWKDWLW¿QGVWREHXQHQIRUFHDEOH
(d) Exceptions. Notwithstanding the foregoing, any: (i) dispute over the validity of intellectual property rights or Sirius licenses to oper-
ate its business; (ii) Claim based on Section 2(a) above; and (iii) dispute involving a violation of the Communications Act of 1934, 47
U.S.C. §605, or the Electronic Communications Privacy Act, 18 U.S.C. §§2510-2521, may be decided only by a court of competent
jurisdiction.
11. MISCELLANEOUS. (a) Notice. Notices to you will be deemed given when deposited in the mail or when sent by email. Notices
may be included in statements or other communications to you. Sirius may also provide notice to you by telephone, which will be
deemed given when a message is left with you, someone answering the telephone at your residence or on an answering machine or
voice mail system at your phone number on record with Sirius. Your notices to Sirius will be deemed given when Sirius receives them
1221 Avenue of the Americas, 36th Floor, New York, New York 10020, Attention: General Counsel.
(b) Applicable Law. The interpretation and enforcement of this EULA shall be governed by the internal laws of the State of New York.
7KLV(8/$LVVXEMHFWWRPRGL¿FDWLRQLIUHTXLUHGE\VXFKODZV1RWZLWKVWDQGLQJWKHIRUHJRLQJ6HFWLRQVKDOOEHJRYHUQHGE\WKH
Federal Arbitration Act.
(c) Assignment. You may not assign your rights and/or obligations under this EULA to any third party. Sirius may assign its rights
and/or obligations under this EULA to any third party without notice for any purpose, including without limitation, in the event of an
acquisition, corporate reorganization, merger or sale of substantially all of Sirius’ assets to another entity. You hereby consent to such
assignment.
(d) Other. This EULA constitutes the entire agreement between you and Sirius relating to your use of the Software and the Documen-
tation. No salesperson or other representative is authorized to change it for you. If any provision is declared by a competent authority
WREHLQYDOLGWKDWSURYLVLRQZLOOEHGHOHWHGRUPRGL¿HGWRWKHH[WHQWQHFHVVDU\DQGWKHUHVWRIWKLV(8/$ZLOOUHPDLQHQIRUFHDEOH
[ Preface ]
12 [ Package Contents ] 13
Preface
Copyrighted Broadcast Material
Several features of the Sirius S50 enable you to record and store broadcast content for
playback. Broadcast content is subject to copyright laws, and distribution of copyrighted ma-
terial is prohibited by law without the express permission of the copyright holder. To prevent
unlawful distribution of copyrighted material, the Sirius S50 prevents you from electronically
copying stored (recorded) songs or shows to another device.
Copyrights & Trademarks
© 2005 SIRIUS Satellite Radio Inc.
® “SIRIUS”, “Sirius S50”, the SIRIUS dog logo, channel names and logos are trademarks of
SIRIUS Satellite Radio Inc. “NFL” and the NFL Shield logo, and the NFL Sunday Drive name
and logo are registered trademarks of the National Football League. “NHL” and the NHL
Shield are registered trademarks of the National Hockey League. “NBA” and the NBA silhou-
ette logo are registered trademarks of NBA Properties Inc. Microsoft is a registered trademark
of Microsoft Corporation. All other trademarks, service marks, sports team names, album art,
and logos are the property of their respective owners. All Rights Reserved.
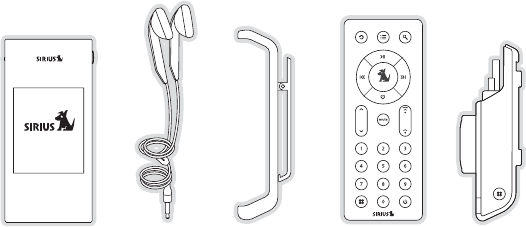
Package Contents
The following items are included with your purchase of the Sirius S50:
Wearable PlayerWearable Player Ear BudsEar Buds Wearable Player ClipWearable Player Clip Remote ControlRemote Control Vehicle DockVehicle Dock

[ Package Contents ]
14
[ Package Contents ] 15
AUDIO
CABLE
X
INCORRECT
SHOULD BE USB
CONNECTOR
X
AUDIO
CABLE
X
INCORRECT
SHOULD BE USB
CONNECTOR
X
AUDIO
CABLE
X
INCORRECT
SHOULD BE USB
CONNECTOR
X
AUDIO
CABLE
X
INCORRECT
SHOULD BE USB
CONNECTOR
X
AUDIO
CABLE
X
INCORRECT
SHOULD BE USB
CONNECTOR
X
Vehicle MountVehicle Mount Audio CableAudio Cable USB CableUSB Cable AC AdapterAC Adapter
Cigarette Lighter
Adapter
Cigarette Lighter
Adapter
©
2
0
0
5
S
i
r
i
u
s
,
I
n
c
.
A
l
l
r
i
g
h
t
s
r
e
s
e
r
v
e
d
.
U
n
a
u
t
h
o
r
i
z
e
d
c
o
p
y
i
n
g
o
r
r
e
p
r
o
d
u
c
t
i
o
n
p
r
o
h
i
b
i
t
e
d
.
MY SIRIUS STUDIO
SOFTWARE VERSION XXXX
Need Art
Need Art
Magnetic AntennaMagnetic Antenna Alcohol SwabAlcohol SwabAntenna Cable
Cover/Tail
Antenna Cable
Cover/Tail
PC Software CDPC Software CD
[ Controls ]
16
[ Controls ] 17
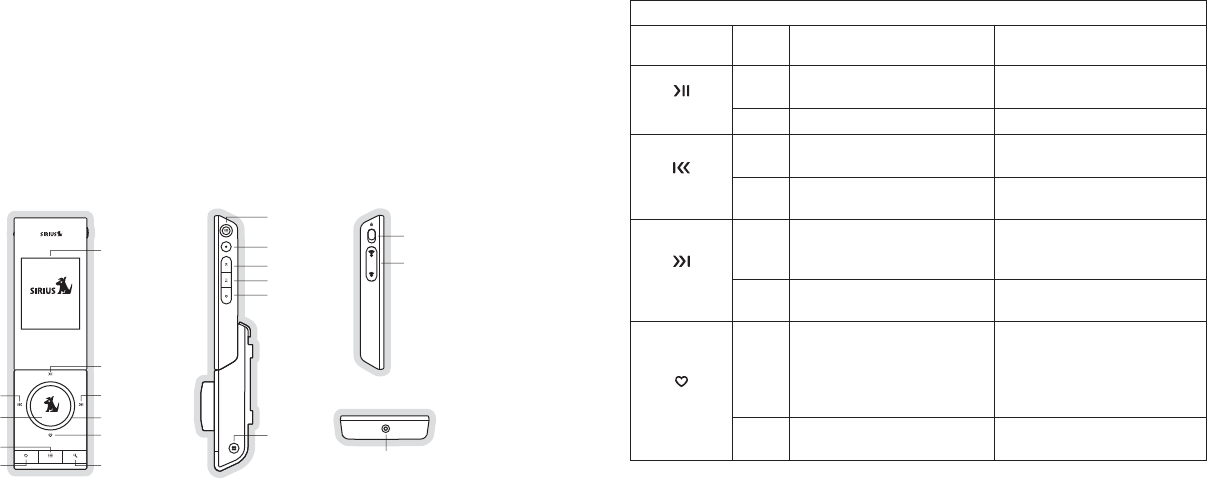
Controls
Sirius S50 Reference Guide
Figure 1 identifies the buttons and controls of the Sirius S50.
Fast Forward
Mode
Media Dial
Play/Pause
Playlists
Rewind
Headphone
Jack
Select
Back
Display Screen
Setup
Menu
Rewind
Play/Pause
Fast Forward
Select
Love
Volume
Lock
Figure 1Figure 1
The following two tables describe the functions of the buttons and controls on the vehicle
dock and the wearable player.
Dock Button Descriptions
Button Action Live Environment Description Playback Environment
Description
Play/Pause
Press Pauses a live broadcast or
resumes playing a broadcast Plays or pauses a song or show
Hold Returns to live broadcast No action
Rewind
Press Rewinds a paused broadcast
to previous song or show
Rewinds to the previous song
or show
Hold Rewinds through a paused
broadcast Rewinds through song or show
Fast-Forward
Press
Fast-Forwards a paused
broadcast to the next song
or show
Fast-Forwards to the next song
or show
Hold Fast-Forwards through a
paused broadcast
Fast-Forwards through song
or show
Love
Press
If listening to a song, saves
song
If listening to a shows,
prompts to save show or set a
reminder
If listening to My Sirius Chan-
nels, saves the song
Hold Saves the currently playing
show
If listening to My Sirius Chan-
nels, saves the song

[ Controls ]
18
[ Controls ] 19
Dock Button Descriptions
Button Action Live Environment Description Playback Environment
Description
Media Dial Turn
If listening to live broadcast,
tunes next channel
If in a list, menu, or prompt,
scrolls to next or previous item
If listening to a broadcast
which was paused, returns to
live broadcast
Moves to next playlist in the list
Select
Press Selects highlighted items in lists, menus, or prompts
Initiates scrolling of screen when listening to view off-screen text
Hold Displays Add/Move/Remove
preset prompt
When listening, displays Save
or Delete prompt
Playlists
Press Enters the playback environ-
ment and displays the playlists
Goes to the most recent playlist
menu screen and highlights the
currently selected song or show
If in a playlist, moves up one
level in the playlist menu
structure
Hold No Action Moves to the top of the playlist
menu structure
Dock Button Descriptions
Button Action Live Environment Description Playback Environment
Description
Back
Press
If listening to a live broadcast,
returns to previous channel
If listening to a broadcast
which was paused, returns
to previous channel, song, or
show
If in a list at the top level,
cancels list
If in a list not at the top level,
moves up one level in the list
structure
If in the setup menu, cancels
and moves up one level in the
menu structure
Returns to previous song or
show
Hold
Jumps to programmed traffic/weather or other channel
If a jump is pending, cancels jump
If in a list, menu, or prompt, jumps to top of list, menu, or prompt
[ Controls ]
20
[ Controls ] 21
Dock Button Descriptions
Button Action Live Environment Description Playback Environment
Description
Mode
Press
First push displays list screen
of current mode.
Second push cycles between
Channel, Presets, and Genre
Mode
No Action
Hold
Displays the list screen for the
current mode
When browsing by list, cycles
through the channel, artist,
and song display of the previ-
ous/next channels
No Action
Setup
Press
Displays the setup menu
If in the setup menu, accepts a change made and moves up one
level in the menu structure
Hold
First push and hold displays the frequency of the currently se-
lected FM preset for 15 seconds
Second and subsequent push and hold cycles through the FM
presets
Wearable Player Button Descriptions
Button Action Description
Menu
Press Displays the setup menu
Hold Jumps to top level of menu
Wearable Player Button Descriptions
Button Action Description
Select
Press Selects highlighted items in lists, menus, or prompts
Initiates scrolling of screen when listening to view off-screen text
Hold When listening, displays Save or Delete prompt
Rewind
Press If listening, rewinds to the previous song or show
If in a menu, scrolls down
Hold If listening, rewinds through song or show
If in a menu, scrolls down until the button is released
Play/Pause
Press Plays or pauses a song or show
Hold Turns off the wearable player
Fast-Forward
Press If Listening, Fast-Forwards to the next song or show
If in a menu, scrolls up
Hold Fast-Forwards through song or show
If in a menu, scrolls up until the button is released
Volume Press Increases or decreases the volume
Lock
On Locks all other buttons
Off Unlocks all buttons
[ Controls ]
22
[ Controls ] 23
Remote Control Reference Guide
Figure 1 identifies the buttons of the remote control.
mute
231
564
897
0
Play/Pause
Love
Select
Mode
PowerSetup
Playlists
Mute
Rewind
Back
Channel
Up/Down Volume
Numeric
Keypad
Fast-Forward
The following table describes the functions of the buttons of the remote control. Note that
only the buttons unique to the remote control are described. Please refer to the vehicle dock
button descriptions for descriptions of the other buttons.
Figure 1Figure 1
Remote Button Descriptions
Button Action Description
Power
Press No Action
Hold Turns the Sirius S50 off
0 - 9 Press Directly selects the channel indicted by the numbers which were
pressed
Mute Press Mutes (or un-mutes) the audio
Volume Press Increases or decreases the volume
Channel
Up/Down
Press Tunes the next or previous channel

[ Getting Started ]
24
[ Getting Started ] 25
Getting Started
Installing the Sirius S50
The accessories necessary to install and use the Sirius S50 in a vehicle are provided. When
installing the Sirius S50 in your vehicle, choose a location in your vehicle where the unit will
not block your vision, interfere with the vehicle controls, or obstruct the air bag. The location
should be easily accessible and provide good visibility of the display.
The mount may be secured to the dashboard or other surface using the adhesive mount as
shown in Figure 1.
Illustration depicting how to assemble the mounting
device for adhesive mount.
Illustration depicting the device adhesive mounted in a vehicle.
Figure 1Figure 1

[ Getting Started ]
26
[ Getting Started ] 27
Installing the Antenna
The optimum mounting location for the magnetic antenna is on the roof of the vehicle, with a
minimum unobstructed area of 12 inches by 12 inches, and exactly 6½ inches from the rear
roof edge of the vehicle (the length of the rubber antenna cable cover/tail). It is important to
avoid any obstructions that will block the SIRIUS signal, obstructions such as a roof rack,
a sunroof, roof mounted cargo containers, or other antennas. For convertible vehicles, the
antenna should be installed on the trunk lid.
For best performance, it is recommended that the antenna be installed with the rubber
antenna cable cover/tail. This rubber antenna cable cover/tail provides two benefits: first, it
positions the antenna the recommended distance from the rear window, rear door/hatch, or
trunk edge to give the antenna the best view of the sky. Secondly, it conceals and protects
the exposed antenna cable. The rubber antenna cable cover/tail has adhesive strips that hold
it securely in place.
The following illustrations show the recommended mounting locations of the antenna for sev-
eral types of vehicles. Follow these recommendations for best performance from the antenna.
Sedan/Coupe. (Figure 1) Mount the antenna along the rear centerline of the vehicle roof,
located at the rear of the roof near the rear window.
Pickup Truck. (Figure 1) Mount the antenna along the rear centerline of the cab roof, located
at the rear of the roof near the rear window.
SUV/Mini-Van. (Figure 1) Mount the antenna along the rear centerline of the vehicle roof,
located at the rear of the roof near the rear door/hatch.
Convertible. (Figure 1) Mount the antenna along the centerline of the trunk lid, with the rub-
Figure 1Figure 1
ber antenna cable cover/tail directed toward the rear window.
When you have selected a suitable mounting location, clean the area where the antenna and
rubber antenna cable cover/tail will be mounted with the supplied alcohol swab.
Rubber Antenna
Cover/Tail
Protective
Strips
Adhesive
Strain
Relief
Cable
Connect the rubber antenna cable cover/tail to the antenna cable, making sure that the strain-
relief on the antenna sits into the rubber antenna cable cover/tail groove. (Figure 2) Route
the antenna cable through the wire channel in the rubber antenna cable cover/tail. Do not yet
attach the adhesive strip.
Temporarily position the antenna and rubber antenna cable cover/tail in the selected mounting
area and route the cable from the antenna to the vehicle’s interior by tucking it underneath the
rubber molding around rear window, as shown in Figure 3.
Route the cable from the lowest point of the rear window into the trunk. Take advantage of
any existing cable channels or wiring conduits. For SUVs, mini-vans and 5-door vehicles, bring
the cable into the vehicle under the rubber molding for the tailgate, and continue under the
interior trim.
From the trunk, or rear of the vehicle, route the cable around the passenger compartment and
to the front of the vehicle, to the receiver. Take care not pull the cable across sharp edges
that could damage it, and keep it away from areas where it might entangle feet. Coil any
excess antenna cable in a location where it can be hidden.
Figure 2Figure 2
Figure 3Figure 3
[ Getting Started ]
28
[ Getting Started ] 29
Once the antenna cable is routed through the vehicle, and you are satisfied with the cable
routing, peel the protective material from the adhesive strip and press the rubber antenna
cable cover/tail firmly into place on the vehicle. Double check that the location of the antenna
and rubber antenna cable cover/tail are correct, and continue to press firmly down on rub-
ber antenna cable cover/tail for another 30 seconds. (Figure 4) At room temperature (68
degrees), maximum adhesion usually occurs within 72 hours. During this period, avoid car
washes and other contact with the antenna and rubber antenna cable cover/tail.
Figure 4Figure 4
Installing the Battery
The battery is fully charged and ready to use. To install the battery, simply remove the protec-
tive material as shown in figure 1.
To install the battery in the remote control, refer to Figure 1.
Illustration depicting how to
enable the batteries
Sirius S50 & Remote Control.
Figure 1Figure 1

[ Getting Started ]
30
[ Getting Started ] 31
Turning the Sirius S50 On and Off
Turn the Sirius S50 on by pressing any button on the unit. To turn the unit on with the remote
control, press the Power button. Note that when the Sirius S50 is being used as a wearable
player, the Lock button must in the unlocked position for the buttons to be enabled.
To turn off the unit when it is docked, press and hold the Play/Pause button on the side
of the wearable player, or press the Setup button on the dock and select the Shut-Down
Device menu option. The unit may also be turned off by pressing the Power button on the
remote control.
If the wearable player is not docked, press and hold the Play/Pause button, or press the
Menu button and select the Shut-Down Device menu option.
Demonstration Mode
When the unit is turned on for the first time, it will begin playing a short demonstration of
some of its important features. At any time while the demonstration is playing, you may press
any button to end the demonstration mode.
When the demonstration is finished playing, you will be asked whether you want the
demonstration to be played again the next time the unit is turned on. If you choose No, the
demonstration will be erased as the unit’s memory becomes full. If you decide you’d like to
retain the demonstration for future playback, but not have it play when the unit is turned on,
press Love while the demonstration is playing and the demonstration will be saved to My
Sirius Shows. You can then playback the demonstration whenever you wish by accessing My
Sirius Shows.
Selecting an FM Frequency
To listen to the audio from the Sirius S50, you will need to tune the FM radio in your vehicle
and the FM transmitter in the unit to the same FM frequency. The FM transmitter in the unit
defaults to 88.1 MHz, so you can begin by tuning your FM radio to 88.1 MHz. If there is an FM
station broadcasting on that frequency, you will have to search for a different FM frequency to
use, and the change the FM frequency that the unit will use to transmit.
The FM transmitter frequency of the unit may be changed using the Setup menu. Details
for changing the FM frequency are found in the FM Transmitter section in the Operations
section.
Subscribing to the SIRIUS Service
Before you can listen to the SIRIUS service, you need to subscribe to the SIRIUS Satellite
Radio service. Do the following:
Be sure that the Sirius S50 is correctly installed and that the antenna is oriented to
receive the SIRIUS signal.
Turn on the unit. After the startup sequence, the unit will update the SIRIUS channel
line-up. Wait until the channel updates have completed before pressing any buttons.
(Figure 1)
Once the channels have been updated, the display will change to “Call 1-888-539-SIR-
IUS to Subscribe” and will tune to channel 184. (Figure 2) You will not be able to listen
to other channels until you activate your SIRIUS subscription.
Use the Media Dial to tune to channel 0 to display the Sirius S50’s unique 12-digit
SIRIUS ID Number (SID). (Figure 3) You can also tune to channel 0 by using the remote
control: Press the Select button, then the 0 (zero) button, and then the Select but-
ton again. (The SID number is also available on the Sirius S50’s packaging.) Write the
SID number down in the space provided at the end of this guide.
Have your credit card handy and contact SIRIUS on the Internet at:
https://activate.siriusradio.com/ and follow the prompts to activate your subscription.
You can also call SIRIUS toll-free at: 1-888-539-SIRIUS (1-888-539-7474).
1.
2.
3.
4.
5.

[ Getting Started ]
32
[ Getting Started ] 33
When you have successfully subscribed to the SIRIUS service, and the Sirius S50 has
been updated with your subscription information, an alert will be displayed. (Figure 4) To
continue, press the Select button.
You are now ready to begin enjoying SIRIUS Satellite Radio’s digital entertainment, and can
tune to other channels!
Updating
Channel List
Screen
Preview
Channel/Call
to Subscribe
Screen
Channel 000
SID Screen
Updated
Subscription
Screen
6.
Figure 1Figure 1 Figure 2Figure 2 Figure 3Figure 3 Figure 4Figure 4
Operation
Learning the Features
The best way to learn and explore the many exciting features of the Sirius S50 is by trying it.
Experience for yourself how the Sirius S50 will enhance your SIRIUS satellite radio listening
pleasure! Press the buttons, turn the Media Dial, change the settings. Find out what that
Love does, and see how easy the Sirius S50 is to use. If you change any settings or record
any material that you do not wish to keep, you can easily reset the unit by accessing the Fac-
tory Default reset feature. So go ahead, take the Sirius S50 out for drive.
Listening Environments
The Sirius S50 functions in two distinct listening environments, Live and Playback.
Live
In the Live environment, the Sirius S50 plays the SIRIUS channels, as they are being broad-
cast. To use the Live mode, the Sirius S50 must be in a dock which is connected to the
antenna. The live environment allows you to browse and select the SIRIUS channels, and find
information about the songs, artists, sports, news, weather, traffic, or other entertainment be-
ing broadcast. You can also save songs and shows for later playback.
When the Play/Pause button is pressed while in the live environment, the broadcast to
which you are listening is stored temporarily, up to the most recent 30-60 minutes (depending
upon the content of the broadcast). You may resume listening to the broadcast at any time,
beginning from the point where the broadcast was paused, or you can fast-forward or rewind
through the paused broadcast, pause the broadcast again, or return to the live broadcast.
While paused, the live broadcast is continuously recorded until the memory becomes full.
When memory becomes full, the oldest part of the paused broadcast is deleted to make room
[ Operation ]
34
[ Operation ] 35
for the new material so that the live broadcast can continue to be recorded. The paused
broadcast is erased when either the Sirius S50 is turned off or tuned to another channel.
Playback
In the playback environment, you can playback songs or shows which you have saved from
live broadcasts, or songs which you have downloaded to the Sirius S50 from your PC using
the SIRIUS PC software. Any combination of songs, sports, talk shows, news broadcasts,
talk entertainment, etc., can be browsed in several playlists which are automatically created
when songs or shows are recorded or downloaded. Songs or shows in the playlists can be
played, erased, or taken along with you for playback when using the wearable player. Playlists
are retained even when the Sirius S50 is turned off.
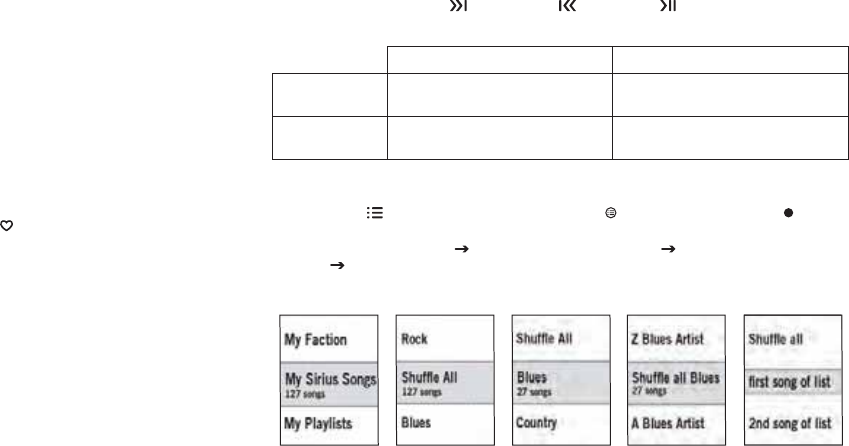
Navigating Menus and Lists
The menu and list structures in the Sirius S50 are navigated by turning the Media Dial to
scroll through a menu or list to highlight your choice, and then pressing the Select button
to select the choice. When using the wearable player, menus and lists are navigated by press-
ing the Fast-Forward and Rewind buttons, and then pressing the Select button.
For example, let’s say you have saved the show All Things Considered and now you want to
listen to it. Following the concept of turning the Media Dial to highlight a choice and press-
ing the Select button, here is how to navigate to it:
Press the Playlist button
Turn the Media Dial to scroll to My Sirius Shows
Press the Select button
Turn the Media Dial to scroll to My NPR
Press the Select button
Turn the Media Dial to scroll to All Things Considered
Press the Select button
Listen to the show
In this guide, menu or list structures like the above example are shown as:
Playlist button My Sirius Shows My NPR All Things Considered Listen.
[ Operation ]
36
[ Operation ] 37
Listening to Live Broadcasts
When you are using your Sirius S50 in the live environment, there are several ways to locate
and tune to the broadcast channels: by channel, by genre, and by preset. When initially turned
on, the Sirius S50 is in the channel mode.
To Tune by Channel:
Press the Mode button and select the channel mode.
Use the Media Dial to tune to a channel. (Figure 1)
To Tune by Genre:
Press the Mode button and select the genre mode.
Use the Media Dial to choose a genre. (Figure 2)
Press the Select button to select a genre.
Use the Media Dial to tune to a channel.
To Tune by Preset:
Press the Mode button and select the preset mode.
Use the Media Dial to browse the presets. (Figure 3)
Press the Select button to select a preset.
Notes:
To listen to a live broadcast, the S50 must be docked.
1.
2.
1.
2.
3.
4.
1.
2.
3.
Figure 1Figure 1 Figure 2Figure 2 Figure 3Figure 3
Channel Presets
The Sirius S50 can store up to 30 of your favorite channels in the preset list for fast tuning to
your favorite channels.
Adding Channel Presets:
To add the channel to which you are listening as a preset, press and hold the Select
button. (Figure 1)
To save the channel in the next available preset press the Select button. (Figure 2)
To save the channel to a different preset number, choose the desired preset number
using the Media Dial and press the Select button.
If a preset already exists for the preset you have selected, select whether to replace the
existing preset or insert the new preset. (Figure 3)
1.
2.
3.
4.
Figure 1Figure 1 Figure 2Figure 2
Figure 3Figure 3
[ Operation ]
38
[ Operation ] 39
Removing or Moving Channel Presets:
Press and hold the Select button.
Select whether to remove or move the preset. (Figure 4)
If Remove was chosen, the preset is removed from the presets list. (Figure 5)
If Move was chosen, the list of the presets will be displayed. Use the Media Dial to
choose a new location and press the Select button. The preset will then be moved to
the new location.
1.
2.
3.
4.
Figure 4Figure 4 Figure 5Figure 5
Pausing a Live Broadcast
If you are unable to continue listening to a live broadcast but do not want to miss the broad-
cast, you can pause and record the channel for up to 60 minutes.
Pausing a Live Broadcast:
Press Play/Pause to pause a live broadcast.
The audio will mute and a time bar will be shown near the bottom of the display screen
indicating the memory capacity and how much of the memory is filled with the broadcast.
(Figure 1)
Notes:
When a broadcast has been paused, the time bar will fill from the right (live broadcast) to the
left, and the time display indicate how much of the broadcast has been paused. The indica-
tor within the time bar indicates your current listening position
When the recording memory is 10 seconds from becoming full, two beeps will be heard (if
system sounds are enabled), and when the memory becomes full, play of the broadcast will
automatically begin. The live broadcast will continue to be recorded, overwriting the oldest
portion of the recorded broadcast however, when the memory is full, you will be unable to
rewind through the broadcast.
Within the time bar, vertical lines indicate segments, which are where a new song or show
begins, or where there was some other break in the broadcast. You can fast-forward or rewind
1.
2.
Figure 1Figure 1
[ Operation ]
40
[ Operation ] 41
through these segments.
Playing a Paused Broadcast:
Press Play/Pause to begin playing a paused broadcast from the point at which it was
paused. (Figures 2 & 3)
Notes:
Pressing and holding Play/Pause exits the paused broadcast and resumes the live broad-
cast.
Tuning a different channel, or responding to a game alert by tuning another channel, will erase
the recorded broadcast.
Figure 2Figure 2 Figure 3Figure 3
Fast-Forwarding and Rewinding Through a Paused Broadcast:
Pressing Fast-Forward and Rewind navigates through the paused broadcast,
either by time or by segments.
As you fast-forward or rewind, the indicator in the time bar will move to show your cur-
rent playback position relative to the live broadcast. (Figures 4 & 5)
Notes:
Pressing and releasing Fast-Forward and Rewind moves forwards or backwards to
the start of the next or previous segment and play immediately begins. The start of segments
(which are the beginning of songs or shows) is indicated in the time bar by vertical lines. If the
beginning of the paused broadcast is reached playback immediately begins. If the end of the
paused broadcast is reached the live broadcast resumes.
Pressing and holding Fast-Forward and Rewind for one second moves forward or back-
wards in 10 second intervals, which increases to 15 and then 30 second intervals the longer
the button remains pressed. Play begins immediately when the button is released or the
beginning of the paused broadcast is reached. If the end of the paused broadcast is reached,
the live broadcast resumes.
1.
2.
Figure 4Figure 4 Figure 5Figure 5

[ Operation ]
42
[ Operation ] 43
Saving Songs and Shows
Songs and shows can be saved by using Love while listening to a live broadcast.
To Save a Song:
Press Love to begin saving the song.
While the song is being saved, the love icon will be displayed for 1½ seconds. (Figure
1)
When the song is complete, it is saved in My Sirius Songs. Refer to the Listening to
Saved Songs, Shows, and MP3s section in the Operations section for information on
playing back the song.
Notes:
If you have tuned to a channel that is in the middle of playing a song that you want to save,
you will only be able to save the song from the point at which you tuned to the channel.
When recording a song, it will be recorded exactly as it was broadcast.
If you attempt to tune away before the song is complete, you will be prompted to confirm that
you wish to stop recording, and save the partial recording. If you save the partial recording,
the song will be displayed as incomplete when browsing the song in the playlist.
In some instances, songs are protected and cannot be saved. When this occurs, an alert will
be displayed and the song will not be saved.
1.
2.
3.
Figure 1Figure 1 Figure 2Figure 2
If you attempt to save a song, and the memory is full, a Memory is Full prompt will be dis-
played. (Figure 2) The following choices are presented:
Don’t Save. The current song or show you are attempting to save will not be saved.
Make Room and Save. The 10 songs which are least played are deleted, and the current
song is saved. Note that the most recently saved 10 songs are exempt from deletion.
Manage My Content. You will be taken to the Content Management menu in Setup
where you can delete the songs of your choice to make room. The current song will
continue to be recorded while you are managing your content, and will be saved when you
have finished deleting content.
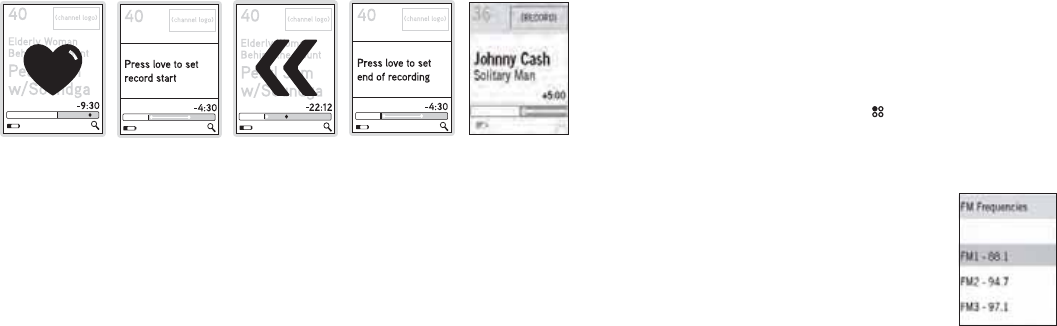
To Save a Show:
Press and hold Love to begin saving the show. The heart icon will be displayed for
1½ seconds and a time bar will indicate the amount of time available for recording.
(Figure 3)
Press and hold Rewind. You will be prompted to press Love to set the record
start. (Figure 4)
You may use Fast Forward and Rewind to modify the starting point of the record-
ing before pressing Love. (Figure 5)
Press Love to set the starting point.
You will be prompted to press Love to set the end of the recording. (Figure 6) You
may use Fast Forward and Rewind to modify the ending point of the recording
before pressing Love.
Press Love to set the ending point.
The recording time is now set. (Figure 7) When the show completes recording, it is
saved in My Sirius Shows. Refer to the Listening to Saved Songs, Shows, and MP3s
section in the Operations section for information on playing back the show.
•
•
•
1.
2.
3.
4.
5.
6.
7.
[ Operation ]
44
[ Operation ] 45
Notes:
Recordings are limited to a maximum of 2 hours.
You may only rewind the starting point for approximately 30 to 60 minutes (depending upon
the content of the show), or to the point at which the channel was tuned.
If you attempt to tune to another channel before the recording is complete, you will be prompt-
ed to confirm that you wish to stop recording, and if you wish to save the partial recording.
In some instances, shows are protected and cannot be saved. When this occurs, an alert will
be displayed and the show will not be saved.
If you attempt to save a song, and the memory is full, a Memory is Full prompt will be
displayed. (Figure 2) Refer to the notes in the notes in the previous section for information
concerning the Memory is Full prompt.
Figure 3Figure 3 Figure 4Figure 4 Figure 5Figure 5 Figure 6Figure 6 Figure 7Figure 7
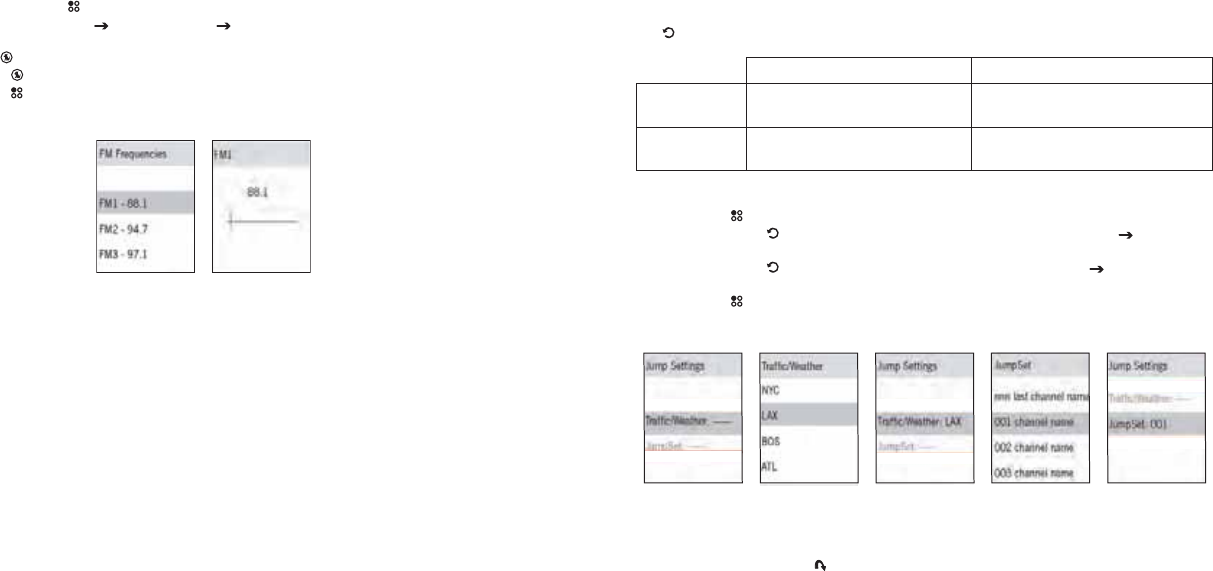
FM Transmitter
When docked in the vehicle docking station, the Sirius S50 can transmit on an FM frequency
which may be received by an FM radio, such as the FM radio in your home or vehicle.
Three FM frequencies may be chosen as FM presets allowing you to quickly change the FM
broadcast frequency.
To Select an FM Preset:
Press and hold the Setup button. The current FM preset frequency is displayed and
highlighted. (Figure 1)
To tune to the next FM preset, press the Setup button again within 15 seconds.
1.
2.
Figure 1Figure 1
[ Operation ]
46
[ Operation ] 47
To Change an FM Preset
Press and hold the Setup button.
Select Device Settings FM Frequencies and the FM preset you wish to change.
(Figure 2)
Use the Media Dial to tune a new FM frequency. (Figure 3)
Press the Select button to set the new FM frequency.
Press the Setup button to exit.
1.
2.
3.
4.
5.
Figure 2Figure 2 Figure 3Figure 3
Back/Jump Feature
The Back button has two main functions which are described in the following table:
Press and Release Press and Hold
Listening Live
or Playback
Returns to previous channel, song
or show
Jumps to programmed channel: Traf-
fic/Weather report or other channel
Browsing a
Menu or List Returns to previous menu or list Returns to the beginning of the
menu or list
Programming the Jump Feature
Press the Setup button and select Jump Settings. (Figure 1)
To program the Back button for traffic/weather, select Traffic/Weather and the city
closest to your location. (Figure 2 & 3)
To program the Back button to a regular channel, select JumpSet and the desired
channel. (Figure 4 & 5)
Press the Setup button to exit.
Notes:
It can take up to 4 minutes to locate a traffic/weather report when the Back button is pressed.
While a jump is pending, the jump icon is displayed until the traffic/weather report begins.
1.
2.
3.
4.
Figure 1Figure 1 Figure 2Figure 2 Figure 3Figure 3
Figure 4Figure 4
Figure 5Figure 5
[ Operation ]
48
[ Operation ] 49
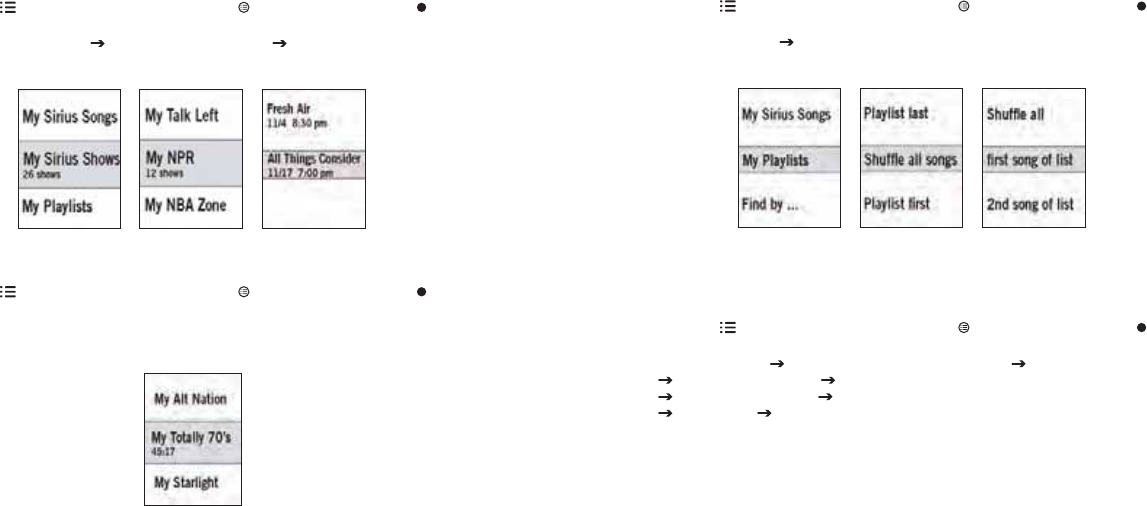
Listening to Saved Songs, Shows, and MP3s
The playback environment allows you to listen to songs, shows, and MP3s which has been
saved in the Sirius S50. In addition, you can also listen to songs from your three most listened
to music channels which the Sirius S50 has automatically saved for you.
In the playback environment, the playlists are arranged into several categories: My Sirius
Channels, My Sirius Songs, My Sirius Shows, and My Playlists.
My Sirius Channels. My Sirius Channels consists of three playlists which are automati-
cally created and contain songs from the three music channels that you listen the most.
Songs from these channels are stored in playlists named after the channel names, for
example, My Octane, My Bluegrass, My Hip-Hop Nation, etc. Once a song from these
playlists has been listened to, or it is more than 30 days old, it is marked to be replaced
with fresh content from the channel. You may save any song by using Love while you
are listening to the song. Songs in the My Sirius Channels playlists cannot be browsed as
a list.
My Sirius Songs. This playlist contains songs which you have saved from music broad-
cast channels and from My Sirius Channels, except if they have been saved using the
scheduled recording feature. (All songs saved using the scheduled recording feature are
saved in the My Sirius Shows.) Songs and sets are automatically saved into sub-catego-
ries within My Sirius Songs which are named after the channel from which they have been
recorded, such as My Alt Nation, My Totally 70’s, etc.
My Sirius Shows. This playlist contains shows, news, sports, etc., and scheduled record-
ings which you have saved from broadcast channels. They are automatically saved into
sub-categories within My Sirius Shows which are named after the channel from which they
are saved, such as My NPR Now, My Talk Left, My Maxim, etc. Sports games are saved in
sub-categories named My NBA Zone, My NHL Zone, etc.
My Playlists. This playlist contains audio files (MP3 and WMA format) which you have
downloaded from your PC using the SIRIUS PC software. You may design this category in
any way you wish, creating sub-categories for organization.
•
•
•
•
While listening, you may use Fast-Forward, Rewind, and Play/Pause to navigate
through the song or show. The following table describes their actions:
Press and Release Press and Hold
Fast-Forward/
Rewind
Begins playing the next/previous
song/show in the playlist
Fast-Forwards/Rewinds the song/
show currently playing
Play/Pause Pauses or plays the song/show
currently selected
Pauses or plays the song/show
currently selected
Playing Songs from My Sirius Songs
Press the Playlists button on the dock (or the Menu button and then the Select
button on the wearable player).
Select My Sirius Songs Select a genre (or Shuffle All) Select an artist (or Shuffle
All) Select a song (or Shuffle All…). (Figure 1)
1.
2.
Figure 1Figure 1
[ Operation ]
50
[ Operation ] 51
Playing Shows from My Sirius Shows
Press the Playlists button on the dock (or the Menu button and then the Select
button on the wearable player)
Select My Sirius Shows Select a channel category Select a show. (Figure 2)
Playing Songs from the My Sirius Channels Playlists
Press the Playlists button on the dock (or the Menu button and then the Select
button on the wearable player).
Select a My Sirius Channels playlist. (Figure 2)
1.
2.
1.
2.
Figure 2Figure 2
Figure 3Figure 3
Playing Audio Files from My Playlists
Press the Playlists button on the dock (or the Menu button and then the Select
button on the wearable player).
Select My Playlists Select a audio file (or Shuffle All). (Figure 4)
Finding Songs and Shows in Playlists
You can find songs or shows by using the Find by … playlist menu option. Find by... will cre-
ate lists of the genres, artists, or songs and shows found within the playlists.
Press the Playlists button on the dock (or the Menu button and then the Select
button on the wearable player).
Select Find by … Select Genre, Artist, or Song/Show
Genre: Select a genre Select a song (or Shuffle All).
Artist: Select an artist Select a song (or Shuffle All).
Song/Show: Select a song (or Shuffle All).
1.
2.
1.
2.
Figure 4Figure 4
[ Operation ]
52
[ Operation ] 53
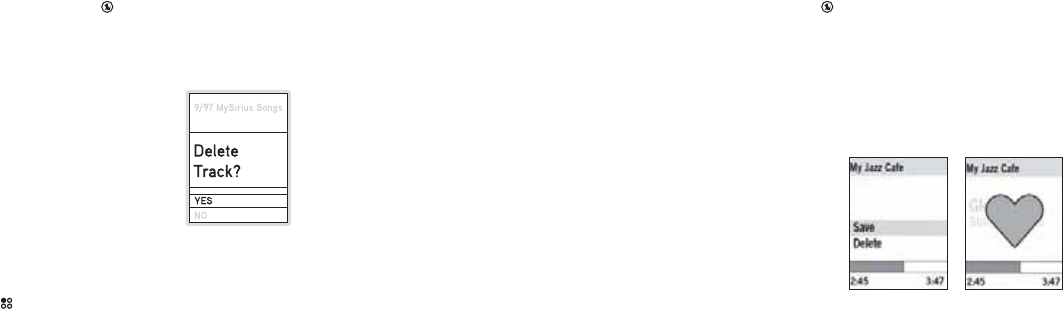
Deleting Songs or Shows from My Sirius Channels, My Sirius Shows, and My Playlists
Press and hold the Select button while listening to the song or show you want to
delete.
At the Delete Track prompt, select Yes or No. (Figure 5)
Notes:
As an alternative, you can use the Delete Content menu option from the Content Management
menu in Setup to delete content.
1.
2.
Figure 5Figure 5
Saving or Deleting Songs from My Sirius Channels
Press and hold the Select button while listening to the song you want to save or
delete.
At the prompt, select Save or Delete (Figure 6)
If you choose Save, the heart icon will be displayed for 1½ seconds and the song is
saved. (Figure 7)
If you choose Delete, the song is immediately deleted and the next song in the playlist
begins playing.
1.
2.
3.
4.
Figure 6Figure 6 Figure 7Figure 7
[ Operation ]
54
[ Operation ] 55
Saving Songs or Shows with a Scheduled Recording
A scheduled recording is a recording session that you program to begin at a future time and
day to record a live broadcast.
Schedule, Edit, or Delete a Program for Scheduled Recordings
Press the Setup button.
Select Content Management Schedule Recordings
If you are creating a new program: Select New Program. (Figure 1)
If you are editing an existing program: Select the program you wish
to edit Select Edit. (Figure 2)
If you are deleting an existing program: Select the program you wish to
delete Select Delete. (Figure 2) The program will be deleted and you will be
returned to the Schedule Recordings screen. (Figure 1)
The New Program screen will be displayed (Figure 3). Use the Media Dial to change
an entry, and press the Select button to set the entry and move to the next entry. To
return to a previous entry use the Back button. Refer to the table following for an
explanation of each entry.
When you have pressed the Select button at the last entry, the new program will be
saved. If it conflicts with an existing scheduled recording, you will be prompted to keep
the new program and replace the conflicting one, or delete the new program. (Figure 4)
New Program Entry Field Descriptions
Channel This entry specifies the SIRIUS channel you wish to record. The default
entry is the current channel.
Date This entry specifies the date the scheduled recording should begin. The
default entry is the current date.
Time This entry specifies the time of day the scheduled recording should
begin. The default entry is the current time.
Duration This entry specifies the length of time to record. The default entry is
one hour.
1.
2.
3.
4.
New Program Entry Field Descriptions
Frequency
This entry specifies how often the scheduled recording should take
place. The default entry is Once. Options for frequency are:
Once. The scheduled recording will take place only one time on the
specified date and time, and will not repeat.
Daily. The scheduled recording will take place daily, beginning on
the date specified and continuing every day of the week at specified
time.
M—F. The scheduled recording will take place every Monday,
Tuesday, Wednesday, Thursday, and Friday at the specified time.
Saturday and Sunday are not included in the schedule.
Weekly. The scheduled recording will take place once a week
beginning on the day of the week specified by the date, at the
specified time.
•
•
•
•
Notes:
Scheduled recordings are limited to a maximum of 10, with a maximum of 4 hours per each
recording session, or a total of 20 hours of scheduled recordings. If you attempt to schedule
more than 10 recordings, you will be prompted to delete an existing scheduled recording, or
to discard the new recording schedule. All recordings are saved to My Sirius Shows.
Scheduled recordings are automatically performed without any intervention, however, the
Figure 1Figure 1 Figure 2Figure 2 Figure 3Figure 3
Figure 4Figure 4

[ Operation ]
56
[ Operation ] 57
Sirius S50 must be docked, connected to a power source, connected to the antenna and
receiving a good signal.
If the Sirius S50 is turned off at the time of a scheduled recording, it will wake up and perform
the recording session as long as it has external power from the dock. Some vehicle cigarette
lighters do not have power when the vehicle is off.
If you attempt to tune away before a recording session is complete, you will be prompted to
confirm that you wish to stop recording. You will have the choice to save the recording up to
the point where it was interrupted, or to discard it.
Game Alert
You can program the Sirius S50 to remember your favorite sports teams. The Sirius S50 will
then automatically alert you when any of your favorite sports teams are playing in a game, and
when there is a score change in a game.
Adding and Removing Favorite Teams for Game Alerts
Press the Setup button.
Select Sport Settings Favorite Teams Select the sports league or college for the
team you want to add/remove (Figure 1)
To add teams for game alerts: Select an individual team (or select All…) (Figure 2)
Selected teams will appear in the list with a star beside the team name. (Figure 3)
To remove teams: Select the team you want to remove. The star beside the team
name will be removed indicating it is no longer selected for game alerts.
You may continue selecting or removing teams by using the Back button to navigate
back in the menu structure.
When complete, scroll to the end of the list and select Save.
1.
2.
3.
4.
Notes:
There is no limit on the amount of teams you can select for game alerts.
The Sirius S50 must be docked and connected to the antenna in order for the game alert
feature to work.
When the Sirius S50 is turned on, a check is done to see if any of your favorite sports teams
are playing. An alert will be displayed if a match is found, and pressing the Select button
will to tune to the game. (Figure 4)
If one of your favorite sports teams begins playing a game while you are listening you will
receive an alert (Figure 4). Pressing the Select button will tune to the game.
When a score change happens for a favorite sports teams an alert will be displayed for 5
seconds (Figure 5). Pressing the Select button will tune to the game.
Whenever any of your favorite sports teams are playing, you can check My Game Zone in the
genre list to see a listing of all the games the scores (Figure 5). This list will scroll every 2
seconds to display the current scores of all the teams. Selecting a game from the list will tune
to the channel where the game is being broadcast.
The game alert feature is enabled by default, but there will be no game alerts until you have
added a team. To disable the game alert feature, refer to Game Alert in the Setup Menu
section.
Figure 2Figure 2
Figure 3Figure 3
Figure 1Figure 1

[ Operation ]
58
[ Operation ] 59
SCORE
CHANGE
ALERT
Sports Ticker
When you are listening to the Sirius S50, you can have a sports ticker displayed at regular
intervals which will show the scores of all your favorite teams which are currently playing.
(Figure 1)
An alert tone will be heard every 5 minutes and the sports ticker will be displayed. Each score
for your favorite teams will be displayed for 10 seconds until all the teams scores have been
displayed. When all the scores have been displayed, the display screen will revert back to the
previous display screen.
Figure 5Figure 5 Figure 6Figure 6Figure 4Figure 4
Notes:
The Sirius S50 must be docked and connected to the antenna in order for the sports ticker
feature to work.
The sports ticker feature is enabled by default, but there will be no alerts until you have added
a team. To disable the sports ticker feature, refer to Sports Ticker in the Setup Menu section.
Figure 1Figure 1

[ Operation ]
60
[ Operation ] 61
Sleep Timer
The sleep timer feature will turn the Sirius S50 off after 15, 30, 45, or 60 minutes. The sleep
timer function differs from the auto shutdown feature in that you may change channels, or any
other activity, without interrupting the sleep timer.
To Set the Sleep Timer
Press the Setup button.
Select Time Settings Sleep Timer Select an amount of time. (Figure 1)
Sleep Timer
Screen
Notes:
The Sirius S50 must be in a dock for this feature to work.
If you are recording any songs or shows when the sleep time has been reached, the recording
will be terminated when the Sirius S50 turns itself off.
1.
2.
Figure 1Figure 1
Auto Shutdown
The auto shutdown feature turns the Sirius S50 off after one hour of inactivity. This feature
is only available when in the vehicle dock. Enabling this feature while using the Sirius S50 in
your vehicle prevents accidental battery drainage by turning it off if you forget to do so.
Enabling Auto Shutdown
Press the Setup button. (Figure 1)
Select Time Settings Sleep Timer Auto Shutdown.
Notes:
If there have been no buttons pressed for one hour, the Sirius S50 will automatically turn itself
off. If any buttons are pressed during the one hour shutdown period, the auto shutdown timer
will be reset to one hour.
After 59 minutes of inactivity, a prompt will be displayed to cancel the auto shutdown. Press-
ing the Select button at the prompt will reset the auto shutdown timer to one hour.
1.
2.
[ Operation ]
62
[ Operation ] 63
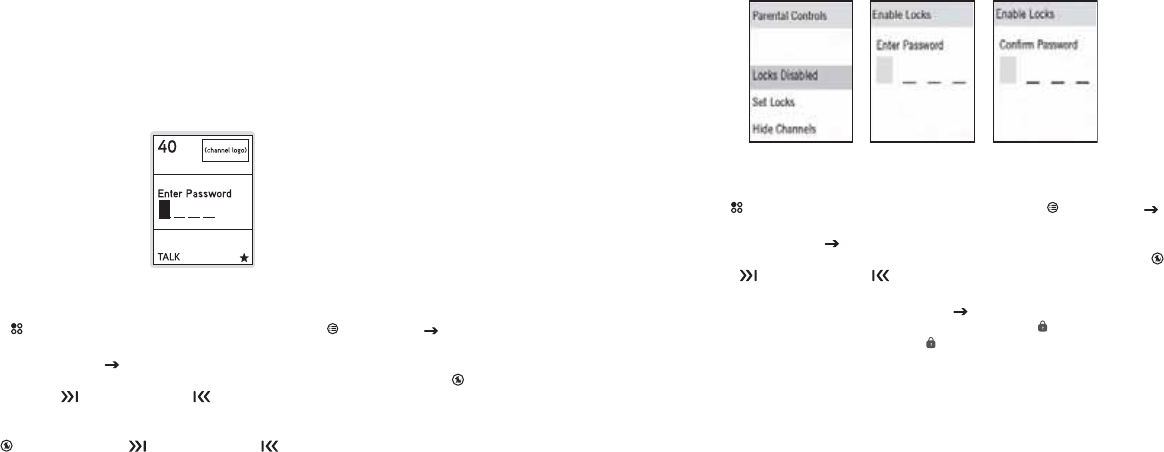
Parental Control
The parental control feature sets a password for access to specific channels or playlists.
Locked channels and playlists are visible when browsing lists, and display a lock icon next to
the name.
When you attempt to access a locked channel or playlist, you will be prompted to enter your
password before you can proceed. (Figure 1)
Enabling or Disabling Locks
Press the Setup button. For the wearable player, press the Menu button Select
Device Management.
Select Parental Controls Locks Enabled or Locks Disabled. (Figure 2)
(a) If the locks are enabled, you will be prompted to enter your password. Use the
Media Dial, or the Fast-Forward and Rewind buttons on the wearable player to
enter each digit of the password. (Figure 3)
(b) If you are enabling locks for the first time, you will be prompted to create a password.
Use the Media Dial, or the Fast-Forward and Rewind buttons on the wearable
player, to enter each digit of the password and press the Select button. (Figure 3)
You will be then be prompted to confirm the password you just entered. (Figure 4)
When you have entered the password, the locks will be enabled or disabled according
to your choice.
1.
2.
3.
4.
Figure 1Figure 1
Locking and Unlocking Channels and Playlists
Press the Setup button. For the wearable player, press the Menu button Select
Device Management.
Select Parental Controls Set Locks. (Figure 5)
If the locks are enabled, you will be prompted to enter your password. Use the Media
Dial, or the Fast-Forward and Rewind buttons on the wearable player to enter
each digit of the password. (Figure 3)
Select either Lock Channels or Lock Playlists Select a channel or playlist to lock/un-
lock. (Figures 6—8) If you are locking a channel or playlist, a lock icon will be displayed
beside the locked channel or playlist. The lock icon is removed if you have unlocked a
channel or playlist.
You may continue locking or unlocking channels and playlists until you have finished.
1.
2.
3.
4.
5.
Figure 3Figure 3
Figure 4Figure 4
Figure 2Figure 2
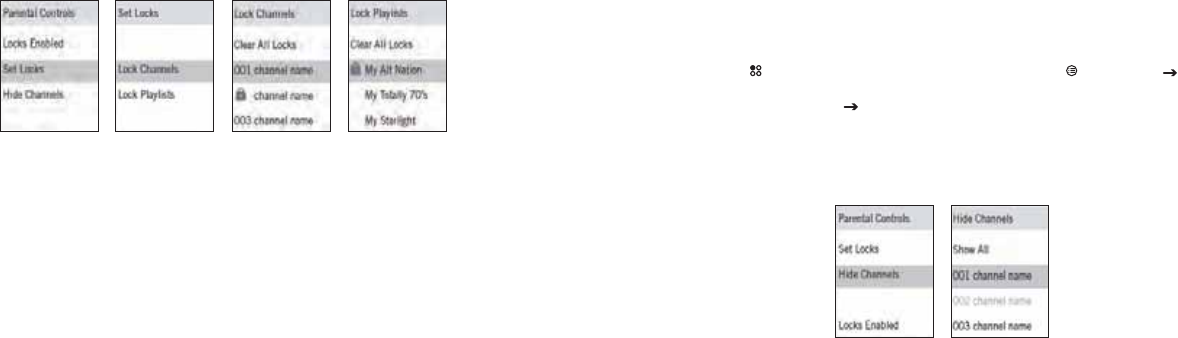
[ Operation ]
64
[ Operation ] 65
Notes:
The lock feature requires you to set a password. Once a password has been set, it is impor-
tant to remember your password as it cannot be reset or erased by using the Factory Default
reset feature of the Sirius S50. This prevents circumvention of the lock.
When you tune away from a locked channel or playlist, the channel or playlist will become
locked again.
Figure 5Figure 5
Figure 6Figure 6 Figure 7Figure 7 Figure 8Figure 8
Hide Channels
The hide feature allows you to designate channels not be displayed when browsing channel
lists.
Hiding or Showing Channels
Press the Setup button. For the wearable player, press the Menu button Select
Device Management.
Select Parental Controls Hide Channels. (Figure 1)
Select a channel to hide or show, or select Show All to show all hidden channels. Hid-
den channels will appear dimmed in the list. (Figure 2)
You may continue hiding or showing channels until you have finished.
Notes:
The hide feature differs from the lock feature in that a locked channel will be displayed while
browsing a list (but is password protected), while a hidden channel will never appear in a list.
Hidden channels are not locked, but can only be tuned by directly entering the channel num-
ber using the numeric keypad on the remote control.
1.
2.
3.
4.
Figure 1Figure 1 Figure 2Figure 2
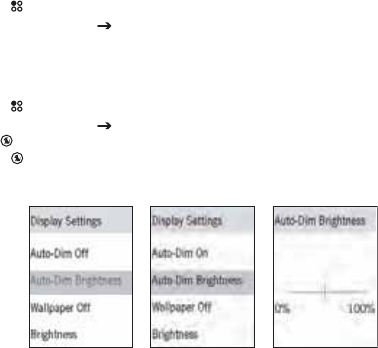
[ Operation ]
66
[ Operation ] 67
Auto Dimming
The auto dimming feature will automatically dim the display screen of the Sirius S50 when it
is dark. This is useful if you use the sleep timer feature at night, or if using the Sirius S50 at
night in a vehicle.
To Enable or Disable Auto Dimming
Press the Setup button.
Select Display Settings Auto-Dim On/Auto-Dim Off. (Figure 1)
The Auto-Dim On/Off menu option toggles to enable or disable. If the Auto-Dim Bright-
ness entry is dimmed, this indicates that it is disabled.
To Adjust the Auto Dimming Brightness
Press the Setup button.
Select Display Settings Auto-Dim Brightness. (Figure 2)
Use the Media Dial to select the brightness level. (Figure 3)
Press the Select button to set the new brightness level.
L
1.
2.
3.
1.
2.
3.
4.
Figure 2Figure 2 Figure 3Figure 3Figure 1Figure 1
PC Software
The PC software included with your Sirius S50 allows you to connect your Sirius S50 to your
PC. The following list provides a few highlights of the capabilities of the PC software:
Download songs to the playlists, delete or modify the order of songs and clips.
Manage the content of My Sirius Channels playlists: Reset the channel ratings and specify
favorite channels for My Sirius Channels.
Manage memory allocation for downloaded music.
Download and manage art for channels, songs, artists, shows, and logos.
Manage presets: Add, move, and remove presets.
Access the Setup menu functions for modification.
Update information pertaining to sports teams and leagues, and traffic and weather cities.
Check for updates to the operating system software and download them to Sirius S50.
Reinstall deleted operating system files.
Display the SIRIUS ID (SID) of your Sirius S50.
•
•
•
•
•
•
•
•
•
[ Setup Menu ]
68
[ Setup Menu ] 69
Setup Menu
Setup Menu Navigation
When the Sirius S50 is docked, the setup menu (Figure 1) is accessed by pressing the
Setup button. Options in the setup menu are selected by highlighting the menu option using
the Media Dial and pressing the Select button. To return to a previous menu, press the
Setup button.
When the Sirius S50 is being used as a wearable player, the setup menu (Figure 2) is ac-
cessed by pressing the Menu button and selecting the Device Management menu option.
Options in the setup menu are selected by highlighting the menu option using the Fast-
Forward and Rewind buttons and pressing the Select button. To return to a previous
menu, press the Menu button.
Not all menu options described in this section are available from the wearable player Device
Management menu. To indicate which menu options are available on the wearable player,
each applicable section or sub-section will have an earbud icon indicating that the menu
option is available on the wearable player.
Each option in the setup menus is described in the following sub-sections, in the order in
which they appear when the Sirius S50 is docked.
PlayLists
Device Management
Shut-Down Device
This option is used to turn off the Sirius S50. Select the Shut-Down Device menu option to
turn the Sirius S50 off.
Content Management
The Content Management menu option provides for scheduling recordings, deleting saved
songs and shows from playlists, for resetting the channel ratings of My Sirius Channels, and
for checking the amount of the Sirius S50’s memory currently being used.
Schedule Recordings
Details for scheduling recordings is found in the Saving Songs or Shows with a Scheduled
Recording section in the Operations section.
Figure 1Figure 1 Figure 2Figure 2

[ Setup Menu ]
70
[ Setup Menu ] 71
Delete Content
The Delete Content menu option provides for deleting songs and shows from My Sirius
Songs, My Sirius Shows, and My Playlists. Select the Delete Content menu option from the
Content Management menu to display the playlists. (Figure 1)
When My Playlists is selected, a list of all the audio files in the playlist are displayed. (Figure
2) Individual audio files can be deleted selecting them, or all audio files be deleted by choos-
ing the Delete All menu option.
When My Sirius Songs is selected (Figure 3), the following delete options are displayed:
By Least Played. Songs are listed in order by least played to most played.
By Artist. Songs are listed alphabetically by artist.
By Title. Songs are listed alphabetically by title.
Delete All. Deletes all songs in the playlist.
When My Sirius Shows is selected (Figure 4), the following delete options are displayed:
By Most Played. Shows are listed in order by most played to least played.
By Date. Shows are listed chronologically from the oldest recording date to the newest
recording date.
By Channel. Shows are listed in ascending order by channel number.
Delete All. Deletes all shows in the playlist.
You can delete songs or shows by selecting them in the various lists. Repeat this process
until you have completed deleting songs and shows.
•
•
•
•
•
•
•
•
My Sirius Channels
The My Sirius Channels menu option deletes all songs from a favorite channel in My Sirius
Channels by resetting the channel rating. If you discontinue listening to a particular channel or
channels, and want the Sirius S50 to begin saving songs from another channel, select the My
Sirius Channels menu option from the Content Management menu and select a favorite chan-
nel to reset. (Figure 5) Select Yes at the prompt to reset the channel rating. (Figure 6)
Memory Usage
To check the amount of memory currently being used, select the Memory Usage menu option
from the Content Management menu. The memory usage screen displays the percentage of
Figure 1Figure 1 Figure 2Figure 2 Figure 3Figure 3
Figure 4Figure 4
Figure 5Figure 5 Figure 6Figure 6

[ Setup Menu ]
72
[ Setup Menu ] 73
memory currently being used. (Figure 7)
Sport Settings
The Sports Settings menu option provides for choosing your favorite teams for game alerts,
and also for enabling or disabling the Game Alert and Sport Ticker features.
Favorite Teams
Details for adding favorite teams for game alerts is found in the Game Alert section in the
Operations section.
Sport Ticker On/Off
To enable or disable the sport ticker feature, select the Sport Ticker On/Off menu option in
the Sport Settings menu to toggle the On/Off setting.
Game Alert On/Off
To enable or disable the game alert feature, select the Game Alert On/Off menu option in the
Sport Settings menu to toggle the On/Off setting.
Figure 7Figure 7
Jump Settings
The Jump Settings menu option provides for setting the jump function of the Back button.
Details for setting the jump feature is found in the Jump/Back Feature section in the Opera-
tions section.
Device Settings
The Device Settings menu option provides for turning the FM transmitter On/Off, choosing
the FM preset frequencies, for displaying the antenna aiming signal strength display, for dis-
playing the Sirius ID (SID), and for displaying device information about the Sirius S50.
FM On/Off
The FM On/Off menu option provides for turning the Sirius S50’s FM transmitter On or Off.
To enable or disable the FM transmitter, select the FM On/Off menu option from the Device
Settings menu to toggle the On/Off setting.
FM Frequencies
Three FM frequencies may be chosen as presets for quickly tuning the Sirius S50’s FM trans-
mitter by pressing and holding the Select button. Details for setting the FM presets are
found in the FM Transmitter section in the Operations section.
Antenna Aiming
The antenna aiming display shows the strength of the SIRIUS signal being received by the
Sirius S50. This is useful when installing and orienting the antenna for optimal reception of
satellite signal. To display the antenna aiming information, select the Antenna Aiming menu
option from the Device Settings menu.
The SATELLITE portion of the Antenna Aiming display screen shows the strength of the
signal being received from the satellite, while the TERRESTRIAL portion of the display screen
shows the strength of the signal being received from terrestrial based transmitters, if available.
(Figure 1)
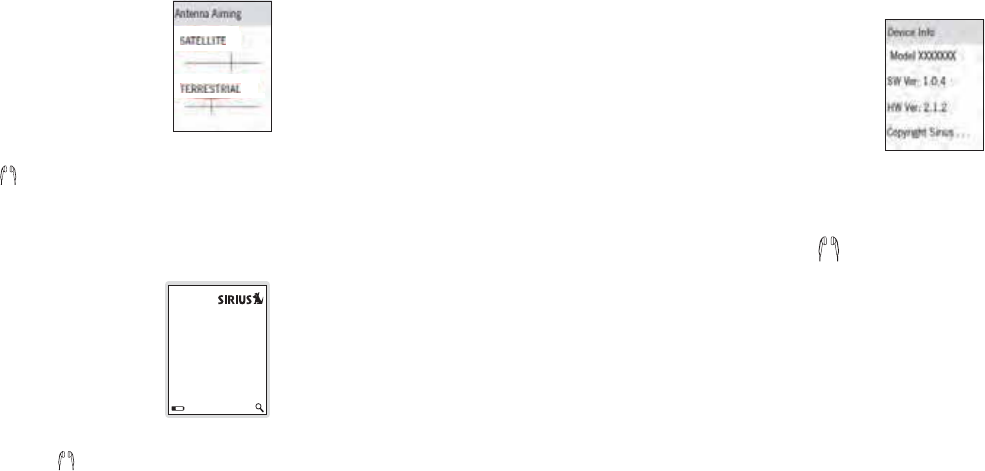
[ Setup Menu ]
74
[ Setup Menu ] 75
SIRIUS ID
The SIRIUS ID (SID) is the unique identification number assigned to the Sirius S50. This num-
ber is used when subscribing to the Sirius Satellite Radio service. To display the SID, select
the SIRIUS ID menu option from the Device Settings menu. (Figure 2) It is recommended that
you record the SID number in the space provided at the end of this guide.
0
Sirius ID
ESN000492229812
Device Information
The Device Information menu option displays information about the model number and
software and hardware version numbers of the Sirius S50. To display the device information,
select the Device Info menu option from the Device Settings menu. (Figure 3)
Figure 1Figure 1
Figure 2Figure 2
Factory Defaults
The factory defaults feature sets most parameters and features of the Sirius S50 back
to the defaults as manufactured from the factory. The following parameters or features
are reset:
All presets are erased
The Sirius S50 is set to the normal tuning mode
Display contrast is set to 50%
Display dimming is set to 50%
Auto dim is set to on
FM transmitter is set to on
FM Frequency of the first FM preset is set to 88.1 MHz, remainder are set to none
Skipped channels are added back
Favorite teams for game alerts erased
Game alert is set to off
•
•
•
•
•
•
•
•
•
•
Figure 3Figure 3
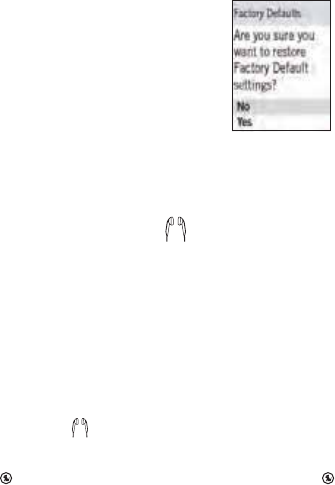
[ Setup Menu ]
76
[ Setup Menu ] 77
Sports ticker is set to off
Clock is set to 12-hour format
Clock is set to Eastern time zone
Clock is set to daylight savings time observed
Alarm clock alarm is set to off
Auto shutdown is set to off
Alarm clock time is set to 12:00 PM
Alarm clock is set to off
Sleep mode is set to off
Jump is set to none
Audio navigation cues are set to off
System sounds are set to on
Scheduled recordings are erased
The contents of My Sirius Songs, My Sirius Shows, My Playlists are erased
The channel ratings for the My Sirius Channels is reset, erasing the content
The demo mode is reset
The following features remain unchanged:
Channels locked with parental control remain locked
Parental password remains unchanged
Password hint remains unchanged
To perform a factory default reset, select the Factory Defaults menu option from the Setup
Menu. At the prompt, select Yes to perform a factory default reset or No to cancel. (Figure 1)
•
•
•
•
•
•
•
•
•
•
•
•
•
•
•
•
•
•
•
Display Settings
The Display Settings menu option provides for turning wallpaper On/Off, for adjusting the
brightness of the display screen, for enabling or disabling the auto-dim feature, and for setting
the auto-dim brightness.
Wallpaper On/Off
The Wallpaper On/Off menu option provides for turning the wallpaper displayed in the back-
ground of the screen On or Off. To enable or disable the wallpaper, highlight the Wallpaper
On/Off menu option from the Display Settings menu to toggle the On/Off setting.
Brightness
The brightness feature increases or decreases the brightness of the display screen. To set
the brightness, select the Brightness menu option from the Display Settings menu. Use the
Media Dial to adjust the brightness and press the Select button to set the brightness.
(Figure 1)
Figure 1Figure 1
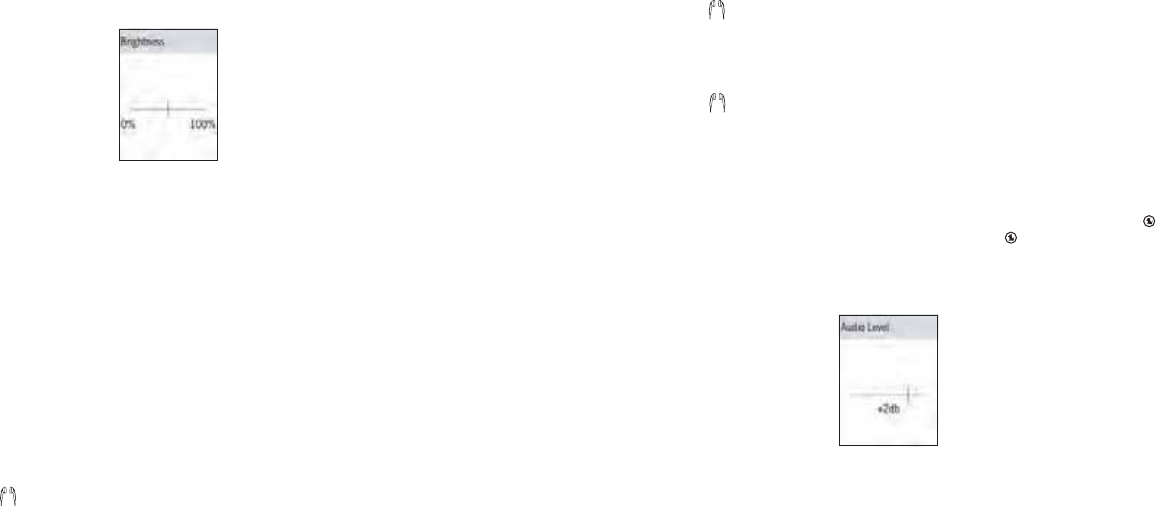
[ Setup Menu ]
78
[ Setup Menu ] 79
Auto-Dim Off/On
The Auto-Dim Off/On feature turns the automatic dimming feature of the display screen in low
light conditions On or Off. Details for setting auto-dim On or Off is found in the Auto Dim-
ming section in the Operations section.
Auto-Dim Brightness
The Auto-Dim Brightness menu option sets the brightness of the display screen when it is
dimmed. Details for setting the auto-dim brightness is found in the Auto Dimming section in
the Operations section.
Audio Settings
The Audio Settings menu option provides for enabling or disabling the verbal audio navigation
cues, system sounds, and startup sounds, and for changing the audio output level.
Audio Navigation
Audio navigation cues are the audible voice cues which are heard when using the Sirius S50.
To enable or disable the audio navigation cues, select the Audio Navigation On/Off menu op-
tion from the Audio Settings menu to toggle the On/Off setting.
Figure 1Figure 1
System Sounds
System sounds are the beeps and other sounds which are heard when using the Sirius S50.
To enable or disable the system sounds, select the System Sounds On/Off menu option from
the Audio Settings menu to toggle the On/Off setting.
Startup Sounds
Startup sounds are the sounds which are heard when the Sirius S50 is turned on. To enable
or disable the system startup sounds, select the Startup Sounds On/Off menu option from the
Audio Settings menu to toggle the On/Off setting.
Audio Level
The audio level menu option changes the audio output level of the Sirius S50. To change the
audio level, select the Audio Level menu option from the Audio Settings menu. Use the
Media Dial to increase or decrease the audio level and press the Select button to set the
audio level. (Figure 1)
Figure 1Figure 1

[ Setup Menu ]
80
[ Setup Menu ] 81
Time Settings
The Time Settings menu option provides access to features having to do with time functions:
the timezone, daylight savings time, auto shutdown, and the sleep timer.
Timezone
The Timezone menu option provides for selecting the time zone to be used for your locale. To
set the time zone, select the Timezone menu option from the Time Settings menu and select
the time zone for your local area. (Figure 1)
Daylight Savings Time
This DST Observed menu option enables or disables the daylight savings time adjustment. To
enable or disable the daylight savings time function, select the DST Observed (or DST Not
Observed) menu option from the Time Settings menu to toggle the observed/not observed
setting.
Auto Shutdown On/Off
The auto shutdown feature turns the Sirius S50 off after one hour of inactivity. Details for set-
Figure 1Figure 1
ting the auto shutdown are found in the Auto Shutdown section in the Operations section.
Sleep Timer
Sleep Timer turns the Sirius S50 off after a specified period of time 15, 30, 45, or 60 minutes.
Details for setting the sleep timer are found in the Sleep Timer section in the Operations
section.
Parental Controls
The Parental Controls menu provides for locking channels and playlists, and for hiding chan-
nels.
Locks Disabled/Enabled
The Locks Enabled/Locks Disabled menu option provides for enabling or disabling the chan-
nel and playlist locks. Details for enabling or disabling locks are found in the Parental Control
section in the Operations section.
Set Locks
The Set Locks menu option provides for locking (or unlocking) channels and playlists. Details
for setting locks are found in the Parental Control section in the Operations section.
Hide Channels
The Hide Channels menu option provides for hiding specific channels from channel lists, or
showing channels which had previously hidden. Details for hiding channels are found in the
Hide Channels section in the Operations section.
[ Optional Accessories ]
82 [ Troubleshooting ] 83
Optional Accessories
The following optional installation kits and replacement items are available for purchase from
your SIRIUS retailer:
Home Dock
The home dock provides a docking cradle, an AC power adapter, a 6’ RCA to 3.5mm stereo
adapter cable, and a windowsill antenna.
Executive System
The executive system provides a boombox, an AC power adapter, a 6’ RCA to 3.5mm stereo
adapter cable, and a windowsill antenna.
Battery
Replacement battery for the Sirius S50.
Earbuds
Replacement ear buds for the wearable player.
Wearable Player Clip
Replacement clip for the wearable player.
Leather Case
Leather case for the wearable player.
Travel Case
Travel case for the wearable player.
Troubleshooting
To be provided.
[ Specifications ]
84 [ Warranty ] 85
Specifications
To be provided.
Warranty
SIRIUS Satellite Radio Inc. (the “Company”) warrants to the original retail purchaser of this
product that should this product or any part thereof, under normal use and conditions, be
proven defective in material or workmanship within 12 months from the date of original pur-
chase, such defect(s) will be repaired or replaced with new or reconditioned product (at the
Company’s option) without charge for parts and repair labor. To obtain repair or replacement
within the terms of this Warranty, the product is to be delivered with proof of warranty cover-
age (e.g. dated bill of sale), specification of defect(s), transportation prepaid, to the location
shown below under WARRANTY RETURN.
This Warranty does not extend to the elimination of externally generated static or noise, to
correction of antenna problems, to costs incurred for installation, removal or reinstallation of
the product, or to damage to tapes, compact discs, speakers, accessories, or vehicle electri-
cal systems.
This Warranty does not apply to any product or part thereof which, in the opinion of the Com-
pany, has suffered or been damaged through alteration, improper installation, mishandling,
misuse, neglect, accident, or by removal or defacement of the factory serial number/bar code
label(s). THE EXTENT OF THE COMPANY’S LIABILITY UNDER THIS WARRANTY IS LIM-
ITED TO THE REPAIR OR REPLACEMENT PROVIDED ABOVE AND, IN NO EVENT, SHALL
THE COMPANY’S LIABILITY EXCEED THE PURCHASE PRICE PAID BY PURCHASER FOR
THE PRODUCT.
This Warranty is in lieu of all other express warranties or liabilities. ANY IMPLIED WARRAN-
TIES, INCLUDING ANY IMPLIED WARRANTY OF MERCHANTABILITY, SHALL BE LIMITED
TO THE DURATION OF THIS WRITTEN WARRANTY. ANY ACTION FOR BREACH OF ANY
WARRANTY HEREUNDER INCLUDING ANY IMPLIED WARRANTY OF MERCHANTABILITY
MUST BE BROUGHT WITHIN A PERIOD OF 48 MONTHS FROM DATE OF ORIGINAL PUR-
CHASE. IN NO CASE SHALL THE COMPANY BE LIABLE FOR ANY CONSEQUENTIAL OR
INCIDENTAL DAMAGES FOR BREACH OF THIS OR ANY OTHER WARRANTY, EXPRESS

[ Warranty ]
86 [ SIRIUS ID ] 87
OR IMPLIED, WHATSOEVER. No person or representative is authorized to assume for the
Company any liability other than expressed herein in connection with the sale of this product.
Some states do not allow limitations on how long an implied warranty lasts or the exclusion or
limitation of incidental or consequential damage so the above limitations or exclusions may not
apply to you. This Warranty gives you specific legal rights and you may also have other rights
which vary from state to state.
WARRANTY RETURN: To obtain repair or replacement within the terms of this Warranty,
please return product to an authorized retailer or call Customer Service at 1-888-869-5590;
proof of purchase and description of defect are required. Products to be returned to an ap-
proved warranty station must be shipped freight prepaid.
SIRIUS ID
Write down the SIRIUS ID (SID) of your Sirius S50 in the space provided below.
SID:

PERSONAL SATELLITE RADIO + CAR KIT
USER MANUAL
S-M50
©2005 SIRIUSSatellite Radio Inc. “SIRIUS”andtheSIRIUSdog logoare registered trademarksofSIRIUSSatelliteR
adio
Inc. “NFL
”andth
eNFLShield designare registered trademarksoftheNational Football League. NHLandtheNHLShield
are registered trademarksof the National HockeyLeague. “NBA
”andtheNBAsilhouette logoareregisteredtrademarks
ofNBAProperties, Inc.All Rights Reserved.