Humax S50-H1 Satellite Radio Receiver User Manual
Humax Co., Ltd. Satellite Radio Receiver Users Manual
Humax >
Users Manual
DETAILS
HOME KIT
Sirius-S50

Congratulations on the purchase of your new Sirius S50 Home Kit
The Home Kit will allow you to use your Sirius S50 in your home or office to listen to live
broadcasts and saved content, and capture and store both scheduled and unscheduled
SIRIUS programming. The Home Kit is designed to easily integrate with your home entertain-
ment system and PC computer.
The My Sirius Studio software included with the Home Kit will allow you to supplement the
SIRIUS broadcast content with your own MP3/WMA library, when connected to a PC through
the USB connection on the dock. My Sirius Studio also allows for channel and image updates
automatically when connected to the SIRIUS website.
© 2005 SIRIUS Satellite Radio Inc.
® “SIRIUS”, My Sirius Studio, S Series and related marks, the SIRIUS dog logo, channel
names and logos are trademarks of SIRIUS Satellite Radio Inc. All Rights Reserved.
[ Table of Contents ]
4[ Warning and Safety Information ] 5
Table of Contents
TABLE OF CONTENTS . . . . . . . . . . . . . . . . . . . . . . . . . . . . 4
WARNING AND SAFETY INFORMATION . . . . . . . . . . . . . . . . . . . . 5
FCC Warning . . . . . . . . . . . . . . . . . . . . . . . . . . . . . . . . . . 5
FCC Compliance . . . . . . . . . . . . . . . . . . . . . . . . . . . . . . . . 5
General Precautions . . . . . . . . . . . . . . . . . . . . . . . . . . . . . . . 6
PACKAGE CONTENTS . . . . . . . . . . . . . . . . . . . . . . . . . . . . 7
CONTROLS. . . . . . . . . . . . . . . . . . . . . . . . . . . . . . . . . 8
Home Dock Reference Guide . . . . . . . . . . . . . . . . . . . . . . . . . . . 8
GETTING STARTED . . . . . . . . . . . . . . . . . . . . . . . . . . . . . 12
Installing the Home Kit . . . . . . . . . . . . . . . . . . . . . . . . . . . . . 12
OPERATION . . . . . . . . . . . . . . . . . . . . . . . . . . . . . . . . 17
Synchronizing the Sirius S50 to your Computer . . . . . . . . . . . . . . . . . . . 17
Accessing the Setup Menu . . . . . . . . . . . . . . . . . . . . . . . . . . . 17
Saving Songs or Shows with a Scheduled Recording . . . . . . . . . . . . . . . . . 18
TROUBLESHOOTING . . . . . . . . . . . . . . . . . . . . . . . . . . . . 19
SPECIFICATIONS . . . . . . . . . . . . . . . . . . . . . . . . . . . . . . 20
WARRANTY . . . . . . . . . . . . . . . . . . . . . . . . . . . . . . . . 21
Warning and Safety Information
FCC Warning
This equipment may generate or use radio frequency energy. Changes or modifications to this
equipment may cause harmful interference unless the modifications are expressly approved in
this owners guide. The user could lose the authority to operate this equipment if an unauthor-
ized change or modification is made.
FCC Compliance
This equipment has been tested and found to comply with Part 15 of the FCC Rules. These
rules are designed to provide reasonable protection against harmful interference. This equip-
ment may cause harmful interference to radio communications if it is not installed and used in
accordance with these instructions. However, there is no guarantee that interference will not
occur in a particular installation. If this equipment does cause harmful interference to radio
reception, which can be determined by turning the equipment off and on, the user is encour-
aged to try to correct the interference by one of more of the following measures:
Reorient or relocate the receiving antenna.
Increase the separation between the other equipment and the Receiver.
Connect the other equipment to a different circuit from that to which the Receiver is con-
nected.
Consult the dealer or an experienced radio technician for help.
•
•
•
•
[ Warning and Safety Information ]
6[ Package Contents ] 7
General Precautions
Safety Precautions
Be sure to observe the following warnings. Failure to follow these safety instructions and
warnings may result in a serious accident.
Be sure the home dock is installed as described in the installation instructions in this
guide.
Failure to follow these safety instructions and warnings may result in a serious accident.
To avoid short circuits, do not open the unit, and never put or leave any metallic objects
(coins, tools, etc.) inside the unit.
If the unit emits smoke or unusual odors, turn the power off immediately, and disconnect
the unit from any power source.
Do not drop the unit or subject it to strong shocks.
If the unit doesn’t seem to be working properly, turn the unit off, wait 5 – 10 seconds, then
turn it on again.
•
•
•
•
•
•
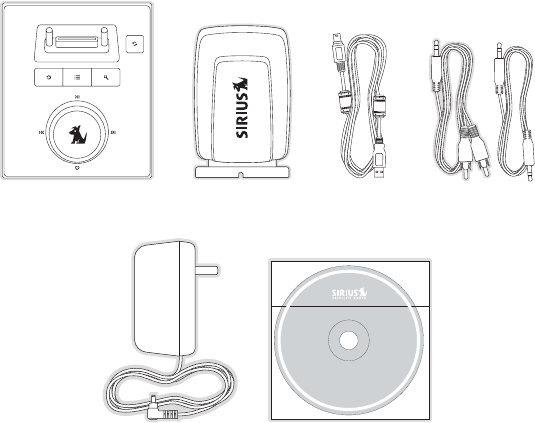
Package Contents
The following items are included with your purchase of the Sirius S50 Home Kit:
©
2
0
0
5
S
i
r
i
u
s
,
I
n
c
.
A
l
l
r
i
g
h
t
s
r
e
s
e
r
v
e
d
.
U
n
a
u
t
h
o
r
i
z
e
d
c
o
p
y
i
n
g
o
r
r
e
p
r
o
d
u
c
t
i
o
n
p
r
o
h
i
b
i
t
e
d
.
MY SIRIUS STUDIO
SOFTWARE VERSION XXXX
Home DockHome Dock Windowsill
Antenna
Windowsill
Antenna
USB CableUSB Cable Audio Cables (2)Audio Cables (2)
AC AdapterAC Adapter PC Software CDPC Software CD
[ Controls ]
8
[ Controls ] 9
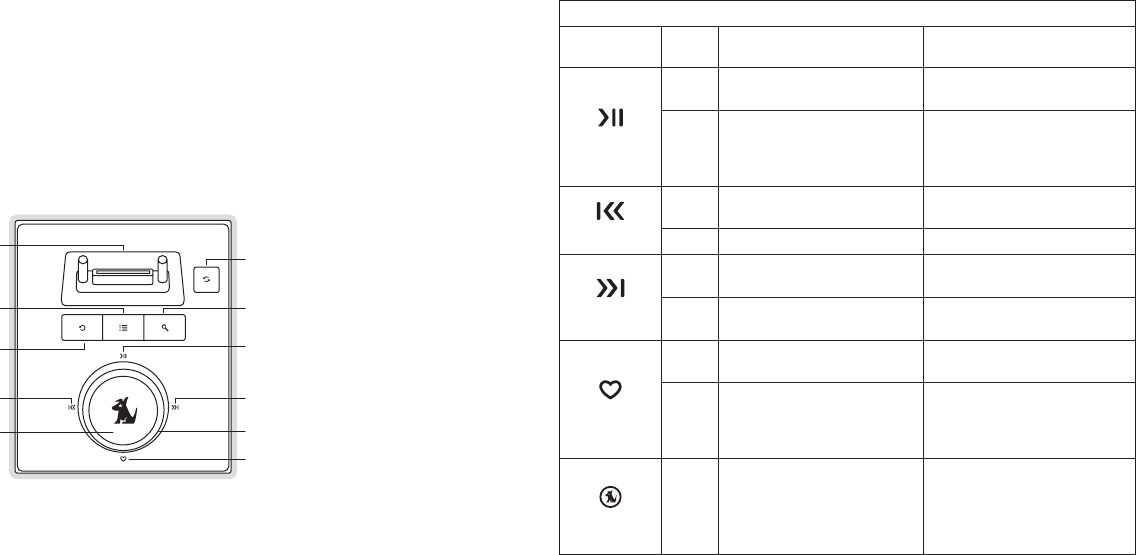
Controls
Home Dock Reference Guide
Figure 1 identifies the buttons of the home dock.
Fast Forward
Media Dial
Play/Pause
Mode
Playlists
Wearable Player
Connector
Rewind
Select
Back
Love
USB Sync
Figure 1Figure 1
Home Dock Button Descriptions
Button Action Live Environment Description Playback
Environment Description
Play/Pause
Press Pauses a live broadcast or
resumes playing a broadcast
Plays or pauses the current
song or show
Hold
If paused, returns to live
broadcast
If in a channel list, plays the
highlighted channel
When in a playlist, shuffles
highlighted playlist
Rewind
Press Rewinds a broadcast to previ-
ous song or show
Rewinds to the previous song
or show
Hold Rewinds through a broadcast Rewinds through song or show
Fast-Forward
Press Fast-Forwards the replay buf-
fer to the next song or show
Fast-Forwards to the next song
or show
Hold Fast-Forwards through the
replay buffer
Fast-Forwards through song
or show
Love
Press Saves song or show If listening to My Sirius Chan-
nels, saves the content
Hold
Time-based save; saves a
song or show by specifying a
starting and ending point
If listening to My Sirius Songs
or My Sirius Shows, displays
prompt to delete the song or
show
Media Dial
Turn
If listening to live broadcast,
tunes next channel
If in a list, menu, or prompt,
scrolls to next or previous item
If listening, begins playing the
songs in the next playlist in
shuffled order
If in a list, menu, or prompt,
scrolls to next or previous item

[ Controls ]
10
[ Controls ] 11
Home Dock Button Descriptions Continued
Button Action Live Environment Description Playback
Environment Description
Select
Press Selects highlighted items in lists, menus, or prompts
Hold Allows you to Add/Move/Re-
move a preset No Action
Playlists
Press Allows you to browse the
playlists
Goes to the most recent playlist
menu screen and highlights the
currently selected song or show
If browsing playlists, moves up
one level in the playlist menu
structure
Hold No Action No Action
Back
Press
If listening, returns to previous channel, song, or show
If in a list at the top level, exits and returns back to previous
content
If in a list not at the top level, moves up one level in the list
structure
Hold
Jumps to programmed traffic/weather or other channel
If a jump is pending, cancels jump
If in a list or in Setup, exits the list or Setup
Mode
Press
First push allows you to browse live channels
Second push cycles browse mode between Channel, Presets,
and Genre
Hold No Action No Action
Home Dock Button Descriptions Continued
Button Action Live Environment Description Playback
Environment Description
USB Sync
Press
Initiates a USB connection between a PC computer and the
home dock
If in the Setup menus, accepts a change made and moves up one
level in the menu structure
Hold Displays the Setup menu
[ Getting Started ]
12
[ Getting Started ] 13
Getting Started
Installing the Home Kit
If you will be connecting the Home Kit to your PC computer, locate the dock in the vicinity of
the computer so that the USB cable can be connected between the dock and the computer.
The dock should also be located where the cable from the windowsill antenna can reach the
dock.
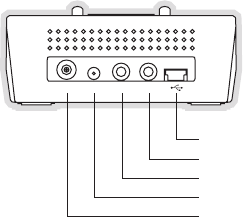
ANT DC 5V LINE IN LINE OUT
USB (To PC USB Port)
LINE OUT (To Amplified Speakers or Home Stereo System)
LINE IN (From PC Sound Card Speaker Connector)
DC 5V (AC Power Adapter)
ANT (To Windowsill Antenna)
Figure 2Figure 2
Connecting the AC Power Adapter
Plug the AC power adapter into a working wall outlet, and connect the power cord of the
adapter to the DC 5v connection on the rear of the home dock. (Figure 2)
Installing the Windowsill Antenna
Before installing the windowsill antenna, read this entire section.
To ensure strong reception of the SIRIUS signal in your home, it is important that the window-
sill antenna be oriented correctly. Note the following antenna placement considerations:
BEST reception can be achieved by placing the antenna outside on the roof. The antenna
is waterproof. This position will afford the best view of the sky for best reception. When
placed in this location, an antenna extension cable may be required.
BETTER reception can be achieved by placing the antenna outside a window, or by
mounting it to the side of the house. In either case, try to achieve the best possible clear
view of the sky.
GOOD reception can be achieved by placing your antenna in a window. Try to achieve
a clear unobstructed view of the sky. If your location is in major metropolitan area, the
antenna may be located inside the home because terrestrial transmitters are used to boost
signal strength.
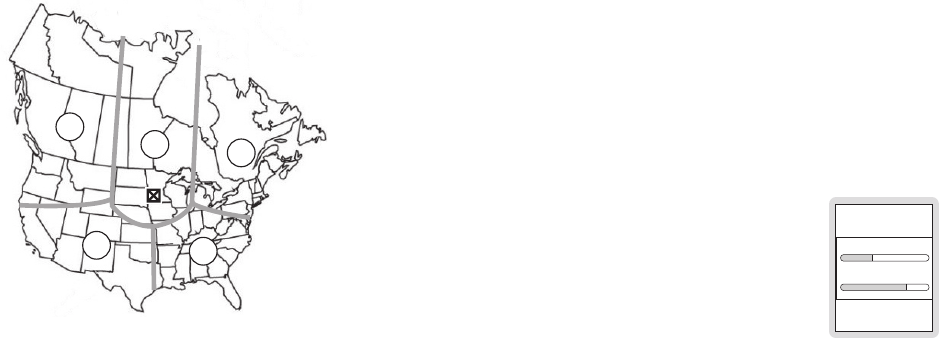
From the map shown in Figure 3, determine your location and aim the portion of the antenna
with the logo toward the location indicated by the X on the map.
[ Getting Started ]
14
[ Getting Started ] 15
1
23
4
5
Key:
Area 1: Aim the antenna East, Northeast, or Southeast
Area 2: Aim the antenna North or Northeast
Area 3: Aim the antenna North or Northwest
Area 4: Aim the antenna West, Northwest or Southwest
Area 5: Aim the antenna Straight Up at the sky
Route the antenna cable to the dock. Be sure you avoid any obstructions that could crimp,
kink, or twist the cable. Use protective grommets wherever rough openings are encountered.
If the antenna is installed outdoors, route the cable from the antenna location to the interior
of the home, working the cable through the basement, under a window sill, etc., and make
adjustments to take up cable slack as necessary.
Connect the antenna cable to the ANT connection on the rear of the dock. (Figure 2)
Figure 3Figure 3
Testing and Optimizing the Antenna Signal Strength
The stronger the SIRIUS signal strength, the less likely it is that you will experience an inter-
ruption of the audio when listening to a broadcast. To assist you in adjusting the antenna
aiming for optimal reception, the Sirius S50 can display a screen showing the strength of the
SIRIUS signal being received.
To access the antenna aiming menu, place the wearable player in the dock without connect-
ing the USB cable. Press the Setup button on the wearable player and select the Antenna
Aiming menu option from the Device Settings menu. (Figure 4) The SATELLITE portion of the
Antenna Aiming display screen shows the strength of the signal being received from the sat-
ellite, while the TERRESTRIAL portion of the display screen shows the strength of the signal
being received from terrestrial based transmitters, if available. Make small adjustments to the
aiming of the windowsill antenna until you achieve the strongest possible signal.
ANTENNA AIMING
SATELLITE
TERRESTRIAL
Connecting the Home Dock to Your Computer
You can integrate the home dock with your computer’s sound system so that you can utilize
the speakers connected to your computer for listening to both the computer and the Sirius
S50. When connected in this way, you will be able to listen to Sirius S50 and use the com-
puter at the same time. For example, when using the My Sirius Studio software, you will be
able to review the songs recorded in your S50 or in your playlists, or listen to the streaming
content available via the SIRIUS internet streaming service through your computer’s speakers.
Or, when listening to the Sirius S50 while using your computer, you will also be able to hear
the various computer sounds.
Figure 4Figure 4

[ Getting Started ]
16 [ Operation ] 17
To connect your computer and the home dock to your computer’s speakers, connect the
audio cables as follows:
Make a note of the connector on your computer to which your speakers are connected.
This is typically a green connector, and may be marked “Speakers” or have a speaker
icon. Disconnect the wire plugged into that connector and plug that wire into the LINE
OUT connection on the rear of the dock. (Figure 2)
Connect the provided audio cable which has the 1/8” (3.5mm) connectors on both ends
into the connector on the computer which had been connected to the speakers.
Connect the other end of this cable to the LINE IN connection on the rear of the dock.
(Figure 2)
If you will be using your PC computer with the dock, connect the provided USB cable to the
USB connection on the rear of the dock. (Figure 2) Connect the other end of the USB cable
to an available USB port on your computer.
Connecting the Home Dock to Your Stereo System
If you will not be connecting the home dock to your computer’s speakers, you may connect
the dock to amplified speakers or your home stereo system. Plug the provided audio cable
with the RCA-type connectors on one end to your speakers or home stereo system audio
input connection, and connect the other end of the cable to the LINE OUT connection on the
rear of the dock. (Figure 2)
Note that if you are connecting the home dock directly to speakers, you will have to use ampli-
fied speakers.
1.
2.
3.
Operation
Synchronizing the Sirius S50 to your Computer
When the Sirius S50 is actively connected to your computer via the USB connection, you will
not be able to listen to live broadcasts. Instead, the My Sirius Studio software is used to con-
trol the Sirius S50 for viewing content which you have recorded, managing and transferring
songs and playlists, or streaming SIRIUS music from the web.
To connect the Sirius S50 to your PC computer, place the wearable player in the home dock
and press the USB Sync button to initiate the USB connection. This will cause the comput-
er to recognize the Sirius S50. While the computer is connecting, the Sirius S50 will display a
Connecting. Please Wait. message. When the Sirius S50 is connected to the computer, the
Connected. Use Software to Disconnect. message will be displayed and no buttons on the
wearable player or the home dock will be functional.
To disconnect from the computer, always use the Eject function of the software to terminate
the USB connection before removing the wearable player from the dock. Failure to do so may
result in the corruption of the files in the Sirius S50. Refer to the software manual included on
the software CD for more information about using the software, or the manual may be down-
loaded from the SIRIUS website at http://www.sirius.com.
Accessing the Setup Menu
To access the Setup menu when the wearable player is in the home dock, press the USB
Sync button. To access the Setup menu during an active USB connection to your computer,
press and hold the USB Sync button.

[ Operation ]
18 [ Troubleshooting ] 19
Saving Songs or Shows with a Scheduled Recording
The home dock is able to save songs and shows using the scheduled recording feature, and
recordings can occur even if the unit is turned off. The dock will wake up and perform the
recording at the scheduled time, provided that the wearable player is in the dock, the dock
is connected to the AC power, and the antenna is receiving a good signal. Upon waking up
at one minute prior to the start time of the recording, you will have the option to cancel the
recording. If you do not cancel the recording, the scheduled recording will occur and the dock
will turn itself off upon completion. For more information about scheduled recordings, refer to
the manual which accompanied the Sirius S50.
Troubleshooting
Symptom Solution
Sirius S50 does not
power on
Check the battery to be sure it is installed correctly.
Check the AC power adapter to be sure it’s plugged into a work-
ing AC outlet, and connected to the home dock.
Sirius S50 displays
No Antenna
The windowsill antenna is not connected to the home dock.
Check the antenna connection to the dock.
Sirius S50 displays:
No Signal
No satellite signal is being received.
Check for obstacles over or around the satellite antenna.
Change the location to eliminate nearby obstacles (roof over-
hangs, trees, buildings, etc.)
Audio from broadcasts
starts and stops
The windowsill antenna is not aimed for optimal reception.
Refer to the section Installing the Windowsill Antenna and follow
the instructions for aiming the antenna.
No sound The home dock is not connected, or is incorrectly connected,
to the amplified speakers or home stereo system. Refer to the
section Connecting the Audio Cables and follow the instructions
for connecting the home dock to amplified speakers or your home
stereo system.
Cannot establish a
USB connection with
the computer
Check that the USB cable is connected to a working USB port on
your computer. Disconnect the USB cable for one minute, then
reconnect and press the USB Sync button.
The Sirius S50 will not
start up
The operating system files on the Sirius S50 have been deleted.
Connect the Sirius S50 to your PC using the USB cable, and use
the SIRIUS software to download new operating system files. Fol-
low the software instructions included on the CD.
[ Specifications ]
20 [ Warranty ] 21
Specifications
Satellite Frequencies . . . . . . . . . . . . . . . . . . . . . . . . . . . . . . . . . . . . . .2322.293/2330.207 MHz
Terrestrial Frequencies ............................................ 2326.250 MHz
Power Requirements . . . . . . . . . . . . . . . . . . . . . . . . . . . . . . . .5 Volts, 2A Negative Ground, DC
Operation Temperature . . . . . . . . . . . . . . . . . . . . . . . . . . . . . . . . . -5° to +40° C (23° to 104° F)
Audio Output . . . . . . . . . . . . . . . . . . . . . . . . . . . . . . . . . 18mW Left + 18mW Right @ 16 ohms
Signal-to-noise (S/N).................................................90dB (MP3)
Dock Dimensions (Height x Width x Depth) . . . . . . . . . . . . . . . . . . . . . . . . . 3.27” x 3.9” x 1.34”
(8.3cm x 9.9cm x 3.4cm)
Antenna Type........................................................Windowsill
Antenna Cable Length . . . . . . . . . . . . . . . . . . . . . . . . . . . . . . . . . . . . . . 21’ (single micro-cable)
Antenna Connector Type....................................................SMB
Audio Interface (Line In/Line Out) . . . . . . . . . . . . . . . . . . . . . . . . . . . . 1/8” / 3.5mm Stereo Jack
Warranty
12 Month Warranty
SIRIUS Satellite Radio Inc. (the “Company”) warrants to the original retail purchaser of this product
that should this product or any part thereof, under normal use and conditions, be proven defective in
material or workmanship within 12 months from the date of original purchase, such defect(s) will be
repaired or replaced with new or reconditioned product (at the Company’s option) without charge for
parts and repair labor. To obtain repair or replacement within the terms of this Warranty, the product
is to be delivered with proof of warranty coverage (e.g. dated bill of sale), specification of defect(s),
transportation prepaid, to the location shown below under WARRANTY RETURN.
This Warranty does not extend to the elimination of externally generated static or noise, to correction
of antenna problems, to costs incurred for installation, removal or reinstallation of the product, or to
damage to tapes, compact discs, speakers, accessories, or vehicle electrical systems.
This Warranty does not apply to any product or part thereof which, in the opinion of the Company,
has suffered or been damaged through alteration, improper installation, mishandling, misuse, neglect,
accident, or by removal or defacement of the factory serial number/bar code label(s). THE EXTENT
OF THE COMPANY’S LIABILITY UNDER THIS WARRANTY IS LIMITED TO THE REPAIR OR
REPLACEMENT PROVIDED ABOVE AND, IN NO EVENT, SHALL THE COMPANY’S LIABILITY
EXCEED THE PURCHASE PRICE PAID BY PURCHASER FOR THE PRODUCT.
This Warranty is in lieu of all other express warranties or liabilities. ANY IMPLIED WARRANTIES, IN-
CLUDING ANY IMPLIED WARRANTY OF MERCHANTABILITY, SHALL BE LIMITED TO THE DURA-
TION OF THIS WRITTEN WARRANTY. ANY ACTION FOR BREACH OF ANY WARRANTY HERE-
UNDER INCLUDING ANY IMPLIED WARRANTY OF MERCHANTABILITY MUST BE BROUGHT
WITHIN A PERIOD OF 48 MONTHS FROM DATE OF ORIGINAL PURCHASE. IN NO CASE SHALL
THE COMPANY BE LIABLE FOR ANY CONSEQUENTIAL OR INCIDENTAL DAMAGES FOR
BREACH OF THIS OR ANY OTHER WARRANTY, EXPRESS OR IMPLIED, WHATSOEVER. No
person or representative is authorized to assume for the Company any liability other than expressed
herein in connection with the sale of this product. Some states do not allow limitations on how long
an implied warranty lasts or the exclusion or limitation of incidental or consequential damage so the
above limitations or exclusions may not apply to you. This Warranty gives you specific legal rights and
you may also have other rights which vary from state to state.
WARRANTY RETURN: To obtain repair or replacement within the terms of this Warranty, please re-
turn product to an authorized retailer or call Customer Service at 1-888-869-5590; proof of purchase
and description of defect are required. Products to be returned to an approved warranty station must
be shipped freight prepaid.

[ Notes ]
22
SIRIUS Customer Service: 1-800-869-5590
Sirius S50 Product Support: 1-800-869-5364
customercare@sirius-radio.com
SIRIUS Satellite Radio Inc.
1221 Avenue of the Americas
New York, NY 10020
1-888-539-7474
http://www.sirius.com
Sirius S50 Home Kit (092905b)
Notes

HOME KIT
USER MANUAL
Sirius-S50