Humax SIR-TS160 Satellite Receiver User Manual 02 TS160
Humax Co., Ltd. Satellite Receiver 02 TS160
Humax >
Contents
- 1. users manual 1
- 2. users manual 2
users manual 2
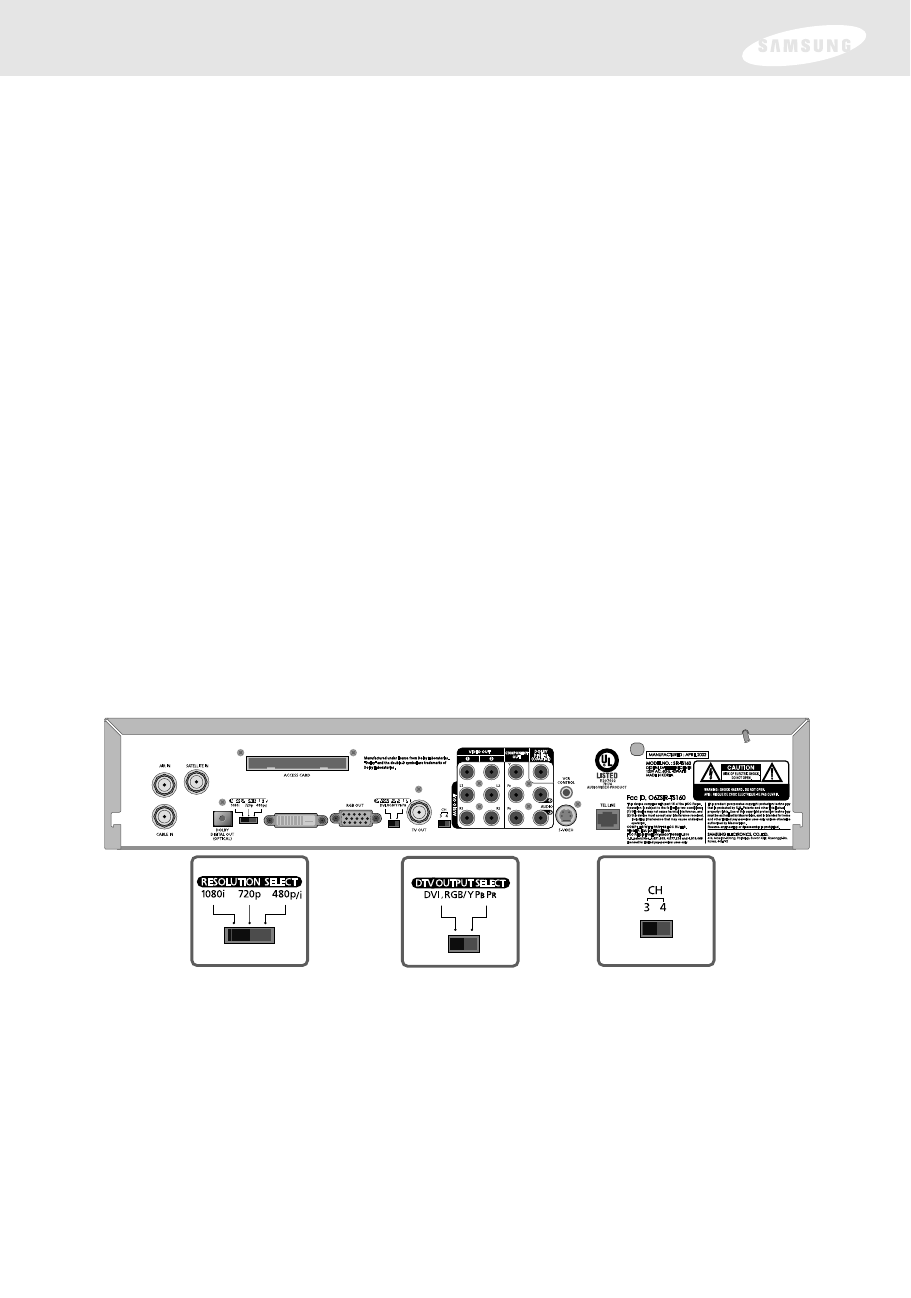
9Set the RESOLUTION switch to the highest resolution supported by your TV.
(See Chapter 1 for information on resolutions. See your TV owner’s manual for
information on your TV’s capabilities.)
If you connect your TV to one of the composite video out jacks (Video Out, S-
Video Out, or TV Out), and you view a high-definition program with the
DIRECTV®High-Definition Receiver’s RESOLUTION switch set to either 720p or
1080i, the picture will be slightly cropped at the top and bottom (the very top
and bottom edges of the image will not appear on the TV screen). To avoid this
problem, set the RESOLUTION switch to the 480p/i position if your TV is
connected to one of the composite video outputs.
10 If you connected your TV using RGB or DVI/HDCP output, set the switch to the
left (DVI, RGB). If you connected your TV using the Component output, set the
switch to the right (YPbPr).
11 If you connected your TV or VCR to the TV OUT RF jack, set the CH3/4 switch
to determine the channel used to view DIRECTV®programming. The position
of the CH 3/4 switch on your DIRECTV Receiver should match the setting of
the similar CH 3/4 switch on your VCR.
12 (Optional) follow the instructions on the next page if you have a VCR and
want to hook up the VCR control.
13 Plug in the power cords for your TV, A/V receiver, and DIRECTV Receiver.
Setting your TV input switch
To view any of the programming from your DIRECTV Receiver (satellite, cable, or
off-air), set your TV to display the input from the video input jack you used to
connect the DIRECTV Receiver. (This is a setting on your TV usually controlled by
a Video, Input, or Mode button. See your TV manual for help.) Also, if necessary, set
your A/V receiver to play the audio from the audio input jack you used to make the
audio connection. See your A/V receiver manual for help.
DVI/ HDCP OUT
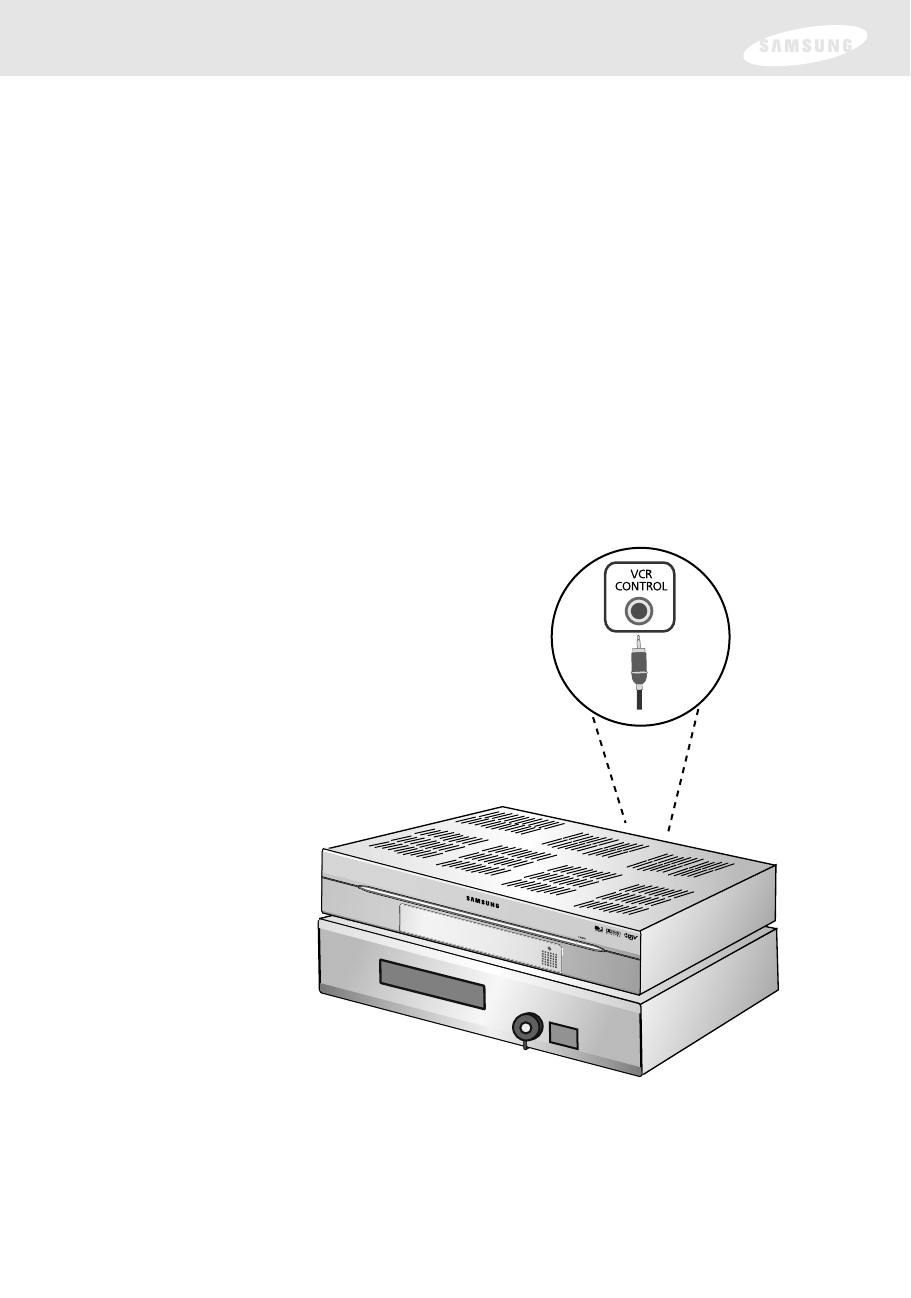
Connecting the VCR control cable
The VCR control cable allows your DIRECTV®High-Definition Receiver to
automatically program your VCR to record a TV program. By selecting a Record
option from the on-screen Program Guide, you can direct the VCR control cable to
flash signals to the VCR’s remote control sensor programming the VCR to tape a TV
program for you.
To connect the VCR control cable to your DIRECTV Receiver, follow these steps:
1Plug the VCR control cable into the VCR CONTROL jack on the back of the
DIRECTV Receiver.
2Remove the backing tape from the adhesive on
the other end of the VCR control cable. Stick the
VCR control next to the remote control sensor
on your VCR. (See the manual for your VCR if
you are not sure where its remote sensor is
located.)
Note: Before you can use the VCR control cable to program your VCR, you must
set up the VCR control. See Setting up the VCR control in Chapter 5 for
details.
Turning on the DIRECTV®High-Definition Receiver for
the first time
You have completed the connection steps and are ready to start using your
DIRECTV Receiver. The first step is to turn on the DIRECTV Receiver.
1Turn on your TV and set it to display the signal from your DIRECTV Receiver.
If you connected the DIRECTV Receiver to an RF-type input jack, you will
need to tune your TV to channel 3 or 4 (depending on how the CH 3/4 switch
on the back of the DIRECTV Receiver is set). If you have a VCR, the VCR
must be in TV mode or turned off.
If you connected the DIRECTV Receiver to video input jacks on your TV, you
will need to set your TV to display the input from these jacks. Usually this is
done by pressing a Video, Input, or Mode button on your TV’s remote control.
(See the manual for your TV if you need help.)
2Press the POWER button on the DIRECTV Receiver’s remote control or on the
front of the DIRECTV Receiver.
Adjusting the satellite dish
If your DIRECTV Receiver is able to acquire the program guide and display TV
programs, your satellite dish is setup and working. You can skip ahead to the section
on Setting the dish type.
If your DIRECTV Receiver cannot acquire the program guide, and you intend to
watch DIRECTV®programming, you may need to adjust the way your satellite dish
is installed. To do this, first make sure your TV and DIRECTV Receiver are turned on
and connected to each other properly. Then follow the instructions below to use
your DIRECTV Receiver’s Menu system to set up your satellite dish.
The light on the front panel will
turn on.
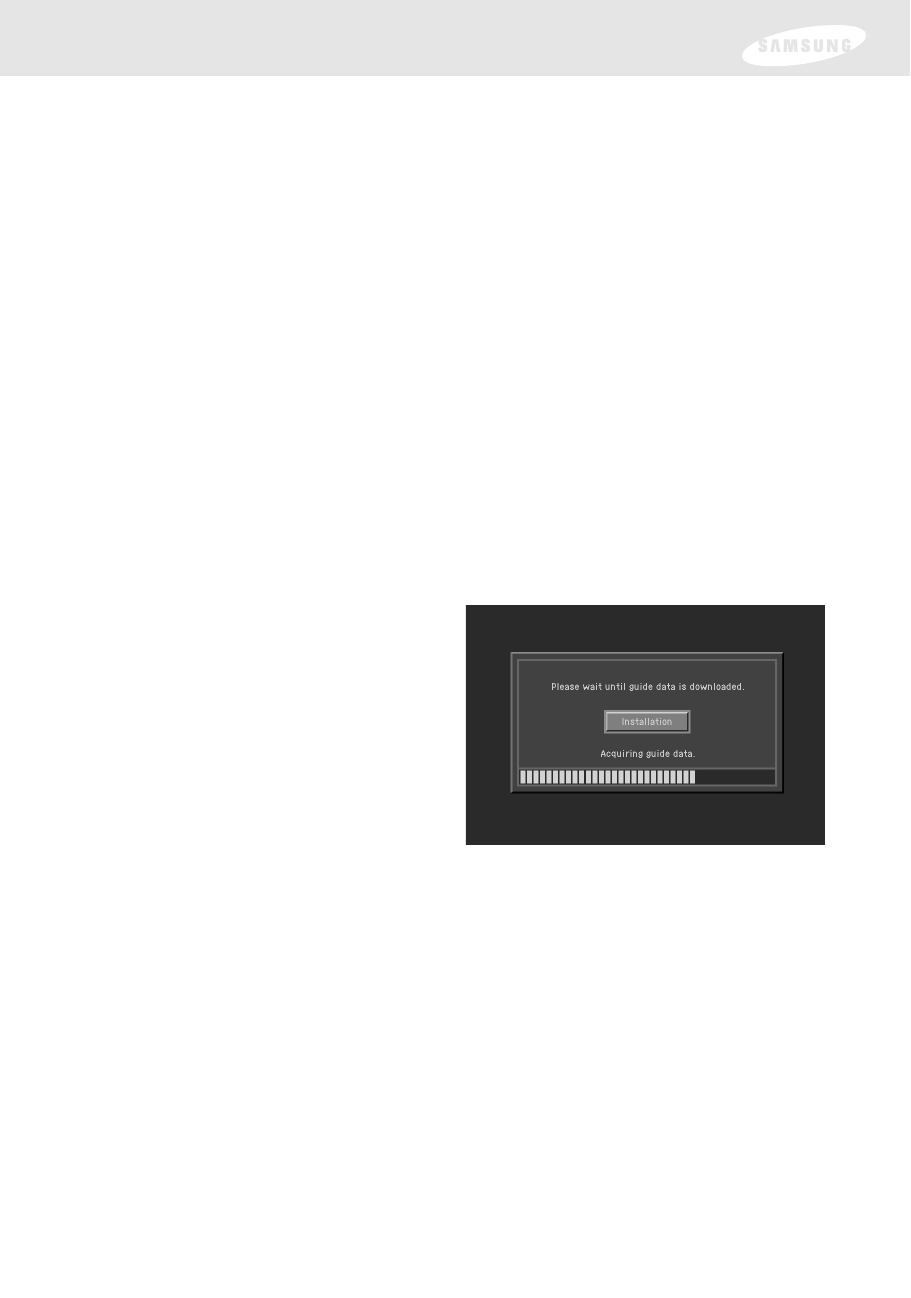
If this is the first time you have
turned on your DIRECTV Receiver,
it will take a few moments to
acquire the program guide from the
satellite. During this process, the
Progress screen appears.
When the program guide has been
fully acquired, the Progress screen
clears and the TV screen is
displayed. You are ready to continue
setting up your DIRECTV System.

The Installation option in the SETUP menu provides access to a variety of important
setup controls. The first of these is the Set Dish menu. The Set Dish menu allows
you to:
•Acquire the exact azimuth, elevation, and tilt angles to help you point your dish
accurately based on your ZIP code.
•Check the setup of your satellite dish using an on-screen signal meter.
•Set the dish type (to tell your DIRECTV®High-Definition Receiver what kind of
satellite dish you are using).
•Set your dish type automatically.
The sections that follow detail each of these procedures.
Acquiring the correct dish pointing angles
The Dish Pointing menu item in the Set Dish menu allows you to find out exactly
how to point your satellite dish by entering your ZIP code. If you have not yet
successfully aligned your satellite dish, or if you need to realign it, follow these
instructions to find the exact angles you should use to point your dish:
1Press the MENU button on your remote control.
The Main menu appears.
2Highlight the SETUP menu item, then press the OK button.
The SETUP menu appears.
3Highlight the Installation menu item, then press the OK button.
The Installation menu appears.
4Highlight the Set Dish menu item, then press the OK button.
The Set Dish menu appears.
5Highlight the Dish Pointing menu
item, then press the OK button.
The Dish Pointing screen appears.
6Use the right-arrow button on your
remote control to highlight the
space for the first digit in the ZIP
code.

7Use the 0 - 9 buttons on your remote control to enter your five-digit ZIP code.
When you have entered all five digits, the screen updates to display the correct
azimuth, elevation, and (for oval dish types only) tilt.
Azimuth refers to the left-to-right angle to which you should point your dish.
Elevation refers to the up-and-down angle to which you should point your dish.
Tilt (for oval dishes only) refers to the amount off-horizontal you should twist
the dish on its axis.
Write down these numbers and use them to accurately point your satellite dish.
8To return to the Set Dish menu, press the BACK button on your remote control.
To exit the Menu system, press the EXIT button on your remote control.
Checking the satellite signal strength
The Signal Meter allows you to check the strength of the signal from the satellite to
your satellite dish. This is useful while setting up your satellite dish, and while
troubleshooting any reception problems you may encounter. Satellite signal strength
can be affected by how accurately you have pointed the satellite dish, and by any
obstructions between the satellite and the satellite dish (tree limbs, for example).
(Note: If you connected your DIRECTV®High-Definition Receiver to an off-air
antenna, you can check the strength of any digital signals received by that
antenna using the Digital Off-Air Signal Strength meter. Follow the
instructions in Programming local channels later in this chapter.)
To check your satellite signal strength, follow these steps:
1Press the MENU button on your remote control.
2Highlight the SETUP menu item, then press the OK button.
3Highlight the Installation menu item, then press the OK button.
4Highlight the Set Dish menu item, then press the OK button.
5Highlight the Signal Meter menu item, then press the OK button.
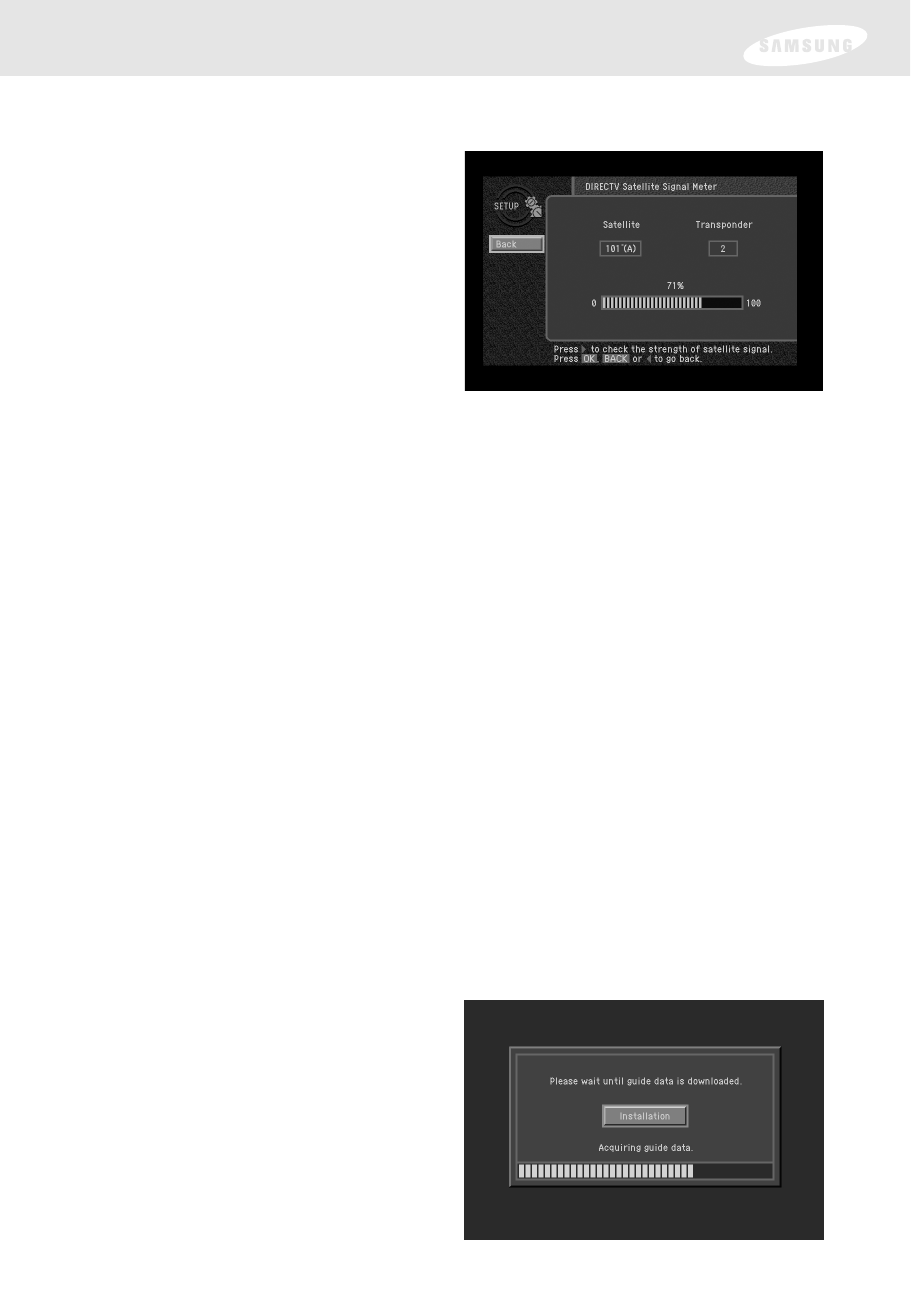
The Signal Meter screen appears.
The signal meter starts checking the
satellite signal strength immediately.
The signal strength (from 0-to-
100%) is indicated at the bottom of
the screen.
The Signal Meter screen allows you
to check signal strengths from
different Satellites, and different
Transponders. The Satellites option
applies only to oval-shaped satellite
1If the Progress screen (shown here)
is on your TV screen, select
Installation by pressing the
OK button.
dishes which receive signals from multiple satellites. On round dishes,
the Satellite setting is fixed.
Transponders are the equipment on satellites that receive the signal from the
earth-based program providers and relay it back to earth to your satellite dish.
Different transponders handle the signals for different TV channels.
When setting up your satellite dish, you should try to maximize the signal
strength across all of the satellites and transponders.
6To check the signal strength for different satellites (oval dishes only), or different
transponders, use the left- and right-arrow buttons on your remote control to
highlight the on-screen Satellite or Transponder option, then use the up- and
down-arrow buttons to change the setting.
The signal meter updates to show you the signal strength for the new satellite
or transponder.
Setting the dish type
To function properly, your DIRECTV®High-Definition Receiver needs to know what
type of satellite dish you are using. You can specify the dish type using the
instructions here, or you can follow the steps on page 33 to use the Auto Detection
menu item to automatically set the dish type.
Note: For DIRECTV®High-Definition programming, you will need an oval triple LNB
satellite dish antenna.
To manually set the dish type:
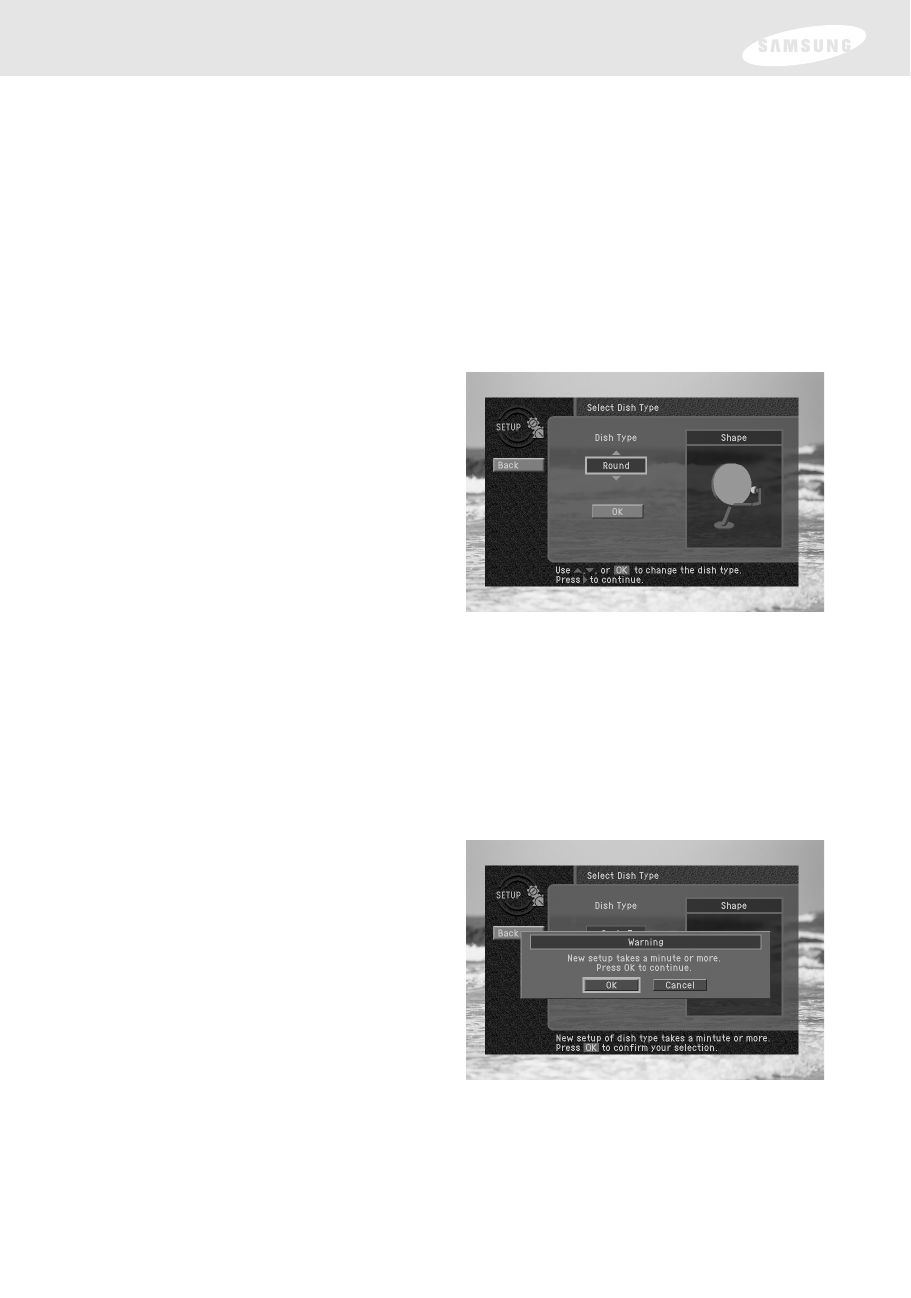
4Use the right-arrow button on your
remote control to highlight the
Dish Type option on the Select Dish
Type screen.
5Use the up- and down-arrow
buttons on your remote control to
display the dish type you are using
(Round, Oval-2, Oval-3, or No Dish).
A message appears warning you that
your DIRECTV Receiver needs to
reboot (turn itself off and on) for the
Dish Type setting to take effect.
7To change the Dish Type to the new
setting, highlight the on-screen OK
button, then press the OK button.
To leave the Dish Type setting
unchanged, highlight the
on-screen Cancel button, and press
the OK button.
2Highlight the Set Dish menu item, then press the OK button.
The Set Dish menu appears.
3Highlight the Select Dish Type menu item, then press the OK button.
The Select Dish Type screen appears.
As you display each dish type, the on-screen pictures update showing you what
each of these dish types look like.
If you plan to use your DIRECTV®High-Definition Receiver for local off-air or
cable TV programs, but do not plan to receive DIRECTV®programming, select
No Dish.
6When you have displayed the correct dish type, use the right-arrow button on
your remote control to highlight the on-screen OK button, then press the OK
button.
After you select the on-screen OK button, the DIRECTV Receiver will reboot.
If you selected No Dish, the DIRECTV Receiver will perform an auto-scan to put
your cable and off-air channels into its memory so you can tune them and see them
in the on-screen Guide.
If this screen is not displayed, access the Main Menu by pressing the MENU
button on your remote control. Then use the arrow buttons on your remote
control to highlight the Setup menu, and press the OK button. Then highlight
the Installation menu, and press the OK button.
The Installation menu appears.
Using Auto Detection to set the dish type
To function properly, your DIRECTV®High-Definition Receiver needs to know what
type of satellite dish you are using. You can specify the dish type using the
instructions on page 31, or you can follow the steps below to use the Auto
Detection menu item to automatically set the dish type.
Before you can use Auto Detection to set the dish-type, the dish must be correctly
aligned and the DIRECTV Receiver must be receiving a strong signal from the
satellite (that is, signal-lock must be established). To check the satellite signal, use the
signal meter — see page 30 for details.
1Press the MENU button on your remote control.
2Highlight the SETUP menu item, then press the OK button.
3Highlight the Installation menu item, then press the OK button.
4Highlight the Set Dish menu item, then press the OK button.
5Highlight the Auto Detection menu item, then press the OK button.
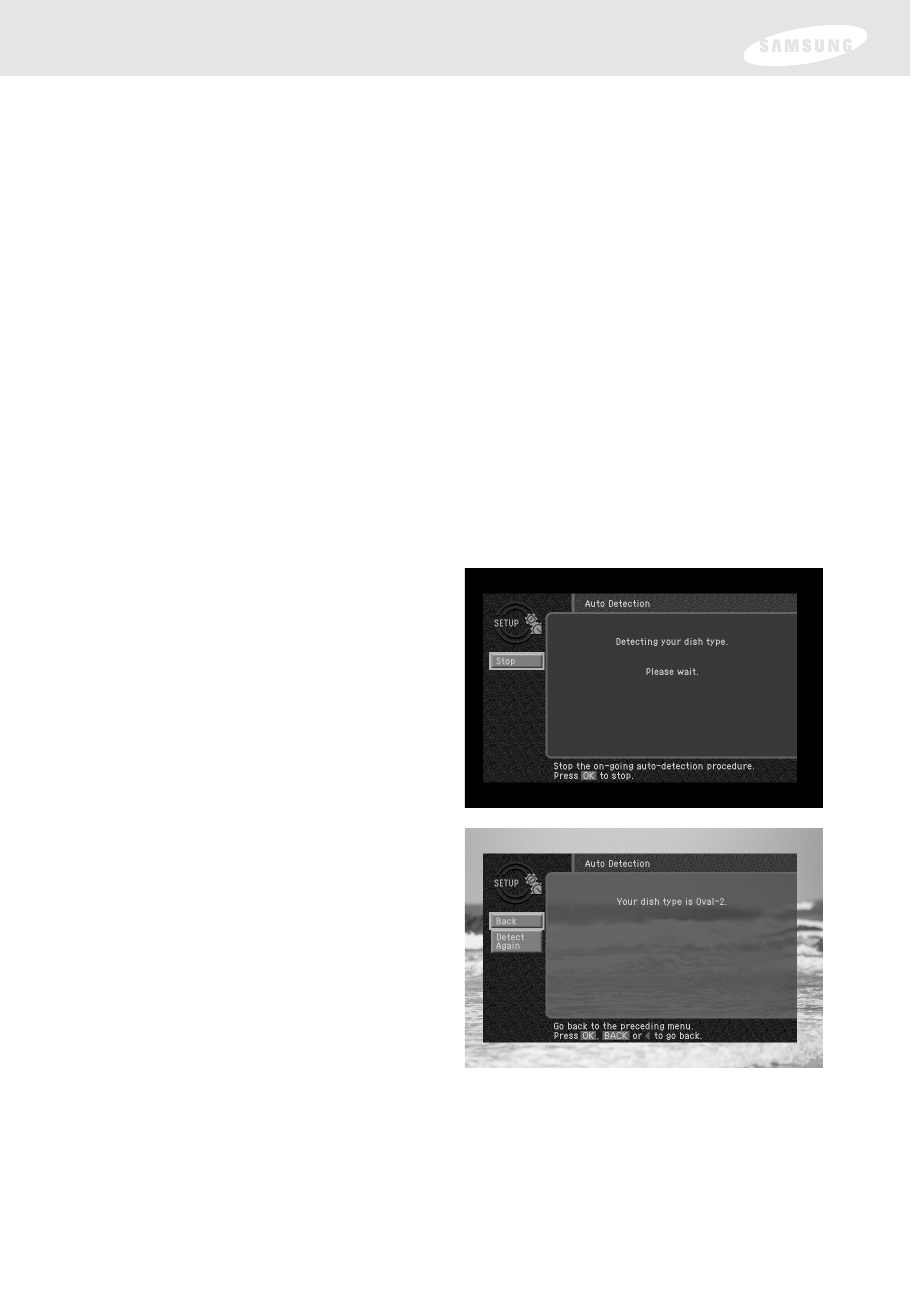
The Auto Detection screen appears.
The DIRECTV Receiver starts
attempting to identify the dish type.
You can stop the detection process
by using the arrow buttons on your
remote control to highlight the
on-screen Cancel button, then press
the OK button.
Once the dish type has been
identified, a screen appears telling
you what type of satellite dish you
have.
6To accept the detected dish type
setting, use the arrow buttons on
your remote control to highlight
the on-screen Back button,
then press the OK button.
The DIRECTV Receiver will reboot.
Testing the DIRECTV®High-Definition Receiver
The System Test feature allows you to quickly check the status of the satellite signal,
your Access Card, and your phone line connection. This is helpful in troubleshooting
should you experience problems with your DIRECTV Receiver.
To start the System Test, follow these steps:
1Press the MENU button on your remote control.
2Highlight the SETUP menu item, then press the OK button.
3Highlight the System menu item, then press the OK button.
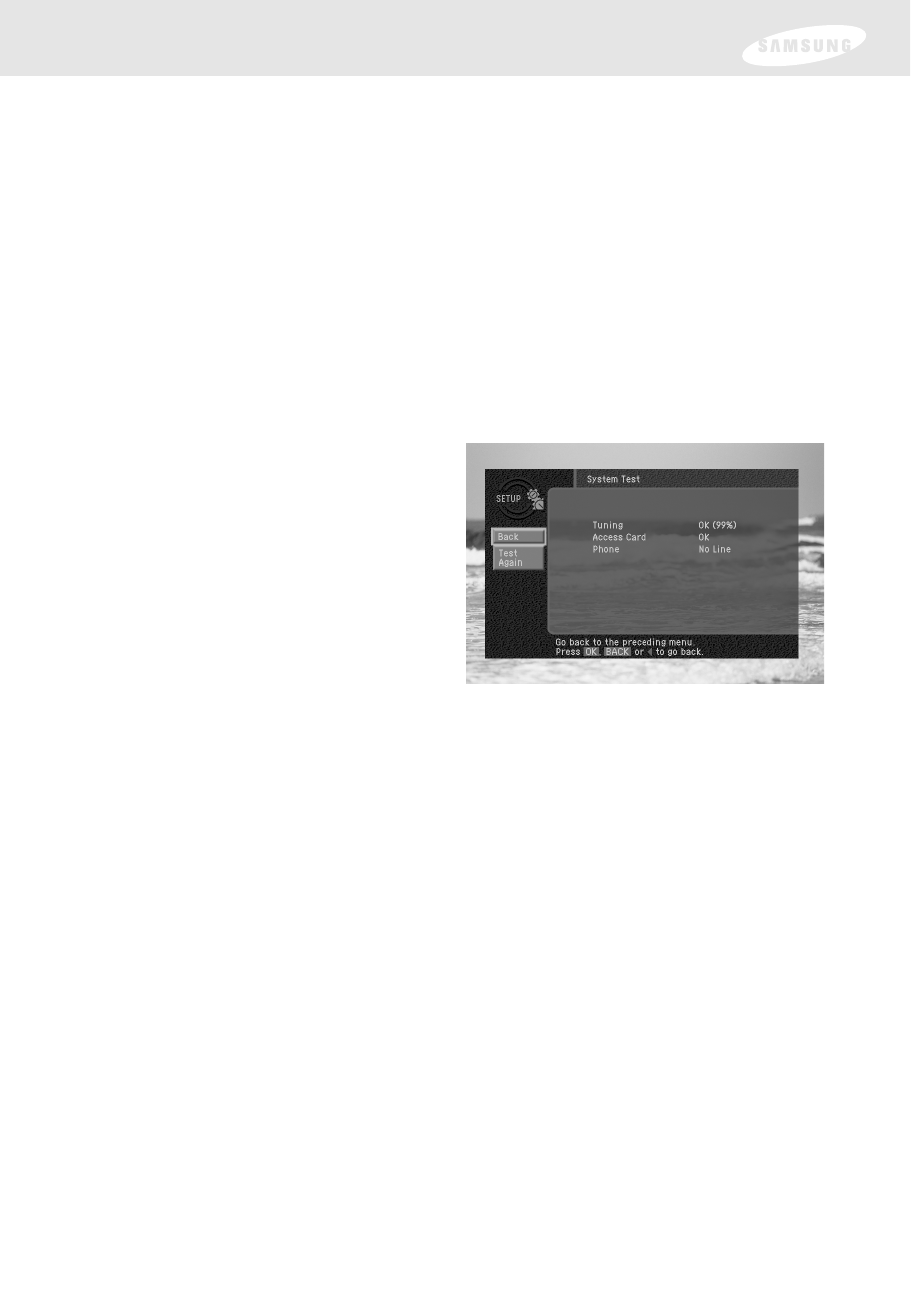
4Highlight the System Test menu item, then press the OK button.
If the test discovers a problem with the Access Card, check that the card is
properly inserted. (See Inserting the Access Card in Chapter 2 for details.)
For problems with the phone line connection, be sure that the DIRECTV
Receiver is connected to a phone line, and that the phone line is working.
(Try plugging a telephone into the line you are using for the DIRECTV
Receiver; check to see if the phone gets a dial tone. If so, the line is working.)
5When you have finished the system test, you can run the test again using the
on-screen Test Again button, exit the Menu system by pressing the EXIT button
on your remote control, or use the arrow keys to highlight on-screen Back
button, then press the OK button to return to the System menu.
The System Test screen appears.
The test will begin as soon as the
screen appears. Results are
displayed in a moment.
If the test discovers a problem with
the satellite tuning, check that the
satellite dish is pointed properly,
and that nothing is obstructing the
direct view to the satellite (over
time trees can grow enough to
block a previously open view).

Setting up local networks
You can use your DIRECTV®High-Definition Receiver to receive Guide information via
satellite for local off-air and cable TV channels. To use this feature, you must connect
your DIRECTV Receiver to a satellite dish as described earlier in this chapter, and you
must set up the Local Networks option in the menu system.
(Note: If you do not connect your DIRECTV Receiver to a satellite dish and subscribe to
DIRECTV®programming, you can still add local channels to the Guide by
following the instructions in the next section.)
To set up the Local Networks menu option:
1Press the MENU button on your remote control.
2Highlight Setup, and press the OK button.
3Highlight Installation, and press the OK button.
4Highlight Local Networks, and press the OK button.
5Highlight Primary Air, and press the OK button.
6Highlight the first box in the Zip code area, then use the number buttons on your
remote control to enter your Zip code.
After a while, a list of cities appears below your ZIP code.
7Highlight the name of the city from which your local channels are broadcast, and
press the OK button.
8Highlight the on-screen Back button, and press the OK button.
You return to the Local Networks screen.
9(Optional) If you receive off-air broadcasts from a second city, highlight Secondary
Air, and press the OK button. Repeat steps 6 - 8 for the second city.
10 (Optional) If you receive programming from a cable TV service, highlight Cable,
and press the OK button. Repeat steps 6 - 8 for the cable service.
11 When you have finished entering your local broadcast and cable TV information,
press the EXIT button on your remote control.
The DIRECTV Receiver will reboot (turn itself off and then back on). After
rebooting, the DIRECTV Receiver will acquire and provide Guide information for
your local off-air and cable TV channels.
Scanning off-air and cable TV channels
The Guide can receive programming information for local and cable channels via
satellite (as described in the previous section). Your DIRECTV Receiver can also add off-
air and cable TV channels to the Guide by scanning for signals from any off-air
antenna or cable TV service connections you have provided.
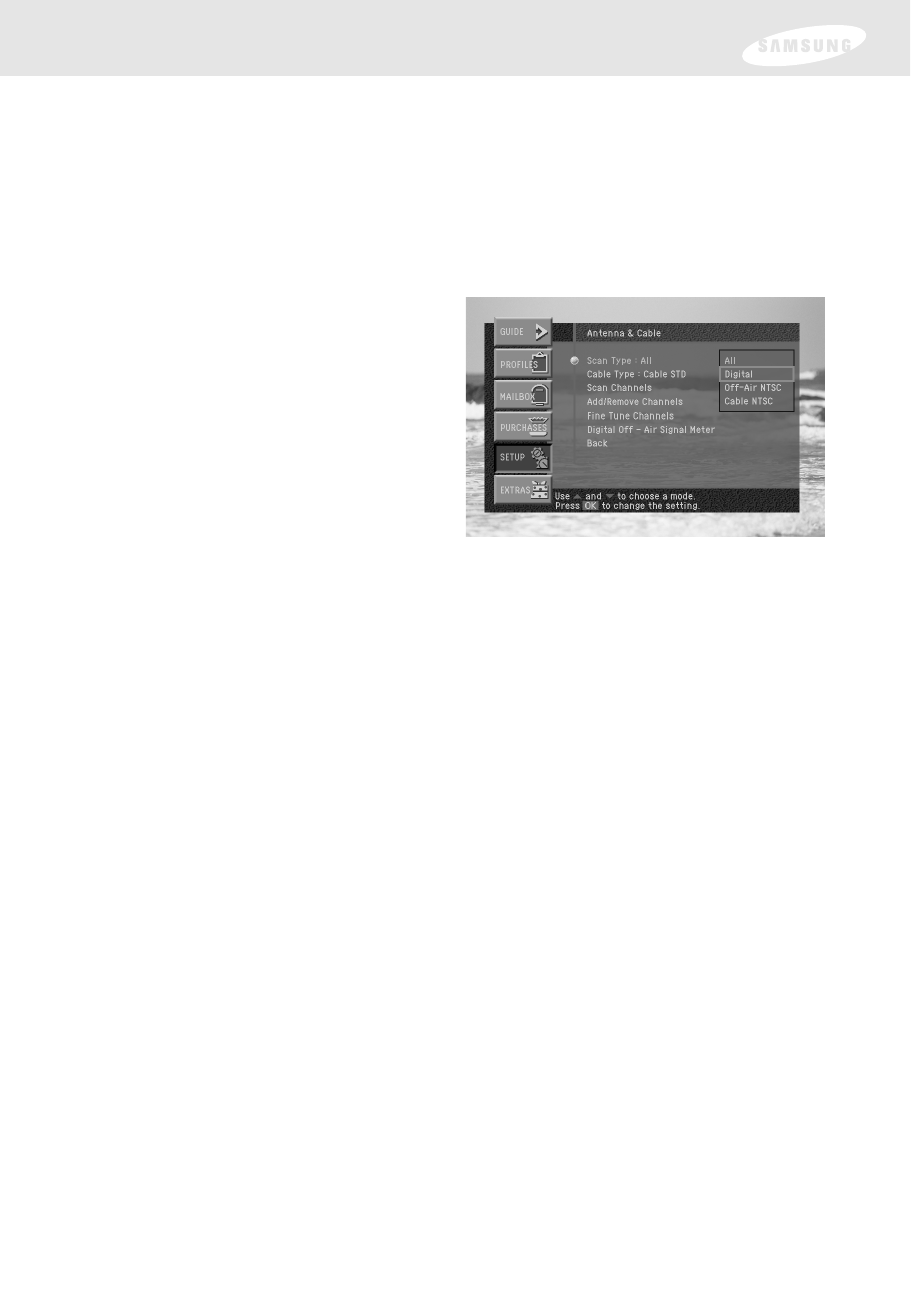
4Highlight the Scan Type menu item
and press the OK button to display
the list of available channel types.
The Scan Type list appears allowing
you to choose to set your DIRECTV
Receiver to automatically scan for
channels from Digital sources (off-air
ATSC broadcasts), Off-Air NTSC
sources (standard TV broadcasts),
Cable NTSC (standard cable TV
services), or all of these.
If this is the first time you are setting up this DIRECTV Receiver to receive local
channels, the All setting is recommended.
5Highlight the Scan Type option that matches the type of broadcasts you would
like to program into your DIRECTV Receiver, then press the OK button.
6Next, set your cable TV type by highlighting the Cable Type menu item and
pressing OK. Then highlight the type of cable signal your cable TV service
provides (STD, HRC, or IRC), and press the OK button.
STD, HRC and IRC are signal formats used by cable TV services. Contact your
Cable TV service provider to determine which signal type they use.
7Highlight the Scan Channels menu item, and press the OK button.
The Scan Channels screen appears and the DIRECTV Receiver automatically
starts looking for all available channels of the type you specified in the Scan
Type list. Wait until the scan is complete.
8If the automatic scan included any channels that you do not intend to watch,
you can edit the channel list by using the Add/Remove Channels menu item in
the Antenna & Cable menu.
9If any of the off-air antenna channels appear out-of-tune, you can fine tune
them using the Fine Tune Channels item in the Antenna & Cable menu.
10 If you have added digital channels from an off-air antenna, you can check the
signal strength for that channel by using the Digital Off-Air Signal Strength
menu item in the Antenna & Cable menu.
11 To exit the Menu system press the EXIT button on your remote control.
Follow this procedure to scan for channels from an off-air antenna and cable TV
service connected to your DIRECTV®High-Definition Receiver.
1Press the MENU button on your remote control.
2Highlight the SETUP menu item, and press the OK button.
3Highlight the Antenna & Cable menu item, and press the OK button.

Activating your DIRECTV account
After you have installed and connected the the satellite dish and DIRECTV®High-
Definition Receiver, you must contact your service provider to create an account. To
order programming from DIRECTV, please call 1-800-DIRECTV (1-800-347-3288).
With this Digital Satellite Receiver and the proper Satellite Dish Antenna, you may be
able to receive local channels from DIRECTV in certain markets. Additional equipment
may be required in some areas. Check with your retailer or visit www.DIRECTV.com for
information on availability of local channels from DIRECTV in your area.
DIRECTV®programming is provided in accordance with the terms and conditions of
the DIRECTV Customer Agreement, which is provided at DIRECTV.com or with your
first DIRECTV bill.
Activation of programming may be subject to credit approval and requires valid service
address, social security number and/or major credit card. Programming subject to
change. You must be physically located in the U.S. to receive DIRECTV®service.
DIRECTV services not available outside the U.S. Deposit or prepayment may be
required. DIRECTV programming is sold separately and independently of DIRECTV®
System hardware. A valid programming subscription is required to operate DIRECTV
System hardware.
Upgrades
Your digital satellite receiver is able to receive upgrades or modifications to some of its
features and functions. These modifications will occur automatically, usually at times
when the receiver would likely be turned off.
If your receiver is on when an upgrade or modification is sent, you may experience a
disruption in reception for a minute or two. Your reception should return to normal
after the modification is complete. Your receiver must be plugged in to receive any
upgrades. Do not unplug your receiver while an upgrade is in progress. Please consult
the System Upgrades menu item (in the System section of the Setup menu) to find a
schedule of upgrades or modifications planned by DIRECTV.

Input/Output Interface
LNB 1 input
Video 2 RCA / Cinch
1 Component video output (Y, Pb, Pr)
1 RGB output
1 DVI output
Audio 6 RCA / Cinch (3 pairs X Left & Right),
1 Optical digital audio output
1 Coaxial digital audio output
S-Video 1 output
RF input & output 2 input, 1 output
VCR control 1 VCR control output
Modem RJ 11 connector
CH 3/4 Switch Toggle switch Ch 3 or Ch 4
Resolution select Switch 1080i / 720p / 480p
/
i
DVI, RGB / Y Pb Pr switch DVI, RGB / Y Pb Pr
Access Card 1 Access Card slot
Accessories
Cables: 1 RF cable
1 phone cable
1 A/V (RCA) cable
1 S-VIDEO cable
1 Component video cable
1 DVI cable
1 VCR control cable
Remote control 1 universal remote control (with 2 batteries)
Card 1 Conditional Access Card
Manual 1 Owner’s manual
Specifications are subject to change without notice.
Troubleshooting and specifications