Hunt Electronic HVT01HTW WEB CAMERA User Manual
Hunt Electronic Co., Ltd. WEB CAMERA
USERS MANUAL

*** USER’S MANUAL ***
FCC ID : UTBHVT01HTW
The Federal Communication Commission Statement
This equipment has been tested and found to comply with the limits for a Class B Digital Device,
pursuant to Part 15 of the FCC rules. These limits are designed to provide reasonable protection
against harmful interference in a residential installation. This equipment generates, uses and can
radiate radio frequency energy and, if not installed and used in accordance with the instruction, may
cause harmful interference to radio communication. However, there is no guarantee that
interference will not occur in a particular installation. If this equipment does cause harmful
interference to radio or television reception, which can be determined by turning the equipment off
and on, the user is encouraged to try to correct the interference by one of more of the following
measures: -
-Reorient or relocate the receiving antenna.
-Increase the separation between the equipment and receiver.
-Connect the equipment into an outlet on a circuit different from that to which the receiver
is connected.
-Consult the dealer or an experienced Radio/TV technician for help.
Use only shielded cables to connect I/O devices to this equipment. You are cautioned that change
or modifications not expressly approved by the party responsible for compliance could void your
authority to operate the equipment.
THIS DEVICE COMPLIES WITH PART 15 OF THE FCC RULES. OPERATION IS SUBJECT TO
THE FOLLOWING TWO CONDITIONS: (1) THIS DEVICE MAY NOT CAUSE HARMFUL
INTERFERENCE, AND (2) THIS DEVICE MUST ACCEPT ANY INTERFERECE RECEIVED,
INCLUDING INTERFERENCE THAT MAY CAUSE UNDESIRED OPERATION.
1. This device may not cause harmful interference and
2. This device must accept any interference received, including interference that may cause
undesired operation.

1/33
User Manual v.0.1
HVT-01HTW

2/33
Content
PREFACE ....................................................................................................................................... 3
I. PRODUCT SPECIFICATIONS .......................................................................................................3
II. PRODUCT INSTALLATION........................................................................................................4
A. HARDWARE
INSTALLATION..................................................................................................... 5
B. IP
ASSIGNMENT........................................................................................................................ 3
C. INSTALL ACTIVEX CONTROL (INSTALL ONCE ONLY)........................................................... 3
III. LIVE VIDEO................................................................................................................................ 3
IV. HVT-01HTW CONFIGURATION.......................................................................................................11
A. SYSTEM
INFORMATION......................................................................................................... 12
B. NETWORK ............................................................................................................................... 16
C. MULTIMEDIA............................................................................................................................ 22
D. EVENT...................................................................................................................................... 28
V. PACKAGE CONTENTS ........................................................................................................... 33

3/33
PREFACE
HVT-01HT is a transceiver which is a combination of Video Server and Video
Receiver with IE built-in.
It encodes analogue signals of traditional cameras to digital signals; the user can
monitor real-time video via IE browser. MPEG4 compression format supports
smooth video quality. In addition, it also supports JPEG. HVT-01HTW supports SD
card backup to save video files and playback on any PC. In addition, the user can
control this HVT-01HTW with an easy-control user interface via IE browser to build
a home surveillance.
The user can use HVT-01HTW to connect any IP camera via IE browser within
Internet or Intranet. It can decode MPEG4 or JPEG compression format and
transfer analogue signals to TVs, CRT monitors or DVR systems.
I. Product Specifications
z Support MPEG4 and JPEG compression format.
z SD card backup.
z Wireless network connection (802.11 b/g).
z Online firmware upgrade.
z Support dynamic IP and PPPoE through free DDNS.
z Support AVI video backup via IE browser.
z Compatible with Microsoft Windows Media Player.
z Support to connect with 10 IP Cameras.
z OSD output support

4/33
Hardware
CPU ARM 9 ,32 bit RISC
RAM 64MB
ROM 8MB
Image sensor
Network
Ethernet 10/ 100 Base-T
Wireless 802.11b/g
WEP 64/ 128 bit
Network Protocol HTTP, TCP/ IP, SMTP, FTP, PPPoE, DHCP, DDNS, NTP
System
Video Resolution
(NTSC/PAL)
720x480/576, 352x240/288, 176x120/144
Video adjust Brightness, Contrast, Saturation, Hue
Image snapshot Yes
Full screen monitoring Yes
Compression format MPEG-4
Video bitrate adjust CBR, VBR
Motion Detection Yes, 3 different areas
Triggered action Mail, FTP, Save to SD card
Pre/ Post alarm Yes, configurable
Security Password protection
Firmware upgrade HTTP mode, can be upgraded remotely
Simultaneous connection Up to 10
SD card management
Recording trigger Motion Detection, Network break down
Video format AVI
Video playback Yes
Delete files Yes
Web browsing requirement
OS Windows 2000, 2003, XP
Browser IE 6.0 or above

5/33
II. Product Installation
A. Hardware Installation
i. Connect the power adapter and Ethernet cable.
ii. Set up the network configuration based on different environments. For
further information, please refer to chapter IV Network Configuration.
B. IP Assignment
i. Use “IP Installer”, comes with CD, to assign the IP address of
HVT-01HTW.
ii. 2 languages supported for IP Installer:
i. IPInstallerCht.exe: Chinese version
ii. IPInstallerEng.exe: English version
iii. 3 different IP configurations based on different environments.
i. Fixed IP (Public IP or Virtual IP)
ii. DHCP (Dynamic IP)
iii. Dial-up (PPPoE)
iv. Execute IP Installer
v. Use Windows XP SP2 or newer version. If the following message popup,
please click “Unblock.”
6/33
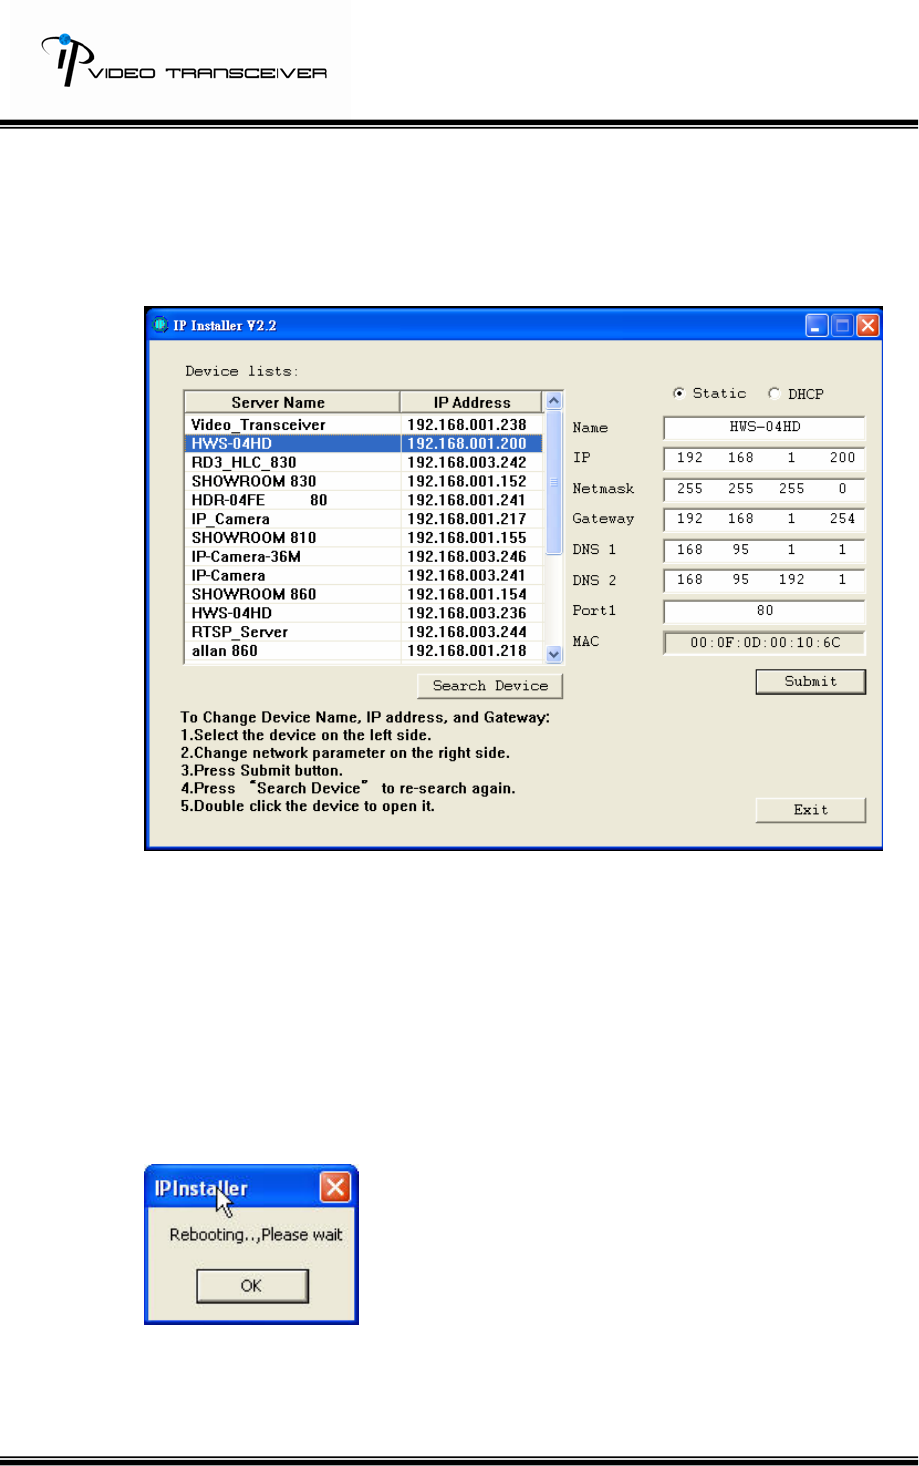
vi. The GUI of IP Installer:
vii. IP Installer searches all IP deceives which connect with the internet and
it lists all of them on the left side or the user can click “Search Device” to
search again.
viii. When the user clicks on each IP device listed on the left side of IP
Installer, the network configuration of the IP device will show on the right
side. The user can change the parameter and click on “Submit”. And,
then, the following message will popup. Click on “OK” to reboot
HVT-01HTW.
ix. After HWS-04HD reboot, click “Search Device” to research HVT-01HT.
And, use IE Browser for live viewing.
7/33
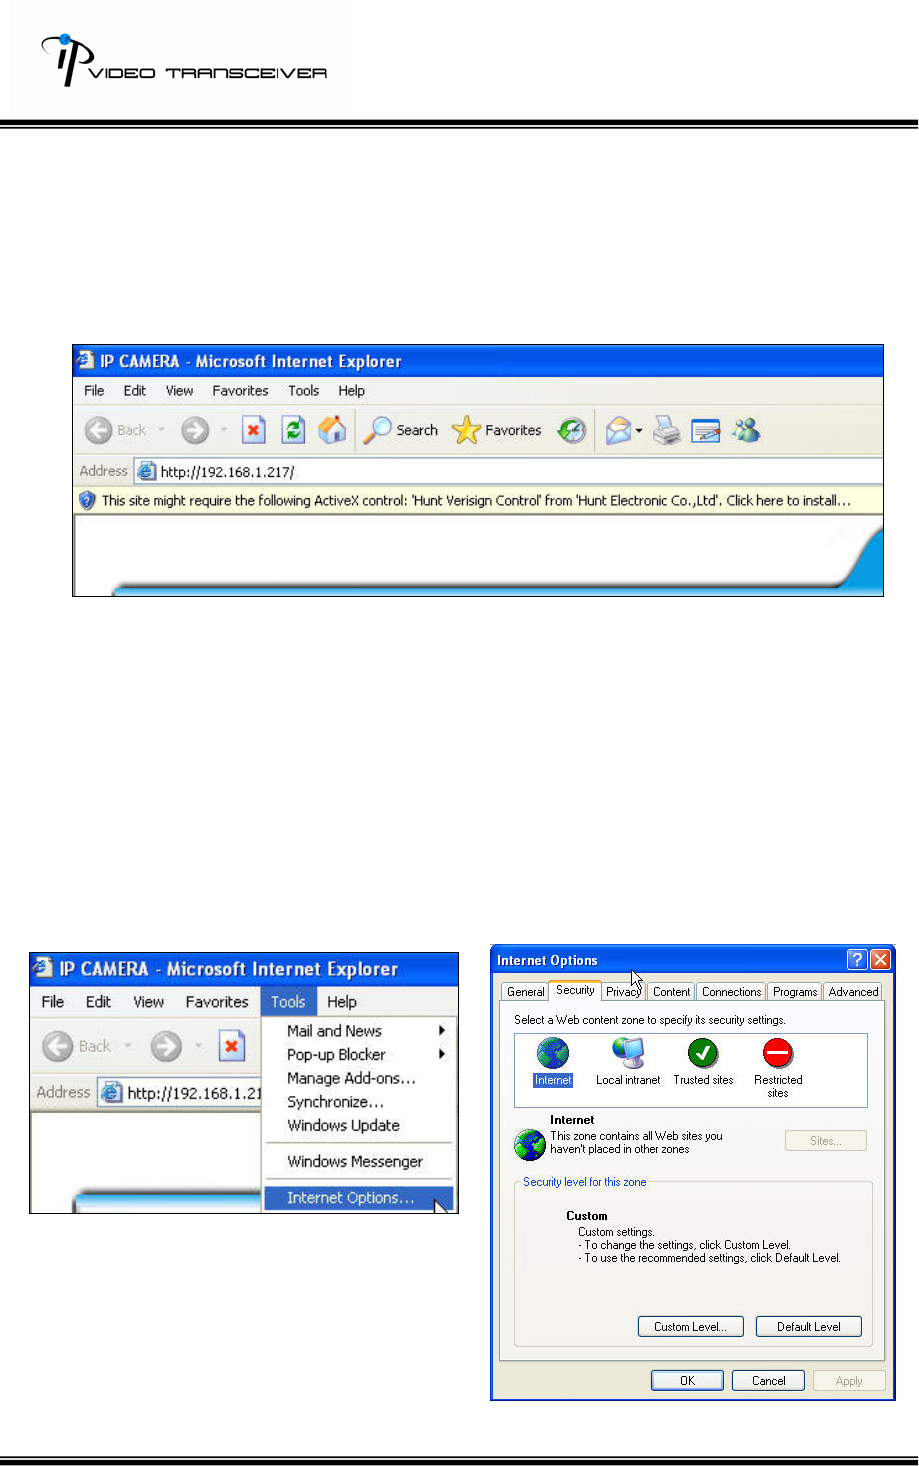
C. Install ActiveX control (setup once only):
For the first time to view HWS-04HD via IE browser, it will request the user to
install ActiveX.
Also, check the security setting as follows.
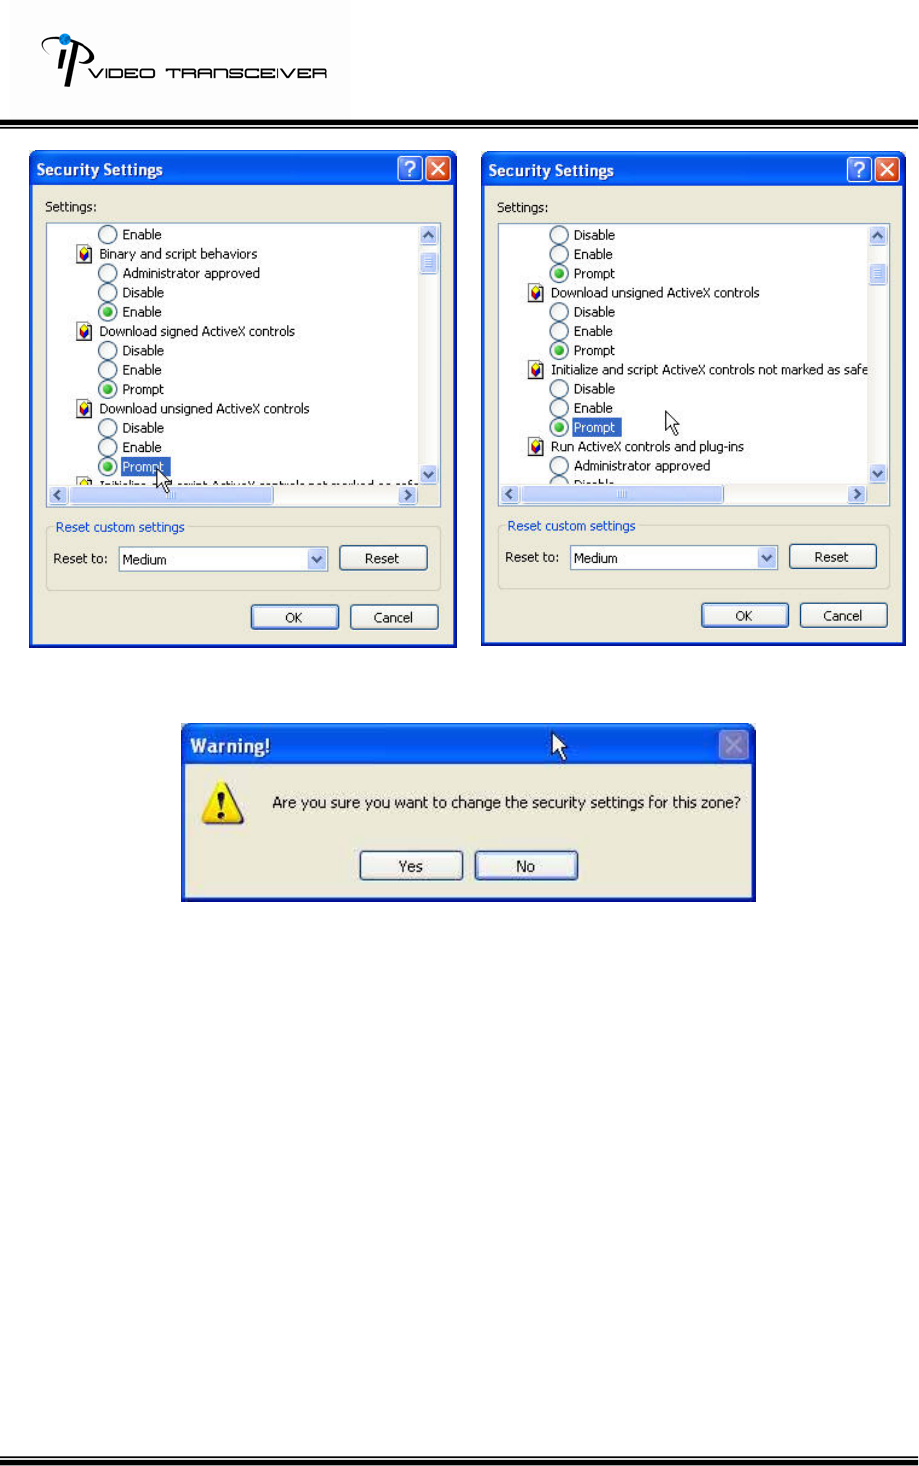
i. IE Æ Tools Æ Internet Options… Æ Security Tap Æ Custom Level Æ
Security Settings ÆDownload unsigned ActiveX controls Æ Select
“Enable” or “Prompt (Recommend).
ii. IE Æ Tools Æ Internet Options Æ Security Tap Æ Custom Level… Æ
Security Settings Æ Initialize and script ActiveX controls not marked as
safe Æ Select “Enable” or “Prompt” (Recommend).
1 2
3 4
8/33
5
When popup the following dialogue box, click “Yes”.
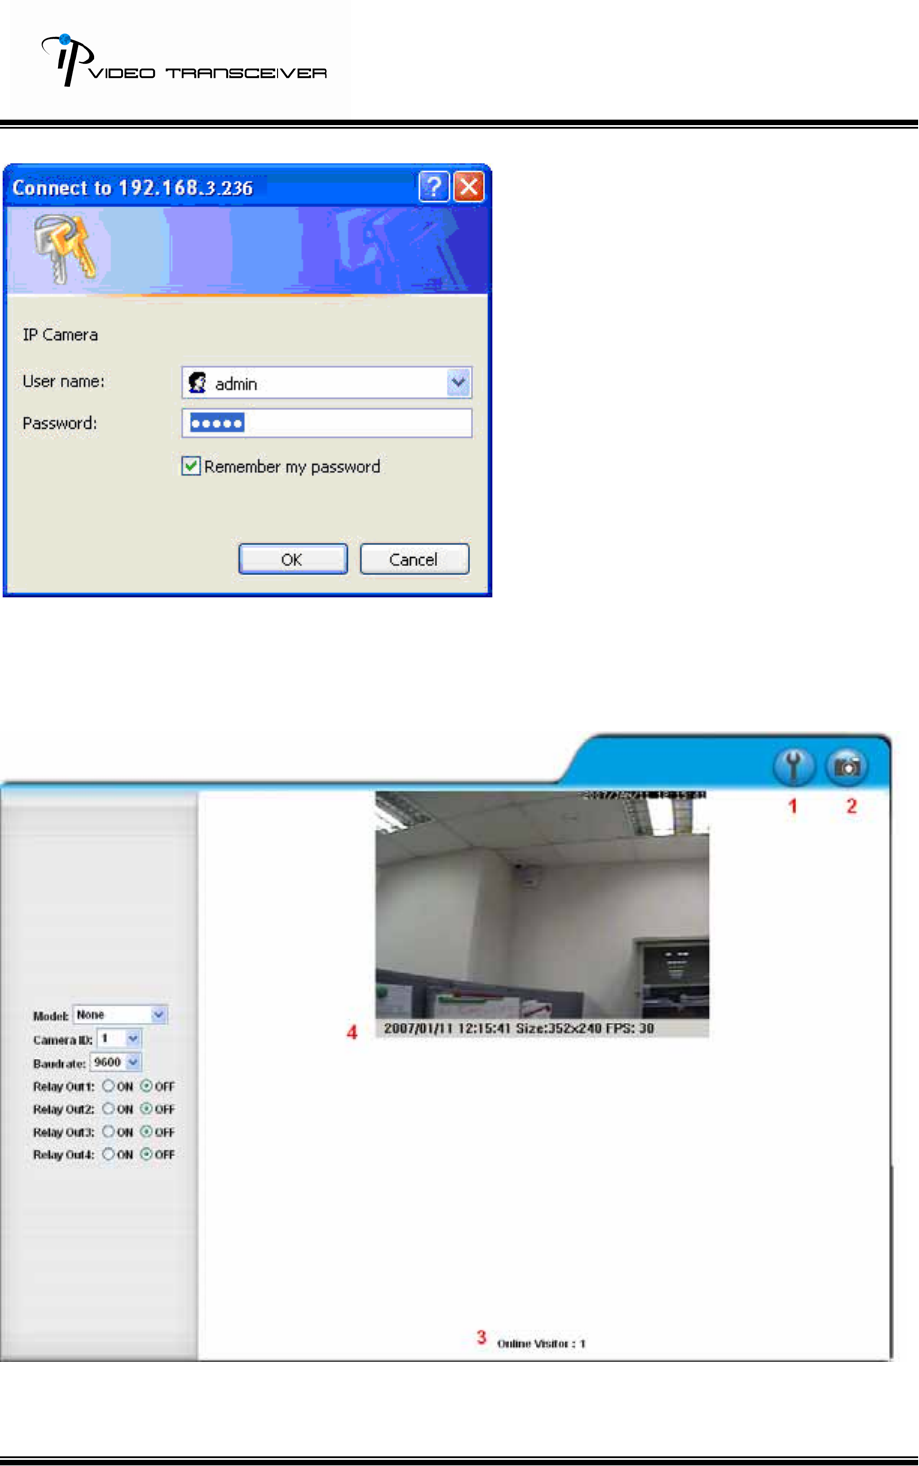
III. Live Video
After executing IE browser and typing the IP address of HVT-01HTW, the following
message will popup and request the user to input the user name and password. The
default user name and password are “admin” and “admin.”
9/33
When the user name and the password are correct, it will connect toHWS-04HD via IE
Browser. The GUI will display as follows.
10/33
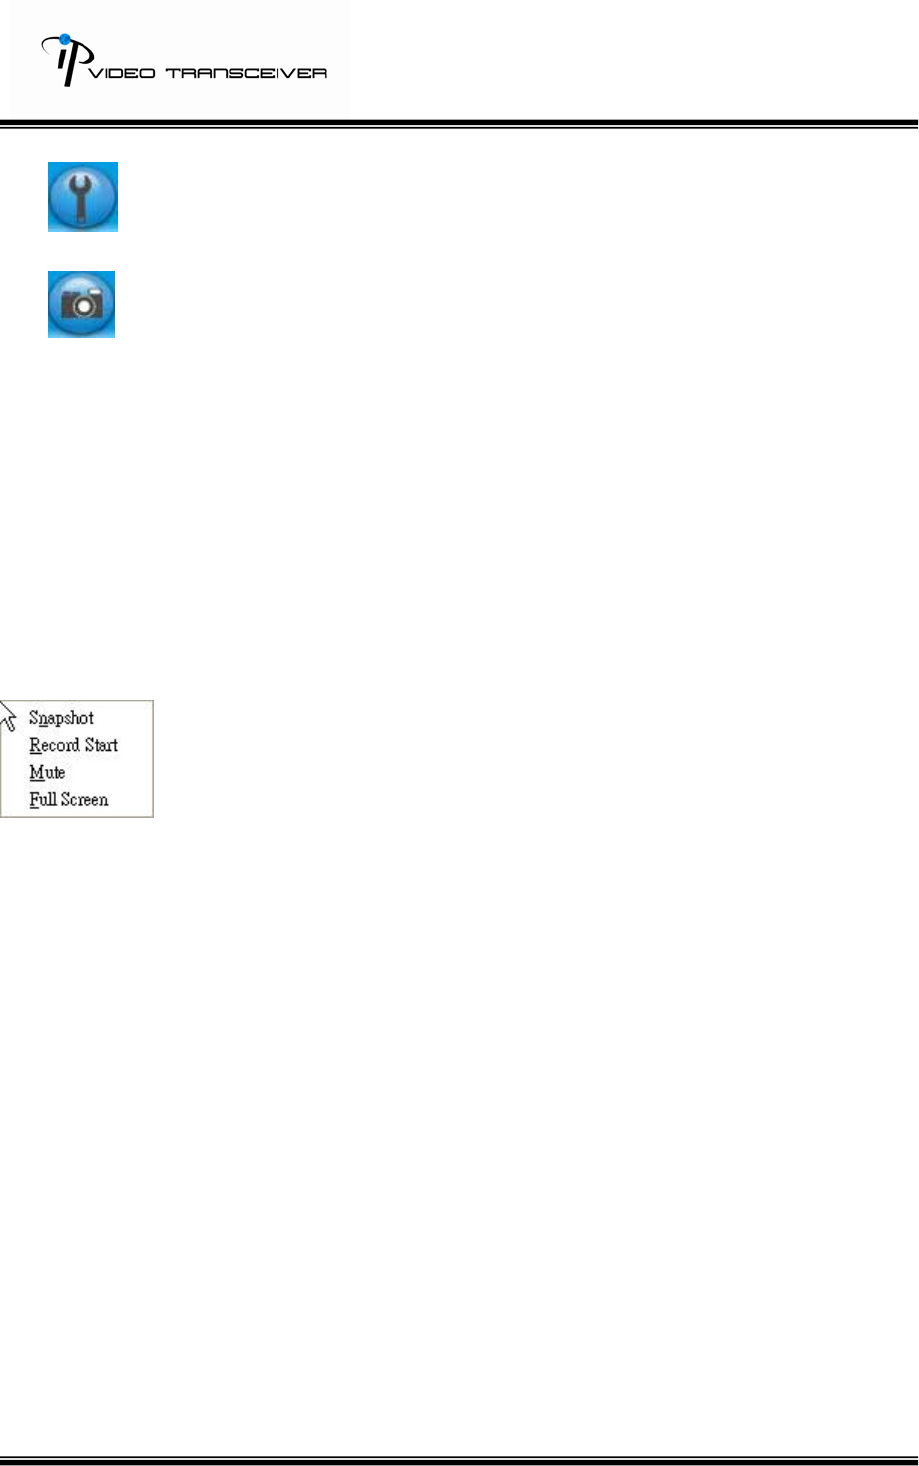
1. :Get into the administration page.
2. :Video Snapshot.
3. Show how many users connect to this HVT-01HT.
4. Display “date and time”, “resolution”, and “refreshing rate”.
On each chancel, the user can left click twice on the mouse to for live viewing with full
screen. And, the user can press Esc on keyboard on left click twice on the mouse to
return to a normal mode.
On each channel, the user can right click on the mouse and a function list will display
as follows.
1. Snapshot:Save as JPE files.
2. Record Start:The user can choose the path to save videos. When the user start
to record. “Record Start” will change its name to “Record Stop” and the user just
click on “Record Stop” to stop recording. The video will be saved as AVI format.
3. Mute:Click on Mute to enable or disable sound.
4. Full Screen:View the video with full screen.
11/33
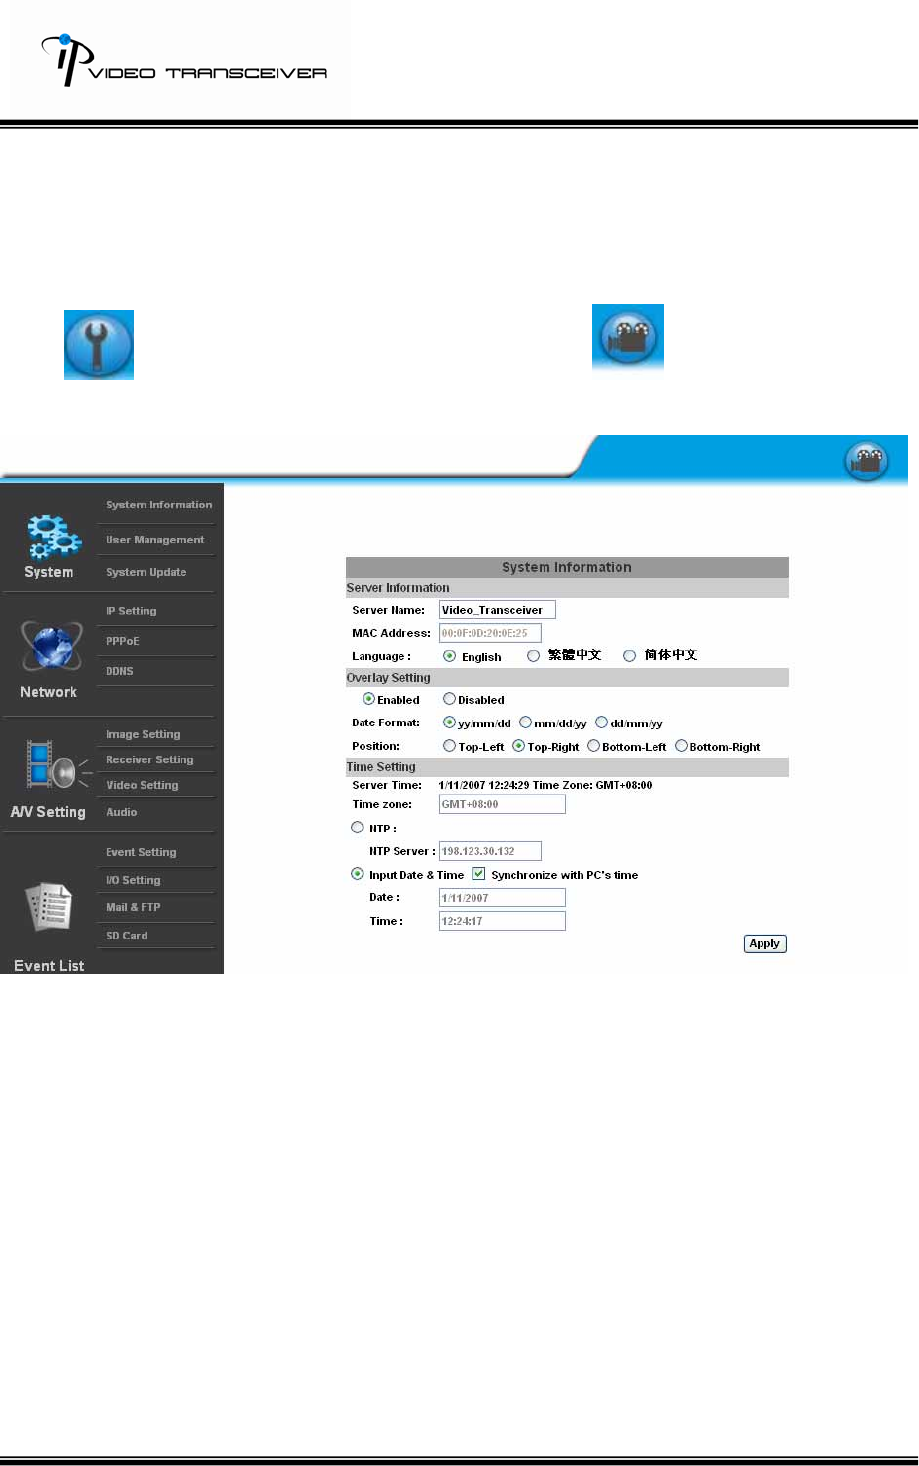
IV. HVT-O1HT Configuration
Click to get into the administration and click on to return to the live
viewing as follows.

12/33
A.System Information
i、 Server Information
a. Sever name:This is the video server name for the user to search on
IP Installer.
b. Select language:There are English, Traditional Chinese, and
simplified Chinese. When a certain language is selected, the
following message will popup and ask the user to confirm language
changed.
c. Overlay Setting:Enable or disable Overlay Setting.
i. Date Format:yy/mm/dd, mm/dd/yy, or dd/mm/yy.
ii. Position:Top-Left, Top-Right, Bottom-Left, or Bottom-Right.
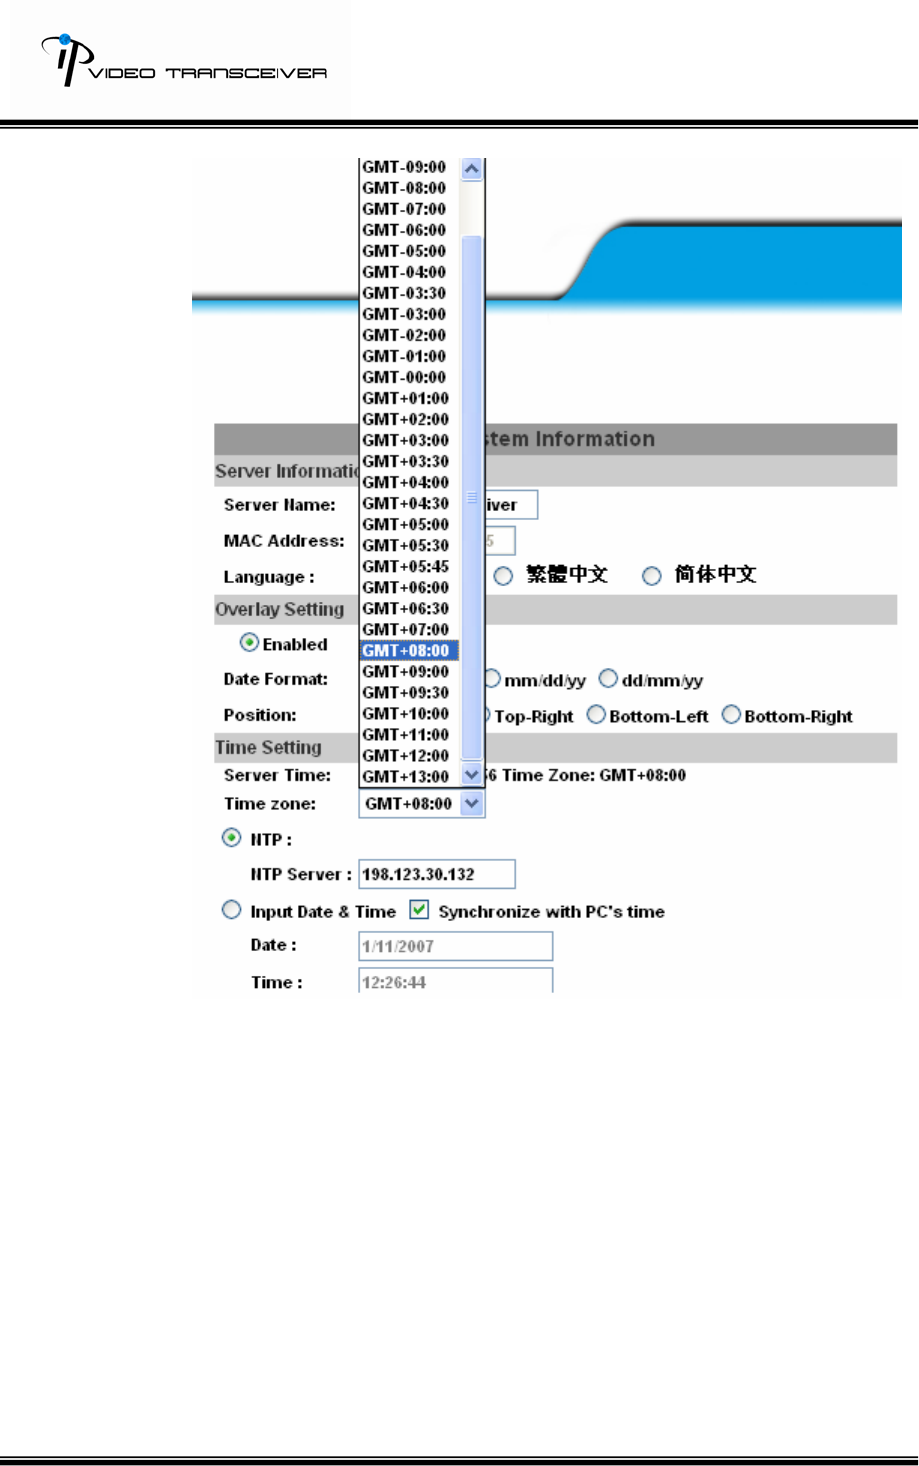
d. Time Setting:Use NTP or Input Date & Time.
e. Click on “Apply” to save.
13/33
14/33
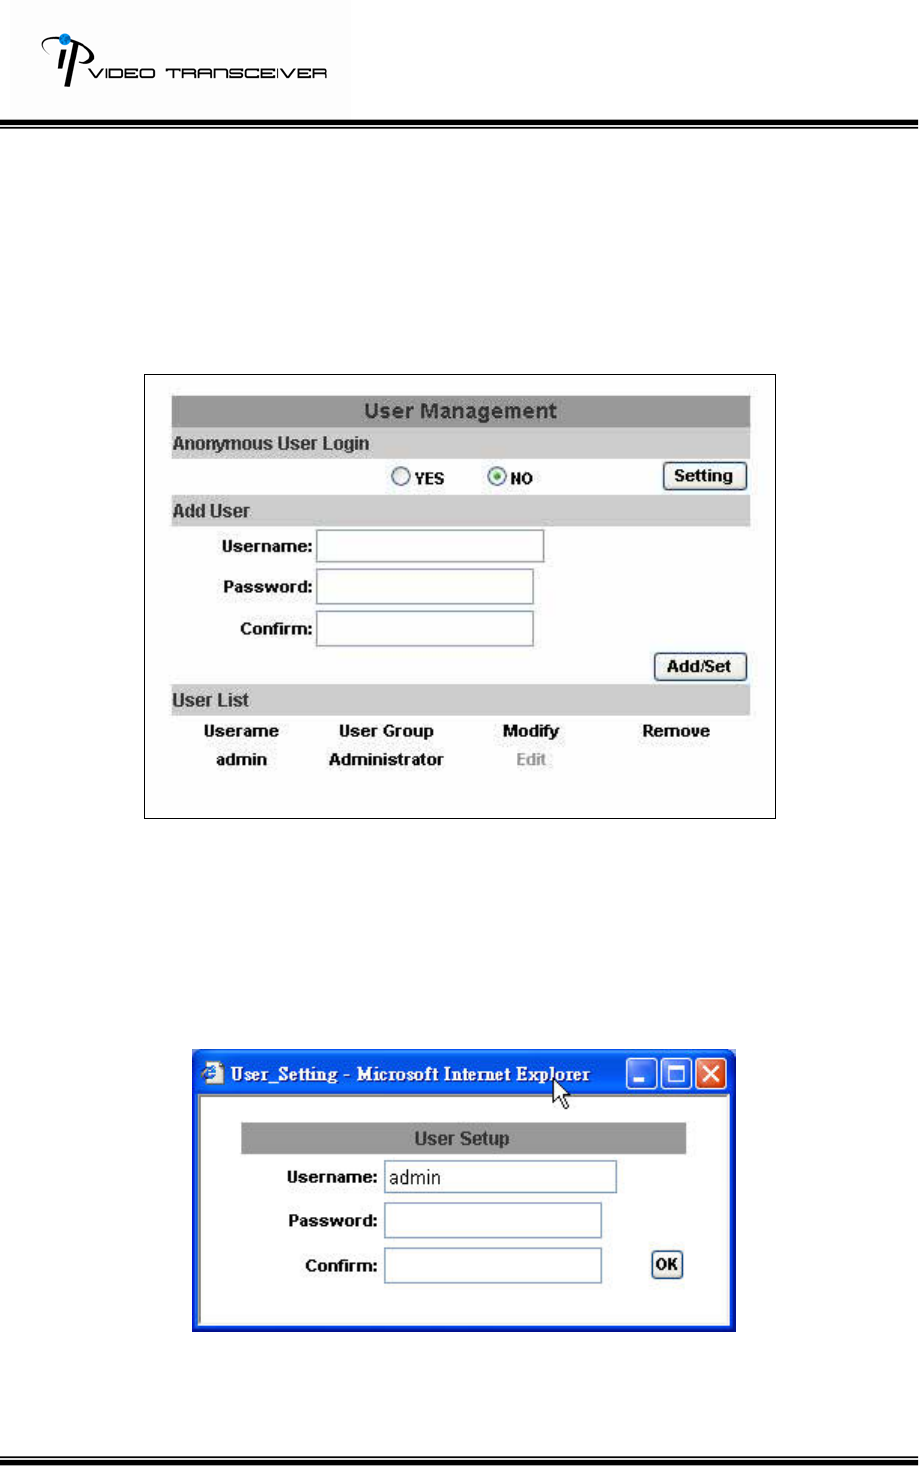
ii、 User Management
Support three authorities: administrator (the highest), user, and
anonymous user.
Default Username and Password: admin/ admin
a. Anonymous User Login:
Yes:Allow anonymous login.
No:Require user name and password to login.
b. Add user:
Type the user name and password and then click on “Add/ Set”.
c. Click on “Edit” or “Delete” to modify the user.
15/33
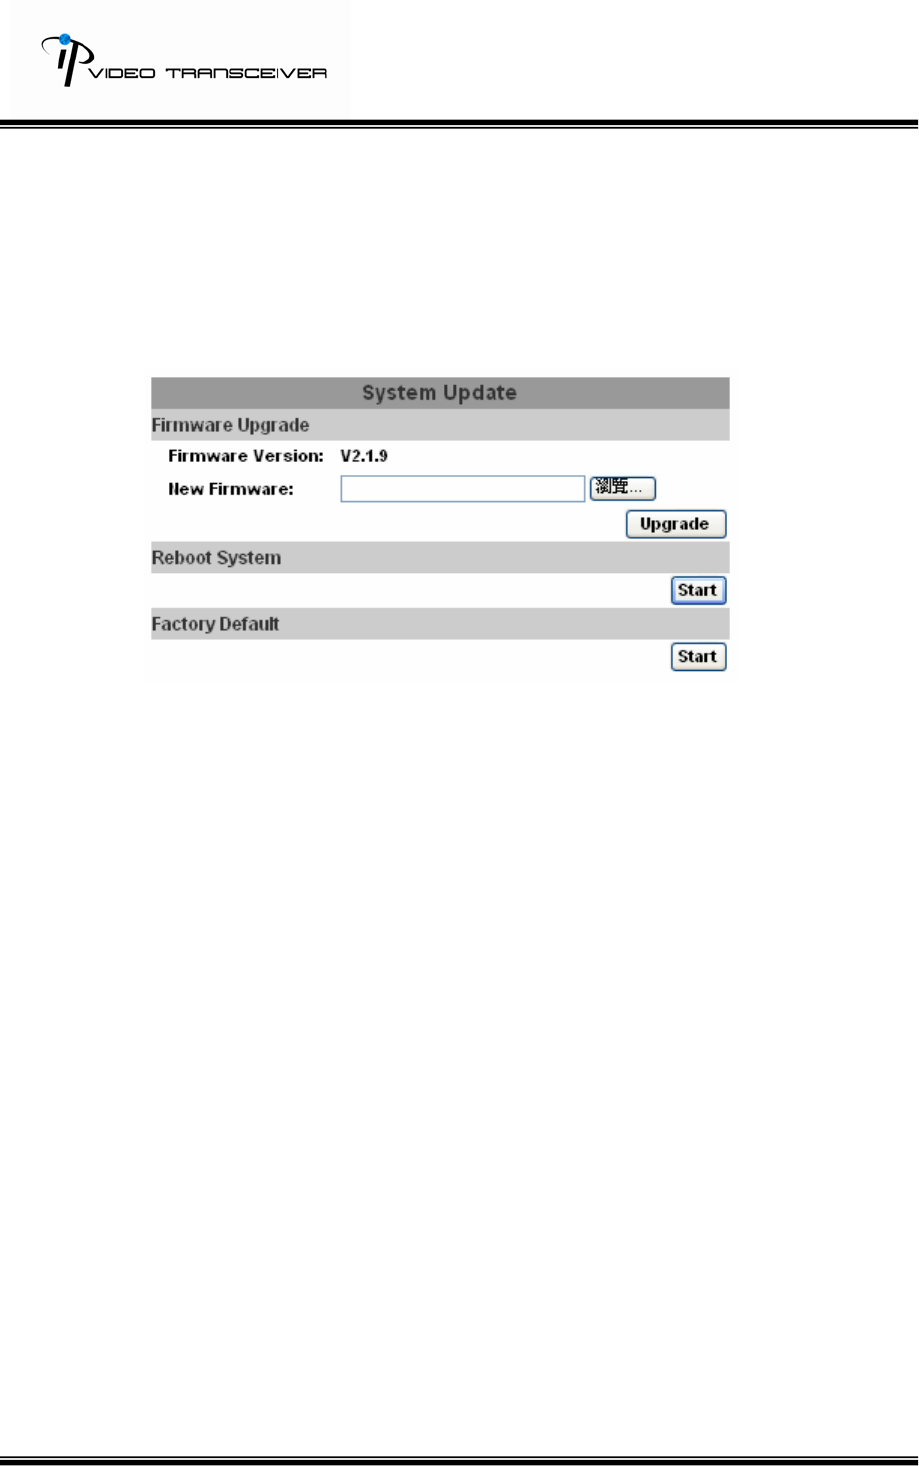
iii、 System update
Update the firmware online. Click on “Browse…” to select the firmware.
And then, click on “Upgrade.”
Other settings:
Reboot system:Reboot the video server.
Factory default:Recover all settings.
16/33
B.Network
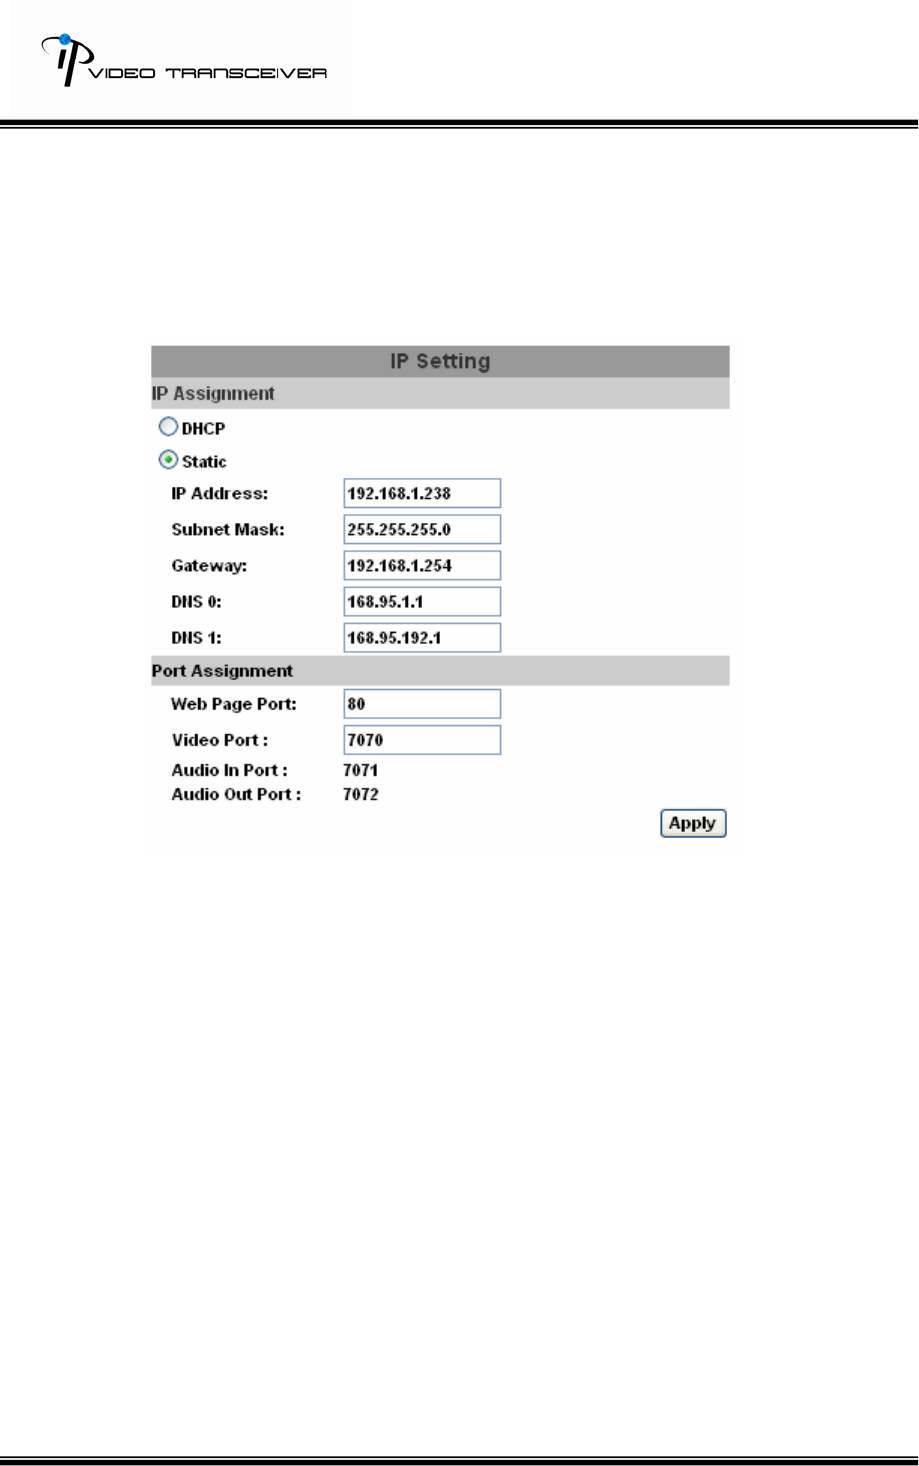
i、 IP Setting
HVT-01HTW supports static IP and DHCP.
a. DHCP:Use Dynamic Host Configuration Protocol to get all network
parameters automatically.
b. Static IP:Type IP address, subnet mask, gateway, and DNS.
c. DNS:
With DHCP, DNS will be assigned automatically.
Static IP: Based on the network environment.
d. Port:If the user uses the router, some ports have to be adjusted in
case of conflict.
e. Click on “Apply” to save.
17/33
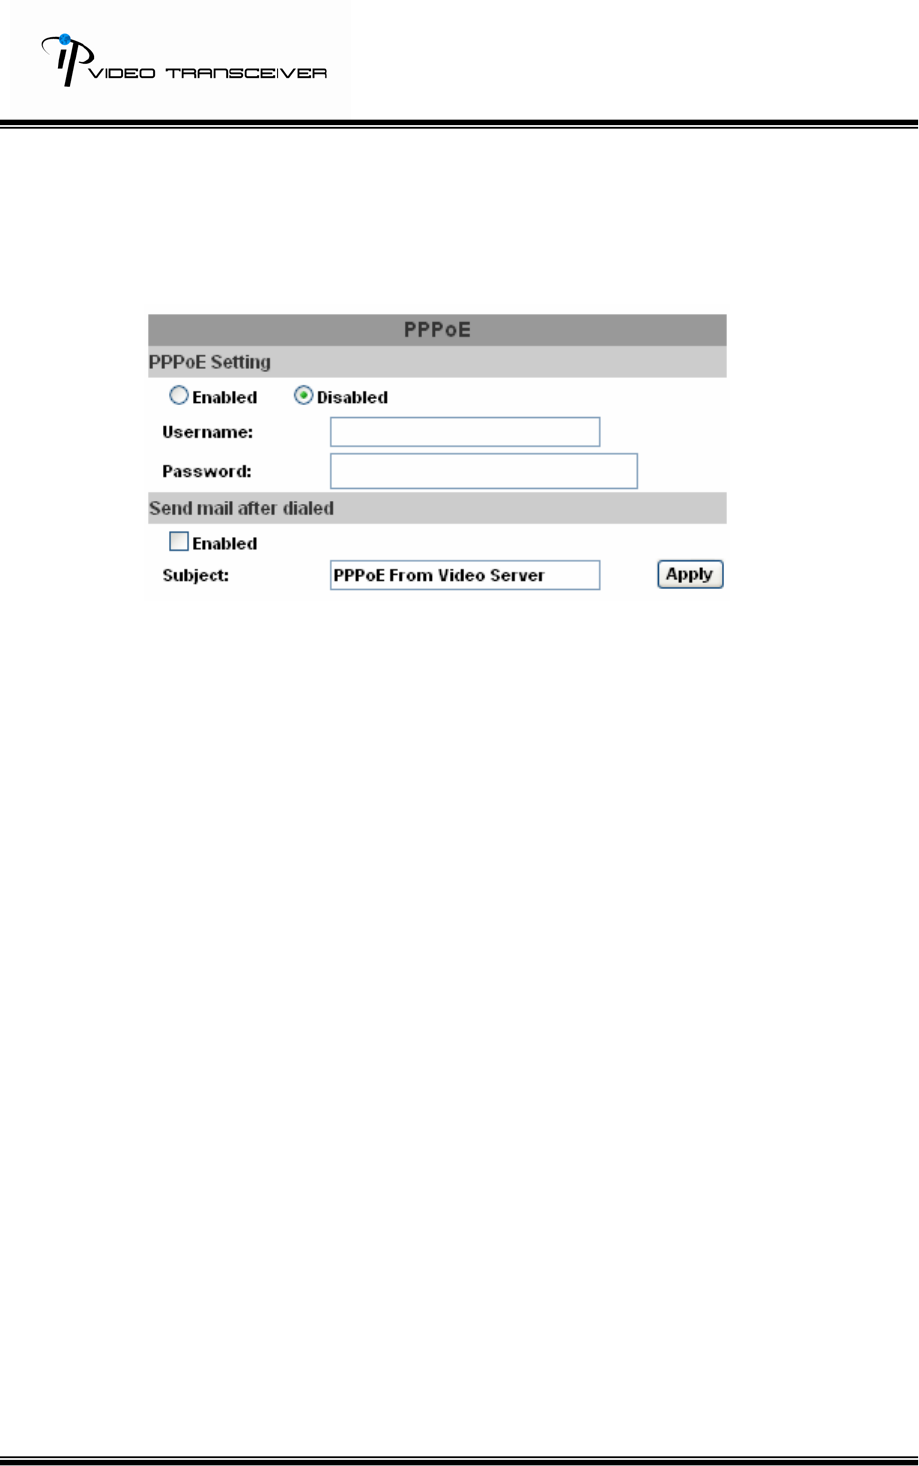
ii、 PPPoE
If the user wants to use ADSL, please select “Enabled”.
Username: username for ADSL connection.
Password: password for ADSL connection.
Send mail after dialed:After this function is enabled, it will send an email
to a specific mail account. Default subject is “PPPoE from Video Server”.
For the mail setting, please refer to IV. “Mail and FTP” settings. And,
click on “Apply” to save.
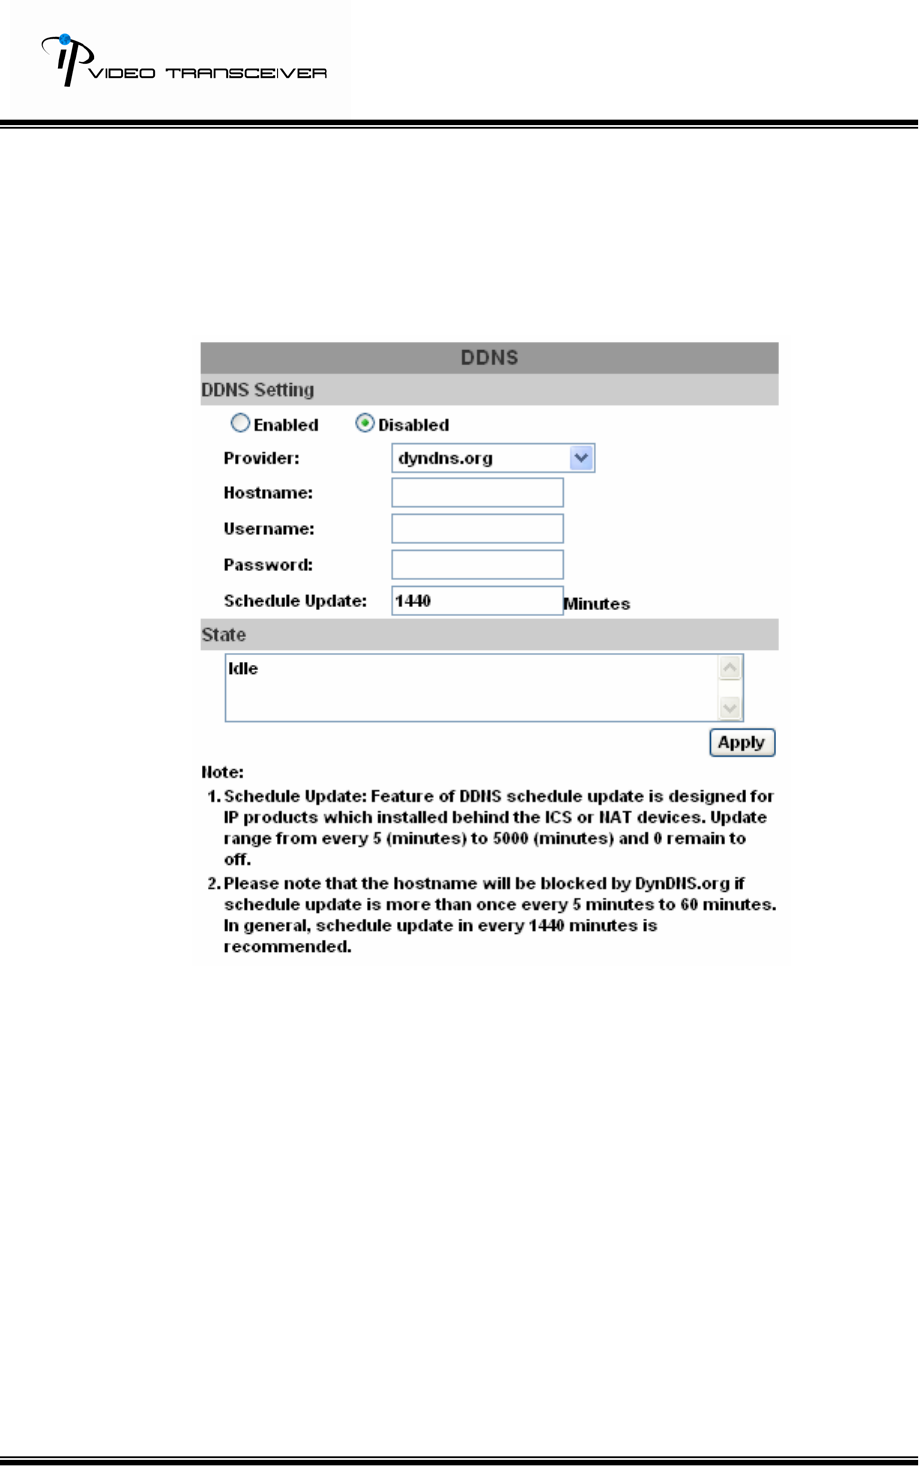
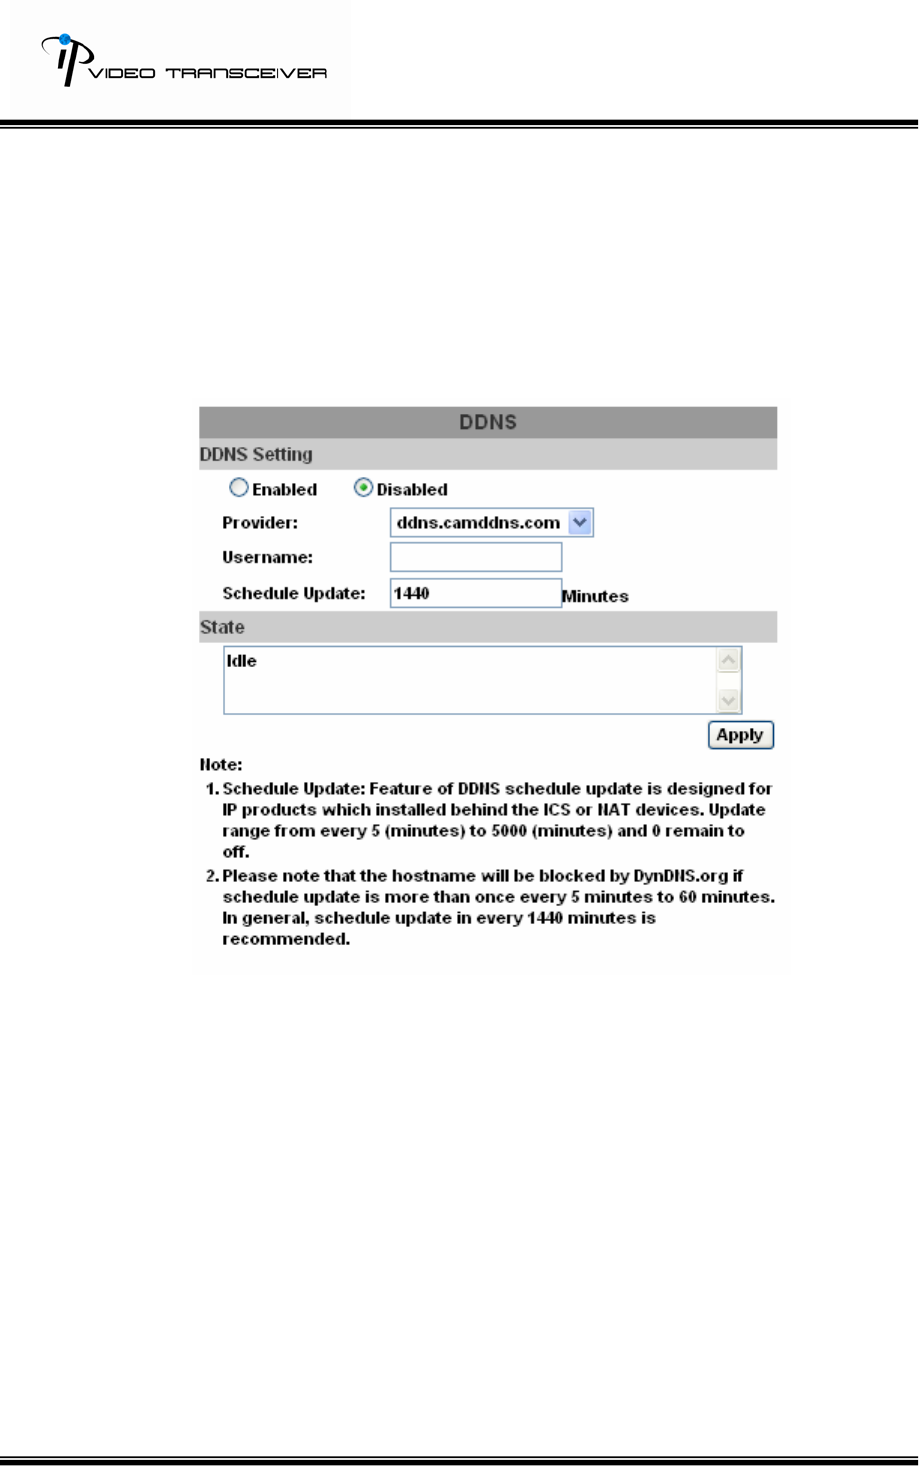
iii、 DDNS
HVT-01HTW supports DDNS. It uses dynamic IP to redirect IP and
connect with the video sever.
HVT-01HTW supports 3 kinds of DDNS severs, including dyndns.org,
ddns.camddns.com, and ddns2.ydsdvr.com.
18/33
a. DynDNS;
1. DDNS Setting: Enable or Disable DDNS setting.
2. Input the DynDNS’s host name, user name, and password.
3. Schedule Update: Default 1440 minutes.
* dyndns.org: If the user’s schedule update is too often, it will
be blocked. Recommend the user to update once per day
(1440 minutes per day).
4. Click on “Apply” to save.
19/33
b. Camddns:
1. Input user name.
2. Schedule Update: Default 1440 minutes.
3. Click on “Apply” on save.
c. DDNS State:
1. Updating: Information updating.
2. Idle: Stop Service.
3. DDNS registration successful, can now log by
http://<username>.ddns.camddns.com: Register successfully.
4. Update Failed, the name is already registered: The user name
has already been used. Please change another one.
5. Update Failed, please check your internet connection: Network
connection failed.
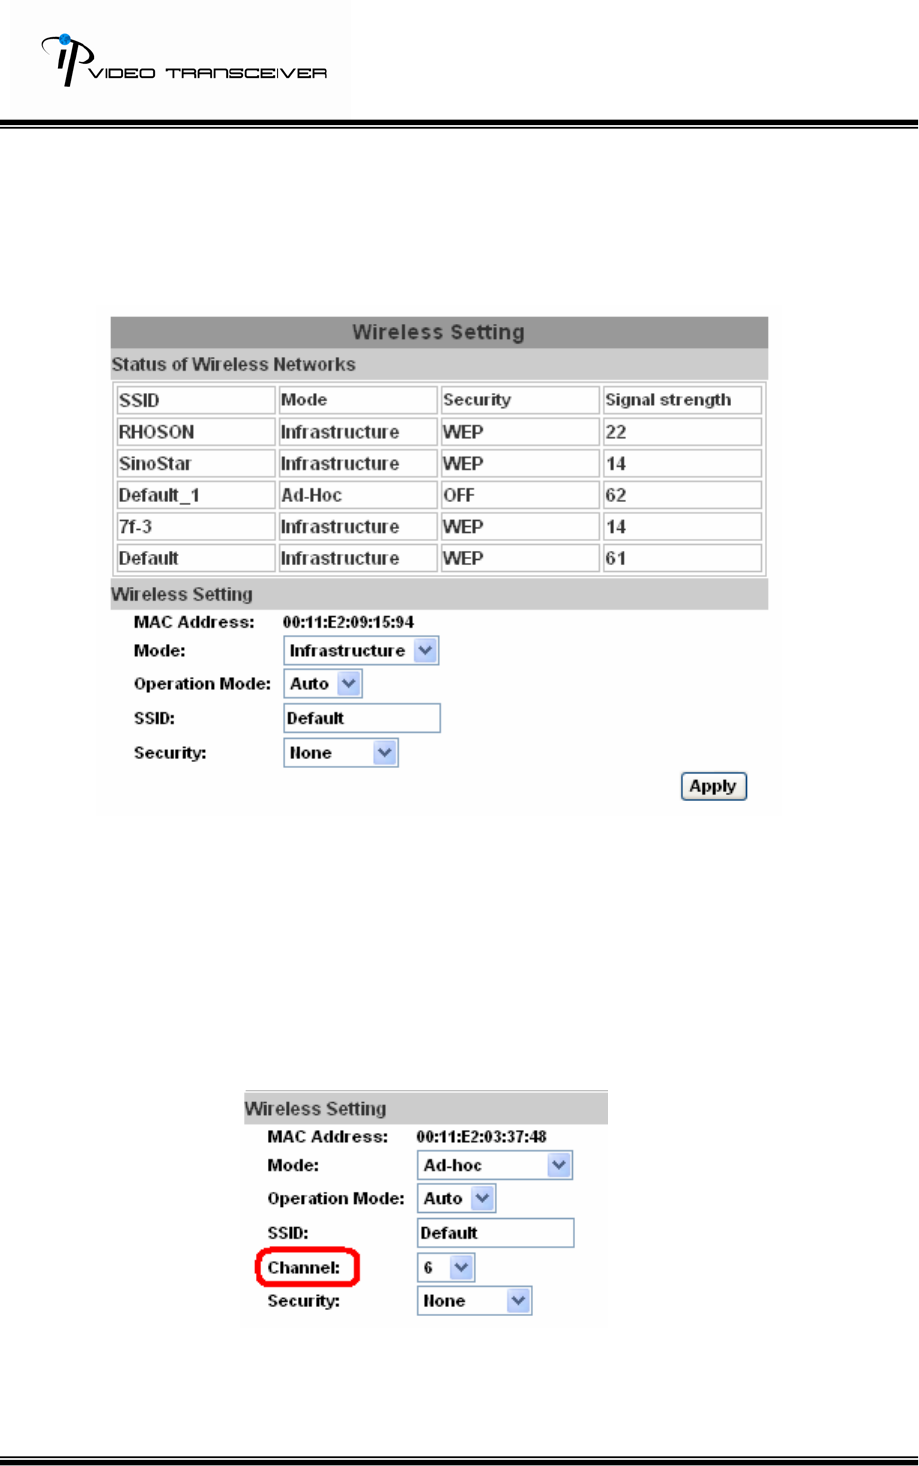
iv、 Wireless Setting
20/33
HVT-01HTW supports 802.11b/g wireless connection. (Notice: While
using wireless setting, the user has to unplug Ethernet cable
because both use the same IP. If the user doesn’t unplug Ethernet
cable, wireless setting can not be executed).
a. Status of Wireless Networks;
It can scan all wireless services.
b. Wireless Setting:
1. Mode:There are Infrastructure and Ad-hoc. Infrastructure is for
connecting with the router. Ad-hoc is for connecting with PC.
When the user uses Ad-hoc mode, there is “Channel” to select.
e.g. If one PC’s channel is 1, the other’s channel has to 1, too.
2. SSID:Based on AP setting.
3. Channel:This is only be used when the user selects Ad-hoc
mode in order to avoid conflict.
21/33
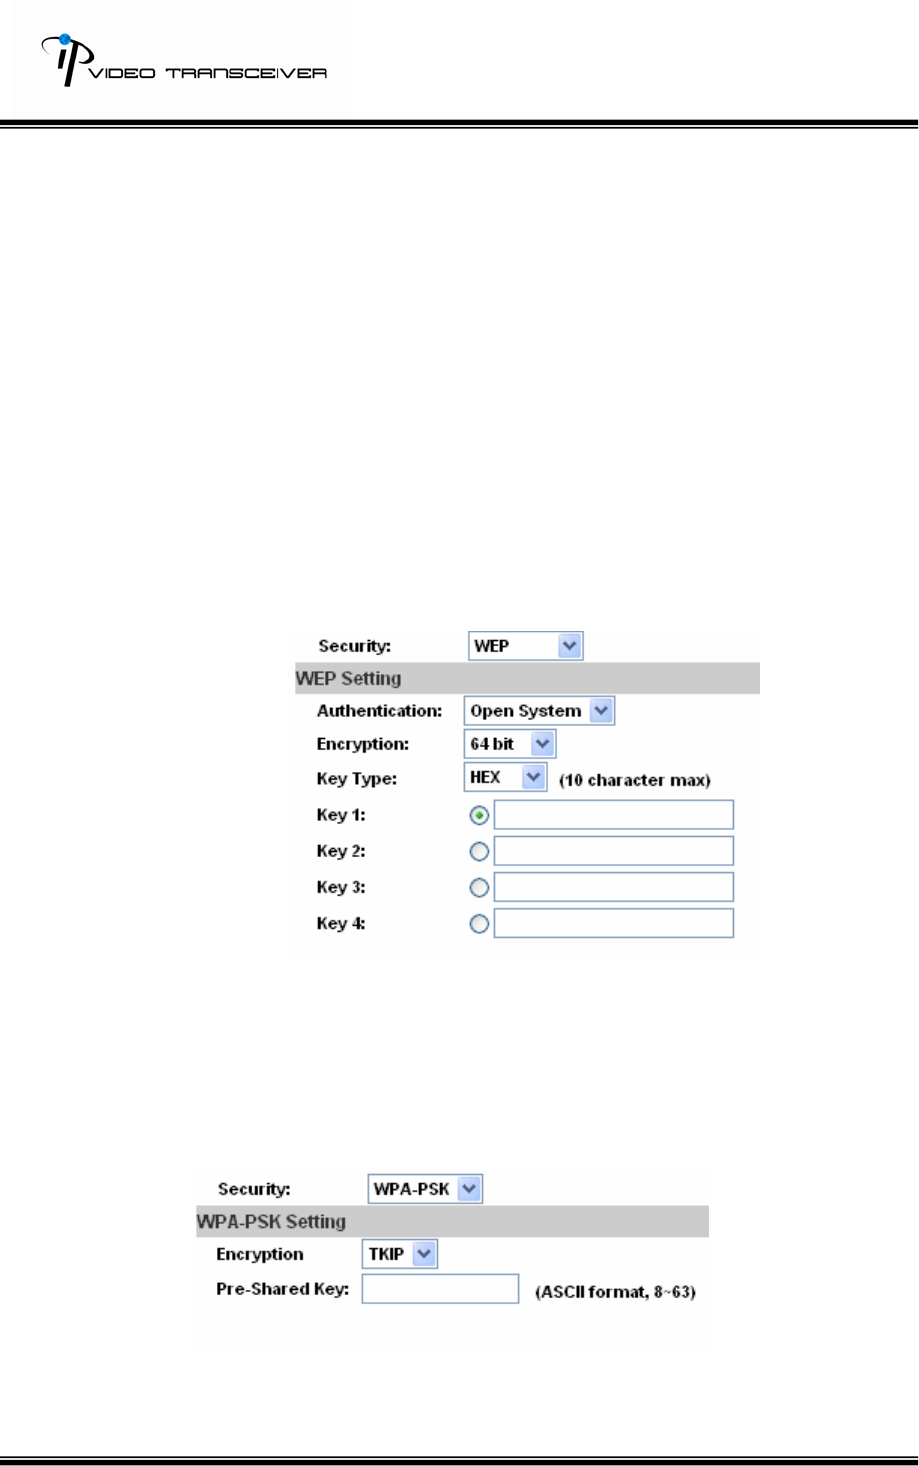
4. Security:It supports “None”, “WEP”, “WPA-PSK” security
encryption based on the setting of the Router.
『WEP』
z Authentication:There are Open System and Shared Keys,
it is based on different encryptions. This has to be the
same as the Router’s setting.
z Encryption:There are 64 bits and 128 bits. This is based
on Key Type based on the Router’s setting.
z Key Type:There are HEX and ASCII. When selecting HEX,
the user only can input 0~9 characters and use A, B, C, D,
E, and F. And, when selecting ASCII, the user can input
any character. (case [upper cases/ lower cases] sensitive).
z Key 1~4:Based on Key Type to input characters.
『WPA-PSK』:
Encryption:There are TKIP and AES.
Pre-Shared Key:Allow any characters (case [upper cases/
lower cases] sensitive).
22/33
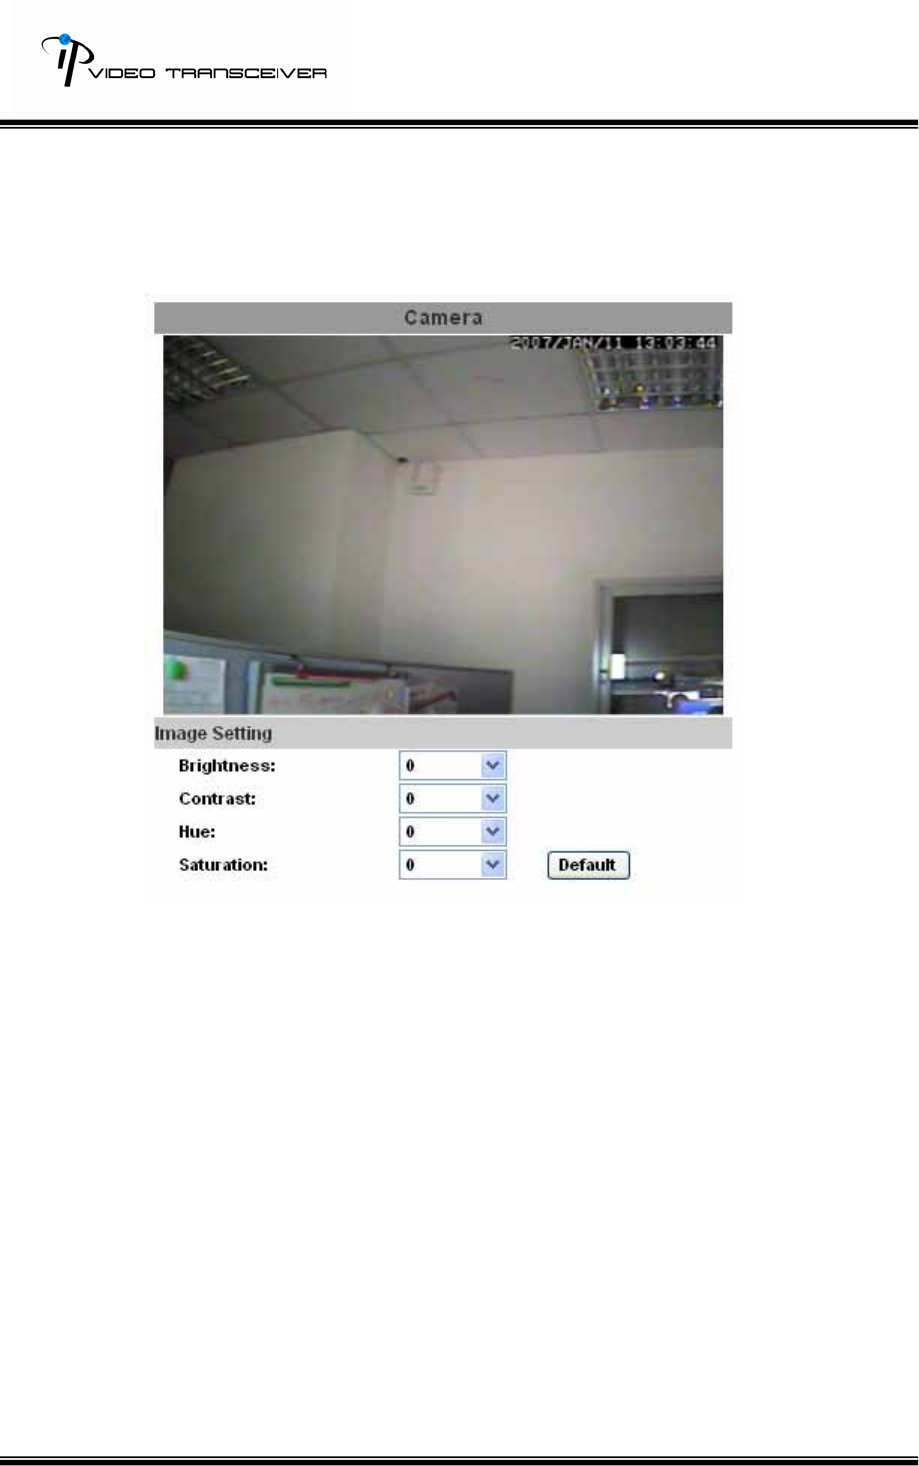
C.Multimedia
i、 Image Setting
The user can adjust “Brightness”, “Contrast”, “Hue”, and “Saturation”.
23/33
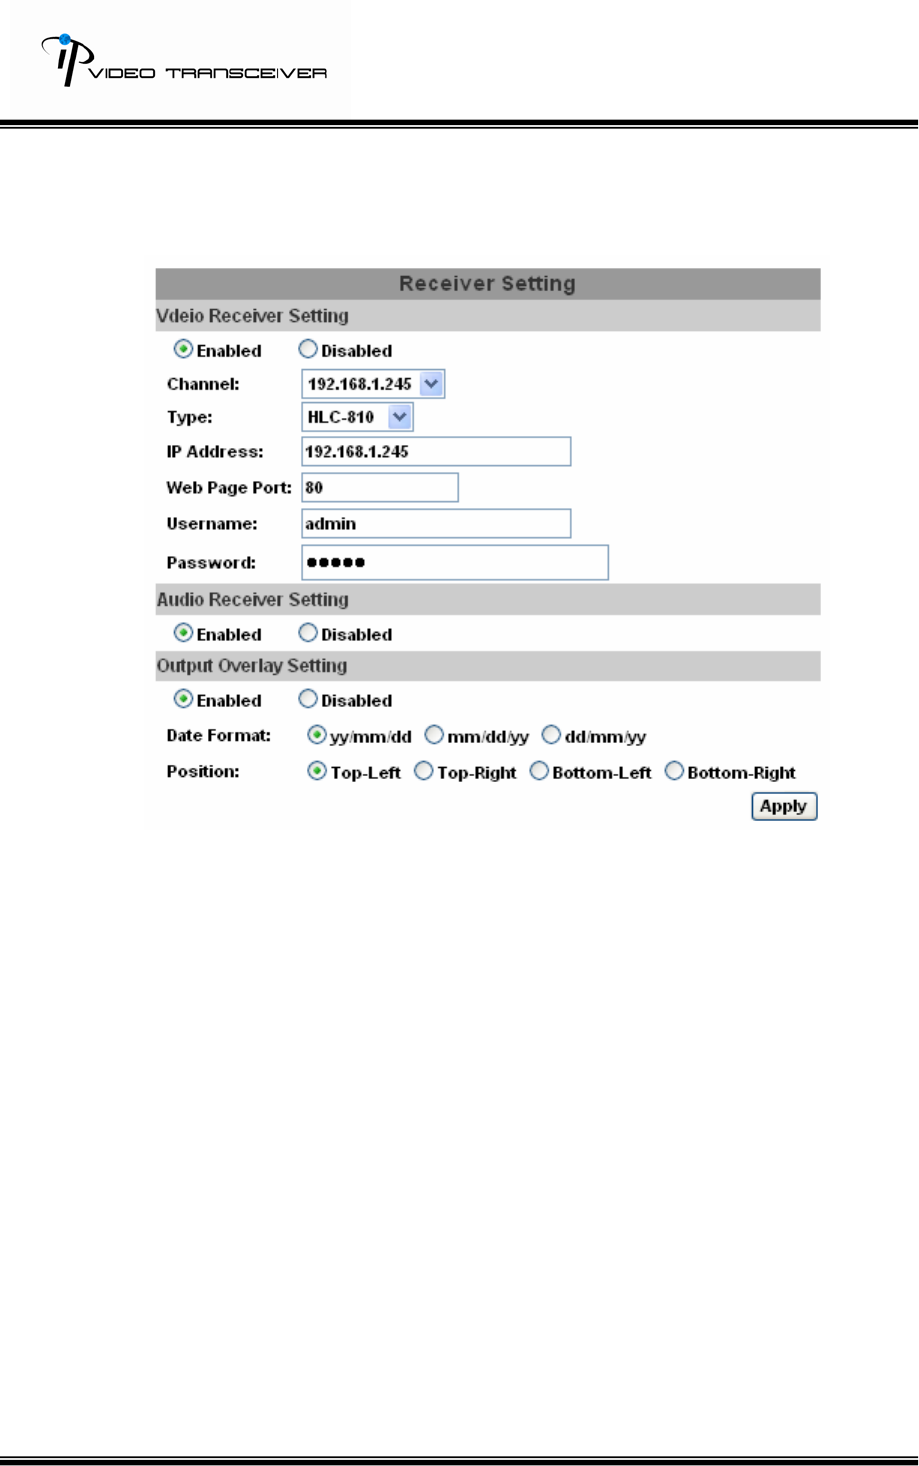
ii、 Receiver Setting
a. Video Receiver Setting:Enable or disable Video Receiver Setting.
1. Channel:10 IP addresses of IP cameras.
2. Type:10 IP camera names.
3. IP Address:Add new IP address.
4. Web Page Port:Default 80.
5. Username:Default admin
6. Password:default admin
b. Audio Receiver Setting:Enable or disable Audio Receiver Setting.
c. Output Overlay Setting:Enable or disable Output Overlay Setting.
1. Date Format:yy/mm/dd, mm/dd/yy, or dd/mm/yy.
2. Position:Top-Left, Top-Right, Bottom-Left, or Bottom-Right.
d. Click on “Apply” to save.
24/33
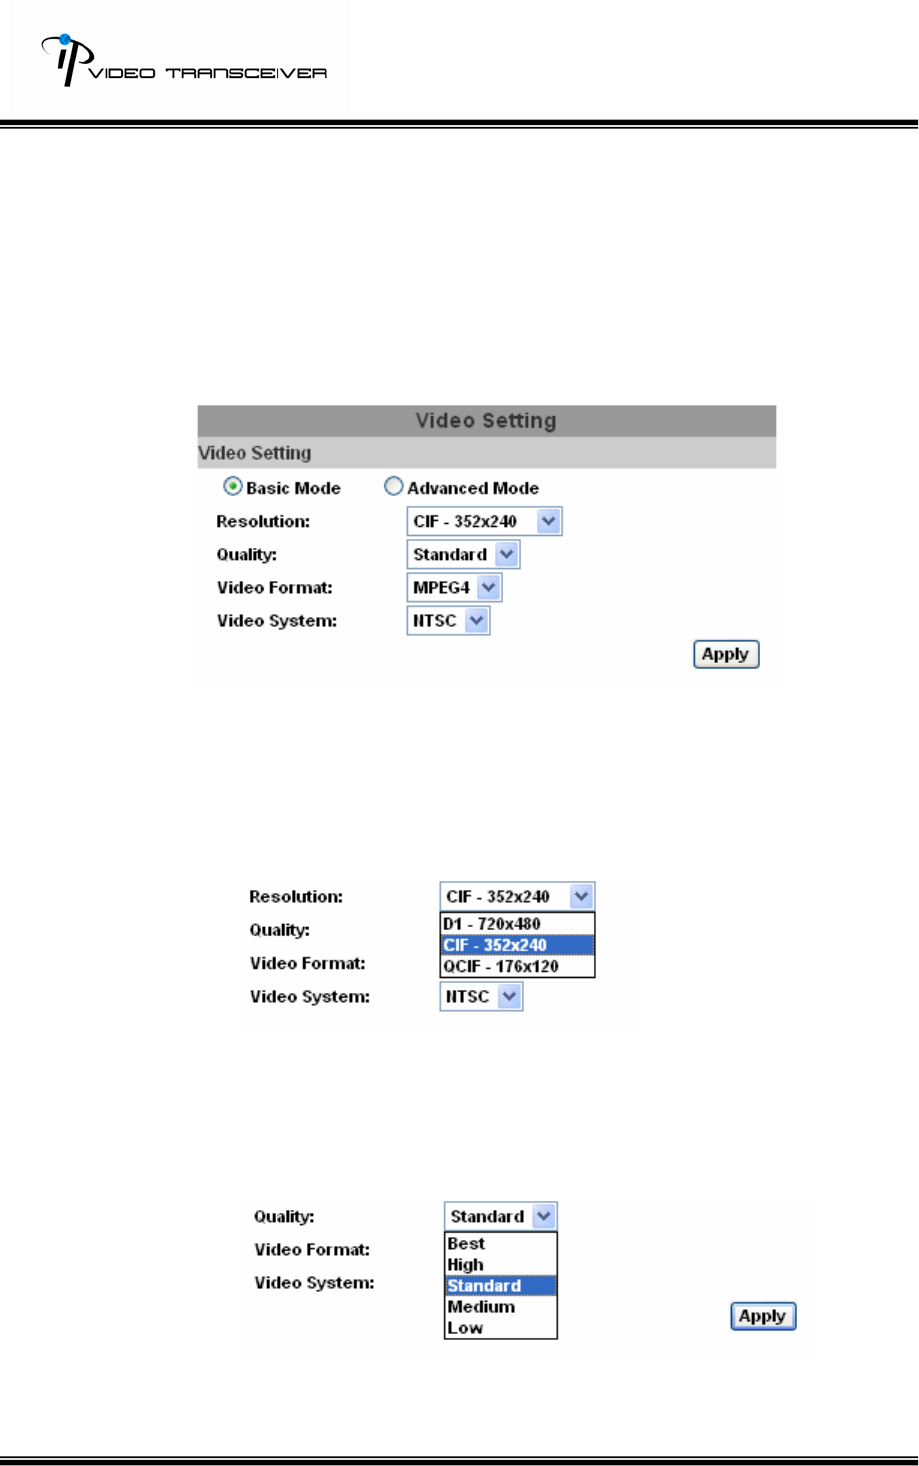
iii、 Video Setting
a. Basic mode:
1. Resolution:
There are 3 resolutions to be adjusted.
D1 – 720X480
CIF – 352X240
QCIF – 176X120
2. Quality:
There are 5 qualities to be adjusted, including Best, High,
Standard, Medium, and Low. The higher the quality is, the
bigger the files size is.
3. Video Format:MPEG4 or JPEG.

25/33
4. Video System:
It supports NTSC and PAL.
5. Click on “Apply” to save.
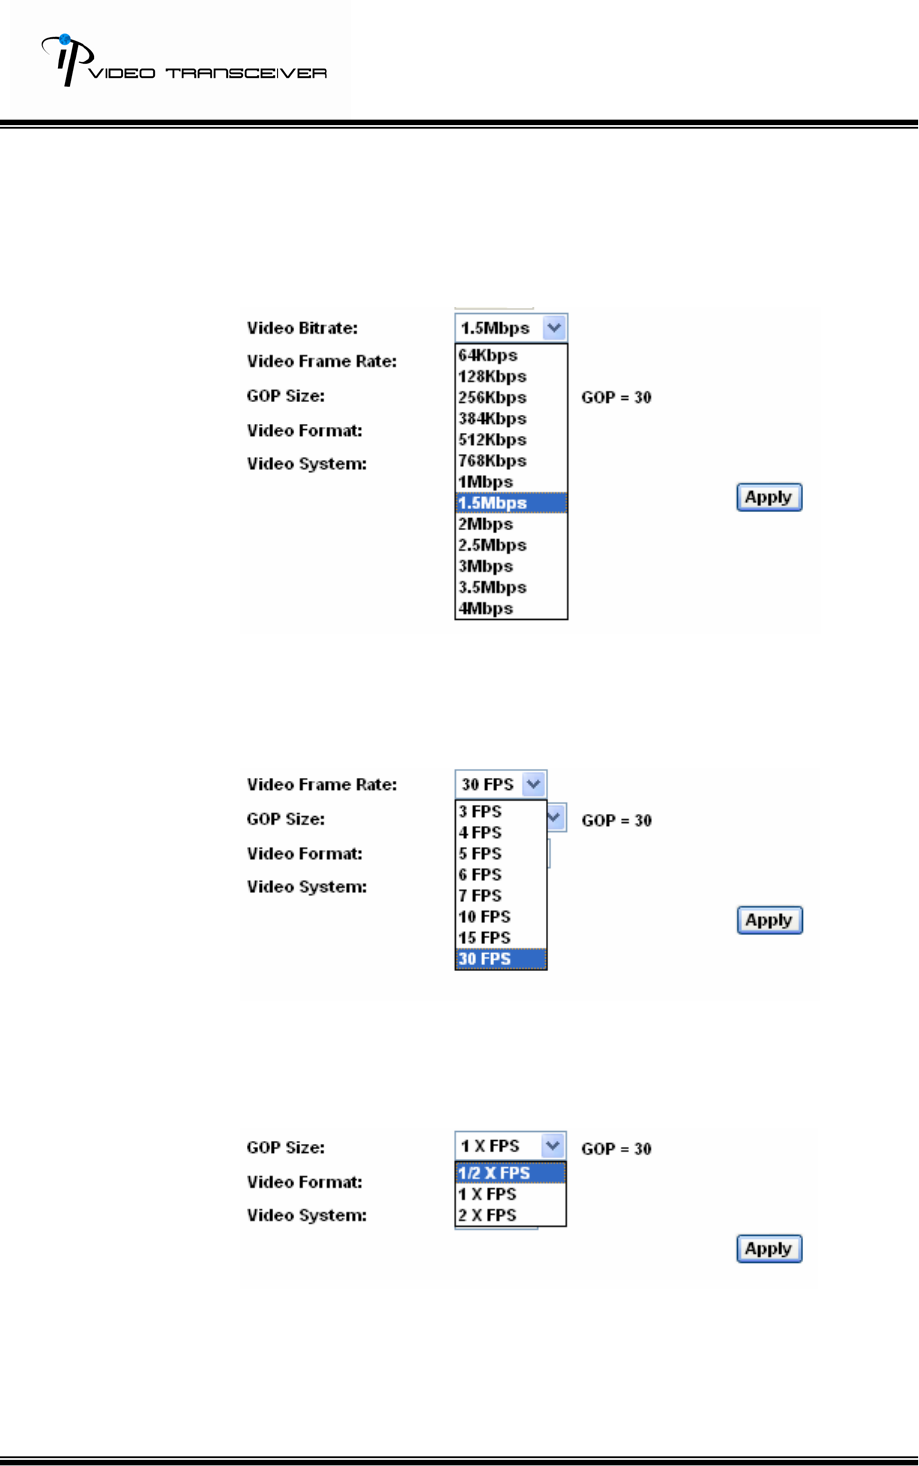
b. Advanced Mode:
1. Resolution:
There are 3 resolutions to be adjusted.
D1 – 720X480
CIF – 352X240
QCIF – 176X120
2. Bitrate Control Mode:
There are CBR﹝Constant Bit Rate﹞and VBR﹝Variable Bit
Rate﹞.
CBR;64Kbps~4Mbps。
26/33
VBR:Q=4~30。
If the bandwidth is smaller than CBR or VBR setup, it will cause
legging and incomplete images.
3. Video Bitrate:There are 13 Video Bitrates to select.
4. Video Frame Rate:
The video refreshing rate per second. The highest Frame Rate
is 30/ FPS.
5. GOP:
It means "Group of Pictures." The higher the GOP is, the better
the quality is.
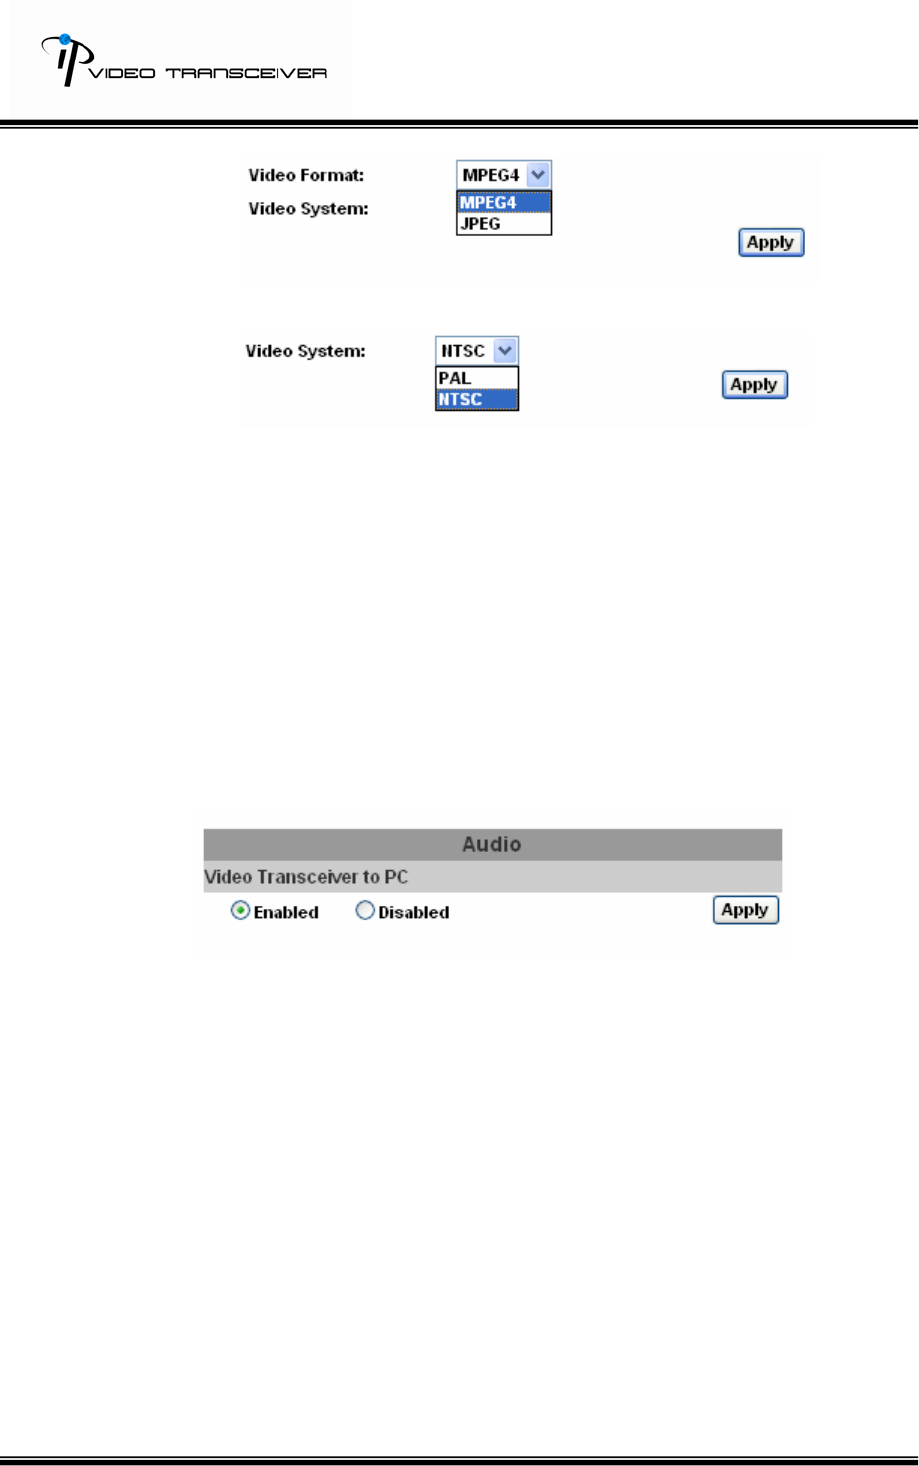
6. Video Format:MPEG4 or JPEG.
27/33
7. Video System:It supports NTSC and PAL.
8. Click on “Apply” to save.
vi. Audio:
a. After HVT-01HT receiving the audio data from IP CAM’s microphone
built-in via Internet or HVT-01HT’s microphone built-in, it can play the
audio data by HVT-01HT’s Audio Out.
b. After HVT-01HT’s microphone built-in receiving the audio data, it can
play the audio data by PC’s Audio Out via Internet.
To transfer the audio data from HVT-01HTW to local PC, please select
“Enabled” to enable this function.
NOTE: HVT-01HTW can’t receive the audio data from PC.
28/33
D.Event
HVT-01HTW provides multiple event settings.
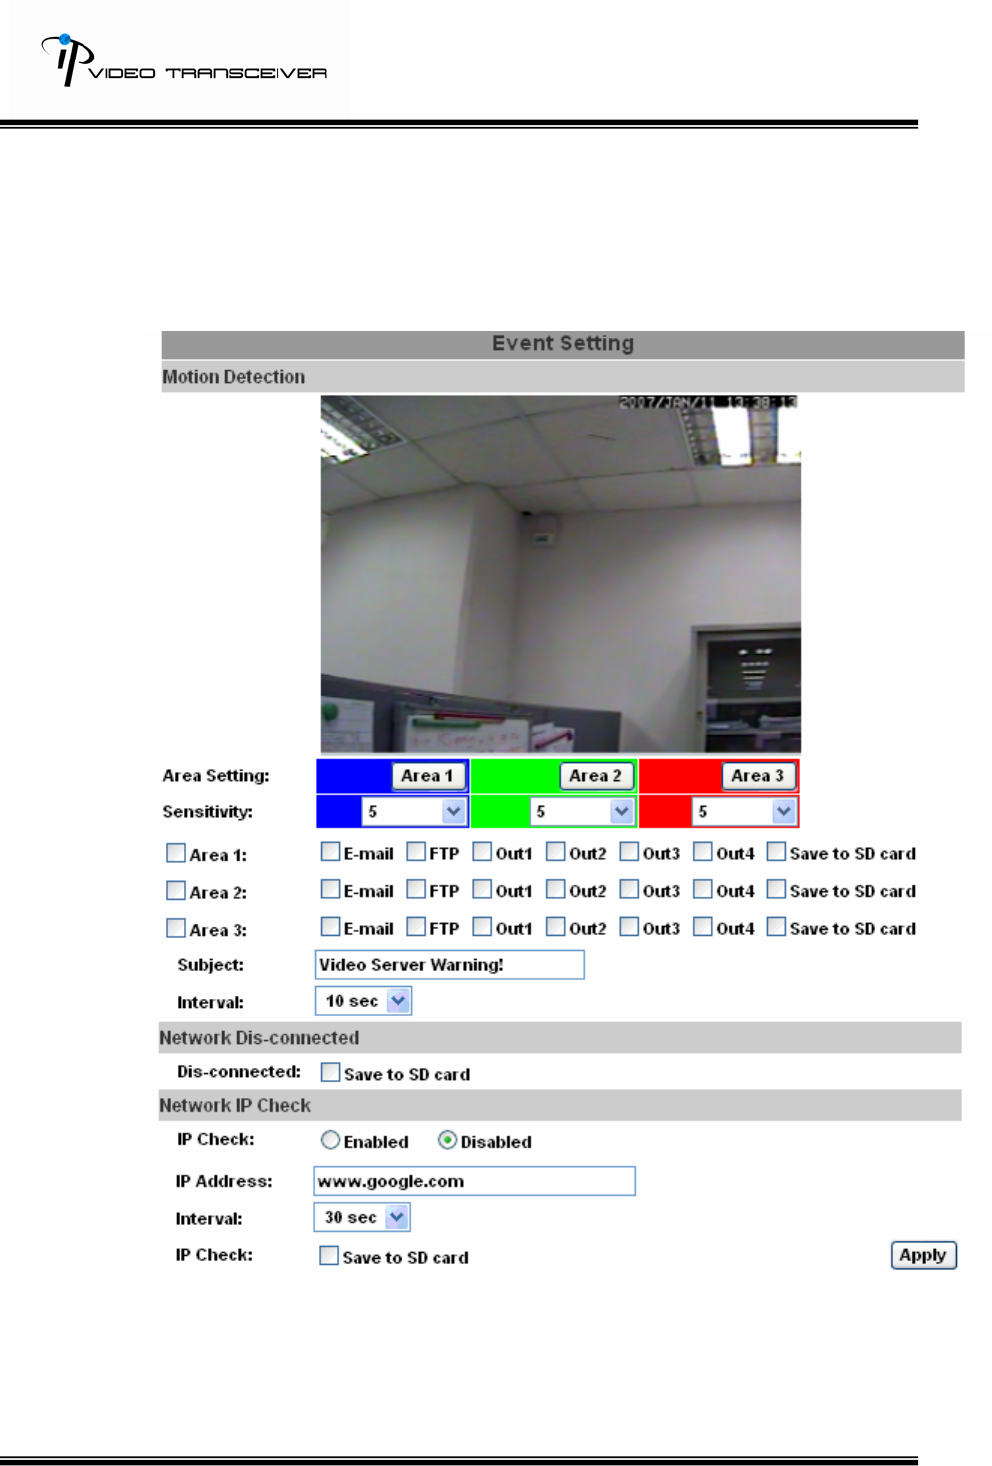
i、 Event Setting
HVT-01HTW supports 3 motion detection areas. When the motion is
triggered, it can send out the video to a certain email address or upload
the video to FTP. If the user has a SD card, they can do SD card backup.

29/33
a. Motion Detection:
1. Put the check mark on each motion detection area to enable
motion detection function.
2. Click on Area Setting’s Area 1/ Area 2/ Area 3 and use the
mouse to drag the area for motion detection areas. If the user
wants to reset motion detection area, just click Area 1/ Area 2/
Area 3 and make new motion detection areas again.
3. Click on “Apply” to save.
b. Network Dis-connected:Enable or disable to save the video files to
SD card. When the network is down, it will save the video to local
SD card. This function is only enabled in wire connection. Click on
“Apply” to save.
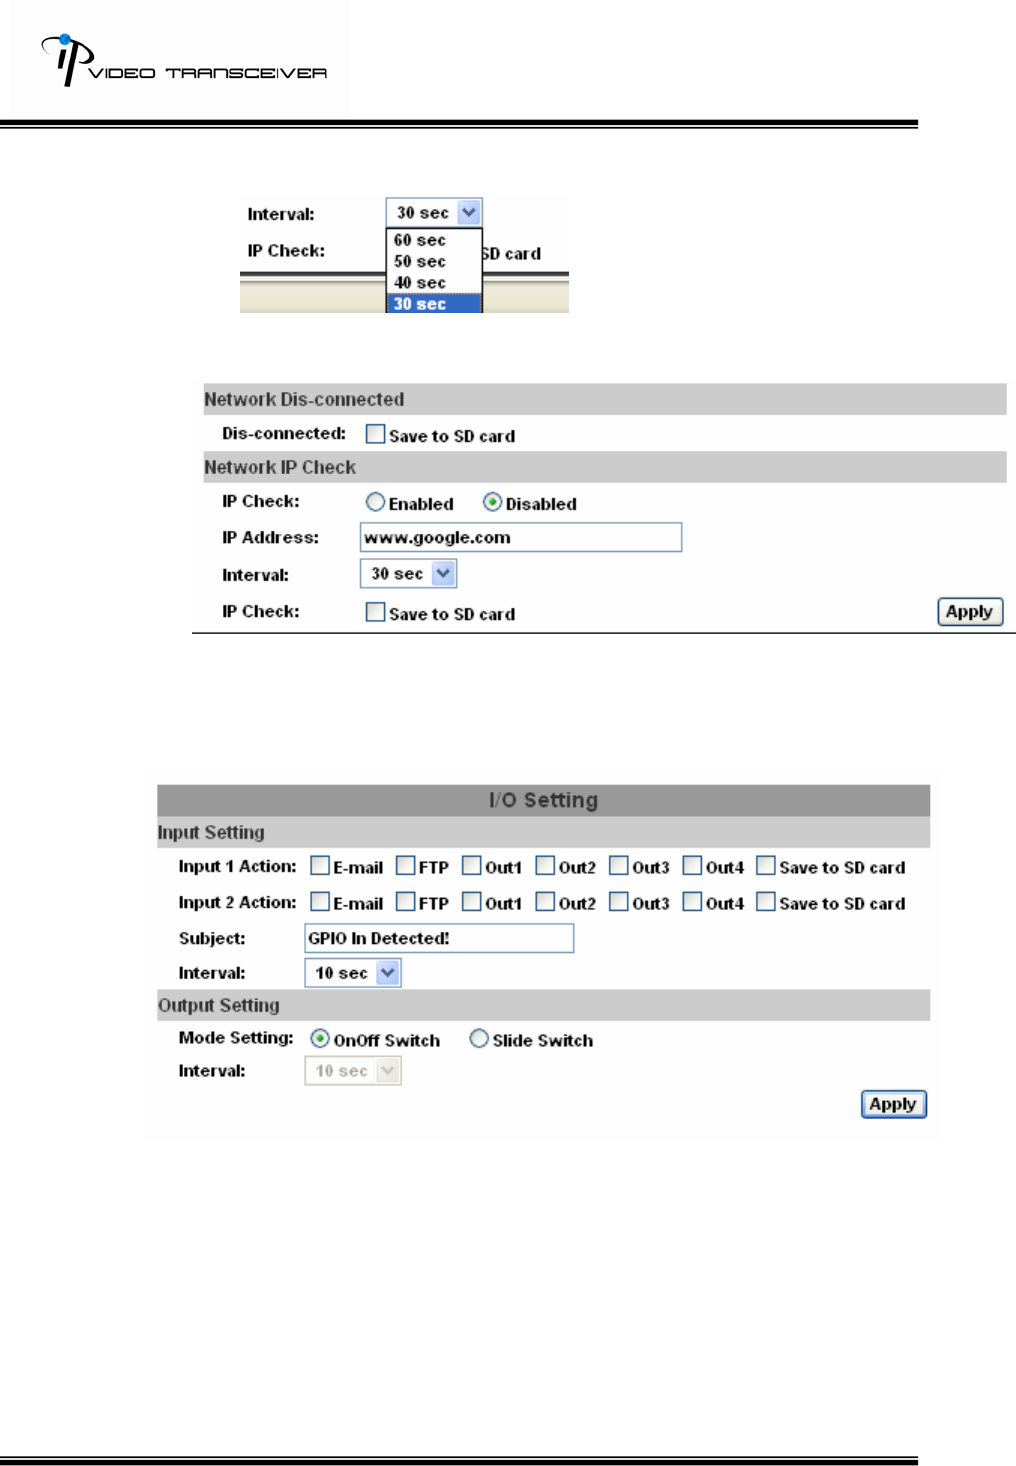
c. Network IP Check:
1. IP Check: Enable or disable IP Check.
2. IP Address:default www.google.com
30/33
3. Interval:Default 30 sec.
4. IP Check:Enable or disable to save to SD card.
5. Click on “Apply” to save.
ii、 I/O Setting:
a. Input Setting:
1. Input 1 Action:E-mail/ FTP/ Out1/ Out2/ Out3/ Out4/ Save to
SD card.
2. Input 2 Action:The same as Input 1.
3. Subject:Default GPIO In Detected!
4. Interval:Default 10 sec.
5. Click on “Apply” to save.
b. Output Setting:Mode Setting:OnOff Switch or Slide Switch. Click
31/33
on “Apply” to save.
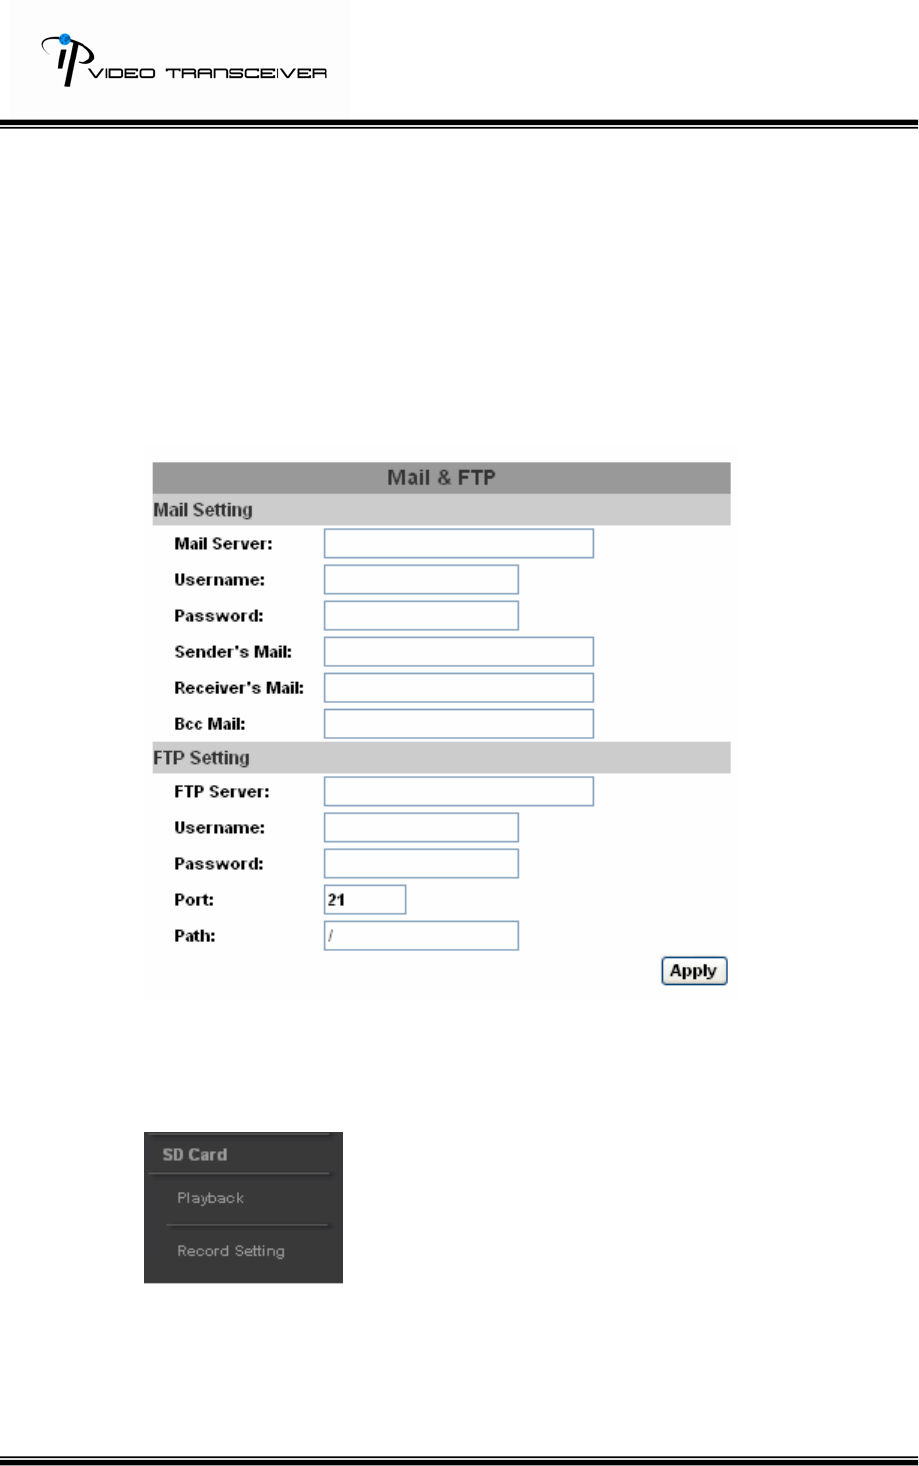
iii、 Mail and FTP
To send out the video via mail or FTP, please set up the configuration first.
iv、 SD card:Support Playback and Record Setting.
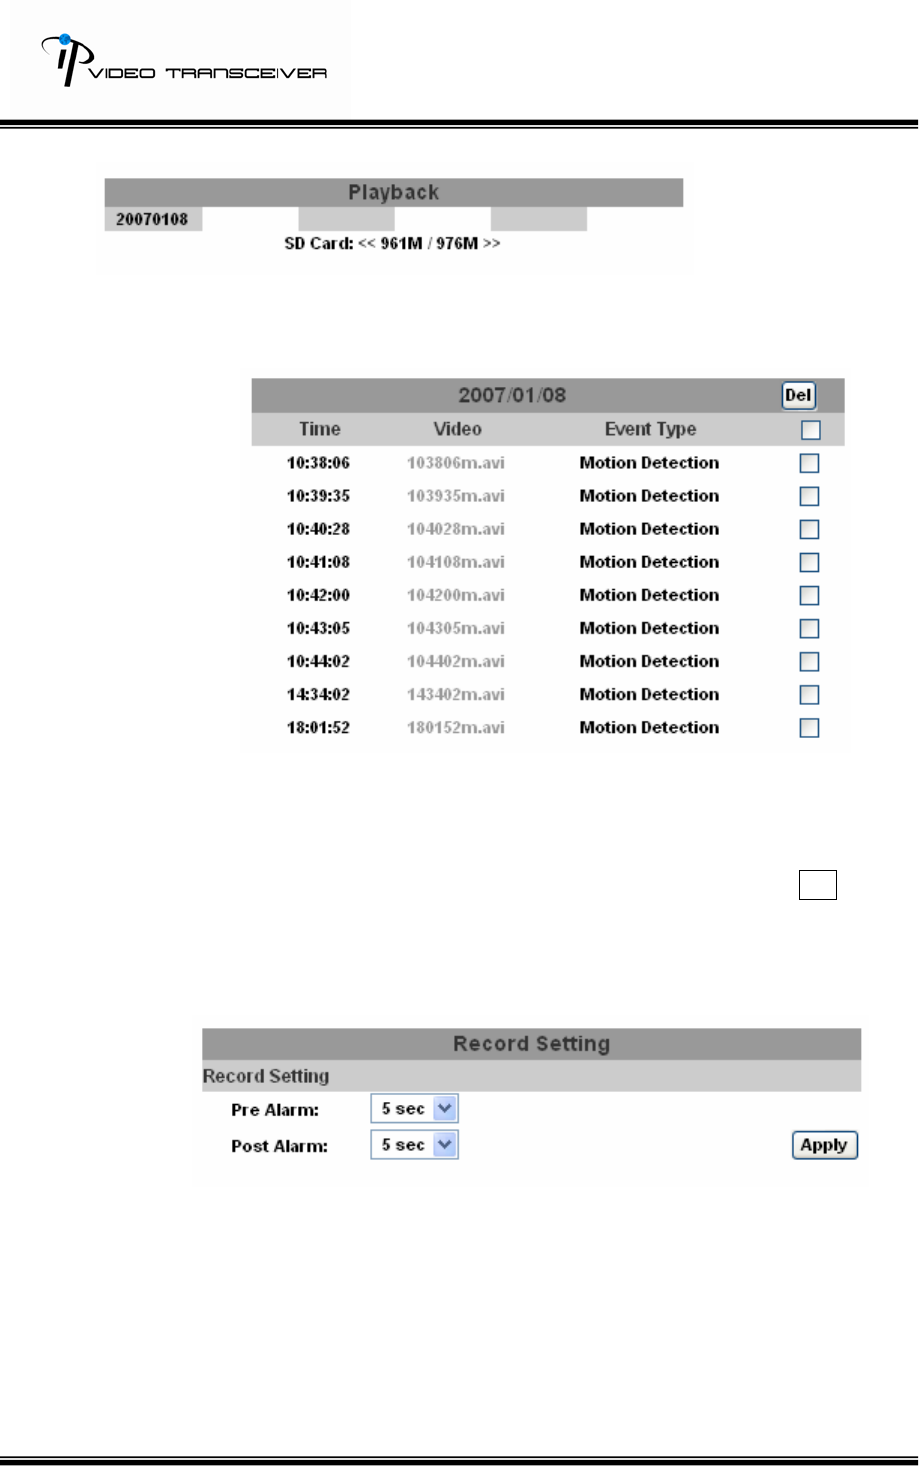
a. Playback:
32/33
1. It will show the capacity of SD card and the date of the video
file. The user can choose a certain date to play back.
2. The video file is with AVI format. On the video, it will display the
date of the video file and the event. The user can click on the
video file to play back on Microsoft Media Player.
3. To delete the video, check the video file and click on Del .
When the SD card is full, it will remove the oldest video
automatically.
b. Record Setting:
The Pre/ Post Alarm are adjustable.

33/33
V. Package contents
1. Hunt HVT-01HTW Video Server + Receiver
2. Adaptor
3. Ethernet Cable
4. CD (user manual, IP installation utility).