Hunter Douglas Window Fashions AC1 Motor Control User Manual Rev 082516
Hunter Douglas Window Fashions Motor Control Users Manual Rev 082516
Users Manual Rev 082516

NOT FOR DISTRIBUTION
PowerView™ AC motor
Quick Start Guide
— Release Candidate —
Release Candidate ©2016 Hunter Douglas. All rights reserved. Page
1 of 11
Daughterboard Firmware: PV_AC_Radio_1.0.5_SVN2049
Motherboard (G2071SM_B) Firmware: REV2.1
DESCRIPTION
The PowerView™ AC motor is designed to operate Hunter Douglas Designer Roller Shades,
Designer Screen Shades, and Alustra® Woven Textures® & Screen Shades. The PowerView AC
motor works in combination with the PowerView™ Remote Control, PowerView Hub, and
PowerView App for radio frequency (RF) control of a single shade or multiple networked shades.
The current version of the motor does not fully support tilt products. The PowerView Remote
Control LEFT and RIGHT buttons can be used to move the motor small, incremental amounts to
approximate tilting, and are used to more accurately position limits or the Favorite position.
Important: The Beta test motors that were sent do not have default limits set. Limits will need
to be set, before normal operation can be commenced.
GENERAL INFORMATION
Limits
Production PowerView AC motors will not have default limits set. The user/installer must set
limits.
The user/installer can change the motor direction when the motor has no limits.
When limits are not set, the motor responds to the Remote OPEN/CLOSE command with a
single jog in the appropriate direction.
When both limits are set, the motor responds to the Remote OPEN/CLOSE command by
running to the desired limit.
Move the Motor with the Push Button
The push button on the motor head can be used to move the motor up and down. The
direction of motor movement toggles between UP and DOWN. For motor movement actions,
the push button acts on release.
1. Press and release the push button on the motor head. The motor will move in direction
A.
2. While the motor is moving, press and release the push button on the motor head. The
motor will stop.
3. Press and release the push button on the motor head. The motor will move in direction
B.
4. While the motor is moving, press and release the push button on the motor head. The
motor will stop.
PREREQUISITES
A user/installer must be familiar with the setup and use of the following:
PowerView Remote Control or PowerView™ Scene Controller

NOT FOR DISTRIBUTION
PowerView™ AC motor
Quick Start Guide
— Release Candidate —
Release Candidate ©2016 Hunter Douglas. All rights reserved. Page
2 of 11
PowerView Hub
PowerView™ Repeater
PowerView App
Please see the PowerView Instructional Guides and FAQs at the following URL:
http://www.hunterdouglas.com/operating-systems/powerview-motorization/support
EQUIPMENT
The following equipment is required for single shade or multiple shade network setup:
One or more PowerView AC motors with roller shade
PowerView Remote Control
PowerView Hub (optional)
PowerView App (optional)
PowerView Repeater (optional)
INSTALLATION STEPS
1. Initial Setup
a) Mount the factory fresh AC motor and roller shade into an appropriate window opening.
b) Plug the AC motor into the appropriate power source (120V~ or 220V~).
c) On a factory fresh PowerView Remote Control, install batteries.
2. Pairing Motor to a Remote
a) On the Remote, press and hold the STOP button until the LEDs begin to blink.
b) On the Remote, press the Group button that you wish to enable. See the APPENDIX to
disable a Group.
c) On the Motor, press and hold the push button on the Motor head.
d) On the Remote, press and release the OPEN button.
e) The Motor will jog two times after it receives the Group enable message from the Remote.
f) On the Motor, release the push button.
3. Change Motor Direction
a) Be sure no end limits are set on the motor. See the APPENDIX to clear limits, if they are set.
b) Wake up the Remote.
c) On the Motor, press and hold the push button.
d) On the Remote, verify no Group LEDs are on solid.
e) Press and release the STOP button.
f) The motor will jog two times after the motor direction has been changed. If end limits are
already set, the motor will not jog, indicating the motor direction did not change.
g) On the Motor, release the push button.
4. Set Upper Motor Limit
a) Use the Remote Open, Remote Close, Remote Tilt Up, Remote Tilt Down, Push Button, or the
Dry Contact inputs to move the motor to the desired upper limit. Note – when limits are
cleared, the motor responds to Remote Open/Close with a single jog in the appropriate
direction.

NOT FOR DISTRIBUTION
PowerView™ AC motor
Quick Start Guide
— Release Candidate —
Release Candidate ©2016 Hunter Douglas. All rights reserved. Page
3 of 11
b) On the Remote, press and hold the STOP button until LEDs begin to blink.
c) On the Remote, verify no Group LEDs are on solid.
d) On the Motor, press and hold the push button on the Motor head.
e) On the Remote, press and release the OPEN button.
f) The Motor will jog twice after the upper limit is set.
g) On the Motor, release the push button.
5. Set Lower Motor Limit
a) Use the Remote Open, Remote Close, Remote Tilt Up, Remote Tilt Down, Push Button, or the
Dry Contact inputs to move the motor to the desired lower limit. Note – when limits are
cleared, the motor responds to Remote Open/Close with a single jog in the appropriate
direction.
b) On the Remote, press and hold the STOP button until LEDs begin to blink.
c) On the Remote, verify no Group LEDs are on solid.
d) On the Motor, press and hold the push button on the Motor head.
e) On the Remote, press and release the CLOSE button.
f) The Motor will jog twice after the lower limit is set.
g) On the Motor, release the push button.
6. Set Favorite Motor Position
After the upper and lower limits are set, the motor will have a default Favorite position at 50%.
a) Use the Remote Open, Remote Close, Remote Tilt Up, Remote Tilt Down, Push Button, or the
Dry Contact inputs to move the motor to the desired Favorite position.
b) On the Remote, press and hold the STOP button until LEDs begin to blink.
c) On the Remote, verify no Group LEDs are on solid.
d) On the Motor, press and hold the push button on the Motor head.
e) On the Remote, press and release the HEART button.
f) The Motor will jog twice after the Favorite position is set.
g) On the Motor, release the push button.
7. Pair the PowerView Hub to the Network
See the various Guides and Videos on the Hunter Douglas website listed on page 1 of this
document.
Also, see the comprehensive PowerView Step-by-Step Guide in a rich media PDF — the link
is pointed out in the Figure 1 screenshot below.
8. Use the PowerView App to Setup or Control the Network
See the various Guides and Videos on the Hunter Douglas website.
Also, see the comprehensive PowerView Step-by-Step Guide in a rich media PDF — the link
is pointed out in the Figure 1 screenshot below.
9. Test the motors and network

NOT FOR DISTRIBUTION
PowerView™ AC motor
Quick Start Guide
— Release Candidate —
Release Candidate ©2016 Hunter Douglas. All rights reserved. Page
4 of 11
Figure 1
APPENDIX
---------------------------------------------------------------------------------------------------------------------------
CLEAR MOTOR LIMITS
Clear Upper Limit (with Remote)
1. Wake up the Remote.
2. On the motor, press and hold the push button.
3. On the Remote, verify no Group LEDs are on solid.
4. On the Remote, press and release the UP button.
5. The motor will jog two times after the upper limit is cleared.
6. On the Motor, release the push button.
Clear Lower Limit (with Remote)
1. Wake up the Remote.
2. On the motor, press and hold the push button.
3. On the Remote, verify no Group LEDs are on solid.
4. On the Remote, press and release the DOWN button.
5. The motor will jog two times after the lower limit is cleared.
6. On the Motor, release the push button.
---------------------------------------------------------------------------------------------------------------------------
DISABLE GROUPS
1. On the Remote, press and hold the STOP button until LEDs begin to blink.
2. On the Remote, press the Group button that you wish to disable.
3. On the Motor, press and hold the push button on the Motor head.
4. On the Remote, press and release the CLOSE button.
5. The Motor will jog two times after it receives the Group disable message from the Remote.
6. On the Motor, release the push button.

NOT FOR DISTRIBUTION
PowerView™ AC motor
Quick Start Guide
— Release Candidate —
Release Candidate ©2016 Hunter Douglas. All rights reserved. Page
5 of 11
---------------------------------------------------------------------------------------------------------------------------
CLEAR NETWORK INFO
1. On the Motor, press and hold the push button on the Motor head for approximately 6 seconds.
2. The motor will jog two times after 6 seconds have elapsed.
3. On the Motor, continue to press and hold the push button on the Motor head for another 6
seconds.
4. The motor will jog two times after 12 seconds have elapsed.
5. On the Motor, release the push button.
6. The Network Id, Device_Id, Groups, Approved_Controller_Info, and Scenes are Reset.
---------------------------------------------------------------------------------------------------------------------------

NOT FOR DISTRIBUTION
PowerView™ AC motor
Quick Start Guide
— Release Candidate —
Release Candidate ©2016 Hunter Douglas. All rights reserved. Page
6 of 11
---------------------------------------------------------------------------------------------------------------------------
FACTORY RESET
1. On the Motor, press and hold the push button on the Motor head for approximately 6 seconds.
2. The motor will jog two times after 6 seconds have elapsed.
3. On the Motor, continue to press and hold the push button on the Motor head for another 6
seconds.
4. The motor will jog two times after 12 seconds have elapsed.
5. On the Motor, continue to press and hold the push button on the Motor head for another 6
seconds.
6. The motor will jog 2 times after 18 seconds have elapsed.
7. On the Motor, release the push button.
8. The Motor limits, favorite position, Network_Id, Device_Id, Groups, Approved_Controller_Info
and Scenes have been reset.
---------------------------------------------------------------------------------------------------------------------------
CONTROL THE MOTOR WITH DRY CONTACTS — 40mm motor only
1. Short the UP dry contact to COMMON and then release — the motor moves in the OPEN
direction.
2. With the motor moving, short the UP dry contact to COMMON and then release. The motor
stops.
3. Short the DOWN dry contact to COMMON and then release — the motor moves in the DOWN
direction.
4. With the motor moving, short the DOWN dry contact to COMMON and then release. The
motor stops.
Go to Favorite Position (short all 3 contacts)
1. Simultaneously short UP and DOWN dry contacts to COMMON for more than 1.5 seconds,
then release. The motor goes to the favorite position (if both end limits are set).
---------------------------------------------------------------------------------------------------------------------------
ALTERNATE STOP (short all 3 contacts)
NOT FOR DISTRIBUTION
PowerView™ AC motor
Quick Start Guide
— Release Candidate —
Release Candidate ©2016 Hunter Douglas. All rights reserved. Page
7 of 11
1. Simultaneously short UP and DOWN dry contacts to COMMON for less than 1.5 seconds,
then release. Stops the motor, if the motor is moving.
A. Detail
The PowerView AC motor is designed to be used with rolling window coverings. The M40PV330 /
M40PV334 / M40PV430 / M40PV620 / M40PV624 / M40PV915 motor models are designed for
connection with an electrical outlet. The M50PV525 / M50PV530 / M50PV626 / M50PV634 /
M50PV674 / M50PV790 / M50PV926 / M50PV934 / M50PV1016 / M50PV1017 / M50PV1234 /
M50PV1530 / M50PV2017 / M50PV2521 / M50PV3017 / M50PV3521 / M50PV4016 / M50PV4017/
M50PV5014 motor models are designed to be wired per local electrical codes.
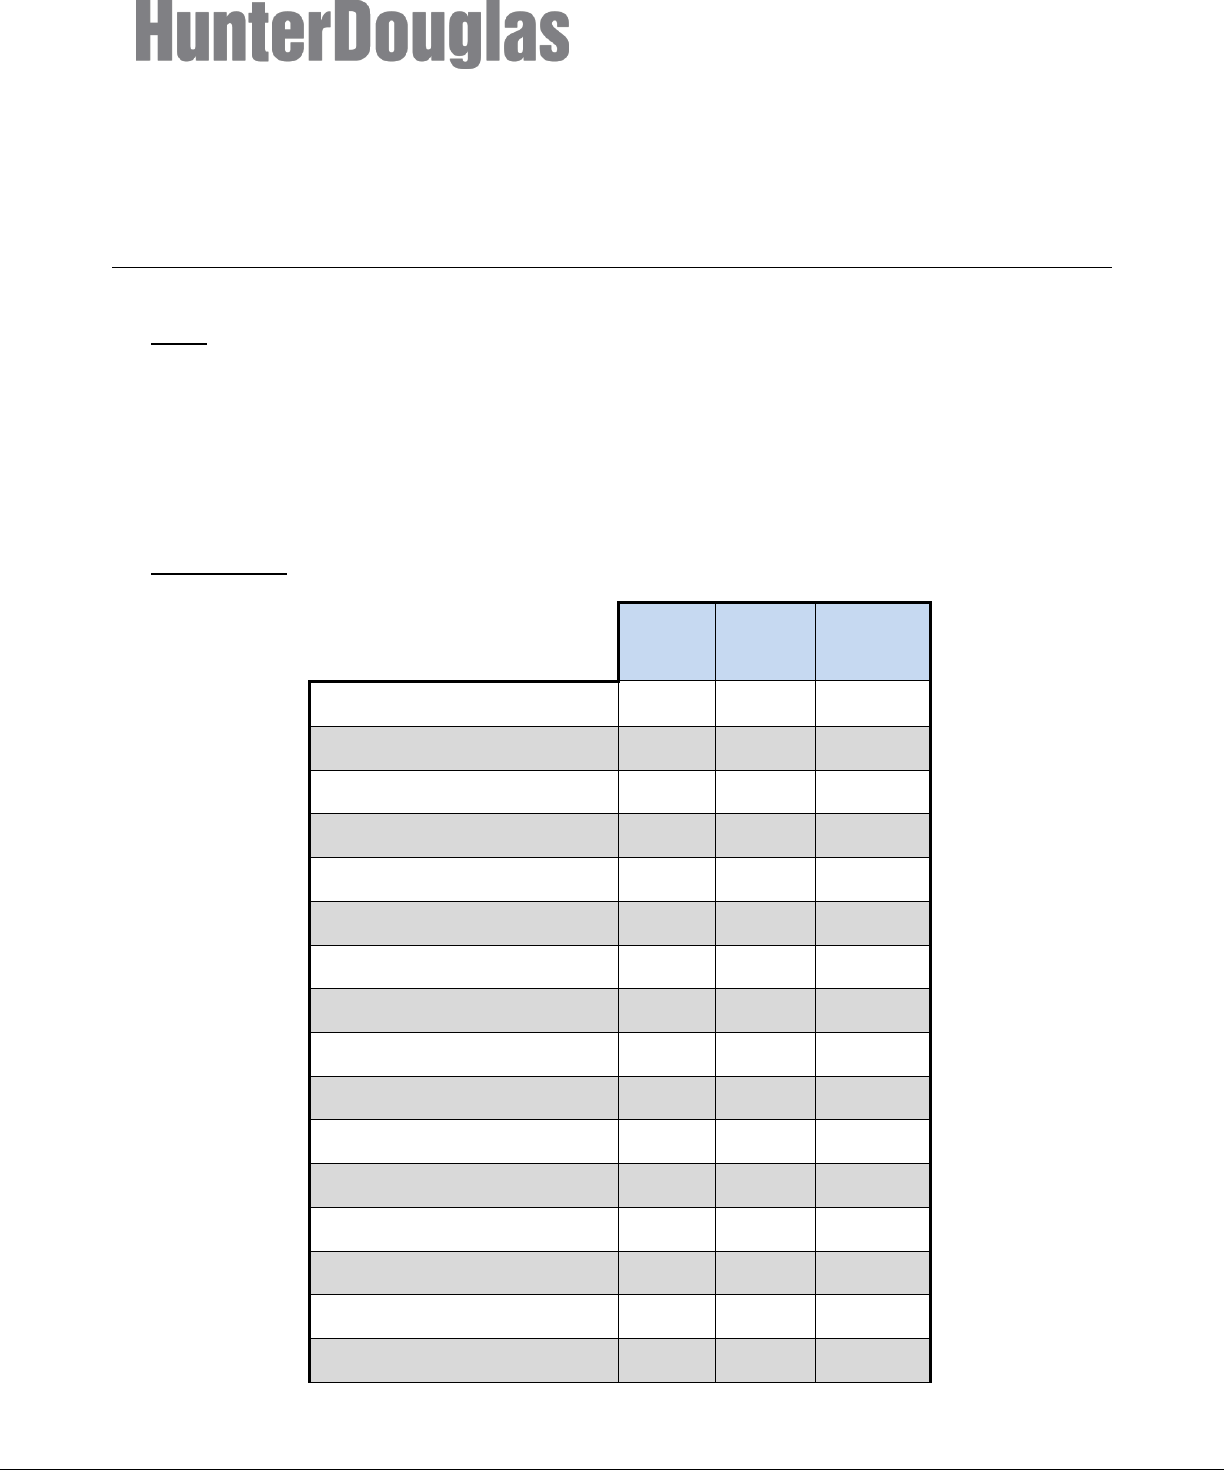
B. Specifications
Torque
Nm
Speed
RPM
Full
Load
Amperes
M40PV330
3
30
0.40
M40PV334
3
34
0.90
M40PV430
4
30
0.90
M40PV620
6
20
0.60
M40PV624
6
24
1.1
M40PV915
9
15
1.1
M50PV525
5
25
0.90
M50PV530
5
30
0.70
M50PV626
6
26
0.6
M50PV634
6
34
0.6
M50PV674
6
74
1.2
M50PV790
7
90
1.2
M50PV926
9
26
0.8
M50PV934
9
34
0.8
M50PV1016
10
16
0.7
M50PV1017
10
17
0.7
NOT FOR DISTRIBUTION
PowerView™ AC motor
Quick Start Guide
— Release Candidate —
Release Candidate ©2016 Hunter Douglas. All rights reserved. Page
8 of 11
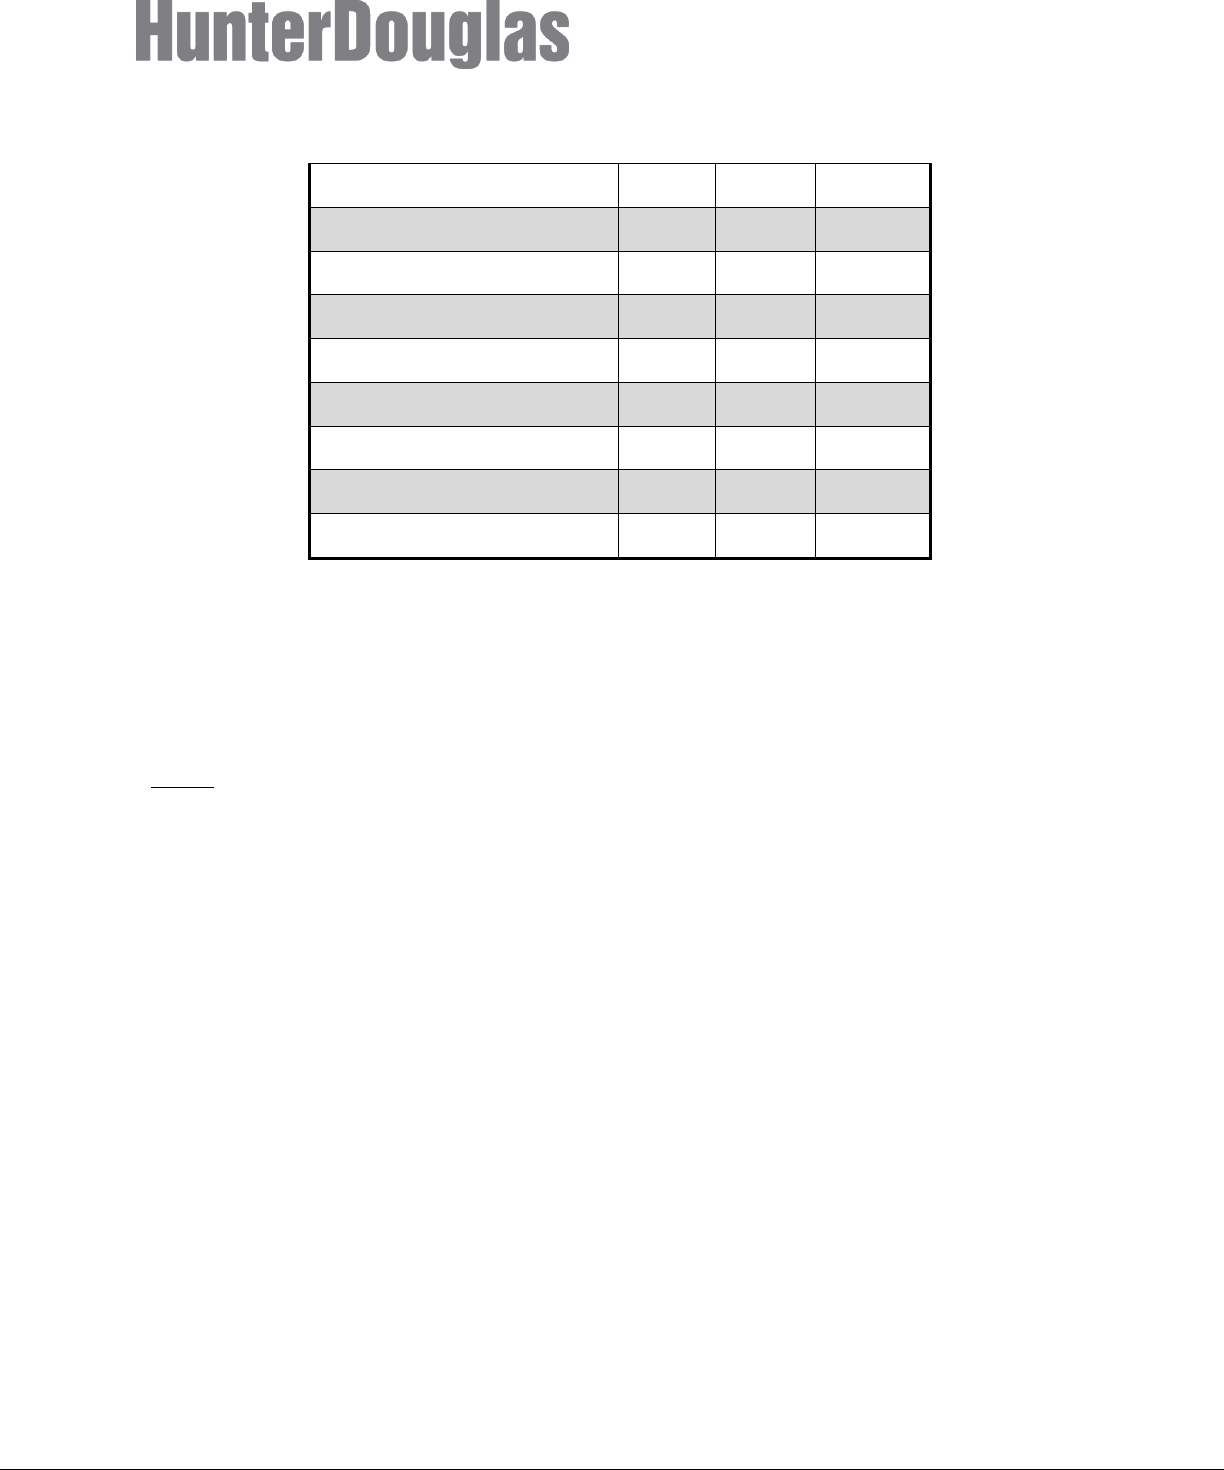
M50PV1234
12
34
1.1
M50PV1530
15
30
1.1
M50PV2017
20
17
0.8
M50PV2521
25
21
0.8
M50PV3017
30
17
1.2
M50PV3521
35
21
1.2
M50PV4016
40
16
1.5
M50PV4017
40
17
1.8
M50PV5014
50
14
1.5
Never exceed the lift capacity from the above table.
A Motor that is cool may run for up to 4 minutes continuously before thermal overload. If the motor is
run for more than up to 4 minutes continuously, the motor may overheat. A motor thermal will act
exactly like a stall. Thermal reset occurs after the motor has cooled sufficiently, this usually takes 10
to 15 minutes depending on ambient temperature and ventilation.
C. Safety
WARNING: Prior to installation inspect all parts for damage or missing components.
WARNING: To Reduce the Risk Of Fire, Electric Shock, Or Injury To Persons, Installation Work And
Electrical Wiring Must Be Done By Qualified Person(s) In Accordance With All Applicable Codes And
Standards.
WARNING: Never install this product with power connected. DISCONNECT FROM POWER
SUPPLY before installing or adding accessories to this device.
WARNING: Important safety instructions. It is important for the safety of persons to follow these
instructions. Save these instructions. Frequently examine the installation for imbalance and signs of
wear or damage to cables and springs. Do not use if repair or adjustment is necessary.
Do not allow children to play with fixed controls. Keep remote controls away from children. Children
should be supervised to ensure that they do not play with the appliance.
The supplied UL rated grounding power cord on models M40PV330 / M40PV334 / M40PV430 /
M40PV620 / M40PV624 / M40PV915 if lost or broken, shall be only replaced with an identical power
cord. A Replacement power cord is available from distributor or manufacturer.
The power cord must be properly plugged into the electrical outlet and the proper motor model.
Loose attachment can cause arcing and can result in failure. Any improper use or misuse can result
in electrical shock causing injury to the person or persons.

NOT FOR DISTRIBUTION
PowerView™ AC motor
Quick Start Guide
— Release Candidate —
Release Candidate ©2016 Hunter Douglas. All rights reserved. Page
9 of 11
As with any 120V~ or 220V~ electrical appliance, care must be taken, when handling. To reduce the
risk of electric shock, this equipment has a grounding type plug, that has a third (grounding) pin.
Motor models M40PV330 / M40PV334 / M40PV430 / M40PV620 / M40PV624 / M40PV915 are
supplied with UL rated grounding power cords that have a grounding pin which shall not be altered or
removed. This plug will only fit into a grounding type outlet. If the plug does not fit into the outlet,
contact a qualified electrician to install the proper outlet. Do not change the plug in any way.
Use appropriate Class 2 wiring, whenever installing dry contact cabling with motor models
M40PV330 / M40PV334 / M40PV430 / M40PV620 / M40PV624 / M40PV915.
If this device is installed in the presence of strong Radio Frequency (RF) signals (such as near RF
transmitters) loss of functionality may occur.
Changes or modifications not expressly approved by the party responsible for compliance could void
the user’s authority to operate this equipment.
If used in an area susceptible to lightning strikes or power surges, surge protectors should be used.
Otherwise, unplug this operator and accessories during lightning storms.
Motors are not rated for exterior use. Water can cause shorting and result in electrical shock.
WARNING: FOR INTERIOR USE ONLY.
Before installing the motor, remove any unnecessary cords and disable any equipment not needed for
powered operation.
If motor malfunctions, disconnect immediately and call the installer or dealer for servicing information.
D. Maintenance:
All PowerView AC motor models shall be kept free of dirt, moisture, and debris.

NOT FOR DISTRIBUTION
PowerView™ AC motor
Quick Start Guide
— Release Candidate —
Release Candidate ©2016 Hunter Douglas. All rights reserved. Page
10 of 11
DECLARATIONS
U.S. Radio Frequency FCC Compliance
This device complies with Part 15 of the FCC Rules. Operation is subject to the following two conditions:
(1) This device may not cause harmful interference, and
(2) This device must accept any interference received, including interference that may cause undesired operation.
This equipment has been tested and found to comply with the limits for a Class B digital device, pursuant to Part 15 of the FCC
Rules. These limits are designed to provide reasonable protection against harmful interference in a residential installation. This
equipment generates, uses and can radiate radio frequency energy and, if not installed and used in accordance with the
instructions, may cause harmful interference to radio communications. However, there is no guarantee that interference will not
occur in a particular installation. If this equipment does cause harmful interference to radio or television reception, which can be
determined by turning the equipment off and on, the user is encouraged to try to correct the interference by one or more of the
following measures:
• Reorient or relocate the receiving antenna.
• Increase the separation between the equipment and receiver.
• Connect the equipment into an outlet on a circuit different from that to which the receiver is connected.
• Consult the dealer or an experienced radio/TV technician for help.
Any changes or modifications not expressly approved by the party responsible for compliance could void the user’s authority to
operate the equipment.
Industry Canada
Under Industry Canada regulations, this radio transmitter may only operate using an antenna of a type and maximum (or
lesser) gain approved for the transmitter by Industry Canada. To reduce potential radio interference to other users, the
antenna type and its gain should be so chosen that the equivalent isotropically radiated power (e.i.r.p.) is not more than that
necessary for successful communication.
This device complies with Industry Canada licence-exempt RSS standard(s). Operation is subject to the following two
conditions: (1) this device may not cause interference, and (2) this device must accept any interference, including interference
that may cause undesired operation of the device.
Class B Digital Device Notice
This Class B digital apparatus complies with Canadian ICES-003, RSS-Gen and RSS-210. CAN ICES-3 (B)/NMB-
3(B)
Industrie Canada
Conformément à la réglementation d’Industrie Canada, le présent émetteur radio peut fonctionner avec une antenne d’un type
et d’un gain maximal (ou inférieur) approuvé pour l’émetteur par Industrie Canada. Dans le but de réduire les risques de
brouillage radioélectrique à l’intention des autres utilisateurs, il faut choisir le type d’antenne et son gain de sorte
que la puissance isotrope rayonnée équivalente (p.i.r.e.) ne dépasse pas l’intensité nécessaire à l’établissement d’une
communication satisfaisante.
Le présent appareil est conforme aux normes CNR d’Industrie Canada applicables aux appareils radio exempts de licence.
L’exploitation est autorisée aux deux conditions suivantes : (1) l’appareil ne doit pas produire de brouillage, et
(2) l’utilisateur de l’appareil doit accepter tout brouillage radioélectrique subi, même si le brouillage est susceptible d’en
compromettre le fonctionnement.
Appareil Numérique de Classe B – Avis
Cet appareil numérique de classe B est conforme à la norme NMB-003, CNR-Gen et CNR-210 du Canada.. CAN
ICES-3 (B)/NMB-3(B)
NOT FOR DISTRIBUTION
PowerView™ AC motor
Quick Start Guide
— Release Candidate —
Release Candidate ©2016 Hunter Douglas. All rights reserved. Page
11 of 11
European Conformity
We, the undersigned,
Hunter Douglas Window Fashions
One Duette Way, Broomfield, CO 80020, USA Hunter Douglas Europe B.V.
Piekstraat 2, 3071 EL Rotterdam, The Netherlands
certify and declare under our sole responsibility that assembly PV4 conforms with the essential requirements of the
EMC directive 2004/108/EC and R&TTE directive 1999/5/EC.
A copy of the original declaration of conformity may be found at:
www.hunterdouglas.com/RFcertifications.