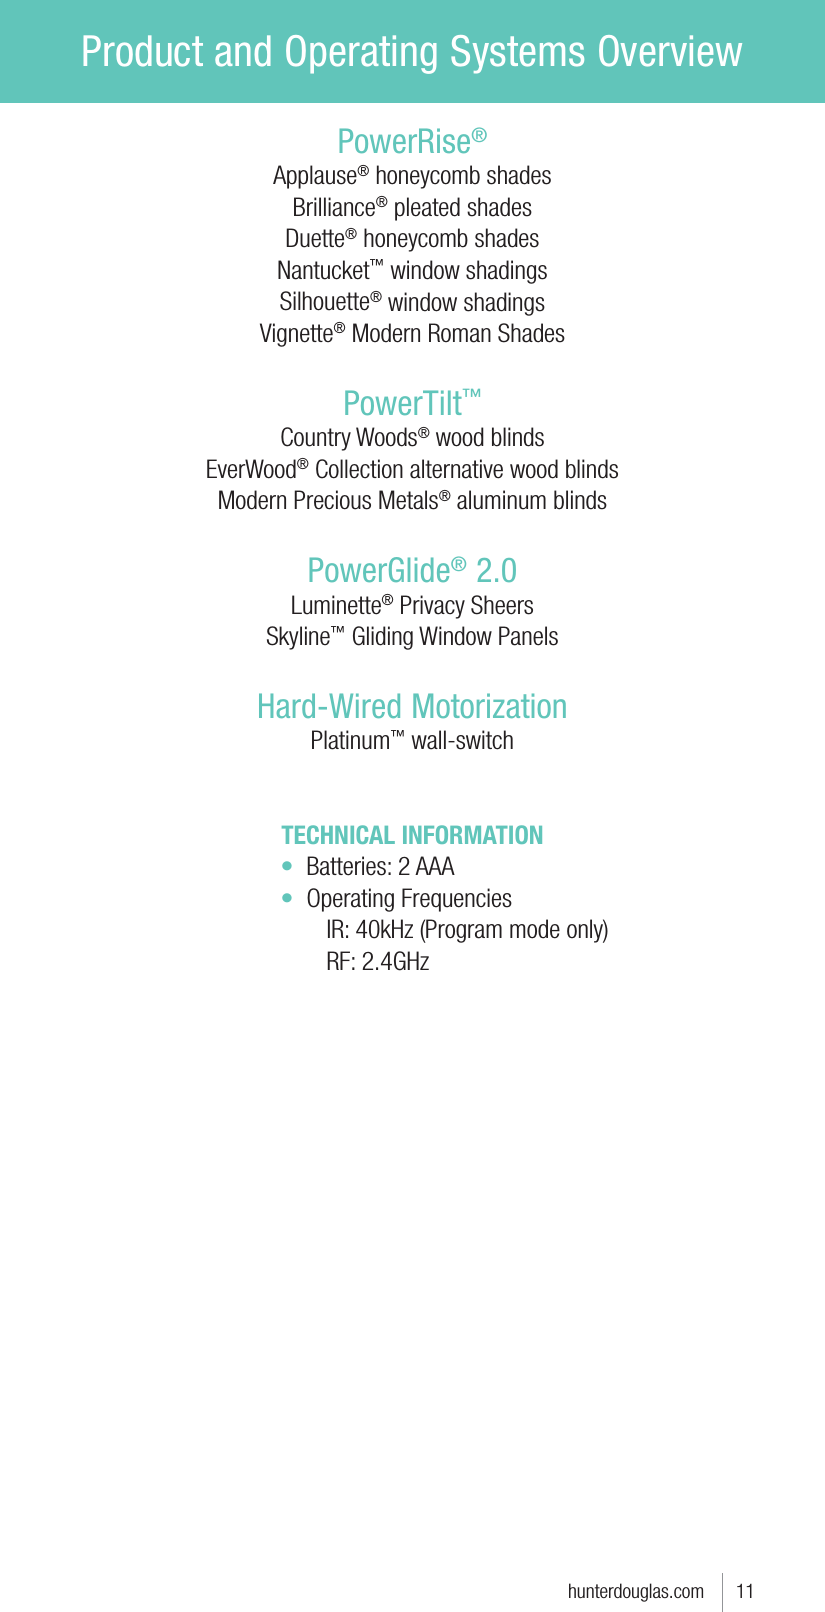
Hunter Douglas Window Fashions WS4U This device is a remote control that will be used to control blinds. It will open, close, lower and raise the blinds. User Manual

Hunter Douglas Window Fashions This device is a remote control that will be used to control blinds. It will open, close, lower and raise the blinds.

user manual

for PowerRise®, PowerGlide®   2.0 and PowerTilt™  systemsGuideWireless Wall SwitchPLATINUM™ TECHNOLOGY
Control Like Never BeforeALL RF GROUPS BUTTONRF GROUP 1BUTTONRF GROUP 2BUTTONRF GROUP 3BUTTONRF GROUP 4BUTTONUP/DOWNBUTTONWith Platinum™ Technology, you can operate individual and “group” window coverings without having to run wires to your windows. This guide shows you how to enjoy optimal performance using the wireless wall switch.The Platinum Technology Wireless Wall Switch2     hunterdouglas.com
Getting StartedUsing the power of Platinum™ Technology is easy. In just two easy steps, your wireless wall switch is ready for setup. hunterdouglas.com      3PROGRAMBUTTONRESETBUTTONBATTERYCOMPARTMENT POWER UPRemove the back cover from the wireless wall switch. Insert two AAA alkaline batteries as diagrammed inside the battery compartment.  RESET  BUTTONUse a paper clip to press and quickly release the RESET button located next to the batteries. The ALL button will blink GREEN twice. Replace the back cover. You are now ready to begin. NOTE: Only necessary for first time setup.12
InstallationSURFACE MOUNT1.  Remove back cover from the switch.2.  Use the mounting screws supplied with the switch to secure the back cover to the wall. 3.  Place the switch assembly over the back cover, top first.4.  Press the bottom edge of the switch assembly over the bottom of the back cover until the bottom locking tab is secure.5.  Install faceplate over switch assembly.Note: The Platinum wireless wall switch may also be flush-mounted. Use a low voltage electrical retrofit ring or electrical junction box for installation. Check local electrical codes for proper installation.4     hunterdouglas.comInstalling the wireless wall switch as a surface mount.
Programming RF Groupshunterdouglas.com      512 PROGRAM MODERemove the back cover of the wireless wall switch. Use a paper clip to press and quickly release the PROGRAM button on the back of the switch. The ALL button on the front of the switch will BLINK GREEN (for approximately 30 seconds). GROUP NUMBERWhile the ALL button is BLINKING GREEN, press  the GROUP number (1–4)  to which you are adding the  window covering.  UP BUTTONPoint the switch at the IR  receiver eye built into the headrail or satellite eye of the window covering and press the UP button. The unit will raise or “jog” to show that it has been programmed into a group.   EXIT PROGRAM MODEPress the PROGRAM button a second time to exit Program Mode. The ALL button on the front of the switch will turn off.Repeat steps to program other window coverings.BEFORE YOU BEGINPartially lower, traverse or tilt the window covering to ensure functionality. TIP 1 When programming a window covering to the switch, place it as close as possible to the IR receiver eye.  TIP 2 There are only  four distinct groups that  can be programmed to a Platinum™ wireless  wall switch.TIP 3 IR mode is only active in Program mode.  34
TO OPEN/CLOSE  A WINDOW COVERINGPress the GROUP number for the window covering(s) you wish to operate. The GROUP button turns SOLID GREEN.t  To CLOSE press the   DOWN button.t  To OPEN press the   UP button.TO STOP A WINDOW COVERING IN MOTIONPress the GROUP number for the window covering(s) you wish to operate. The GROUP button turns SOLID GREEN.t  For window coverings   that are CLOSING press    the UP button.t  For window coverings   that are OPENING press    the DOWN button.ALL GROUPS BUTTONTo operate all four groups of window coverings at the same time, press the ALL button before pressing the UP or DOWN button. TIP 1  Range of operation  may vary due to common household construction  and layout.6     hunterdouglas.comPowerRise® and PowerTilt™ Operating SystemsOperating RF Groups
Operating RF Groupshunterdouglas.com      7TRAVERSE THE WINDOW COVERING TO THE OPEN POSITION1.  Press the GROUP number for the window covering(s) you wish to operate. (GROUP button turns  SOLID GREEN)2.  Press the UP button.PowerGlide® 2.0 Operating SystemTRAVERSE THE WINDOW COVERING TO THE CLOSED POSITION1.  Press the GROUP number for the window covering(s) you wish to operate. (GROUP button turns  SOLID GREEN)2.  Press the DOWN button.TILTING THE VANES (Only available for Luminette® Privacy Sheers)1.  Completely traverse the sheer closed by following the instructions above.2.  Press the GROUP number for the sheer(s) you wish to operate. (GROUP button turns SOLID GREEN)3.  Press and hold the UP or DOWN button to tilt the vanes. Once the vanes have reached the desired position, release the button.ALL GROUPS BUTTONTo operate all four groups of window coverings at the same time, press the ALL button before pressing the UP or DOWN button.TO STOP A WINDOW COVERING IN MOTION1.  Press the GROUP number for the window covering(s) you wish to operate. (GROUP button turns SOLID GREEN)2.  For window coverings that are TRAVERSING CLOSED press the UP button. For window coverings that are TRAVERSING OPEN press the DOWN button.TIP 1   Wait four seconds between button presses. NOTE: Wireless wall switch will only operate PowerGlide products manufactured after September 7, 2008.
Removing Window Coverings from a RF Group PROGRAM MODERemove the back cover of the wireless wall switch. Use a paper clip to press and quickly release the PROGRAM button on the  back of the switch. The ALL button on the front of the switch will BLINK GREEN (for approximately 30 seconds). GROUP NUMBERWhile the ALL button is BLINKING GREEN, press the GROUP number from which you are removing  the window covering.  DOWN BUTTONPoint the switch at the IR receiver eye (built into the headrail or satellite eye) of the window covering and press the DOWN button. The unit will lower or “jog” to show that it has been removed.   EXIT PROGRAM MODEPress the PROGRAM button a second time to exit Program Mode. The ALL button on the  front of the switch will turn off.123BEFORE YOU BEGINPartially lower, traverse or tilt the window covering to ensure functionality.4RESET BUTTONTo erase all programmed groups, use a paper clip to quickly press and release the RESET button located next to the batteries. NOTE: The ALL button will FLASH GREEN twice.8     hunterdouglas.com
Cloninghunterdouglas.com      91.  Collect both the Source Remote or Wireless Wall Switch  (already programmed), and the Target Wireless Wall Switch  (new switch accepting program).2.  Remove the back cover from the Target Switch.3.  Use a paperclip to press and hold the RESET button on the Target Switch for approximatley 10 seconds. The ALL button  will blink GREEN.4.  Place the Source Remote within 18" of the Target Switch.5.  Press the UP button on the Source Remote. The GROUP  and ALL buttons on the Target Switch will stop blinking.TIP 1   Any subsequent programming changes performed  after cloning, with either remote or wireless wall switch,  will affect BOTH the Source Remote and Target Switch. SOURCE REMOTE(PROGRAMMED)TARGET WIRELESS WALL SWITCHTARGET WIRELESS WALL SWITCHSOURCE WIRELESS WALL SWITCH(PROGRAMMED)18"OR LESS18"OR LESS
AVOIDING INADVERTANT PROGRAMMINGTIP 1  Place wireless wall switch as close as possible to the      IR receiver eye.TIP 2 Program window covering(s) prior to installation.TIP 3 Remove power from window covering(s) not     being programmed.ENTERING PROGRAM MODETo activate Program Mode, use a paper clip to quickly press and release the PROGRAM button located on the back of the wireless wall switch. The Program Mode is indicated by the BLINKING GREEN  ALL button and will stay active for approximately  30 seconds before timing out. WINDOW COVERING OPERATIONWindow coverings may not be operated while in the Program  Mode. Do not operate window coverings when the ALL button  is BLINKING GREEN.EXITING PROGRAM MODETo exit Program Mode before the 30-second time-out, quickly  press and release the PROGRAM button a second time. The ALL button will stop BLINKING GREEN. The switch may now be used  to operate your window covering(s). INFRARED (IR) CHANNEL 2Wireless Wall Switch will not operate window coverings set to operate on IR Channel 2.SATELLITE EYE The satellite eye only needs to be visible during the RF programming phase. Once programming has been completed the satellite eye can be hidden out of sight. Refer to the product Installation, Operation and Care for further details about Platinum™ Technology.10     hunterdouglas.comNotes on Programming
Product and Operating Systems Overviewhunterdouglas.com      11PowerRise®Applause® honeycomb shadesBrilliance® pleated shadesDuette® honeycomb shadesNantucket™ window shadingsSilhouette® window shadingsVignette® Modern Roman ShadesPowerTilt™Country Woods® wood blindsEverWood® Collection alternative wood blindsModern Precious Metals® aluminum blindsPowerGlide® 2.0Luminette® Privacy SheersSkyline™ Gliding Window PanelsHard-Wired MotorizationPlatinum™ wall-switchTECHNICAL INFORMATIONt Batteries: 2 AAAt Operating Frequencies IR: 40kHz (Program mode only) RF: 2.4GHz
© 2009 Hunter Douglas Inc. ® Registered trademark of Hunter Douglas Inc. ™Trademark of Hunter Douglas Inc.  Patented in the U.S. and foreign countries. Other U.S. and foreign patents pending.   5110540035   5/09  INFORMATION TO USER  This device complies with Part 15 of the FCC Rules.  Operation is subject to the following twoconditions:  (1) This device may not cause harmful interference, and (2) This device must accept any interference received, including interference that may cause undesired operation.  This equipment has been tested and found to comply with the limits for Class B Digital Device, pursuant to Part 15 of the FCC Rules.  These limits are designed to provide reasonable protection against harmful interference in a residential installation.  This equipment generates and can radiate radio frequency energy and, if not installed and used in accordance with the instructions, may cause harmful interference to radio communications.  However, there is noguarantee that interference will not occur in a particular installation.  If this equipment does cause harmful interference to radio or television reception, which can be determined by turningthe equipment off and on, the user is encouraged to try to correct the interference by one or more of the following measures.  • Reorient or relocate the receiving antenna • Increase the separation between the equipment and receiver • Connect the equipment into an outlet on a circuit different from that to which the receiver is connected • Consult the dealer or an experienced radio/TV technician for help  Any changes or modifications not expressly approved by the party responsible for compliance could void the user’s authority to operate the equipment.

Navigation menu