Huntwise HW2200R Double Trouble User Manual SHMHW2200R Part 1
Huntwise Inc. Double Trouble SHMHW2200R Part 1
Huntwise >
User manual

WARNING:Maynotbelegalinallareas.
CheckStateandFederalRegulationsforyourareaBEFOREyouhunt
withtheDoubleTroubleSystem.ElectronicCallers,RecordedSounds
and/or Electronic Decoys may not be legal for some game (animals
andgamebirds)insomestates.Regulationsforyourareacanusually
befoundonyourstatewildlifeagency’swebsite–orgivethemacall.
It’s better to be safe than sorry! All hunters should acquaint
themselves with the hunting regulations for the game and location
theyintendtohunt.
MOJOOutdoors
623Hwy594•Monroe,LA71203•(866)2166656
i
ListofSuppliedProducts.
1. Caller
2. Remote/Protectivecover
3. Decoytop
4. USBcable
5. SmartCharger
FCCCompliance:
Warning:Changesormodificationstothisunitnotexpresslyapprovedby
the party responsible for compliance could void the user’s authority to
operatetheequipment.
NOTE: This equipment has been tested and found to comply with the
limits for a Class B digital device, pursuant to Part 15 of the FCC Rules.
These limits are designed to provide reasonable protection against
harmful interference in a residential installation. This equipment
generates, uses and can radiate radio frequency energy and, if not
installedandusedinaccordancewiththeinstructions,maycauseharmful
interferencetoradiocommunications.
However, there is no guarantee that interference will not occur in a
particularinstallation. Ifthis equipmentdoes causeharmful interference
toradioor televisionreception, which canbedeterminedbyturningthe
equipment off and on, the user is encouraged to try to correct the
interferencebyoneormoreofthefollowingmeasures:
xReorientorrelocatethereceivingantenna.
xIncreasetheseparationbetweentheequipmentandreceiver.
xConnecttheequipmentintoanoutletonacircuitdifferentfrom
thattowhichthereceiverisconnected.
xConsultthedealeroranexperiencedradio/TVtechnicianforhelp.
14

Remote control. Finally press and hold the select track button on your
remote for 15 seconds or until is displays “synchronizing” on the screen.
OncethisiscompleteyouarereadytohuntwithyournewMojoECalling
system.GoodHunting!
For more direction and tips on using your Mojo Call Management system
seeourdocumentationonlineatwww.mojooutdoors.com
XWarranty
LimitedWarranty
The MOJO Double Trouble Game Calling System is warranted to be free
fromdefectsinworkmanshipormaterialsforaperiodofone(1)yearfrom
thedateofpurchase.
If you should need the warranty provisions, return the unit properly
packagedtoprotectitandprepaidto:
WarrantyDepartment
MOJOOutdoors
623Hwy594
Monroe,LA71203
Alongwithproofofpurchase.
Please note that the warranty is void if the product has been damaged in
any way or used otherwise to its intended use or abused in any way.
Batteriesordamagecoveredincorrectbatteriesorincorrectchargingisnot
coveredbythewarranty.
13
DOUBLETROUBLE
BYRONSOUTHSIGNATURESERIES
Congratulations: You have just purchased the most complete
electronic game calling system in the world. The Double Trouble
combines a stateoftheart programmable all digital game calling
system with the most popular predator decoy in the world with an
addedbuiltintripod.ENJOY!
The Calling System is very simple and easy to use – just follow the
instructionsgivehereafter.
GoodLuckandGoodHunting!
MOJOOutdoors
IdesignedthisproducttogivethehunterthosetoolsIhave
foundthatledtomysuccess.
ii
TABLEOFCONTENTS
XGeneralOperationofUnit
GettingStarted………………………………………………………………………12
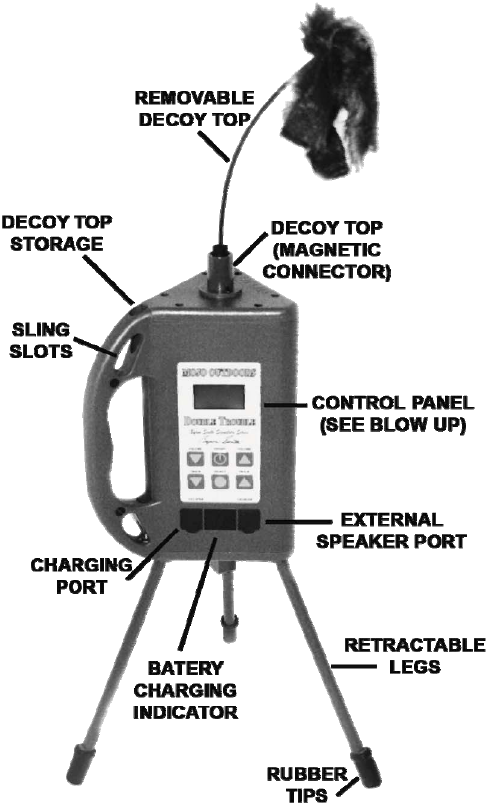
XCallerFeatures
MotorizedDecoy..........................................................................3
InternalAntenna ..........................................................................3
ExpandableTripodLegs ..............................................................3
MojoExtensionPoleReceptaclewithinternalthreaded
Tripodreceiver............................................................................3
Chargeindicatorlight...................................................................3
BacklitLCDScreen........................................................................3
DecoyStorageReceptacle............................................................3
ÊButtons
On/Off ..........................................................................................3
VolumeUpandDown ..................................................................3
TrackUpandDown......................................................................3
SelectTrackButton ......................................................................3
ÊScreen
BatteryStatusIndicator ...............................................................5
TrackNumberSelectedIndicator ................................................5
ÊPorts
ExternalSpeakerPort...................................................................5
ChargePort ..................................................................................5
USBMiniPort...............................................................................5
XRemoteControlFeatures
ExternalAntenna..........................................................................8
SoftRubberProtectiveCover.......................................................8
2”BacklitLCDScreen ...................................................................8
LanyardLoop................................................................................8
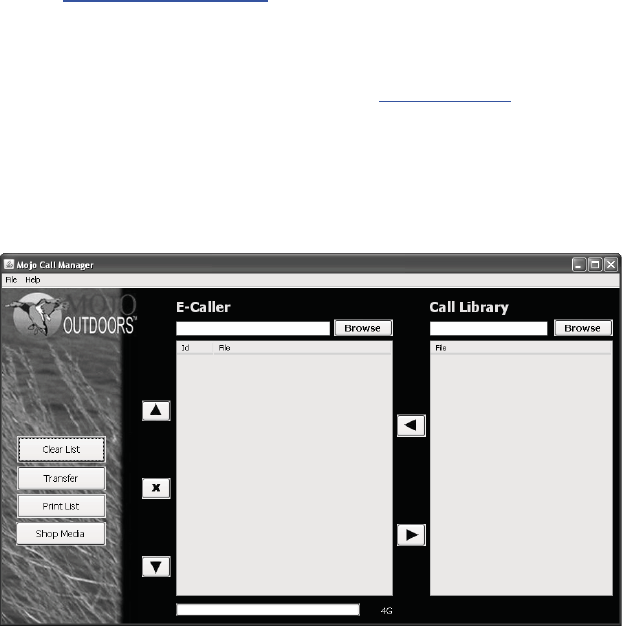
ClearList(Button)PresstoclearyourcurrentECallerTrackList.
Transfer (Button) Press to Transfer New Track List from yourPC to your
ECaller.Pressingthisbuttonwhenyouecallertracklistisblankwillerase
allsoundsfromyourecaller.
PrintList(Button)PresstoPrintyourcurrentECallerDownloadListThisis
usefulifyouwantapapercopytouseinthefield.
Shop Media (Button) Press to go to Mojo’s Website to purchase new
soundsorotherproducts.
Up Arrow (Button) Press to Move Selected/Highlighted Track up on the
ECallerDownloadList.
X (Button) Press to Delete Selected/Highlighted Track from ECaller
DownloadList.
DownArrow(Button)PresstoMoveSelected/HighlightedTrackdownon
theECallerDownloadList.
Left Arrow (Button) Press to Add Selected/Highlighted Track to ECaller
DownloadList
Right Arrow (Button) Press to Remove Selected/Highlighted Track from
ECallerDownloadList.
CallLibraryBrowse(Button)–Presstolocateandloadyoursoundsonyour
computerintothecallmanagementsystem.
ECaller Browse (Button) – Press to locate and load you ecaller and its
soundsintothecallmanagementsystem,
After you have selected the sounds and transferred them to your ECaller
you’llneedtosynchronizethenewtracklisttoyourECaller’sremote.Todo
this you will need to disconnect your ECaller from your PCby unplugging
theUSBcordfromtheunit.Poweriton.NowpoweronyourECaller’s
12
TIP: you can use the mute button during this process to save your “Hot
Buttons” track and volume level. This will allow you to go through this
processinsilence.
NOTE: When loading new tracks the total amount of characters (spaces
are counted, as characters used cannot exceed 19. (Example: 019 cryn
kitten.mojisacceptable).Iftheamountofcharactersexceeds19thenthe
trackwillbeinaccessibleandwillnotplay.
XProgramming&CallManagementSystem
Go to www.mojooutdoors.com to download and install the Mojo Call
Managementsoftware.
The Mojo Call Management software requires Java to run. If you do not
have java installed on your computer go to www.java.comtodownload
andinstall.
ConnectthecallertoacomputerusingtheprovidedUSBcordandopenthe
MojoCallManagerSoftware.Belowisanillustrationofthesoftwareanda
listofbuttonsandtheirfunctions.
11
ÊButtons
On/Off ..........................................................................................8
VolumeUpandDown ..................................................................8
TrackUpandDown......................................................................8
SelectTrackButton/TrackListSynchronization...........................8
Recall ............................................................................................8
Mute.............................................................................................8
HotButtons14............................................................................8
DecoyOn/Off ...............................................................................8
ÊScreen
HotButtonIndicator14 ..............................................................9
SignalStrengthIndicator..............................................................9
SelectedTrackIndicator...............................................................9
TrackList ......................................................................................9
StandTimer ..................................................................................9
VolumeLevelIndicator ................................................................9
MuteIndicator ...........................................................................10
BatteryLevelIndicator...............................................................10
ÊSynchronizationofyourcallerandremote
tracklist.............................................................................10
ÊConfiguring“HotButtons”onyourRemote
………………………………………………………………………………………….1011
XProgramming&CallManagementSystem
………………………………………………………………………………………….1113
XWarranty
LimitedWarranty……………………………………………………………………13
FCCCompliance………………………………………………………………..……14
ListofSuppliedProducts………………………………………………………..14
GettingStarted
BatteryInstallation(BatteriesnotIncluded)
Thecalleruses8AAbatteries(AlkalineorRechargeableNIMH).CAUTION:
Never attempt to recharge nonrechargeable batteries. Doing so could
damage the caller and could cause fire and/or personal injury. Remove
batterydoorbyunscrewingthethumbscrewatthetopofthebatterydoor.
Insertbatteriesintheproperorderasindicatedinthebatterycompartment.
Theremoteuses3AAbatteries(AlkalineorRechargeableNIMH).CAUTION:
Never attempt to recharge nonrechargeable batteries. Doing so could
damagethecallerandcouldcausefireand/orpersonalinjury.Removethe
rubberprotectivecoverfromtheremotethenremovebatterydoor.Insert
batteriesintheproperorderasindicatedinthebatterycompartment.
PowerOn
Topoweronboththecallerandremote,pressandholdthepowerbutton
for5seconds.
Thecallerwasdesignedtobeusedbyremotebutcanbeusedwithoutthe
remote.
SelectingaTracktoPlay
To use the caller without the remote simply use the track up and down
buttons on the caller to scroll to the desired track number and press the
selectbuttontoselect.Usevolumeupanddownbuttonstoselectdesired
volumelevel.
Using the remote controller. Use the track up and down buttons on the
callertoscrolltothedesiredtrackandpresstheselectbuttontoselect.Use
volumeupanddownbuttonstoselectdesiredvolumelevel.
1
MuteIndicator:LocatedonthebottommiddleportionoftheLCDscreenon
theremote.Thisindicates(whenlit)thatthecallerismuted.Whennotlit
thecallerisnotmuted.
Battery Level Indicator: Located at the bottom right portion of the LCD
screenontheremote.Thisindicatestheremotescurrentbatterylevel.
ÊSynchronizationofyourcallerandremotetracklist.
After any changes have been made to the track list or a firmware update
has been completed, you must resynchronize the caller and the remote.
Thisassuresthatthetracklistanddescriptionsarethesameontheremote
andthecaller.Todothisyousimplyperformthefollowingsteps.
1. Poweronthecaller
2. Powerontheremotecontrol
3. Press and hold the “Track Select” button on the remote for 15
seconds or until the remote displays “Synchronizing”. NOTE: The
remoteandcallermustbewithin10feetofeachotherduringthis
process.Resyncingtheremoteerasessaved“HotButton”settings.
Oncethesynchronizationprocesshascompletedyournewtracklist
will automatically be displayed on the remote. At this time your
callerisreadyforuse.
ÊConfiguring“HotButtons”onyourRemote
“Hot Buttons” store selected tracks and selected volume levels for easy
quick access to your most used tracks. This is a very handy feature that
keeps your most used sounds readily accessible. These “Hot Buttons” are
locatedjustbelowtheRemote’sLCDdisplayandarenumbered“1”“2”“3”
and“4”.Tosetthe“HotButtons”performthefollowingsteps.
1. Poweronthecaller
2. Powerontheremote
3. Selectyourdesiredtrack.
4. Selectyourpreferredlevelofvolume.
5. Pressandholdthe“HotButton”youwishtosaveyourtrackand
volumelevelstofor5seconds.Toconfirmthesettingsweresaved
lookatyour“HotButtons”Indicatoratthetoplefthandcornerof
yourremote’sLCDscreen.Asuccessfulsavewillbeindicatedby
highlightingthe“HotButton”numberthatyousetitto.
6. Repeatsteps35toseteach“HotButton”toyourdesiredtrackand
volumelevel.
10
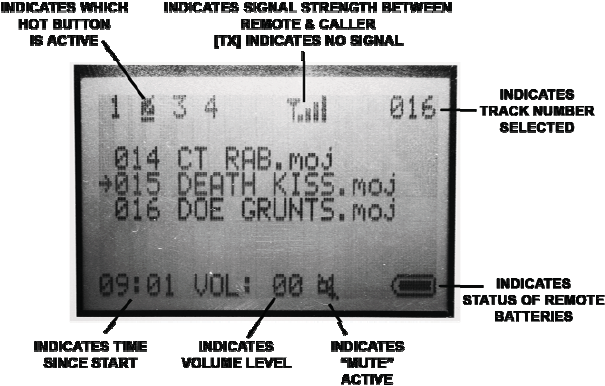
ÊScreen
HotButtonIndicator14:LocatedinthetopleftportionoftheLCDscreen
on the remote. This indicates stored and currently selected hot track. See
configuring“HotButtons”onpage(9).
Signal Strength Indicator: Located in the top middle portion of the LCD
screen on the remote.This displays current level of signal between caller
andremote.
SelectedTrackIndicator:LocatedinthetoprightportionoftheLCDscreen
ontheremote.Thisdisplaysthecurrentlyselectedtrack.
Track list: Located in the middle portion the LCD screen on the remote.
Constantly displays three lines of the track list. This indicates the track
numberaswellastheaudiofiletype.
Stand Timer: Located in the bottom left corner of the LCD screen on the
remote. The timer begins whenremote is powered on. Thisallows you to
knowhowlongyouhavebeenatthecallinglocation.
Volume Level Indicator: Located in the bottommiddle portion ofthe LCD
screen on the remote. This indicates your currently selected volume level
(020).
9
UsingtheDecoy
Remove the decoy from its magnetic storage receptacle located in the
callershandle, then insertthe decoyconnectorinto the receptacleon the
topofthecaller.NOTE:Alignthenotchontheconnectorofthedecoywith
thepinontheinsideofthereceptacleonthecallertoensureproperseating
andfunctionofthedecoy.
Toturnon/offthedecoysimplypressthedecoybuttonlocatedonthe
caller’sremotecontrol.
UsingtheCaller’sTripodExtensionLegs.
NOTE: The legs on the caller are designed to lock into place in both the
extendedandnonextendedpositions.
Toextendthelegssimplypullthelegsstraightdowntothefullyextended
positionandthenpushouttolockthemintoplace.
To reinsert the legs back into the caller simply perform the above in the
reverseorder.
NOTE:Thelegsmustbefullyextendedtolockinplace–iftheyare
notlocking–youareprobablynotfullyextendingthem.
2