Husqvarna 50 Rancher Users Manual OM, 50, 1982 11, Chain Saw
50 Rancher ab464fdd-c777-4dd4-93fe-1a7288e34f8f
50 Rancher to the manual ab464fdd-c777-4dd4-93fe-1a7288e34f8f
2015-01-24
: Husqvarna Husqvarna-50-Rancher-Users-Manual-316964 husqvarna-50-rancher-users-manual-316964 husqvarna pdf
Open the PDF directly: View PDF ![]() .
.
Page Count: 8

Chain saw
50 Rancher
Owner’s maintenance manual
TECHNICAL SPECIFICATION
Displacement . . . . 48.7 cm3
Bore . . . . . . . . . . . 44 mm
Stroke . . . . . . . . . . 32 mm
Ignition advance . . . . . 26˚ before t.d.c. at 8400 rpm
Sparking Plug . . . . Champion CJ 7Y
Electrode gap . . . . 0.5 mm
Carburettor . . . . . . Diaphragm type
Fuel tank capacity . . . .0.6 l
Oil tank capacity . . . . . 0.3 l
Sawing chain. . . . . . .325” pitch
Guide Bar . . . . . . . . . . 15” (38 cm)
Weight empty, incl. 38 cm
guide bar , chain
and chain brake . . . . . 6.0 kg
I
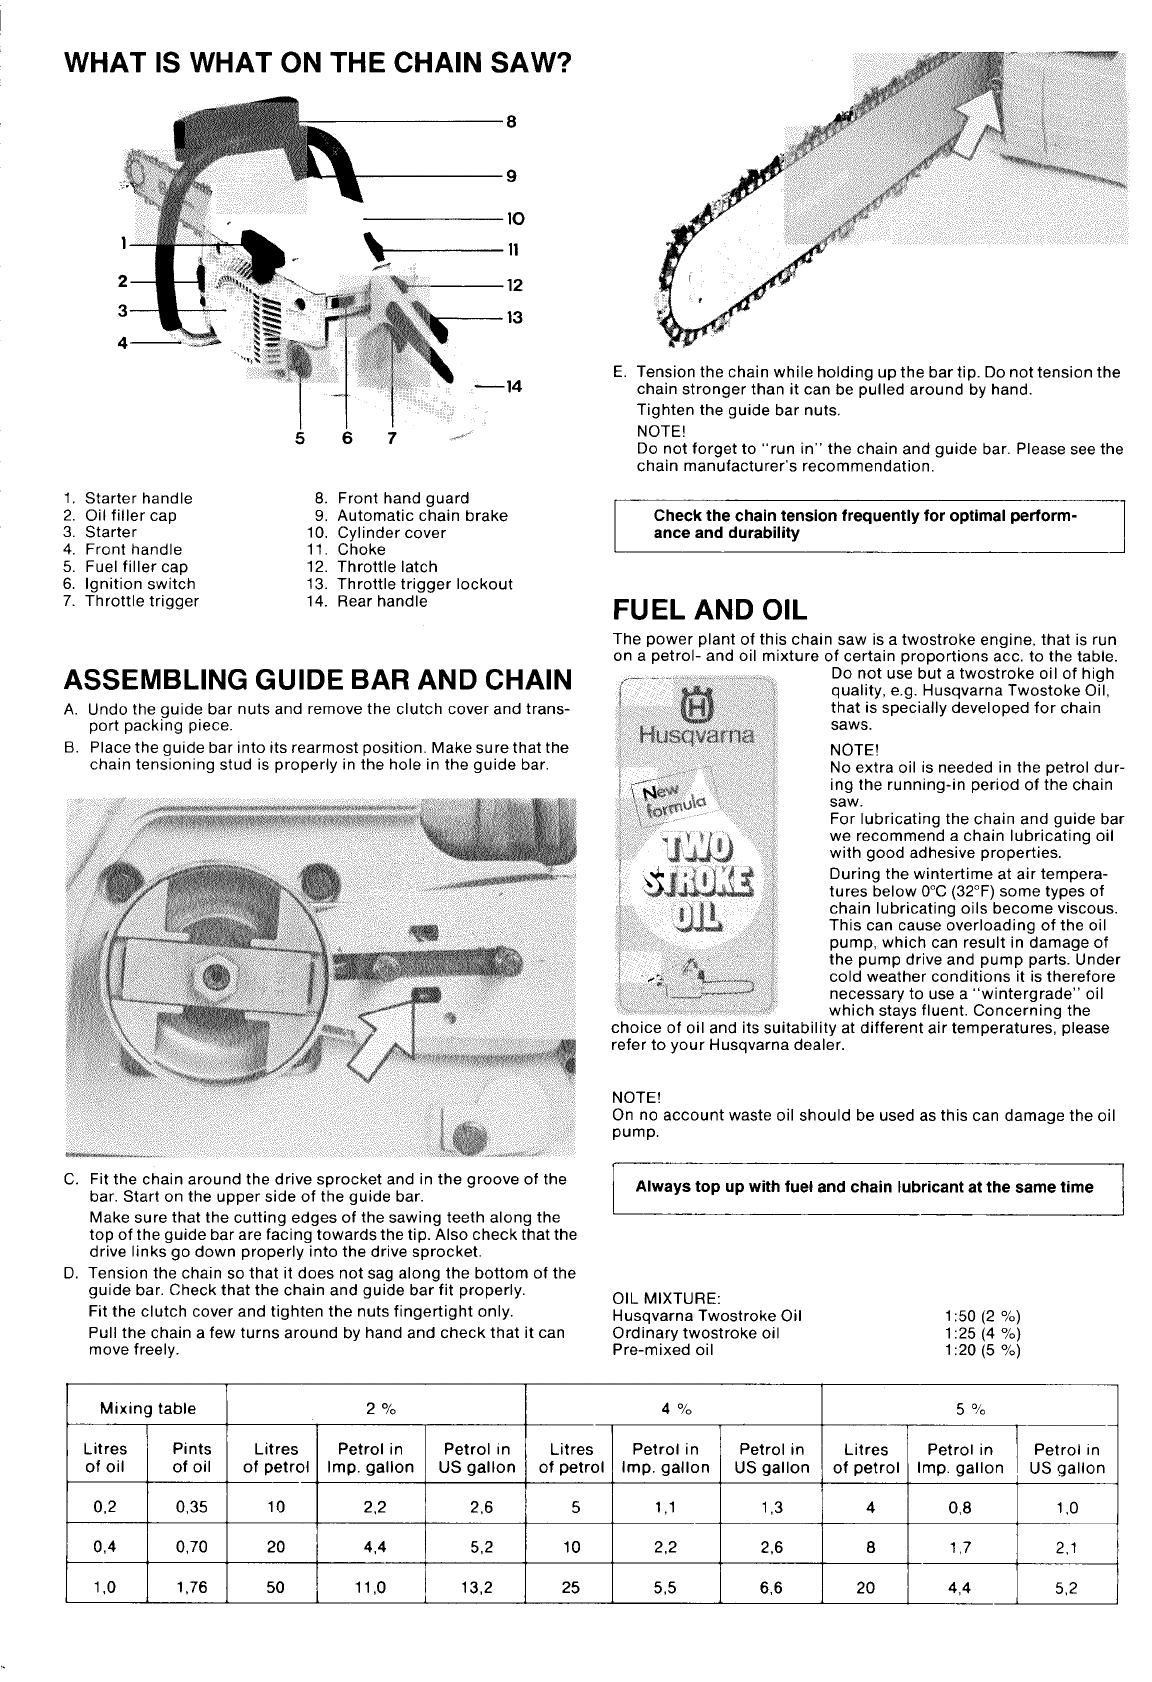
WHAT IS WHAT ON THE CHAIN SAW?
8
11
%--
5
1, Starter handle 8.
2. Oil filler cap 9.
3. Starter 10,
4. Front handle 11.
5. Fuel filler cap 12.
6. Ignition switch 13.
7. Throttle trigger 14.
6 7 ---
Front hand guard
Automatic chain brake
Cylinder cover
Choke
Throttle latch
Throttle trigger lockout
Rear handle
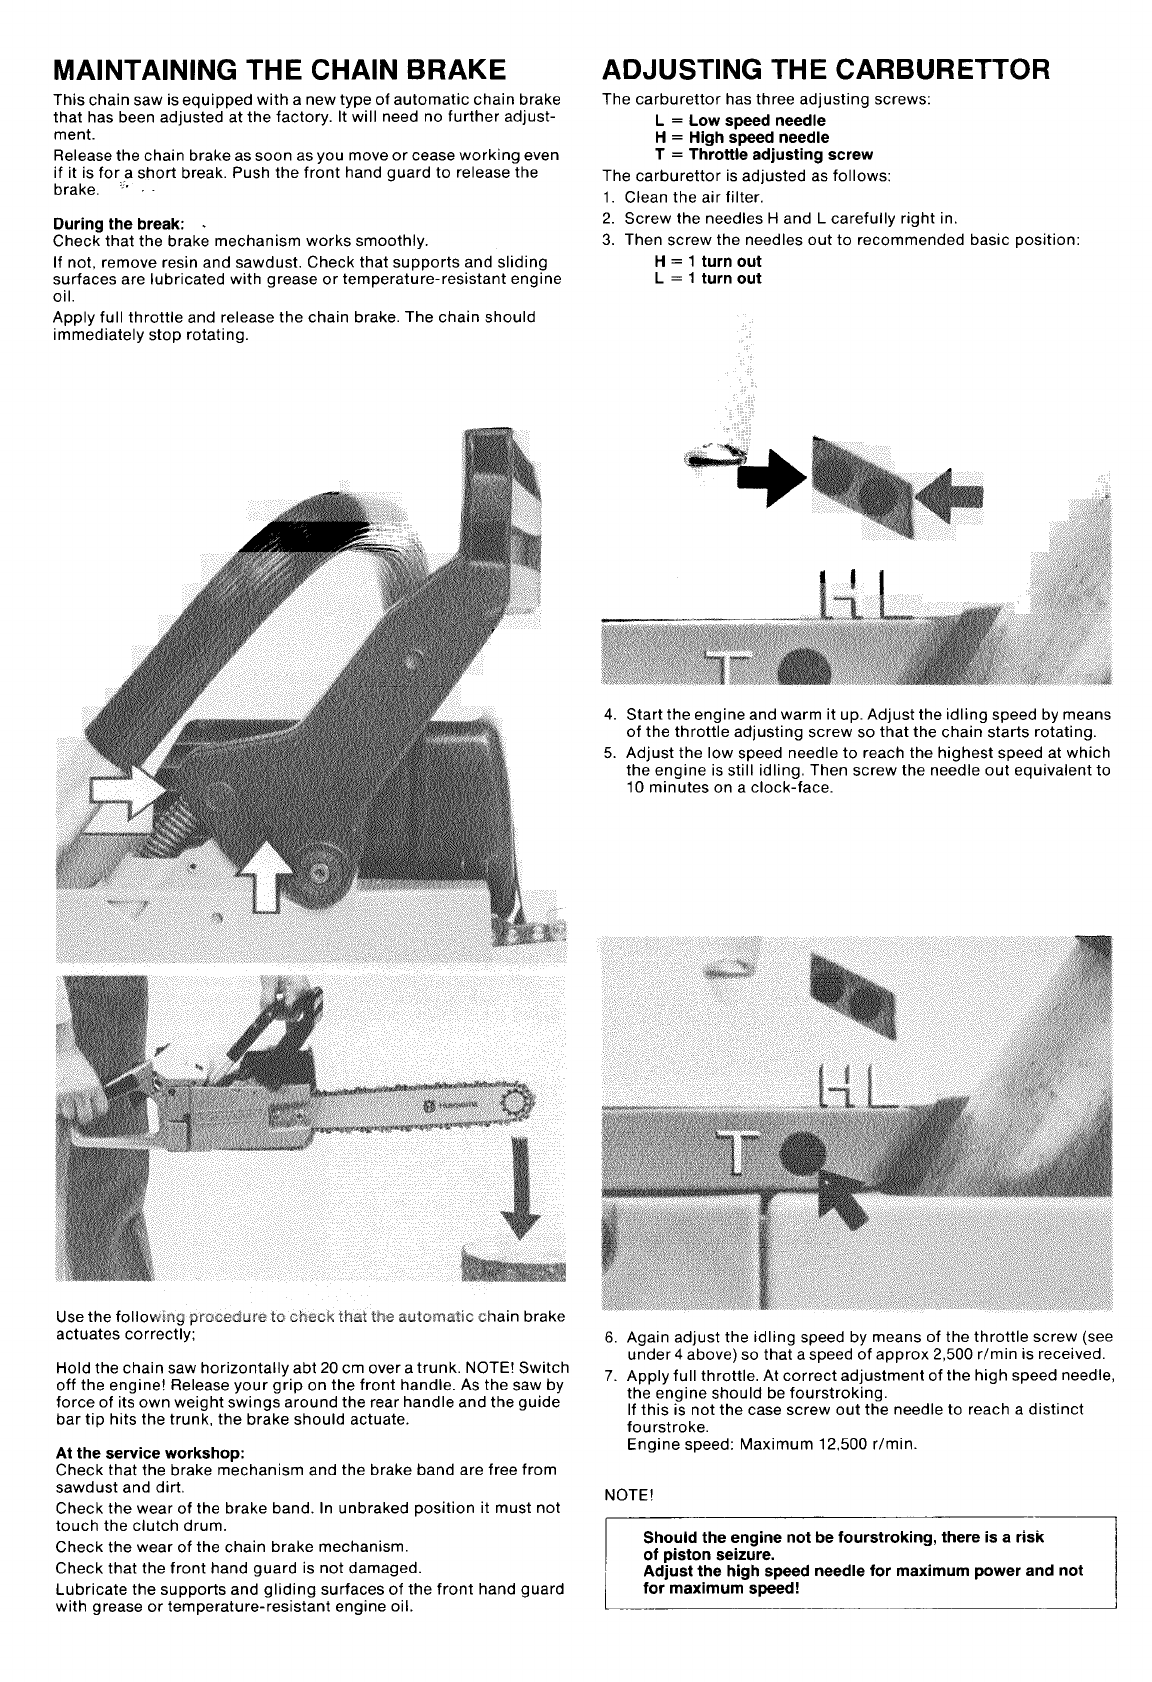
ASSEMBLING GUIDE BAR AND CHAIN
A. Undo the guide bar nuts and remove the clutch cover and trans-
port packing piece.
B. Place the guide bar into its rearmost position. Make sure that the
chain tensioning stud is properly in the hole in the guide bar.
C. Fit the chain around the drive sprocket and in the groove of the
bar. Start on the upper side of the guide bar.
Make sure that the cutting edges of the sawing teeth along the
top of the guide bar are facing towards the tip. Also check that the
drive links go down properly into the drive sprocket.
D, Tension the chain so that it does not sag along the bottom of the
guide bar. Check that the chain and guide bar fit properly.
Fit the clutch cover and tighten the nuts fingertight only,
Pull the chain afew turns around by hand and check that it can
move freely.
E
[
Tension the chain while holding up the bar tip. Do not tension the
chain stronger than it can be pulled around by hand.
Tighten the guide bar nuts.
NOTE!
Do not forget to “run in” the chain and guide bar. Please see the
chain manufacturer’s recommendation.
Check the chain tension frequently for optimal perform-
ance and durability
FUEL AND OIL
NOTE!
On no account waste oil should be used as this can damage the oil
pump.
Always top up with fuel and chain lubricant at the same time
OIL MIXTURE:
Husqvarna Twostroke Oil 1:50 (2 %)
Ordinary twostroke oil 1:25 (4 %)
Pre-mixed oil 1:20 (5 %)
Mixing table 2%4%5“10
Litres Pints Litres Petrol in Petrol in Litres Petrol in Petrol in Litres Petrol in Petrol In
of oil of oil of petrol Imp. gallon US gallon of petrol Imp, gallon US gallon of petrol Imp. gallon US gallon
0,2 0,35 10 2,2 2,6 51,1 1,3 40,8 1,0
0,4 0,70 20 4,4 5,2 10 2,2 2,6 81,7 2,1
1,0 1,76 50 11,0 13,2 25 5,5 6,6 20 4,4 5,2
MAINTAINING THE CHAIN BRAKE
This chain saw is equipped with anew type of automatic chain brake
that has been adjusted at the factory. It will need no further adjust-
ment.
Release the chain brake as soon as you move or cease working even
if it is for ashort break. Push the front hand guard to release the
brake. ‘:”
During the break: .
Check that the brake mechanism works smoothly.
If not, remove resin and sawdust. Check that supports and sliding
surfaces are lubricated with grease or temperature-resistant engine
oil.
Apply full throttle and release the chain brake. The chain should
immediately stop rotating.
~,,
Use the following procedw’e to check that the automatic chain brake
actuates correctly;
Hold the chain saw horizontally abt 20 cm over atrunk. NOTE! Switch
off the engine! Release your grip on the front handle. As the saw by
force of its own weight swings around the rear handle and the guide
bar tip hits the trunk, the brake should actuate.
At the service workshop:
Check that the brake mechanism and the brake band are free from
sawdust and dirt.
Check the wear of the brake band. In unbraked position it must not
touch the clutch drum.
Check the wear of the chain brake mechanism.
Check that the front hand guard is not damaged.
Lubricate the supports and gliding surfaces of the front hand guard
with grease or temperature-resistant engine oil.
ADJUSTING THE CARBURETOR
The carburetor has three adjusting screws:
L=Low speed needle
H=High spaed needle
T=Throttle adjusting screw
The carburetor is adjusted as follows:
1. Clean the air filter.
2. Screw the needles Hand Lcarefully right in.
3. Then screw the needles out to recommended basic position:
H=1turn out
L=1turn out
4.
5.
Start the engine and warm it up. Adjust the idling speed by means
of the throttle adjusting screw so that the chain starts rotating.
Adjust the low speed needle to reach the highest speed at which
the engine is still idling, Then screw the needle out equivalent to
10 minutes on aclock-face.
6
7
Again adjust the idling speed by means of the throttle screw (see
under 4above) so that aspeed of approx 2,500 r/rein is received.
ADDIV full throttle, At correct adjustment of the hiqh sDeed needle,
the e’ngine should be fourstrok~ng. -.
If this is not the case screw out the needle to reach adistinct
fourstroke.
Engine speed: Maximum 12,500 r/rein.
NOTE!
-
Should the engine not be fourstroking, there is arisk
of piston seizure.
Adjust the high speed needle for maximum power and not
for maximum speed!

CLEANING THE AIR FILTER
In order to get at the air filter, remove the cylinder cover by undoing
the three retaining screws and lifting the cover off upward% back-
wards,
Lift off the filter carefully to prevent dirt from falling down into the
carburetor.
Rinse the filter in warm soap suds.
Do not rinse in fuel, Reassemble the filter and make sure that it lies
close to the carburetor. Use two filters alternately. Clean the filter
daily.
CHANGING STARTER CORD AND
RETURN SPRING
Loosen the four screws that retain the starter
Remove the starter.
Pull out the cord approx. 30 cm and lift up into the notch in the
periphery of the pulley. Zero-set the return spring by letting the
pulley rotate slowly backwards. Undo the screw in the centre of the
pulley. If necessary, remove the return spring and change it.
Lubricate the new springWiih engineoil.
Assemble the remaining parts in reverse order of removal.
Lift up the starter cord into the notch on the pulley. Tension the
return spring by turning the pulley clockwise about two turns.
NOTE!
Make sure that it is possible to turn the pulley at least half a
turn further when the cord is pulled out completely.
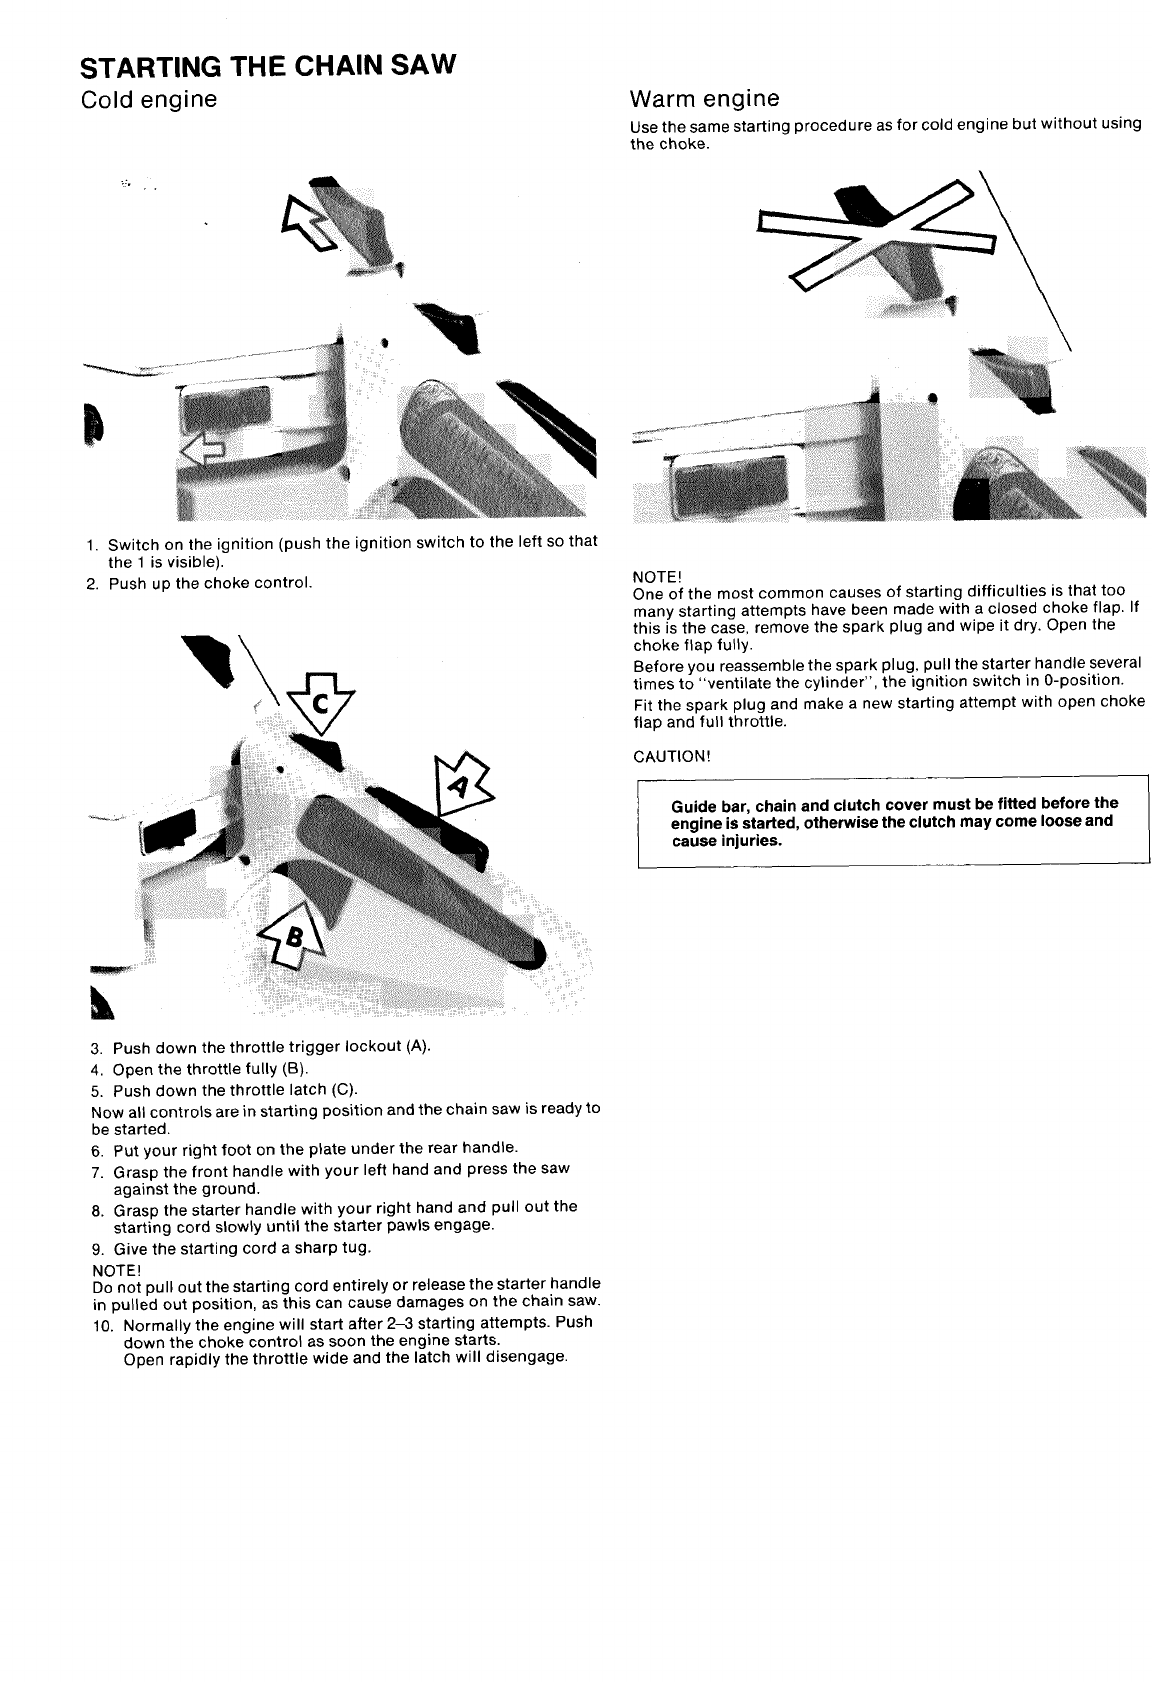
STARTING THE CHAIN SAW
Cold engine
.....
-_-..-,’1, A$ \
1. Switch on the ignition (push the ignition switch to the left so that
the 1is visible).
2. Push UII the choke control.
3. Push down the throttle trigger lockout (A).
4, Open the throttle fully (B).
5. Push down the throttle latch (C).
Now all controls are in starting position and the chain saw is ready to
be started.
6. Put your right foot on the plate under the rear handle.
7. Grasp the front handle with your left hand and press the saw
against the ground.
8. Grasp the starter handle with your right hand and pull out the
starting cord slowly until the starter pawls engage.
9. Give the starting cord asharp tug.
NOTE!
One of the most common causes of starting difficulties is that too
many starting attempts have been made with aclosed choke flap. If
this is the case, remove the spark plug and wipe it dry. Open the
choke flap fully.
Before you reassemble the spark plug, pull the starter handle several
times to “ventilate the cylinder”, the ignition switch in O-position.
Fit the spark plug and make anew starting attempt with open choke
flap and full throttle.
CAUTION!
Guide bar, chain and clutch cover must be fitted before the
engine is started, otherwise the clutch may come loose and
cause injuries.
NOTE!
Do not pull out the starting cord entirely or release the starter handle
in pulled out position, as this can cause damages on the chain saw.
10. Normally the engine will start after 2X3 starting attempts. Push
down the choke control as soon the engine starts.
Open rapidly the throttle wide and the latch will disengage.

MAINTENANCE OF THE CHAIN SAW
3
....
0.
410 14 13
Daily maintenance Weekly maintenance
1.
2,
3.
4,
5.
6.
7.
8.
9.
Clean the saw body from the outside. 10. Check the starter, its cord and return spring
Clean the air filter. ”Change if necessary. 11. Clean the spark plug from the outside a“ndcheck the gap. Adjust
Turn around the guide bar, lower edge up. Clean the bar groove. the gap or change the plug if necessary.
Clean the air intakes in the starter cover. 12. File off burrs if any on the sides of the guide bar.
Clean the cooling fins on the cylinder.
Clean the sDace under the clutch cover.
Sharpen the chain and check its tension.
Check the oiling system for the chain and the guide bar. Monthly maintenance
Clean the chain brake. Make it ahabit to release the chain brake 13, Wash out the fuel tank with petrol,
during pauses and transports. 14. Wash out the oil tank with petrol.
15. Clean the carburetor.
16. Clean the spark plug.
216 5
186 9 8
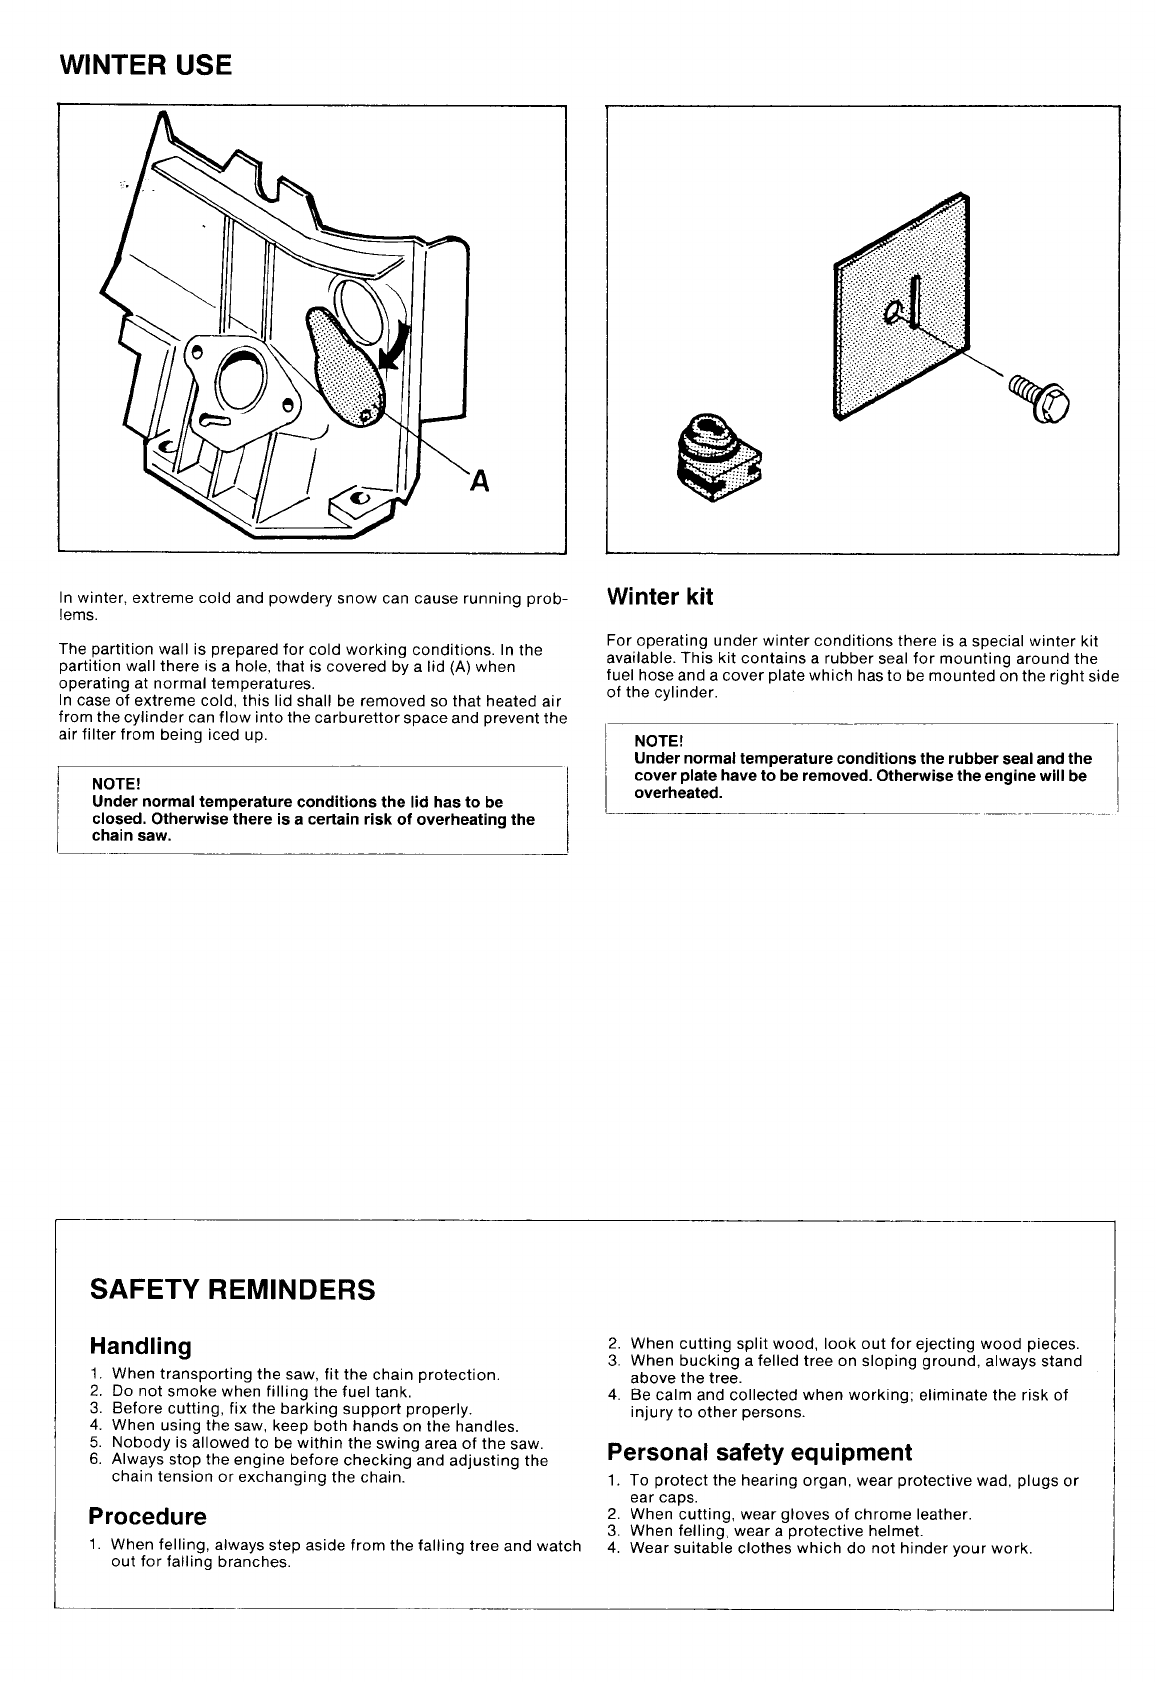
WINTER USE
In winter, extreme cold and powdery snow can cause running prob-
lems.
The partition wall is prepared for cold working conditions. In the
partition wall there is ahole, that is covered by alid (A) when
operating at normal temperatures,
In case of extreme cold, this lid shall be removed so that heated air
from the cylinder can flow into the carburetor space and prevent the
air filter from being iced up.
fNOTE!
Under normal temperature conditions the lid has to be
closed. Otherwise there is acertain risk of overheating the
chain saw.
e
,.’.
-.. .,,
.:..
. .....{. :,. .
,.
.
%
For operating under winter conditions there is aspecial winter kit
available. This kit contains arubber seal for mounting around the
fuel hose and acover plate which has to be mounted on the right side
of the cylinder.
I
~fl~~~normaltemperature conditions therubberseal and the
cover plate have to be removed. Otherwise the engine will be
overheated.
SAFETY REMINDERS
Handling 2. When cutting split wood, look out for ejecting wood pieces.
3. When buckina afelled tree on slor)ina around. alwavs stand
1.
2,
3.
4.
::
When transporting the saw, fit the chain protection. -.,
Do not smoke when filling the fuel tank, above the tre~.
Before cutting, fix the barking support properly. 4. Be calm and collected when working; eliminate the risk of
injury to other persons.
When usina the saw, keetI both hands on the handles.
Nobody is ~llowed to be within the swing area of the saw.
Always stop the enqine before checkina and adiustina the Personal safety equipment
,-
chain tension or ex~hanging the chain.- 1. To protect the hearing organ, wear protective wad, plugs or
I
ear caps.
Procedure 2. When cutting, wear gloves of chrome leather.
3. When felling, wear aprotective helmet.
1. When felling, always step aside from the falling tree and watch 4. Wear suitable clothes which do not hinder your work
out for falling branches.

I
I
1018 401-26A 20. 1I-62
Printed in Sweden mrmtr.~s Mo,,(. w
