Hytera Communications ADA01 Wireless Audio Adapter User Manual
Hytera Communications Corporation Ltd. Wireless Audio Adapter Users Manual
Users Manual
Preface
Thanks for your favor in our product. To derive optimum performance from the product, please read this
manual carefully before use.
This manual is applicable to the following product:
ADA-01 Wireless Audio Adapter
Disclaimer
Hytera Communications Corporation Limited (the Company) endeavors to achieve the accuracy and
completeness of this manual, but no warranty of accuracy or reliability is given. All the specifications and
designs are subject to change without notice due to continuous technology development. No part of this
manual may be copied, modified, translated, or distributed in any manner without the express written
permission of us.
We do not guarantee, for any particular purpose, the accuracy, validity, timeliness, legitimacy or
completeness of the Third Party products and contents involved in this manual.
If you have any suggestions or would like to learn more details, please visit our website at:
http://www.hytera.com.
Instructions
Ensure the distance between the wireless devices and the mobile radio is within 10 meters during
operation.
Only use the wireless devices if traffic conditions permit safe use and check if local laws and
regulations restrict the use of wireless devices while driving.
Do not use the wireless earpiece during lightning storm to avoid malfunction.
FCC Warning:
This device complies with Part 15 of the FCC Rules. Operation is subject to the following two
conditions: (1) this device may not cause harmful interference, and (2) this device must accept any
interference received, including interference that may cause undesired operation.
Changes or modifications not expressly approved by the party responsible for compliance
could void the user's authority to operate the equipment.
NOTE: This equipment has been tested and found to comply with the limits for a
Class B digital device, pursuant to Part 15 of the FCC Rules. These limits are
designed to provide reasonable protection against harmful interference in a
residential installation. This equipment generates, uses and can radiate radio
frequency energy and, if not installed and used in accordance with the
instructions, may cause harmful interference to radio communications. However,
there is no guarantee that interference will not occur in a particular installation.
If this equipment does cause harmful interference to radio or television reception,
which can be determined by turning the equipment off and on, the user is
encouraged to try to correct the interference by one or more of the following
measures:
-- Reorient or relocate the receiving antenna.
-- Increase the separation between the equipment and receiver.
-- Connect the equipment into an outlet on a circuit different
from that to which the receiver is connected.
-- Consult the dealer or an experienced radio/TV technician for help.
RF Exposure Statement
To maintain compliance with FCC’s RF Exposure guidelines, This equipment should be installed
and operated with minimum distance between 20cm the radiator your body: Use only the supplied
antenna.
IC Caution:
- English:
This device complies with Industry Canada licence-exempt RSS standard(s).
Operation is subject to the following two conditions: (1) This device may not cause interference, and
(2) This device must accept any interference, including interference that may cause undesired
operation of the device.
- French:
Le présentappareilestconforme aux CNR d'Industrie Canada applicables aux appareils radio
exempts de licence. L'exploitationestautorisée aux deux conditions suivantes:
(1) l'appareil ne doit pas produire de brouillage, et
(2) l'utilisateur de l'appareildoit accepter tout brouillageradioélectriquesubi, mêmesi le brouillageest
susceptible d'encompromettre le fonctionnement.
4e édition Novembre 13, 2014
RSS-Gen Issue 4, November 13, 2014"&"CNR-Gen

1. Items in the Package
Please unpack carefully and make sure all items listed below are received. If any item is missing or
damaged, please contact your dealer.
No. Name Qty.
1 Wireless Audio Adapter 1
2 Owner’s Manual 1
Note
Wireless ring PTT mentioned in this manual is an optional accessory. Please contact us or your local
dealer for details.
2. Product Overview
This exquisite and low-powered wireless audio adapter is applicable to MD65X/MD78X conventional
mobile radios with firmware version of V7.00.10.000 and above.
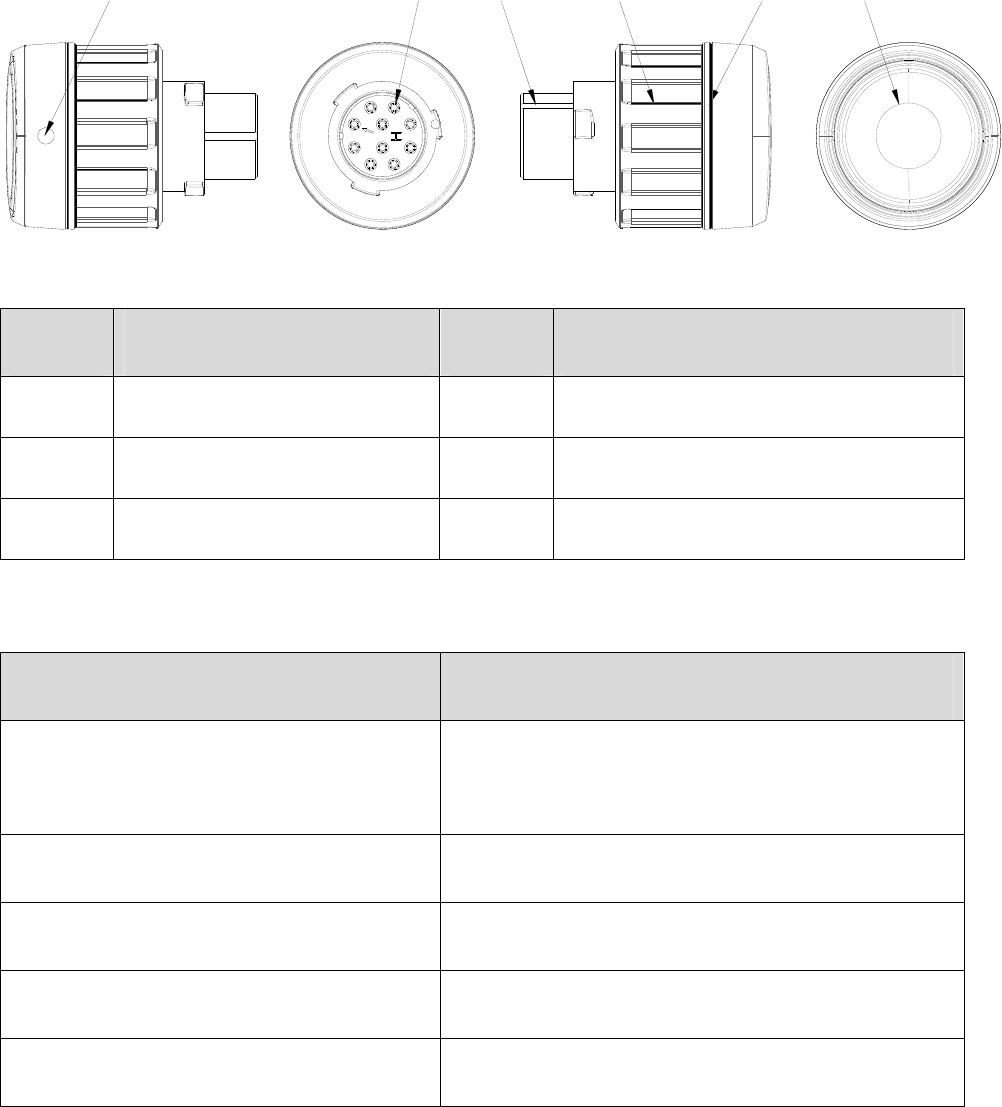
2.1 Product Controls
⑥
⑤
④
③
②
①
No. Part Name No. Part Name
1 Indication Point 4 Lock Knob
2 POGO Pin 5 LED Indicator
3 Aviation Connector 6 PTT (Push-to-talk)/Multi-functional Key
2.2 LED Indicator
LED Indication Wireless Audio Adapter Status
The LED indicator flashes red and blue
alternatively.
Pairing
The LED Indicator glows red. Transmitting
The LED indicator flashes blue twice rapidly. Connected with no voice
The LED indicator flashes blue once rapidly. Connected with voice
The LED indicator flashes blue slowly. Paired but not connected

LED Indication Wireless Audio Adapter Status
The LED Indicator glows blue. Waiting for pairing and connection of the wireless ring
PTT
3. Before Use
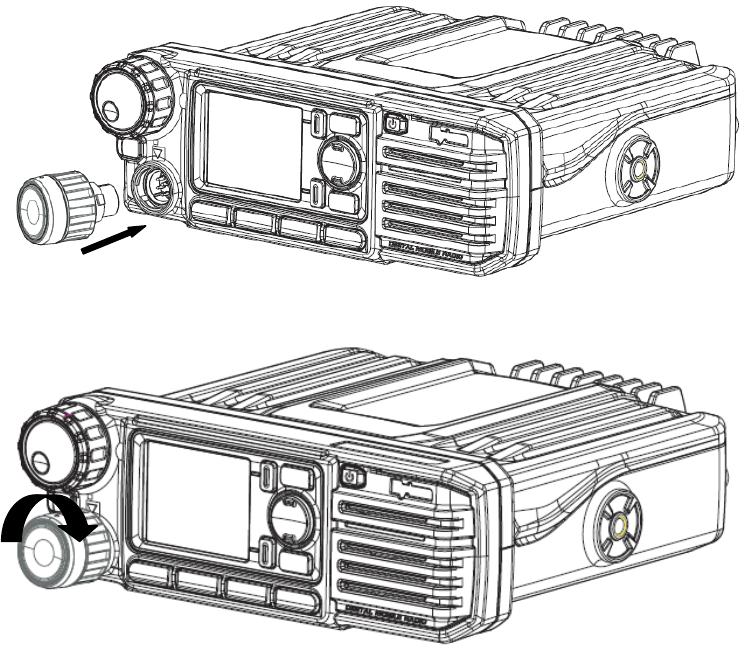
3.1 Installing Wireless Audio Adapter
Step 1 Make the indication point face upward, adjust the lock knob and fix the wireless audio adapter
into the remote speaker microphone connector properly.
Step 2 Rotate the lock knob clockwise to fasten it.

4. Basic Operations
4.1 Powering On/Off
Power On
Turn on the mobile radio.
The LED indicator flashes after the wireless audio adapter is powered on. Please refer to 2.2 LED
Indicator for details.
Power Off
Turn off the mobile radio.
4.2 Pairing with and Connecting to the Adapter
Pairing and connection involve the following situations. Please pair and connect the devices per actual
needs before use. Afterwards, the devices will be connected automatically upon power-on.
Wireless Device mentioned in this manual can be the wireless devices of the Company or other
companies, such as wireless earpiece, wireless remote speaker microphone, etc.
Caution
When the wireless audio adapter is connected to Wireless Device and wireless ring PTT, if any
device needs to be changed, the devices must be connected again following the steps below.
4.2.1 Using Wireless Audio Adapter with Wireless Device
Step 1 Turn off other devices connected to wireless audio adapter and Wireless Device.
Step 2 Turn on the mobile radio.
Step 3 Long press the PTT/Multi-functional Key of the wireless audio adapter until the LED indicator
flashes red and blue alternatively to enter pairing mode.
Step 4 Wireless Device enters pairing mode.
After successful pairing, Wireless Device will be connected to the wireless audio adapter
automatically. After successful connection, the LED indicator of the wireless audio adapter will
glow blue (waiting for pairing and connection of wireless ring PTT). About three minutes later,
the LED indicator of the wireless audio adapter will flash blue rapidly.
4.2.2 Using Wireless Audio Adapter with Wireless Device and Wireless
Ring PTT
Step 1 Turn off other devices connected to wireless audio adapter, Wireless Device and wireless ring
PTT.
Step 2 Turn off the wireless ring PTT.
Step 3 Turn on the mobile radio.
Step 4 Long press the PTT/Multi-functional Key of the wireless audio adapter until the LED indicator
flashes red and blue alternatively to enter pairing mode.
Step 5 Wireless Device enters pairing mode.
After successful pairing, Wireless Device will be connected to the wireless audio adapter
automatically. After successful connection, the LED indicator of the wireless audio adapter will
glow blue (waiting for pairing and connection of wireless ring PTT).
Step 6 Long press the + key and – key of the wireless ring PTT until the LED indicator glows blue to
enter pairing mode. After successful pairing, the wireless ring PTT will be connected to the wireless
audio adapter automatically.
After successful connection, the LED indicators of the wireless audio adapter and the wireless
ring PTT will flash blue rapidly.
4.2.3 Using Wireless Audio Adapter with Wireless Ring PTT
Step 1 Turn off other devices connected to wireless audio adapter and wireless ring PTT.
Step 2 Turn off the wireless ring PTT.
Step 3 Turn on the mobile radio.
Step 4 Long press the PTT/Multi-functional key of the wireless audio adapter until the LED
indicator flashes red and blue alternatively, then short press the PTT/Multi-functional key for three
times until the LED indicator glows blue to enter wireless ring PTT pairing mode.
Step 5 Long press the + key and – key of the wireless ring PTT until the LED indicator glows blue
to enter pairing mode.
After successful pairing, Wireless Device will be connected to the wireless audio adapter
automatically. After successful connection, the LED indicators of the wireless audio adapter
and the wireless ring PTT will flash blue rapidly.
4.3 Transmitting
Hold down the PTT/Multi-functional key of the wireless audio adapter to transmit.

5. Troubleshooting
Phenomena Analysis Solution
Fail to reconnect
automatically.
The device may be out of
communication range.
Make sure the device is within communication
range and pair again. (Max communication
distance is 10 meters when there is no
obstacle. Communication distance will be
shortened when there is obstacle.)
Noise in
communication.
The device may be out of
communication range.
Make sure the device is within communication
range.
LED indicator does
not glow red when
holding down the PTT
key.
If the above solutions cannot fix your problems, or you may have some other queries, please contact us
or your local dealer for more technical support.

6. Care and Cleaning
To guarantee optimal performance as well as a long service life of the product, please follow the tips
below.
Product Care
Do not pierce or scrape the product.
Keep the product far away from substances that can corrode the circuit.
Product Cleaning
Caution
Turn of the wireless audio adapter before cleaning.
Clean up the dust and fine particles on the product surface and charging piece with a clean and dry
lint-free cloth or a brush regularly.
Use neutral cleanser and a non-woven fabric to clean the keys and front case after long-time use. Do
not use chemical preparations such as stain removers, alcohol, sprays or oil preparations, so as to
avoid surface case damage.
Make sure the product is completely dry before use.