Hytera Communications ADN02 Wireless Audio Adapter User Manual
Hytera Communications Corporation Ltd. Wireless Audio Adapter Users Manual
Users Manual
DN-02
OWNER’S MANUAL
2014
Hyte ra C ommunicatio ns C orporatio n Li mited.
Hyte ra C ommunicatio ns C orporatio n Li mited.
O10745 C 10 52 4 Z04313
8110000006910
A
1
Preface
Thanks for your favor in our product. To
derive optimum performance from the
product, please read this manual carefully
before use.
This manual is applicable to the following
product:
ADN-01 Wireless Audio Adapter (PD70X
series)
ADN-02 Wireless Audio Adapter (PD60X
series)
ESW01 Wireless Earpiece
Disclaimer
Hytera Communications Corporation Limited
(the Company) endeavors to achieve the
accuracy and completeness of this manual,
but no warranty of accuracy or reliability is
given. All the specifications and designs
are subject to change without notice due
to continuous technology development. No
part of this manual may be copied, modied,
translated, or distributed in any manner
without the express written permission of us.
If you have any suggestions or would like to
learn more details, please visit our website
at: http://www.hytera.com.
Instructions
●Ensure the distance between the
wireless earpiece and the radio is within
10 meters during operation.
●Only use the wireless earpiece if trafc
conditions permit safe use and check
if local laws and regulations restrict the
use of wireless earpiece while driving.
●Do not use the wireless earpiece
during lightning storm weather to avoid
malfunction.
●Exposure to loud noise from any
source for extended periods of time
may temporarily or permanently affect
your hearing. Use as low a volume as
possible and avoid prolonged wearing.

2
Items in the Package
Please unpack carefully and check that all
items listed below are received. If any item
is missing or damaged, please contact your
dealer.
No. Name Qty.
1 Wireless Earpiece 1
2 Earhook 1
3 Rubber Ear Cushion 3
4Wireless Audio Adapter 1
5 Owner’s Manual 1
Function Overview
This exquisite, easy-wearing and low-
powered wireless kit is applicable to Hytera
portable radios with rmware version of 5.05
and above.
With Hands-free function, you can have
convenient and safe communication within a
distance of 10 meters from the radio.
3
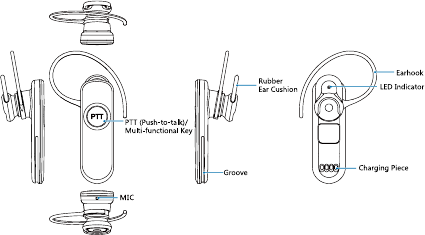
Product Overview
Wireless Earpiece
4
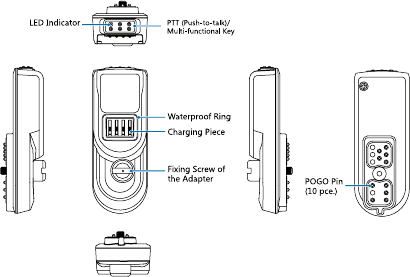
Wireless Audio Adapter
5
Specication
Talk Time >4 hours
D u s t/W a t e r
P r o t e c t i o n
Class
IP54
Operation
Temperature
Wireless Earpiece: -20˚C to
+60˚C
Wireless Audio Adapter:
-25˚C to +65˚C
Storage
Temperature
Wireless Earpiece: -40˚C to
+75˚C
Wireless Audio Adapter:
-40˚C to +75˚C
Charging the Wireless
Earpiece
Note:
●To charge the wireless earpiece,
simply connect it to the adapter on
the radio. It is recommended to use
the high-capacity battery specified
by the Company to ensure the
optimal operation duration of the
radio.
●Charging the wireless earpiece will
not affect the radio operation.
●If the earpiece is idle for a long
time, charge it at least once within
three months.
●If the LED indicator does not glow
red while the wireless earpiece is
being charged, charge the earpiece
for 10 to 20 minutes for it to
recover to normal status.
Charge the wireless earpiece before use.
The LED indicator of the wireless earpiece
glows red during charging and glows blue
when the wireless earpiece is fully charged.
Also, the LED indicator indicates the pairing
and connection status. Please refer to LED
Indication for details.
6
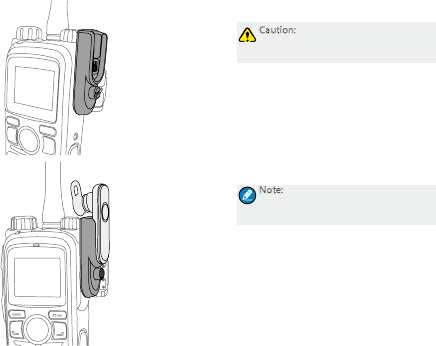
3. Turn on the radio.
Caution: The wireless earpiece can be
charged only when the radio is powered
on.
2. Fix the wireless
earpiece into the
wireless audio
adapter.
Make sure the
wireless earpiece
is fully xed into
the adapter.
Pairing with and
Connecting to the Adapter
Before initial use, the wireless earpiece
needs to be paired with and connected to
the adapter automatically. Afterwards, the
wireless earpiece can be connected to the
adapter automatically upon power-on.
Note: Wireless ring PTT is an optional
accessory. Please contact us or your
local dealer for details.
Auto Pairing and Connection
When the wireless earpiece is connected
to the adapter for initial use, the wireless
earpiece will be paired with and connected
to the adapter automatically.
1. Connect the
wireless audio
adapter to the
radio and secure
the screw to
fasten it.
7
»When there is a wireless ring PTT
available for pairing and connection
an d i t i s pa i re d a nd c o nn ec t ed
successfully, the LED indicator of the
adapter ashes blue rapidly.
»When there is a wireless ring PTT
available for pairing and connection
but it is not paired and connected
successfully, the adapter will exit the
pairing and connection mode of the
wireless ring PTT after about three
minutes, and the LED indicator of the
adapter flashes blue rapidly at the
same time.
»When there is no wireless ring PTT
available for pairing and connection,
the adapter will exit the pairing and
connect ion mode of the wireless
ring PTT after about three minutes,
and the LED indicator of the adapter
ashes blue rapidly at the same time.
1. Disconnect the wireless earpiece from
other devices (excluding wireless ring
PTT).
2. Connect the wireless earpiece with
the radio. See Charging the Wireless
Earpiece for details.
3. Turn on the radio, and the wireless
earpiece will be powered up.
4. The wireless earpiece will be paired
with and connected to the adapter
automatically.
1. Pairing mode: The LED indicator of
the wireless earpiece/adapter ashes
red and blue alternatively.
2. Connection status: When the
connection is completed, the LED
indicator of the wireless earpiece
flashes blue rapidly and the LED
indicator of the adapter glows blue
(waiting for pairing and connection of
the wireless ring PTT).
8
Manual Pairing and Connection
Scenario One
When the wireless earpiece is not connected
to the adapter for initial use, the wireless
earpiece needs to be paired with and
connected to the adapter manually.
1. Disconnect the wireless earpiece from
other devices (excluding wireless ring
PTT).
2. Connect the wireless audio adapter to
the radio and secure the screw to fasten
it.
3. Turn on the radio, and the wireless audio
adapter will be powered up.
4. Long press the PTT/ Multi-functional
key of the wireless earpiece and wireless
audio adapter respectively until the LED
indicators ash red and blue alternatively
to enter the pairing mode. Then release
the PTT/ Multi-functional key.
For LED indications of the wireless
earpiece and wireless audio adapter after
the connection is completed, please see
sub-step 2 of Step 4 in Auto Pairing and
Connection.
Scenario Two
When the wireless earpiece is paired with
and connected to the adapter, if you want to
add or replace the wireless ring PTT, you will
need to connect the wireless earpiece to the
wireless ring PTT manually.
1. Disconnect the wireless earpiece from
other devices (excluding wireless ring
PTT).
2. Long press the PTT/ Multi-functional
key of the wireless audio adapter and
then turn on the radio. Do not release the
PTT/ Multi-functional key of the wireless
audio adapter until the LED indicator of
the wireless audio adapter flashes red
and blue alternatively to enter the pairing
mode.
3. Long press the PTT/ Multi-functional
9
key of the wireless earpiece and the
+ key and – key of the wireless ring
PTT until the LED indicator of the
wireless earpiece flashes red and blue
alternatively and the LED indicator of the
wireless ring PTT glows blue to enter the
pairing mode.
The LED indicators of the wireless
earpiece, wireless audio adapter and
wireless ring PTT ash blue rapidly after
the connection is completed.
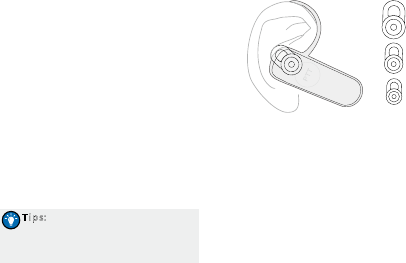
Wearing the Wireless
Earpiece
Tips: There are three rubber ear
cushions with different sizes provided
with the wireless earpiece for your
comfortable wearing.
Wear the wireless earpiece after the
connection is completed. Adjust the rubber
ear cushion to position it into your ear
canal, and adjust the earhook to secure the
earpiece.
Transmitting
After detaching the wireless earpiece
from the adapter, you can hold down the
PTT/ Multi-functional key on the wireless
earpiece or the PTT/ Multi-functional key
on the adapter to make a call.
Powering On/Off
The wireless earpiece will give ring indication
(you can hear it only when you are wearing
the wireless earpiece) upon power-on/off.
Powering On
10
●Automatic power-on: When attached
to the radio via the adapter, the
wireless earpiece will be powered on
automatically when the radio is turned
on.
●Manual power-on: When the wireless
earpiece is not attached with the
adapter, you can power on the wireless
earpiece by long pressing the PTT/
Multi-functional key on it. The adapter
can be powered on by turning on the
radio only.
The LED indicator ashes after the wireless
earpiece is powered on. Please refer to LED
Indication for indication details.
Powering Off
To power off the adapter, turn off the radio.
To power off the wireless earpiece, long
press the PTT/ Multi-functional key after
the wireless connection is disconnected
(the LED indicator ashes blue slowly) and
release the PTT/ Multi-functional key when
the LED indicator glows red.

11
LED Indication
LED Indication Wireless Earpiece Status Adapter Status
The LED indicator ashes red and
blue alternatively.
Pairing Pairing
The LED indicator glows red. ●Transmitting
●Charging
Transmitting
The LED indicator ashes red. Low battery power /
The LED indicator ashes blue
twice rapidly.
Connected with no voice Connected with no voice
The LED indicator ashes blue
once rapidly.
Connected with voice Connected with voice
The LED indicator ashes blue
slowly.
Paired but not connected Paired but not connected
The LED indicator glows blue. Fully charged Waiting for pairing and
connection of the wireless
ring PTT

12
Troubleshooting
Phenomena Analysis Solution
The LED indicator does not glow
red while the wireless earpiece is
being charged.
The battery power of the
wireless earpiece may run
out completely.
Charge the wireless earpiece
for 10 to 20 minutes.
The wireless earpiece cannot pair
with the adapter.
The wireless earpiece or the
adapter may pair with other
wireless devices.
Move away from other
wireless devices and restart
the radio to pair the wireless
earpiece with the adapter.
FCC Statement
Changes or modifications not expressly approved by the party responsible for compliance could
void the user’s authority to operate the equipment.
This device complies with part 15 of FCC Rules. Operation is subject to the following two
conditions:
(1) This device may not cause harmful interference, and
(2) This device must accept any interference received, including interference that may
cause undesired operation
Note: This equipment has been tested and found to comply with the limits for a Class B digital
device, pursuant to part 15 of the FCC Rules. These limits are designed to provide reasonable
protection against harmful interference in a residential installation. This equipment generates,
uses and can radiate radio frequency energy and, if not installed and used in accordance with
the instructions, may cause harmful interference to radio communications. However, there is
no guarantee that interference will not occur in a particular installation. If this equipment does
cause harmful interference to radio or television reception, which can be determined by turning
the equipment off and on, the user is encouraged to try to correct the interference by one or
more of the following measures:
—Reorient or relocate the receiving antenna.
—Increase the separation between the equipment and receiver.
—Connect the equipment into an outlet on a circuit different from that to which the receiver is
connected.
—Consult the dealer or an experienced radio/TV technician for help.
This equipment complies with FCC radiation exposure limits set forth for an uncontrolled
environment.
This transmitter must not be co-located or operating in conjunction with any other antenna or
transmitter.
IC statement
This device complies with Industry Canada licence-exempt RSS standard(s). Operation is
subject
to the following two conditions:
(1) This device may not cause interference, and
The device compliance with
(2) This device must accept any interference, including interference that may cause
undesired operation of the Device.
information on RF exposure and compliance
Le présent appareil est conforme aux CNR d'Industrie Canada applicables aux appareils
radio exempts de licence. L'exploitation est autorisée aux deux conditions suivantes :
(1) l'appareil nedoit pas produire de brouillage, et
(2) l'utilisateur de l'appareil doit accepter tout brouillage radioélectrique subi, même si le
brouillage est susceptible d'en compromettre le fonctionnement.
Après examen de ce matériel aux conformité aux limites DAS et/ou aux limites d’intensité
de champ RF, les utilisateurs peuvent sur l’exposition aux radiofréquences et la
conformité and compliance d’acquérir les informations correspondantes
Under Industry Canada regulations, this radio transmitter may only operate using an
antenna of a type and maximum (or lesser) gain approved for the transmitter by
Industry Canada. To reduce potential radio interference to other users, the antenna
type and its gain should be so chosen that the equivalent isotropically radiated power
(e.i.r.p.) is not more than that necessary for successful communication.
Conformément à la réglementation d'Industrie Canada, le présent émetteur radio peut
fonctionner avec une antenne d'un type et d'un gain maximal (ou inférieur) approuvé
pour l'émetteur par Industrie Canada. Dans le but de réduire les risques de
brouillage radioélectrique à l'intention des autres utilisateurs, il faut choisir le type
d'antenne et son gain de sorte que la puissance isotrope rayonnée équivalente (p.i.r.e.)
ne dépasse pas l'intensité nécessaire à l'établissement d'une communication
satisfaisante.
SAR limits, users can obtain Canadian