Hytera Communications BD30XU1 Digital Portable Radio User Manual
Hytera Communications Corporation Limited Digital Portable Radio Users Manual
User Manual
Preface
Thanks for your favor in our product. This manual provides guidance for you to use the product. To avoid
body injury or property loss caused by misoperation, please carefully read the Safety Information
Booklet before using the product.
This manual is applicable to the following product:
BD30X Digital Portable Radio (X may represent 2, 5, 6 or 8)
Copyright Information
Hytera is the trademark or registered trademark of Hytera Communications Corporation Limited (the
Company) in PRC and/or other countries or areas. The Company retains the ownership of its trademarks
and product names. All other trademarks and/or product names that may be used in this manual are
properties of their respective owners.
The product described in this manual may include the Company's computer programs stored in memory
or other media. Laws in PRC and/or other countries or areas protect the exclusive rights of the Company
with respect to its computer programs. The purchase of this product shall not be deemed to grant, either
directly or by implication, any rights to the purchaser regarding the Company's computer programs. Any
of the Company's computer programs may not be copied, modified, distributed, decompiled, or
reverse-engineered in any manner without the prior written consent of the Company.
Disclaimer
The Company endeavors to achieve the accuracy and completeness of this manual, but no warranty of
accuracy or reliability is given. All the specifications and designs are subject to change without notice
due to continuous technology development. No part of this manual may be copied, modified, translated,
or distributed in any manner without the prior written consent of the Company.
We do not guarantee, for any particular purpose, the accuracy, validity, timeliness, legitimacy or
completeness of the Third Party products and contents involved in this manual.
If you have any suggestions or would like to learn more details, please visit our website at:
http://www.hytera.com.
FCC Statement
The interference by one or more of the following measures:
Reorient or relocate the receiving antenna. Increase the separation between the
equipment and receiver.
Connect the equipment into an outlet on a circuit different from that to which the receiver
is connected.
communicat
if not installed and used
y and, if not installed and
installation. This equipm
ce in a residential
mply with
This equipment has been tested and found to co
These limits are designed to provide reasonable protection against harmful
ent generates and can radiate radio frequency
in accordance with the instructions, may cause harmful interference
ions. However, there is no guarantee that interference will not occur in a particular
installation. If this equipment does cause harmful interference to radio or television reception, which can
be determined by turning the equipment off and on, the user is encouraged to try to correct.
90 of Fpart CC Rules.
interferen
energ
to radio
Consult the dealer or an experienced radio/TV technician for help.
Operation is subject to the following two conditions: 1. This device may not cause harmful interference,
and 2. This device must accept any interference received, including interference that may cause
undesired operation.
Note: Changes or modifications to this unit not expressly approved by the party responsible for
compliance could void the user’s authority to operate the equipment.
Compliance with RF Exposure Standards
Hytera's portable radio complies with the following RF energy exposure standards and guidelines:
United States Federal Communications Commission, Code of Federal Regulations; 47 CFR
§ 1.1307, 1.1310 and 2.1093
American National Standards Institute (ANSI) / Institute of Electrical and Electronic
Engineers (IEEE) C95. 1:2005; Canada RSS102 Issue 5 March 2015.
Institute of Electrical and Electronic Engineers (IEEE) C95.1:2005 Edition
RF Exposure Compliance and Control Guidelines and
Operating Instructions
To control your exposure and ensure compliance with the occupational/controlled environment
exposure limits always adhere to the following procedures.
Guidelines:
Do not remove the RF Exposure Label from the device.
User awareness instructions should accompany device when transferred to other users.
Do not use this device if the operational requirements described herein are not met.
Operating Instructions:
Transmit no more than the rated duty factor of 50% of the time. To transmit (talk), push the
Push-To-Talk (PTT) button. To receive calls, release the PTT button. Transmitting 50% of
the time, or less, is important because this radio generates measurable RF energy
exposure only when transmitting (in terms of measuring for standards compliance).
Hold the radio in a vertical position in front of face with the microphone (and the other parts
of the radio, including the antenna) at least one inch (2.5 cm) away from the nose. Keeping
the radio at the proper distance is important because RF exposures decrease with distance
from the antenna. Antenna should be kept away from eyes.
When worn on the body, always place the radio in a Hytera's approved clip, holder, holster,
case, or body harness for this product. Using approved body-worn accessories is important
because the use of Hytera's or other manufacturer's non-approved accessories may result
in exposure levels, which exceed the FCC's occupational/controlled environment RF
exposure limits.
If you are not using a body-worn accessory and are not using the radio in the intended use
position in front of the face, then ensure the antenna and the radio are kept at least 2.5 cm
(one inch) from the body when transmitting. Keeping the radio at the proper distance is
important because RF exposures decrease with increasing distance from the antenna.
Use only manufacturer's name approved supplied or replacement antennas, batteries, and
accessories. Use of non-manufacturer-name approved antennas, batteries, and
accessories may exceed the FCC RF exposure guidelines.
Contact your local dealer for the optional accessories of the product.
IC Statement
The device has been tested and compliance with SAR limits, users can obtain Canadian information on
RF exposure and compliance
Après examen de ce matériel aux conformité aux limites DAS et/ou aux limites d’intensité de champ RF,
les utilisateurs peuvent sur l’exposition aux radiofréquences et la conformité and compliance d’acquérir
les informations correspondantes
This device complies with Industry Canada license-exempt RSS standard(s). Operation is subject to the
following two conditions:
(1) this device may not cause interference, and
(2) this device must accept any interference, including interference that may cause undesired operation of the device.
Le présent appareil est conforme aux CNR d'Industrie Canada applicables aux appareils radio exempts
de licence. L'exploitation est autorisée aux deux conditions suivantes: (1) l'appareil ne doit pas produire
de brouillage, et (2) l'utilisateur de l'appareil doit accepter tout brouillage radioélectrique subi, même si le
brouillage est susceptible d'en compromettre le fonctionnement
EU Regulatory Conformance
As certified by the qualified laboratory, the product is in compliance with the essential requirements and
other relevant provisions of the following directives:
1999/5/EC or 2014/53/EU
2006/66/EC
2011/65/EU
2012/19/EU
Please note that the above information is applicable to EU countries only.
1
1. Items in the Package
Please unpack carefully and check if all items listed below are received. If any item is missing or
damaged, please contact your dealer.
Item
Quantity (PCS)
Item
Quantity (PCS)
Radio
1
Belt Clip
1
Battery
1
Strap
1
Power Adapter
1
Documentation Kit
1
Antenna
1
/
/
Note
The frequency band is marked on the label of antenna; if it is unavailable there, see the label on the
radio.
2
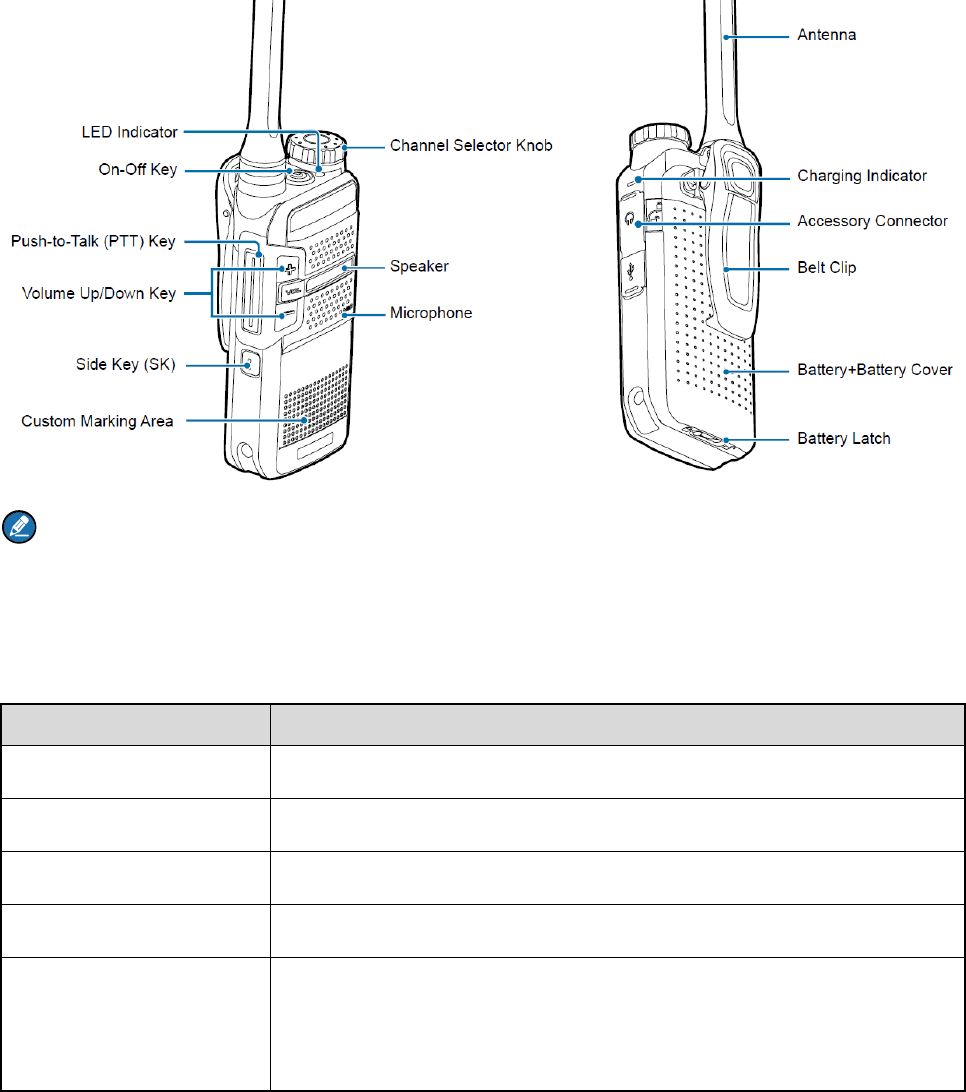
2. Product Overview
2.1 Product Controls
Note
For your convenience, you may request your dealer to program the SK as the shortcut to a radio
feature.
2.2 LED Indication
LED Indicator
Radio Status
Flashes green
Being turned on.
Glows green
Receiving.
Glows red
Transmitting.
Flashes orange slowly
Scanning.
Glows orange
Call hang time: No voice is being transmitted or received on the channel
during a call. Within such a period, you can hold down the PTT key to
speak.

3
3. Before Use
3.1 Attaching the Antenna
Step 1 Place the antenna in its receptacle.
Step 2 Rotate the antenna clockwise.
Caution
Do not hold the radio by its antenna; otherwise, the radio performance may be reduced and the life span
of the antenna may be shortened.
3.2 Attaching the Battery
Step 1 Slide the battery latch to the unlock position, and remove the battery cover.
Step 2 Align the battery contacts with the contacts in the battery compartment, and press the battery
into place.
Step 3 Insert the two protrusions at the top of the battery cover into the radio, and press the cover into
palce.
Step 4 Slide the battery latch to the lock position.
Note
To remove the battery, make sure that the radio is turned off, remove the battery cover, and lift the
bottom of the battery.
3.3 Attaching the Belt Clip
Step 1 Unfasten the two screws on the back of the radio.
Step 2 Align the screw holes on the belt clip with those on the back of the radio.
Step 3 Tighten the screws.
3.4 Attaching the Audio Accessories
Step 1 Open the accessory connector cover.
Step 2 Plug the accessory into the accessory connector.
Step 3 Rotate the accessory plug clockwise into place.

4
3.5 Charging the Battery
Be sure to charge the battery fully before initial use, since reduction of state of charge (SoC) may lead to
low battery alarm. It is recommended that your radio remain powered off during charging.
To charge the battery, insert the USB plug of the power adapter into the USB connector of the radio, and
then connect the power adapter to the main supply.
The charging indicator on the radio shows the charging status. For details, see the following table.
Charging Indicator
Charging Status
Glows red
The battery is charging.
Glows green
The battery is fully charged.
3.6 Checking the Battery Power
You can check the current battery power by holding down the Battery Power Indicator key
programmed by your dealer, and release the key to exit. The following table lists battery power
indications:
LED Indicator
Alert Tone
Battery Power
Glows green
Three beeps
High
Glows orange
Two beeps
Medium
Glows red
One beep
Low
Flashes red
Low battery tone
Under the low battery threshold. Please
recharge or replace the battery.

5
4. Basic Operations
If you want to…
Do this…
Turn on/off the radio
Press the On-Off key.
Increase the volume
Press the Volume Up key.
Decrease the volume
Press the Volume Down key.
Select a channel
Rotate the Channel Selector knob.
6
5. Call Services
5.1 Call on Digital Channel
On the digital channel, you can initiate or respond to a group call or private call. A group call is a call from
an individual user to a group of users. A private call is a call from an individual user to another individual
user.
5.1.1 Initiating a Call
Step 1 Select the required channel.
Step 2 Hold the radio vertically 2.5 to 5 cm from your mouth.
Step 3 Hold down the PTT key and speak when the radio is in standby mode.
5.1.2 Receiving and Responding to a Call
When receiving a call, you can listen to it without any operation. You can hold down the PTT key to
respond within the preset time period.
5.2 Call on Analog Channel (Without Signaling)
A call on analog channel is from an individual user to all users on the channel. The operations are the
same as the call on digital channel.

7
6. Optional Features
The following features need to be programmed by your dealer. Please contact your dealer for detailed
operations.
Type
Feature
Description
Radio
Feature
Zone
Allows you to select a zone. The radio supports up to 3 zones, with a
maximum of 16 channels per zone.
Power Level
Allows you to switch the transmit power level between high and low.
Scan
Allows the radio to scan all channels in the scan list programmed for
the current channel.
Emergency Alarm
Allows you to initiate an emergency alarm or call at any time to ask for
help in case of emergencies.
Busy Channel
Lockout
Prevents the radio from transmitting on a busy channel.
Time-out Timer
(TOT)
Terminates transmission when the preset time period expires.
Battery Save
Allows the radio to automatically enter the battery save mode when
detecting no activity or operation within a certain time period.
Digital
Feature
One Touch Call
Allows you to press one key to call the predefined private or group
contact.
All Call
Allows you to initiate a call to all users on the channel.
TDMA Direct Mode
Allows the radio to operate on a channel with two time slots.
Analog
Feature
Squelch Off
Allows the radio's speaker to always keep unmuted.
Squelch Level
Allows you to adjust the squelch threshold required for the radio to
unmute.
Monitor
Allows the radio to monitor activities on the channel.
CTCSS/CDCSS
Allows you to prevent unwanted calls on the same frequency.

8
7. Troubleshooting
Phenomena
Analysis
Solution
The radio cannot
be turned on.
The battery may be installed
improperly.
Remove and reattach the battery.
The battery power may run out.
Recharge or replace the battery.
The battery may suffer from
poor contact caused by dirtied
or damaged battery contacts.
Clean the battery contacts or replace the
battery.
During receiving,
the voice is weak,
discontinuous or
totally inactive.
The battery voltage may be
low.
Recharge or replace the battery.
The volume level may be low.
Increase the volume by rotating the Volume
Control Knob.
The antenna may get loose or
may be installed improperly.
Turn off the radio, and remove and reattach
the antenna.
The speaker may be blocked.
Clean the surface of the speaker.
You cannot
communicate with
other group
members.
The frequency or signaling may
be inconsistent with that of
other members.
Set your TX/RX frequency and signaling to the
same as those of other members.
The channel type (digital or
analog) may be set
inconsistently.
Make sure all members are on the same
digital or analog channel.
You may be too far away from
other members.
Move towards other members.
Irrelevant voices or
noise is heard on
the channel.
You may be interrupted by
radios using the same
frequency.
Change the frequency, or adjust the squelch
level.
The radio in analog mode may
be set with no signaling.
Set signaling for all radios operating at the
same frequency to avoid interference.

9
Phenomena
Analysis
Solution
The noise is too
loud.
You may be too far away from
other members.
Move towards other members.
You may locate in an
unfavorable position. For
example, your communication
may be blocked by high
buildings or frustrated in the
underground areas.
Move to an open and flat area, and restart the
radio to try again.
You may suffer from external
disturbance (such as
electromagnetic interference).
Stay away from equipment that may cause
interference.
If the above solutions cannot fix your problems, or you may have some other queries, please contact us
or your local dealer for more technical support.

10
8. Care and Cleaning
To guarantee optimal performance as well as a long service life of the product, please follow the tips
below.
Product Care
Do not pierce or scrape the product.
Keep the product far away from substances that can corrode the circuit.
Do not hold the product by its antenna or earpiece cable.
Close the accessory connector cover when no accessory is in use.
Product Cleaning
Caution
Turn off the product and remove the battery before cleaning.
Clean up the dust and fine particles on the product surface and charging piece with a clean and dry
lint-free cloth or a brush regularly.
Use neutral cleanser and a non-woven fabric to clean the keys, knobs and front case after long-time
use. Do not use chemical preparations such as stain removers, alcohol, sprays or oil preparations, so
as to avoid surface case damage.
Make sure the product is completely dry before use.

11
9. Optional Accessories
Contact your local dealer for the optional accessories of the product.
Caution
Use the accessories specified by the Company only; otherwise, the Company shall not be liable for
any loss or damage arising out of use of unauthorized accessories.