Hytera Communications MD78XIVHF Digital Mobile Radio User Manual My
Hytera Communications Corporation Limited Digital Mobile Radio My
User Manual

QUICK REFERENCE GUIDE
MD78XL DIGITAL MOBILE RADIO
Product Overview
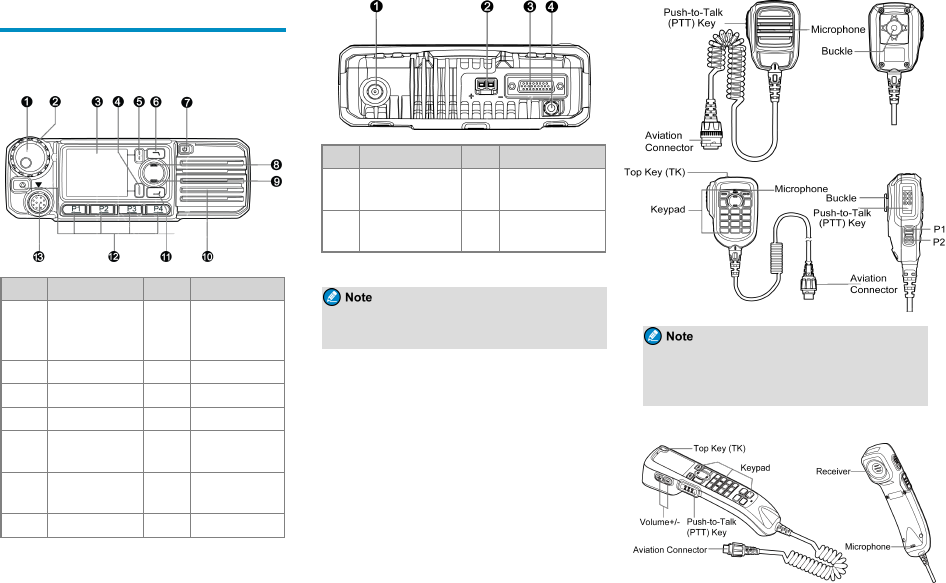
Product Layout
Front Panel
No. Part Name No. Part Name
1
Volume Control &
Channel/Group
Selector Knob
8 Up Key
2 LED Indicator 9 Down Key
3 LCD Display 10 Speaker
4 OK/Menu Key 11 P5/Answer Key
5Back/Subgroup
Key 12 Programmable
Keys
6 P6/End Key 13 Aviation
Connector
7 On-Off Key / /
Rear Panel
No. Part Name No. Part Name
1RF Antenna
Connector 3Accessory
Connector
2 Power Inlet 4 GPS Antenna
Connector
The GPS antenna connector is used only by radios
with the GPS feature.
Palm Microphone
The palm microphone without keypad is available
for the digital radio and the one with keypad is for
the trunking radio.
Handset
1
The handset is available only for the duplex radio.
Programmable Keys
You can request your dealer to program the following
keys as shortcuts to assignable radio features:
lMobile radio: P1 key, P2 key, P3 key, P4 key, TK,
P5/Answer key, P6/End key, Up key, and Down key.
lPalm microphone with keypad: TK,P1 key, and P2
key.
lHandset: Same as the mobile radio.
Installation
Instructions
Before installing the radio in a vehicle, read the following
instructions carefully:
lThe radio must work with a 13.6V ± 15% negative
ground electrical system only. Ensure to check the
polarity and voltage of the vehicle power supply.
lCheck how long the screws will extend from the
bottom surface of the radio. Drill the mounting hole
cautiously to avoid damage to the vehicle wiring and
other parts.
lConnect the antenna and power cord to the radio
before you install the radio in the bracket. Use the
antenna and power cord authorized by the Company
only.
lInstall the radio with the mounting bracket supplied by
the Company to avoid radio looseness in case of
accidents. The loose radio may cause bodily injury.
lInstall the radio in a location where you can reach the
front panel conveniently.
lKeep sufficient clearance at the back of the radio for
wiring.
lBe sure to use the fuse with the same specification for
the DC power cord upon replacement.
lEnsure that the antenna of the radio must be no less
than 10 meters away from that of other RF devices.
Tools
lElectric drill
lCross head screwdriver
lT20 torx screwdriver
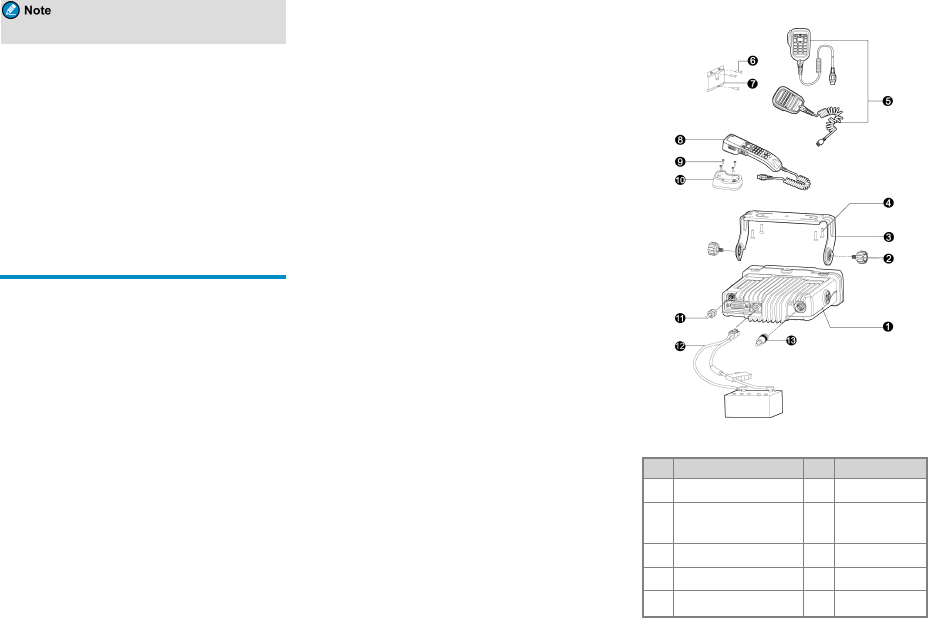
Parts
NO. Part Name NO. Part Name
1 Mobile Radio 8 Handset
2 Locking Knob 9 Screw (4 mm x
16 mm)
3 Mounting Bracket 10 Handset Hanger
4 Screw (4.8 mm x 20 mm) 11 GPS Antenna
5 Palm Microphone 12 Power Cord (with
2
●As the manufacturer declare, the installation of
EUT is for built-in, only front enclosure can be touch-
ed, others parts can’t be touched.
NO. Part Name NO. Part Name
fuse)
6 Screw (4 mm x 16 mm) 13 RF Antenna
7 Microphone Hanger / /
lThe RF antenna should be purchased separately.
lThe GPS antenna is available only for radios
with the GPS feature.
lThe palm microphone without keypad (with ⑥
and ⑦) is available for the digital radio and the
one with keypad (with ⑥and ⑦) is for the
trunking radio. The handset (with ⑨and ⑩) is
for the duplex radio.
Procedure
1. Select a location, drill holes based on the shape of the
mounting bracket, and then use the screws (4.8 mm x
20 mm) to secure the bracket.
2. Connect the RF antenna, GPS antenna,and power
cord to the radio.
3. Slide the radio into the mounted bracket and secure it
using the locking knobs.
4. Install the microphone hanger in a location where
you can reach it easily, and use the screws (4 mm x
16 mm) to secure it.
5. Align the triangle index on the palm microphone or
the handset with the installation index, plug the
connector into the radio, and rotate the connector
clockwise to secure it.
6. Place the palm microphone or the handset on the
hanger when you do not use it.
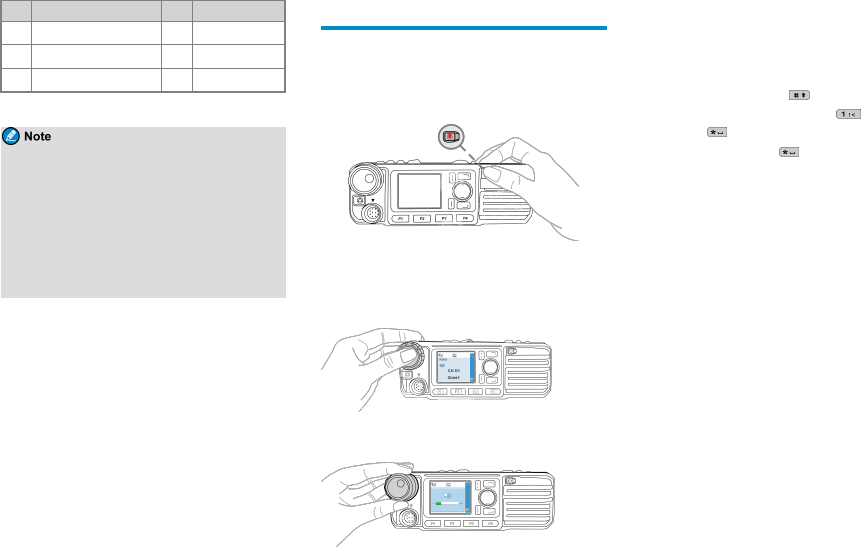
Basic Operations
Turning the Radio On or Off
To turn the radio on, long press the On-Off key.
To turn the radio off, press the On-Off key.
Adjusting the Volume
1. Press the Volume Control knob to switch to volume
control mode.
2. Rotate the Volume Control knob to adjust the
volume.
Using the Keypad
You can use the keypad on the palm microphone or the
handset to edit user aliases or IDs and text messages.
lTo switch the input method between alphabetic mode
and numeric mode, press .
lTo enter special characters, press in alphabetic
mode or in numeric mode.
lTo enter a space, press in alphabetic mode.
Switching the Operation Mode
The radio can operate in conventional or trunking mode.
In conventional mode, you can receive and transmit voice
and data after selecting the required channel. In trunking
mode, you can receive and transmit voice and data after
the radio registers with the base station (BS)successfully.
lTo manually switch the operation mode, go to
Mode>Manual Switch, or press the preprogrammed
Operation Mode Switch key.
lTo allow the radio to automatically switch to
conventional mode when the signal drops below the
preset level in trunking mode, go to Mode>Auto
Switch , or press the preprogrammed Mode
Automatic Switch key.
Conventional Mode
In conventional mode, the radio receives and transmits
data and voice on the selected channel.
Selecting Zones and Channels
A channel is used to receive and transmit data and voice.
A zone is a group of channels within the same operational
area. The radio supports up to 64 zones, each of which
contains up to 256 channels.
3
To receive and transmit data and voice, do as follows:
1. Select a zone in either of the following ways:
lOn the Zone menu, press the Up or Down key to
select a zone, and then press the OK/Menu key.
lPress the preprogrammed Zone Up or Zone
Down key.
2. Select a channel in one of the following ways:
lRotate the Channel Selector knob.
lPress the preprogrammed Channel Up or
Channel Down key.
lPress the preprogrammed Preset Channel key.
If the Voice Notify feature is enabled by your
dealer, the radio announces the channel number
upon channel switching.
Trunking Mode
In trunking mode, the radio communicates with each
other through base stations after successful registration.
The radio can communicate with a group of radios or a
single radio.
Selecting Subgroups
A subgroup is a group of group or private contacts. To
select a subgroup, do either of the following:
lPress the Back/Subgroup key and then press the Up
or Down key.
lPress the preprogrammed Subgroup Up or Subgroup
Down key.
Selecting Group or Private Contacts
lRotate the Group Selector knob.
lPress the Back/Subgroup key and then press the Up
or Down key to select from the member list.
lPress the preprogrammed Group/Private Up or
Group/Private Down key.
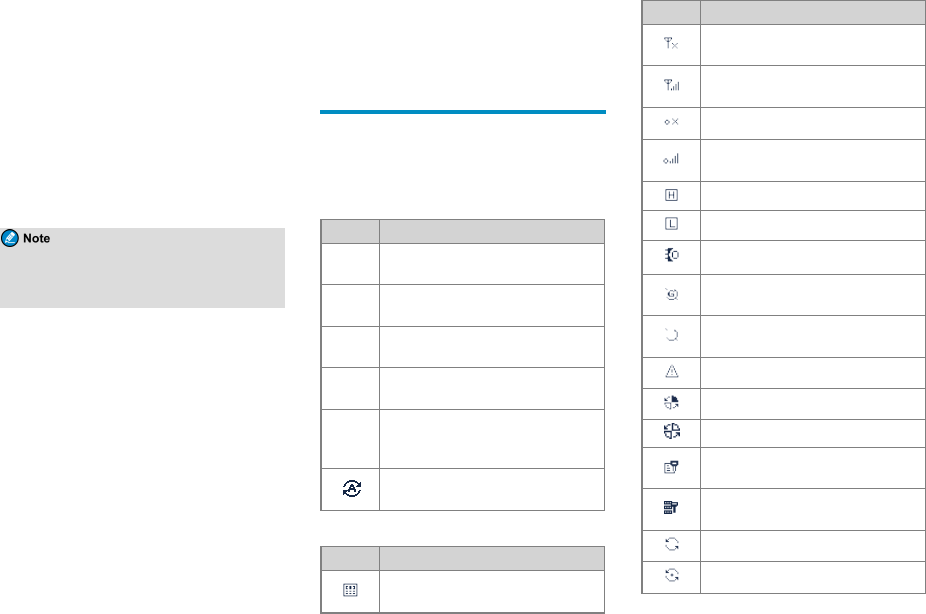
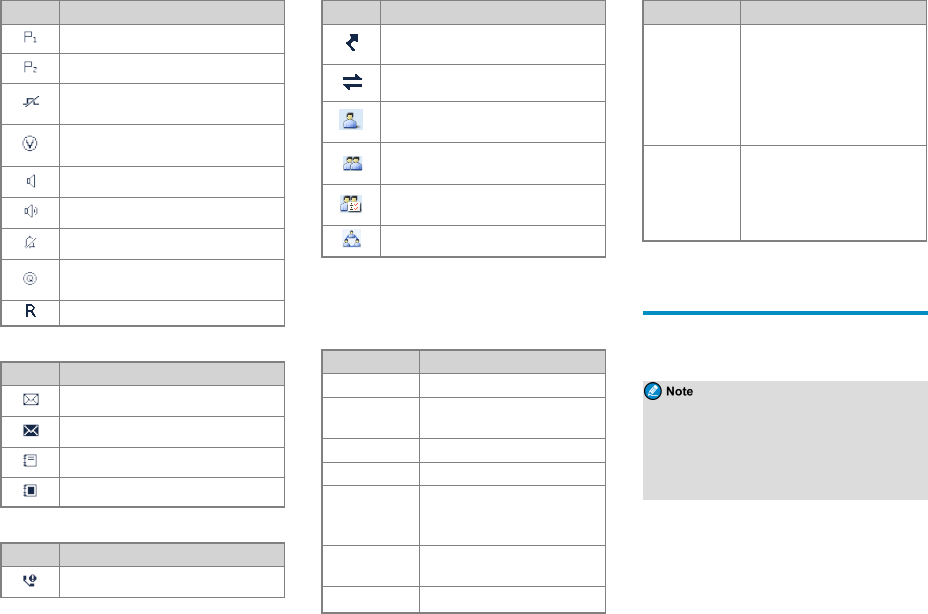
Status Indications
Checking LCD Icons
The following tables list icons that may appear on the
radio's liquid-crystal display (LCD).
Operation Mode
Icon Radio Status
DM Direct mode: The radio transmits and
receives directly.
RM Repeater mode: The radio transmits and
receives through a repeater.
TM-DW Trunking Mode - Digital Wide: The radio
operates under multiple interconnected BSs.
TM-DL Trunking Mode - Digital Local: The radio
operates under a single BS.
DM-R
Direct mode: The single frequency repeat
(SFR) feature is enabled on the current
channel.
The Mode Automatic Switch feature is
enabled.
Basic Status
Icon Radio Status
The Dual-Tone Multi-Frequency (DTMF)
keypad is enabled.
Icon Radio Status
There is no signal in DM, RM, or TM-DW
mode.
The number of bars indicates the signal
strength in DM, RM, or TM-DW mode.
There is no signal in TM-DL mode.
The number of bars indicates the signal
strength in TM-DL mode.
The radio operates in high power mode.
The radio operates in low power mode.
An accessory is connected.
The Global Positioning System (GPS) feature
is enabled, and the radio receives GPS data.
The GPS feature is enabled, but the radio
receives no GPS data.
The radio is in emergency mode.
The radio is roaming.
The radio is detecting sites for roaming.
The Scrambler or Encrypt feature is
enabled.
The Over The Air Encrypt feature is
enabled.
The radio is scanning or hunting.
The radio stays on a non-priority channel.
4
Icon Radio Status
The radio stays on priority channel 1.
The radio stays on priority channel 2.
The non-dedicated control channel feature
is enabled
The Voice Operated Transmit (VOX)
feature is enabled.
The Monitor feature is enabled.
The speaker is turned on.
The radio operates in silent mode.
The Loudness and Quality Optimizer (LQO)
feature is enabled.
The SFR feature is enabled.
Short Data Service
Icon Radio Status
There is/are unread short message(s).
The Inbox is full.
There is/are unread work order(s).
The work order list is full.
Call Service
Icon Radio Status
There is/are alert call(s).
Icon Radio Status
The Call Divert feature is enabled.
A full-duplex call is in progress.
A private call is in progress or a private
contact is on the contact list.
A group call is in progress or a group
contact is on the contact list.
An all call is in progress or an all call
contact is on the contact list.
An include call is in progress.
Checking LED Indications
To determine the radio status, check the LED indicator on
the radio according to the following table:
LED Indicator Radio Status
Flashes green Being turned on.
Flashes green
slowly Standby in trunking mode.
Glows green Receiving.
Glows red Transmitting.
Flashes red
Establishing a call in trunking mode.
This indication is applicable only to
the calling radio.
Flashes orange
slowly Scanning, hunting, or roaming.
Flashes orange lConventional mode: Operating in
LED Indicator Radio Status
rapidly
emergency mode.
lTrunking mode: Establishing a
Full Off Air Call Set- Up
(FOACSU) call. This indication
is applicable only to the called
radio.
Glows orange
Call hang time: No voice is being
transmitted or received on the
channel during a call. Within such a
period, you can press and hold the
PTT key and speak.
Call Services
When you are speaking during a call, keep the
microphone about 2.5 to 5 cm away from your mouth.
This ensures optimal voice quality on the receiving radio.
lUnless otherwise specified, the PTT key
mentioned in this manual indicates that on the palm
microphone or the handset.
lThe radio cannot make any call if it fails to
register with the BS or you select an empty group.
Digital Calls
You can initiate or receive the following types of digital
calls:
lGroup call: A call from an individual user in a group
to all the other members.
5
lPrivate call: A call from an individual user to another
individual user.
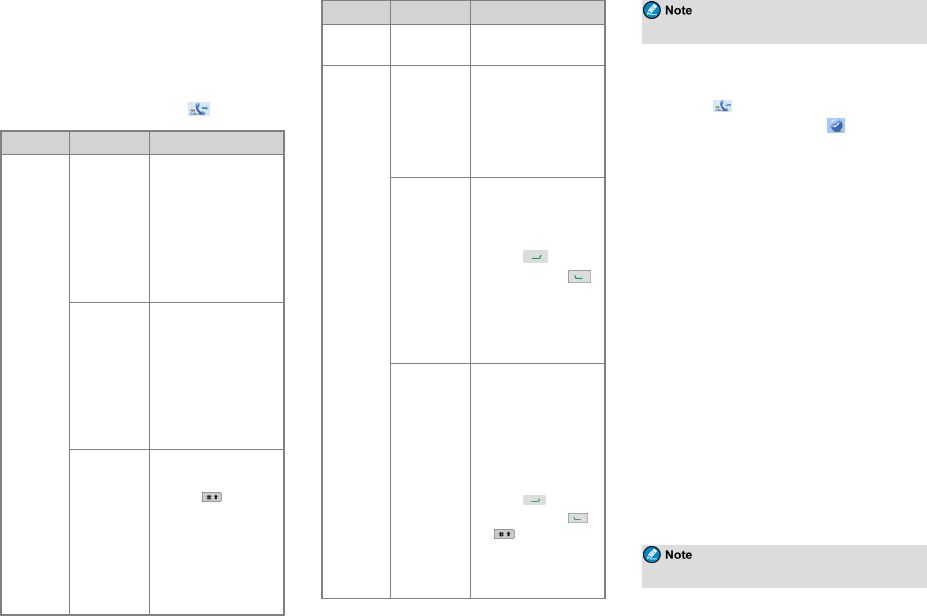
Initiating Group Calls
The following table describes how to initiate a group call
in conventional mode and trunking mode. When you
initiate a group call, the radio displays .
Mode Manner Operation
Conventional
Preset Contact
1. Rotate the Channel
Selector knob to
select the channel
associated with the
required group
contact.
2. Press and hold the
PTT key.
Contact
List/Favorite
Contact
1. Go to Contact >
Contact
List/Favorite
Contact.
2. Select the required
group contact.
3. Press and hold the
PTT key.
Manual Dial
1. Go to Contact >
Manual Dial.
2. Press on the palm
microphone or the
handset to switch the
input mode to Group
ID.
3. Enter the required
group ID.
Mode Manner Operation
4. Press and hold the
PTT key.
Trunking
Preset Contact
1. Rotate the Group
Selector knob to
select the required
group contact.
2. Press and hold the
PTT key.
Group Contact
1. Go to Subgroup >
Members.
2. Select the required
group contact.
3. Press on the
radio, or press
or press and hold the
PTT key on the palm
microphone or the
handset.
Manual Dial
1. Go to Settings >
Radio Set >Keypad
Mode, and then
select Enable.
2. From the home
screen, enter the
group number.
3. Press on the
radio, or press or
or press and hold
the PTT key on the
palm microphone or
the handset.
For dialing rules, contact your dealer.
Receiving Group Calls
When you receive a group call in conventional mode, the
radio displays . The call is established automatically.
In trunking mode, the radio displays after the call is
established successfully.
Ending Group Calls
In conventional mode and trunking mode, a group call
automatically ends when the call hang time expires.
In trunking mode, a group call also ends in any of the
following cases:
lThe calling party ends the call.
lThe call duration preset by your dealer expires.
lA preemptive or emergency call interrupts the call.
lThe calling party switches to an empty group.
lThe base station signal is lost.
Initiating Private Calls
You can initiate simplex or duplex calls, which can be set
by going to Settings>Radio Set>Call Setup Mode or
pressing the preprogrammed Call Setup Mode key.
lDuplex call: both parties can speak at the same time.
lSimplex call: Only one party can speak at one time.
The duplex call is only available for duplex radios.
6
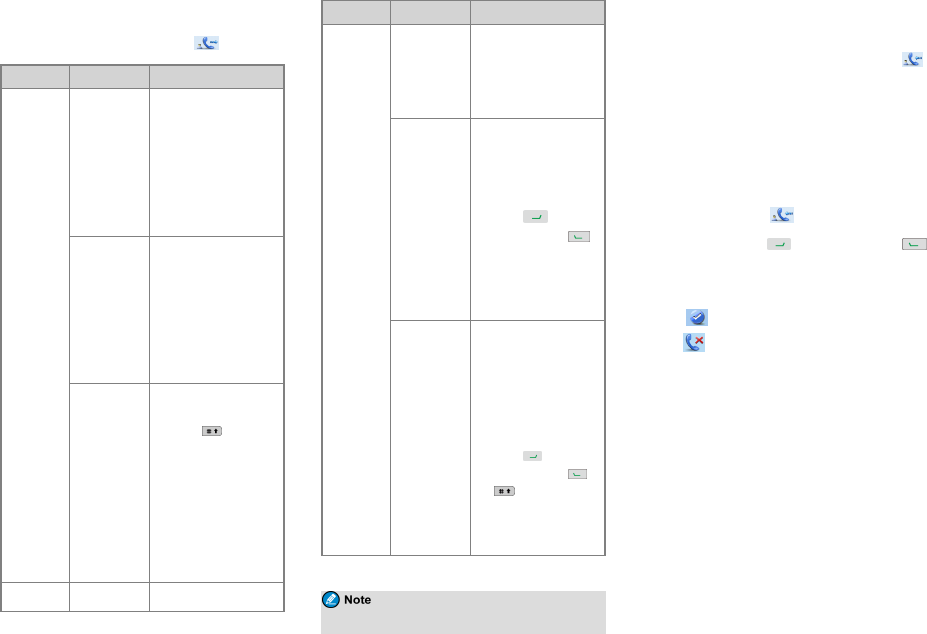
The following table describes how to initiate a private call
in conventional mode and trunking mode. When you
initiate a private call, the radio displays .
Mode Manner Operation
Conventional
Preset Contact
1. Rotate the Channel
Selector knob to
select the channel
associated with the
required private
contact.
2. Press and hold the
PTT key.
Contact
List/Favorite
Contact
1. Go to Contact >
Contact
List/Favorite
Contact.
2. Select the required
private contact.
3. Press and hold the
PTT key.
Manual Dial
1. Go to Contact >
Manual Dial.
2. Press on the palm
microphone or the
handset to switch the
input mode to Private
ID.
3. Enter the required
private ID.
4. Press and hold the
PTT key.
Trunking Preset Contact 1. Rotate the Group
Mode Manner Operation
Selector knob to
select the required
private contact.
2. Press and hold the
PTT key.
Favorite
Contact/Private
Contact
1. Go to Contact >
Favorite Contact/
Private Contact.
2. Select the required
private contact.
3. Press on the
radio, or press or
press and hold the
PTT key on the palm
microphone or the
handset.
Manual Dial
1. Go to Settings >
Radio Set >Keypad
Mode, and then
select Enable.
2. From the home
screen, enter the
private call number.
3. Press on the
radio, or press or
or press and hold
the PTT key on the
palm microphone or
the handset.
For dialing rules, contact your dealer.
Receiving Private Calls
Conventional Mode
When you receive a private call, the radio displays .
The call is established automatically.
Trunking Mode
You can listen to a call in different ways varying with the
setup mode of the call:
lFOACSU
When receiving a FOACSU private call, the radio rings
and vibrates, and displays .
To answer the call, press on the radio, or press
or press and hold the PTT key on the palm microphone or
the handset within the preset time period. After the call is
established successfully, the radio emits a tone and
displays . If you don’t answer this call, the radio
displays .
lOff Air Call Set-Up (OACSU)
When receiving an OACSU private call, you can listen to
it without any operation.
Ending Private Calls
In conventional mode and trunking mode, a private call
automatically ends when the call hang time expires.
In trunking mode, a private call also ends in any of the
following cases:
lThe calling or called party ends the call.
lThe call duration preset by your dealer expires.
lA preemptive or emergency call interrupts the call.
7
lThe calling or called party switches to an empty
group.
lThe base station signal is lost.
Analog Calls
You can initiate or receive a call on an analog channel
with or without signaling.
Call Without Signaling
On an analog channel without signaling, you can initiate a
call to all the other users on the channel. Do as follows:
1. Select the required channel.
2. Press and hold the PTT key, and speak into the
microphone.
Call With Signaling
On an analog channel with signaling, you can initiate a
call to a specific contact on the channel. Do as follows:
1. Rotate the Channel Selector knob to select the
required channel.
2. Press the OK/Menu key, and go to Contact >
Contact List.
3. Select the required channel.
4. Press the PTT key or the preprogrammed One Touch
Call/Menu key to send the code.
The call is established when the target radio receives and
decodes the matched signaling.
Emergency Call
In case of emergency, you can initiate an emergency call
to ask for help from other personnel or the control centre.
This feature needs to be configured and enabled by your
dealer. For details, refer to the Emergency feature
described in the relevant user manual.
Message Services
The Message feature allows you to send and receive the
following types of messages in trunking mode or on a
digital channel in conventional mode:
lText messages: messages created using the keypad.
lQuick text messages: frequently used messages
predefined by your dealer but editable.
lStatus messages (trunking only): frequently used
messages predefined by your dealer and not editable.
Viewing Messages
To view a message upon receiving, directly press the
OK/Menu key.
To view a message from the Inbox or a sent message, go
to Message >Inbox/Outbox, and then select the required
message.
Sending Messages
Sending Text Messages
1. Go to Message >New Msg, and then type the text.
2. Press the OK/Menu key, and then select Send.
3. Select or enter the required contact, and then press
the OK/Menu key.
Instead of directly sending the new message, you
can also select Save in conventional mode or select
Save to Drafts or Save to QuickText in trunking
mode to save the new message, and send it later.
Sending Quick Text Messages
1. Go to Message >Quick Text, and then select the
required quick text message.
2. Select Send, and then select or enter the required
contact.
3. Press the OK/Menu key.
Sending Status Messages
1. Go to Message >Status Msg, and then select the
required status message.
2. Press the OK/Menu key, and then select or enter the
required contact.
3. Press the OK/Menu key.
You can also send status messages by manual
dialing. For details, contact your dealer.
Deleting Messages
Deleting Text Messages
To delete a message from the InBox, OutBox, or Drafts,
do as follows:
1. Go to Message >InBox/OutBox/Drafts.
2. Select the required message, and then press the
OK/Menu key.
3. Select Delete, and then press the OK/Menu key.
8

20cm de distance entre le antenne et votre
20cm between the antenna & your
must be at least 0 cm away from human body.
Antenna gain must not exceed 5 dBi.
Deleting Quick Text Messages
In trunking mode, you can go to Message >Quick Text
to select and delete a quick text.
For details on more features and
operations, please visit our website at
http://www.hytera.com , or scan the QR
code to download the relevant user
manual.
9
Operational Instructions and Training Guidelines
To ensure optimal performance and compliance with the
occupational/controlled environment RF energy
exposure limits in the above standards and guidelines,
users should transmit not more than 50% of the time and
always adhere to the following procedures:
z
zThe antenna must be installed complying with the
requirements of manufacturer or supplier, and it
FCC Statement
This equipment has been tested and found to comply with
the limits for a Class B digital device, pursuant to part 15
of FCC Rules. These limits are designed to provide
reasonable protection against harmful interference in a
residential installation. This equipment generates and can
radiate radio frequency energy. If not installed and used
in accordance with the instructions, it may cause harmful
interference to radio communications. However, there is
no guarantee that interference will not occur in a
particular installation. Verification of harmful
interference by this equipment to radio or television
reception can be determined by turning it off and then on.
The user is encouraged to try to correct the interference
by one or more of the following measures:
zReorient or relocate the receiving antenna. Increase
the separation between the equipment and receiver.
zConnect the equipment into an outlet on a different
circuit to that of the receiver's outlet.
zConsult the dealer or an experienced radio/TV
technician for help.
Operation is subject to the following two conditions:
zThis device may not cause harmful interference.
zThis device must accept any interference received,
including interference that may cause undesired
operation.
Note: Any changes or modifications to this unit not
expressly approved by the party responsible for
compliance could void the user's authority to operate the
equipment.
ISEDC Statement
This device complies with Innovation, Science and
Economic Development Canada Compliance
license-exempt RSS standard(s). Operation is subject to
the following two conditions:
This device may not cause harmful interference.
This device must accept any interference received,
including interference that may cause undesired
operation.
Le présent appareil est conforme aux CNR d'Industrie
Canada applicables aux appareils radio exempts de
licence. L'exploitation est autorisée aux deux conditions
suivantes: (1) l'appareil ne doit pas produire de brouillage,
et (2) l'utilisateur de l'appareil doit accepter tout
brouillage radioélectrique subi, même si le brouillage est
susceptible d'en compromettre le fonctionnement
ISEDC Radiation Exposure Statement:
This device must be restricted to work related operations
in an Occupational/Controlled RF exposure
Environment.
This equipment should be installed and operated with
minimum distance
body.
ISEDC exposition aux radiations:
Ce dispositif doit être limité aux opérations liées au
travail dans un environnement d'exposition RF
professionnel/contrôlé.
Cet équipement doit être installé et utilisé avec un
minimum de
corps.
3
2

USER MANUAL
MD780(G) DIGITAL MOBILE RADIO
is the trademark or registered trademark of Hytera Communications Corporation Limited.
2017 Hytera Communications Corporation Limited. All Rights Reserved.
Postcode: 518116
http:// www.hytera.com
MD780(G)数字车载终端
Hytera Tower,Hi-Tech Industrial Park North, 9108# Beihuan Road, Nanshan
District, Shenzhen, People's Republic of China
Hytera Communications Corporation Limited