Hytera Communications PDC760UXB1 Multi-mode Advanced Radio User Manual Owner s Manualx
Hytera Communications Corporation Limited Multi-mode Advanced Radio Owner s Manualx
Contents
- 1. User Manual
- 2. Users Manual
User Manual
Preface
Welcome to the world of Hytera and thank you for purchasing this product. This manual includes a description of
the functions and step-by-step procedures for use. To avoid bodily injury or property loss caused by incorrect
operation, please carefully read the Safety Information Booklet before use.
This manual is applicable to Multi-mode Advanced Radio.
Copyright Information
Hytera is the trademark or registered trademark of Hytera Communications Corporation Limited (the Company) in
the People's Republic of China (PRC) and/or other countries or areas. The Company retains the ownership of its
trademarks and product names. All other trademarks and/or product names that may be used in this manual are
properties of their respective owners.
The product described in this manual may include the Company's computer programs stored in memory or other
media. Laws in PRC and/or other countries or areas protect the exclusive rights of the Company with respect to its
computer programs. The purchase of this product shall not be deemed to grant, either directly or by implication, any
rights to the purchaser regarding the Company's computer programs. The Company's computer programs may not
be copied, modified, distributed, decompiled, or reverse-engineered in any manner without the prior written consent
of the Company.
Disclaimer
The Company endeavors to achieve the accuracy and completeness of this manual, but no warranty of accuracy or
reliability is given. All the specifications and designs are subject to change without notice due to continuous
technological development. No part of this manual may be copied, modified, translated, or distributed in any
manner without the prior written consent of the Company.
We do not guarantee, for any particular purpose, the accuracy, validity, timeliness, legitimacy or completeness of
the third-party products and contents involved in this manual.
If you have any suggestions or would like to receive more information, please visit our website at:
http://www.hytera.com.
FCC Statement
This equipment has been tested and found to comply with the limits for a Class B digital device, pursuant to part 15
of FCC Rules. These limits are designed to provide reasonable protection against harmful interference in a
residential installation. This equipment generates and can radiate radio frequency energy. If not installed and used in
accordance with the instructions, it may cause harmful interference to radio communications. However, there is no
guarantee that interference will not occur in a particular installation. Verification of harmful interference by this
equipment to radio or television reception can be determined by turning it off and then on. The user is encouraged to
try to correct the interference by one or more of the following measures:
Reorient or relocate the receiving antenna. Increase the separation between the equipment and receiver.
Connect the equipment into an outlet on a different circuit to that of the receiver's outlet.
Consult the dealer or an experienced radio/TV technician for help.
Operation is subject to the following two conditions:
This device may not cause harmful interference.
This device must accept any interference received, including interference that may cause undesired operation.
Note: Changes or modifications to this unit not expressly approved by the party responsible for compliance could
void the user's authority to operate the equipment.
RF Energy Exposure Awareness and Control
Information and Operational Instructions for
Occupational Use
NOTICE: This radio is intended for use in occupational/controlled conditions where users have full
knowledge of their exposure and can exercise control over their exposure to meet the
occupational limits in FCC and International standards. This radio device is NOT authorized for
general population consumer use.
This radio uses electromagnetic energy in the radio frequency (RF) spectrum to provide communications between
two or more users over a distance. It uses radio frequency (RF) energy or radio waves to send and receive calls.
RF energy is one form of electromagnetic energy. Other forms include, but are not limited to, sunlight and x-rays.
RF energy, however, should not be confused with these other forms of electromagnetic energy, which when used
improperly, can cause biological damage. Very high levels of x-rays, for example, can damage tissues and genetic
material.
Experts in science, engineering, medicine, health, and industry work with organizations to develop standards for
safe exposure to RF energy. These standards provide recommended levels of RF exposure for both workers and
the general public. These recommended RF exposure levels include substantial margins of protection.
All Hytera radios are designed, manufactured, and tested to ensure they meet government-established RF
exposure levels. In addition, manufacturers also recommend specific operating instructions to users of radios.
These instructions are important because they inform users about RF energy exposure and provide simple
procedures on how to control it.
Please refer to the following websites for more information on what RF energy exposure is and how to control
your exposure to assure compliance with established RF exposure limits:
http://www.fcc.gov/oet/rfsafety/rf-faqs.html
Compliance with RF Exposure Standards
Hytera's radio complies with the following RF energy exposure standards and guidelines:
United States Federal Communications Commission, Code of Federal Regulations; 47 CFR § 1.1307, 1.1310
and 2.1093
American National Standards Institute (ANSI) / Institute of Electrical and Electronic Engineers
(IEEE) C95. 1:2005; Canada RSS102 Issue 5 March 2015
Institute of Electrical and Electronic Engineers (IEEE) C95.1:2005 Edition
RF Exposure Compliance and Control Guidelines and
Operating Instructions
To control your exposure and ensure compliance with the occupational/controlled environmental exposure limits,
always adhere to the following procedures.
Guidelines:
Do not remove the RF Exposure Label from the device.
User awareness instructions should accompany device when transferred to other users.
Do not use this device if the operational requirements described herein are not met.
Operating Instructions:
Transmit no more than the rated duty factor of 50% of the time. To transmit (talk), push the Push-To-Talk (PTT)
key. To receive calls, release the PTT key. Transmitting 50% of the time, or less, is important because the radio
generates measurable RF energy only when transmitting (in terms of measuring for standards compliance).
Keep the radio unit at least 2.5 cm away from the face. Keeping the radio at the proper distance is important as
RF exposure decreases with distance from the antenna. The antenna should be kept away from the face and
eyes.
When worn on the body, always place the radio in a Hytera-approved holder, holster, case, or body harness or
by use of the correct clip for this product. Use of non-approved accessories may result in exposure levels which
exceed the FCC's occupational/controlled environmental RF exposure limits.
Use of non-approved antennas, batteries, and accessories causes the radio to exceed the FCC RF exposure
guidelines.
Contact your local dealer for the optional accessories of the product.
ISED Statement
The device has been tested and complies with SAR limits, users can obtain Canadian information on RF exposure
and compliance
Après examen de ce matériel aux conformité aux limites DAS et/ou aux limites d’intensité de champ RF, les
utilisateurs peuvent sur l’exposition aux radiofréquences et la conformité and compliance d’acquérir les
informations correspondantes
This device complies with Innovation, Science and Economic Development Canada Compliance license-exempt
RSS standard(s). Operation is subject to the following two conditions:
This device may not cause harmful interference.
This device must accept any interference received, including interference that may cause undesired operation.
Le présent appareil est conforme aux CNR d'Industrie Canada applicables aux appareils radio exempts de licence.
L'exploitation est autorisée aux deux conditions suivantes: (1) l'appareil ne doit pas produire de brouillage, et (2)
l'utilisateur de l'appareil doit accepter tout brouillage radioélectrique subi, même si le brouillage est susceptible d'en
compromettre le fonctionnement
EU Regulatory Conformance
As certified by the qualified laboratory, the product is in compliance with the essential requirements and other
relevant provisions of the following directives: 1999/5/EC or 2014/53/EU, 2006/66/EC, 2011/65/EU, and
2012/19/EU.
Please note that the above information is applicable to EU countries only.
1
Contents
1. Product Overview ............................................................................................................................... 3
1.1 Product Controls ............................................................................................................................. 3
1.2 Key Description ............................................................................................................................... 4
1.3 Radio Screens ................................................................................................................................ 5
2. Before Use .......................................................................................................................................... 7
2.1 Charging the Battery ....................................................................................................................... 7
2.2 Installing the SIM Card and Micro-SD Card .................................................................................... 8
2.3 Attaching the Battery ....................................................................................................................... 9
2.4 Attaching the Antenna ..................................................................................................................... 9
2.5 Attaching the Belt Clip ................................................................................................................... 10
2.6 Attaching the Accessory ............................................................................................................... 10
3. Basic Operations .............................................................................................................................. 11
3.1 Turning the Radio On or Off .......................................................................................................... 11
3.2 Adjusting the Volume .................................................................................................................... 12
3.3 Selecting a Channel or Contact .................................................................................................... 12
3.4 Operating the Main Screen ........................................................................................................... 13
3.5 Locking and Unlocking the Main Screen ....................................................................................... 15
3.6 Switching the Operation Mode ...................................................................................................... 16
4. Status Indications............................................................................................................................. 17
4.1 LCD Icons ..................................................................................................................................... 17
4.2 LED Indications ............................................................................................................................. 19
5. Call Services ..................................................................................................................................... 20
5.1 Group Calls ................................................................................................................................... 20
5.2 Private Calls .................................................................................................................................. 20
5.3 Broadcast Calls (Trunking Only) ................................................................................................... 21
5.4 All Calls ......................................................................................................................................... 22
5.5 Calls on Analog Channels (Conventional Only) ............................................................................ 22
5.6 Phone Calls .................................................................................................................................. 22
6. Message Services ............................................................................................................................ 24
6.1 Viewing Messages ........................................................................................................................ 24
6.2 Sending Messages ....................................................................................................................... 24
6.3 Forwarding Messages ................................................................................................................... 24
6.4 Deleting Messages ....................................................................................................................... 25
7. Supplementary Features .................................................................................................................. 26
7.1 Basic Settings ............................................................................................................................... 26
2
7.2 Contact Management .................................................................................................................... 27
7.3 Wireless and Network ................................................................................................................... 28
7.4 APPs ............................................................................................................................................. 29
7.5 Power Level .................................................................................................................................. 35
7.6 Radio over IP (RoIP) ..................................................................................................................... 35
7.7 Scan .............................................................................................................................................. 36
7.8 Roam ............................................................................................................................................ 37
7.9 Position ......................................................................................................................................... 37
7.10 Analog Services .......................................................................................................................... 37
7.11 Encryption ................................................................................................................................... 38
7.12 Stun ............................................................................................................................................ 38
7.13 Kill ............................................................................................................................................... 38
8. Troubleshooting ............................................................................................................................... 39
9. Care and Cleaning ............................................................................................................................ 41
10. Optional Accessories ..................................................................................................................... 42
11. Specifications ................................................................................................................................. 43
Doc
u
Icon C
o
Icon
Notati
o
Item
Boldface
" "
>
Italic
Courier
New
Key O
p
Operati
Short pres
s
Long pres
s
Double pr
e
Press and
h
u
men
t
o
nvent
i
Indicat
Indicat
o
n Con
v
Denotes
m
window n
a
hardware
b
Denotes
m
folder na
m
Directs yo
u
Denotes d
o
Denotes c
o
results.
p
eratio
n
on
s
Pres
s
s
Pres
s
e
ss Pres
s
h
old Kee
p
t
atio
n
i
ons
es reference
s
es situations
v
ention
s
Descr
i
m
enus, tabs, p
a
a
mes, dialog
u
b
uttons.
m
essages, dire
m
es, and para
m
u
to access a
o
cument title
s
o
mmands an
d
n
s
s
and release
r
s
and hold fo
r
s
twice conti
n
p
the key pre
s
n
Info
r
s
that can fur
t
that could c
a
s
i
ption
a
rameter na
m
u
e names, an
d
ctories, file
n
m
eter values.
multi-level
m
s
.
d
their execu
t
r
apidly.
r
the preset d
u
n
uously and
q
s
sed.
1
r
mati
o
Des
t
her describe
a
use data loss
m
es,
d
T
T
P
n
ames,
T
O
G
I
m
enu.
G
F
D
t
ion
T
De
s
u
ration (2s b
y
q
uickly.
o
n
cription
t
he related t
o
or equipme
n
T
o save the c
o
T
he Log Lev
P
ress the PT
T
T
he screen d
i
O
pen "PDT_
P
G
o to "D:/op
t
I
n the Port t
e
G
o to File >
N
F
or details a
b
D
ispatch Wo
r
T
o set the IP
vos-cmd
-
s
cription
y
default).
o
pics.
n
t damage.
Exa
m
o
nfiguration,
el Settings d
T
key.
i
splays "Inva
l
P
SS.exe".
t
/local".
e
xt box, enter
N
ew.
b
out using th
e
r
kstation Us
e
address, run
t
-
m
name
m
ple
click Apply
ialogue appe
a
l
id Battery!".
"22".
e
DWS, refer
e
r Guide.
t
he followin
g
IP
.
a
rs.
to
g
command:

Touch
Operati
o
Tap
Touch and
h
Swipe
Drag
Pinch
Spread
Scree
n
o
n
Tou
c
tip.
h
old
Tou
c
main
t
Swi
p
Tou
c
mov
e
Mov
e
scre
e
Mov
e
n
Opera
t
Des
c
c
h items once
c
h items with
t
ain contact.
p
e your finge
r
c
h and hold a
n
e
it to a new
p
e
two fingers
e
n.
e
two fingers
t
ions
c
ription
with your fi
n
your finger
a
r
across the s
c
n
item, and t
h
p
osition.
together on
t
apart on the
2
n
ger
Ta
p
a
nd
To
u
c
reen.
S
w
th
e
h
en To
u
to
t
t
he
Pi
n
screen. Sp
r
p
to la
u
u
ch and hold
w
ipe down fr
o
e
notification
u
ch and hold
t
he proper p
o
n
ch the scree
n
r
ead the scre
e
Exa
m
u
nch the Cam
e
until i
t
o
m the top ed
g
panel.
until i
t
o
sition.
n
to zoom ou
t
e
n to zoom i
n
m
ple
e
ra app.
t
jiggles.
g
e of any scr
t
jiggles, and
t
.
n
.
een to acces
s
then drag it
s
3
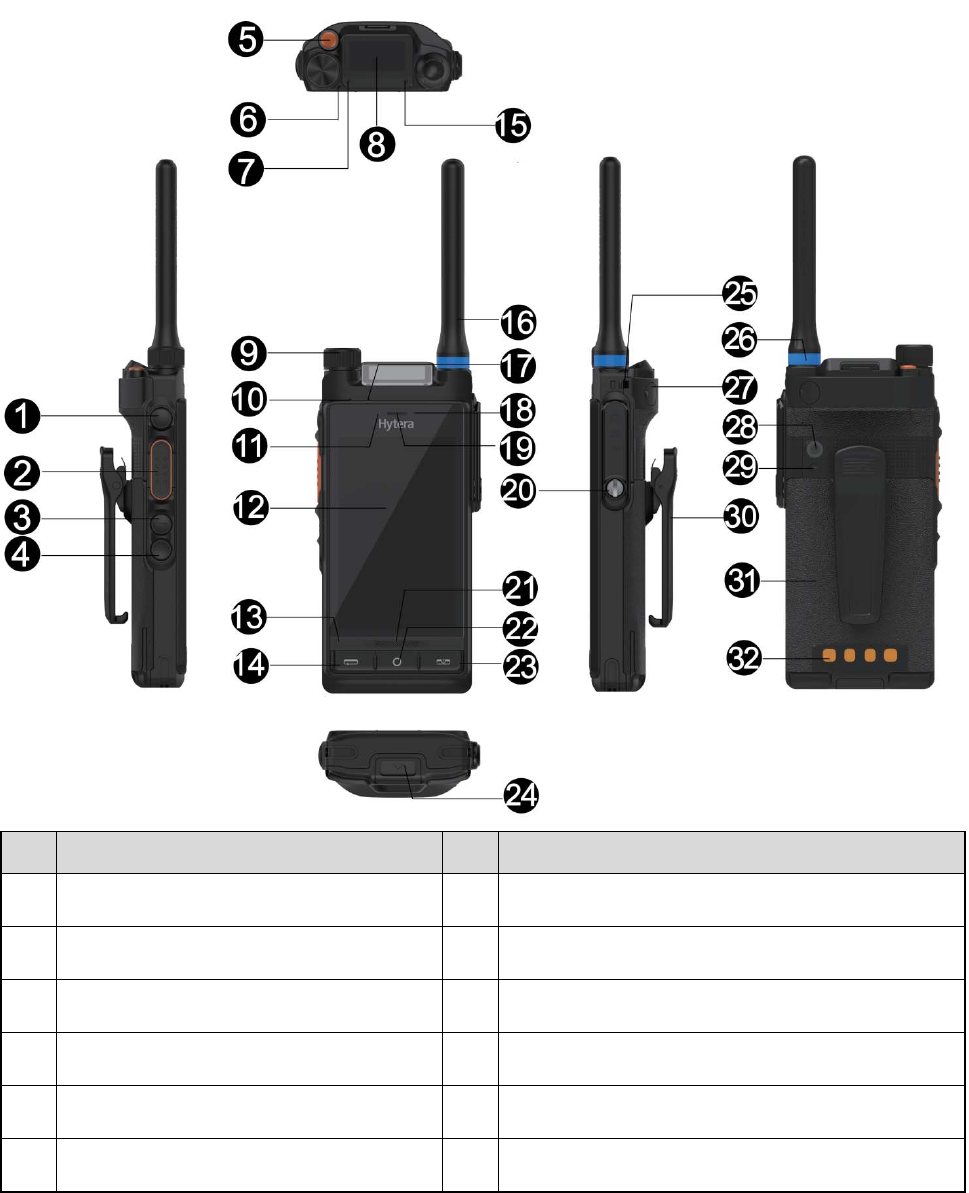
1. Product Overview
1.1 Product Controls
No. Part Name No. Part Name
1 Smart Key 17 Pressure Sensor
2 Push-to-Talk (PTT) Key 18 Front-facing Camera
3 Side Key 2 (SK2) 19 Speaker
4 Side Key 3 (SK3) 20 Accessory Connector
5 Top Key (TK) 21 Speaker
6 Microphone 3 22 Home Key

4
No. Part Name No. Part Name
7 LED Indicator 1 23 Power/End Call Key
8 Top Screen 24 Battery Latch
9 Smart Knob 25 Strap Hole
10 Microphone 2 26 Colored Ring
11 Light Sensor 27 CARKIT RF Connector
12 Main Screen 28 Rear-facing Camera
13 Microphone 1 29 Flash
14 Back/Answer Call Key 30 Belt Clip
15 LED Indicator 2 31 Battery
16 Antenna 32 Charging Piece
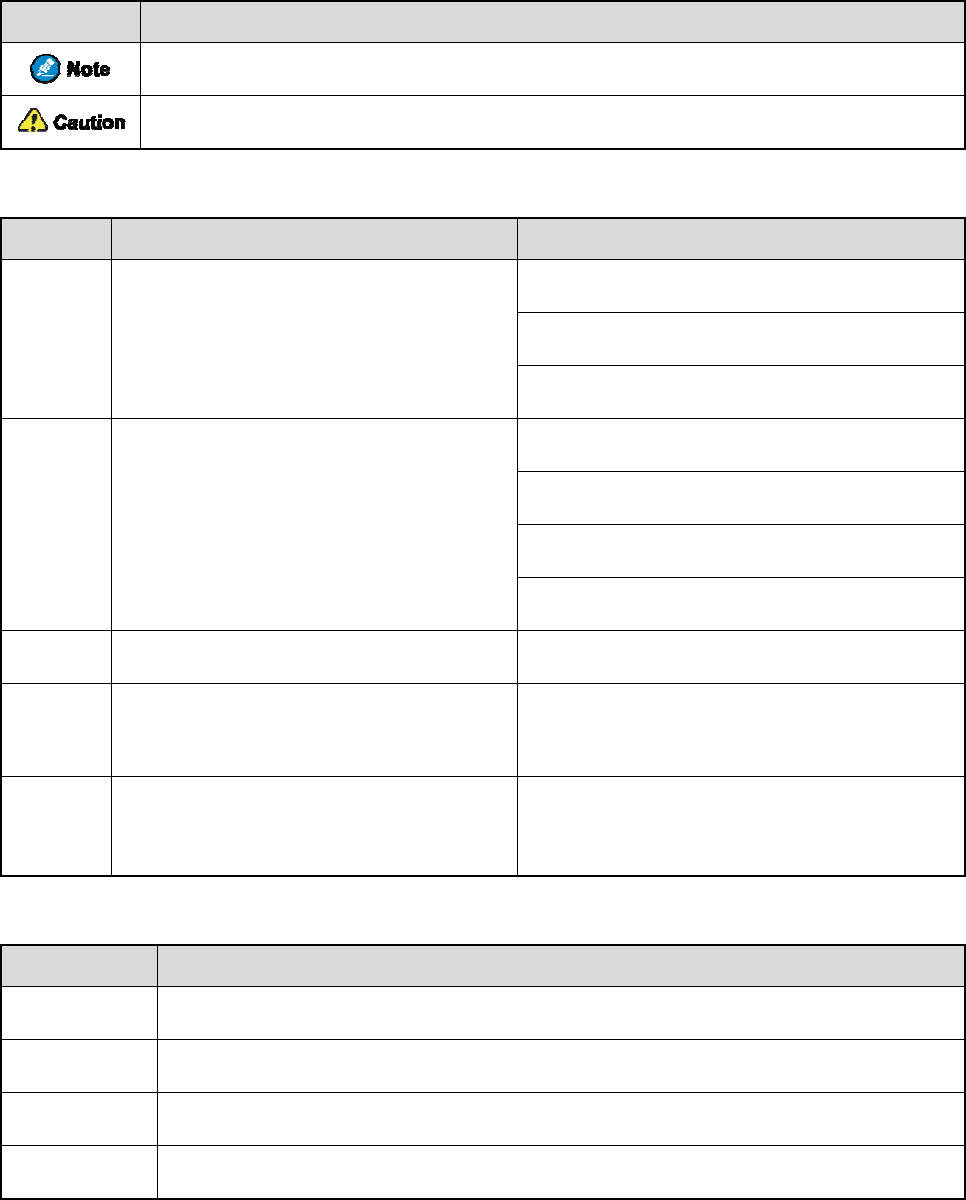
1.2 Key Description
The following table describes functions of the radio's keys.
Key Description
PTT key
Press the key to initiate or answer calls.
Press and hold the key to speak during half-duplex calls.
Smart Key
When the main screen is on, long press the key to turn it off.
When you view a list or page, press the key to flip.
When the main screen is off, press the key to turn it on, or long press the key to
launch the camera.
SK2/SK3
Programmable keys. You can set the keys as shortcuts to radio features. Then you can
press, long press, or double press the keys to trigger the assigned features.
TK
Programmable key. You can set this key as shortcuts to the following two radio features:
Emergency call and Cancel emergency call. Then you can press or long press the key to
initiate or end an emergency call.
Back/Answer key Press the key to return to the upper-level menu or answer calls.
5
Key Description
Home key
When the main screen is off, press the key to turn it on.
When the main screen is on, press the key to return to the home screen, or double
press the key to view running apps.
On-Off/End key
Press the key to end ongoing calls.
Long press the key to turn the radio on or off.
Key combination Press SK2+SK3 to take a screenshot.
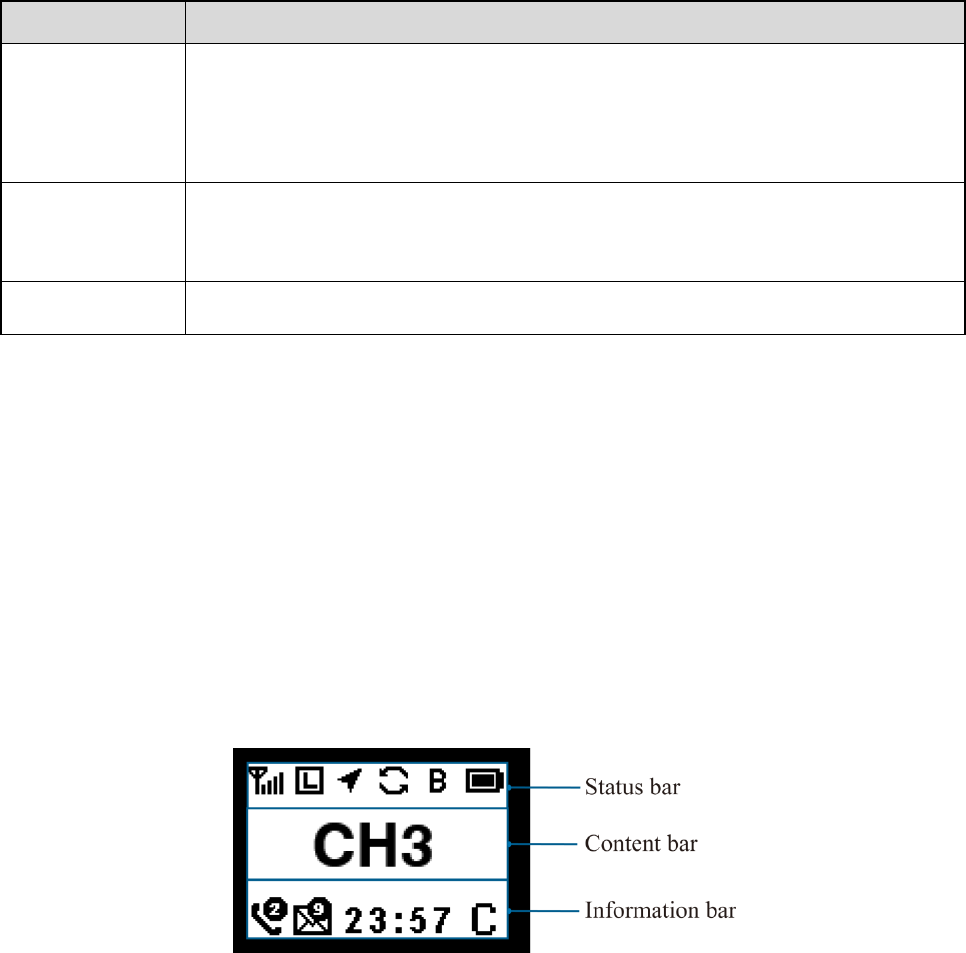
1.3 Radio Screens
The radio provides two screens: top screen and main screen.
1.3.1 Top Screen
The top screen shows information about narrow band (NB) services. It includes the following three areas:
Status bar: Shows status icons.
Content bar: Mainly shows the selected channel or contact and icons related to ongoing calls.
Information bar: Shows icons indicating unread messages and missed calls, time information, and current
operation mode.
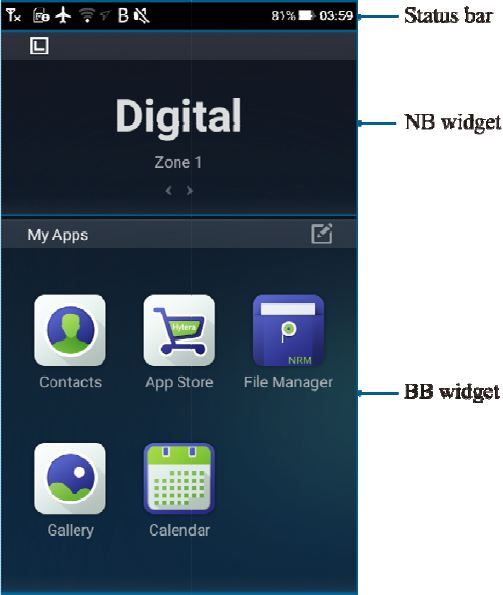
1.3.2 Main Screen
The main screen is a touch screen with Android Platform (AP) for managing widgets, apps, information, and radio
settings. The home screen contains the status bar, NB widget, and broadband (BB) widgets.
On the mai
n
detailed ope
n
screen, you
rations, see
3
can also acc
e
3
.4 Operatin
g
e
ss the notifi
c
g
the Main Sc
6
c
ation panel,
reen.
quick setting
panel, and a
p
p
plication (a
p
p
p) list. For
2. B
e
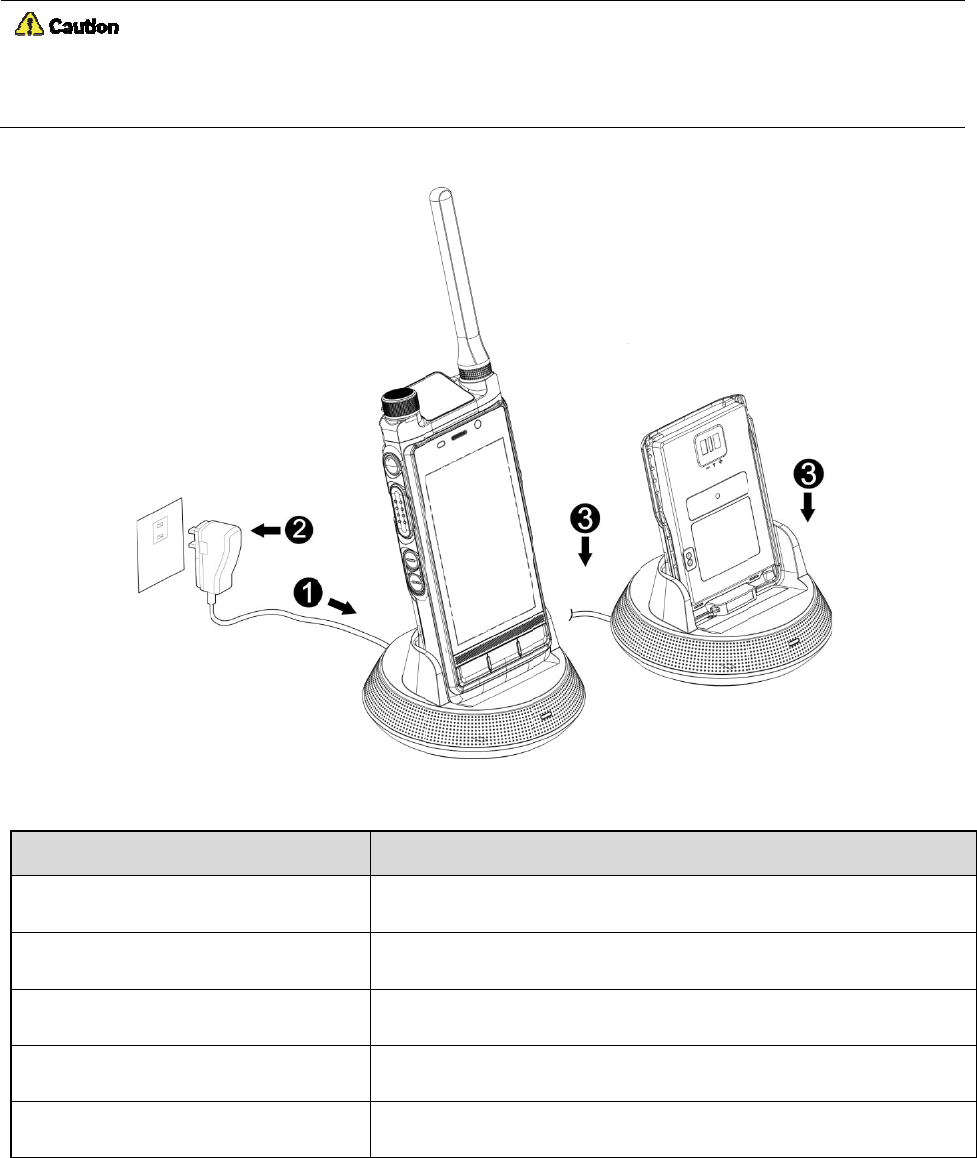
2.1
Ch
U
s
R
e
Before initi
a
To determi
n
LE
D
Flashes or
a
Flashes re
d
Glows red
Glows gre
e
Flashes re
d
e
fore
U
arging
s
e the appro
v
e
ad the Safet
y
a
l use, fully c
n
e the chargi
n
D
Indicato
r
o
a
nge slowly
d
slowly
e
n
d
rapidly
U
se
the Ba
t
v
ed charger t
o
y
Informatio
n
harge the
b
a
t
n
g status, che
c
o
n Charge
r
t
tery
o
charge the
b
n
Booklet
b
e
fo
t
tery to ensur
e
c
k the LED i
n
The c
h
The b
a
The b
a
The b
a
The b
a
7
b
attery.
fo
re charging.
e
optimum p
e
n
dicator on t
h
h
arger is bein
a
ttery fails to
a
ttery is char
g
a
ttery is fully
a
ttery fails to
e
rformance.
h
e charger a
c
Char
g activated.
make prope
r
g
ing.
charged.
be charged.
c
cording to t
h
ging Statu
s
r
contact wit
h
h
e following
t
s
h
the charge
r
.
t
able:
8
If the LED indicator flashes red slowly, take the battery out of the charger, and then place it into the charger for
proper contact.
If the LED indicator flashes red rapidly, please contact your dealer to check whether the battery or power adapter
is damaged.
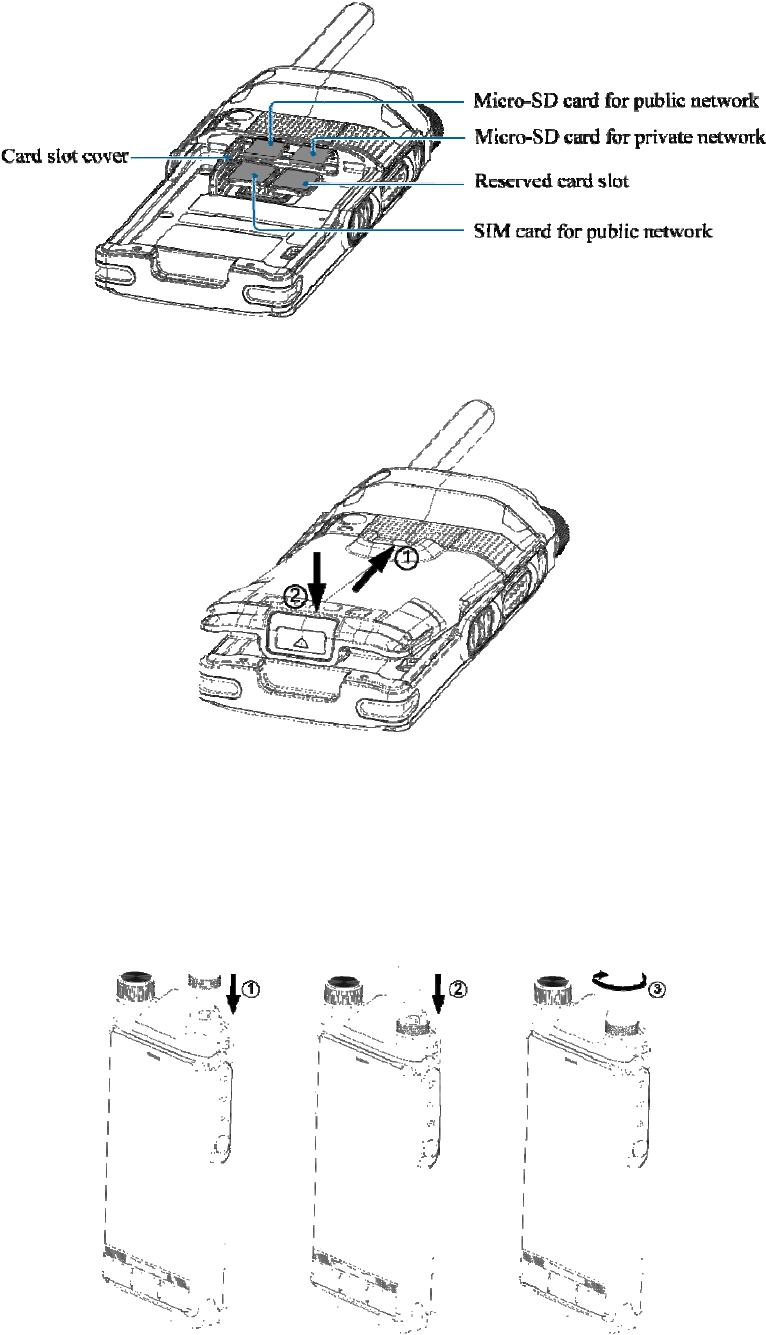
2.2 Installing the SIM Card and Micro-SD Card
If you are provided with an SIM card and a micro-SD card, install them as follows:
1. Open the card slot cover on the top of the battery compartment.
2. Pull the SIM card tray out of the slot, and place the SIM card with the gold contacts facing up on the tray.
3. Insert the card tray with the SIM card back into the slot.
4. Insert the micro-SD card into the corresponding slot.
5. Put the card slot cover back in place.
2.3
At
t
2.4
At
t
t
aching
t
aching
the Ba
t
the An
t
tery
tenna
9

Do n
o
2.5
At
t
1. Align t
h
2. Press t
h
2.6
At
t
For o
p
screw
1. Turn t
h
2. Insert t
h
3. Turn t
h
o
t hold the ra
d
t
aching
h
e rails on t
h
h
e belt clip d
o
t
aching
p
timal water
p
when no acc
h
e screw on t
h
h
e accessory
h
e screw on t
h
d
io by the an
t
the Be
h
e belt clip w
i
o
wnwards in
t
the Ac
c
p
roof and dus
essory is att
a
h
e accessory
plug into th
e
h
e accessory
t
enna, as it
m
lt Clip
i
th the groov
e
t
o place.
c
esso
r
y
tproof perfo
r
a
ched.
connector c
o
e
top of the a
c
plug clockw
i
10
m
ay reduce th
e
e
s on the bat
t
y
r
mance, clos
e
o
ver counterc
l
c
cessory con
n
i
se until han
d
e
radio perfo
r
t
ery.
e
the accesso
r
l
ockwise, an
d
n
ector.
d
tight.
r
mance and l
i
r
y connector
c
d
open the co
i
fe span of th
e
c
over and fa
s
ver.
e
antenna.
s
ten the
11
3. Basic Operations
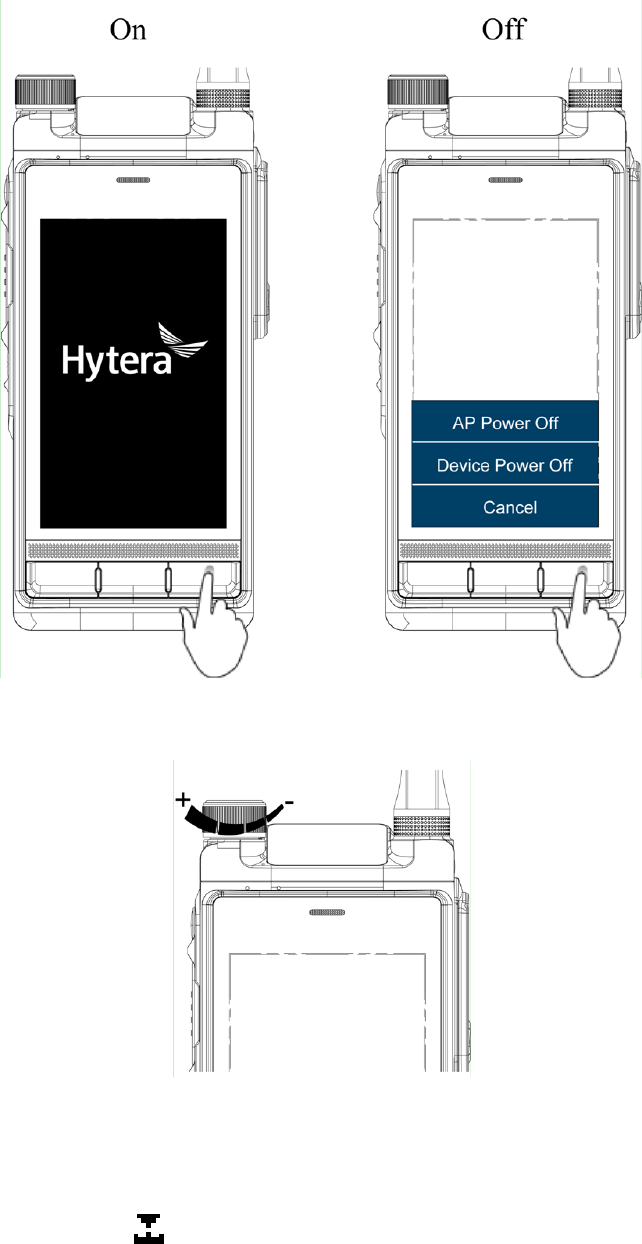
3.1 Turning the Radio On or Off
To turn the radio on, press and hold the Power key until the splash screen appears.
To turn the radio off, do as follows:
1. Press and hold the Power key until the power-off selection screen appears.
2. Tap Device Power Off, and then tap SURE.
12
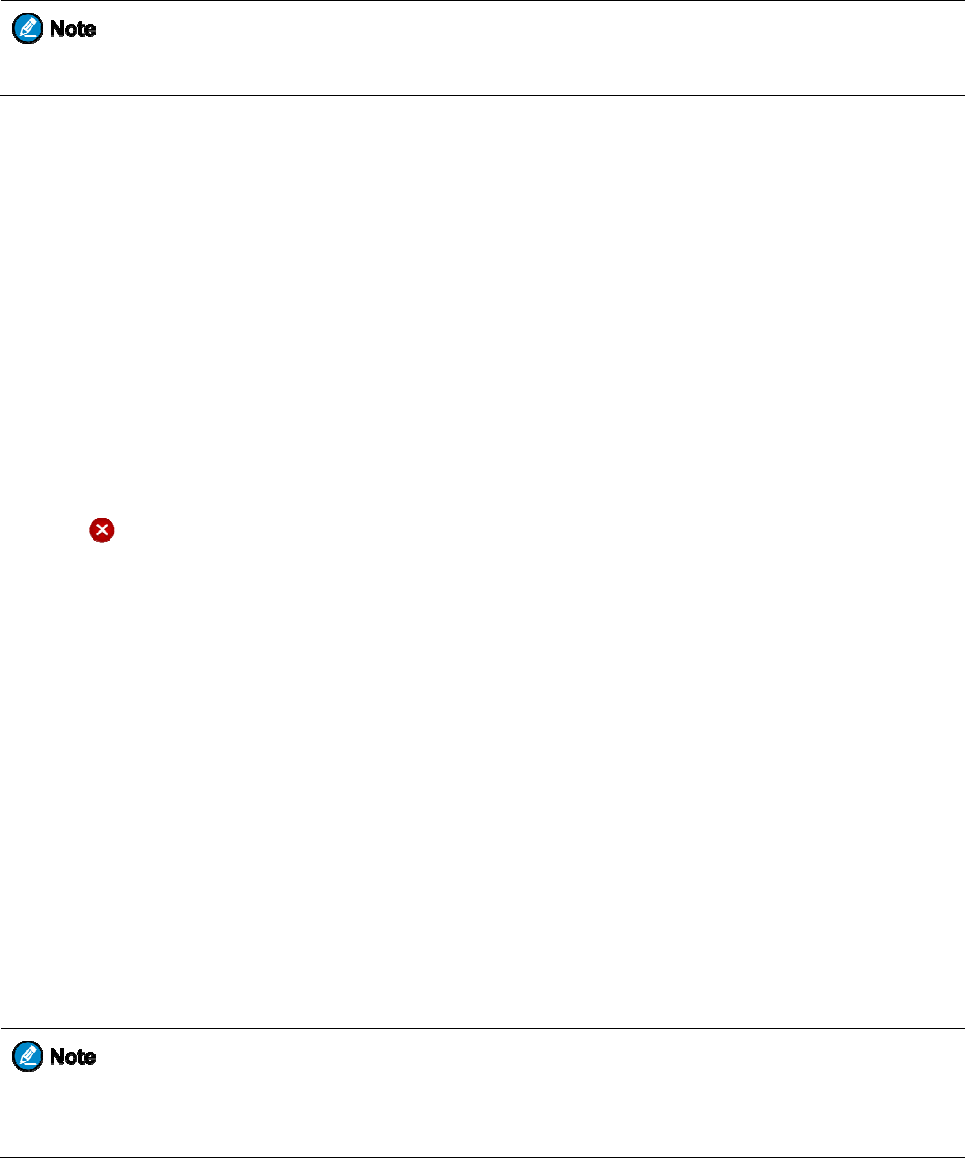
3.2 Adjusting the Volume
3.3 Selecting a Channel or Contact
1. Press the Smart Knob.
2. After the top screen displays , rotate the knob.
If you do not operate the knob within 10s, it automatically returns to the volume control state.
3.4
O
p
3.4.1
A
c
On the hom
e
You c
a
Accessi
n
To access
w
Adding
W
1. Touch
2. Tap A
D
3. Tap O
K
Deleting
W
1. Touch
2. Tap
Repositi
o
1. Touch
2. After t
h
3. Press t
h
3.4.2
A
c
From the h
o
Accessi
n
1. Swipe
l
2. Swipe
u
To set
icon i
n
p
eratin
g
c
cessin
g
e
screen, yo
u
a
nnot remov
e
n
g Widget
s
w
idgets on th
e
W
idgets
and hold the
D
D, and then
K
.
W
idgets
and hold the
on the up
p
o
ning Wi
d
and hold the
h
e widget is
h
h
e Home ke
y
c
cessin
g
o
me screen, y
o
n
g Apps
l
eft or right
fr
u
p or down t
o
whether yo
u
n
the app list
,
g
the M
a
g
and M
a
u
can access,
a
e
or repositio
n
s
e
home scree
n
widget
b
elo
w
tap the requ
i
widget to be
p
er right corn
e
d
gets
widget to be
h
ighlighted,
d
y
.
g
and M
a
o
u can acces
s
fr
om the righ
t
o
view the a
p
u
can access t
h
,
go to Gene
r
a
in Scr
e
a
naging
W
a
dd, delete,
o
n
the NB wi
d
n
, swipe up o
r
w
which you
w
i
red widget.
deleted until
e
r of the wid
g
repositioned
d
rag it up or
d
a
naging
A
s
the app list
,
t
or left edge
p
ps, and then
h
e app list fr
o
r
al > Device
>
13
e
en
W
idgets
o
r reposition
w
d
get.
r
down to th
e
w
ant to add
a
it is highlig
h
g
et, and then
.
d
own to the
d
A
pps
,
and then re
p
of the home
s
tap the targe
t
o
m the left o
r
>
Personali
z
w
idgets.
e
target widg
e
a
new widget
,
h
ted.
tap OK.
d
esired positi
o
p
osition or de
s
creen.
t
app.
r
right edge o
z
ation > Sid
e
e
t, and then t
a
,
until the wi
d
o
n.
lete apps.
f the home s
c
e
_fence, and
t
a
p it.
d
get is highli
g
c
reen, tap th
e
t
hen tap Left
g
hted.
e
Settings
,
Right, or
Both.
Repositi
o
1. Touch
2. Drag t
h
3. Press t
h
Deleting
A
1. Touch
2. Tap
3. Tap O
K
You cannot
3.4.3
Vi
You can ac
c
Viewing
N
1. Swipe
d
2. Tap a
n
Clearing
To clear a n
o
To clear all
n
3.4.4
S
e
1. Swipe
d
2. Tap th
e
3. Use th
e
3.4.5
P
e
The quick s
e
You can als
o
o
ning Ap
p
and hold the
h
e app icon t
o
h
e Home ke
y
A
pps
and hold the
on the up
p
K
.
delete built-i
i
ewing a
c
ess the notif
i
N
otificati
o
d
own from t
h
n
otification t
o
Notificati
o
o
tification, s
w
n
otifications
,
e
archin
g
d
own from t
h
e
search ba
r
o
e
on-screen k
e
rformi
n
e
tting panel p
r
o
adjust the
b
p
s
app icon to
b
o
the desired
p
y
.
app icon to
b
p
er right corn
e
n apps.
nd Man
a
i
cation panel
o
ns
h
e top edge o
o
view the de
t
o
ns
w
ipe the noti
f
,
tap Clear a
t
g
for Ap
p
h
e top edge o
o
n the top.
eypad to ent
e
n
g Quick
r
ovides insta
n
b
rightness, a
n
b
e reposition
e
p
osition.
b
e deleted un
t
e
r of the app
a
ging N
o
to view and
c
f any screen
t
t
ails.
f
ication left
o
t
the bottom
o
p
s, Mess
f any screen.
e
r the keywo
r
Setting
s
n
t access to
S
n
d turn on or
o
14
e
d until it jig
g
t
il it jiggles.
icon.
o
tificatio
n
c
lear notific
a
t
o view noti
fi
o
r right.
o
f the notific
a
ages, a
n
r
d.
s
S
ettings, Ca
m
o
ff the airpla
n
g
les.
n
s
tions.
fi
cations.
a
tion panel.
n
d Conta
era, Flashlig
h
n
e mode, Wi
-
cts
h
t, Calculato
r
-
Fi, NB netw
r
, and other h
a
ork, Bluetoo
t
a
ndy feature
s
t
h, and so on
.
s
.
.

To acc
e
additio
n
To rep
o
3.4.6
M
You can ac
c
Accessi
n
1. Doubl
e
2. Swipe
u
Closing
R
To close a r
u
To close all
3.5
Lo
c
When the
m
operations.
To tur
n
To allo
w
Main
S
To tur
n
In addition,
main screen
To set the s
c
1. Go to
S
2. Tap U
n
N
o
S
w
P
a
P
a
e
ss the quick
n
al items.
o
sition an ite
m
anaging
c
ess and clos
e
n
g Runnin
e
-press the H
o
u
p or down t
o
R
unning
A
u
nning app,
s
running app
s
c
king a
m
ain screen is
n
off the scre
e
w
the main s
c
S
creen > Sle
e
n
on the scree
n
it is recomm
e
is turned of
f
c
reen lock, d
o
S
ettings > G
e
n
lock Patter
n
o
ne: The scr
e
w
ipe: Swipe
u
a
ssword: Cr
e
a
ttern: Creat
e
setting pane
l
m
, touch and
Runnin
g
e
running ap
p
g Apps
o
me key fro
m
o
the target a
p
A
pps
s
wipe it left
o
s
, tap .
nd Unl
o
not in use, it
e
n, long pres
s
c
reen to be t
u
e
p, and then
t
n
, press the
S
e
nded that y
o
f
.
o
as follows:
e
neral > Pri
v
n
, and then t
a
e
en will neve
r
u
p to unlock.
e
ate a passw
o
e
a pattern t
h
l
, swipe up fr
o
hold the ite
m
g
Apps
p
s.
m
any screen.
p
p, and then
o
r right.
o
cking
t
is recomme
n
s
the Smart
K
u
rned off aut
o
t
ap the requi
r
S
mart Key o
r
o
u secure yo
u
v
acy & Secu
r
a
p one o
f
the
r
be locked.
o
rd for unloc
k
h
at you draw
o
15
o
m the botto
m
m
, and drag it
tap it.
t
he Mai
n
ded that yo
u
K
ey.
o
matically, g
o
r
ed interval.
r
Home key.
u
r radio using
r
ity > Scree
n
following:
k
ing the scre
e
o
n the scree
n
m
edge of an
y
to the desire
d
n Scre
e
u
turn it off t
o
o
to Settings
a screen loc
k
n
Lock.
e
n.
n
to unlock it.
y
screen. Yo
u
d
position af
t
e
n
o
save the bat
t
> General >
k
. The scree
n
u
can swipe l
e
t
er it is highl
i
t
ery and avoi
>
Device > D
i
n
lock is trigg
e
e
ft to view
i
ghted.
d unintende
d
i
splay >
e
red after th
e
d
e
16
3.6 Switching the Operation Mode
The radio can operate in NB mode or NB & broadband (BB) mode. The NB mode further includes the following
two types:
Conventional mode: supports half-duplex operation and allows radios to communicate directly, without using
the network.
Trunking mode: supports half-duplex operation and allows radios to communicate over the network. The
radio must register with the network and then operate within the network coverage.
To switch the specific NB mode, go to Settings > Private > Mode, and then tap the required mode.
Upon power-on, the radio operates in NB & BB mode. To allow the radio to operate only in NB mode, do as
follows:
1. Press and hold the Power key until the power-off selection screen appears.
2. Tap AP Power Off, and then tap SURE.
4. St
a
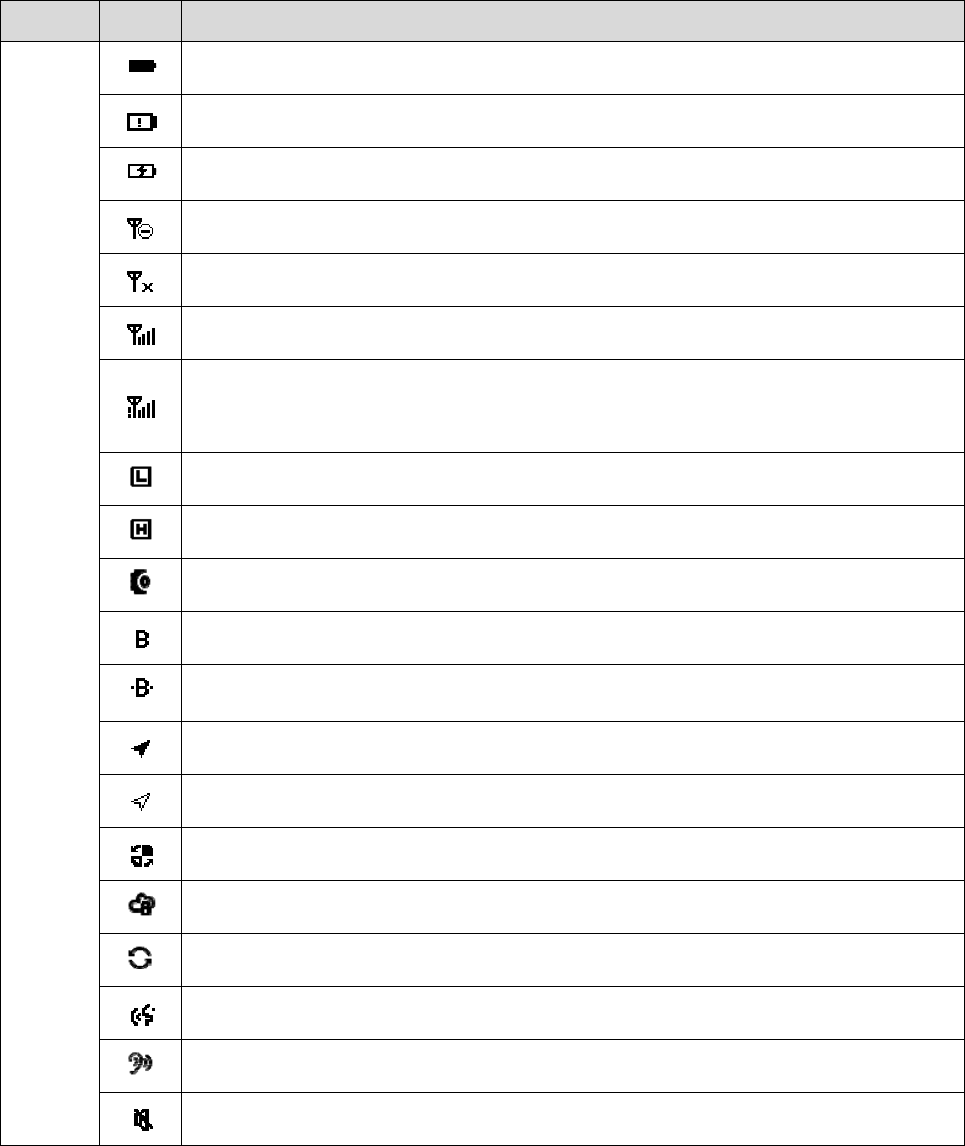
4.1
LC
Status Ic
o
Screen
Top
screen &
main
screen
a
tus I
D Icon
s
o
ns
Icon
T
h
T
h
T
h
T
h
T
h
T
h
T
h
u
n
T
h
T
h
A
n
T
h
A
T
h
T
h
T
h
T
h
T
h
T
h
T
h
T
h
ndic
a
s
h
is icon sho
w
h
e battery po
w
h
e radio is c
h
h
e NB netwo
r
h
ere is no sig
n
h
e number o
f
h
e number o
f
n
der a single
B
h
e radio is se
t
h
e radio is se
t
n
accessory i
s
h
e Bluetooth
Bluetooth d
e
h
e Position f
e
h
e Position f
e
h
e radio is ro
a
h
e Encryptio
n
h
e radio is sc
a
h
e Squelch
O
h
e Monitor f
e
h
e radio oper
a
a
tion
s
w
s the battery
w
er is low.
h
arging.
r
k is turned
o
n
al from the
N
f
bars indicat
e
f
bars indicat
e
B
S.
t
at low pow
e
t
at high po
w
s
connected.
feature is en
a
e
vice is conn
e
e
ature is ena
b
e
ature is ena
b
a
ming.
n
feature is e
n
a
nning.
O
ff feature is
e
e
ature is ena
b
a
tes in silent
17
s
R
a
level.
o
ff.
N
B network.
e
s the signal
s
e
s the signal
s
e
r.
w
er.
a
bled.
e
cted.
b
led, and the
r
b
led, but the
r
n
abled.
e
nabled.
b
led.
mode.
a
dio Status
s
trength of t
h
s
trength whe
n
r
adio receive
s
r
adio receive
s
h
e NB netwo
r
n
the radio o
p
s
positioning
s
no position
i
r
k.
p
erates in tru
n
data.
i
ng data.
n
king mode
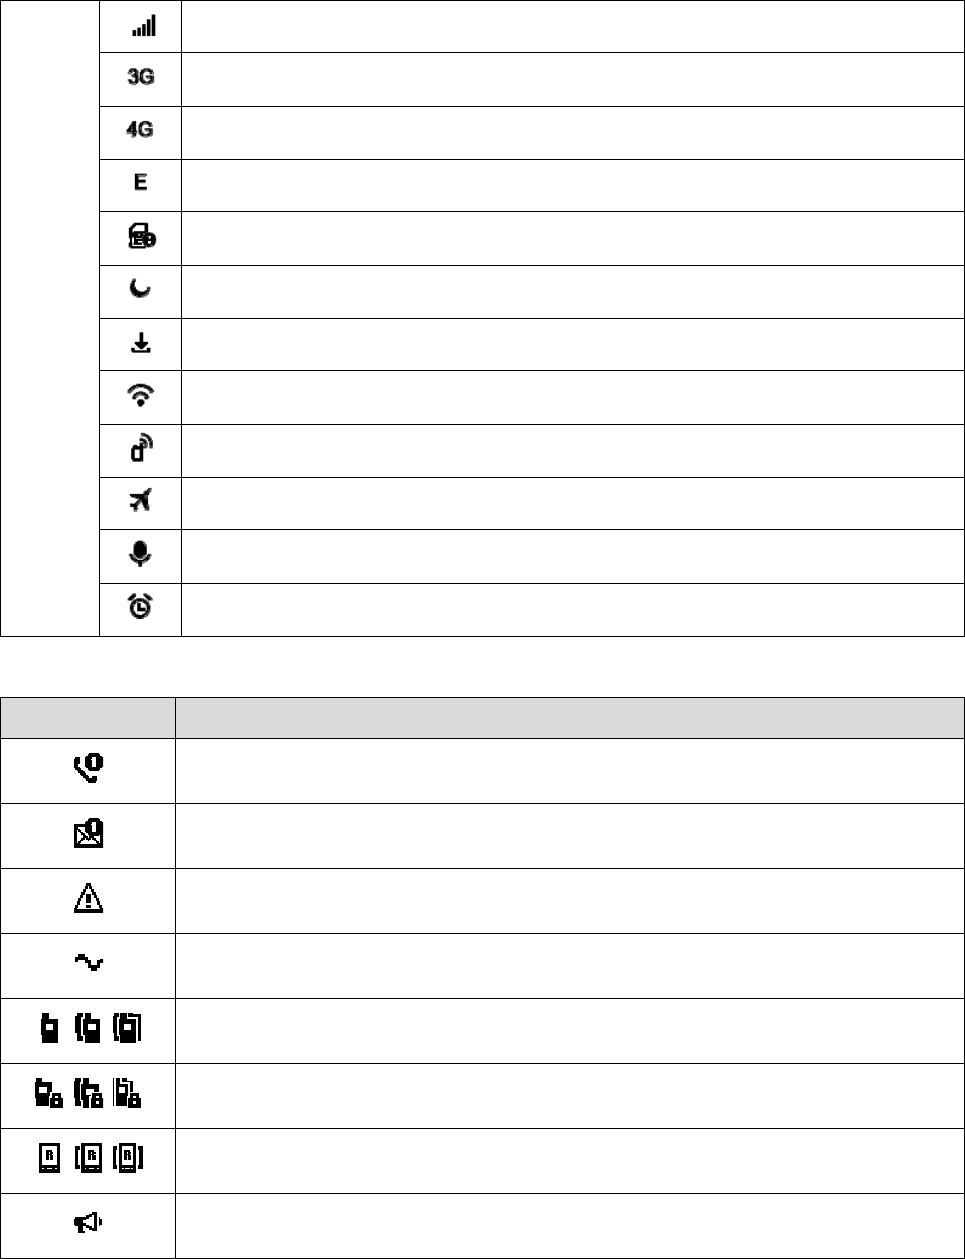
Main
screen
Call and
Ico
n
/
/
/
T
h
A
A
A
n
N
o
T
h
T
h
T
h
T
h
T
h
T
h
T
h
Data Icon
s
n
Th
Th
A
n
Th
/ A
p
/ A
n
/ A
p
A
b
h
e number o
f
3G network
4G network
n
EDGE net
w
o
SIM card i
s
h
e radio oper
a
h
e radio is d
o
h
e radio is co
h
e radio prov
h
e radio oper
a
h
e Voice Re
c
h
e Alarm fea
t
s
e digit indic
a
e digit indic
a
n
emergency
c
e radio is tra
n
p
rivate/grou
p
n
encrypted p
r
p
rivate/grou
p
b
roadcast cal
f
bars indicat
e
is available.
is available.
w
ork is avail
a
s
detected.
a
tes in Do N
o
o
wnloading.
nnected to t
h
ides a perso
n
a
tes in Airpl
a
c
order featur
e
t
ure is enabl
e
a
tes the num
b
a
tes the num
b
c
all is in pro
g
n
smitting on
p
/all call is in
r
ivate/group/
p
/all call is in
l is in progre
s
18
e
s the signal
s
a
ble.
o
t Disturb m
o
h
e Internet ov
n
al hotspot.
a
ne mode.
e
is enabled.
e
d.
Ra
b
er of missed
b
e
r
of unread
g
ress.
an analog ch
a
progress on
t
all call is in
p
progress on
a
s
s.
s
trength of t
h
o
de.
er a Wi-Fi n
e
dio Status
calls.
short messa
g
a
nnel.
t
he NB netw
o
p
rogress on t
h
a
Radio over
h
e BB networ
k
e
twork.
g
es.
o
rk.
h
e NB netwo
r
IP (RoIP) n
e
k
.
r
k.
e
twork.

19
4.2 LED Indications
LED Indicator 1
LED Indicator Radio Status
Flashes blue A Bluetooth device is connected.
Flashes red There is/are unread short messages/notifications or missed calls.
LED Indicator 2
LED Indicator Radio Status
Flashes green Being turned on.
Flashes green slowly Standby in trunking mode.
Glows green Receiving.
Glows red
During a call: Transmitting.
Standby: The battery runs low. Please recharge or replace the battery.
Flashes red
Establishing a call in trunking mode. This indication is applicable to the calling
radio.
Flashes orange slowly
Conventional mode: scanning or roaming
Trunking mode: registering
Flashes orange rapidly
Conventional mode: working in emergency mode.
Trunking mode: Establishing a Full Off Air Call Set-Up (FOACSU) call.
This indication is applicable to the called radio.
Glows orange
Call hang time: No voice is being transmitted or received during a call. Within
such a period, you can press and hold the PTT key and speak.

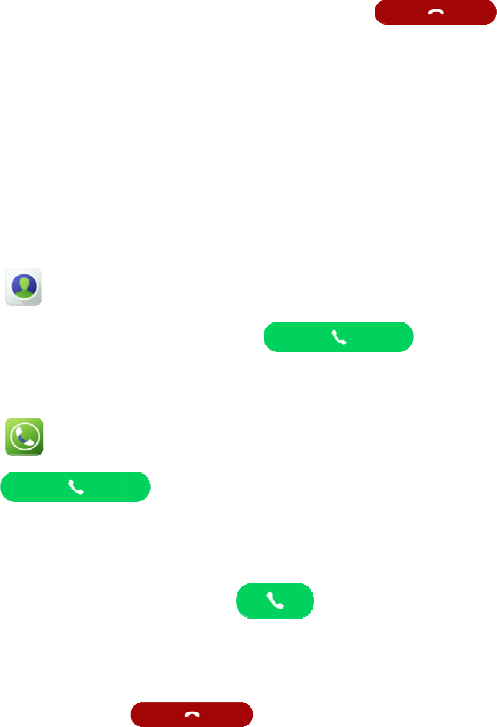
5. C
a
You can ini
t
make sure t
h
5.1
Gr
o
A group cal
l
5.1.1
I
n
To initiate a
1. Select
t
P
r
T
a
2. Press a
n
To initiate a
1. Tap
2. Tap P
M
5.1.2
R
e
You can lis
t
5.1.3
E
n
A group cal
l
In trunking
m
5.2
Pri
A private c
a
5.2.1
I
n
To initiate a
1. Select
t
P
r
a
ll Se
r
t
iate various
t
h
at the numb
e
o
up Ca
l
l
is a hal
f
-du
p
n
itiating
G
call to a gro
u
t
he target gr
o
r
ess the Sma
r
a
p >
F
n
d hold the
P
call to a gro
u
, and then
M
R Group
C
e
ceivin
g
t
en to a recei
v
n
ding o
r
l
ends autom
a
m
ode, you c
a
vate C
a
a
ll is a hal
f
-d
u
n
itiating
P
call to a pri
v
t
he target pri
v
r
ess the Sma
r
r
vice
s
t
ypes of call
s
e
r complies
w
l
ls
p
lex NB call
G
roup C
u
p contact sa
v
o
up contact i
n
r
t Knob, an
d
avorites/Gr
o
P
TT key.
u
p contact n
o
enter the tar
g
C
all, and the
n
g
Group
C
v
ed group ca
l
r
Exiting
a
tically whe
n
a
n also press
t
a
lls
u
plex NB cal
l
P
rivate
C
v
ate contact s
v
ate contact
i
r
t Knob, an
d
s
s
in different
w
w
ith the dial
r
from an indi
v
alls
v
ed in Cont
a
n
one of the f
o
d
then rotate
i
o
up, and the
n
o
t saved in C
o
g
et number.
n
press and h
o
C
alls
l
l without an
y
Group
C
n
the call han
g
t
he End key
l
initiated by
C
alls
aved in Con
t
i
n one of the
f
d
then rotate
i
20
w
ays. When
i
r
ule. For the
d
v
idual user i
n
a
cts, do as fo
l
o
llowing wa
y
i
t to the posit
i
n
tap the targ
e
o
ntacts, do a
o
ld the PTT
k
y
operation.
C
alls
g
time expire
to end an ou
t
one individu
t
acts, do as f
o
f
ollowing w
a
i
t to the posit
i
i
nitiating an
N
d
etailed dial
r
n
a group to a
l
lows:
y
s:
i
on associate
d
e
t group.
s follows:
k
ey.
s.
t
going group
al user to an
o
o
llows:
a
ys:
i
on associate
d
N
B call by e
n
r
ule, please c
ll the other
m
d
with the ta
r
call or exit a
n
o
ther.
d
with the ta
r
n
tering the ta
r
onsult your
d
m
embers in t
h
r
get group co
n
n
incoming
g
r
get private c
o
r
get number,
d
ealer.
h
e group.
n
tact.
g
roup call.
o
ntact.

T
a
2. Press a
n
To initiate a
3. Tap
4. Tap P
M
5.2.2
R
e
In conventi
o
In trunking
m
FOAC
S
Press t
h
Off Ai
r
The ca
l
5.2.3
E
n
A private c
a
In trunking
m
5.3
Br
o
A broadcast
authorized
b
5.3.1
I
n
To initiate a
1. Tap
2. Tap th
e
5.3.2
R
e
You can lis
t
a
p >
F
n
d hold the
P
call to a pri
v
, and then
M
R Private
C
e
ceivin
g
o
nal mode, y
o
m
ode, the op
e
S
U
h
e PTT key t
o
r
Call Set-Up
l
l is establish
e
n
ding P
r
a
ll ends auto
m
m
ode, you c
a
o
adcas
t
call is a spe
c
b
y your deale
r
n
itiating
B
broadcast c
a
> Favor
i
e
target grou
p
e
ceivin
g
t
en to a recei
v
avorites/Pri
v
P
TT key.
v
ate contact
n
enter the tar
g
C
all, and the
n
g
Private
o
u can listen
t
e
ration varie
s
o
answer the
(OACSU)
e
d automatic
a
r
ivate C
a
m
atically wh
e
a
n also press
t
t
Calls
(
c
ial group ca
l
r
for you to i
n
B
roadca
a
ll, do as foll
o
i
tes/Group.
p
contact, an
d
g
Broadc
v
ed
b
roadcas
t
v
ate, and the
n
n
ot saved in
C
g
et number.
n
press and h
o
Calls
t
o a received
s
with the set
u
call.
a
lly. You can
a
lls
e
n the call ha
n
t
he End key
(
Trunki
n
l
l. In a broad
c
n
itiate a
b
roa
st Calls
o
ws:
d
then tap
ast Call
s
t
call withou
t
21
n
tap the tar
g
C
ontacts, do
a
o
ld the PTT
private call
w
u
p mode of t
h
listen to it
w
n
g time expi
r
to end the ca
l
n
g Onl
y
c
ast call, onl
y
dcast call.
.
s
t
any operati
o
g
et private co
n
a
s follows:
key.
w
ithout any
o
h
e received
p
ithout any o
p
r
es.
l
l.
y
)
y
the calling
p
o
n.
n
tact.
o
peration.
p
rivate call:
p
eration.
p
arty can spe
a
a
k. Your rad
i
i
o must be

5.3.3
E
n
Press the E
n
5.4
All
In conventi
o
In turnking
m
system.
Your radio
m
5.4.1
I
n
To initiate a
1. Tap
2. Press a
n
5.4.2
R
e
You can lis
t
5.4.3
E
n
In conventi
o
In trunking
m
5.5
Ca
On analog c
follows:
1. Press t
h
2. Press a
n
5.6
E
m
An emerge
n
dealer for y
o
5.6.1
I
n
To initiate a
n
ding o
r
n
d key to en
d
Calls
o
nal mode, a
n
m
ode, an all
c
m
ust be auth
o
n
itiating
A
n all call, do
> Grou
p
n
d hold the
P
e
ceivin
g
t
en to an inco
n
ding o
r
o
nal mode, a
n
m
ode, you c
a
lls on
A
hannels, you
h
e Smart K
n
n
d hold the
P
m
ergen
c
n
cy call is a c
a
o
u to initiate
a
n
itiating
a
n emergenc
y
r
Exiting
d
an outgoing
n
all call is a
c
c
all is a call
f
o
rized by yo
u
A
ll Calls
as follows:
p
and select t
h
P
TT key.
g
All Call
s
ming all call
r
Exiting
n
all call end
s
a
n press the
E
A
nalog
C
can initiate
c
n
ob, and then
P
TT key, an
d
c
y Calls
a
ll initiated t
o
a
n emergenc
y
a
n Emer
g
y
call, press t
h
Broadc
a
broadcast c
a
c
all from an
i
f
rom an indi
v
u
r dealer for
y
h
e all call co
n
s
without any
All Call
s
s
after the cal
l
E
nd key to e
n
C
hann
e
c
alls to all th
e
rotate it to s
e
d
speak into t
h
o
ask for hel
p
y
call.
g
ency C
h
e Emergen
c
22
a
st Calls
a
ll or exit an
i
i
ndividual us
e
v
idual user to
y
ou to initiat
e
n
tact, or tap
operation.
s
l
ing party rel
n
d an outgoin
e
ls (Co
n
e
other users
o
e
lect the req
u
h
e micropho
n
p
in case of e
m
all
c
y On key.
i
ncoming
b
ro
e
r to all the
o
all the other
u
e
an all call.
and en
t
ease the PT
T
g all call or
e
n
ventio
n
o
n the chann
e
u
ired channel
.
n
e.
m
ergency. T
h
adcast call.
o
ther users o
n
u
sers in a sp
e
t
er the all ca
l
T
key.
e
xit an incom
i
n
al Onl
y
e
ls. To initia
t
.
h
e radio mus
t
n
the current
c
e
cific base st
a
l
l number.
i
ng all call.
y
)
t
e such a call
,
t
be authoriz
e
c
hannel.
a
tion, area, o
r
,
do as
e
d by your
r
5.6.2
R
e
You can lis
t
5.6.3
E
n
As the calli
n
As the calle
d
5.7
Ph
If you inser
t
5.7.1
I
n
To initiate a
1. Tap
2. Tap th
e
To initiate a
3. Tap
4. Tap
5.7.2
R
e
To answer
a
5.7.3
E
n
To end a ph
o
e
ceivin
g
t
en to a recei
v
n
ding o
r
n
g party, you
d
party, you
c
one Ca
t
an SIM car
d
n
itiating
P
call to a ph
o
>
Favor
e
target cont
a
call to a ph
o
, and the
n
e
ceivin
g
a
received ph
o
n
ding P
h
o
ne call, tap
g
an Em
e
v
ed emergen
c
r
Exiting
can press th
e
c
an press the
lls
d
, you can ini
t
P
hone C
o
ne number s
a
ites/Private.
a
ct, and then
t
o
ne number n
o
n
enter the ta
r
.
g
Phone
C
o
ne call, tap
h
one cal
e
rgency
C
c
y call witho
u
an Eme
r
e
Emergenc
y
End key or
t
t
iate a call to
alls
a
ved in Cont
t
ap
o
t saved in
C
r
get number.
C
alls
.
ls
.
23
C
all
u
t any operat
i
r
gency
C
y
Of
f
key or
t
t
ap
a phone nu
m
acts, do as f
o
.
C
ontacts, do
a
i
on.
C
all
t
urn off the r
a
to ex
i
m
ber.
o
llows:
a
s follows:
a
dio to end a
n
i
t an emerge
n
n
emergency
n
cy call.
call.
6. M
e
The Messa
g
6.1
V
i
e
To view a
m
6.2
Se
n
You can cre
6.2.1
C
1. Tap
2. Enter t
h
3. Tap th
e
You c
a
4. Tap
If you
6.2.2
S
e
To send a q
u
1. Tap
2. Enter t
h
3. Tap
4. Slide r
i
5. Tap th
e
6.3
Fo
r
1. Tap
2. Touch
3. Enter t
h
e
ssag
g
e feature all
o
e
wing
M
m
essage, tap
n
ding
M
ate a messag
e
reating
a
, and then
h
e target nu
m
e
Type mess
a
a
n also tap
to send t
h
do not tap
e
nding
Q
u
ick text mes
, and then
h
e target nu
m
in the fr
o
i
ght to acces
s
e
required m
e
r
wardi
n
, and then
t
and hold the
h
e target nu
m
e Se
r
o
ws you to se
n
M
essag
e
, and the
n
M
essag
e
e
or send a p
r
a
nd Sen
d
tap .
m
ber in the T
o
a
ge text box,
to add th
e
h
e message.
, the cre
a
Q
uick Te
sage, do as f
o
tap i
n
m
ber in the T
o
o
nt of the Ty
p
s
the predefi
n
e
ssage, and t
h
n
g Mes
s
t
ap the conve
r
target messa
g
m
ber in the T
o
r
vice
s
n
d and recei
v
e
s
n
tap the targ
e
e
s
r
edefined qu
i
d
ing Me
s
o
text box, o
r
and enter th
e
e
required at
t
a
ted message
xt Mess
a
o
llows:
n
the lower ri
o
text box, o
r
p
e message t
e
n
ed message l
h
en tap
.
s
ages
r
sation conta
g
e to select i
t
o
text box, o
r
24
s
v
e messages.
e
t message.
i
ck text mess
a
s
sages
r
tap to
e
text.
t
achment.
will be save
d
a
ges
ght corner.
r
tap to
e
xt box.
ist.
.
ining the me
s
t
, and then ta
p
r
tap to
a
ge.
select a cont
d
as a draft.
select a cont
s
sage to
b
e f
o
p
Forward.
select a cont
act.
act.
o
rwarded.
act.

4. Tap
6.4
De
To delete a
c
1. Tap
2. Touch
3. Tap D
e
To delete a
s
1. Tap
2. Touch
3. Tap D
e
.
leting
M
c
onversation
,
.
and hold the
e
lete > DEL
E
s
ingle messa
g
, and then
t
and hold the
e
lete > DEL
E
M
essag
e
,
do as follo
w
target conve
r
E
TE.
g
e in a conve
t
ap the conve
r
target messa
g
E
TE.
e
s
w
s:
r
sation to sel
e
rsation, do a
s
r
sation.
g
e to select i
t
25
e
ct it.
s
follows:
t
.

26
7. Supplementary Features
7.1 Basic Settings
You can tap Settings > General and then do the following operations:
If you want to... Then...
Set SK2, SK3, and TK as
shortcuts to radio features
Go to Device > Programmable keys > SK2/SK3/TK > Short press / Long
press / Double-click, and then tap the required feature.
Set the language
Go to System > Language & input > Language, and then tap the required
language.
Set the wallpaper
1. Go to Device > Personalization > Wallpaper.
3. Tap the required picture, and then tap CONFIRM.
Adjust the brightness of backlight
Go to Device > Display > Main screen / Top screen, and then drag the
brightness slider.
Turn vibration on or off Go to Device > Sounds, and then tap Vibrate on ring or Vibrate on silent.
Set the profile Go to Device > Sounds > Profiles, and then tap Ring or Mute.
Set the ring, media, alarm, and call
volume
Go to Device > Sounds > Volume, and then drag the corresponding slider.
Select ringtones
1. Go to Device > Sounds > Sounds and vibrations.
2. Tap the corresponding tone, and then set tap the required ringtone.
Clear cached data Go to Device > Storage > Cached data, and then tap OK.
Set whether the main screen
displays battery percentage in the
status bar
Go to Device > Battery, and then tap Battery percentage.
Turn the gloves mode on or off Go to Device > Assistance, and then tap gloves mode.
Set the date and time Go to System > Date & time.
7.2
C
o
The Contac
t
7.2.1
A
d
To add a pr
i
1. Tap
2. Tap
T
a
C
h
3. Tap th
e
4. Tap th
e
5. Tap
6. Tap th
e
7. (Optio
n
8. Tap th
e
9. Tap S
a
7.2.2
A
d
To add freq
u
1. Tap
2. Tap th
e
7.2.3
D
e
1. Tap
2. Tap th
e
3. Swipe
u
4. Tap O
K
o
ntact
M
t
feature allo
w
d
ding P
r
i
vate contact,
> Privat
e
and assig
n
a
ke Photo: u
s
h
oose Photo
:
e
Name text
b
e
Add PMR
N
, and then ta
p
e
Add Phon
e
n
al) Tap Ad
d
e
Email, Ad
d
a
ve in the up
p
d
ding C
o
u
ently used c
> Favori
t
e
required co
n
e
leting
P
, and then
t
e
contact to b
u
p to the bot
t
K
.
M
anage
m
w
s you to vie
w
r
ivate C
o
do as follo
w
e
> .
n
a picture to
s
e the camer
a
:
choose a p
h
b
ox, and ent
e
N
umber tex
t
p
the require
d
e
Number te
x
d
Number to
d
ress, and N
o
p
er right corn
e
o
ntacts
t
ontacts to th
e
t
es > .
n
tacts, and t
h
P
rivate
C
t
ap Private.
e deleted, an
d
t
om, and the
n
m
ent
w
and mana
g
o
ntacts
w
s:
the contact
b
a
to take a ph
h
oto from the
e
r the contact
t
box, and en
t
d
type of pho
n
x
t box and e
n
add another
p
o
te text boxe
s
e
r.
t
o Favor
e
Favorites l
i
h
en tap OK.
C
ontacts
d
then tap
n
tap Delete.
27
g
e private an
d
b
y choosing
o
oto.
Gallery.
name.
t
er the Privat
e
n
e number.
n
ter the phon
e
p
hone numb
e
s
and enter t
h
ites
i
st, do as foll
o
.
d
group cont
a
o
ne the follo
w
e
Mobile Ra
d
e
number.
e
r.
h
e related inf
o
o
ws:
a
cts.
w
ing options:
d
io (PMR) n
u
o
rmation.
u
mber of the
c
c
ontact.
28
7.3 Wireless and Network
7.3.1 Wi-Fi
The Wi-Fi feature provides free Internet access.
To connect to a Wi-Fi network, do as follows:
1. Go to Settings > General > Wireless & networks > Wi-Fi.
2. Check whether Wi-Fi is on. If yes, go to the next step. If no, tap Off to turn on it.
When Wi-Fi is turned on, the radio automatically scans for available networks and displays them.
3. Tap the network you want to connect to.
When you select an open network, the radio automatically connects to it. Otherwise, enter a password to
connect.
7.3.2 Bluetooth
The Bluetooth feature allows a wireless connection with another Bluetooth device for short-range communication.
To pair the radio with another Bluetooth device, do as follows:
1. Go to Settings > General > Wireless & networks > Wi-Fi.
2. Check whether Bluetooth is on. If yes, go to the next step. If no, tap Off to turn on it.
3. Tap the name of the target device.
7.3.3 Personal Hotspot
The Personal Hotspot feature allows you to share the radio's Internet connection with other devices.
To set up a hotspot, do as follows:
1. Go to Settings > General > Wireless & networks > Personal Hotpot > Set up Wi-Fi hotspot.
2. Enter the related information, and then tap Save.
To turn on or off the Bluetooth tethering feature, tap Bluetooth tethering under Personal Hotspot.
7.3.4 NFC
The Near Field Communication (NFC) feature allows data exchange when you touch the radio with another
compatible device.
To turn on or off NFC, go to Settings > General > Wireless & networks > More, and then tap NFC.

7.4
A
P
On the AP,
y
icon.
7.4.1
C
a
The Camer
a
ordinary ph
o
Taking P
To take a p
h
1. Launc
h
2. Swipe
l
3. Tap
H
D
4. Tap
5. Aim th
6. Tap
Recordi
n
To record a
1. Launc
h
2. Swipe
l
3. Tap
4. Tap
5. Aim th
P
Ps
y
ou can use
e
a
mera
a
app allows
y
o
to, or takin
g
hotos
h
oto, do as fo
l
h
the Camera
l
eft or right t
o
to do the f
o
: Turn on
o
D
R: High D
y
: Take tim
e
: Switch b
e
in the up
p
e camera at t
h
.
n
g Videos
radio, do as
f
h
the Camera
l
eft or right t
o
to do the
: Turn on
o
: Switch b
e
in the up
p
e camera at t
h
e
mbedded ap
p
y
ou to take p
h
g
a panorama
l
lows:
app.
o
the tab wit
h
o
llowing bas
i
o
r off the fla
s
y
namic Rang
e
e
-delayed ph
o
e
tween the fr
o
p
er right cor
n
h
e subject, a
n
f
ollows:
app.
o
the tab wit
h
following ba
s
o
r off the fla
s
e
tween the fr
o
p
er right cor
n
h
e subject, a
n
p
s as you do
h
otos and re
c
photo.
h
.
i
c settings:
s
h.
e
, helps you
g
o
tos
o
nt-facing ca
m
n
er to do othe
r
n
d pinch the
s
h
.
s
ic settings:
s
h.
o
nt-facing ca
m
n
er to do othe
r
n
d pinch the
s
29
on your mob
c
ord videos. I
t
g
et a brighte
r
m
era and rea
r
settings, su
c
s
creen to zoo
m
era and rea
r
settings, su
c
s
creen to zoo
ile phone. T
o
t
includes ta
b
and richer p
h
r
-facing cam
e
c
h as resoluti
m out or spr
e
r
-facing cam
e
c
h as resoluti
m out or spr
e
o
launch an a
p
b
s for recordi
n
h
oto.
e
ra.
on, wate
r
ma
r
e
ad the scree
n
e
ra.
on and wate
r
e
ad the scree
n
p
p, tap the re
n
g a video, t
a
r
k, and face
d
n
to zoom in
i
r
mark.
n
to zoom in
i
lated app
a
king an
d
etection.
i
f required.
i
f required.

6. Tap
7. (Optio
n
8. Tap
Taking P
a
To take a p
a
1. Launc
h
2. Swipe
l
3. Tap th
e
4. Pan sl
o
7.4.2
G
The Gallery
V
iewing
P
To view a p
i
1. Launc
h
2. Tap
A
l
A
l
3. Depen
d
tap a p
i
4. (Optio
n
While view
i
Move
t
Edit:
V
Set pi
c
Slides
h
Detail
s
to start re
c
n
al) Tap
to stop re
c
a
norama
P
a
norama phot
h
the Camera
l
eft or right t
o
e
panorama c
a
o
wly in the re
allery
app allows
y
P
ictures
a
i
cture or vid
e
h
the Gallery
, and then
t
l
l: View pict
u
l
bums: View
d
ing on the v
i
i
cture or vid
e
n
al) Swipe le
f
i
ng a picture,
t
o Folder: M
V
iew and use
c
ture as: Set
t
h
ow: Start a
s
s
: View infor
m
c
ording.
to pause, a
n
c
ording.
P
hotos
o, do as foll
o
app.
o
the tab for
t
a
mera icon.
quired direct
i
y
ou to view a
n
a
nd Video
s
e
o, do as foll
o
app.
t
ap one of th
e
u
res and vide
o
pictures and
i
ew mode, ei
t
e
o.
f
t or right to
v
you can tap
t
ove the pict
u
the editing t
o
t
he picture a
s
s
lideshow wi
t
m
ation about
n
d then tap
o
ws:
t
aking a pan
o
i
on.
n
d manage p
i
s
o
ws:
e
following o
p
o
s organized
videos orga
n
t
her tap a pic
v
iew the nex
t
t
he screen, a
n
u
re into an ex
i
o
ols.
s
a contact av
t
h the picture
the picture,
i
30
to conti
n
o
rama photo.
i
ctures and v
i
p
tions to sel
e
by date.
n
ized by alb
u
ture or video
t
or previous
n
d then tap
M
i
sting or a ne
w
atar or the w
a
s and videos
i
ncluding the
n
ue.
i
deos.
e
ct the view
m
m.
to view it, o
r
picture or vi
d
M
ore to do th
e
w
folder.
a
llpaper.
in the curren
t
title, time, a
n
m
ode:
r
first tap an
a
d
eo.
e
following
o
t
folder.
n
d properties
a
lbum or fol
d
o
pe
r
ations:
.
d
er and then

Zooming
To zoom in
Doubl
e
Spread
Deleting
To delete an
To delete al
l
1. Tap
2. Touch
3. Tap D
e
7.4.3
C
The Clock
a
Using th
e
The Alarm
f
To create a
n
1. Launc
h
2. Tap
3. Tap O
K
R
e
V
i
L
a
4. Tap
Si
S
n
V
o
o
p
In and O
u
or out a pict
u
e
-tap anywhe
r
two fingers
a
Pictures
a
image or a
v
l
pictures an
d
, and then ta
p
and hold the
e
lete, and the
n
lock
a
pp allows y
o
e
Alarm
f
eature allow
s
n
alarm, do a
s
h
the Clock a
p
, and then
d
K
, and then t
a
e
peat: Tap t
h
: Set the al
a
i
brate: Enab
l
a
bel: Add a l
a
> Settings
lence after:
S
n
ooze length
o
lume butto
n
p
tions are av
a
u
t
u
re, do one o
f
r
e on the scr
e
a
part on any
p
a
nd Video
v
ideo, tap De
l
d
videos in a
f
p
Albums.
folder to be
d
n
tap OK.
o
u to access a
l
s
you to set
a
s
follows:
p
p, and then
t
d
rag the poi
n
a
p the follo
w
h
e days on w
h
a
rm tone.
l
e or disable
a
a
bel for the
a
to set the fo
l
S
et the perio
d
: Set a durati
o
n
s: Set the f
u
a
ilable: Snoo
z
f
the followi
n
e
en.
p
lace to zoo
m
s
l
ete while vi
e
f
older, do as
d
eleted until
i
l
arms, view
t
a
n alarm to ri
n
t
ap .
n
te
r
to set the
w
ing items to
s
h
ich you wan
t
a
larm vibrati
o
a
larm.
l
lowing optio
d
after which
o
n for the al
a
u
nction of the
z
e, Dismiss,
a
31
n
g:
m
in, and pin
c
e
wing it.
follows:
i
t is selected.
t
he world clo
c
n
g at a speci
f
time for the
a
s
et the alarm
:
t
the alarm t
o
o
n.
ns:
the alarm st
o
a
rm while sn
o
Smart Kno
b
a
nd Do noth
i
c
h the screen
c
k, set a stop
w
f
ic time.
a
larm to sou
n
:
o
ring.
o
ps ringing.
o
ozing.
b
when the a
l
i
ng.
to zoom out.
w
atch, and u
s
n
d.
l
arm sounds.
s
e a timer.
The followi
n
n
g three
S
t
S
u
When the al
To delete a
n
Using th
e
The World
C
To ac
c
To lis
t
To re
m
Using th
e
The Timer
f
To use a ti
m
1. Launc
h
2. Tap th
e
3. Tap
After the ti
m
Tap
Tap
Tap th
e
If you creat
e
Using th
e
The stopwa
t
To use the s
t
1. Launc
h
2. Tap
3. (Optio
n
4. Tap
t
art week on
u
nday, and
M
arm sounds,
n
alarm, tap
e
World C
C
lock featur
e
c
ess the wor
l
t
a city on th
e
m
ove a city
fr
e
Timer
f
eature allow
s
m
er, do as fol
l
h
the Clock a
p
e
digits on th
e
to start t
h
m
er starts, yo
u
to pause t
to delete
t
e
icon in the l
e
more than
o
e
Stopwa
t
t
ch feature al
l
t
opwatch, do
h
the Clock a
p
to begin
t
n
al) Tap the i
to stop ti
m
: Set the beg
i
M
onday.
swipe left to
, and then
lock
e
allows you
t
l
d clock, lau
n
e
world cloc
k
fr
om the list,
t
s
you to cou
n
l
ows:
p
p, and then
t
e
screen to s
e
h
e timer.
u
can do the
f
he timer.
t
he timer.
ower right c
o
o
ne timers, s
w
t
ch
l
ows you to
m
as follows:
p
p, and then
t
t
iming.
con in the lo
w
m
ing.
i
nning day o
f
snooze or s
w
tap . If
y
t
o keep track
n
ch the Clock
k
screen, tap
t
ap , and
n
t down to an
t
ap .
e
t the length.
f
ollowing op
e
o
rner to add
a
w
ipe up or do
m
easure inte
r
t
ap .
w
er left corn
e
32
f
the week. T
h
w
ipe right to
d
y
ou want to
c
of the curre
n
app, and the
n
, and the
n
then tap the
c
event based
o
e
rations:
a
nother timer
.
wn to view t
h
r
vals of time.
e
r to measur
e
h
e following
d
ismiss the al
c
ancel the de
l
n
t time in mu
l
n
tap .
n
tap the city
c
ity to desele
o
n a preset p
e
.
h
e timers.
e
another inte
r
three option
s
arm.
l
etion, tap U
N
l
tiple cities a
r
to select it.
ct it.
e
riod.
r
val of time.
s
are availabl
e
N
DO instead
.
r
ound the wo
r
e
: Saturday,
.
r
ld.

5. View t
h
6. Click
7.4.4
C
a
The Calend
a
a reminder.
V
iewing
t
To set the c
a
1. Launc
h
2. Tap th
e
D
a
W
M
A
g
Setting t
h
To set the c
a
1. Tap
2. Set the
Creating
To create a
n
1. Tap
2. Set the
3. Tap D
O
Deleting
To delete a
n
1. Tap
2. Tap th
e
3. Tap
h
e timing res
u
to reset
t
a
lendar
a
r app allows
t
he Calen
d
a
lendar view
,
h
the Calend
a
e
date in the
u
a
y: Display t
h
W
eek: Displa
y
M
onth: Displ
a
g
enda: Disp
l
h
e Calen
d
a
lendar, do a
s
> Settings
related opti
o
an Event
n
event on th
e
> New ev
e
parameters
a
O
NE in the u
p
an Event
n
event from
t
> Delete e
v
e
event to be
d
, and then
t
u
lt on the sc
r
t
he stopwatc
h
you to consu
d
ar
,
do as follo
w
a
r app.
u
pper left co
r
h
e day view.
y
the week vi
e
a
y the month
v
l
ay the agend
a
d
ar
s
follows:
> General s
o
ns.
e
calendar, d
o
e
nt.
a
s required.
p
per right co
r
t
he calendar,
v
ents.
d
eleted.
t
ap OK.
r
een, or tap
h
.
lt the calend
a
w
s:
r
ner of the sc
r
e
w.
v
iew.
a
view.
ettings.
o
as follows:
r
ner.
do as follow
s
33
to share
t
a
r by day, we
e
r
een to displ
a
s
:
t
he result.
e
k, or month,
a
y the follow
i
create event
s
i
ng view opti
o
s
, and set an
a
o
ns:
a
larm to act a
s
s

7.4.5
B
The Browse
To set
t
To acc
e
To ope
n
To clo
s
To boo
k
To vie
w
7.4.6
C
a
The Calcul
a
To perform
b
1. Launc
h
2. Enter t
h
3. Tap th
e
4. Enter t
h
5. Tap th
e
To perform
7.4.7
C
o
The Compa
s
To use the c
1. Launc
h
2. Hold t
h
3. Follow
4. View t
h
rowser
r
app allows
t
he browser,
t
e
ss a web sit
e
n
a new tab,
t
s
e a tab, tap
k
mark the c
u
w
bookmarks
a
lculato
r
a
tor app facili
b
asic arithm
e
h
the Calcula
t
h
e first num
b
e
appropriate
h
e next num
b
e
equal sign t
o
advanced ari
t
o
mpass
s
s app allow
s
ompass, do
a
h
the Compa
s
h
e radio flat i
n
the on-scree
n
h
e informati
o
you to acces
s
t
ap > Se
t
e
, tap the add
r
t
ap >
, swipe u
p
u
rrent web pa
g
, tap >
B
r
tates basic a
n
e
tic operatio
n
t
or app.
b
er using the
o
arithmetic f
u
b
er.
o
view the re
t
hmetic oper
a
s
you to find
a
a
s follows:
s
s app.
n
your palm.
n
instruction
s
o
n on the co
m
s
a web site.
t
tings, and s
e
r
ess bar, ente
, and enter t
h
p
or down to
v
g
e, tap
>
B
ookmarks.
n
d advanced
a
n
s, do as foll
o
o
n-screen nu
m
u
nction key.
sult.
a
tions, swipe
a
direction a
n
s
when prom
p
m
pass screen.
34
e
t the param
e
r the web ad
d
h
e new web
a
v
iew the tab,
>
Save to bo
o
a
rithmetic o
p
o
ws:
m
eric keypa
d
left from th
e
n
d see your l
a
p
ted to calib
r
ters followin
d
ress, and th
e
a
ddress.
and then tap
o
kmarks.
p
erations.
d
.
e
edge of the
c
a
titude, longi
t
r
ate.
g on-screen
i
e
n tap Go on
.
c
alculator sc
r
t
ude, and alti
t
i
nstructions.
the on-scree
n
r
een.
t
ude.
n
keypad.

7.4.8
S
o
The Sound
R
To record a
n
1. Launc
h
2. Tap R
e
3. Tap D
o
To share an
7.4.9
A
The App St
o
To vie
w
To vie
w
require
To sea
r
To ma
n
7.5
Po
w
The radio c
a
High
P
Low P
o
To set the p
o
or Low.
To set the p
o
tap Trans
m
7.6
Ra
When the r
a
to enjoy sm
o
To turn on
o
o
und R
e
R
ecorder app
n
audio file,
d
h
the Sound
R
e
cord, and th
e
o
ne to stop r
e
audio file, ta
p
pp Stor
e
o
re allows y
o
w
app messa
g
w
apps, tap
A
d.
r
ch an app, t
ap
n
age downlo
a
w
er Le
v
a
n operates a
t
P
ower: Enabl
o
wer: Enabl
e
o
wer level in
o
wer level fo
m
ission Powe
r
dio ov
e
a
dio operatin
g
o
oth trunkin
g
o
r off this fea
t
e
corder
allows you
t
d
o as follows
R
ecorder app.
e
n speak int
o
e
cording.
p
File, tap th
e
o
u to downlo
a
g
es, tap Mess
A
pp Store, ta
p
ap
App Store
>
a
ded apps, ta
p
v
el
t
one of the f
o
es communi
c
e
s communic
a
trunking mo
r a channel i
n
r
> Low Po
w
e
r IP (R
o
g
in trunking
g
services ov
e
t
ure, go to S
e
t
o record an
a
:
o
the microp
h
e audio file,
a
a
d apps to yo
u
ages.
p
Cat in the
u
>
, and
e
p
Managem
e
o
llowing po
w
c
ation with d
i
a
tion with cl
o
de, go to Set
t
n
convention
a
w
er / High P
o
o
IP)
mode is out
o
e
r an RoIP n
e
e
ttings > Pri
v
35
a
udio file an
d
h
one.
a
nd then tap
S
u
r radio.
u
pper left cor
n
e
nter the key
w
e
nt.
w
er levels:
i
stant radios
b
o
se radios an
d
t
ings > Gen
e
a
l mode, go t
o
wer.
o
f the trunki
n
e
twork.
v
ate > RoIP,
d
share it.
S
hare.
n
er, and the
n
w
ord.
b
ut consume
s
d
saves batte
r
e
ral > Privat
o Contacts
>
n
g network c
o
and then tap
n
tap All, Top
s
more batter
y
r
y power.
e > Power L
>
Manage, ta
p
o
verage, the
R
RoIP.
charts, and
y
powe
r
.
evel, and the
n
a
p the channe
l
R
oIP feature
Latest as
n
tap High
l
, and then
allows you
36
To set the RoIP network, go to Settings > Private > RoIP Settings. For details, please consult your dealer.
7.7 Scan
7.7.1 Scan in Conventional Mode
In conventional mode, the Scan feature allows you to listen to activities on other channels, keeping a track of your
team members. With this feature enabled, the radio searches the scan list preset for the current channel and stay on a
channel with activities.
To turn the Scan feature on or off, go to Settings > Private, and then tap Scan.
To select a scan list for a channel, do as follows:
1. Go to Contacts > Manage, and then tap the target channel.
2. Tap Scan List, and then tap the required scan list.
3. Tap OK.
7.7.2 Scan in Trunking Mode
In trunking mode, the radio must register with a base station (BS) for normal operation. The Scan feature allows the
radio to:
Hunt through the Trunked Station Control Channels (TSCCs) for an available BS for registration.
Always work under a BS with a higher RSSI value after registration, ensuring smooth communication.
Turning the Background Hunt Feature On or Off
The Background Hunt feature allows the radio in standby mode to keep detecting the signal strength of the current
BS. If the signal strength goes below the preset threshold, the radio switches to another BS with higher signal
strength.
To turn this feature on or off, go to Settings > Private > Scan > Handover, and then tap Background Hunt.
Turning the Handover Feature On or Off
The Handover feature prevents call drops or discontinuous voice caused by low signal strength. With this feature
enabled, if the signal strength of the current BS goes below the preset threshold during a call, the radio
automatically switches another BS with higher signal strength.
To turn this feature on or off, go to Settings > Private > Scan > Handover, and then tap HandOver.
37
7.8 Roam
The Roam feature allows you to enjoy seamless communication across sites or networks.
In conventional mode, you can turn this feature on or off as follows: go to Settings > Private, and then tap
Roaming.
In trunking mode, this feature needs to be turned on or off by your dealer.
7.9 Position
The Position feature provides location information.
To turn this feature on or off, go to Settings > General > Privacy & Security > Security > Location, and then
tap GPS.
To view your location information, go to Settings > General > Privacy & Security > Security > Location >
Location Service.
7.10 Analog Services
The following features are available only on analog channels in conventional mode.
7.10.1 Turning the Monitor Feature On or Off
The Monitor feature allows the radio to receive weak signals in case of low signal strength.
To turn this feature on or off, press the preset Monitor key.
7.10.2 Turning the Squelch On Feature On or Off
The Squelch On feature allows the radio's speaker to keep turned on no matter whether the squelch condition is
satisfied.
To turn this feature on or off, press the preset Squelch On key.
7.10.3 Setting the Squelch Level
The squelch level refers to the squelch threshold required for the radio's speaker to be turned on.
To set the squelch level for a channel, do as follows:
1. Go to Contacts > Manage, and then tap the target channel.
2. Tap Squelch Level, and then tap Open, Normal, or Tight (from low to high) as required.
Generally, a higher squelch level requires a higher RSSI value. If the squelch level is set to Open, the speaker will
38
always keep turned on.
7.11 Encryption
The Encryption feature prevents eavesdropping on calls and interception of data.
To turn this feature on or off, go to Settings > PMR, and then tap Encryption.
7.12 Stun
When being stunned, the radio displays . In this case, you can only turn the radio on or off.
To restore normal operation, contact your dealer.
7.13 Kill
When being killed, the radio displays . In this case, the radio is restored to factory settings, and you can
only turn the radio on or off.
To restore normal operation, contact your dealer.

39
8. Troubleshooting
Phenomena Analysis Solution
The radio cannot be
turned on.
The battery may be installed improperly. Remove and reattach the battery.
The battery power may run out. Recharge or replace the battery.
The battery may suffer from poor
contact caused by dirtied or damaged
battery contacts.
Clean the battery contacts or replace
the battery.
The radio cannot register.
The radio may not detect signals from
the BS.
Make sure the radio is within the
coverage of the BS.
The radio may not be authorised.
Contact the BS manager to check if the
radio is authorised in the network
management system.
The radio registers
repeatedly.
The signal may be intermittent.
Make sure the radio is within the
coverage of the BS.
The radio cannot
establish a call.
The signal may be weak.
Make sure the radio is within the
coverage of the BS.
The called party
disconnects repeatedly
during communication.
The signal may be intermittent or weak.
Make sure the radio is within the
coverage of the BS.
The voice is unclear. The signal may be weak.
Make sure call participants are within
the communication range.
During receiving, the
voice is weak,
discontinuous or totally
inactive.
The battery voltage may be low. Recharge or replace the battery.
The volume level may be low. Increase the volume.
The antenna may be loose or may be
installed incorrectly.
Turn off the radio, and then remove
and reattach the antenna.
The speaker may be blocked. Clean the surface of the speaker.
You cannot communicate The frequency or signaling type may be Verify your TX/RX frequency and

40
Phenomena Analysis Solution
with other group
members.
inconsistent with that of other members. signaling type are correct.
The channel type (digital or analog) may
be set incorrectly.
Verify you are on the correct digital or
analog channel.
You may be too far away from other
members.
Move towards other members.
You hear unknown
voices or noise.
You may be interrupted by radios using
the same frequency.
Change the frequency, or adjust the
squelch level.
The radio in analog mode may be set
with no signaling.
Set signaling for all radios operating at
the same frequency to avoid
interference.
You are unable to hear
anyone because of too
much noise and hiss.
You may be too far away from other
members.
Move towards other members.
You may be located in an unfavorable
position. For example, your
communication may be blocked by high
buildings or blocked in an underground
area.
Move to an open and flat area, restart
the radio, and try contacting again.
It could be the result of external
disturbance (such as electromagnetic
interference).
Stay away from equipment that may
cause interference.
The GPS cannot locate
your position.
GPS signals may not be received due to
unfavorable position.
Move to an open and flat area, and try
again.
You cannot use the keys.
The keypad may fail to function
temporarily.
Restart the radio.
The LCD does not
display any information.
The LCD may fail to function
temporarily.
Restart the radio.
If the above solutions cannot fix your problems, or you may have some other queries, please contact your local
dealer for more technical support.

9. C
a
To guarante
Product
C
Do not
Keep t
h
Do not
Close t
h
Product
C
Turn
o
Clean
u
cloth o
r
Use ne
u
use ch
e
case d
a
If the r
a
Make
s
a
re a
n
e optimal pe
r
C
are
pierce or scr
h
e product fa
r
hold the pro
d
h
e accessory
C
leaning
o
ff the produ
c
u
p the dust a
n
r
a brush reg
u
u
tral cleanse
r
e
mical prepa
r
a
mage.
a
dio is used i
s
ure the prod
u
n
d Cl
e
r
formance as
ape the prod
u
r
away from
d
uct by the a
n
connector c
o
c
t and remov
n
d fine partic
l
u
larly.
r
and a non-w
r
ations such
a
n a harsh en
v
u
ct is comple
e
anin
well as a lo
n
u
ct.
substances t
h
n
tenna or ea
rp
o
ver when no
e the battery
l
es on the pr
o
oven fabric t
o
a
s stain remo
v
v
ironment (s
u
tely dry befo
41
g
n
g service lif
e
h
at can corro
d
rp
iece cable.
accessory is
befo
r
e clean
i
o
duct surface
o
clean the k
e
v
ers, alcohol,
u
ch as sea an
d
re use.
e
of the prod
u
d
e the circuit
r
in use.
i
ng.
and chargin
g
e
ys, knobs, a
n
sprays or oi
l
d
salt frog),
p
u
ct, please fo
l
ry
.
g
piece with
a
n
d front case
a
l
preparation
s
p
eriodically c
l
l
low these ti
p
a
clean and d
r
a
fter long-ti
m
s
, so as to av
o
l
ean and dry
t
s.
r
y lint-free
m
e use. Do no
t
o
id surface
t
he radio.
t

10.
O
Contact yo
u
Use t
h
any u
n
O
ptio
n
u
r local deale
r
h
e approved
a
n
authorised
a
n
al A
c
r
for the opti
o
a
ccessories o
n
a
ccessories.
c
ces
s
o
nal accessor
i
n
l
y
. We will
n
42
s
orie
s
i
es used wit
h
n
ot be liable
f
s
h
the product.
f
or any loss
o
o
r damage ar
i
i
sing out of t
h
h
e use of

43
11. Specifications
General
Dimensions (H x W x D) (with battery and without
antenna)
150.1 mm x 68 mm x 25.3 mm
Weight (with battery and antenna) ≤ 380 g
Battery 2900 mAh Li-ion battery
Operating Voltage DC 7.4±1 V
Operating Temperature –20°C to +50°C
Storage Temperature –40°C to +85°C
Humidity 95% RH
United States Military Standard MIL-STD-810 C/D/E/F/G
Electrostatic Discharge (ESD) IEC 61000 Level 3
Water & Dust Protection IP67
Embedded Storage 32 MB Nor Flash
TF External Storage/Encryption Card 16 GB (Max), third-party encryption supported
SIM Encryption Card Third-party encryption supported
Audio Output Power 2 W@8 Ω (rated), 3 W (Max)
Audio Distortion ≤ 1% (Rated), ≤ 5% (Max)
Microphone Number: 3, multi-mic noise reduction
BB
Processor Operating Frequency 2.0 GHz
Touch Screen Size 4.0 inch
Touch Screen Resolution 800 x 480
RAM 3 GB
Embedded Storage 32 GB

44
TF External Storage Card 64 GB (Max)
Front-facing/Rear-facing Camera 13MP
Wireless Module
Wi-Fi 802.11 b/g/n, 2.4 GHz
Bluetooth Bluetooth 4.0 EDR
RFID 13.56 MHz
Positioning System GPS/GLONASS/BDNSS/Galileo
Positioning Accuracy < 5 m
Time to First Fix (TTFF) Cold start: < 1 minute, hot start: < 10s
RF
PDT 350-527MHz
2G GSM 850/900/1800/1900
CDMA 1×RTT BC0
4G TDD-LTE B38/B41
FDD-LTE B2 /B4/ B5/B7/B26