Hytera Communications POA47 Wireless PTT User Manual
Hytera Communications Corporation Ltd. Wireless PTT Users Manual
Users Manual
1
Preface
Thanks for your favor in our product. To derive optimum
performance from the product, please read this manual carefully
before use.
This manual is applicable to the following product:
SM15W0 Wireless Remote Speaker Microphone
POA47 Wireless Finger PTT
Instructional Icons
The following icons are available through this manual:
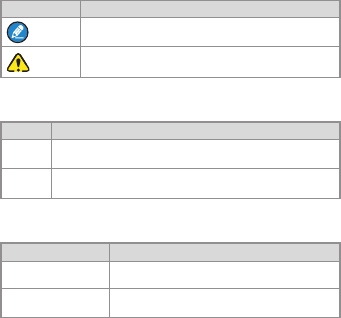
Icon Description
Note Indicates references that can further describe
the related topics.
Caution Indicates situations that could cause data loss
or equipment damage.
Notational Conventions
Item Description
“ ” Th e qu ot at ion m ar ks encl os e th e na me of a
software interface element. For example, click “OK”.
【 】The text in boldface denotes the name of a
hardware button. For example, press the PTT key.
Key Operation
Operation Option Denition
Short press Press the key and release within 1
second.
Long press Press the key and hold it for no less than
2 seconds.
2
Copyright Information
HYT and Hytera are the trademarks or registered trademarks of
Hytera Communications Co., Ltd. (the Company) in PRC and/or
other countries or areas. The Company retains the ownership of
its trademarks and product names. All other trademarks and/or
product names that may be used in this manual are properties
of their respective owners.
The product describes in this manual may include the
Company’s computer programs stored in memory or other
media. Laws in PRC and/or other countries or areas protect the
exclusive rights of the Company with respect to its computer
programs. The purchase of this product shall not be deemed
to grant, either directly or by implication, any rights to the
purchaser regarding the Company’s computer programs. Any
of the Company’s computer programs may not be copied,
modied, distributed, decompiled, or reverse-engineered in any
manner without the prior written consent of the Company.
Disclaimer
The Compan y endea vo rs t o ach ie ve th e accur ac y and
completeness of this manual, but no warranty of accuracy
or reliability is given. All the specifications and designs are
subject to change without notice due to continuous technology
development. No part of this manual may be copied, modied,
translated, or distributed in any manner without the express
written permission of us.
We do not guarantee, for any particular purpose, the accuracy,
validity, timeliness, legitimacy or completeness of the Third
Party products and contents involved in this manual.

2
3
If you have any suggestions or would like to learn more details,
please visit our website at: http://www.hytera.com
Safety and Maintenance
To help you ward off bodily injury and property loss resulting
from improper operation, please read the following safety
information carefully before use.
The product is in compliance with IP54 requirements.
To have a good waterproof performance, please keep the
charge jack covered when the device is not charging.
Please operate the product within the temperature range of
-10 ~50℃.
Make sure the adapter plugs are in good condition, or it will
cause damage to the product or your bodily safety.
Do not drop, knock, or shake the device. Rough handling
can set the device in function failure state.
Do not repair the product without authorization.
Use a non-woven cloth with neutral cleanser to clean the
keys and housing after long-time use. Do not use stain
removers, alcohol, sprays or oil preparations. Make sure the
products are completely dry before use.
Caution:Please turn off the product before cleaning.
Wireless Remote Speaker Microphone
Checking Items in the Package
Please unpack carefully and check that all items listed below
are received. If any item is missing or damaged, please contact
your local dealer.
10
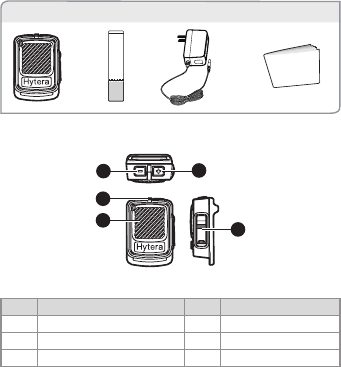
Wireless Finger PTT
Checking Items in the Package
Please unpack carefully and check that all items listed below
are received. If any item is missing or damaged, please contact
your local dealer.
Product Introduction
Product Controls
No. Part Name No. Part Name
1- Key 2 LED Indicator
3PTT (Push-to-Talk) Key 4 + Key
5 Charge Jack / /
Wireless PTT Velcro Power Adapter Documentation Kit
1
2
3
4
5
Owner's Manual
4
10
11
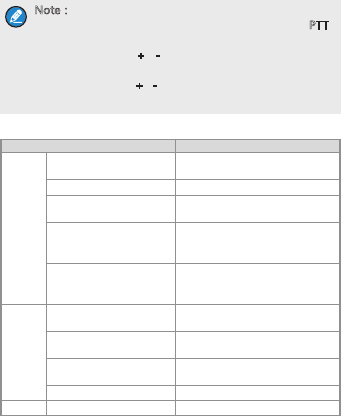
Note:
You can transmit audio signals by holding down PTT
key.
You can press +/ - key to adjust the volume or
change the channel. It should be noted the specific
function of the +/ - key is depending on the paired
radio.
LED Indicator
LED Indication Product Status
Blue
Flashes for 4 times
continuously Powering on
Glows solidly Pairing
Flashes slowly (once
every 3 seconds) No connection
Flashes twice in a row
every three minutes
Connected with the radio
but unable to transmit audio
signals
Flashes quickly (once
per second)
Connected with the radio
and able to transmit audio
signals
Red
Flashes for 4 times
continuously Powering off
Flashes slowly (once
every 3 seconds) Low battery
Flashes quickly (once
per second) Charging
Glows solidly Transmitting
Green Glows solidly Fully charged
Before Use
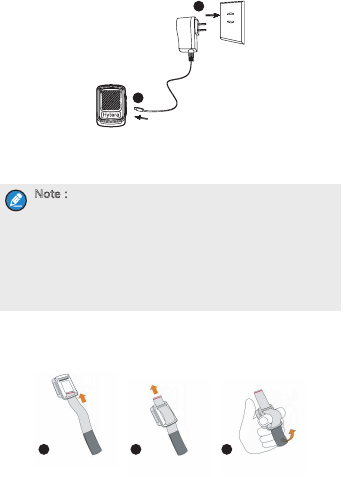
Charging the Battery
Please charge the battery before use in the way shown below:
1. Uncover the charge jack.
5
12
1
2
123
2. Use the power adapter to connect the product with the AC
power socket as the diagram instructs.
Diagram for charging
Upon charging, the product will power off automatically and the
LED indicator will glow red.
Note:
Please turn off the product and get it fully charged
before it stands idle for a long time. Please charge
the product every three months, or the life span of
the battery would be shortened.
If the product is idle for over three months, its LED
indicator only turns red after it has been charged for
10 to 20 minutes.
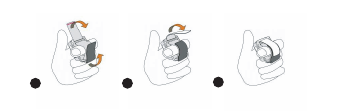
Assembling and Wearing the Wireless Finger PTT
Please assemble the wireless PTT and Velcro in the way shown
below:
6
12
13
456
Basic Operations
Turning On/Off the Product
To turn on the product, long press the Power On/Off key
until the LED indicator ashes blue.
To turn off the product, long press the Power On/Off key
until the LED indicator ashes red.
Connecting with the Radio
Initial Connection
1. Turn off the product and long press the Power On/Off key
to enter the pairing mode until the blue LED indicator glows
solidly. During this process, the LED indicator will ash blue
for four times, keep pressing and do not release the key.
2. Activate the wireless feature of the radio and search for the
product (refer to the relevant owner’s manual for details).
For radio with display, search for the product and pair
with it through the menu.
For radio without display, please ask your local dealer to
get them paired.
3. When the wireless nger PTT connects with the radio:
If the radio has not connected with wireless audio device
like a wireless remote speaker microphone or wireless
headset, the wireless nger PTT can not transmit. And
the LED indicator ashes blue twice in a row every three
seconds.
7

14
If the radio has connected with wireless audio device,
the wireless finger PTT can transmit and the LED
indicator ashes blue quickly (once per second).
In pairing mode, if the connection can not be established
within 3 minutes, the product will exit pairing mode and stay
unconnected.
Non-initial Connection
1. When turned on, the product searches for the paired devices
and establishes connection with the latest connected one.
2. When the wireless nger PTT connects with the radio:
If the radio has not connected with wireless audio device
like a wireless remote speaker microphone or wireless
headset, the wireless nger PTT can not transmit. And
the LED indicator ashes blue twice in a row every three
seconds.
If the radio has connected with wireless audio device,
the wireless finger PTT can transmit and the LED
indicator ashes blue quickly (once per second).
Note:
If the connection is not established within 15
seconds, short press + and – key to search for paired
radio and connect it again.
After the product is turned on, if there is no
connection established within 5 minutes, the
product will turn off automatically to save battery.
Transmitting
Ensure that the radio has connected with wireless audio device
like a wireless remote speaker microphone or wireless headset,
and then hold down the PTT key to transmit.
8

14
15
Troubleshooting
Phenomena Analysis Solution
Automatic
connection
failed
The product may be
out of communication
range.
Ensure the product is within
the communication range, and
re-establish the connection. In
environment with no obstacle,
the maximum communication
range between the product and
the radio is 4m. And if there’s
any obstacle, the distance could
be shortened.
Power-up
failure
The battery may
be completely
discharged.
Charge the battery.
When
charging ,
the red LED
indicator not
glowing
The battery may
be completely
discharged.
Charge it for 10 to 20 minutes
and the red LED indicator will
glow.
The power adapter
may be damaged. Replace the power adapter.
The red LED
indicator not
glowing with
the PTT key
pressed
The product may be
out of communication
range.
Ensure the product is within the
communication range.
The connection of
the radio and the
wireless gure PTT
may be cut off.
Please pair the product with the
radio and connect them again.
The connection of
the radio and the
wireless remote
microphone speaker
or wireless headset
may be cut off.
Please pair the product with
the wireless remote speaker
microphone or wireless headset
again.
If the above solutions can not x your problems, or you may
have some other queries, please contact us or your local dealer
for more technical support.
9
uncontrolled environment.
FCC Notice:
Any Changes or modifications not expressly approved by the party responsible for
compliance could void the user’s authority to operate the equipment.
This device complies with part 15 of the FCC Rules. Operation is subject to the following
two conditions: (1) This device may not cause harmful interference, and (2) this device
must accept any interference received, including interference that may cause undesired
operation.
FCC Radiation Exposure Statement:
This equipment complies with FCC radiation exposure limits set forth for an
This transmitter must not be co-located or operating in conjunction with any other antenna
or transmitter.
IC RSS warning
This device complies with Industry Canada licence-exempt RSS standard (s).
Operation is subject to the following two conditions: (1) this device may not cause
interference, and (2) this device must accept any interference,including interference
that may cause undesired operation of the device.
LeprésentappareilestconformeauxCNRd'IndustrieCanadaapplicablesaux
appareilsradioexemptsdelicence.
L'exploitationestautoriséeauxdeuxconditionssuivantes:
(1)l'appareilnedoitpasproduiredebrouillage,et
(2)l'utilisateurdel'appareildoitacceptertoutbrouillageradioélectriquesubi,même
silebrouillageestsusceptibled'encompromettrelefonctionnement.
Under Industry Canada regulations, this radio transmitter may only operate using an
antenna of a type and maximum (or lesser) gain approved for the transmitter by
Industry Canada. To reduce potential radio interference to other users, the antenna
type and its gain should be so chosen that, the equivalent isotropically radiated power
(e.i.r.p.) is not more than that necessary for successful communication.
Conformémentàlaréglementationd'IndustrieCanada,leprésentémetteurradio
peutfonctionneravecuneantenned'untypeetd'ungainmaximal(ouinférieur)
approuvépourl'émetteurparIndustrieCanada.Danslebutderéduirelesrisquesde
brouillageradioélectriqueàl'intentiondesautresutilisateurs,ilfautchoisirletype
d'antenneetsongaindesortequelapuissanceisotroperayonnéeéquivalente
(p.i.r.e.)nedépassepasl'intensiténécessaireàl'établissementd'unecommunication
satisfaisante.
This radio transmitter (identify the device by certification number, or model number if
Category II) has been approved by Industry Canada to operate with the antenna types
listed below with the maximum permissible gain and required antenna impedance for
each antenna type indicated. Antenna types not included in this list, having a gain
greater than the maximum gain indicated for that type, are strictly prohibited for use
with this device.
Leprésentémetteurradio(identifierledispositifparsonnumérodecertificationou
sonnumérodemodèles'ilfaitpartiedumatérieldecatégorieI)aétéapprouvépar
IndustrieCanadapourfonctionneraveclestypesd'antenneénumérésci‐dessouset
ayantungainadmissiblemaximaletl'impédancerequisepourchaquetyped'antenne.
Lestypesd'antennenoninclusdanscetteliste,
oudontlegainestsupérieuraugainmaximalindiqué,sontstrictementinterditspour
l'exploitationdel'émetteur.
IC Radiation Exposure Statement:
This equipment complies with IC RF radiation exposure limits set forth for an
uncontrolled environment. This transmitter must not be co-located or operating in
conjunction with any other antenna or transmitter.
IC exposition aux radiations:
CetéquipementestconformeavecICleslimitesd'expositionauxrayonnements
définiespouruncontrôléenvironnement.
Cetémetteurnedoitpasêtreco‐localisésoufonctionnerenconjonctionavecune
autreantenneouémetteur.
CetéquipementdoitêtreinstalléetutiliséavecunminimumdeXXcmdedistance
entreleradiateuretvotrecorps.