Hytera Communications TC-500U1 Two-way Radio User Manual YAMTC 500U1 V04
Hytera Communications Corporation Ltd. Two-way Radio YAMTC 500U1 V04
User Manual
1
Preface
Thank you for your purchase of the HYT TC-500 radio - the choice for professionals. This
easy-to-use radio will deliver you secure, instant and reliable communications at peak
efficiency. Please read this manual carefully before use. The information presented herein
will help you to derive maximum performance from your radio.

2
Safety and General Information ............................................................................................... 2
Product Inspection ...................................................................................................................... 4
Battery Information ...................................................................................................................... 4
Antenna........................................................................................................................................... 8
Assembly and Disassembly ...................................................................................................... 8
Getting Started ............................................................................................................................ 11
Basic Operations ........................................................................................................................ 12
Functions and Setting ............................................................................................................... 12
Time-Out Timer (TOT) ................................................................................................. 12
Battery Save ................................................................................................................ 13
Low Battery Alert ......................................................................................................... 13
Monitor ........................................................................................................................ 13
High/Low Power .......................................................................................................... 13
Wide/Narrow Channel Spacing Compatible ................................................................ 13
CTCSS & CDCSS .................................................................................................................... 14
Channel Scan .............................................................................................................. 14
Busy Channel Lockout ................................................................................................. 14
Troubleshooting Guide ............................................................................................................. 15
Care and Cleaning...................................................................................................................... 15
Safety and General Information
The following general safety precautions as would normally apply, which should be
observed during all phases of operation, service and repair of this equipment.
◇ Turn off your radio prior to entering any area with a potentially explosive
atmosphere.

3
◇ Do not charge your battery in a potentially explosive atmosphere.
◇ Do not use any portable radio that has a damaged antenna. If a damaged
antenna comes into contact with your skin, a minor burn can result.
◇ This equipment should be serviced by qualified technicians only.
◇ To avoid possible interference with blasting operations, turn off your radio when
you are near electrical blasting caps. In a blasting area or in areas such as
hospital site posted “Turn off two-way radio”; when taking an airplane, please
obey the “turn off two-way radio” instruction of aircrew staff as well.
◇ For vehicles with an air bag, do not place a radio in the area over an air bag or in
the air bag deployment area. Air bags inflate with great force. If a radio is placed
in the air bag deployment area and the air bag inflates, the radio may be
propelled with great force and cause serious injury to occupants of the vehicle.
◇ Do not expose the radio to direct sunlight over a long time, nor place it close to
heating source.
◇ When using your radio, hold the radio in a vertical position with the microphone 3
to 4 centimeters away from your lips.
WARNING: If you wear a radio on your body, ensure the radio and its antenna is
at least 2.5 centimeters away from your body when transmitting.
WARNING: Nearly every electronic device is susceptible to electromagnetic
interference (EMI) if inadequately shielded, designed, or alternately configured
for electromagnetic compatibility.
The radio is not intended for use by general population in an uncontrolled environment. It
is only for occupational use and only applied to work-related conditions.The radio must be
only used by users, who are fully aware of the hazards of the exposure and who are able
to exercise control over their RF exposure to qualify for the higher exposure limits.

4
Product Inspection
Thank you for your use of HYT portable two-way radio. Before use, you are recommended
to inspect the product as follows.
First check the shipping carton for any signs of damage. If any damage has occurred,
please contact your dealer immediately. Confirm the supplied product against the packing
slip to assure accuracy.
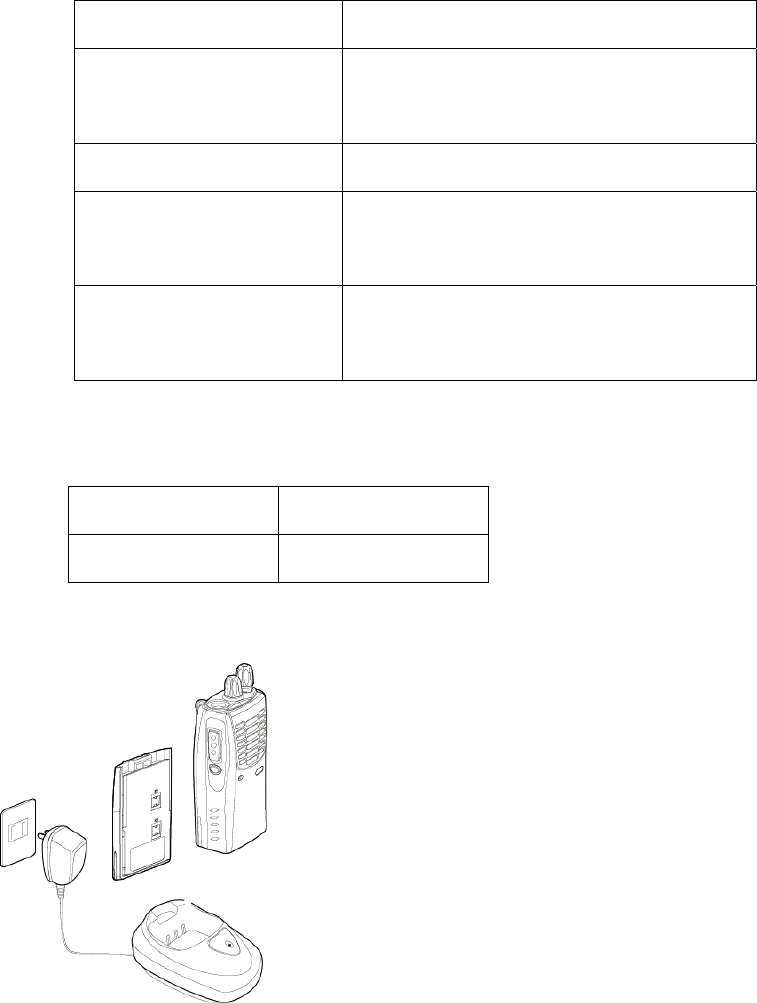
Available Accessories
Item Qty. (pcs)
Antenna 1
Charger 1
AC Power Adapter 1
Ni-MH Battery Pack 1
Belt Clip 1
Strap 1
Owner’s Manual 1
Note:
Frequency is marked on the color circle of the antenna.
If frequency is not marked on the color circle, please refer to the label on the main unit for
details.
Battery Information
Initial Use
New batteries are shipped uncharged from the factory. Charge a new battery for 12 hours
before initial use. The maximum battery capacity and performance is achieved after three
full charge/discharge cycles. If you notice the battery power runs low, please recharge the
battery.
Applicable Battery Packs
To reduce the risk of injury, charge only the battery specified by the manufacturer. Other
batteries may burst, causing bodily injury and damage.
5
Caution:
1. To avoid risk of personal injury, do not dispose of batteries in a fire!
2. Dispose of batteries according to local regulations (e.g. recycling). Do not dispose as
household waste.
3. Never attempt to disassemble the battery.
4. All batteries can cause property damage and/or bodily injury such as burns if
conductive materials such as jewelry, keys, or beaded chains touch exposed
terminals. The conductive material may complete an electrical circuit (short circuit)
and become quite hot. Exercise care in handling any charged battery, particularly
when placing it inside a pocket, purse, or other container with metal objects.
Battery Tips
1. When charging your battery, keep it at a temperature among 5℃ - 40℃. Temperature
out of the limit may cause battery leakage or damage.
2. When charging a battery attached to a radio, turn the radio off to ensure a full charge.
3. Do not return fully charged batteries to the charger for an “extra boost”. This action
will significantly reduce battery life.
4. Never charge a battery that is wet. Please dry it with soft cloth prior to charge.
5. The battery will eventually wear out. When the operating time (talk-time and standby
time) is noticeably shorter than normal, it is time to buy a new battery.
To Prolong Battery Life
1. Battery performance will be greatly decreased at a temperature below 0 . A spare ℃
battery is necessary in cold weather. The cold battery unable to work in this situation
may work under room temperature, so keep it for later use.
2. The dust on the battery contact may cause the battery cannot work or charge. Please
use clean dry cloth to wipe it before attaching the battery to the radio.
Battery Storage
1. Fully charge a battery before you store it for a long time, to avoid battery damage due
to over-discharge.
6
2. Recharge a battery after several months’ storage (Ni-MH batteries: 3 months), to
avoid reducing battery capacity due to over-discharge.
3. When storing your battery, keep it in a cool, dry place under room temperature.
Charging the Battery
Use only the charger specified by the manufacturer. The charger’s LED indicates the
charging progress. Description for LED indicators of the two chargers (rapid-rate charger
and slow–rate charger) is shown below:
MCU Rapid-rate charger:
Status Charger LED
Standby (no-load) Red LED flashes slowly (0.2s on/3s
off )
Battery is charging Red LED solidly glows
Battery is fully
charged
Green LED solidly glows
Error Red LED flashes rapidly (0.2s on/0.2s
off)
Slow-rate charger:
Charging please refer to the following procedure:
LED Indicator Status
Red light glows charging

7
1. Plug the power cord into the adapter.
2. Plug the DC connector of the adapter into the DC socket on the back of the charger.
3. Place the radio with the battery attached, or the battery alone, in the charger.
4. Make sure the battery is in well contact with the charging terminals. The charging
process initiates when the red LED lights.
5. The greed LED lights about 3 hours later indicating the battery is fully charged. Then
remove the radio with the battery attached or the battery alone from the charger.
(available to rapid-rate charger only)
6. Charged for about 8 to 10 hours, the radio with the battery attached or the battery
alone can be removed from the charger.(available to slow-rate charger only)
Troubleshooting (MCU rapid-rate charger):
When troubleshooting, always observe the color of the LED.
No LED Indication?
1. Make sure that the power cord is plugged into an appropriate AC outlet.
Red LED flashes rapidly (0.2s on/0.2s off)?
1. Remove the battery from the charger, and:
a) Make sure that it is a HYT authorized battery. Other batteries may not charge.
b) Remove power from the battery charger, and clean the gold metal, charging
contacts of the battery and charger, using a clean dry cloth.
2. The battery temperature may be above 45℃.
3. Defective battery. Please replace it with a new one.
4. Power up the charger and place the battery back into the charger pocket. If the LED
indicator continues to flash red, replace the battery.
Note:
When the battery charger detects the proper battery conditions, rapid charging begins
automatically (steady red LED).
If the battery temperature is above 45℃, the charger will report the fault by flashing
red LED rapidly (0.2s on/0.2s off), and will not charge until the battery temperature is
below 45℃, with red LED solidly glows (Ni-MH battery only).
8
Antenna
1. Stubby antenna is ideal for communication within limited range. Thin and long antenna
optimizes communication coverage, its flexible and soft characteristic makes it ideal
for wearing your radio on the belt.
2. Communication range may vary with terrain and your operating conditions. Rainy
days or forest locations may narrow your communication range, please make
preparation in advance to avoid potential inconvenience.
Assembly and Disassembly
Attaching the Battery
1. Turn off the radio.
2. Insert the tabs, at the bottom of the battery, into the slots at the bottom of the radio
chassis.
3. Press the top of the battery towards the radio until a click is heard. (See figure 1)
Figure 1
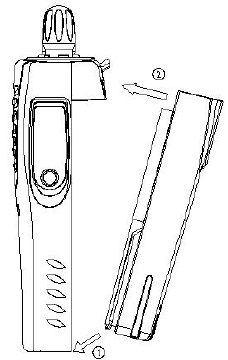
Removing the Battery
1. Turn off the radio.
2. Push the battery latch on the back panel towards the top of the radio.
3. Pull the top of the battery away from the radio chassis, and lift the battery from the
radio. (See figure 2)
9
Figure 2
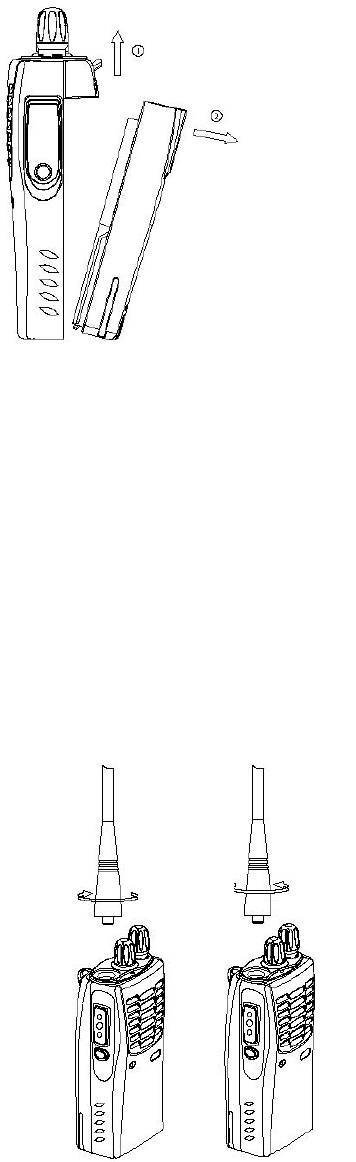
Attaching the Antenna
1. Align the threaded end of the antenna with the radio’s antenna connector.
2. Turn the antenna clockwise to tighten. (See figure 3)
Removing the Antenna
1. Turn the antenna counter-clockwise until you can remove it. (See figure 3)
A
ttach
Remove
Figure 3
Attaching the Belt Clip
1. Align the grooves of the belt clip with those of the battery.
2. Press the belt clip down until a click is heard. (See figure 4)

10
Figure 4
Removing the Belt Clip
1. Pull the belt clip tab away from the battery.
2. Slide the belt clip upwards to remove it. (See figure 5)
Figure 5
External Earpiece (Optional)
Remove the earpiece cover and insert the earpiece into the earpiece jack.(see figure 6)
Figure 6
11
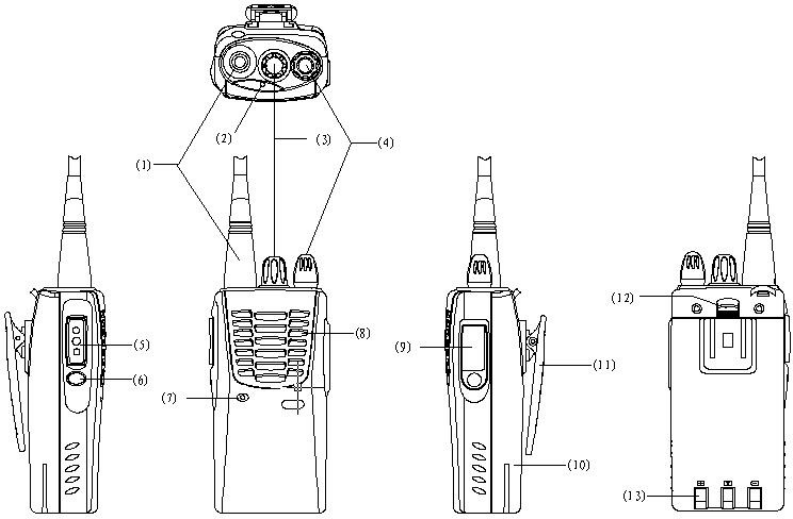
Getting Started
1. Antenna
2. LED indicator
The light will glow red during transmission. The light will glow green during receiving. The
light flashes red when the battery voltage is low.
3. Channel selector knob
4. Power/Volume control knob
Rotate the Power/Volume Knob clockwise until a “click” is heard to turn the radio on, fully
counter clockwise until a “click” is heard to turn the radio off. When the radio is on, turn the
knob to adjust volume.
5. PTT key
Press and hold PTT key to talk, release to receive.
6. Monitor key
In receive mode, hold down Monitor key to monitor activity on the current channel; briefly
press Monitor key to toggle between high and low power. The MONI key is programmable
via PC programming software (Refer to your dealer for operation details).
7. Microphone
8. Speaker
9. External jack
12
Remove the jack cover and insert an accessory plug or programming cable into the jack to
programme the radio via programming software.
10. Battery
11. Belt clip
Used to clip radio on your belt.
12. Battery latch
Used to fasten and remove the battery.
13. Charging connectors
Connect the charging connectors with that on the charger to begin charging.
Basic Operations
1. Turn on the radio: Turn the POWER/VOL knob clockwise until a click is heard; Turn off
the radio: Turn the POWER/VOL knob counter clockwise until a click is heard.
2. Adjust the volume: Turn the POWER/VOL knob to adjust the volume while holding
down the Monitor key.
3. Select Channel: Rotate Channel Selector knob to select your desired channel.
4. Transmit: Press and hold down PTT key, speak into the microphone with normal voice.
Keep microphone about 5cm away from your mouth.
5. Receive: Release PTT key, the radio returns to receive mode. Note: when battery
voltage runs low, Tx will be prohibited and LED flashes red. Refer to “Low Battery
Alert” for more details.
Functions and Setting
Time-Out Timer (TOT)
Time-Out Timer is used to prevent one from using the same channel for a long time and to
prevent the radio from damage due to continuous transmission.
If the transmission exceeds the preset time (programmable by your dealer), transmission
will be stopped and a beep will sound. To stop the beep tone, release PTT key. Press PTT
again to transmit.
TOT Reset Time
When this feature is disabled, the TOT is immediately reset after releasing the PTT key.
When this feature is enabled, TOT won’t reset until a preset time (programmable by your
13
dealer) elapses, even if you have released the PTT key.
TOT Rekey Time
The feature is used to set the duration until transmission is allowed after returning to
receive by TOT. When enabled, transmission will be prohibited until preset time elapses
(programmable by your dealer).
TOT Alert Time
When this feature (programmable by your dealer) is enabled, the radio will sound an alert
at the preset time. Transmission will be prohibited by the TOT after this time.
Battery Save
When there is no activity on the channel and no operation is performed for 10 seconds,
Battery Save feature is automatically activated. When a signal is received or an operation
is performed, Battery Save feature is automatically deactivated.
Low Battery Alert
Low Battery Alert alerts you to recharge or replace the battery.
During transmission, when the battery voltage goes below a preset value, the LED
indicator will flash red. When the alert tone sounds, the radio stops transmitting. Please
recharge or replace the battery.
Monitor
Press and hold Monitor key to monitor activities on the current channel. This operation is
especially useful for adjusting volume level or receiving a weak signal.
The LED indicator will glow green while the Monitor key is held down.
High/Low Power
In receive mode, briefly press Monitor key to toggle between high and low power. Three
beeps alternating from high tone to low tone indicate that the transmit power is switched
from high to low; and three beeps alternating from low tone to high tone indicate that the
transmit power is switched from low to high.
Wide/Narrow Channel Spacing Compatible
The dealer can select wideband or narrowband via PC programming software.
14
CTCSS & CDCSS
CTCSS/CDCSS blocks unwanted calls from other parties using the same channel.
When CTCSS/CDCSS is set, the user will only receive the calls from other units on the
same channel with the same CTCSS/CDCSS.
The dealer can preset CTCSS/CDCSS signaling on all or just certain channels.
Note: Although using CTCSS/CDCSS enables you to avoid hearing unwanted calls, it
does not mean your calls will be private.
Channel Scan
Turn channel selector knob to the position “16”, the radio will automatically detect those
channels which have been programmed as scan items in channel 1-15 (your dealer can
set any channel as scan item or non-scan item). When any activity is detected on one
channel, the radio will stop on the active channel for communications. This feature can be
disabled by your dealer.
Priority Channel Scan
Any programmed channel may be set as the priority channel. The radio will detect the
priority channel periodically while stopping on a non-priority channel. When there is any
activity on the priority channel, the radio will automatically turn to the priority channel for
communications.
Scan Revert Channel
When the radio is scanning, press the PTT key, it will transmit in pre-programmed revert
channel.
The revert channel can be programmed by your dealer.
Busy Channel Lockout
If the current channel is set by your dealer as “busy channel lockout”, and this channel is
being used by other users, press PTT, the radio sounds a beep and will not transmit the
signal. To stop the beep, release PTT key. Press PTT key to transmit when this channel is
free.

15
Troubleshooting Guide
Symptom Solution
Cannot power on the radio.
a. The battery is run out. Please recharge the battery
or replace it with a fresh one.
b. The battery is not properly installed. Please remove
and reinstall the battery.
The operation time will not
increase even though the
battery is properly charged.
a. The battery life cycle is over, please replace with a
new one.
b. The battery is not fully charged. Make sure that the
battery is removed after LED indicator has indicated
green.
Cannot talk to or hear group
members. a. Confirm radios have the same channel, and
CTCSS/CDCSS settings.
b. Make sure you are within their communication
range.
Hear non-group members
a. Please change your CTCSS/CDCSS settings, and
so as your group members.
Care and Cleaning
z Do not handle the radio by its antenna or external microphone directly.
z Do not place the radio in a dusty or dirty environment.
z Clean the radio with a lint-free cloth to remove dirt or grease, to avoid poor contact
due to excessive dust.
z Clean the radio using a lint-free cloth moistened with clean water and a mild
dishwashing liquid.
z Avoid subjecting the radio to corrosives, solvents or spirits.