Hytera Communications TF-512 FRS/GMRS TWO-WAY RADIOS User Manual
Hytera Communications Corporation Limited FRS/GMRS TWO-WAY RADIOS Users Manual
Contents
- 1. Users Manual
- 2. User Manual Rev
Users Manual
Preface
Welcome to the world of Hytera and thank you for purchasing this product. This manual includes a description of
the functions and step-by-step procedures for use. To avoid bodily injury or property loss caused by incorrect
operation, please carefully read the Safety Information Booklet before use.
This manual is applicable to the following product:
TF-512 Portable Radio
Copyright Information
Hytera is the trademark or registered trademark of Hytera Communications Corporation Limited (the Company)
in the People's Republic of China (PRC) and/or other countries or areas. The Company retains the ownership of its
trademarks and product names. All other trademarks and/or product names that may be used in this manual are
properties of their respective owners.
The product described in this manual may include the Company's computer programs stored in memory or other
media. Laws in PRC and/or other countries or areas protect the exclusive rights of the Company with respect to its
computer programs. The purchase of this product shall not be deemed to grant, either directly or by implication,
any rights to the purchaser regarding the Company's computer programs. The Company's computer programs may
not be copied, modified, distributed, decompiled, or reverse-engineered in any manner without the prior written
consent of the Company.
Disclaimer
The Company endeavors to achieve the accuracy and completeness of this manual, but no warranty of accuracy or
reliability is given. All the specifications and designs are subject to change without notice due to continuous
technological development. No part of this manual may be copied, modified, translated, or distributed in any
manner without the prior written consent of the Company.
We do not guarantee, for any particular purpose, the accuracy, validity, timeliness, legitimacy or completeness of
the third-party products and contents involved in this manual.
If you have any suggestions or would like to receive more information, please visit our website at:
http://www.hytera.com.
FCC Statement
This equipment has been tested and found to comply with the limits for a Class B digital device, pursuant to part
15 of FCC Rules. These limits are designed to provide reasonable protection against harmful interference in a
residential installation. This equipment generates and can radiate radio frequency energy. If not installed and used
in accordance with the instructions, it may cause harmful interference to radio communications. However, there is
no guarantee that interference will not occur in a particular installation. Verification of harmful interference by
this equipment to radio or television reception can be determined by turning it off and then on. The user is
encouraged to try to correct the interference by one or more of the following measures:
z Reorient or relocate the receiving antenna. Increase the separation between the equipment and receiver.
z Connect the equipment into an outlet on a different circuit to that of the receiver's outlet.
z Consult the dealer or an experienced radio/TV technician for help.
Operation is subject to the following two conditions:
z This device may not cause harmful interference.
z This device must accept any interference received, including interference that may cause undesired operation.
Note: Changes or modifications to this unit not expressly approved by the party responsible for compliance could
void the user's authority to operate the equipment.
Compliance with RF Exposure Standards
Hytera's radio complies with the following RF energy exposure standards and guidelines:
z United States Federal Communications Commission, Code of Federal Regulations; 47 CFR § 1.1307, 1.1310
and 2.1093
z American National Standards Institute (ANSI) / Institute of Electrical and Electronic Engineers (IEEE) C95.
1:2005; Canada RSS102 Issue 5 March 2015
z Institute of Electrical and Electronic Engineers (IEEE) C95.1:2005 Edition
RF Exposure Compliance and Control Guidelines and
Operating Instructions
To control your exposure and ensure compliance with the environmental exposure limits, always adhere to the
following procedures.
Guidelines:
z Do not remove the RF Exposure Label from the device.
z User awareness instructions should accompany device when transferred to other users.
z Do not use this device if the operational requirements described herein are not met.
Operating Instructions:
z Transmit no more than the rated duty factor of 50% of the time. To transmit (talk), push the Push-To-Talk
(PTT) key. To receive calls, release the PTT key. Transmitting 50% of the time, or less, is important because
the radio generates measurable RF energy only when transmitting (in terms of measuring for standards
compliance).
z Keep the radio unit at least 2.5 cm away from the face. Keeping the radio at the proper distance is important as
RF exposure decreases with distance from the antenna. The antenna should be kept away from the face and
eyes.
z When worn on the body, always place the radio in a Hytera-approved holder, holster, case, or body harness or
by use of the correct clip for this product. Use of non-approved accessories may result in exposure levels which
exceed the FCC's occupational/controlled environmental RF exposure limits.
z Use of non-approved antennas, batteries, and accessories causes the radio to exceed the FCC RF exposure
guidelines.
z Contact your local dealer for the optional accessories of the product.
FCC Licensing Information
This device operates on GMRS frequencies which require a license from the Federal Communications Commission
(FCC) for business, personal, education and recreational use. To abtain forms, call the FCC forms hotline at:
1-800-418-3676 or go to http://www.fcc.gov.
For questions concerning GMRS licensing contact the FCC at 1-888-CALL-FCC (1-888-225-5322).
ISED Statement
The device has been tested and complies with SAR limits, users can obtain Canadian information on RF exposure
and compliance.
Après examen de ce matériel aux conformité aux limites DAS et/ou aux limites d’intensité de champ RF, les
utilisateurs peuvent sur l’exposition aux radiofréquences et la conformité and compliance d’acquérir les
informations correspondantes
This device complies with Innovation, Science and Economic Development Canada license-exempt RSS
standard(s). Operation is subject to the following two conditions:
z This device may not cause harmful interference.
z This device must accept any interference received, including interference that may cause undesired operation.
Le présent appareil est conforme aux CNR Innovation, Sciences et Développement économique Canada
applicables aux appareils radio exempts de licence. L'exploitation est autorisée aux deux conditions suivantes: (1)
l'appareil ne doit pas produire de brouillage, et (2) l'utilisateur de l'appareil doit accepter tout brouillage
radioélectrique subi, même si le brouillage est susceptible d'en compromettre le fonctionnement.
Contents
1. Packing List ........................................................................................................................................ 1
2. Product Controls ................................................................................................................................ 2
3. Before Use .......................................................................................................................................... 3
3.1 Attaching Batteries .......................................................................................................................... 3
3.2 Charging the Ni-MH Battery ............................................................................................................ 3
3.3 Attaching the Belt Clip ..................................................................................................................... 3
4. Basic Operations ................................................................................................................................ 4
4.1 Turning the Radio On/Off ................................................................................................................ 4
4.2 Adjusting the Volume ...................................................................................................................... 4
4.3 Selecting a Channel ........................................................................................................................ 4
4.4 Selecting a CTCSS/CDCSS Code .................................................................................................. 4
5. LCD Icons ............................................................................................................................................ 5
6. Call Services ....................................................................................................................................... 6
6.1 Initiating a Call ................................................................................................................................ 6
6.2 Receiving a Call .............................................................................................................................. 6
7. Supplementary Features .................................................................................................................... 7
7.1 Keypad Lock ................................................................................................................................... 7
7.2 Scan ................................................................................................................................................ 7
7.3 Monitor ............................................................................................................................................ 7
7.4 Power Level (TF-512 only) .............................................................................................................. 7
7.5 Call Tone ........................................................................................................................................ 8
7.6 Talk End Tone ................................................................................................................................ 8
7.7 Voice Operated Transmit (VOX) ..................................................................................................... 8
7.8 Silent Mode ..................................................................................................................................... 9
7.9 Keypad Tone .................................................................................................................................. 9
7.10 Room Monitor ............................................................................................................................. 10
7.11 Sleep Level ................................................................................................................................. 10
7.12 Stopwatch and Timer .................................................................................................................. 11
7.13 Weather Mode (TF-512 only) ...................................................................................................... 11
7.14 Battery Save ............................................................................................................................... 12
7.15 Low Battery Alert......................................................................................................................... 12
7.16 Time-out Timer (TOT) ................................................................................................................. 12
7.17 Auto Squelch .............................................................................................................................. 12
8. Troubleshooting ............................................................................................................................... 13
9. Optional Accessories ....................................................................................................................... 15
Channels and Frequencies .................................................................................................................. 16

1
1. Packing List
Please unpack carefully and check if all items listed below are received. If any item is missing or damaged, please
contact your local dealer.
Item Quantity (PCS) Item Quantity (PCS)
Radio 2 Charger 1
Battery 2 Power Adapter 1
Belt Clip 2 Documentation Kit 1
Lanyard 2 / /
2
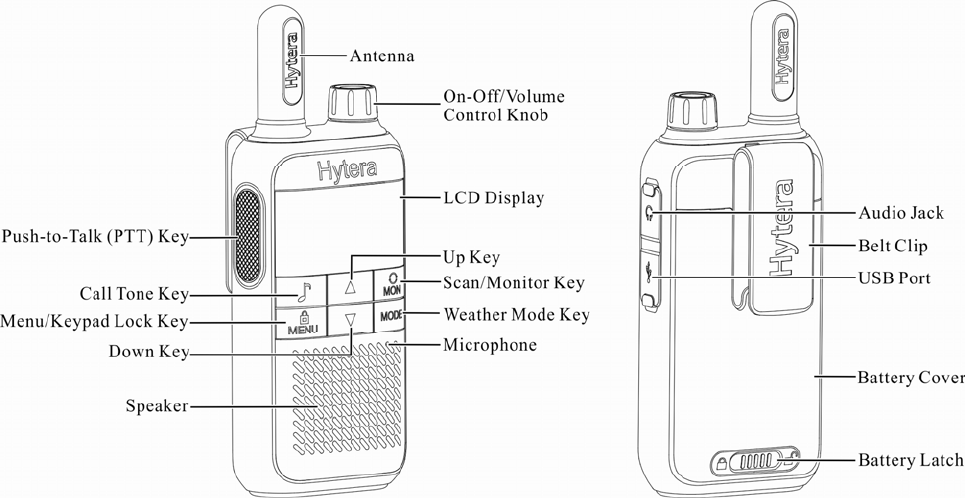
2. Product Controls

3. B
e
3.1 At
t
You can att
a
To attach
ba
1. Slide th
2. Insert t
h
compar
t
3. Put the
b
3.2 C
h
¾
U
s
¾
R
e
Before initi
a
To charge t
h
1. Insert t
h
2. Plug th
e
3.3 At
t
To attach th
e
1. Align t
h
2. Press t
h
e
fore
U
t
achin
g
a
ch the Ni-M
a
tteries, do as
e battery latc
h
e Ni-MH
b
t
ment and th
e
b
attery cove
r
h
argin
g
s
e the specifi
e
e
ad the Safet
y
a
l use, fully c
h
e battery, d
o
h
e USB plug
e
power adap
t
t
achin
g
e
belt clip, d
o
h
e rails on th
e
h
e belt clip d
o
U
se
g
Batt
e
H
b
attery sp
e
follows:
h to the unlo
c
b
attery or th
r
e
instruction
o
r
into space a
n
g
the N
e
d power ad
a
y
Informatio
n
harge the ba
t
o
as follows:
of the power
t
e
r
to a powe
g
the
B
o
as follows:
e
belt clip wi
t
o
wnwards int
o
e
ries
e
cified by th
e
c
k position a
n
r
ee AA alk
a
o
n the batteri
n
d then slide
i-MH
B
a
pte
r
to char
g
n
Booklet
b
ef
o
t
tery.
adapte
r
into
r outlet.
B
elt Cli
t
h the groove
o
place.
3
e
Company o
r
n
d then rem
o
a
line batteri
e
es.
the battery l
a
B
attery
g
e the battery
.
o
re charging.
the USB por
t
p
on the batte
r
r
three AA al
k
o
ve the
b
atter
y
e
s following
a
tch to the lo
c
.
t
of the radio
r
y.
k
aline batter
i
y
cover.
the polarity
c
k position.
.
i
es to the rad
i
indicated i
n
i
o.
n
the batter
y
y

4. B
a
4.1 Tu
To turn the
r
4.2 A
d
To increase
turning on t
h
4.3 S
e
To commu
n
To select a
c
1. Press t
h
The ch
a
2. Press t
h
3. Press t
h
4.4 S
e
The Contin
u
(CDCSS) c
o
channel, yo
u
To set a CT
C
1. Press t
h
The co
d
2. Press t
h
C
h
a
3. Press t
h
a
sic
O
rning
t
r
adio on or o
f
d
justin
g
or decreas
e
h
e radio.
e
lectin
g
n
icate with ot
h
c
hannel, do a
s
h
e Menu key.
a
nnel number
h
e Up key or
D
h
e PTT key t
o
e
lectin
g
u
ous Tone
C
o
de allows y
o
u
receive call
C
SS/CDCSS
h
e Menu key
d
e number fl
a
h
e Up key or
D
C
ode 0 means
a
ve CTCSS/
C
h
e PTT key t
o
O
pera
t
t
he Ra
d
ff
, rotate the
O
g
the
V
e
the volum
e
g
a Ch
a
h
er users thr
o
s
follows:
flashes.
D
own key to
o
confirm yo
u
g
a CT
C
C
oded Sque
l
o
u to preven
t
s from radio
s
code for yo
u
for two cons
e
a
shes.
D
own key to
no CTCSS/
C
C
DCSS code
o
confirm yo
u
t
ions
d
io O
n
O
n-Off kno
b
V
olum
e
e
, rotate the
a
nnel
o
ugh radios,
y
select a cha
n
u
r selection.
C
SS/C
D
l
ch System
t
unwanted
c
s
with matchi
u
r selected c
h
e
cutive time
s
select a cod
e
C
DCSS code
, select code
u
r selection.
4
n
/Of
f
b
clockwise
o
e
Volume C
o
y
ou need to s
e
n
nel.
D
CSS
C
(CTCSS) o
r
c
alls on the s
a
ng CTCSS/
C
h
annel, do as
f
s
.
e
.
is selected.
T
0.
o
r counter-cl
o
o
ntrol knob
e
lect the sa
m
C
ode
r
Continuou
s
a
me channel
.
C
DCSS code
o
f
ollows:
T
o communic
o
ckwise until
clockwise o
r
m
e channel as
s
Digital Co
n
.
If a CTCS
S
o
nly.
ate with radi
o
you hear a c
l
r
counter-cl
o
others.
n
trolled Sq
u
S
/CDCSS co
d
o
s which do
n
l
ick.
o
ckwise afte
r
u
elch Syste
m
d
e is set on
a
n
ot
r
m
a

5
5. LCD Icons
Icon Description Icon Description
Battery Room Monitor
Radio Mode Battery Save
Weather Mode (TF-512 only) Talk End Tone
Weather Alert (TF-512 only) Call Tone
Silent Mode Transmit
Keypad Tone Receive
Keypad Lock High Power (TF-512 only)
Scan Low Power (TF-512 only)
VOX / /

6
6. Call Services
6.1 Initiating a Call
You can initiate calls to other radios on the same channel and CTCSS/CDCSS code as yours.
To initiate a call, do as follows:
1. Select a channel and a CTCSS/CDCSS code.
2. Hold the radio vertically 2.5 to 5 cm from your mouth.
3. Press and hold the PTT key, and then speak into the microphone.
When transmitting, the radio displays .
4. When you finish your talk, release the PTT key.
6.2 Receiving a Call
When receiving a call, you can listen to the call without any operation. If you need to speak, wait till no one is
speaking, and then press and hold the PTT key to speak into the microphone.

7
7. Supplementary Features
7.1 Keypad Lock
The Keypad Lock feature allows you to lock the keypad to avoid accidental operations when the radio is not in
use. In the keypad lock mode, you can initiate calls and turn the radio on or off.
To lock or unlock the keypad, press and hold the Keypad Lock key until appears or disappears on the
screen.
7.2 Scan
The Scan feature allows you to find someone in your team who has accidentally changed the channel, and can
quickly find unused channels for your own use.
To turn on this feature, press the Scan key. The radio displays and begins to scan channels. When detecting
activities on a channel, the radio stays on the channel to receive signals. Two seconds after the signal disappears,
the radio continues to scan channels.
To turn off this feature, press the Scan key again.
7.3 Monitor
The Monitor feature allows the radio to receive weak signals on the current channel.
To turn on this feature, press and hold the Monitor key. The radio displays and begins to monitor the
channel and receive signals.
To turn off this feature, release the Monitor key.
7.4 Power Level
The Power Level feature allows you to adjust the power level for the selected channel.
To adjust the power level, do as follows:
1. Press the Menu key for three consecutive times.
The current setting flashes.
2. Press the Up or Down key to select one of the following:
z HI: enables communication with distant radios but consumes more battery power.
z
L
O
C
3. Press t
h
7.5 C
a
The Call To
To transmit
1. Select
a
a. D
o
z
b. P
r
c. Pre
2. Press t
h
7.6 Ta
The Talk E
n
you finish y
o
To turn on
o
1. Do the
f
z
Fo
r
2. Press t
h
3. Press t
h
7.7
Vo
The VOX
f
volume rea
c
O
: enables co
m
C
hannels 8 to
h
e PTT key t
o
a
ll Ton
e
ne
f
eature al
l
a call tone,
d
a
call tone.
o
the followi
n
For TF-5
1
r
ess the Up o
r
Setting t
h
ss the PTT
k
h
e Call Tone
lk End
n
d Tone feat
u
o
ur talk.
o
r of
f
the feat
u
f
ollowing un
t
r
TF-512, pr
e
h
e Up or Do
w
h
e PTT key t
o
o
ice O
p
f
eature allow
s
c
hes the pres
e
m
municatio
n
14 are low-
p
o
confirm yo
u
e
l
ows you to t
r
d
o as follows:
n
g until the r
a
1
2, press the
M
r
Down key
t
h
e call tone t
o
k
ey to confir
m
key to trans
m
Tone
u
re allows yo
u
u
re, do as fo
l
t
il the radio
d
e
ss the Men
u
w
n key to sel
e
o
confirm yo
u
p
erate
d
s
the radio t
o
e
t level.
n
with close r
a
p
ower chann
e
u
r selection.
r
ansmit a ton
a
dio displays
M
enu key fo
t
o select a ca
l
o
OFF turns
m
your select
i
m
it the call to
u
to send a t
o
l
lows:
d
isplays :
u
key for six
c
e
ct ON or O
F
u
r selection.
d
Tran
s
o
transmit v
o
8
a
dios and sa
v
e
ls and their
p
e to notify o
t
:
r four conse
c
l
l tone.
of
f
the Call
T
i
on.
ne.
o
ne when yo
u
c
onsecutive t
i
F
F.
s
mit (
V
o
ice automat
i
v
es battery p
o
p
ower levels
c
t
hers that yo
u
c
utive times.
T
one feature.
u
release the
P
i
mes.
V
OX)
i
cally with o
o
wer.
c
annot be ch
a
u
want to talk
.
P
TT key. Th
i
r without an
a
nged.
.
is tone notifi
e
earpiece w
h
e
s others tha
t
h
en the voic
e
t
e
To turn on
o
1. Do the
f
z
Fo
r
2. Press t
h
L1, L2,
z
L1
z
L2
z
L3
3. Press t
h
A sh
o
7.8 Sil
The Silent
M
b
acklight o
f
the
b
acklig
h
To turn on
o
1. Do the
f
z
Fo
r
2. Press t
h
3. Press t
h
7.9 K
e
The Keypa
d
To turn on
o
1. Do the
f
z
Fo
r
2. Press t
h
3. Press t
h
o
r of
f
this fea
t
f
ollowing un
t
r
TF-512, pr
e
h
e Up or Do
w
and L3 mea
n
: low sensiti
v
: medium se
n
: high sensit
i
h
e PTT key t
o
o
rt delay occ
u
ent M
o
M
ode featur
e
f
the radio a
n
h
t becomes o
f
o
r of
f
this fea
t
f
ollowing un
t
r
TF-512, pr
e
h
e Up or Do
w
h
e PTT key t
o
e
ypad
T
d
Tone featur
e
o
r of
f
the feat
u
f
ollowing un
t
r
TF-512, pr
e
h
e Up or Do
w
h
e PTT key t
o
t
ure, do as fo
t
il the radio
d
e
ss the Men
u
w
n key to sel
e
n
different s
e
v
ity applicab
l
n
sitivity appl
i
i
vity applica
b
o
confirm yo
u
u
rs fro
m
the t
i
o
de
e
allows you
n
d on t
h
f
f while the i
c
t
ure, do as fo
t
il the radio
d
e
ss the Men
u
w
n key to sel
e
o
confirm yo
u
T
one
e
allows you
u
re, do as fo
l
t
il the radio
d
e
ss the Men
u
w
n key to sel
e
o
confirm yo
u
llows:
d
isplays :
u
key for five
e
ct L1, L2, o
r
e
nsitivity lev
e
l
e to noisy e
n
i
cable to co
m
b
le to quiet e
n
u
r selection.
i
me you star
t
to avoid dis
t
h
e screen fla
s
c
on still flas
h
llows:
d
isplays :
u
key for sev
e
e
ct ON or O
F
u
r selection.
to hear the k
e
l
lows:
d
isplays :
u
key for eig
h
e
ct ON or O
F
u
r selection.
9
consecutive
t
r
L3 to turn
o
e
ls, as shown
n
vironments
m
mon enviro
n
n
vironments
t
talking till t
h
t
urbance by
m
s
h when the
r
h
es indicating
e
n consecutiv
F
F.
e
y tone whe
n
h
t consecutiv
e
F
F.
t
imes.
o
n the feature
,
below:
n
ments
h
e time the r
a
m
uting the s
p
r
adio receive
s
missed calls
e times.
n
you press a
k
e
times.
,
or select O
F
a
dio starts tra
n
p
eaker of th
e
s
signals. W
h
.
k
ey.
F
F to turn of
f
n
smitting.
e
radio. In t
h
h
en the sign
a
f
the feature.
h
is mode, th
e
a
l disappears
,
e
,
7.10
R
The Room
M
preset level.
In the
To turn on
o
1. Do the
f
z
Fo
r
2. Press t
h
L1, L2,
z
L1
z
L2
z
L3
3. Press t
h
7.11
S
The Sleep
L
is detected
a
To turn on
o
1. Do the
f
z
Fo
r
2. Press t
h
L1, L2
,
respecti
3. Press t
h
In th
e
emer
g
R
oom
M
M
onito
r
feat
u
When you a
r
room monit
o
o
r of
f
this fea
t
f
ollowing un
t
r
TF-512, pr
e
h
e Up or Do
w
and L3 mea
n
: low sensiti
v
: medium se
n
: high sensit
i
h
e PTT key t
o
S
leep L
L
evel feature
a
t the specifi
e
o
r of
f
this fea
t
f
ollowing un
t
r
TF-512, pr
e
h
e Up or Do
w
,
and L3 m
e
vely.
h
e PTT key t
o
e
sleep mode,
g
encies, do n
o
M
onito
r
u
re allows t
h
r
e out, you c
a
o
r mode, the
r
t
ure, do as fo
t
il the radio
d
e
ss the Men
u
w
n key to sel
e
n
different s
e
v
ity applicab
l
n
sitivity appl
i
i
vity
a
pplica
b
o
confirm yo
u
evel
allows the r
a
e
d interval. It
t
ure, do as fo
t
il the radio
d
e
ss the Men
u
w
n key to sel
e
e
an that the
o
confirm yo
u
the radio do
e
o
t enable the
r
h
e radio to tr
a
a
n use this fe
r
adio cannot
llows:
d
isplays :
u
key for nine
e
ct L1, L2, o
r
e
nsitivity lev
e
l
e to noisy e
n
i
cable to co
m
b
le to quiet e
n
u
r selection.
a
dio to enter
t
saves the
b
a
t
llows:
d
isplays :
u
key for ten
c
e
ct L1, L2, o
r
radio is in
s
u
r selection.
e
s not receiv
e
Sleep Level
10
a
nsmit voice
ature to mon
i
receive sign
a
consecutive
r
L3 to turn
o
e
ls, as shown
n
vironments
m
mon enviro
n
n
vironments
t
he sleep mo
d
t
tery power.
c
onsecutive t
i
r
L3 to turn
o
s
leep mode
e
or send any
feature.
automatical
l
i
tor your roo
m
a
ls.
times.
o
n the feature
,
below:
n
ments
d
e for a dura
t
i
mes.
o
n the feature
,
for one sec
o
signal. Ther
e
l
y when the
v
m
.
,
or select O
F
t
ion if no ch
a
,
or select O
F
o
nd, two sec
o
e
fore, when
y
v
oice volum
e
F
F to turn of
f
a
nnel activit
y
F
F to turn of
f
onds, and t
h
y
ou must res
p
e
reaches th
e
f
the feature.
y
or operatio
n
f
the feature.
h
ree seconds
,
p
ond to
e
n
,
7.12
S
The Stopwa
t
allows the r
a
To use the s
t
1. Do the
f
z
Fo
r
2. To turn
z
Fo
r
z
Fo
r
The sto
p
3. To pau
s
4. Option
a
5. To rese
t
6. To turn
7.13
W
The weathe
r
b
roadcasted
In the
must
r
7.13.1
E
To enter the
To exit the
w
7.13.2
S
To select a
w
1. In the
w
S
topwa
t
t
ch
f
eature a
l
a
dio to count
s
t
opwatch or
t
f
ollowing un
t
r
TF-512, pr
e
on the Stop
w
r
the Stopwa
t
r
the Timer
fe
p
watch or th
e
s
e the stopwa
t
a
l: To resume
t
the stopwat
c
off the featu
r
W
eathe
r
mode allo
w
b
y the Unite
weather mo
d
r
espond to e
m
E
nterin
weather mo
d
w
eather mod
e
S
electi
n
w
eather chan
n
w
eather mode
t
ch an
d
l
lows the rad
i
s
down from
t
he time
r
, do
t
il the radio
d
e
ss the Men
u
w
atch feature
t
ch feature, p
fe
ature, press
e
timer begin
s
t
ch or the ti
m
the stopwat
c
c
h or the tim
e
r
e, press the
P
r Mod
e
w
s you to lis
t
d States Nati
d
e, the radio
e
m
ergencies, d
o
g/Exiti
n
d
e, press the
W
e
, press the
W
n
g a W
e
n
el, do as fol
, press the
M
d
Tim
e
i
o to count u
p
the 59 minu
t
as follows:
d
isplays
u
key for elev
or the Timer
ress the Up
k
the Down k
e
s
to count.
m
er, press the
c
h or timer, p
e
r, press the
S
P
TT key or t
h
e
(TF-5
t
en to weath
e
onal Oceani
c
e
xits the radi
o
o
not enter t
h
n
g the
W
W
eather M
o
W
eather Mo
d
e
ather
C
lows:
M
enu key.
11
e
r
p
wards from
z
t
es and 59 se
c
:
en consecuti
v
feature, do t
h
k
ey.
e
y.
Call Tone k
e
ress the Call
S
can/Monit
o
h
e Menu ke
y
12 onl
y
e
r conditions
c
and Atmos
p
o
mode and
c
h
e weather m
o
W
eathe
r
o
de key. The
d
e key again.
C
hanne
l
z
ero for mea
s
c
onds.
v
e times.
h
e following
:
e
y.
Tone key a
g
o
r key.
y
.
y
)
and set the
p
heric Admi
n
c
annot receiv
e
o
de.
r
Mode
radio displa
y
l
s
uring elaps
e
:
g
ain.
radio to aler
t
n
istration (N
O
e
or send cal
l
y
s .
e
d time. The
T
t
you to ext
r
O
AA) Weath
e
l
s. Therefore,
T
imer featur
e
r
eme weathe
r
e
r Radio.
when you
e
r

12
The current weather channel flashes.
2. Press the Up or Down key to select a weather channel with good reception in your area.
3. Press the PTT key to confirm your selection.
7.13.3 Turning the Weather Alert On/Off
With the Weather Alert feature on, when receiving NOAA Weather Radio emergency messages, the radio rings an
alert tone and changes to the selected weather channel to inform you of weather alert information.
To turn the Weather Alert feature on or off, do as follows:
1. In the weather mode, press the Menu key twice.
The radio displays and the current setting flashes.
2. Press the Up or Down key to select ON or OFF.
3. Press the PTT key to confirm your selection.
7.14 Battery Save
The Battery Save feature allows the radio to get maximum operational life on a single battery charge. When the
radio does not detect any activity or operation for three seconds, it enters the battery save mode.
7.15 Low Battery Alert
When the radio is low on power, flashes on the screen and an alert tone rings when you press the PTT key,
indicating that the radio enters the low battery alert mode. In this mode, you are not allowed to send a call tone or
initiate a call.
To exit this mode, charge or replace the battery.
7.16 Time-out Timer (TOT)
The purpose of TOT is to prevent any user from occupying a channel for more than 60 seconds. After 60 seconds,
the radio stops transmitting and keeps beeping. To stop beeping, release the PTT key.
7.17 Auto Squelch
The Auto Squelch feature allows the radio to improve voice clarity during the call by automatically removing
background noise.

13
8. Troubleshooting
Phenomena Analysis Solution
The radio cannot be
turned on.
The battery may be installed
improperly. Remove and reattach the battery.
The battery power may run out. Recharge or replace the battery.
The battery may suffer from poor
contact caused by dirtied or
damaged battery contacts.
Clean the battery contacts or replace the battery.
During receiving, the
voice is weak,
discontinuous or
totally inactive.
The battery voltage may be low. Recharge or replace the battery.
The volume level may be low. Increase the volume.
The speaker may be blocked. Clean the surface of the speaker.
You cannot
communicate with
other members.
The channel or CTCSS/CDCSS
code may be inconsistent with that
of other members.
Set your channel and CTCSS/CDCSS code to the
same as those of other members.
You may be too far away from
other members. Move towards other members.
You hear unknown
voices or noise.
You may be interrupted by radios
using the same channel and/or
CTCSS/CDCSS code.
Change the channel and/or the CTCSS/CDCSS
code.
The radio may be set with no
CTCSS/CDCSS code.
Set a CTCSS/CDCSS code for all radios in your
team to avoid interference.
You are unable to
hear anyone because
of too much noise and
hiss.
You may be too far away from
other members. Move towards other members.
You may locate in an unfavorable
position. For example, your
communication may be blocked by
high buildings or frustrated in the
Move to an open and flat area, restart the radio, and
try contacting again.

14
Phenomena Analysis Solution
underground areas.
It could be the result of external
disturbance (such as
electromagnetic interference).
Stay away from equipment that may cause
interference.
You cannot use the
keys.
The keypad may fail to function
temporarily. Restart the radio.
The LCD does not
display any
information.
The LCD may fail to function
temporarily. Restart the radio.
If the above solutions cannot fix your problems, or you may have some other queries, please contact us or your
local dealer for more technical support.

9. O
p
Contact yo
u
Use t
h
dama
g
p
tion
a
u
r local deale
r
h
e accessorie
g
e arising ou
t
a
l Ac
c
r
fo
r
the opti
o
s specified b
y
t
of the use o
c
esso
r
o
nal accessor
i
y
Hytera onl
y
f any unauth
o
15
r
ies
i
es used wit
h
y
; otherwise,
o
rised access
h
the product.
the Compan
y
ories.
y
will not be
l
l
iable for an
y
y
loss or

16
Channels and Frequencies
Channel Frequency (MHz) Description Channel Frequency (MHz) Description
1 462.5625 GMRS/FRS 12 467.6625 FRS
2 462.5875 GMRS/FRS 13 467.6875 FRS
3 462.6125 GMRS/FRS 14 467.7125 FRS
4 462.6375 GMRS/FRS 15 462.5500 GMRS
5 462.6625 GMRS/FRS 16 462.5750 GMRS
6 462.6875 GMRS/FRS 17 462.6000 GMRS
7 462.7125 GMRS/FRS 18 462.6250 GMRS
8 467.5625 FRS 19 462.6500 GMRS
9 467.5875 FRS 20 462.6750 GMRS
10 467.6125 FRS 21 462.7000 GMRS
11 467.6375 FRS 22 462.7250 GMRS
Weather Channel Chart
Channel No. Frequency (MHz) Channel No. Frequency (MHz)
1 162.550 6 162.500
2 162.400 7 162.525
3 162.475 8 161.650
4 162.425 9 161.775
5 162.450 10 163.275