Hyun Won DAH1900 MP3 Player User Manual User s Manual H
Hyun Won Inc. MP3 Player User s Manual H
Hyun Won >
USERS MANUAL

EUT Type: MP3 Player
FCC ID : PCMDAH1900
Test Report No.: GETEC-E3-05-082
FCC Class B Certification
APPENDIX H
: USER’S MANUAL

User Manual
www.mobiblu.com
Playing multitude formats of digital files
Music recording (MP3 Direct Encoding)
Voice recording
FM Radio listening & recording
Stop Watch
DAH-1900
Download
Installation of Program CD
File download/upload
Format
57
59
62
Customer Support
It may not be a trouble!
FCC RF INTERFERENCE STATEMENT
Warranty card
65
FM Radio
Radio listening
Searching radio station
Storing radio station
Deleting stored station
Radio recording
FM recording Bit rate setting
33
34
35
36
37
38
Menu
Button manipulation
Menu list
Mode Change
Setting
Recording
Display
Timer
EQ
SRS
Erase
About
Stop Watch
41
42
43
44
48
49
50
51
52
54
55
56
Getting Started
1
1
Safety Precaution
Special Features
Specification
Accessories
1
3
6
7
Carefully read this part before using the product. The Safety Precautions are classified into three
categories; Danger, Warning and Caution. We are not responsible for any damage or loss from
being not in conformity with these precaution provisions.
Danger : User may be endangered to death or any major injury when not in
conformity with the provisions with this mark.
Warning : User may be subject to any major injury when not in conformity with
the provisions with this mark.
Caution : User may be subject to any minor injury or property damage when not
in conformity with the provisions with this mark.
SRS is a registered trademark of SRS Labs.
WOW Technology is an intellectual property of SRSLabs.
Table of Contents
2
Safety Precaution Safety Precaution
1
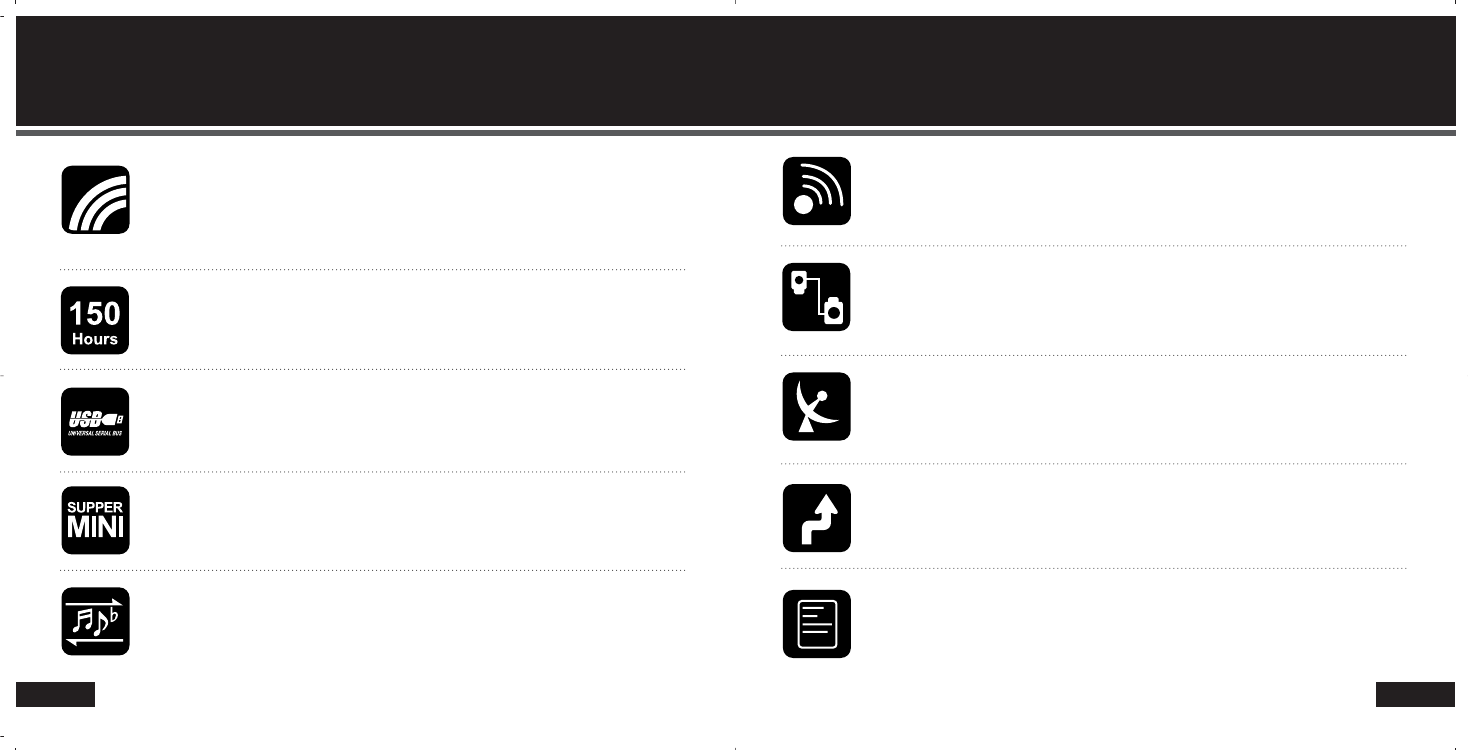
Avoid humidity or dusty area.
Don t disassemble or
modify the product.
Don t put the product close to
any heating device or under
direct sunlight.
DANGER
DANGER
Never use any chemical or cleanser. It
may damage the surface of product.
Don t touch the product with a
wet hand. Distributing music files without
authorization is against
copyright law.
The manufacturer is not
responsible for any damaged
data saved in the product if
the product error was caused
by user s carelessness.
Listening to sound sources in
higher volume may cause
auditory disorder.
Don t use earphone
set while riding a
bicycle, motorcycle,
or driving a car.
Immediately reset the
product when it
generates excessive
heat or burning small,
and then contact our
A/S agent for repair.
Avoid the product
from dropping or
excessive shock.
Don t carry the product in the pocket with
metal parts such as coin or key. It may
generate high heat or fire.
4
Special FeaturesSpecial Features
3
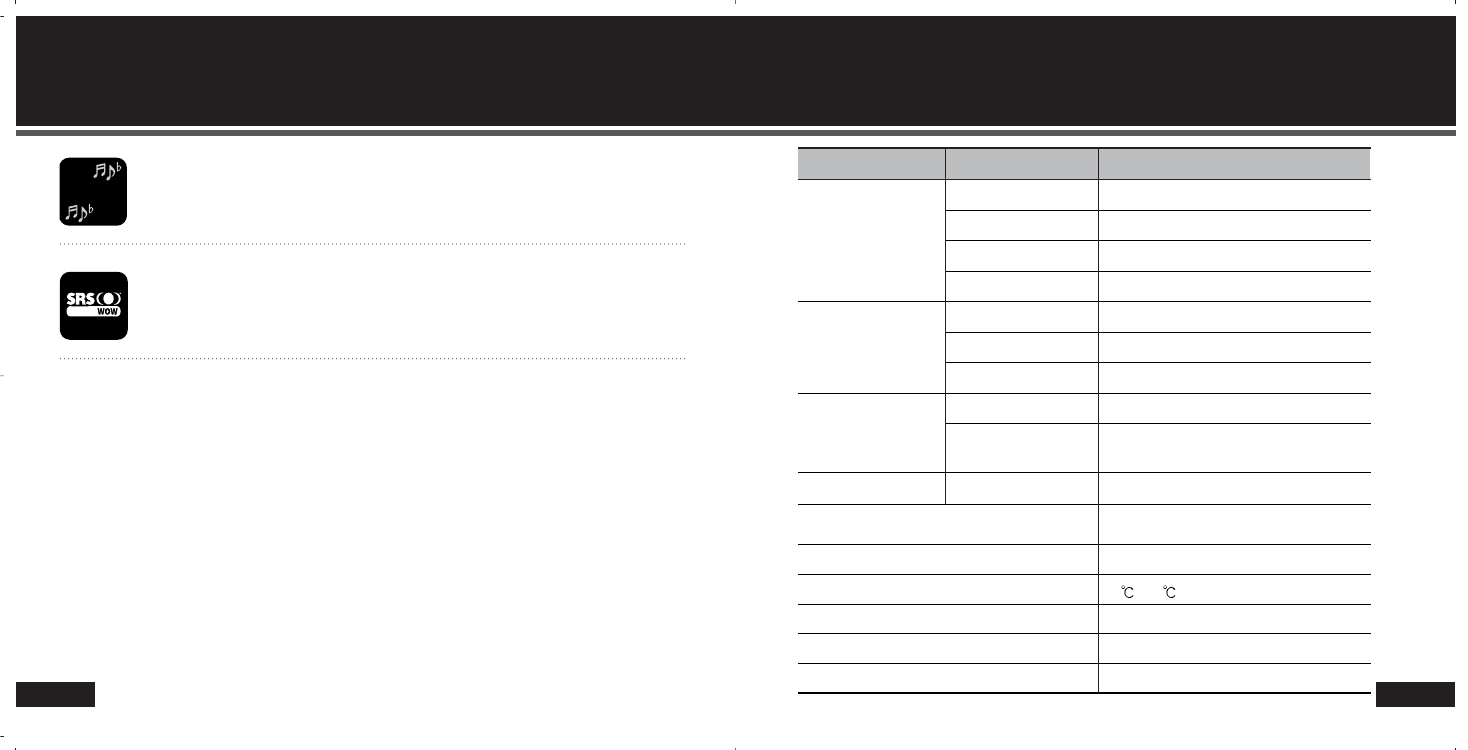
Sharp-cut/crisp OLED
Blue colored self-illuminant organic EL is used as the main screen with optimum harmony
between black background and blue texts. This organic EL LCD provides you very sharp-
cut color, comfortable-to-eye display and elegant high-end screen quality.
150-hour of play time
The play time of the product is up to 150 hours with one AAA type battery.
USB fast transmission
USB connection enables you to download/upload files very quickly.
Portable/cute size
This cute sized product has been designed for the use with only one hand.
Voice recording
High performance microphone built in the product enable you to use multitude functions
for voice recording.
Music recording
By connecting with CD player, walkman, audio and other sound sources you can
record the sources as digital files while you are enjoying them.
Firmware Upgrade
If any modification in the functions is required by manufacturer, you may easily upgrade
the firmware by simple manipulation
Removable Disk (Mass Storage)
By connecting the product to PC, the Windows system identifies it as a removable disk. No
extra effort to install additional software in the PC is required. All other file formats can be
saved in the product.
FM Radio listening & recording
Enjoy FM radio with this product as well as digital music files. You can also record
your favorite FM programs as music files.
Language-learning Aid
With all convenient and essential functions for language-learning such as section-
repeat, sectional FF/REW, resumption, bookmark and others the product enables you
to study languages very effectively.
6
Specification
Special Features
5
Multi-Codec
The product support Multi-codec to allow you to enjoy not only MP3 files but also WMA,
WAV, OGG, JPEG, MPEG-4 and other media files.
MULTI
SRS 3D
You can now enjoy 3D Surround Stereophonic music with a tiny MP3 player! This SRS
function offers you not only 3D Surround music but deep and abundant tone with the aid of
enhanced bass.
Class
FM Tuner
Audio
File
Recording hours
Max. Playback hours
Operational Temperature
Size (W x H x D mm)
Weight (g)
Battery
USB
FM Frequency Range
Headset Output
S/N ratio
Antenna
Frequency Characteristic
Headset Output
S/N ratio
File Type
Bit Rate
Downloading Speed 20Mbps
150 hours
-5 ~70
40 X 80 X 15.5 (mm)
35 (g)
Li-Ion
2080 minutes for voice recording
(with 512MB and based on 32Kbps)
87.5MHz ~ 108.0MHz
Max. 7mW (16), at Max. Volume
50dB
Headset/ Earphone code antenna
20Hz ~ 20KHz
Max. 15mW (16) Max. Volume
90dB
MP3, WMA
MP3 : 8~320Kbps,
WMA : 32~192Kbps
Items Specifications
Accessories
7
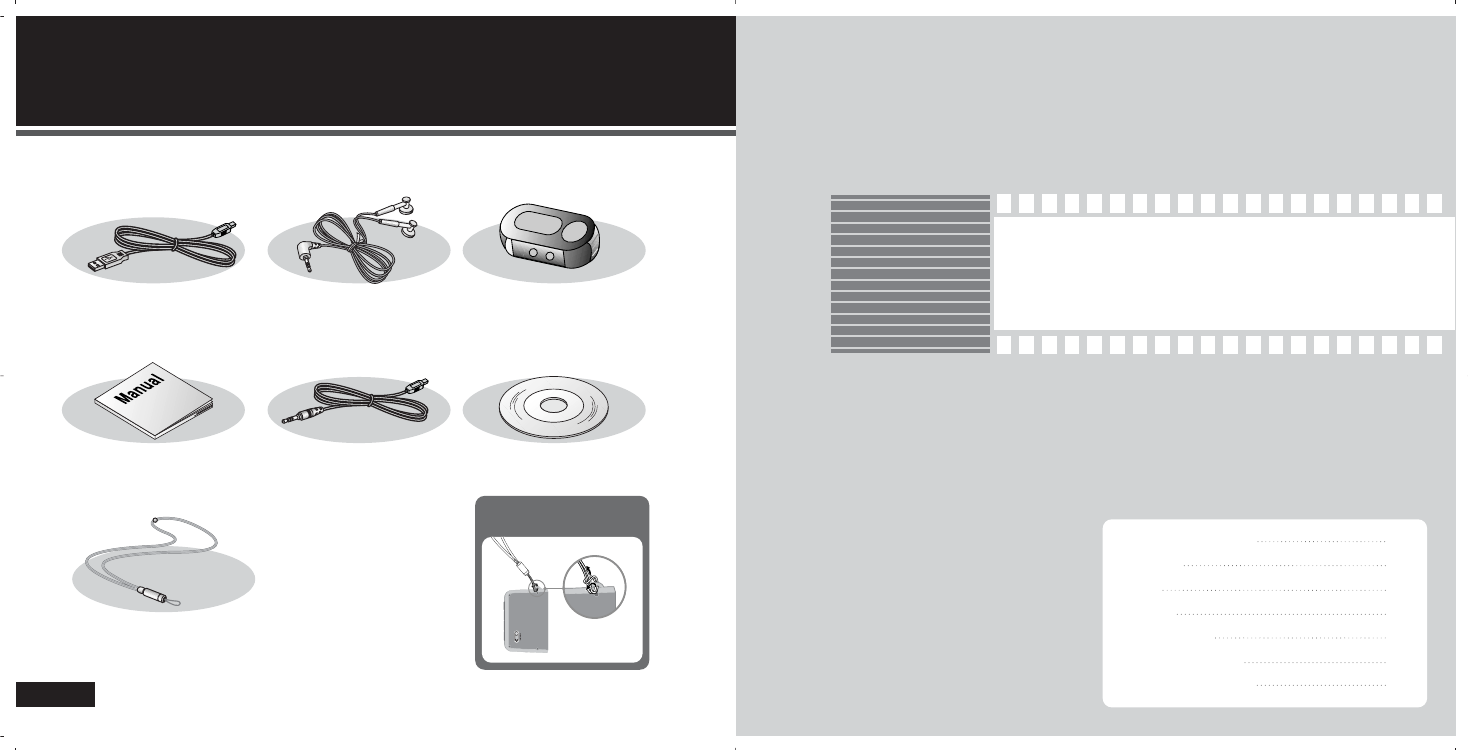
USB Cable Earphone Portable Case
User Manual Line-in Cable Program CD
Neck strap
Depicted images shown below are provided only for your appreciation and they may
be different from real products.
Hooking up the neck strap
with the product
Basic Use of the Player
2
2
9
10
11
13
14
15
16
Location of Controls
Buttons
LCD
Battery
About Power
USB Connection
USB Disconnection
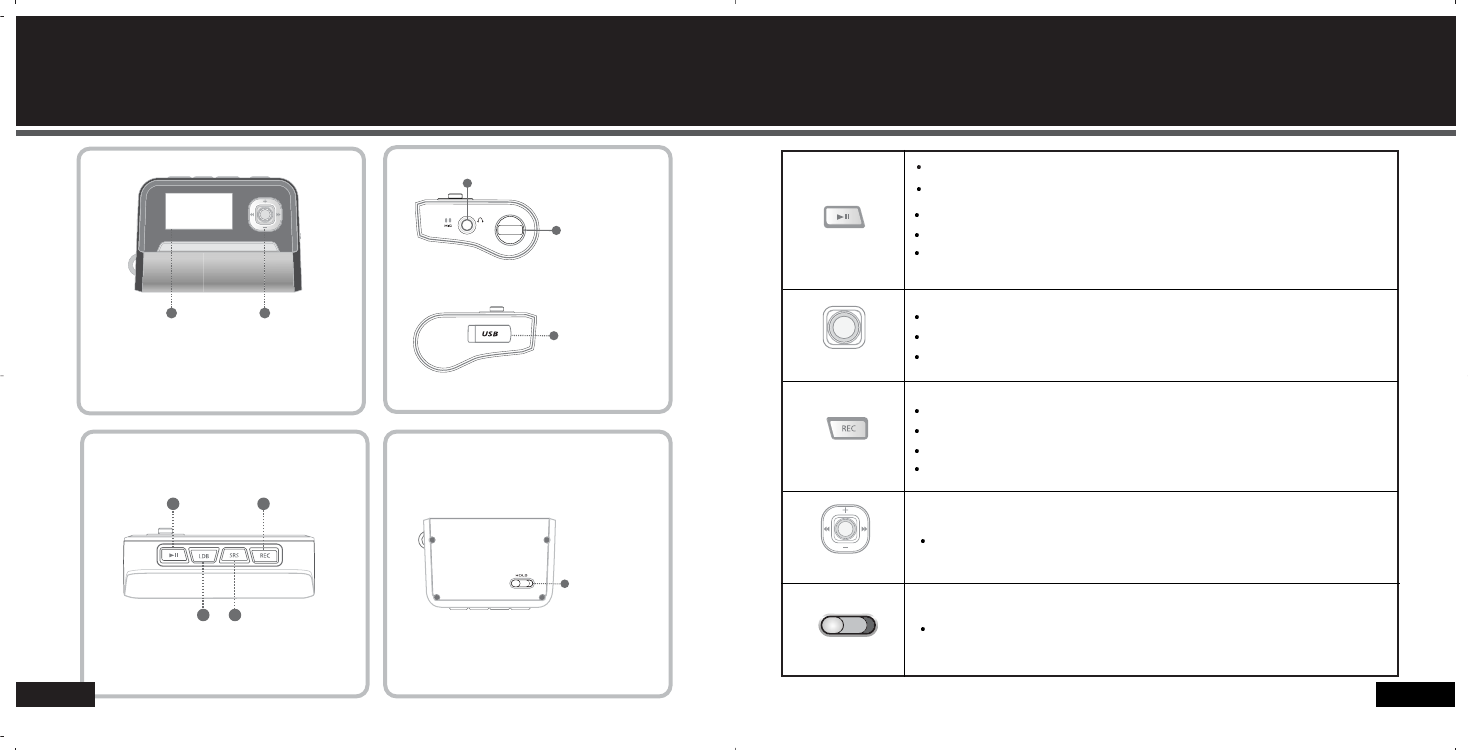
LCD FF/REW & Vol+/Vol-
Hold switch
Power/Play/Pause
EQ/ Rec/ A-B section
repeat
USB Port
Line-in Port
Menu/Navigation
Earphone Port
10
Buttons
Location of Controls
9
Hole switch
Power On/Off
File play/ pause
Increase/ decrease of volume
Hold of all key functions
Shift to the previous/next file
Searching within the track
Search
-shift to Up/ Down/ Left/ Right in menu/navigation mode
Enter Menu/ Navigation mode
Mode set value save
Shift to the sub folder in navigation
Voice, Music, FM radio recording
A - B section repeat in play mode/ EQ selection in stop mode
Shift to preceding stage in menu mode
Release of navigation
Play button
Menu button
Record button
Volume button
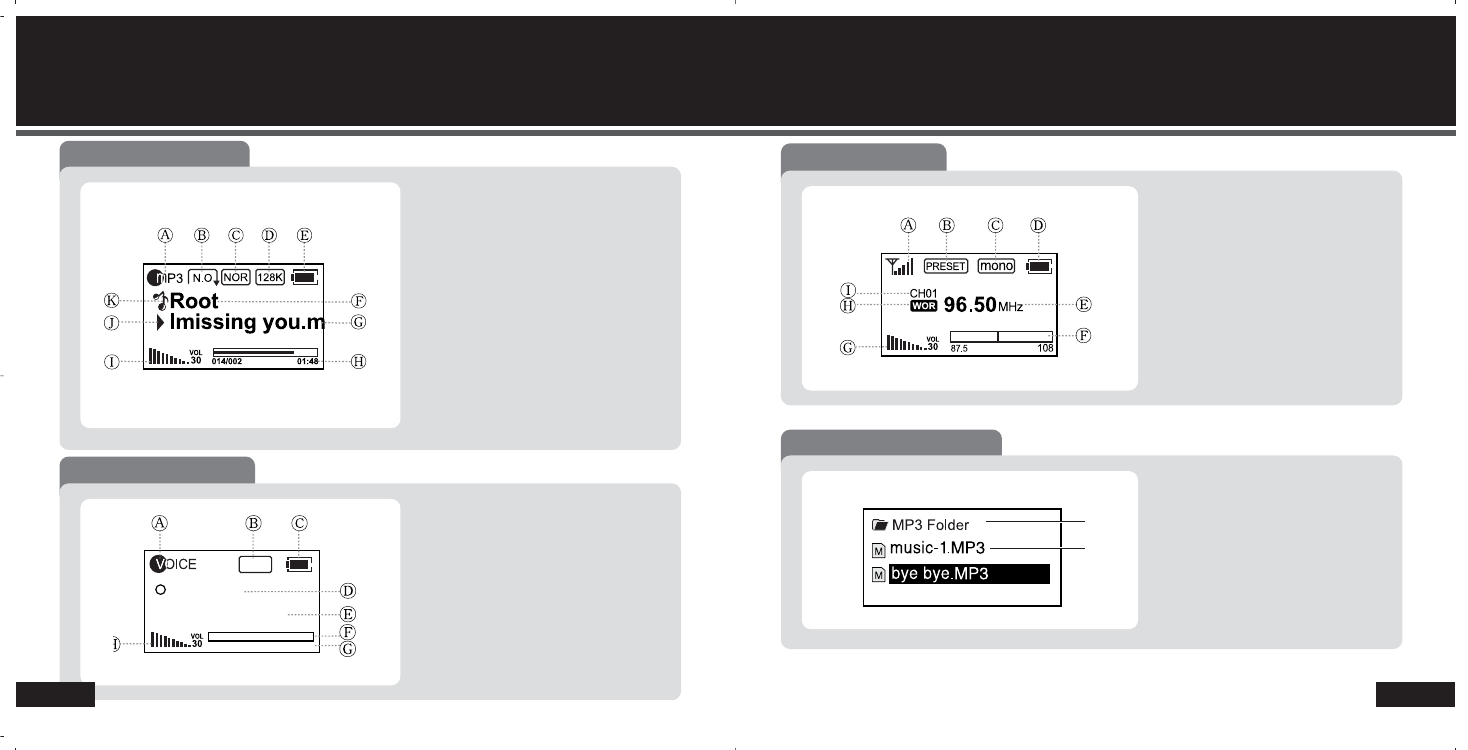
Record mode display
A : Recording status
B : Bit-rate
C : Battery capacity
D : Recording process
E : Record elapsing time/ remaining time
F : Recording status
G : Recorded file name
H : Volume
355K
Ready
V001.mp3
000:00 115:48
Music mode display
A : File format in play
B : Play mode
C : EQ/SRS
D : Bit-rate
E : Battery capacity
F : Folder name
G : File name
H : File elapsing time
I : File number
J : Volume
K : Status of Files
L : Modes
Voice/ music recoding available in this mode
you may listen to all saved music files in this mode
12
LCDLCD
11
FM Mode Display
A : Antenna mark in receiving / no mark
in ready
B : Auto/ Manual
C : Preset No. 1 to 20
D : Mono/ Stereo
E : Battery capacity
F : Frequency
G : Frequency sensitivity
H : Preset mode
I : Volume
you can enjoy stereo FM radio in the mode.
Navigation mode display
B
A
A: Folder B: File
you may search stored files in the mode.
14
About Power
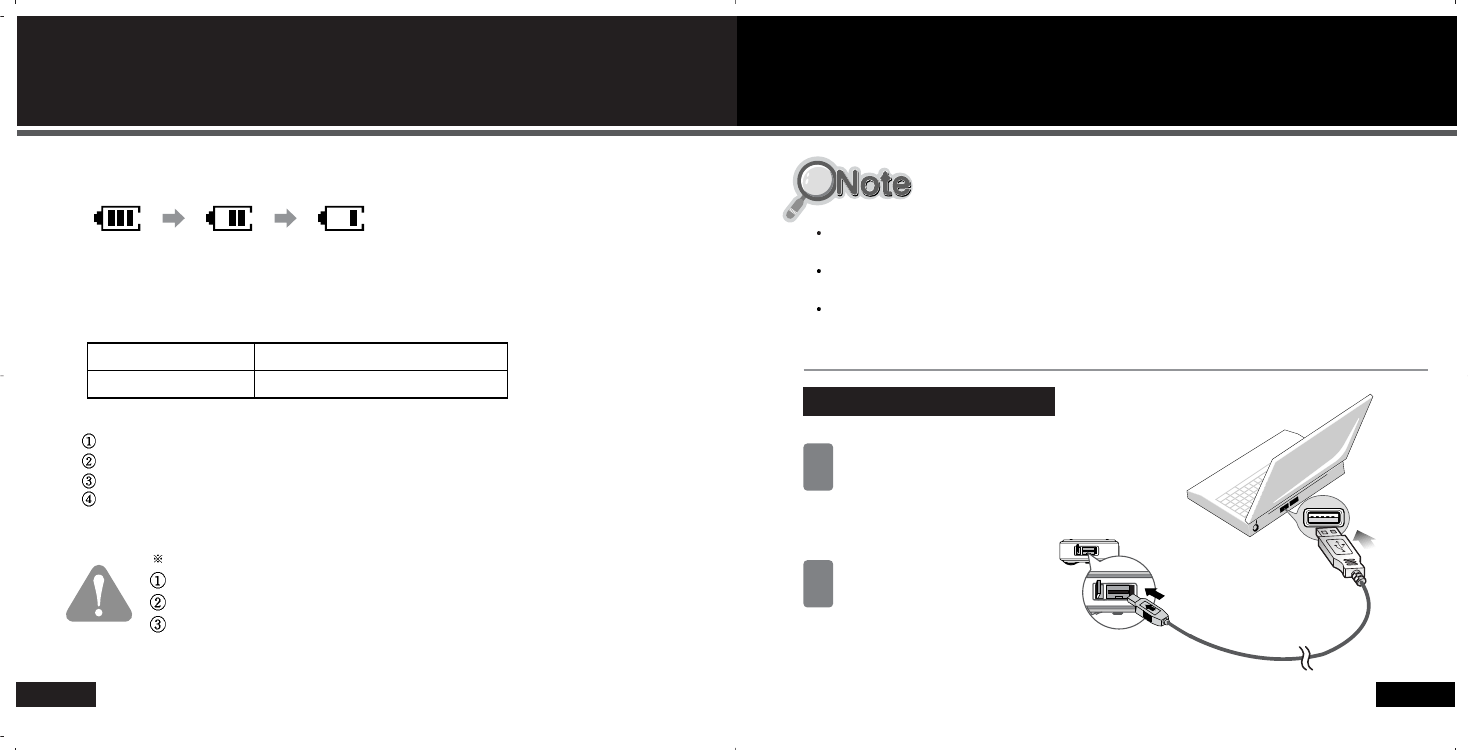
1. When initially turning on the product, the battery status may vary. It is
stabilized 5 to 6 seconds after the power ON.
2. According to its characteristic, when using commonly used battery, the player
may not work even with the battery capacity display in its medium position.
Replace the battery. (Alkaline battery lasts longer than Manganese battery.)
3. Continuous play hours
Replace the battery in case with the following symptoms;
“Low Battery” displayed on LCD.
Button is not functioning or stops its function soon after the trial.
LCD does not activate at the pressing of any button.
1 battery: 15 hours (AAA alkaline)
MP3 : 128Kbps
with Vol 15, Normal
Above result is subject to variation according to the type, the manufacturer and the use
condition of battery.
(Full) (Mid) (Low)
Battery
Alkaline type
MP3 playing
15 hours (1.5V AAA X 1)
USB Connection
15
Connection with USB cable
What’s USB (Universal Serial Bus)? This is a new connection system between PC and
peripheral devices.
Connect the USB cable supplied with the product into a USB port in PC. Any unexpected
error can be happened when connecting to the USB port in front of PC or USB hub.
The product can not be identified in the PC with Windows 98SE or lower. Install program CD
supplied with the product in the PC.
Open USB port cover on the
back.
1
Connect between PC and
the product using the USB
cable supplied in the
package.
2
16
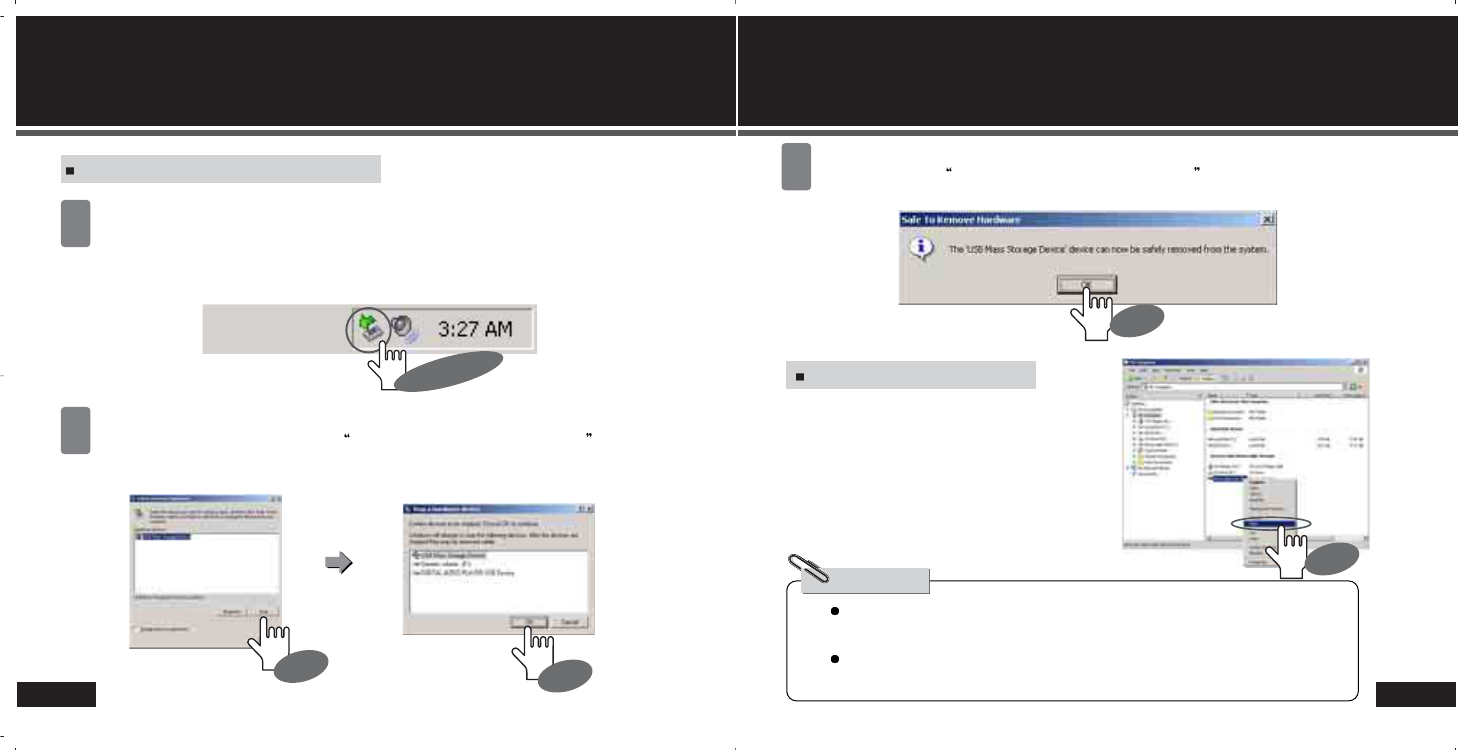
USB Disconnection
In case with Windows ME, 2000 and XP;
Double click on the green arrow on the right-bottom part of the initial Window
screen.
1
Click on Stop and OK after selecting USB High Capacity Storage Device and click on
OK once again.
2
Double Click
Click
Click
In case with Windows 98SE
Removing the cable without following above instruction will display a warning
message and may cause a fatal error in PC or the product.
Removing the cable while downloading or uploading files, or formatting the
product may cause a fatal error in PC or the product.
Note!
Open “My Computer” or “Windows
Search” and choose “Removable
Disk.” Choose “Remove” using the
right button of mouse and then
remove the USB cable.
Click on OK on Safety removal of the hardware message bar and then
remove the cable.
3
USB Disconnection
17
Click
Click
Music Mode
3
3
Power ON/OFF
Listening
Navigation
(Folder searching in play mode)
Hold/ EQ
Setting section-repeat
Mode shift
19
20
21
22
23
24
MEMO
MEMO
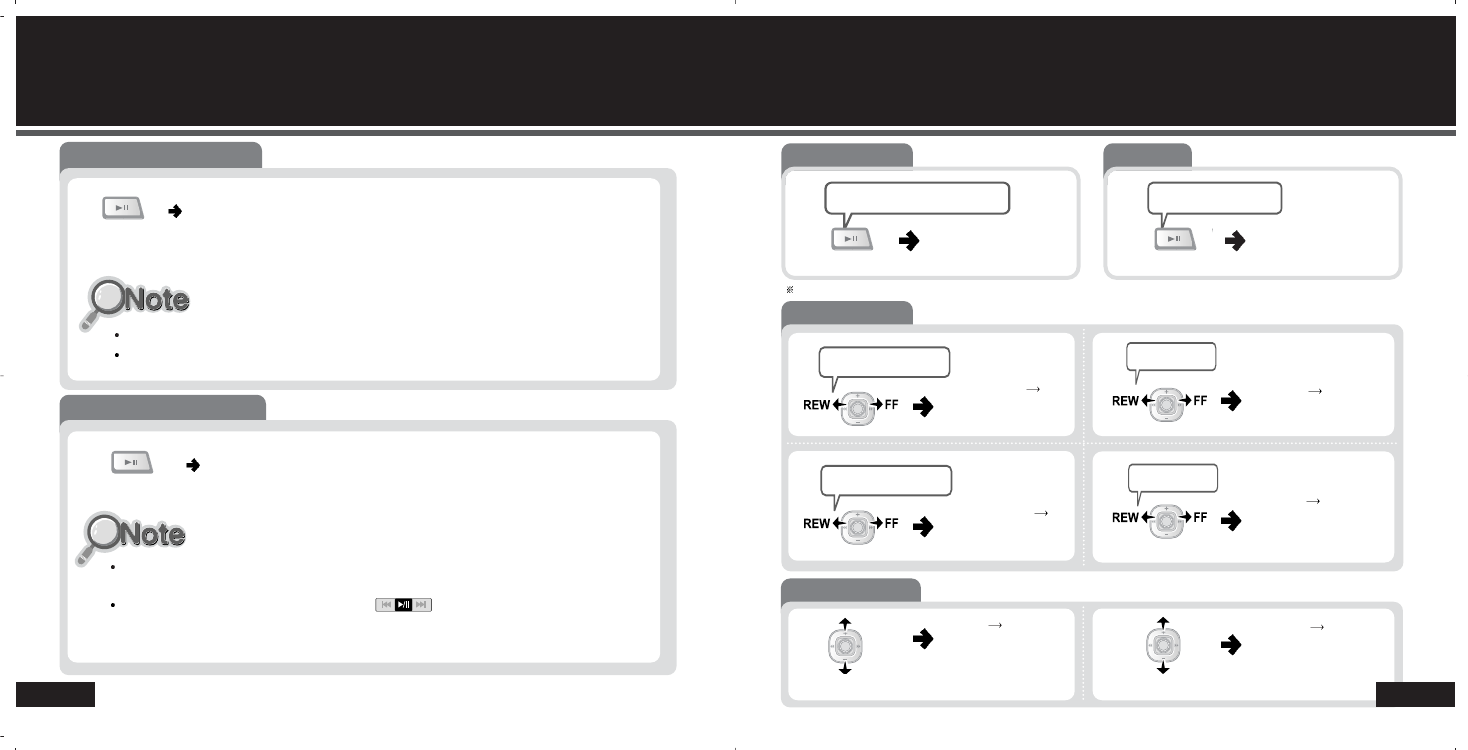
Volume control
File selection
shortly to
increase/decrease
the volume by one
step.
in play mode to
play the
next/previous file
in stop mode
to move to the
next/previous file
Shortly push
and hold to
continuously move to
the next/previous files
Press
Press
and hold to
continuously
increase/decrease to
volume.
Press
to play the file
and hold to search
the next/previous files
Playing file
At “Stop” or “Pause”;
Stop
Push
Press
to stop the file
In playing;
20
Music Listening
Power On/Off
19
Only the intro message displays when the product is in HOLD.
Replace the battery when LCD is not activated.
Press
and hold to turn the power on.
Turning ON the power
Turning OFF the power
When no button manipulation in pause or stop condition is done for the set
period time for “Auto Power Off,” it automatically turns off the power.
When you try to play a file by pressing after the restarting of the
product, it completely recovers all previous setting. All track numbers, equalizer
and other settings are recovered. (Resume function in second unit)
Press
and hold to turn the power off.
MP3 with VBR encoding can occur mismatch of playing time due to file's characteristic.
Push
Shortly push
22
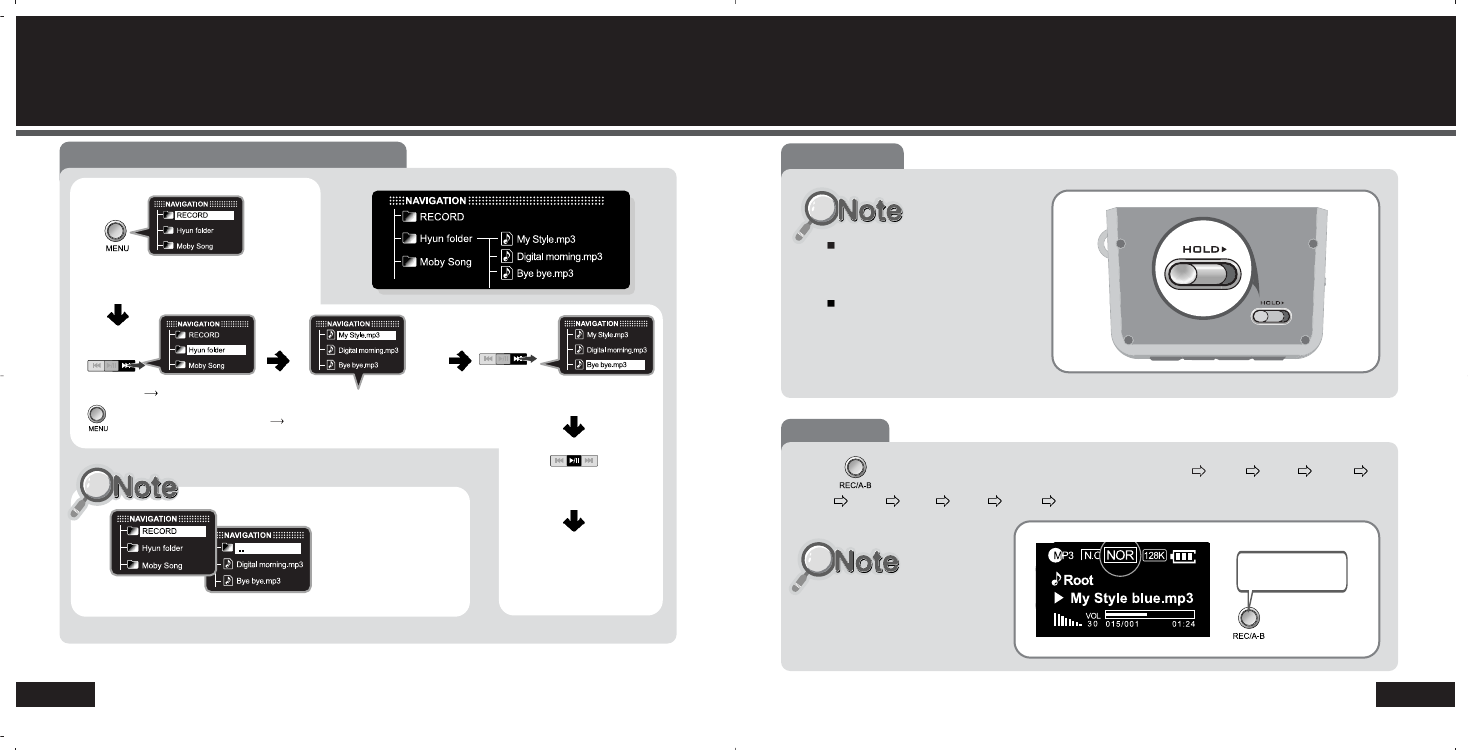
HOLD/ EQ Navigation (Folder searching in play mode)
21
Example) When trying to play “bye bye” file;
Press
after moving to [Hyun folder]
enter [Hyun folder]
and hold
press
Choose [..] folder to
move to the
preceding folder.
press
to play “bye bye” file
move to [bye bye.mp3]
Hold function
No button is functioning in Hold
status.
Power ON is not available in
Hold mode. (HOLD screen only
appears temporality)
EQ Selection
Enjoy the best suitable
tone according to each
song by selecting a mode.
Press shortly in Stop or Pause mode to move to NOR ROC JAZ CLS
POP EQ1 EQ2 SRS FOC T.B. in sequence.
In Stop / Pause
mode, press
shortly.
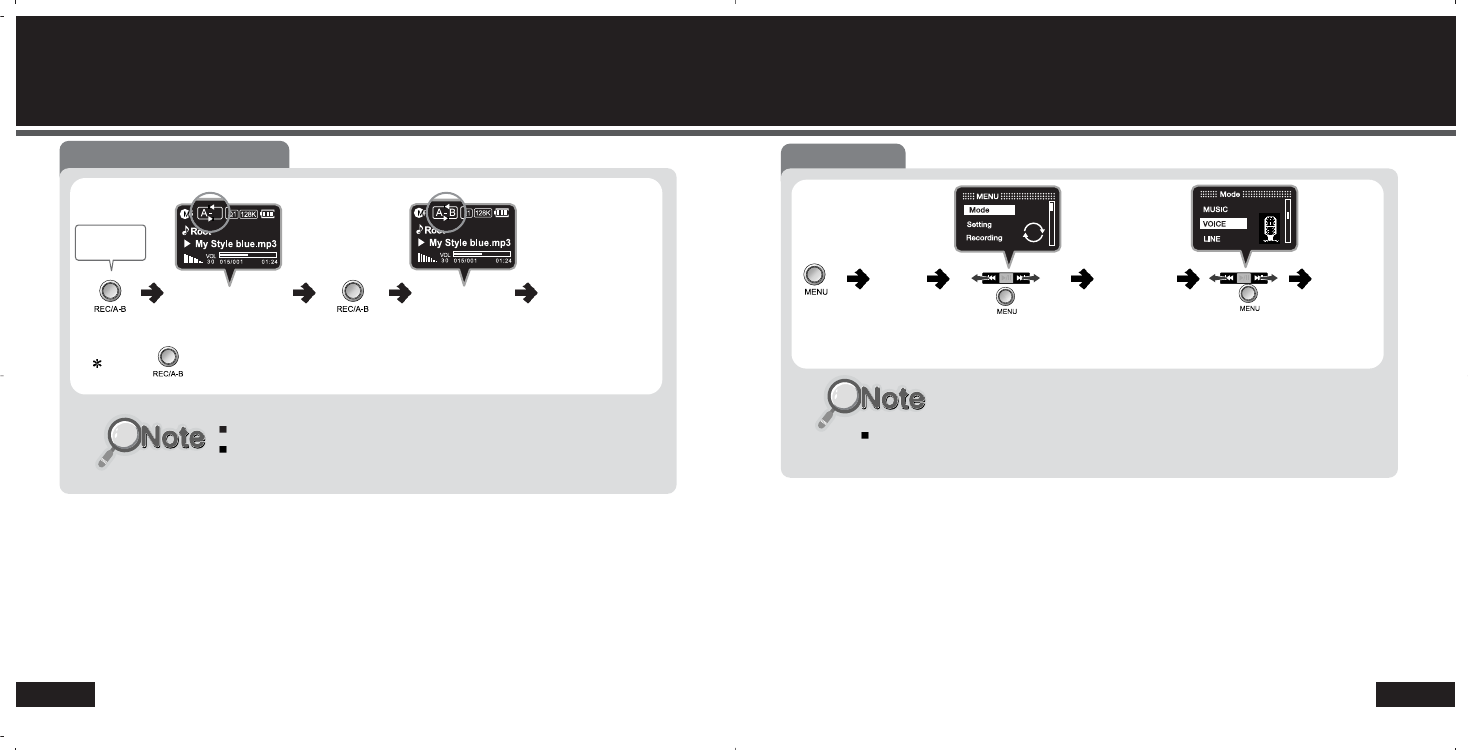
Setting up ‘section repeat’
press
to set point A to set point B section A-B
repeat available.
press
File end will be set as point B when it is not specified.
Point B can be set only 3 seconds after the setting of point A.
press to release the function.
In play
mode,
24
Mode shift
Section Repeat
23
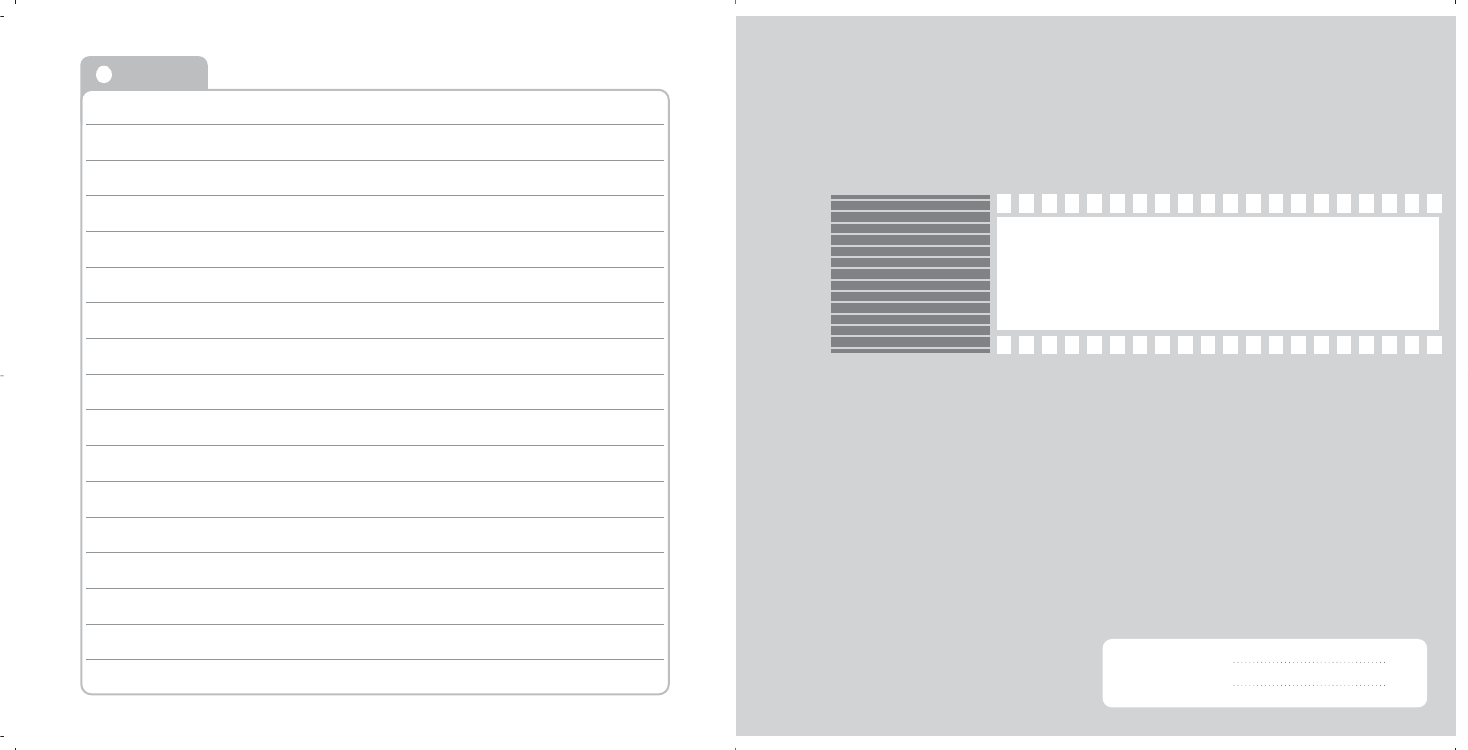
Mode shift
Press
to enter
the
Menu press after
moving to
[Mode Change]
in the mode
press after
moving to the
mode you desire
to enter
the mode
There are all 5 modes in the player.
(Music, Voice Recording, Music Recording, FM Radio, Stopwatch)
Recording mode
4
4
Voice recording
Music recording
27
29
MEMO
MEMO
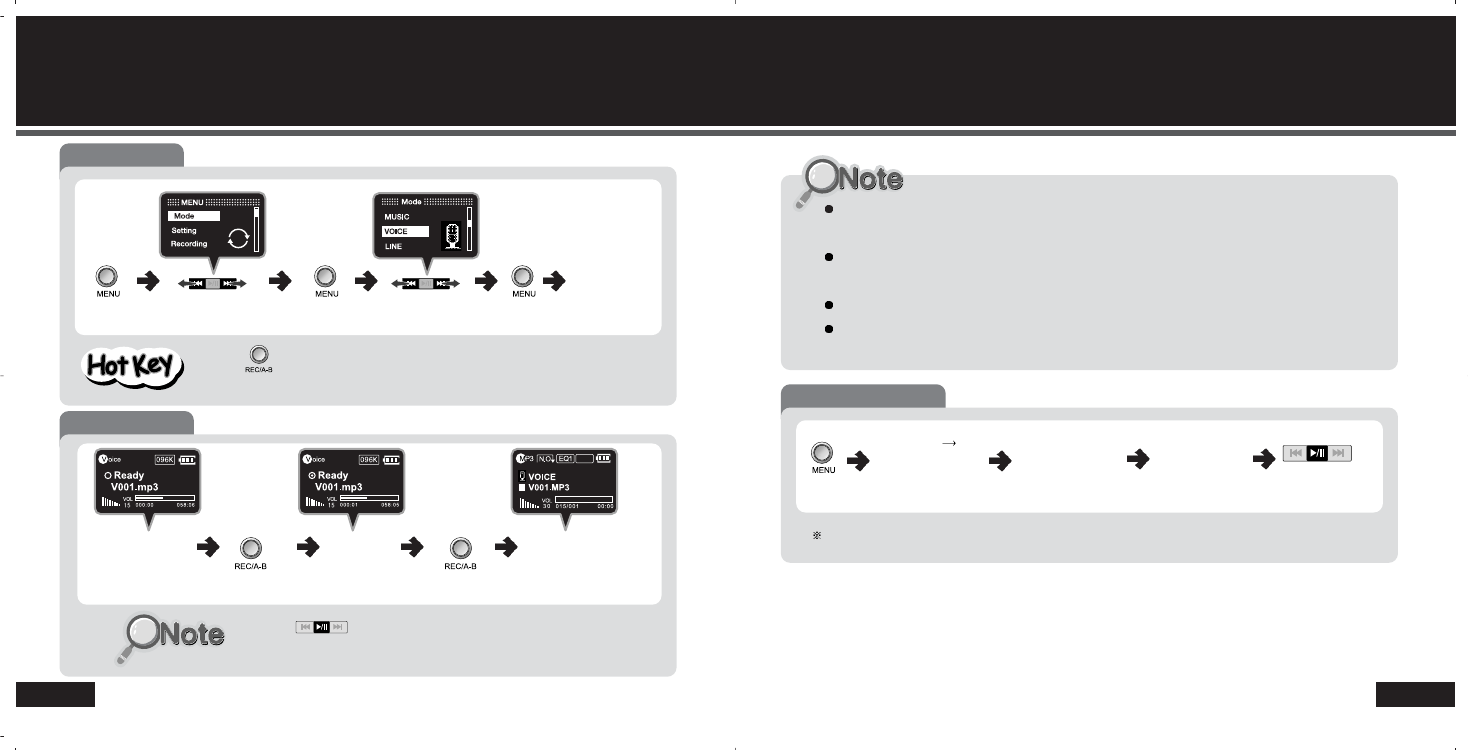
28
Voice recording Voice Recording
27
Voice recording
to start the
voice
recording
Ready for the
recording
completion of
voice recording.
press press
Preparation
Press and hold in music (pause/stop) mode to get ready for voice
recording without going though above procedures.
Press to move to
[Mode]
to move to
[VOICE]
press press
completion of
voice recording
128K
Press to pause the recording.
Playing voice file
Press
Recorded files are stored in MP3 format in VOICE folder in the following sequence;
VC001.MP3, VC002,MP3...
The recording will be interrupted when the memory gets full. The recorded voice
source only is saved in the memory in this incident.
Sound quality may vary according to the distance from the sound source.
In case that the power is not enough to run the product, the recording may not be
completed correctly.
and hold to
enter navigation
mode
enter [VOICE]
folder
move to the
file you desire press
to play
See page 21 for navigation details
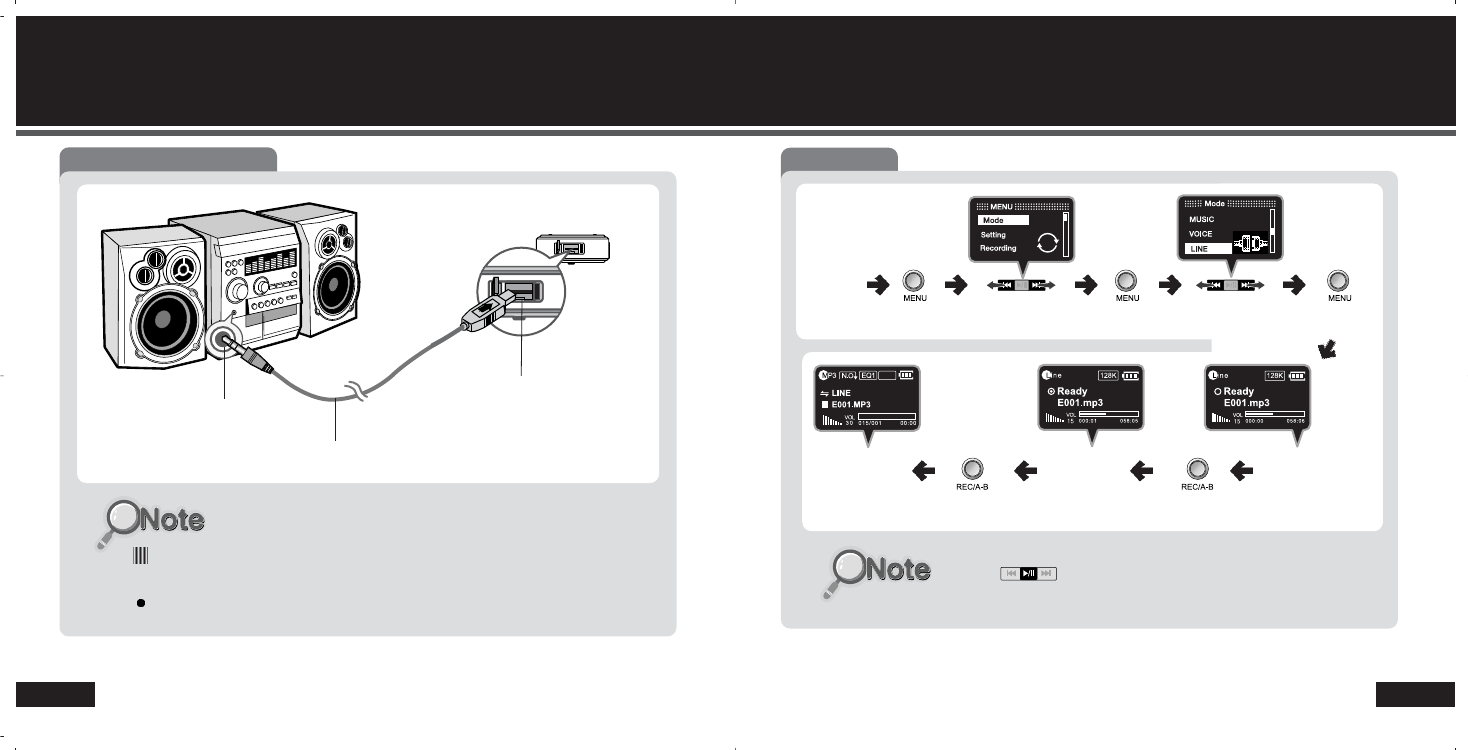
30
Music RecordingMusic Recording
29
Connecting Line-in cable
Line-in cable
Audio connection port
USB port
Connect the product into external audio player with the Line-in cable supplied in the
package to convert analogue sound source to digital. .
You can listen to the audio source being recorded (Loop Back function).
Preparation
press to move to
[Mode]
Connect
Line-in
cable to move to [LINE]
press press
Ready for the
recording
to start the
recording
completion
press
press
128K
Press to pause the recording.
Music Recording
31
Playing stored file
Press
Recorded sound source is saved in MP3 format in LINE folder in the following sequence;
E001.MP3, E002.MP3…
The recording will be interrupted when the memory gets full. The recorded voice source
only is saved in the memory in this incident.
In case that the power is not enough to run the product, the recording may not be
completed correctly.
and hold to
enter navigation
mode
enter [LINE]
folder
move to the
file you desire press
to play
See page 21 for navigation details
FM Radio
5
5
Radio listening
Searching radio station
Storing radio station
Deleting stored station
Radio recording
FM recording Bit rate setting
33
34
35
36
37
38
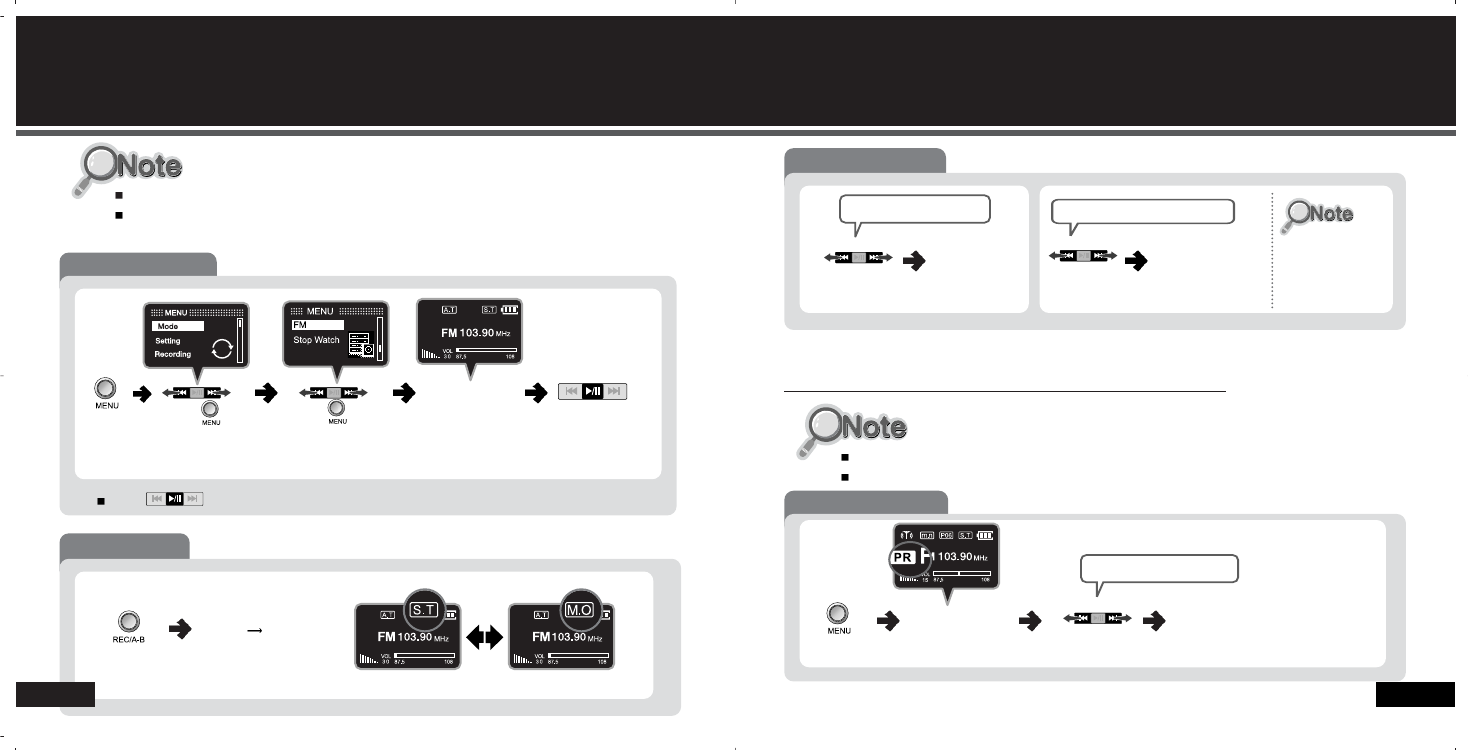
Mono/ Stereo
Press
and hold in FM radio
mode to change
Mono/stereo
34
Searching radio station
Radio listening
33
FM Radio listening
Earphone also performs antenna function.
The local frequency ranges may be various around the world.
press in receiving the signals to go to Ready mode.
Press press after
moving to
[Mode]
press after
moving to
[FM]
to enter FM
radio mode press
and enjoy
You can find all saved channels in the product by entering Preset Mode.
Preset search will not be available if there is no channel saved.
Frequency search
in FM radio mode
Push
to increase/
decrease by
0.1Mhz
and hold in FM radio mode
Push
to continuously
increase/decrease
the frequency level
The frequency with
the higher receiving
rate will be
selected.
Station searching
Press
and hold – to
enter Preset
mode
Searching for saved station (frequency)
in preset mode
push
to increase/decrease saved
station number by [P01]
36
Deleting stored stationStoring radio station
35
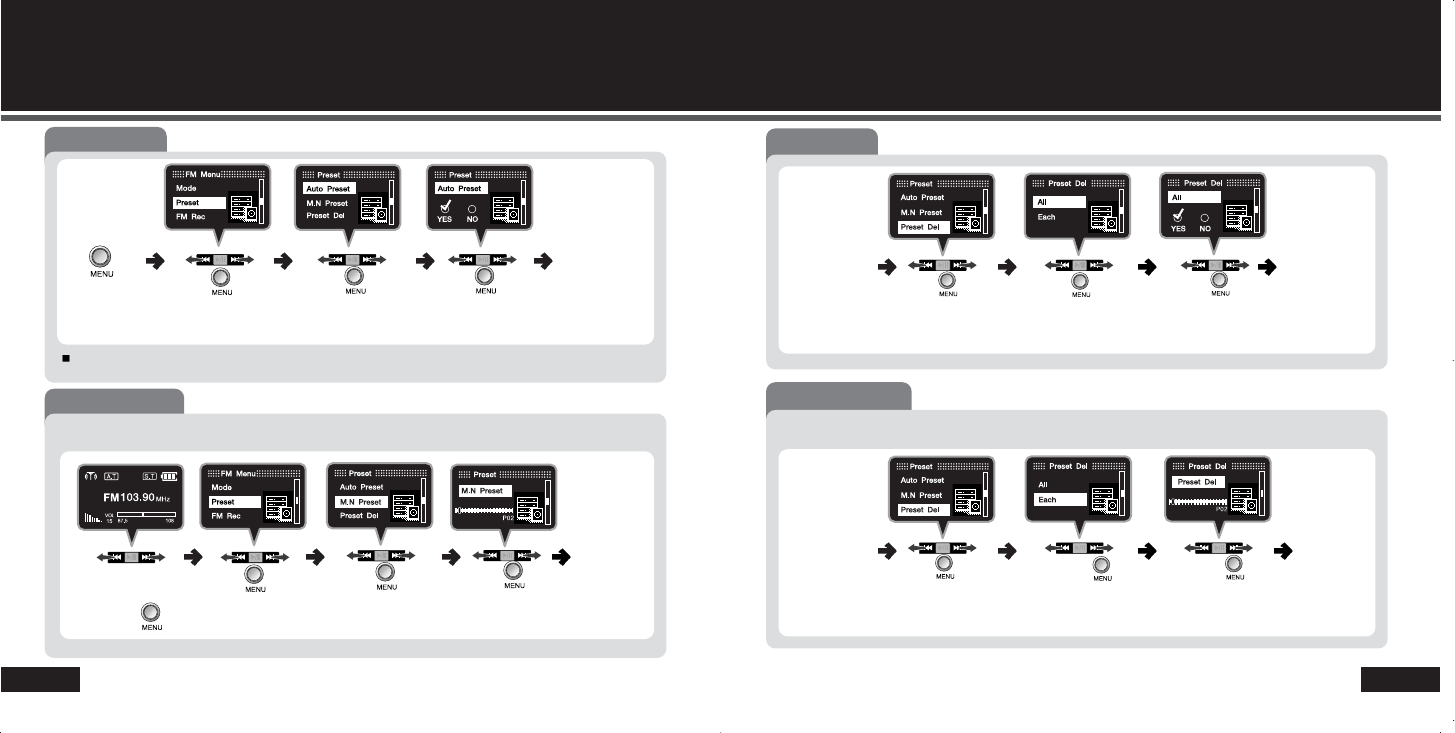
Auto Saving
press after
moving to
[YES]
Press
to enter FM
menu
At auto saving: The frequency with the higher receiving rate will be automatically selected and saved.
auto saving
after the auto
searching
Manual Saving
Example) When saving 103.90Mhz to [P02];
Push to move to
103.90MHz and
press
press after
moving
[M.N Preset]
press after
moving to
[Preset]
save
completed.
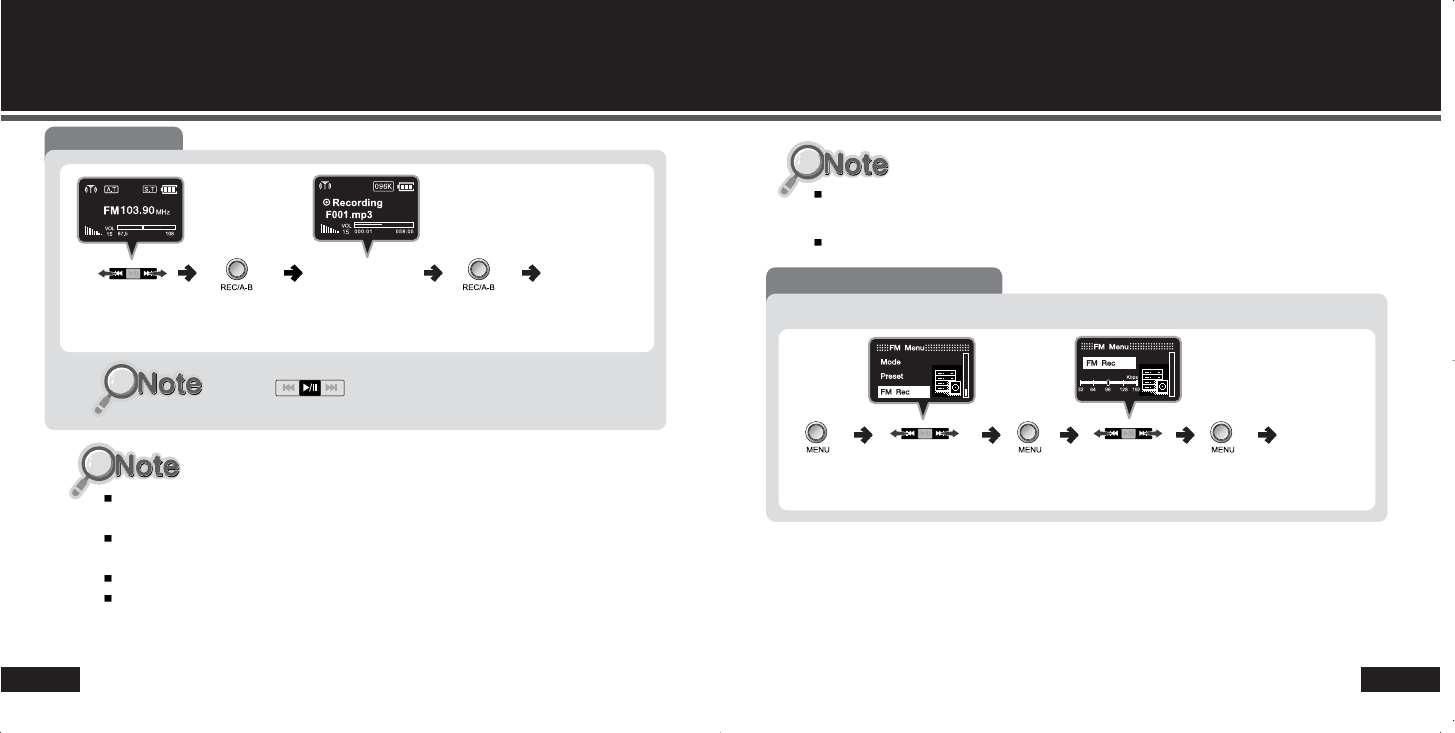
Deleting all
press after
moving to
[Preset Del]
After entering
[preset menu] press after
moving to
[YES]
press after
moving to
[All]
all saved
station
deleted.
press after
moving to
[Preset Del]
After entering
[preset menu] press
after moving to
[Each]
press
after moving
to [P02]
selected
station
deleted.
Example) Deleting selected station [P02] only
press after
moving to
[Preset]
press after
moving to
[Auto Preset]
press after
moving to
[PO2]
Deleting Each
38
FM radio recording
37
Recording FM
Move to the
station
(frequency)
FM recording recording
completed.
press press
Recorded sound source is saved in MP3 format in FM folder in the following
sequence; F00001.MP3, F00002.MP3…..
When the memory gets full the recording automatically stops and the file is recorded
up-to-point.
Sound quality may vary according to FM Bit rate
In case that the power is not enough to run, the product the recording may not be
completed correctly.
Lower bit rate means higher compression rate with low sound quality while higher bit rate
stands for vice versa.
In FM recording, the bit rate can be set from 32, 64, 96 through to 128Kbps.
FM recording Bit rate setting
move to
[FM Rec]
move to
[96Kbps]
Press to enter
FM menu
press to enter
[FM Rec]
press
recording bit
rate is not set
for 96Kbps.
Example) When the bit rate was set for 96Kbps;
Press to pause the recording.
FM recording Bit rate setting
Program CD Installation
58
The Program CD allows you to upload or download files without installing other
additional software.
For Windows 98SE Users: install the software first before using the player
(otherwise, PC will not detect the player as a peripheral).
For Windows 2000/ME/XP Users: install the provided program CD if you are
upgrading Firmware
Download
7
7
Installation of Program CD
File download/upload
Format
58
59
62
The minimum requirements for PC to use the player are as follows;
Microsoft OS (Windows 98SE, 2000, ME, and XP)
CD–ROM Drive
Pentium 200MHz or higher
More than 32 MB of RAM (64 MB or more for Window ME or 2000).
More than 128MB of Hard Disk Space
(Additional Disk Space is required for storing music files)
USB Port (Ver. 1.1) Available
60
File download/ upload File download/ upload
59
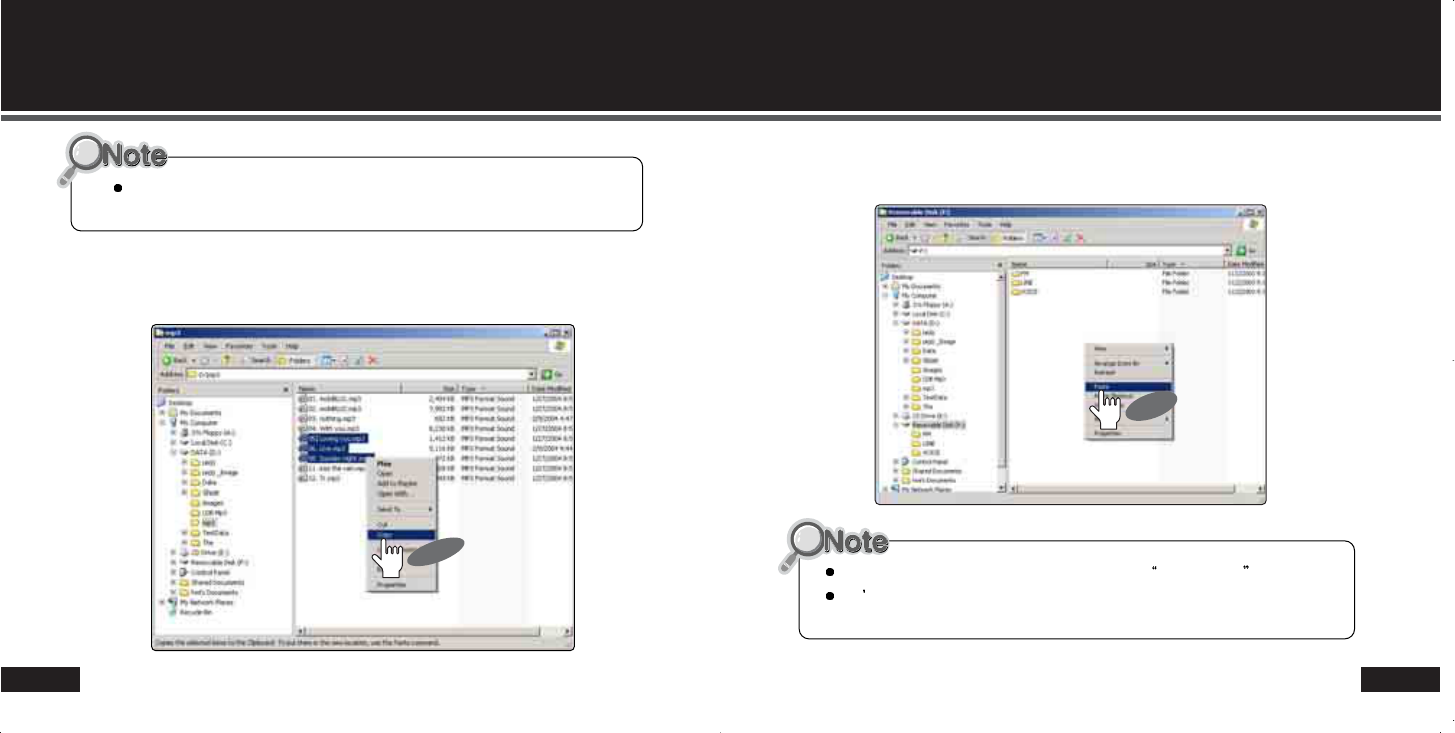
1.To download files connect USB cable and click on “Copy” using right mouse button
following the selection of files in PC.
This product can download or upload all types of data files (*.jpg, *.xls, *.hwp )
functioning as a removable disk as well as a MP3 player.
2.Using right mouse button, paste the copied file on removable disk window as shown
below picture.
PC identifies the product as a removable disk under My Computer.
Don t remove USB cable while transferring the files. It may cause fatal error in PC or
the product.
CLICK
CLICK
62
FormatFile download/ upload
61
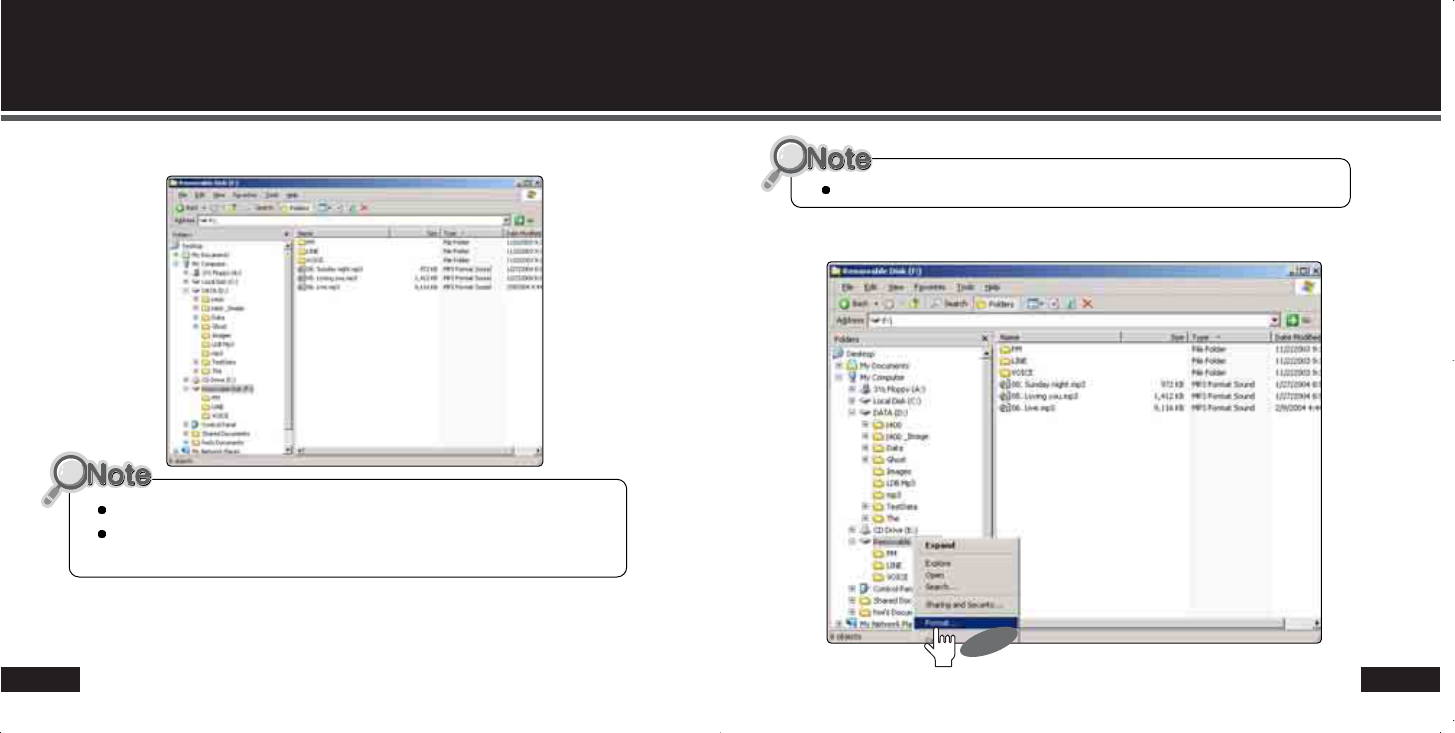
3.File storing has been completed as shown below.
You can upload files from the product to PC by following reverse way.
Drag & drop also enables you to download/upload files.
1.Choose “format” using right mouse button on removable disk folder in PC Windows.
Removed files can not be recovered after formatting the device!
CLICK
FCC RF INTERFERENCE STATEMENT
Note
This equipment has been tested and found to comply with the limits for a Class B digital
device, pursuant to Part 15 of the FCC Rules. These limits are designed to provide
reasonable protection against harmful interference in a residential installation.
This equipment generates, uses and can radiate radio frequency energy and, if not
installed and used in accordance with the instructions, may cause harmful interference to
radio communications. However, there is no guarantee that interference will not occur in
a particular installation.
If this equipment does cause harmful interference to radio or television reception which
can be determined by turning the equipment off and on, the user is encouraged to try to
correct the interference by one or more of the following measures.
- Reorient or relocate the receiving antenna.
- Increase the separation between the equipment and receiver.
- Connect the equipment into an outlet on a circuit different from that to which the
receiver is connected.
- Consult the dealer or an experienced radio, TV technical for help.
- Only shielded interface cable should be used.
Finally, any changes or modifications to the equipment by the user not expressly
approved by the grantee or manufacturer could void the users authority to operate such
equipment.
CAUTION
Changes or modifications not expressly approved by the party responsible for compliance could void
the user's authority to operate the equipment.
THIS DEVICE COMPLIES WITH PART 15 OF THE FCC RULES. OPERATION IS SUBJECT TO THE
FOLLOWING TWO CONDITIONS: (1) THIS DEVICE MAY NOT CAUSE HARMFUL INTERFERENCE, AND
(2) THIS DEVICE MUST ACCEPT ANY INTERFERENCE RECEIVED INCLUDING INTERFERENCE THAT
MAY CAUSE UNDESIRED OPERATION.
MEMO
MEMO
Warranty Card
When required, you need to present this Warranty Card with the date of
purchase written thereon in order to receive satisfactory services. Please
keep this card well in a secure place.
The design and size of the product are subject to change without prior notice in
order to improve product quality.
Warranty
Term: 1 year
Product Name :
Model :
Date of Purchase : (m) (d) (y)
Name of Customer : Telephone Number :
Address :
Name of Agent : Telephone Number :
Address :
1. The warranty service for the product shall be provided based on the
information contained in this Warranty Card.
2. The warranty service is available effect from the date of purchase, so
please put the date of purchase on this Warranty Card. (If the date of
purchase is not identified in the card, the effective warranty period will start
from the date 6 months from the date of manufacture.)
3. This Warranty Card can not be reissued.