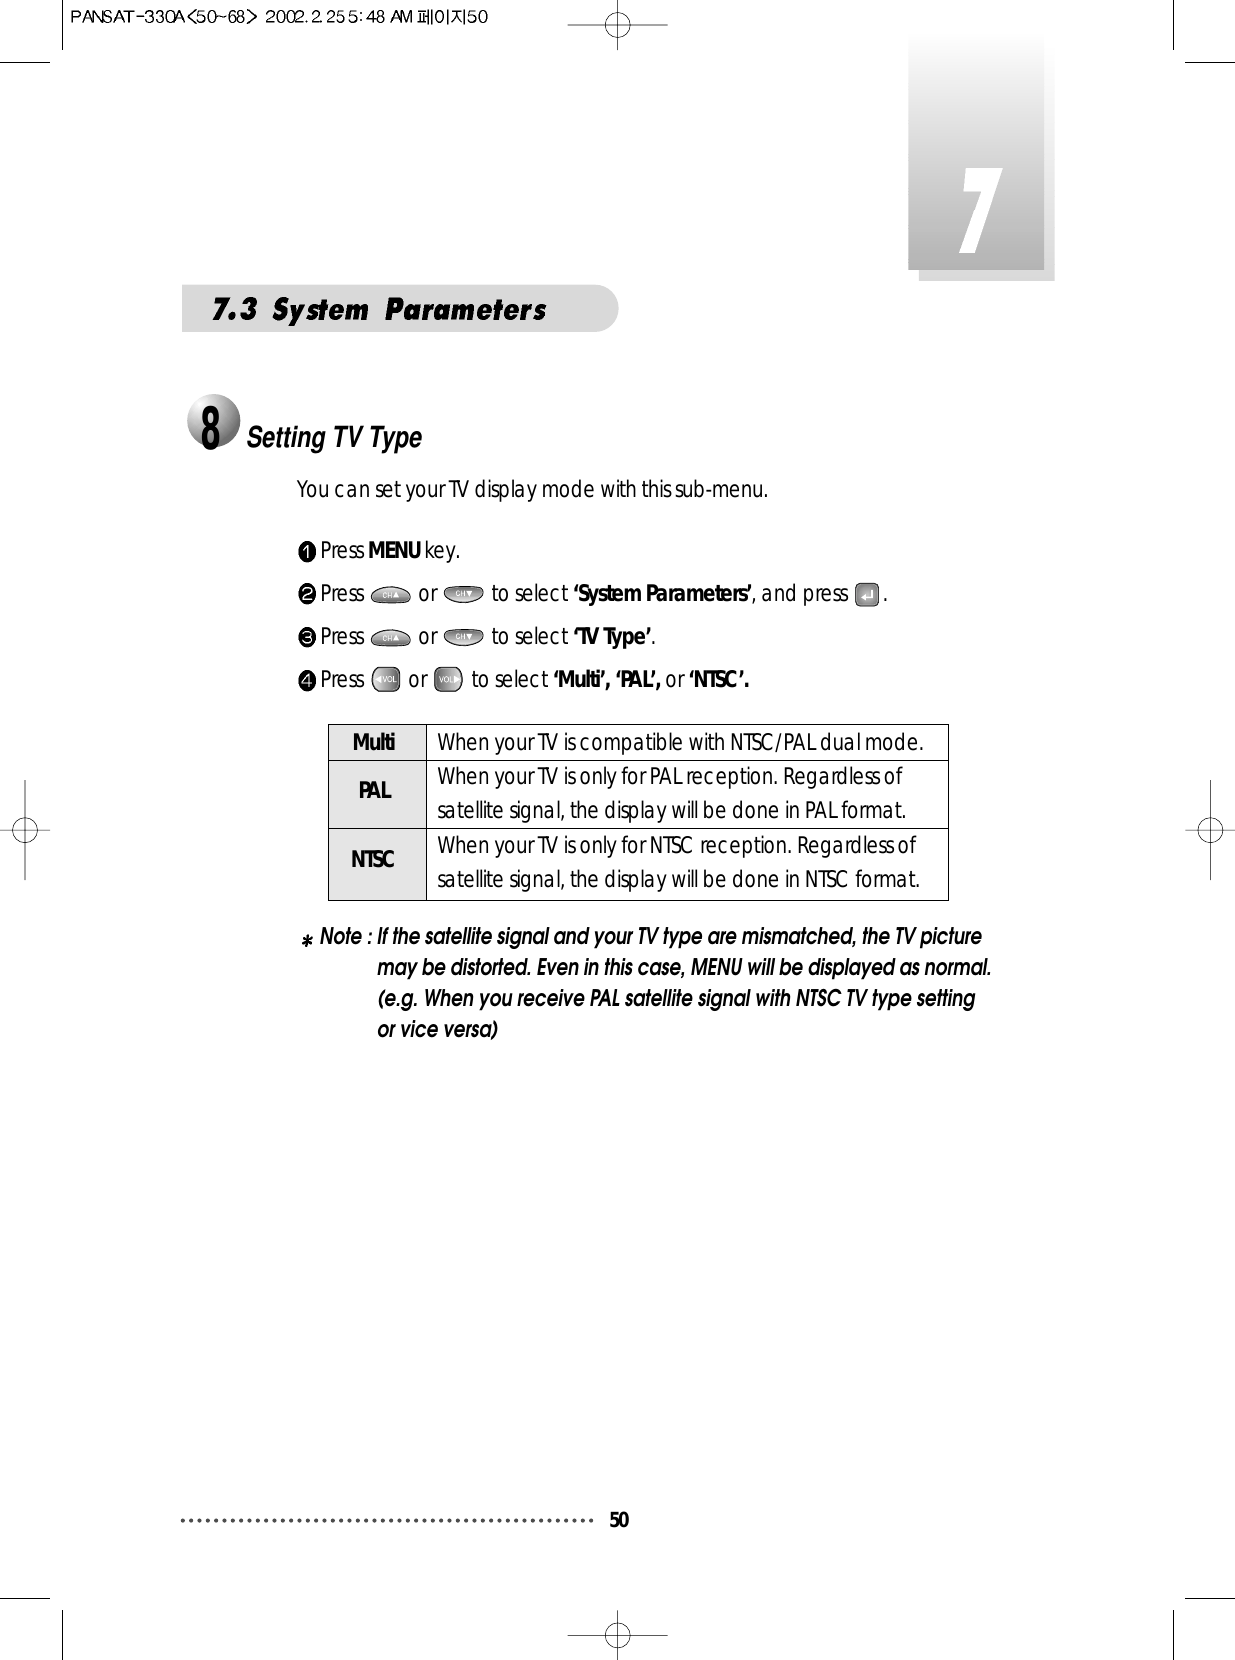
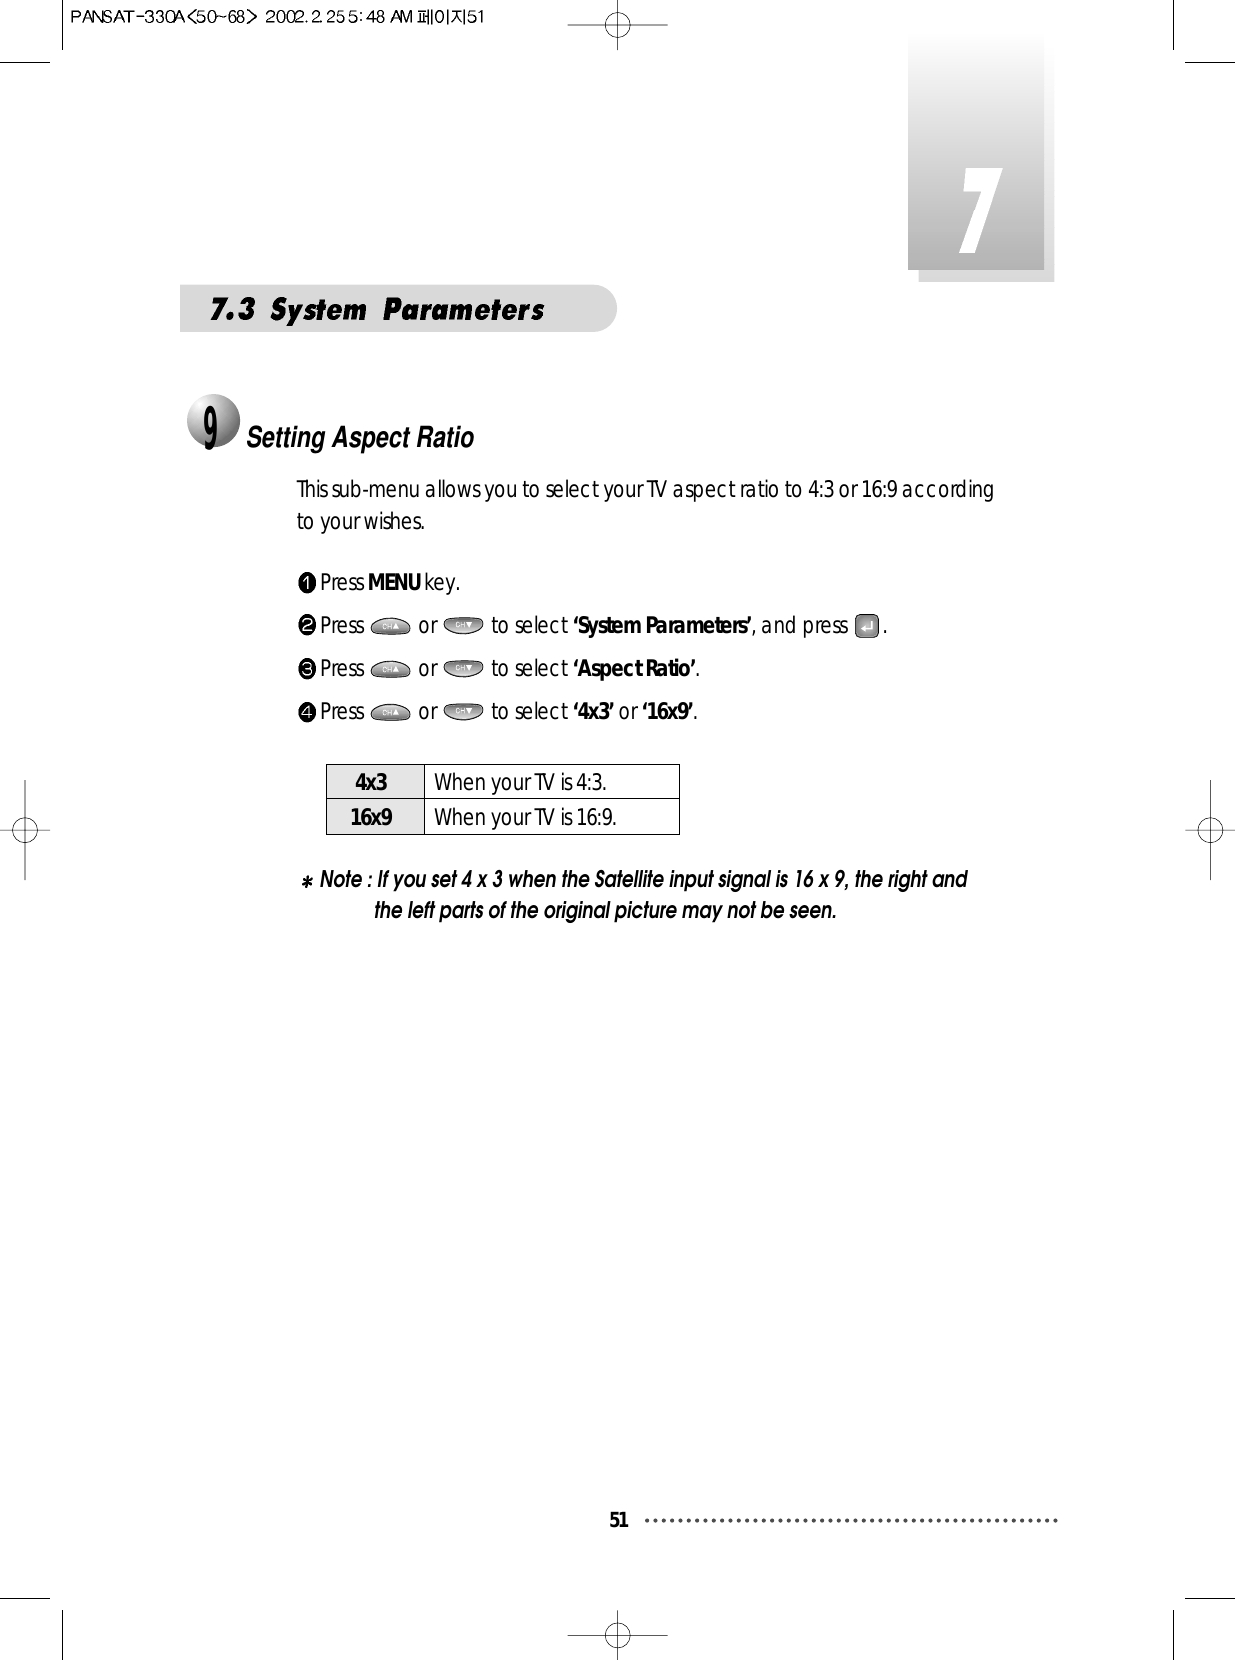
Hyundai Digital Technology PANSAT330A Digital Satellite Receiver User Manual Manual 330A
Hyundai Digital Technology Co., Ltd. Digital Satellite Receiver Manual 330A
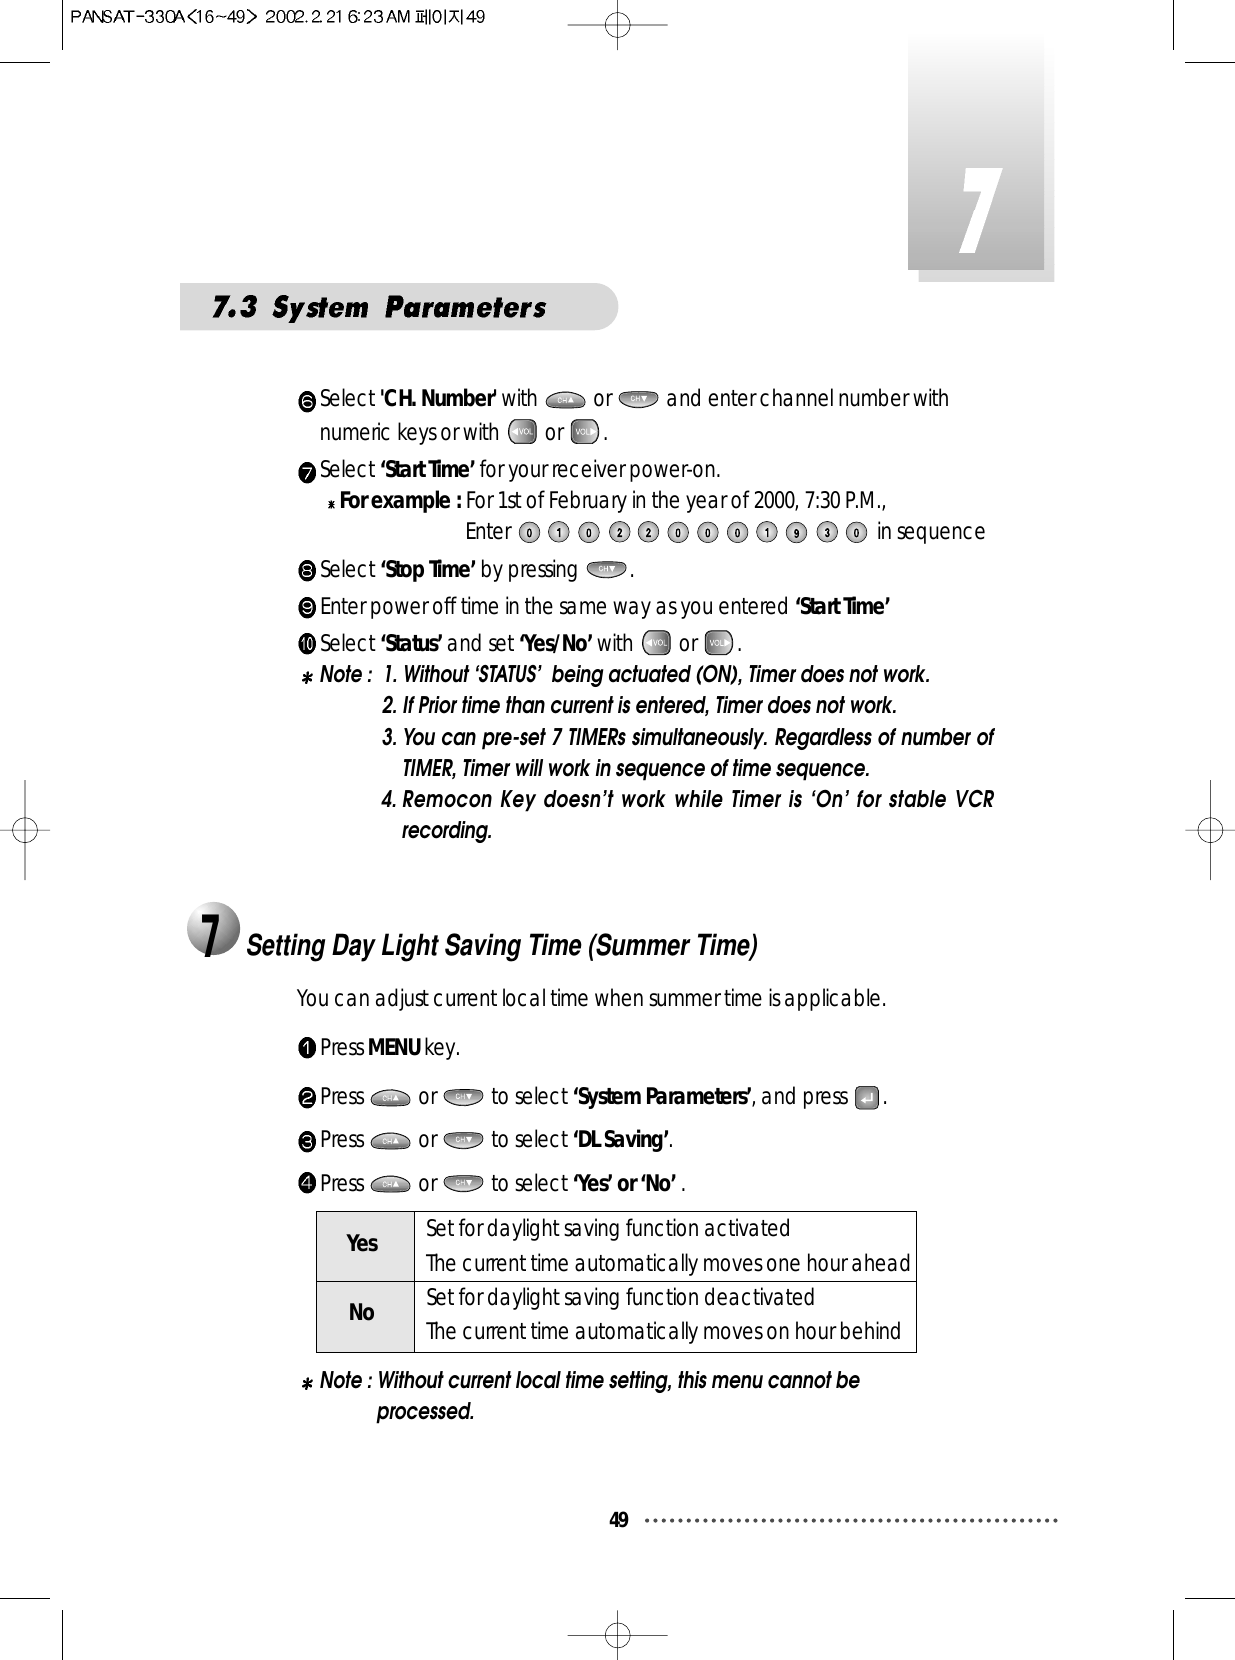
UserManual.wiki
>
Hyundai Digital Technology
>
PANSAT330A User Manual
Users Manual
Navigation menu
Upload a User Manual
Namespaces
Wiki Guide
HTML
PDF
Info
Views
User Manual
Discussion / Help
Navigation


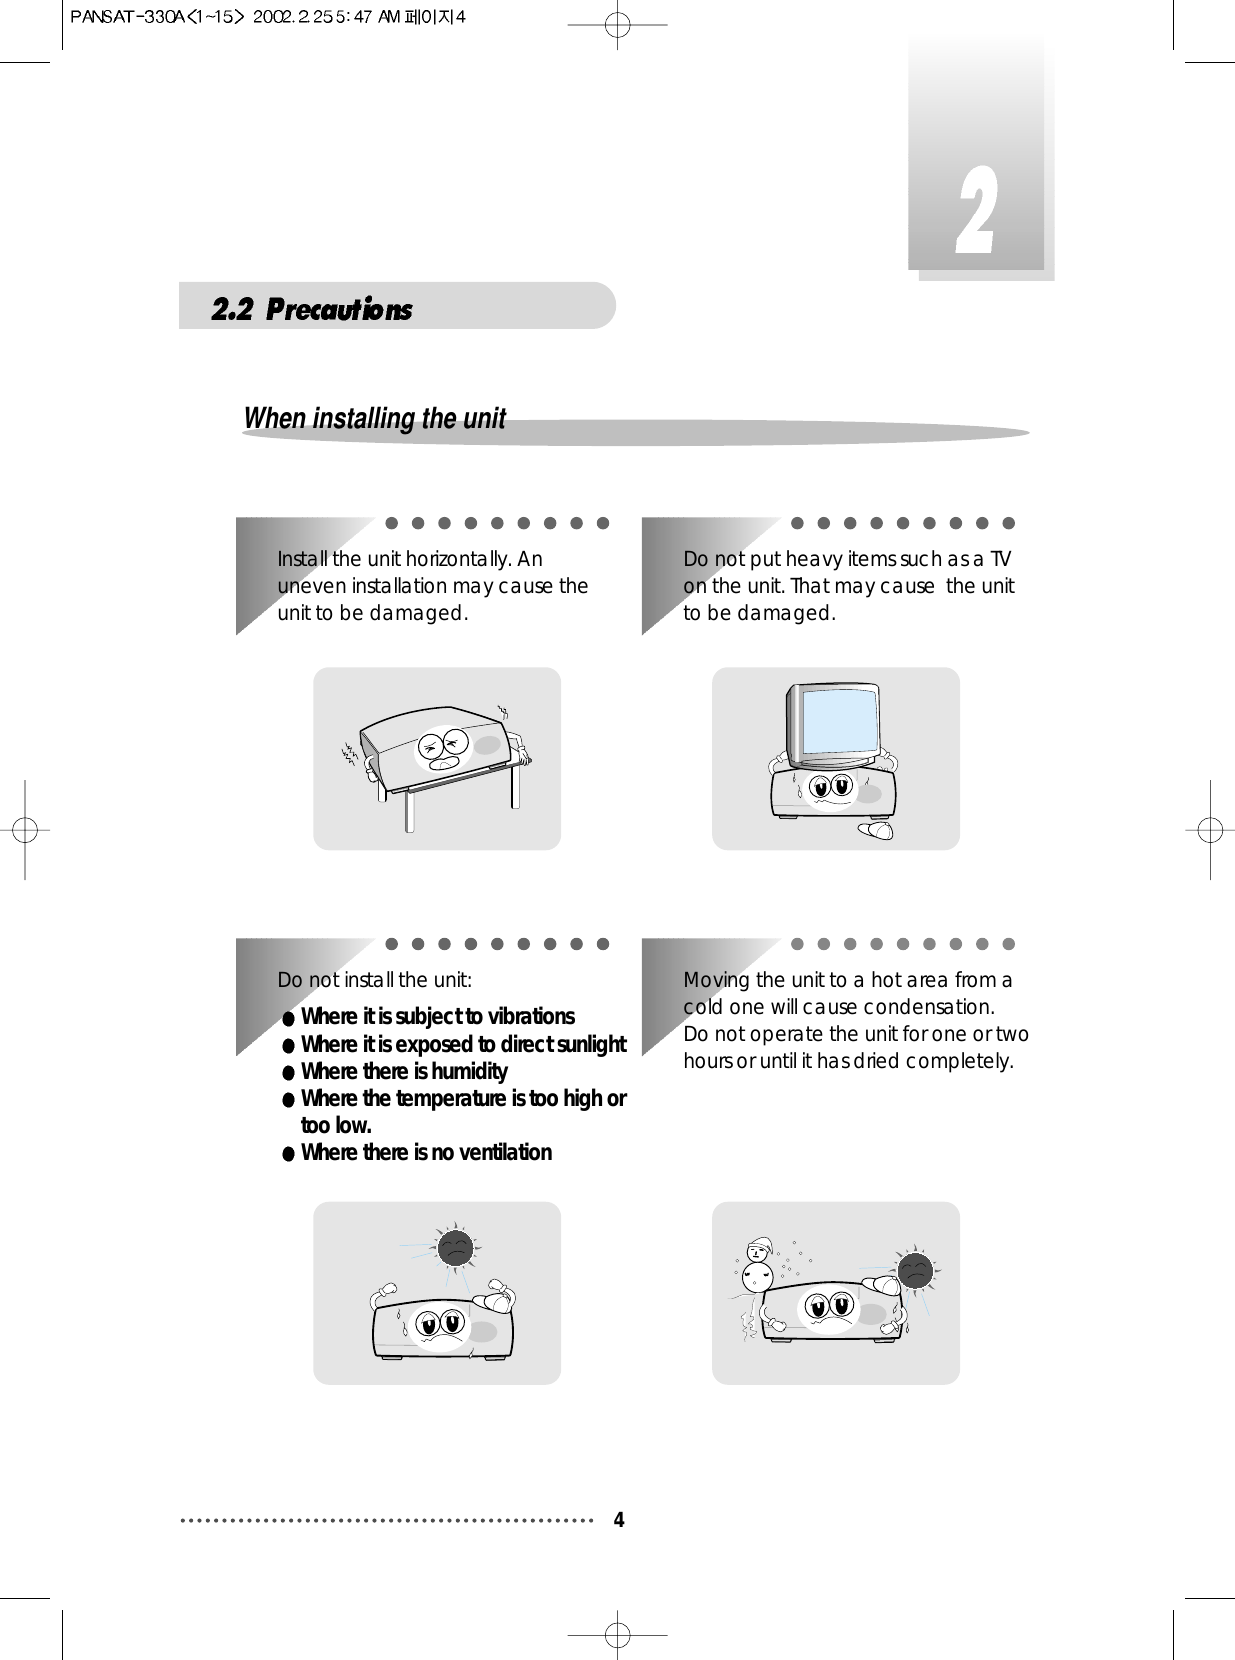
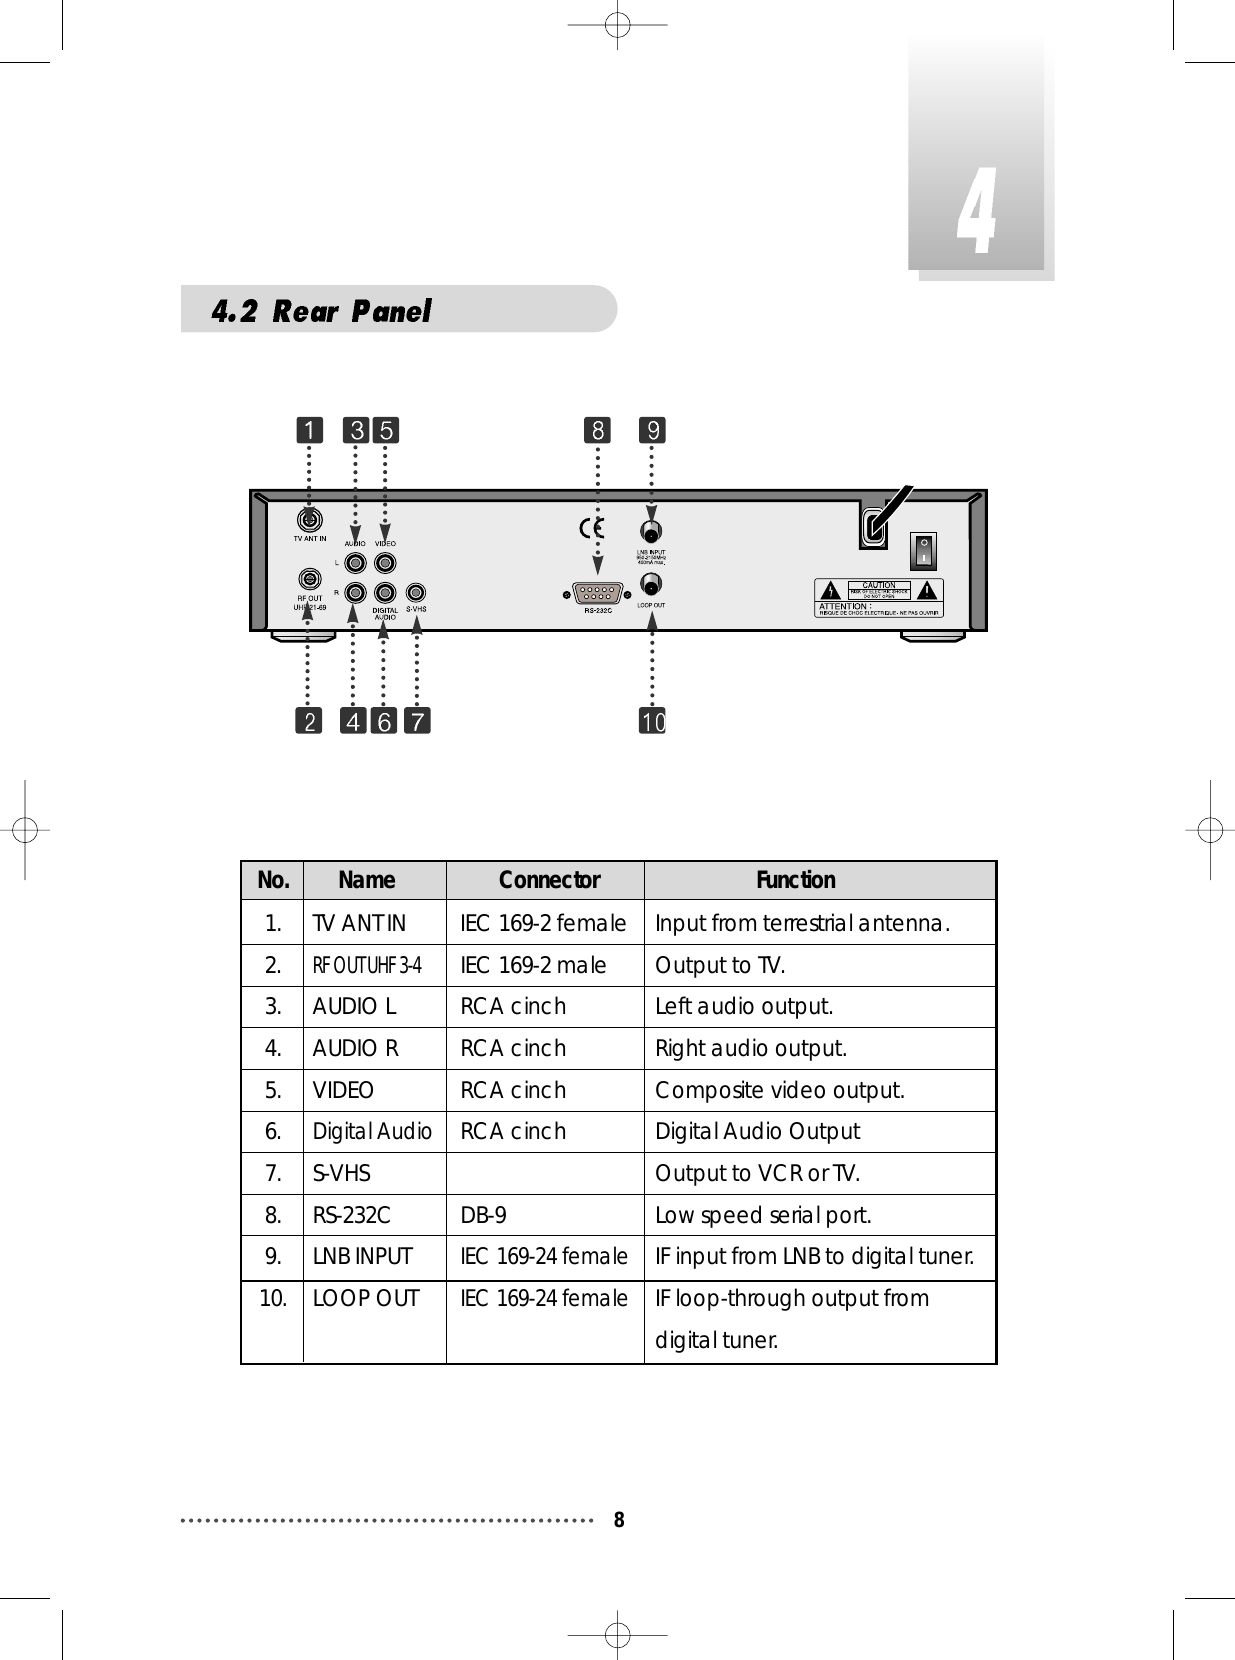
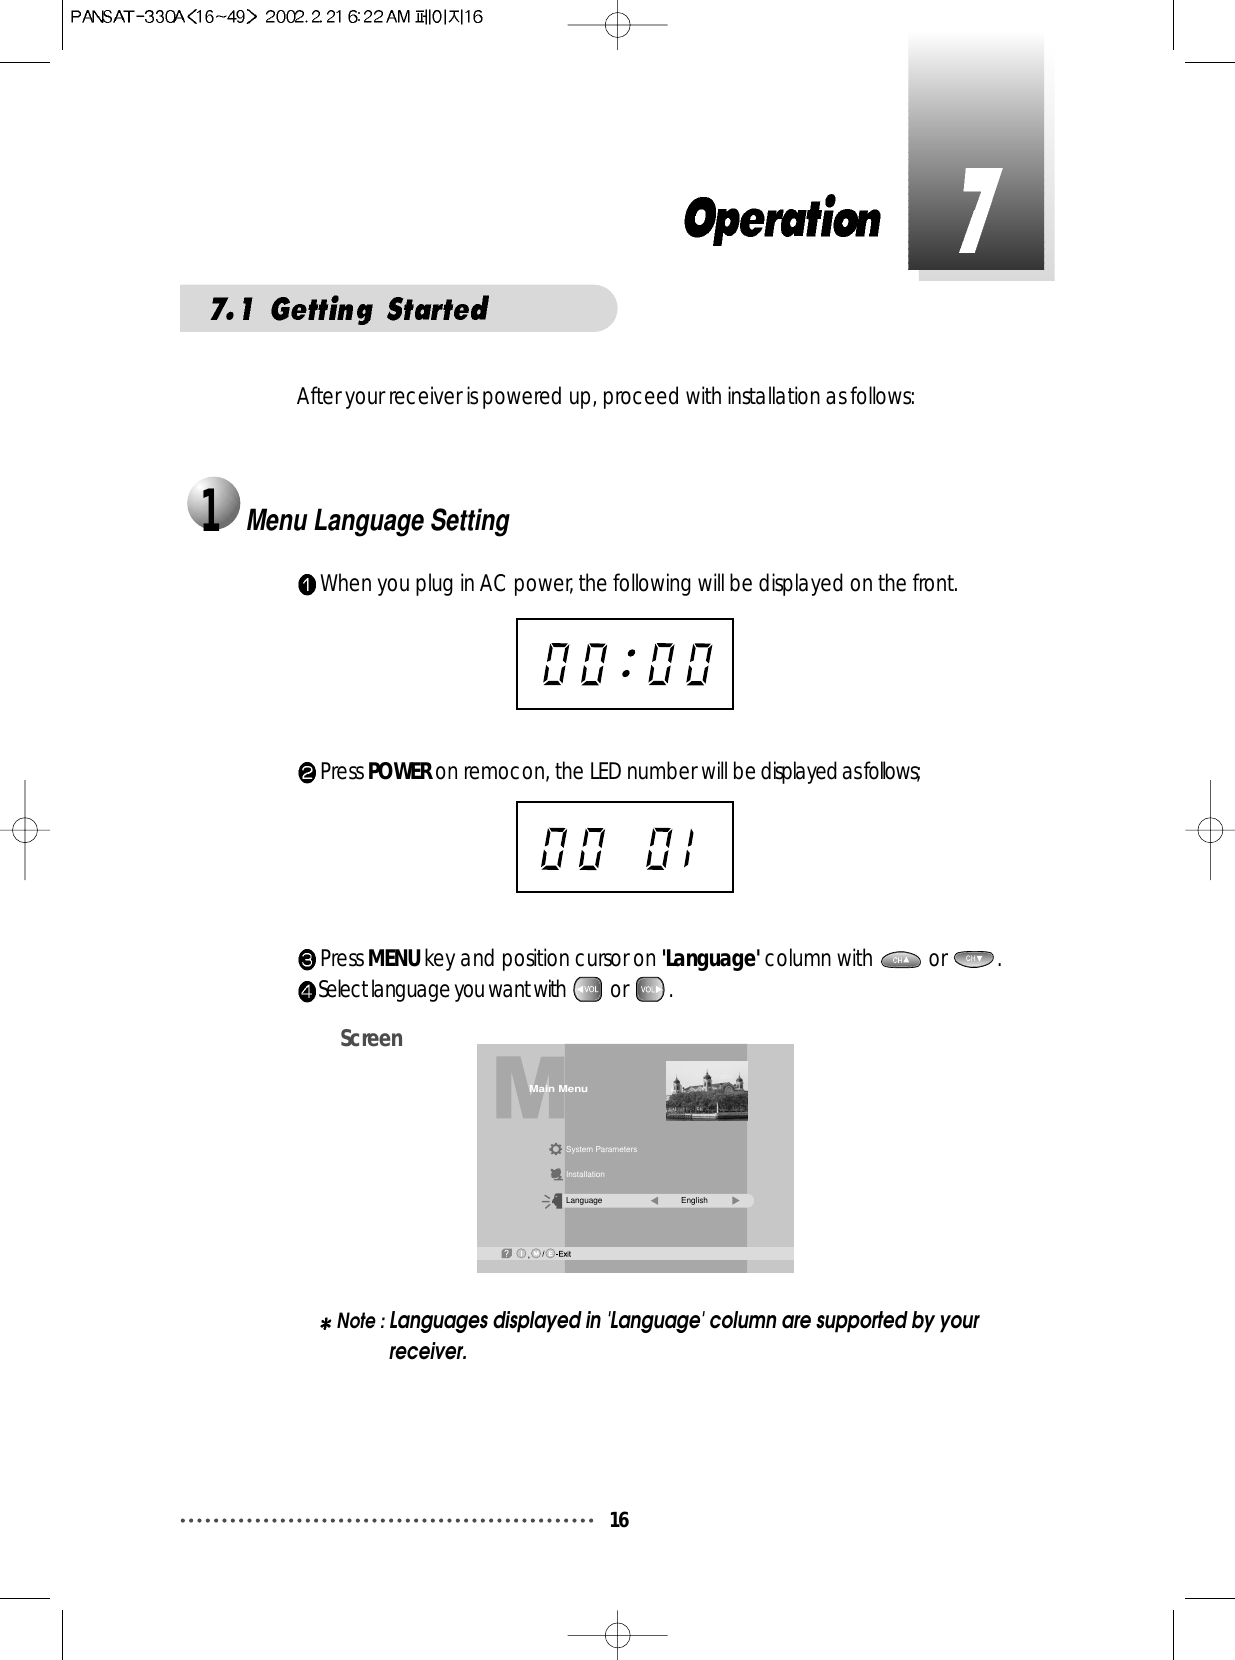
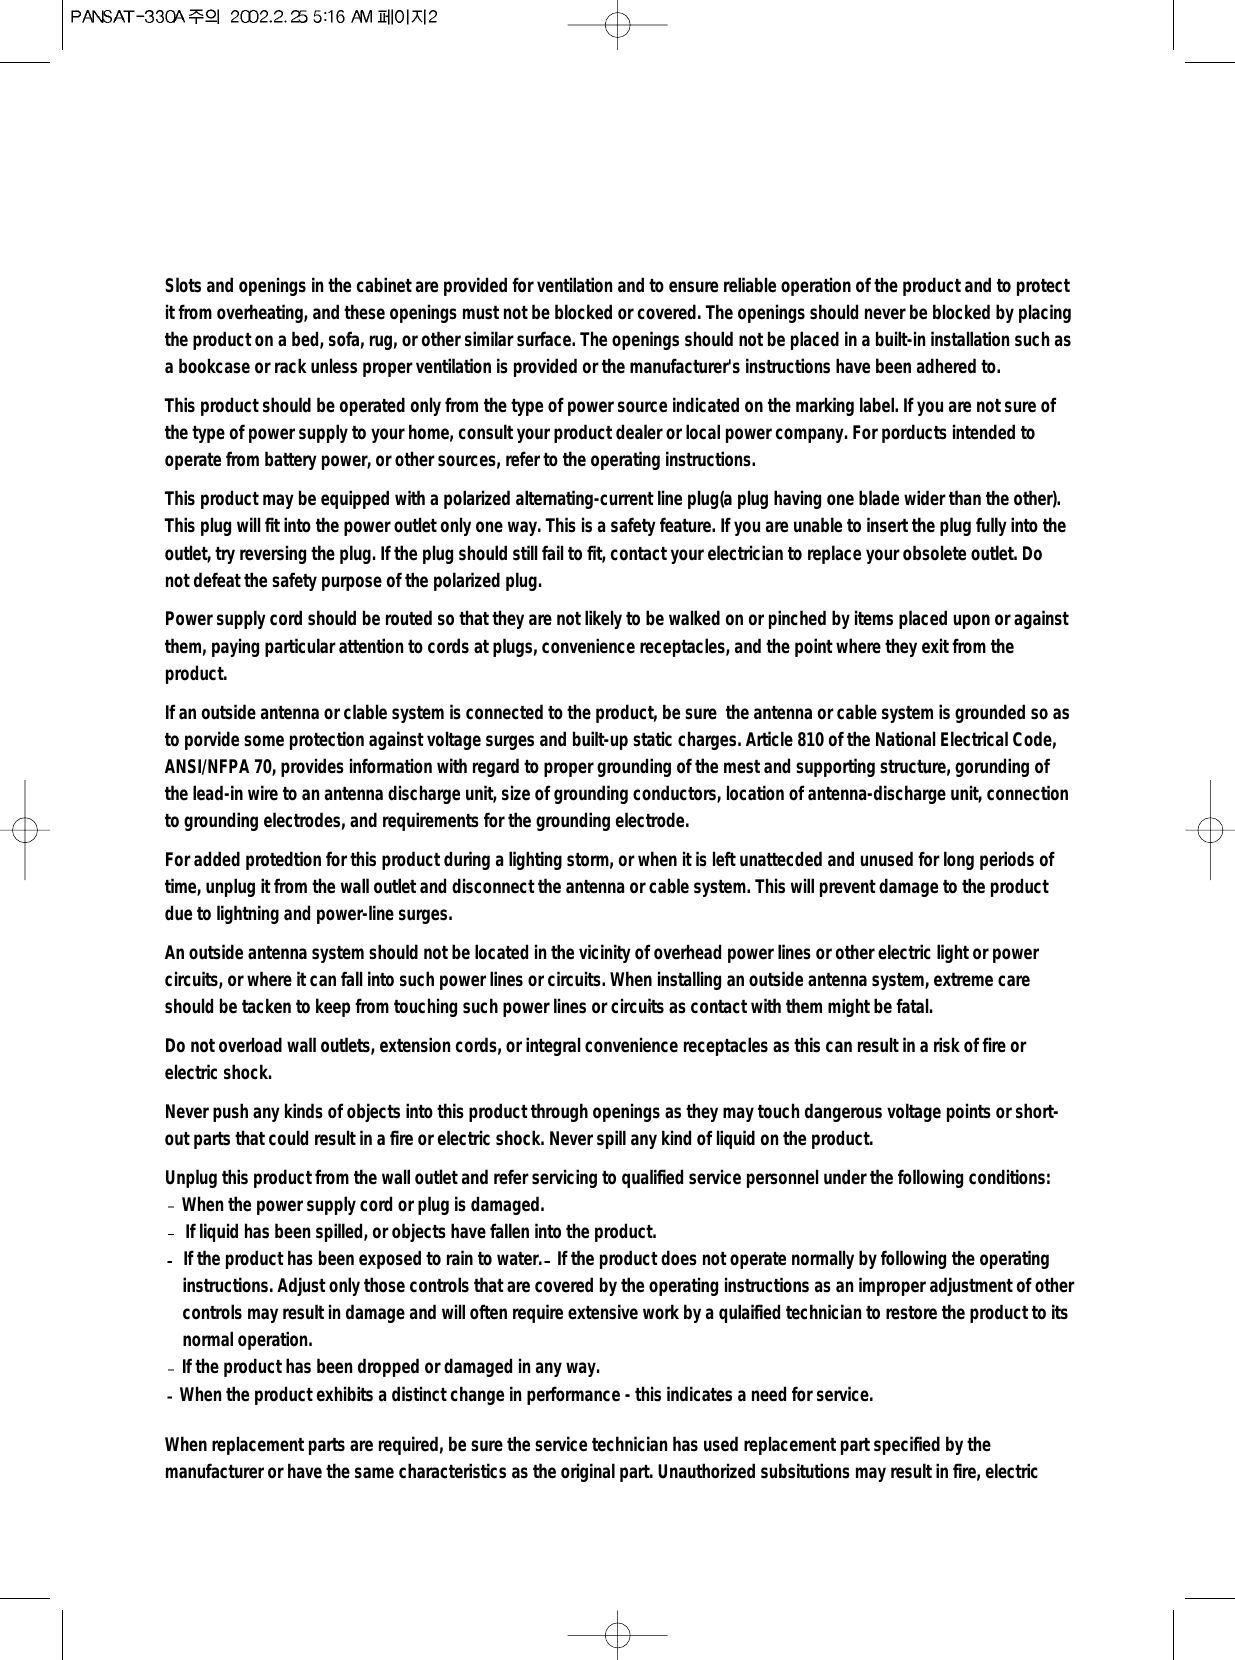
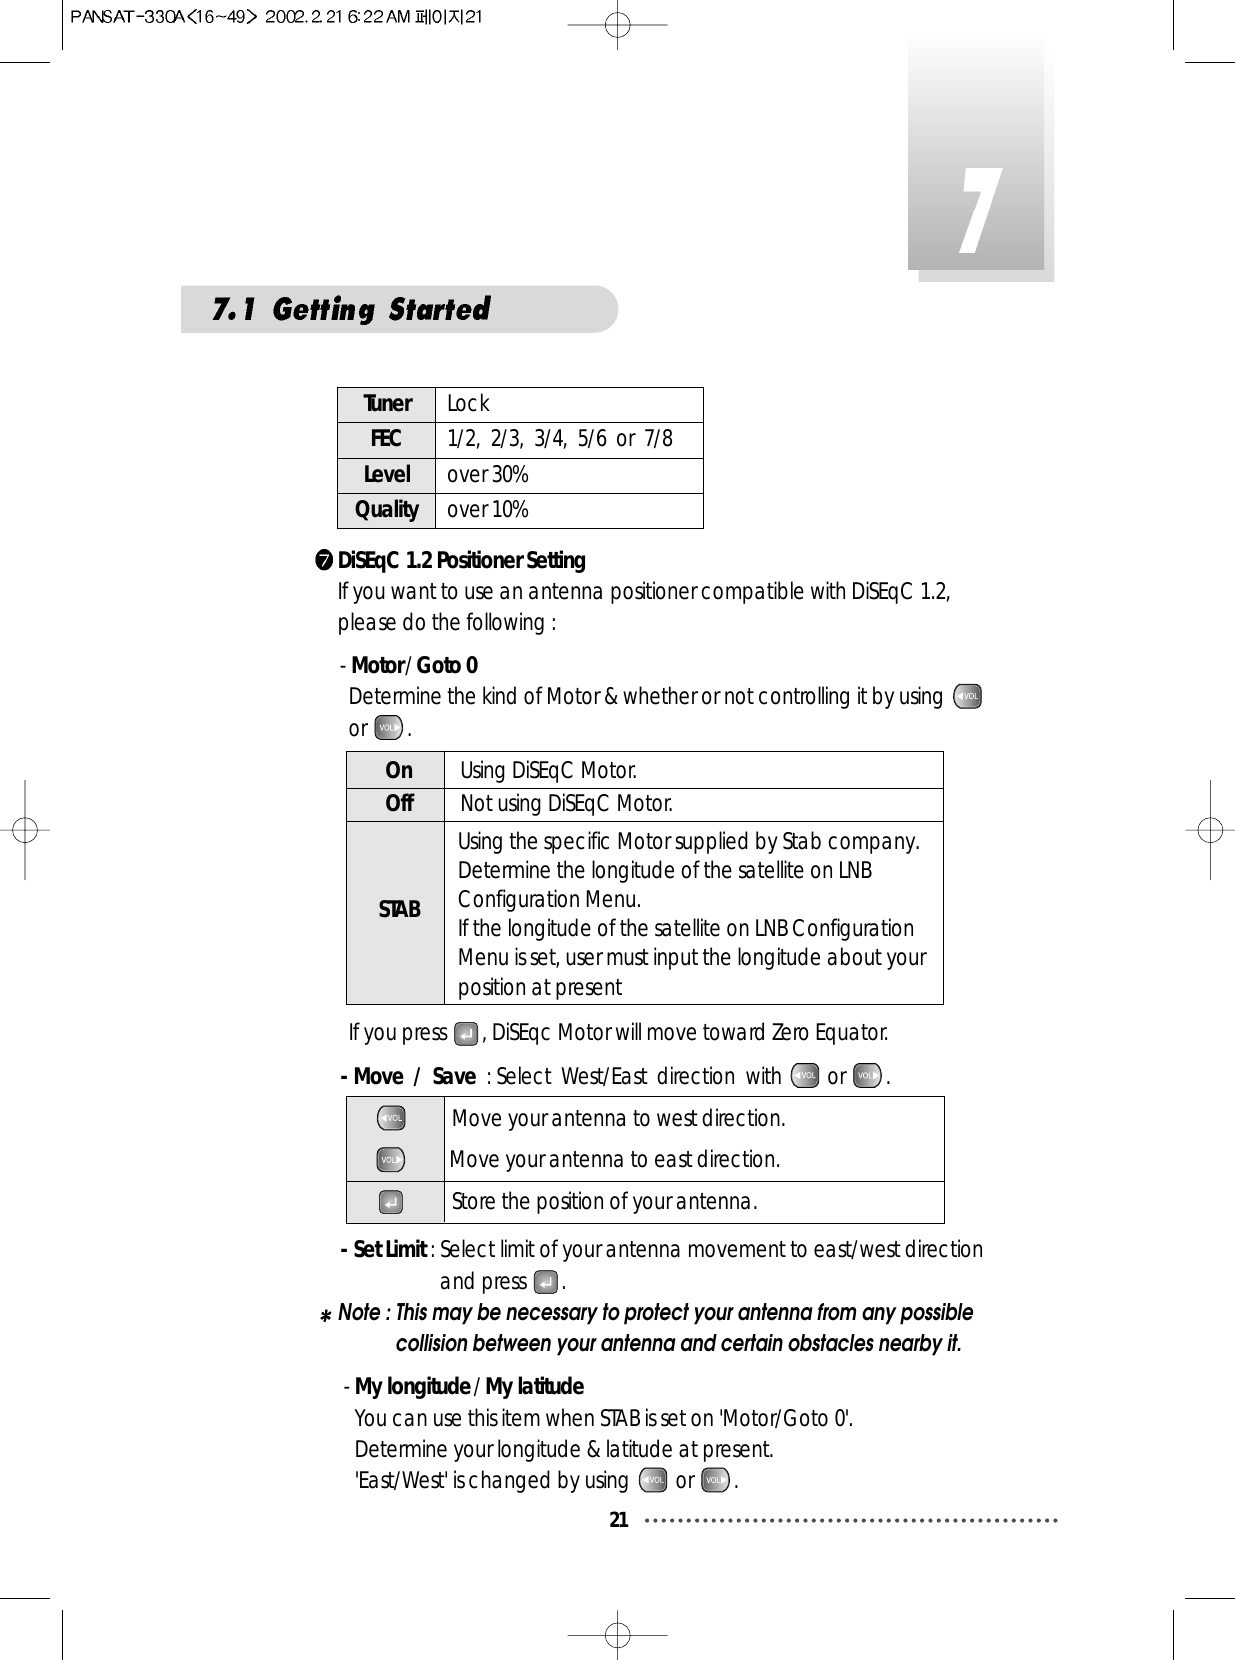
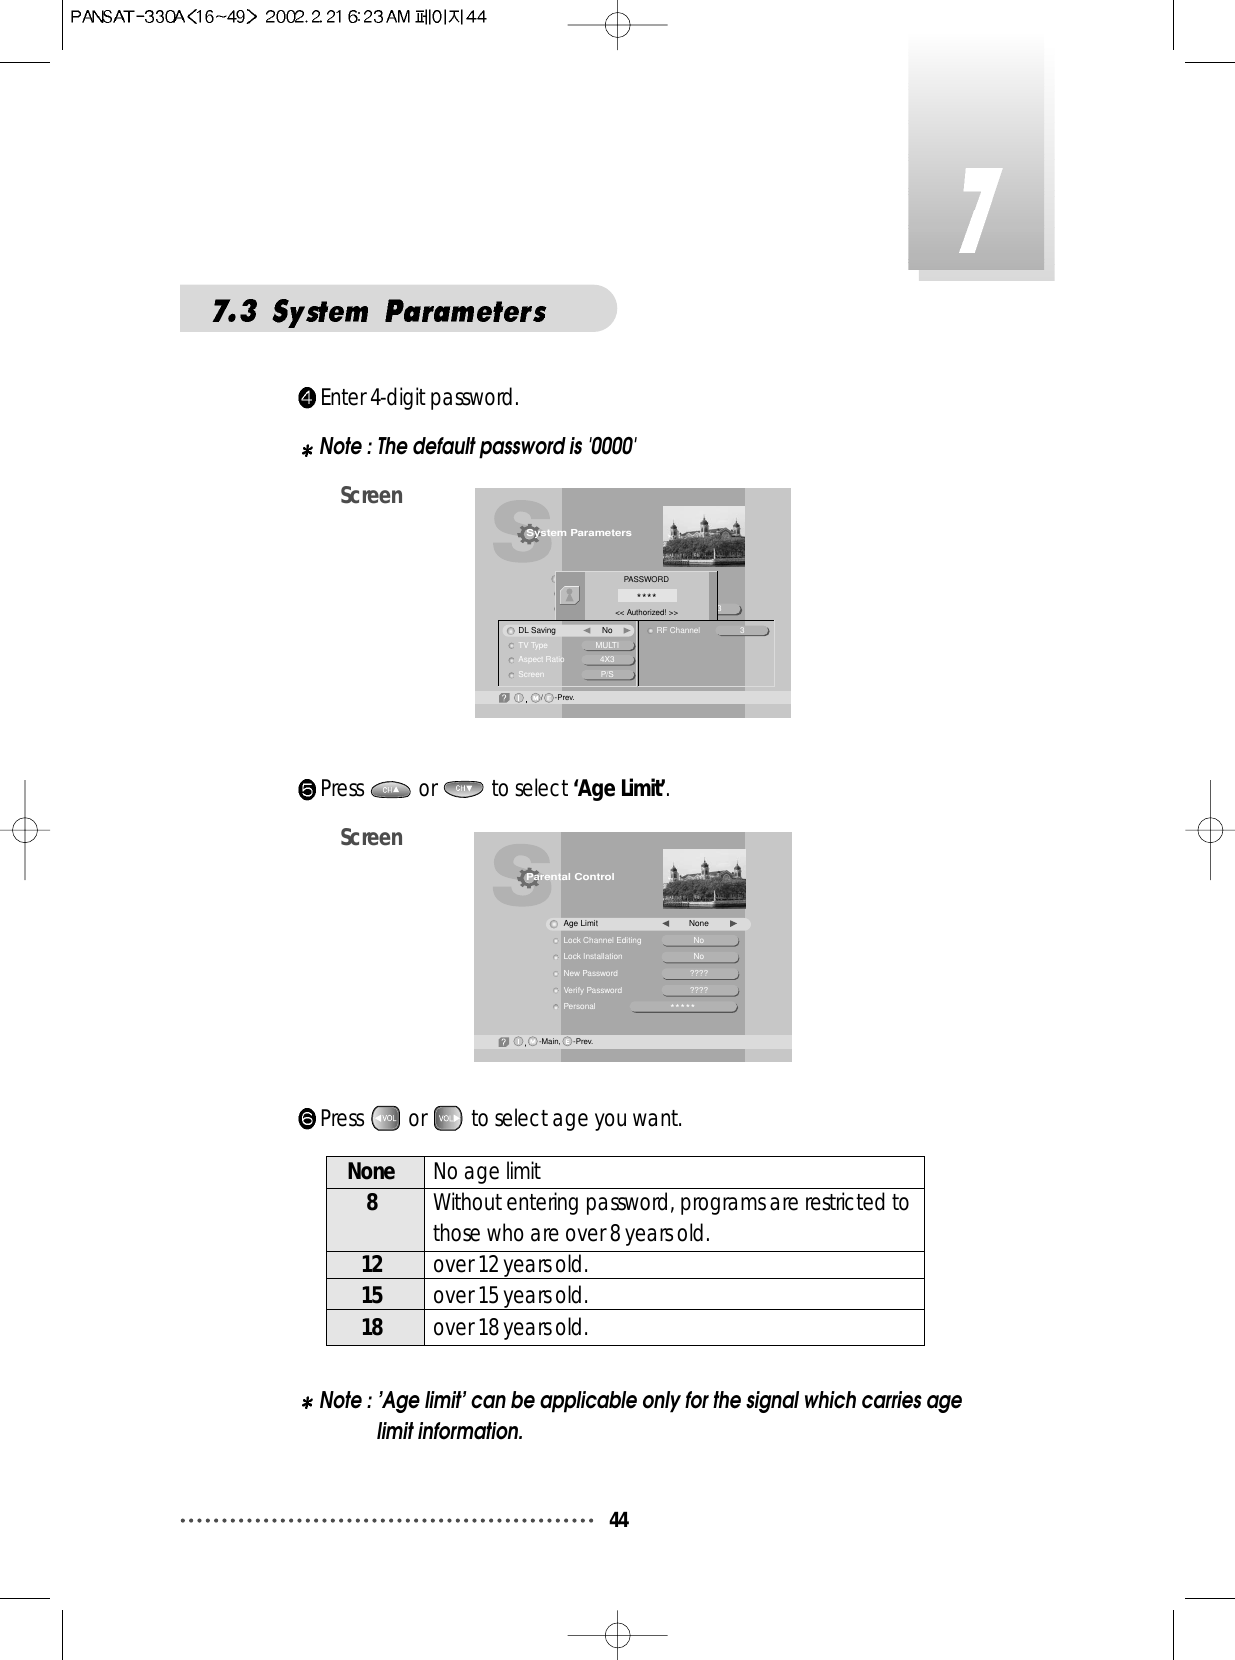
![20Select the satellite you want with or .Press to move to TP section and select the TP you want with or .When the satellite and the TP are selected, you can check the receptionstatus of the satellite signal. If the reception signal status is bad, adjustantenna to get the following result.Select ‘Antenna Setup’ with or and press .ScreenMotor/Goto 0Move/SaveSet LimitMy longitudeMy latitudeAntenna Setup-Main,M-Prev.EHorizontal-18V28,123 MSPSOFFStopDisable120.0 E56.0 NTunerFEC 3/4LockLevel Qual.47% 98%[24] 4,000 GHzAsiaSat 2Level Indicating selected satellite signal strength levelQuality Indicating signal to noise ratioYou need to position your antenna correctly for reception of the best signal.Press MENU key.Select ‘Installation’ with or , and press .Screen4Antenna SetupInstallation-Next, -Prev.LNB ConfigurationAntenna SetupSatellite ScanTP Edit/ScanDiSEqC[UFO] SetupFactory SetOn Air Download](https://usermanual.wiki/Hyundai-Digital-Technology/PANSAT330A/User-Guide-228859-Page-21.png)
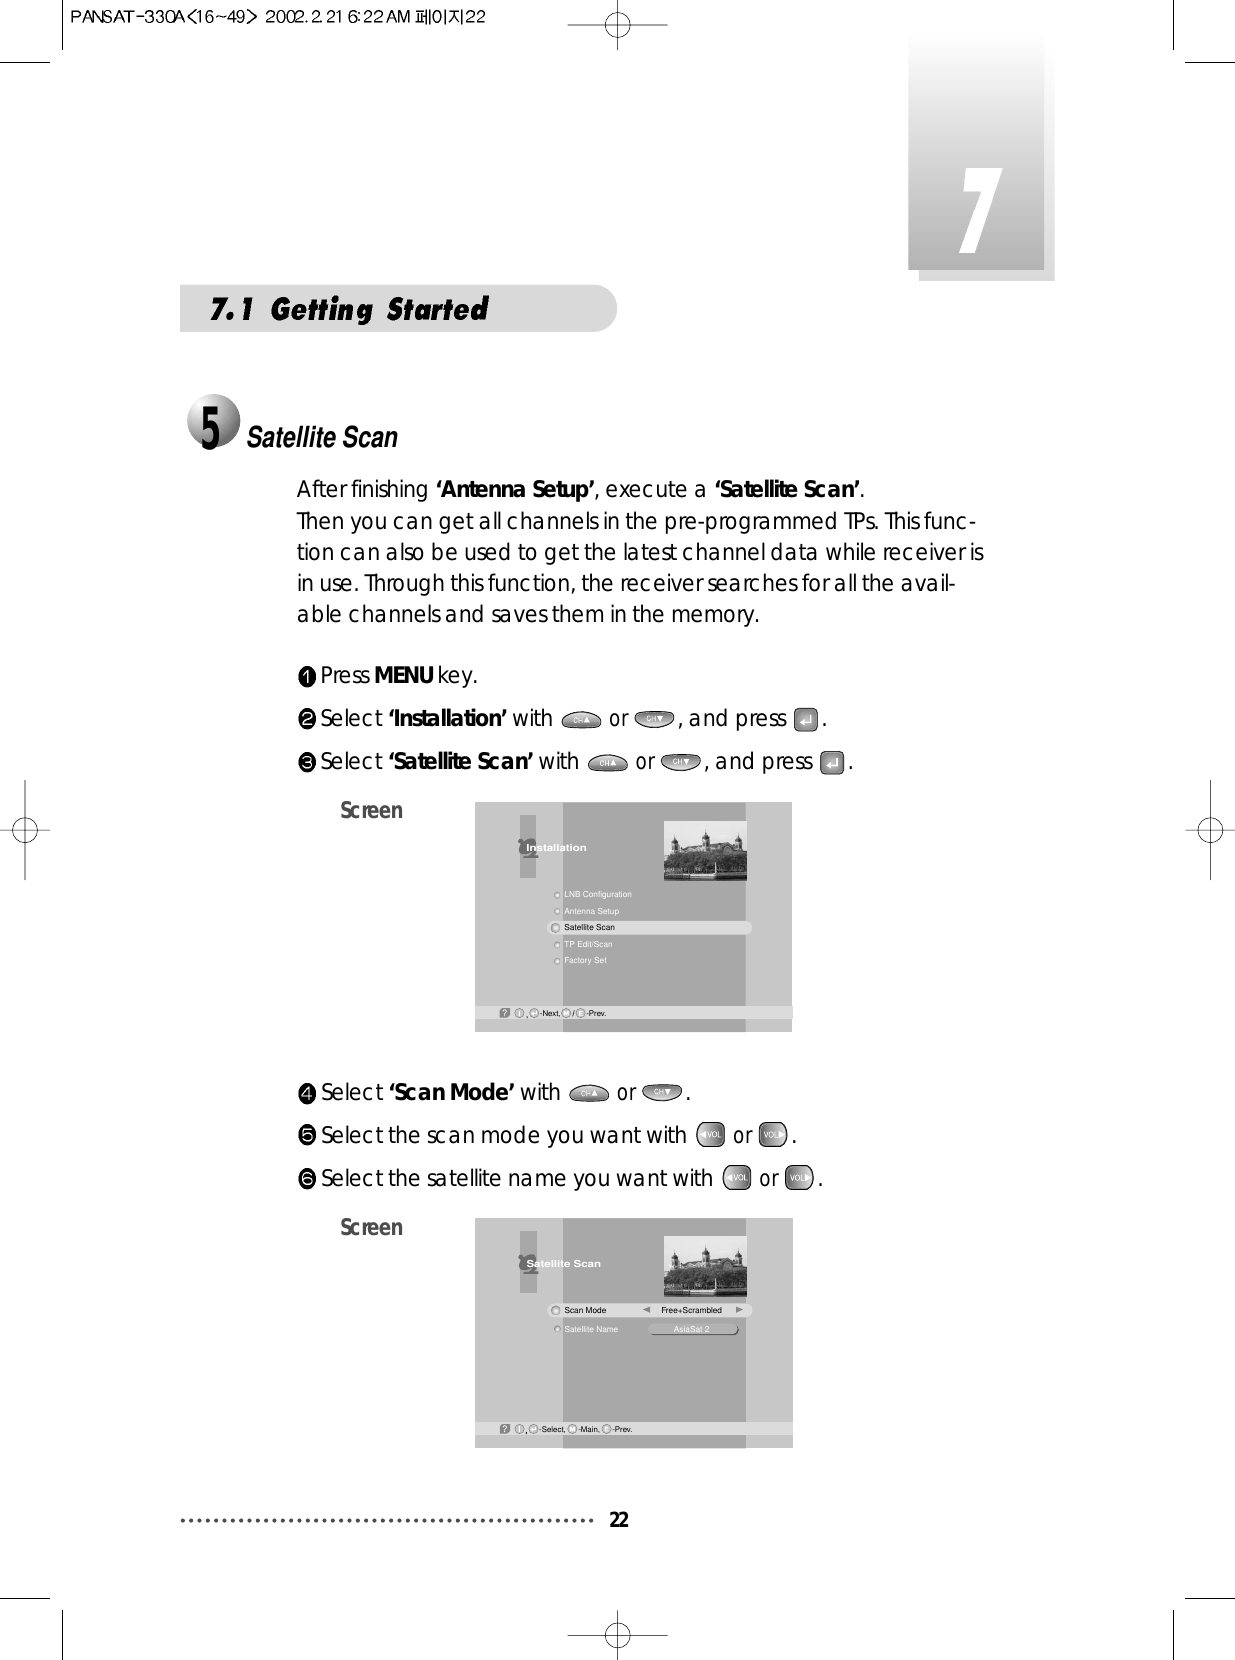
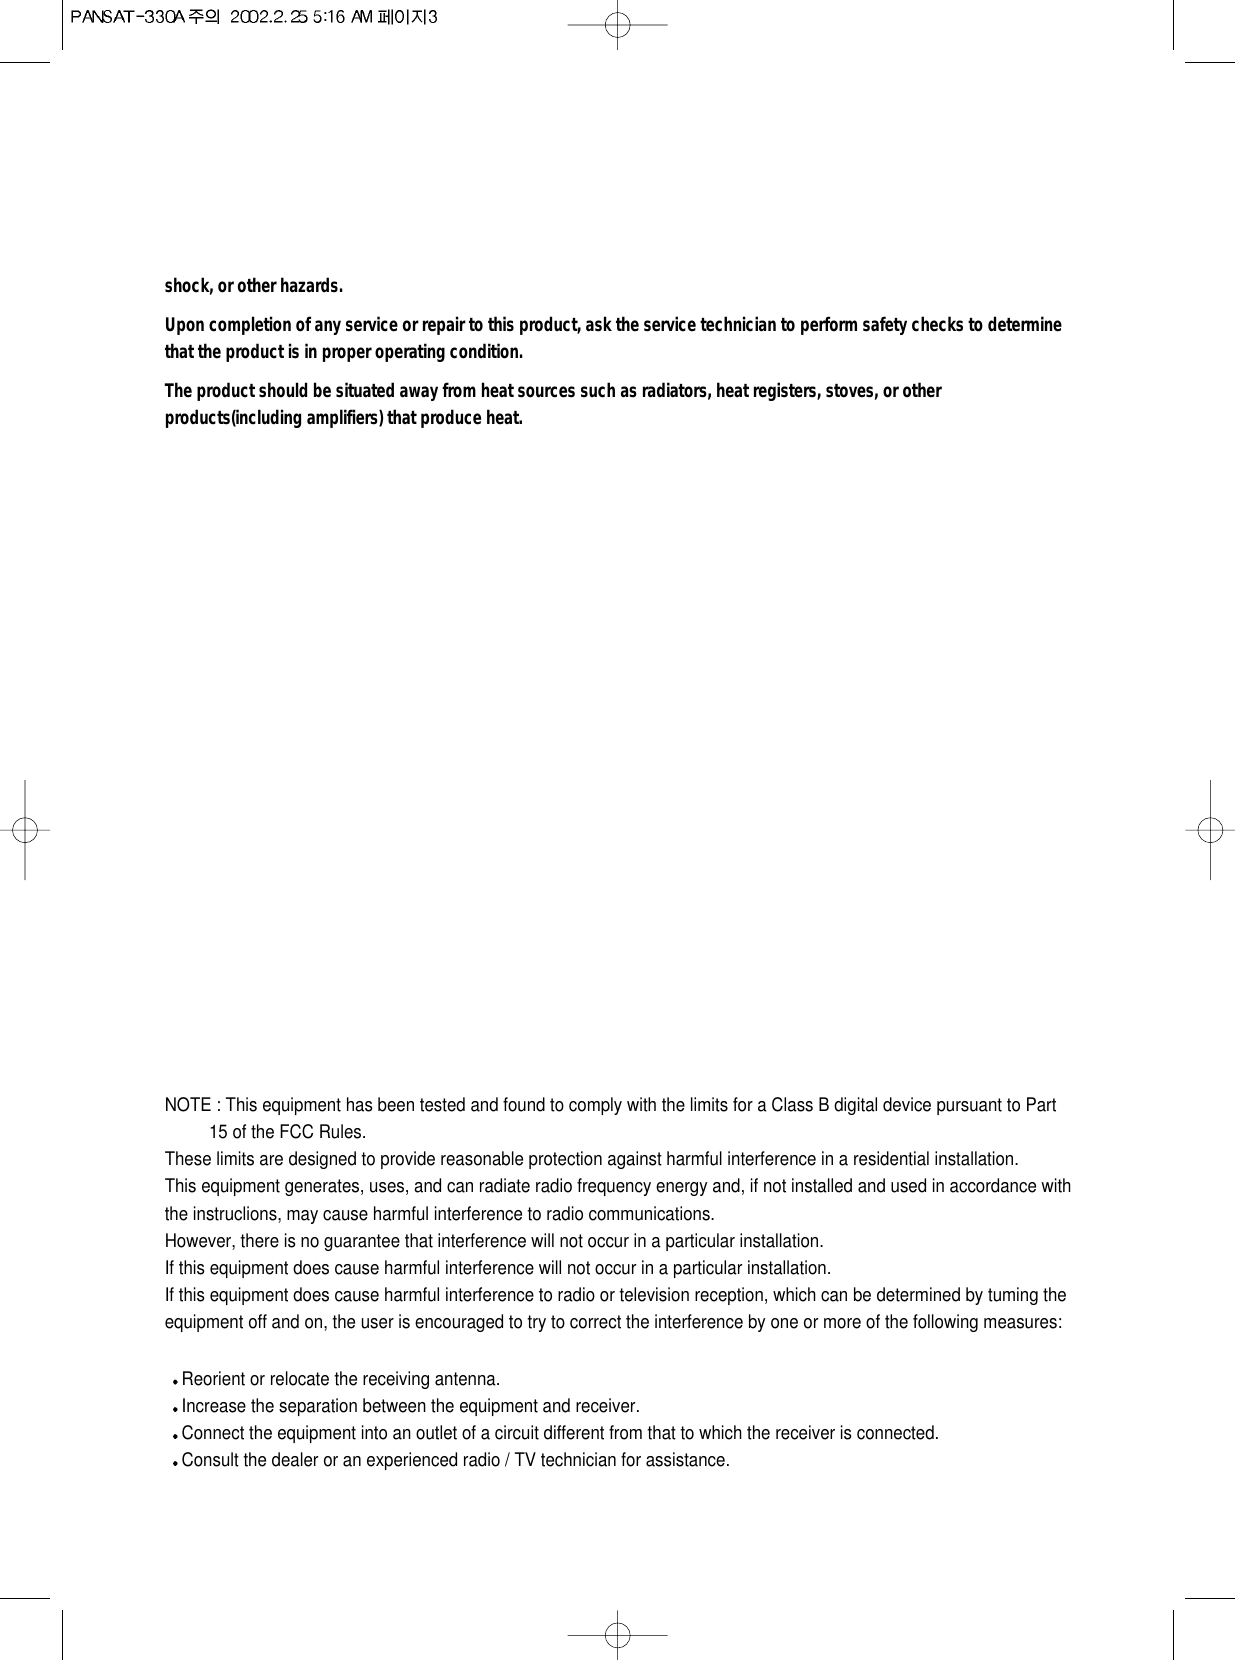
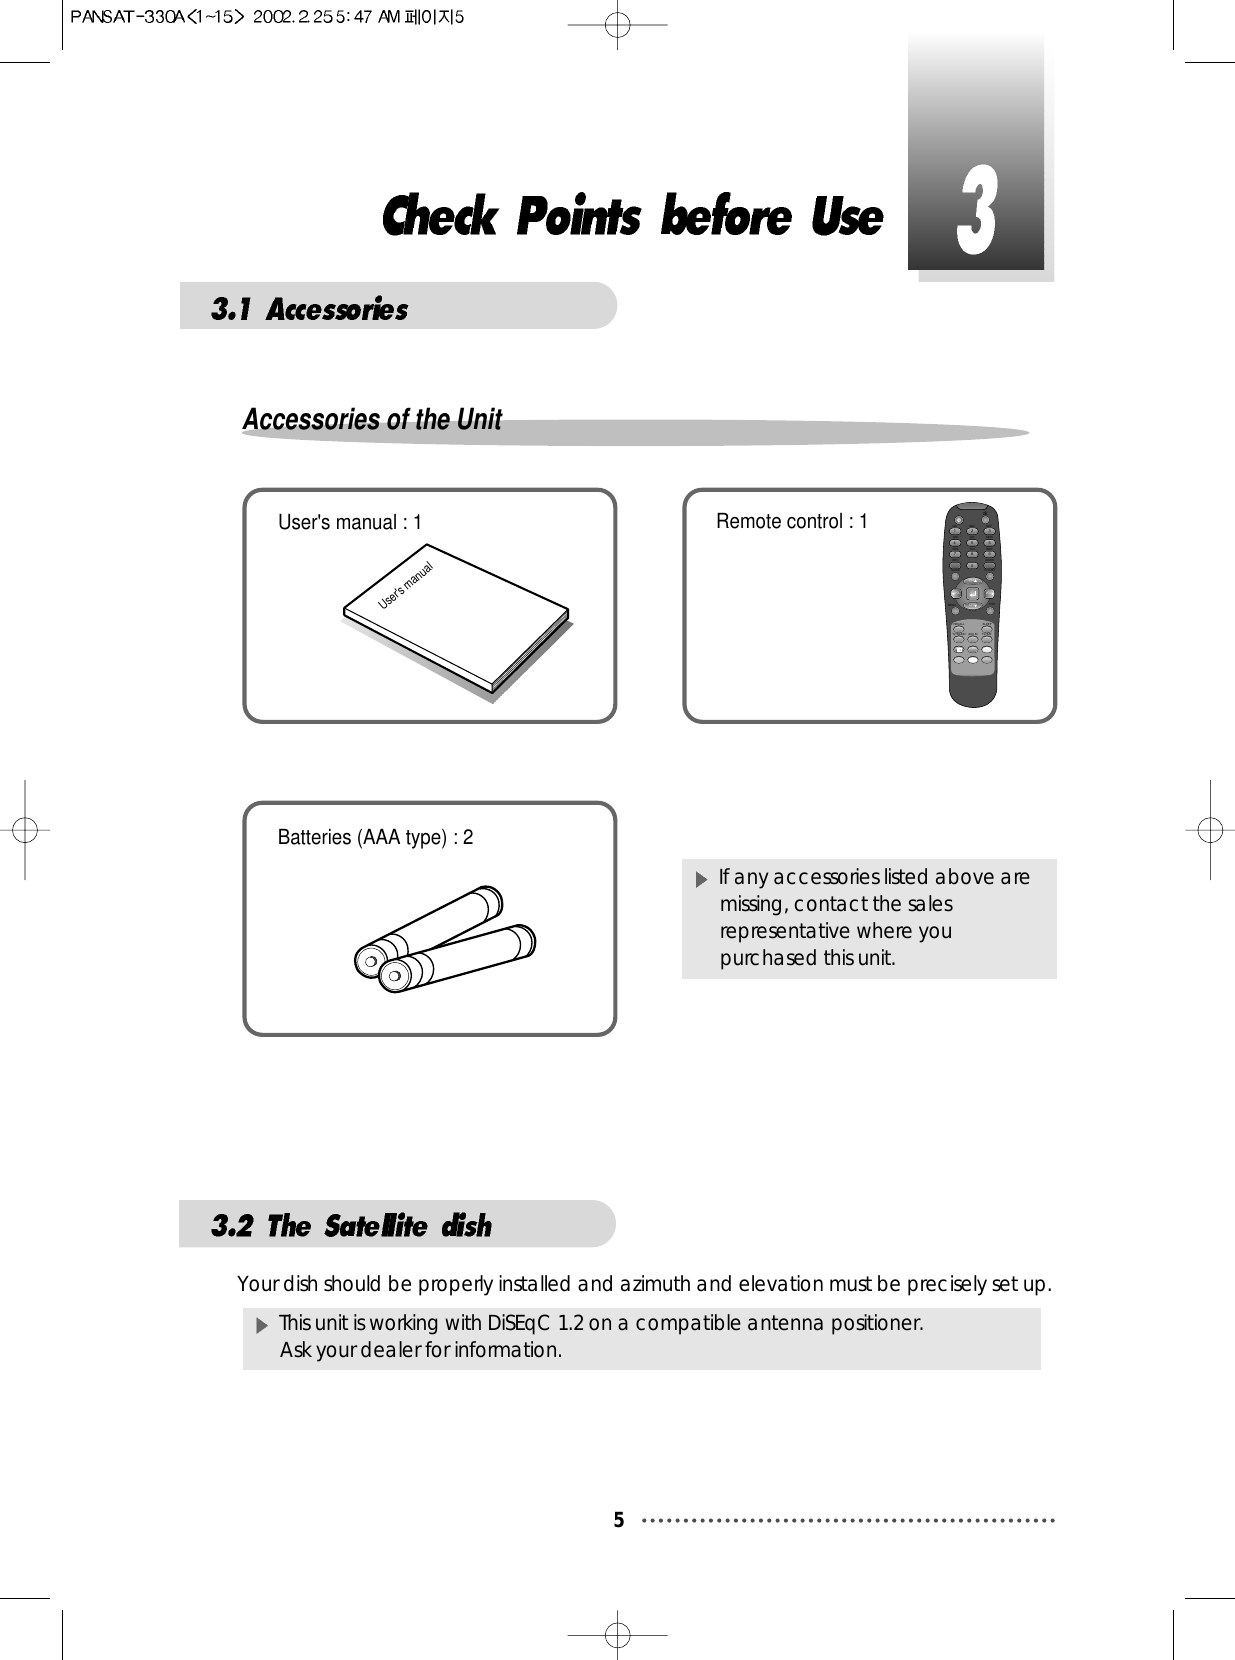
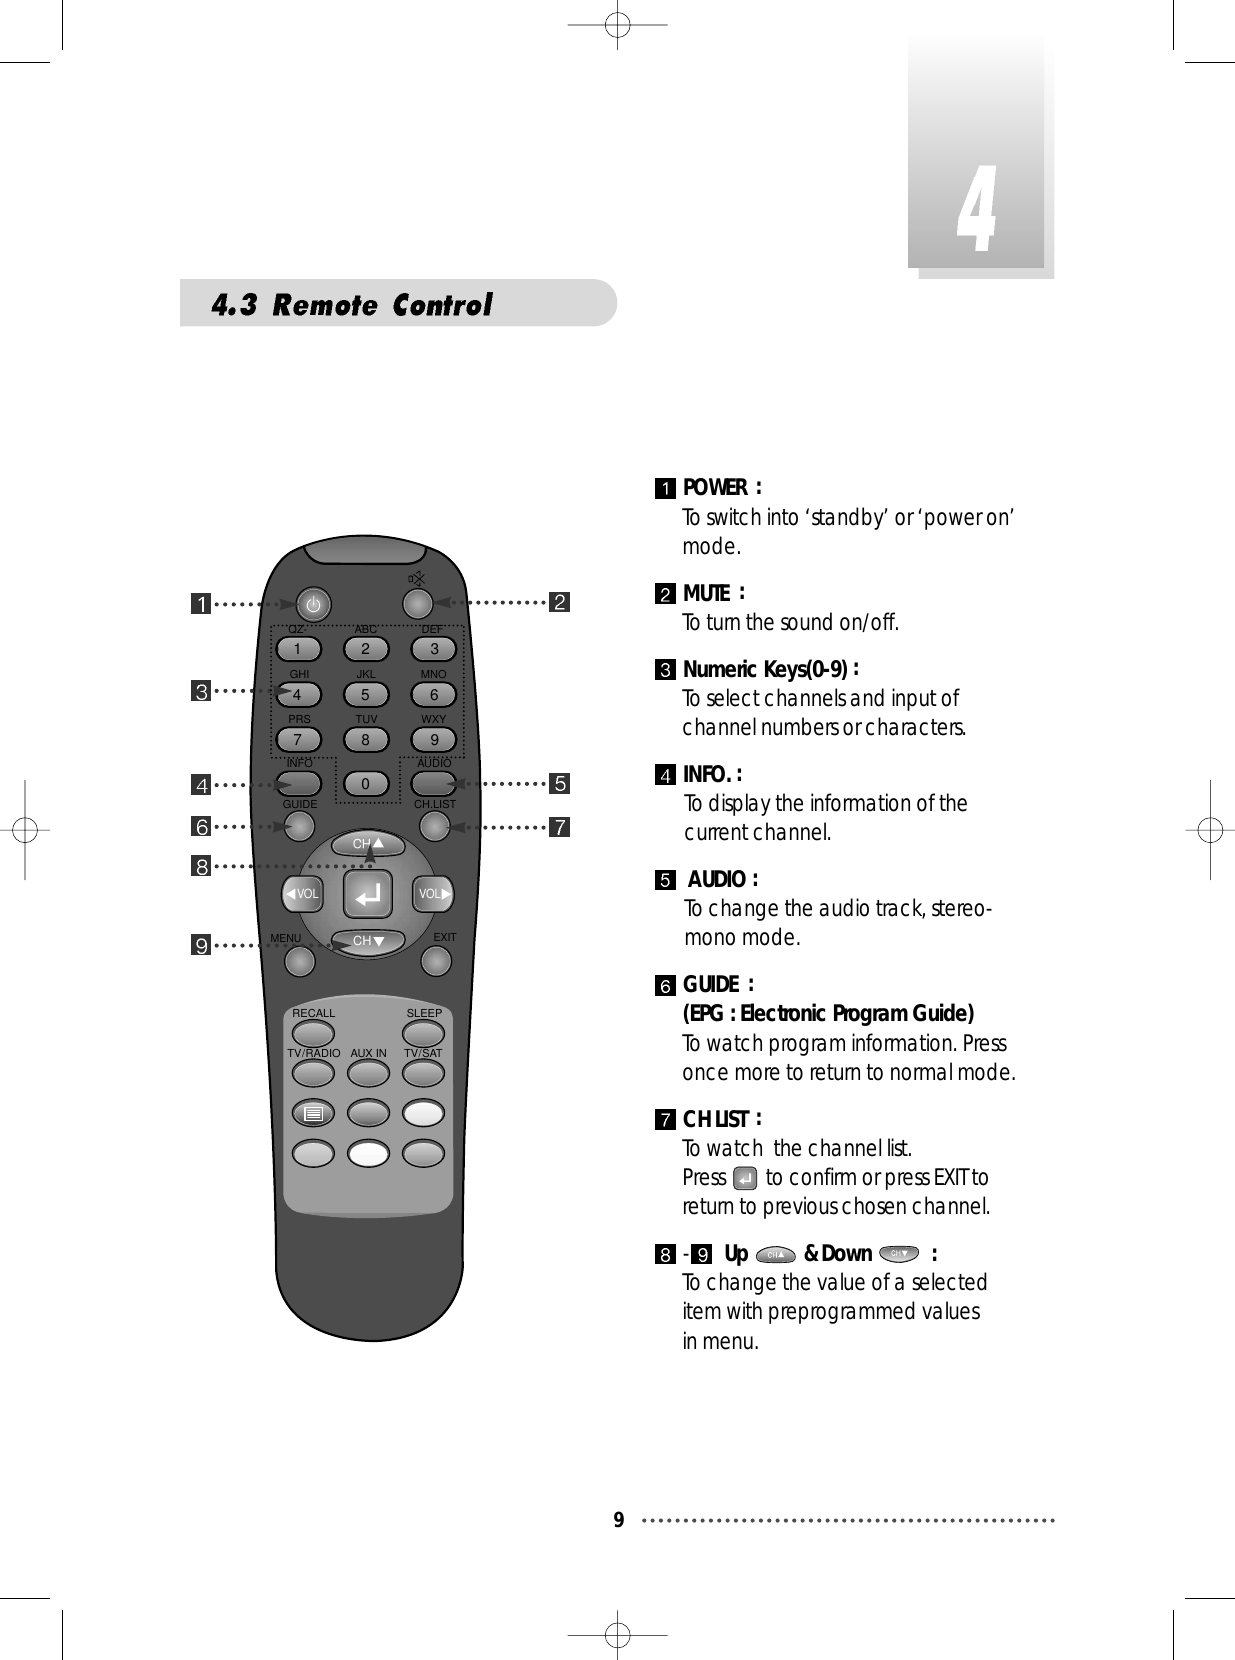
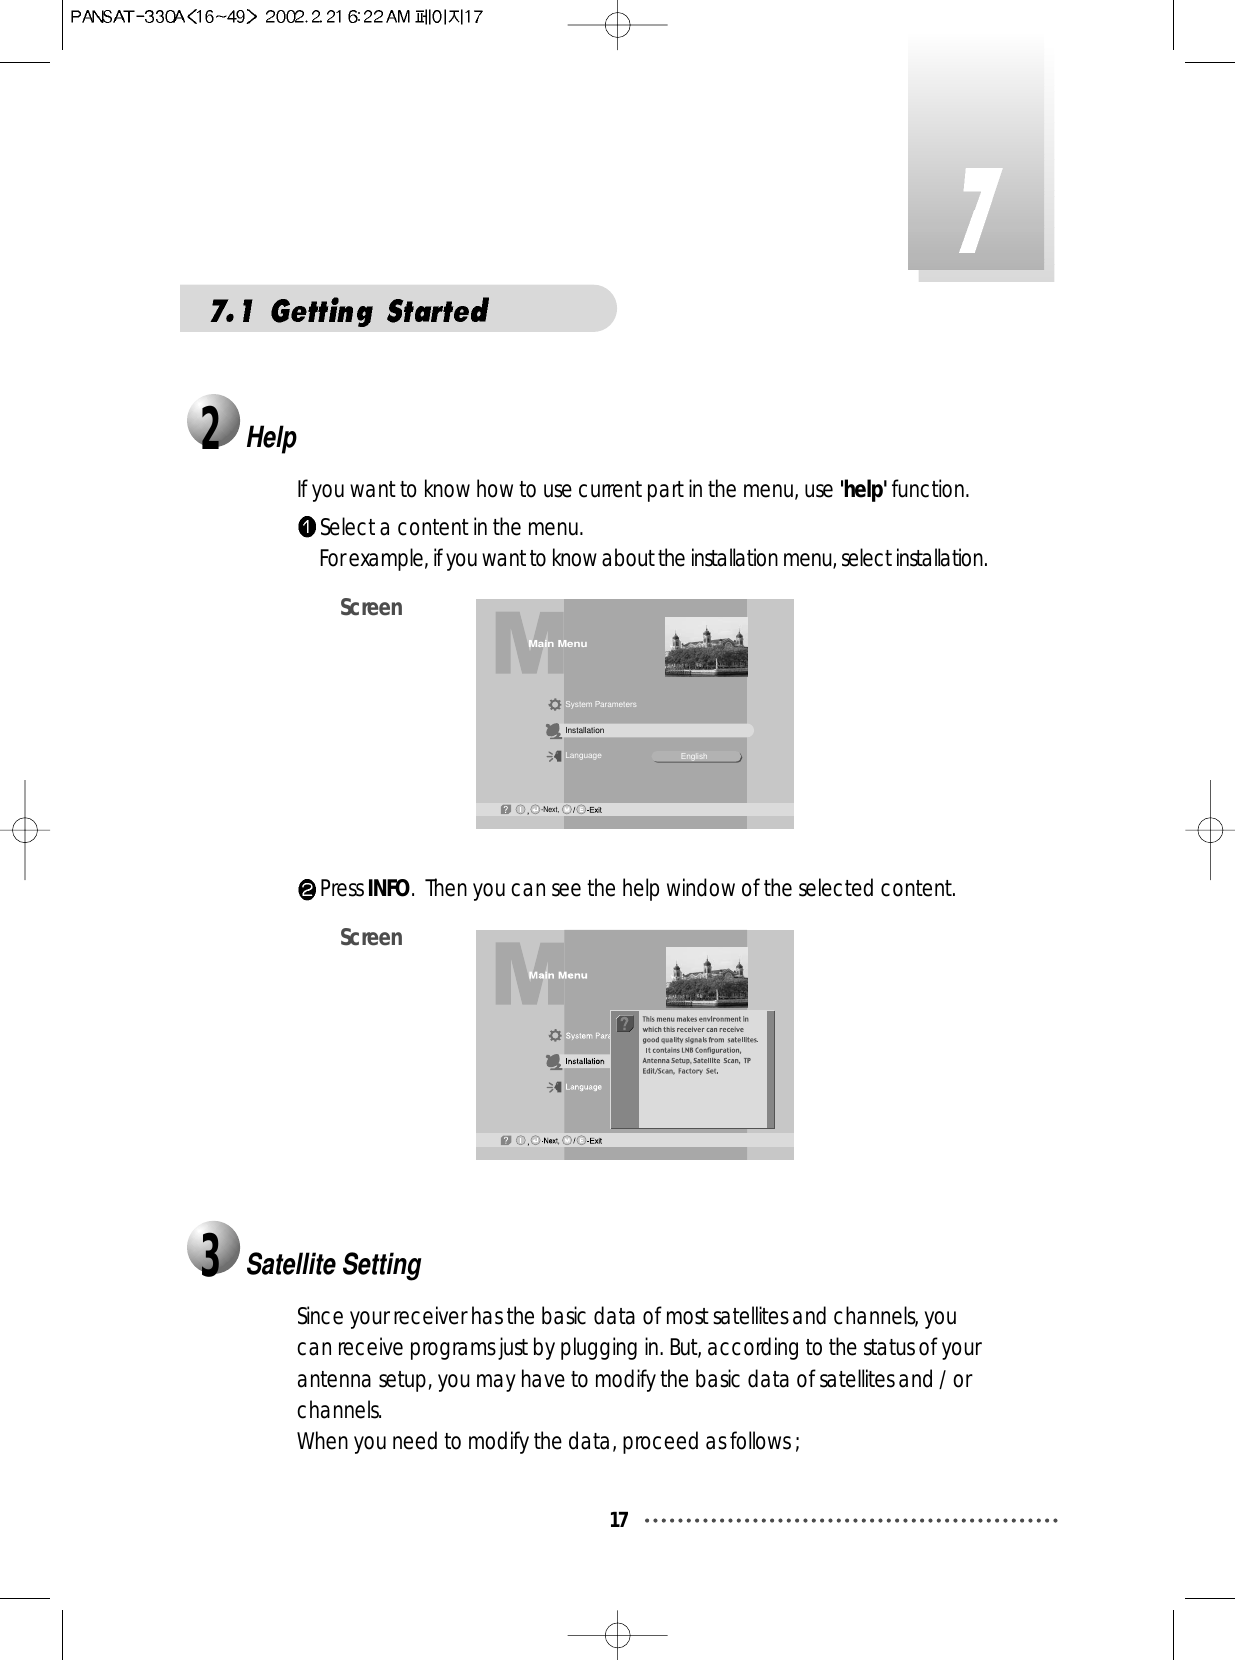
![If you press , the selected satellites will be scanned.ScreenWhile scanning, you can see the following menu on the screen.ScreenAfter the scanning process, the first channel of the last scanned TP will bedisplayed on the back screen.Press to finish the process. Then select a channel and press towatch a program or press MENU key or EXIT key. Note : Now you have completed all steps needed for watching programs.If you could not see the program after finishing these procedures,please contact your engineer or representative.Satellite Scan-Select, -Main,M-Prev.EGood84%TV: 2 Scanning:10% Radio: 033343536373839171819202122SATLINK 972 2APTN1 + 442074NMTVGuangdong 2Hunan 2Hubei 1Hubei 2DW 9RDP ANTENA 1RDP ESPECIALNN¥xÆWaN¥<< TWN¥@uØ1/2Auø USAAsiaSat 2 [4] 3,720 GHz Hor. 4,420~~Satellite Scan-Watch, /M-Prev.EBad1%-Page Up/Down,TV: 39 Scanning:10% Radio: 22171819202122DW 9RDP ANTENA 1RDP ESPECIALNN¥xÆWaN¥<< TWN¥@uØ1/2Auø USAAsiaSat 2 [28] 3,960 GHz Hor. 30,000~~33343536373839SATLINK 972 2APTN1 + 442074NMTVGuangdong 2Hunan 2Hubei 1Hubei 2Satellite scan is done. Press Key.Q23](https://usermanual.wiki/Hyundai-Digital-Technology/PANSAT330A/User-Guide-228859-Page-24.png)
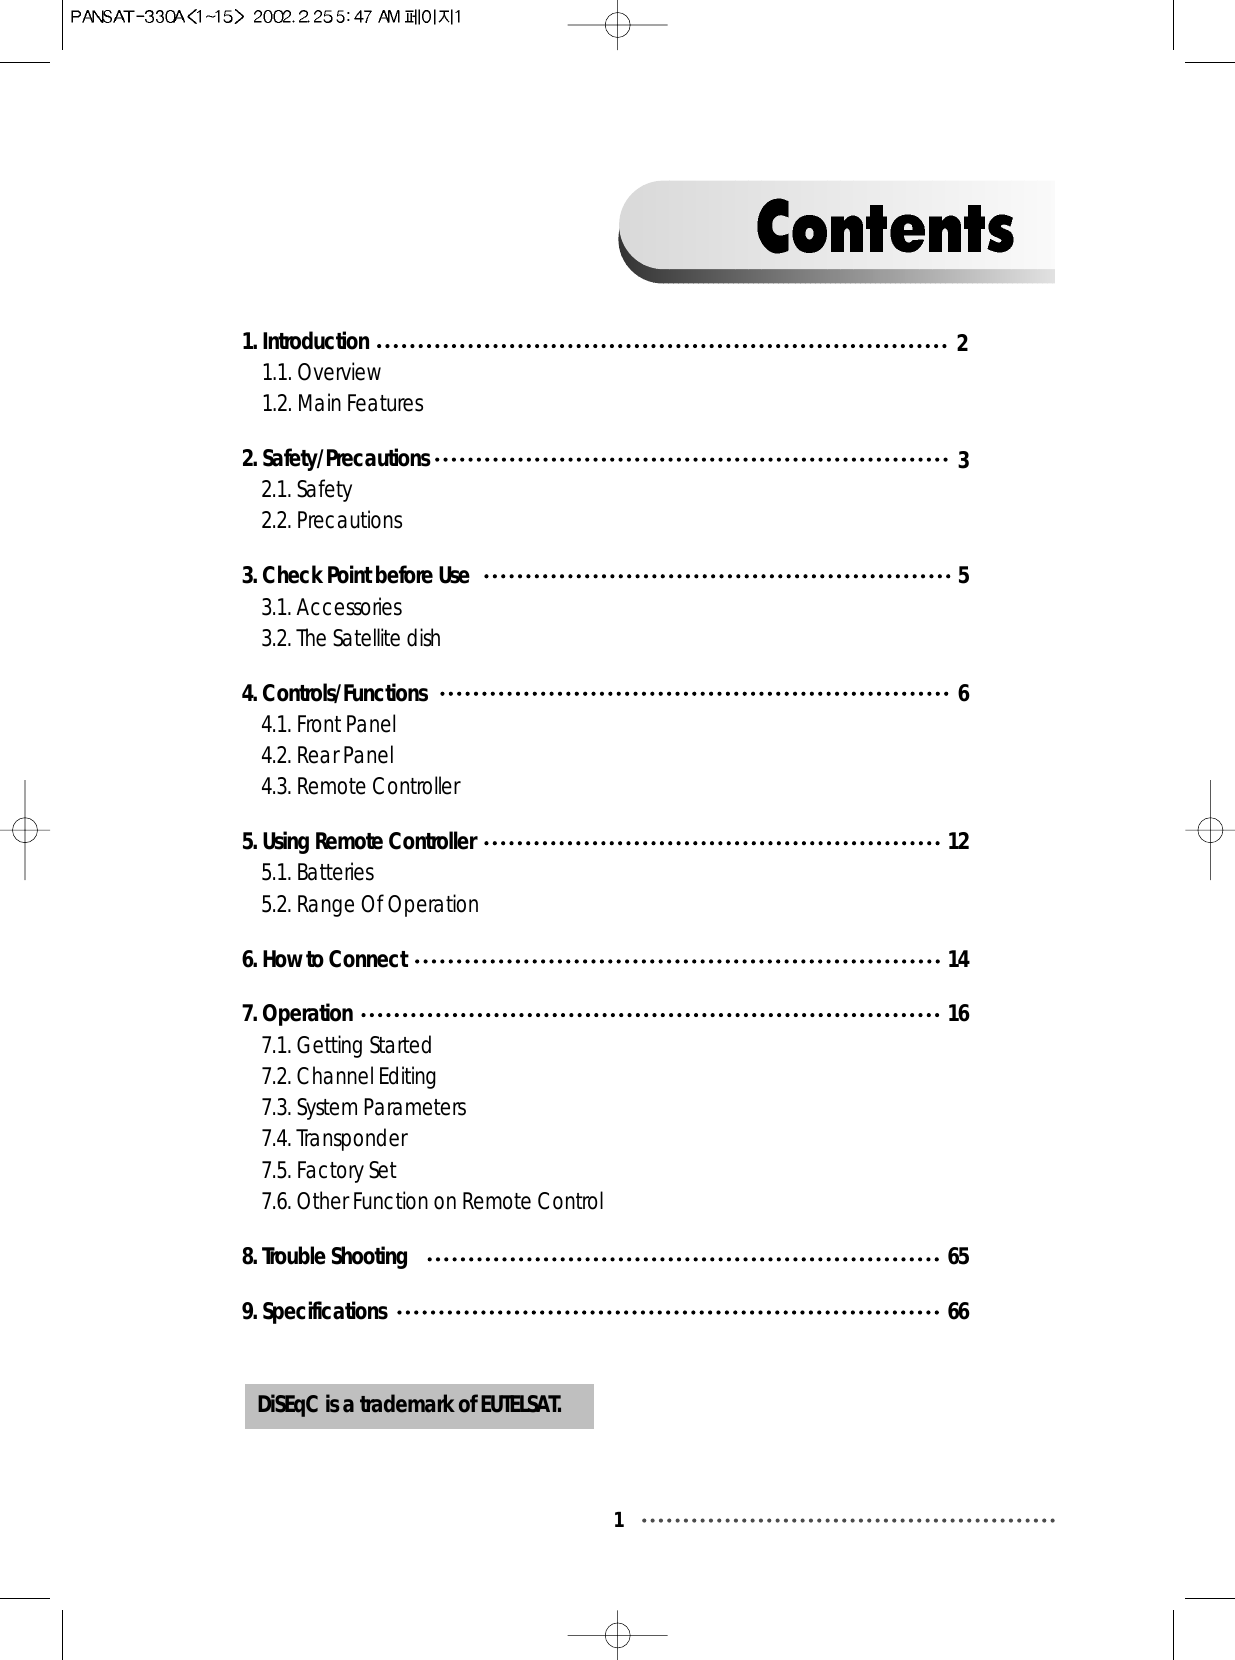
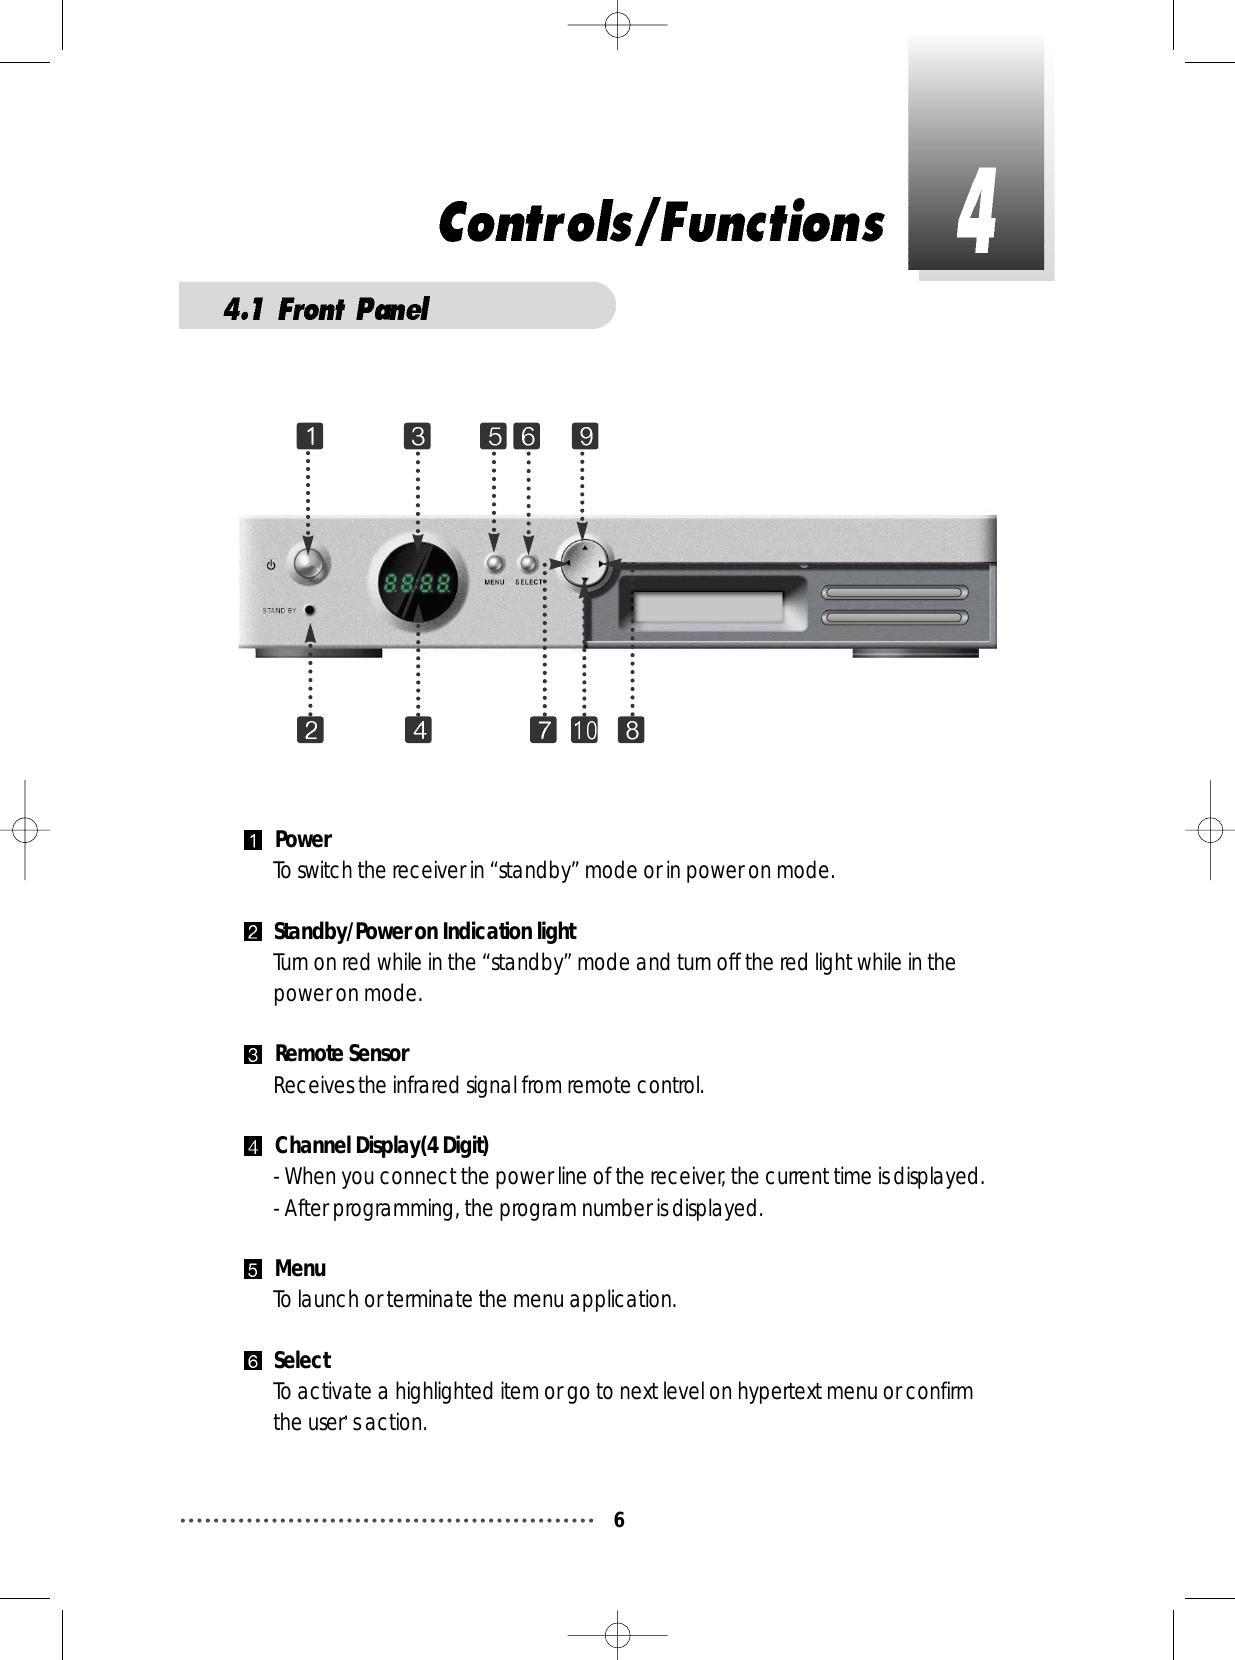
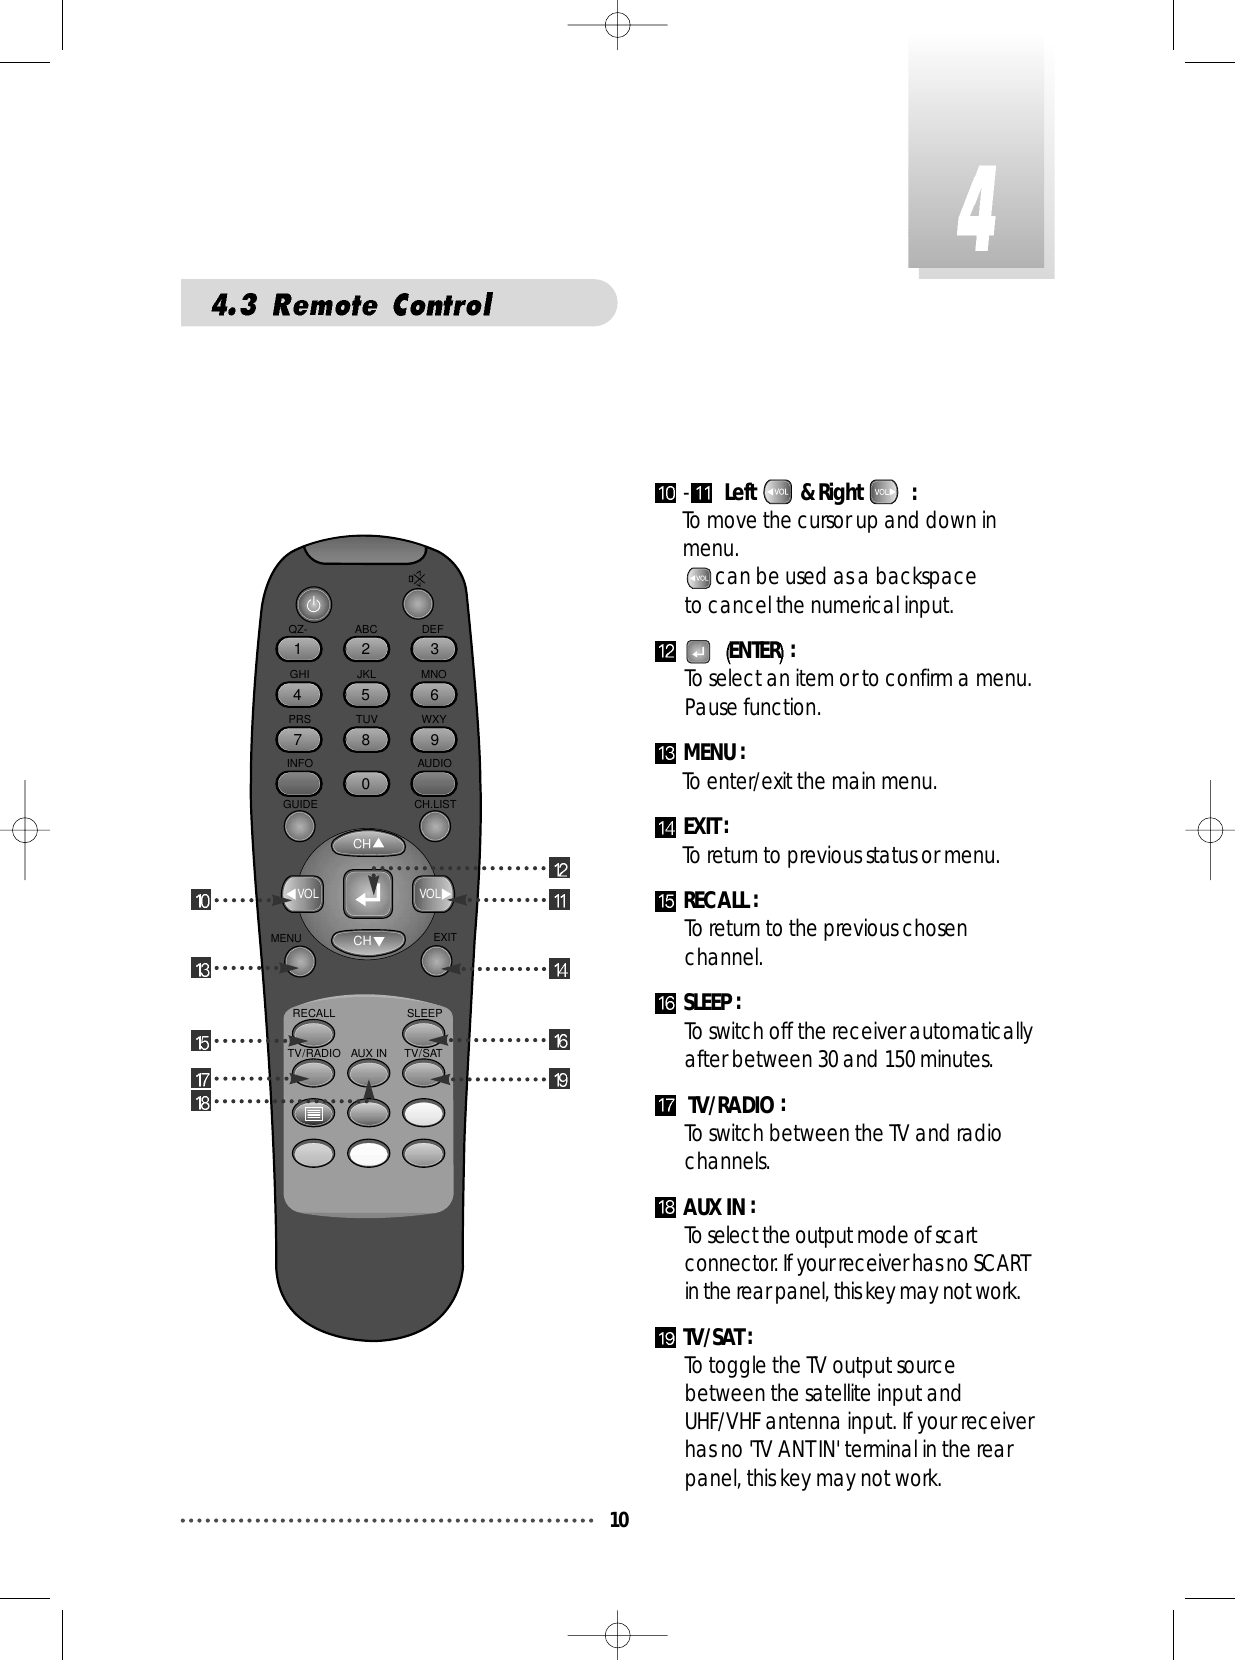
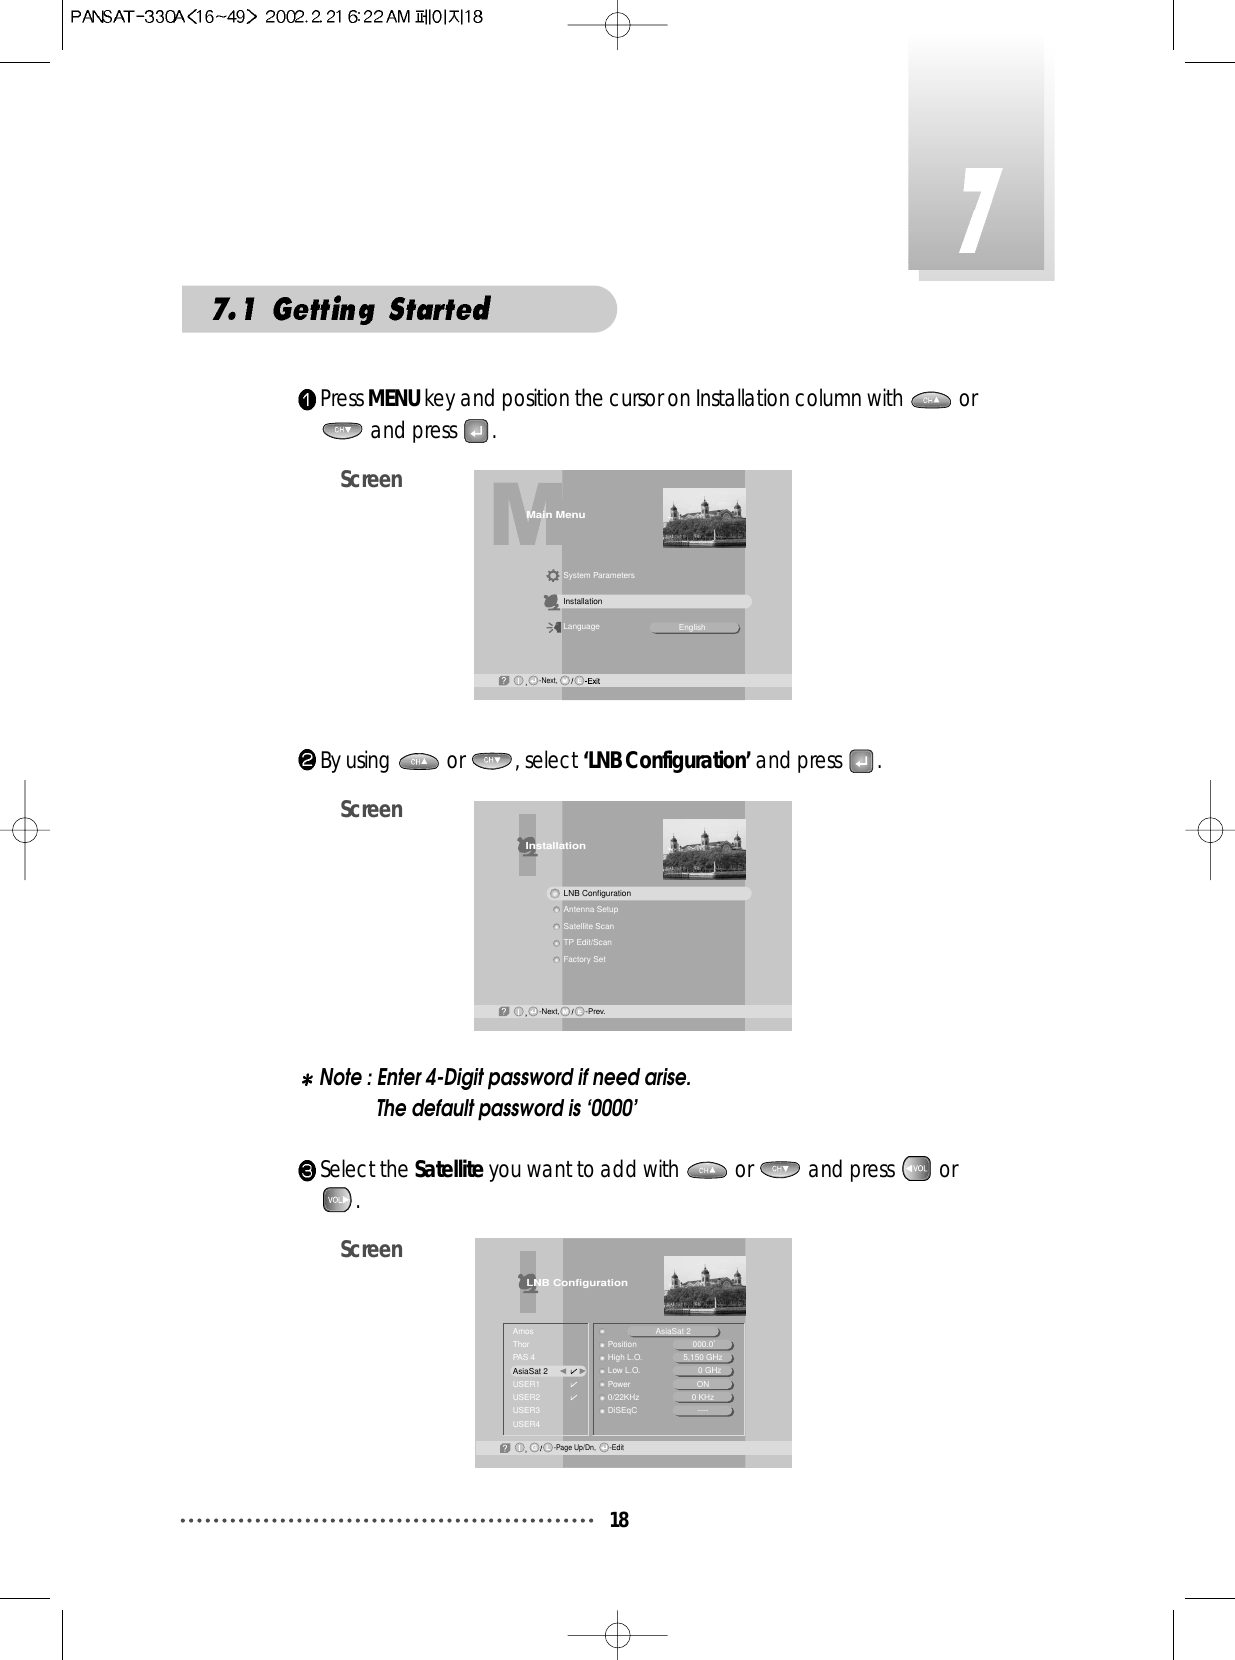
![24You can change the current channel to any other channel you want.If you do not know the channel name, or you want to select a channelat random, you can navigate between channels with or (CH.Up/Down) till you find the channel you want.If you know the channel number, enter the number and wait 5 secondsfor the channel to change.If you know the channel name, press CH LIST key then channel list will pop-up.ScreenIn the right section, detailed information of the selected channel will bedisplayed.(Name of satellite, frequency, symbol rate, etc.) Select the channel you want with / (scroll up/down) or /(page up/down). When the scroll bar is positioned on the channel you want to see, press . TV Channel List-Watch, -EXIT, ~ -Move09-Main,-Page Up/Down,12345678Fujian 1DIGITL VIDANHUI TVNMCHTVGuangdong 1Hunan 1DWtvMCMAsiaSat 2[24] 4,000 GHzHorizontal-18V28,123 MSPSDeutsche WellFAV.LOCKMOVEDELADDMODEAll List6Select Channel](https://usermanual.wiki/Hyundai-Digital-Technology/PANSAT330A/User-Guide-228859-Page-25.png)
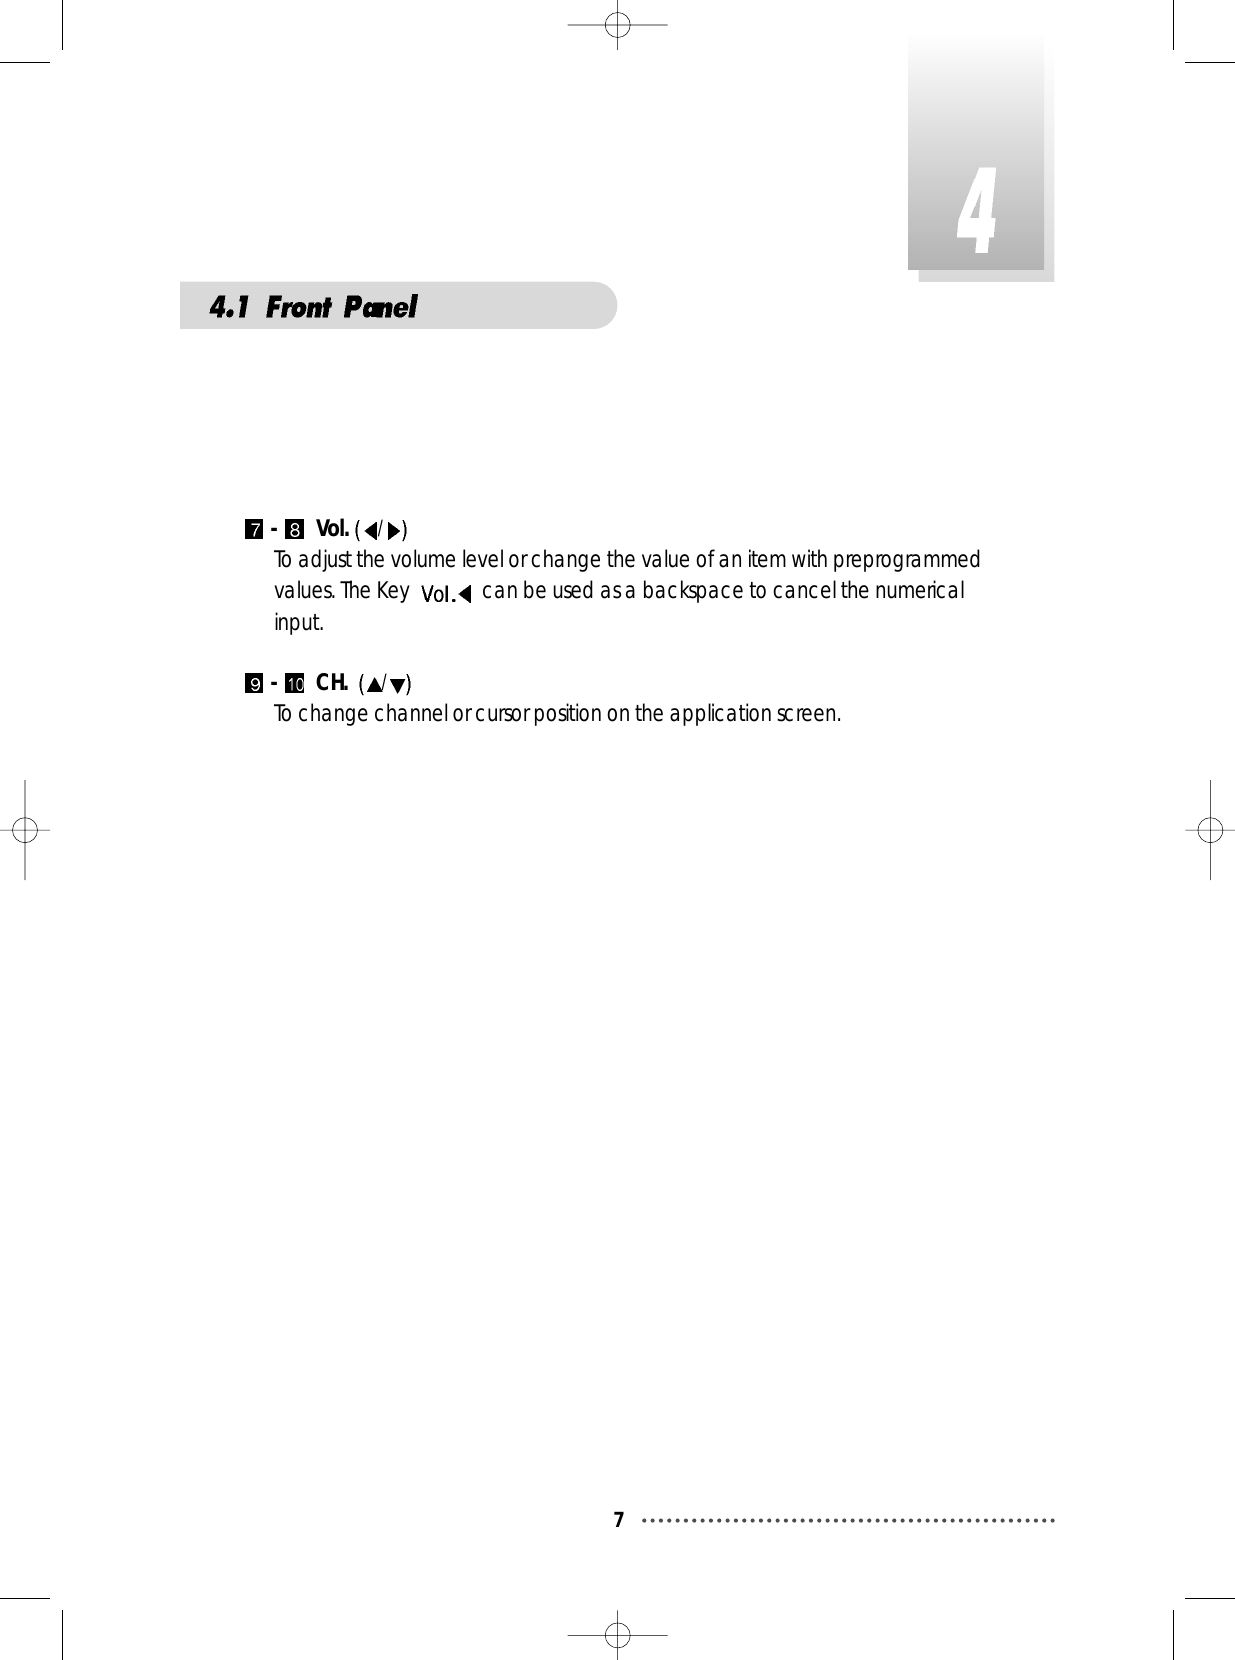
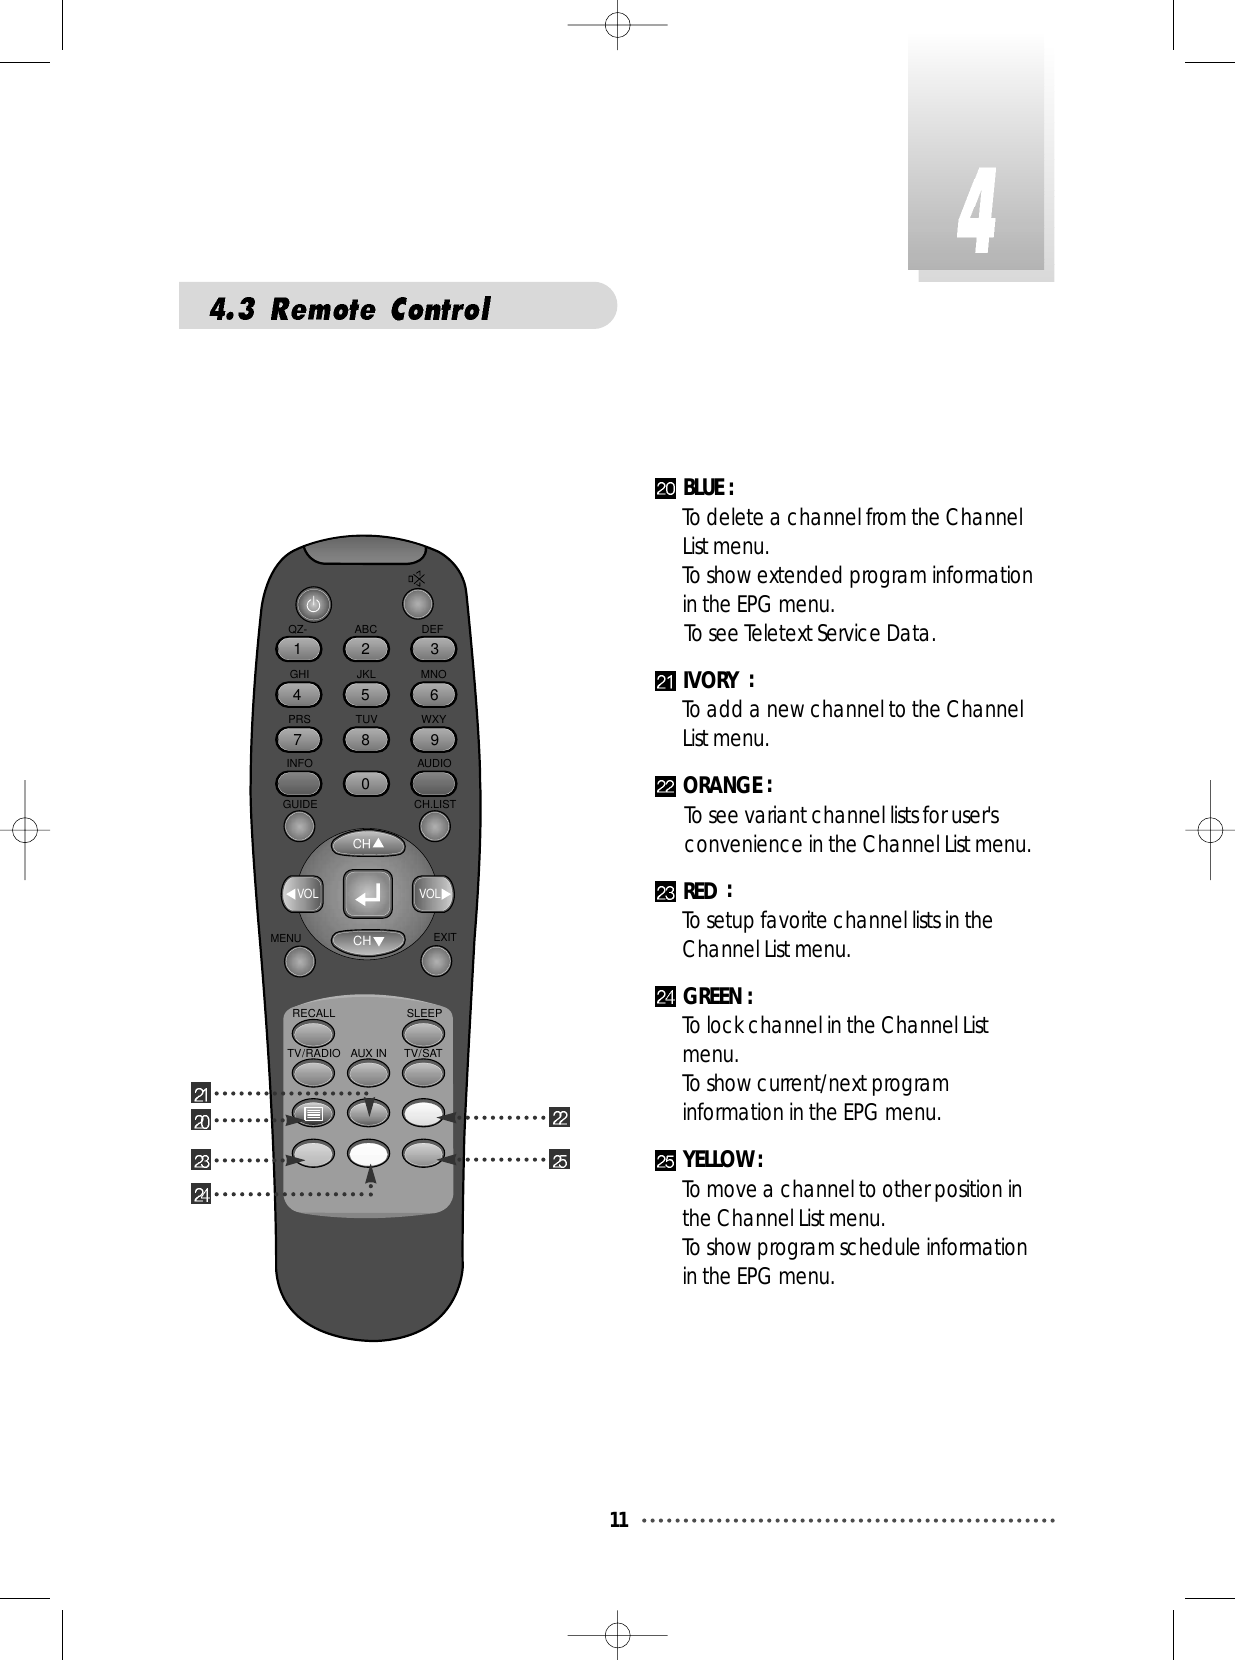
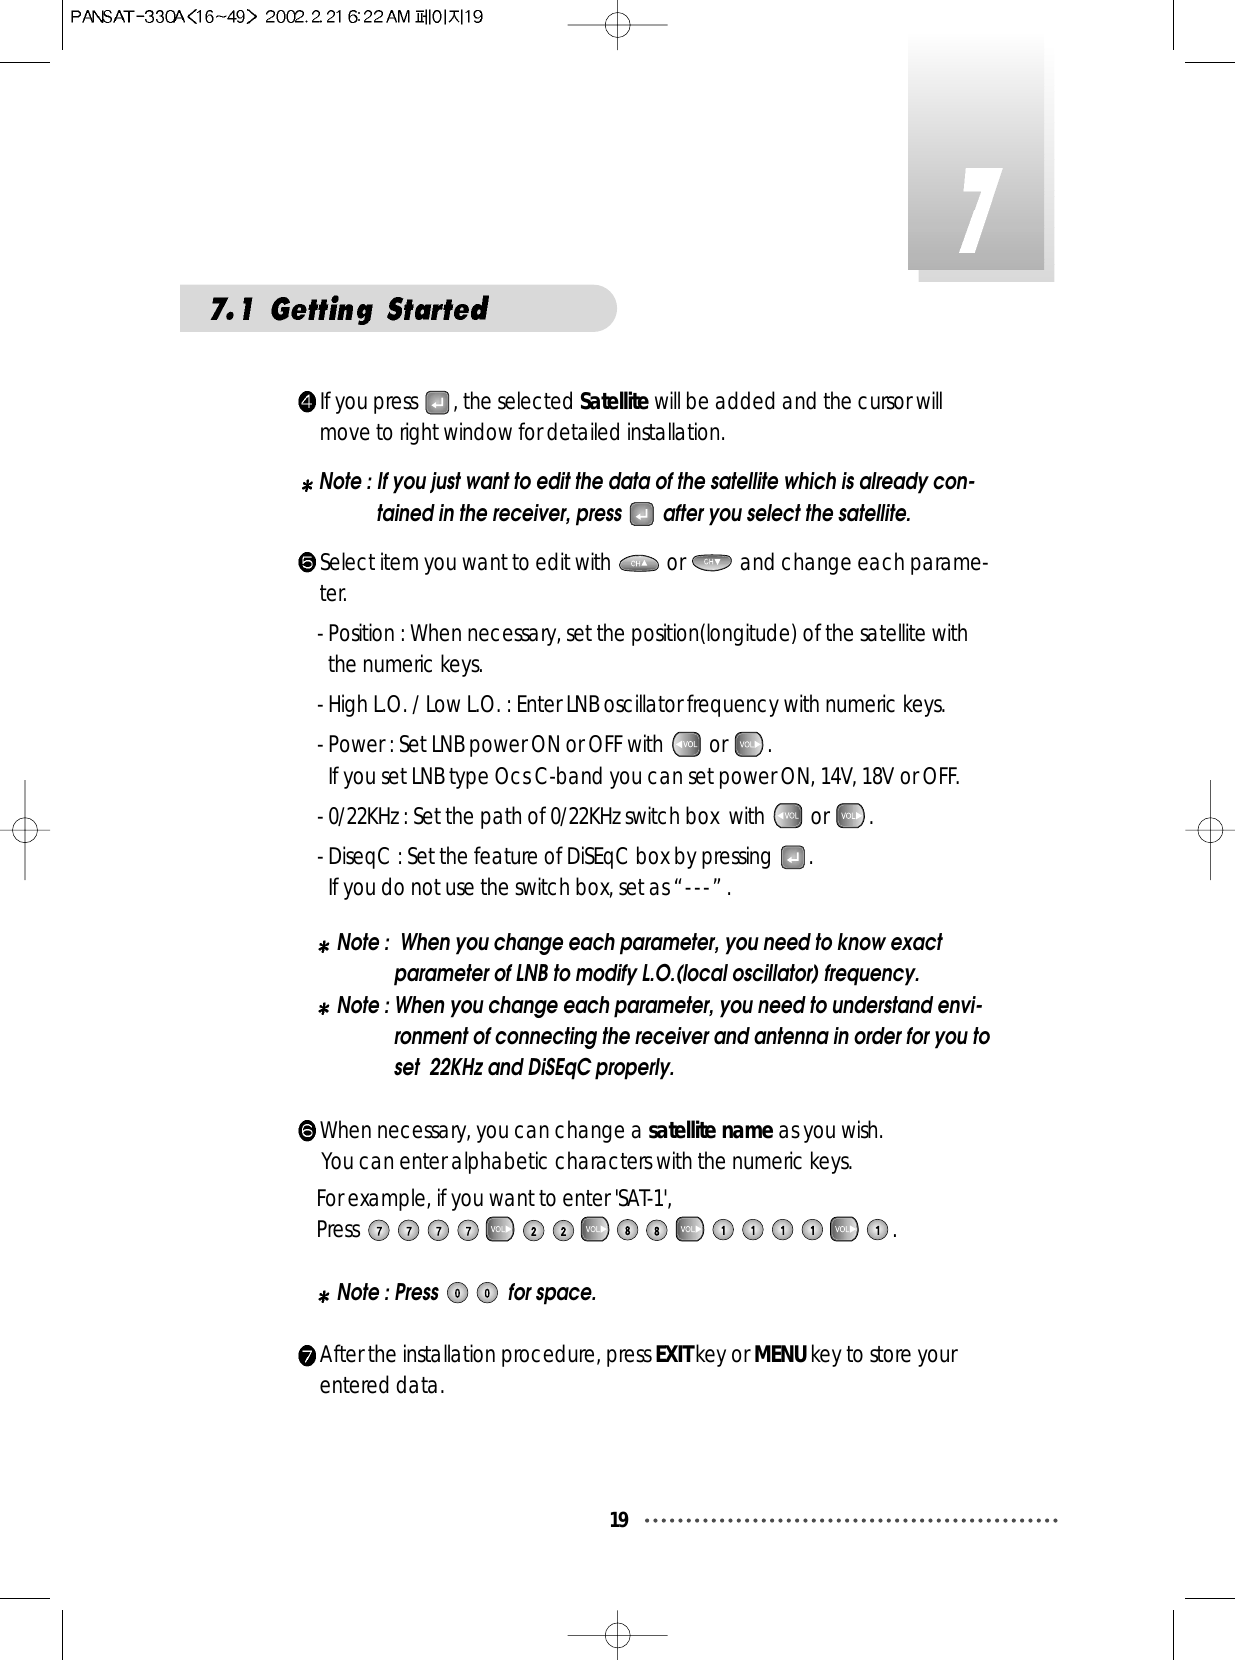
![26You can set up favorite channel lists as you want.For example, if you want to set favorite channel lists as following.Favorite1 : 7 DWtv, 6 Hunan1Favorite2 : 1 Fujian1Favorite3 : 3 ANHUI TV, 5 Guangdong1Firstly, set favorite1 channels.Press CH.LIST.Select 'DWtv' channel with / or / .ScreenPress RED.ScreenTV Channel List-Watch, -EXIT, ~ -Move09-Main,-Page Up/Down,12345678Fujian 1DIGITL VIDANHUI TVNMCHTVGuangdong 1Hunan 1DWtvMCMAsiaSat 2[24] 4,000 GHzHorizontal-18V28,123 MSPSDeutsche WellFAV.LOCKMOVEDELADDMODEAll ListTV Channel List-Select, -Exit/12345678Fujian 1DIGITL VIDANHUI TVNMCHTVGuangdong 1Hunan 1DWtvMCMAsiaSat 2[24] 4,000 GHzHorizontal-18V28,123 MSPSDeutsche WellFAV.LOCKMOVEDELADDMODEAll List Favorite StateFavorite 1Favorite 2Favorite 3Favorite 4Favorite 5Rename.1Favorite Channel](https://usermanual.wiki/Hyundai-Digital-Technology/PANSAT330A/User-Guide-228859-Page-27.png)
![27Select favorite1 with or and Press .ScreenDo the same for the 'Hunan 1' channel.ScreenTV Channel List-Select, -Exit/12345678Fujian 1DIGITL VIDANHUI TVNMCHTVGuangdong 1Hunan 1DWtvMCMAsiaSat 2[24] 4,847 GHzHorizontal-18V28,123 MSPSDbanFAV.LOCKMOVEDELADDMODEAll List Favorite StateFavorite 1Favorite 2Favorite 3Favorite 4Favorite 5Rename.TV Channel List12345678Fujian 1DIGITL VIDANHUI TVNMCHTVGuangdong 1Hunan 1DWtvMCMAsiaSat 2[24] 4,000 GHzHorizontal-18V28,123 MSPSDeutsche WellFAV.LOCKMOVEDELADDMODEAll List-Watch, -Exit, ~ -Move09-Main,-Page Up/Down,TV Channel List12345678Fujian 1DIGITL VIDANHUI TVNMCHTVGuangdong 1Hunan 1DWtvMCMAsiaSat 2[20] 3,847 GHzHorizontal-18V4,420 MSPSHunanFAV.LOCKMOVEDELADDMODEAll List-Watch, -Exit, ~ -Move09-Main,-Page Up/Down,](https://usermanual.wiki/Hyundai-Digital-Technology/PANSAT330A/User-Guide-228859-Page-28.png)
![28Press RED.ScreenPress .ScreenFavorite1 ~ Favorite5 are default name. Users can rename them for theirconvenience. If you want to rename 'Favorite1' (for example 'Drama').Press RED.ScreenTV Channel List-Select, -Exit/12345678Fujian 1DIGITL VIDANHUI TVNMCHTVGuangdong 1Hunan 1DWtvMCMAsiaSat 2[24] 4,847 GHzHorizontal-18V28,123 MSPSDbanFAV.LOCKMOVEDELADDMODEAll List Favorite StateFavorite 1Favorite 2Favorite 3Favorite 4Favorite 5Rename.TV Channel List12345678Fujian 1DIGITL VIDANHUI TVNMCHTVGuangdong 1Hunan 1DWtvMCMAsiaSat 2[24] 4,000 GHzHorizontal-18V28,123 MSPSDeutsche WellFAV.LOCKMOVEDELADDMODEAll List-Watch, -Exit, ~ -Move09-Main,-Page Up/Down,TV Channel List-Select, -Exit/12345678Fujian 1DIGITL VIDANHUI TVNMCHTVGuangdong 1Hunan 1DWtvMCMAsiaSat 2[24] 4,000 GHzHorizontal-18V28,123 MSPSDeutsche WellFAV.LOCKMOVEDELADDMODEAll List Favorite StateFavorite 1Favorite 2Favorite 3Favorite 4Favorite 5Rename.](https://usermanual.wiki/Hyundai-Digital-Technology/PANSAT330A/User-Guide-228859-Page-29.png)
![29Select ‘Favorite 1’ with / .ScreenPress IVORY.ScreenTV Channel List-Select, -Exit/12345678Fujian 1DIGITL VIDANHUI TVNMCHTVGuangdong 1Hunan 1DWtvMCMAsiaSat 2[24] 4,847 GHzHorizontal-18V28,123 MSPSDbanFAV.LOCKMOVEDELADDMODEAll List Favorite StateFavorite 1Favorite 2Favorite 3Favorite 4Favorite 5Rename.TV Channel List-Select, -Exit/12345678Fujian 1DIGITL VIDANHUI TVNMCHTVGuangdong 1Hunan 1DWtvMCMAsiaSat 2[24] 4,830 GHzHorizontal-18V28,123 MSPS HTV1FAV.LOCKMOVEDELADDMODEAll List Favorite StateRename.Favorite 1Favorite 2Favorite 3Favorite 4Favorite 5](https://usermanual.wiki/Hyundai-Digital-Technology/PANSAT330A/User-Guide-228859-Page-30.png)
![30ScreenPress MENU, EXIT or to finish the process.You have finished favorite1 channel setting.With similar way, you can set favorite2 ~ favorite5 channel list.You can use these favorite channel lists by using ORANGE key. Refer to the next section for detail.TV Channel List-Select, -Exit//12345678Fujian 1DIGITL VIDANHUI TVNMCHTVGuangdong 1Hunan 1DWtvMCMAsiaSat 2[24] 4,000 GHzHorizontal-18V28,123 MSPS he WellFAV.LOCKMOVEDELADDMODEAll List Favorite StateRename.DRAMAFavorite 2Favorite 3Favorite 4Favorite 5](https://usermanual.wiki/Hyundai-Digital-Technology/PANSAT330A/User-Guide-228859-Page-31.png)
![31Using this function, you can see variant channel lists which may enable you toedit and select channels more conveniently.If you have set up favorite channel lists as the previous section, you can usethem as following.Press CH.LIST.ScreenPress ORANGE.ScreenTV Channel List-Watch, -Exit, ~ -Move09-Main,-Page Up/Down,12345678Fujian 1DIGITL VIDANHUI TVNMCHTVGuangdong 1Hunan 1DWtvMCMAsiaSat 2[20] 3,847 GHzHorizontal-18V4,420 MSPSHunanFAV.LOCKMOVEDELADDMODEAll ListTV Channel List-Exit/12345678Fujian 1DIGITL VIDANHUI TVNMCHTVGuangdong 1Hunan 1DWtvMCMAsiaSat 2[20] 3,847 GHzHorizontal-18V4,420 MSPSHunanFAV.LOCKMOVEDELADDMODEAll ListABChannel List ModeFavoriteSatelliteAlphabetFavorite 1AsiaSat 2AFree+Scrambled2Channel List ModeFavorite Mode](https://usermanual.wiki/Hyundai-Digital-Technology/PANSAT330A/User-Guide-228859-Page-32.png)
![32You can see 'Channel List Mode' window. Select 'Favorite' with /and select 'Favorite1' with or .ScreenPress . ScreenYou can see only favorite1 channels are listed. With similar way, you can seefavorite2 ~ favorite5 channel list.If you want to return to all channel list (all channels of the selected satellite),press ORANGE and select 'Satellite' with / and press .ScreenTV Channel List-Watch, -Exit, ~ -Move09-Main,-Page Up/Down,AsiaSat 2[20] 3,847 GHzHorizontal-18V4,420 MSPSHunanFAV.LOCKMOVEDELADDMODE67Hunan 1DWtvFavorite 11TV Channel List-Exit/AsiaSat 2[24] 4,000 GHzHorizontal-18V28,123 MSPSDeutsche WellFAV.LOCKMOVEDELADDMODE27DIGITL VIDDWtvDABABChannel List ModeFavoriteSatelliteAlphabetFavorite 1AsiaSat 2DFree+ScrambledTV Channel List-Exit/12345678Fujian 1DIGITL VIDANHUI TVNMCHTVGuangdong 1Hunan 1DWtvMCMAsiaSat 2[20] 3,847 GHzHorizontal-18V4,420 MSPSHunanFAV.LOCKMOVEDELADDMODEAll ListABChannel List ModeFavoriteSatelliteAlphabetFavorite 1AsiaSat 2AFree+Scrambled](https://usermanual.wiki/Hyundai-Digital-Technology/PANSAT330A/User-Guide-228859-Page-33.png)
![33Using this function, you can see the channel list which have same initial. This function isuseful when you search specific channel among the list of thousands channels. For example, if you want to see the channel lists which start with 'D'.Press ORANGE in the channel list and select 'Alphabet' with / .ScreenSelect 'D' with / .ScreenTV Channel List-Exit/12345678Fujian 1DIGITL VIDANHUI TVNMCHTVGuangdong 1Hunan 1DWtvMCMAsiaSat 2[20] 3,000 GHzHorizontal-18V4,420 MSPSHunanFAV.LOCKMOVEDELADDMODEAll ListABChannel List ModeFavoriteSatelliteAlphabetFavorite 1AsiaSat 2AFree+ScrambledTV Channel List-Exit/12345678Fujian 1DIGITL VIDANHUI TVNMCHTVGuangdong 1Hunan 1DWtvMCMAsiaSat 2[20] 3,000 GHzHorizontal-18V4,420 MSPSDeutsche WellFAV.LOCKMOVEDELADDMODEAll ListABChannel List ModeFavoriteSatelliteAlphabetFavorite 1AsiaSat 2DFree+ScrambledAlphabet ModePress .ScreenYou can see the channel list where all channels have initial 'D'.TV Channel List-Watch, -Exit, ~ -Move09-Main,-Page Up/Down,AsiaSat 2[24] 4,000 GHzHorizontal-18V28,123 MSPSDeutsche WellFAV.LOCKMOVEDELADDMODE27DIGITL VIDDWtvDAB](https://usermanual.wiki/Hyundai-Digital-Technology/PANSAT330A/User-Guide-228859-Page-34.png)
![34Press ORANGE in the channel list and select first line with / .Select 'Free only' with / . ScreenSelect 'Favorite' or 'Satellite' or 'Alphabet' and press . You can see onlythe selected 'free' channel list. TV Channel List-Exit/12345678Fujian 1DIGITL VIDANHUI TVNMCHTVGuangdong 1Hunan 1DWtvMCMAsiaSat 2[20] 3,000 GHzHorizontal-18V4,420 MSPSHunanFAV.LOCKMOVEDELADDMODEAll ListABChannel List ModeFavoriteSatelliteAlphabetFavorite 1AsiaSat 2AFree+ScrambledFree only ModePress ORANGE in the channel list and select first line with / . Select 'Free+ Scrambled' with / . ScreenTV Channel List-Exit/12345678Fujian 1DIGITL VIDANHUI TVNMCHTVGuangdong 1Hunan 1DWtvMCMAsiaSat 2[20] 3,20 GHzHorizontal-18V4,420 MSPSDianFAV.LOCKMOVEDELADDMODEAll ListABChannel List ModeFavoriteSatelliteAlphabetDRAMAAsiaSat 2AFree+ScrambledFree + Scrambled Mode](https://usermanual.wiki/Hyundai-Digital-Technology/PANSAT330A/User-Guide-228859-Page-35.png)
![35By using this function, you can see all channel list of the selected satellite.Press ORANGE and select ‘Satellite’ item with / . ScreenPress / to select a satellite and press .TV Channel List-Exit/AsiaSat 2[24] 4,000 GHzHorizontal-18V28,123 MSPSDeutsche WellFAV.LOCKMOVEDELADDMODE27DIGITL VIDDWtvDABABChannel List ModeFavoriteSatelliteAlphabetFavorite 1AsiaSat 2DFree+ScrambledSatellite ModeSelect 'Favorite' or 'Satellite' or 'Alphabet' and press . You can see theselected free and scrambled channel list.ScreenNote : 'Scrambled' channel can be shown only with CI (Common Interface)model and CAS (Conditional Access System) model.'Free' channel can be shown with all (FTA(Free To Air) and CI andCAS) model.TV Channel List-Watch, -Exit, ~ -Move09-Main,-Page Up/Down,12345678Fujian 1DIGITL VIDANHUI TVNMCHTVGuangdong 1Hunan 1DWtvMCMAsiaSat 2[24] 4,000 GHzHorizontal-18V28,123 MSPSDeutsche WellFAV.LOCKMOVEDELADDMODEAll List](https://usermanual.wiki/Hyundai-Digital-Technology/PANSAT330A/User-Guide-228859-Page-36.png)
![36This menu enables you to prevent children from viewing programs unsuitablefor their age.Press CH.LIST and Select the channel you want to lock with / oror and press GREEN. Then the selected channel is locked.ScreenNote : If ‘password' window is risen as following picture, enter password withnumeric keys (default password is' 0000'). Then you can lock thechannel. If you don't want this window, change ‘Parental Control' setup in the ‘System Parameters' menu. Refer to the ‘Parental control' in‘System parameters' in this manual for detail.Screen3Lock ChannelTV Channel List-Watch, / -EXIT, ~ -Move09-Main,-Page Up/Down,12345678Fujian 1NMCHTVRAIGuangdong 1Hunan 1MCMDWtvTVEAsiaSat 2[24] 4,000 GHzHorizontal-18V28,123 MSPSDeutsche WellFAV.LOCKMOVEDELADDMODEAll ListTV Channel List-Watch, -EXIT, ~ -Move09-Main,-Page Up/Down,12345678Fujian 1DIGITL VIDANHUI TVNMCHTVGuangdong 1Hunan 1DWtvMCMAsiaSat 2[24] 4,000 GHzHorizontal-18V28,123 MSPSDeutsche WellFAV.LOCKMOVEDELADDMODEAll List](https://usermanual.wiki/Hyundai-Digital-Technology/PANSAT330A/User-Guide-228859-Page-37.png)
![ScreenPress MENU,EXIT or to finish the process.Without entering your password, you cannot watch a locked channel's pro-gram.ScreenIf you want to cancel the channel lock, go to the channel list and select thechannel and press GREEN.37TV Channel List-Watch, / -EXIT, ~ -Move09-Main,-Page Up/Down,12345678Fujian 1NMCHTVRAIGuangdong 1Hunan 1MCMDWtvTVEAsiaSat 2[24] 4,000 GHzHorizontal-18V28,123 MSPSDeutsche WellFAV.LOCKMOVEDELADDMODEAll List<< Authorized! >>7 DWtv 14:1413:56 ~ 14:26In Focus((((((1/?AsiaSat 2](https://usermanual.wiki/Hyundai-Digital-Technology/PANSAT330A/User-Guide-228859-Page-38.png)
![38You can organize the number or sequence of the channels.Press CH.LIST. ScreenSelect the channel you want to move with / or / andpress YELLOW.ScreenMove the selected channel with / or / to the position youwant.ScreenTV Channel List-Watch, / -EXIT, ~ -Move0L9-Main,-Page Up/Down,1718192021222324Jiangxi 1Jiangxi 2LNTVWNS MEA LONSATLINK 972 2APTN1 +442074NMTVGuangdong 1AsiaSat 2[9] 3,773 GHzHorizontal-18V5,632 MSPSReuters LondoFAV.LOCKMOVEDELADDMODEAll ListTV Channel List-Watch, -EXIT, ~ -Move09-Main,-Page Up/Down,910111213141516RAI InternatiTVETV5-AsiaRTPiuØoH-u1/4Ö¥x CSªFËê>>Ú¥x ET«DoZ¥x USTV-Ioé¥>>¥x JET AsiaSat 2[24] 4,000 GHzHorizontal-18V28,123 MSPSDeutsche WellFAV.LOCKMOVEDELADDMODEAll ListSSSSTV Channel List-Watch, -EXIT, ~ -Move09-Main,-Page Up/Down,912111213141516RAI InternatiRTPiTV5-AsiaRTPiuØoH-u1/4Ö¥x CSªFËê>>Ú¥x ET«DoZ¥x USTV-Ioé¥>>¥x JET AsiaSat 2[24] 4,000 GHzHorizontal-18V28,123 MSPSDeutsche WellFAV.LOCKMOVEDELADDMODEAll ListSSSS4Channel Order Setting](https://usermanual.wiki/Hyundai-Digital-Technology/PANSAT330A/User-Guide-228859-Page-39.png)
![39Press YELLOW.ScreenPress MENU,EXIT or to finish the process. TV Channel List-Watch, -EXIT, ~ -Move09-Main,-Page Up/Down,910111213141516RAI InternatiRTPiTVETV5-AsiauØoH-u1/4Ö¥x CSªFËê>>Ú¥x ET«DoZ¥x USTV-Ioé¥>>¥x JET AsiaSat 2[24] 4,000 GHzHorizontal-18V28,123 MSPSDeutsche WellFAV.LOCKMOVEDELADDMODEAll ListSSSS5Delete ChannelYou can delete channels from the channel list. Press CH.LIST and select the channel you want to remove with / or / . ScreenTV Channel List-Watch, -Exit,/ ~ -Move0L9-Main,-Page Up/Down,910111213141516TVETV5 - AsiaHubei 1Hubei 2RAI InternatiFujian 2Jiangxi 1Jiangxi 2AsiaSat 2[3] 3,713 GHzHorizontal-18V4,420 MSPSHubeiFAV.LOCKMOVEDELADDMODEAll List](https://usermanual.wiki/Hyundai-Digital-Technology/PANSAT330A/User-Guide-228859-Page-40.png)
![40Press BLUE.Note : If ‘password' window is risen as following picture, enter password withnumeric keys (default password is' 0000'). Then you can delete thechannel. If you don't want this window, change ‘Parental Control' setup in the ‘System Parameters' menu. Refer to the 'Parental control' inSystem parameters' in this manual for detail.ScreenThen, you need to confirm the deletion. If you definitely want to delete,press . If not, press EXIT.ScreenNote: Please be careful when you delete channel(s).Press MENU, EXIT or to finish the process.TV Channel List-Watch, -Exit,/ ~ -Move0L9-Main,-Page Up/Down,910111213141516TVETV5 - AsiaHubei 1Hubei 2RAI InternatiFujian 2Jiangxi 1Jiangxi 2AsiaSat 2[3] 3,713 GHzHorizontal-18V4,420 MSPSHubeiFAV.LOCKMOVEDELADDMODEPASSWORD????TV Channel List-Watch, -Exit,/ ~ -Move0L9-Main,-Page Up/Down,910111213141516TVETV5 - AsiaHubei 1Hubei 2RAI InternatiFujian 2Jiangxi 1Jiangxi 2AsiaSat 2[3] 3,713 GHzHorizontal-18V4,420 MSPSHubeiFAV.LOCKMOVEDELADDMODEAll List Do you want to delete this channel?Yes / NoQ](https://usermanual.wiki/Hyundai-Digital-Technology/PANSAT330A/User-Guide-228859-Page-41.png)
![41Press CH.LIST. ScreenPress Ivory.ScreenSelect a satellite into which you want to add your new channel. Note : You can only select satellites which you set in ‘Installation’ menu.Move to 'TP Frequency' section (column) by pressing and change frequency with / or enter frequency with numeric keys. Note : TP frequency consists of 5 digits ending with GHz.For example : TP Frequency 4.000GHz is6Add ChannelTV Channel List-Watch, -EXIT, ~ -Move09-Main,-Page Up/Down,12345678Fujian 1DIGITL VIDANHUI TVNMCHTVGuangdong 1Hunan 1DWtvMCMAsiaSat 2[24] 4,000 GHzHorizontal-18V28,123 MSPSDeutsche WellFAV.LOCKMOVEDELADDMODEAll ListTV Channel ListAsiaSat 2[24] 4,000 GHzHorizontal-18V28,123 MSPSDWtv230523062304Satellite NameTP FrequencyPolarizationSymbol RateCH. NameVideo PIDAudio PIDPCR PID](https://usermanual.wiki/Hyundai-Digital-Technology/PANSAT330A/User-Guide-228859-Page-42.png)


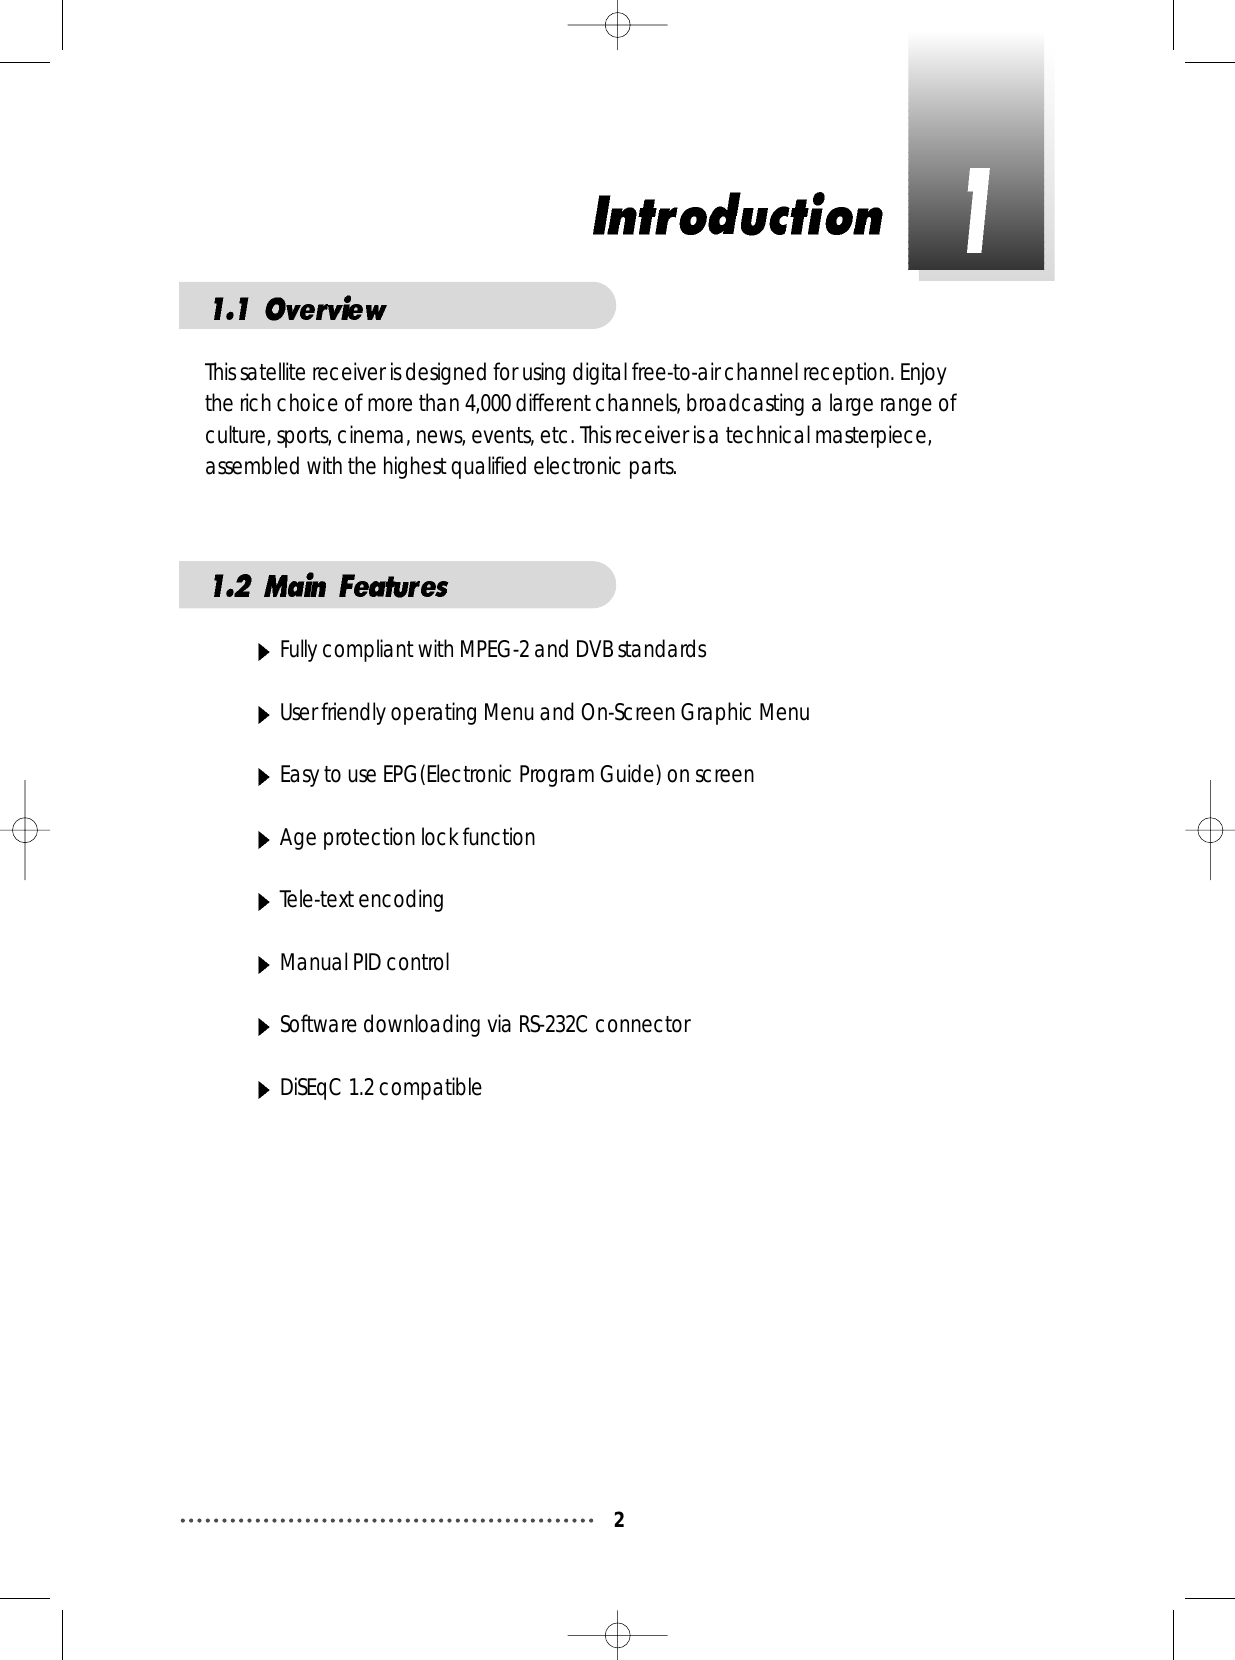
![53After ‘LNB Configuration’ and ‘Antenna Setup’ procedure, when nec-essary, you can edit and/or add certain TPs (transponders)Press MENU key.Select ‘Installation’ with or , and press .ScreenSelect ‘TP Edit/Scan’ with or , and press .ScreenSelect the ‘Satellite Name’ which includes the TP you want toadd/edit with or .Move to ‘TP Frequency’with and select the TP you want toedit with or .If you want to add the new TP, enter the TP frequency withnumeric keys.1TP Edit / ScanInstallation-Next, -Prev.LNB ConfigurationAntenna SetupSatellite ScanTP Edit/ScanFactory SetTP Edit/Scan-Select, -Prev.-Main,AsiaSat 2[24] 4,000 GHzHorizontal-18V28,123 MSPSFree+Scrambled Good81%Satellite NameTP FrequencyPolarizationSymbol RateScanTP Delete](https://usermanual.wiki/Hyundai-Digital-Technology/PANSAT330A/User-Guide-228859-Page-54.png)
![54Select ‘Polarization’ by pressing and the set the propervalue for selected TP with or .Select ‘Symbol rate’ by pressing and enter the symbol ratevalue for the selected TP with numeric keys . After entering all values of the TP parameters, move to ‘SCAN’section (column) with and press for storing all theentered TP data.As a result, you can get the following menu showing the scan-ning process.ScreenAfter scanning process, the first channel of scanned TP will be displayed.ScreenNote : If the scan fails, please check whether your entered values are cor-rect or not and the signal reception sensitivity is good or bad.TP Edit/Scan-Select, -Prev.-Main,USER[15] 3,820 GHzVertical-14V28,123 MSPSFree+ScrambledGood81%Satellite NameTP FrequencyPolarizationSymbol RateScanTP DeleteScanningPress to stop scanningQTP Edit/ScanGood82%-Watch, -Prev./-Page Up/Down,TV: 6 Success Radio: 20171819202122DW 9RDP ANTENA 1RDP ESPECIALNN¥xÆWaN¥<< TWN¥@uØ1/2Auø USA-AsiaSat 2 [24] 4,000 GHz Hor. 28,123~~910111213141516RAI InternatiTVETV5-AsiaRTPiuØoH-u1/4Ö¥x CSªFËê>>Ú¥x ET«DoZ¥x USTV-Ioé¥>>¥x JET](https://usermanual.wiki/Hyundai-Digital-Technology/PANSAT330A/User-Guide-228859-Page-55.png)
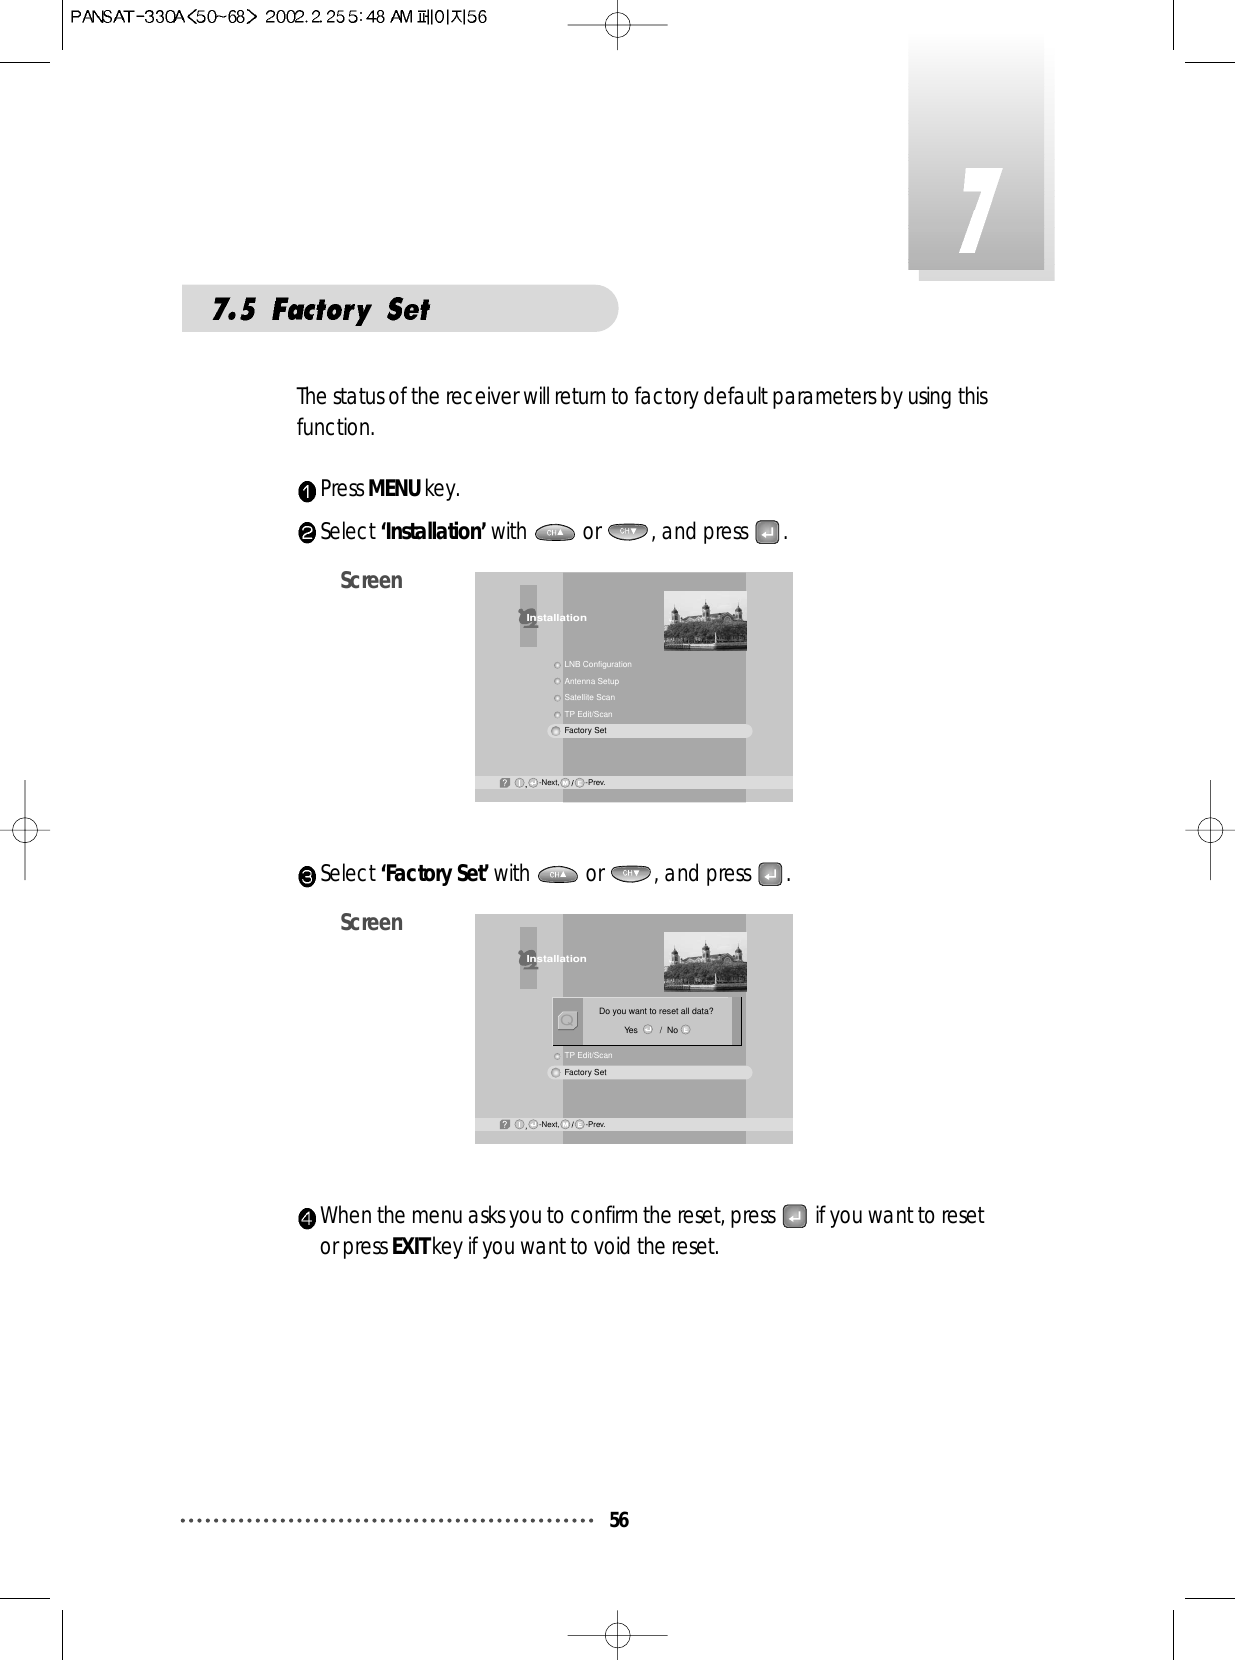
![55Press MENU key.Select ‘Installation’ with or , and press .Select ‘TP Edit/Scan’ with or , and press .ScreenMove to TP section (column) with and select the TP you wantto delete with or .Move to ‘TP Delete’ section (column) by pressing and press .When the menu asks you to confirm the deletion, press if youwant to delete it or press EXIT key if you want to void the deletion.ScreenTP Edit/Scan-Select, -Prev.-Main,AsiaSat 2[24] 4,000 GHzHorizontal - 18V28,123 MSPSFree+ScrambledGood80%Satellite NameTP FrequencyPolarizationSymbol RateScanTP DeleteTP Edit/Scan-Select, -Prev.-Main,USER[15] 3,820 GHzVertical-14V28,123 MSPSFree+ScrambledGood81%Satellite NameTP FrequencyPolarizationSymbol RateScanTP DeleteDo you want to delete this TP?Yes / NoQ2TP Delete](https://usermanual.wiki/Hyundai-Digital-Technology/PANSAT330A/User-Guide-228859-Page-56.png)
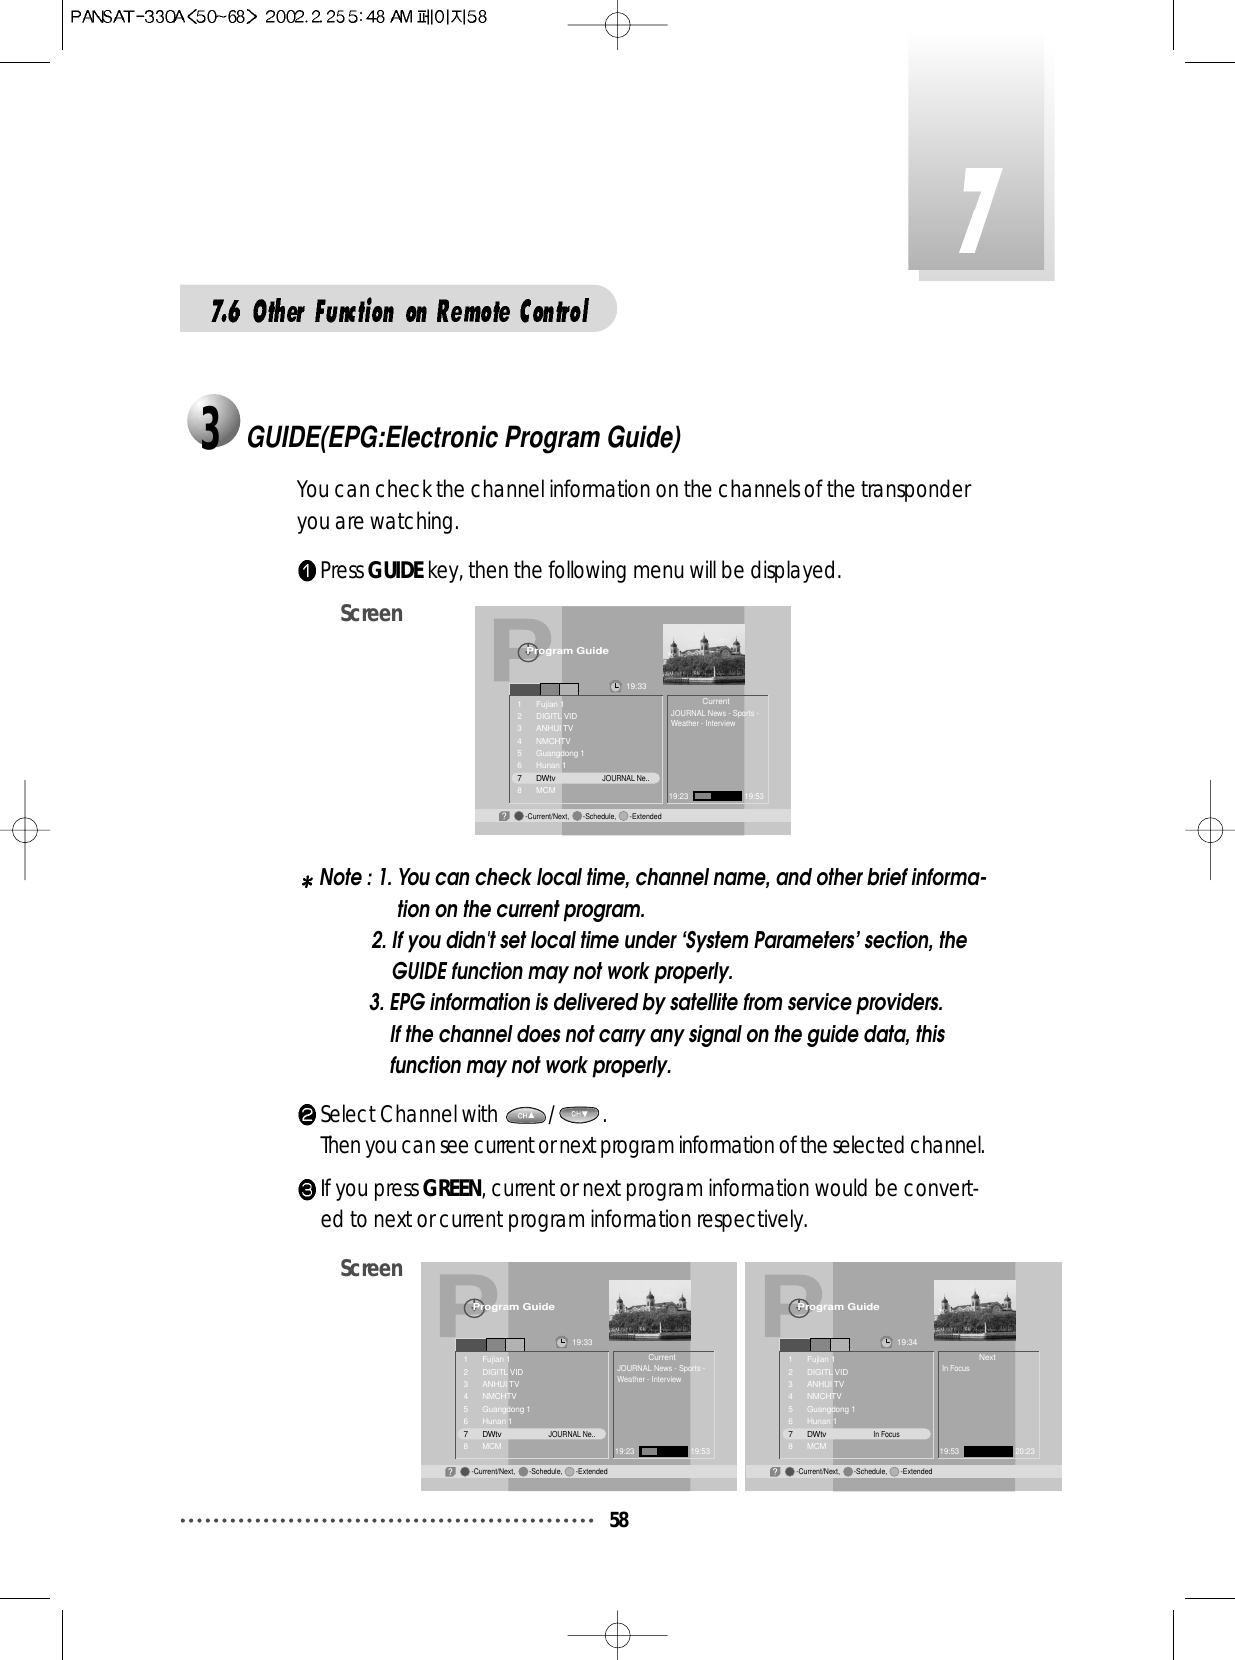
![59If you press YELLOW, you can see program schedule list of the selectedchannel.ScreenIf you want to see program information of a program in the program sched-ule list, select the program with / . Then you can see the program information in the right window.ScreenIf you press BLUE, you can see extended program information of the select-ed program.ScreenProgram Guide-Schedule, -Extended-Current/Next,19:39Guest: Marianne Birthler Commissionerfor Stasi Files [7] DWtv11/03/1998 19:27~19:57JOURNAL News-Sports-Weather - InterviewProgram Guide19:3919:27~19:5719:57~20:2720:27~20:5720:57~21:2721:27~21:5721:57~22:2722:27~22:5722:57~23:27JOURNAL News - Sports..In FocusJOURNAL Nachrichten - ..ThemaJOURNAL News - Busines..Germany LiveJOURNAL Nachrichten - ..Im Focus [7] DWtv11/03/1998 19:27~19:57JOURNAL News-Sports-Weather - Interview-Schedule, -Extended, -Reserve-Current/Next,Program Guide19:4219:27~19:5719:57~20:2720:27~20:5720:57~21:2721:27~21:5721:57~22:2722:27~22:5722:57~23:27JOURNAL News - Sports..In FocusJOURNAL Nachrichten - ..ThemaJOURNAL News - Busines..Germany LiveJOURNAL Nachrichten - ..Im Focus [7] DWtv11/03/1998 20:27~20:57JOURNAL Nachrichten -Wirtsohaft - Wetter -Tagesthema-Schedule, -Extended, -Reserve-Current/Next,](https://usermanual.wiki/Hyundai-Digital-Technology/PANSAT330A/User-Guide-228859-Page-60.png)
![60You can set up automatic power on-off (Timer) on the programschedule list. After press YELLOW in the Guide( EPG) menu, select aprogram with /or /and press .Select between 'No', 'Once', 'Daily' or 'Weekly' of 'Status' with or .ScreenPress to save the new 'Timer' setting.ScreenPress MENU,EXIT or to finish GUIDE menu.Note : 1. Without 'STATUS' being actuated (Yes), 'Timer' does not work.2. If a program of prior time than current time ('Local Time' in 'SystemParameters' menu) is selected, Timer does not work.3. Refer to 'Setting Timer' in 'System Parameters' in this manual.Program Guide19:4219:27~19:5719:57~20:2720:27~20:5720:57~21:2721:27~21:5721:57~22:2722:27~22:5722:57~23:27JOURNAL News - Sports..In FocusJOURNAL Nachrichten - ..ThemaJOURNAL News - Busines..Germany LiveJOURNAL Nachrichten - ..Im Focus [7] DWtv11/03/1998 20:27~20:57JOURNA chrichten -Weather -- Wetter -11/03/1998 20:26Timer11/03/1998 21:02StatusNo-Reserve,Program Guide19:4219:27~19:5719:57~20:2720:27~20:5720:57~21:2721:27~21:5721:57~22:2722:27~22:5722:57~23:27JOURNAL News - Sports..In FocusJOURNAL Nachrichten - ..ThemaJOURNAL News - Busines..Germany LiveJOURNAL Nachrichten - ..Im Focus [7] DWtv11/03/1998 20:27~20:57JOURNA chrichten -Weather -- Wetter --Reserve,11/03/1998 20:26Timer11/03/1998 21:02StatusOnceProgram Guide19:4219:27~19:5719:57~20:2720:27~20:5720:57~21:2721:27~21:5721:57~22:2722:27~22:5722:57~23:27JOURNAL News - Sports..In FocusJOURNAL Nachrichten - ..ThemaJOURNAL News - Busines..Germany LiveJOURNAL Nachrichten - ..Im Focus [7] DWtv11/03/1998 20:27~20:57Wirtsohaft - Wetter -TagesthemaReserved at Timer #1!-Reserve,](https://usermanual.wiki/Hyundai-Digital-Technology/PANSAT330A/User-Guide-228859-Page-61.png)
![61You can adjust the subtitle and audio condition/status of the current channel.Press ‘AUDIO’ and subtitle and audio related window will be displayed on the screen.ScreenIn this example, program spoken language is 'English' and user's selectedsubtitle language is 'Swedish'. ScreenThe contents of each parameter are as follows ;Note : These subtitle and audio parameters are workable only when thereceiving channel supports these functions.-Subtitle On/OffSubtitle TrackAudio TrackAudio ModeDig.Output2 of 10 [Swedish]1 of 8 [English]StereoNon-compressedSubtitle/Audio4Subtitle/AudioSubtitle Track (Subtitle language #) of (all subtitle language available in thisprogram)[ Current selected subtitle language ]Audio Track (Audio track #) of (all tracks available in this program )[spoken language in this program ] Audio Mode Stereo -> Mono-Left -> Mono-RightDig.Output Non-compressed / Compressed](https://usermanual.wiki/Hyundai-Digital-Technology/PANSAT330A/User-Guide-228859-Page-62.png)