Hyundai IBT C21F05120 21-inch CRT Monitor User Manual
Hyundai IBT Corp. 21-inch CRT Monitor Users Manual
Users Manual
NEXT
www.hyundaiQ.com
Type No. C21F05120
User’s Guide
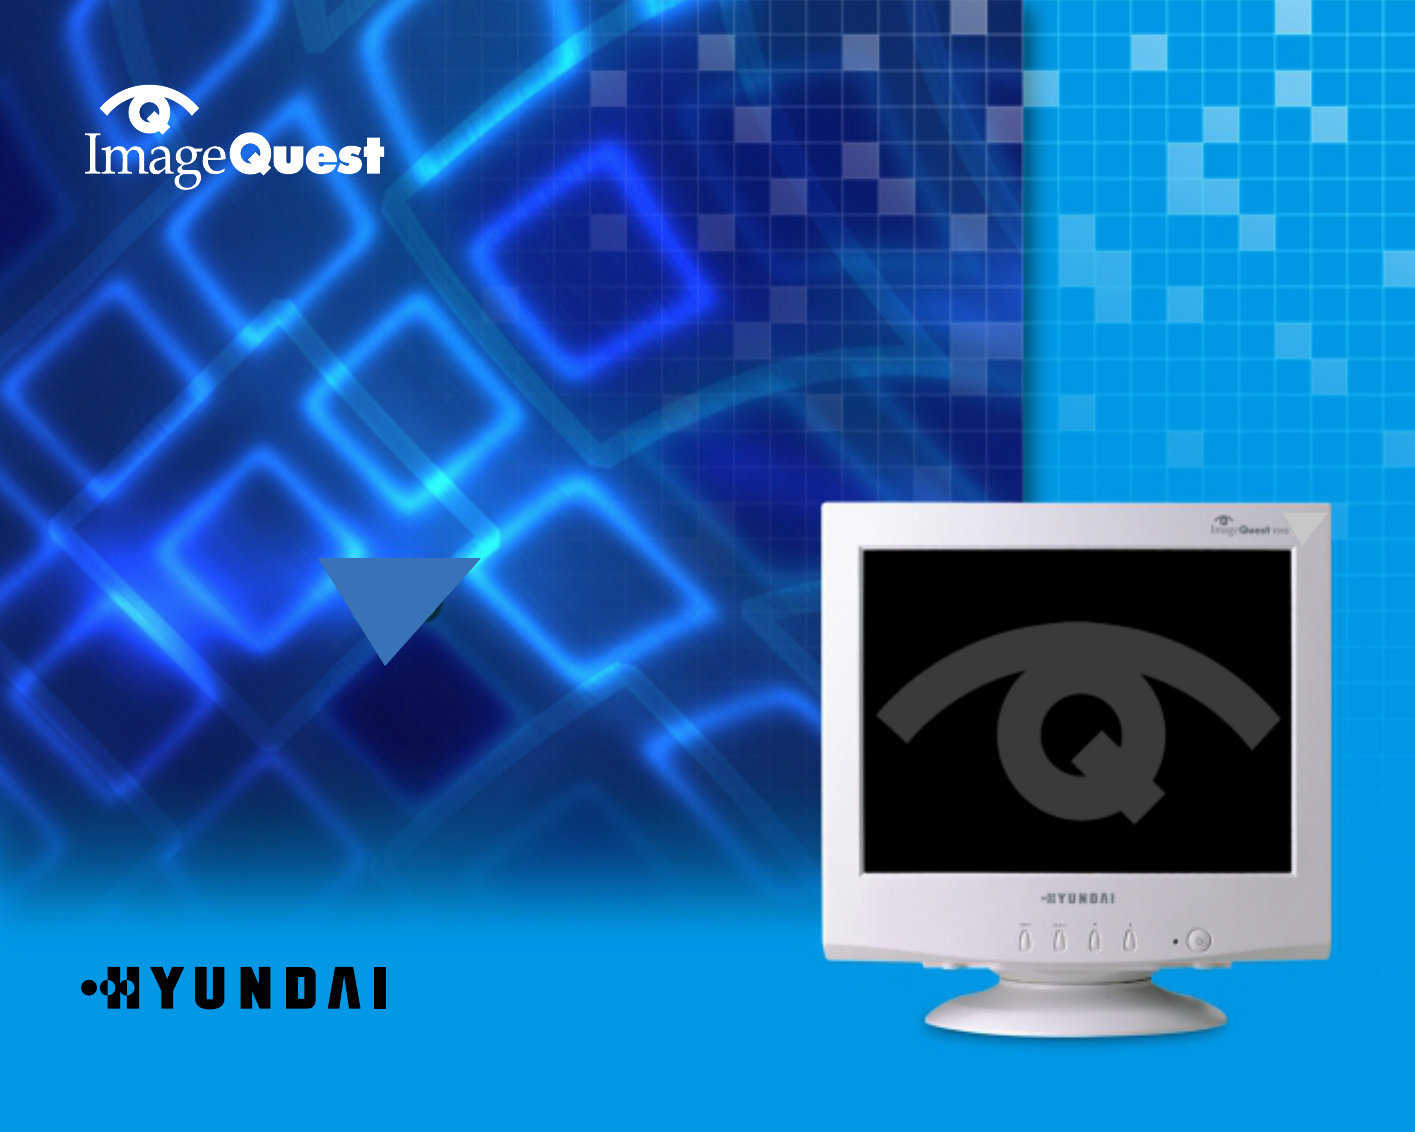
ImageQuest F230
Perfectly Flat Color Monitor

U.S.A.
U.S.FEDERAL COMMUNICATIONS COMMISSION
RADIO FREQUENCY INTERFERENCE STATEMENT
INFORMATION TO THE USER
NOTE : This equipment has been tested and found to comply with the limits for a
Class B digital device pursuant to Part 15 of the FCC Rules.
These limits are designed to provide reasonable protection against harmful
interference in a residential installation.
This equipment generates, uses, and can radiate radio frequency energy and, if
not installed and used in accordance with the instructions, may cause harmful
interference to radio communications.
However, there is no guarantee that interference will not occur in a particular
installation.
If this equipment does cause harmful interference to radio or television reception,
which can be determined by turning the equipment off and on, the user is
encouraged to try to correct the interference by one or more of the following
measures:
Reorient or relocate the receiving antenna.
Increase the separation between the equipment and receiver.
Connect the equipment into an outlet of a circuit different from that to which
the receiver is connected.
Consult the dealer or an experienced radio/TV technician for assistance.
Changes or modification not expressly approved by the party responsible for
compliance could void the user’s authority to operate the equipment.
Connecting of peripherals requires the use of grounded shielded signal cables.
BACK
NEXT
WE ImageQuest CO., LTD.
Ami-ri Bubal-Eub Ichon-Si Kyungki-Do
467-860 KOREA
declare under our sole responsibility that the product:
to which this declaration relates is in conformity with the
following standard(s) or other normative document(s)
following the provisions of the Low Voltage Directive 73/23/EEC,
93/68/EEC and the EMC Directive 89/336/EEC.
KOREA / MAY 10, 2002 HONG KI, KIM
(Place and date of issue) (Name and signature of
authorized person)
DECLARATION OF CONFORMITY BACK
NEXT
Kind of equipment : COLOR MONITOR
Type-Designation : C21F05120
Safety : EN 60950 : 1992 + A1, A2, A3, A4 , A11
EMC : EN 55022 : 1998, EN 55024 : 1998
EN 61000-3-2 : 1995+A1 : 1998+A2 : 1998
EN 61000-3-3 : 1995
Accredited testlaboratory:
TÜV Rheinland
Am Grauen Stein
51105 Köln
F230
Perfectly Flat Color Monitor
BACK
NEXT
Contents 1. Introduction ...............................1/20
2. Safety Information ...................1/20
3. Installing the monitor ..............3/20
3-1. Packing List ....................................3/20
3-2.
Fastening the swivel and tilt base ...
4/20
3-3. Selecting a suitable location .........4/20
3-4. Connecting the monitor ................5/20
3-5. Setting the refresh rate.................8/20
Preset Timing Table.......................8/20
4. Adjusting the picture...............9/20
4-1. Using the On Screen Display......10/20
4-2. Direct access buttons..................10/20
4-3. OSD Adjustments........................11/20
5. Display power management..16/20
Reducing power consumption.........16/20
6. Troubleshooting......................17/20
7. Specifications..........................20/20

F230
Perfectly Flat Color Monitor
1/20
BACK
NEXT
1. Introduction
2. Safety Information
This manual contains instructions for installing and operating ImageQuest F230.
ImageQuest F230 is a highly ergonomic color display unit;
• 21” diagonal Flat(20” viewable) 0.25 mm dot pitch CDT
• Supporting high screen refresh rates and full scan flicker-free picture quality
• With On Screen Display menus for user control
• 100-240V AC input voltage
• VESA DPMS (Display Power Management Signaling)
• VESA DDC1/2B compatibility
When you set up and use your display unit, follow the safety instructions below.
• Do not use the display unit in humid environments like bathrooms, damp
cellars, swimming pools, etc.
• This equipment must be connected to an earthed outlet which is close to the
display unit and accessible in case you need to disconnect the display.
• Do not connect an extension cord.
• Never insert objects into the openings on the outside of the device as you can
come into contact with live electrical components. This can cause fire or give
strong electrical shocks.
• Slots in the cabinet are provided for ventilation. Do not block the ventilation
slots in the display unit cabinet.
• Do not under any circumstances open the display unit cabinet.

F230
Perfectly Flat Color Monitor
2/20
BACK
NEXT
• To avoid risk of electric shock, do not disassemble the display unit cabinet.
The unit is not user-serviceable. Remember to unplug the display unit from the
power outlet before cleaning.
• Do not use alcohol (methyl, ethyl or isopropyl) or any strong dissolvent. Do not
use thinner or benzene, abrasive cleaners or compressed air.
• Do not wipe the screen with a cloth or sponge that could scratch the surface.
• To clean your antistatic screen, use water and a special microfiber screen
cleaning tissue used in optical lens cleaning, or lightly dampen a soft, clean
cloth with water or a mild detergent.
• To clean display unit cabinet, use a cloth lightly dampended with a mild
detergent.
• During the transportation of the monitor, the swivel base has to be removed in
every case.
Cleaning and Maintenance
F230
Perfectly Flat Color Monitor
3/20
BACK
NEXT
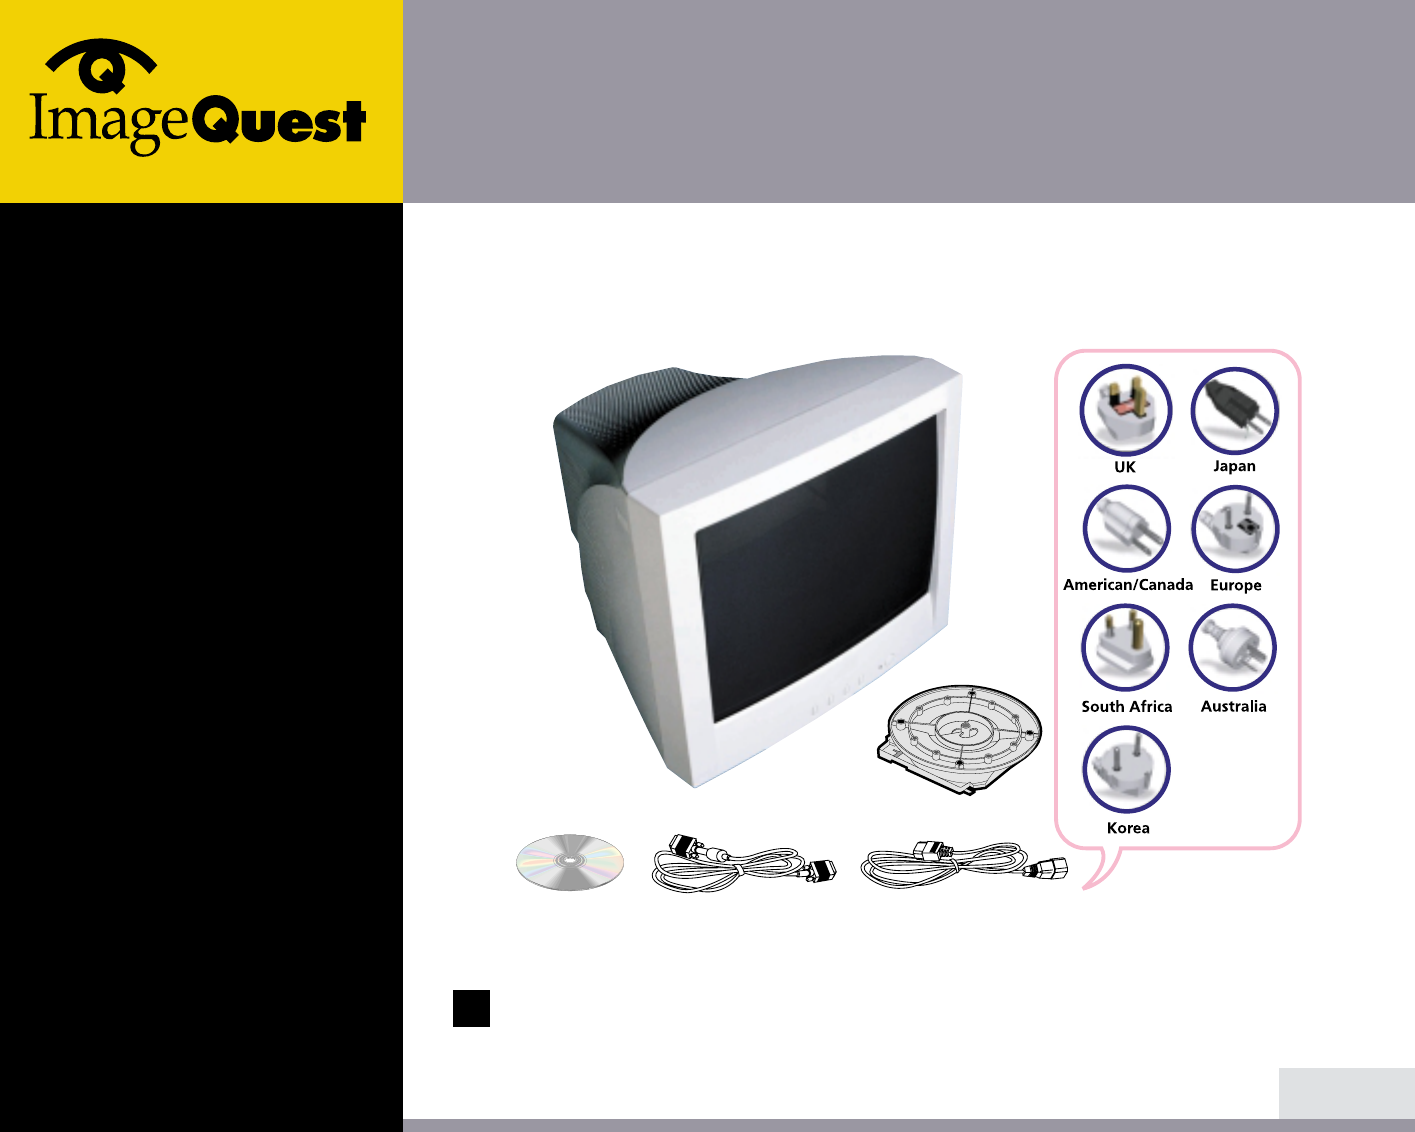
The following items should be found in the packaging.
Above power cord can be changed upon different voltage areas. Please
contact your dealer if anything is missing or damaged.
3. Installing the
monitor
3-1. Packing List
!
Tilt and Swivel
Compact Disc Signal Cable
Monitor
Power cord
F230
Perfectly Flat Color Monitor
4/20
BACK
NEXT
3-2. Fastening the swivel
and tilt base
3-3. Selecting a suitable
location
• Place the base against the bottom of the monitor so that the base fasteners are
aligned with appropriate slots.
• Push the base towards the front of the monitor until the latch locks into
position.
• Place the monitor at least 30cm from other electrical or heat-emitting
equipment and allow at least 10cm on each side for ventilation.
• Place the monitor in a position where no light shines directly onto or is
reflected on the screen.
• To reduce eye strain, avoid installing the display unit against a bright
background such as a window.
• Position the monitor so that the top of the screen is no higher than eye level.
• Position the monitor directly in front of you at a comfortable reading distance
(around 45 to 90cm)

F230
Perfectly Flat Color Monitor
5/20
BACK
NEXT
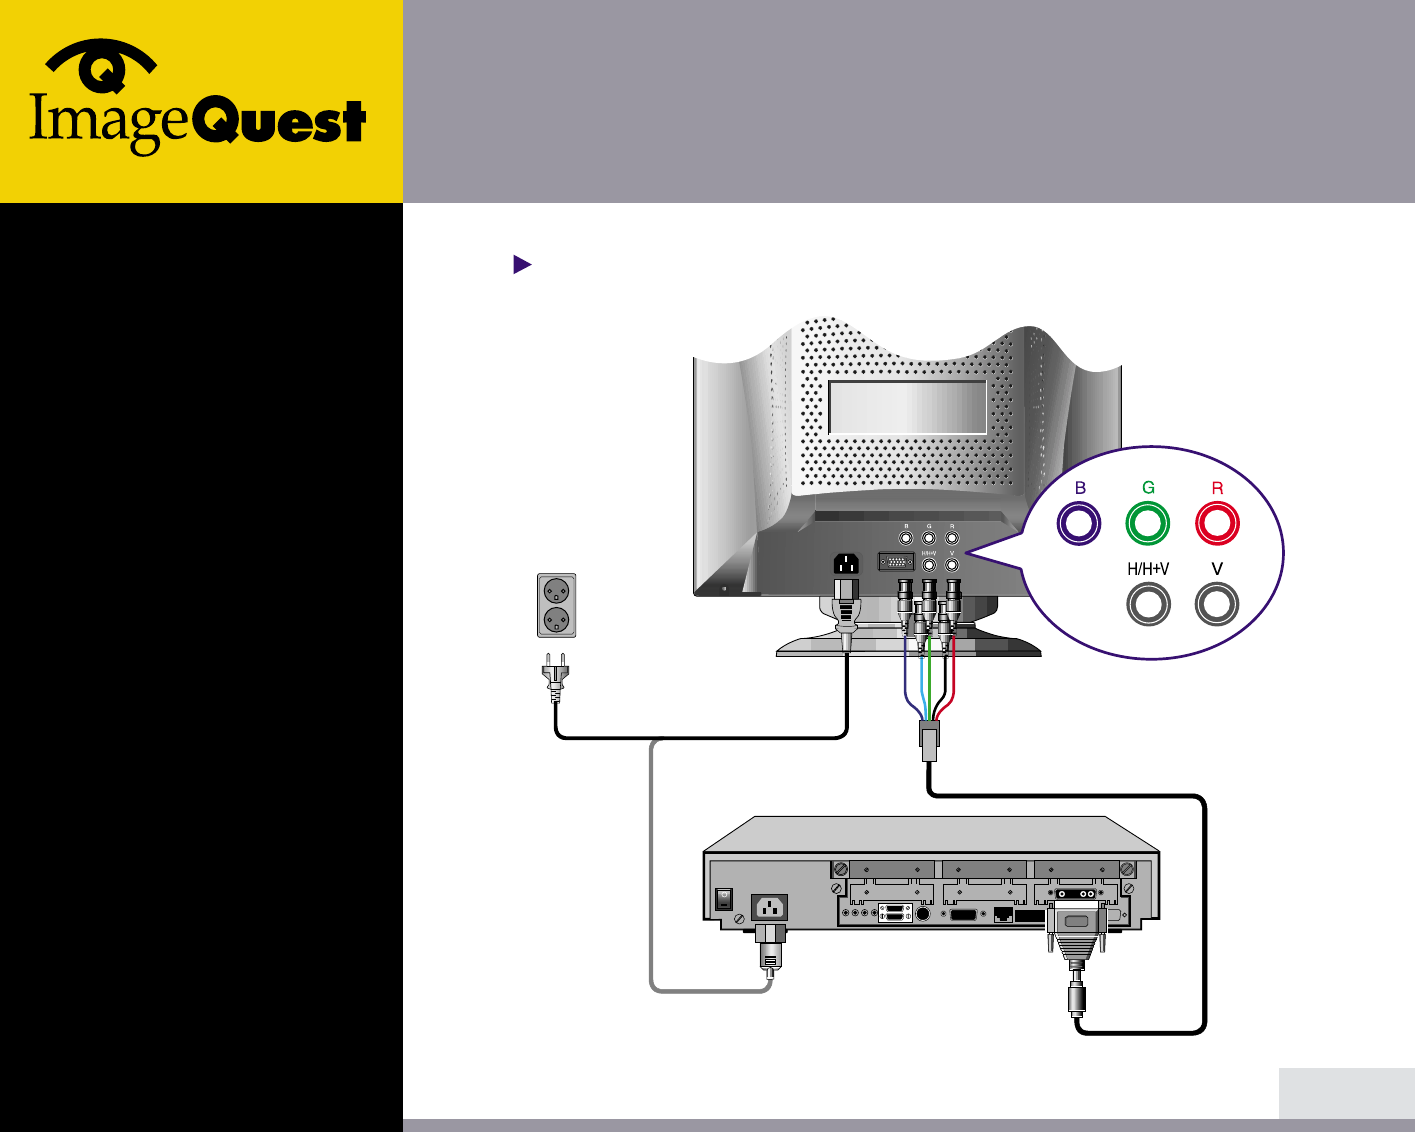
3-4. Connecting the
monitor Before you start cabling your monitor, check that
the power is off on all units. To avoid any
possibility of electric shock, always connect your
equipment to properly earthed outlets.
!
P/C
F230
Perfectly Flat Color Monitor
6/20
BACK
NEXT
WORK STATION
F230
Perfectly Flat Color Monitor
7/20
BACK
NEXT
1. Insert the 15-pin signal cable connector to the VGA connection on your
computer and screw it down. (Insert BNC connectors into the BNC connection
on the monitor and PC)
2. Plug the display unit’s power cable first to the back of the display unit.
3. Then plug the power cable to a 100V - 240V earthed electrical outlet or to the
system unit, if it has an outlet for the display power cable.
4. Turn on the display unit using the power switch and check that the power LED
is on. If not, repeat steps 2, 3 and 4 or refer to the Troubleshooting section of
this guide.
5. Turn on the power to the computer. The picture will appear within about 15
seconds. Adjust the picture to obtain optimum picture quality. See the section
Adjusting the picture in this guide for more information.
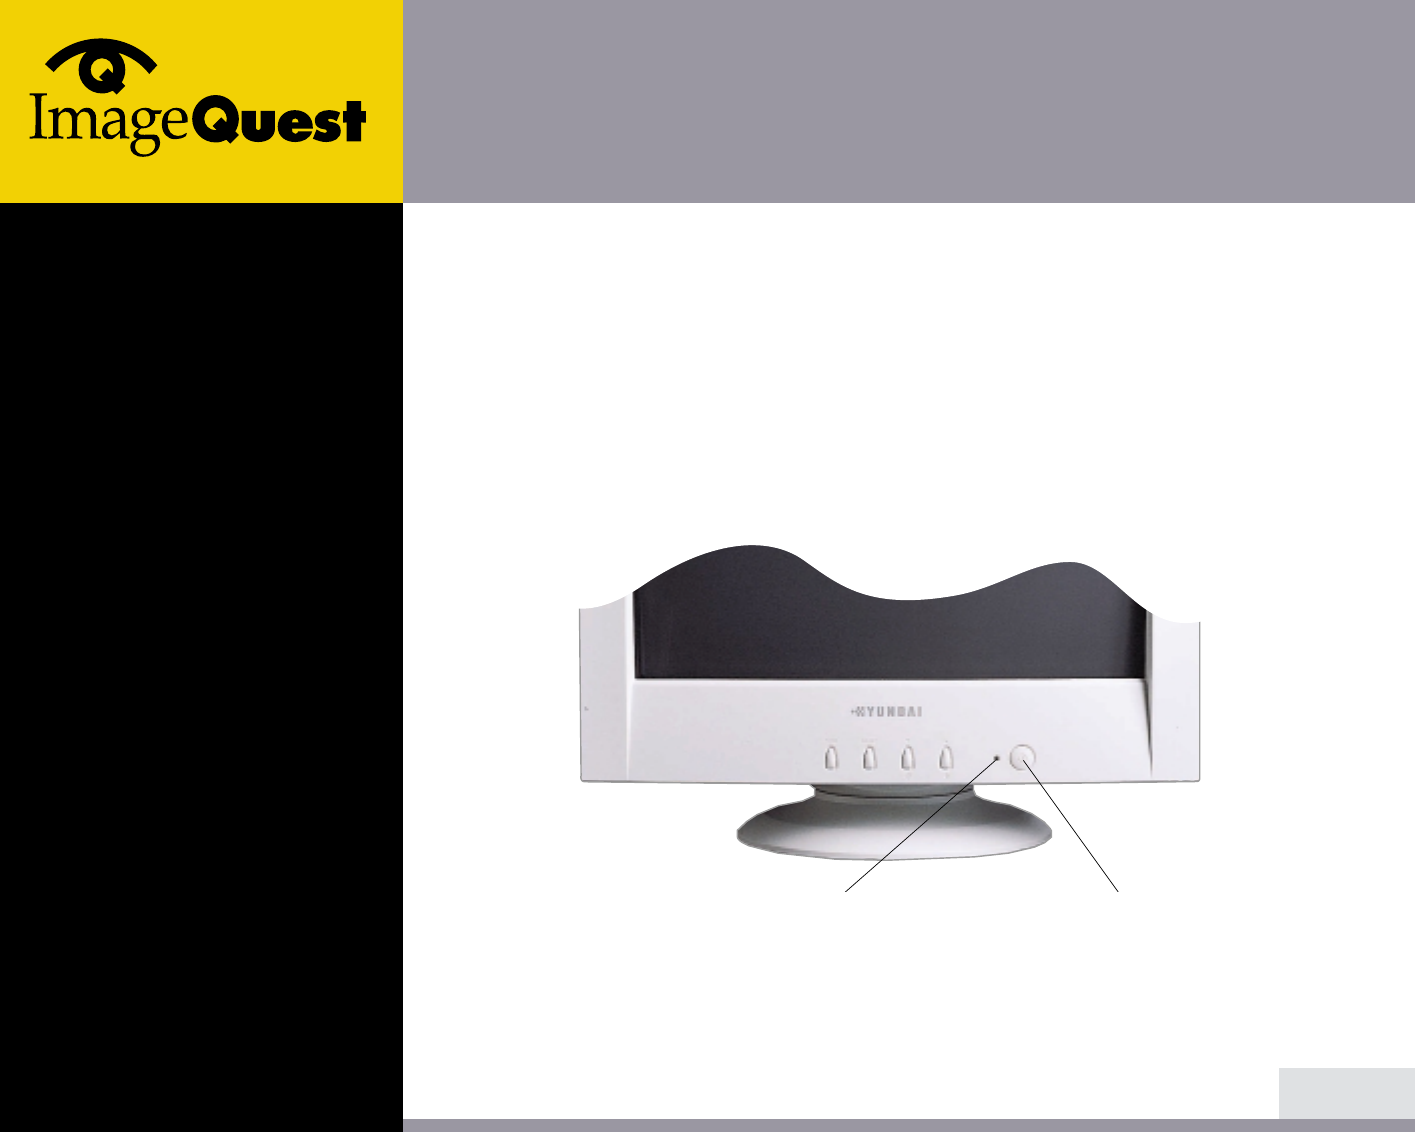
Power Switch
Power LED
F230
Perfectly Flat Color Monitor
8/20
BACK
NEXT
3-5. Setting the refresh
rate
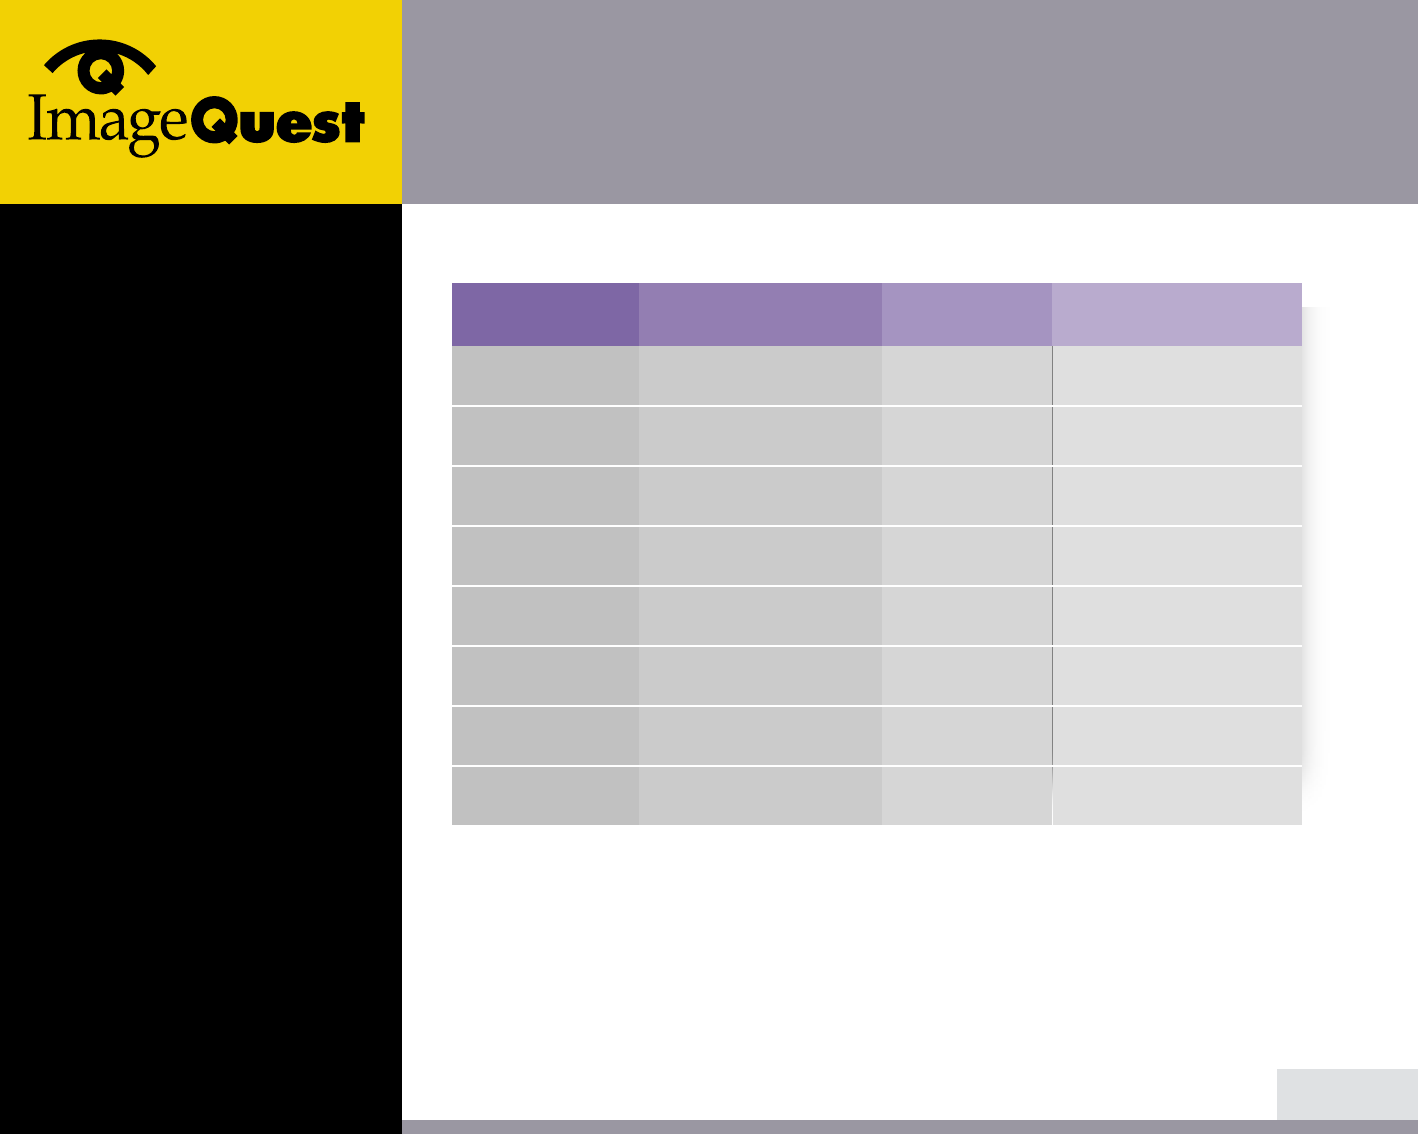
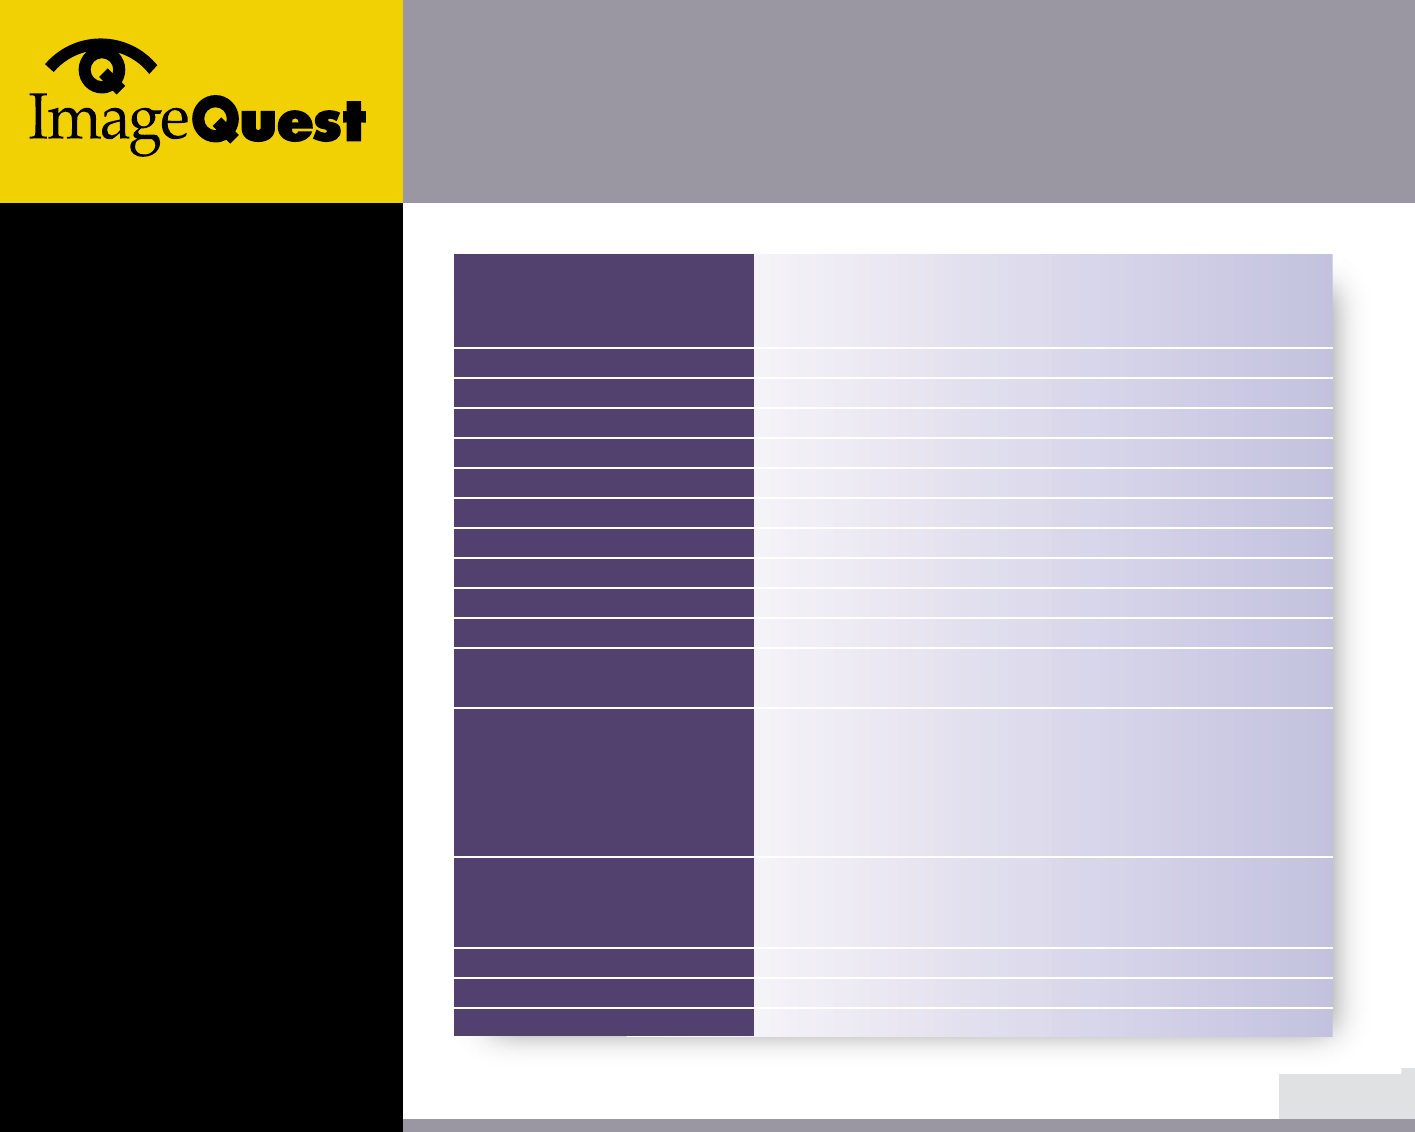
Preset Timing Table
No.
1
2
3
4
5
6
7
8
9
10
11
12
Resolution
720
x
400
640
x
480
640
x
480
800
x
600
1152
x
864
1024
x
768
1024
x
768
1280
x
1024
1280
x
1024
1600
x
1200
1600
x
1200
1920
x
1440
Horizontal Frequency
31.5 KHz
31.5 KHz
63.7 KHz
53.7 KHz
67.5 KHz
68.7 KHz
81.8 KHz
79.9 KHz
91.1 KHz
93.8 KHz
106.3 KHz
112.5 KHz
Refresh rate
70 Hz
60 Hz
120 Hz
85 Hz
75 Hz
85 Hz
100 Hz
75 Hz
85 Hz
75 Hz
85 Hz
75 Hz
Follow the instructions below to set your refresh rate in Windows 98/ME/XP/2000.
1. Go to the configuration window (Start-Settings-Configuration window).
2. Double click on the ‘Display’ icon.
3. Click on the ‘Settings’ tab.
4. Click on the ‘Advanced’ button.
5. Click on ‘Adapter’ and select 85Hz from the list.
6. Click on ‘Apply’ to accept the selected value.
The recommended setting is a resolution of 1600x1200 and a refresh rate
of 85Hz.
* The horizontal sync width of input timing should be no less than 0.8 .
F230
Perfectly Flat Color Monitor
Resolution table to
support
9/20
BACK
NEXT
Maximum
Refresh rate Maximum
Horizontal Frequency
Resolution Support
Refresh rate
150 Hz
144 Hz
144 Hz
112 Hz
91 Hz
81 Hz
81 Hz
76 Hz
78.7 KHz
94 KHz
120.2 KHz
122.304 KHz
121.728 KHz
122.148 KHz
122.148 KHz
121.904 KHz
640
x
480
800
x
600
1024
x
768
1280
x
1024
1600
x
1200
1800
x
1440
1920
x
1440
2048
x
1536
60/70/85/100/
120/150Hz
60/70/85/100
120/144Hz
60/70/85/100/
120/144Hz
60/70/85/100/
112Hz
60/70/85/91Hz
60/75/81Hz
60/70/81Hz
60/70/76Hz
F230
Perfectly Flat Color Monitor
9/20
BACK
NEXT
4. Adjusting the picture You can adjust the screen display by using the buttons located below the screen.
75112.51920 1440
PR
HC
VC
F230
Perfectly Flat Color Monitor
10/20
BACK
NEXT
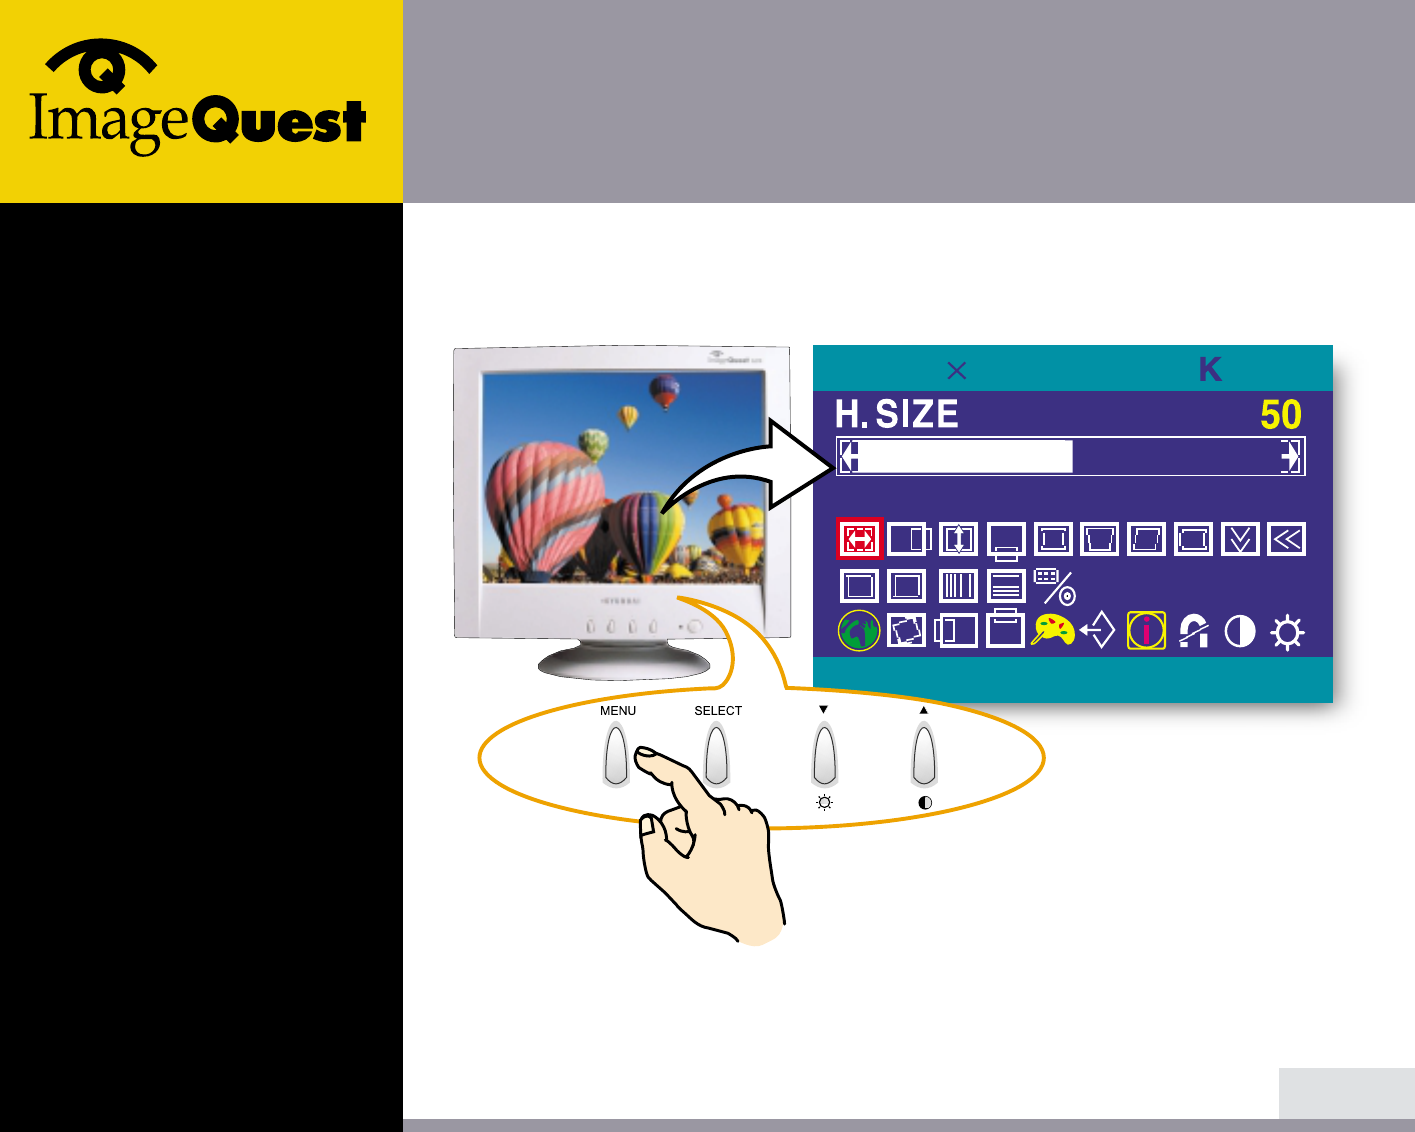
1. Push the MENU button to call the OSD to the screen. The resolution and
frequency are displayed at the top of the menu box for your information.
2. Push the or button to choose the item you want to adjust. The selected
item is highlighted.
3. Push the SELECT button to adjust the highlighted item.
4. Use the or button to adjust the selection.
5. Push the MENU button to return to the previous menu if you are in a submenu.
6. The display unit automatically saves the new settings in 3 to 4 seconds after
your last adjustments and the menu disappears. You can also push the MENU
button to make the menu disappear.
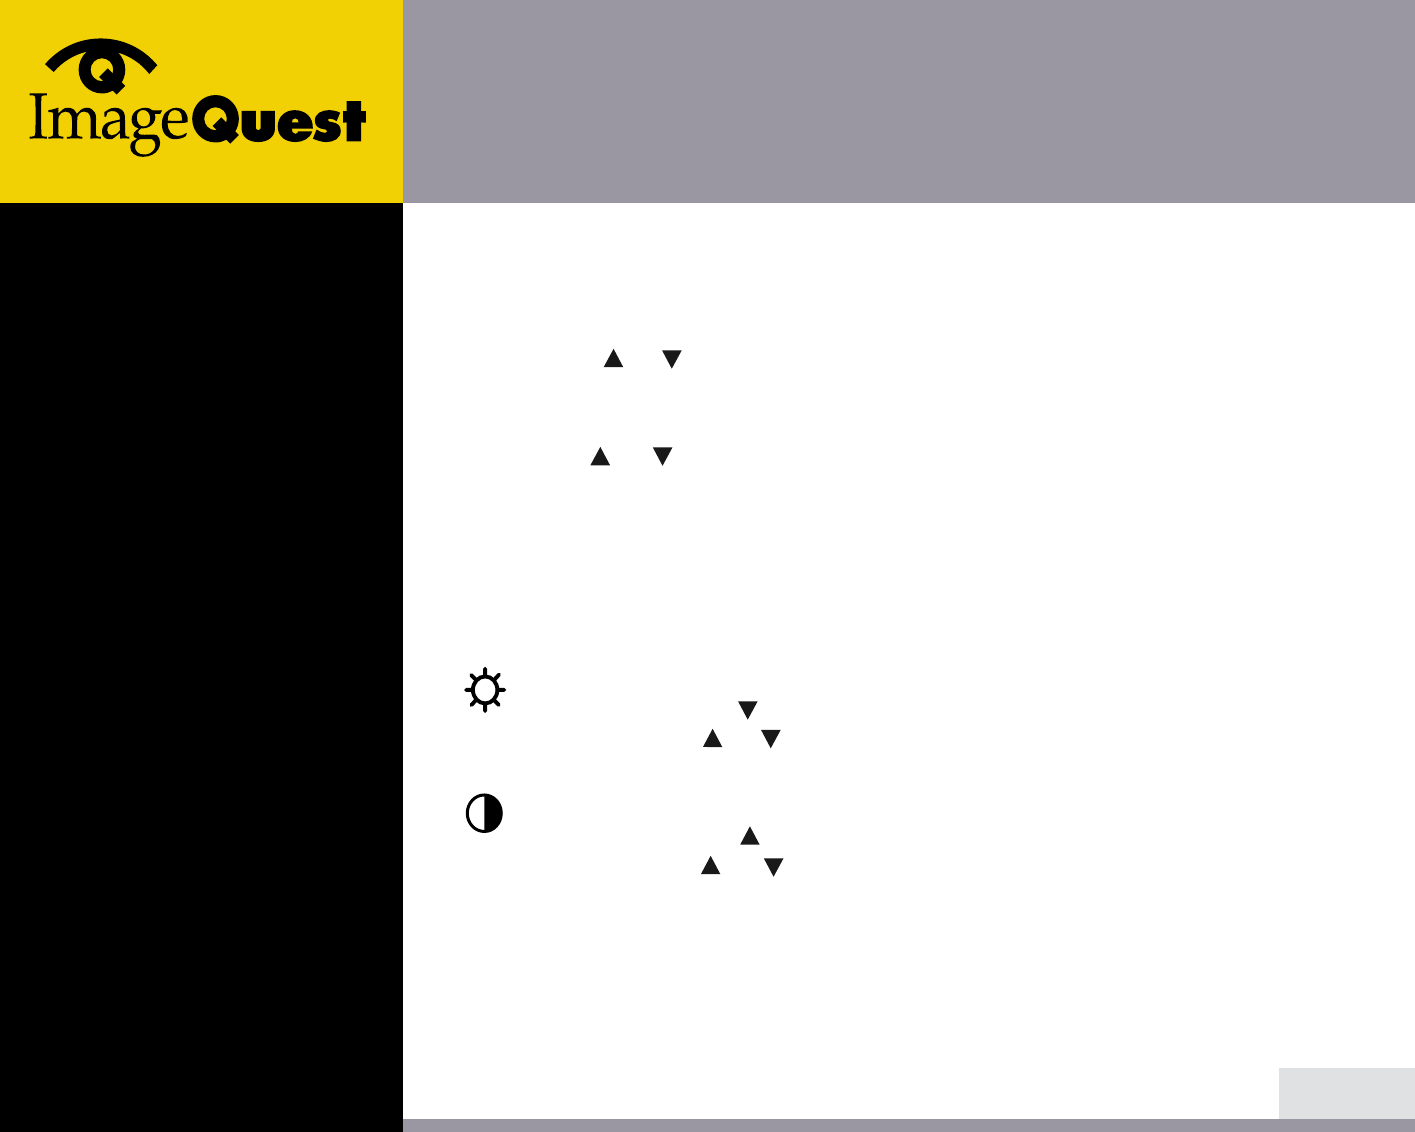
BRIGHTNESS
Use the button to select the brightness adjustment.
Adjust with or button.
CONTRAST
Use the button to select the contrast adjustment.
Adjust with or button.
4-1. Using the On Screen
Display
4-2. Direct access buttons

F230
Perfectly Flat Color Monitor
11/20
BACK
NEXT
4-3. OSD Adjustments
You can play the movie
file to see how to adjust
the picture image by
clicking each icon or title
hereunder.
The OSD adjustments available to you are listed below.
H. SIZE
Adjusts the horizontal size of the entire screen image.
H. POSITION
Adjusts the horizontal position of the entire screen image.
V. SIZE
Adjusts the vertical size of the entire screen image.
V. POSITION
Adjusts the vertical position of the entire screen image.
PINCUSHION
If the vertical sides of the picture curve in or bulge out, you can correct
the pincushion distortion by using this adjustment.
TRAPEZOID
If the picture is wider at the top or at the bottom, you can correct the
trapezoid distortion by using this adjustment.
PARALLEL
If the sides of the screen image are tilted, you can correct the parallel
distortion by using this adjustment.
F230
Perfectly Flat Color Monitor
12/20
BACK
NEXT
PIN BALANCE
If the sides of the picture are bowed to the right or to the left, you can
correct the pincushion balance by using this adjustment.
V. MOIRE
Clears vertical moire if a series of concentric circles or arcs appear on
your screen.
H. MOIRE
Clears horizontal moire if a series of concentric circles or arcs appear
on your screen.
Moire is an interference pattern that makes the screen seem to have
faint lines. A picture that is rasterised or consists of (small) repeating
figures is sensitive to moire interference. Strong colors are also liable to
intensify moire.
The moire pattern on the screen does not affect the printout of the
image.
TOP CORNER
If the top corner sides of the picture curve in or bulge out, you can
correct the top corner distortion by using this adjustment.
BOTTOM CORNER
If the bottom corner sides of the picture curve in or bulge out, you can
correct the bottom corner distortion by using this adjustment.
F230
Perfectly Flat Color Monitor
13/20
BACK
NEXT
H. LINEARITY
If either left or right side of the picture is out of proportion to the other,
you can correct horizontal linearity by using this adjustment.
V. LINEARITY
If top and bottom side of the picture is out of proportion to the center
area, you can correct vertical linearity by using this adjustment.
BNC / D-SUB
Press the SELECT button to select signal source. (BNC or D-SUB)
PURITY
If primary color like white, blue or red is displayed on the whole screen
and some areas or dots are showing different colors, you can correct
them by using this adjustment.
Color purity error is caused by misalignment of one of the electron
beams (R,G, B). Each beam is set to strike only phosphor dots of a single
color like the red beam for the red phosphor dots only. If such beam is
misaligned to strike incorrect phosphor dots, then the colors of the
screen will be incorrect.
H. CONVERGENCE
If the shadows appear around the text or graphic image, you can remove
them horizontally by using this adjustment.
V. CONVERGENCE
If the shadows appear around the text or graphic image, you can remove
them vertically by using this adjustment.
PR
HC
VC
F230
Perfectly Flat Color Monitor
Convergence is related to the three electron beams (Red, Green and Blue)
which come together at a single spot on the screen. If the individual
electron beams do not converge perfectly, mis-convergence error appears
as shadows around text and graphic images with different colors than
you designated.
LANGUAGE
You can select the language in which adjustment menus are displayed.
The following languages are available; English, French, German, Italian,
Spanish, Swedish, Finnish, Danish and Portuguese.
ROTATION
If the entire screen image is tilted, you can correct the distortion by using
this adjustment.
OSD H. POSITION
Adjusts the OSD menu’s horizontal position on the screen.
OSD V. POSITION
Adjusts the OSD menu’s vertical position on the screen.
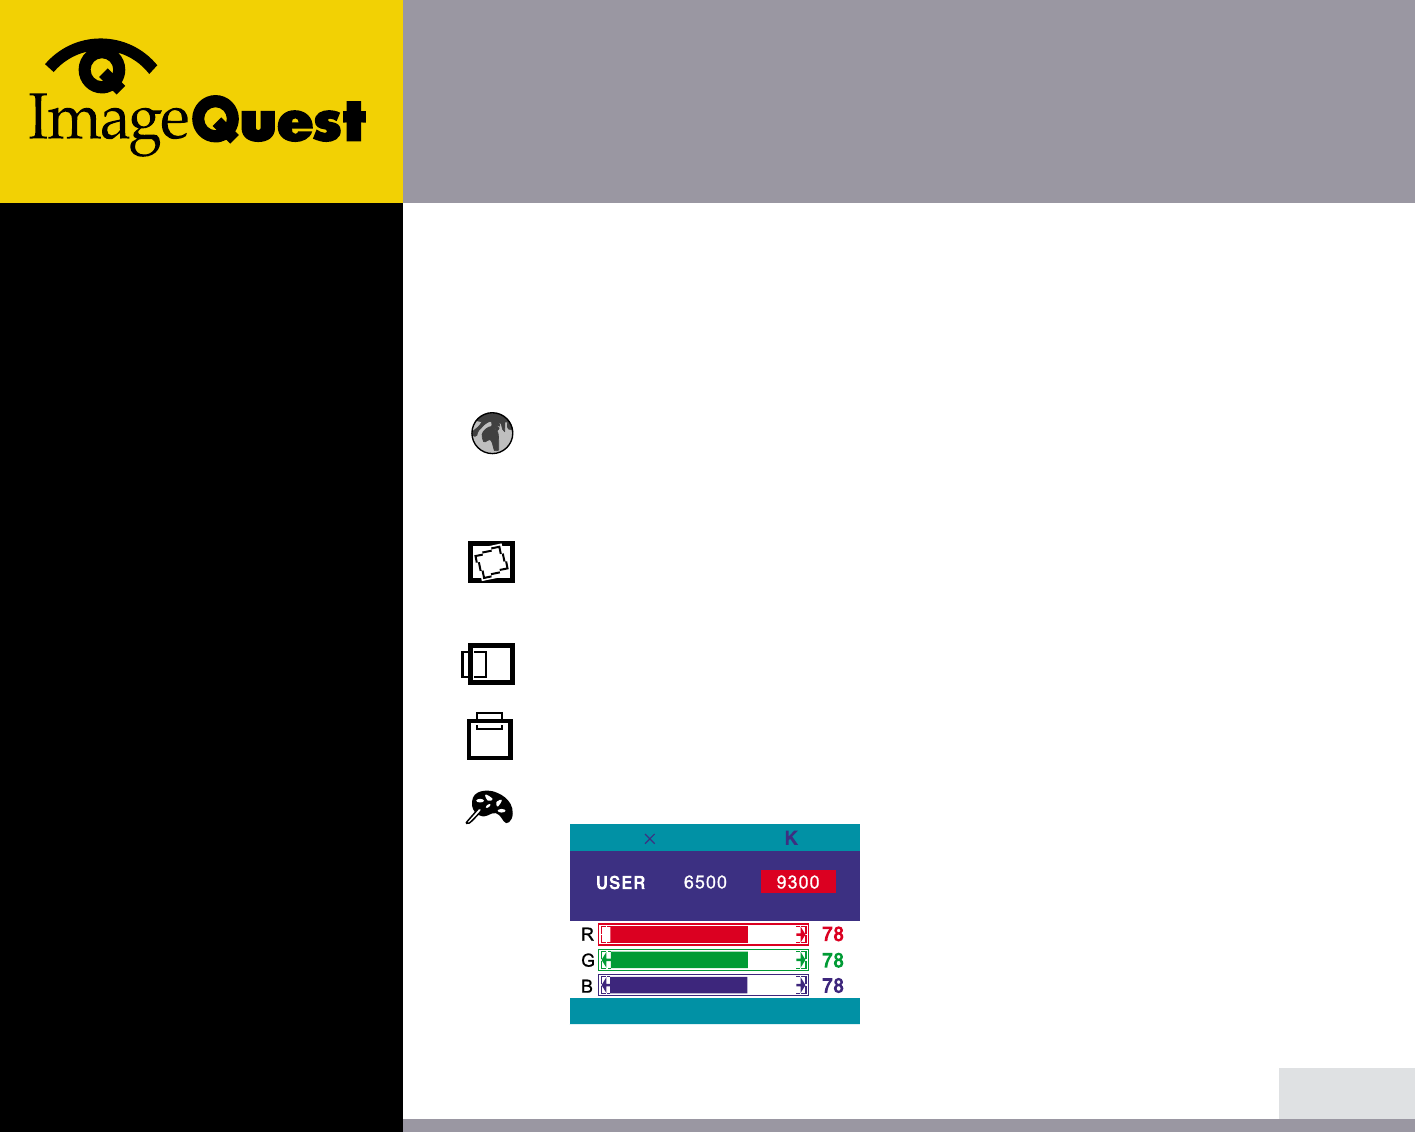
COLOR CONTROL Color temperature affects the tint of the
image. With lower color temperatures the
image turns reddish and with higher
temperatures bluish.
There are three color settings available:
9300K, 6500K or USER. With the USER
setting you can set individual values for red,
green and blue.
14/20
BACK
NEXT
75112.51920 1440

F230
Perfectly Flat Color Monitor
15/20
BACK
NEXT
RECALL
If you operate your display unit in a factory preset mode, this function
deletes adjustments you made for size, position and shape, and restores
the properties which have been set in the factory. If you operate your
display unit in a user mode, this function has no effect except that the
contrast will be reset to the maximum value and the brightness to the
cut-off level.
INFORMATION
Information shows horizontal and vertical sync polarity of current timing
set.
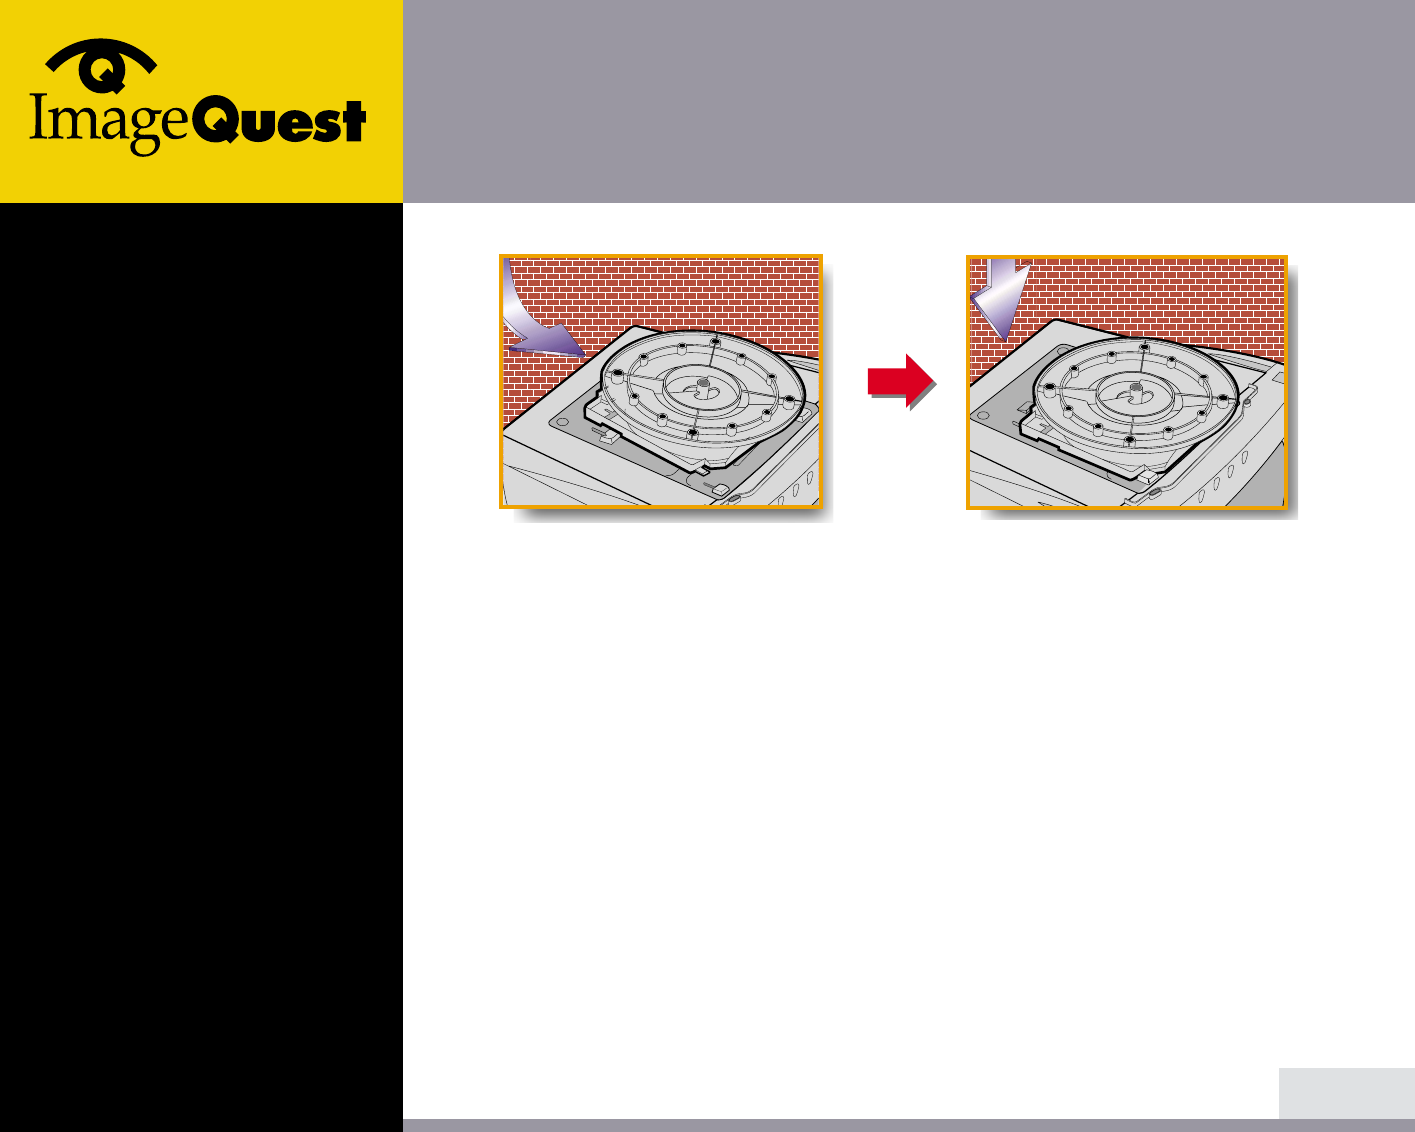
DEGAUSS
External magnetic fields may cause distortion or discoloration in the
picture. Demagnetizing takes place automatically when the display unit
is switched on, and the unit normally maintains faultless color purity
during operation.
If you have tilted, swiveled or moved the display unit, you can perform
demagnetization. During this process the picture is distorted for a few
seconds. After demagnetizing, the color impurities have disappeared if
caused by stray magnetic fields.
Do not use the degauss feature more than once every half hour.
CONTRAST
Adjusts the contrast of the screen.
BRIGHTNESS
Adjusts the brightness of the screen.
F230
Perfectly Flat Color Monitor
16/20
BACK
NEXT
5. Display power
management
Reducing power
consumption
!
Power consumption
110 W (Typ.)
3 W
3 W
3 W
1 W
Mode
Normal
Standby
Suspend
off
Power switch off
LED
Green
Green/Orange blinking (1sec.)
Green/Orange blinking (0.5sec.)
Orange
Not illuminated
If the power management function of your computer is enabled, your monitor
turns on and off automatically. You can control power management features from
your computer.
Your computer may have power management features which enable the computer
or monitor to enter a power saving mode when the system is idle. You can
reactivate the system by pressing any key or moving the mouse.
The power button at the front bezel does not disconnect the display unit from
the mains. Please unplug the power cord from the mains to close the power
totally.

F230
Perfectly Flat Color Monitor
17/20
BACK
NEXT
6. Troubleshooting
Problem
Blank screen
Error message:
OUT OF RANGE
Self diagnostics
message
NO SIGNAL
The display does
not enter power
management
mode
Possible solution
If the power LED is not lit, push the power switch to turn the
monitor on. If the display unit is powered through the computer,
check that the computer is switched on.
The display unit might be in standby mode. Push one of the
keyboard keys. Check that the keyboard is properly connected to
the computer.
Check that the power cable is correctly connected to the display unit
and to the power outlet.
The graphics adapter is set for too high refresh rate or line
frequency. Select another display mode with lower frequencies in
computer.
This message indicates that the signal is missing or faulty. Check
that the signal cable connector is properly connected and that the
connection pins are not bent or damaged. If the connector is loose,
tighten the connector's screws.
The video signal from the computer does not comply with VESA
DPMS standard. Either the computer or the graphics adapter is not
using the VESA DPMS power management function.
If your monitor is not functioning properly, you may be able to solve the problem
by reading followings.

F230
Perfectly Flat Color Monitor
18/20
BACK
NEXT
Possible solution
The screen may seem to flicker when the refresh rate is less than
75Hz. See the list of recommended modes in the section Preset
timing table.
If your color is not uniform, demagnetize the display unit as
described in the section Degauss under OSD adjustments, and make
sure that the display unit is at least 30cm from any other electrical
equipment.
Check that the signal cable connector is properly connected and that
the connection pins are not bent or damaged. Try another color
temperature.
If the picture has strong color defects, switch off the display unit
and the computer.
Make sure that other electrical devices are at least quality 30cm
away.
Adjust the picture characteristics as described in the section
Adjusting the picture.
A problem with your graphics adapter or display unit. Contact your
service representative.
Problem
Screen flickers
Color defects
Size, position,
shape or quality
unsatisfactory
Duplicated
images

F230
Perfectly Flat Color Monitor
19/20
BACK
NEXT
Contacting service If the above troubleshooting hints do not help you find a solution to the
problem, contact an authorized service agent. If the monitor is sent for
service, use the original package if possible.
Unplug the display unit from the power outlet and contact a service agent
when:
• The monitor does not operate normally according to the operating instructions.
• The monitor exhibits a distinct change in performance.
• The monitor has been dropped or the cabinet has been damaged.
• The monitor has been exposed to rain, or water or liquid has been spilled onto
the monitor.
F230
Perfectly Flat Color Monitor
20/20
BACK
NEXT
21"(viewable size : 19") Dyna Flat,
Dot pitch 0.25 mm
Anti-Static, anti-glare, TCO treatment coated.
factory preset area : 380X285 mm
Infinite
R.G.B Analog, 15 pin D-sub, BNC
Horizontal : 30 to 123kHz, Vertical : 50 to 150Hz
340 MHz
2048X1536@75Hz
1600X1200@85Hz
100-240 VAC, 3.0A
110W (Typ.)
VESA DPMS
Lower than EPA recommendation
VESA DDC 1/2B
H/V SIZE, H/V POSITION, PINCUSHION, TRAPEZOID, PARALLEL,
PIN BALANCE, H/V- MOIRE, TOP CORNER, BOTTOM CORNER,
H/V LINEARITY, BNC/D-SUB(OPTION), PURITY, H/V CONVERGENCE,
LANGUAGES, ROTATION, OSD H/V POSITION, COLOR CONTROL,
RECALL, INFORMATION, DEGAUSS, BRIGHTNESS, CONTRAST
TCO,
FCC Class B, CE, cULus, TÜV-GS, DHHS,
NEMKO, DEMKO, FIMKO, SEMKO
0 ~ 35O C
25.0Kg unpacked, 30.0Kg packed
500 X 495.3 X 484.5 mm
Picture tube
Display area
Number of color
Input signals
Frequency rate
Maximum bandwidth
Maximum resolution
Recommanded resolution
Input voltage
Power consumption
Power Management
Plug & Play
OSD menu
Ergonomics,
Safety and EMC
Operating Temperature
Weight
Dimensions (W X H X D mm)
• Specification is subject to change without notice for performance improvement.
7. Specifications