Hyundai IBT ES130 Home Theatre Projector User Manual ES140 UserManual
Hyundai IBT Corp. Home Theatre Projector ES140 UserManual
User Manual
USER GUIDE
ES130
Home Theatre Projector
Hyundai ImageQuest Co., Ltd.
THIS DEVICE COMPLIES WITH PART 15 OF THE FCC RULES. OPERATION IS
SUBJECT TO THE FOLLOWING TWO CONDITIONS: (1) THIS DEVICE MAY NOT
CAUSE HARMFUL INTERFERENCE, AND (2) THIS DEVICE MUST ACCEPT ANY
INTERFERENCE RECEIVED, INCLUDING INTERFERENCE THAT MAY CAUSE
UNDESIRED OPERATION.
FCC RF INTERFERENCE STATEMENT
Note:
This equipment has been tested and found to comply with the limits for a Class B
digital device, pursuant to part 15 of the FCC Rules. These limits are designed to provide
reasonable protection against harmful interference in a residential installation. This
equipment generates, uses and can radiate radio frequency energy and, if not installed
and used in accordance with the instructions, may cause harmful interference to radio
communications. However, there is no guarantee that interference will not occur in a
particular installation.
If this equipment does cause harmful interference to radio or
television reception, which can be determined by turning the equipment off and on, the
user is encouraged to try to correct the interference by one or more of the following
measures:
--Reorient or relocate the receiving antenna.
--Increase the separation between the equipment and receiver.
--Connect the equipment into an outlet on a circuit different
from that to which the receiver is connected.
--Consult the dealer or an experienced radio/TV technician
for help.
တ
Caution
Do not change or modify the product without permission or authority of manufacturer. It
may cause undesirable operations, permanent damages or harmful interferences.

1
Features of ES130 Projector
In order to help users to resolve problems in adjusting whole colors, ES130 Projector enables
users to adjust the intended colors to be controlled independently, such as red, green, blue and
yellow.
ICC (Independent Color Control)
i-Brightness
PIP / POP
i-Brightness complements both brightness and contrast of the dark screen simultaneously.
This function is designed to resolve fundamental problem that projecting screen gets darker when
DVD is inserted in the computer.
You may adjust the brightness and contrast conveniently using the shortcut key on the remote
controller or the control panel on the projector without having to control the brightness and contrast
in a separate way.
In case you need to show two screens simultaneously, PIP overlaps two screens, whereas POP
shows two screens evenly (1:1).
You may freely adjust the size of each screen when the PIP/POP function is implemented.
Color Mode
Since 5 pre-defined user modes are provide, you may need to make complex color control, which is
optimized for the operational environment.
You can select a mode that best matches with the projecting image out of five pre-defined modes.
- Standard mode
- Cinema mode
- P.T mode (Presentation Mode)
- Sport mode
- Game mode

Safety Precautions .................................................................................................................... 3
Symbols ................................................................................................................................................. 3
Precautions on Installation ..................................................................................................................... 4
Precautions on Power Supply................................................................................................................. 4
Precautions on Usage and Miscellaneous.............................................................................................. 5
Product Description .................................................................................................................. 7
What's Inside ........................................................................................................................... 7
Names and Functions of Projector Unit.................................................................................................. 8
Remote Controller ................................................................................................................................ 10
Installing the Projector ........................................................................................................... 11
Installing the Projector ......................................................................................................................... 11
Projection Distance and Screen Size ........................................................................................ 11
Connecting to the S-Video Signal......................................................................................................... 12
Connecting to the Video Signal ................................................................................................ 12
Connecting to the PC ........................................................................................................................... 13
Connecting to the Power Cord .................................................................................................. 14
Basic Operations ..................................................................................................................... 15
Power On ............................................................................................................................... 15
Adjusting Projected Image Size (Optical Zoom) .......................................................................... 16
Adjusting Focus ...................................................................................................................... 16
Adjusting the Image Angle ....................................................................................................... 17
Removing the Trapezoidal Position of the Image (keystone).................................................................... 18
Adjusting the Computer Image ............................................................................................................ 19
Power Off ............................................................................................................................................. 19
Adjustments ............................................................................................................................. 21
Setting and Adjusting the Menus.......................................................................................................... 21
How to Use the Menu on the Remote Controller.................................................................................. 22
How to Use the Menu on the Control Panel ......................................................................................... 23
Shortcut Key Functions......................................................................................................................... 24
Image Adjustments............................................................................................................................... 26
Screen Adjustments ................................................................................................................ 28
Menu Adjustments .................................................................................................................. 30
Tuning Adjustments.............................................................................................................................. 31
Automatic Adjustments......................................................................................................................... 31
Troubleshooting....................................................................................................................... 33
Miscellaneous ......................................................................................................................... 36
Specifications........................................................................................................................................ 36
Standard Signal Table ......................................................................................................................... 37
Maintenance and Repair....................................................................................................................... 38
Cleaning the External Parts of the Projector ........................................................................................ 38
Cleaning a Lens ................................................................................................................................... 38
Cleaning the Air Filter .......................................................................................................................... 39
Replacing the Air Filter ........................................................................................................................ 39
Time to Replace the Lamp........................................................................................................ 40
Replacing the Lamp ................................................................................................................. 40
Customer Service Information .................................................................................................... 42
Warranty Card ...................................................................................................................................... 43
2
Table of Contents
3
English
Safety Precautions
Safety Precautions
Symbols
Symbols and descriptions in this manual are designed to prevent possible injuries and product
damages through safe projector using guide. Please comply with the instruction.
Warning Ignoring warning messages may result in serious injuries or
fatal product damages.
Caution Ignoring caution messages may result in slight injuries or
product damages.
Note The note section provides supplementary information on
selected subjects as well as the useful information.
This product is registered as an EMI regulation compliant household appliance.
You can use this product in all areas including the residential area.
4
Safety Precautions
Precautions on Installation
1. Do not install the projector at a place where cables can be trampled. Plugs can be damaged or
worn out.
2. Do not install the projector at a place where vibration or strong impacts can be applied.
3. Do not install the projector close to a high voltage wire or magnetic fields. It may interrupt the
normal operation of the projector.
4. Keep projector at least 20 cm apart from deadlocked areas such as walls.
5. Do not place heavy objects on top of the projector.
6. Do not install the projector in an unstable or slating area.
7. Keep away from reach of children.
8. Do not install the projector close to kitchen or humidifier, or unclean places filled with smoke or
steams.
9. Turn off the power and unplug the power cord and remove all cables before moving the projector.
1. Be careful not to drop foreign objects into the holes of the projector. Moreover, do not spill liquid
into the projector.
2. Do not place any breakable objects, liquid cans, medical supplies or any other similar objects
near by the product.
3. Do not close the projector and remote controller loaded with batteries inside the vehicle with
windows closed, or under the direct sunlight, or close to the air conditional or heater outlet, or
areas with high temperature.
4. Do not fill in the cracks or holes of the projector. If proper ventilation is not secured, the projector
can be heated. Furthermore, do not install the projector in a poor ventilated place, or the places
with soft surface such as couch and cushion, or the closed places.
Warning
Caution
Safety Precautions
5
English
Safety Precautions
1. Use the voltage indicated on the projector only. If you use the voltage other than specified, fire
may break out or you may be struck by electricity.
2. Do not place heavy objects on the power cord.
3. Do not bend or pull the power cord.
4. Do not place the power cord close to a heater.
5. Be careful not to get overloaded on the power cord.
6. Do not insert unclean and dusty plug or connector into a socket.
7. Plug socket tightly.
8. Do not touch the power cord with wet hands.
9. Do not pull out the cable when removing the plug or the connector. Instead, hold the plug or
connector head.
Precautions on Power Supply
Warning
Precautions on Usage and Miscellaneous
1. Do not stare the projector lens while the illumination lamp is turned on. Exposure of your eyes
to the strong light can result in impaired vision. Especially, warn the children.
2. Do not open the projector cover except the lens cap. The electrical voltage inside the projector is
dangerous and can cause a fatal injury. Do not attempt to disassemble or fix the product except
as it is specified. Ask for certified service engineers for product repair.
3. Do not insert or drop metallic objects, combustible objects or other foreign objects into the
projector inlet and outlet.
4. If the projector runs abnormally as described below, turn off the power immediately and unplug
the power cord. Then, contact customer service center for assistance.
In case smoke, smell or strange sounds are detected.
In case an image is not projected, or the fan rotation noise is not heard.
In case liquid is spilled or other objects are inserted into the projector.
In case the projector is dropped on a floor or the case is wrecked.
Warning
Safety Precautions

6
1. If you plan not to use the projector for a long time, plug out the power cord for your safety.
Fire may break out.
2. Do not remove a lamp after using the projector. Turn off the power and wait until it cools down
sufficiently. Otherwise, you may get burned or injured by heat.
3. Do not use
the projector while the lens cap is closed. The lens cap can be malformed due to heat.
4. The LCD display panel is manufactured by the leading-edge technology.
It contains more than 99.99% active pixels. However, pixels less than 0.01% can inactivate and
emit the light inappropriately.
5. Do not touch the lamp bulb when replacing the lamp. The lifecycle of the lamp can be reduced if
grease remains on the lamp. Make sure to use the cloth or glove when handling a lamp.
6. Clean inside of the projector periodically. In case the projector remains unattended for a long
time, dusty projector may cause a fire or the electrical shock.
7. Do not use or store the projector in a place with extremely high or low temperature.
Also, stay away from abrupt temperature changing area. Make sure to use or store the projector
with the temperature range specified by the instructions.
8. A certain point (dot) may get brighter or darker than other points during projection. This is part
of the LCD panel features, not a symptom of malfunction. The LCD panel is manufactured with
high-precision technology that black dot may appear, or red/green/blue dot can be too bright at
the same time. Moreover, the irregular vertical lines or brighter parts can appear from time to
time.
9. Close the lens cap when not in use. It may protect from contamination and damage.
10. Do not use or store the projector at a place with smoke or flame. It can affect the image quality.
11. Mercury and other substance used for projector's light source can be damaged by noise,
abnormal operation or shock. If it is damaged, the projector will not activate and its lifecycle can
be reduced. Lamp lifecycle varies according to the lamp characteristics and operational
environment, therefore, it is recommended to prepare a spare lamp.
12. The mercury lamp can be inactive if it is used as a projector light source, which is the normal
characteristic of the lamp. If the lamp is not turned on when you turn on the projector, you have
to check to see if the lamp is damaged or not. If the lamp is not damaged, install the lamp again.
Refer to the instruction for lamp replacement and reinstallation. If the lamp is damaged, replace
with new ones or ask for assistance to the nearest dealers. It is recommended to have a spare
lamp to prepare for unexpected occasions.
13. Precautions when moving the projector.
Turn off the projector and plug out all power cords from the consent. If other cables are
connected, remove them all.
Close the lens cap.
Push back the adjustable foot
Put the projector into a carry-on case when you carry it.
Safety Precautions
Precautions on Usage and Miscellaneous
Caution
Safety Precautions
7
English
Product Description
Product Description
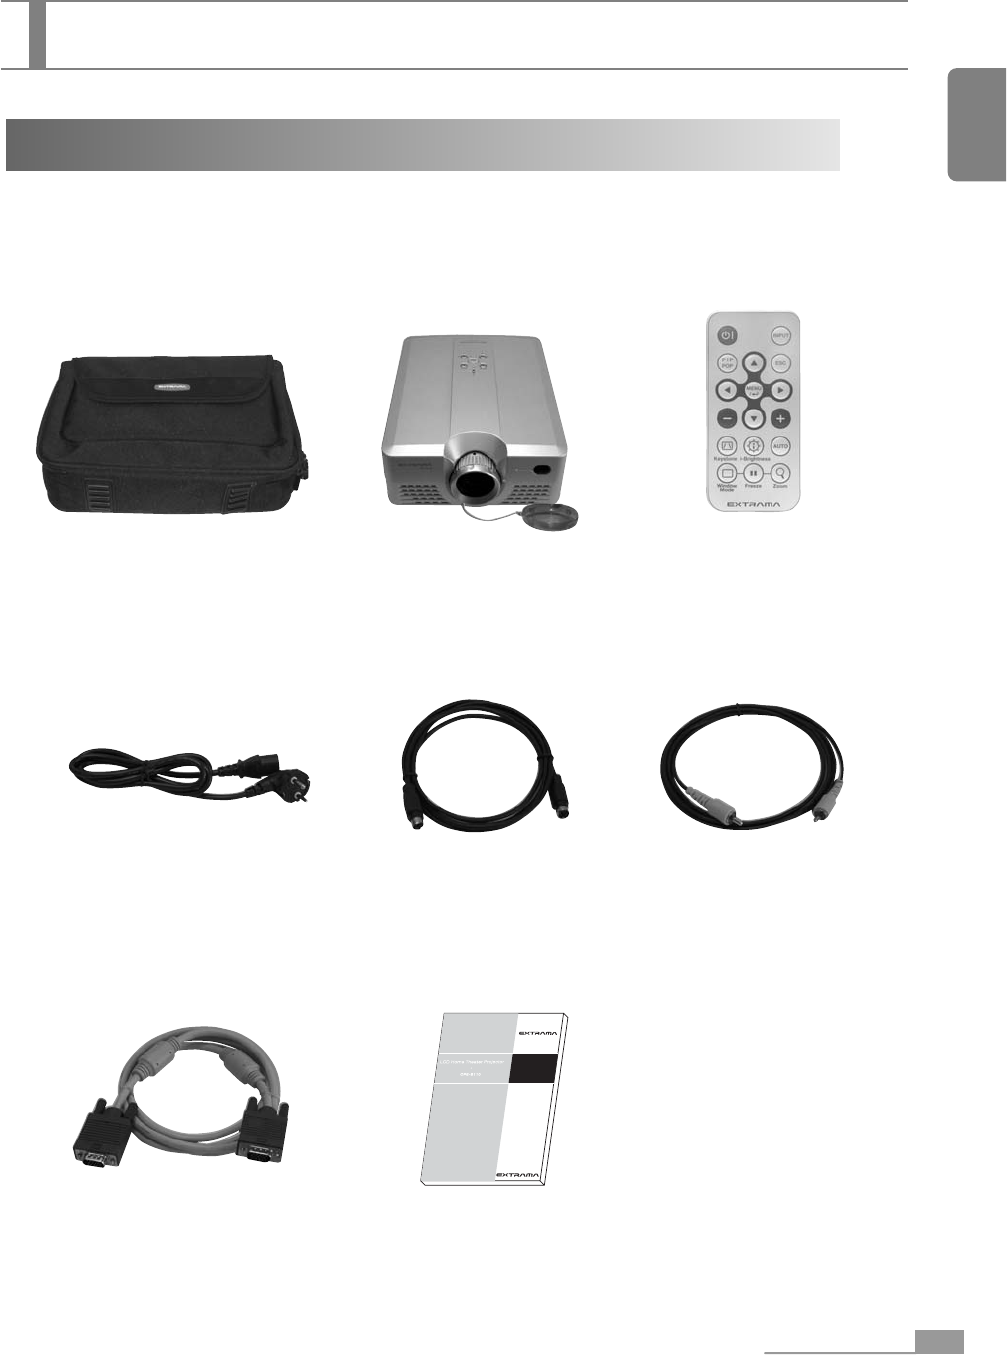
What's Inside
See if the following components are included in the product package.
If you find anything is missing, consult the authorized dealer or the service center.
User’s manual
Projector carry-on case
(including a shoulder strap)
Projector Remote controller
(including CR2025 lithium battery)
Video cablePower cord
15pin D-sub cable
S-Video cable
User's manual
8
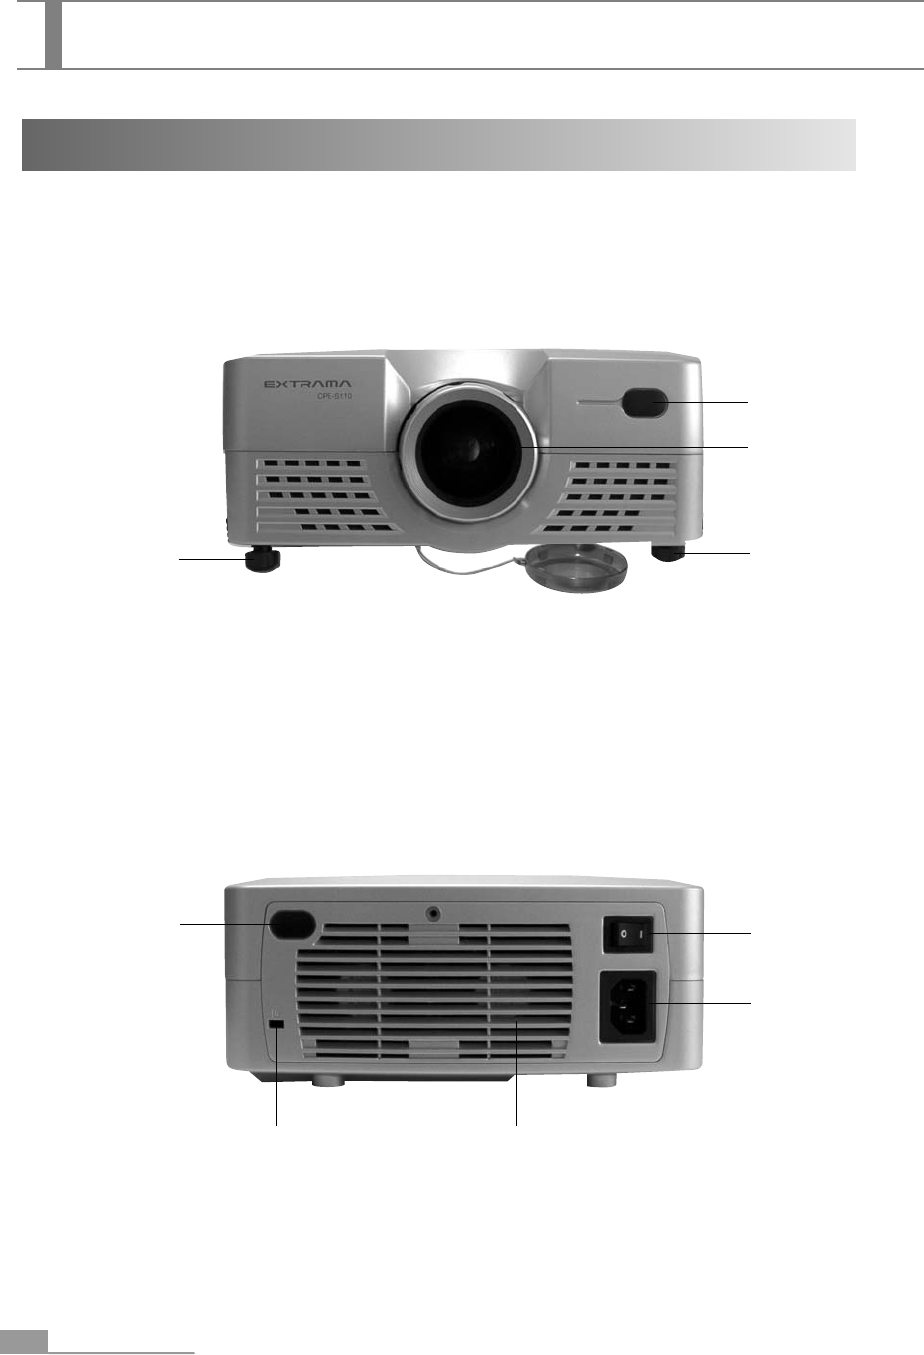
Names and Functions of Projector Unit
< Front side >
< Rear side >
Lens
Remote sensor
Adjustable foot Adjustable foot
Lens cap
Exhaust ventsSafety locking device
Power switch
AC power input terminal
Remote sensor
Product Description
Product Description
9
English
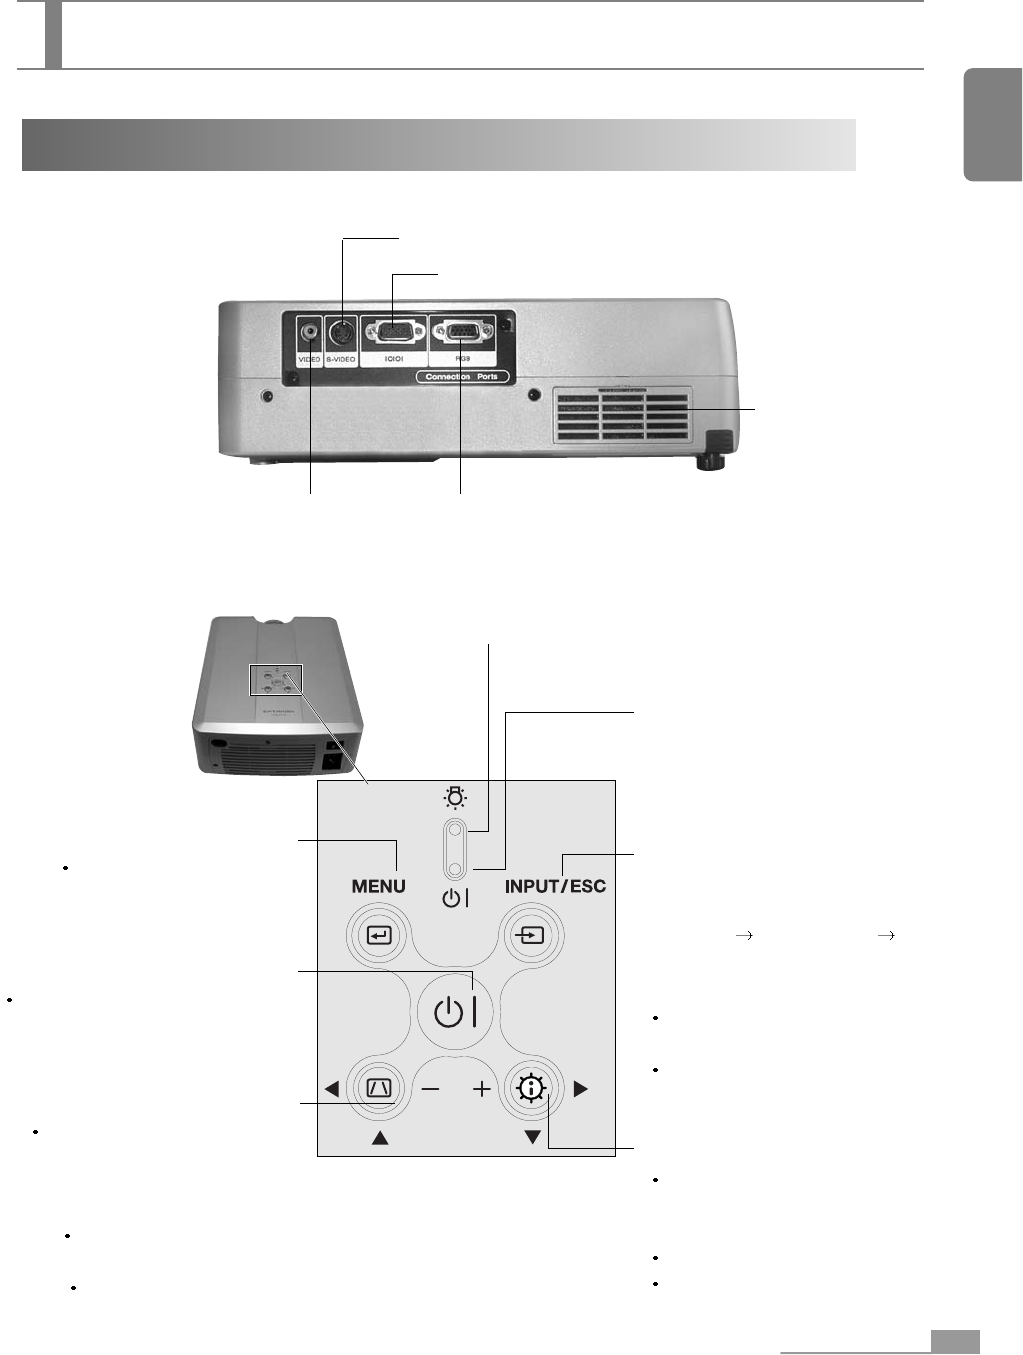
< Left side >
<Top surface and control panel>
Names and Functions of Projector Unit
Video terminal Computer connection terminal
S-Video terminal
Yellow lamp : When the lamp is not in the projector or
fan is disconnected, the yellow lamp blinks.
(Indicates a fan malfunction)
Lamp indicator:
Yellow : On standby mode.
Green: During projection.
Green / Yellow blinking :
On cool down mode.
MENU button
Use this button to enter or
exit the menu mode.
Power button
Use this button to turn the power
on/off.(Press this button twice
to turn off.)
Keystone button
Use this button to remove the
trapezoidal distortion of the
image projected on the
screen.
Moves to the upper or the
left menu.
Reduces the value of the
function selected by the menu.
INPUT/ESC button:
INPUT: Use this button to select an
input device.
(S-VIDEO COMPOSITE
COMPUTER)
i-Brightness button
Use this button to compensate for
the dark screen when displaying the
movie file in the PC.
Moves to the lower or right menu.
Increases the value of the function
selected by the menu.
RS-232C
<control panel>
Product Description
ESC:
When the menu screen is open,
the menu will move to the upper level.
If the menu screen is not opened in
the PIP/POP mode, the menu will
return to the original screen.
Air inlet
Product Description
10
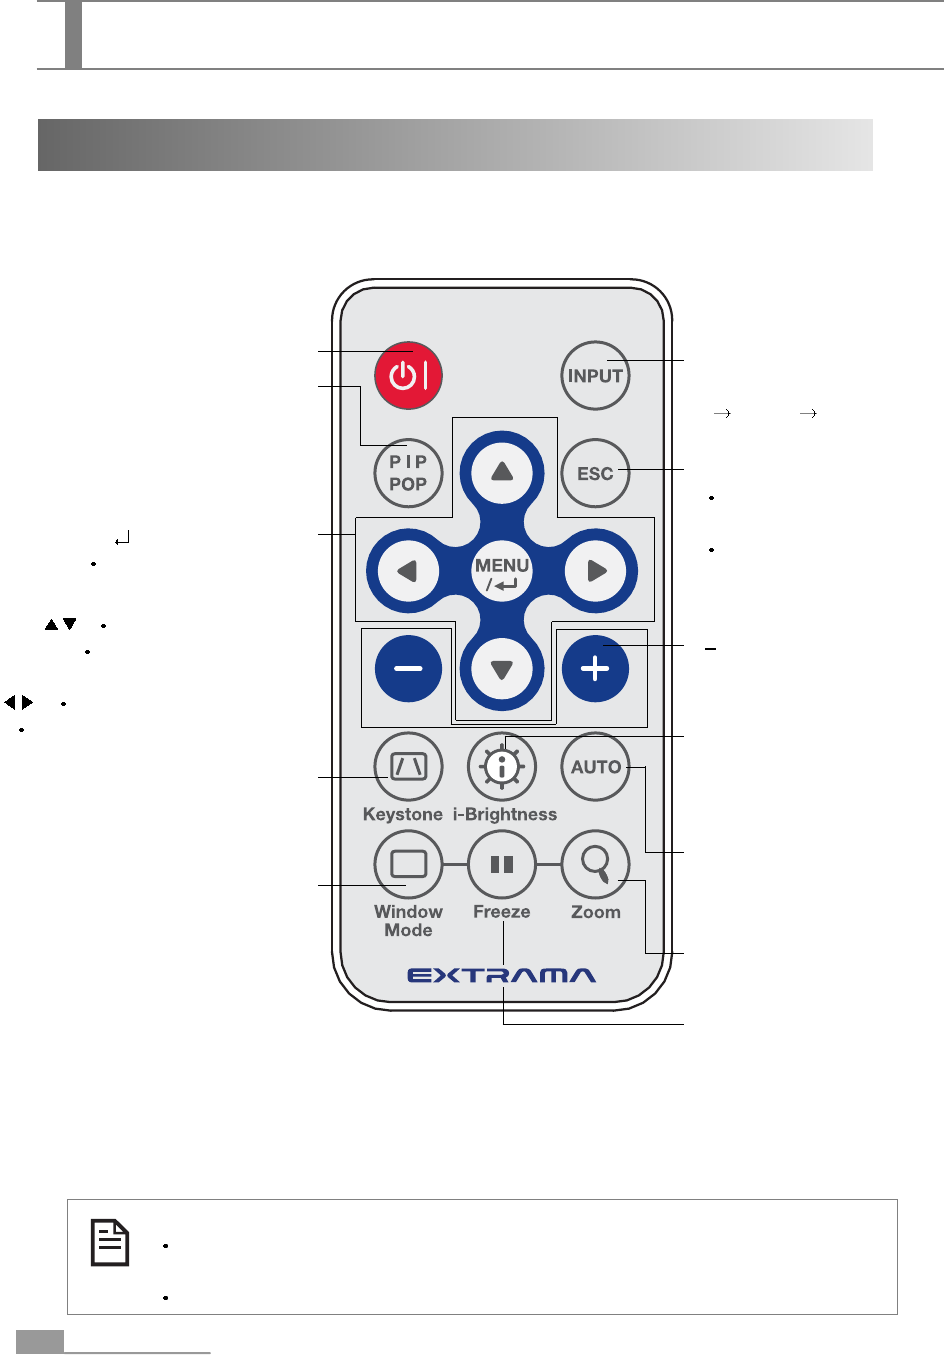
Input Select button
(Switches between S-Video
VIDEO Computer)
Power button
PIP : Two screen button.
Use this button to project
two screens at a time.
POP : Displays the video and com-
puter screen with the same size.
MENU/ : Menu/Select button
Displays the main menu
or select it.
:Pops up the sub-menu.
Moves to the upper/lower
menu item.
:Shows/Hides the sub-menu.
Moves to the left/right menu item.
Keystone button
Use this button to remove the
trapezoidal distortion of the image
projected on the screen.
Window Mode button
Sets the window mode for the
currently active screen in order to
adjust screen size or position.
ESC button
Moves to the upper menu when
the menu screen is available.
If the menu screen is not opened
in the PIP/POP mode, the menu
will return to the original screen.
/+ button
Increases or decreases the value
of the selected menu.
Auto button
Automatically detects the input
signal to optimize the computer
image.
i-Brightness button
Use this button to compensate for
the dark screen when displaying
the movie file in the PC.
Zoom button
Magnifies the screen.
Freeze button
This button allows the image to be
retained in the projector memory and
stills the picture on the screen.
Press the button once to freeze the
picture and again to de-freeze.
Product Description
Remote Controller
Replacing Batteries
Refer to the figures shown at the rear side of the remote controller
when replacing batteries.
Use the CR2025 type battery.
Product Description
Seen from the side Seen from the top
Installing the Projector
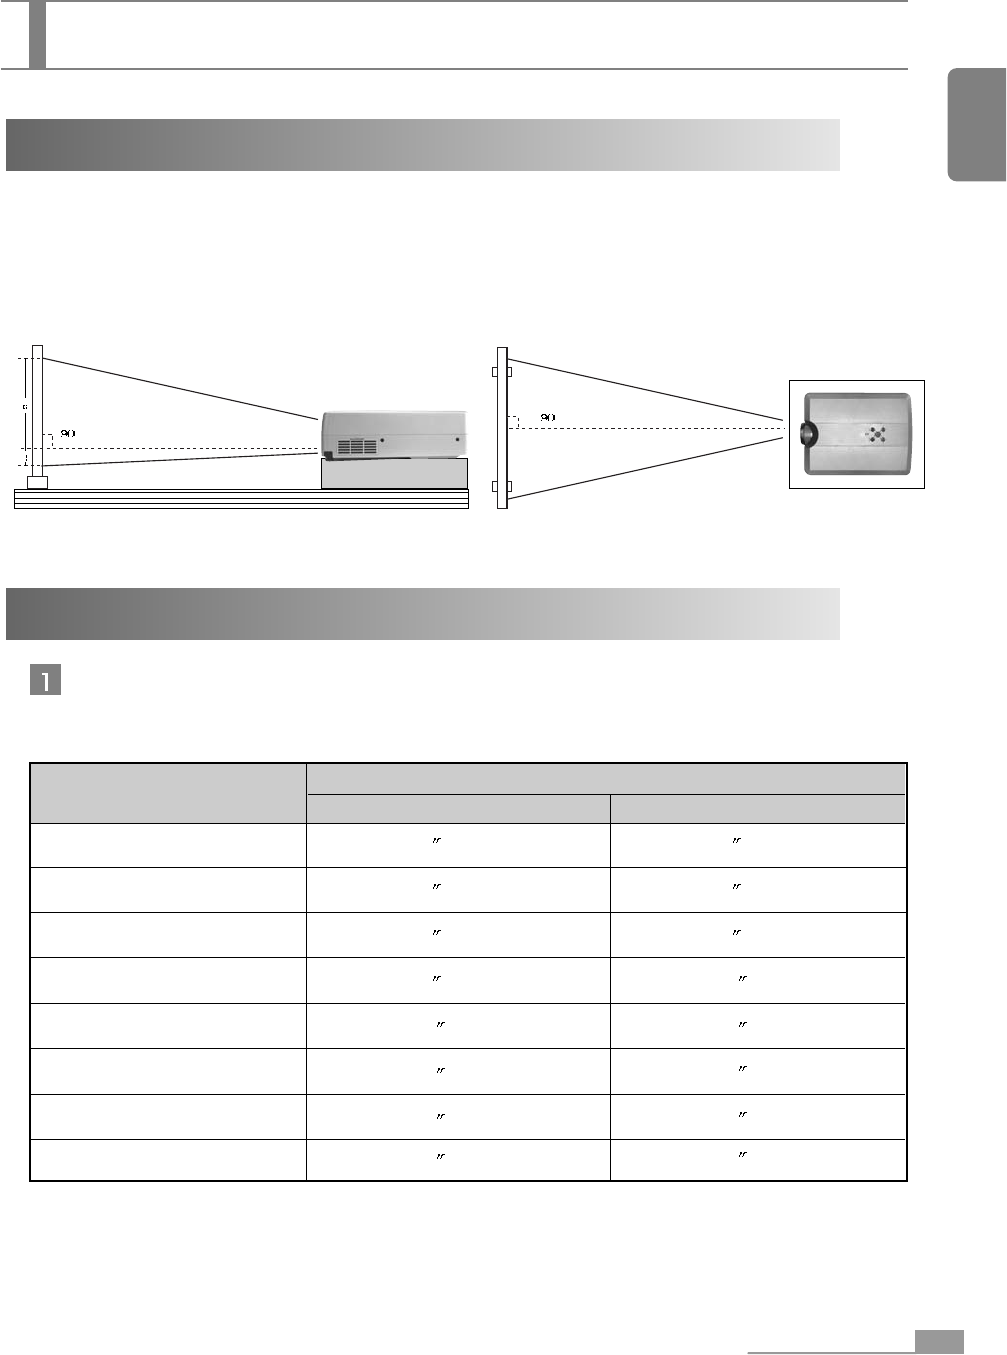
The projector should be placed so that the center line of the lens is at a right angle to the screen
as in the following figures.
Use the adjustable foot to control the angle of the projector. (See page 17.)
Projection Distance and Screen Size
Installing the Projector
Projecting distance
The projected image size may vary depending on the lens and projection distance.
Please use the following table.
Screen size (inch/cm)
Maximum zoom Minimum zoom
1.7 m
2.0 m
3.0 m
4.0 m
5.0 m
6.0 m
7.0 m
8.0 m
40 (102cm)
46 (117cm)
68 (173cm)
88 (224cm)
107 (272cm)
128 (325cm)
148 (376cm)
153 (389cm)
50 (127cm)
58 (147cm)
86 (218cm)
114 (290cm)
140 (356cm)
166 (422cm)
187 (475cm)
200 (508cm)
11
English
Installing the Projector
12
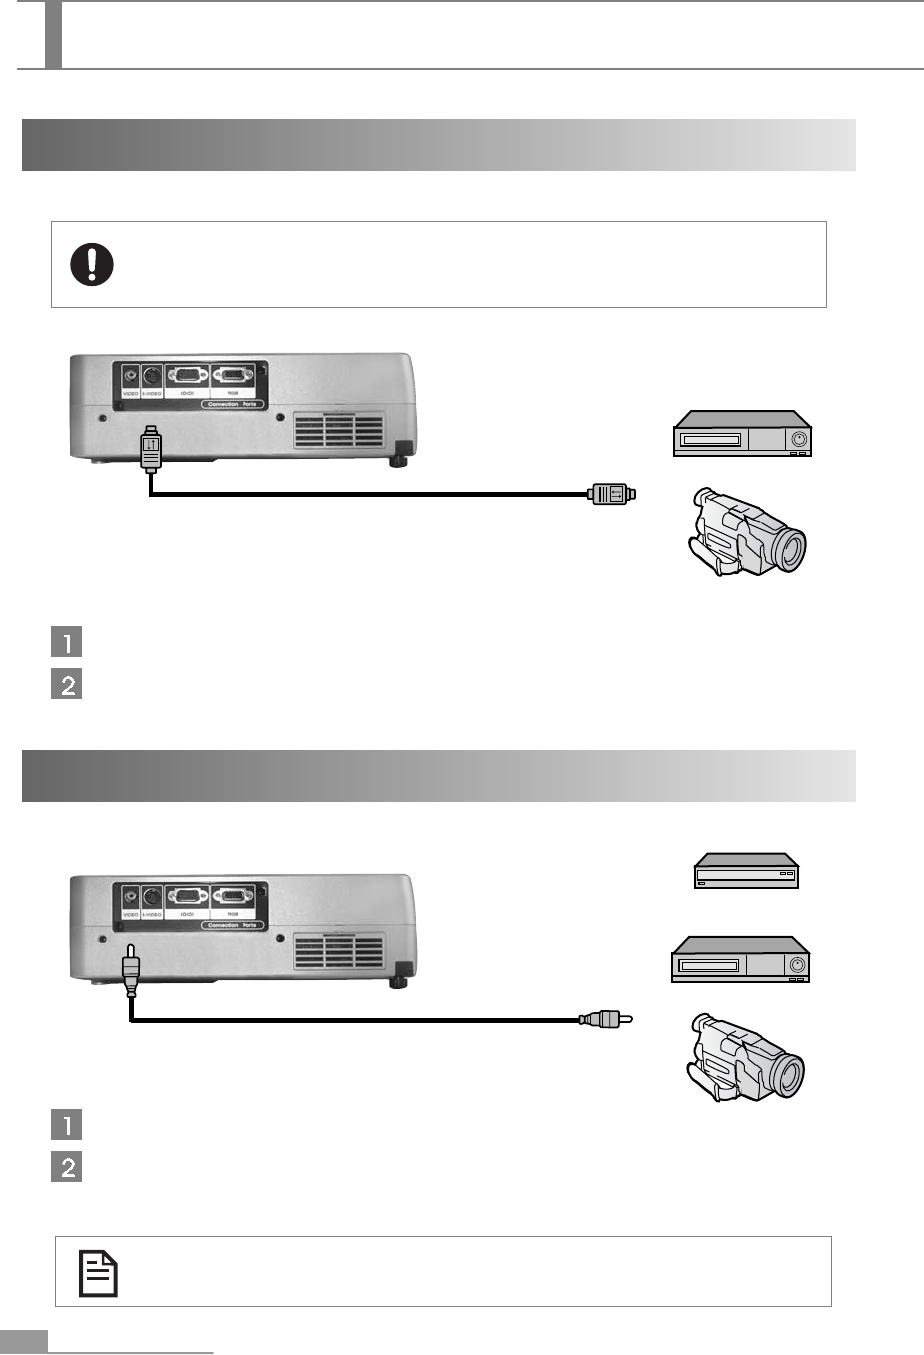
Connecting to the Video Signal
Connecting to the S-Video Signal
Turn off the projector and device connected to the projector.
Connect the video output terminal for DVD, TV, camcorder or set-top box to the projector
video output terminal, using the provided S-video cable.
Turn off the projector and device connected to the projector.
Connect the S-video output terminal for DVD, TV, camcorder or set-top box to the
projector S-video output terminal, using the provided S-video cable.
Always turn off the projector before connecting to the video device in order to
protect the device connected to the projector.
DVD/VCR
GAME Player
Camcorder
DVD/VCR
Camcorder
S-VIDEO Cable
VIDEO Cable
Installing the Projector
To connect the digital camera, use the connection cable provided with the
digital camera.
Installing the Projector
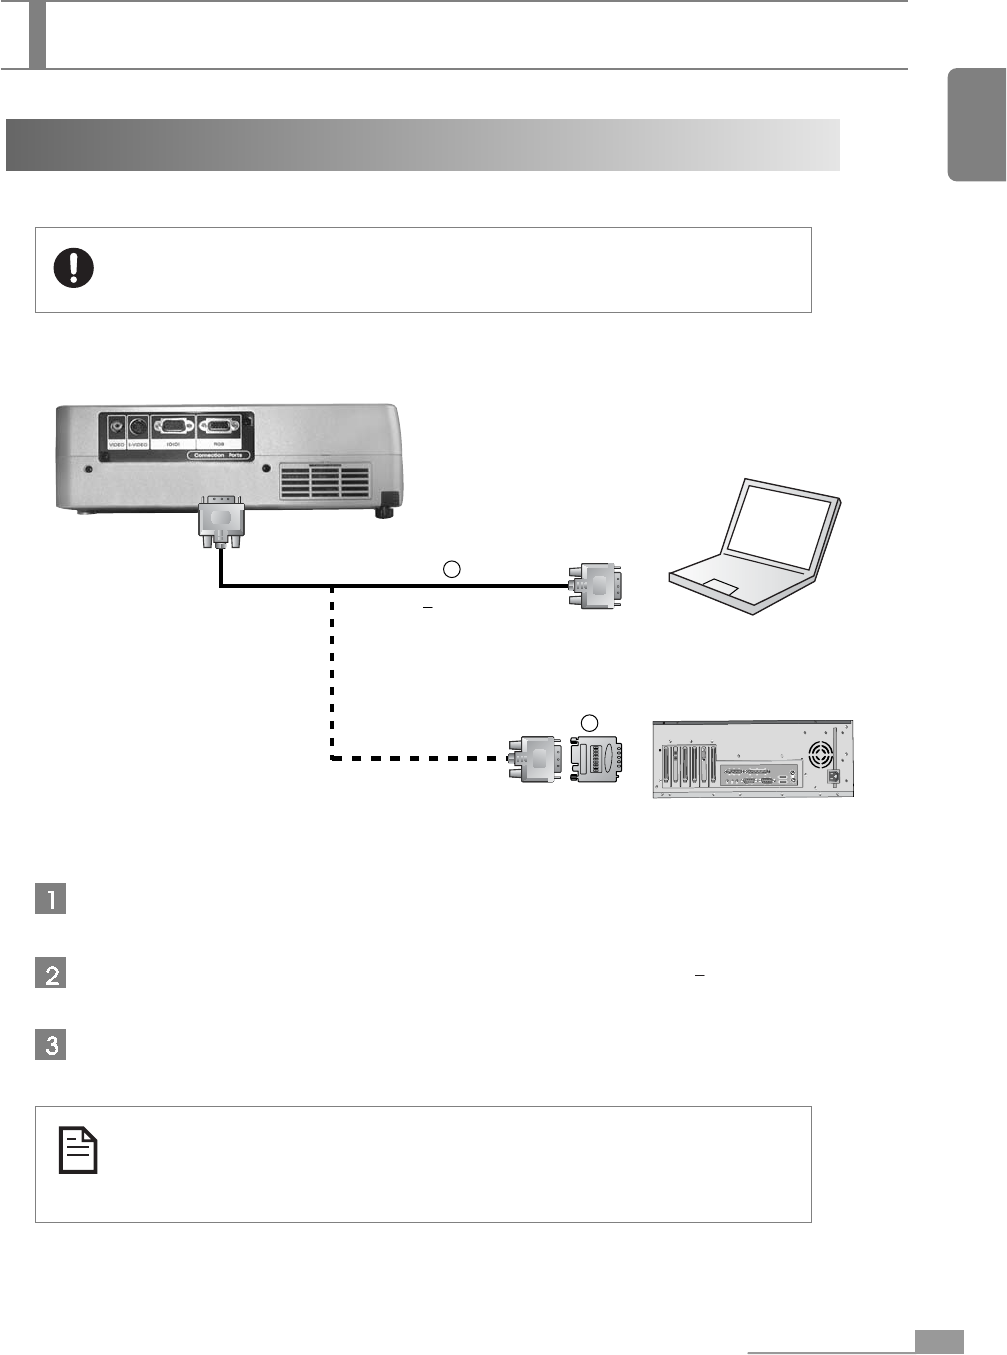
Connecting to the PC
Installing the Projector
Check to see if the computer power is off and the power switch located at the rear side of
the projector is also turned off.
Connect the PC to the projector RGB terminal using the provided 15-pin D sub signal cable.
If you're using the old model Macintosh, buy Macintosh adaptor from the market and connect
to the Macintosh video port.
Always turn off the projector before connecting to the PC in order to protect
the PC connected to the projector.
If you want to use the computer as a projector, you should check the computer
resolution and frequency by referring to the computer user’s manual because
the output resolution of the video signal should match with that of the projector.
Projector
IBM VGA or compatible
(laptop or desktop PC)
MAC
15-pin D sub signal cable
13
English
1
2
Installing the Projector
14
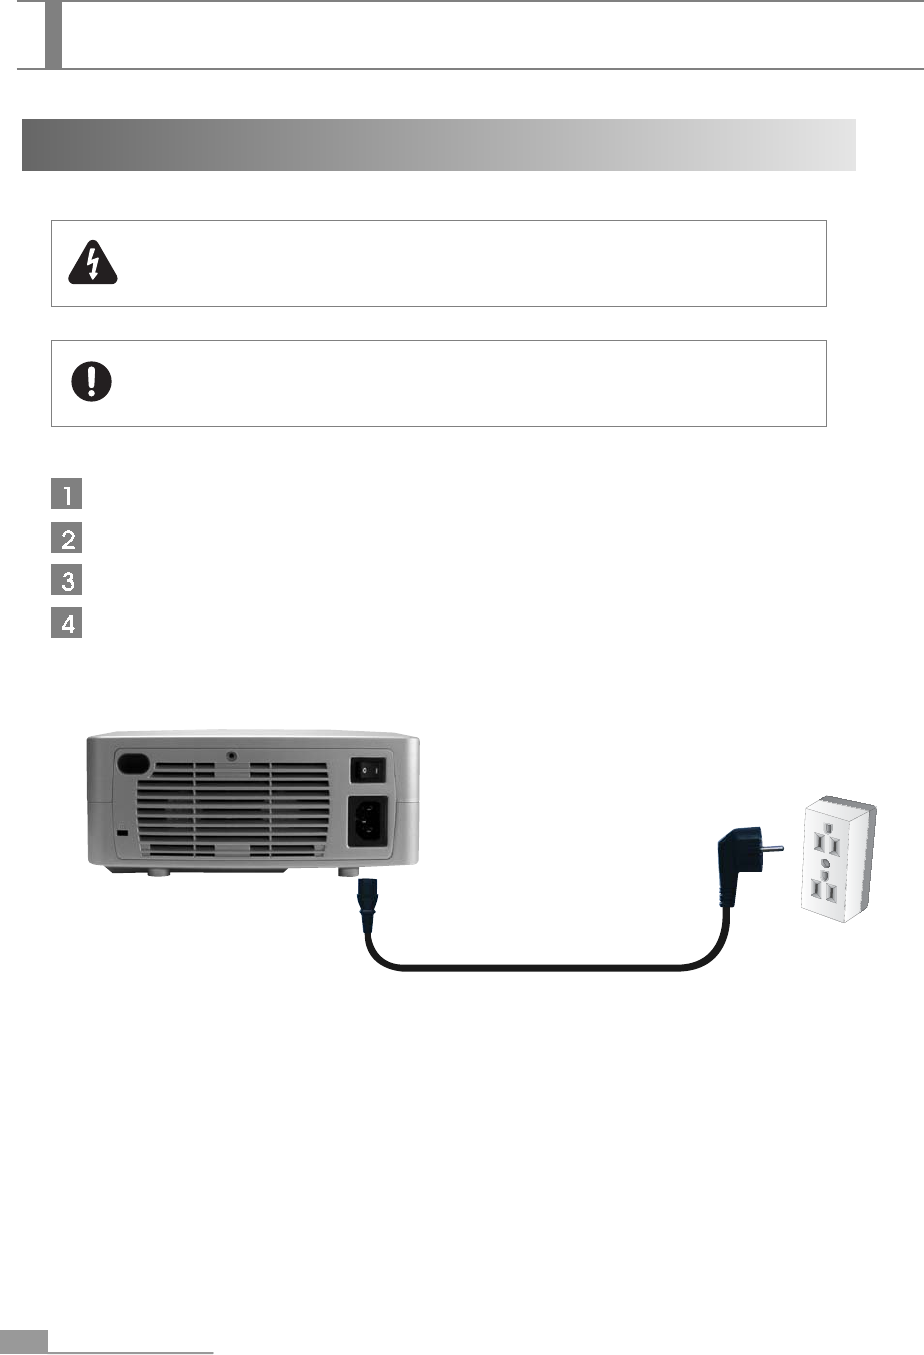
Connecting to the Power Cord
Installing the Projector
Do not project with lens cap on.
The lens cap may be deformed by heat.
Never look into the lens after turning on the projector.
Your vision can be impaired due to strong light.
See if the projector and connected device are turned off.
Check connection status between the projector and computer or video device.
Open the lens cap.
Plug in the provided power cord completely to the power port located at the rear side of
the projector.
Then, connect the power cord plug t the power socket.
Installing the Projector

15
English
Basic Operations
Power On
Press the power switch on located at the rear side of the
projector. (The power indicator will light up with red color
and the projector will be standby mode.)
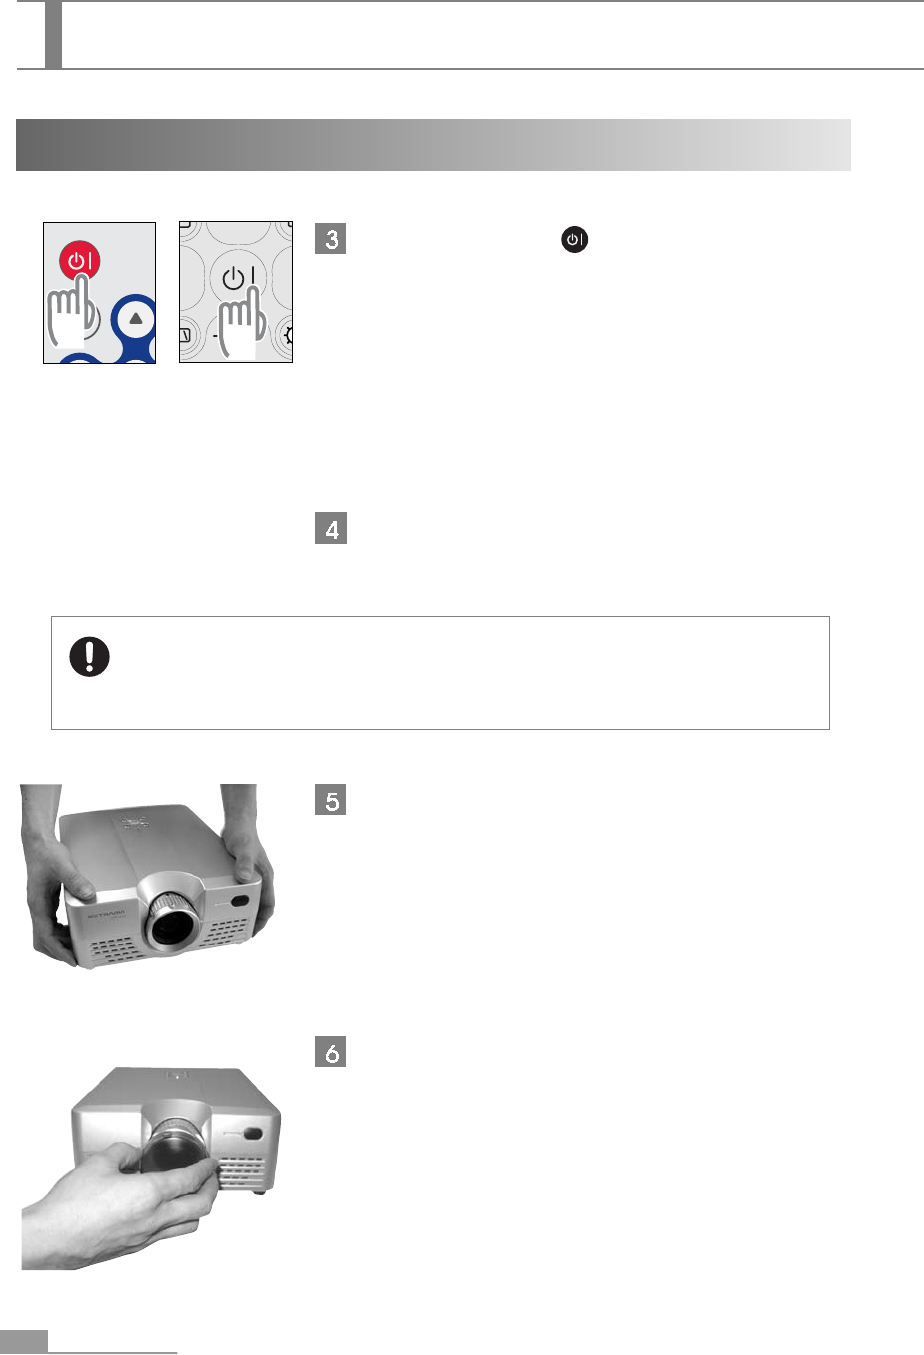
Press the Power button( ) on the remote controller or
the top surface of the projector. (The operation indicator
will light up with green color and projection will be started.)
Press the Input button on the remote controller or the
projector control panel to select the intended device.
(Whenever you press the Input button, the input source
will be switched to S-video Composite Computer.)
< Remote
controller > < Projector >
< Remote
controller > < Projector >
< Projector >
Basic Operations
16
Basic Operations
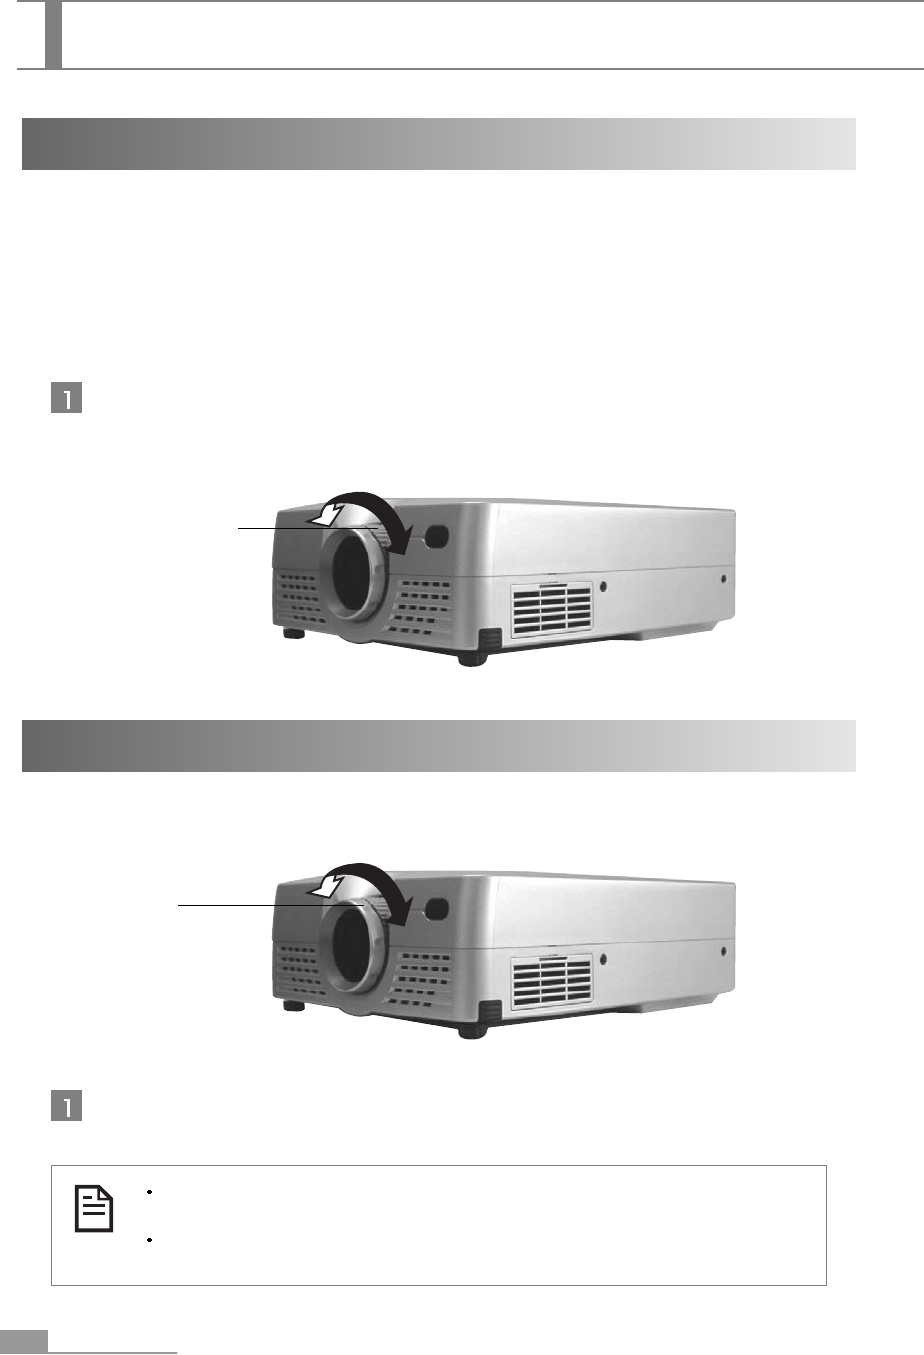
Turn the iris inside the projector lens clockwise or counterclockwise to set the proper
projected image.
Basic Operations
Adjusting Projected Image Size (Optical Zoom)
The projected image size varies depending on the distance between the screen and the projector.
To adjust screen size in the optimal state, check the projected distance range by screen size and
adjust the distance using the optical zoom function.
Projection distance: Screen size at 1.7mm ~ 8.0mm is 40"(102cm) ~ 200"(508cm).
Adjusting Focus
Adjust focus by turning the focus iris located at the front side of the projector clockwise
or counterclockwise.
Optical zoom iris
Focus iris
If the lens is stained or set with dirt, focus cannot be set properly.
Clean it neatly.
If you cannot adjust focus, refer to the recommended installation distance by
screen size to see if the installation distance is proper or not.
17
English
Basic Operations
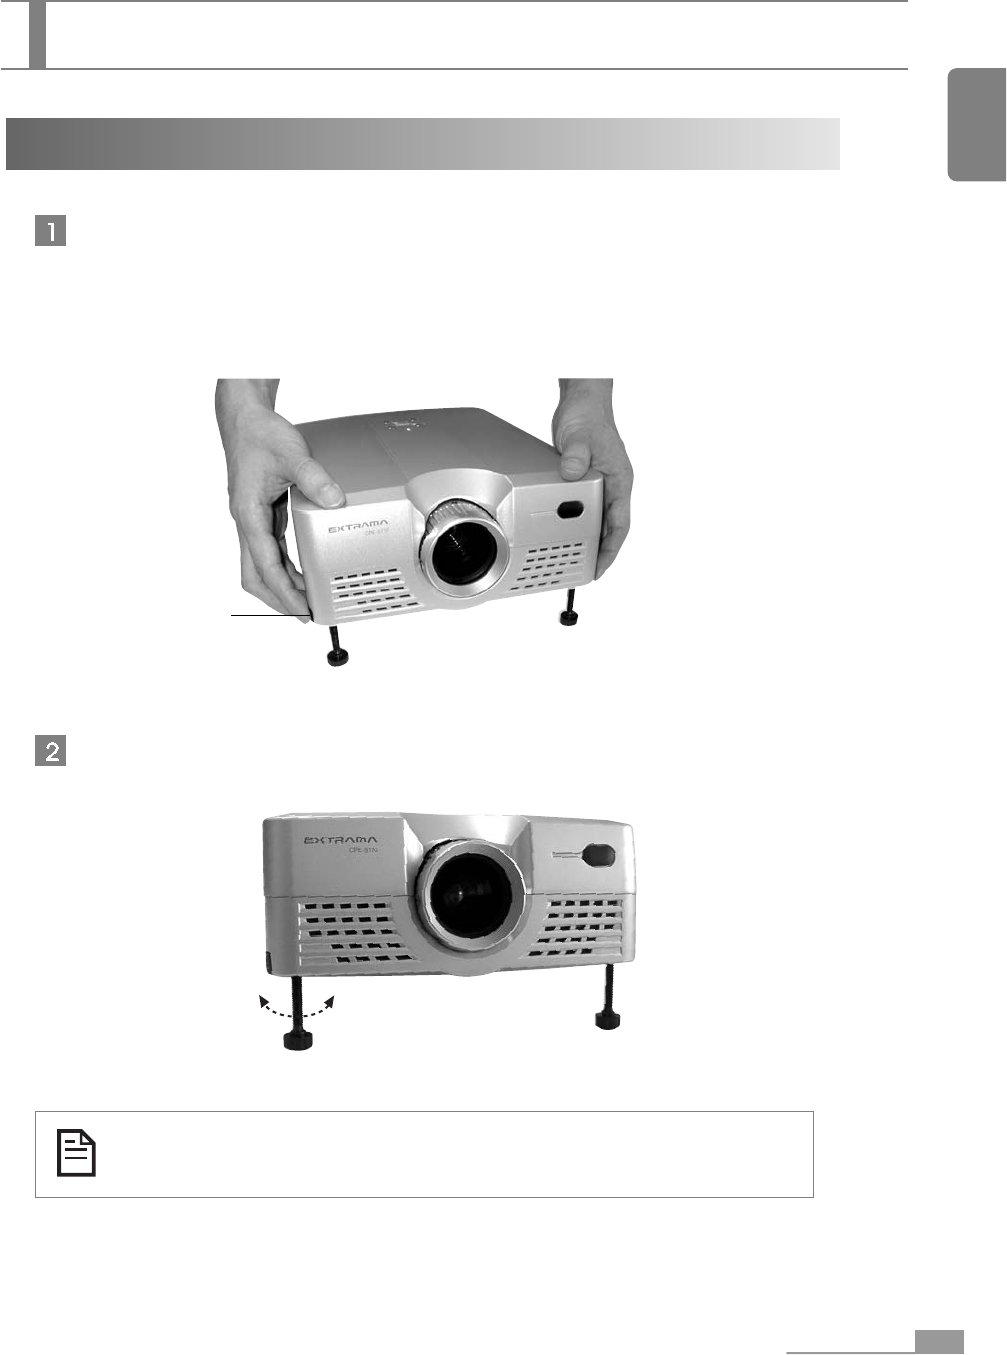
Adjusting the Image Angle
Lift up the front side of the projector until the intended angle is obtained. Then, press down
the adjustable foot button with both hands. The front foot will be ejected.
Release the adjustable foot button when the front foot is ejected as much as you want.
If you want to take the foot back, put down the projector while pressing down the adjustable
foot button.
If the projector is tilting vertically, adjust the level using the adjustable foot.
When you use an adjustable foot, the image may get distorted in trapezoid
form sometimes. Use the keystone function to remove the trapezoidal
distortion of the image. (8page)
Loosen Fasten
Basic Operations
Push
18
Basic Operations
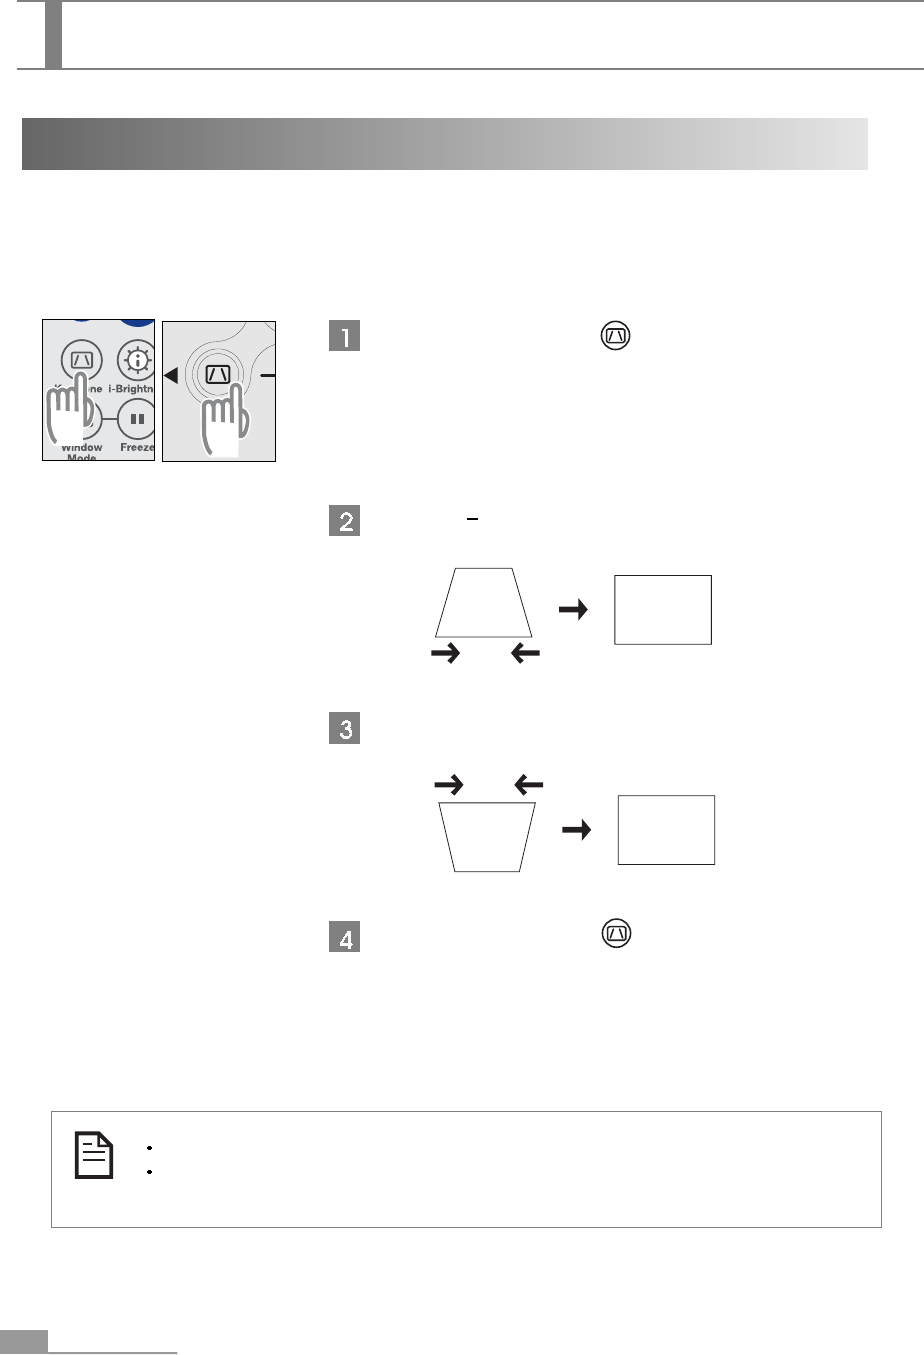
Removing the Trapezoidal Position of the Image (keystone)
If you install the projector with a specific angle suing the adjustable foot lever of the projector, the
projected image may get distorted in trapezoid form. You can adjust the projected image if it can
be adjusted within approximately 15" range vertically, suing the keystone adjustment function.
Basic Operations
When you use the keystone function, image size will be reduced.
You need to re-adjust the image when you move the projector to a different place
or change the projection angle.
Press the Keystone button( ) on the remote controller
or the projector control panel.
Press the " " button to make the lower side image narrower.
Press the "+" button to make the upper size image narrower.
Press the Keystone button( ) again to complete adjustm-
ent and exit from this function.
< Remote
controller > < Projector >
Power Off
Turn off the power of the input device connected to the
projector.
Press the Power button( ) on the remote controller or
the connected input device.
< Remote
controller > < Projector >
Basic Operations
Adjusting the Computer Image
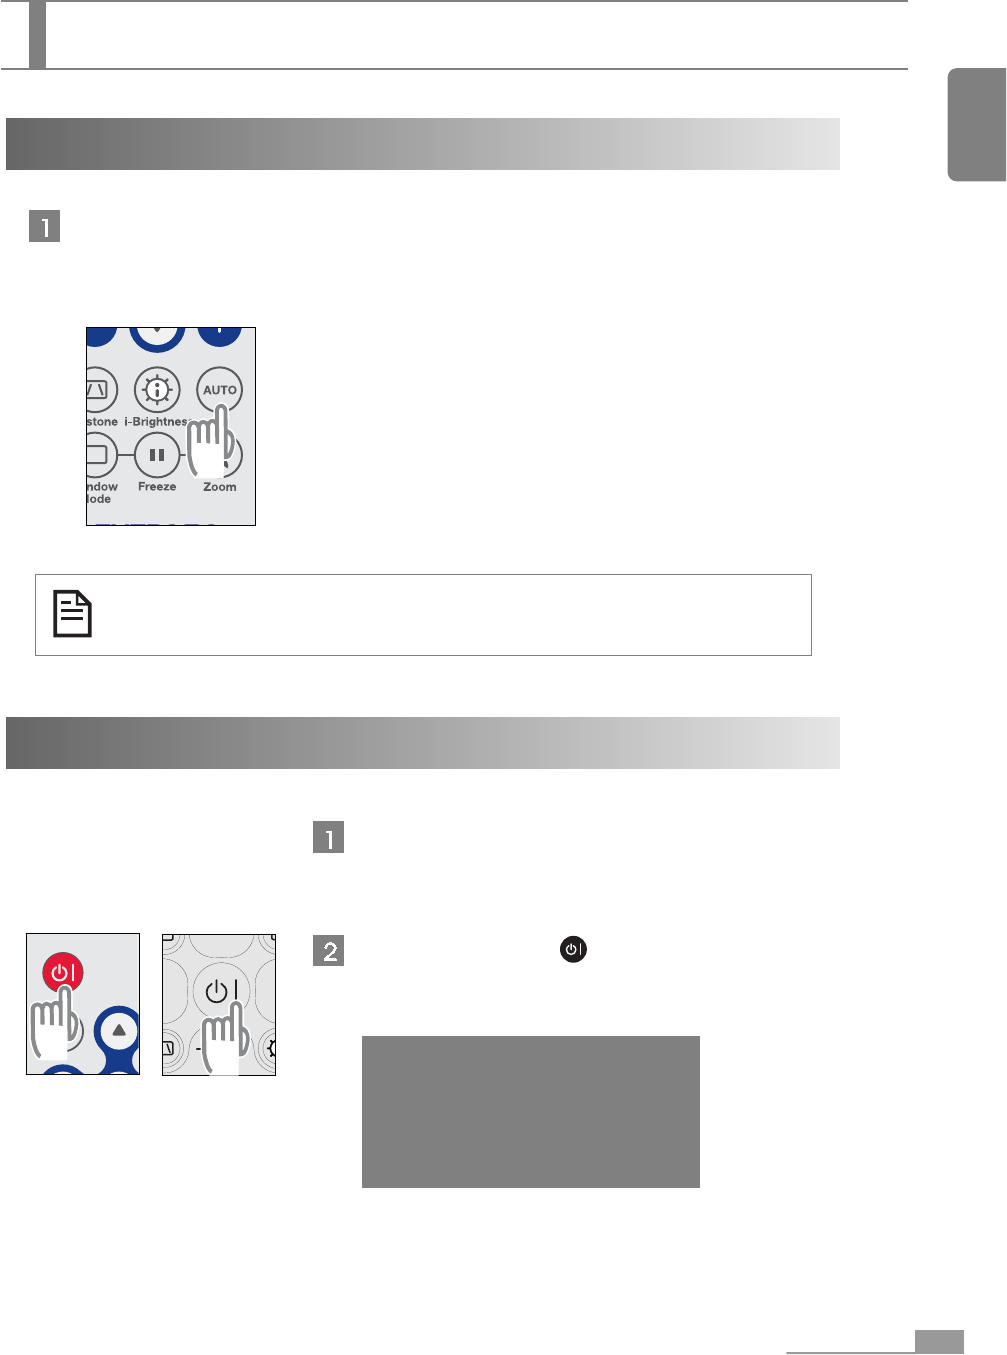
Press the Auto button on the remote controller.
When the computer signal is entered, phase, frequency and position will be automatically
adjusted to the optimal state.
You can use this function only when the input signal of the projecting device
is a computer.
19
English
Basic Operations
DO you want to turn off?
[ Turn off mode ]
20
Basic Operations
If you expand the lamp height adjustment foot, take it back
to the original position.
Fit the lens cap on.
Be sure to fit the lens cap on when the projector is not in
use to keep out dirt.
Fit the lens cap on.
Basic Operations
Power Off (continue)
< Remote
controller > < Projector >
Do not plug out the power cord from the consent when the power indicator
blinks (cool down mode). If you pull out the power cord while the indicator
blinks with yellow color, the projector malfunction can occur or lamp life can
be reduced.
Press the Power button( ) again.
The lamp will be turned off and the power indicator will blink
with yellow color. The projector will enter into the cool down
mode. (Duration of the cool down mode varies depending
on the surrounding temperature.)
When the power indicator is on with yellow color continuou-
sly, fan operation will be stopped and the cool down mode
will be completed.
Plug out the power consent if you will not use the projector
for a long time.
21
English
Adjustments
Adjustments
Setting and Adjusting the Menus
You can adjust or set the video or computer images using the remote controller of the menu
function of the control panel located on the top surface of the projector.
This chapter describes how to adjust or set the projector using a remote controller.
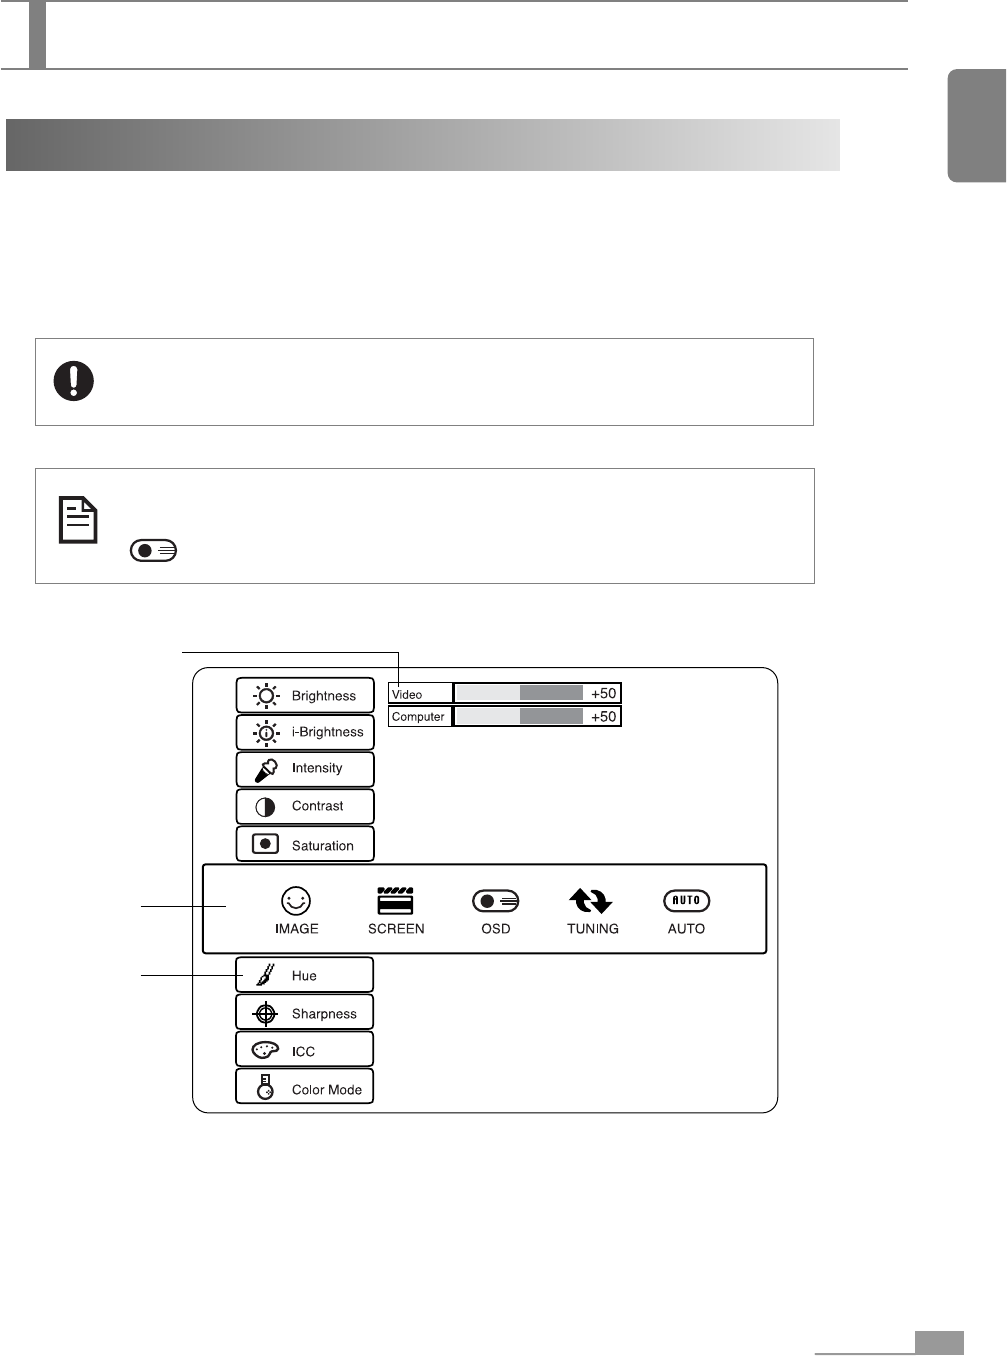
<Main menu>
Main menu
Selection menu
Function
icon/ name
Use the projector adjustment function after running the projector more than
3 minutes.
The menus of the projector are set in Korean by default.
To use the English menus, select the "English" screen from the main menu
( ) with reference to the following menu usages.
22
Adjustments
Adjustments
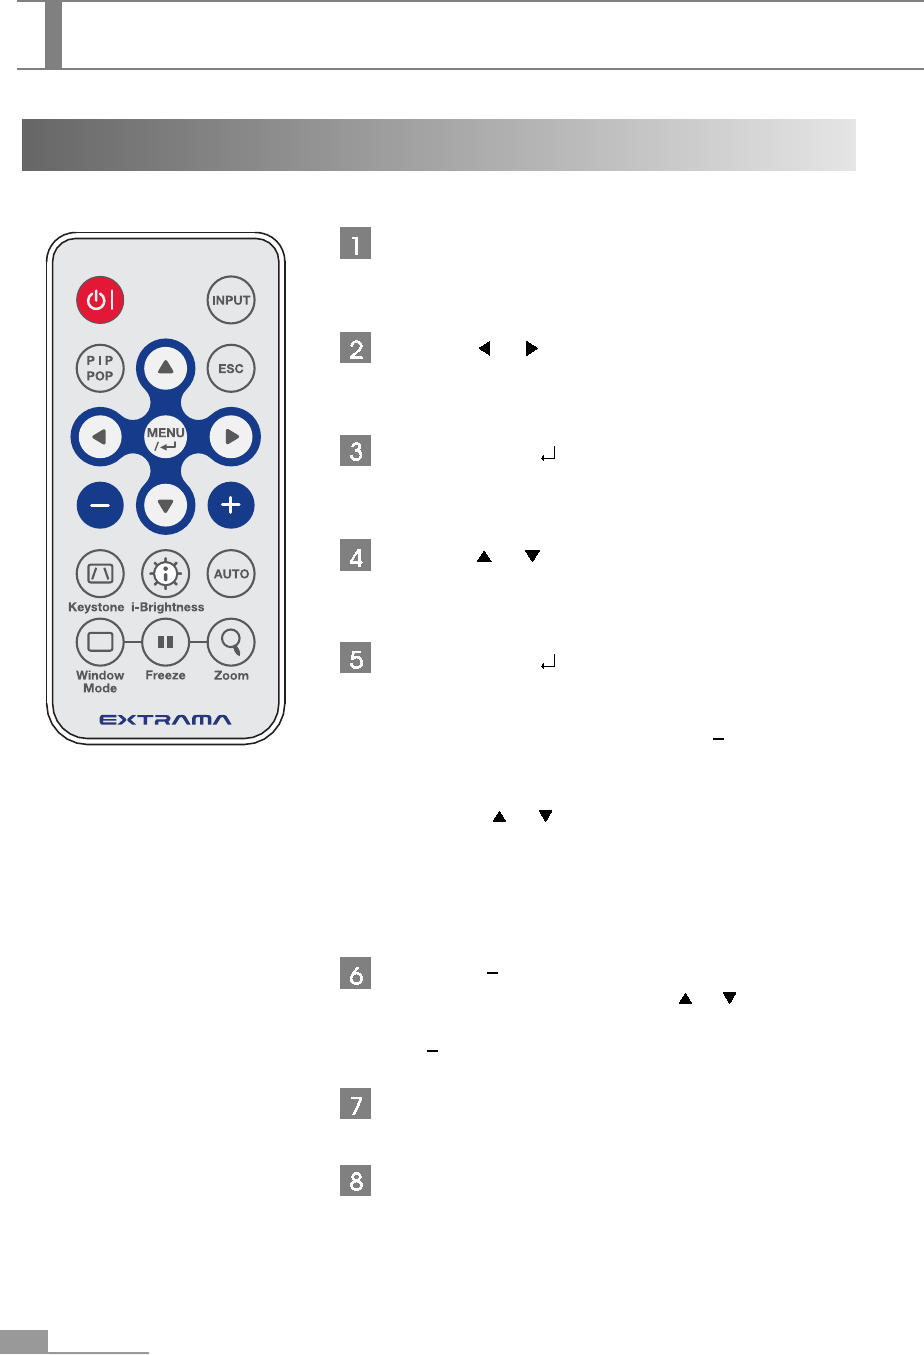
How to Use the Menu on the Remote Controller
Press the MENU button on the remote controller.
The main menu will appear on the projector screen.
Press the or button to select the icon you want
(main screen menu)
The selected icon menu will be displayed brighter.
Press the Enter ( ) button.
The submenu will be displayed on the screen
(function icon and name).
Press the or button to select an adjustment item.
The selected item will be displayed brighter.
Press the Enter ( ) button.
The selection menu will appear.
1) If the common menu appears,
Adjust the value you want using the " " or "+" button or
select the item you want.
2) If the selection menu appears,
Press the or button to select a group or an item
you want.
The selected group item or the item will be displayed
brighter.
Press the " " or "+" button to adjust the value.
If the group item appear, press the or button to move
to the menu item you want and then, adjust the value using
the " " or "+" button.
Press the ESC button to return to the previous menu.
To exit from the menu, press the ESC button until the
main menu disappears.
23
English
Adjustments
Adjustments
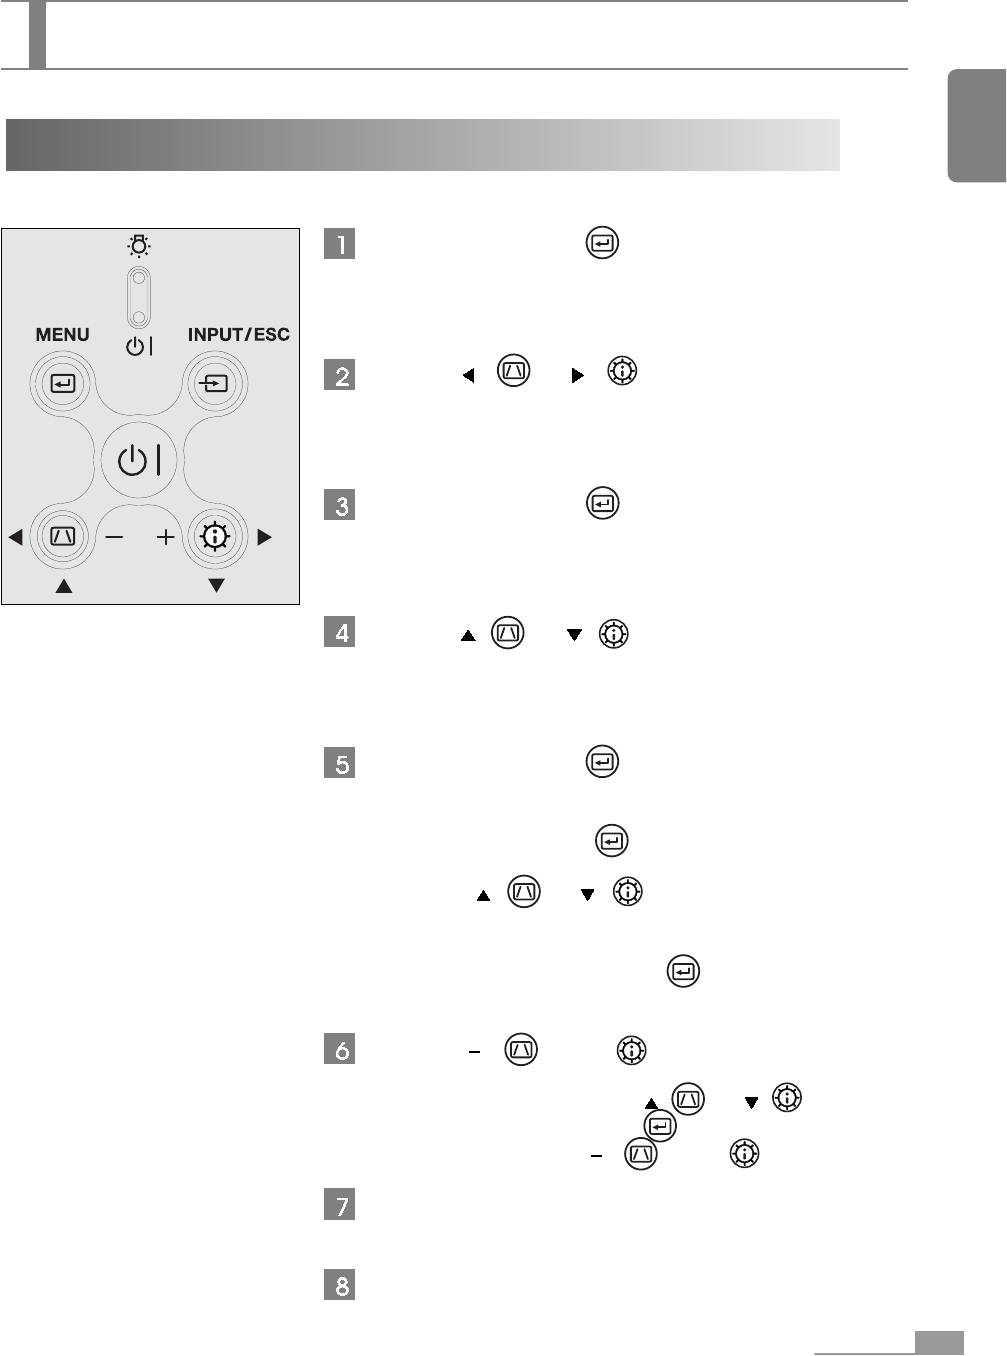
How to Use the Menu on the Control Panel
Press the MENU button( ) on the control panel
located on the top surface of the projector.
The main menu will appear on the projector screen.
Press the ( ) or ( ) button to select the
icon you want (main screen menu)
The selected icon menu will be displayed brighter.
Press the MENU button( ).
The submenu will be displayed on the screen
(function icon and name).
Press the ( ) or ( ) button to select an
adjustment item.
The submenu will be displayed brighter.
Press the MENU button( ).
The selection menu will appear.
1) If the common menu appears,
Press the MENU button( ).
2) If the selection menu appears,
Press the ( ) or ( ) to select a group or
an item you want.
The selected group item or the item will be displayed
brighter. Press the MENU button( ).
Press the " "( ) or "+"( ) button to adjust the
value.
If a group item appear, press the ( ) or ( )
button to move to the menu item( ) you want and then,
adjust the value using the " "( ) or "+"( ) button.
Press the INPUT/ESC button to return to the previous
menu.
To exit from the menu, press the INPUT/ESC button
until the main menu disappears.
24
Adjustments
Adjustments
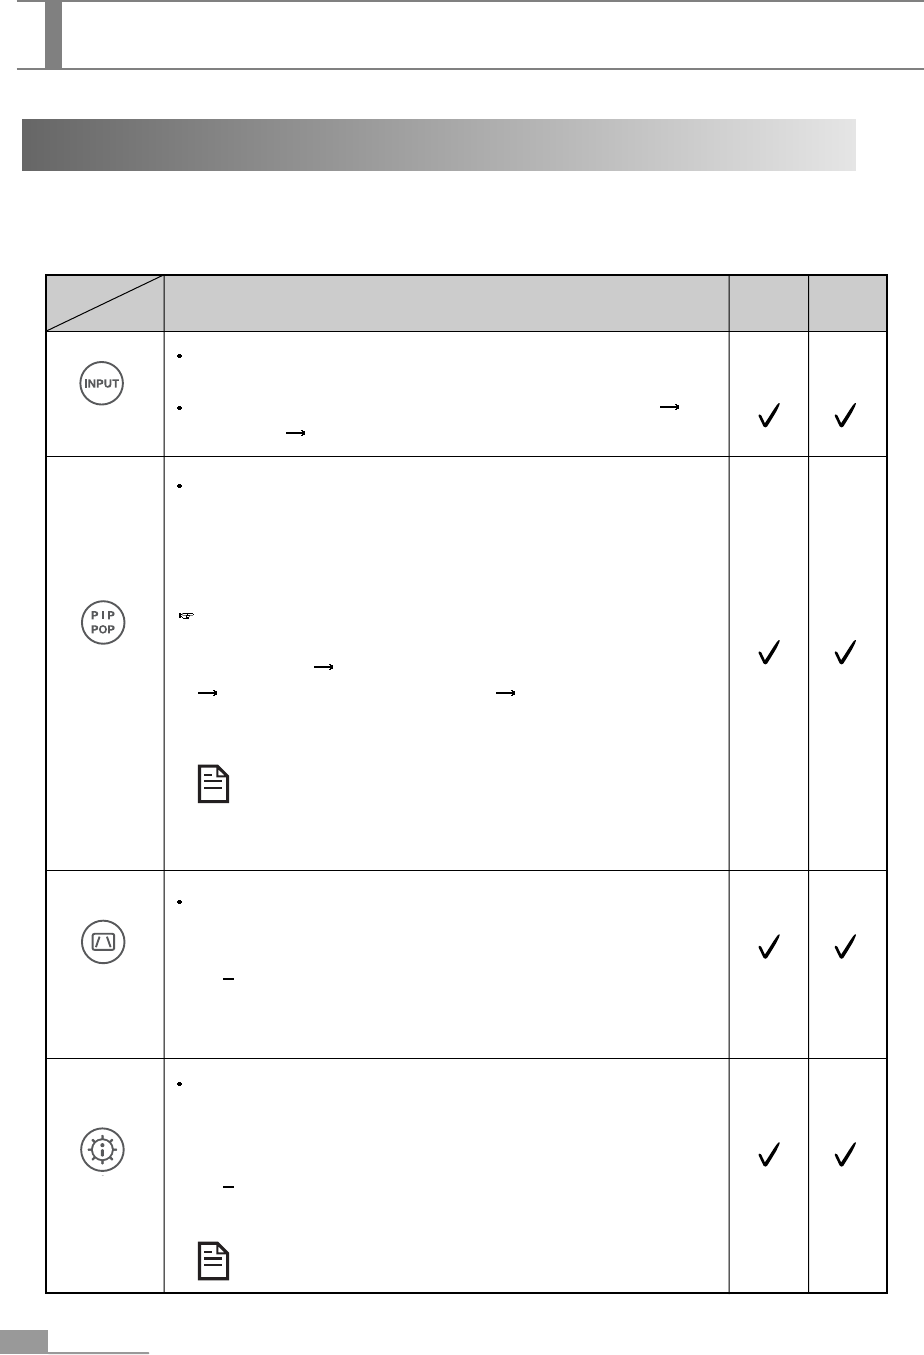
Shortcut Key Functions
You can use several functions for adjustments by selecting the following shortcut key once on the
remote controller or the control panel of the projector.
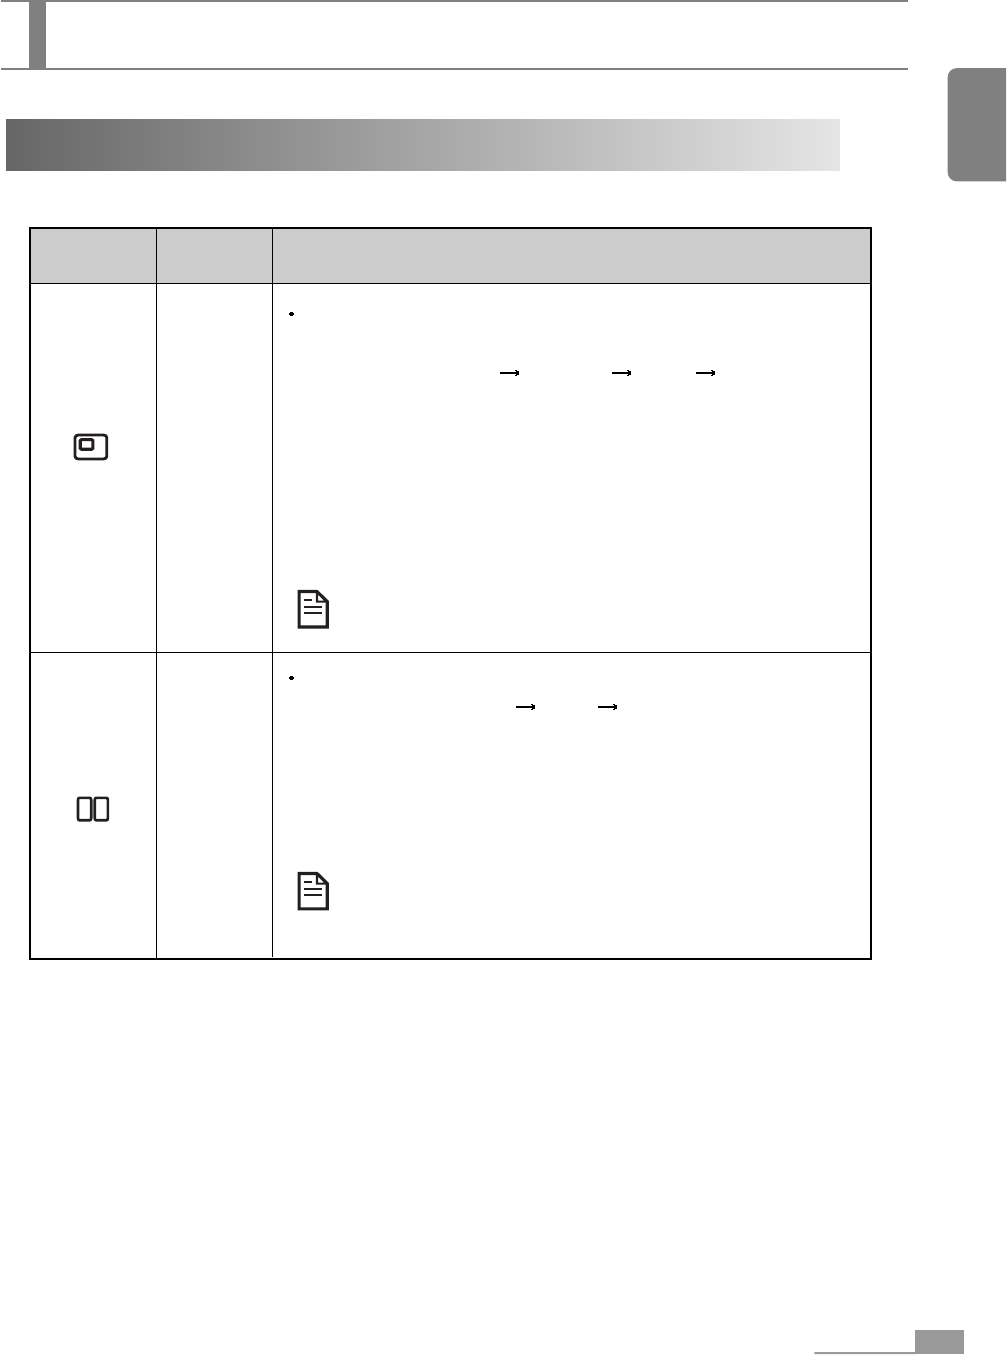
Icon Menu Remote
controller
Control
Panel
Function Description
You can select a projected input signal among several projector
input signals.
Press the INPUT button. The input signal will be S-Video
Composite Computer whenever you press this button.
You can display a small computer screen on the video screen,
or small video screen on the computer screen (PIP). or, you can
display the video screen and the computer screen by the same
size (PIP).
Press the PIP/POP button.
Display will be changed from "small computer screen/ entire
video screen" "small video screen / entire computer screen"
"computer screen / video screen" "video screen / computer
screen".
You can use this function when more than two input
signals are available. You should set to the Window
mode to adjust size and position of the PIP / POP
screen.
Using this button, you can adjust image projection if size of the
upper side does not match with that of the lower side.
1) Press the Keystone button.
2) button: Size of the lower side becomes narrower.
+ button: Size of the upper side becomes narrower.
3) Press the INPUT/ESC button to exit from this function.
Use this button to compensate for the dark screen when
displaying the movie file in the PC.
Brightness and contrast will be improved at the same time.
1) Press the i-Brightness button.
2) , + : Function is set to on, and brightness and contrast will
be improved at the same time
This function is enabled for the computer input only.
INPUT
PIP/POP
Keystone
i-Brightness
25
English
Adjustments
Adjustments
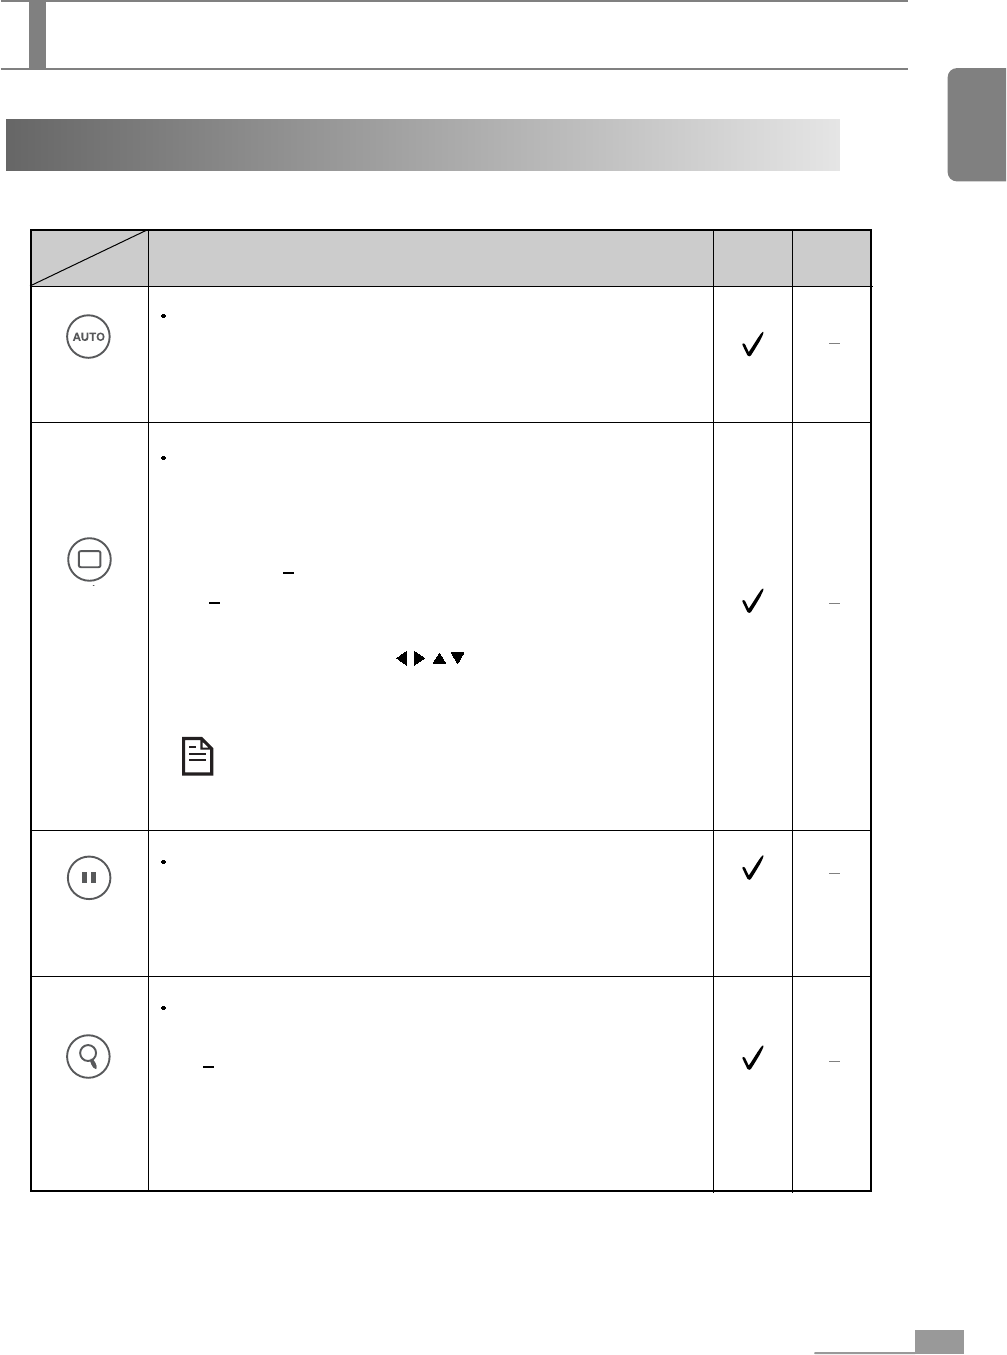
Shortcut Key Functions (continue)
Function Description
Use this button to automatically adjust phase, frequency and
position of the computer input.
1) Press the Auto button.
Phase, frequency and position will be automatically adjusted.
Use this button to set the active window for the currently
projected screen, in order to adjust screen size or position.
1) Press the Window mode button on the remote controller.
The active window will be set.
2) Use the " " or "+" button to adjust screen size.
button: Zooms in the projected image.
+ button: Zooms out the projected image.
3) Use the cursor button ( ) to move the screen position
up / down / left / right.
In the PIP mode, the small screen will be adjusted,
whereas the left screen will be adjusted in the POP
mode.
Freezes the projected image only.
1) Press the Freeze button on the remote controller.
The projecting image will be frozen.
2) Press the Freeze button again to resume projection.
Zooms in/out the video screen.
1) Press the Zoom button.
2) button: Zooms in the projected image.
+ button: Zooms out the projected image.
3) Press the Zoom button again to exit from the magnified or
shrunken screen.
Auto
Window mode
Freeze
Zoom
Icon Menu Remote
controller
Control
Panel

26
Adjustments
Adjustments
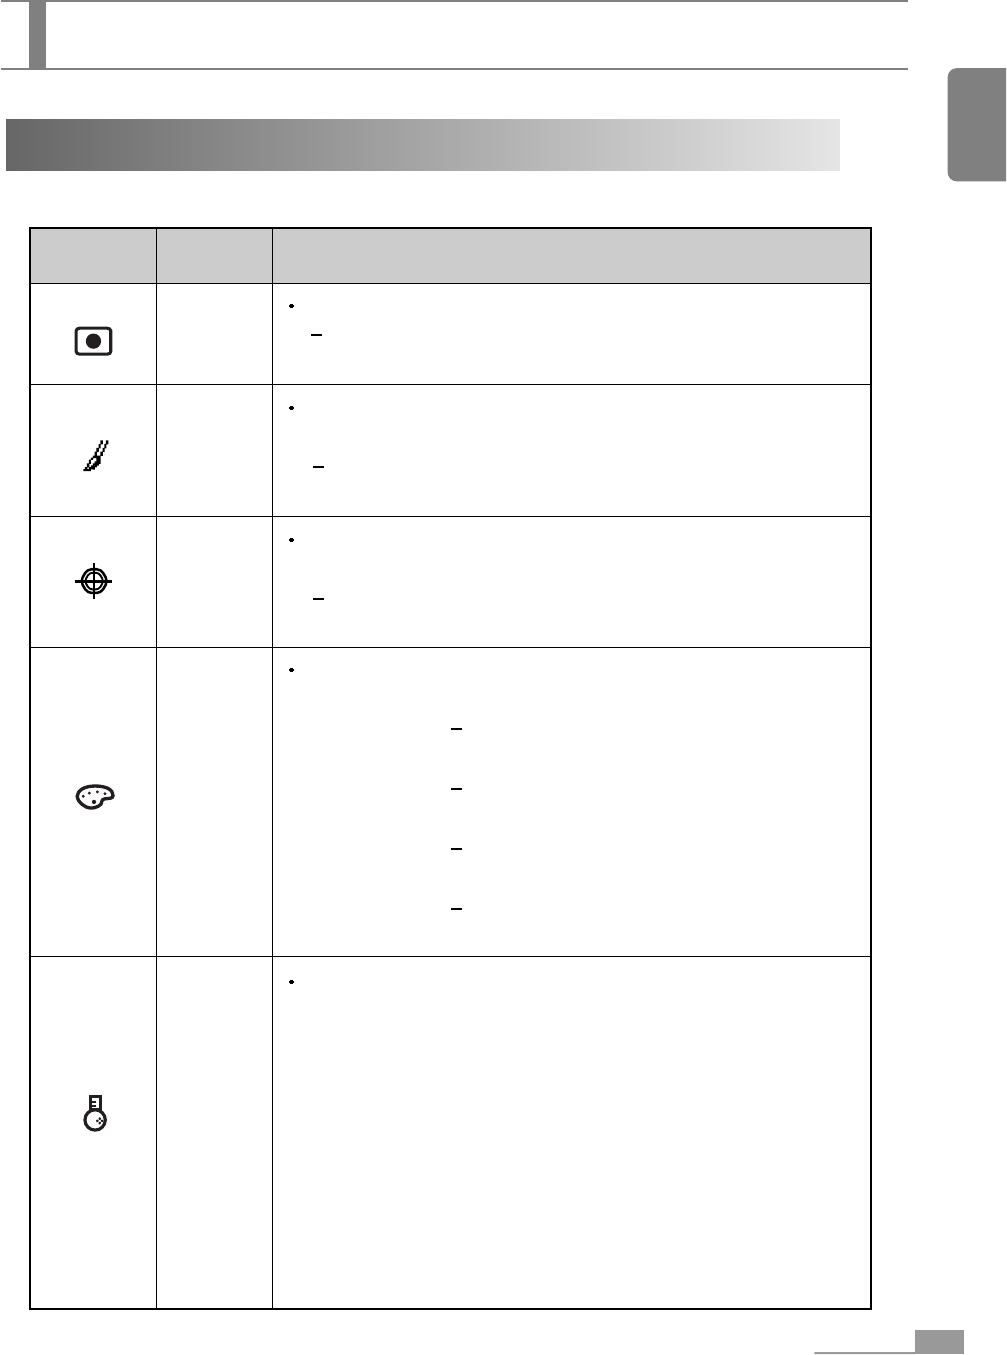
Image Adjustments
Icon Menu Function Description
Adjusts screen brightness.
button: Screen becomes darker.
+ button: Screen becomes brighter.
Compensates for the dark screen when displaying the movie
file in the PC. Screen becomes brighter and contrast sharpens.
, + button: Enable / Disable toggle button.
Enable: i-Brightness function is activated. Screen becomes brighter.
Disable: i-Brightness function is deactivated. Screen resumes
normal display.
This function will be disabled if the input signal comes
from the video.
Adjusts image intensity when the image is blurred or dark.
button: Screen intensity becomes darker.
+ button: Screen intensity becomes brighter.
Changes image contrast. It makes the bright section brighter and
the dark section darker.
button: Contrast decreases, which reduces difference between
bright section and dark one.
+ button: Contrast increases, which increases difference between
bright section and dark one.
Brightness
i-Brightness
Intensity
Contrast
+
27
English
Adjustments
Adjustments
Image Adjustments (continue)
Icon Menu Function Description
Adjusts depth of color (saturation).
button: Screen color becomes light.
+ button: Screen color becomes dark.
Adjusts balance between green and red color while not changing
the blue color.
button: Red color is added to the image.
+ button: Green color is added to the image.
Adjusts the image if the image border line becomes blurred or too
strong.
button: Image border line (outline) becomes blurred.
+ button: Image border line (outline) becomes more clear.
Adjusts color sensation by controlling red, green, blue or yellow
color.
Video/Computer R: Red color becomes weaker,
+ R: Red color becomes stronger.
Video/Computer G: Green color becomes weaker,
+ G: Green color becomes stronger.
Video/Computer B: Blue color becomes weaker,
+ B: Blue color becomes stronger.
Video/Computer Y: Yellow color becomes weaker,
+ Y: Yellow color becomes stronger.
You can select five user modes optimized for the operational
environment.
Standard: General color mode. Input image will be presented
naturally.
Cinema: Move color sensation becomes richer.
Presentation: Widens the color presentation range so that the
computer input signal can be projected without
change. Therefore, color is presented more clearly.
Sport: Emphasizes green and blue color to present vivid image.
Game: Rough image of the game screen is presented softly so
that more vivid image can be obtained.
Saturation
Hue
Sharpness
ICC
Color Mode
28
Adjustments
Adjustments
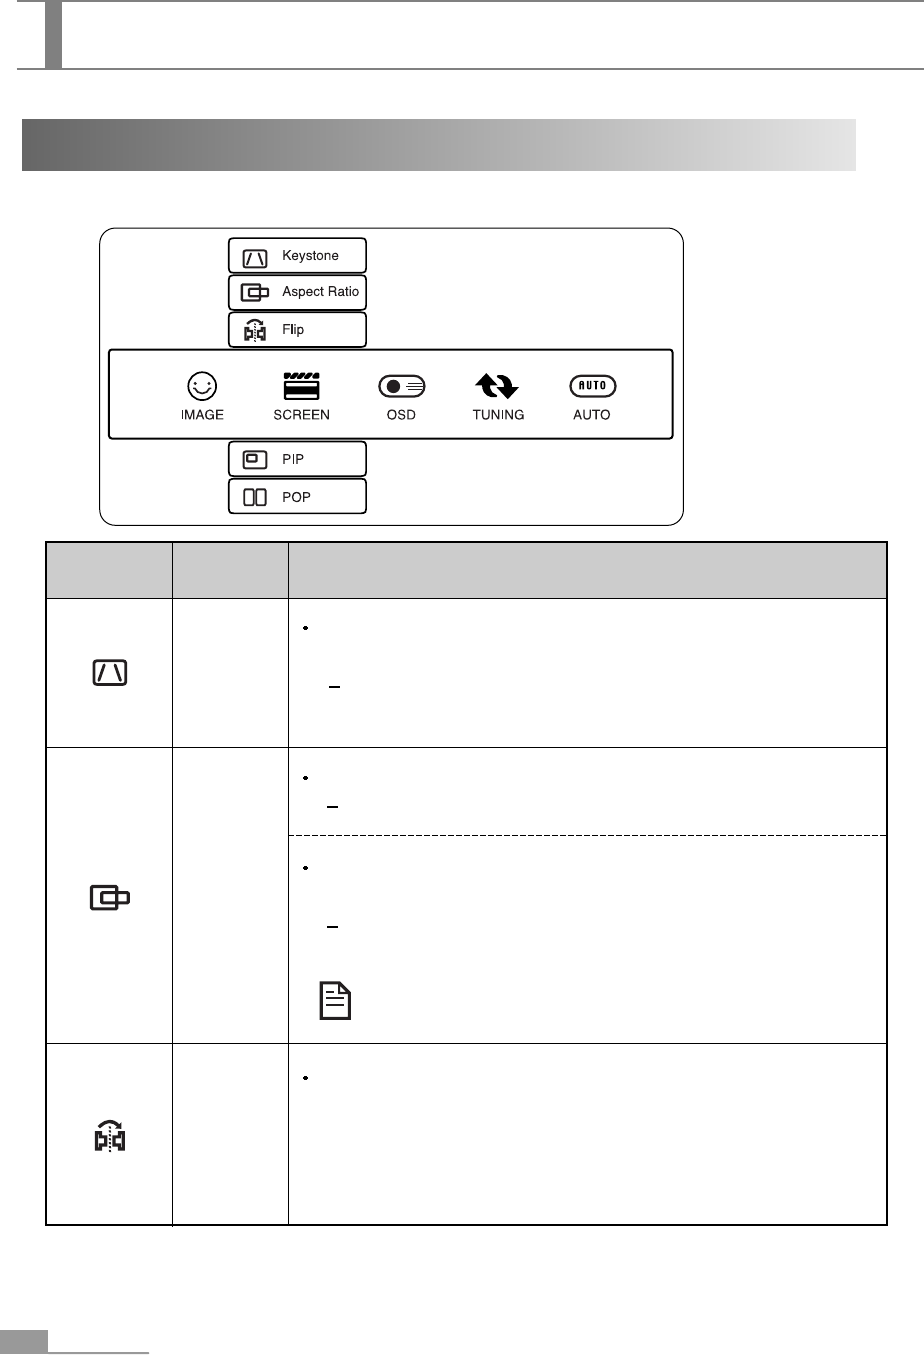
Screen Adjustments
Icon Menu Function Description
Adjusts screen size when the upper side and the lower size
mismatch in size depending on the projection angle.
button: The lower screen part becomes narrower.
+ button: The upper screen part becomes narrower.
Selects the screen aspect ratio.
, + button: Toggles between 4:3 or 16:9 aspect ratio.
16:9 aspect ratio.
Selects 16:9 aspect ratio position.
, + button: select one of top, middle or bottom.
This function is disabled when the input signal comes
from the computer.
Flips the screen left/right or up/down,
Left/Right Disabled: Normal screen.
Left/Right Enabled: Screen flips left/right from Left/Right Disable.
Up/Down Disabled: Normal screen.
Up/Down Enabled: Screen flips up/down from Up/Down Disable.
Keystone
Aspect
Ratio
Flip
29
English
Adjustments
Adjustments
Screen Adjustments (continue)
Icon Menu Function Description
Displays the small computer screen on the video screen or small
video screen on the computer screen.
+: Changes from Video Computer V on C C on V
Video: Video screen will be displayed on the entire screen.
Computer: Computer screen will be displayed on the entire screen.
V on C: Small video screen will be displayed on the entire
computer screen.
C on V: Small computer screen will be displayed on the entire
video screen.
This function is enabled only when more than two input
signals are available.
Displays the video and computer screen with the same size.
+: Changes from Disable C vs V V vs C.
Disable: The currently selected screen will be displayed.
C vs V: Computer screen will be displayed on the left side and the
video screen is displayed on the right side.
V vs C: Video screen will be displayed on the left side and the
computer screen is displayed on the right side.
This function is enabled only when more than two input
signals are available.
PIP
POP

30
Adjustments
Adjustments
Menu Adjustments
Icon Menu Function Description
Size
Selects the menu screen size - normal or double.
Normal: Sets the normal menu screen.
Double: Sets the menu screen two times bigger than the normal
menu screen.
Grid
Normal: The menu screen will be displayed normally.
Grid: The menu screen will be displayed with a grid format.
Changes the menu screen display position.
, + button: Center TopLeft TopRight BottomRight
BottomLeft.
Changes color transparency in the menu area.
You can adjust color sensation by red, green or blue color.
Changes the menu display language.
You can display the menu in Korean or English.
Display
Position
Transpa-
rency
Language
31
English
Adjustments
Adjustments
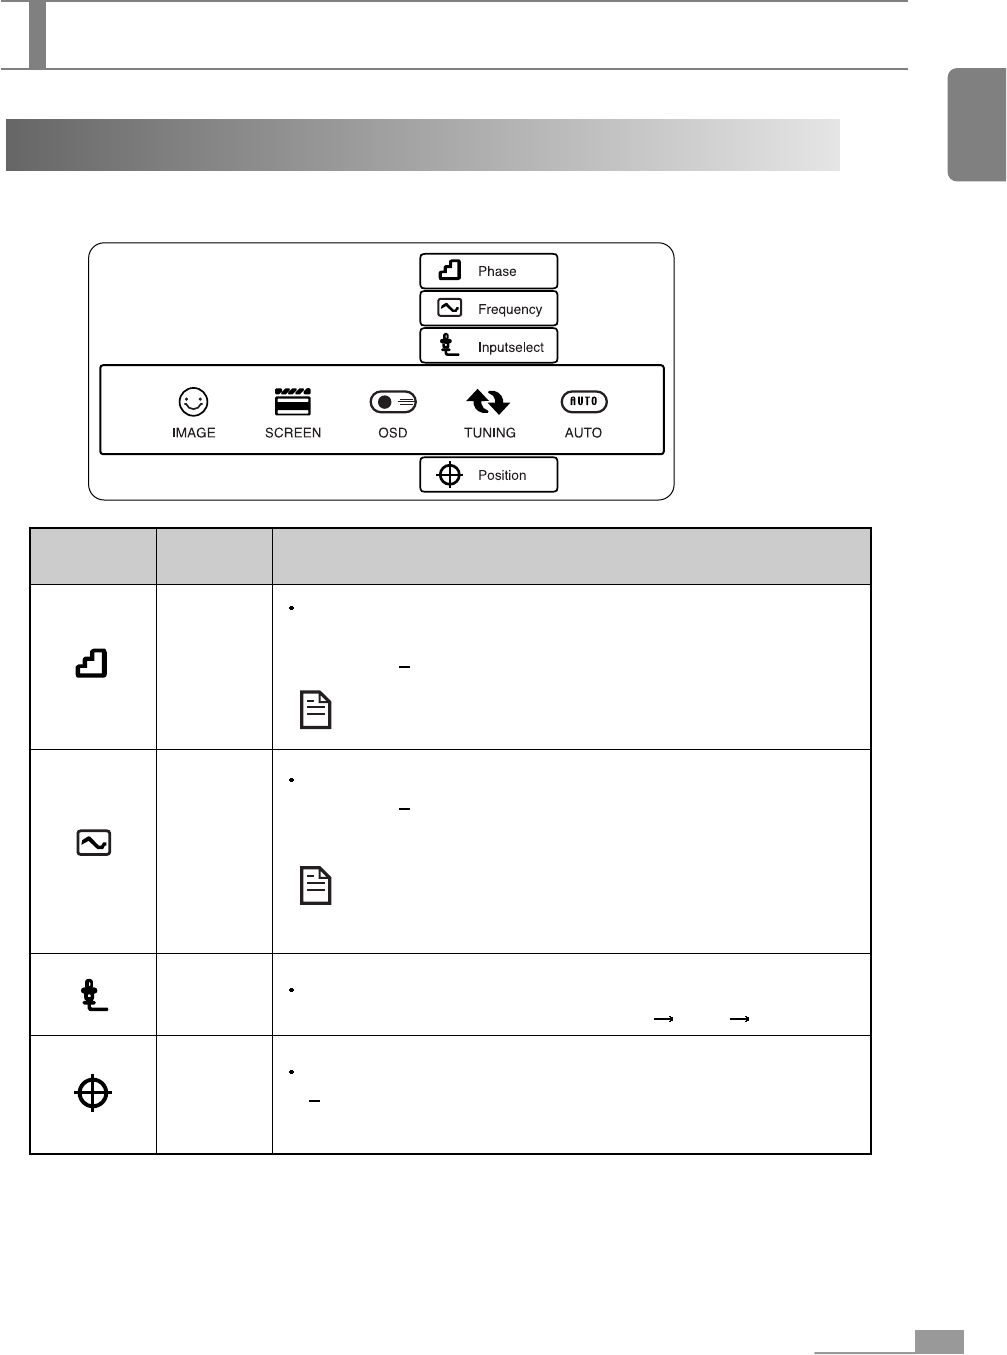
Tuning Adjustments
Icon Menu Function Description
Corrects noise to the horizontal direction when displaying the
computer input.
Press the " " or "+" button for adjustment until noise is removed.
This function is enabled only when the input signal
comes from the computer.
Corrects strip noise when displaying the computer input.
Press the " " or "+" button for adjustment until strip noise is
removed.
Refrain from using this function as much as possible
since correct adjustment can be made using the
automatic adjustment menu.
Changes the input source that will be projected into the screen.
+: Changes the input source from S-video Video Computer.
Changes the screen position vertically or horizontally.
button: Moves to the left horizontally and upwards vertically.
+ button: Moves to the right horizontally and downward vertically.
Phase
Frequency
Input Select
Position
32
Adjustments
Adjustments
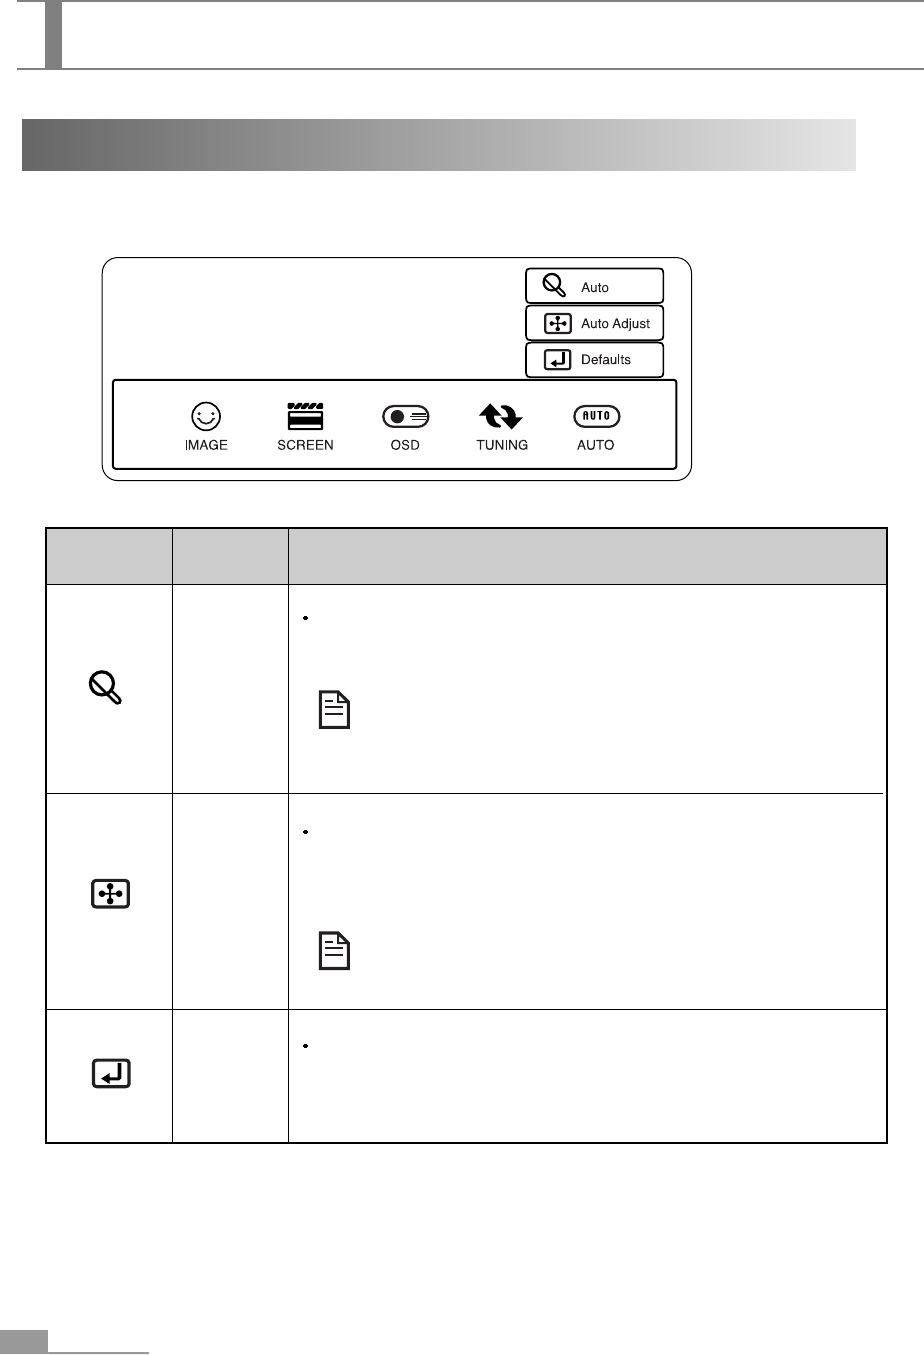
Automatic Adjustments
Icon Menu Function Description
Automatically detects the projector input signal. (Default: Off)
+: Enables the automatic adjustment function.
Press the INPUT button on the remote controller or the
INPUT/ESC button on the control panel to change the
projector input signal.
Automatically adjusts phase, frequency and position when displaying
the computer input.
: Returns to the off mode when automatic adjustment is made.
This function is enabled only when the input signal
comes from the computer.
Returns to the factory default value.
Select: Returns to the default value.
Selected value will be off after returning to the default value.
Auto
Auto Adjust
Defaults
33
English
Troubleshooting
Troubleshooting
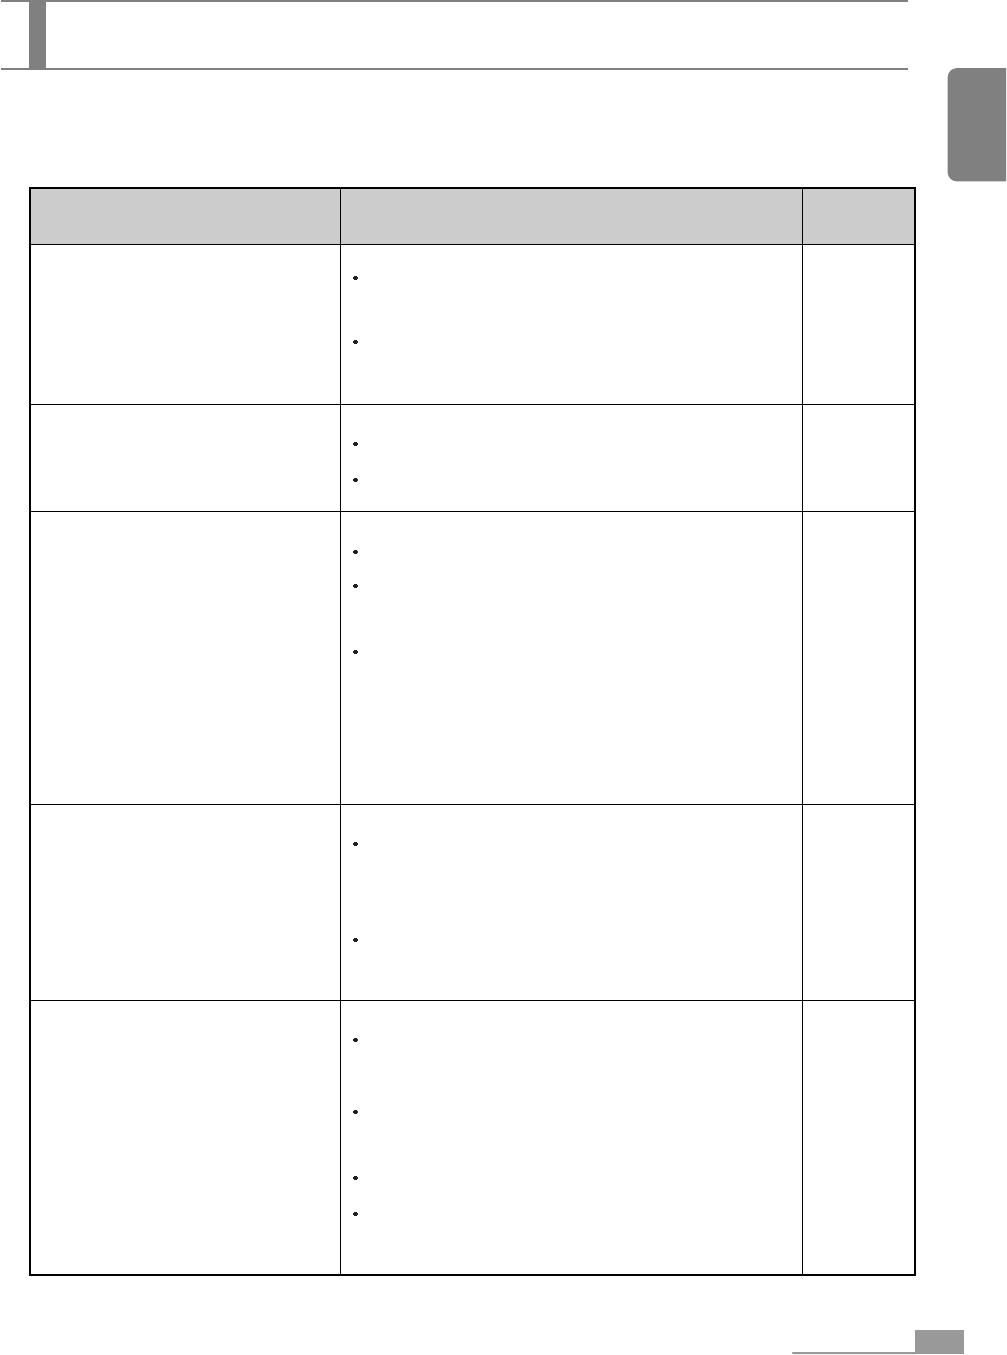
Symptom Probable Cause and Corrective Action Page
The following table describes the problems that can occur while using the projector or installing the
projector as well as its resolution.
Before consulting your authorized dealer, please check the following points.
The warning lamp blinks every
0.5 second.
The power indicator lamp blinks
every 0.5 second with green and
yellow color by turns.
The power lamp is turned on with
yellow color.
The power lamp is turned on with
green color.
Video image does not appear.
Lamp is not available. Insert a lamp inside the
projector.
If you turn on the projector without a lamp, a malfun-
ction may occur.
Cooling down is in progress.
Cooling down takes about 2 seconds.
Implies the waiting mode.
Press the Power button on the remote controller or
top surface of the projector to start projection.
To start projection, press the Power button on the
remote controller or top surface of the projector to
start projection at least one second after switch on.
(If you press the button within one second, the pro-
jector may not be started due to self-diagnosis.)
If you press the Power button in the waiting mode,
the power indicator lamp turns to green color and
warning-up starts.
Warming-up takes about one minute. The projection
screen will be brighter piecemeal.
See if the power is in the waiting mode.
(Yellow color on)
Press the Power button on the remote controller or
top surface of the projector.
See if lens cap is on.
Cooling time is needed to shut down the power
compulsory. (about two minutes)
9
9
9,10
9
9,10
34
Troubleshooting
Troubleshooting
Symptom Probable Cause and Corrective Action Page
See if the signal is being received.
See if the cable for projection is properly connected.
See if the power saving function is enabled in case
of the computer input.
See if the frequency and resolution of the computer
are within the range of the one in the standard
signal mode table of the projector.
Adjust focus with the ring of the lens.
(The minimum distance to adjust focus is 1 meter.)
Set the projector at the correct distance.
(Recommended distance is 1 ~ 8.3 m)
(See the projection distance for each screen size.)
Adjust brightness.
See if the lens is clean. If not, clean it.
Press the i-Brightness button on the remote
controller or top surface of the projector.
(It compensates both brightness and contrast of the
video from the computer input.)
Adjust brightness and contrast.
Replace the lamp.
(The recommended lamp life is 3,000 hours.
Replace it earlier if the video looks darker.)
12,13
37
16
11
27
38
9,10
26
40
Video image does not appear.
Video image is fuzzy.
Video by computer input signal is
abnormally dark.
Video image is abnormally dark.
35
English
Troubleshooting
Troubleshooting
Symptom Probable Cause and Corrective Action Page
Adjust ICC or hue.
Adjust saturation.
Adjust brightness and contrast.
Adjust screen flip.
Use the Keystone button on the remote controller or
top surface of the projector.
See if the projector remote sensor is blocked.
See if the distance from the remote controller to the
projector is within the operation distance range.
(Operational distance: About 6 meter.
Operational angle: About 30 horizontally and
15 vertically.)
See if the remote sensor is exposed to the too
bright place.
(The remote controller may not work normally under
the direct sunlight or fluorescent lamp.)
See if batteries are installed correctly.
Replace with new batteries.
27
27
26
28
9,10
8
11
8
10
Color is poor or unstable.
Video seems reversed in left/right
or up/down position.
The upper part of the video image
bows or distorts.
Remote control unit does not work.
36
Miscellaneous
Miscellaneous
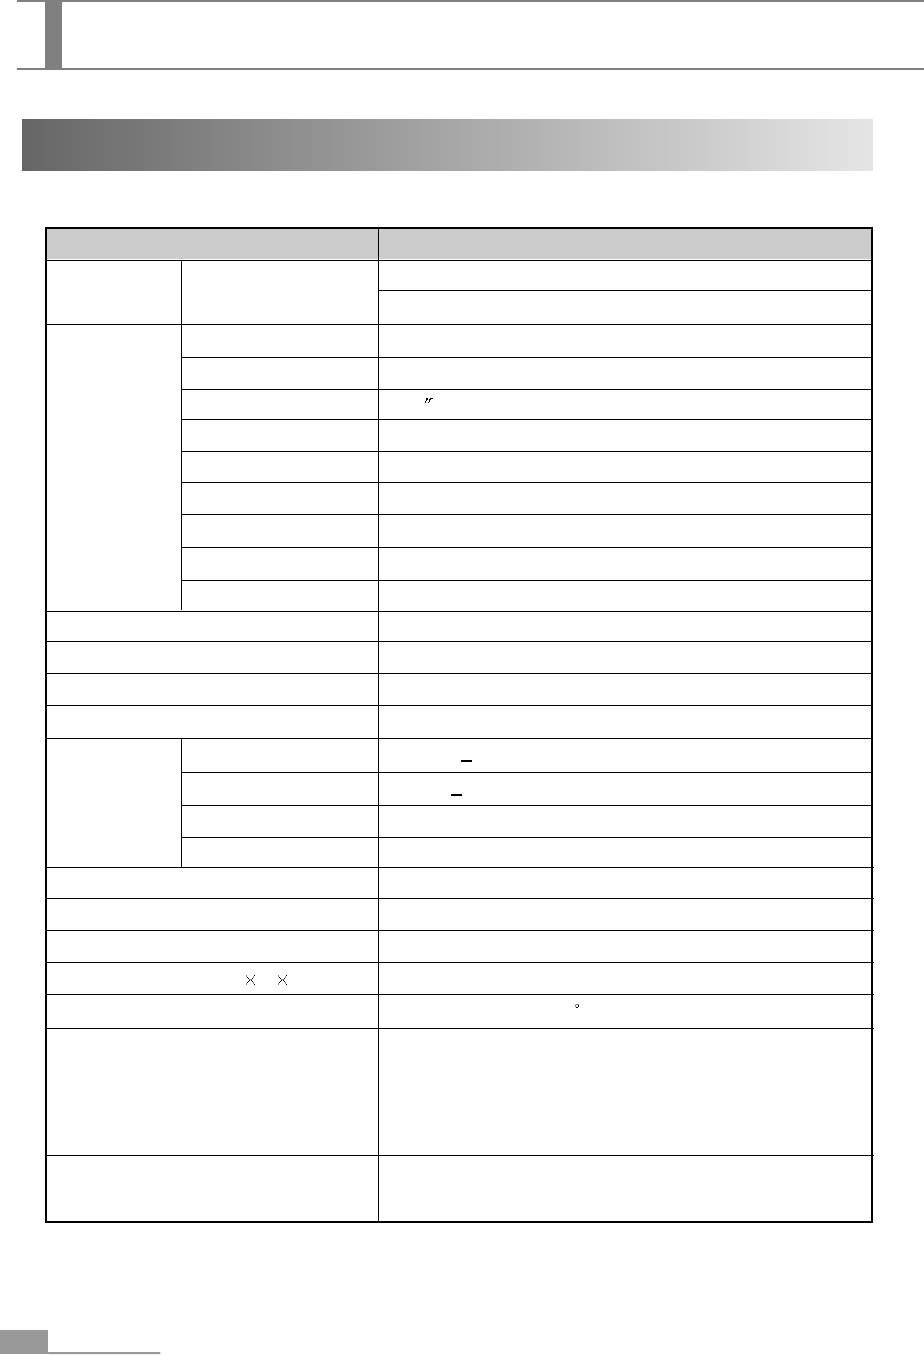
Specifications
ES130
Input Resolution: VGA ~ XVGA
Vertical frequency: 56 ~ 85Hz
NTSC, PAL, SECAM (Automatic switching)
3 panel transmitted light type
0.7
TFT active matrix
SVGA (800 x 600)
350:1
16.7 million color
1,100 Ansi Lumens
English
Zoom lens F/1.7~ 2.1, F=26 ~ 32mm
150W (Lifetime 3,000hrs)
40 ”~ 200 ”
1.33m ~ 8.33m
Mini 15 pin D-sub
Mini 4 pin DIN
RCA terminal
RS-232C
220W
AC 110 ~ 220V, 50/60Hz
2.9kg
220 x 305 x 102.5mm
Temperature : 0 ~ 40 C, Humidity : 30 ~ 70%
ICC(Independent Color Control)
PIP(Picture in Picture) , POP(Picture out Picture)
i-Brightness, Digital Zoom, Optical Zoom, Digital
Keystone, Freeze
Carry-on Case
Lens
Lamp
Projection Screen Size
Projection Distance
PC Input
Color System
Display Method
Panel Size
Emission Method
Resolution
Contrast Ratio
Number of Colors
Projection Brightness
OSD Language
PC Input terminal
S-Video Input terminal
Video Input terminal
Control terminal
Power Consumption
Power Input
Weight
Dimension (W DH)
Operation Environment
Major Functions
Accessories
Model Name
Type of Input
Signal
Output
Connection
terminal

37
English
Miscellaneous
Miscellaneous
Standard Signal Table
37.861
37.927
31.469
37.861
37.500
43.269
35.156
37.879
48.077
46.875
53.674
48.363
56.476
60.023
68.677
60.000
63.981
79.976
91.146
85.080
85.039
59.940
72.809
75.000
85.008
56.250
60.317
72.188
75.000
85.061
60.004
70.069
75.029
84.997
60.000
60.020
75.025
85.024
31.500
35.500
25.175
31.500
31.500
36.000
36.000
40.000
50.000
49.500
56.250
65.000
75.000
78.750
94.500
108.000
108.000
135.000
157.500
+ /
/ +
/
/
/
/
+, / +,
+ / +
+ / +
+ / +
+ / +
/
/
+ / +
+ / +
+ / +
+ / +
+ / +
640 350
720 400
640 480
640 480
640 480
640 480
800 600
800 600
800 600
800 600
800 600
1024 768
1024 768
1024 768
1024 768
1280 960
1280 1024
1280 1024
1280 1024
VGA
SVGA
XGA
SXGA
WXGA
Mode Resolution Horizontal
Frequency
(kHz)
Vertical
Frequency
(Hz)
Clock
Frequency
(MHz)
Sync.
Polarity
(H / V )
38
Miscellaneous
Cleaning
Clean the projector if it is dirty or the projected image quality is degraded.
Maintenance and Repair
Clean the external parts of the projector with soft cloth.
If the external part of the projector is too dirty, dip the cloth into a detergent fluid that is half mixed
with water and scrub the surface. Then, scrub it with a dry cloth again.
Cleaning the External Parts of the Projector
Read the safety precautions carefully and comply with instructions before
cleaning the projector.
Make sure to turn off the projector and remove the power cord before cleaning
the projector.
Do not use the active solvents such as wax, alcohol and thinner because the
external color can be de-colored or damaged.
If you have to use the detergent, make sure to scrub it out.
Miscellaneous
To clean a lens, use the air spray or lens cleaning paper that you can buy at the market.
How to clean alens
1) Beat the dust out of the lens surface using an air spray.
2) Shake the dust off again using a soft brush.
3) If a lens is stained with fingerprint or foreign object, dip the lens tissue paper into the lens cleaning
fluid and scrub the lens softly.
4) When the fluid is dried up, finish cleaning with soft cloth.
Cleaning a Lens
The lens surface can be easily damaged.
Therefore, use the soft materials always.
Miscellaneous
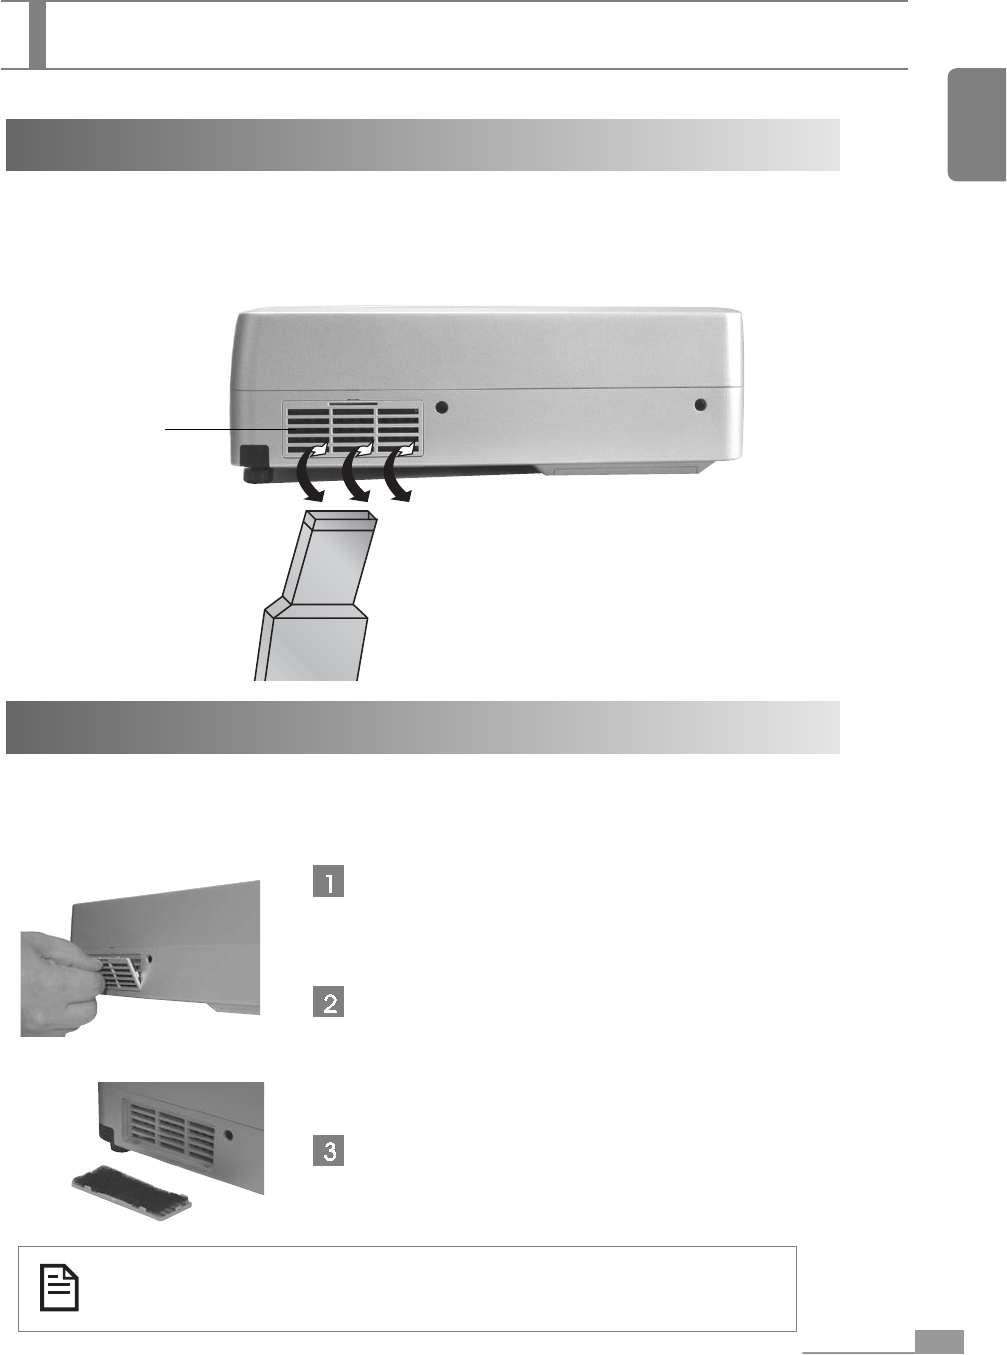
If dirt has gotten in or blocked by the foreign objects, ventilation performance will be degraded and
can cause a malfunction due to overheat inside the project.
Clean dirt and foreign objects using a vacuum cleaner or replace with new one.
If you cannot remove dirt and foreign objects using a vacuum cleaner, replace the air filter.
Cleaning the Air Filter
Replacing the Air Filter
If the air filter is damaged or the dir has gotten in, you have to replace the filter.
Consult the authorized dealer where you purchased the projector.
Air Filter
39
English
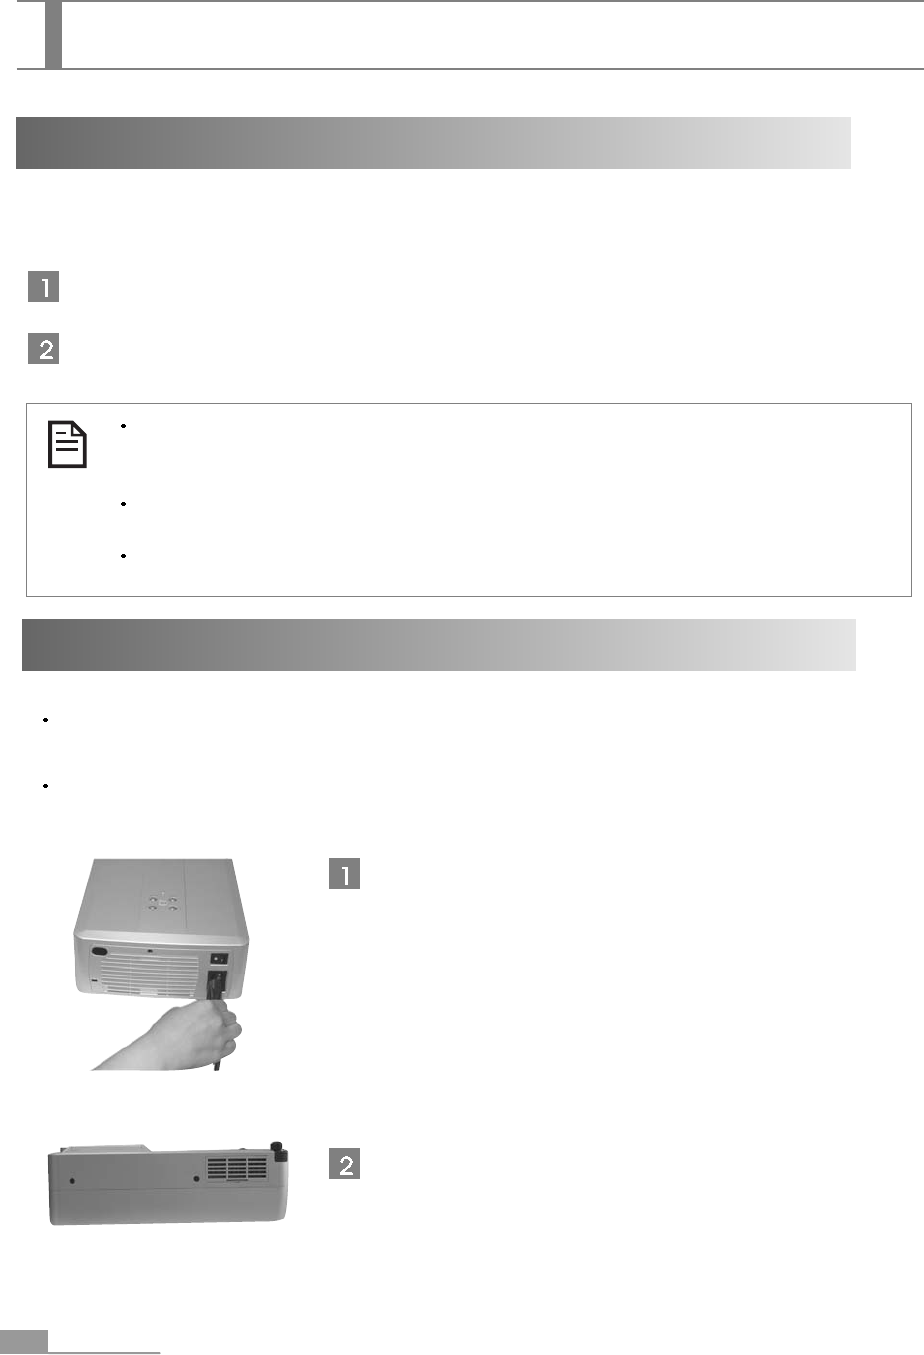
Miscellaneous
Unplug the power cod after cooling down.
Pull down the hook on the upper side of the air filter cover,
located at both sides of the projector, to remove it.
Replace with a new air filter and reinstall the filter. Than,
press softly to fix it.
40
Miscellaneous
When you replace the lamp while using it due to a malfunction, take time until the lamp is cooled
down completely.
The lamp can be broken. Pay attention when replacing it.
Replacing the Lamp
Turn off the projector and wait until the cooling down procedure
is completed. Then, remove the power cord from the power
consent.
Wait until the lamp is completely cooled down. And, turn the
projector upside down so that the bottom faces upwards.
Miscellaneous
Please purchase the new lamp unit under the following circumstances.
Time to Replace the Lamp
The projector lamp is not turned on or the screen disappears while it is in use.
Brightness and the quality of the projected image is deteriorated compared wit the initial usage.
The life of the lamp currently used for this projector is about 3000 hours.
However, it the lamp is not turned on, replace with new one regardless of the life
of the lamp.
Get a replacement lamp ready since the lamp can be broken before reaching 3000,
depending on the characteristics of the lamp and the operation environment.
Purchase the replacement lamp from the authorized dealer where you purchased the
projector.
41
English
Safety Precautions
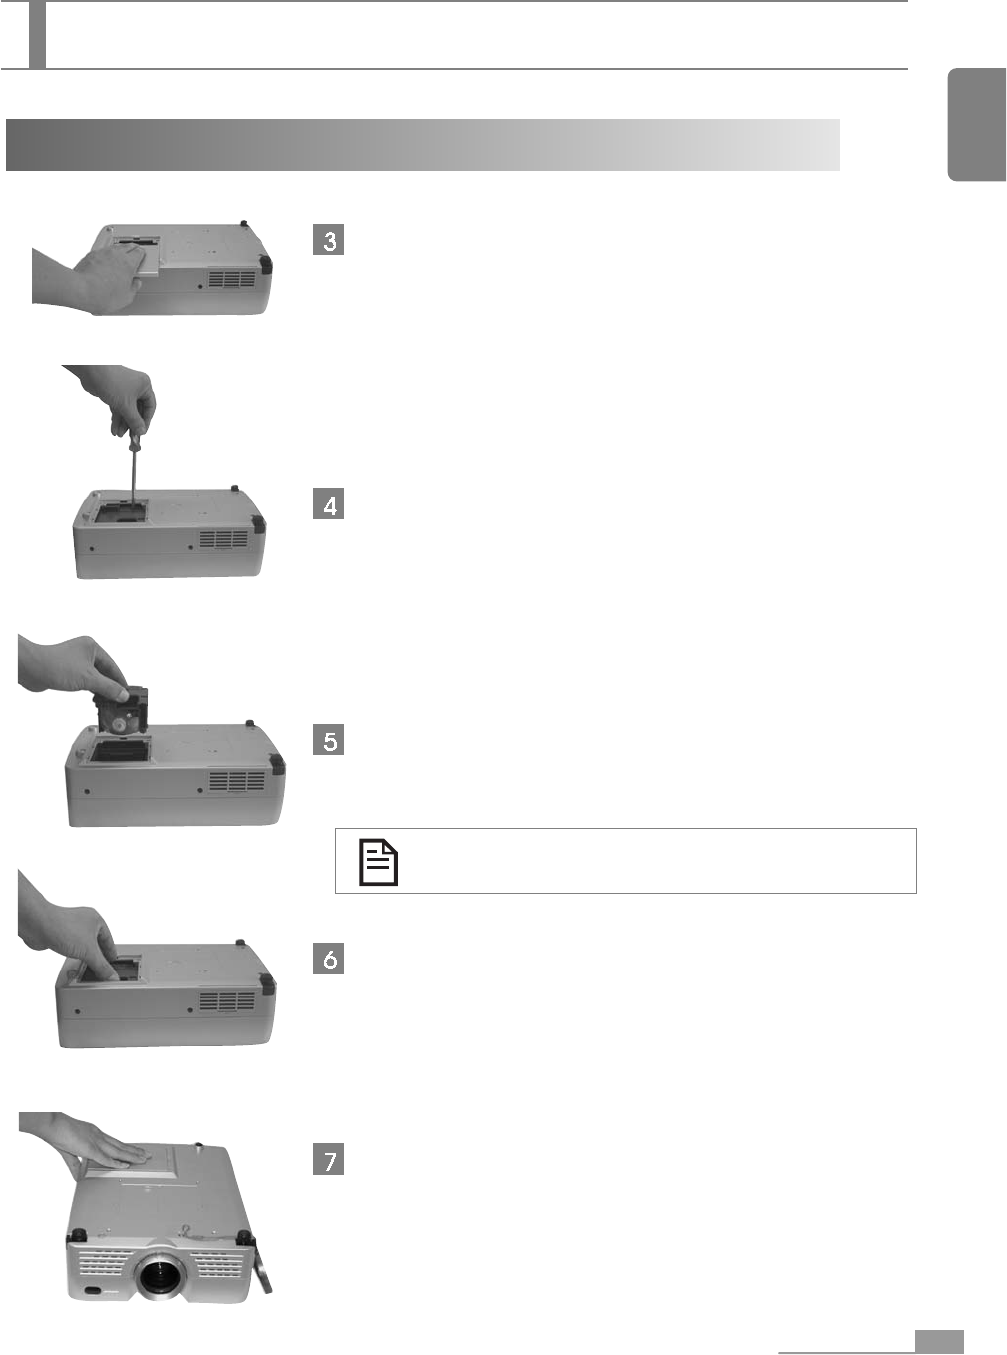
Time to Replace the Lamp (continue)
Push the lamp cover to the arrow direction to remove it
from the projector.
Loosen the two screws with a (+) screwdriver.
Remove the lamp unit.
Hold the handles at both sides of the lamp and pull it up to
remove from the projector.
Insert the new lamp unit fully in.
Hold the lamp using the same method used for removal and push
into the replacement point inside the projector.
Then, tighten the tow screws.
Push back the lamp cover to the arrow direction until you can
hear a click sound.
Miscellaneous
Do not touch the glass surface of the lamp directly
with your hand. Wear the gloves.
42
Customer Service Information
If the EXTRAMA you use is not working properly or cannot solve the problem using the
troubleshooting points in this instruction, contact the customer service center as described below.
www.extrama.co.kr
Please visit the EXTRAMA web site (http://www.extrama.co.kr) for diverse and detailed
information on new products and Q&A.
+82+080-263-0914
Free call number
Customer Support Center
EXTRAMA
Customer Service Information