Hyundai IBT LT32DW002 32" LCD TV User Manual ATT E manual
Hyundai IBT Corp. 32" LCD TV ATT E manual
Users Manual

FCC ID : PJILT32DW002
HYUNDAI CALIBRATION & CERTIFICATION TECHNOLOGIES CO., LTD.
SAN 136-1, AMI-RI, BUBAL-EUP, ICHEON-SI, KYOUNGKI-DO, 467-701, KOREA
TEL:+82 31 639 8517 FAX:+82 31 639 8525 www.hct.co.kr
Report No. : HCT-F06-0403 1/1
ATTACHMENT E.
- USER’S MANUAL -

FCC Information
User Instructions
The Federal Communications Commission Radio Frequency Interference Statement includes
thefollowing warning :
NOTE : This equipment has been tested and found to comply with the limits for a Class B digital
devicepursuant to Part 15 of the FCC Rules.
These limits are designed to provide reasonable protection against harmful interference in
aresidential installation. This equipment generates, uses, and can radiate radio frequency energy and,
ifnot installed and used in accordance with the instructions, may cause harmful interference to
radiocommunications. However, there is no guarantee that interference will not occur in a
particularinstallation.
If this equipment does cause harmful interference to radio or television receptions, which can
bedetermined by turning the equipment off and on, the user is encouraged to try to correct
theinterference by one or more of the following measures :
• Reorient or relocate the receiving antenna.
• Increase the separation between the equipment and receiver.
• Connect the equipment into an outlet on a circuit different from that to which the receiver isconnected.
• Consult the dealer or an experienced radio/TV technician for assistance.
User Information
Changes or modifications not expressly approved by the party responsible for compliance could
voidthe user’s authority to operate the equipment.Connecting of peripherals requires the use of
grounded shielded signal cables.

HYUNDAI LCD TV
Important Tip
Image Retention Effect (Image Sticking)
1. Cause :
- Image Retention Effect may come from displaying a still picture in certain period of time with at a
certain area continuously, as the feature of LCD panel. This is caused due to brightness degradation.
Many LCD manufacturers are trying to overcome this limitation.
2. Prevention
- To avoid this matter, use the product after reducing brightness and contrast, especially when a still
image is displaying for a long time. (Contrast 50/Brightness 50 - See 32 page)
Once image retention occurs, use the mode that displays more motion pictures. It will help reduce this
matter.
3. Solution
- The temporary image sticking would decrease with displaying Full-White pattern during 10 hours.
* The permanent image sticking could not take off under the latest technology.
This method may be used to eliminate a temporary retained image that occurs after displaying a still
image for a certain period of time. Since it may take several minutes to several hours to remove image
sticking, it is recommendable to display motion pictures during 2~3 minutes every hour when keeping
displaying a still image. As image sticking is influenced by the brightness of a still image being
displayed and its display time, it is recommended that you reduce the brightness of the screen when
displaying a still image for a long time.
* Image Sticking does not come under the warranty.
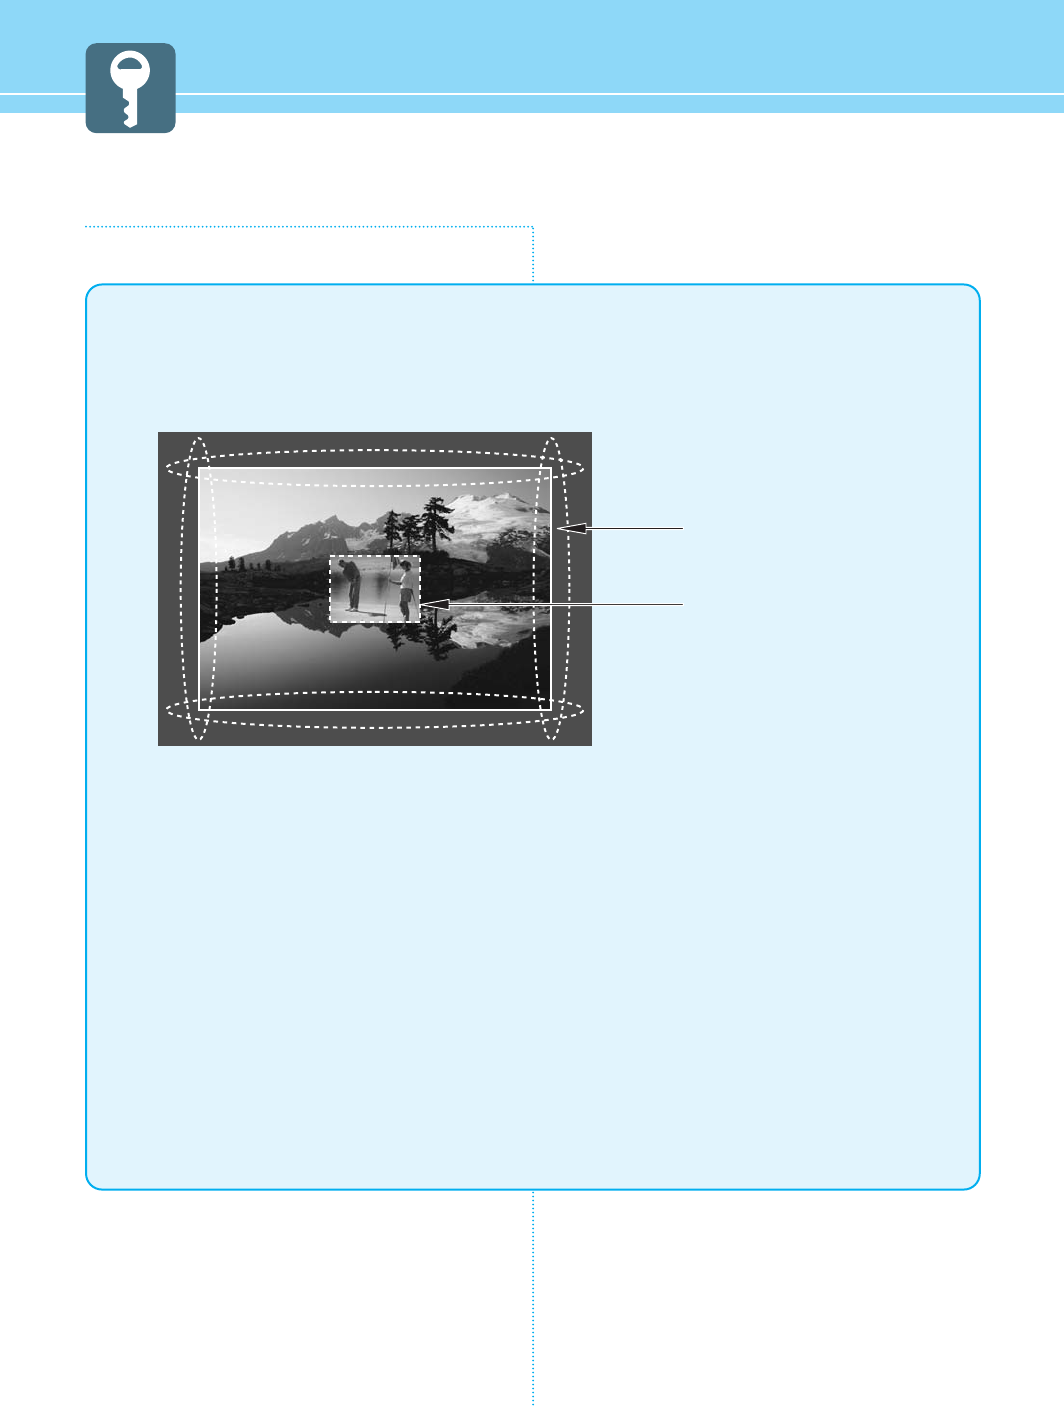
Image Sticking Precaution
When watching a still Image within motion pictures and
Panorama/Wide/4:3 screen
1. Note :
- When the central area of the screen and the screen edges are fixed, the different brightness level of
the edges may cause image retention on the edges when watching for a long time
- This phenomenon is the same matter to other LCD manufacturers. Please do not watch a still image
for a long time.
- If you watch a still image for a long time, this may damage your TV.
* This matter does not come under the warranty.
Panorama, Wide, 4:3 screen
Box still image

HYUNDAI LCD TV
Features
Integrated HDTV
An HDTV has a built-in ATSC digital tuner.
It does not need a separate set-top box to receive over the-air DTV signal.
Dual Scan/Multi-Viewing
You can program analog TV broadcasting and digital TV broadcasting automatically at the same time
for multi-viewing.
A Wide Array of Screen Settings
You can choose different screen settings depending on the type of program you are watching or the
surrounding conditions (the outside weather conditions). You can switch among Standard, and Mild
options or you can configure the screen settings for yourself.
A Wide Array of Sound Settings
You can choose an optimal sound setting for the type of program you are watching.
You can switch among custuom Standard, movies, Music, and Speech options or you can configure
the sound settings for yourself.
Favorite Channel Memory
You can memorize the channels you are watching frequently.
SRS TrueSurround XT
You can enjoy dynamic and surround sound with ordinary speakers.
Dolby-Digital
When receiving digital broadcast signal, you can enjoy dynamic and surround sound with two
ordinary speakers just like Dolby 5.1.
A Variety of Aspect Ratios
You can adjust the screen size at your preference.
Auto On/Off Function
This function allows you to turn on or off your TV at the preset time.
Game Prevention Function
This function is designed to prevent a VCR or game player from being connected to the TV.


HYUNDAI LCD TV
Table of Contents
General Information
Safety Precaution ................................................................5
Contents of the Package .......................................................9
Products Sold Separately ......................................................9
Kensington Lock Anti-theft Device ......................................10
How to Mount and Detach The Speakers ...........................11
How to adjust the view angle ..............................................12
Parts Names and Functions ................................................13
Remote Control ...................................................................17
Connections
How to Watch Both Analog and Digital Broadcasts
with a Single Antenna .........................................................19
How to Watch Both Analog and Digital Broadcasts
with Two Antennas .............................................................20
Before Connecting the Video/Audio Connections to
External Devices... .............................................................21
How to Connect a VCR/Cable Receiver ................................22
How to Connect a DTV Receiver or DVD Player ....................23
How to Connect a Camcorder/Game Player .........................24
How to Connect to a PC ......................................................25
HDMI Connection ................................................................27
How to Connect an External Visual Device ...........................29
How to Use Digital Sound ....................................................30
Picture Setup
How to Select the Picture Mode ..........................................31
How to Set the Desired Picture ...........................................32
How to Adjust the Color Temperature of the Screen ............33
How to Select the Aspect Ratio ...........................................34
How to Watch the PIP .........................................................36
How to Set the INPUT for the Sub-Picture ...........................37
How to Reduce Noise ..........................................................39
Sound Setup
How to Select the Audio Mode ............................................40
How to Adjust the Desired Audio Mode ..............................41
How to Use the Automatic Volume Control ..........................42
How to Select MTS(Multi-Channel Sound) ...........................43
How to Listen to SRS TruSurround XT (Surround) ................44
How to Set the Output of Subwoofer ...................................45
How to Set the Audio Output ...............................................46
How to Set the Digital Audio Output ....................................47
How to Set Audio Language ................................................48
Channel Setup
How to Store Channels Automatically ..................................49
How to Add/Erase Channels Manually .................................50
How to Set Favorite Channels .............................................51
How to Fine Tune Channel Reception ..................................52
How to the LNA (Low-Noise-Amplifier) Feature ...................53
Function Setup
How to Choose Your Language ...........................................54
How to Set Clock, On/Off Time, Sleep Time ........................55
How to Set the Geometry in PC Mode ..................................57
How to Set Key Lock ...........................................................58
How To Set Block Program .................................................60
How to View Closed Captions ..............................................62
DTV Setup
How to Use the Current Channel Guide ..............................64
How to Reserve TV Programs Using the Total Channel Guide
....64
How to Use TV Program Reservation ...................................65
How to Check or Cancel a Scheduled TV Program ...............66
How to Use Memory Mode
...............................67
Appendix
How to Use an External Device Using the Remote Control ...75
Glossary .............................................................................78
Troubleshooting ..................................................................81
Care and Cleaning ..............................................................83
Product Specifications ........................................................84
GENERAL INFORMATION
5
Safety Precaution
The contents of this section are provided for the safety of users and their property.
Please read the instructions carefully before using.
Do not connect multiple electrical
appliances to a single outlet.
- It may cause a fire due to overheating from
the outlet.
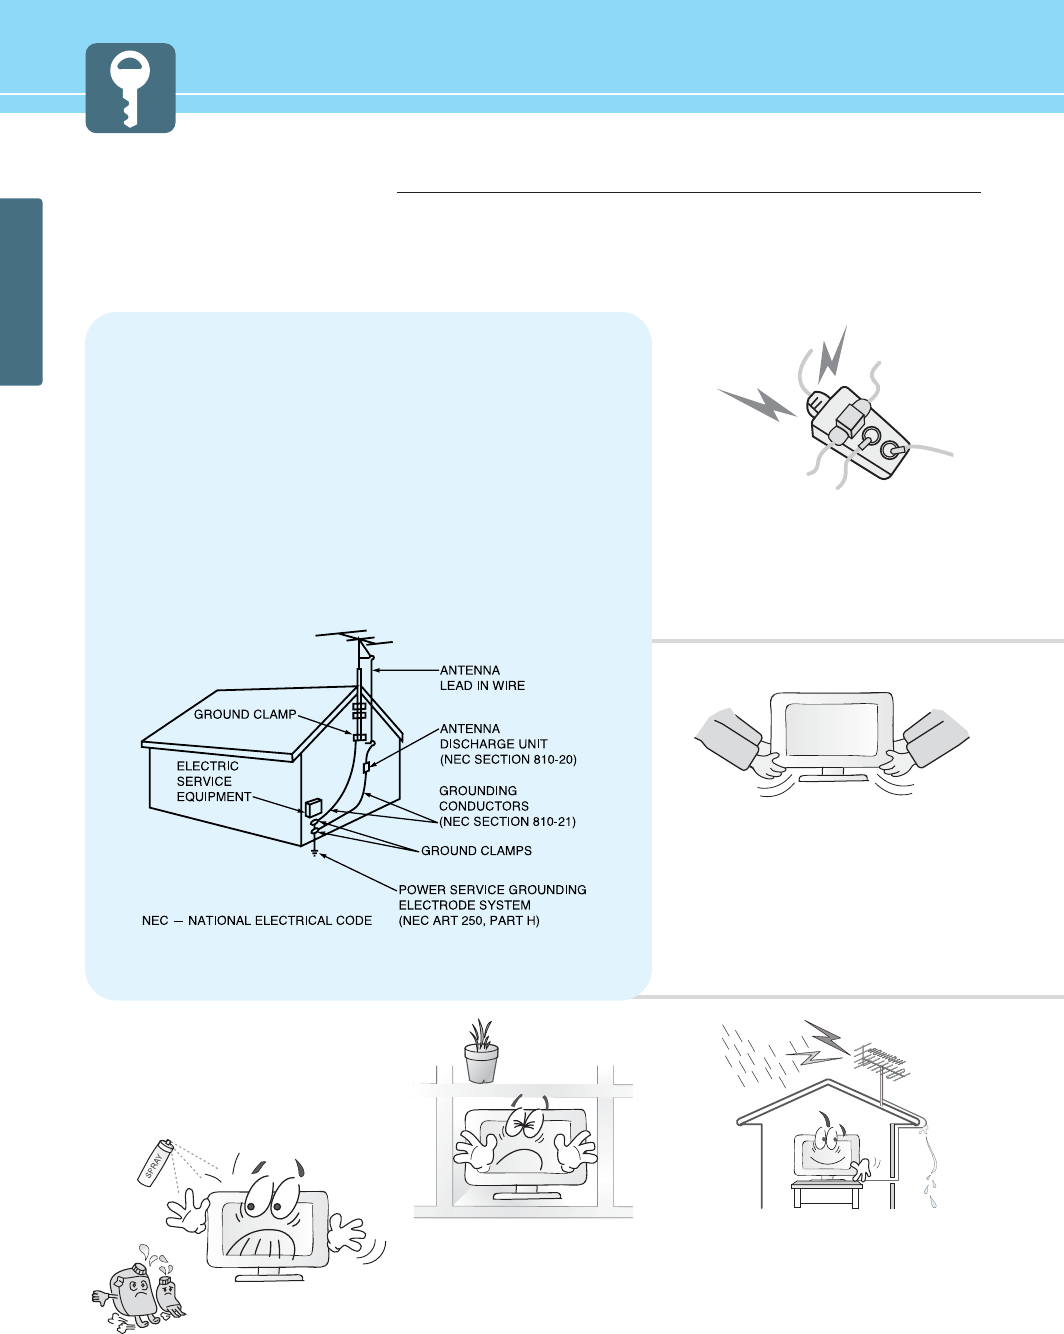
Outdoor Antenna Grounding
If an outside antenna or cable system is connected to the TV, be sure the antenna or
cable system is grounded so as to provide some protection against voltage surges
and built-up static charges. Section 810 of the National Electrical Code, ANSI/NFPA
No.70-1984, provides information about proper grounding of the mast and supporting
structure, grounding of the lead-in wire to an antenna discharge unit, size of
grounding conductors, location of antenna discharge unit, connection to grounding
electrodes, and requirements for the grounding electrode.
Example of Grounding According to National Electrical Code
Instruction
Do not use or store a flammable
spray or inflammable things near the
TV.
- They may cause explosion or fire.
Do not install the TV in a
bookshelf, closet, or a place where
there is poor air circulation.
- Fire may be caused due to the rise of
internal temperature.
Make sure to remove the speakers
before moving the TV with speakers
mounted on it.
- When the speakers are detached from the
unit while carrying it, this may cause damage
to the unit or personal injury.
Any necessary action such as making the
antenna cable loop at the entrance of the
building should be taken to prevent rainwater
on the outdoor antenna cable from possibly
running into the indoor.
- If raindrop gets into the LCD TV, it may
cause a fire or an electric shock.
6
HYUNDAI LCD TV
GENERAL INFORMATION
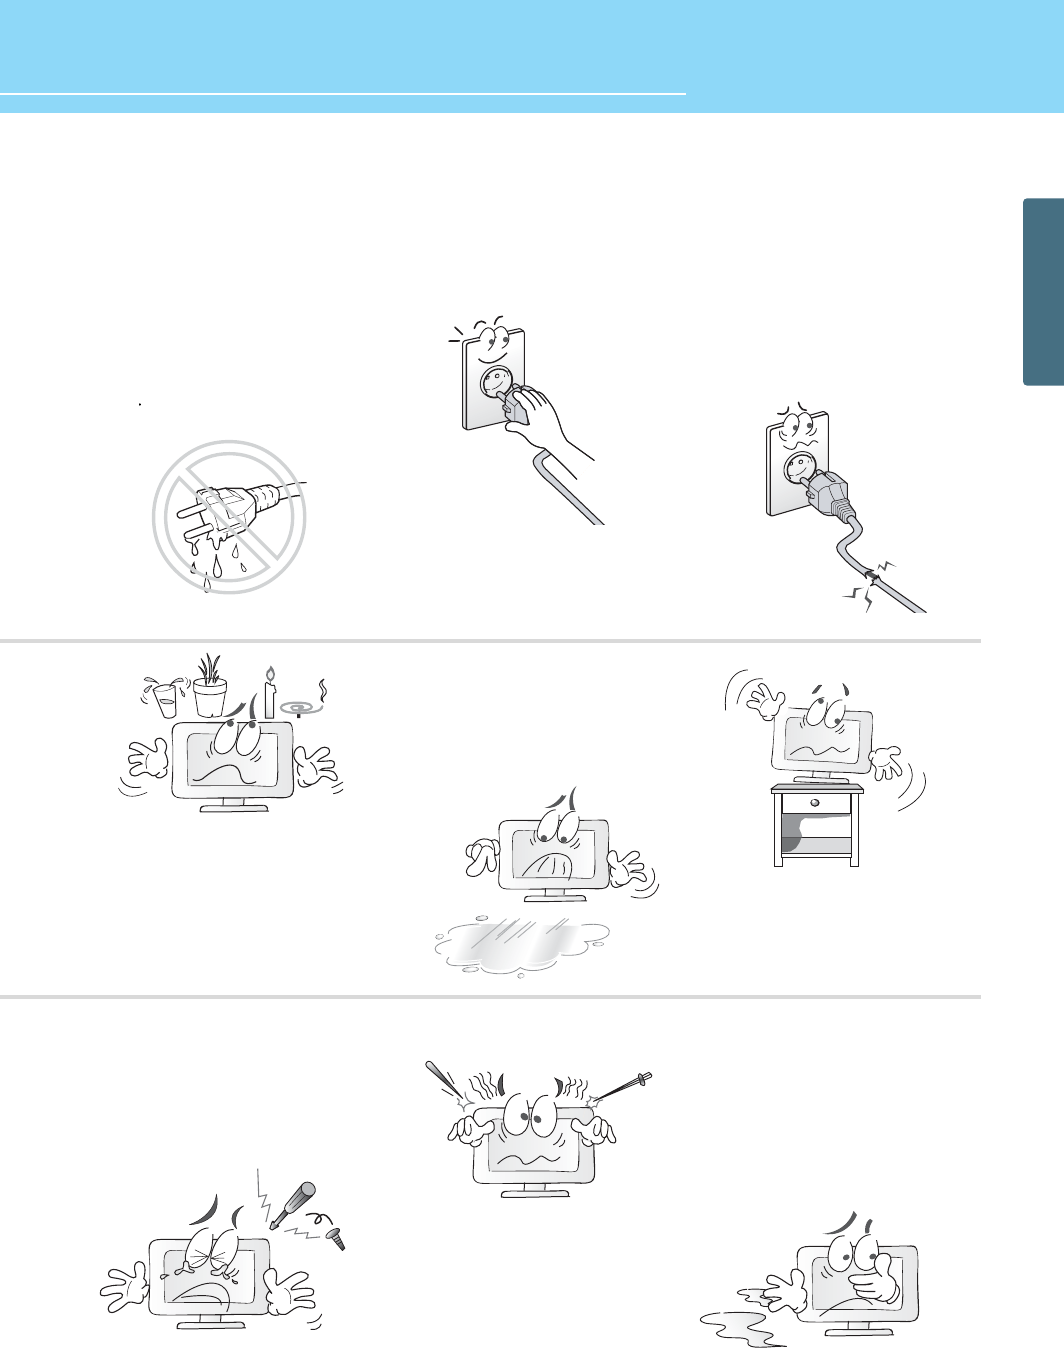
If there is a persistent accumulation
of dusts or water on the plug, please
make sure to wipe it off using a dry
cloth.
- It may cause a fire or an electric shock.
Firmly plug in the power cord so that
it does not pull out.
- An unstable connection may cause fire.
Do not use a damaged power cord
or plug, or loose outlet.
- It may cause electric shock or fire.
Do not put a water bowl, vase,
candle, bug repellant smoke,
cigarette, plants, or heavy thing on
the TV.
- It may cause electric shock or fire and also
heavy things may cause injury when they
fall.
Do not install in a place where there
is oil, smoke, excessive humidity, or
where water may be sprinkled on it.
- This may cause electric shock or fire.
Do not install on an unstable place
or small support.
- This may cause the TV to fall, resulting in
serious injury to a child or adult.
Never attempt to open, fix, or modify
your TV.
- When there is a need for fixing, call a
service center. Fire or electric shock may be
caused.
Do not put a metallic object like chopstick,
wire, or puncher or inflammables like paper
or a match in a vent, headphone jack, or AV
jacks of the TV.
- Electric shock or fire may be caused.
When the TV produces abnormal noise,
burning smell, or smoke, unplug the TV
immediately and call a service center.
- Electric shock or fire may be caused.

GENERAL INFORMATION
7
Safety Precaution ......................................Continued from previous page
The contents of this section are provided for the safety of users and their property.
Please read the instructions carefully before using.
Do not place any heat sources such as
radiators and heat registers, etc. near the TV.
- It may cause a fire.
Do not block ventilating slits with a table
cloth.
- Blocking the ventilation slits may produce
inner heat increase, resulting in a fire.
Keep the TV at least 10cm away from the
wall for ventilation.
- Fire may be caused due to the rise of inner
temperature.
Do not allow children to climb or play on the
TV.
- If it falls over on children, it may cause
serious injury.
Do not place toys and cookies, etc. on the TV,
which may attract children’s attention.
- If it falls over on children, it may cause serious
injury.
When cleaning the TV, make sure to
disconnect the power plug and use a dry, soft
cloth for a cleanup.
- Please avoid using chemicals such as wax,
benzene, alcohol, thinner, mosquito spray,
air freshener, lubricant or synthetic
detergent.
Unplug when you do not use your TV for a
long time.
- If dust is stacked on the TV, electric shock
or fire may be caused from heat, fire, or
deterioration of insulation.
When moving the TV, two or more people are
advised to carry it.
- Injury or damage may be caused when the
TV falls.
Consult a service center or customer service
for inside cleaning about once a year.
- When dust is piled inside the TV for long
time, fire or malfunction may be caused.
8
HYUNDAI LCD TV
GENERAL INFORMATION
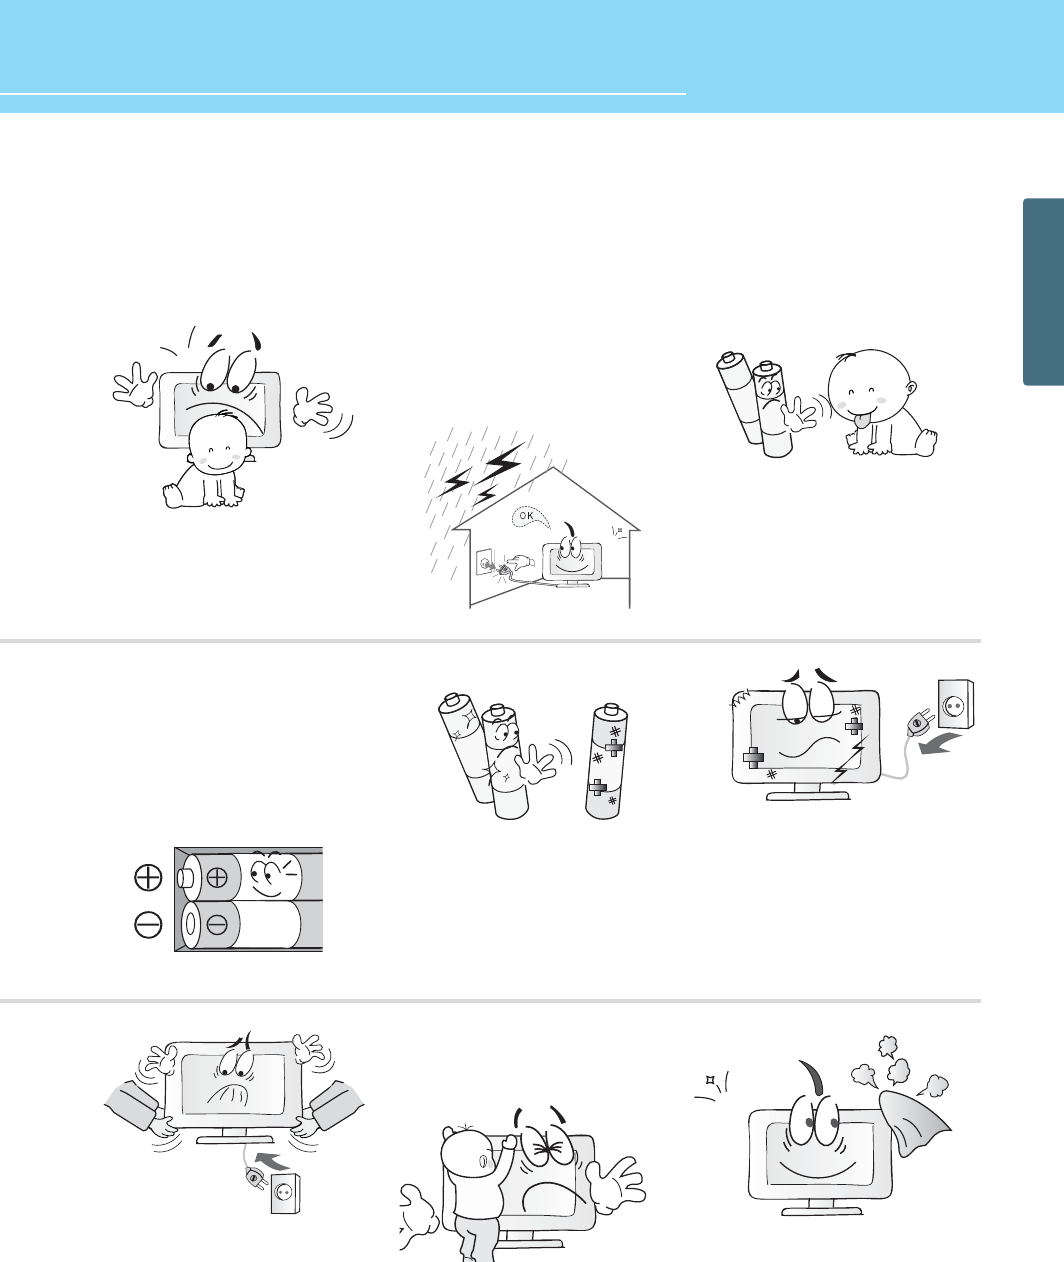
Do not install the product on the floor.
- If it falls over, your child may be injured.
Unplug the product during lightning or
thunderstorms and never touch the antenna
cable.
- It may cause a fire or an electric shock.
Keep the remote control batteries out of
sight and out reach of children.
- If your child swallows a battery, see your
doctor immediately.
When replacing batteries, make sure to
match the batteries to the (+) and (-) marks
in the battery compartment.
- Mismatching of polarities may result in
internal damage to batteries, fire due to
leakage or contamination.
Always use the standard batteries and avoid
using old batteries together with new ones.
- Otherwise it may result in internal damage
to batteries, fire due to leakage or
contamination.
In the event of damaging or dropping the
product, switch off the power and remove
the plug.
- Using a damaged product may cause an
electric shock or a fire.
- Contact your local service center.
Before moving the product, ensure to switch
off the power and unplug all the electrical
cords and the external connection cords such
as an antenna cable and other source
connections, etc.
- An electrical cord(s) may be damaged,
resulting in a fire or an electrical shock.
Ensure the power cord doesn’t trail
across any hot objects like a heater.
- This may cause a fire or an electric shock.
Consult a service center or customer
service for inside cleaning about
once a year.
- When dust is piled inside the PDP for long time,
fire or malfunction may be caused.
9
GENERAL INFORMATION
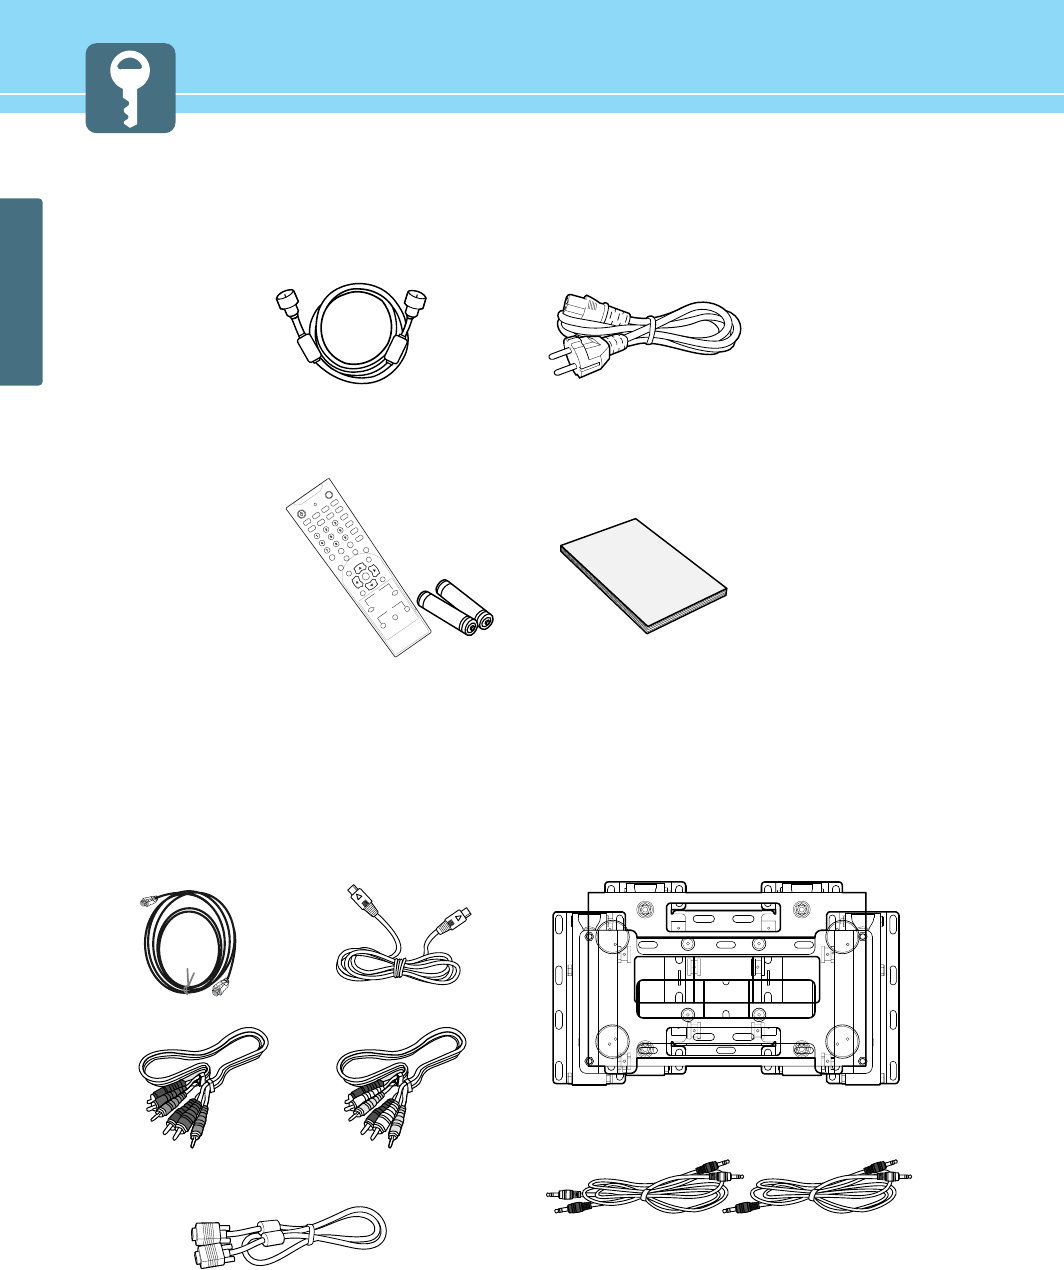
Contents of the Package
hen opening the package, please ensure to check the following accessories provided.
Products Sold Separately
If you want to purchase separately sold products, consult a service center, electronics shops, or parts seller.
POWERSOURCE
FREEZESLEEPASPECTCAPTION
FAV
PREV-/DRF
SERVICEINFO
VOL+
VOL-
MENUEXIT
OK
EPG
L-TURNR-TURN
TILT
SOURCE
CH-
CH+
ADD/ER
PICTURE
SOUND
SRS
SAP
PIP
ON/OFF
SOURCE
SIZESWAP
POSITION
Power Cord
Antenna Cable
(coaxial cable)
User's GuideRemote Control & 2 batteries
(1.5V AAA)
Hdmi cable
Component Cable
(Y, Pb, Pr)
Composite Cable
(Video/Audio)
PC signal Cable (D-SUB)
Audio Cable (PC)Audio Cable (DIV/DVD)
Wall Mounting Support
S-video Cable
10
HYUNDAI LCD TV
GENERAL INFORMATION
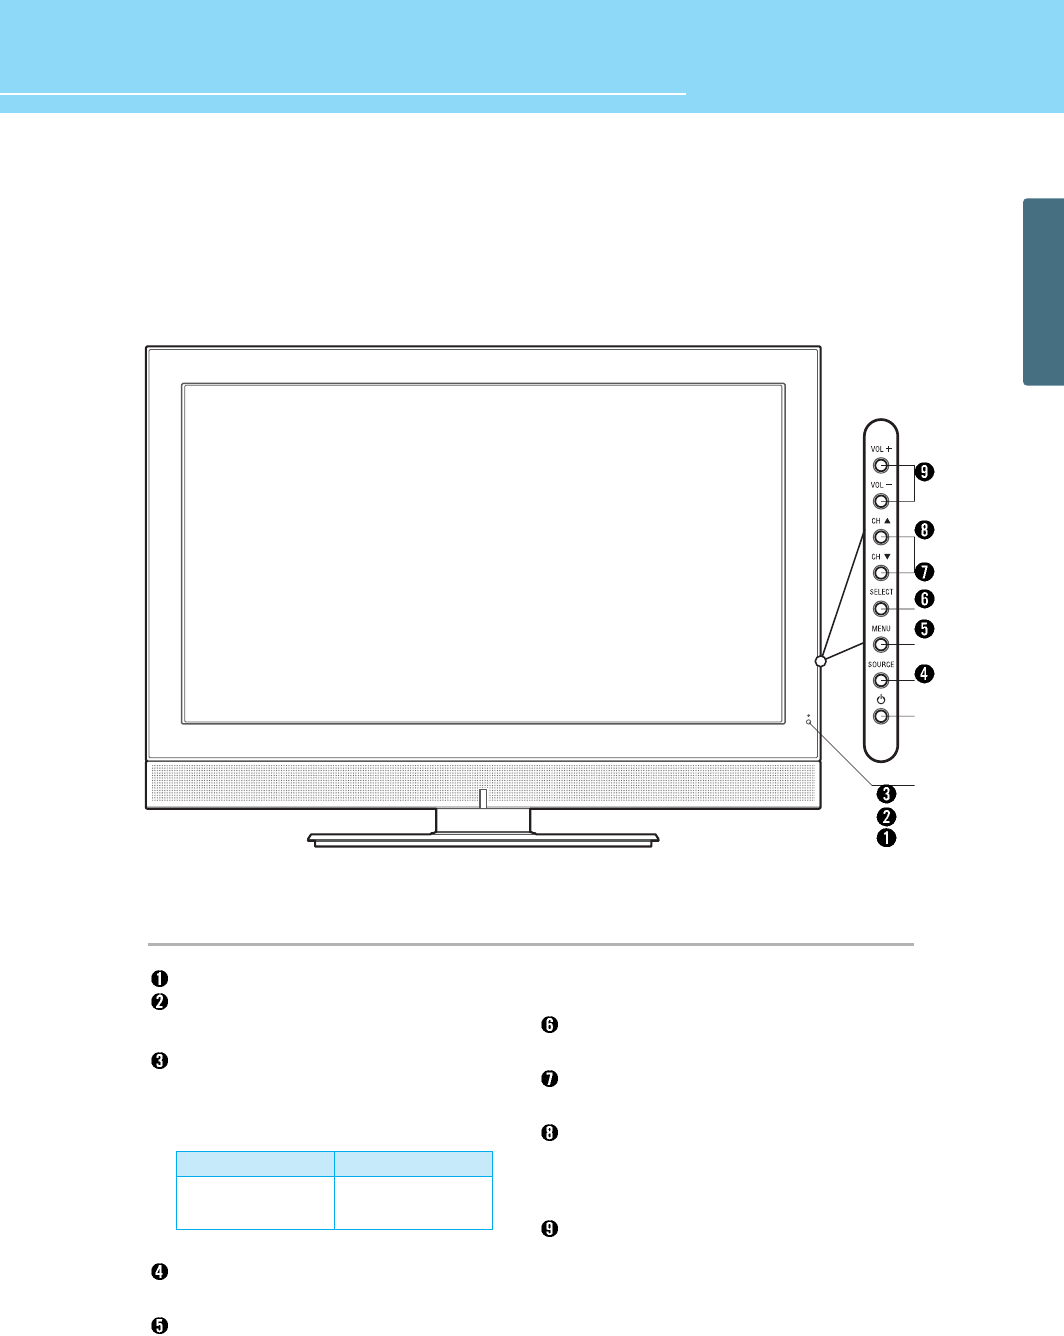
Parts Names and Functions - For Q40* Model only
Front View
* This product image may be a bit different from the actual product.
- Power Indicator Status -
Speaker
Power switch
Use this switch to turn on/off power.
Remote sensor and power LED.
- Point the remote control toward here.
- It displays standby or operation status.
Power button
Use this button to turn on or off the TV.
Source button
Use this button to switch among inputs
connected to the TV.
Menu button
Use this button to display or exit from menus.
Select button
Use this button to select each item of menu.
Channel buttons
Use these buttons to change channels. These
buttons also serve as the cursor of Down and
Up buttons when in Menu mode.
Volume buttons
Use these buttons for your desired sound level.
These buttons also serve as the cursor of
Select/Adjust when in Menu mode.
Indicator
Red
Green
Status
Standby
Power on

11
GENERAL INFORMATION
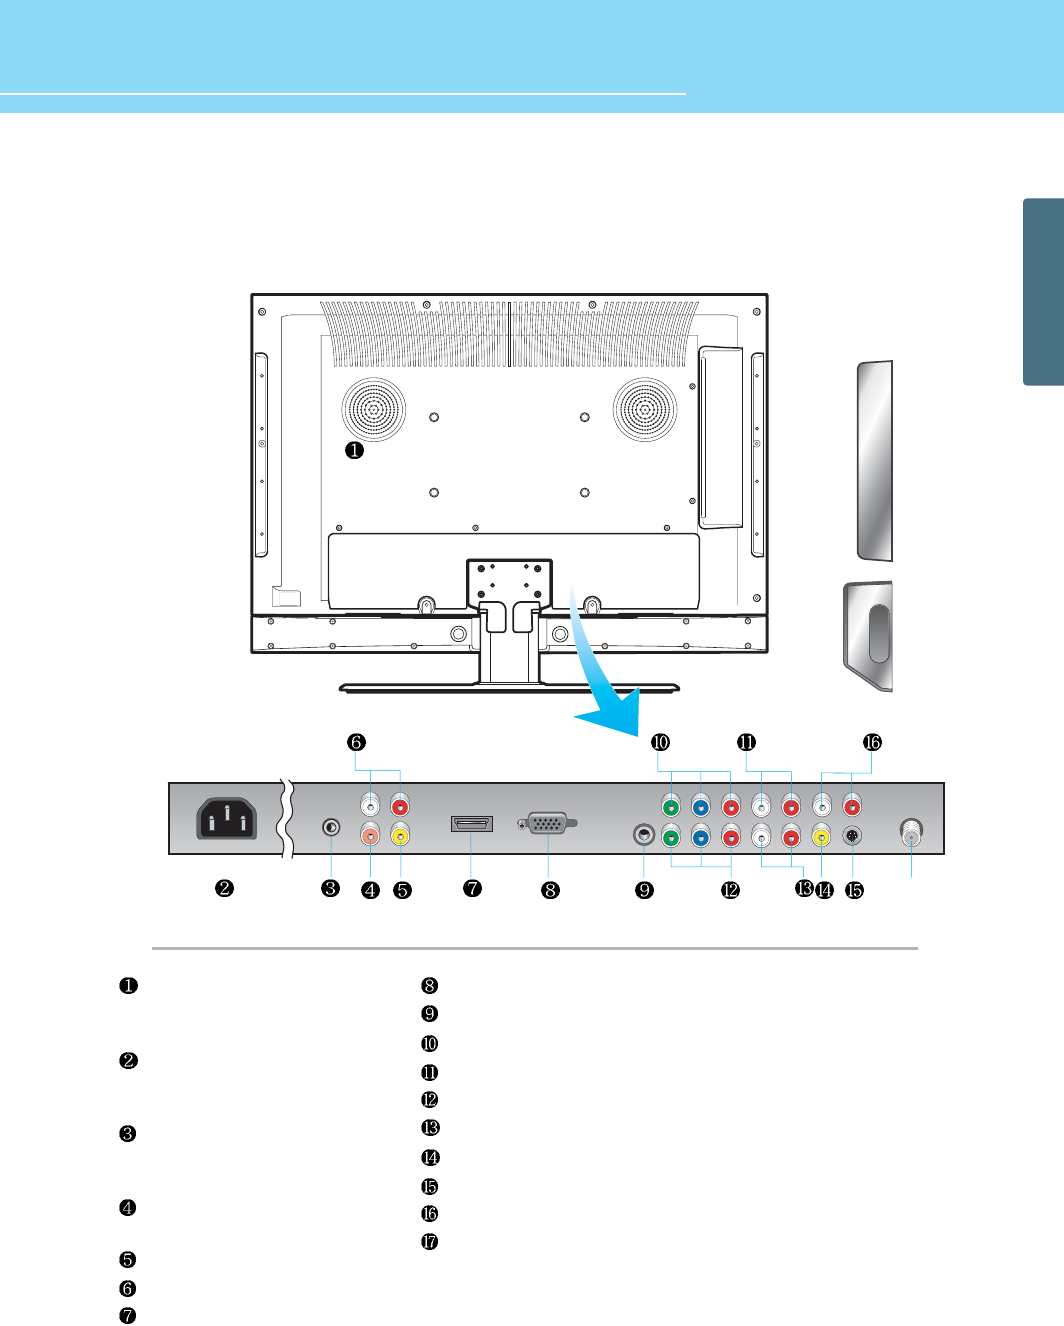
Rear View
* This product image may be a bit different from the actual product.
Power Switch
use this switch to tum on/off
power
Power(AC) Input terminal
Connect the power cord to this
terminal.
RS-232 input terminal
Connect to the RS-232 terminal of a
PC to check its service.
S/P DiF optical digital audio
output terminal
D-SUB input terminal
D-SUB Audio input terminal
Component 1 Video input terminal
Component 1 Audio input terminal
Component 2 Video input terminal
Component 2 Audio input terminal
Video input terminal
S-Video input terminal
S-Video/Video Audio input terminal
Antenna (Analog/DTV) input
terminal
12
HYUNDAI LCD TV
GENERAL INFORMATION
Rear View
* This product image may be a bit different from the actual product.
Power Switch
use this switch to tum on/off
power
Power(AC) Input terminal
Connect the power cord to this
terminal.
RS-232 input terminal
Connect to the RS-232 terminal of a
PC to check its service.
S/P DiF optical digital audio
output terminal
D-SUB input terminal
D-SUB Audio input terminal
Component 1 Video input terminal
Component 1 Audio input terminal
Component 2 Video input terminal
Component 2 Audio input terminal
Video input terminal
S-Video input terminal
S-Video/Video Audio input terminal
Antenna (Analog/DTV) input
terminal
13
GENERAL INFORMATION
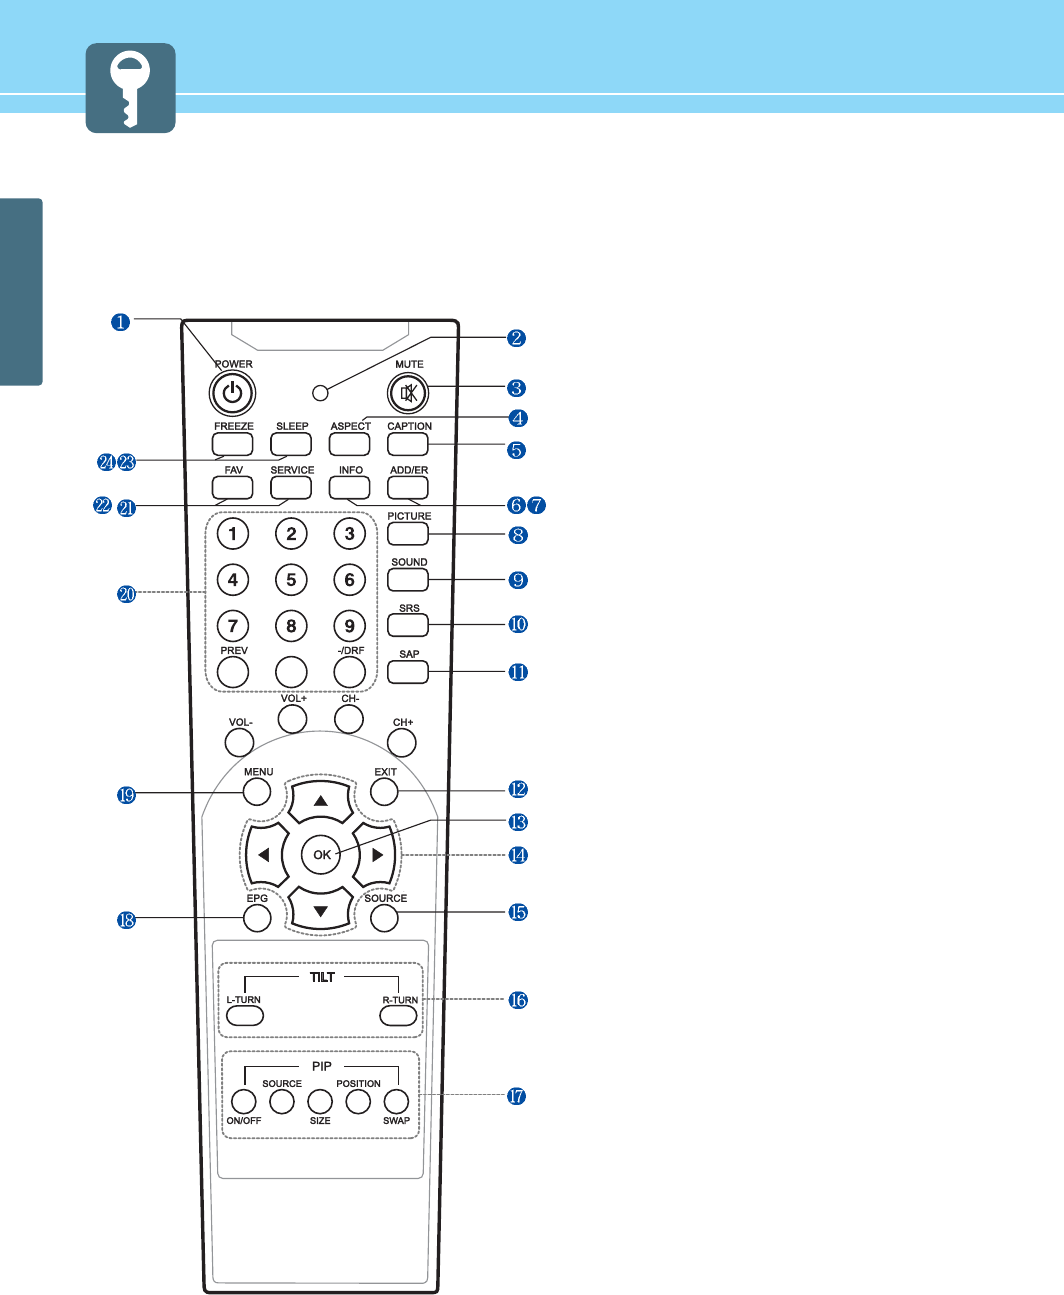
Remote Control
1. POWER/STANDBY
2. POWER LED
3. MAGIC
4. ASPECT
5. CAPTION
6. ADD/ERASE
Use this button to add or erase channels.
7. INFOMATION
Use this button to display resolution or various program
8. PICTURE
9. SOUND
10. SRS
Use this button to select 3D surround sound.
11. SAP
12. EXIT
13. MENU SELECTION
Use this button to select menu item
14. LEFT/RIGHT MOVE/ADJUST
Use these buttons to move between menu items or to adjust
each item.
15. SOURCE
16. TILT
17. PIP
- ON/OFF
:
- SIZE
: Use this button to select the size of sub-picture.
- SIZE
: Use this button to select the size of sub-picture.
- POSITION
: Use this button to select the position of sub-picture.
- SWAP
: Use this button to swap main and sub-picture.
14
HYUNDAI LCD TV
GENERAL INFORMATION
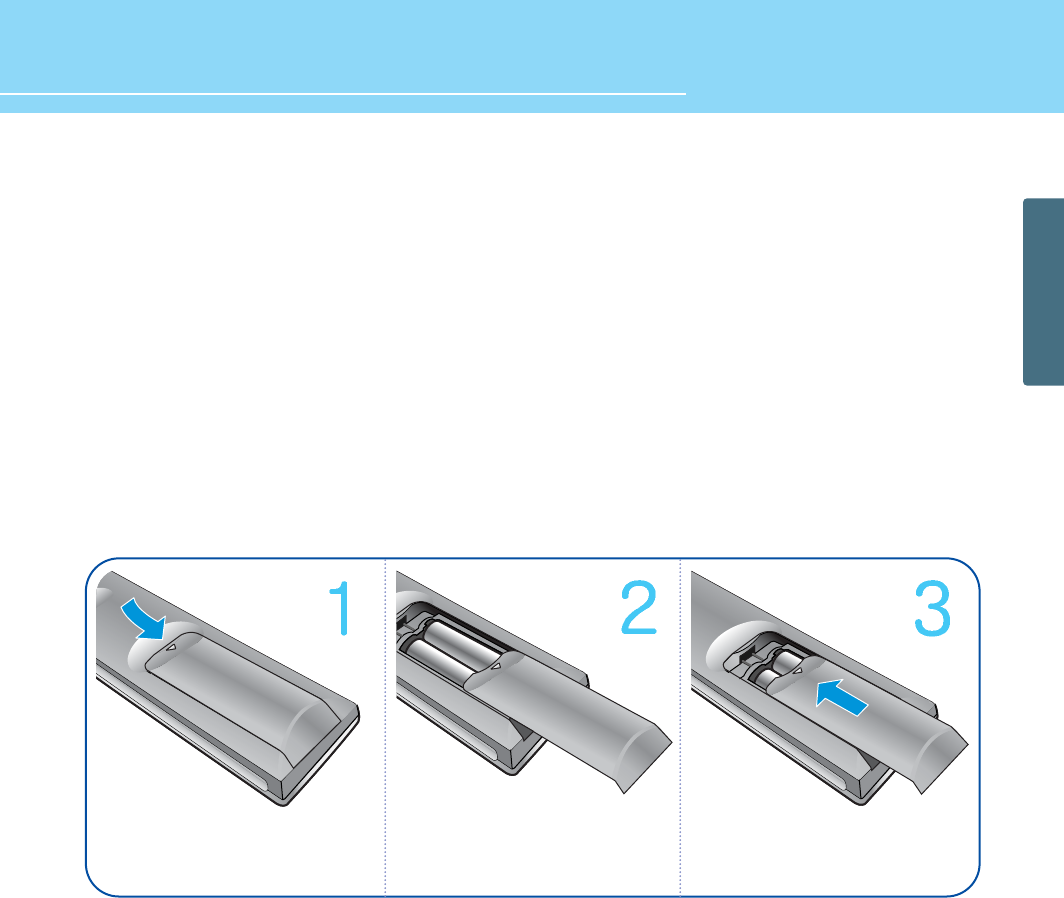
How to Insert Batteries in Remote Control
* Battery type :1.5V/AAA
Press and hold ∆part and push
to open cover.
Insert batteries with proper
polarities of +and -.
Use the remote control with cover
closed.
18. EPG
19. MENU
Use this button to call the OSD to the screen.
20. NUMERIC KEYS
21. SERVICE
22. FAV
23. SELLP
24. FREEZE
15
CONNECTIONS
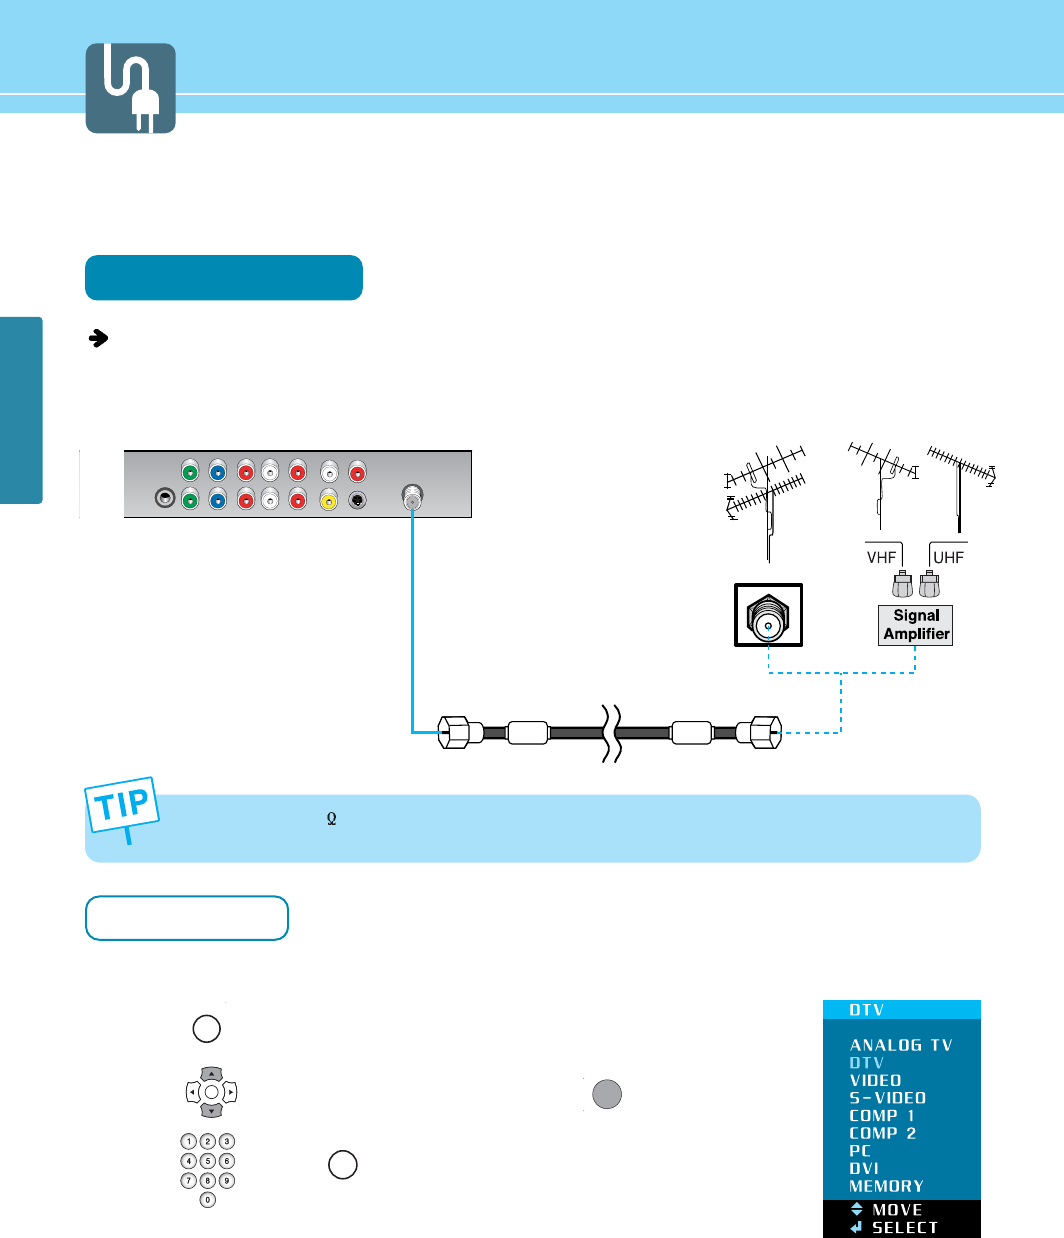
How to Watch Both Analog and Digital Broadcasts with a Single Antenna
You can watch both analog and digital broadcasts by connecting a single antenna.
Connection Method
Make sure that the antenna cable is connected to ANT (ATV/DTV).
- Antenna or Cable service without a cable box connections
- For optimum picture quality, adjust antenna direction if need,
How to Watch
Turn on TV to activate Auto Channel (See page 49) to memorize the available channels.
Press INPUT on remote control.
Press to move to Analog TV or Digital TV and press to select.
Press button or button to select the desired channels.
Ex.) When you want to watch cable channel number 120, press +100 + 2 + 0
the digit buttons.
1
2
3
4
CH-
SOURCE
- When inserting a 75 ohm coaxial cable into the input connection, ensure the wire tip not to bend.
- If you experience poor signal reception, we recommend you purchase a signal amplifier for better picture quality.
OK
OK

16
CONNECTIONS
HYUNDAI LCD TV
- When connecting an external device, ensure to read the connecting device’s manual. The location or the number
of the terminals on the external device may be different depending on its model.
- Connect a
HDMI (or DVI)
connection to the output of DVD, cable receiver or satellite receiver. Connecting a
HDMI (or DVI)
connection to a PC may result in a message, “Unknown Signal”.
- Do not power on until all necessary connections are made. If power is given before connections completed, this
may damage the product.
- Make sure to match the cable in color with the terminal.
- Make sure to check the type of terminals to be connected.
Before Connecting the Video/Audio Connections to External Devices...
Please make sure to read the following information on connection to enjoy best picture quality.
Video/Audio connectors
Types of video/audio cable :
➀HDMI ➁ 15-Pin D-Sub ➂ COMPONENT ➃ S-VIDEO ➄ COMPOSITE
Best picture quality is displayed in the following order.
The superior picture quality starts from the far left side.

17
CONNECTIONS
How to Connect a VCR/Cable Receiver
Connection Method
Connect the Video cable or S-Video cable between Video/S-Video output terminal of VCR or Cable receiver and
Video/S-Video input terminal of TV. (Connect the jacks to terminals in the same color.)
Connect the Audio cable (Left: white, Right: red) between Audio output terminal of VCR or cable receiver and
Audio input terminal of TV. (Connect the jacks to terminals in the same color.)
How to Watch
Turn on TV to press on remote control.
Press to move to Video or S-Video and press to select.
For more information, read the user’s guide of VCR or cable receiver.
1
1
2
To enjoy better picture quality, use the S-Video cable rather than the composite cable.
Audio cable
S-Video Cable
Video cable
Video/Cable receiver
SOURCE
2
OK
OK
Audio cable
18
CONNECTIONS
HYUNDAI LCD TV
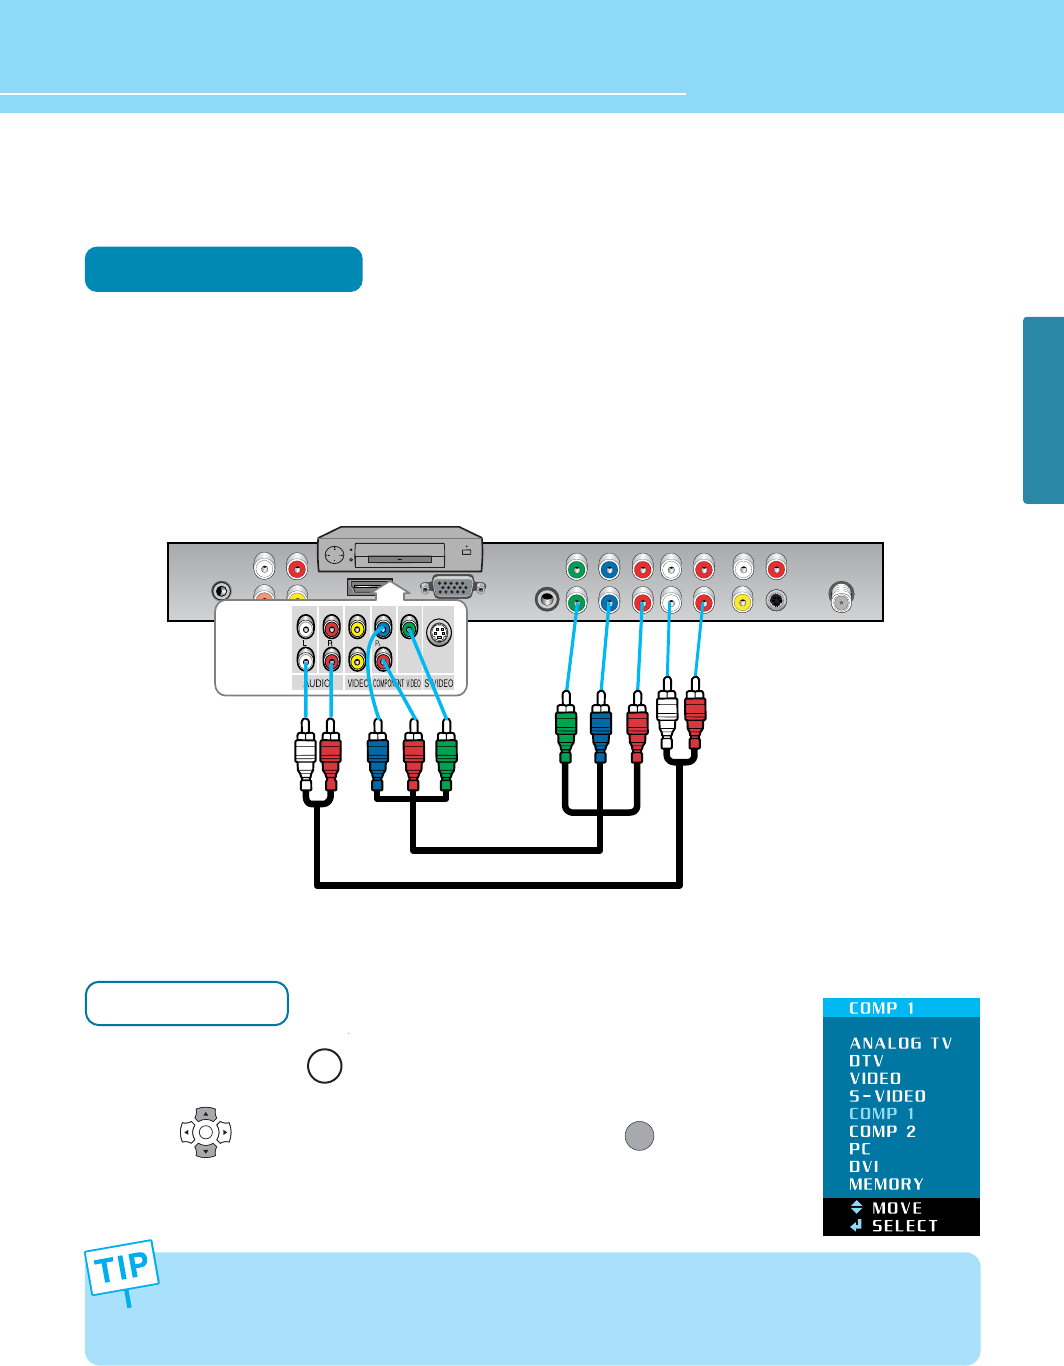
How to Connect a DTV Receiver or DVD Player
Connection Method
Connect the Video cable (Y, Pb, Pr) between output terminals (Y, Pb, Pr) of DTV receiver or DVD player and the
input terminals (Y, Pb, Pr) of DTV/DVD (480i/480p/720p/1080i) on the rear of TV.
(Connect the jacks to terminal in the same color.)
Connect the Audio cable between Audio output terminal of DTV receiver or DVD player and Audio input
terminal for DTV/DVD Audio on the rear of TV. (Connect the jacks to terminals in the same color.)
How to Watch
Turn on TV and press on remote control.
Press to move Component 1 or Component 2 and press to select.
For more information, read the user’s guide of DTV receiver or DVD player.
1
- Output terminal mark (Y, Pb, and Pr) of DVD player may be indicated as Y, B-Y, R-Y/Y-Cb-Cr /Y-Pb-Pr according
to the type of DVD player models.
- If your DVD player or Set Top Box supports HDMI (or DVI) /D-SUB, see Connecting to a PC (page 25) for
connection. You can enjoy more clear picture quality.
1
2
Audio cable
2
SOURCE
Video (Y, Pb, Pr) cable
DTV receiver / DVD Player
OK
OK
19
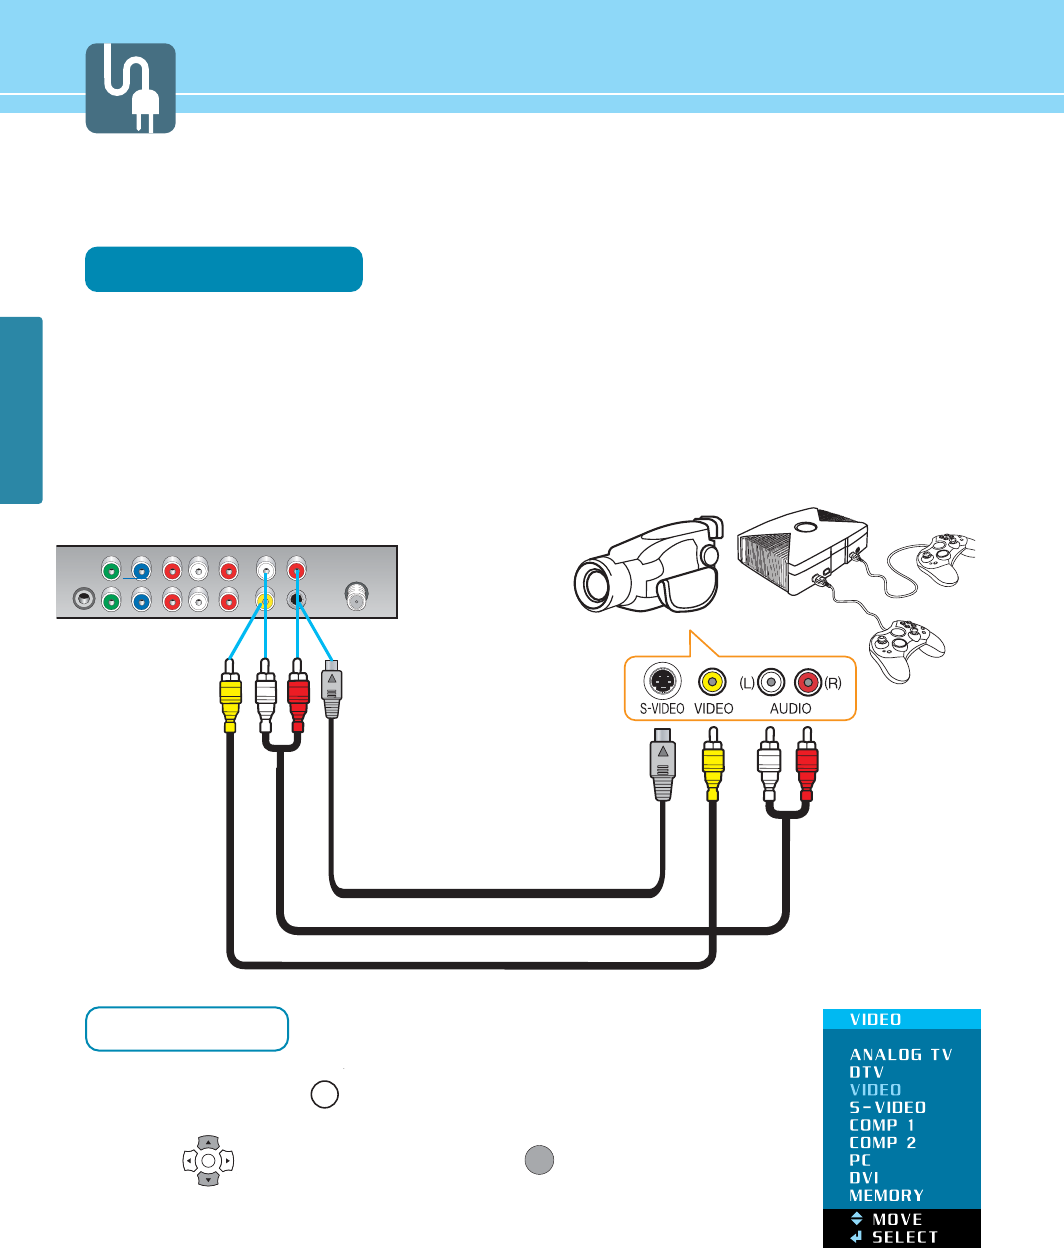
CONNECTIONS
How to Connect a Camcorder/Game Player
Connection Method
Connect the Video/S-Video cable between Video/S-Video output terminal of Camcorder/Game player and
Video/S-Video input terminal of TV. (Connect cables and terminal in the same colors.)
Connect the Audio cable (Left-white, Right-red) between Audio output terminal of Camcorder/Game player
and Audio input terminal of TV. (Connect the jacks to terminals in the same color.)
How to Watch
Turn on TV and press on remote control.
Press to move Video or S-Video and press to select.
For more information, read the user’s guide of Game player or Camcorder.
1
2
1
2
Game Player
Camcorder
SOURCE
Audio cable
Video cable
S-Video Cable
OK
OK
20
CONNECTIONS
HYUNDAI LCD TV
HDMI Cable
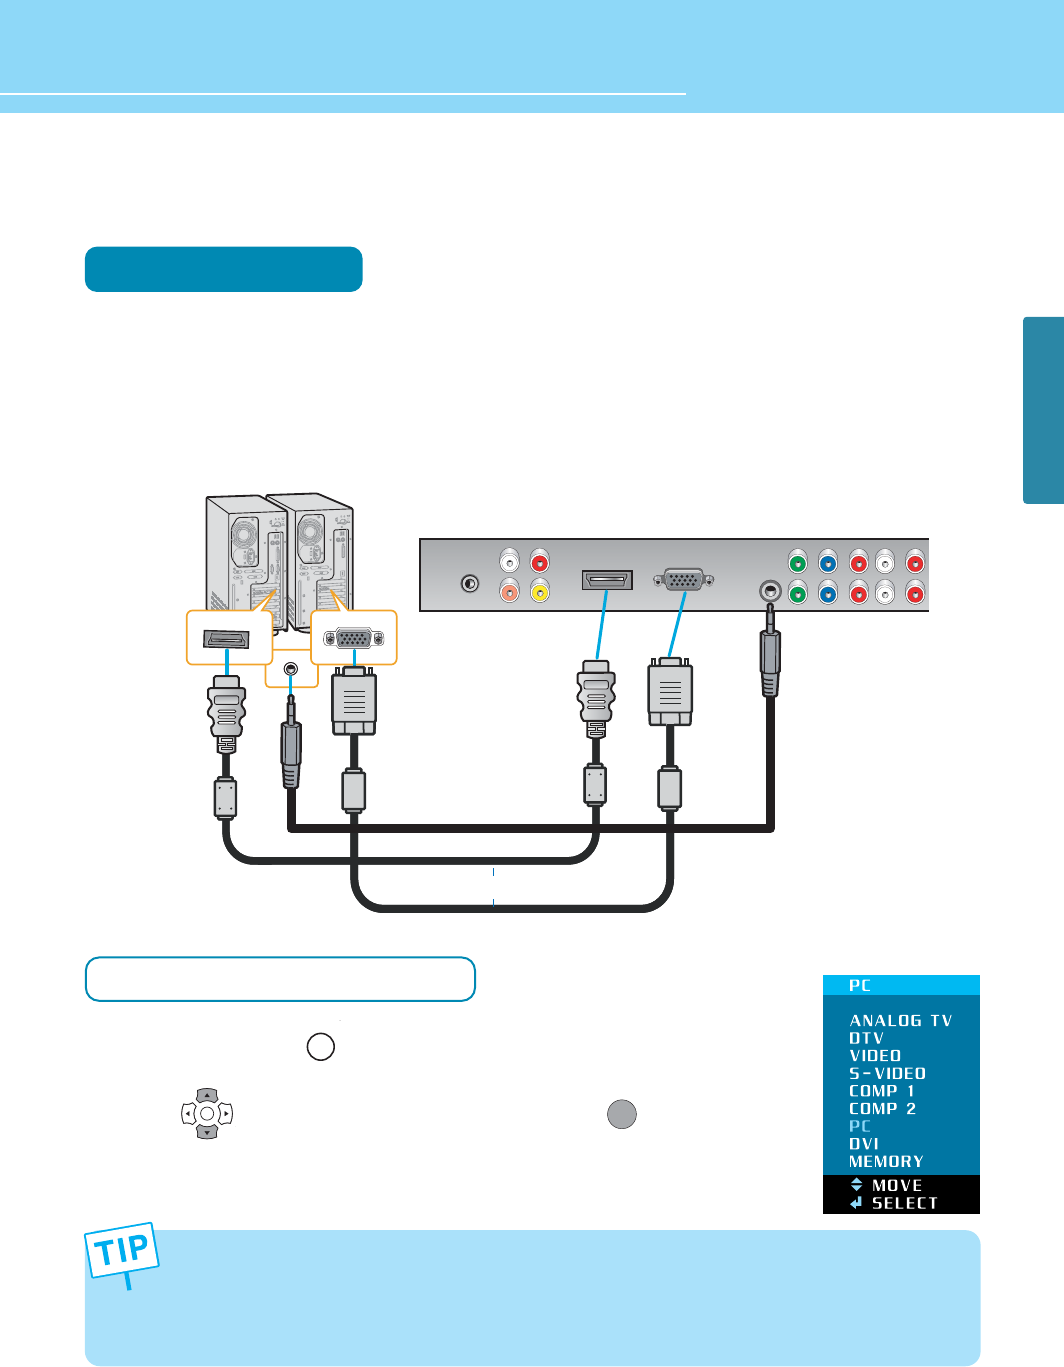
How to Connect to a PC
Connection Method
Connect the PC signal cable (15-pin D-sub) between the output terminal of PC and the D-sub input terminal of
TV.
Connect the Audio cable between Audio output terminal of PC and Audio input terminal for PC on the rear of
TV. (Connect the jacks to terminals in the same color.)
When Using as a PC Monitor
Turn on TV and press on remote control.
Press to move to PC or HDMI (or DVI) and then press to select.
- If you use the HDMI (or DVI) connection, you can enjoy better picture quality.
- This product supports Plug-and-Play function.
- We recommend the above method if the DVD player or set top box supports DTV signal with HDMI (or DVI)/
D-Sub (15 pin) cable for the better picture quality.
- If you input an unsupported resolution in PC or HDMI (or DVI) mode, the screen won’t be displayed properly.
1
2
1
2
D-SUB cable
Audio Cable
SOURCE
OK
OK
or
21
CONNECTIONS
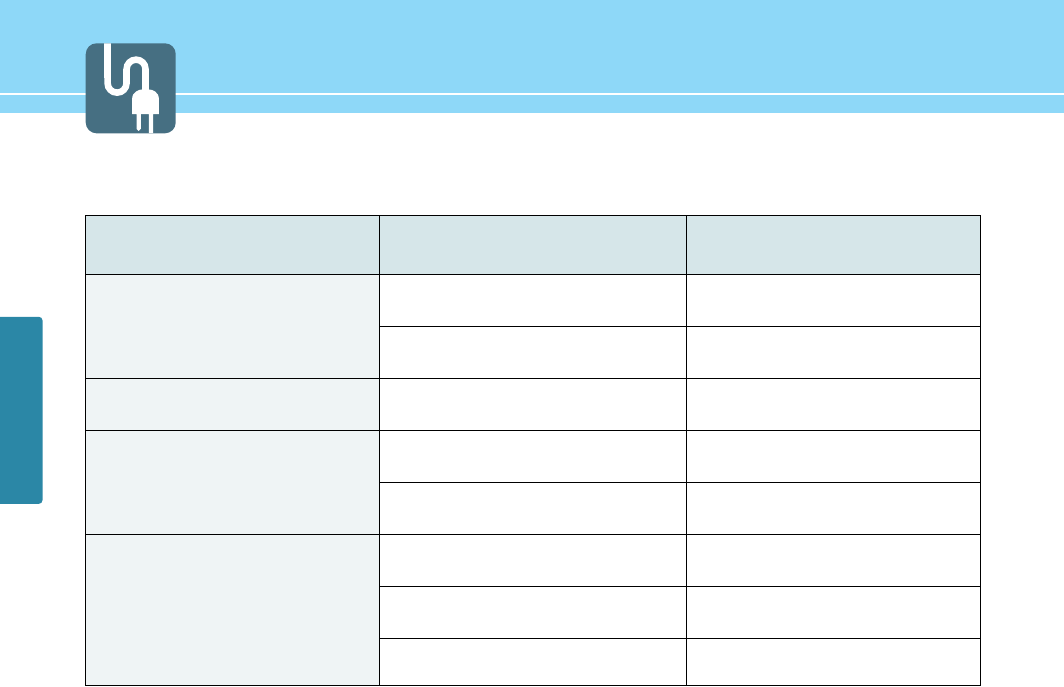
Resolution
31.47
37.50
31.47
37.88
46.88
48.36
56.50
60.02
Vertical frequency
59.94
75.00
70.08
60.32
75.00
60.00
70.10
75.03
720 x 400
800 x 600
1024 x 768
640 x 480
Horizontal frequency
Resolutions Supported in PC
22
CONNECTIONS
HYUNDAI LCD TV
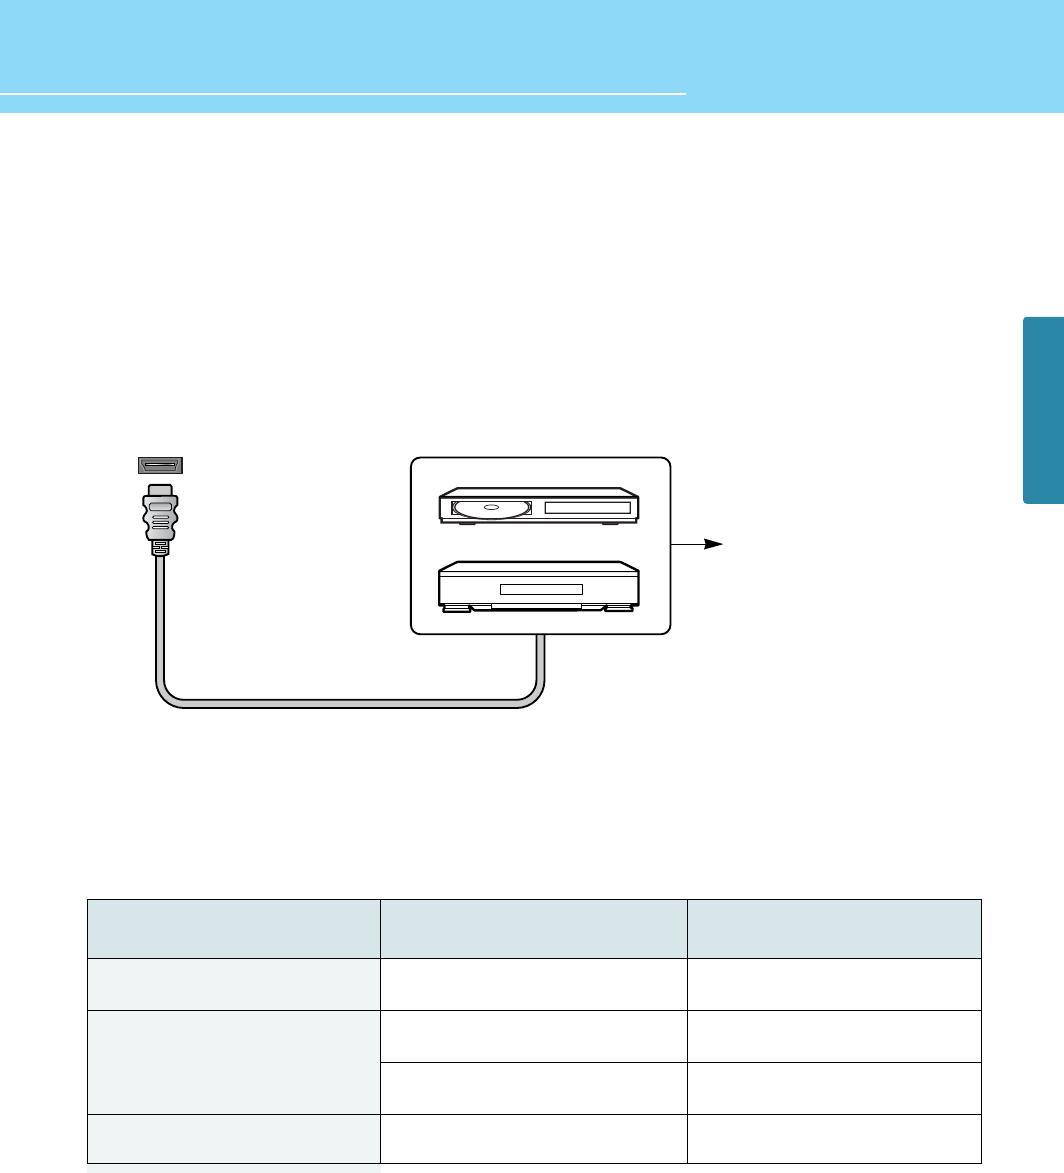
HDMI Connection - For HDMI Model only
HDMI *1 (High Definition Multi media Interface) is the first all digital consumer electronics A/V interface that
supportsuncompressed standard. The HDMI terminal supports both video and audio information.To the HDMI*1
input terminal, you can connect an EIA/CEA-861/861B*2 compliant consumer electronic device, such asa Set
Top Box or DVD player with HDMI or DVI output terminal.Input a High-bandwidth Digital Content Protection
(HDCP) high-definition picture source to this HDMI terminal, so youcan display the high-definition pictures on
this TV in the digital form.
Compatible VIDEO Signal
This input terminal is not intended for use with computers.
Resolution
1920 X 1080i
720 X 480p
640 X 480p
1280 X 720p
Vertical scanning frequency(Hz)
59.94/60
59.94/60
59.94/60
59.94/60
1080i
480p
720p
No. of dots(HXV)
HDMI
HDMI Cable
Set Top Box
DVD Player
If the external device has DVI
output only, use a DVI to HDMI
adapter *3 cable to connect to
the HDMI terminal.
23
CONNECTIONS
Compatible sampling freguency of AUDIO signal through HDMI (L.PCM) : 48kHz / 44.1kHz / 32 kHz
Notes:
• This HDMI connector is Type A.
• If you connect an equipment without a digital output terminal, connect to the COMPONENT VIDEO, S VIDEO or
VIDEO input terminal on the TV so you can enjoy an analog signal.
• The DIGITAL IN terminal can only be used with 1080i, 480i or 480p picture signals. Set the Digital Set -Top -
BoxDIGITAL OUT terminal Output setting to 1080i, 480i or 480p. For detailed information, refer to the Digital
Set -Top -Box instruction manual. If you cannot display the picture because your Digital Set -Top -Box does
not have a DIGITAL OUT terminal Output setting, use the component Video Input (or the S Video Input or
Video Input). In this case the picture will be displayed as an analog signal.
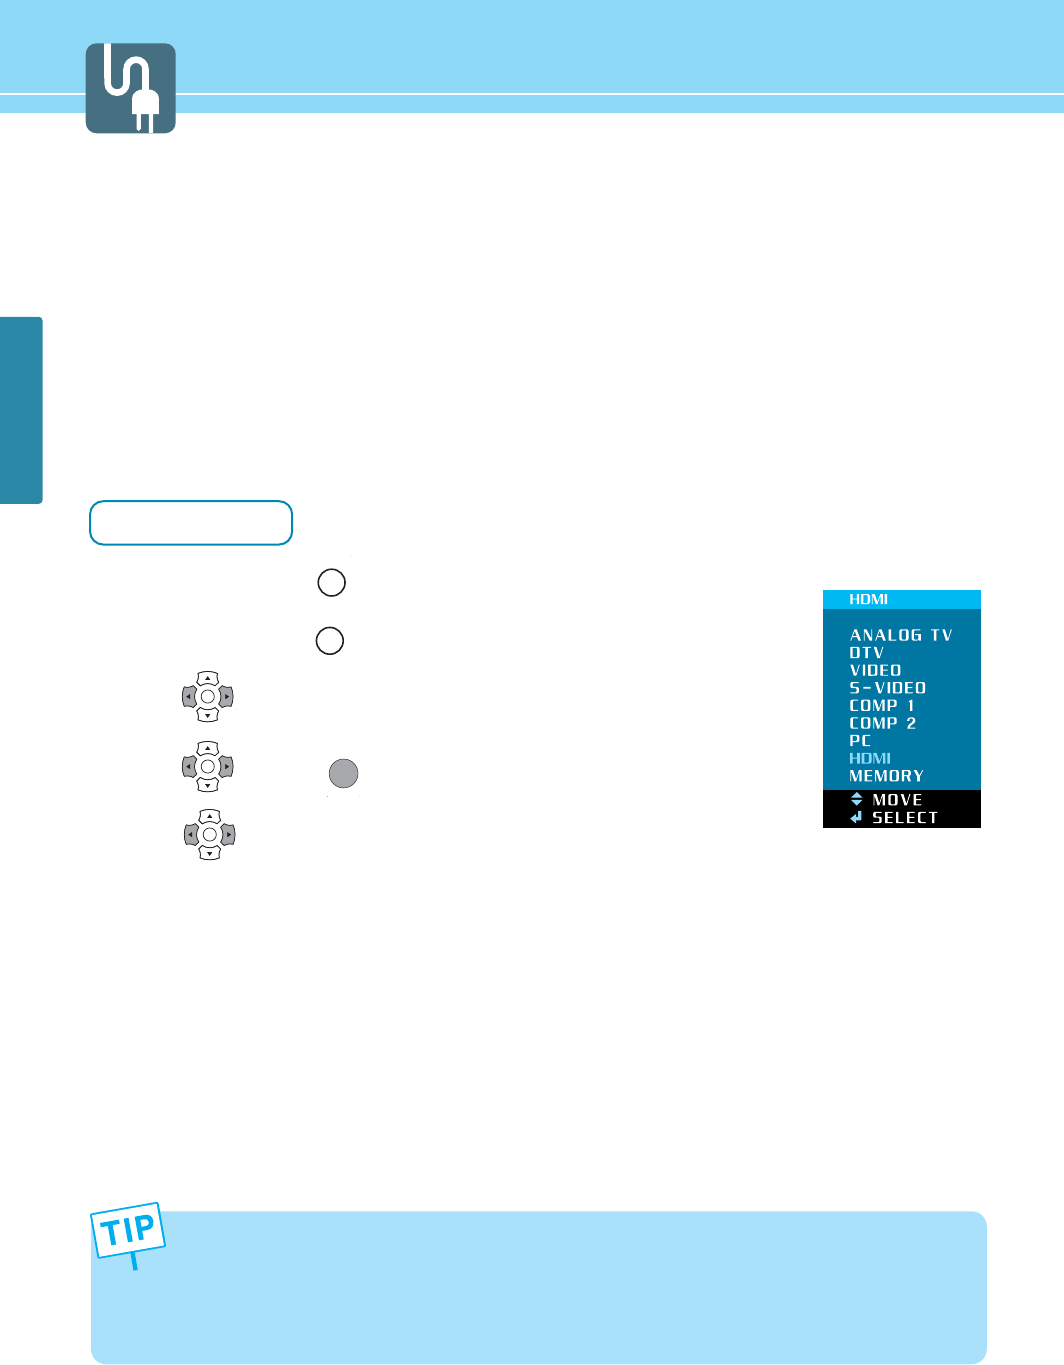
How to Watch
Turn on TV and Press on remote control.
Turn on TV and Press on the remote control
press button and press up/down button to move to externel input
press button or
Press button to get the HDMI input
- *1 HDMI, the HDMI logo and High-Definition Multimedia Interface are trademarks or registered trademarks of
HDMILicensing LLC.
- *2 EIA/CEA-861/861B profiles compliance covers profiles for transmission of uncompressed digital video
includinghigh bandwidth digital content protection.
1
2
3
4
5
SOURCE
OK
MENU
OK
OK
OK
24
CONNECTIONS
HYUNDAI LCD TV
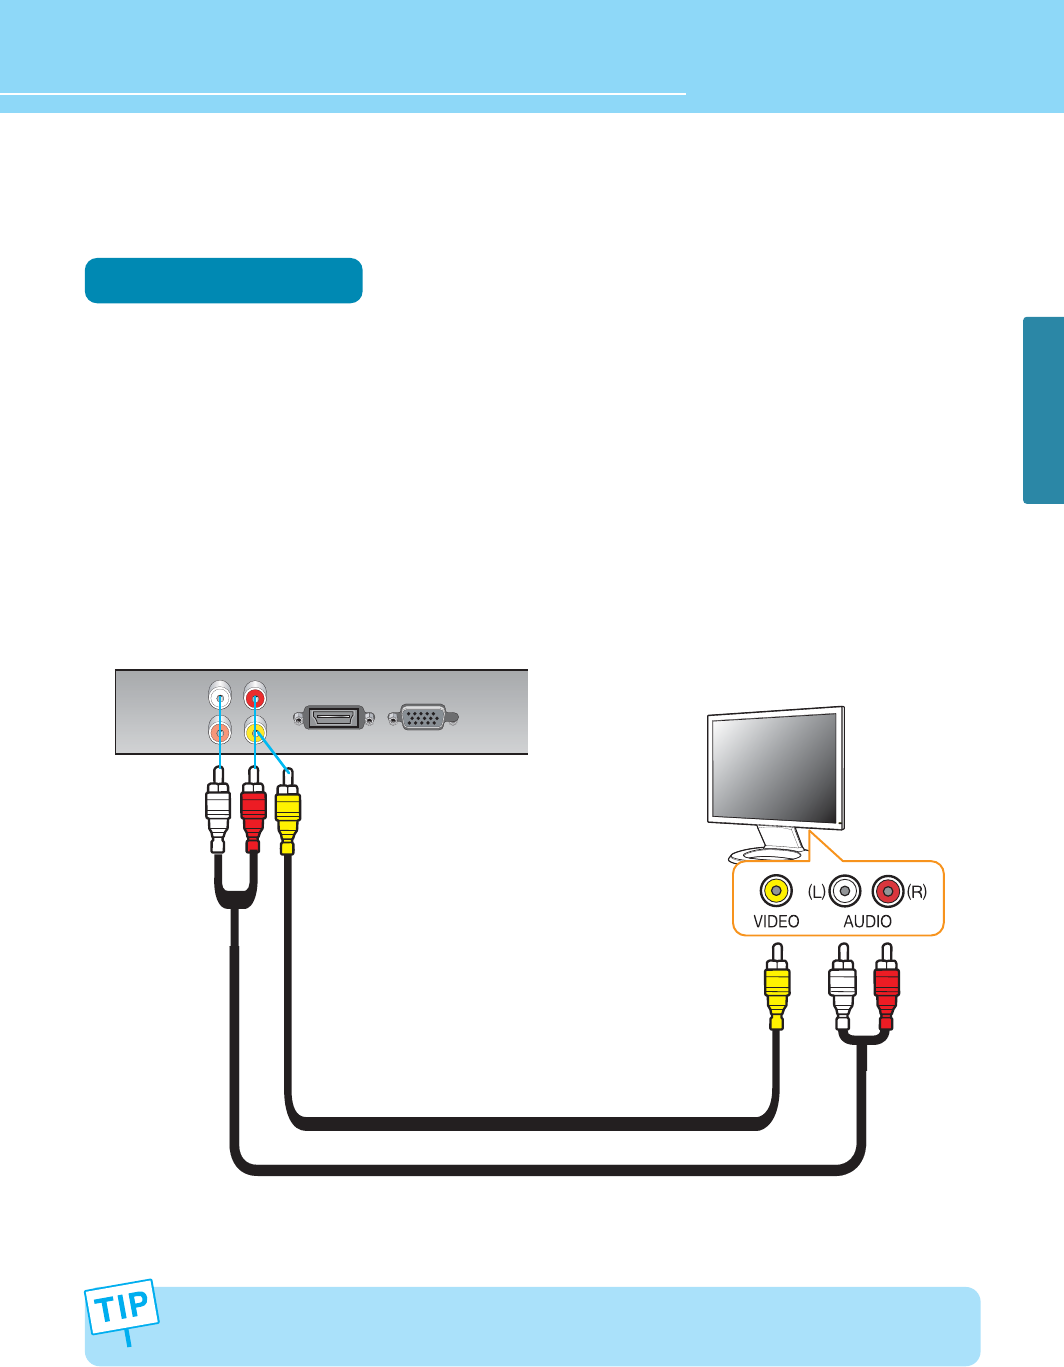
How to Connect an External Visual Device
You can connect your TV to other visual device to record TV programs to VCR.
Connection Method
Connect the Composite Video cable between Video input terminals of an external device and the Video output
terminals for Video on the rear of TV.
(Connect the jacks to terminals in the same color.)
Connect the Audio cable between Audio input terminal (Left-white, Right-red) of an external device and Audio
output terminal for Video on the rear of TV. (Connect the jacks and terminals in the same color.)
For more information, read the user’s guide of an external device.
1
2
3
External Visual Device
Audio Cable
Video Cable
Video and Audio outputs are available only when watching an Analog TV, Digital TV or VCR. This is not supported
in the Input Mode of Component, HDMI (or DVI) /D-SUB or S-Video.
25
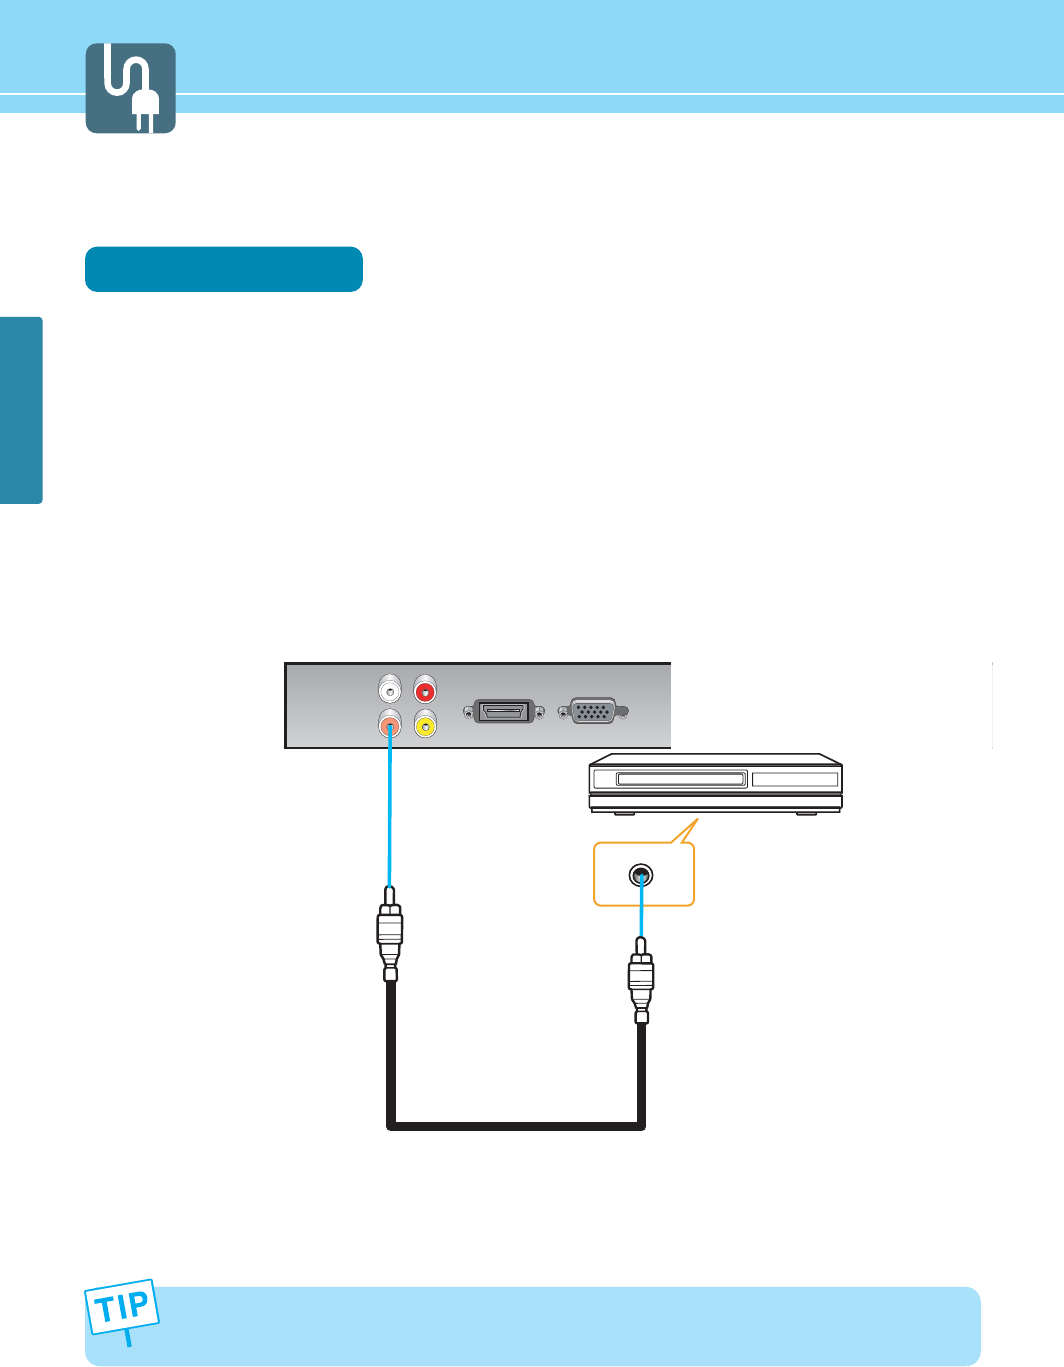
CONNECTIONS
How to Use Digital Sound
Connection Method
Connect the coaxial cable to the digital audio output terminal for coaxial cable or SPDIF optical digital audio
output terminal on the rear of TV.
Select Digital Sound Output. (See page 46~47)
For more information, read the user’s guide of the external sound device.
1
2
3
Coaxial cable
Amplifier with Built-in Dolby Digital AC3
Digital Audio Output is available when watching a digital TV program.
26
HYUNDAI LCD TV
1
2
3
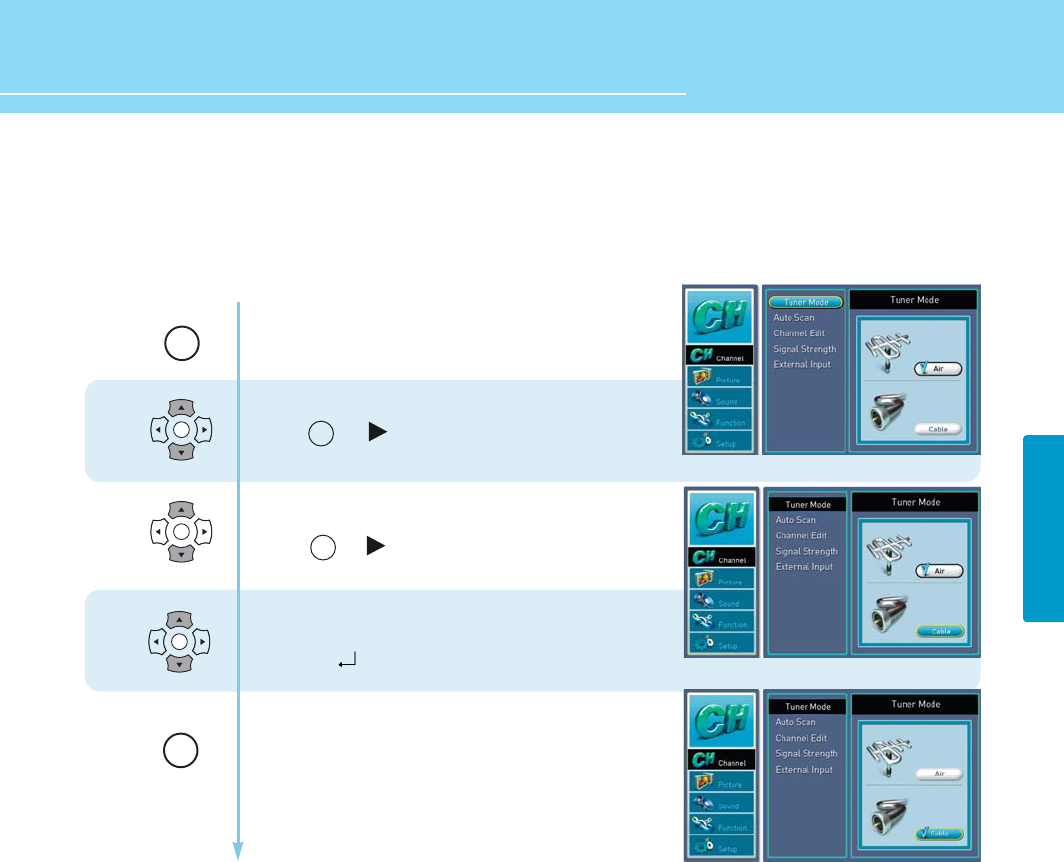
How to Select TUNER MODE
You can choose the RF-input between off-air and cable.
MENU
OK
OK
EXIT
Press Menu button.
Menu items appear on the screen.
Press up or down button to move to “channel”
Press or buttons to select “channel”
Press up or down button to move to Tuner Mode
Press or buttons to select Tuner Mode
Press up or down button to move to Air / Cable
and Press buttons to select item you want.
Press MENU button after the setting is done,
and Menu goes to the previous menu.
If the EXIT button is pressed, the menu will appear.
OK
OK
OK
CHANNEL
27
CHANNEL
1
2
3
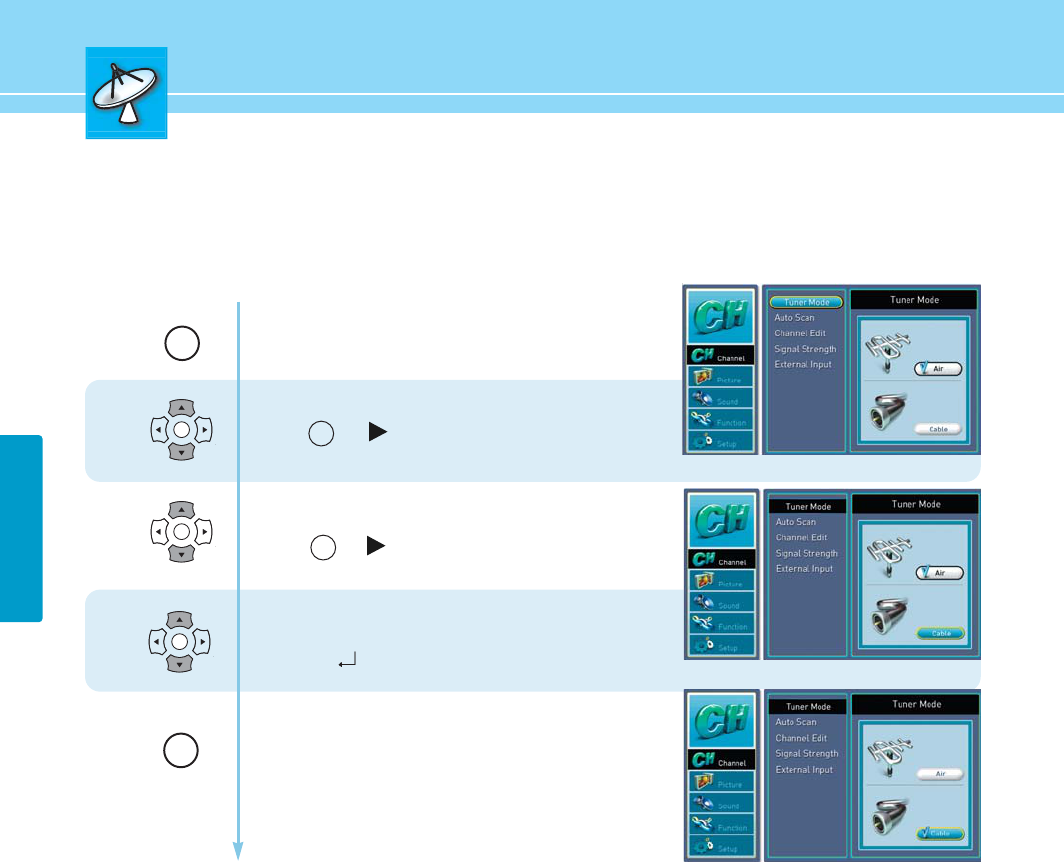
How to Select TUNER MODE
You can choose the RF-input between off-air and cable.
MENU
OK
OK
EXIT
Press Menu button.
Menu items appear on the screen.
Press up or down button to move to “channel”
Press or buttons to select “channel”
Press up or down button to move to Tuner Mode
Press or buttons to select Tuner Mode
Press up or down button to move to Air / Cable
and Press buttons to select item you want.
Press MENU button after the setting is done,
and Menu goes to the previous menu.
If the EXIT button is pressed, the menu will appear.
OK
OK
OK
28
HYUNDAI LCD TV
CHANNEL
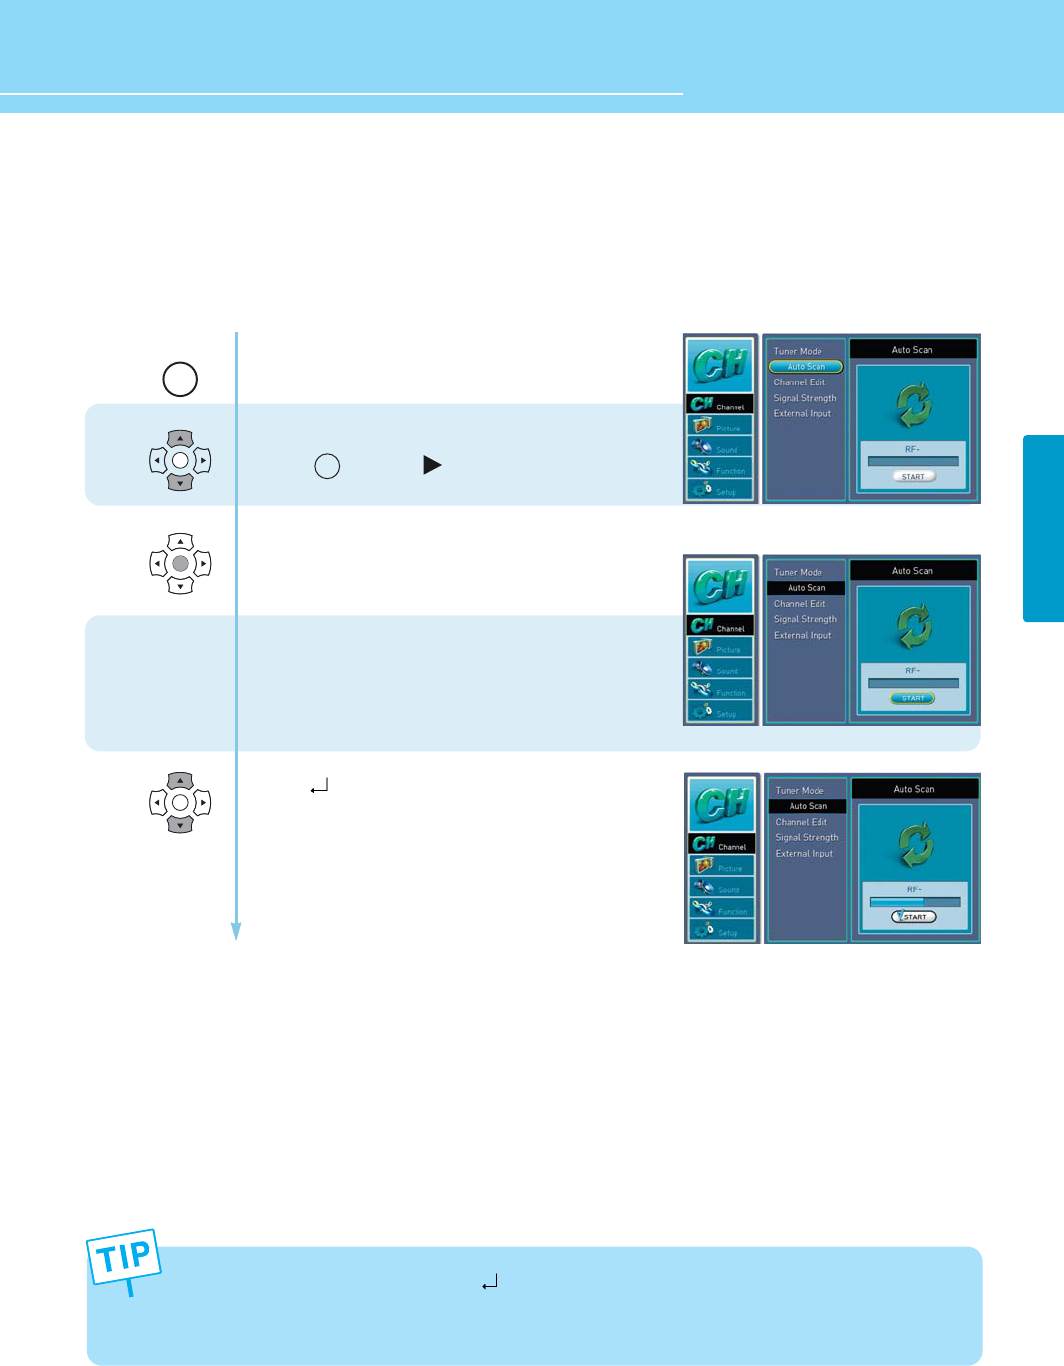
How to Store Channels Automatically
- Your TV can memorize and store all of the available analog/digital broadcast signals for both “off-air”
(antenna) and cable channels.
- Before your television can begin memorizing the available channels, make sure to specify the type of the
signal source (antenna or cable) connected to your TV.
1
2
3
OK
OK
OK
Press Menu button.
Menu items appear on the screen.
Press Up or Down buttons to move to “channel”.
Press button or button to select “channel”.
Press Up or Down button to move to “AUTO SCAN”.
• AIR ONLY : Watching the analog over-the-air and
digital over-the-air signals via ANT
input port.
• CABLE ONLY : Watching the Cable and digital cable
signals via ANT input port.
Press button and Auto Scan is Activated
*CABLE BAND NOTE : STD (Standard), HRC (HRC band),
IRC (IRC band)
(For further band information, contact your
cable service provider.)
MENU
OK
- In the middle of AUTO SCAN, if you press button once, AUTO SCAN is interrupted.
Press the Menu button to exit. Then the original channel is returned.
- If you have changed the connection of an antenna or cable, perform AUTO SCAN again.
29
CHANNEL
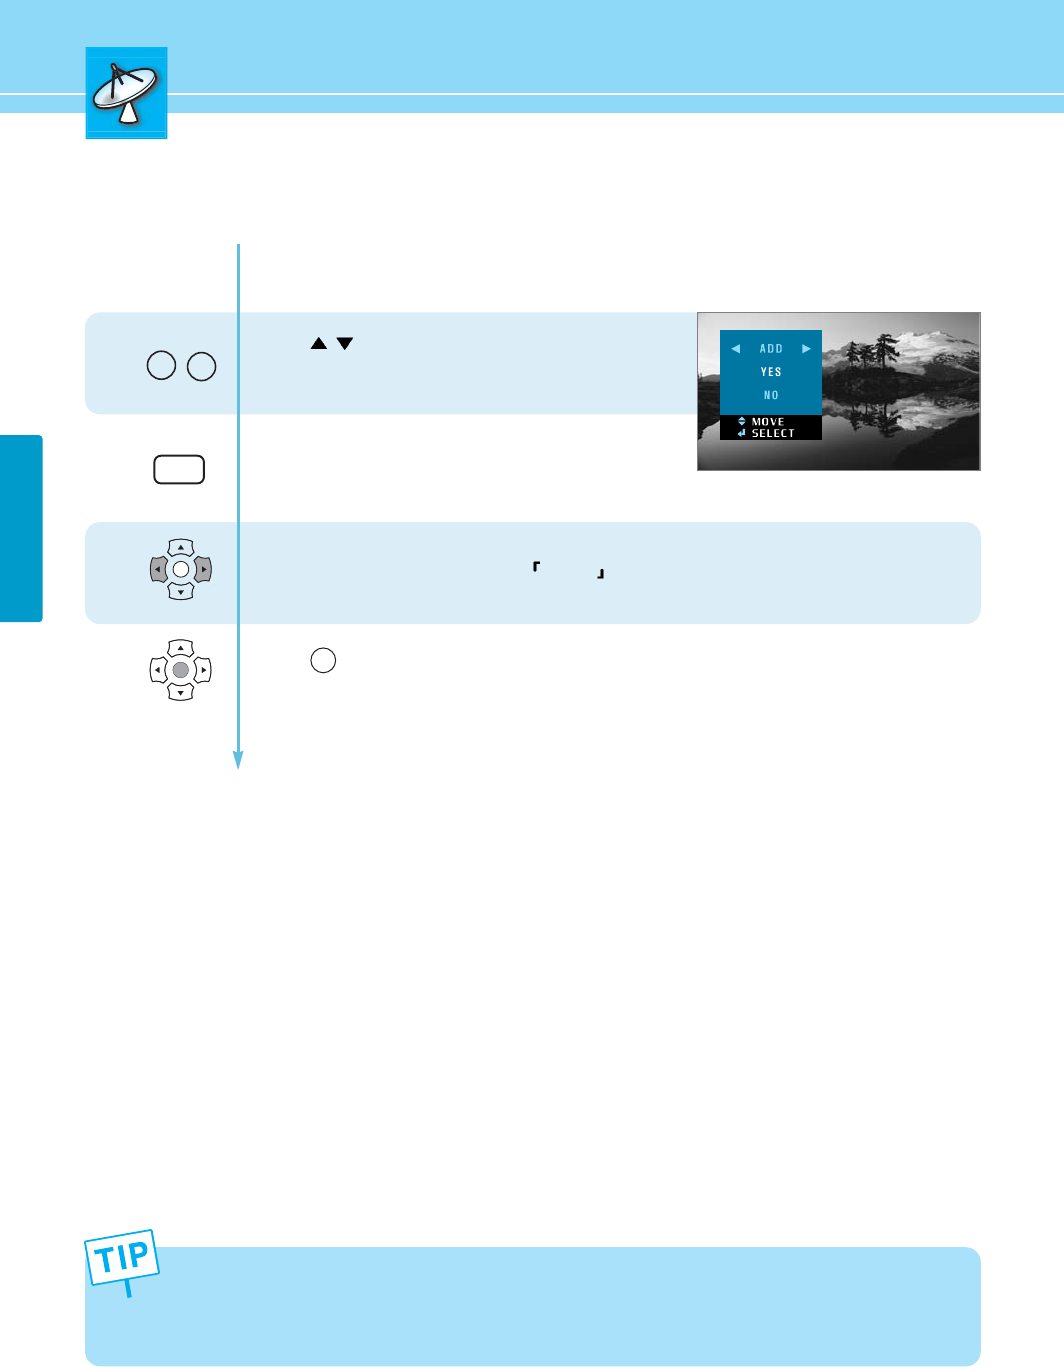
How to Add/Erase Channels Manually
Users can add or erase the desired channels.
1
2
3
4
Press \channel buttons or the number buttons
on remote control to view the channels that will be
added or erased.
Add the channel by pressing the
ADD/ERASE button.
Press the ADD/ERASE button to erase the channel
Press Left and Right buttons to set YES/NO .
Press button to set.
CH-
CH+
OK
OK
ADD/ER
When you wish to restore any digital channels that have been deleted, you need to perform AUTO SCAN again.
If you want to directly use the number buttons for storing, contact your local broadcasting company or cable
company for the required channel digits. Unlike an analog broadcast, a digital broadcast uses virtual channels,
not fixed channels. For more information on virtual channels, see page 62.
OK
30
HYUNDAI LCD TV
CHANNEL
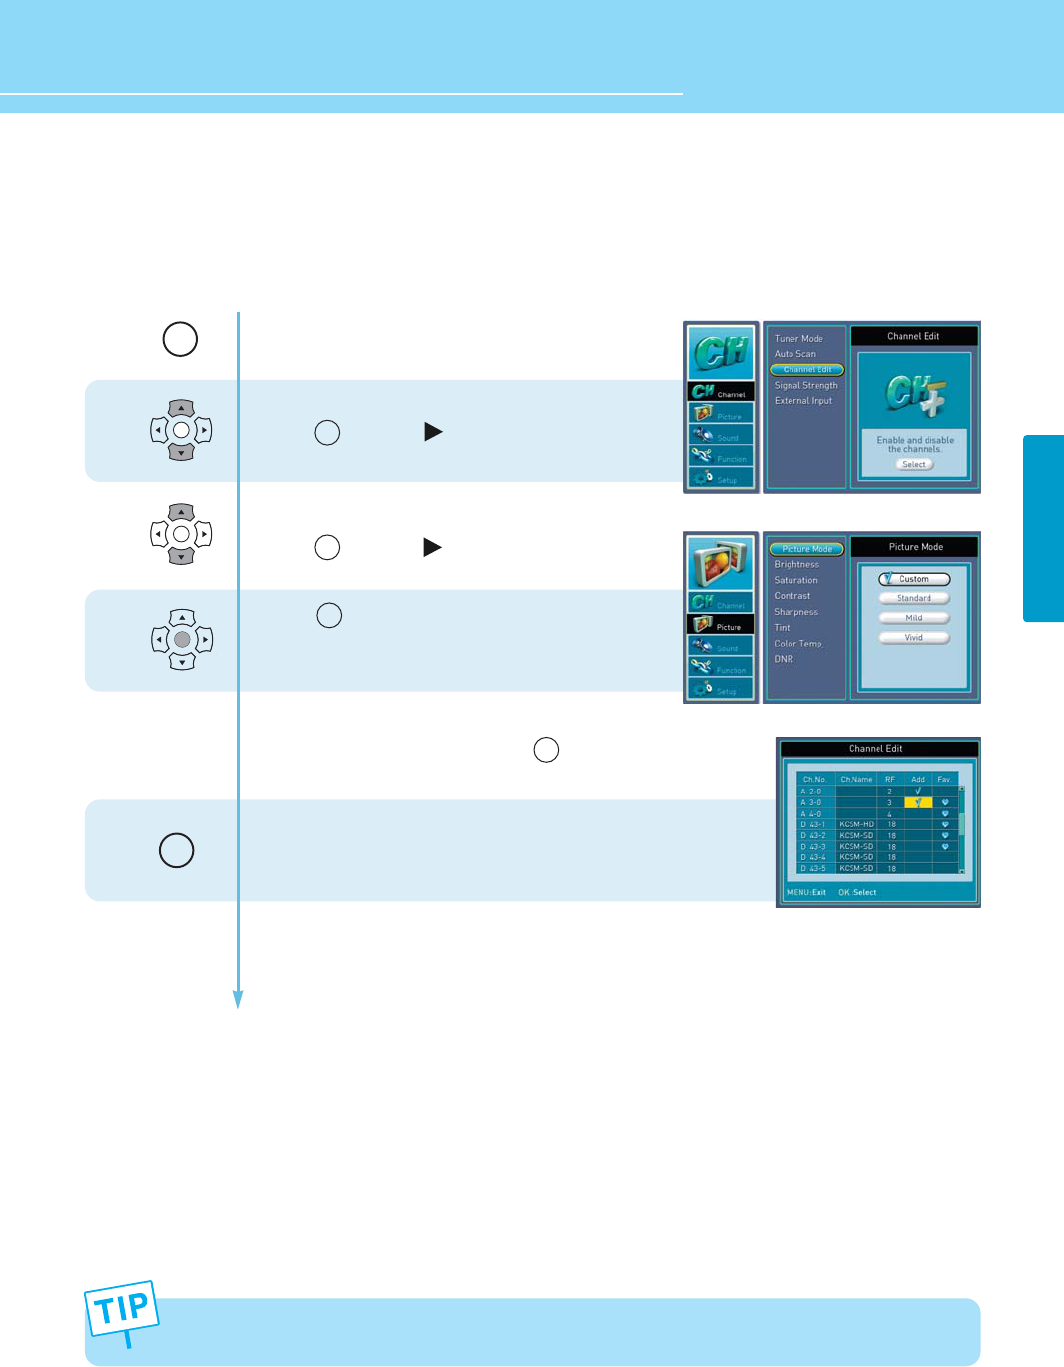
How to Set Channel Edit and Favorite Channels
Users can store frequently watched channels to quickly access a preferred channel.
The Favorite function is available only with remote control.
1
2
3
OK
OK
OK
Press Menu button.
Menu items appear on the screen.
Press Up or Down buttons to move to “channel” .
Press button or to select “channel”.
Press Up or Down button to move to “channel edit” .
Press button or to select “channel edit”.
Press button to “select”.
You can channel and Favorite-channels by pressing
add/erase, Up/Down, left/right and buttons.
Press MENU or exit button after the setting is done, and you
can save the channels you select.
MENU
EXIT
OK
OK
OK
OK
31
CHANNEL
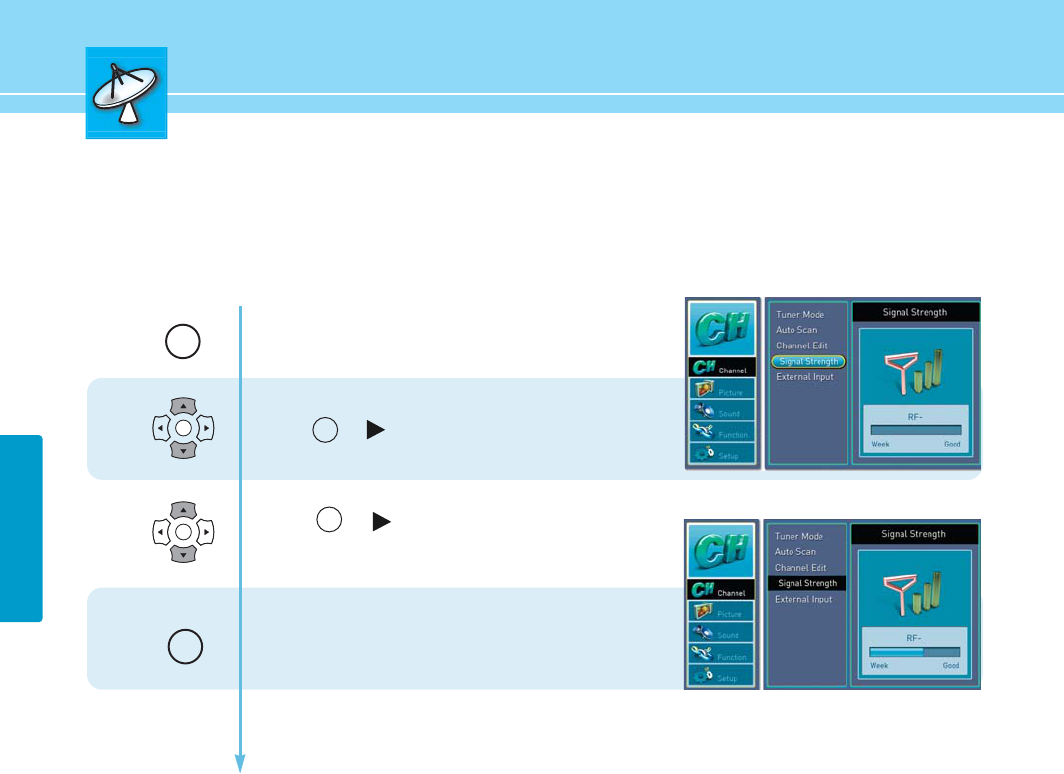
How to See Signal Strength
The function is only for DTV channel.
1
2
OK
OK
Press menu button.
menu items appear on the screen.
Press Up or Down button to move to “channel” .
Press or button to select “channel”.
Press Up or Down button to move to “signal strength” .
Press or button to select “signal strength”
then the signal strength of anntena appears
on the screen.
Press Menu button after the setting is done.
menu goes to the previous menu
If the Exit button is pressed, the menu will disappear.
MENU
EXIT
OK
OK
32
HYUNDAI LCD TV
CHANNEL
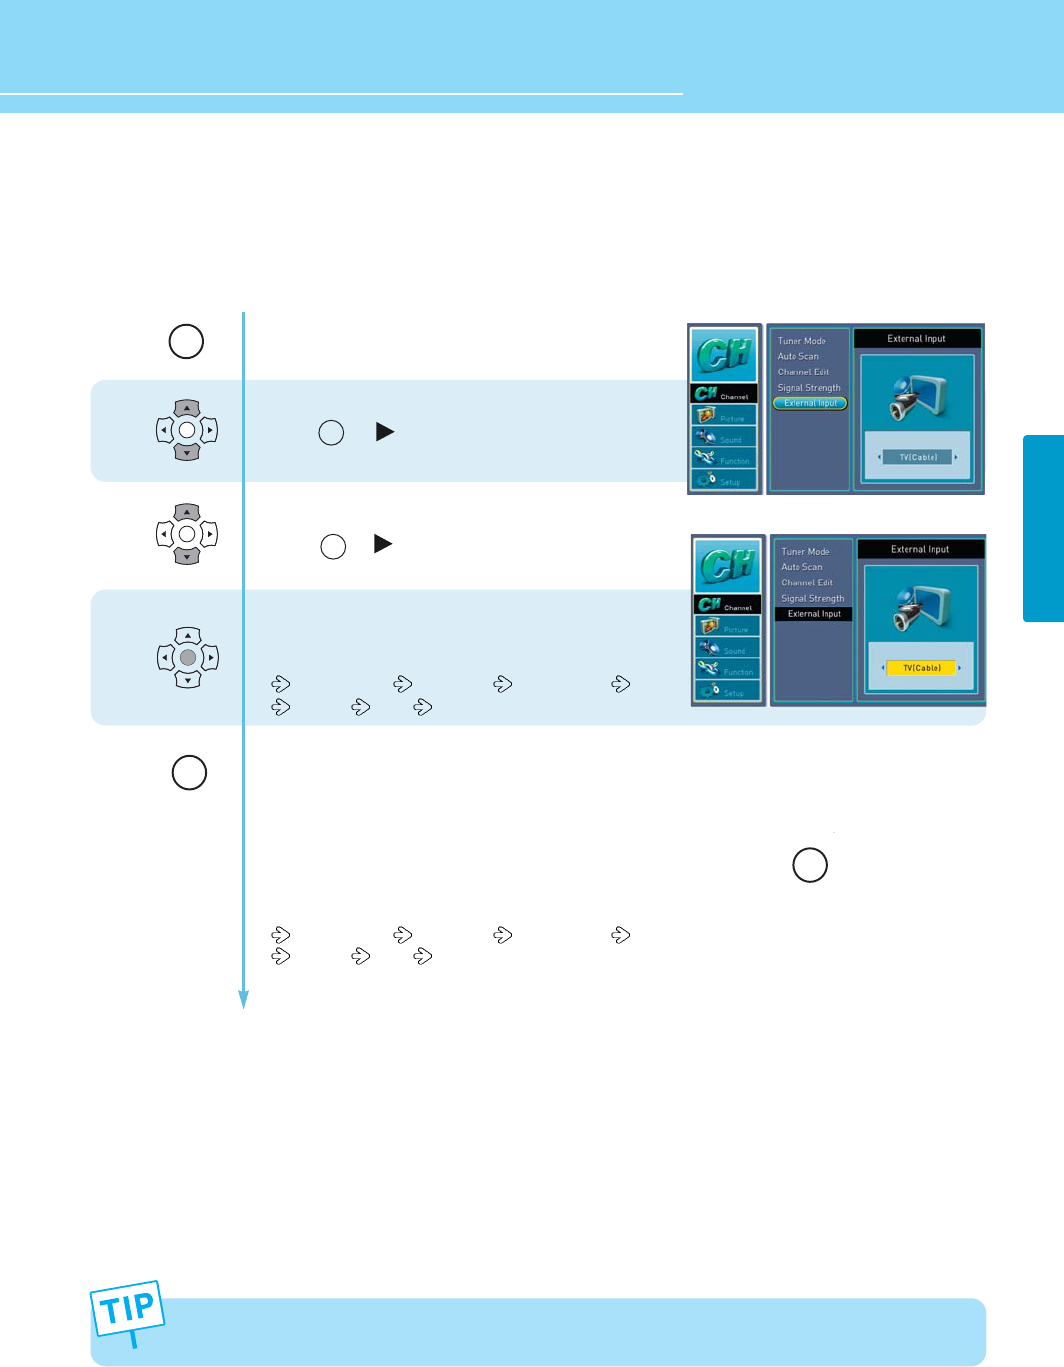
How to Set The Input Mode
The Favorite function is available only with remote control.
1
2
3
OK
OK
OK
Press Menu button.
Menu items appear on the screen.
Press Up or Down button to move to “channel” .
Press or button to select “channel”.
Press Up or Down button to move to “external input” .
Press or button to select “external input”.
Press left or right button to set input mode
Whenever press left/right button to set input mode
Changes in following order.
TV(Air/Cable) AVI(CVBS) AVI(S-Video) Ypbpr1
Ypbpr2 HDMi VGA
Press Menu button after the setting is done, and Menu goes to the previous Menu.
If the Exit button is prested, the menu will appear.
You can set the input mode quickly using the remote control press the button
Whenever press this button, the input mode changes if following order
TV(Air/Cable) AVI(CVBS) AVI(S-Video) Ypbpr1
Ypbpr2 HDMi VGA
SOURCE
MENU
EXIT
OK
OK
33
PICTURE
PICTURE
1
2
3
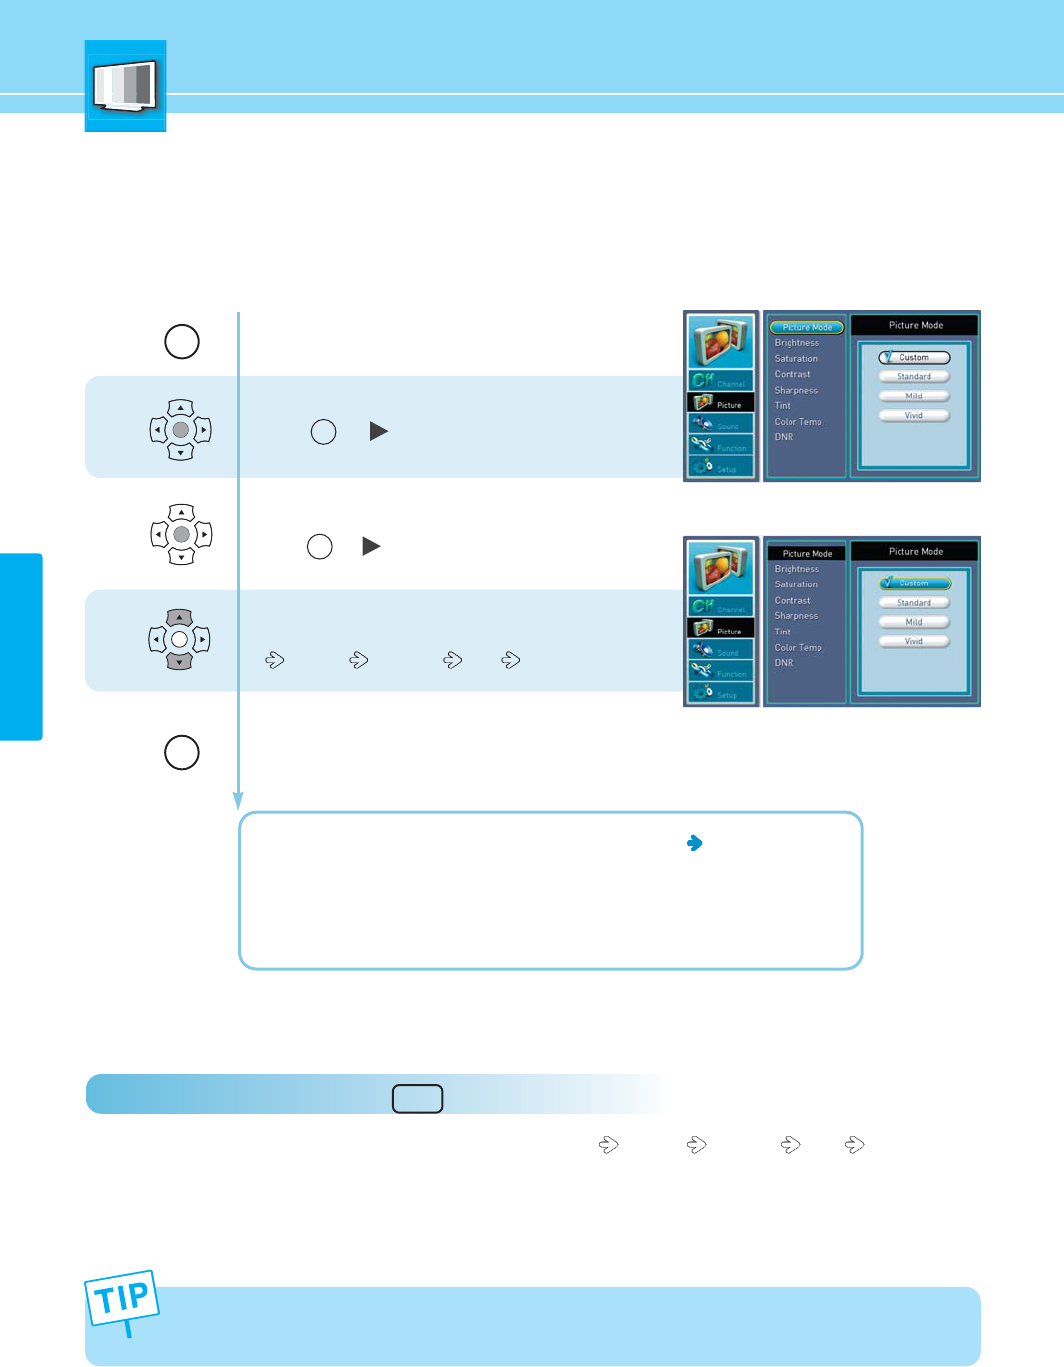
How to Select the Picture Mode
Users can automatically adjust the picture mode according to the input mode.
How to Directly Select Picture Mode : Press Pricture button.
- Whenever press this button the mode changes in following arder. Custom Standard Mild VIVID.
OK
OK
OK
Press Menu button.
Menu items appear on the screen.
Press Up or Down button to move to picture.
Press or button to select picture.
Press Up or Down button to move to picture mode
Press or button to select
Whenever you press Up or Down button, the mode
changes in following order.
Custom Standard Mild Vivid
Press MENU button after the setting is done, and Menu goes
to the previous menu.
If the EXIT button is pressed, the menu will disappear.
CUSTOM : When the user wants to directly set the values See the next page
STANDARD : Most video contents are appropriate to this mode.
MILD : Soft display.
VIVIDI: Clear and Vivid display
- The adjustment of Contrast, Brightness, Sharpness, Saturation and Tint is allowed only in the Custom mode.
MENU
EXIT
OK
OK
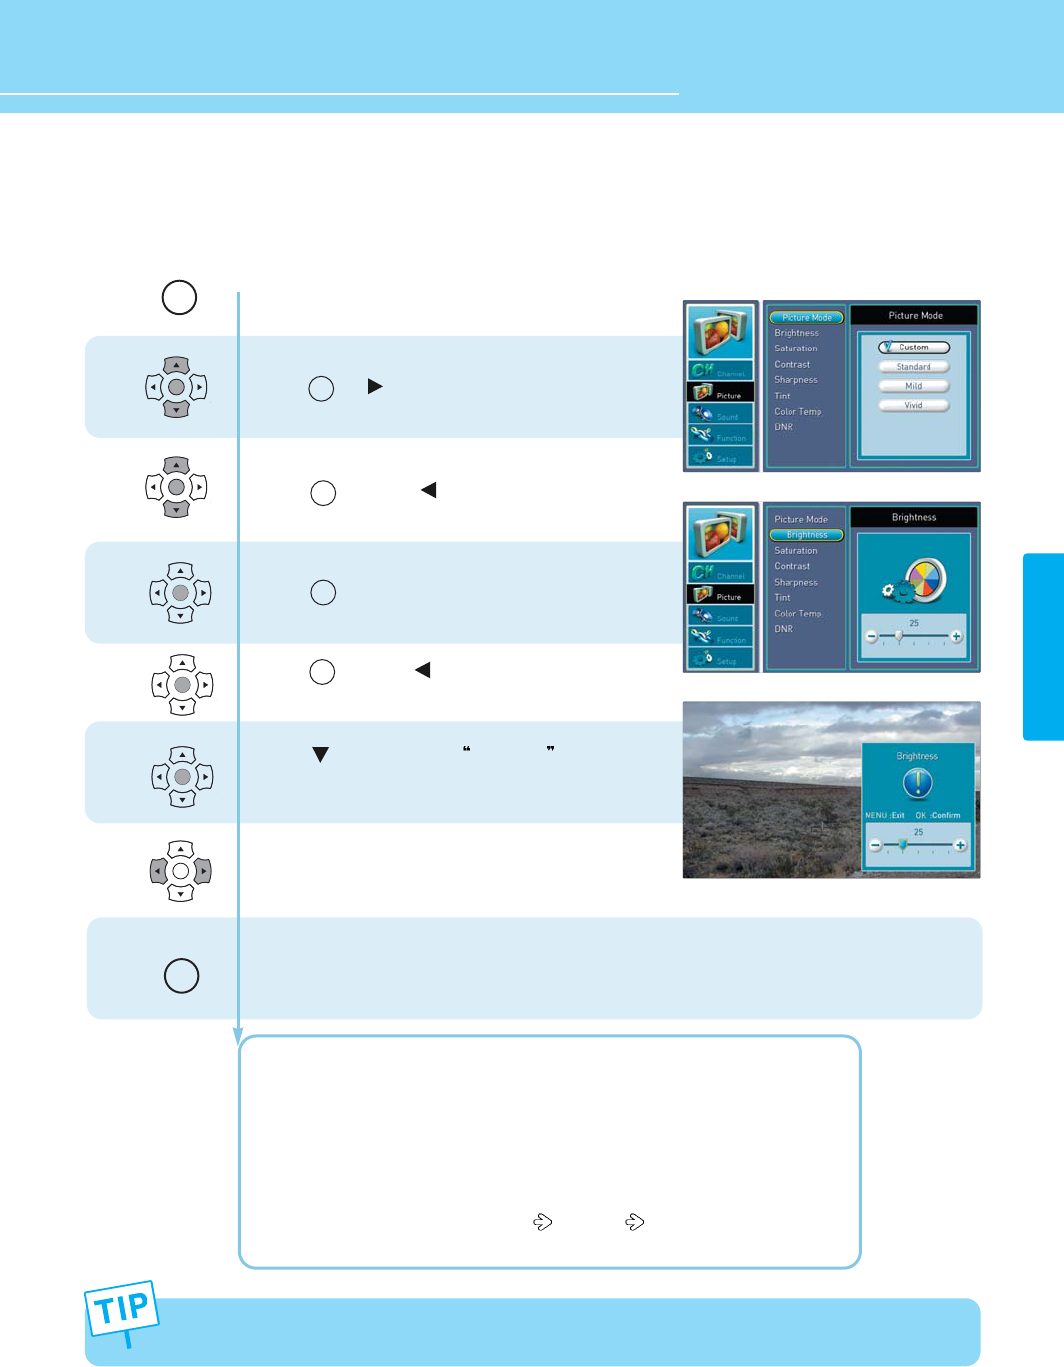
How to Set the Desired Picture
Users can manually adjust their desired picture.
Press Menu button.
Menu items appear on the screen.
Press Up or Down button to move to picture
Press or button to select
picture mode.
Press Up or Down button to move to picture mode
Press button or to select picture mode
Press Up or Down buttom to move to custom and
Press button to make a selection
Press button or to move to picture mode.
Press button to select Brightness .
Brightness apprears on the right.
Press Left or Right button to adjust.
Press MENU button after the setting is done, and Menu
goes to the previous menu.
If the EXIT button is pressed, the menu disappears.
BRIGHTNESS : Adjust the brightness of the entire picture.
SATURATION : Adjust colors into deeper or lighter colors.
CONTRAST : Adjust the brightness and darkness of object and background.
SHARPNESS : Adjust clarity of outline of objects.
TINT : Adjust colors naturally.
COLOR TEMP : Whenever You Press left or right button, the mode changes in
following order COOL NORMAL WARM
DNR : Reuce the Digital Noise in the DTV mode.
SHARPNESS, COLOR, TINT are not applied to PC and HDMI (or DVI) modes.
1
2
3
4
5
6
OK
OK
OK
OK
OK
OK
34
HYUNDAI LCD TV
PICTURE
MENU
EXIT
OK
OK
OK
OK
Press Aspect button.
Menu items appear on the screen.
Whenever you press aspect button the mode changes in following order.
WIDE NORMAL ZOOM
SOUND
ASPECT
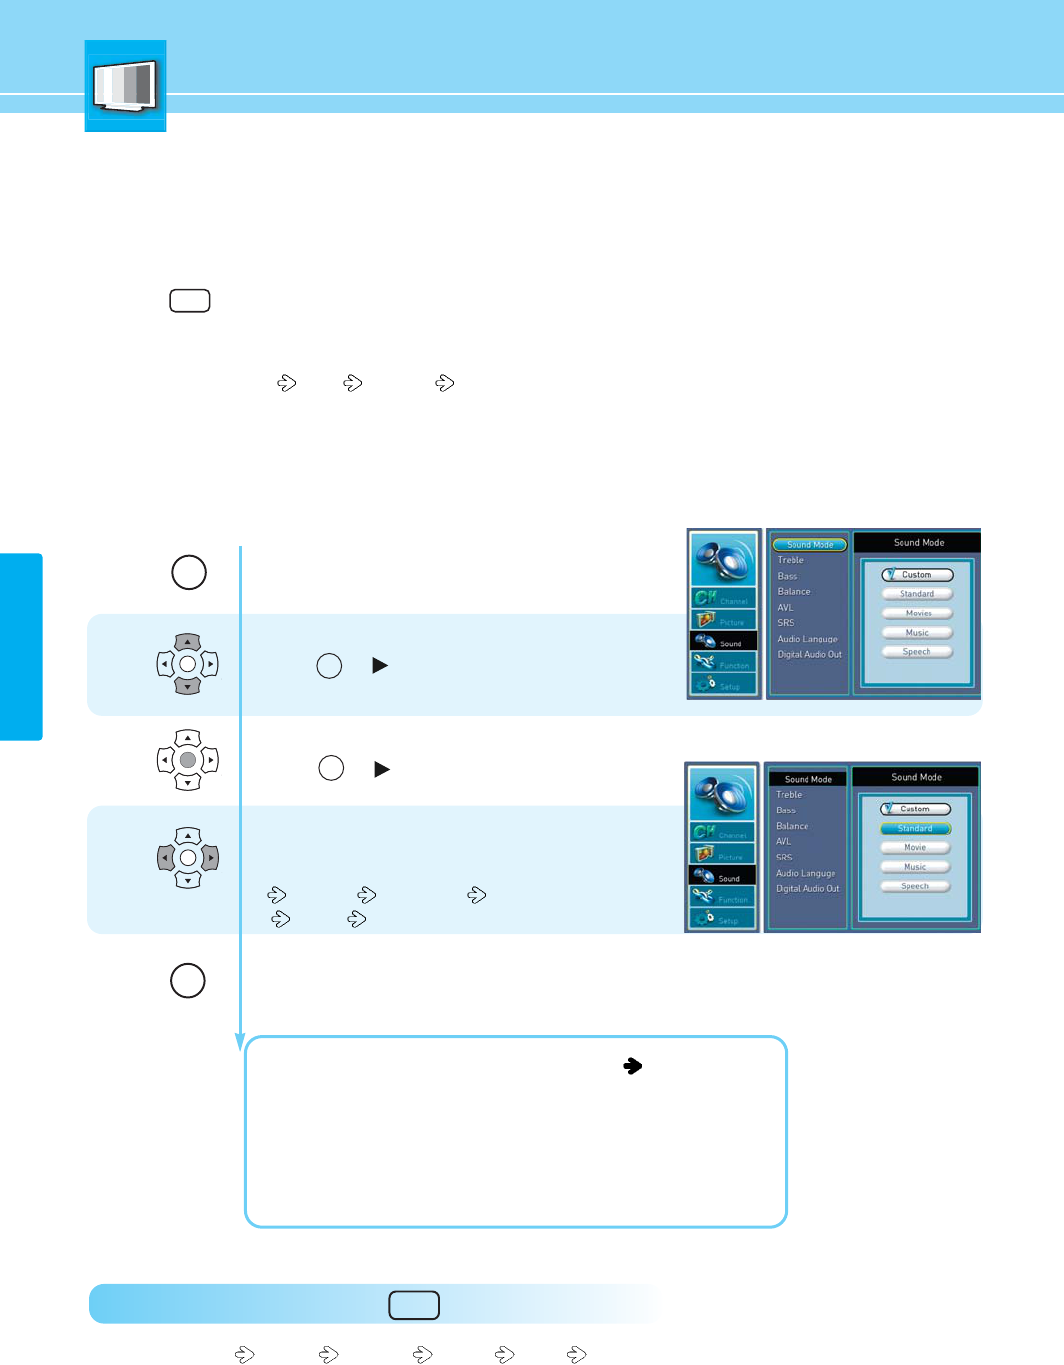
How to Directly Select Sound Mode : Press SOUND button.
Users can select Custom Standard M ovies Music Speech
Press Menu button.
Menu items appear on the screen.
Press Up or Down button to move to sound .
Press or button to select sound .
Press Up or Down button to move to sound mode
Press or button to select sound mode.
Mode is selected.
Whenever you press Up or Down button,
the mode changes in following order.
CUSTOM STANDARD MOVIES
MUSIC SPEECH
Press MENU button after the setting is done, and Menu goes to the previous menu.
If the EXIT button is pressed, the menu will disappear.
CUSOTM : When the user wants to set the value. See the next page
STANDARD : General sound mode. This fits most audio contents.
MOVIES : For enjoying vivid sound.
SPEECH : For enjoying clear sound.
MUSIC : For enjoying original sound.
1
2
3
OK
OK
OK
35
PICTURE
How to Select the Aspect Ratio
Users can manually adjust size of the screen.
How to Select the Audio Mode
Users can adjust sound mode automatically as they want.
MENU
EXIT
OK
OK
36
HYUNDAI LCD TV
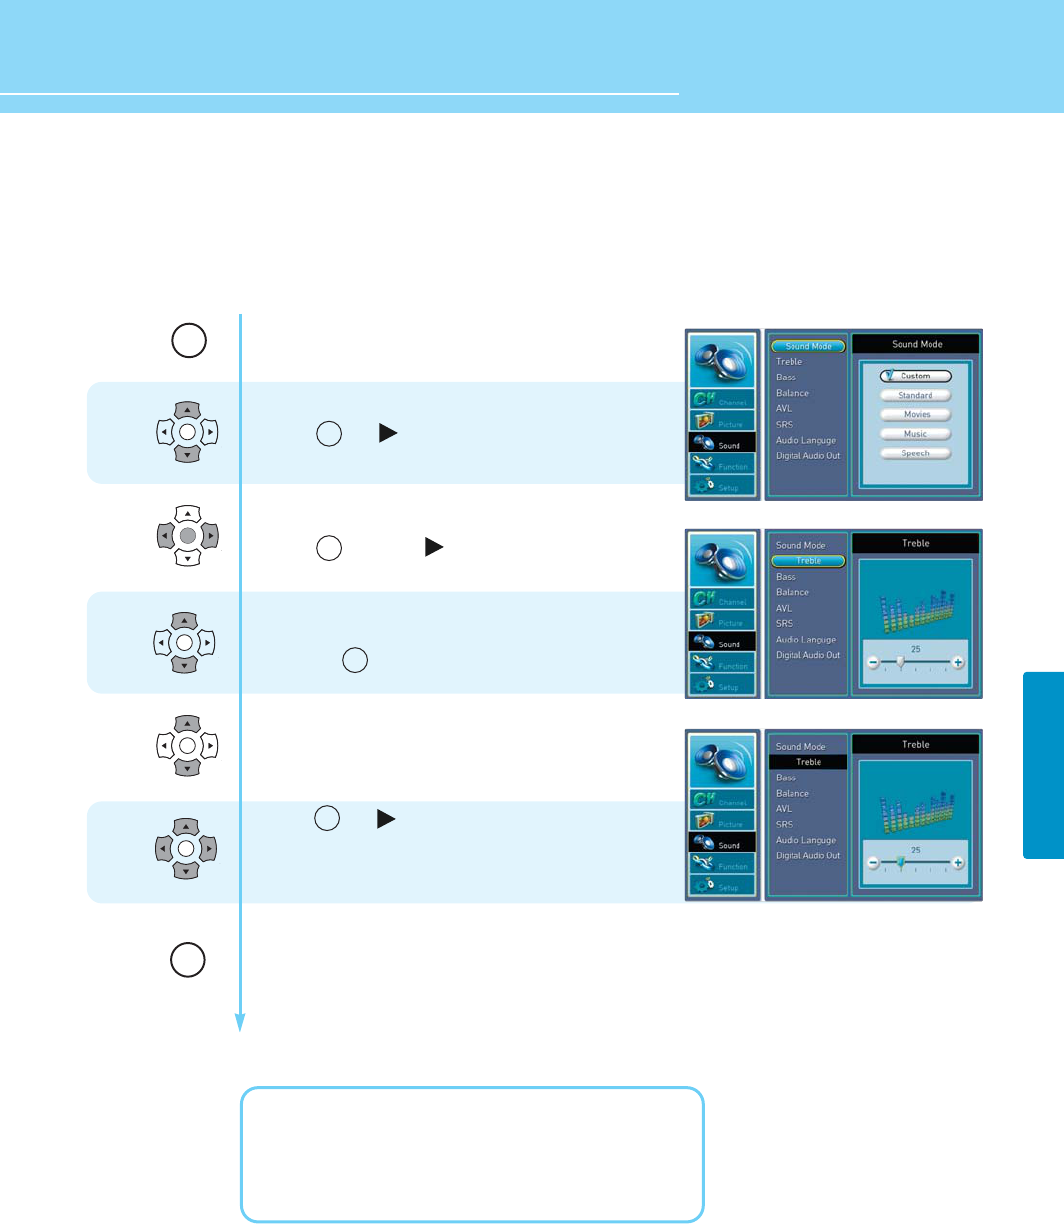
How to Adjust the Desired Audio Mode
Users can adjust sound mode manually as they want.
Press Menu button.
Menu items appear on the screen.
Press Up or Down button to move to sound
Press or button to move to sound
Press Up or Down button to move to sound mode
Press button or to select
Press Up or Down button to move to custom
and press button to make a selection
Press Up or Down to select items
(Table, Boss and blance)
Press or button to select items
Move between the items listed using UP or Down button.
Adjust the level of the item selected using
Left or Right button.
Press MENU button after the setting is done, and Menu goes to
the previous menu.
If the EXIT button is pressed, the menu disappears.
TREBLE: Adjusts the range size of high sound.
BASS: Adjusts the range size of low sound.
BALANCE : Adjusts the balance of left and right speakers.
1
2
3
4
5
OK
OK
OK
OK
OK
MENU
EXIT
OK
OK
OK
OK
SOUND

37
SOUND
How to Use the Automatic Volume Control
With this Automatic Volume Level Control, everything you watch will always maintain the volume level that you
decide. Basically it is set to “off”
Press Menu button.
Menu items appear on the screen.
Press Up or Down button to move to sound .
Press or button to select sound .
Press Up or Down button to move to AVL.
Press or button to select AVL.
Press or button to set to on/off.
Press button to set to on/off.
Press MENU button after the setting is done, and Menu goes to the previous menu.
If the EXIT button is pressed, the menu will disappear.
1
2
3
OK
OK
OK
MENU
EXIT
OK
OK
OK
38
HYUNDAI LCD TV
SOUND
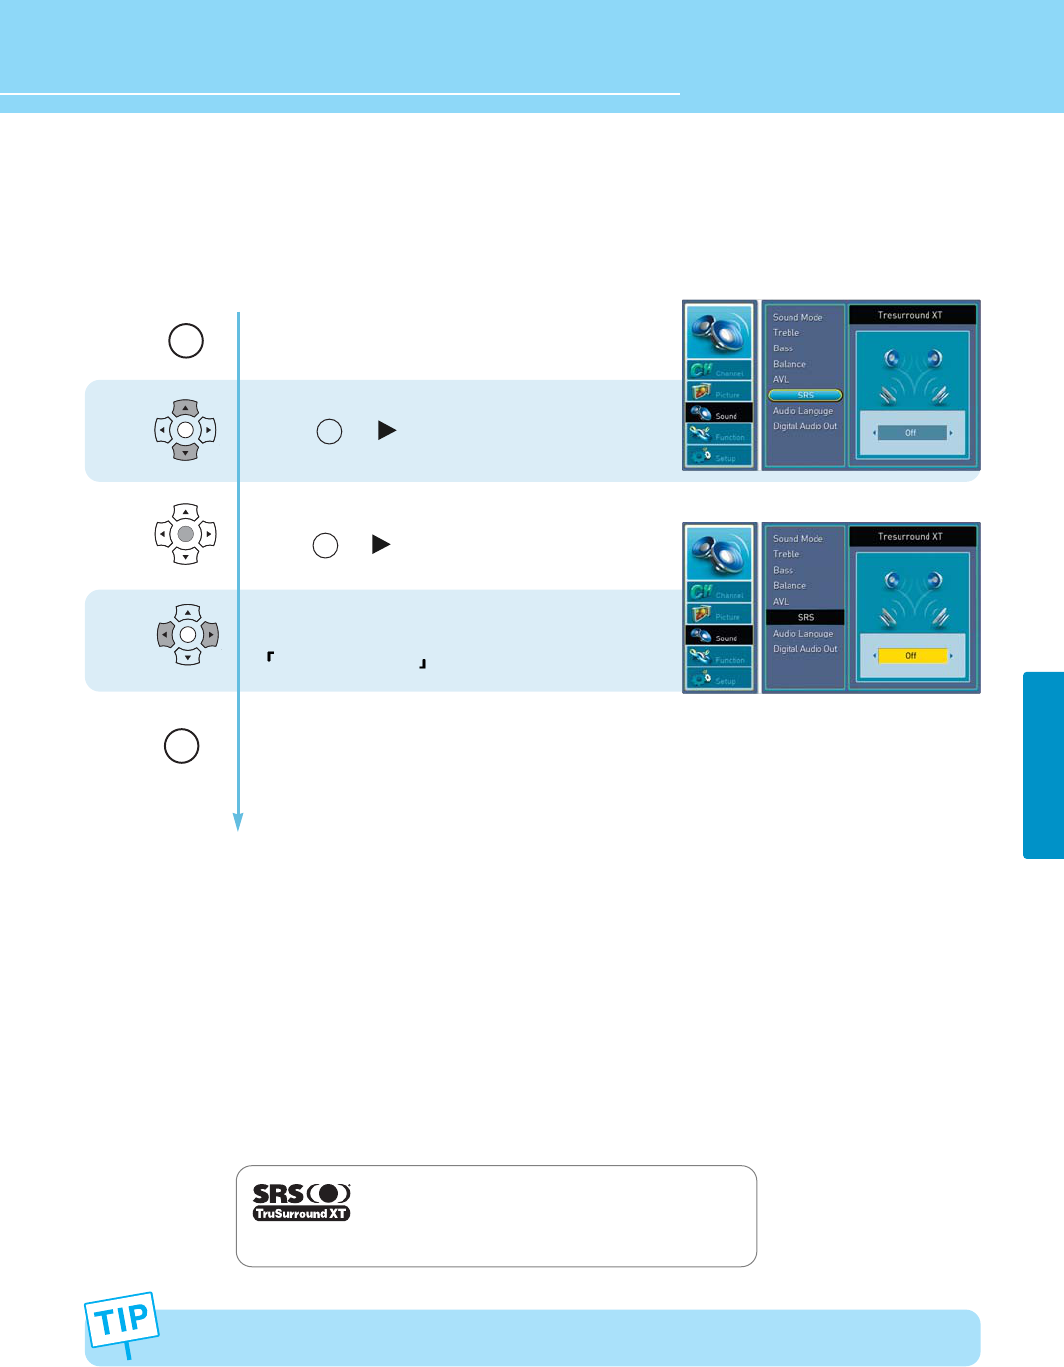
How to Listen to SRS TruSurround XT (Surround)
Users can enjoy spectacular 3D sound.
Press Menu button.
Menu items appear on the screen.
Press Up or Down button to move to sound.
Press or button to select sound.
Press Up or Down button to move to SRS.
Press or button to select SRS.
Press Left and Right buttons to set to
OFF/Tresurround XT .
Press MENU button after the setting is done, and Menu goes to the previous menu.
If the EXIT button is pressed, the menu will disappear.
1
2
3
The SRS TruSurround XT function is activated only when the audio input signal is Stereo.
is a trademark of SRS Labs, Inc.
TruSurround XT technology is incorporated under
license from SRS Labs, Inc.
OK
OK
OK
MENU
EXIT
OK
OK
39
SOUND
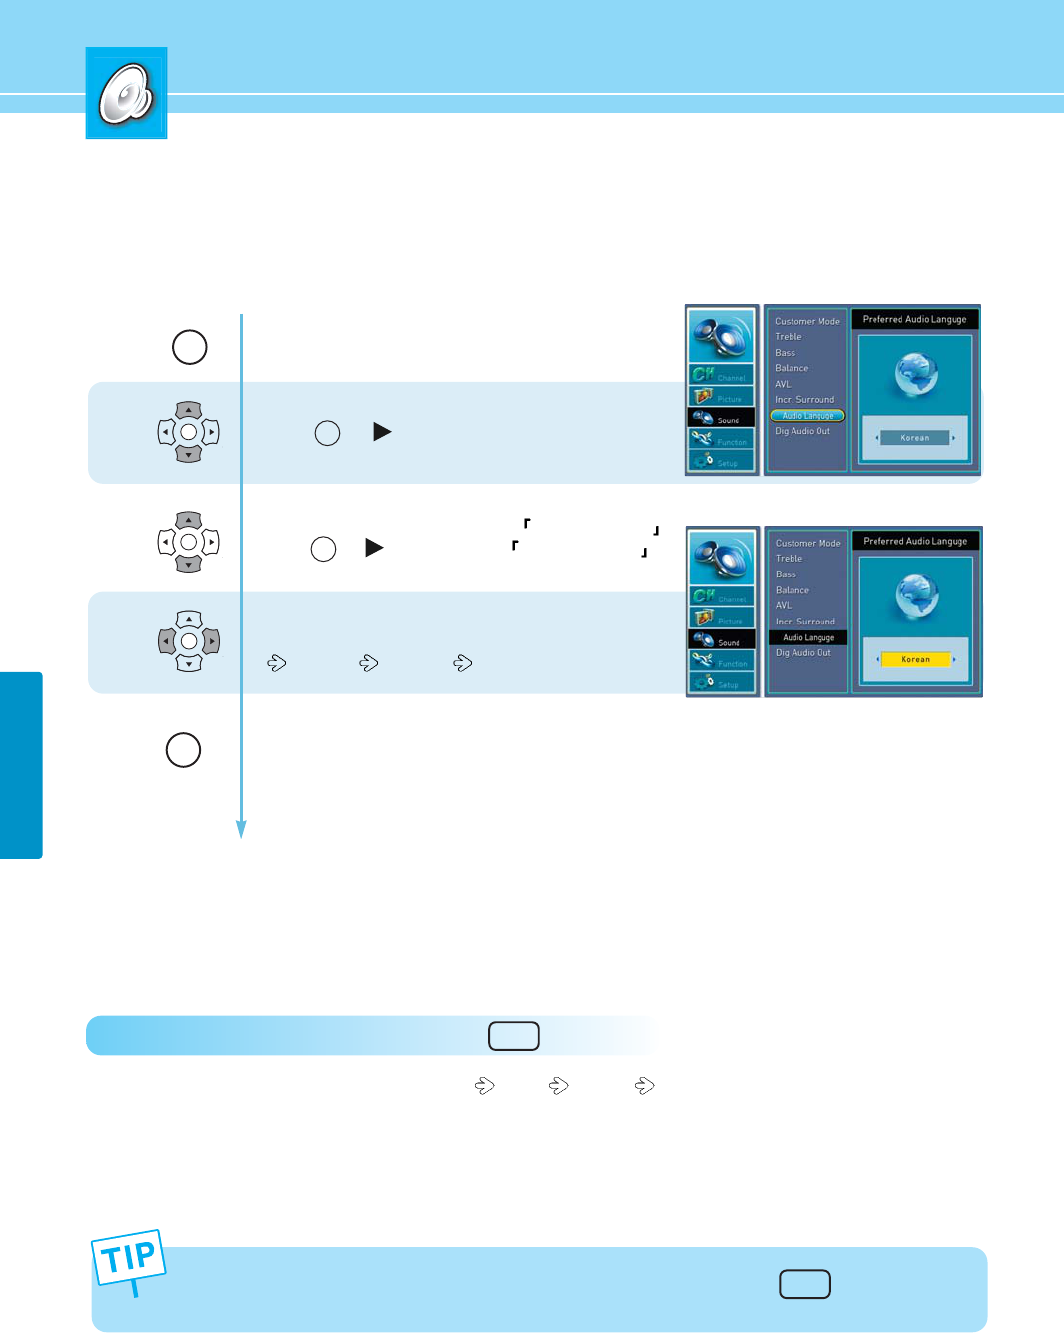
How to Set Audio Language
While watching a digital program, you can listen to foreign language if the program is supported with foreign
language.
Press Menu button.
Menu items appear on the screen.
Press Up or Down button to move to sound .
Press or button to select sound .
Press Up or Down button to move to AUDIO LANGUAGE .
Press or button to select AUDIO LANGUAGE .
Whenever you press Left or Right button,
the mode shifts in following order.
ENGLISH SPANISH FRANCE
Press MENU button after the setting is done, and Menu goes to the previous menu.
If the EXIT button is pressed, the menu will disappear.
1
2
3
OK
OK
OK
SAP
How to Directly Select Audio Language : Press the button.
- Whenever you press this button, the mode shifts MONO STEREO SAP in order when receiving analog
signals.
You can select one of the languages listed you prefer when receiving digital signals.
- If you want to see language information while watching a digital channel, press the button to display
language information that is currently received.
INFO
MENU
EXIT
OK
OK
40
HYUNDAI LCD TV
SOUND
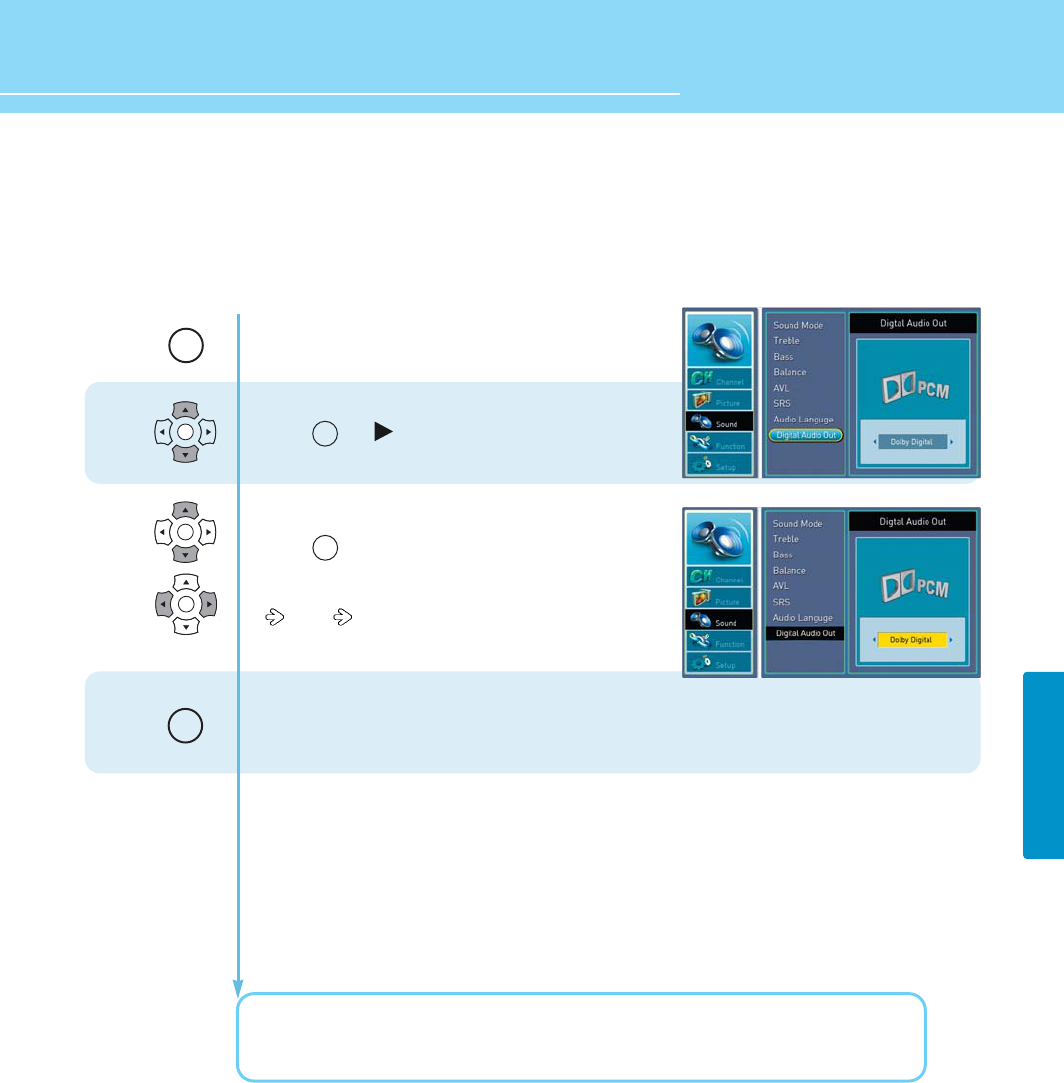
How to Set the Digital Audio Output
The digital audio output terminal allows you to enjoy digital sound. (For more details, see page 30)
Press Menu button.
Menu items appear on the screen.
Press Up or Down button to move to sound .
Press or button to select sound.
Press Up and Down buttons to move to
“DIGITAL AUDIO OUT”
Press or buttons to select Digital Audio out.
Whenever you press Left or Right button, the mode
shifts in following order.
Dolby PCM
Press MENU button after the setting is done, and Menu goes to the previous menu.
If the EXIT button is pressed, the menu will disappear.
Manufactured under license from Dolby Laboratories.
“Dolby” and the double-D symbol are trademarks of Dolby Laboratories.
1
2
OK
OK
OK
MENU
EXIT
OK
OK
41
SOUND
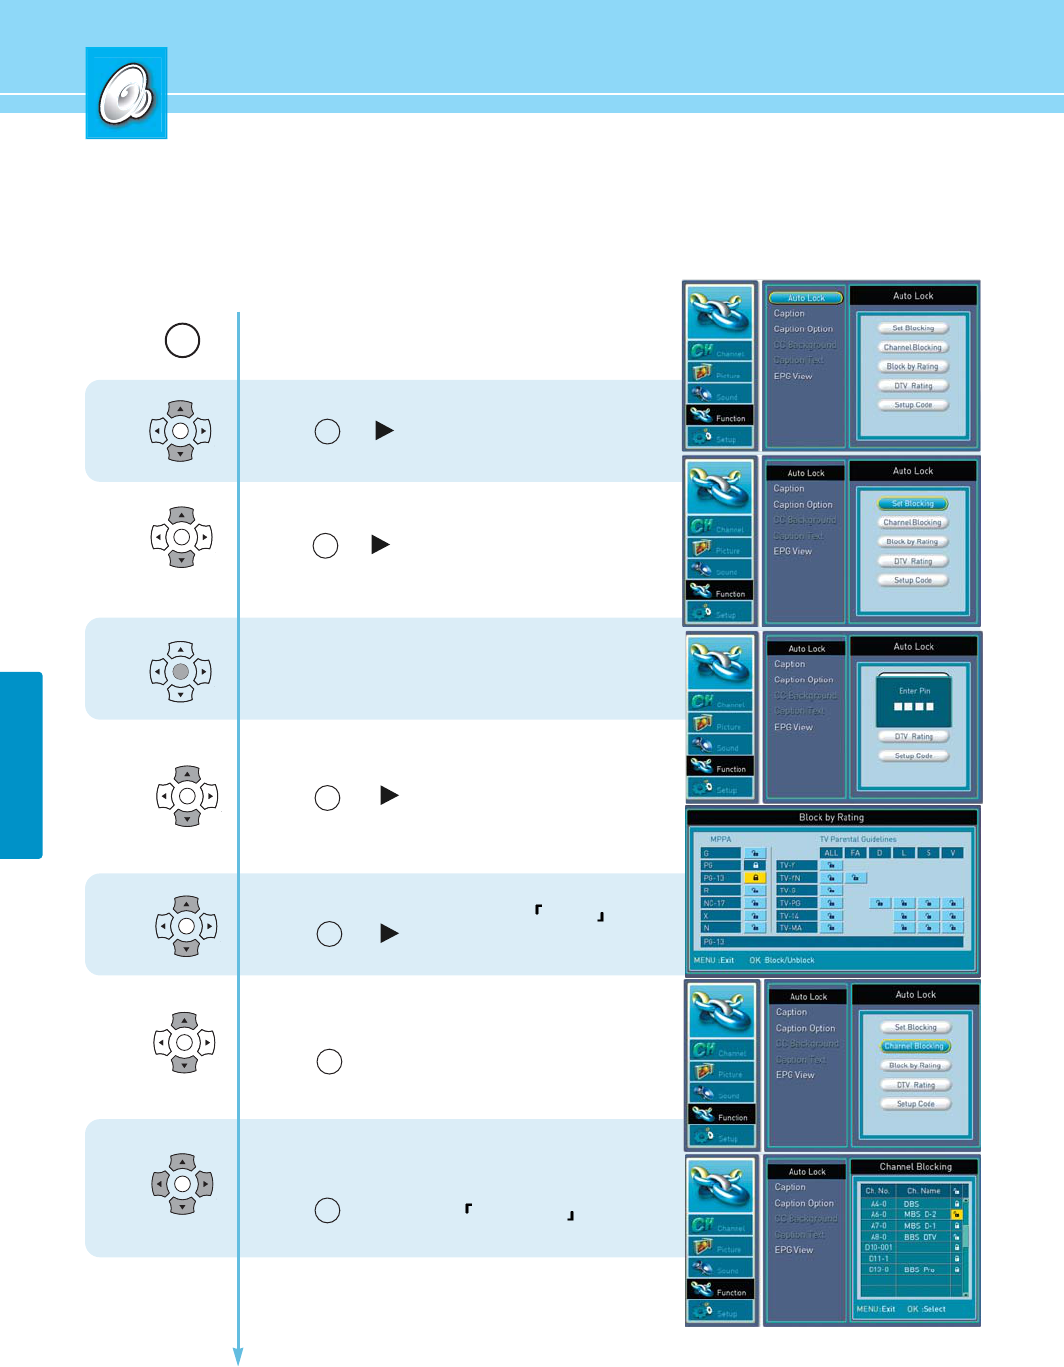
How to Set Auto Lock
This function is used to prevent from using the control buttons on the front top of the TV or from connecting
external devices to the TV. You make sure to set a PIN number to use this function.
1
2
3
4
5
6
7
Press Menu button.
Menu items appear on the screen.
Press Up or Down button to move to function .
Press or button to select function .
Press Up or Down buttons to move to “AUTO LOCK”.
Press or button to select “AUTO LOCK”.
Then the Enter PIN number window appears.
The default is 4 digits (0-0-0-0).
- To set Key Lock :
Press Up or Down button to move to “SET BLOCKING”.
Press or button to select “SET BLOCKING”
Press Up or Down button to move to ON/OFF .
Press or button to select “SET BLOCKING”
- To set Channel blocking :
Press Up or Down button to move to
“CHANNEL BLOCKING”.
Press button to select “CHANNEL BLOCKING”.
Then the AUX BLOCK items appear.
Press Up and Down buttons to move to the
item you want.
Press button to set to LOCK/UNBAK .
If the item is set to ON, such item is disabled.
OK
OK
OK
OK
OK
OK
OK
MENU
OK
OK
OK
OK
OK
OK
42
HYUNDAI LCD TV
SOUND
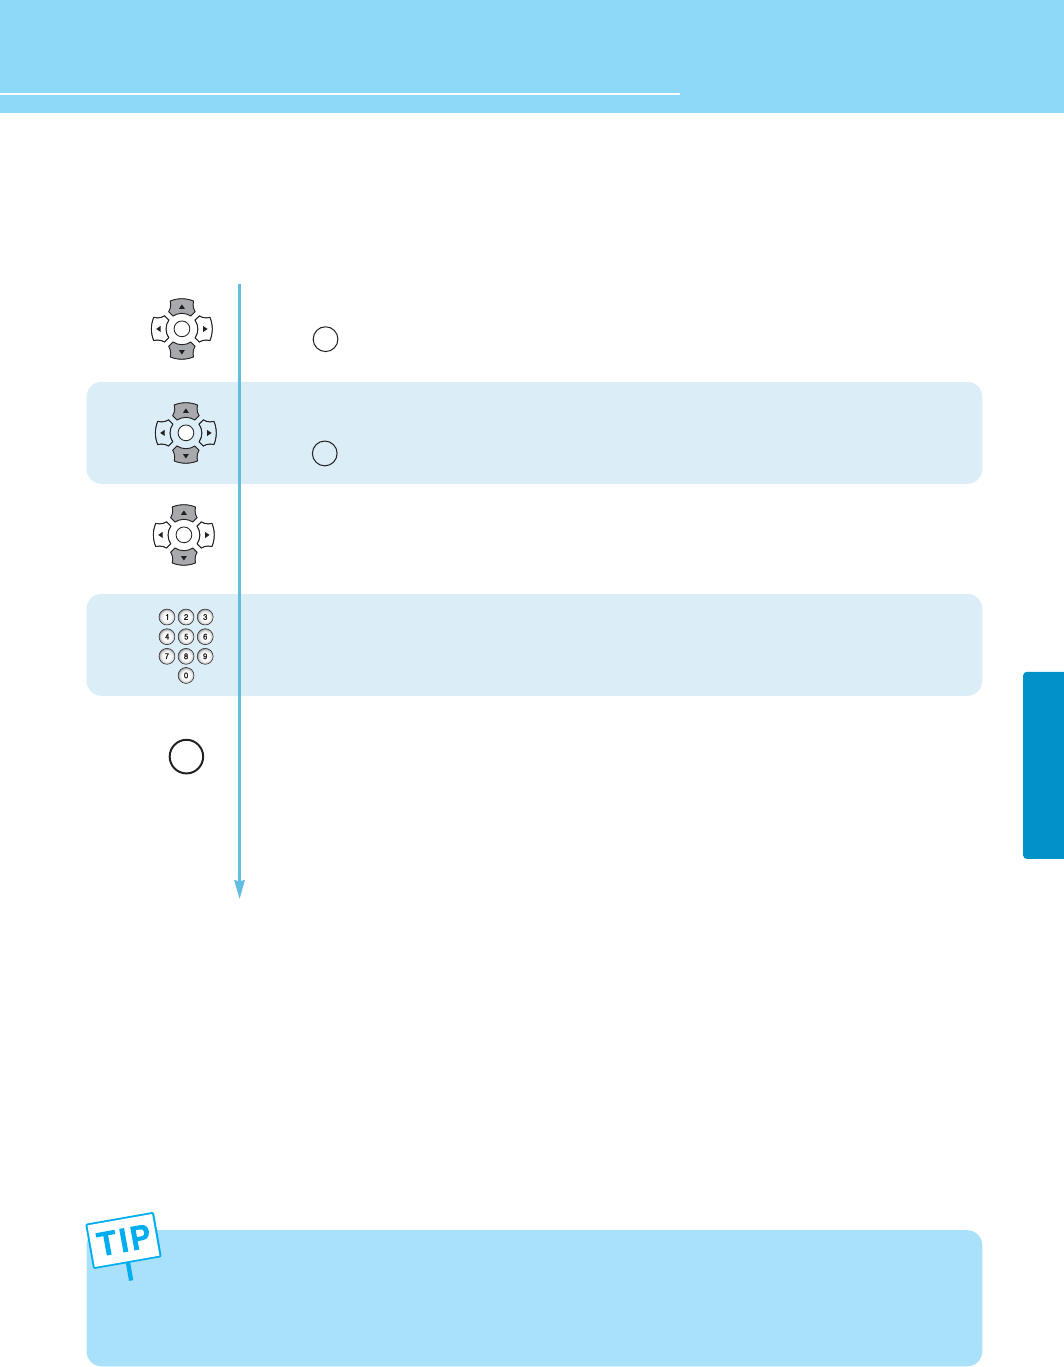
Continued from previous page.....
(Set the Lock External Signal function.)
9
8
- To set block by rating :
Press Up or Down button to move to “block by rating”.
Press button to select “block by rating”.
- To update DTV rating :
Press Up or Down button to move to “setup code”.
Press button to select “block by rating”.
Press Up or Down button to select “SETUP CODE”.
Press button to select “SETUP CODE”
Then the Enter PIN number window appears.
Enter a 4- digit PIN number.
When the Confirm PIN number window appears,
emter the PIN number again
Press MENU button after the setting is done, and Menu
goes to the previous menu.
If the EXIT button is pressed, the menu will appear.
OK
OK
- The Lock External SIGNAL function is designed to prevent a VCR or game player from being connected to the TV.
- If you forgot your PIN number, Enter a 4-digit number (2-5-0-1) inthe pin number window.
- The Key Lock function will be disengaged when you turn off and then on AC power or when a power failure
happens.
11
10
OK
OK
OK
EXIT
43
FUNCTION
How To Set Block By Rating
This(V-Chip) is used to block program viewing based on the ratings sent by the broadcasting station.
The default setting is to allow all programs to be viewed. Viewing can be blocked by the type of program and by
the categories chosen to be blocked.
V-Chip rating and categories
Rating guidelines are provided by broadcasting stations. Most television programs and television movies can be
blocked by TV Rating and/or Individual Categories. Movies that have been shown at the theaters or direct-to-
video movies use the Movie Rating System (MPAA) only.
Ratings for Movies previously shown in theaters :
Ratings for Television programs including made-for-TV movies :
Continued on next page ......
Movie Ratings : - Blocking Off (Permits all programs)
- G (General audience)
- PG (Parental guidance suggested)
- PG-13 (Parents strongly cautioned)
- R (Restricted)
- NC-17 (No one 17 and under admitted)
- X (Adult only)
If you set PG-13 : G and PG movies will be available , PG-13, R, NC-17 and X will be blocked.
- TV-G (General audience)
- TV-PG (Parental guidance suggested)
- TV-14 (Parents strongly cautioned)
- TV-MA (Mature audience only)
- TV-Y (All children)
- TV-Y7 (Children 7 years older)
TV Rating Children : - Age (applies to TV-Y, TV-Y7)
- Fantasy Violence (applies to TV-Y7)
TV Rating General : - Age (applies to TV-G, TV-PG, TV-14, TV-MA)
- Dialogue-sexual dialogue (applies to TV-PG, TV-14)
- U Language-adult language (applies to TV-PG, TV-14, TV-MA)
- Sex-sexual situations (applies to TV-PG, TV-14, TV-MA)
- Violence (applies to TV-PG, TV-14, TV-MA)
44
FUNCTION
HYUNDAI LCD TV
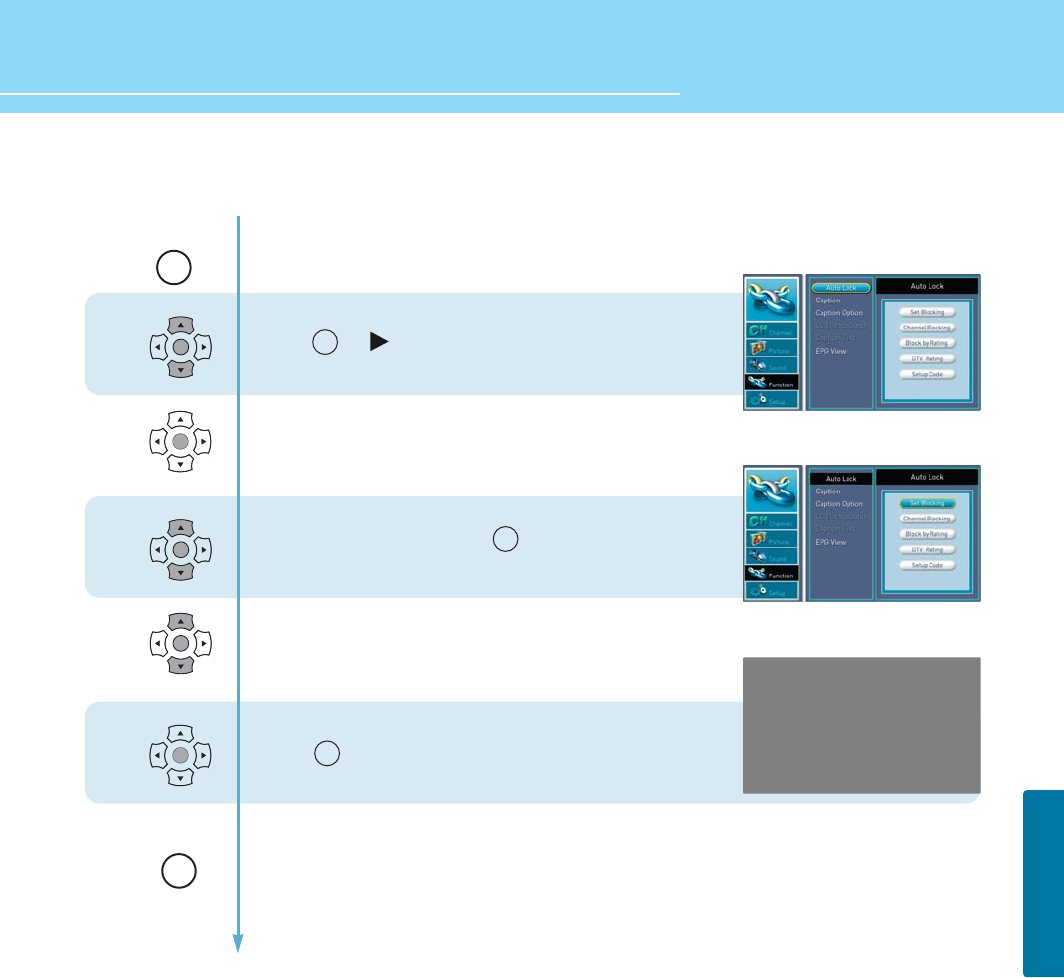
...... Continued from previous page.
1
2
3
4
5
Press Menu button.
Menu items appear on the screen.
Press Up or Down button to move to Auto Lock.
Press or button to select Auto Lock.
The message “Enter PIN” will appear.
Enter your 4-digit PIN number.
Press Up or Down button to move to
“BLOCK BY RATING” and press buttons
to mode a selection.
The new screen will appear.
Press Up/Down and left/right buttons to select the items
(MPAA and TV Parental midelines)
Press up/down and left/right buttons to select the item
Press button to mode a selection.
Press MENU button after the setting is done,
and Menu goes to the previous menu.
If the EXIT button is pressed, the menu will disappear.
OK
OK
OK
OK
OK
MENU
EXIT
OK
OK
OK
45
FUNCTION
How to View Closed Captions
Choices in the closed caption menu are : CC Mode, Priority (Analog caption or Digital caption), and Option.
1. CC MODE :
ON : Captioning information is always shown, when available.
OFF : No captioning information is displayed.
2. PRIORITY :
You can choose whether the TV uses digital or analog captions for digital TV programs that have both or either.
- ANALOG (CAPTION) : You can select a closed caption mode, which is the mode, or source, used for displaying
captioning information for analog channels or digital channels, if available.
- DIGITAL (CAPTION) : You can select a closed caption, service mode(1-7) for digital channels.
The service modes support MPEG-2 based transport sources Service 1 and Service2 are the
primary and secondary languages, respectively.
Service3 and service4.5.6 are additional caption sources that may be available.
Continued on next page ......
• CAPTION :
The form for the words that scroll across the bottom of the TV screen : usually the audio portion of the program
provided for the hearing impaired.
CC 1 : For video related information that can be displayed. Script can be in any language.
CC 2/3/4 : Other modes used for video related information.
• TEXT :
The term for the words that appear in a large black frame and almost cover the entire screen :
Usually message provided by the broad caster.
T 1 : Blanks out a large portion of the picture on the television screen, and display program guide or any
other information currently being transmitted.
T 2/3/4 : other modes that display information and blank out a large portion of the picture of the TV screen.
46
FUNCTION
HYUNDAI LCD TV
COLOR : Set the color of the cc Background AUTO -> BLACK -> WHITE -> RED -> GREEN -> BLUE -> YELLOW ->
MARGENTA -> CYAN
OPACIFY : Specify the opacity for the - AUTO -> SOLED -> FIASHUNG -> TRANSLUCENT -> TRANSPARE
CAPTION SIZE : Set the size of the words - AUTO -> SMALL -> STANDARD -> LARGE
CAPTION STYLE : Set the style of the words - AUTO -> STYLE1 -> STYLE2 -> STYLE3 -> STYLE4 -> STYLE5
-> STYLE6 ->STYLE7.
TEXT COLOR : Choose a color for the text - AUTO -> BLACK -> WHITE -> RED -> GREEN -> BLUE -> YELLOW ->
MARGENTA -> CYAN
TEXT OPACIFY : Specify the opacity for the text - AUTO -> SOLED -> FIASHUNG -> TRANSLUCENT -> TRANSPARENT
EDGE STYLE : Select Edge style for the text - AUTO -> NONE -> RASIED -> DEPRESSED -> UNIFORM -> DROP
-> SHADOW
EDGE COLOR : Select Edge color for the text - AUTO -> BLACK -> WHITE -> RED -> GREEN -> BLUE -> YELLOW ->
MARGENTA -> CYAN
ITALIC : Convert the text in to italic - AUTO -> ON -> OFF
UNDERLINE : Add the underline to the text - AUTO -> ON -> OFF
...... Continued from previous page.
3. OPTION :
Customized closed captioning for the digital caption by choosing the settings for the following options :
1) cc Background
2) Caption Text
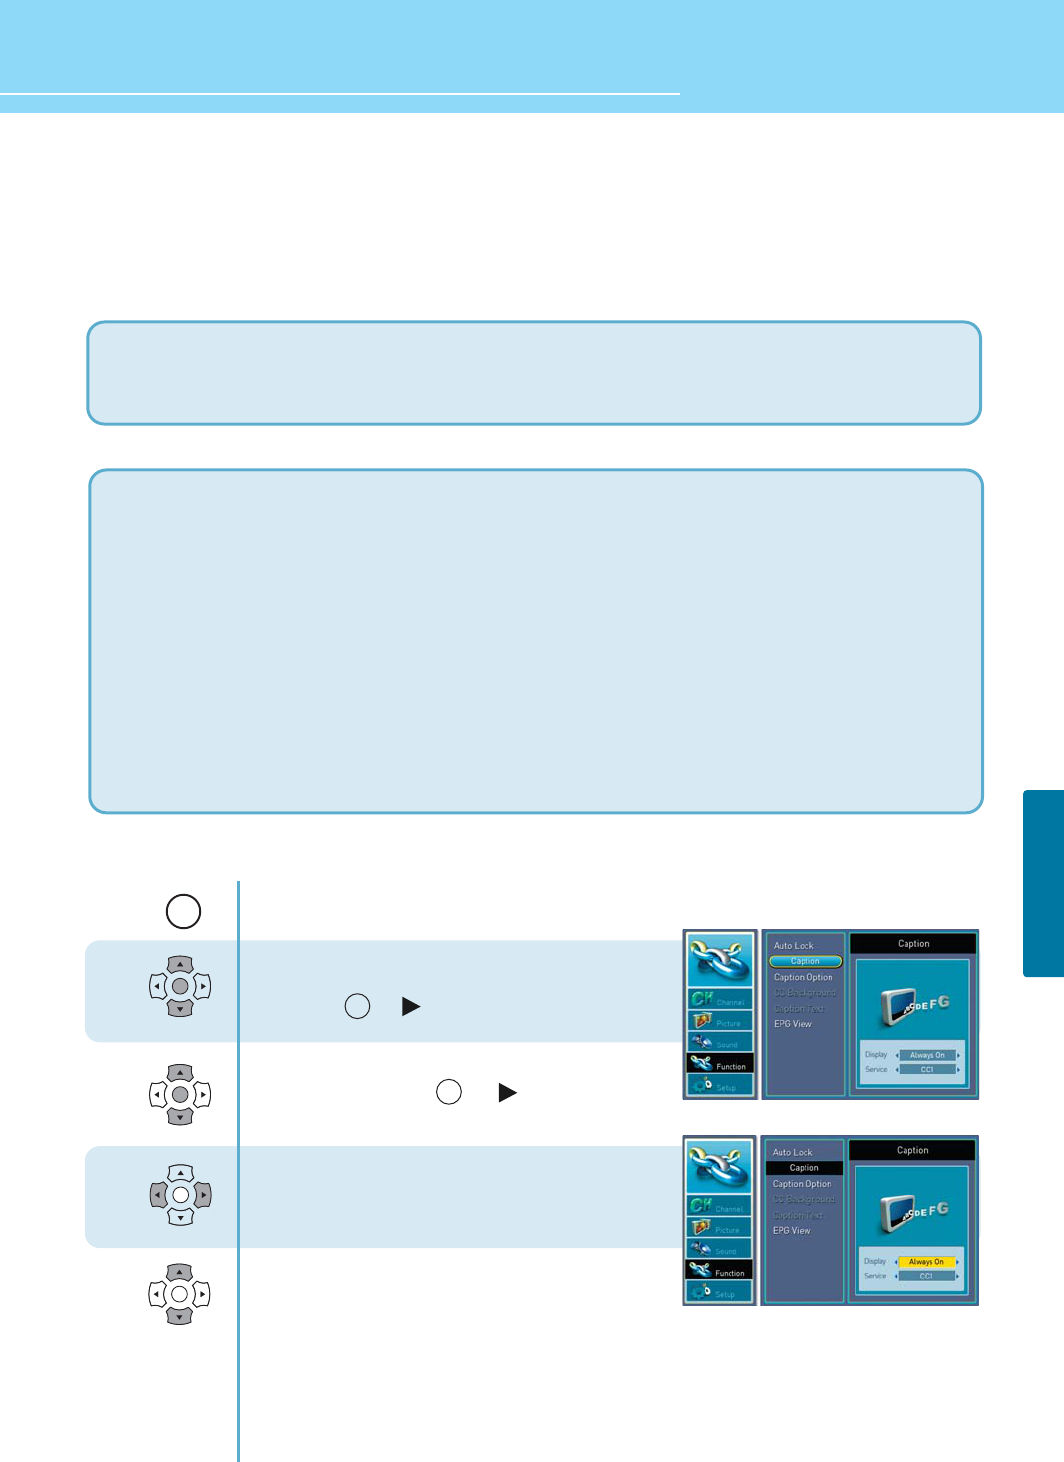
Press Menu button.
Menu items appear on the screen.
Press Up or Down button to move to function
and press or to select function
Press Up and Down buttons to move to
“CAPTION” and press or button
to make a selection.
Display MODE is highlighted.
Press Left and Right buttons to select
“OFF” or ALWAYS ON”.
Sub menu item are activated.
Press Up or Down button to move the item
Press Left or Right button to select the item.
1
2
3
4
OK
OK
OK
OK
MENU
OK
OK
47
FUNCTION
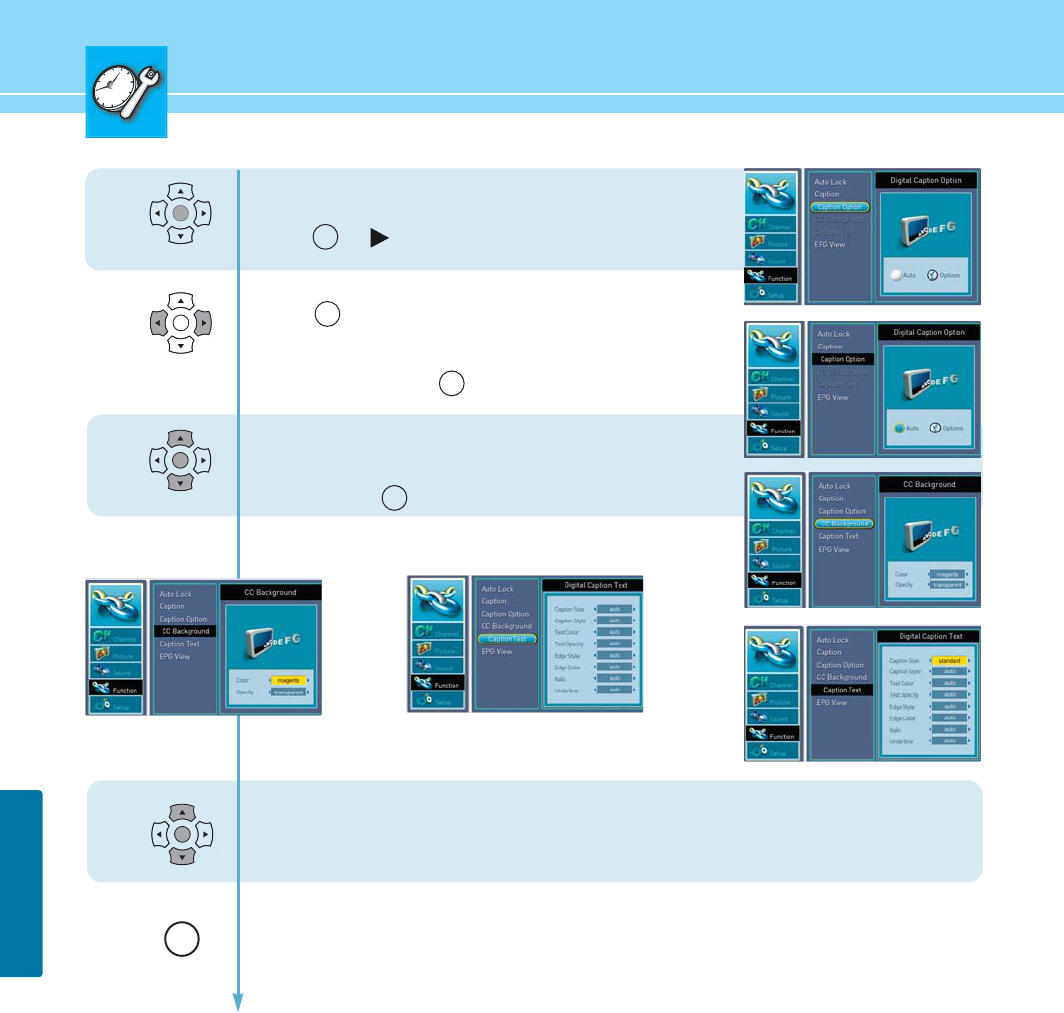
To select caption option
Press Up or Down button to move to caption option.
Press or button to select caption option.
Press left/right buttons to select Auto/Option and
press to select make a selection.
If caption option selected options, CC Background and
caption Text are highlighted When selectiong the CC Background
and caption text, press button.
Press Up or Down button to move between the items
(cc Background and Caption text)
Press left/right buttons to select the item
Then you can choose the CC Background and
caption text by pressing up/down and left/Right buttons.
Press MENU button after the setting is done,
and Menu goes to the previous menu.
If the EXIT button is pressed, the menu will disappear.
6
5
7
OK
8
OK
OK
OK
EXIT
OK
OK
OK
OK
48
HYUNDAI LCD TV
3
How to Set the EPG View
- This service is only for DTV mODEL.
OK
2
1
OK
OK
Press Menu button.
Menu items appear on the screen.
Press Up or Down button to move to function.
Press
or
button to select function.
Press Up or Down button to move to EPG View
Press
or
button to select EPG View
Press
or
button to see the EPG
Then you can get information on the broadcastion
time and program.
Press MENU button after the setting is done,
and Menu goes to the previous menu.
If the EXIT button is pressed, the menu will appear.
MENU
OK
OK
OK
EXIT
SETUP
49
SETUP
50
3
4
5
6
7
8
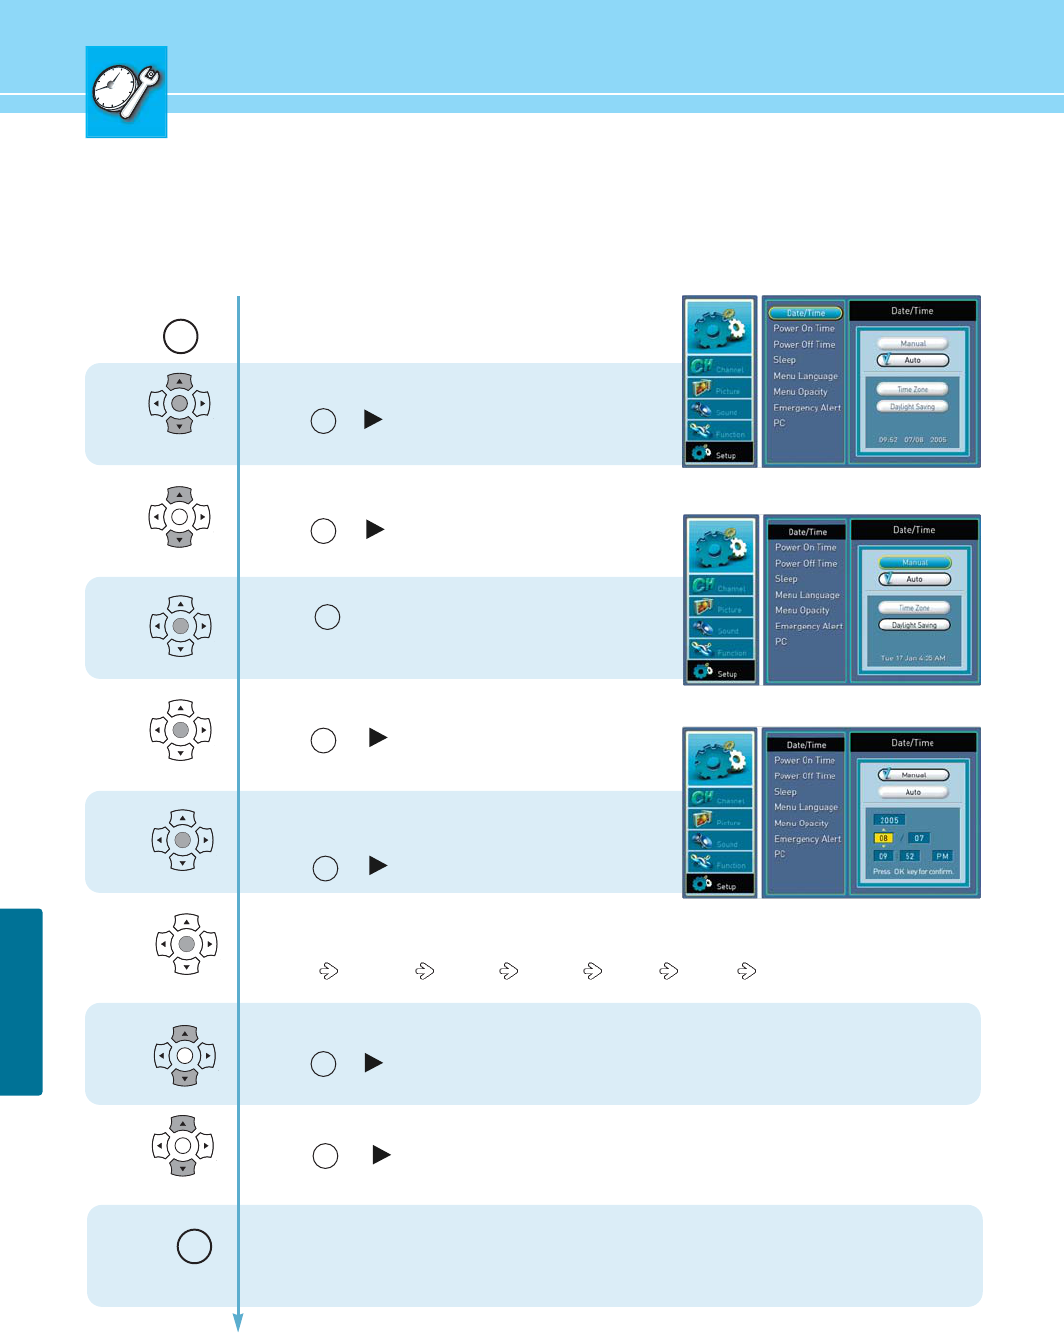
How to Set Date / Time
- Yes can automatocally turn on or off the TV at a present time, To do this, you must set the time it you wish to
use the automatic on or off timers
OK
OK
OK
2
1
OK
OK
OK
OK
OK
Press Menu button.
Menu item appear on the screen.
Press Up or Down button to move to setup
Press
or
button to select setup
Press Up or Down button to move to “DATE/TIME”
Press
or
button to select “DATE/TIME”
Press Up or Down button to move to manual manually.
Press button to set the current “DATE/TIME”
Press Up/Down and Left/Right buttons to set
year, month, day, Hour, Minute and AM/PM
After setting,
Press
or
button to exit
“AUTO” is only for DTV mode.
If you select “AUTO”.
Press
or
button to select function
Press Up/Down or left/right buttons to timezone
Whenever you press the buttons, timetone is changed in following order
Pacifuc Mountain Central Eastern Alaska Hawaii Atalamtic
Press Up or Down button to move to “DAYLIGHT SAVING”
Press
or
button to select “DAYLIGHT SAVING”
Press Up or Down button to select observe/Do not observe
Press
or
button to make a selection.
Press MENU button after the setting is done,
and Menu goes to the previous menu.
If the EXIT button is pressed, the menu disappears.
MENU
OK
OK
OK
OK
OK
OK
OK
EXIT
50
HYUNDAI LCD TV
SETUP
51
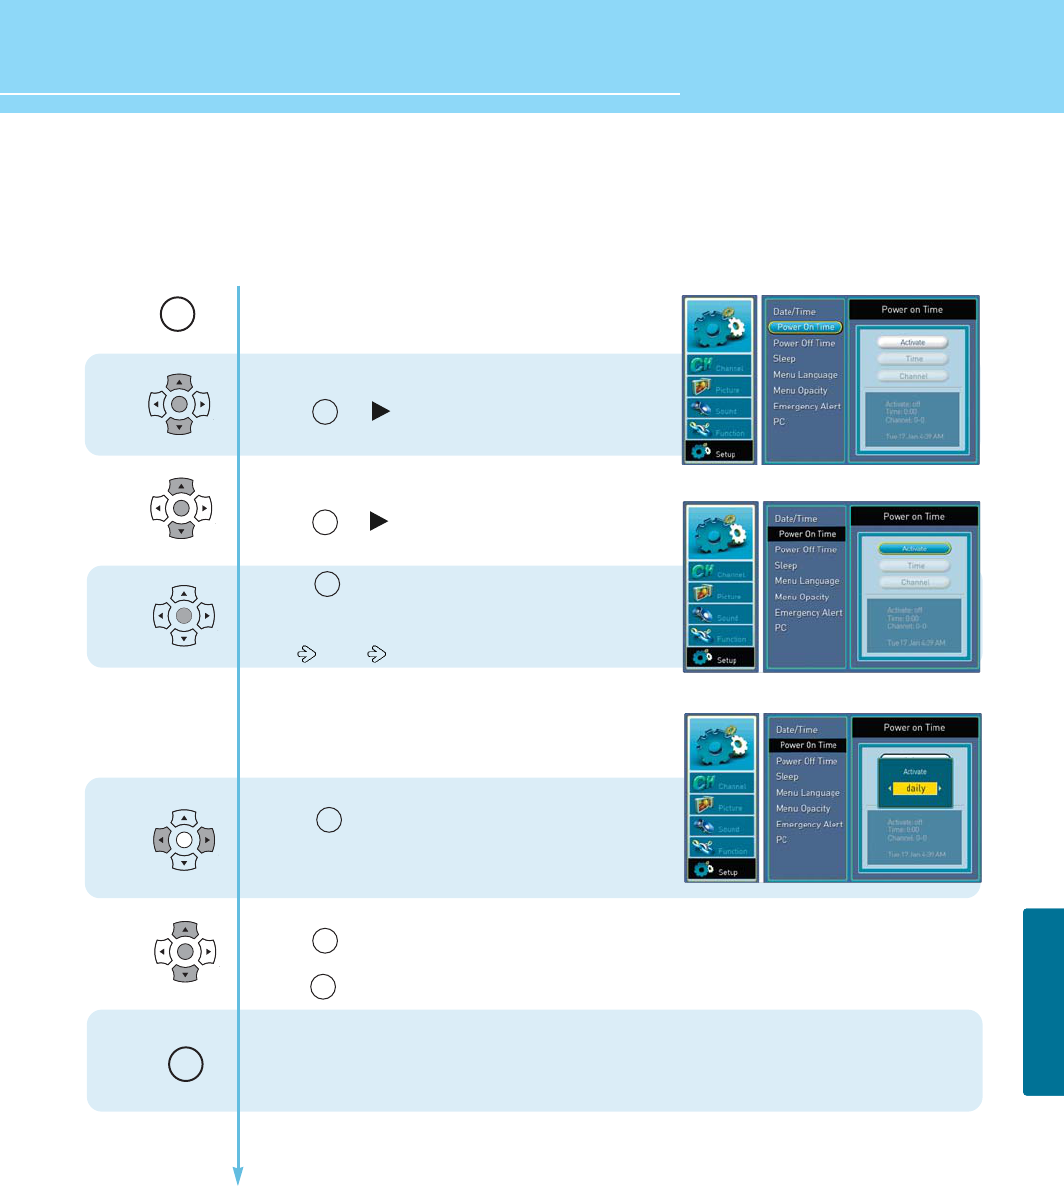
How to Set Power on Time
DTV GUIDE
1
2
3
4
5
Press Menu button.
Menu items appear on the screen.
Press Up or Down button to move to setup
Press or button to select setup.
Press Up/Down button to select power on time
Press or button to select power on time.
Press button to activate power on time
whenever you press left and right button, the mode
shifts in following order
OFF DAILY ONCE
If you select once or daliy in the “ACTIVATE”
You can set time and channel
Press up/down button to select Time
Press button to set Time
Press Left or Right button to move between Hour,
minute and AM/PM and Press up or down buttons
to set Hour, minute and AM/PM
Press Up/Down buttons to select channel
Press button to set channel.
Press numeric key to set channel number
Press button to set.
Press MENU button after the setting is done,
and Menu goes to the previous menu.
If the EXIT button is pressed, the menu will appears.
OK
OK
OK
OK
OK
MENU
EXIT
OK
OK
OK
OK
OK
OK
51
SETUP
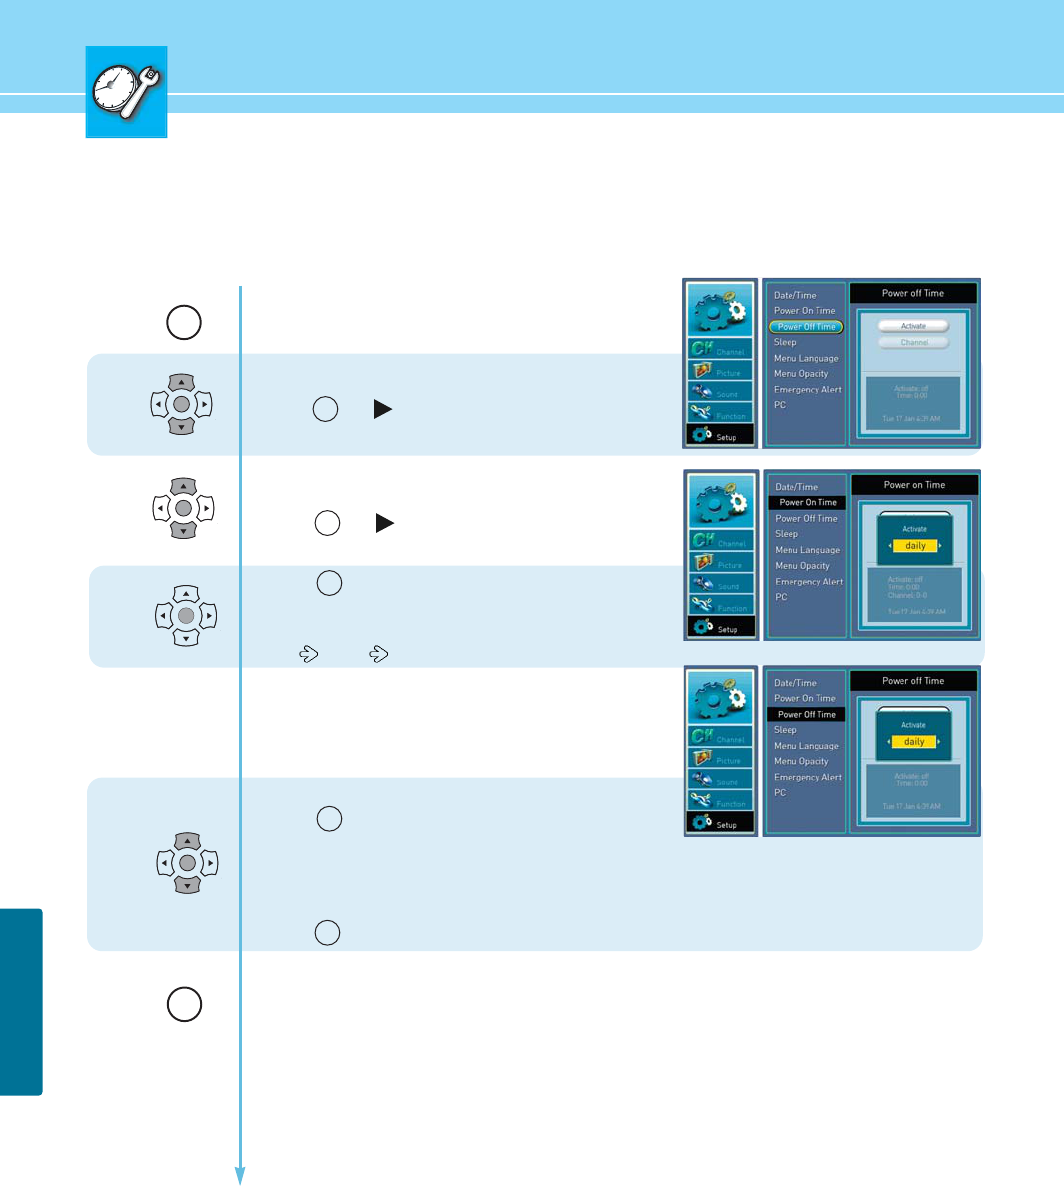
How to Set Power Off Time
1
2
3
4
Press Menu button.
Menu items appear on the screen.
Press Up or Down button to move to setup
Press or button to select setup.
Press Up/Down button to move to power off time
Press or button to select power off time.
Press button to activate power off time
whenever you press left and right button, the mode
shift in following order
OFF DAILY ONCE
If you select once or daliy in the “ACTIVATE”
You can set time.
Press Up/Down buttons to select time
Press button to set time.
Press Left or Right button to move between
Hour, minute and AM/PM
Press Up or Down buttons to set
Hour, minute and AM/PM.
Press button to set
Press MENU button after the setting is done,
and Menu goes to the previous menu.
If the EXIT button is pressed, the menu will appears.
OK
OK
OK
OK
MENU
EXIT
OK
OK
OK
OK
OK
52
HYUNDAI LCD TV
SETUP
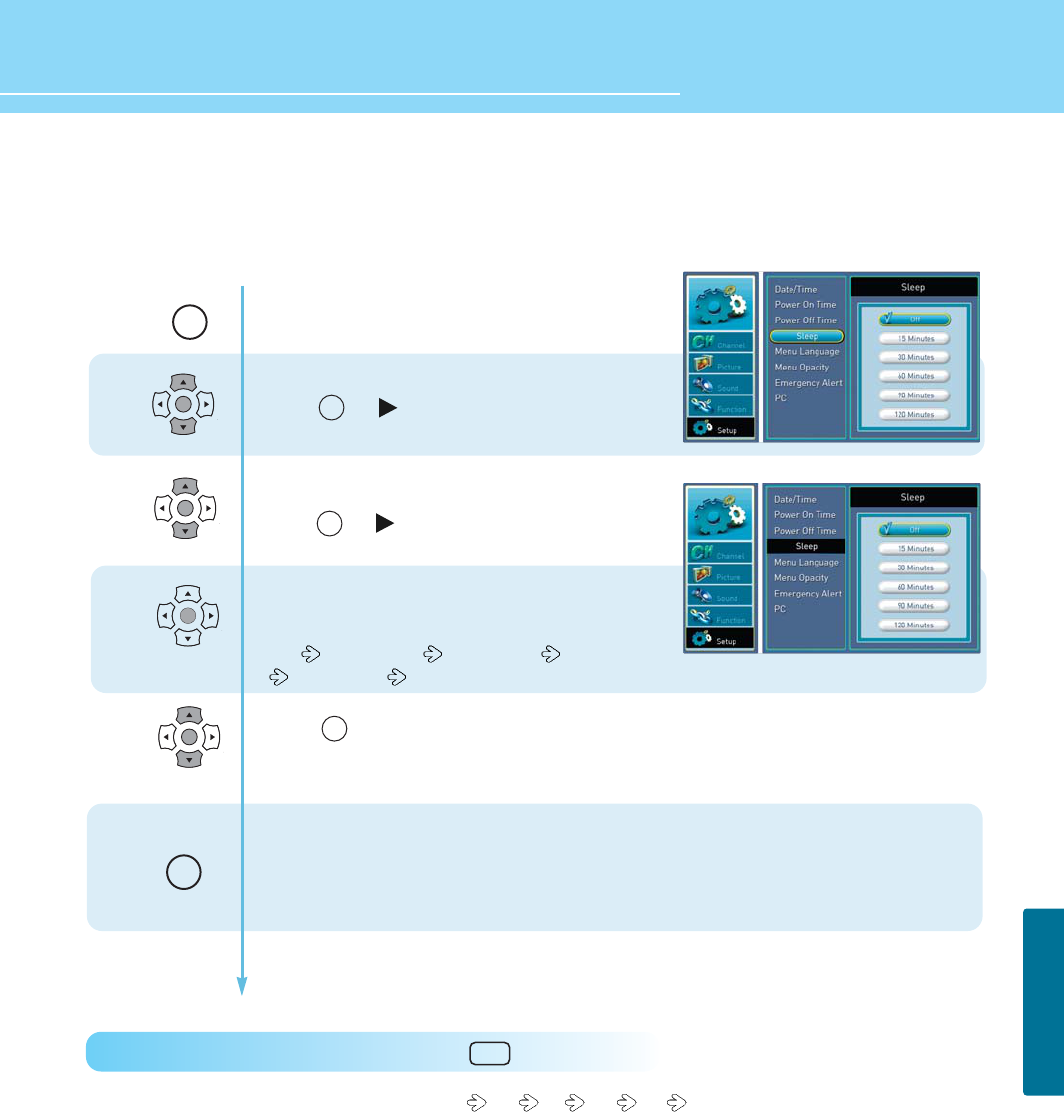
How to Set Sleep Time
1
2
3
4
Press Menu button.
Menu items appear on the screen.
Press Up or Down button to move to setup
Press or button to set sleep time.
Press Up or Down button to move to sleep time
Press or button to set sleep time.
Press up or down button to set sleep time
whenever you press up or down button the mode
shifts in following order
OFF 15 MINUTES 30 MINUTES 60 MINUTES
90 MINUTES 120 MINUTES
Press button to set.
Press MENU button after the setting is done,
and Menu goes to the previous menu.
If the EXIT button is pressed, the menu will disappear.
OK
OK
OK
OK
How to Directly Set the sleep timer : Press the button.
- Whenever press this button, the mode shifts off 15 30 60 90 120 minutes
MENU
OK
OK
OK
EXIT
SLEEP
53
SETUP
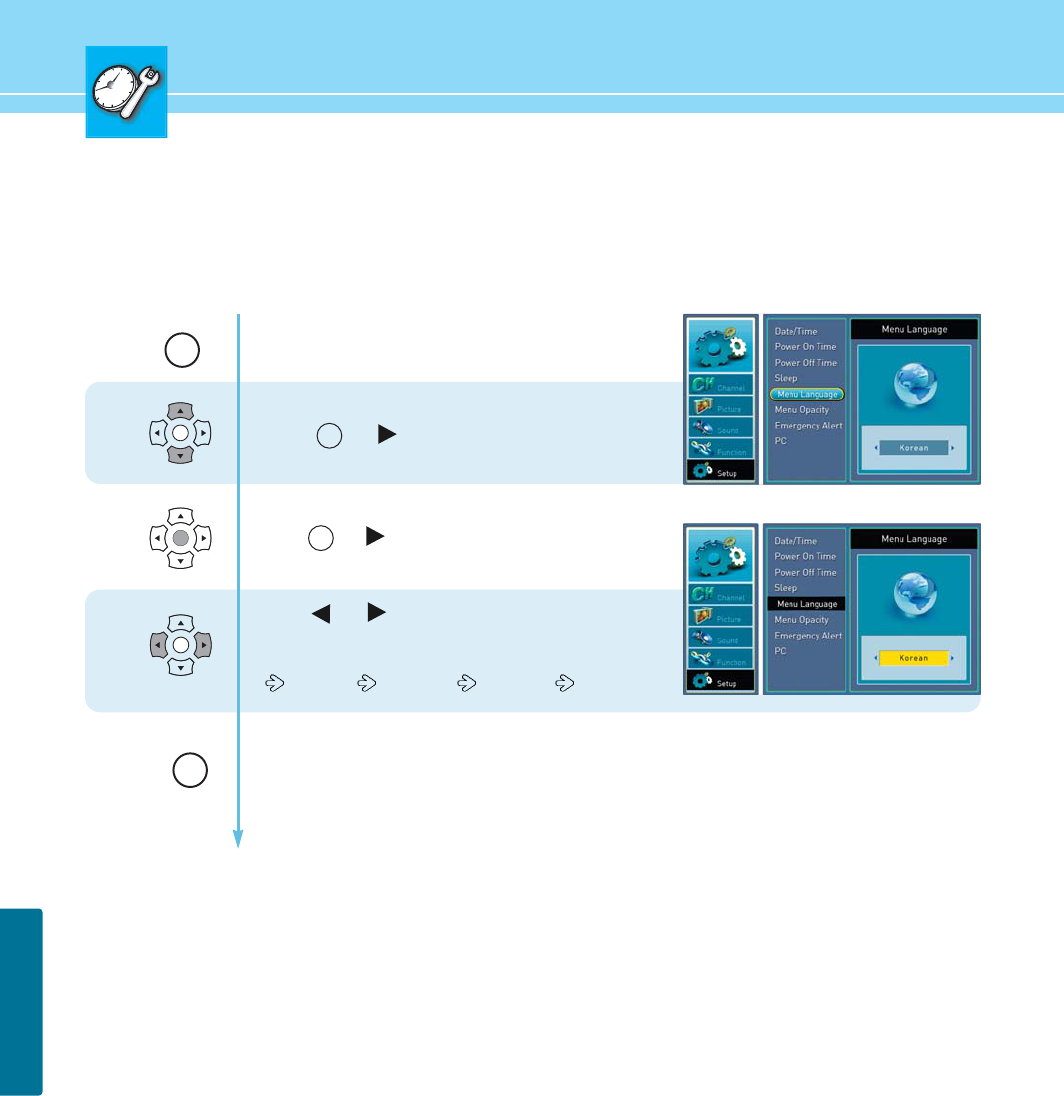
How to Choose Menu Language
Users can select their language preference in order to display main menus and sub menus, etc.
1
2
3
Press Menu button.
Menu items appear on the screen.
Press Up or Down button to move to setup.
Press or button to select setup.
Press up/down button to move to menu language
Press or button to select menu language
Press or button to set language
Whenever you press Left or Right button,
the mode shifts in following order.
ENGLISH FRANÇAIS ESPAÑOL
Press MENU button after the setting is done, and Menu goes to the previous menu.
If the EXIT button is pressed, the menu will appear.
OK
OK
OK
MENU
OK
OK
EXIT
54
HYUNDAI LCD TV
SETUP
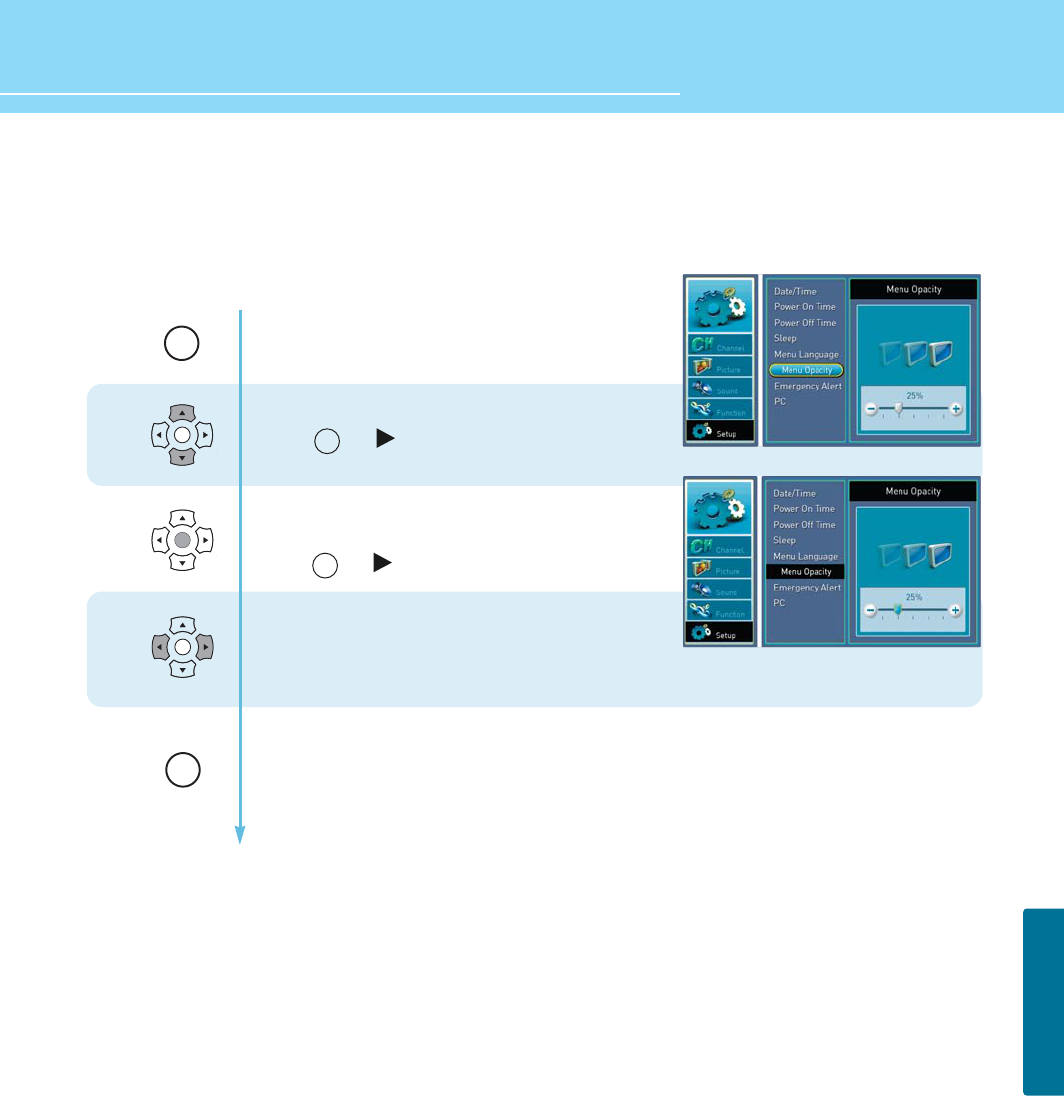
How to Set Menu Opacify
Users can select their language preference in order to display main menus and sub menus, etc.
1
2
3
Press Menu button.
Menu items appear on the screen.
Press Up or Down buttons to move to setup .
Press or button to select setup
Press Up or Down button to move to move to
menu opacify
Press or button to select menu opacifty
Press left or right to set menu opacify you want
Press MENU button after the setting is done, and Menu goes to the previous menu.
If the EXIT button is pressed, the menu will disappear.
OK
OK
OK
MENU
EXIT
OK
OK
55
SETUP
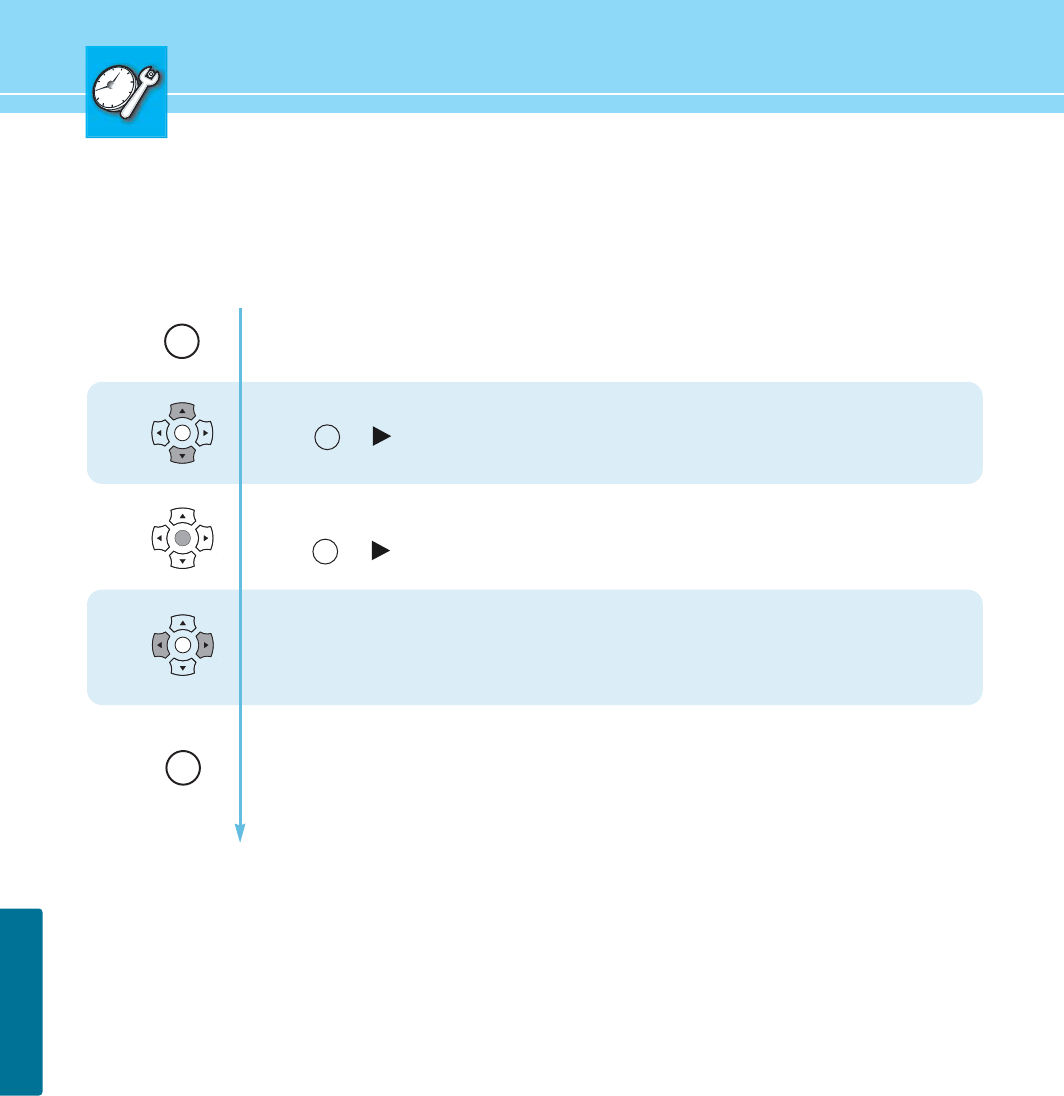
How to Set Energency Alert
1
2
3
Press Menu button.
Menu items appear on the screen.
Press Up or Down buttons to move to setup .
Press or button to select setup
Press Up or Down button to move to Energency Alert.
Press or button to select Energency Alert.
Press Up or Down button to move to Low/medium
Press left or right button to select present/descard.
Press MENU button after the setting is done, and Menu goes to the previous menu.
If the EXIT button is pressed, the menu will appear.
OK
OK
OK
MENU
EXIT
OK
OK
56
HYUNDAI LCD TV
SETUP
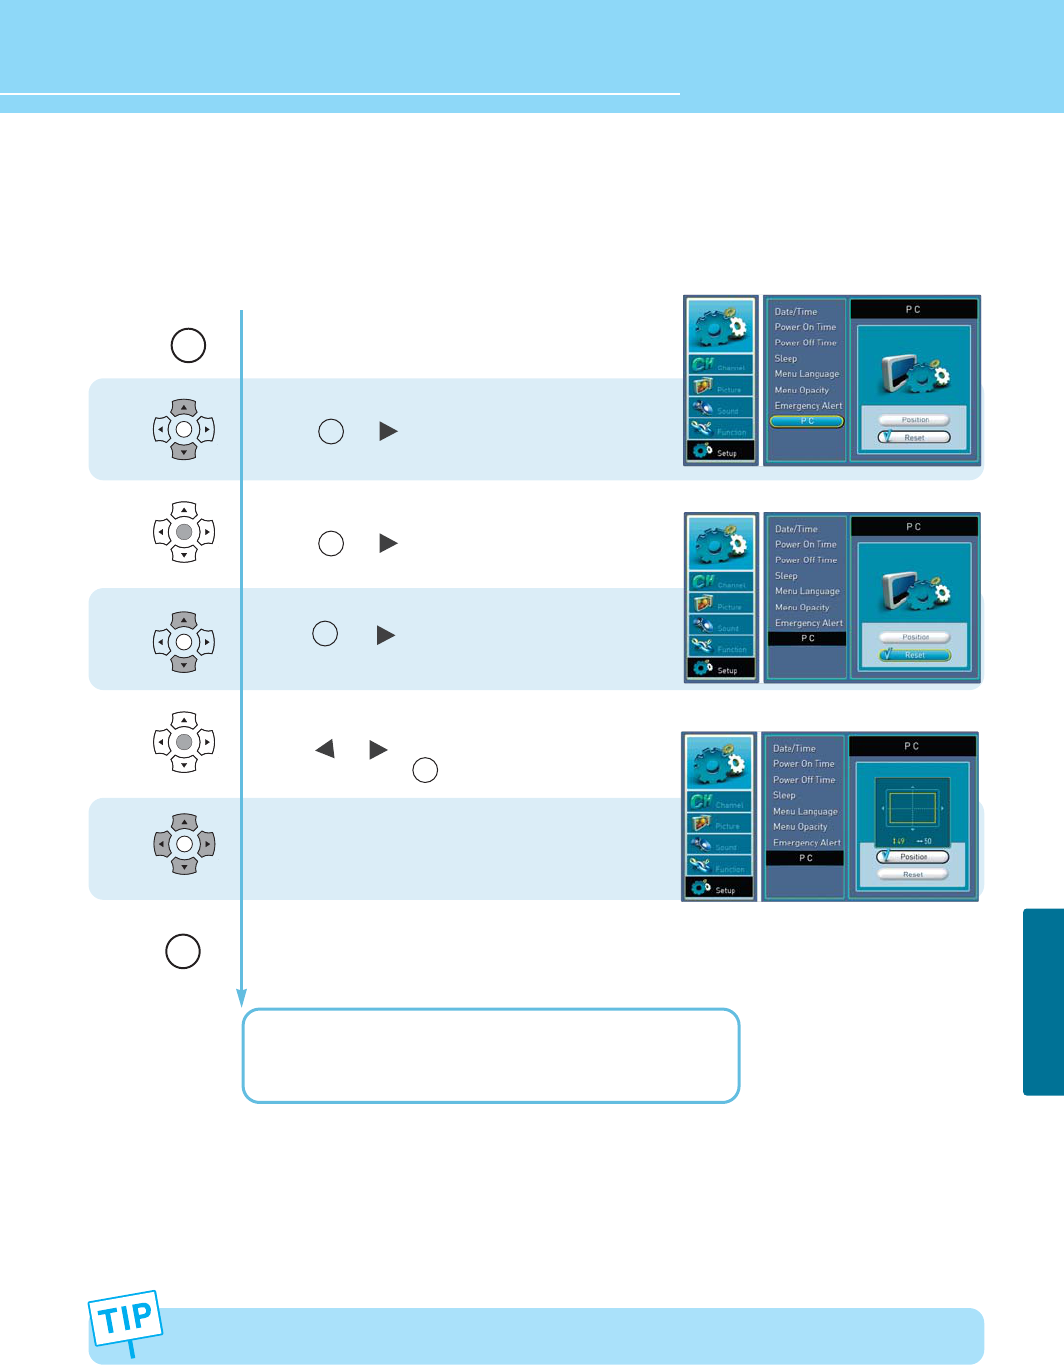
How to Set the Geometry in PC Mode
This function is only available in PC mode.
1
2
3
4
5
Press Menu button.
Menu item appear on the screen.
Press Up or Down button to move to setup.
Press or button to select setup.
Press Up or Down buttons to move to “PC”.
Press or button to select “PC”.
Press Up or Down button to move to setup.
Press or button to select
Press Up and Down buttons to adjust v-position
Press or button to adjust h-position
After setting press button to exit
Press Up and Down buttons to move to “AUTO”
Press or button to adjust h/V-position auto
Press MENU button after the setting is done, and Menu goes to the previous menu.
If the EXIT button is pressed, the menu disappears.
H. POSITION : To adjust the horizontal position of the picture.
V. POSITION : To adjust the vertical position of the picture.
OK
OK
OK
OK
OK
If the display input signal (resolution) has been changed, the picture will be automatically optimized.
MENU
EXIT
OK
OK
OK
OK
APPENDIX
49
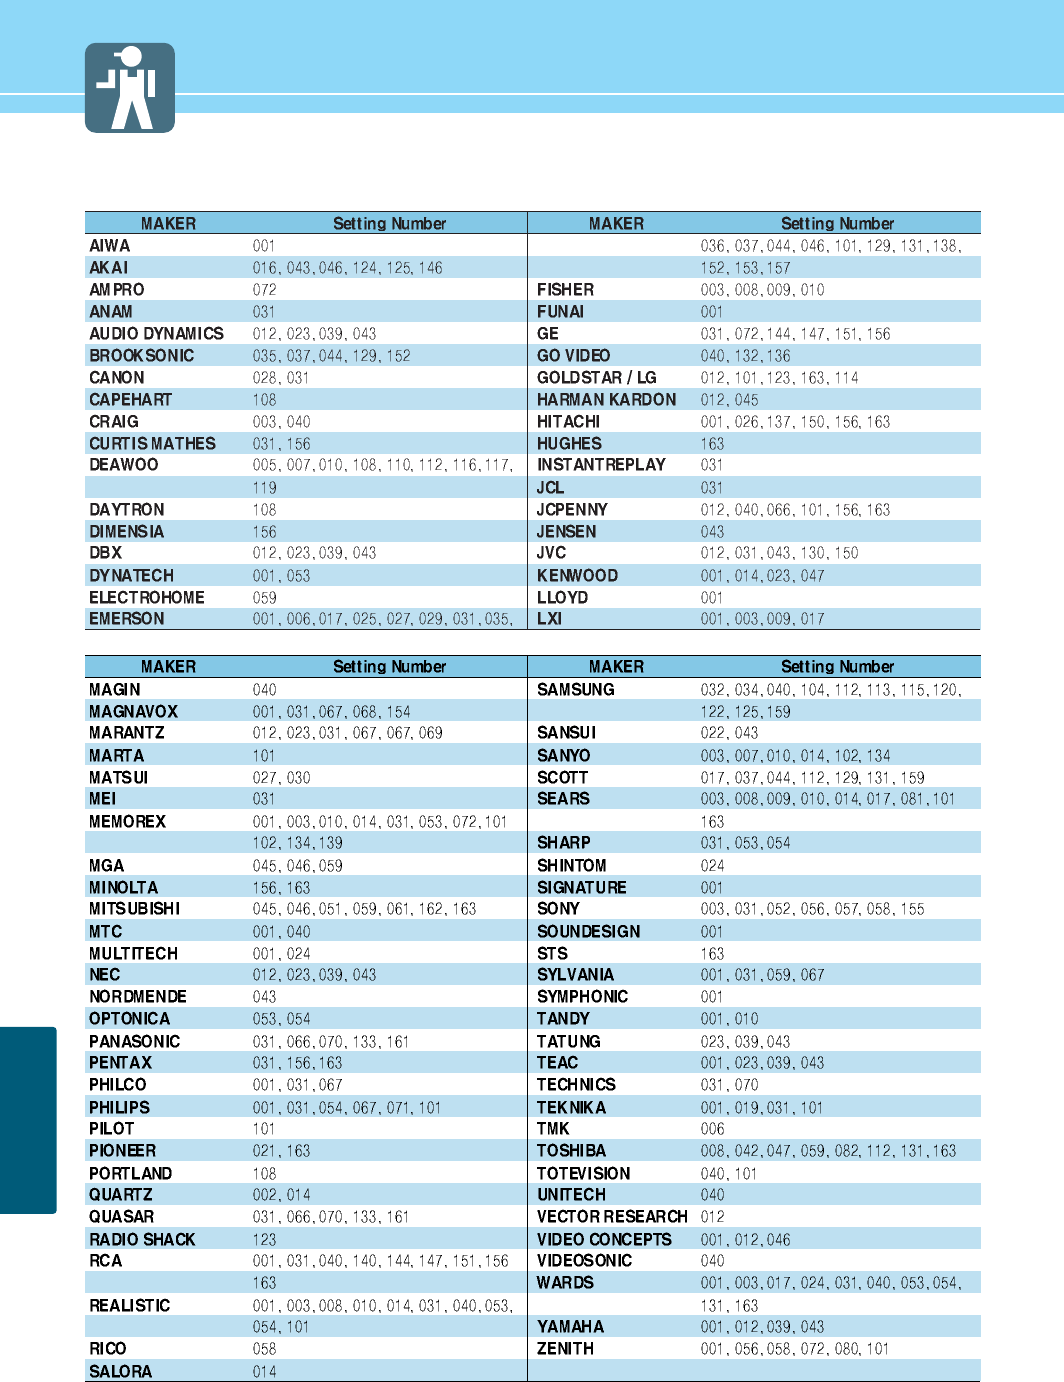
VCR Setting Number Table
APPENDIX
50
HYUNDAI LCD TV
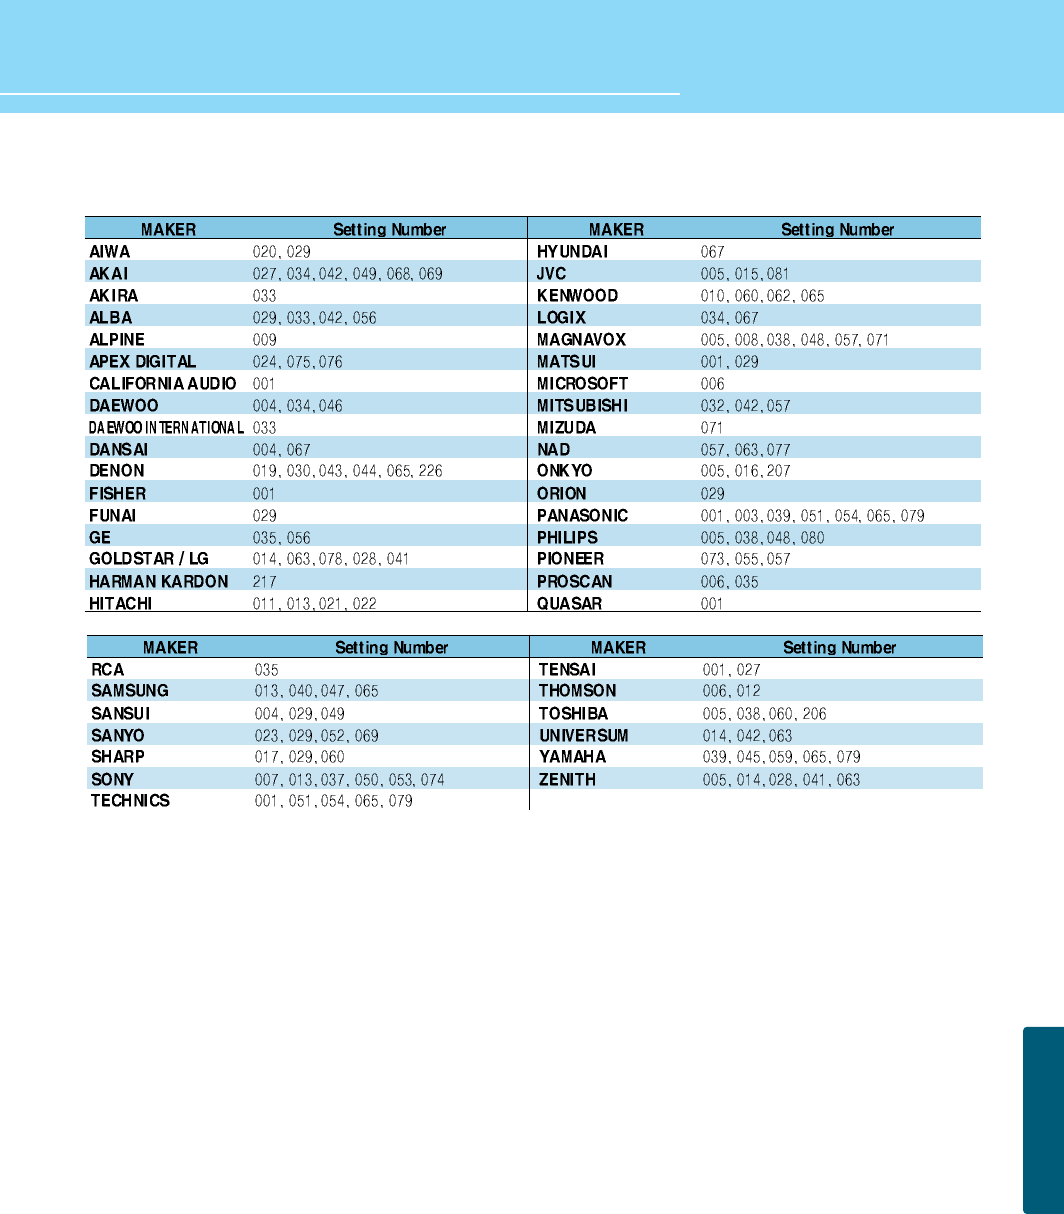
DVD Setting Number Table
APPENDIX
51
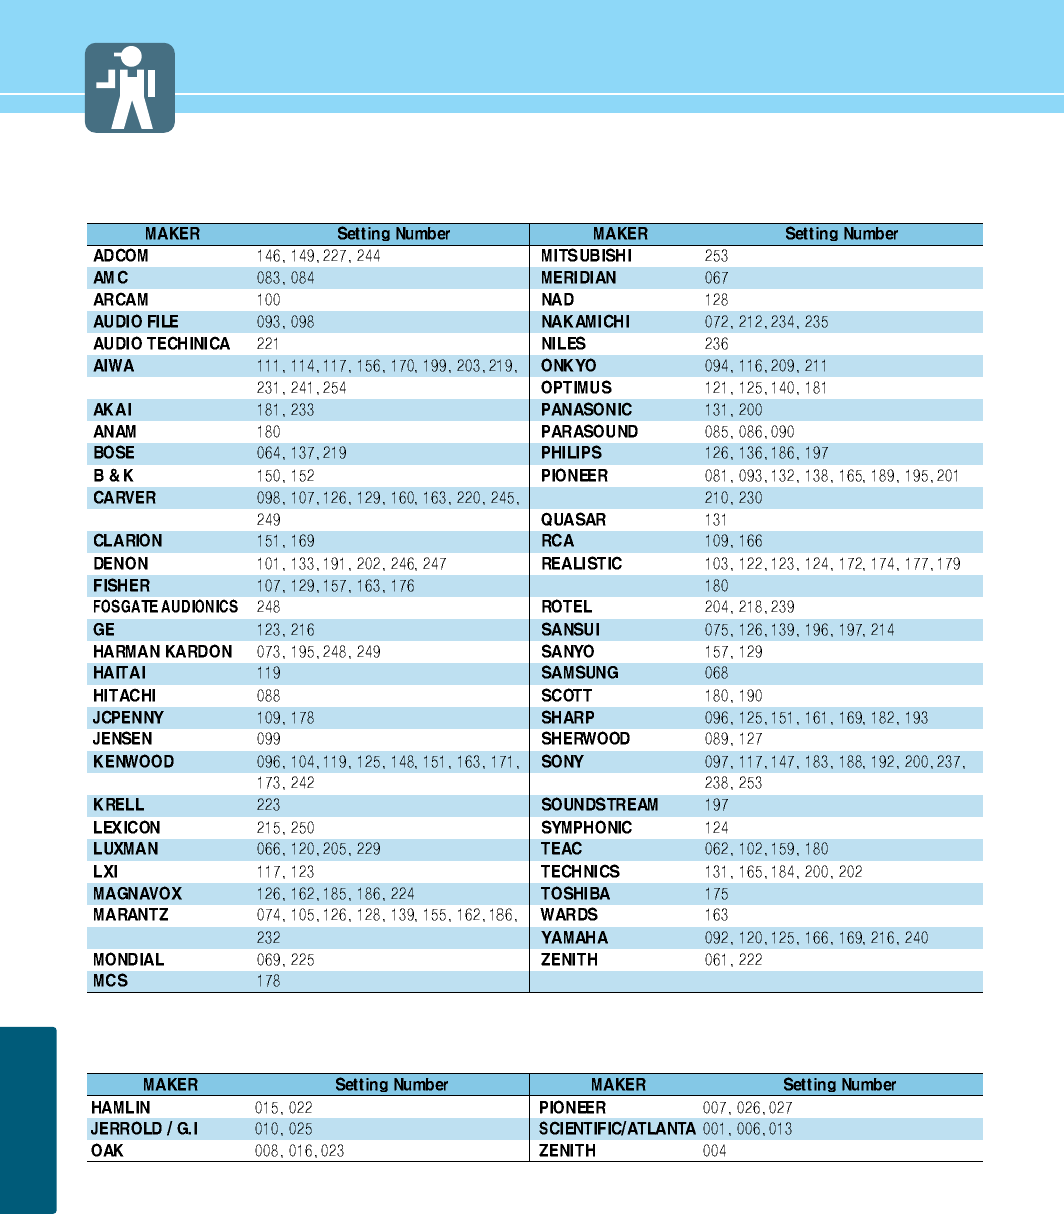
AMP Setting Number Table
CATV Setting Number Table

APPENDIX
52
HYUNDAI LCD TV
Glossary 1
Component video Component video is sent through three cables: two color shade (chrominance) signals
and one brightness (luminance) signal. Component video achieves greater color
accuracy than composite video or S-VIDEO by splitting chrominance into two separate
portions.
Composite video Composite video is sent through a single cable. Composite video combines the color
shade (chrominance) and brightness (luminance) information into one video signal.
S-VIDEO S-VIDEO requires a single cable, which carries the brightness (luminance) and color
(chrominance) signals of the picture separately. S-VIDEO provides better resolution
than composite video, which carries the signals together.
480i Provides 480 lines of resolution. Displays images using interlaced scanning, which first
transmits all the odd lines on the TV screen and then the even lines.
480p Provides 480 lines of resolution. Displays images using progressive scanning, which
transmits each line from top to bottom.
720p Provides 720 lines of resolution. Displays images using progressive scanning, which
transmits each line from top to bottom.
1080i Provides 1080 lines of resolution. Displays images using interlaced scanning, which
first transmits all the odd lines on the TV screen and then the even lines. 1080i is one
of the formats used by HDTV (High Definition TV).
Digital television (DTV) A new technology for transmitting and receiving broadcast television signals. DTV
provides higher resolution and improved sound quality over analog television.
HDTV(High Definition TV) HDTV is a new kind of digital TV, creating a high quality picture, high definition. The
HDTV provides a theater-like screen with an aspect ratio of 16:9. Supports 720p or
higher.
SDTV(Standard Definition TV) SDTV is a new kind of standard definition digital TV, having a range of lower resolution
than the HDTV. Supports 480i.
Cable Broadcast Receiver A device that receives cable broadcasting. Connecting it to your TV set allows you to
watch a various channels.
(Converter)
Satellite Broadcasting Provides crisp picture and clear audio quality throughout the country via a satellite.
VHF/UHF VHF (Very High Frequency) is the part of the frequency spectrum from 30 to 300
megahertz. UHF (Ultra High Frequency) is the part of the frequency spectrum from 300
to 3,000 megahertz.

APPENDIX
Glossary 2
53
DVD DVD (Digital Versatile Disc) is an optical disc that can store a huge volume of
multimedia such as video, game, and audio application, etc.
Coaxial Cable Coaxial cable is the kind of rounded copper cable, which is generally used for TV
antenna.
Aspect ratio Refers to the ratio between the width and height of the screen. This TV has a 16:9
(widescreen) aspect ratio, as opposed to a 4:3 aspect ratio.
Picture Mode Picture Mode features the optimal picture quality. There are Standard-Dynamic-Movie-
Mild- Custom features in order. “CUSTOM” allows you to adjust Contrast, Brightness,
Sharpness, Color and Tint.
Sound Mode Sound Mode features the optimal sound quality. There are Standard-News-Music-
Sports- Custom features in order. “CUSTOM” allows you to adjust high frequency
sound, middle frequency sound and low frequency sound.
Digital Broadcasting Video and Audio signals digitized and transmitted by broadcasting companies
complying with the new digital television standard developed by the ATSC (Advanced
Television System Committee). Digital Broadcasting technology provides multimedia
services including a variety of additional services as well as high-definition quality
picture.
Analog Broadcasting ATSC-based Video and Audio signals transmitted by broadcasting companies.
SRS TruSurround TX A well-recognized 3D sound technology developed by US SRS Labs, Inc.
This technology delivers the ultimate audio experience only with two speakers as if
through multi-channel speakers.
Dolby Digital Formerly known as AC-3, Dolby Digital is a digital audio coding technique that reduces
the amount of data needed to produce high quality sound.
Mono Audio signals are produced through a single channel. It is difficult to experience a
spectacular sound since audio signals are reproduced with a single speaker.
Stereo Audio signals are produced through two channels. A spectacular sound is reproduced
with two separated speakers.
Widescreen Term given to picture displays with a wider aspect ratio than NTSC 4:3. Digital HDTV is
16:9 widescreen. Most motion pictures also have a widescreen aspect ratio, some
even wider than 16:9.
External source Refers source signals that come from other external devices such as a VCR, camcorder
and DVD player, etc. than a TV set.

APPENDIX
Glossary 3
54
HYUNDAI LCD TV
MTS A bilingual service provided when an overseas film, foreign drama or overseas news,
etc. is aired. You can select one of two choices: mother tongue and foreign language.
Or you can listen to both languages at the same time.
DVI Digital Visual Interface is a specification for digital signals. This interface using TMDS
transmission reduces the loss of signal, allowing to enjoy a clear and crisp image.
HDMI HDMI (High-Definition Multimedia Interface) is the first and only industry-supported,
uncompressed, all-digital audio/video interface.
HDMI provides an interface between any audio/video source, such as a set-top box,
DVD player, or A/V receiver and an audio and/or video monitor, such as a digital
television (DTV), over a single cable.
Virtual channels There is a new numbering system for DTV channels. The system, called the “DTV
virtual channels,” gives a number for each DTV program service, and almost always
uses the analog NTSC channel number as the first number for that station. The use of
virtual channels allows stations to use the same channel number “brand” for both
NTSC and DTV. The printed listing services have not yet changed their format to show
only the DTV virtual channel numbering system. So in the example, the station is using
RF Channel 38 for DTV and is transmitting DTV programs with virtual channel
numbers 15.n. The 15.n is short hand for 15.1, and 15.2 and 15.3, etc., as there can
be more than one DTV program lineup from the station. So, 15.1 is the first DTV
program lineup, 15.2 is the second, 15.3 is the third. Some DTV stations may have
only one virtual channel, others perhaps as many as six.

APPENDIX
55
Troubleshooting
Installation Problems
Picture Problems
Symptom
How can I install an
antenna?
TV screen is not clear after
installing an indoors
antenna.
How can I view cable
broadcasting?
Symptom
Neither picture nor
sound comes up.
Picture turns on slowly
after power is on.
Picture is distorted or frozen
while watching digital
broadcasting.
Input Source information
only appears on black
screen.
Poor reception on some
channels.
Black and white on some
channels.
TV won’t turn on.
Screen is too bright or too
dark.
Possible solution
Refer to pages 19~20.
Indoors antenna may experience poor reception due to surrounding buildings. Please
install an outdoors antenna or wireless antenna.
Please install a cable broadcasting receiver (Converter).
Possible solution
Check whether power is on.
Check whether the power is cut or whether power cord is properly connected.
Try to plug another product’s power cord to the outlet the TV is plugged into.
This symptom is not a malfunction. This delay is designed to prevent the distorted and
noisy picture when power is on. However, if the picture does not appear more than 5
minutes after power is on, call a service center.
This symptom may be caused by weak reception. Contact your local station or cable
company.
Check whether your TV is properly connected to external devices.
Check whether you selected proper channels. Try re-orienting your antenna.
Check other channels for black and white screen. Adjust colour.
Ensure the power cord is plugged.
Adjust brightness.
Ensure to use the remote control or power button on the product to turn off your TV. If

APPENDIX
56
HYUNDAI LCD TV
Sound Problems
General
Auto On does not work.
After setting the time,
I turned TV off and turn it on.
The programmed information
has been erased.
Symptom
Too much noise occurs.
No sound while viewing a
cable channel
Picture is OK but sound does
not come out.
One of the speakers does not
produce sound.
Symptom
Remote control won't work.
Where does the S-Video
cable plug in for audio
output?
Strange noises are heard.
I tried to use the TV screen
as a PC monitor
but it doesn’t work.
you unplug the power cord, the stand-by consumption power becomes 0 (zero), which
causes the programmed time to be erased.
Ensure to use the remote control or power button on the product to turn off your TV. If
you unplug the power cord, the stand-by consumption power becomes 0 (zero), which
causes the programmed time to be erased.
Possible solution
Check whether the audio setting is in the Stereo mode. In the Stereo mode, the sound
may be distorted in the area where experiences poor reception or is located far away
from a TV broadcasting station.
Make sure an audio or audio/video component is securely inserted into the appropriate
jacks. Check other channels for sound. Check the volume settings on the cable
broadcasting receiver.
Try to press volume up/volume down buttons of your remote control.
Try to press MUTE buttons of your remote control.
Select sound balance and make proper adjustment. (Page 39)
Check the speaker connection cables.
Possible solution
Check whether there is a blocking object between the remote control and TV.
Make sure your TV is Power On. (In case of normal, LED on the front panel is in Red.)
Check whether batteries are inserted with proper polarities(+, -).
When the batteries are worn out, replace with new ones.
Connect the two Audio jacks from the S-Video cable to the left and right ports on the
Composite.
Ticking noise during or after watching is caused by the change of ambient
environment such as humidity and temperature, which is characterized by plastic
products. Strange ticking noise occurs because a signal is suddenly transmitted to the
TV panel. So, this is not a malfunction.
Adjust the resolution referring to the standard signal mode table. Check the
specification of your video card installed in your PC. If your video card does not work in
supported hardware. Try upgrading the video card’s driver.
APPENDIX
57
Care and Cleaning
Cabinet Cleaning
Wipe a soft dry cloth.
Do not use inflammables like Benzene or Thinner, or wet clothes.
Do not scratch the panel of PDP with a fingernail or pointed object.
Screen Cleaning
Clean the screen with a soft cloth moistened in mild glass
detergent and dry with a soft cloth.
Never use any solvent on the screen such as Acetone, Benzene, or
Thinner, etc.
Cleaning Inside
When the inside needs to be cleaned, contact a service center or
distribution agent where the item is purchased.
It is recommended cleaning is complete before the rainy season.

APPENDIX
HYUNDAI LCD TV
58
Product Specifications
- The above specifications may be subject to change without prior notice.
LT32DW002
1EA (A/V audio common)
1EA (Audio included)
2EA (Audio included)
1EA
D-SUB
1024 X 768 @ 85 Hz
L/R
1EA
No
1EA
2EA (L/R, SPDiF)
NTSC M
FM
Component, S-Video,
Composite, PC, HDMI
AC 100 - 240 V, 50/60 Hz
Typical 150W
Typical 2W
460 x 230 x 485
16.1 Kg
Remote control, Key control
LT37DW000
1EA (A/V audio common)
1EA (Audio included)
2EA (Audio included)
1EA
D-SUB
1024 X 768 @ 85 Hz
L/R
1EA
No
1EA
2EA (L/R, SPDiF)
NTSC M
FM
Component, S-Video,
Composite, PC, HDMI
AC 100 - 240 V, 50/60 Hz
Typical 170W
Typical 5W
939 x 310 x 728
25.5Kg
Remote control, Key control
S-Video
Video (RCA)
Component(Y/Cb/Cr)
Antenna
PC Connection jack
Max. resolution
Audio
HDMI-HDCP
Memory Slot
Video
Audio
Color system
Sound system
Video system
Supply
Consumption power
Stand-by power
Model
Input
Output
TV/Video
Power
Dimension
(W x D x H mm - Stand included)
Weigh (Stand included)
Control type
LT26AW001
1EA (A/V audio common)
1EA (Audio included)
2EA (Audio included)
1EA
D-SUB
1024 X 768 @ 75 Hz
L/R
1EA
No
1EA
2EA (L/R, SPDiF)
NTSC M
FM
Component, S-Video,
Composite, PC, HDMI
AC 100 - 240 V, 50/60 Hz
Typical 130W
Typical 5W
684 x 194 x 541.5
12.2 Kg
Remote control, Key control