ICOM orporated 306600 VHF/UHF Digital Transceiver User Manual IC 92A AD indd
ICOM Incorporated VHF/UHF Digital Transceiver IC 92A AD indd
UserManual.wiki
>
ICOM orporated
>
306600 User Manual
user manual
Navigation menu
Upload a User Manual
Namespaces
Wiki Guide
HTML
PDF
Info
Views
User Manual
Discussion / Help
Navigation
![■ Time-out timer 116 ■ PTT lock 116 ■ Cloning function 117 ■ [MIC/SP] jacks 117 ■ Resetting 11813 TROUBLESHOOTING 11914 SPECIFICATIONS 120–12115 OPTIONS 122–124 ■ Optional UT-121 installation 123 ■ Optional HM-75A REMOTE CONTROL MICROPHONE 124SUPPLIED ACCESSORIESThe following accessories are supplied with the transceiver.q Hand strap 1w Antenna 1e Battery pack* 1r Battery charger* 1t Belt clip (with screws) 1 set*Not supplied with some versions.vNew2001reqtw](https://usermanual.wiki/ICOM-orporated/306600/User-Guide-882334-Page-6.png)
![2NeNew2001PANEL DESCRIPTION2■ Front, top and side panelsq ANTENNA CONNECTOR (p. 1)Connects the supplied antenna.• An optional AD-92SMA adapter (p. 122) is available for con-necting an antenna with a BNC connector.w TX/RX INDICATOR [TX/RX] (p. 24)Lights green while receiving a signal or when the squelch is open; lights red while transmitting.e PTT SWITCH [PTT] (p. 24)Push and hold to transmit, release to receive.r SQUELCH KEY [SQL]➥ Push and hold to open the squelch temporarily and monitor the operating frequency. (p. 22)➥ While pushing and holding this key, rotate [DIAL] to adjust the squelch level. (p. 21)t MAIN/DUAL KEY [MAIN/DUAL]➥ Push to select the main band between A and B bands. (p. 26)➥ Push and hold for 1 sec. to toggle the dualwatch func-tion ON and OFF. (p. 25)y POWER KEY [PWR]Push and hold for 1 sec. to turn the transceiver power ON and OFF. u BAND KEY [BAND]➥ During VFO mode operation, push to select an operat-ing frequency band. (pgs. 16, 17)➥ During memory bank mode, push to select a memory bank. (p. 68)➥ Enters or sends the DTMF code “D.” (pgs. 103, 104)MAINBANDRECMENUVFOMRCALL123456789 .0DUALSCOPESCANLOW MODE MHzS.MWRX CSCQM.NAMESKIPDUPTONE TSDTMF.MT.SCANDSQCS CD#CBACLRA/aDPWRqSpeakeruFunction displayInternal microphoneiytrew!3!4!0o!1!2!5!6!7](https://usermanual.wiki/ICOM-orporated/306600/User-Guide-882334-Page-8.png)
![New200132PANEL DESCRIPTION2i KEYPAD (pgs. 4, 5)o CALL/RX➝CS KEY [CALL]/[RX➝CS](CALL)➥ Push to select the call channel/TV channel/weather channel. (p. 16)➥ During DV mode operation, push and hold for 1 sec. to set the received call signs (station and repeaters) for operation. (p. 47)➥ Enters or sends the DTMF code “C.” (pgs. 103, 104)!0 MEMORY/SELECT MEMORY WRITE KEY [MR]/[S.MW](MR)➥ Push to select memory mode. (p. 15)➥ During memory mode operation, push to toggle be-tween memory and memory bank mode. (p. 68)➥ Push and hold for 1 sec. to enter select memory write mode. (p. 64)➥ Enters or sends the DTMF code “B.” (pgs. 103, 104)!1 VFO/MHz KEY [VFO]/[MHz](VFO)➥ Push to toggle select VFO mode. (p. 15)➥ During VFO mode operation, push and hold for 1 sec. to select and toggle 1 MHz and 10 MHz tuning steps (p. 18)➥ Enters or sends the DTMF code “A.” (pgs. 103, 104)!2 MENU/LOCK KEY [MENU/LOCK] ➥ Push to toggle menu screen indication ON and OFF. (p. 85)➥ Push and hold for 1 sec. to toggle the lock function ON and OFF. (p. 25)!3 EXTERNAL DC IN JACK [DC IN]➥ Connects the supplied wall charger, BC-167, to charge the attached battery pack. (p. 10)➥ Connect an external DC power supply through the op-tional CP-12L, CP-19R or OPC-254L for external DC operation. (p. 13)!4 DATA JACK [DATA]Connects a PC through the optional data communication cable, OPC-1529R, for low-speed data communication or control the transceiver remotely using the optional RS-91 (OPC-1529R is supplied). (p. 56)!5 VOLUME CONTROL [VOL]Rotate to adjust the audio output level. (p. 20)!6 CONTROL DIAL [DIAL]➥ Rotate to tune the operating frequency. (p. 18)➥ During memory mode, rotate to select the memory channel. (pgs. 15, 64)➥ While pushing and holding [BAND], selects the operat-ing band in VFO mode. (p. 18)➥ While scanning, changes the scanning direction. (p. 75)➥ While pushing and holding [SQL], sets the squelch level. (p. 21)➥ While pushing and holding [BAND], selects the pro-grammed bank in memory mode. (p. 68)!7 EXTERNAL SPEAKER/MICROPHONE JACK [MIC/SP]Connect an optional speaker-microphone or headset, if desired.See page 122 for a list of available options.](https://usermanual.wiki/ICOM-orporated/306600/User-Guide-882334-Page-9.png)
![Ne42PANEL DESCRIPTIONNew2001D KEYPAD1SCOPECLR2SCANKEY Pushed momentarily3LOWA/a4DUP5SKIP6M.NAMEPushed and held for 1 sec.• Inputs digit ‘1’ for frequency input, memory channel selection, etc.• While pushing [PTT], this key sends the DTMF code “1.”• Inputs digit ‘2’ for frequency input, memory channel selection, etc.• While pushing [PTT], this key sends the DTMF code “2.”• Inputs digit ‘3’ for frequency input, memory channel selection, etc.• While pushing [PTT], this key sends the DTMF code “3.”• Inputs digit ‘4’ for frequency input, memory channel selection, etc.• While pushing [PTT], this key sends the DTMF code “4.”• Inputs digit ‘5’ for frequency input, memory channel selection, etc.• While pushing [PTT], this key sends the DTMF code “5.”• Inputs digit ‘6’ for frequency input, memory channel selection, etc.• While pushing [PTT], this key sends the DTMF code “6.”• Displays the simple band scope for a single sweep. (p. 23)• Starts a scan. (p. 75)• Toggles the transmit output power between high and low (p. 24). - “LOW” appears when low power is selected. - While pushing and holding this key, with [DIAL] rotation se-lects the output power.• Activates the following duplex functions in order. - Minus duplex operation— “–DUP” appears. - Plus duplex operation— “+DUP” appears. - Simplex operation— no duplex indicator appears. - While pushing and holding this key, with [DIAL] rotation se-lects the duplex function.• Turn the frequency skip function ON and OFF in VFO mode, or set the memory channel as the following skip channel in mem-ory mode in order (p. 79). - Skip channel— “SKIP” appears. - Frequency skip channel— “PSKIP” appears. - Non-skip channel— no skip indicator appears.• Turn the memory name or bank name indication ON and OFF. (p. 70)](https://usermanual.wiki/ICOM-orporated/306600/User-Guide-882334-Page-10.png)
![52PANEL DESCRIPTIONNew200129DTMF.MCS0CQ.T.SCANCD#RECMODEKEY Pushed momentarily Pushed and held for 1 sec.• Inputs digit ‘7’ for frequency input, memory channel selection, etc.• While pushing [PTT], this key sends the DTMF code “7.”• Inputs digit ‘8’ for frequency input, memory channel selection, etc.• While pushing [PTT], this key sends the DTMF code “8.”• Inputs digit ‘9’ for frequency input, memory channel selection, etc.• While pushing [PTT], this key sends the DTMF code “9.”• Inputs digit ‘0’ for frequency input, memory channel selection, etc.• While pushing [PTT], this key sends the DTMF code “0.”• Inputs MHz digit for frequency input.• While pushing [PTT], this key sends the DTMF code “F (#).”• During DV mode operation, selects the record track for voice memory. (p. 62)• While pushing [PTT], this key sends the DTMF code “E (✱).”• During FM/FM-N mode operation, selects repeater tone, tone squelch, DTCS squelch and no tone operation in sequence. (p. 110)• During DV mode operation, selects digital call sign, digital code and no tone operation in sequence. (p. 110)• Selects tuning step selection. (p. 18)• Select DTMF memory mode. (p. 103)• During DV mode operation, CALL SIGN setting mode is dis-played. (p. 51)• During DV mode operation, set “CQCQCQ” for station’s call sign for operation.• During FM/FM-N mode operation, starts tone scan function. (p. 112)• During DV mode operation, RX CALL SIGN is displayed. (p. 56)• Selects the operating mode.7TONEDSQ8TS](https://usermanual.wiki/ICOM-orporated/306600/User-Guide-882334-Page-11.png)
![Ne103BATTERY CHARGINGNew2001■ Regular chargingPrior to using the transceiver for the first time, the battery pack must be fully charged for optimum life and operation.D Battery indicatorsThe indicators show “ ,” “ ” and “ ” in sequence while charging, and both indicators disappear when com-pletely charged.D Charging note• Be sure to turn the transceiver power OFF.Otherwise the battery pack will not be charged completely or takes longer charging time periods.• External DC power operation becomes possible when using an optional CP-12L, CP-19R or OPC-254L. The at-tached battery pack is also charged simultaneously, except during transmit. (see p. 11 for more details)• The external DC power supply voltage must be within 10–16 V to charge the battery pack and operation when using an optional OPC-254L.• BC-167A/D• CP-12L (Optional)• OPC-254L (Optional)to AC outletto cigarette lightersocket (12 V DC)to 12 V DC(power supply)White: +Black: _Transceiverto [DC IN]Turn power OFF while charging the battery pack.• Charging time period: Approx. 6 hoursBP-256 • CP-19R (Optional)](https://usermanual.wiki/ICOM-orporated/306600/User-Guide-882334-Page-16.png)
![113BATTERY CHARGINGNew20013■ Rapid chargingThe optional BC-177 provides rapid charging of the battery pack.• Charging period: approx. 2.5 hours (with BP-256)D Charging note• Be sure to turn the transceiver power OFF.Detach the battery pack from the transceiver then charge the battery pack by itself, or charge the battery with regu-lar charging when the transceiver power cannot be turned OFF.Otherwise the battery pack will not be charged (charging in-dicator on the BC-177 blinks orange about 10 sec. after the battery pack is installed in BC-177).• The desktop charger, BC-177, can only be charged BP-256. Other types of rechargeable battery, Ni-Cd or Ni-MH, cannot be charged.• If the charging indicator blinks orange, there may be a problem with the battery pack (or charger). Reinsert the bat-tery pack or contact your dealer.• The optional CP-12L and OPC-254L can be used instead of the supplied AC adapter (BC-123A/E). Connect one of these to the [DC 13.5V] jack in this case.Transceiver(with battery pack)Turn power OFF. Battery packto AC outletBC-177 (optional)Desktop chargerto [AC ADAPTER]to [DC 13.5V]CP-12LOPC-254LCharging indicatorCharging : OrangeFinished : GreenCharging terminalAC adapter(suppliedwith BC-177)](https://usermanual.wiki/ICOM-orporated/306600/User-Guide-882334-Page-17.png)
![133BATTERY CHARGINGNew20013■ External DC power operationAn optional cigarette lighter cable (CP-12L or CP-19R; for 12 V cigarette lighter socket) or external DC power cable (OPC-254L) can be used for external power operation. D Operating note• Power supply range is between 10.0–16.0 V DC. NEVER CONNECT OVER 16 V DC directly into the [DC IN] jack of the transceiver.• BE SURE to use CP-12L,CP-19R or OPC-254L when con-necting a regulated 12 V DC power supply.Use an external DC-DC converter to connect the trans-ceiver through optional CP-12L, CP-19R or OPC-254L to a 24 V DC power source.• The voltage of the external power supply must be within 10–16 V DC when using either CP-12L, CP-19R or OPC-254L, otherwise, use the battery pack.• Up to 5 W (approx.) of maximum output power is provided with the external DC power operation, however, when the supplied voltage exceeds 14 V, the built-in protection circuit activates to reduce the transmit output power to 0.5 W (ap-prox.).• Disconnect the power cables from the transceiver when not using it. Otherwise, the vehicle battery will become ex-hausted.• The power save function is deactivated automatically dur-ing external DC power operation.Transceiver• CP-12L (Optional)• CP-19R (Optional)• OPC-254L (Optional)to cigarette lightersocket (12 V DC)to 12 V DC(power supply)White: +Black: _to [DC IN]](https://usermanual.wiki/ICOM-orporated/306600/User-Guide-882334-Page-19.png)
![14NeNew2001FREQUENCY AND CHANNEL SETTING4■ Main band selectionThe IC-92A/92AD has two independent operating bands; A band (VFO A) and B band (VFO B). A band (VFO A) can oper-ate 0.495 MHz to 999.990 MHz*, and B band (VFO B) can operate 118 MHz to 174 MHz and 350 MHz to 470 MHz. * Some frequency ranges are blocked for the USA version by regula-tion. NOTE: When in dualwatch mode, transmission is avail-able from the MAIN band only.D How to change the main band➥ Push [MAIN/DUAL] to toggle between A and B band.➥ Push and hold [MAIN/DUAL] for 1 sec. to turn the dual-watch operation ON and OFF. • While in dualwatch operation, the display indicates A band in the upper half and B band in the lower half.➥ During dualwatch operation, push [MAIN/DUAL] to select A band or B band as the main operating band alternately.DTCSDTCSWPSEMEMWPSFMFMPRIOPRIOPRIOPRIO+DUP+DUP+DUP+DUPFM1460104400000002550μ000000μ000000DTCSDTCSWPSEMEMWPSFMFMPRIOPRIOPRIOPRIO+DUP+DUP+DUP+DUPFM1460104400002550μ000000μ000000AMemoNameMemoNameμPRIO WX EMRDTCSFMLOWATT146010PSKIPSKIP+DUP2525000000MemoNameμPRIOPRIO WXWX EMREMRDTCSDTCSFMFMBLOWATT440000PSKIPSKIP+DUP+DUP2525000Push Push• Selecting A band • Selecting upper side as main band• Selecting lower side as main band• Selecting B bandPushDTCSDTCSWPSEMWPSFMPRIOPRIO+DUP+DUPFM146 010440 0002550μ000μ000DTCSDTCSWPSEMWPSFMPRIOPRIO+DUP+DUPFM146 010440 0002550μ000μ000AMemoNameμPRIO WX EMRDTCSFMLOWATT146010P SKIP+DUP25000MemoNameμPRIO WX EMRDTCSFMBLOWATT440000P SKIP+DUP25000Single band operation Dualwatch operationfor 1 sec.](https://usermanual.wiki/ICOM-orporated/306600/User-Guide-882334-Page-20.png)
![New2001154FREQUENCY AND CHANNEL SETTING 4■ Mode selectionD VFO modeVFO mode is used to set the desired frequency.➥ Push [VFO] to select VFO mode.What is VFO?VFO is an abbreviation of Variable Frequency Oscillator. Fre-quencies for both transmitting and receiving are generated and controlled by the VFO.D Memory modeMemory mode is used for operation on memory channels which store programmed frequencies.q Push [MR] to select memory mode. • “μ ” appears when memory mode is selected.w Rotate [DIAL] to select the desired memory channel. • Only programmed memory channels can be selected. • Enter the memory channel directly to select the desired memory channel. (p. 64) • See p. 66 for memory programming details.AMem oNameMemoNameµPRIOPRIOWXWXEMREM RDTCSDTCSFMLOWLO WAT TATT146010PSKIP+DUP+DUP2525000000• VFO mode indicationVFOMHzAMRS.MWBAMemoNameMemoNameμPRIOPRIO WXEMREMRDTCSDTCSFMFMLOWLOWATTATT433000PSKIP+DUP+DUP2525001001• Memory mode indicationAppear](https://usermanual.wiki/ICOM-orporated/306600/User-Guide-882334-Page-21.png)
![Ne164FREQUENCY AND CHANNEL SETTING New2001D Call/TV*/Weather† channelsCall channels are used for quick recall of most-often used frequencies. * Appears only when TV channels are programmed via the optional RS-91. Also available for A band operation only. † Available for the USA version only.q Push [CALL] several times to select call channels/TV channels (A band only)/Weather channels. •- Call/TV/Weather channels can be selected in sequence.w Rotate [DIAL] to select the desired channel.■ Operating band selectionThe transceiver can receive the AM broadcast, HF bands, 50 MHz, FM broadcast, VHF air, 144 MHz, 300 MHz, 400 MHz or 800 MHz* bands. (Some bands are not selectable for B band operation. See next page for details.)➥ In VFO mode, push [BAND] several times to select the desired frequency band. •- If the other than VFO mode is selected, such as a memory channel/call channel/TV channel/Weather channel, push [VFO] to select VFO mode first, then push [BAND] to select the de-sired band.➥ While pushing and holding [BAND], rotating [DIAL] also selects frequency band. Available frequency bands are different depending on ver-sion. See the specifi cation for details. (pgs. 120, 121) * Some frequency ranges are blocked for the USA version by regulation.[DIAL]CALLRX CSCAMemoNameMemoNameμPRIOPRIOWXWXEMREMRDTCSDTCSFMLOWATT145000PSKIPSKIP+DUP+DUP25C0TVAMemoNameMemoNameμPRIOPRIOWXWXEMREMRDTCSDTCSWFMWFMLOWATT10 chPSKIPSKIP+DUP+DUP25WXWXAMemoNameMemoNameμPRIOPRIOWXWXEMREMRDTCSDTCSLOWATT1chPSKIPSKIP+DUP+DUP25• Call channel indication• TV channel indication• Weather channel indicationBANDD[DIAL]AMemoNameMemoNameμPRIOPRIO WX EMREMRDTCSDTCSFMLOWLOWATTATT145000PSKIP+DUP+DUP25000000](https://usermanual.wiki/ICOM-orporated/306600/User-Guide-882334-Page-22.png)
![174FREQUENCY AND CHANNEL SETTING New200112345678910111213141516171819• Available frequency bandsAMem oNameMemoNamePRIOPRIOWXWXEMREM RDTCSDTCSAMAM118000PSKIP+DUP+DUP2525AMem oNameMemoNamePRIOPRIOWXWXEMREM RDTCSDTCSAMB118000PSKIP+DUP+DUP2525AMem oNameMemoNamePRIOPRIOWXWXEMREM RDTCSDTCSFMFMB146010PSKIP+DUP+DUP2525AMem oNameMemoNamePRIOPRIOWXWXEMREM RDTCSDTCSFMFMB370000PSKIPSKIP+DUP+DUP2525AMem oNameMemoNamePRIOPRIOWXWXEMREM RDTCSDTCSFMFMB440000PSKIP+DUP+DUP2525AMem oNameMemoNamePRIOPRIOWXWXEMREM RDTCSDTCSFMFM850000PSKIP+DUP+DUP2525AMem oNameMemoNamePRIOPRIOWXWXEMREM RDTCSDTCSFM440000PSKIP+DUP+DUP2525AMem oNameMemoNamePRIOPRIOWXWXEMREM RDTCSDTCSAM370000PSKIP+DUP+DUP2525AMem oNameMemoNamePRIOPRIOWXWXEMREM RDTCSDTCSFMFM146010PSKIPSKIP+DUP+DUP2525AMem oNameMemoNamePRIOPRIOWXWXEMREM RDTCSDTCSAM001620PSKIP+DUP+DUP2525AMem oNameMemoNamePRIOPRIOWXWXEMREM RDTCSDTCSAM005000PSKIP+DUP+DUP2525AMem oNameMemoNamePRIOPRIOWXWXEMREM RDTCSDTCSFMFM051 000PSKIPSKIP+DUP+DUP2525AMem oNameMemoNamePRIOPRIOWXWXEMREM RDTCSDTCSWFMWFM076 000PSKIP+DUP+DUP2525AM broadcast band HF band• A band• B band50 MHz band800 MHz band400 MHz band400 MHz bandFM broadcast bandVHF air bandVHF air band144 MHz band144 MHz band300 MHz band300 MHz band: Push: Rotating [DIAL] while pushingInitial frequencies shown differ according to version.BANDDBANDD](https://usermanual.wiki/ICOM-orporated/306600/User-Guide-882334-Page-23.png)
![Ne184FREQUENCY AND CHANNEL SETTING New2001■ Setting a tuning stepThe tuning step can be selected for each frequency band. The following tuning steps are available for the IC-92A/92AD.• 5.0 kHz* • 6.25 kHz* • 8.33 kHz† • 9.0 kHz‡ • 10.0 kHz• 12.5 kHz • 15.0 kHz • 20.0 kHz • 25.0 kHz • 30.0 kHz• 50.0 kHz • 100.0 kHz • 125.0 kHz • 200.0 kHz* Appears for below the 600 MHz bands only. † Appears for the VHF air band only.‡ Appears for the AM broadcast band only.D Tuning step selectionq Push [VFO] to select VFO mode, if necessary.w Push [BAND] to select the desired frequency band. • Or, while pushing and holding [BAND], rotate [DIAL] to select the desired frequency band.e Push and hold [TS](8) for 1 sec. to enter tuning step set mode.r Rotate [DIAL] to select the desired tuning step.t Push [TS](8) (or [VFO]) to return to VFO mode.■ Setting a frequencyD Using the dialq Push [VFO] to select VFO mode, if necessary.w Select the desired frequency band with [BAND]. • Or, while pushing and holding [BAND], rotate [DIAL] to select the desired frequency band.e Rotate [DIAL] to select the desired frequency. • The frequency changes according to the preset tuning steps. See the left-hand side of the page to set the tuning step. • Push and hold [MHz](VFO) for 1 sec. then rotate [DIAL] to change the frequency in 1 MHz steps, or push and hold for 1 sec. again then rotate [DIAL] to change the frequency in 10 MHz steps. (Each pushing and holding for 1 sec. toggles 1 MHz or 10 MHz tuning steps. Push [MHz](VFO) to cancel it.)APRIOPRIO WXEMREMRDTCSDTCSFMFM146010P+DUP+DUP2525SETSET-TS:5.0kHzTS:5.0kHzμ000SKIP5 kHz tuning step[DIAL]8TSAPRIOPRIO WXEMREMRDTCSDTCSFM146010+DUP+DUP25APRIOPRIO WXEMREMRDTCSDTCSFM146010+DUP+DUP25[DIAL] changes the frequency according to the selected tuning step.After pushing and holding [MHz](VFO) for 1 sec., [DIAL] changes the frequency in 1 MHz/10 MHz steps.BANDVFOMHzAD[DIAL]](https://usermanual.wiki/ICOM-orporated/306600/User-Guide-882334-Page-24.png)
![194FREQUENCY AND CHANNEL SETTING New200112345678910111213141516171819D Using the keypadThe frequency can be directly set via nu-meric keys.• If a frequency outside the frequency range is entered, the previously displayed frequency is automatically recalled after editing last digit.q Push [VFO] to select VFO mode, if neces-sary.w Enter the desired frequency via the keypad.Depending on the tuning step setting, the 1 kHz digit may not acceptable as input. In this case, enter “0” as 1 kHz digit, then rotate [DIAL] to set the desired frequency.RECVFOMRCALL23456789 .0SCANLOW MODE MHzS.MWRX CSCQM.NAMESKIPDUPTONE TSDTMF.MT. S C A NDSQCS CD#CBAA/a1SCOPECLR• Entering 146.520 MHz• Entering 79.3 MHz• Editting to 684 kHz• Changing 100 kHz and below.Editting 146.520 MHz to 146.240 MHzAPRIOPRIOWXWXDTCSDTCSFMFM830 000+DUP+DUP25APRIOPRIOWXWXDTCSDTCSFMFM800000+DUP+DUP25APRIOPRIOWXWXDTCSDTCSFMFM080 200+DUP+DUP25APRIOPRIOWXWXDTCSDTCSFMFM080200+DUP+DUP25APRIOPRIOWXWXDTCSDTCSFMFM080 200+DUP+DUP25APRIOPRIOWXWXDTCSDTCSFMFM080 200+DUP+DUP25APRIOPRIOWXWXDTCSDTCSFMFM430 000+DUP+DUP2525APRIOPRIOWXWXDTCSDTCSFMFM430000+DUP+DUP2525APRIOPRIOWXWXDTCSDTCSFMFM433580+DUP+DUP2525APRIOPRIOWXWXDTCSDTCSFMFM433 580+DUP+DUP2525APRIOPRIOWXWXDTCSDTCSFMFM433580+DUP+DUP2525APRIOPRIOWXWXDTCSDTCSFMFM433580+DUP+DUP25APRIOPRIOWXWXDTCSDTCSFMFM433140+DUP+DUP2525APRIOPRIOWXWXDTCSDTCSFMFM433140+DUP+DUP2525APRIOPRIOWXWXDTCSDTCSFMFM433 140+DUP+DUP2525APRIOPRIOWXWXDTCSDTCSFMFM43433140+DUP+DUP25250CQ0CQ0CQ0CQ0CQ.T.SCANCD#.T.SCANCD#.T.SCANCD#1SCOPECLR3LOWA/a3LOWA/a2SCAN8TS8TS4DUP4DUP4DUP6M.NAME0CQ8TS5SKIP](https://usermanual.wiki/ICOM-orporated/306600/User-Guide-882334-Page-25.png)
![20NeNew2001BASIC OPERATION5■ ReceivingMake sure charged battery pack (BP-256) or brand new al-kaline batteries (BP-257) are installed (pgs. 1, 12).q Push and hold [PWR] for 1 sec. to turn power ON.w Rotate [VOL] to set the desired audio level. • The frequency display shows the volume level while setting. See the section at right for details.e Set the receiving frequency. (p. 18)r Set the squelch level. (p. 21)• While pushing and holding [SQL], rotate [DIAL].• The fi rst click of [DIAL] indicates the current squelch level.• “ LEVEL 1” is loose squelch (for weak signals) and “LEVEL 9” is tight squelch (for strong signals).• “ AUTO” indicates automatic level adjustment by a noise pulse counting system.• Push and hold [SQL] to open the squelch manually.t When a signal is received:• Squelch opens and audio is output.• The S/RF-meter shows the relative signal strength level.■ Setting audio volume➥ Rotate [VOL] to adjust the audio level. • If squelch is closed, push and hold [SQL] to verify the audio level. • The display shows the volume level while setting.q [PWR]e Set frequencyr Set squelch levelw Set audio levele Select bandr Push for setting the squelch (Push to monitor)μ000000VOLVOLμ000000VOLVOLμ000000VOLVOLAMemoNameMemoNameμPRIOPRIO WXEMREMRDTCSDTCSFMLOWLOWATTATT14145000PSKIPPSKIPPSKIPPSKIP+DUP+DUP2525000000Minimum setting(no audio)Volume level indicatorMaximum setting[VOL][SQL]](https://usermanual.wiki/ICOM-orporated/306600/User-Guide-882334-Page-26.png)
![New2001215BASIC OPERATION12345678910111213141516171819■ Setting squelch levelThe squelch circuit mutes the received audio signal depend-ing on the signal strength. The receiver has 9 squelch levels, a continuously open setting and an automatic squelch set-ting.➥ While pushing and holding [SQL], rotate [DIAL] to select the squelch level.• “ LEVEL 1” is loose squelch (for weak signals) and “LEVEL 9” is tight squelch (for strong signals).• “ AUTO” indicates automatic level adjustment by a noise pulse counting system.• “OPEN” indicates continuously open setting.■ Operating mode selectionOperating modes are determined by the modulation of the radio signals. The transceiver has total 5 operating modes (A band: FM, WFM and AM modes, B band FM, FM-N, AM and DV modes). The mode selection is stored independently for each band and memory channel.Typically, AM mode is used for the AM broadcast stations (0.495–1.620 MHz) and air band (118–136.995 MHz), and WFM is used for FM broadcast stations (76–107.9 MHz).WFM mode cannot be selected above 810 MHz for USA ver-sion.➥ Push and hold [MODE](REC) for 1 sec. several times to select the desired operating mode.[DIAL][SQL]AMemoNameMemoNameμPRIOPRIO WXEMREMRDTCSDTCSFMLOWLOWATTATT145000PSKIPPSKIP+DUP+DUP2525000000SQUELCH:LEVEL9SQUELCH:LEVEL9μ000000PSKIPSQUELCH:AUTOSQUELCH:AUTOμ000000PSKIPAutomatic squelchMaximum levelAFMFM14500025AWFMWFM1450002525AAMAM14500025PSKIPPSKIPPSKIPWFM modeIndicates while selecting AUTO MODE.AM mode• Display exampleRECMODE](https://usermanual.wiki/ICOM-orporated/306600/User-Guide-882334-Page-27.png)
![Ne225BASIC OPERATIONNew2001■ Monitor functionThis function is used to listen to weak signals without dis-turbing the squelch setting or to open the squelch manually even when mute functions such as the tone squelch are in use.➥ Push and hold [SQL] to monitor the operating frequency. • The 1st segment of the S-meter blinks. The [SQL] key can be set to ‘sticky’ operation in set mode. See page 89 for details.■ Attenuator functionThe attenuator prevents a desired signal from distortion by very strong signals near the desired frequency or when very strong electric fi elds, such as from a broadcasting station, are near your location. The attenuation is about 10 dB.q Enter “ATTENUATOR” in set mode. (p. 88)w Rotate [DIAL]† to select “ON” or “OFF.”e Push [](5) (or [](4)) to return to set mode, and push [MENU/ ] to return to frequency indication. • “ATT” appears on the function display when “ON” is selected.†[DIAL] ↔ [ ](2)/[](8) [ ](5) ↔ [ ](6)[SQL]AMemoNameMemoNameμPRIOPRIO WXWX EMREMRDTCSDTCSFMLOWLOWATTATT146010PSKIP+DUP+DUP2525000000The 1st segment blinksMENU5SKIP[DIAL]AMemoNameMemoNameμPRIOPRIOWXWXEMREMRDTCSDTCSFMFMLOWLOWATTATT146010PSKIP+DUP+DUP2525000000Appears. ❮MENU screen❯ ➪ ❮SET MODE❯ ➪ ❮ATTENUATOR❯ (Push [MENU/ ]) (Rotate [DIAL]†, then push [ ](5)†.)](https://usermanual.wiki/ICOM-orporated/306600/User-Guide-882334-Page-28.png)
 for 1 sec. to start a single sweep. • 1 short and 1 long beeps sound. • Signal conditions (strengths) appear starting from the center of the range.e Rotate [DIAL] to set the highlighted cursor to the desired signal and set the frequency of the signal.r Push [VFO] to return to normal operation.D Continuous sweepq Set the desired frequency as band scope center fre-quency.w Push and hold [SCOPE](1) for 3 sec. to start continuous sweep. • 2 short beeps sound after 1 short and 1 long beeps. • Signal conditions (strengths) appear starting from the center of the range.e Push and hold [SCOPE](1) for 1 sec. to cancel sweep. • Pushing [SQL] also cancels sweep.r Push [VFO] to return to normal operation. The receive audio during sweeping can be muted in sounds set mode. See p. 102 for details.PRIOPRIO WXEMREMRDTCSDTCSFMFMBA145780P SKIPP SKIP+DUP+DUP25μ000000Sweep markerBand scope indication1SCOPECLR[SQL]PRIOPRIOWXWXEMREMRDTCSDTCSFMFMBA145780P SKIPP SKIP+DUP+DUP2525μ000000](https://usermanual.wiki/ICOM-orporated/306600/User-Guide-882334-Page-29.png)
![Ne245BASIC OPERATIONNew2001■ Transmitting✍ NOTE: To prevent interference, listen on the channel be-fore transmitting by pushing and holding [SQL]qSet the operating frequency. (pgs. 18, 19) • Transmission is available on the 144 MHz/440 MHz amateur bands only.• Select output power if desired. See the section at right for details.w Push and hold [PTT] to transmit.• Tx/Rx indicator lights red.• S/RF meter shows the output power level.e Speak into the microphone using your normal voice level.• DO NOT hold the transceiver too close to your mouth or speak too loudly. This may distort your speech.r Release [PTT] to return to receive.■ Transmit power selectionThe transceiver has two output power levels to suit your op-erating requirements. Low output power during short-range communications may reduce the possibility of interference to other stations and will reduce current consumption.➥ Push and hold [LOW](3) for 1 sec. to toggle the transmit output power between High and Low. • “LOW” appears when the low power is selected.WARNING! NEVER continuously transmit the transceiver for long periods of time. When the transceiver is used for continuous prolonged transmission at high power, the transceiver radiates heat to protect itself from overheating and transceiver’s chassis will become hot. This may cause a burn.AVOID operating the transceiver in a situation that will obstruct heat dissipation, especially if the transceiver is operated with an external power supply. Heat dissipation may be affected, and it may cause a burn, warp the casing or damage the trans-ceiver.Tx/RxMicrophoneindicator[SQL]3LOWA/aAMemoNameMemoNameμPRIOPRIOWXWXEMREMRDTCSDTCSFMFMLOWLOWLOWLOWLOWLOWATTATT146010PSKIP+DUP+DUP2525000000AppearsLow power transmissionHigh power transmissionCAUTION:- Transmitting without an antenna will damage the transceiver.](https://usermanual.wiki/ICOM-orporated/306600/User-Guide-882334-Page-30.png)
![255BASIC OPERATIONNew200112345678910111213141516171819■ Lock functionTo prevent accidental frequency changes and unnecessary function access, use the lock function. ➥ Push and hold [MENU/ ] for 1 sec. to turn the lock function ON and OFF. • “ ” appears while the lock function is activated. • The squelch control and volume control can be used while the lock function is in use with default setting. Either or both the squelch control and volume control can also be locked in set mode. (p. 90)■ Dualwatch operationDualwatch operation monitors two frequencies simultane-ously. The IC-92A/92AD has two independent receiver circuits as A band and B band (available frequency bands and operating mode are different depending on bands). D Dualwatch operation➥ Push and hold [MAIN/DUAL] for 1 sec. to turn the dual-watch operation ON and OFF. • While in dualwatch operation, the display indicates A band in the upper half and B band in the lower half.MENUAMemoNameMemoNameμPRIOPRIOWXWXEMREMRDTCSDTCSFMFMLOWLOWATTATT145000PSKIPPSKIP+DUP+DUP2525000000AppearsMAINDUALDTCSDTCSDTCSDTCSWPSPSEMEMWPSPSFMPRIOPRIOPRIOPRIO+DUP+DUP+DUP+DUPFMFM1460104444000025255050μ000000μ000000AMemoNameMemoNameμPRIOPRIOWXWXEMREMRDTCSDTCSFMLOWLOWATTATT146010PSKIPSKIP+DUP+DUP25000000](https://usermanual.wiki/ICOM-orporated/306600/User-Guide-882334-Page-31.png)
![Ne265BASIC OPERATIONNew2001D Main band selection➥ Push [MAIN/DUAL] to select A band or B band as the main operating band alternately.D Setting audio volumeThe audio level for dualwatch operation can be adjusted both on A band and B band simultaneously (default). This setting can be set separately for each band in sounds set mode. q Push and hold [MAIN/DUAL] for 1 sec. to enter the dual-watch operation, if necessary.w Rotate [VOL] to adjust the audio level for the main band. • If squelch is closed, push and hold [SQL] to verify the audio level. • The display shows the volume level while setting.MAINDUALDTCSDTCSDTCSDTCSWPSPSEMEMWPSPSFMPRIOPRIOPRIOPRIO+DUP+DUP+DUP+DUPFMFM146010440000μ000000μ000000DTCSDTCSDTCSDTCSWPSPSEMEMWPSPSFMPRIOPRIOPRIOPRIO+DUP+DUP+DUP+DUPFMFM14146010440000μ000000μ000000DTCSDTCSDTCSDTCSWPSPSEMEMWPSPSFMPRIOPRIOPRIOPRIO+DUP+DUP+DUP+DUPFMFM146010010440000μ000000μ000000DTCSDTCSDTCSDTCSWPSEMEMWPSPRIOPRIOPRIOPRIO+DUP+DUP+DUP+DUP2575μ000000μ000000146010010DTCSDTCSDTCSDTCSWEMEMWPSPRIOPRIOPRIOPRIO+DUP+DUP+DUP+DUP2575μ000000μ000000440000FMFM440000PSPSFM146010VOLVOLVOLVOL[VOL]Setting for A band (upper side)Setting for B band (lower side)](https://usermanual.wiki/ICOM-orporated/306600/User-Guide-882334-Page-32.png)
![275BASIC OPERATIONNew200112345678910111213141516171819D Volume setting for dualwatchThe volume setting for dualwatch can be set for both bands simultaneously or for each band separately in set mode.q Enter “VOLUME SELECT” in sounds set mode. (p. 102)w Rotate [DIAL]† to select “BOTH” or “SEPARATE.”e Push [](5) (or [ ](4)) to return to sounds set mode, and push [MENU/LOCK] to return to frequency indication.D Setting squelch levelq Push and hold [MAIN/DUAL] for 1 sec. to enter the dual-watch operation, if necessaryw While pushing and holding [SQL], rotate [DIAL] to adjust the main band’s squelch level.• “LEVEL 1” is loose squelch and “LEVEL 9” is tight squelch.• “ AUTO” indicates automatic level adjustment with a noise pulse count system.• “OPEN” indicates continuously open setting.†[DIAL] ↔ [ ](2)/[](8) [ ](5) ↔ [ ](6)[DIAL]MAINDUAL[SQL]DTCSDTCSDTCSDTCSWPSEMEMWPSPRIOPRIOPRIOPRIO+DUP+DUP+DUP+DUP2575μ000000μ000000SQUELCH:AUTOSQUELCH:AUTO146010010DTCSDTCSDTCSDTCSWEMEMWPSPRIOPRIOPRIOPRIO+DUP+DUP+DUP+DUP2575μ000000μ000000SQUELCH:LEVEL6SQUELCH:LEVEL6440000FMFM440000PSPSFM146010DTCSDTCSDTCSDTCSWPSPSEMEMWPSPSFMPRIOPRIOPRIOPRIO+DUP+DUP+DUP+DUPFMFM146010440000μ000000μ000000Setting for A band (Upper)Setting for B band (Lower) ❮MENU screen❯ ➪ ❮SOUNDS❯ ➪ ❮VOLUME SELECT❯ (Push [MENU/ ]) (Rotate [DIAL]†, then push [ ](5)†.)](https://usermanual.wiki/ICOM-orporated/306600/User-Guide-882334-Page-33.png)
![285BASIC OPERATIONNew2001■ TV channel operationTV channel operation is available only when TV channels are programmed using the optional RS-91. (p. 122) Also available for A band operation only.D TV channel receivingq Push [CALL] several times to select TV channels. • “ TV” and channel number appear.w Rotate [DIAL] to select the desired channel. • While pushing and holding [BAND], rotating [DIAL] selects the all channels including skip channel.D Skip channel settingUnwanted channels can be skipped for rapid selection, etc.q Push [CALL] several times to select TV channels. • “TV” and channel number appear.w Rotate [DIAL] to select the channel to be skipped. • To clear the skip setting, rotate [DIAL] while pushing and hold-ing [BAND] to select a skip channel.e Push and hold [SKIP](5) for 1 sec. to toggle the skip set-ting ON and OFF. • “SKIP” appears when the channel is set as skip channel.D Automatic TV channel programmingTV channels can be programmed automatically. q Push [CALL] several times to select TV channels. • “ TV” and channel number ap-pear.w Push [SCAN](2) to start TV channel programming. • The programming will automatically stop after scanning all channels.[DIAL]CALLRX CSCTVTVAMemoNameMemoNameμPRIOPRIO WXWX EMREMRDTCSDTCSWFMLOWLOWATTATT10CHCHPSKIP+DUP+DUP2525TV mode indicationChannel indication[DIAL]BANDD5SKIPCALLRX CSCTVTVAMem oNameMemoNameµPRIOPRIOWXWXEMREM RDTCSDTCSWFMWFMLOWLO WAT TATT12 chPSKIP+DUP+DU P2525AppearsTVTVAMem oNameMemoNameµPRIOPRIOWXWXEMREM RDTCSDTCSWFMWFMLOWLO WAT TATT2chPSKIP+DUP+DUP2525](https://usermanual.wiki/ICOM-orporated/306600/User-Guide-882334-Page-34.png)
 for 1 sec. to activate the subaudible tone encoder, according to re-peater requirements. •-“TONE” appears. Refer to p. 107 for tone frequency settings.r Push and hold [PTT] to transmit. •- The displayed frequency automati-cally changes to the transmit frequency (repeater input fre-quency). •- If “OFF” appears, check the offset frequency or shift direction. (p. 30)t Release [PTT] to receive.y Push and hold [SQL] to check whether the other station’s transmit signal can be directly received or not. U.S.A. and Korean versions: Auto repeater function uses standard values of the re-peater tone frequency and offset frequency.Station A Station BRepeater145.300 MHz144.700 MHz 144.700 MHz145.300 MHzUplinkDownlink(transmitting freq.)(receiving freq.)ATONETONEFM145300-DUP-DUP“–DUP”or “+DUP” appears.7TONEDSQ[SQL]While receiving While transmittingAATONETONEFMPSKIPSKIP-DUPATONEFM144700PSKIP-DUP145300](https://usermanual.wiki/ICOM-orporated/306600/User-Guide-882334-Page-35.png)
![Ne306REPEATER AND DUPLEX OPERATIONSNew2001D Checking the repeater input signalThe transceiver can check whether the other station’s trans-mit signal can be received directly or not, by listening on the repeater input frequency.➥ Push and hold [SQL] to check whether the other station’s transmit signal can be directly received or not. • When the other station’s signal can be directly received, move to a non-repeater frequency to use simplex. (duplex OFF)D Off band indicationIf the transmit frequency is out of the amateur band, the off band indication, “OFF,” appears on the display when [PTT] is pushed. Check the offset frequency or duplex direction in this case. (p. 31) U.S.A. and Korean versions: Auto repeater function uses standard values of the offset frequency.✔-CONVENIENT!Tone scan function: When you don’t know the subaudible tone used for a repeater, the tone scan is convenient for de-tecting the tone frequency.➥ Push and hold [T.SCAN](.) for 1 sec. to start the tone scan. See p. 112 for more information.Indication while receiving.Receives –0.6 MHz shift frequency.Blinks while pushing and holding [SQL].ATONETONEFM145300145300PSKIPSKIP-DUP-DUPATONEFM144700PSKIP-DUPPush and hold[SQL][SQL]AOFFOFFTONETONEFMPSKIPSKIP-DUP-DUP](https://usermanual.wiki/ICOM-orporated/306600/User-Guide-882334-Page-36.png)
![316REPEATER AND DUPLEX OPERATIONSNew200112345678910111213141516171819■ Duplex operationAlthough [DIAL] and [ ](5) are used for description in this section, [](2)/[](8) and [](6) are available instead of [DIAL] and [](5).D Setting offset frequencyq Enter “OFFSET FREQ” in DUP/TONE… set mode. (p. 97)w Rotate [DIAL]† to set offset frequency. • 1 MHz and 10 MHz tuning steps are available by pushing and holding [MHz](VFO) for 1 sec.: push [MHz](VFO) to cancel it.e Push [](5) (or [](4)) to return to DUP/TONE… set mode, and push [MENU/ ] to return to frequency indi-cation.D Setting duplex direction➥ Push and hold [DUP](4) for 1 sec. to select “–DUP” or “+DUP”. • “–DUP” or “+DUP” indicates the transmit frequency for minus shift or plus shift, respectively. • When offset frequency is 0.6 MHz.U.S.A. and Korean versions:Auto repeater function has priority over the manual duplex setting. If the frequency changes after setting, the auto re-peater function may have changed the duplex setting.†[DIAL] ↔ [ ](2)/[](8) [ ](5) ↔ [ ](6)5.0 MHz offsetNo offset frequency 5.000.00 5.000.00OFFSET FREQOFFSET FREQ 0.000.00 0.000.00OFFSET FREQOFFSET FREQ4DUP–Duplex example +Duplex exampleReceivingTransmittingATONETONEFMFM145300145300PSKIPSKIP-DUP-DUPATONETONEFMFM144700144700PSKIPSKIP-DUP-DUPReceivingTransmittingATONETONEFM145300145300PSKIPSKIP+DUP+DUPATONETONEFMFM145900145900PSKIPSKIP+DUP+DU P ❮MENU screen❯ ➪ ❮DUP/TONE…❯ ➪ ❮OFFSET FREQ❯ (Push [MENU/ ]) (Rotate [DIAL]†, then push [ ](5)†.)](https://usermanual.wiki/ICOM-orporated/306600/User-Guide-882334-Page-37.png)
![Ne326REPEATER AND DUPLEX OPERATIONSNew2001■ Auto repeater functionThe U.S.A. and Korean versions automatically use standard repeater settings (duplex ON/OFF, duplex direction, tone encoder ON/OFF) when the operating frequency falls within or outside of the general repeater output frequency range. The offset and repeater tone frequencies are not changed by the auto repeater function, reset these frequencies, if necessary.D Frequency range and offset direction• U.S.A. version• Korean versionq Enter “AUTO RPT” in set mode. (p. 89)w Rotate [DIAL]† to select the auto repeater setting. [U.S.A. version]: • “RPT1” : Activates duplex only. (default) • “RPT2” : Activates duplex and tone. • “OFF” : Auto repeater function is turned OFF. [Korean version]: • “ON” : Activates duplex and tone. (default) • “OFF” : Auto repeater function is turned OFF.e Push [](5) (or [](4)) to return to set mode, and push [MENU/ ] to return to frequency indication.FREQUENCY RANGE SHIFT DIRECTION147.000–147.395 MHz “+DUP” appears442.000–444.995 MHz “+DUP” appears447.000–449.995 MHz “–DUP” appears145.200–145.495 MHz146.610–146.995 MHz “–DUP” appearsFREQUENCY RANGE SHIFT DIRECTION439.000–440.000 MHz “–DUP” appears ❮MENU screen❯ ➪ ❮SET MODE❯ ➪ ❮AUTO RPT❯ (Push [MENU/ ]) (Rotate [DIAL]†, then push [ ](5)†.)U.S.A./KOREAN versions only](https://usermanual.wiki/ICOM-orporated/306600/User-Guide-882334-Page-38.png)
 for 1 sec. to select DTMF memory.w Rotate [DIAL]† counter-clockwise until “T-CALL” appears.e Push [](5) to set.r Push [VFO] to exit DTMF memory.t Set the receive frequency (repeater output frequency).y Set the shift direction of the transmit frequency. (–DUP or +DUP; see p. 31 for details.)u While pushing [PTT], push [SQL] to transmit a 1750 Hz tone burst signal. • If “OFF” appears, check the offset frequency or shift direction. (p. 97) • The displayed frequency automatically changes to the transmit frequency (repeater input frequency).i Push and hold [PTT] to transmit.o Release [PTT] to receive.!0 Push and hold [SQL] to check whether the other station’s transmit signal can be received directly or not, by listening on the repeater input frequency.†[DIAL] ↔ [ ](2)/[ ](8)rCh01DTMF MEMORYDTMF MEMORYrT-CALLDTMF MEMORYDTMF MEMORY](https://usermanual.wiki/ICOM-orporated/306600/User-Guide-882334-Page-39.png)
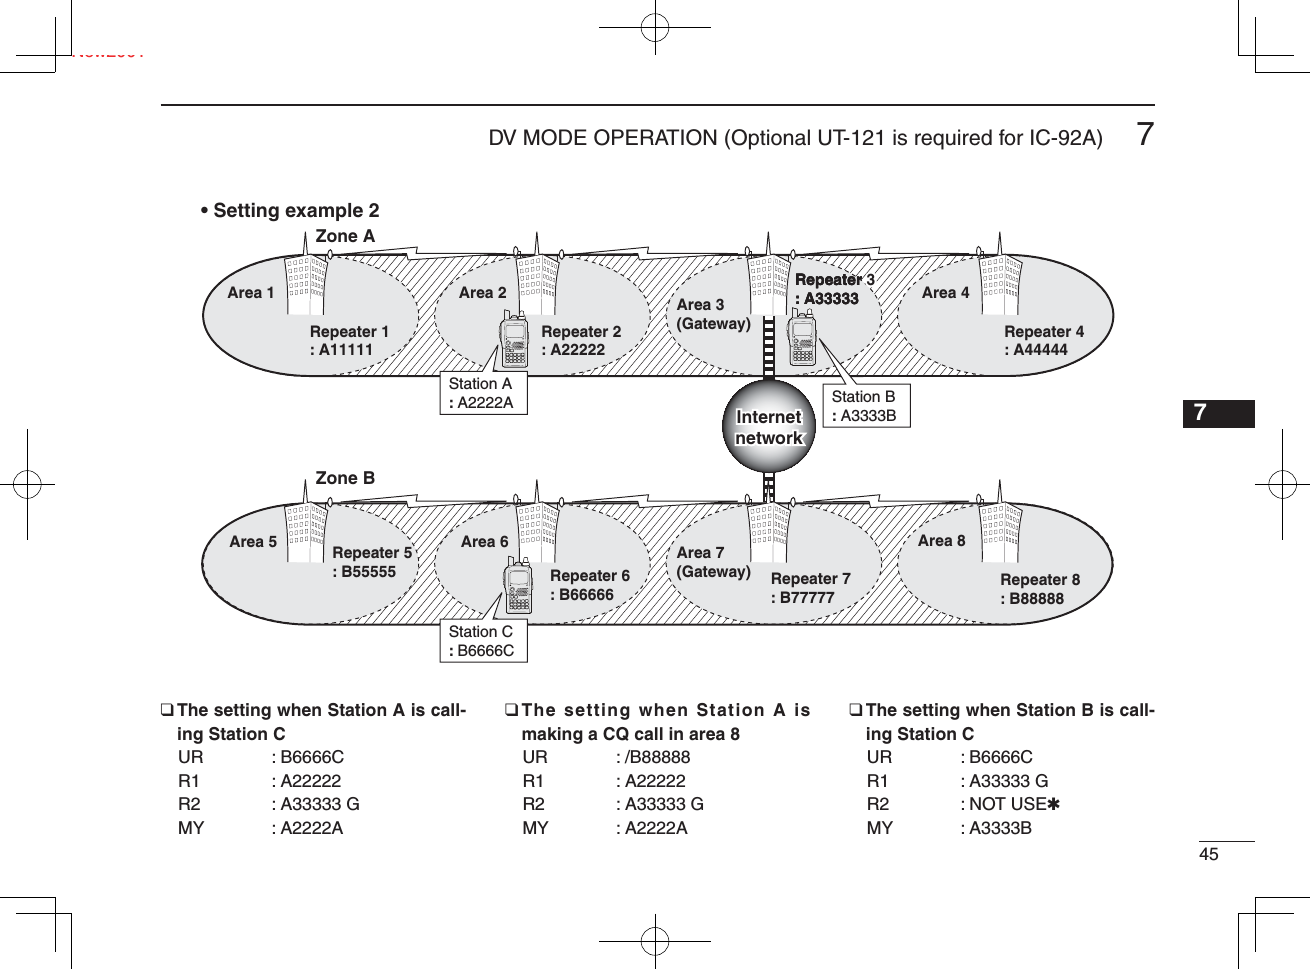
![Ne34New2001DV MODE OPERATION (Optional UT-121 is required for IC-92A)7Although [DIAL] and [ ](5) are used for description in this section, [](2)/[](8) and [](6) are available instead of [DIAL] and [](5).■ Digital mode operationThe IC-92A*/92AD can be operated in digital voice mode and low-speed data operation for both transmit and receive. It can also be connected to a GPS receiver (compatible with an RS-232 output/NMEA format/4800 bps) and transmit/receive position data.*The optional UT-121 is required for the IC-92A.■ Call sign programmingFour types of call sign memories are available; your own call sign “MY CALL SIGN,” other station call sign “YOUR CALL SIGN,” repeater call sign “RPT1 CALL SIGN” and “RPT2 CALL SIGN.” “MY CALL SIGN” can store up to 6 call signs, “YOUR CALL SIGN” can store up to 60 call signs and “RPT1/2 CALL SIGN” can store up to 60 call signs, and each call sign can be programmed with up to 8 characters.D Your own call sign programmingYour own call sign must be programmed for both digital voice and low-speed data communications (including GPS transmis-sion).q Select B band as the main band. (p. 14)w Enter “MY” in call sign set mode. • MY CALL SIGN screen is displayed.e Rotate [DIAL]† to select the desired call sign memory, “M01” to “M06.” r Push [](6) to enter call sign programming mode. • The 1st digit blinks.t Rotate [DIAL]† to select the desired character or code. • Push [A/a](3) to change the character group from “AB” (alpha-betical characters; capital letters), “12” (numbers) and “/” (sym-bols) in sequence.M01 /:SET:BACK:SEL:EDITCLR:CLRMY CALL SIGNrM01 † /MY CALL SIGNr:SET:SEL:CURCLR:CLRA/a:CHARAB ❮MENU screen❯ ➪ ❮CALL SIGN❯ ➪ ❮MY❯ (Push [MENU/ ]) (Rotate [DIAL]†, then push [ ](5)†.)](https://usermanual.wiki/ICOM-orporated/306600/User-Guide-882334-Page-40.png)
 to select 2nd digit, then rotate [DIAL]† to se-lect the desired character or code. • Push [](6) to move the cursor right; push [](4) to move the cursor left. • 2nd digit blinks (1st digit stops blinking).u Repeat the steps t and y to enter your own call sign. • Up to a 8-digit of call sign can be set. • If an un-necessary character is entered, push [](6) or [](4) to select the character, then push [CLR](1) to erase the se-lected character, or push and hold [CLR](1) for 1 sec. to erase all characters following the cursor. • When programming a note (Up to a 4-digit for operating radio type or area, etc.), go to step i, otherwise go to step !0.i Push [ ](6) several times to set the cursor beside “/” indi-cation.o Repeat steps t to y to program the desired 4-character note.!0 Push [](5) to store the programmed call sign with note and returns to MY CALL SIGN screen.!1 Push [MENU/ ] to return to frequency indication.†[DIAL] ↔ [ ](2)/[](8) [ ](5) ↔ [ ](6)1234568910111213141516171819M01 M† /MY CALL SIGNMY CALL SIGNr:SET:SET:SEL:SEL:CUR:CURCLR:CLRCLR:CLRA/a:CHARA/a:CHARABM01 MYCALL /IC91:SET:BACK:BACK:SEL:SEL:EDIT:EDITCLR:CLRCLR:CLRMY CALL SIGNMY CALL SIGNr](https://usermanual.wiki/ICOM-orporated/306600/User-Guide-882334-Page-41.png)
![Ne367DV MODE OPERATION (Optional UT-121 is required for IC-92A)New2001D Station call sign programming Station call sign must be programmed for the specifi ed sta-tion call as well as repeater operation in both digital voice and low-speed data communications.q Select B band as the main band. (p. 14)w Enter “UR” in call sign set mode. • YOUR CALL SIGN screen is displayed.e Rotate [DIAL]† to select the desired call sign memory, “U01” to “U60.” r Push [](6) to enter call sign programming mode. • The 1st digit blinks.t Rotate [DIAL]† to select the desired character or code. • Push [A/a](3) to change the character group from “AB” (alpha-betical characters; capital letters), “12” (numbers) and “/” (sym-bols) in sequence.y Push [ ](6) to select 2nd digit, then rotate [DIAL]† to se-lect the desired character or code. • Push [](6) to move the cursor right; push [](4) to move the cursor left. • 2nd digit blinks (1st digit stops blinking).u Repeat the steps t and y to enter the desired station call sign. • Up to an 8-digit of call sign can be set. • If an un-necessary character is entered, push [](6) or [](4) to select the character, then push [CLR](1) to erase the se-lected character, or push and hold [CLR](1) for 1 sec. to erase all characters following the cursor.i Push [](5) to store the programmed call sign and re-turns to YOUR CALL SIGN screen.o Push [MENU/ ] to return to frequency indication.U CQCQCQ:SET:BACK:BACK:SEL:SEL:EDIT:EDITCLR:CLRCLR:CLRYOUR CALL SIGNYOUR CALL SIGNrU01ABAB †:SET:SEL:SEL:CURCLR:CLRCLR:CLRA/a:CHARA/a:CHAR0:CQYOUR CALL SIGNrU01 AB S†:SET:SEL:SEL:CURCLR:CLRA/a:CHARA/a:CHAR0:CQYOUR CALL SIGNrU01 STATION1:SET:SET:BACK:BACK:SEL:SEL:EDIT:EDITCLR:CLRCLR:CLRYOUR CALL SIGNYOUR CALL SIGNr ❮MENU screen❯ ➪ ❮CALL SIGN❯ ➪ ❮UR❯ (Push [MENU/ ]) (Rotate [DIAL]†, then push [ ](5)†.)](https://usermanual.wiki/ICOM-orporated/306600/User-Guide-882334-Page-42.png)
 to set “CQCQCQ,” and push [CQ](0) again to return to the previously stored call sign.✔ For your informationThe IC-92A/92AD has call sign edit record function.When editing a call sign stored in a call sign memory, regu-lar memory or call channel, the default setting is to store the edited call sign into a blank channel automatically. (“FULL” is displayed when all call sign memory is programmed.)The edited call sign can be over-written when the setting of the EDIT RECORD is set to OFF or SELECT. (p. 95)However, you must manually over-write a programmed call sign in regular memory and call channels. (Temporary op-eration without over-writing is possible.)†[DIAL] ↔ [∫](2)/[√](8) [ï](5) ↔ [≈](6)1234568910111213141516171819](https://usermanual.wiki/ICOM-orporated/306600/User-Guide-882334-Page-43.png)
![Ne387DV MODE OPERATION (Optional UT-121 is required for IC-92A)New2001■ Digital voice mode operationq Set the desired frequency in B band. (pgs. 14, 18) • Select output power, if desired. (p. 24)w Select DV mode. (p. 21)e Set your own call sign for DV operation as follows.z Enter “MY” in call sign set mode.x Rotate [DIAL]† to select the desired your own call sign channel (if you have programmed several call signs) then push [](5) to set the call sign and return to CALL SIGN screen. • See page 34 for your own call sign programming details.r Set the desired call sign as described in “When calling the desired station (p. 39)” or “When sending a CQ (p. 39).” t Push and hold [PTT] to transmit and speak into the micro-phone at normal voice level. • Tx/Rx indicator lights red and the RF meter shows the output power.y Release [PTT] to return to receive. • The other station call sign will be received. • Received call signs can be stored into the received call record automatically. See page 93 for details. NOTE: The digital mode operation is vastly different from FM mode. One of the differences is in digital mode the squelch does not function as in FM mode. Changing the squelch setting will not open it to hear the hiss of “White Noise.” It only activates for digital squelch functions such as CSQL (Digital code squelch) or DSQL (Digital call sign squelch).UR:R1:R2:NOT USE*MY:MYCALL /IC92 /IC92CALL SIGNCALL SIGNr ❮MENU screen❯ ➪ ❮CALL SIGN❯ ➪ ❮MY❯ (Push [MENU/ ]) (Rotate [DIAL]†, then push [ ](5)†.)](https://usermanual.wiki/ICOM-orporated/306600/User-Guide-882334-Page-44.png)
![397DV MODE OPERATION (Optional UT-121 is required for IC-92A)New20017D When calling the desired stationContinued instruction from step x on page 38.c Rotate [DIAL]† to select “UR,” then push [ ](5)†. • YOUR CALL SIGN screen is displayed.v Rotate [DIAL]† to select the call sign channel in which de-sired station’s call sign is programmed. • See page 36 for station call sign programming details.b Push [](5) to set the station’s call sign and return to CALL SIGN screen. n Push [MENU/ ] to return to frequency indication.m Perform the instruction steps t and y on page 38.D When sending a CQContinued instruction from step x on page 38.c Rotate [DIAL]† to select “UR,” then push [ ](5)†. • YOUR CALL SIGN screen is displayed.v Rotate [DIAL]† to select the call sign channel in which “CQCQCQ” is programmed. Or, select “U” then push [](6) and [CQ](0) in sequence to set “CQCQCQ.”b Push [](5) to set “CQCQCQ” as the call sign and return to CALL SIGN screen.n Push [MENU/ to return to frequency indication.m Perform the instruction step t and y on page 38.†[DIAL] ↔ [ ](2)/[](8) [ ](5) ↔ [ ](6)1234568910111213141516171819UR:STATION1R1:R2:NOT USE*MY:MYCALL /IC92 /IC92CALL SIGNCALL SIGNrUR:CQCQCQR1:R2:NOT USE*MY:MYCALL /IC92 /IC92CALL SIGNCALL SIGNr](https://usermanual.wiki/ICOM-orporated/306600/User-Guide-882334-Page-45.png)

![417DV MODE OPERATION (Optional UT-121 is required for IC-92A)New20017■ Digital repeater operationRepeater call signs must be programmed for repeater op-eration in both digital voice and low-speed data communica-tions.D Repeater call sign programmingq Select B band as the main band. (p. 14)w Enter “R1” or “R2” in call sign set mode. • RPT1 or RPT2 CALL SIGN screen is displayed.e Rotate [DIAL]† to select the desired call sign memory, “R01” to “R60.” r Push [](6) to enter call sign programming mode. • The 1st digit blinks.t Rotate [DIAL]† to select the desired character or code. • Push [A/a](3) to change the character group from “AB” (alpha-betical characters; capital letters), “12” (numbers) and “/” (sym-bols) in sequence. • Set “/” at the 1st digit then set the desired area repeater’s call sign (in a different zone) for CQ call (“/” stands for “CQCQCQ”) in a different zone operation. (p. 44)y Push [ ](6) to select 2nd digit, then rotate [DIAL]† to se-lect the desired character or code. • Push [](6) to move the cursor right; push [](4) to move the cursor left. • 2nd digit blinks (1st digit stops blinking).u Repeat the steps t and y to enter the desired repeater call sign. • Up to an 8-digit of call sign can be set. • Push [7] when setting with the gateway connection if the selected repeater has gateway capability. (The gateway con-nection can be set in RPT1 only when “NOT USE✱” is set to RPT2.) • If an un-necessary character is entered, push [](6) or [](4) to select the character, then push [CLR](1) to erase the selected character, or push and hold [CLR](1) for 1 sec. to all characters following the cursor.i Push [](5) to store the programmed call sign and re-turns to RPT1 or RPT2 CALL SIGN screen.o Push [MENU/ ] to return to frequency indication.†[DIAL] ↔ [ ](2)/[](8) [ ](5) ↔ [ ](6)1234568910111213141516171819 ❮MENU screen❯ ➪ ❮CALL SIGN❯ ➪ ❮R1❯/❮R2❯ (Push [MENU/ ]) (Rotate [DIAL]†, then push [ï](5)†.)R01 RPT1AA G RPT1AA G:SET:BACK:BACK:SEL:SEL:EDIT:EDITCLR:CLRCLR:CLRRPT1 CALL SIGNRPT1 CALL SIGNr](https://usermanual.wiki/ICOM-orporated/306600/User-Guide-882334-Page-47.png)
![Ne427DV MODE OPERATION (Optional UT-121 is required for IC-92A)New2001D Repeater operation in the same zoneq Set the desired repeater’s frequency, offset and shift di-rection in B band. (pgs. 18, 31)• Select DV mode in advance. (p. 21)w Set your own call sign. (p. 38)• See p. 34 for your own call sign programming.e Set the desired station call sign. (p. 39)• See p. 36 for station call sign programming.r Set the repeater’s call sign as follows; z Enter “R1” in call sign set mode. x Rotate [DIAL]† to select the nearest repeater’s call sign. c Push [](5) to set the call sign for “R1.” • Return to CALL SIGN screen. v Rotate [DIAL]† to select “R2” then push [ ](5)†. • RPT2 CALL SIGN screen is displayed. b Rotate [DIAL]† to select the desired repeater’s (in the same zone) call sign. • Select “NOT USE✱” when not operating RPT2. n Push [ ](5) to set the call sign for “R2.” • Return to CALL SIGN screen. m Push [MENU/ ] to return to frequency indication.t Push [PTT] to transmit; release to receive.†[DIAL] ↔ [ ](2)/[](8) [ ](5) ↔ [ ](6) ❮MENU screen❯ ➪ ❮CALL SIGN❯ ➪ ❮R1❯ (Push [MENU/ ]) (Rotate [DIAL]†, then push [ ](5)†.)UR:CQCQCQR1:RPT1AAR2:NOT USE*MY:MYCALL /IC92 /IC92CALL SIGNCALL SIGNr](https://usermanual.wiki/ICOM-orporated/306600/User-Guide-882334-Page-48.png)
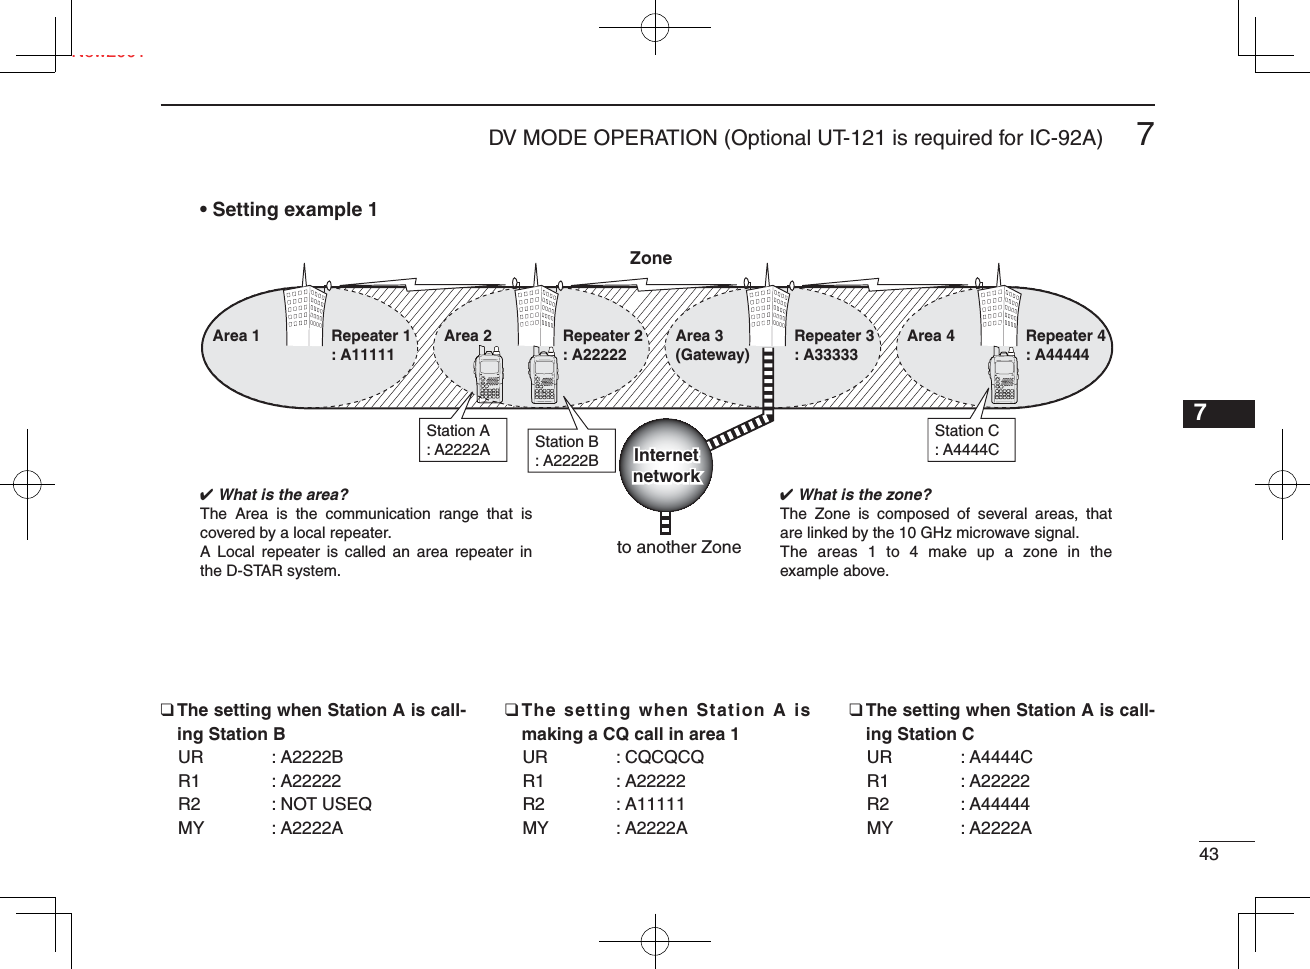
![Ne447DV MODE OPERATION (Optional UT-121 is required for IC-92A)New2001D Repeater operation into another zoneq Set the desired repeater’s frequency, offset and shift di-rection in B band. (pgs. 18, 31)• Select DV mode in advance.w Set your own call sign. (p. 38)• See p. 34 for your own call sign programming.e Set the desired station call sign. (p. 39)• When making a CQ callSet the desired repeater’s (in a different zone) call sign with a “/” symbol at the 1st digit, for the area in which you want to make a CQ call, into “UR.”• See p. 36 for station call sign programming.r Set the repeater’s call sign as follows; z Enter “R1” in call sign set mode. x Rotate [DIAL]† to select the nearest repeater’s call sign. • If the nearest repeater is gateway repeater, select the re-peater’s call sign with “G” setting at the 8th digit. c Push [ ](5) to set the call sign for “R1.” • Return to CALL SIGN screen. v Rotate [DIAL]† to select “R2” then push [ ](5)†. b Rotate [DIAL]† to select the gateway repeater’s (in the same zone) call sign. • The call sign should have “G” setting at the 8th digit. • When gateway repeater call sign is set in “R1,” select “NOT USE✱” for “R2” setting. n Push [ ](5) to set the call sign for “R2.” •-Return to CALL SIGN screen. m Push [MENU/ ] to return to frequency indication.t Push [PTT] to transmit; release to receive.†[DIAL] ↔ [ ](2)/[](8) [ ](5) ↔ [ ](6) ❮MENU screen❯ ➪ ❮CALL SIGN❯ ➪ ❮R1❯ (Push [MENU/ ]) (Rotate [DIAL]†, then push [ ](5)†.)UR:CQCQCQR1:RPT1AAR1:RPT1AAR2:NOT USE*MY:MYCALL /IC92 /IC92CALL SIGNCALL SIGNr](https://usermanual.wiki/ICOM-orporated/306600/User-Guide-882334-Page-50.png)
![Ne467DV MODE OPERATION (Optional UT-121 is required for IC-92A)New2001■ Received call signWhen a call is received in DV mode, the calling station and the repeater call signs being used can be stored into the re-ceived call record. The stored call signs are viewable in the following manner.Up to 20 calls can be recorded.D Desired call record indicationq Enter RX call sign set mode.• RX CALL SIGN screen is displayed.w Rotate [DIAL]† to select the desired record channel.e To confirm the received call, push [](5) several times to select the desired call sign from CALLER, CALLED, RXRPT1 and RXRPT2.CALLER : The station call sign that made a call.CALLED : The station call sign called by the caller.RXRPT1 : The repeater call sign used by the caller station.RXRPT2 : The repeater call sign linked from RXRPT1.r Push [MENU/ ] to return to frequency indication. NOTE: When a call is received in DV mode when the power save function is activated, the call sign may not be received correctly. This is normal, not a malfunction, because of header of the call sign cannot be detected during power save. Turn the power save function OFF (p. 115) if you want to receive a call sign correctly even in stand-by condition.✔ For your informationWhen receiving a call, the received station call sign is auto-matically displayed and scrolled in sequence at the bottom line of the function display.This can be turned OFF in display set mode. (p.100)†[DIAL] ↔ [ ](2)/[](8) [ ](5) ↔ [ ](6) ❮MENU screen❯ ➪ ❮RX CALL SIGN❯ (Push [MENU/ ]) (Rotate [DIAL]†, then push [ ](5)†.)RX01 CALLER: AAAAAAAAAAAA / /:CALLED:CALLED:SEL:SEL:COPY:COPYCLR:CLRCLR:CLRRX CALL SIGNRX CALL SIGNrRX01RX01 CALLED: CALLED: CQCQCQCQCQCQ:RXRPT1:RXRPT1:SEL:SEL:COPY:COPYCLR:CLRCLR:CLRRX CALL SIGNRX CALL SIGNrRX01 RXRPT2: :CALLER:CALLER:SEL:SEL:COPY:COPYCLR:CLRCLR:CLRRX CALL SIGNRX CALL SIGNrRX01RX01 RXRPT1: RXRPT1: :RXRPT2:RXRPT2:SEL:SEL:COPY:COPYCLR:CLRCLR:CLRRX CALL SIGNRX CALL SIGNrPush• Station call sign • Called station call sign• Repeater 1 call sign• Repeater 2 call sign5SKIP](https://usermanual.wiki/ICOM-orporated/306600/User-Guide-882334-Page-52.png)
 for 1 sec. Or, while pushing and holding [RX➝CS](CALL), rotate [DIAL] to select the desired call sign record.• Set your own call sign (MY) in advance. (p. 34)• The call sign stored in “CALLER” is stored as “UR,” “RXRPT1” is stored as “R2” and “RXRPT2” is stored as “R1.”• Error beeps sound when a call sign is received incorrectly, and no call sign is set in this case.w Push [PTT] to transmit; release to receive.✔-For your informationWhen a call specifying your call sign is received, the call signs of the calling station and the repeater it is using can be used for operation automatically.• When “RX call sign auto write” (p. 93) is set to “AUTO,” the station call sign in “CALLER” is set to “UR” automatically.• When “Repeater call sign auto write” (p. 93) is set to “AUTO,” the stored station call sign in “RXRPT1” is stored as “R2” and “RXRPT2” is stored as “R1” automatically.1234568910111213141516171819DVDVB439706-DUP-DUP2525AAAAAAAAAAAAThe received call sign is displayed while pushing and holding [CALL/RX➝CS] when [DIAL] is rotated while [CALL/RX➝CS] is pushed.Important!Setting call signs with the “One-touch reply using the call record” operation as at left are for temporary operation only. Therefore, the set call signs will be overwritten when another call record is used to set call signs.• Never saved into a call sign memory.If you want to save the set call signs, see “Copying the call record contents into call sign memory” (p. 50) for details.](https://usermanual.wiki/ICOM-orporated/306600/User-Guide-882334-Page-53.png)
![Ne487DV MODE OPERATION (Optional UT-121 is required for IC-92A)New2001■ Copying the call signD Copying the call sign memory contentsThis function is convenient when or modifying a part of the current call sign. NOTE: Make sure that the “EDIT RECORD” item in DV set mode is set to “AUTO” or “SELECT” in advance. (p. 95)q During DV mode operation, enter call sign set mode. • CALL SIGN screen is displayed.w Rotate [DIAL]† to select “UR,” “R1” or “R2” as desired, then push [](5)†.e Rotate [DIAL]† to select the desired call sign channel to be copied.• U01–U60 and R01–R60 are available.• When “AUTO” is set to “EDIT RECORD” itemr Push [ ](6) to select the call sign programming mode. • A blank channel is selected automatically. • The 1st digit of the selected call sign blinks.t Edit or modify the selected call sign as described in “D Station call sign programming” (p. 36) or “D Repeater call sign programming” (p. 41).y Push [](5) to store the edited/modifi ed call sign into the selected blank channel. NOTE: The message “FULL” is displayed when no blank channel is available in station or repeater call sign mem-ory. Select the desired call sign channel number as described in step u of “• When “SELECT” is set to “EDIT RECORD” item” at right-hand page in this case. ❮MENU screen❯ ➪ ❮CALL SIGN❯ (Push [MENU/ ]) (Rotate [DIAL]†, then push [ ](5)†.)U21U21 AB †AAAAA:SET:SET:SEL:SEL:CUR:CURCLR:CLRA/a:CHARA/a:CHAR0:CQYOUR CALL SIGNrA blank channelnumber blinks.](https://usermanual.wiki/ICOM-orporated/306600/User-Guide-882334-Page-54.png)
 to select the call sign programming mode. • The 1st digit of the selected call sign blinks.t Edit or modify the selected call sign as described in “D Station call sign programming” (p. 36) or “D Repeater call sign programming” (p. 41).y Push [](5). • Call sign channel number blinks.u Rotate [DIAL]† to select the desired call sign channel to store.i Push [](5) to store the edited/modifi ed call sign into the selected channel.†[DIAL] ↔ [ ](2)/[](8) [ ](5) ↔ [ ](6)1234568910111213141516171819U21 AB AAAAA1 AAAAA1:SET:SEL:CURCLR:CLRCLR:CLRA/a:CHARA/a:CHAR0:CQYOUR CALL SIGNYOUR CALL SIGNrCall sign channelnumber bliks.](https://usermanual.wiki/ICOM-orporated/306600/User-Guide-882334-Page-55.png)
 to select copy select mode. • COPY SELECT screen is displayed.e Rotate [DIAL]† to select the desired call sign to be copied from “ALL,” “RXRPT1” and “RXRPT2.”• “ALL” selection won’t appear when either station or repeater call sign memory has no blank channel.• When “ALL” is selected➥ Push [](6) to copy the selected record’s contents into the appropriate call sign memory.• Returns to RX CALL SIGN screen automatically.• When “CALLER,” “RXRPT1” or “RXRPT2” is selectedz Push [ ](6) then rotate [DIAL]† to select the desired con-dition of call sign memory channel selection to be copied to from “AUTO” and “LIST SEL.”• “AUTO” selection won’t appear when the appropriate call sign memory has no blank channel.• Go to step r when “AUTO” is selected.x Push [](6), then select the desired call sign memory channel to copy to with [DIAL].c Push [](6) to copy the call sign into the selected call sign memory.• Returns to RX CALL SIGN screen automatically.r Push [MENU/ ] to return to frequency indication.†[DIAL] ↔ [ ](2)/[](8) [ ](5) ↔ [ ](6)RX01RX01ALLALL:BACK:BACK:LIST:LIST C:CURRCOPY SELECTCOPY SELECT:SEL:SELrRX01RX01AUTOLIST SEL:BACK:BACK:LIST:LISTCOPY SELECT:SELr](https://usermanual.wiki/ICOM-orporated/306600/User-Guide-882334-Page-56.png)
 for 1 sec. to set the communi-cating station’s call sign. • When a call sign has not been received correctly, error beeps sound and no call sign is set. Receive the call sign of a commu-nicating signal again, or set the call sign manually.w Turn the Break-in function ON in the MENU screen opera-tion (p. 103), then exit the MENU screen operation. • “BK” appears.e When both stations are in standby, push [PTT] to transmit a break-in call. • The programmed call sign station receives the break-in call as well as your call sign.r Wait for the reply call from the station who receives the break-in call.t After receiving the reply call, communicate normally.y To cancel the break-in function, turn the Break-in function OFF in the MENU screen operation (p. 103).• How to use the break-in?While operating with the call sign squelch (p. 110), the squelch never opens (no audio sounds) even if a call is re-ceived, unless your own call sign (“MY”) is specifi ed.However, when the call including the “BK ON” signal (break-in call) is received, the squelch will open and audio sounds even if the call is specifi ed for another station.1234568910111213141516171819BKBKDVDVBLOWLOWATTATT43071250AppearsStation A Station BStation C• Station C calling to Station A with “BK OFF”Station A Station BStation C• Station C calling to Station A with “BK ON”Station A and B are communicating using the call sign squelch.Station A and B are communicating using the call sign squelch.Station B never hears that Station C is calling Station A.Station B also hears that Station C is calling Station A.](https://usermanual.wiki/ICOM-orporated/306600/User-Guide-882334-Page-57.png)
![Ne527DV MODE OPERATION (Optional UT-121 is required for IC-92A)New2001■ Message operationD TX message programmingTX messages are available for up to 5 channels and each channel can be programmed with a message of up to 20 characters. Available characters are 0 to 9, A to Z (capital let-ters), a to z (lower case letters), some symbols and space.q Enter “TX MESSAGE” in message/position set mode. • TX MESSAGE screen is displayed.w Rotate [DIAL]† to select the desired transmit message channel. • Ch01 to Ch05 and OFF are available. • Previously message is displayed if programmed.e Push [ ](6) to select the message edit condition. • The 1st digit of the message blinks.r Rotate [DIAL]† to select the desired character or symbol. • Push [A/a](3) to change the character group from “AB” (alpha-betical characters; capital letters), “ab” (alphabetical characters; lower case letters), “12” (numbers) and “-!”-” (symbols) in se-quence. • If an un-necessary character is entered, push [](6) or [](4) to select the character, then push [CLR](1) to erase the se-lected character, or push and hold [CLR](1) for 1 sec. to erase all characters following the cursor.t Push [ ](6) to select 2nd digit, then rotate [DIAL]† to se-lect the desired character or code. • Push [](6) to move the cursor right; push [](4) to move the cursor left. • 2nd digit blinks (1st digit stops blinking).y Repeat the steps r and t to enter the desired message. • Up to 20-character messages can be set.u Push [ ](5) to store the message.i Push [MENU/ ] to return to frequency indication.❮MENU screen❯ ➪ ❮MESSAGE/POSITION❯ ➪ ❮TX MESSAGE❯ (Push [MENU/ ]) (Rotate [DIAL]†, then push [ ](5)†.)Ch01Ch01 †:SET:SET:SEL:SEL:BACK:BACKCLR:CLRCLR:CLRTX MESSAGE:EDIT:EDITrCh01Ch01 !''Hello!†:SET:SET:SEL:SEL:CUR:CURCLR:CLRA/a:CHARA/a:CHARTX MESSAGEr](https://usermanual.wiki/ICOM-orporated/306600/User-Guide-882334-Page-58.png)
![537DV MODE OPERATION (Optional UT-121 is required for IC-92A)New20017D Message TransmissionSelect the message transmission function ON (Ch01–05) and OFF. When a message channel is selected, the transceiver transmits a text message (pre-programmed). (default: OFF) q Set the operating frequency, call signs and other settings, such as repeater, as desired in B band.w Perform the steps q to e in “D TX message program-ming” as at left.e Rotate [DIAL]† to select the desired message channel. • “Ch01” to “Ch05” available. • See left-hand pages for message programming.r Push [ ](5) to set the message for transmission.t Push [PTT] to transmit the selected message. • The message is transmitted each time [PTT] is pushed. • The message is transmitted each 30 sec. automatically during continuous transmission.y Release [PTT] to return to receive.u When the reply call with a message is received, the call sign and the message scrolls at the bottom of the function display.✔ For your informationThe automatic received call sign and/or message indication can be turned OFF in display set mode, if desired.➥ RX CALL SIGN (p. 100)➥ RX MESSAGE (p. 101) NOTE: Only 1 message can be stored in the IC-92A/92AD. The received message is cleared by turning power OFF, or overwritten when another message is received. A transmitted message that includes lower case charac-ters from the IC-92A/92AD may not be decoded and dis-played correctly by the ID-800H, IC-V82/U82, etc.†[DIAL] ↔ [ ](2)/[](8) [ ](5) ↔ [ ](6)1234568910111213141516171819DVDVB43071250MSG:Hello!MSG:Hello!Scrolls the received message.](https://usermanual.wiki/ICOM-orporated/306600/User-Guide-882334-Page-59.png)
![Ne547DV MODE OPERATION (Optional UT-121 is required for IC-92A)New2001D RX message indicationThe received message can also be checked in DV set mode.q Select “RX MESSAGE” in message/position set mode. • The received message is displayed in RX MESSAGE screen.w Rotate [DIAL] or push [](8) to display the station call sign.e Push [](5) or [](4) to return to MESSAGE/POSITION screen.r Push [MENU/ ] to return to frequency indication.■ Automatic reply functionThe automatic reply function replies to calls by a station that specifi ed your call sign.Two methods of replying are available— one is making a reply call with your own call sign, and other one is making a reply call with reply voice audio that has been recorded in DV voice memory. D Automatic reply function settingq Enter “AUTO REPLY” in DV set mode. (p. 92) • AUTO REPLY screen is displayed.w Rotate [DIAL]† to select the desired reply condition. OFF : Deactivate the automatic reply function. (default) ON : Reply to the call with your own call sign. VOICE : Reply to the call with the recorded voice memory.e Push [ ](5). • Returns to DV SET MODE screen automatically.r Push [MENU/ ] to return to frequency indication.❮MENU screen❯ ➪ ❮MESSAGE/POSITION❯ ➪ ❮RX MESSAGE❯ (Push [MENU/ ]) (Rotate [DIAL]†, then push [ ](5)†.)MESSAGE:MESSAGE:Hello!Hello!:CALLER:CALLER:BACK:BACKRX MESSAGErCALLER:CALLER: BBBBBB BBBBBB / /:MSG:MSG:BACK:BACKRX MESSAGEr❮MENU screen❯ ➪ ❮DV SET MODE❯ ➪ ❮AUTO REPLY❯ (Push [MENU/ ]) (Rotate [DIAL]†, then push [ ](5)†.)OFFONVOICEVOICEAUTO REPLYAUTO REPLYr](https://usermanual.wiki/ICOM-orporated/306600/User-Guide-882334-Page-60.png)
![557DV MODE OPERATION (Optional UT-121 is required for IC-92A)New20017D Voice memory recording for automatic replyq Select DV mode in B band, and deactivate the priority watch (p. 83) and weather alert function (p. 114) if activated.w Enter “REPLY VOICE” in DV voice memo set mode. • REPLY VOICE screen is displayed.e While pushing and holding [PTT], speak into the micro-phone. • Up to 10 seconds of message is recordable. • The recording stops after 10 second or when [PTT] is released.r Push [ ](4) to return to DV VOICE MEMO screen.t Push [MENU/ ] to return to frequency indication.D Play-back or erase the voice memoryq Push [MENU/ ] to select menu mode indication.w Rotate [DIAL]† to select “DV VOICE MEMO,” then push [](5)†.e Rotate [DIAL]† to select “REPLY VOICE,” then push [](5)†. • REPLY VOICE screen is displayed.r To play-back the recorded voice memory, push [ ](5). • Push [](5) again to pause, push [](6) to cancel the play-back.t To erase the recorded voice memory, push and hold [CLR](1) for 1 sec.†[DIAL] ↔ [ ](2)/[](8) [ ](5) ↔ [ ](6)1234568910111213141516171819IMPORTANT!Deactivate the dualwatch function and set minimum [VOL] level when recording the DV voice memo.Otherwise received audio or unwanted noise from A band is also recorded into the voice memory.❮MENU screen❯ ➪ ❮DV VOICE MEMO❯ ➪ ❮REPLY VOICE❯ (Push [MENU/ ]) (Rotate [DIAL]†, then push [ ](5)†.)REPLY VREPLY VPTT:●:BACK:BACKCLR:CLRCLR:CLRREPLY VOICEREPLY VOICE:r](https://usermanual.wiki/ICOM-orporated/306600/User-Guide-882334-Page-61.png)
![Ne567DV MODE OPERATION (Optional UT-121 is required for IC-92A)New2001■ EMR communicationThe EMR communication mode is available for digital mode operation. In the EMR communication mode, no call sign setting is necessary. When an EMR communication mode signal is received, the audio (voice) will be heard at the specified level even the volume setting level is set to mini-mum level, or digital call sign/digital code squelch is in use.q Set the desired frequency in 144 or 440 MHz band then push [MENU/ ] to select menu mode indication.w Rotate [DIAL]† to select “DV SET MODE,” then push [](5)†.e Rotate [DIAL]† to select “EMR,” then push [ ](5)†.r Rotate [DIAL]† to select the desired reply condition. OFF : The EMR communication sets OFF. (default) ON : The EMR communication sets ON. • “EMR” appears when selecting "ON".t Push [ ](5). • Returns to DV SET MODE screen automatically.y Push [MENU/ ] to return to frequency indication.■ Low-speed data communicationIn addition to the digital voice communication, low-speed data communication is available.The optional OPC-1799 DATA COMMUNICATION CABLE and serial data communication software (purchase locally) are re-quired in addition.The optional RS-92 REMOTE CONTROL SOFTWARE (OPC-1799 supplied) also includes a low-speed data communication ca-pability. NOTE: Turn OFF the GPS mode (p. 58) in advance to op-erate the low-speed data communication.D ConnectionConnect the transceiver to your PC using with the optional OPC-1799 as illustrated below.EMREMRDVDVB43071250Appears to [MIC/SP/DATA]OPC-1799(optional)toRS-232C](https://usermanual.wiki/ICOM-orporated/306600/User-Guide-882334-Page-62.png)
![577DV MODE OPERATION (Optional UT-121 is required for IC-92A)New20017D Low-speed data communication application settingConfi gure the low-speed data communication application as follows. • Port : The same COM port number as IC-92A/92AD’s • Baud rate : 38.4 kbps (fi xed value) • Data : 8 bit • Parity : None • Stop : 1 bit • Flow control : Xon/XoffD Low-speed data communication operation NOTE: Confi rm that in AUTO, the computer controls when [PTT] is activated to send data and the user doesn’t have to operate the radio.q Set your own, station call signs, etc. as described in “■ Digital voice mode operation” (p. 38) and “■ Digital re-peater operation” (p. 41).w Refer to the instructions of the low-speed data communi-cation application.e To transmit data • With your voice audio, push and hold [PTT] to transmit while sending data from the PC. Release [PTT] to receive. • Under computer control, see Transmission condition setting at right.D Transmission condition settingq Enter “DV DATA TX” in DV set mode. (p. 92)w Rotate [DIAL]† to select “PTT” or “AUTO.” PTT : The input data from [MIC/SP/DATA] are transmit-ted when pushing [PTT]. (default) AUTO : The input data from [MIC/SP/DATA] are transmit-ted automatically when the data are input.e Push [](5) (or [ ](4)) to return to DV set mode, and push [MENU/ ] to return to frequency indication.✔ For your informationWhile operating low-speed data communication via the inter-net network from one zone to another zone, some packets may be lost due to the network trouble (poor data throughput performance). In such a case, the IC-92A/92AD displays an “L” in the upper right corner on the display to indicate Packet Loss has occured.†[DIAL] ↔ [ ](2)/[](8) [ ](5) ↔ [ ](6)1234568910111213141516171819 ❮MENU screen❯ ➪ ❮DV SET MODE❯ ➪ ❮DV DATA T X❯ (Push [MENU/ ]) (Rotate [DIAL]†, then push [ ](5)†.)LDVDVB43071250Appears](https://usermanual.wiki/ICOM-orporated/306600/User-Guide-882334-Page-63.png)
![58New2001GPS/GPS-A OPERATION (Optional UT-121 is required for IC-92A)8Ne■ GPS operationDipslaying (FM/AM/DV mode) or transmitting (DV mode only) GPS data is available when connecting a 3rd party GPS receiver* (RS-232C output/NMEA format) and optional HM-175GPS (GPS speaker microphone). GPS data pass through the [DATA/SP/MIC] socket of the IC-92A/92AD. In addition, the GPS message transmission is also available for the GPS mode operation.*GPS receiver with RS-232C terminal is required.* Set “GPS TX MODE” to “GPS” or “GPS-A” at r operation of right colum when connecting a 3rd party GPS receiver.D Sentence formatter settingq Enter “GPS MODE” in DV set mode. (p. 94) • GPS TX MODE screen is displayed.w Rotate [DIAL]† to select “GPS.”e Push [](5)† to select GPS SENTENCE screen.r Rotate [DIAL]† to select the desired GPS sentence, then push [](5). • A total 6 sentences, RMC, GGA, GLL, GSA, VTG and GSV are available.t Rotate [DIAL]† to turn the sentence usage ON and OFF.y Push [](5) (or [](4)) to return to GPS SENTENCE screen.u Repeat the steps r to y to set another GPS sentence usage. • Up to 4 GPS sentences are usable at the same time.i Push [MENU/ ] to return to frequency indication.OPC-1799(optional)HM-175GPS(optional)to [DATA/SP/MIC]to RS-232C port(null modemadapter is required)GPSreceiver ❮MENU screen❯ ➪ ❮DV SET MODE❯ ➪ ❮GPS TX MODE❯ (Push [MENU/ ]) (Rotate [DIAL]†, then push [ ](5)†.)OFFGPSGPS-AGPS-AGPS TX MODE:SENTENCE:SENTENCEr](https://usermanual.wiki/ICOM-orporated/306600/User-Guide-882334-Page-64.png)
 to select the message edit condition. • The 1st digit of the message blinks.e Rotate [DIAL]† to select the desired character or symbol. • Push [A/a](3) to change the character group from “AB” (alpha-betical characters; capital letters), “ab” (alphabetical characters; lower case letters), “12” (numbers) and “!”” (symbols) in se-quence.r Push [ ](6) to select 2nd digit, then rotate [DIAL]† to se-lect the desired character or code. • Push [](6) to move the cursor right; push [](4) to move the cursor left. • 2nd digit blinks (1st digit stops blinking).t Repeat the steps r and t to enter the desired message. • Up to 20-character messages can be set.y Push [ ](5) to store the message.u Push [MENU/ ] to return to frequency indication.❮MENU screen❯ ➪ ❮MESSAGE/POSITION❯ ➪ ❮GPS❯ (Push [MENU/ ]) (Rotate [DIAL]†, then push [ ](5)†.)DATA:DATA: AB †:SET:SET:SEL:SEL:CUR:CURCLR:CLRCLR:CLRGPS MESSAGEGPS MESSAGEA/a:CHARA/a:CHARrDATA:DATA: AB Hello!†:SET:SEL:CURCLR:CLRGPS MESSAGEA/a:CHARr†[DIAL] ↔ [ ](2)/[](8) [ ](5) ↔ [ ](6)NOTE: Set the GPV sentence is OFF when sending the GPS message to conventional digital transceivers (IC-2820/E2820,IC-D800,IC-91AD/E91,IC-V85). GPV sentence is incompatible with them. There-fore, those transceivers cannot display GPS mes-sages properly when sending the GPS message from IC-92AD with GPV sentense is available con-dition.](https://usermanual.wiki/ICOM-orporated/306600/User-Guide-882334-Page-65.png)
![608GPS/GPS-A OPERATION (Optional UT-121 is required for IC-92A)New2001D GPS message automatic transmissionq Enter “GPS AUTO TX” in DV set mode. (p. 95) • GPS AUTO TX screen is displayed.w Rotate [DIAL]† to select the desired position data trans-mitting interval from 5 sec., 10 sec., 30 sec., 1 min., 3 min., 5 min., 10 min., 30 min. and OFF. • The position data is transmitted only when [PTT] is pushed with OFF setting, the data is transmitted automatically once every 5 sec., 10 sec., 30 sec., 1 min., 3 min., 5 min., 10 min. and 30 min. when the appropriate setting is selected. • The GPS message is also transmitted if programmed.e Push [ ](5) (or [ ](4)) to return to DV SET MODE screen.r Push [MENU/ ] to return to frequency indication. NOTE: Your own call sign (“MY”) should be set to activate the GPS automatic transmission. D Received GPS message indicationq Enter “RX GPS” in message/position set mode.• RX GPS MESSAGE screen is displayed. w Push [](5) (or [](4)) to return to MESSAGE/POSITION screen.e Push [MENU/ ] to return to frequency indication.Ne❮MENU screen❯ ➪ ❮DV SET MODE❯ ➪ ❮GPS AUTO TX❯ (Push [MENU/ ]) (Rotate [DIAL]†, then push [ ](5)†.)OFFOFF5SEC5SEC10SEC10SEC30SEC30SEC1MIN1MINGPS AUTO TXr❮MENU screen❯ ➪ ❮MESSAGE/POSITION❯ ➪ ❮RX GPS❯ (Push [MENU/ ]) (Rotate [DIAL]†, then push [ ](5)†.)DATA:DATA: Call from Call from Osaka! Osaka!:BACK:BACKRX GPS MESSAGEr[NOTICE]USE GPS message automatic transmission at simplex mode.Sending with GPS message automatic transmission through the repeater may interfere with other amateur radio.[NOTICE]“5SEC” cannot select when 4 GPS sentences are selected.](https://usermanual.wiki/ICOM-orporated/306600/User-Guide-882334-Page-66.png)
![618GPS/GPS-A OPERATION (Optional UT-121 is required for IC-92A)New20017D Position indicationq Enter “POSITION” in message/position set mode.• GPS POSITION screen is displayed. w Rotate [DIAL]† to select the received position data indica-tion.• MY POSITION and ELEVATION or RX POSITION and DIS-TANCE display at the same tine when selecting SMALL on the FONT SIZE in the set mode.e Push [](5) (or [](4)) to return to MESSAGE/POSITION screen.r Push [MENU/ ] to return to frequency indication.[Indication items]• MY POSITION : Displaying own latitude and longitude.• RX POSITION : Displaying other station latitude and longitude.• ELEVATION : Displaying own elevation and the time.• DIATANCE : Displaying distance from other station.D Saving own/received position dataq Operate q – r of “Position indication” (See left column), and select the desired position data.w Push and hold [S.MR](MR) for 1 sec. to save the selected position data to GPS memory (CH00). • The M-CH number brings forward automatically in case the next M-CH is already stored. • 100 GPS M-CH are available. • Push [MR] to display stored postion data.1234568910111213141516171819†[DIAL] ↔ [ ](2)/[](8) [ ](5) ↔ [ ](6)❮MENU screen❯ ➪ ❮MESSAGE/POSITION❯ ➪ ❮POSITION❯ (Push [MENU/ ]) (Rotate [DIAL]†, then push [ ](5)†.)MY POSITIONMY POSITIONGPS POSITIONGPS POSITIONr34.56.789 N34.56.789 N123.45.678 E123.45.678 E:RX POS:RX POS:BACK:BACKNOTE: The ELEVATION may be changed by received sig-nal strength.](https://usermanual.wiki/ICOM-orporated/306600/User-Guide-882334-Page-67.png)
![Ne628GPS/GPS-A OPERATION (Optional UT-121 is required for IC-92A)New2001D Displaying own/received position data with compassDisplaying the own direction, received station’s direction and setting direction in the GPS memory.q Enter “COMPAS” in message/position set mode.• COMPAS screen is displayed.w Rotate [DIAL]† to select the received position data indica-tion.• MY, RX or SET is available. [Indication items] • MY : Displaying own latitude, longitude, elevation, the time and direction. • RX : Displaying other station latitude, longitude, distance from own and direction. • SET : Displaying latitude, longitude, distance from own and direction of alarm setting for GPS memory.e Push and hold [S.MR](MR) for 1 sec. to save the selected position data to GPS memory (CH00). • The M-CH number brings forward automatically in case the next M-CH is already stored. • 100 GPS M-CH are available. • Push [MR] to display stored postion data.r Push [](5) (or [](4)) to return to MESSAGE/POSITION screen.t Push [MENU/ ] to return to frequency indication.❮MENU screen❯ ➪ ❮MESSAGE/POSITION❯ ➪ ❮COMPAS❯ (Push [MENU/ ]) (Rotate [DIAL]†, then push [ ](5)†.)35°4545'00"NNORTHUPELEVATELEVATEWNS15mTIME21:00135°3636'00"EMY](https://usermanual.wiki/ICOM-orporated/306600/User-Guide-882334-Page-68.png)
![638GPS/GPS-A OPERATION (Optional UT-121 is required for IC-92A)New20017D GPS data additionq Enter “GPS MEMORY” in message/position set mode.• GPS MEMORY screen is displayed.w Rotate [DIAL]† to select the desired memory bank or ALL, then push [](6).e Rotate [DIAL]† to select <ADDITION>, then push [](5).1234568910111213141516171819†[DIAL] ↔ [ ](2)/[](8) [ ](5) ↔ [ ](6)❮MENU screen❯ ➪ ❮MESSAGE/POSITION❯ ➪ ❮GPS MEMORY❯ (Push [MENU/ ]) (Rotate [DIAL]†, then push [ ](5)†.)RXRXALLA:A::SET:SET:BACK:BACK:SEL:SEL:EDIT:EDIT:ALM:ALMGPS MEMORYCr<ADDITION><ADDITION>:SET:SET:BACK:BACKBANK ArNAME:NAME::SET:SET:BACK:BACK<ADDITION><ADDITION>r:SEL:SEL:EDIT:EDITNAME:NAME::SET:BACK:BACK<ADDITION><ADDITION>r:SEL:SEL:EDIT:EDITAB](https://usermanual.wiki/ICOM-orporated/306600/User-Guide-882334-Page-69.png)
![Ne648GPS/GPS-A OPERATION (Optional UT-121 is required for IC-92A)New2001r Rotate [DIAL]† to select desired items (NAME, TIME, LATITUDE, LONGITUDE, BANK or BANK NAME), then push [](6) to edit the selected item.t Rotate [DIAL]† to select the desired character or symbol.y Push [](6) to select 2nd digit, then rotate [DIAL]† to se-lect the desired character or code. • Push [](6) to move the cursor right; push [](4) to move the cursor left. • 2nd digit blinks (1st digit stops blinking).u Repeat the steps r and t to enter the desired message. • Up to 20-character messages can be set.i Push [ ](5) to add the GPS data.o Push [MENU/ ] to return to frequency indication.D GPS alarm settingGPS alarm sounds when your own position is close the specified area. This function can be set the received chan-nel, specifi ed GPS memory channel, all GPS memory chan-nels or a memory bank.q Enter “GPS MEMORY” in message/position set mode.• GPS MEMORY screen is displayed.w Rotate [DIAL]† to select the desired memory bank or memory channel. • “RX”, “ALL”, one of the memory bank or memory channel can be selected. • Skip e and operate r when alarm RX, ALL, BANK A–Z set.RXALLA::SET:BACK:SEL:EDIT:EDIT:ALMGPS MEMORYGPS MEMORYCr<ADDITION><ADDITION>01:BAY-AREAAREA02:KOBE-AIR:SET:BACK:BACK:SEL:SEL:EDIT:EDIT:ALM:ALMBANK ACr❮MENU screen❯ ➪ ❮MESSAGE/POSITION❯ ➪ ❮GPS MEMORY❯ (Push [MENU/ ]) (Rotate [DIAL]†, then push [ ](5)†.)<ADDITION><ADDITION>01:BAY01:BAY-ARE02:KOBE02:KOBE-AIR:SET:SET:BACK:BACK:SEL:SEL:EDIT:EDIT:ALM:ALMBANK ACrAlarm markAppearing at 8-digitsof memory name.](https://usermanual.wiki/ICOM-orporated/306600/User-Guide-882334-Page-70.png)
![658GPS/GPS-A OPERATION (Optional UT-121 is required for IC-92A)New200112345678910111213141516171819D GPS memory clearingq Enter “GPS MEMORY” in message/position set mode.• GPS MEMORY screen is displayed.w Rotate [DIAL]† to select “ALL” or desired memory bank or memory channel. • Skip e and operate r when ALL or each all channels of bank A–Z delete.e Push [](6), then rotate[DIAL]† to select the desired GPS memory channel.r Push and hold [CLR](1) for 1 sec. to clear. • 3 beeps sound, then the memory channel is cleared. • Remaining channels scroll up.t Push [ ](4) to return to GPS MEMORY screen.y Push [MENU/ ] to return to frequency indication.RXRXALLA::SET:SET:BACK:BACK:SEL:SEL:EDIT:EDIT:ALM:ALMGPS MEMORYCr❮MENU screen❯ ➪ ❮MESSAGE/POSITION❯ ➪ ❮GPS MEMORY❯ (Push [MENU/ ]) (Rotate [DIAL]†, then push [ ](5)†.)<ADDITION><ADDITION>01:BAY-AREAAREA02:KOBE-AIR:SET:SET:BACK:BACK:SEL:SEL:EDIT:EDIT:ALM:ALMBANK ACr](https://usermanual.wiki/ICOM-orporated/306600/User-Guide-882334-Page-71.png)
, then rotate[DIAL]† to select the desired memory channel.r Push [C](CALL) to switch alarm function ON or OFF.t Push [](4) to return to GPS MEMORY screen.y Push [MENU/ ] to return to frequency indication.✔-For your information! • When “RX” or memory channel is selected above step r, alarm functions depending on “ALM AREA2” setting in the GPS set mode (p. ??). • When “ALL” or memory bank is selected above step r, alarm functions depending on “ALM AREA1” setting in the GPS set mode (p. ??).■ Other functions for DV mode operationD DV voice memoryThe IC-92A/92AD has a DV voice memory that records a total 30 second (approx.) of received audio.The DV voice memory is divided into 2 tracks, 15 seconds each in a track, as the default setting.◆ Recording received audioq Select DV mode in B band, and deactivate the priority watch (p. 83) and weather alert function (p. 114) if activated.w While receiving a DV signal, push [REC].e Rotate [DIAL] to select the desired track. • “✱” is displayed beside the track number when the selected track has been recorded.r Push [REC] to start recording. • Track counter (bar meter) is displayed during record.DVB44001250qREC TRACK:2REC TRACK:2❮MENU screen❯ ➪ ❮DV VOICE MEMO❯ ➪ ❮TRACK SIZE❯ (Push [MENU/ ]) (Rotate [DIAL]†, then push [ ](5)†.)10S/3TRACK10S/3TRACK15S/2TRACK15S/2TRACK30S/1TRACK30S/1TRACKTRACK SIZEr](https://usermanual.wiki/ICOM-orporated/306600/User-Guide-882334-Page-72.png)
![677DV MODE OPERATION (Optional UT-121 is required for IC-92A)New200112345678910111213141516171819 • The recording is paused automatically when the DV signal is interrupted or when the DV audio signal cannot be received correctly. Re-starts the recording when the DV audio signal is received correctly. t Push [REC] again to stop recording. • The recording stops automatically when the track becomes full.◆ Track size settingThe track size can be changed with the following instruction.q Enter “TRACK SIZE” in DV voice memo set mode. • TRACK SIZE screen is displayedw Rotate [DIAL]† to select the desired track size. 10S/3TRACK : Makes 3 tracks and 10 seconds audio can be recorded in each track. 15S/2TRACK : Makes 2 tracks and 15 seconds audio can be recorded in each track. 30S/1TRACK : Makes 1 track only and 30 seconds audio can be recorded in a track.e Push [](5) (or [](4)) to return to DV VOICE MEMO screen.r Push [MENU/ ] to return to frequency indication.❮MENU screen❯ ➪ ❮DV VOICE MEMO❯ ➪ ❮TRACK❯ (Push [MENU/ ]) (Rotate [DIAL]†, then push [ ](5)†.)TRACK:1TRACK:1 *::SEL:SEL:BACK:BACKCLR:CLRCLR:CLRTRACKr❮MENU screen❯ ➪ ❮DV SET MODE❯ ➪ ❮AUTO DETECT❯ (Push [MENU/ ]) (Rotate [DIAL]†, then push [ ](5)†.)†[DIAL] ↔ [ ](2)/[](8) [ ](5) ↔ [ ](6)](https://usermanual.wiki/ICOM-orporated/306600/User-Guide-882334-Page-73.png)
![688GPS/GPS-A OPERATION (Optional UT-121 is required for IC-92A)New2001■ GPS set mode itemsD Entering GPS set modeq Enter “GPS SET MODE” in message/position set mode.• GPS SET MODE screen is displayed.w Rotate [DIAL]† to select the desired item, and then push[](5)†.e Rotate [DIAL]† to select the desired value or condition.r Push [](5) (or [](4)) to return to GPS SET MODE screen.t Push [MENU/ ] to return to frequency indication.D GPS SPEEDSelects the data transmission speed for packet operation from 4800 bps (default) and 9600 bps.D FORMATSelects the displaying position format from dddºmm.mm´ (default) and dddºmm´ss´´.D UNITSSelects display units for distance and elevation from “m” or “ft/ml.” (default : USA/General versions; ft/ml, Other versions; m)D COMPASS DIRECTIONSelects compass indication type from “NORTH REF” (default) and “SOUTH REF.”D UTC offsetSets time difference from UTC (Universal Time Coordinated) within –12:00 to +12:00 range in 5 min. steps. (default: 0:00)GPS SPEEDGPS SPEEDFORMATFORMATUNITSUNITSCOMPASS DIRCOMPASS DIRUTC OFFSETUTC OFFSETGPS SET MODEr❮MENU screen❯ ➪ ❮MESSAGE/POSITION❯ ➪ ❮GPS SET MODE❯ (Push [MENU/ ]) (Rotate [DIAL]†, then push [ ](5)†.)Ne](https://usermanual.wiki/ICOM-orporated/306600/User-Guide-882334-Page-74.png)
![698GPS/GPS-A OPERATION (Optional UT-121 is required for IC-92A)New200112345678910111213141516171819D-Alarm area 1Sets GPS alarm active range within 00c05s to 59c59s in 1 sec. (00c01s) steps. (default: 00c15s)q Enter “GPS MEMORY” in message/position set mode.w The alarm area 1 function is available when “GPS ALARM” function of ALL or BANK A–Z turns ON.D-Alarm area 2Selects GPS alarm active range from “LIMITED,” “EX-TENDED” and “BOTH.”•-LIMITED : GPS alarm will be sound when a target position is coming into 500 m* (547 Y)* range.•-EXTENDED : GPS alarm will be sound when a target position is coming into 1 km* (1094 Y)* range.• BOTH : GPS alarm will be sound when a target position is coming into both 500 m* (547 Y)* and 1 km* (1094 Y)* range. (default) *Approximate00′15″00′15″00′15″00′15″Your positionPoint APoint CPoint BPoint DN• Example:Your position : 35˚N/135˚EALM AREA1 setting : 00′15″ (default)• Position of point A : 35˚00′15″N/134˚59′45″E• Position of point B : 35˚00′15″N/135˚00′15″E• Position of point C : 34˚59′45″N/134˚59′45″E• Position of point D : 34˚59′45″N/135˚00′15″EWhen the target position is coming into the area as above, the GPS alarm will be sound.Extended range(approx. 1 km; 1094 Y)Limited range(approx. 500 m; 547 Y)Your position• Example:When the target position is coming into either/each area as above, the GPS alarm will be sound.❮MENU screen❯ ➪ ❮MESSAGE/POSITION❯ ➪ ❮GPS SET MODE❯ (Push [MENU/ ]) (Rotate [DIAL]†, then push [ ](5)†.)](https://usermanual.wiki/ICOM-orporated/306600/User-Guide-882334-Page-75.png)
![72NeNew2001MEMORY/CALL CHANNELS9■ General descriptionThe IC-92A/92AD has 850 memory channels in A band, 450 memory channels in B band, and 2 call channels in each band. Memory channels in each bands including 50 scan edge memory channels (25 pairs) for storage of often-used frequencies, respectively.And a total of 26 memory banks, A to Z, are available in each bands for storing groups of frequencies, etc. Up to 100 channels can be assigned into a bank.D Memory channel contentsThe following information can be programmed into memory channels:• Operating frequency (p. 18)• Operating mode (p. 21)• Duplex direction (+DUP or –DUP) with an offset fre-quency (p. 31)• Subaudible tone encoder (p. 107), tone squelch or DTCS squelch ON/OFF (p. 110)• Subaudible tone frequency (p. 107), tone squelch fre-quency or DTCS code with polarity (pgs. 107, 111)• Scan skip information (p. 80)• Memory bank (p. 67)• Memory name (p. 70)• Tuning step (p. 18)• Call sign squelch or Digital code squelch* (p. 110)• Station call sign* (p. 36)• RPT1/RPT2 call sign* (p. 41)*Available for B band operation only.■ Selecting a memory channelD Using [DIAL]— Programmed channelsq Push [MR] to select memory mode.w Rotate [DIAL] to select the desired memory channel.• Only programmed channels are displayed.D Using [DIAL]— All channelsq Push [MR] to select memory mode.w Push and hold [S.MW](MR) for 1 sec. to enter select memory write mode.• 1 short and 1 long beep sound.• “μ ” indicator blinks.e Rotate [DIAL] to select the desired memory channel.• All channels are displayed.• Push [VFO] to return to memory mode indication.AμFM146010000000[DIAL]MRS.MWBAppearsRotate [DIAL] to select the memory channel.](https://usermanual.wiki/ICOM-orporated/306600/User-Guide-882334-Page-76.png)
![New2001738MEMORY/CALL CHANNELS12345678910111213141516171819D Using the KEYPADq Push [MR] to select memory mode.w Push the keypad to enter 3 digits to select the desired memory channel.• The blank channels are also selectable.• Example— selecting memory channel “25” Push [MR] then push [0], [2], [5].■ Selecting a call channelq Push [CALL] to select call channel mode.• Pushing [CALL] toggles call, TV* and weather† channels.w Rotate [DIAL] to select the desired call channel.• “C0” and “C1” are selectable. * Appears only when TV channels are programmed via the optional RS-92. Also available for A band operation only. † Available for the USA version only.146010010BANKBANK :----:---- MNAME:MNAME:SKIPSKIP :OFF:OFFFMFMrμ000000[DIAL]MRS.MWBBlinksRotate [DIAL] to select the memory channel.AppearsAμFMFM145600025025The entered memory channel is selected.MRS.MWBKeypadAFM440000C1AFM146010C0VHF band call channelUHF band call channel[DIAL]CALLRX CSC](https://usermanual.wiki/ICOM-orporated/306600/User-Guide-882334-Page-77.png)
![Ne748MEMORY/CALL CHANNELSNew2001■ Memory channel programmingq Push [VFO] to select VFO mode.w Set the desired frequency:➥ Select the desired band with [BAND].➥ Set the desired frequency with [DIAL].➥ Or set the desired frequency with keypad directly. In this case, the band and frequency settings with [BAND] and [DIAL] as above are not required.➥ Set other data (e.g. offset frequency, duplex direction, tone squelch, etc.), if desired.e Push and hold [S.MW](MR) for 1 sec. to enter select memory write mode.• 1 short and 1 long beep sound.• “μ ” indicator blinks.r Rotate [DIAL] to select the desired channel.• Call channels (C0, C1), VFO (VFO) and scan edge channels (0A/0B to 24A/24B), as well as regular memory channels, can be programmed in this way.t Push and hold [S.MW](MR) for 1 sec. to program.• 3 beeps sound.• Memory channel number automatically increases when con-tinuing to push and hold [S.MW](MR) for 3 sec. after program-ming.[EXAMPLE]: Programming 145.870 MHz into memory channel 11 (blank channel).14146010BANKBANK :----:---- MNAME:MNAME:SKIPSKIP :OFF:OFFFMrμ000BANKBANK :----:---- MNAME:MNAME:SKIPSKIP :OFF:OFFrμ011AFMFM145870PSKIPPSKIPAFM145870PSKIPPSKIPAμFM145870PSKIPPSKIP011[DIAL]MRS.MWBMRS.MWBMRS.MWBVFO modeEnter select memory write mode.Rotate [DIAL] to selectchannel 11.Push and holdfor 1 sec.Channel 11Push and holdfor 1 sec. to program.Return to the VFO mode.](https://usermanual.wiki/ICOM-orporated/306600/User-Guide-882334-Page-78.png)
 for 1 sec. to enter select memory write mode.• 1 short and 1 long beep sound.• “μ ” indicator blinks.w Rotate [DIAL] to select the desired memory channel.e Push [](2) or [ ](8) to select “BANK.”• Bank group and channel number is displayed if the selected memory channel has already been previously assigned to a bank.r Push [](4) or [](6) several times to select the desired bank group from “A” to “Z.”t Rotate [DIAL] to select the bank channel number from “00” to “99.”• Only vacant bank channel numbers will be displayed.y Push and hold [S.MW](MR) for 1 sec. to assign the chan-nel to the bank.• Return to the previous indication. 145870870BANKBANK :----:---- MNAME:MNAME:SKIPSKIP :OFF:OFFFMFMrμ011011145870870BANKBANK :----:---- MNAME:MNAME:SKIPSKIP :OFF:OFFrμ011011Push or[DIAL]MRS.MWB2SCAN8TS2SCAN8TS145870BANKBANK :C-00:C-00 MNAME:MNAME:SKIPSKIP :OFF:OFFrμ011011Bank group is selectedwith or .[DIAL]4DUP6M.NAME4DUP6M.NAME145870BANK :C-05 MNAME:MNAME:SKIPSKIP :OFFrμ011011Bank channel is selected with [DIAL].](https://usermanual.wiki/ICOM-orporated/306600/User-Guide-882334-Page-79.png)
![Ne768MEMORY/CALL CHANNELSNew2001■ Memory bank selectionq Push [MR] several times to select memory bank mode.w While pushing and holding [BAND], rotate [DIAL] to se-lect the desired bank (A to Z).• Only programmed banks are displayed.e Rotate [DIAL] to select the bank channel.• Only programmed channels are displayed.r Push [MR] to return to regular memory condition.AμFMFM145870011011Memory modeAμFMFM145870C05C05Memory bank modeBank channel is displayed.Memory channel is displayed.[DIAL]MRS.MWBBANDDAμFM145620C01C01Memory bank modeBank channel is selected with [DIAL].[DIAL]](https://usermanual.wiki/ICOM-orporated/306600/User-Guide-882334-Page-80.png)
![778MEMORY/CALL CHANNELSNew200112345678910111213141516171819■ Programming memory/bank/scan nameEach memory channel can be programmed with an alpha-numeric channel name for easy recognition and can be indi-cated independently by channel. Names can be a maximum of 8 characters. NOTE: Scan name indication can be turned ON or OFF in display set mode. (p. 101)q Push [MR] to select memory mode.• When programming a call channel name, push [CALL] to se-lect call channel mode.w Rotate [DIAL] to select the desired memory channel.• Select scan edge channels (0A/0B to 24A/24B) for program-ming a scan name.e Push and hold [S.MW](MR) for 1 sec. to enter select memory write mode.• 1 short and 1 long beep sound.• “μ ” indicator blinks.r Push [](2) or [](8) several times to select “BNAME,” “MNAME” or “SNAME” when programming the bank name, the memory name or the scan name, respectively.• After selecting the name to be programmed, a cursor blinks for the fi rst character.t Rotate [DIAL] to select the desired character.• The selected character blinks.• Push [A/a](3) to change the character group from “AB” (alphabeti-cal characters; capital letters), “ab” (alphabetical characters; lower case letters), “12” (numbers) and “-!”-” (symbols) in sequence.• Push [](6) to move the cursor right; push [](4) to move the cursor left. • Push [CLR](1) to erase the selected character, or push and hold [CLR](1) for 1 sec. to erase all characters following the cursor.y Repeat step t until the desired channel name is pro-grammed.u Push and hold [S.MW](MR) for 1 sec. to program the name and exit channel name programming.• 3 beeps sound. NOTE: Only one bank name can be programmed into each bank. Therefore, the previously programmed bank name will be displayed when bank name indication is se-lected. Also, the programmed bank name is assigned for the other bank channels automatically.D Available charactersABCDEFGHIJKLMNOPQRSTUVWXYABCDEFGHIJKLMNOPQRSTUVWXYZabcdefghijklmnopqrstuvwxyabcdefghijklmnopqrstuvwxyz0123456780123456789! ''#$%&'()*+,-./:;<=>?@[\]'#$%&'()*+,-./:;<=>?@[\]^_`{|}^_`{|}~ (Space)](https://usermanual.wiki/ICOM-orporated/306600/User-Guide-882334-Page-81.png)
![Ne788MEMORY/CALL CHANNELSNew2001[EXAMPLE]: Programming the bank name “AIR” into the scan edge channel 03A. ■ Selecting memory/bank name indicationDuring memory mode operation, either the programmed memory name or bank name can be displayed below the frequency indication. NOTE: The programmed scan name is displayed during the programmed scan edge channel selection.q Push [MR] to select memory mode.w While pushing [M.N](6), rotate [DIAL] to select display indication type from memory name (normal size), memory name (large size), bank name and OFF.127500500BANKBANK :A-01:A-01BNAME: BNAME: MNAME:MNAME:SNAME:SNAME:AMAMrμ03AAμAM12750003AAμFM14587087001112127500BANKBANK :A-01:A-01BNAME:AIR BNAME:AIR MNAME:MNAME:SNAME:SNAME:AMAMrμ03A12127500BANKBANK :A-01:A-01BNAME:AI BNAME:AI MNAME:MNAME:SNAME:SNAME:AMAMrμ03A12127500BANKBANK :A-01:A-01BNAME:A BNAME:A MNAME:MNAME:SNAME:SNAME:AMAMrμ03AEnter select memory write mode.Push and holdfor 1 sec.Push and holdfor 1 sec. to program.Pushto select memory mode.Rotate [DIAL] to selectscan edge channel 03A.Pushto select BNAME *.orScan edge channel 03ARotate [DIAL] to enterA , push . Enter I and Rwith [DIAL] and .*Select when programming the memory name or the scan name, respectively.MRS.MWBMRS.MWBMRS.MWB2SCAN8TS6M.NAME6M.NAMEAAAIRAIRμFM12750050003A03AAAirport1Airport1μFM12750050003A03AAμFMFM12750050003A03AName indication OFF.Memory name indicationBank name indication[DIAL]6M.NAME](https://usermanual.wiki/ICOM-orporated/306600/User-Guide-882334-Page-82.png)
![798MEMORY/CALL CHANNELSNew200112345678910111213141516171819■ Copying memory/call contentsThis function transfers a memory channel’s contents to VFO (or another memory/call channel). This is useful when searching for signals around a memory channel frequency and for recalling the offset frequency, subaudible tone fre-quency etc.D Memory/call➪VFOq Select the memory (call) channel to be copied.➥ Push [MR] or [CALL] to select memory mode or call channel mode, then rotate [DIAL] to select the desired channel.w Push and hold [S.MW](MR) for 1 sec. to enter select memory write mode.• 1 short and 1 long beep sound.• “μ ” indicator blinks.e Rotate [DIAL] to select “VFO.”r Push and hold [S.MW](MR) for 1 sec. to write the selected channel contents to VFO mode.• Returns to VFO mode automatically. Holding [S.MW](MR) for 2 sec. at the step w, will also copy the memory contents to VFO. In this case, the steps e and r are not necessary.D Memory/call➪memory/callq Select the memory (call) channel to be copied.➥ Push [MR] or [CALL] to select memory mode or call channel mode, then rotate [DIAL] to select the desired memory channel.w Push and hold [S.MW](MR) for 1 sec. to enter select memory write mode.• 1 short and 1 long beep sound.• “μ ” indicator blinks.• Do not hold [S.MW](MR) for more than 2 sec. otherwise the memory contents will be copied to VFO.e Rotate [DIAL] to select the target memory (call) channel.r Push and hold [S.MW](MR) for 1 sec. again to copy.AFMFM145870PSKIPPSKIPAμFMFM1414587001101114145000FMFMμVFO145870870BANKBANK :----:---- MNAME:MNAME:SKIPSKIP:OFF:OFFFMFMrμ011011During memory mode, rotate [DIAL] to selectmemory channel 11 .Rotate [DIAL] to select VFO .Push and hold for 1 sec.VFO is selected.MRS.MWBPush and hold for 1 sec.MRS.MWB[EXAMPLE]: Copying memory channel 11 to VFO.](https://usermanual.wiki/ICOM-orporated/306600/User-Guide-882334-Page-83.png)
 for 1 sec. to enter select memory write mode.• 1 short and 1 long beeps sound.• “μ ” indicator blinks.• Do not hold [S.MW](MR) for more than 2 sec. otherwise the memory contents will be copied to VFO.w Rotate [DIAL] to select the desired memory channel to be cleared.e Push [∫](2) or [√](8) to select “CLEAR.”r Push and hold [S.MW](MR) for 1 sec. to clear the con-tents.• 3 beeps sound.• The cleared channel changes to blank channel• Return to select memory write mode.— “μ ” indicator blinks. Push [VFO] to exit select memory write mode. NOTE: Be careful!— the contents of cleared memories CANNOT be recalled.146010010BANKBANK :----:---- MNAME:MNAME:SKIPSKIP :OFF:OFFFMrμ000145000000MNAME:MNAME:SKIPSKIP :OFF:OFFCLEARCLEARrμ005005AFMFM145870PSKIPPSKIP145000000BANKBANK :----:---- MNAME:MNAME:SKIPSKIP :OFF:OFFrμ005BANKBANK :----:---- MNAME:MNAME:SKIPSKIP :OFF:OFFrμ005005AFM145870PSKIPPSKIPVFO modeRotate [DIAL] to selectthe desired channel.Push and hold for 1 sec. to clear.Push .Return to the VFO mode.Enter select memory write mode.Push and hold for 1 sec.Pushto select CLEAR .orMRS.MWBMRS.MWB2SCAN8TSVFOMHzA](https://usermanual.wiki/ICOM-orporated/306600/User-Guide-882334-Page-84.png)
![818MEMORY/CALL CHANNELSNew200112345678910111213141516171819■ Erasing/transferring bank contentsThe bank contents of programmed memory channels can be cleared or reassigned to another memory bank. INFORMATION: Even if the memory bank contents are cleared, the memory channel contents still remain pro-grammed.q Select the desired bank contents to be transferred or erased from the bank. (p. 68) ➥ Push [MR] several times to select memory bank mode. ➥ While pushing [BAND], rotate [DIAL] to select the de-sired memory bank group. ➥ Rotate [DIAL] to select the bank channel.w Push [S.MW](MR) for 1 sec. to enter select memory write mode.• 1 short and 1 long beeps sound.• Displays the original memory channel number automatically and “μ ” indicator blinks.• Do not hold [S.MW](MR) for more than 2 sec., otherwise the memory contents will be copied to VFO.e Push [ ](2) or [ ](8) to select “BANK.”r Push [](6) or [](4) several times to select the desired bank group to be transferred.• Select “– – – –” indication when erasing the contents from the bank.t Rotate [DIAL] to select the desired bank channel.• Skip this step when “– – – –” indication is selected in step r.y Push [S.MW](MR) for 1 sec. to erase/transfer the bank contents.[DIAL]MRS.MWBBANDDAμFM433000C05C0514145600BANKBANK :----:----BNAME: BNAME: MNAME:MNAME:SKIPSKIP :OFF:OFFFMFMrμ02514145600BANKBANK :B-11:B-11BNAME: BNAME: MNAME:MNAME:SKIPSKIP :OFF:OFFFMFMrμ025To transfer the bank contentsto ch 11 in Bank B.To eraseBank channel is displayed.is displayed.[DIAL]MRS.MWB2SCAN8TS4DUP](https://usermanual.wiki/ICOM-orporated/306600/User-Guide-882334-Page-85.png)
 in either VFO or memory mode.PROGRAMMED SCAN (p. 75)Repeatedly scans between two user-programmed fre-quencies. Used for checking for frequencies within a speci-fied range such as repeater output frequencies, etc.MEMORY (SKIP) SCAN (p. 77)Repeatedly scans memory channels except those set as skip channel. Skip chan-nels can be turned ON and OFF by pushing and holding [SKIP](5) in memory mode.495kHz999.990MHzScanJumpBandedgeBandedgeScanJumpBandedge xxA xxBBandedgeScan edgesScanJumpSKIPSKIPM 0 M 4M 1 M 2 M 3M 5M 199M 6SKIPSKIPA99 A03A00 A01 A02A04A98A05BandedgeBandedgeScanSKIP SKIPJump](https://usermanual.wiki/ICOM-orporated/306600/User-Guide-882334-Page-86.png)
![New2001839SCAN OPERATION12345678910111213141516171819■ Full/band/programmed scan q Push [VFO] to select VFO mode.• Select the desired frequency band with [BAND], if desired.w Set the squelch level.e While pushing and holding [SCAN](2), rotate [DIAL] to select the desired scanning type.• “ALL” for full scan; “BAND” for band scan, “PROG-xx (or scan name if programmed)” for programmed scan (xx= 0 to 24; pro-grammed scan edges numbers are only displayed), “DUP” (ap-pears only when duplex operation is set) for duplex scan.r To start the scan, release [SCAN](2).• Scan pauses when a signal is received.• Rotate [DIAL] to change the scanning direction, or resumes manually.• Push [VFO] to stop the scan. About the scanning steps: The selected tuning step in each frequency band (in VFO mode) is used during scan. Duplex scan function: Repeatedly scans two frequen-cies (transmission/reception) during duplex scan opera-tion.FMFMA148800PSKIPSKIPP01P01FMFMA148800PSKIPSKIPSCAN:SCANNAMESCAN:SCANNAMEScan nameScan name is not displayed during a programmed scan.Scan edge numberScan name selectionFMFMA146010SCAN:ALLSCAN:ALLFMA148 800SCAN:BANDSCAN:BANDFMA148 800SCAN:PROG-01SCAN:PROG-01PSKIPSKIPPSKIPSKIPPSKIPSKIP• Full scan selection• Programmed scan selection• Band scan selectionSelectable between “ 00” to “24” if programmed.[DIAL]2SCANVFOMHzAFMA14148800FMAPSKIPSKIPPSKIPSKIPP01P01148800• During full/band scan • During programmed scan](https://usermanual.wiki/ICOM-orporated/306600/User-Guide-882334-Page-87.png)
![Ne849SCAN OPERATIONNew2001■ Scan edges programmingScan edges can be programmed in the same manner as memory channels. Scan edges are programmed into scan edges, 00A/00B to 24A/24B, in memory channels.q Push [VFO] to select VFO mode.w Set the desired frequency:➥ Select the desired band with [BAND].➥ Set the desired frequency with [DIAL].➥ Set other data (e.g. offset frequency, duplex direction, tone squelch, etc.), if desired.e Push and hold [S.MW](MR) for 1 sec. to enter the select memory write mode.• 1 short and 1 long beeps sound.• “μ ” indicator blinks.r Rotate [DIAL] to select the desired programmed scan edge channel from 00A to 24A.t Push and hold [S.MW](MR) for 1 sec.• 3 beeps sound.• The other scan edge channel “B,” 00B to 24B, is automatically selected when continuing to push [S.MW](MR) after program-ming.y To program a frequency for the other pair of scan edges, 00B to 24B, repeat steps w and r.• If the same frequency is programmed into a pair of scan edges, programmed scan will not function.[EXAMPLE]: Programming 145.300 MHz into scan edges 03A.[DIAL]VFOMHzAMRS.MWBBANDDAFMFM145300PSKIPSKIPAFM145300PSKIPSKIP03A03AAFM145300PSKIPSKIP14146010010BANKBANK :----:---- MNAME:MNAME:SKIPSKIP :OFF:OFFFMrμ001BANKBANK :----:---- MNAME:MNAME:SNAME:SNAME:FMFMrμ03APush and hold for 1 sec. Rotate [DIAL] Push and hold for 1 sec.MRS.MWBMRS.MWB](https://usermanual.wiki/ICOM-orporated/306600/User-Guide-882334-Page-88.png)
![859SCAN OPERATIONNew200112345678910111213141516171819■ Memory scan IMPORTANT!: To perform memory scan, 2 or more mem-ory channels MUST be programmed, otherwise the scan will not start.q Push [MR] to select memory mode.w Set the squelch level.e While pushing and holding [SCAN](2), rotate [DIAL] to select the desired scanning type.• “ALL” for full memory scan; “BAND” for band memory scan, “MODE” for mode scan, “DUP” (appears only when duplex op-eration is set) for duplex scan.r Release [SCAN](2) to start the selected scan.• Scan pauses when a signal is received.• Rotate [DIAL] to change the scanning direction, or resumes manually.t To stop the scan, push [VFO]. Band memory scan function: Repeatedly scans all memory channels programmed with any frequencies of the band programmed in the memory channel selected for scanning. Mode scan function: Repeatedly scans all memory channels in which the same operating mode as the se-lected memory channel has been programmed. Duplex scan function: Repeatedly scans two frequen-cies (transmission/reception) during duplex scan opera-tion.FMA146010μ088088SCAN:ALLSCAN:ALLFMA148 800μ088088SCAN:BANDSCAN:BANDFMA148 800μ088088SCAN:MODESCAN:MODEPSKIPSKIPPSKIPSKIPPSKIPSKIP• All memory scan selection• Mode scan selection• Band memory scan selection[DIAL]VFOMHzAMRS.MWB2SCANFMAμ012148800• During memory scan](https://usermanual.wiki/ICOM-orporated/306600/User-Guide-882334-Page-89.png)
 several times to select memory bank mode.w Set the squelch level.e While pushing and holding [SCAN](2), rotate [DIAL] to select the desired scanning type.• “ALL” for all bank scan; “BANK-LINK” for bank link scan or “BANK-x” for bank scan (x= A to Z; programmed bank groups are only displayed.), “DUP” (appears only when duplex opera-tion is set) for duplex scan.r Release [SCAN](2) to start the selected scan.• Scan pauses when a signal is received.• Rotate [DIAL] to change the scanning direction, or resumes manually.t To stop the scan, push [VFO]. The bank-link setting can be changed in scan set mode. See page 97 for details. Duplex scan function: Repeatedly scans two frequen-cies (transmission/reception) during duplex scan opera-tion.FMA146010μA01A01SCAN:ALLSCAN:ALLFMA148800μA01SCAN:BANK-LINKSCAN:BANK-LINKFMA148800μA01A01SCAN:BANK-ASCAN:BANK-APSKIPSKIPPSKIPSKIPPSKIPSKIP• All bank scan selection• Bank scan selection• Bank link scan selectionSelectable between “A” to “Z” if programmed.[DIAL]VFOMHzAMRS.MWB2SCANFMAμ888148800• During all bank/bank link scan • During bank scanFMAμA88148800](https://usermanual.wiki/ICOM-orporated/306600/User-Guide-882334-Page-90.png)
![879SCAN OPERATIONNew200112345678910111213141516171819■ Skip channel/frequency settingMemory channels can be set to be skipped for memory skip scan. In addition, memory channels can be set to be skipped for both memory skip scan and frequency skip scan. These are useful to speed up the scan rate.q Select a memory channel:➥ Push [MR] to select memory mode.➥ Rotate [DIAL] to select the desired channel to be a skip channel/frequency.w Push and hold [S.MW](MR) for 1 sec. to enter select memory write mode.e Push [∫](2) or [√](8) several times to select “SKIP.”r Rotate [DIAL] to select the skip condition from “SKIP,” “P SKIP” or “OFF” for the selected channel.• P SKIP : The channel is skipped during memory/bank scan and the programmed frequency is skipped during VFO scan, such as programmed scan.• SKIP : The channel is skipped during memory or bank scan. • OFF : The channel is scanned during any scan. (Continue to the next page.)FMFMAμ020020145870[DIAL]MRS.MWB146010010BANKBANK :----:---- MNAME:MNAME:SKIPSKIP :OFF:OFFFMFMrμ012146010010 MNAME:MNAME:SKIPSKIP :OFF:OFFCLEARCLEARFMFMrμ012orseveral times.PushMRS.MWB2SCAN8TS2SCAN8TS](https://usermanual.wiki/ICOM-orporated/306600/User-Guide-882334-Page-91.png)
 for 1 sec. to store the skip condition into the memory.• “SKIP” or “P SKIP” indicator appears, according to the skip se-lection in the step r.✔-CONVENIENT!The the skip setting can be set with the following operation.q Select the desired memory channel to be set as a skip channel/frequency.w While pushing [SKIP](5), rotate [DIAL] to select the skip condition from “P SKIP,” “SKIP” and “OFF (no indication).”✔-CONVENIENT!During VFO scanning, such as programmed scan, the skip setting can be programmed into the highest blank memory channel which is automatically selected with the following operation.q Start the VFO scan.➥ Push [VFO] to select VFO mode.• Select the desired frequency band with [BAND], if desired.➥ Set the squelch level.➥ While pushing and holding [SCAN](2), rotate [DIAL] to select the desired scanning type.• “ALL” for full scan; “BAND” for band scan, “PROG-xx (or scan name if programmed)” for programmed scan (xx= 0 to 24; programmed scan edges numbers are only displayed), “DUP” for duplex scan.➥ To start the scan, release [SCAN](2).• Scan pauses when a signal is received.• Rotate [DIAL] to change the scanning direction, or resumes manually.w When scan pauses and you want to set the paused fre-quency as a skip frequency.➥ Push and hold [SKIP](5) for 1 sec. to store the paused frequency into the highest blank memory channel.• While pushing and holding [SKIP](5), rotate [DIAL] to select a skip condition from “SKIP,” “P-SKIP” and “OFF.”• While pushing and holding [SKIP](5), scan pauses; and after writing the frequency, scan resumes.FMAμSKIPSKIP033033145700FMAμPSKIPSKIP033033145700• Skip channel setting • Program skip setting“SKIP” appears “P SKIP” appears](https://usermanual.wiki/ICOM-orporated/306600/User-Guide-882334-Page-92.png)
![■ Scan resume conditionD Scan pause timerThe scan pauses when receiving signals according to the scan pause time. It can be set from 2 to 20 sec. or unlimited.q Enter “PAUSE” in scan set mode. (p. 96)w Rotate [DIAL]† to set the desired scan pausing time from 2–20 sec. (2 sec. steps) or “HOLD.” • “2SEC”–“20SEC” :- Scan pauses for 2–20 sec. while receiving a signal.• “HOLD” :- Scan pauses on a received a signal until it disappears.e Push [ ](5) (or [ ](4)) to return to scan set mode.r [MENU/ ] to return to frequency indication.D Scan resume timerThe scan restarts after the signal disappears according to the resume time. It can be set from 0–5 sec. or unlimited.q Enter “RESUME” in scan set mode. (p. 96)w Rotate [DIAL]† to set the desired scan resume time from 0–5 sec. (1 sec. steps) and “HOLD.” • “0SEC” :- Scan restarts immediately after the signal disappears.• “1SEC”–“5SEC” :- Scan restarts 1–5 sec. after the signal disap-pears.• “HOLD” :- Scan restarts by rotating [DIAL] only.e Push [ ](5) (or [ ](4)) to return to scan set mode.r [MENU/ ] to return to frequency indication. Scan resume timer must be set shorter than the scan pause timer, otherwise this timer does not activate.899SCAN OPERATIONNew200112345678910111213141516171819 ❮MENU screen❯ ➪ ❮SCAN❯ ➪ ❮PAUSE❯ (Push [MENU/ ]) (Rotate [DIAL]†, then push [ ](5)†.)10SEC6SEC8SEC4SEC12SECPAUSE TIMERPAUSE TIMERr• Pause timer setting ❮MENU screen❯ ➪ ❮SCAN❯ ➪ ❮RESUME❯ (Push [MENU/ ]) (Rotate [DIAL]†, then push [ ](5)†.)• Resume timer setting2SEC4SEC3SEC1SEC5SECRESUME TIMERRESUME TIMERr†[DIAL] ↔ [ ](2)/[](8) [ ](5) ↔ [ ](6)](https://usermanual.wiki/ICOM-orporated/306600/User-Guide-882334-Page-93.png)

 for 1 sec. to start memory/bank scan.e Enter “PRIO WATCH” in scan set mode. (p. 96)r Rotate [DIAL]† to select “ON.” • Select “BELL” if the priority beep function is desired.t Push [MENU/ ] to exit scan set mode and start the watch.• “PRIO” indicator appears.• The transceiver checks the memory/bank channel(s) or call channel every 5 sec.• The watch resumes according to the selected scan resume condition. (p. 81)y Push [VFO] to cancel the watch.New20019110PRIORITY WATCH12345678910111213141516171819Although [DIAL] and [ ](5) are used for description in this section, [](2)/[](8) and [](6) are available instead of [DIAL] and [](5). ❮MENU screen❯ ➪ ❮SCAN❯ ➪ ❮PRIO WATCH❯ (Push [MENU/ ]) (Rotate [DIAL]†, then push [ ](5)†.)• During priority watchMonitors VFO frequency for 5 sec.Pauses on a memory or call channel when a signal is received.• During priority watch with priority beepEmits beep and blinks “S” indicator when a signal is received on a memory or call channel.PRIOPRIOFMFMA145180μ035035PRIOPRIOFMA433260PSKIPSKIPPRIOPRIOFMFMA145180μ035035PRIOPRIOFMA433260PSKIPSKIP†[DIAL] ↔ [ ](2)/[](8) [ ](5) ↔ [ ](6)](https://usermanual.wiki/ICOM-orporated/306600/User-Guide-882334-Page-95.png)
 for 1 sec. to start memory/bank scan.w Enter “PRIO WATCH” in scan set mode. (p. 96)e Rotate [DIAL]† to select “ON.” • Select “BELL” if the priority beep function is desired.r Push [VFO] to exit scan set mode and start the watch.• “PRIO” indicator appears.t Push and hold [SCAN](2) for 1 sec. to enter scan type se-lection condition.y Rotate [DIAL] to select the desired scan type from “ALL,” “BAND” and “PROG-xx (xx= 0–24),” “DUP.” u Release [SCAN](2) to start the VFO scan watch.• The transceiver checks the memory/bank channel(s) or call channel every 5 sec.• The watch resumes according to the selected scan resume condition. (p. 81)i Push [VFO] to cancel the watch. ❮MENU screen❯ ➪ ❮SCAN❯ ➪ ❮PRIO WATCH❯ (Push [MENU/ ]) (Rotate [DIAL]†, then push [ ](5)†.)• During priority watchSearches VFO frequencies for 5 sec.Pauses on a memory or call channel when a signal is received.• During priority watch with priority beepEmits beep and blinks “S” indicator when a signal is received on a memory or call channel.PRIOPRIOFMFMA145000μ000000PRIOPRIOFMA888800PSKIPSKIPPRIOPRIOFMA145000μ000000PRIOPRIOFMFMA888800PSKIPSKIP†[DIAL] ↔ [ ](2)/[](8) [ ](5) ↔ [ ](6)](https://usermanual.wiki/ICOM-orporated/306600/User-Guide-882334-Page-96.png)
![9311MENU SCREEN OPERATION12345678910111213141516171819■ GeneralMENU screen is used for programming infrequently changed values or conditions of functions.D Entering MENU screen and operatione.g.) Set “AUTO power OFF” to 30 minutes.q Push [MENU/ ] to enter MENU screen.w Rotate [DIAL]† to select the desired menu group, then push [](5)†.e Rotate [DIAL]† to select the desired item, then push [](5)†.r Rotate [DIAL]† to select the desired value or condition, then push [](5) to return to the setting item selection mode.t Push [MENU/ ] to return to frequency indication, re-peat steps w to r to set another items.SET MODESET MODESCANDUP/TONE...DUP/TONE...DISPLAYDISPLAYSOUNDS***** MENU ********** MENU *****r• MENU groupsappear.AP OFFAP OFFPOWER SAVEPOWER SAVEATTENUATORATTENUATORMONITORMONITORDIAL SPEEDDIAL SPEEDSET MODESET MODEr• Setting itemsappear.OFF30MIN60MIN90MIN120MINAUTO POWER OFFAUTO POWER OFFrOFF30MIN60MIN90MIN120MIN120MINAUTO POWER OFFAUTO POWER OFFr[DIAL]MENU2SCAN8TS4DUP6M.NAME5SKIP†[DIAL] ↔ [ ](2)/[](8) [ ](5) ↔ [ ](6)](https://usermanual.wiki/ICOM-orporated/306600/User-Guide-882334-Page-97.png)
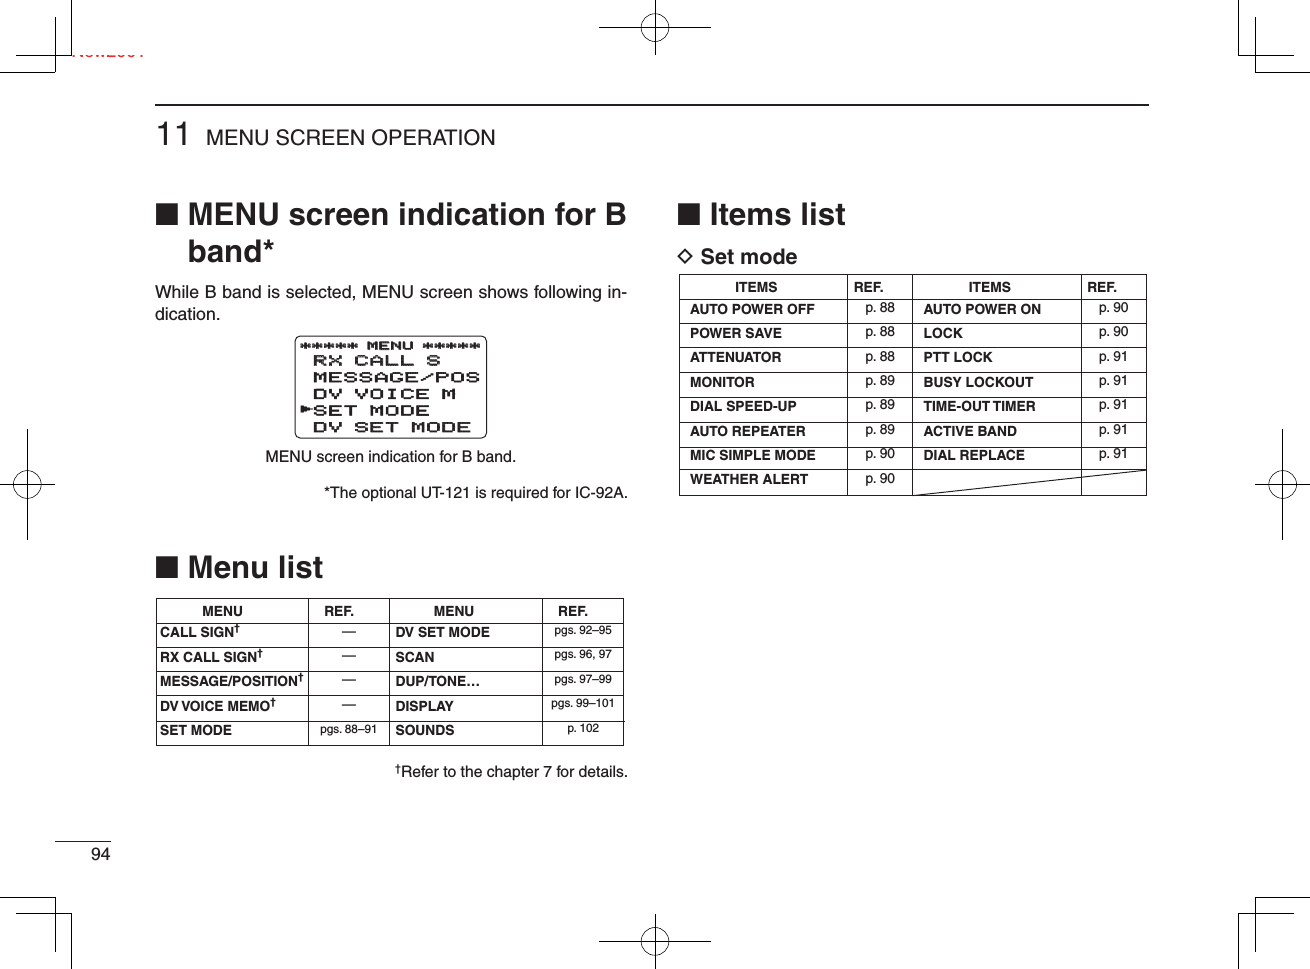
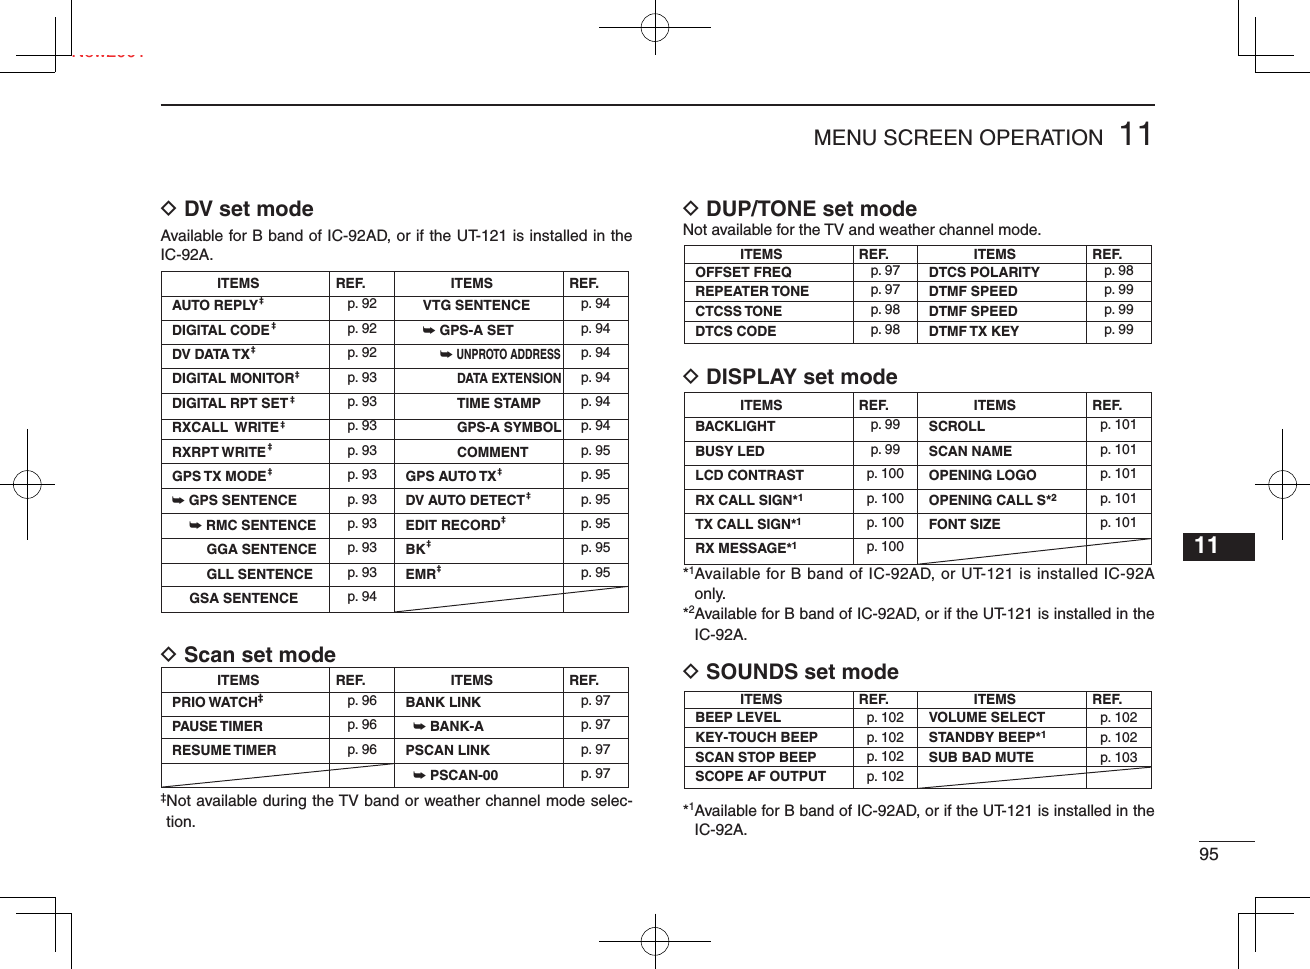
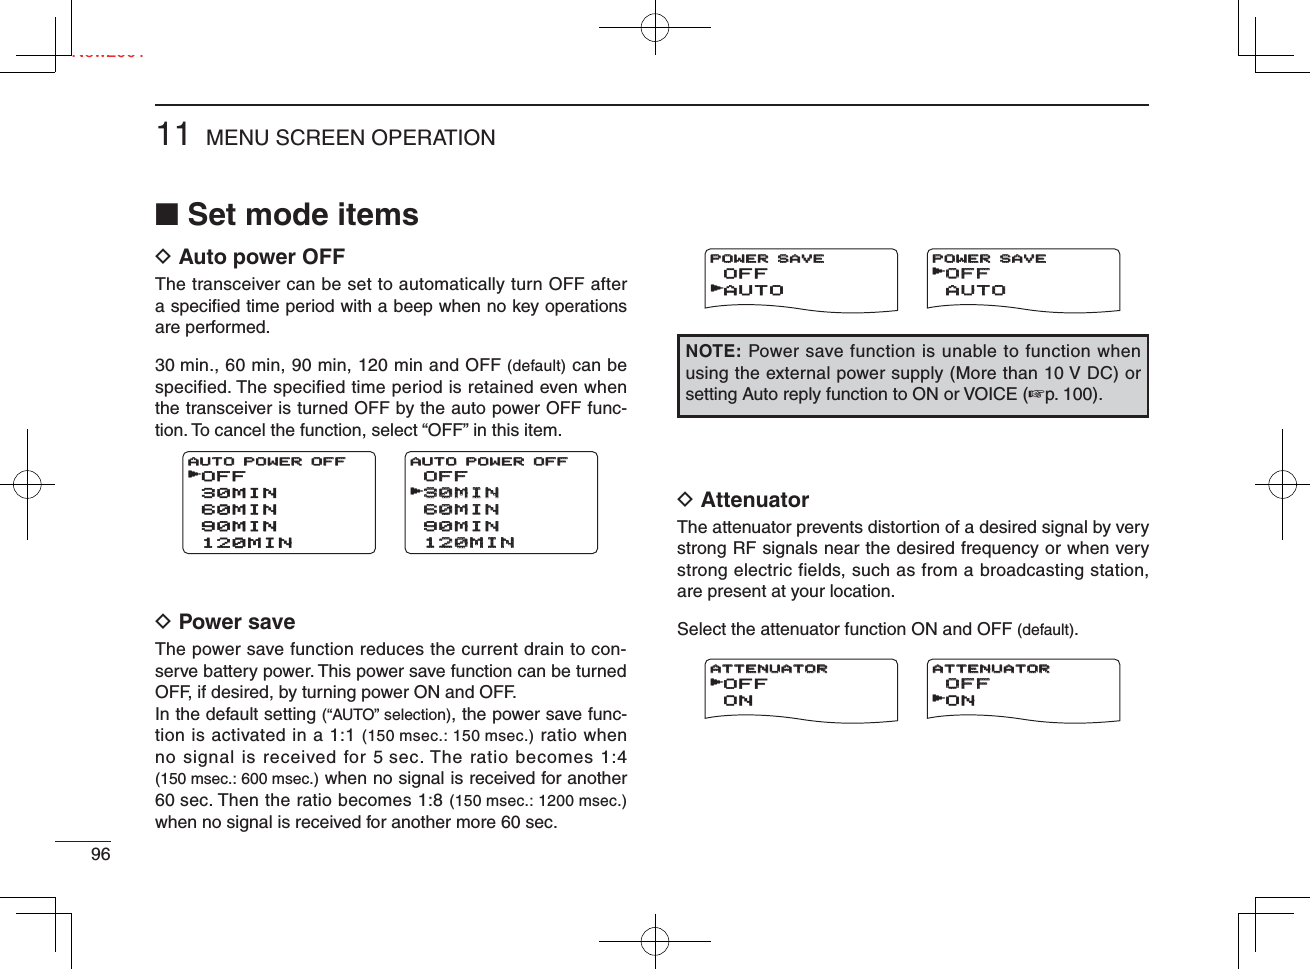
![9711MENU SCREEN OPERATIONNew200112345678910111213141516171819D Monitor key actionThe monitor key, [SQL] , can be set as a ‘sticky’ key. When set to the sticky condition, each push of [SQL] toggles the monitor function ON and OFF.• PUSH : Pushing and holding [SQL] to monitor the fre-quency. (default)• HOLD : Push [SQL] momentarily to monitor the frequency and push momentarily again to cancel it.D Dial speed accelerationThe dial speed acceleration automatically speeds up the tuning dial speed when rotating [DIAL] rapidly.• OFF : The dial speed acceleration is turned OFF.• ON : The dial speed acceleration is tuned ON. (default)D Auto repeater U.S.A./KOREAN versions onlyThe auto repeater function automatically turns ON or OFF the duplex operation and tone encoder. The offset and re-peater tone is not changed by the auto repeater function. Reset these frequencies, if necessary.U.S.A. version:• OFF : The auto repeater function is turned OFF.• RPT1 : Activates for duplex only. (default)• RPT2 : Activates for duplex and tone.Korean version:• OFF : Deactivates the function.• ON : Activates duplex and tone. (default)PUSHHOLDHOLDMONITORMONITORrHOLDHOLDPUSHPUSHMONITORMONITORrONOFFDIAL SPEED-UPDIAL SPEED-UPrOFFOFFONDIAL SPEED-UP DIAL SPEED-UP rRPT1OFFRPT2AUTO REPEATERAUTO REPEATERrOFFRPT1RPT2AUTO REPEATERAUTO REPEATERrONOFFAUTO REPEATERAUTO REPEATERrOFFOFFONAUTO REPEATERAUTO REPEATERr](https://usermanual.wiki/ICOM-orporated/306600/User-Guide-882334-Page-101.png)
![Ne9811 MENU SCREEN OPERATIONNew2001D Microphone simple modeMicrophone simple mode is used to change the function assignments for keys on the optional HM-75A REMOTE CON-TROL SPEAKER-MICROPHONE. (pgs. 122, 124)• SIMPLE• NORM-1 (default)• NORM-2D Weather alert functionTurns weather alert function ON and OFF. (p. 114) (default: OFF)D Auto power ONAuto power ON function turns the transceiver power ON au-tomatically after passing the set time period from power OFF.Select the desired time period within 30 minutes to 24 hours in 30 minutes steps and OFF. (default: OFF)D Key lock TypeWhile the key lock function is ON, [PWR], [PTT], [SQL], [VOL] and [MENU](Lock function only) can still be accessed. Accessible keys can be set to 1 of 4 groups.• NORMAL : [PWR], [PTT], [SQL], [VOL] and [MENU] (Lock function only) accessible. (default)• NO SQL : [PWR], [PTT], [SQL] and [MENU] (Lock func-tion only) are accessible.• NO VOL : [PWR], [PTT], [VOL] and [MENU] (Lock func-tion only) are accessible.• ALL : [PWR], [PTT] and [MENU] (Lock function only) are accessible.NORM-1SIMPLENORM-2MIC SIMPLE MODEMIC SIMPLE MODErSIMPLESIMPLENORM-1NORM-1NORM-2NORM-2MIC SIMPLE MODEMIC SIMPLE MODErOFFONWEATHER ALERT WEATHER ALERT rOFFONWEATHER ALERT WEATHER ALERT rOFFAUTO POWER ONAUTO POWER ON24:00AUTO POWER ONAUTO POWER ONNORMALNO SQLNO VOLALLLOCKrNORMALNORMALNO SQLNO SQLNO VOLNO VOLALLALLLOCKLOCKrU.S.A. version only](https://usermanual.wiki/ICOM-orporated/306600/User-Guide-882334-Page-102.png)
![9911MENU SCREEN OPERATIONNew200112345678910111213141516171819D PTT lock Turns the PTT lock function ON and OFF.Transmission with [PTT] is inhibited when ON is selected to prevent accidental transmission, etc. (default: OFF)D Busy lockoutTurns the busy lockout function ON and OFF.This function inhibits transmission while receiving a signal or when the squelch is open. (default: OFF)D Time-out timerTo prevent accidental prolonged transmission, etc., the transceiver has a time-out timer. This function cuts a trans-mission OFF after 1, 3, 5 or 10 min. of continuous transmis-sion. This timer can be cancelled.• OFF : The time-out timer is turned OFF. (default)• 1 to 10 MIN : The transmission is cut OFF after the set period elapses.D Active bandAllows continuous frequency selection of the operating fre-quency across all bands.• SINGLE : A single operating frequency can be selected within the current band. Push [BAND] for band selection in this case.• ALL : The operating frequency can be selected continuously. (default)D Dial replaceExchanging [DIAL] and [VOL] function.• OFF : The dial replace function is turned OFF. (default)• ON : The dial replace function is turned ON.OFFONPTT LOCK PTT LOCK rOFFONPTT LOCK PTT LOCK rOFFONBUSY LOCKOUT BUSY LOCKOUT rOFFONBUSY LOCKOUT BUSY LOCKOUT rOFF1MIN3MIN5MIN10MINTIME-OUT TIMERTIME-OUT TIMERrOFF1MIN3MIN5MIN10MINTIME-OUT TIMERTIME-OUT TIMERrALLSINGLEACTIVE BAND ACTIVE BAND rALLSINGLESINGLEACTIVE BANDACTIVE BANDrONOFFOFFDIAL REPLACE DIAL REPLACE rONOFFDIAL REPLACEDIAL REPLACE r](https://usermanual.wiki/ICOM-orporated/306600/User-Guide-882334-Page-103.png)
![Ne10011 MENU SCREEN OPERATIONNew2001■ DV set mode itemsThe following items are selectable by the IC-92AD or op-tional UT-121 is installed into the IC-92A.D Auto replyThis function replies to an individual station call even you are away from the transceiver.After a manual transmission (pushing [PTT]), the Auto Reply setting returns to OFF automatically.• OFF : No reply is performed even a call is received. (default)• ON : Sets caller’s call sign and reply to the call with the set own call sign automatically.• VOICE : Sets caller’s call sign and reply to the call with the recorded audio in REPLY VOICE memory of DV VOICE MEMO. NOTE: When “ON” or “VOICE” is set to the auto reply function, the power save function (p. 88) is turned OFF au-tomatically to receive call sign signal properly.D Digital codeSets the desired digital code for digital code squelch opera-tion. Total of 100 codes (00–99) are available. (default: 00)D DV data TXDuring low-speed data operation, auto data transmission function is available. This function transmits when data has been input from PC via the [DATA] jack. (default: PTT)OFFONVOICEAUTO REPLYAUTO REPLYrOFFONVOICEAUTO REPLYAUTO REPLYr00DIGITAL CODEDIGITAL CODE99DIGITAL CODEDIGITAL CODEPTTAUTOAUTODV DATA TXDV DATA TXPTTAUTODV DATA TXDV DATA TXrr](https://usermanual.wiki/ICOM-orporated/306600/User-Guide-882334-Page-104.png)
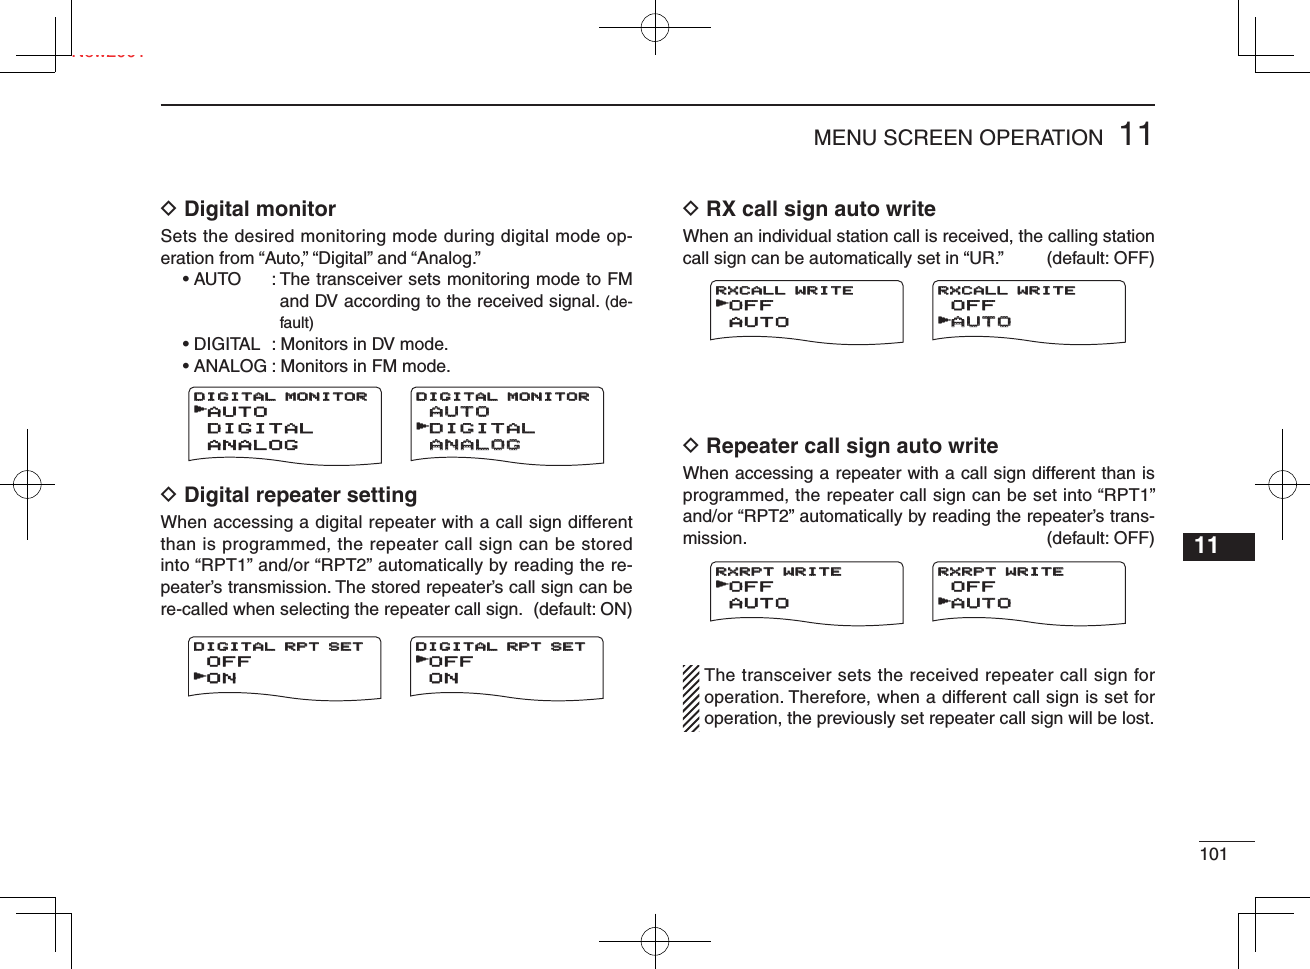
† to enter the sentence formatter selection.w Rotate [DIAL]† to select the desired sentence formatter. •- RMC, GGA, GLL, GSA, VTG and GPS are selectable.e Push [ ](5)† to enter the desired sentence formatter se-lection.r Rotate [DIAL]† to select the setting. t Rotate [DIAL]† to select next sentence and repeat steps w to r, or push [MENU/ ] to return to frequency in-dication. •-Only three sentence formatters can be activated at same time.DISABLEGPSGPS-AGPS TX MODEGPS TX MODEr:SENTENCE:SENTENCEDISABLEDISABLEGPSGPS-AGPS TX MODEGPS TX MODErRMC:OFFGGA:ONGLL:OFFGLL:OFFGSA:OFFVTG:OFFGPS SENTENCEGPS SENTENCErRMC:OFFRMC:OFFGGA:ONGGA:ONGLL:OFFGLL:OFFGSA:OFFGSA:OFFVTG:OFFVTG:OFFGPS SENTENCEGPS SENTENCErOFFONRMC SENTENCERMC SENTENCErOFFONRMC SENTENCERMC SENTENCEr†[DIAL] ↔ [ ](2)/[](8) [ ](5) ↔ [ ](6)](https://usermanual.wiki/ICOM-orporated/306600/User-Guide-882334-Page-106.png)
†. This set mode is available to set unproto address, data extension, time stamp, GPS-A symbol and comment.D Unproto Address56 characters can be entered for unproto address.q Push [](5)† to enter the unproto address edit mode.w Rotate [DIAL]† to select the desired character.• The selected character blinks.• Push [A/a](3) to change the character group from “AB” (alphabeti-cal characters; capital letters), “ab” (alphabetical characters; lower case letters), “12” (numbers) and “ !” ” (symbols) in sequence.• Push [](6) to move the cursor right; push [](4) to move the cursor left. • Push [CLR](1) to erase the selected character, or push and hold [CLR](1) for 1 sec. to erase all characters following the cursor.e Repeat step w until the desired channel name is pro-grammed.r Push [](5)† to program the unproto address and exit the unproto address edit mode.D DATA ExtensionSets the data extension capability from “COURSE/SPEED”and OFF (default).The transceiver’s course and speed information is addition-ally transmitted with position data when “COURSE/SPEED” is selected. NOTE: When “COURSE/SPEED” is selected, number of character for “COMMENT” is limited to 36-character.UNPROTO ADDDATA EXTENSTIME STAMPGPS-A SYMBOCOMMENTGPS-A SET MODEGPS-A SET MODErUNPROTO ADDUNPROTO ADDDATA EXTENSDATA EXTENSTIME STAMPTIME STAMPGPS-A SYMBOGPS-A SYMBOCOMMENTCOMMENTGPS-A SET MODEGPS-A SET MODErAPI92,DSTAAPI92,DSTAR*R* R*:SET:SET:EDITCLR:CLRCLR:CLRUNPROTO ADDRESSUNPROTO ADDRESS:BACK:BACKAB†PI92,DSTAPI92,DSTA:SET:SEL:CURCLR:CLRCLR:CLRA/a:CHARA/a:CHARUNPROTO ADDRESSUNPROTO ADDRESSOFFCOURSE/SPEEDATA EXTENSIONDATA EXTENSIONrOFFCOURSE/SPEECOURSE/SPEEDATA EXTENSIONDATA EXTENSIONr](https://usermanual.wiki/ICOM-orporated/306600/User-Guide-882334-Page-107.png)
† to enter programming condition.w Rotate [DIAL] to select the 1st character from “\” and “/.”e Push Push [ ](6) to select the 2nd digit.r Rotate [DIAL] to select the 2nd digit character.t Push [](5)† to program the symbol code, then exit pro-gramming condition. When “Other” is selected, check the symbol codes of APRS® and set it correctly.Ne†[DIAL] ↔ [ ](2)/[](8) [ ](5) ↔ [ ](6)OFFDHMDHMHMSHMSTIME STAMPTIME STAMPrOFFDHMDHMHMSHMSTIME STAMPTIME STAMPrHelicpterSmall AircrShip(powerCarMotorcycleGPS-A SYMBOLGPS-A SYMBOLrHelicpterHelicpterSmall AircrSmall AircrShip(powerShip(powerCarCarMotorcycleMotorcycleGPS-A SYMBOLGPS-A SYMBOLr](https://usermanual.wiki/ICOM-orporated/306600/User-Guide-882334-Page-108.png)
† twice to enter programming condition.w Rotate [DIAL] to select the desired character.• The selected character blinks.• Push [A/a](3) to change the character group from “AB” (alphabeti-cal characters; capital letters), “ab” (alphabetical characters; lower case letters), “12” (numbers) and “ !” ” (symbols) in sequence.• Push [](6) to move the cursor right; push [](4) to move the cursor left. • Push [CLR](1) to erase the selected character, or push and hold [CLR](1) for 1 sec. to erase all characters following the cursor.e Repeat step w until the desired channel name is pro-grammed.r Push [](5)† to program the comment and exit comment programming condition.t Push [](4) to return to GPS-A SET screen mode.D GPS auto TX timerSelects the desired interval for automatic position transmis-sion function from 5, 10, 30 second, 1, 3, 5, 10 and 30 min-utes.D DV auto detectWhen a signal other than DV mode is received during DV mode operation, the transceiver has capability of automatic FM mode selection.• OFF : Operating mode is fi xed in DV. (default)• ON : The transceiver automatically selects FM mode for temporary operation.:SET:EDITCLR:CLRCLR:CLRCOMMENTCOMMENT:BACK:BACKABAB†:SET:SEL:CURCLR:CLRCLR:CLRA/a:CHARA/a:CHARCOMMENTOFF5SEC10SEC30SEC1MINGPS AUTO TXGPS AUTO TXrOFFOFF5SEC5SEC10SEC10SEC30SEC30SEC1MIN1MINGPS AUTO TXGPS AUTO TXrOFFONDV AUTO DETECTDV AUTO DETECTrOFFONDV AUTO DETECTDV AUTO DETECTr](https://usermanual.wiki/ICOM-orporated/306600/User-Guide-882334-Page-109.png)
† to enter programming condition.w Rotate [DIAL] to select the 1st character from “\” and “/.”e Push Push [ ](6) to select the 2nd digit.r Rotate [DIAL] to select the 2nd digit character.t Push [](5)† to program the symbol code, then exit pro-gramming condition. When “Other” is selected, check the symbol codes of APRS® and set it correctly.†[DIAL] ↔ [ ](2)/[](8) [ ](5) ↔ [ ](6)OFFDHMDHMHMSHMSTIME STAMPTIME STAMPrOFFDHMDHMHMSHMSTIME STAMPTIME STAMPrHelicpterSmall AircrShip(powerCarMotorcycleGPS-A SYMBOLGPS-A SYMBOLrHelicpterHelicpterSmall AircrSmall AircrShip(powerShip(powerCarCarMotorcycleMotorcycleGPS-A SYMBOLGPS-A SYMBOLrNe](https://usermanual.wiki/ICOM-orporated/306600/User-Guide-882334-Page-110.png)

![Ne10811 MENU SCREEN OPERATIONNew2001■ Scan set mode itemsD Priority watchActivates priority watch or priority watch with alert (Bell).• OFF : The priority watch is turned OFF. (default)• ON : The transceiver checks the memory channel fre-quency every 5 sec.• B ELL : The transceiver checks the memory channel frequency every 5 sec. You can be alerted with beeps and blinking “S.”D Scan pause timerSelects the scan pause time. When receiving signals, the scan pauses according to the scan pause time.• 2–20 SEC : Scan pauses for 2–20 sec. on a received signal in 2 sec. steps. (default: 10 sec.)• HOLD : Scan pauses on a received signal until it disappears. Rotate [DIAL] to resume man-ually.D Scan resume timerSelects the scan resume time from a paused frequency after the received signal disappears.• 0 : Scan resumes when a received signal disap-pears.• 1–5 SEC : Scan pauses 1–5 sec. after a received signal disappears. (default: 2 sec.)• HOLD : Scan pauses on the received signal even if it disappears. Rotate [DIAL]† to resume manu-ally. Scan resume timer must be set shorter than scan pause timer (previous item), otherwise this timer does not activate.OFFONBELLPRIO WATCHPRIO WATCHrOFFONBELLPRIO WATCHPRIO WATCHr10SEC6SEC8SEC4SEC12SECPAUSE TIMERPAUSE TIMERr20SEC20SEC16SEC16SEC18SEC18SEC14SEC14SECHOLDHOLDPAUSE TIMERPAUSE TIMERr2SEC4SEC3SEC1SEC5SECRESUME TIMERRESUME TIMERr3SEC3SEC5SEC5SEC4SEC4SEC2SEC2SECHOLDHOLDRESUME TIMERRESUME TIMERr](https://usermanual.wiki/ICOM-orporated/306600/User-Guide-882334-Page-112.png)
![10911MENU SCREEN OPERATIONNew200112345678910111213141516171819D Memory bank link functionSets the memory bank link function ON (default) and OFF. The link function provides continuous bank scan, scanning all contents in the selected banks during bank scan.• Bank link settingq Rotate [DIAL]† to select the bank that you want to change.w Push [](5)† to enter bank setting.e Rotate [DIAL]† to select the setting. r Push [](5)† to set and return to the BANK LINK screen.t Rotate [DIAL]† to select next bank and repeat steps w to r, or push [MENU/ ] to exit scan set mode.D Program scan link functionSets the program scan link function ON (default) and OFF. The link function provides continuous program scan in the selected number during program scan.• Program scan link settingq Rotate [DIAL]† to select the program scan number that you want to change.w Push [](5)† to enter program scan setting.e Rotate [DIAL]† to select the setting. r Push [](5)† to set and return to the PROGRAM SCAN LINK screen.t Rotate [DIAL]† to select next program scan and repeat steps w to r, or push [MENU/ ] to exit MENU screen operation.BANK-A:ONBANK-D:ONBANK-C:ONBANK-B:ONBANK-E:ONBANK LINKBANK LINKrBANK-V:ONBANK-V:ONBANK-Y:ONBANK-Y:ONBANK-X:ONBANK-X:ONBANK-W:ONBANK-W:ONBANK-Z:ONBANK-Z:ONBANK LINKBANK LINK\rONOFFBANK-ABANK-ArONOFFBANK-ABANK-Ar†[DIAL] ↔ [ ](2)/[](8) [ ](5) ↔ [ ](6)P-00:OFFP-03:ONP-02:ONP-01:ONP-04:ONPSCAN LINKPSCAN LINKrP-01:ONP-01:ONP-04:ONP-04:ONP-03:ONP-03:ONP-02:ONP-02:ONP-05:ONP-05:ONPSCAN LINKPSCAN LINK\rONOFFPSCAN-00PSCAN-00rONOFFPSCAN-00PSCAN-00r](https://usermanual.wiki/ICOM-orporated/306600/User-Guide-882334-Page-113.png)
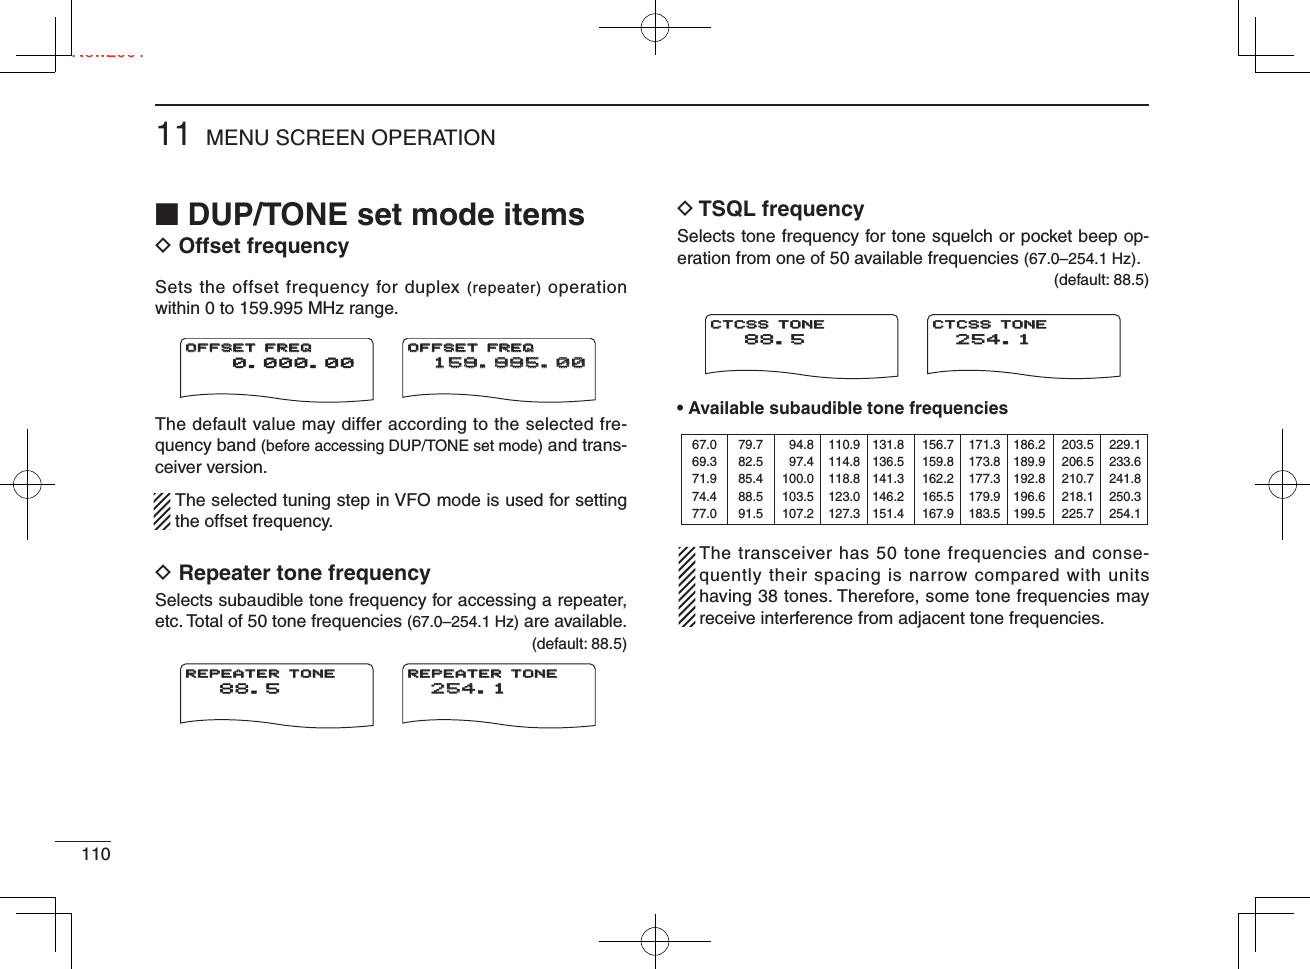
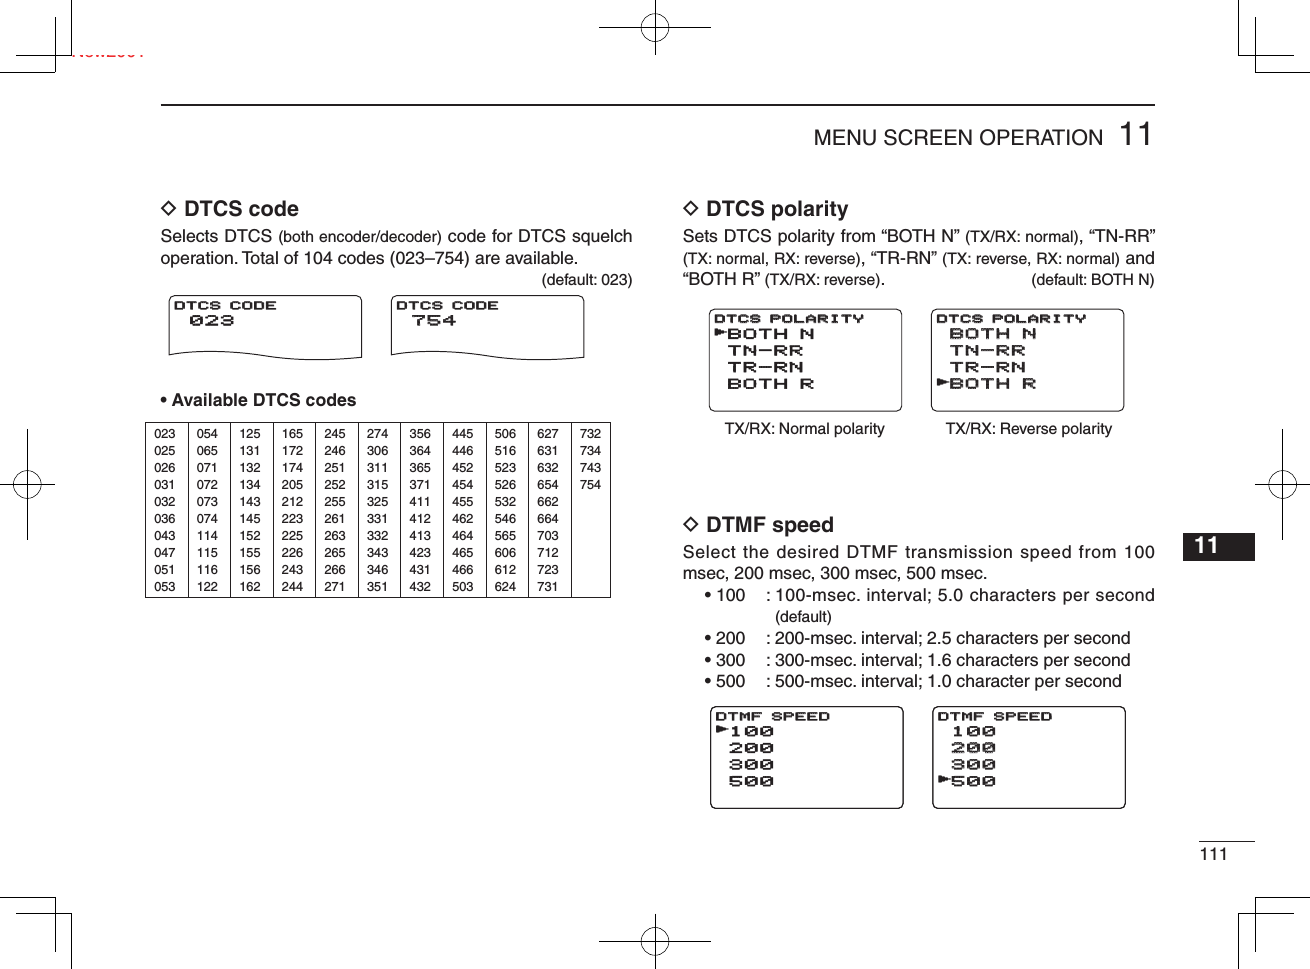
![Ne11211 MENU SCREEN OPERATIONNew2001D DTMF TX KEY Selects DTMF transmitting code when pushing and holding [PTT], then pusing 10-key.• KEY : [1]–[9], [0], [A], [B], [C], [D], [E] or [F] DTMF code is transmitted respectively. (default)• DTMF-M : The assigned DTMF memory to [1]–[9] and [0] is transmitted respectively.■ Display set mode itemsD Display backlightingThe transceiver has display backlighting with a 5 sec. timer for night time operation. The display backlighting can be turned ON continuously or turned OFF, if desired.• OFF : The backlight is turned OFF.• ON : The backlight continuously lights ON.• AUTO : Lights when an operation is performed, goes out after 5 sec. (default) * C ontinuously lights ON while operating with an external DC power source.D Busy LEDThe TX/RX indicator lights green while receiving a signal or when the squelch is open. This indication can be turned OFF to conserve the battery power, if desired.• OFF : The indicator does not function even if a signal is received.• ON : The indicator lights green while receiving a signal or when the squelch is open. (default)AUTOONOFFBACKLIGHTBACKLIGHTrAUTOONOFFBACKLIGHTBACKLIGHTrONOFFBUSY LEDBUSY LEDrONOFFBUSY LEDBUSY LEDrDTMF-MKEYDTMF TX KEYDTMF TX KEYrDTMF-MDTMF-MKEYDTMF TX KEYDTMF TX KEYr](https://usermanual.wiki/ICOM-orporated/306600/User-Guide-882334-Page-116.png)
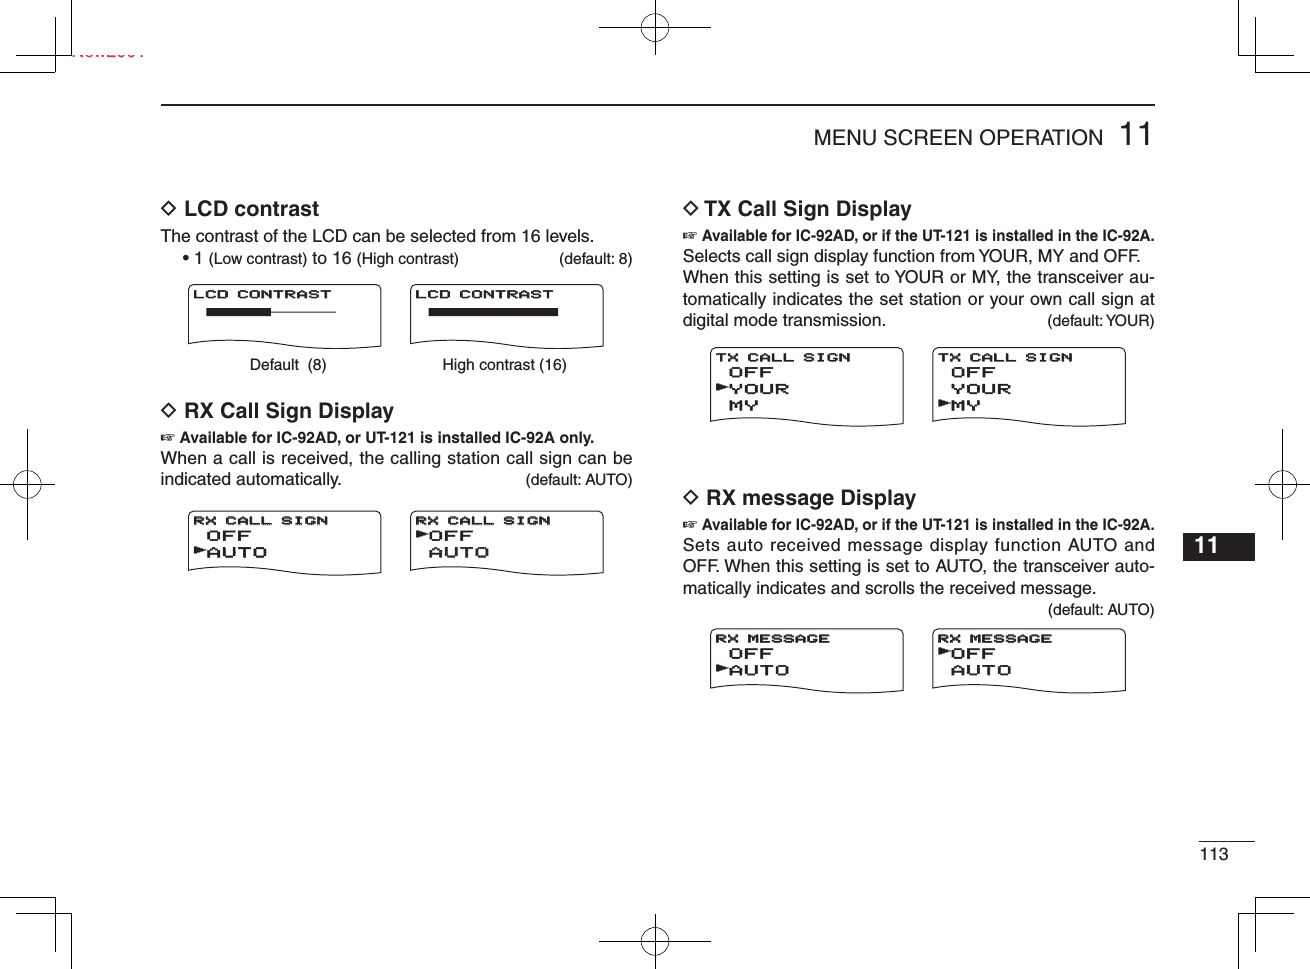
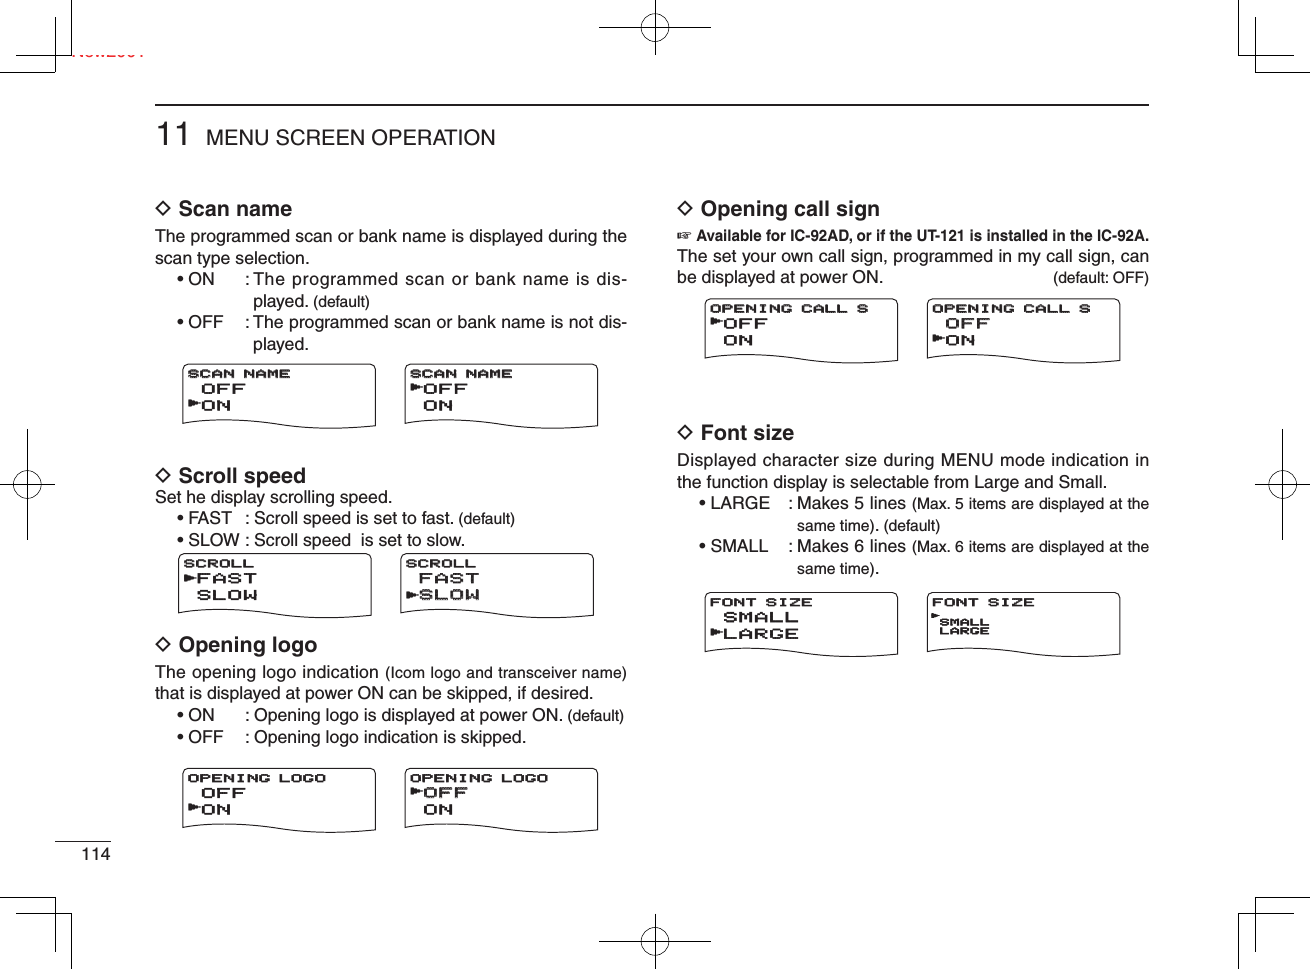
![11511MENU SCREEN OPERATIONNew200112345678910111213141516171819■ Sounds set mode itemsD Beep output levelAdjusts the key-touch beep tone level to the desired level within 39 levels. The key-touch beep (following item) must be set to ON to have a beep tone.D Key-touch beepTurns the key-touch beep ON or OFF. (default: ON)D Scan stop beepTurns the scan stop beep function ON or OFF. (default: OFF) D Scope audio outputSelect the audio output function capability during sweep with band scope function.• ON : The received audio sounds during sweep. (default)• OFF : No audio sounds during sweep.D Volume selectSelect the volume level adjustment from Both and Separate for dualwatch operation.• BOTH : Both A band and B band volume level is adjusted with [VOL] at the same time. (de-fault)• SEPARATE : The Volume setting is adjusted independ-ently in A and B bands with [VOL].BEEP LEVELBEEP LEVELBEEP LEVELBEEP LEVELMinimum level (no audio)Maximum levelONOFFKEY-TOUCH BEEPKEY-TOUCH BEEPrOFFOFFONKEY-TOUCH BEEPKEY-TOUCH BEEPrOFFONSCAN STOP BEEPSCAN STOP BEEPrONOFFOFFSCAN STOP BEEPSCAN STOP BEEPrONOFFSCOPE AF OUTPUTSCOPE AF OUTPUTrOFFOFFONSCOPE AF OUTPUTSCOPE AF OUTPUTrBOTHSEPARATEVOLUME SELECTVOLUME SELECTrSEPARATESEPARATEBOTHBOTHVOLUME SELECTVOLUME SELECTr](https://usermanual.wiki/ICOM-orporated/306600/User-Guide-882334-Page-119.png)
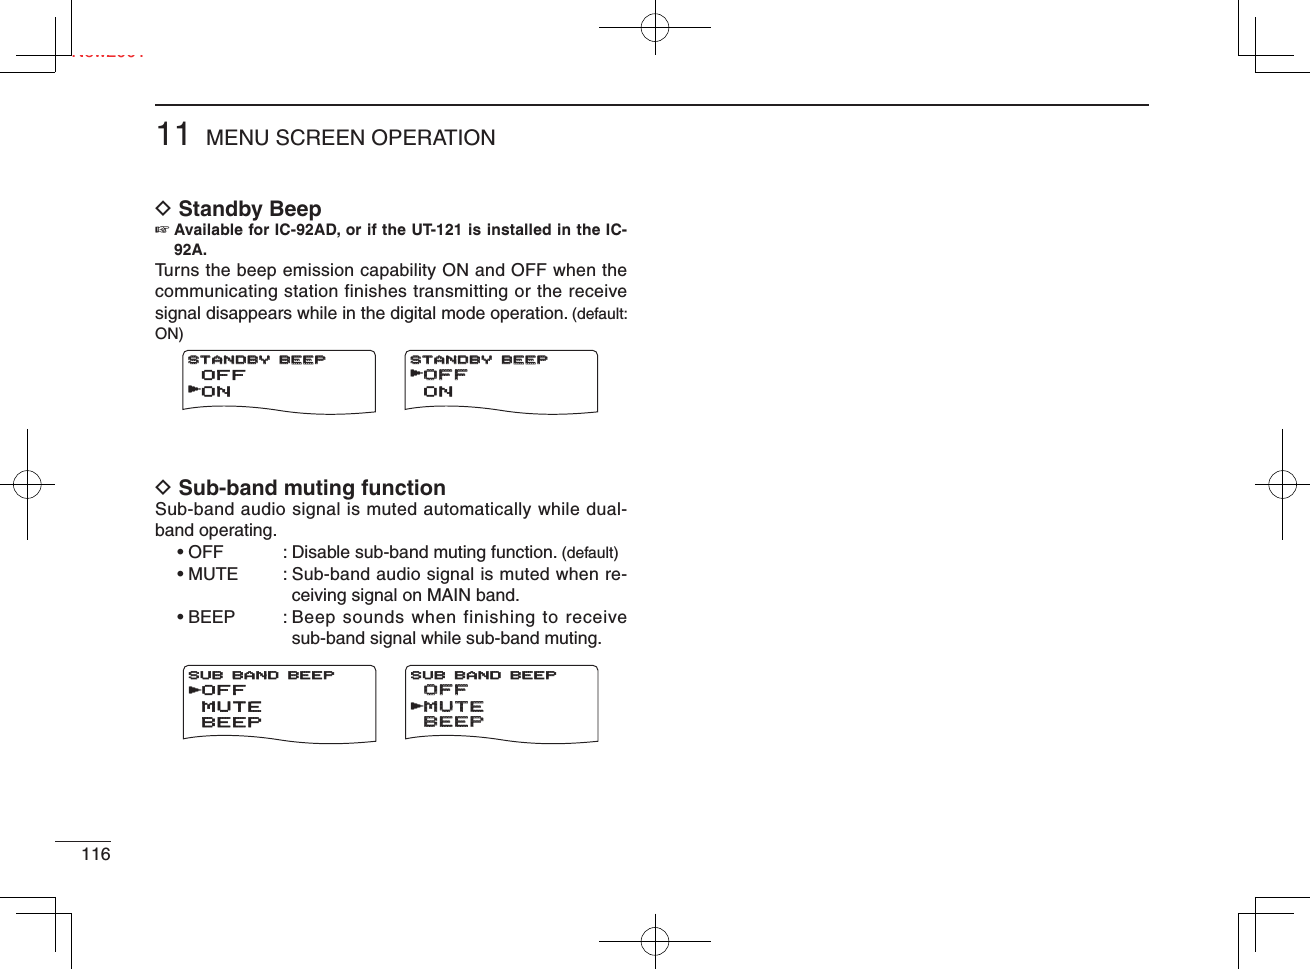
 for 1 sec. to enter DTMF memory.w Rotate [DIAL]† to select the desired DTMF memory chan-nel. • “T-CALL” appears when a 1750 Hz tone burst signal is selected. (p. 33)e Push [ ](6) to enter programming mode. • Previously programmed DTMF code is displayed if pro-grammed.r Push the desired keys to input the characters. • [0]–[9] input “0”–“9,” [A](VFO) inputs “A,” [B](MR) inputs “B,” [C](CALL) inputs “C,” [D](BAND) inputs “D,” [#](.) inputs “#” and [✱](REC) inputs “✱.” • Up to 16 digits can be programmed. • Push [MAIN/DUAL] to delete the cursor placed code. • Push and hold [MAIN/DUAL] for 1 sec. to delete the character at the cursor and all following characters.t Repeat step r until the desired code is input.y Push [MENU/ ] to program the DTMF code and exit programming mode. • Entering 16th digit automatically exits the programming mode.u Push [VFO] to exit DTMF memory.DTMF memorychannelrCh01Ch01DTMF MEMORYDTMF MEMORYDisplays NO indication when the blank channel is selected.rCh016DTMF MEMORYCh01 01234567 89ABC*#0:SET:BACK:SEL:EDITDTMF MEMORYCh01 01234567 89AB6SQL:SET MAIN:CLR SQL:SET MAIN:CLRDTMF MEMORYCh01 01234567 89ABDTMF MEMORYThe cursor is blinking whenentering programming mode.rCh01DTMF MEMORYrCh01Ch016DTMF MEMORYDTMF MEMORYCh01 01234567 89ABC*#0:SET:BACK:SEL:EDITDTMF MEMORYCh01 01234567 89AB6SQL:SET MAIN:CLR SQL:SET MAIN:CLRDTMF MEMORYCh01 01234567 89ABDTMF MEMORYThe display after 16th digit of channel 01 is input.rCh01DTMF MEMORYrCh016DTMF MEMORYCh01 01234567 01234567 89ABC*#0 89ABC*#0:SET:SET:BACK:BACK:SEL:SEL:EDIT:EDITDTMF MEMORYDTMF MEMORYrCh01 01234567 01234567 89AB 89AB6SQL:SETSQL:SET MAIN:CLRMAIN:CLR SQL:SETSQL:SET MAIN:CLRMAIN:CLRDTMF MEMORYDTMF MEMORYrCh01Ch01 012345 01234567 89AB 89ABDTMF MEMORYDTMF MEMORYrThe cursor can be moved when rotating [DIAL].†[DIAL] ↔ [ ](2)/[](8) [ ](5) ↔ [ ](6)](https://usermanual.wiki/ICOM-orporated/306600/User-Guide-882334-Page-121.png)
![11812 OTHER FUNCTIONSNew2001■ Transmitting a DTMF codeD Transmitting from DTMF memoryThe selected DTMF code is transmitted at each push of the [SQL] switch while transmitting. The transmitting speed at which DTMF memories send individual DTMF characters can be set in “DTMF SPEED” menu. (p. 99)q Set the desired frequency. (p. 18)w Push and hold [DTMF.M](9) for 1 sec. to enter DTMF memory.e Rotate [DIAL]† to select the desired DTMF memory chan-nel.r Push [](5) to set the DTMF memory.t Push [VFO] to exit DTMF memory.y While pushing [PTT], push [SQL] to transmit the selected DTMF code.D Transmitting a DTMF code directlyDTMF code can be transmitted via keypad directly while transmitting.q Set the desired frequency. (p. 18)w While pushing [PTT], push the desired keys to transmit the DTMF code. • [0]–[9] input “0”–“9,” [A](VFO) inputs “A,” [B](MR) inputs “B,” [C](CALL) inputs “C,” [D](BAND) inputs “D,” [#](.) inputs “#” and [✱](REC) inputs “✱.”MemoNameMemoNamePRIOPRIO WX EMREMRDTCSDTCSFMA438500PSKIPPSKIP+DUP+DUP2525μ0000005D28AB45D28AB4The DTMF code is displayed to here when transmitting the code.AFM438500PSKIP[SQL][DIAL]VFOMHzA9DTMF.MCSMemoNamePRIO WX EMRDTCSFMA438500PSKIP+DUP25μ0005D28AB4DTMF codes do not appear on the display when transmitting codes directly.AFMFM438500PSKIPSKIPDTMF code keys](https://usermanual.wiki/ICOM-orporated/306600/User-Guide-882334-Page-122.png)
 for 1 sec. to enter DTMF memory mode.w Rotate [DIAL]† to select the desired DTMF memory chan-nel to be cleared.e Push and hold [CLR](1) for 1 sec. to clear the selected DTMF memory channel.■ Confi rming a DTMF memoryA DTMF memory can be confi rmed with a DTMF tone.q Push and hold [DTMF.M](9) for 1 sec. to enter DTMF memory mode.w Rotate [DIAL]† to select the desired DTMF memory chan-nel.e Push [SQL] to confi rm the DTMF memory contents.••When entering DTMF programming mode.After clearing the DTMF memory.Ch01 01234567 01234567 89ABSQL:BACKSQL:BACK MAIN:CLRMAIN:CLRDTMF MEMORYDTMF MEMORYrCh01SQL:BACKSQL:BACK MAIN:CLRMAIN:CLRDTMF MEMORYDTMF MEMORYrCh01 01234567 89ABC*#0:SET:BACK:SEL:EDITDTMF MEMORY[DIAL]19SCOPEDTMF.MCSCLRPush [SQL], then sounds DTMF codes.Ch01 01234567 89ABSQL:BACK MAIN:CLRDTMF MEMORYCh01SQL:BACK MAIN:CLRDTMF MEMORYCh01 01234567 01234567 89ABC*#0 89ABC*#0:SET:SET:BACK:BACK:SEL:SEL:EDIT:EDITDTMF MEMORYDTMF MEMORYr[SQL][DIAL]9DTMF.MCS†[DIAL] ↔ [ ](2)/[](8) [ ](5) ↔ [ ](6)](https://usermanual.wiki/ICOM-orporated/306600/User-Guide-882334-Page-123.png)
![Ne12012 OTHER FUNCTIONSNew2001■ Setting DTMF transfer speedThe DTMF transfer speed can be selected.q Enter “DTMF SPEED” in DUP/TONE… set mode. (p. 99)w Rotate [DIAL]† to select DTMF transfer speed as below. 100: Transfer the DTMF data per about 100 msec. 200: Transfer the DTMF data per about 200 msec. 300: Transfer the DTMF data per about 300 msec. 500: Transfer the DTMF data per about 500 msec.e Push [](5) (or [](4)) to return to DUP/TONE… set mode, and push [MENU/ ] to return to frequency indi-cation.■ Tone frequency and DTCS codeD Subaudible (repeater) toneSome repeaters require subaudible tones to be accessed. Subaudible tones are superimposed over your normal signal and must be set in advance.D Tone and DTCS squelchesThe tone squelch (CTCSS) or DTCS squelch opens only when receiving a signal containing a matching subaudible tone or DTCS code, respectively. You can silently wait for calls from group members using the same tone or code. Separate tone frequencies can be set for repeater and tone squelch/pocket beep operation.D Pocket beepThese functions use subaudible tones or DTCS codes for calling and can be used as a “common pager” to inform you that someone has called while you were away from the transceiver. ❮MENU screen❯ ➪ ❮DUP/TONE...❯ ➪ ❮DTMF SPEED❯ (Push [MENU/ ]) (Rotate [DIAL]†, then push [ ](5)†.) DV SET MODE SCANrDUP/TONE...***** MENU *****r100 200 500 300DTMF SPEEDDTMF SPEED](https://usermanual.wiki/ICOM-orporated/306600/User-Guide-882334-Page-124.png)
![12112OTHER FUNCTIONSNew200112345678910111213141516171819D Setting subaudible tones for repeater or tone squelchq Enter “CTCSS TONE (or RPT TONE)” in DUP/TONE… set mode. (pgs. 97, 98)w Rotate [DIAL]† to select the desired repeater or CTCSS tone frequency. • Each operating band and each memory channel have inde-pendent settings. • See page 98 for available tone frequencies for details.e Push [](5) (or [Ω](4)) to return to DUP/TONE… set mode, and push [MENU/ ] to return to frequency indi-cation.D Setting DTCS code for DTCS squelch or beepq Enter “DTCS CODE” in DUP/TONE... set mode. (p. 98)w Rotate [DIAL]† to select the desired DTCS tone code. • Each operating band and each memory channel have inde-pendent settings. • See page 98 for available DTCS codes for details.e Push [](5) (or [](4)) to return to DUP/TONE… set mode, and push [MENU/ ] to return to frequency indi-cation. DTCS phase mode can be selected in “DTCS POLAR-ITY” menu. (p. 99) ❮MENU screen❯ ➪ ❮DUP/TONE...❯ ➪ ❮CTCSS TONE❯ (Push [MENU/ ]) (Rotate [DIAL]†, then push [ ](5)†.) DV SET MODE SCANrDUP/TONE...***** MENU ***** 88.588.5 200 500r300CTCSS TONECTCSS TONE 88.5 200 500r300300REPEATER TONEREPEATER TONE DV SET MODE SCANrDUP/TONE...***** MENU ***** 023 200 500r300DTCS CODE ❮MENU screen❯ ➪ ❮DUP/TONE...❯ ➪ ❮DTCS TONE❯ (Push [MENU/ ]) (Rotate [DIAL]†, then push [ ](5)†.) DV SET MODE SCANrDUP/TONE...***** MENU ***** 88.5 200 500r300CTCSS TONE 88.5 200 500r300REPEATER TONE DV SET MODE SCANrDUP/TONE...***** MENU ***** 023 200 500r300DTCS CODEDTCS CODE†[DIAL] ↔ [ ](2)/[](8) [ ](5) ↔ [ ](6)](https://usermanual.wiki/ICOM-orporated/306600/User-Guide-882334-Page-125.png)
![Ne12212 OTHER FUNCTIONSNew2001D Setting digital code for digital code squelch or beepq Push [MAIN/DUAL] to select B band, then push and hold [MODE](REC) for 1 sec. several times to select DV mode.w Enter “DIGITAL CODE” in DV SET MODE. (p. 92)e Rotate [DIAL]† to select the desired digital code. • Each operating band and each memory channel have inde-pendent settings.r Push [](5) (or [](4)) to return to DV SET MODE, and push [MENU/ ] to return to frequency indication.D Setting the YOUR and MY call signs for digital call sign squelch or beepq Push [MAIN/DUAL] to select B band, then push and hold [MODE](REC) for 1 sec. several times to select DV mode.w Enter “YOUR CALL SIGN” in CALL SIGN set mode. (p. 36)e Rotate [DIAL]† to select the desired call sign. • Input the call sign if the desired call sign is not stored in the transceiver. See p. 36 for detail.r Push [ ](5) (or [ ](4)) to return to CALL SIGN set mode.Continue to the next page.■ Digital code and digital call sign setting ❮MENU screen❯ ➪ ❮DV SET MODE❯ ➪ ❮DIGITAL CODE❯ (Push [MENU/ ]) (Rotate [DIAL]†, then push [ ](5)†.) ❮MENU screen❯ ➪ ❮CALL SIGN❯ ➪ ❮YOUR CALL SIGN❯ (Push [MENU/ ]) (Rotate [DIAL]†, then push [ ](5)†.) DV VOICE M SET MODErDV SET MODE***** MENU ***** 00 200 500r300DIGITAL CODEDIGITAL CODErCALL SIGN RX CALL S MESSAGE/POS***** MENU *****rU01 ABCDEF 500r300YOUR CALL SIGNrM01 GHIJKL 500r300MY CALL SIGN DV VOICE M SET MODErDV SET MODE***** MENU ***** 00 200 500r300DIGITAL CODErCALL SIGN RX CALL S MESSAGE/POS***** MENU *****rU01 ABCDEF 500r300YOUR CALL SIGNYOUR CALL SIGNrM01 GHIJKL 500r300MY CALL SIGNThe optional UT-121 is required for the IC-92A](https://usermanual.wiki/ICOM-orporated/306600/User-Guide-882334-Page-126.png)
![12312OTHER FUNCTIONSNew200112345678910111213141516171819t Rotate [DIAL]† to select “MY CALL SIGN” in CALL SIGN set mode, then push [](5)† to enter “MY CALL SIGN” setting.y Rotate [DIAL]† to select the desired call sign. • Input the call sign if the desired call sign is not stored in the transceiver. See pgs. 34 and 35 for detail.u Push [ ](5) to set call sign and push [MENU/ ] to re-turn to frequency indication. ❮MENU screen❯ ➪ ❮CALL SIGN❯ ➪ ❮MY CALL SIGN❯ (Push [MENU/ ]) (Rotate [DIAL]†, then push [ ](5)†.) DV VOICE M SET MODErDV SET MODE***** MENU ***** 00 200 500r300DIGITAL CODErCALL SIGN RX CALL S MESSAGE/POS***** MENU *****rU01 ABCDEF 500r300YOUR CALL SIGNrM01 GHIJKL 500r300MY CALL SIGNMY CALL SIGNCAUTION!: Use digital code squelch when operating with more than 3 stations. Because the digital call sign squelch function recognizes “MY CALL SIGN,” the digital call sign squelch function can be used when operating with only one station.NOTE:• The tone/DTCS code squelch opens sometimes when other stations communicate with adjacent tone frequency or DTCS code.†[DIAL] ↔ [ ](2)/[](8) [ ](5) ↔ [ ](6)](https://usermanual.wiki/ICOM-orporated/306600/User-Guide-882334-Page-127.png)
 for 1 sec. several times to acti-vate the tone or DTCS squelch. (TONE, TSQL or DTCS) • Subaudible tone encoder “TONE,” tone squelch “TSQL,” pocket beep “TSQLS,” DTCS squelch “DTCS,” DTCS beep “DTCSS” and no tone operation are activated in order. • Rotating [DIAL] while pushing [TONE](7) also selects the tone functions.e Operate the transceiver in the normal way.r When the received signal includes a matching tone/code, the squelch opens and the signal can be heard. • When the received signal’s tone/code does not match, tone/DTCS squelch does not open, however, the S-indicator shows signal strength. • To open the squelch manually, push and hold [SQL].■ Digital code/digital call sign squelch q Set the desired operating frequency on DV mode, Digital code and MY CALL SIGN.w Push and hold [DSQ](7) for 1 sec. several times to acti-vate the digital code or digital call sign squelch. (DSQL or CSQL) • Digital call sign squelch “DSQL,” Digital call sign beep “DSQLS”, Digital code squelch “CSQL,” Digital code beep “CSQLS” and no tone operation are activated in order. • Rotating [DIAL] while pushing [DSQ](7) also selects the tone functions.e Operate the transceiver in the normal way.r When the received signal includes a matching call sign/code, the squelch opens and the signal can be heard. • When the received signal’s call sign/code does not match, dig-ital call sign/digital code squelch does not open, however, the S-indicator shows signal strength. • To open the squelch manually, push and hold [SQL].BMemoNameMemoNamePRIOPRIO WXWX EMREMRDTCSDTCSFMFM145300145300PSKIPPSKIP+DUP+DUP2525BMemoNameMemoNamePRIOPRIO WXWX EMREMRTONETONEFMFM145300145300PSKIPPSKIP+DUP+DUP2525BMemoNameMemoNamePRIOPRIO WXWX EMREMRTSQLTSQLFMFM145300145300PSKIPPSKIP+DUP+DUP2525BMemoNameMemoNamePRIOPRIO WXWX EMREMRDTCSDTCSFMFM145300145300PSKIPPSKIP+DUP+DUP2525BMemoNamePRIOWXEMRTSQLFM438500PSKIP+DUP25BMemoNamePRIO WX EMRDTCSFM438500PSKIP+DUP25BMemoNameMemoNamePRIOPRIO WXWX EMREMRDTCSDTCSFMFM145300145300PSKIPPSKIP+DUP+DUP2525BMemoNameMemoNamePRIOPRIO WXWX EMREMRTSQLTSQLFMFM145300145300PSKIPPSKIP+DUP+DUP2525BMemoNamePRIO WX EMRDSQLDV145300PSKIP+DUP25BMemoNamePRIO WX EMRCSQLDV145300PSKIP+DUP25BMemoNamePRIO WX EMRDSQLDV145300PSKIP+DUP25BMemoNamePRIO WX EMRCSQLDV145300PSKIP+DUP25BMemoNamePRIO WX EMRDSQLDV438500PSKIP+DUP25BMemoNamePRIO WX EMRCSQLDV438500PSKIP+DUP25No tone operationSubaudible tone encoderTone squelchPocket beep DTCS beepDTCS squelchThe optional UT-121 is required for the IC-92ABMemoNamePRIO WX EMRDTCSFM145300PSKIP+DUP25BMemoNamePRIOWXEMRTONEFM145300PSKIP+DUP25BMemoNamePRIOWXEMRTSQLFM145300PSKIP+DUP25BMemoNamePRIOWXEMRDTCSFM145300PSKIP+DUP25BMemoNamePRIOWXEMRTSQLFM438500PSKIP+DUP25BMemoNamePRIOWXEMRDTCSFM438500PSKIP+DUP25BMemoNamePRIOWXEMRDTCSFM145300PSKIP+DUP25BMemoNamePRIOWXEMRTSQLFM145300PSKIP+DUP25BMemoNameMemoNamePRIOPRIO WXWX EMREMRDSQLDSQLDVDV145300145300PSKIPPSKIP+DUP+DUP2525BMemoNameMemoNamePRIOPRIO WXWX EMREMRCSQLCSQLDVDV145300145300PSKIPPSKIP+DUP+DUP2525BMemoNameMemoNamePRIOPRIO WXWX EMREMRDSQLDSQLDVDV145300145300PSKIPPSKIP+DUP+DUP2525BMemoNameMemoNamePRIOPRIO WXWX EMREMRCSQLCSQLDVDV145300145300PSKIPPSKIP+DUP+DUP2525BMemoNamePRIOWXEMRDSQLDV438500PSKIP+DUP25BMemoNamePRIO WX EMRCSQLDV438500PSKIP+DUP25Digital call sign squelchDigital call sign pocket beep Digital code pocket beepDigital code squelch](https://usermanual.wiki/ICOM-orporated/306600/User-Guide-882334-Page-128.png)
/[DSQ](7) for 1 sec. several times to activate the pocket beep, DTCS beep, Digital call sign beep or Digital code beep. (“TSQLS,” “DTCS S,” “DSQLS” or “CSQLS”) • Rotating [DIAL] while pushing [TONE](7)/[DSQ](7) also selects the tone functions.r When a signal with the correct tone, code, digital call sign or digital code is received, the transceiver emits beep tones for 30 sec. and blinks “S.”t Push [PTT] to answer or push [SQL] to stop the beeps and blinking.■ DTCS polarity settingq Enter “DTCS P” in DUP/TONE... set mode. (p. 99)w Rotate [DIAL]† to select the desired DTCS polarity mode. • BOTH N: Normal phase is used for both TX and RX. (Default) • TN-RR: Normal phase is used for TX; Reverse phase for RX. • TR-RN: Reverse phase is used for TX; Normal phase for RX. • BOTH R: Reverse phase is used for both TX and RX.e Push [](5) (or [](4)) to return to DUP/TONE… set mode, and push [MENU/ ] to return to frequency indi-cation.BMemoNamePRIO WX EMRDTCSFM145300PSKIP+DUP25BMemoNamePRIOWXEMRTONEFM145300PSKIP+DUP25BMemoNamePRIOWXEMRTSQLFM145300PSKIP+DUP25BMemoNamePRIO WX EMRDTCSFM145300PSKIP+DUP25BMemoNameMemoNamePRIOPRIO WXWX EMREMRTSQLTSQLFMFM438500PSKIPPSKIP+DUP+DUP2525BMemoNameMemoNamePRIOPRIO WXWX EMREMRDTCSDTCSFMFM438500PSKIPPSKIP+DUP+DUP2525BMemoNamePRIO WX EMRDTCSFM145300PSKIP+DUP25BMemoNamePRIOWXEMRTSQLFM145300PSKIP+DUP25BMemoNamePRIO WX EMRDSQLDV145300PSKIP+DUP25BMemoNamePRIO WX EMRCSQLDV145300PSKIP+DUP25BMemoNamePRIO WX EMRDSQLDV145300PSKIP+DUP25BMemoNamePRIO WX EMRCSQLDV145300PSKIP+DUP25BMemoNameMemoNamePRIOPRIO WXWX EMREMRDSQLDSQLDVDV43438500PSKIPPSKIP+DUP+DUP2525BMemoNameMemoNamePRIOPRIO WXWX EMREMRCSQLCSQLDVDV438500PSKIPPSKIP+DUP+DUP2525Digital call sign pocket beep Digital code pocket beepPocket beep DTCS beep ❮MENU screen❯ ➪ ❮DUP/TONE...❯ ➪ ❮DTCS P❯ (Push [MENU/ ]) (Rotate [DIAL]†, then push [ ](5)†.)rrRPT TONE CTCSS TONECTCSS TONErDTCS CODEDUP/TONE...DUP/TONE...rDTCS PDTCS P†[DIAL] ↔ [ ](2)/[](8) [ ](5) ↔ [ ](6)](https://usermanual.wiki/ICOM-orporated/306600/User-Guide-882334-Page-129.png)
 for 1 sec. several times to ac-tivate the repeater tone, tone squelch or DTCS squelch. (TONE, TSQL or DTCS) • Rotating [DIAL] while pushing and holding [TONE](7) also se-lects the tone functions.e Push and hold [T.SCAN](.) for 1 sec. to start the tone scan. • To change the scanning direction, rotate [DIAL].r When the tone frequency or DTCS code is decoded, the set mode contents are programmed with the frequency or code. • The tone scan pauses for the set period in scan pause timer (p. 96) when a tone frequency or DTCS code is detected. • The decoded tone frequency is used for the repeater tone fre-quency when the tone squelch is OFF. • The decoded tone frequency is used for the tone squelch fre-quency (CTCSS TONE) when the tone squelch is ON. • The decoded DTCS code is used for the DTCS code when the DTCS squelch is ON.t Push [VFO] to stop the scan. • If the scan is cancelled before the transceiver detects the tone or code, the set mode contents are not changed. • The detected tone is temporary operation only. The stored tone setting in memory or call channel won’t be changed.AMemoNameMemoNamePRIOPRIOWXWXEMREMRDTCSDTCSFMFM17131713PSKIPPSKIP+DUP+DUP2525AMemoNameMemoNamePRIOPRIOWXWXEMREMRDTCSDTCSDVDV662662PSKIPPSKIP+DUP+DUP2525Tone scan for tone squelch/ repeater tone.Tone scan for DTCS squelch.The decimal point is blinking whiletone scanning..T.SCAN7TONEDSQCD#[DIAL]](https://usermanual.wiki/ICOM-orporated/306600/User-Guide-882334-Page-130.png)
![12712OTHER FUNCTIONSNew200112345678910111213141516171819■ Beep tonesYou can select to have confirmation beeps sound at the push of a switch. The output level can be adjusted within 39 levels with “BEEP LEVEL” in sounds set mode. (p. 102)You can select silent operation by turning beep tones OFF with “KEY-TOUCH BEEP” in sounds set mode. (p. 102)■ Dial speed accelerationThe dial speed acceleration automatically speeds up the tuning dial speed when rotating [DIAL] rapidly.This function can be turned ON and OFF with “DIAL SPEED” in menu screen operation. (p. 89)■ Key lock effectD Lock functionThe lock function prevents accidental frequency changes and accidental function access.➥ Push [MENU/ ] for 1 sec. to toggle the lock function ON and OFF. • [PWR], [VOL], [SQL] and [PTT] can still be accessed while the lock function is ON. (default)D Key lock typeWhile the lock function is ON, [PWR], [VOL], [SQL] and [PTT] can still be accessed. Accessible switches can be set to one of 4 groups with “LOCK” in set mode. (p. 90)• “NORMAL” : [PWR], [VOL], [SQL] and [PTT] are accessible.• “NO SQL” : [PWR], [SQL] and [PTT] are accessible.• “NO VOL” : [PWR], [VOL] and [PTT] are accessible.• “ALL” : [PWR] and [PTT] are accessible. ❮MENU screen❯ ➪ ❮SOUNDS❯ ➪ ❮BEEP LEVEL❯ (Push [MENU/ ]) (Rotate [DIAL]†, then push [ ](5)†.) ❮MENU screen❯ ➪ ❮SOUNDS❯ ➪ ❮KEY-TOUCH BEEP❯ (Push [MENU/ ]) (Rotate [DIAL]†, then push [ ](5)†.) ❮MENU screen❯ ➪ ❮SET MODE❯ ➪ ❮DIAL SPEED❯ (Push [MENU/ ]) (Rotate [DIAL]†, then push [ ](5)†.)AFMFM439540PSKIPSKIPAppears. ❮MENU screen❯ ➪ ❮SET MODE❯ ➪ ❮LOCK❯ (Push [MENU/ ]) (Rotate [DIAL]†, then push [ ](5)†.)†[DIAL] ↔ [ ](2)/[](8) [ ](5) ↔ [ ](6)](https://usermanual.wiki/ICOM-orporated/306600/User-Guide-882334-Page-131.png)
![Ne12812 OTHER FUNCTIONSNew2001■ Weather channel operationThere are 10 weather channels for moni-toring weather channels from the NOAA (National Oceanographic and Atmospheric Administration) broadcasts.D Weather channel selectionq Push [CALL] several times to select weather channel mode. • “WX” and the weather channel number appear.w Rotate [DIAL] to select the desired weather channel.e Push [VFO] or [MR] to return to the previous frequency or memory channel.D Weather alert functionNOAA broadcast stations transmit weather alert tones be-fore important weather announcements. When the weather alert function is turned ON, the selected weather channel is monitored every 5 sec. for the announcement. When the alert signal is detected, the “ALT” and the WX channel are displayed alternately and sounds a beep tone until the trans-ceiver is operated. The previously selected (used) weather channel is checked periodically during standby or while scanning.q Select the desired weather channel.w Enter “WEATHER ALERT” in set mode. (p. 90)e Rotate [DIAL]† to select “ON” or “OFF.”r Push [](5) (or [](4)) to return to set mode, and push [MENU/ ] to return to the weather channel indication.t Set the desired stand-by condition. • Select VFO, memory or call channel. • Scan or priority watch operation can also be selected.Weather channel indication.AWX1WXAWX1WXAWX1ALTMRS.MWBVFOMHzACALLRX CSC[DIAL]U.S.A. version only ❮MENU screen❯ ➪ ❮SET MODE❯ ➪ ❮WEATHER ALERT❯ (Push [MENU/ ]) (Rotate [DIAL]†, then push [ ](5)†.)](https://usermanual.wiki/ICOM-orporated/306600/User-Guide-882334-Page-132.png)
![12912OTHER FUNCTIONSNew200112345678910111213141516171819y When the alert is detected, a beep sounds and the follow-ing indication will be displayed.u Turn the weather alert function OFF in set mode. NOTE: While receiving a signal (on a frequency other than the weather alert ON frequency), the receiving signal or audio will be interrupted momentarily every 5 sec. (ap-prox.) in the case that the alert function is turned ON. This symptom is caused by the WX alert function. To cancel these symptoms, set the weather alert item OFF in set mode.■ Power saveThe power save function reduces the current drain to con-serve battery power. The power save duty cycle, the ratio of receive circuit on to receive circuit off during standby, can be set to auto-matic (default), 1 : 1 (150 msec. : 150msec.), 1 : 4 (150 msec. : 600msec.), 1 : 8 (150 msec. : 1200msec.) or OFF with “POWER SAVE” in set mode. (p. 88)• “AUTO” selects “1:1” duty ratio when receiving no signal for 5 sec., then “1:4” 60 sec. after that. The ratio becomes “1:8” when no sig-nal is received for another 60 sec.AWX1WXAWX1WXWXAWXWX1ALTALTShows above indications alternately ❮MENU screen❯ ➪ ❮SET MODE❯ ➪ ❮POWER SAVE❯ (Push [MENU/ ]) (Rotate [DIAL]†, then push [ ](5)†.)150 msec.150 msec.60 sec. 60 sec.600 msec. 1200 msec.No signal5 sec.Circuit ONCircuit OFF†[DIAL] ↔ [ ](2)/[](8) [ ](5) ↔ [ ](6)](https://usermanual.wiki/ICOM-orporated/306600/User-Guide-882334-Page-133.png)
![Ne13012 OTHER FUNCTIONSNew2001■ Auto power OFFThe transceiver can be set to automatically turn OFF after a specifi ed period with a beep when no switch is pushed.120 min., 90 min., 60 min., 30 min. and OFF can be speci-fied. The specified period is retained even when the trans-ceiver is turned OFF by the auto power-off function. To cancel the function, select “OFF” in the auto power-off item in set mode.This can be selected with “AP OFF” in set mode. (p. 88)■ Auto power ONThe transceiver can be set to automatically turn ON after a specifi ed period. The timer can be selected within 30 min. to 24 hrs. in 30 min. steps.This can be selected with “AP ON” in set mode. (p. 90) When operating with battery pack or case and the battery is exhausted, auto power-on does not function. A slight current still flows in the circuits during standby condition of the auto power-on function.■ Time-out timerTo prevent accidental prolonged transmission, etc., the transceiver has a time-out timer. This timer cuts a transmis-sion OFF after 1, 3, 5 or 10 min. of continuous transmission. This timer can be cancelled (default). Approx. 10 sec. before the time-out timer is activated, the transceiver emits a beep tone as a warning.This can be selected with “TOT” in set mode. (p. 91)■ PTT lockTo prevent accidental transmission, etc., the transceiver has a PTT lock function.This can be selected with “PTT LOCK” in set mode. (p. 91) ❮MENU screen❯ ➪ ❮SET MODE❯ ➪ ❮AP OFF❯ (Push [MENU/ ]) (Rotate [DIAL]†, then push [ ](5)†.) ❮MENU screen❯ ➪ ❮SET MODE❯ ➪ ❮AP ON❯ (Push [MENU/ ]) (Rotate [DIAL]†, then push [ ](5)†.) ❮MENU screen❯ ➪ ❮SET MODE❯ ➪ ❮TOT❯ (Push [MENU/ ]) (Rotate [DIAL]†, then push [ ](5)†.) ❮MENU screen❯ ➪ ❮SET MODE❯ ➪ ❮PTT LOCK❯ (Push [MENU/ ]) (Rotate [DIAL]†, then push [ ](5)†.)†[DIAL] ↔ [ ](2)/[](8) [ ](5) ↔ [ ](6)](https://usermanual.wiki/ICOM-orporated/306600/User-Guide-882334-Page-134.png)
![13112OTHER FUNCTIONSNew200112345678910111213141516171819■ Cloning functionThe IC-92A/92AD has transceiver-to-transceiver data clon-ing capability. This function is useful when you want to copy all of the programmed contents from one IC-92A/92AD to another. • An optional OPC-474 CLONING CABLE is required.q Turn the transceiver’s power OFF, then connect an op-tional OPC-474 between both [SP] jacks.w While pushing [MR] and [MENU/ ], push and hold [PWR] for 1 sec. to enter cloning mode. • “CLONE M” appears.e Push [PTT] on the “master” transceiver. • “CLONE OUT M” appears and the bar meter shows that cloning is taking place. • After the cloning is completed, the display returns to “CLONE M.”r Push and hold [PWR] for 1 sec. to turn power OFF.The optional RS-92 REMOTE CONTROL SOFTWARE is also available to clone/edit contents with a PC (for Microsoft® Windows® 98/98SE/ME/2000XP) and using ICF format fi les.Microsoft® and Windows® are registered trademarks of Microsoft Corporation in the U.S.A. and other countries.■ [DATA/MIC/SP] jacksTo connect external equipment such as speaker, micro-phone, TNC, etc. refer to the diagram below. The center terminal of [MIC] outputs 3.3 V DC via 330 resistor.OPC-1751 OPC-1751OPC-474to the [SP] jack to the [SP] jackExternal speakerthe [SP] jackSPSPGND3.5 (d) mmplugthe [MIC] jack33 k330 MIC MICGND External microphone2.5 (d) mmplugPTT3.3 V (See below)Impedance 8 Impedance 2 kMIC3.0 VMIC GNDINTERNAL SPSP (AF OUT)CLONESP GND](https://usermanual.wiki/ICOM-orporated/306600/User-Guide-882334-Page-135.png)
![13212 OTHER FUNCTIONSNew2001■ ResettingThe function display may occasionally display erroneous information (e.g. when first applying power). This may be caused externally by static electric-ity or by other factors.If this problem occurs, turn power OFF. After waiting a few seconds, turn power ON again. If the problem persists, per-form either or both procedures below.• All resetReset the CPU before operating the transceiver for the first time, or if the internal CPU malfunctions, to clear and return all programmed contents to their default settings. • Partial resetIf you want to initialize the operat-ing conditions (VFO frequency, VFO settings, set mode contents) without clearing the memory contents, a partial reset function is available for the trans-ceiver.D All resetq Push and hold [PWR] for 1 sec. to turn power OFF.w While pushing and holding [VFO], [MR] and [BAND], then turn power ON to reset the CPU. • “ALL RESET” appears when resetting the CPU (See the illustration below). CAUTION: Resetting the CPU returns all programmed contents to their default settings.D Partial resetq Push and hold [PWR] for 1 sec. to turn power OFF.w While pushing and holding [VFO], then turn power ON to partially reset the transceiver.[NOTE]: No message appears on the display after the partial reset is done.ALL RESETALL RESETPRIO WX EMREMRDTCSFMBA146010+DUP2525PRIO WX EMRDTCSFMBA145000+DUP25PRIO WX EMRDTCSFMBA438550+DUP25ALL RESETPRIO WX EMRDTCSFMBA146010+DUP25PRIO WX EMRDTCSFMBA145000+DUP25PRIO WX EMRDTCSFMBA438550+DUP25MRS.MWBVFOMHzABANDDPWR](https://usermanual.wiki/ICOM-orporated/306600/User-Guide-882334-Page-136.png)
![13313TROUBLESHOOTING12345678910111213141516171819PROBLEMNo power comes ON.No sound comes from the speaker.Transmitting is impossible.No contact possible with another station.Frequency can not be set.Program scan function can not start.Memory scan function can not start.The displayed frequency is erroneous.Can not charge the bat-tery with BC-139 (LED blinks orange).If your transceiver seems to be malfunctioning, please check the following points before sending it to a service center.POSSIBLE CAUSE• The batteries are exhausted.• The battery polarity is reversed.• Volume level is too low.• Different tone is selected with tone/DTCS squelch.• The batteries are exhausted.• A frequency outside of the 144/440 MHz amateur bands is set.• Different tone is selected with tone/DTCS squelch.• The lock function is activated.• Memory mode or call channel is selected.• Memory mode or call channel is selected.• Same frequencies are programmed both “✱A” and “✱B” of PROGRAM-CH.• VFO mode or call channel is selected.• The programmed memory channel is only one.• The CPU malfunctioned.• External factors caused a fault.• Turn the transceiver’s power ON.SOLUTION• Replace the batteries or charge the battery pack.• Check the battery polarity.• Rotate [VOL] to suitable level.• Check the tone using tone/DTCS scan.• Replace the batteries or charge the battery pack.• Reset the frequency within 144/440 MHz amateur bands.• Check the tone/DTCS using tone scan.• Push [MENU/ ] for 1 sec. to cancel the function.• Push [VFO] to set VFO mode.• Push [VFO] to set VFO mode.• Programming different frequencies in “✱A” and “✱B” respectively.• Push [MR] to set memory mode.• Program more than 2 memory channels.• Reset the transceiver.• Remove and re-attach the battery pack or battery case.• Turn the transceiver’s power OFF, or insert only the battery pack into the BC-139 to charge it.REF.pgs. 1, 10–12p. 12p. 20p. 110pgs. 1, 10–12p. 24p. 112p. 25p. 15p. 15p. 74p. 15p. 66p. 118p. 1pgs. 11 ,20](https://usermanual.wiki/ICOM-orporated/306600/User-Guide-882334-Page-137.png)
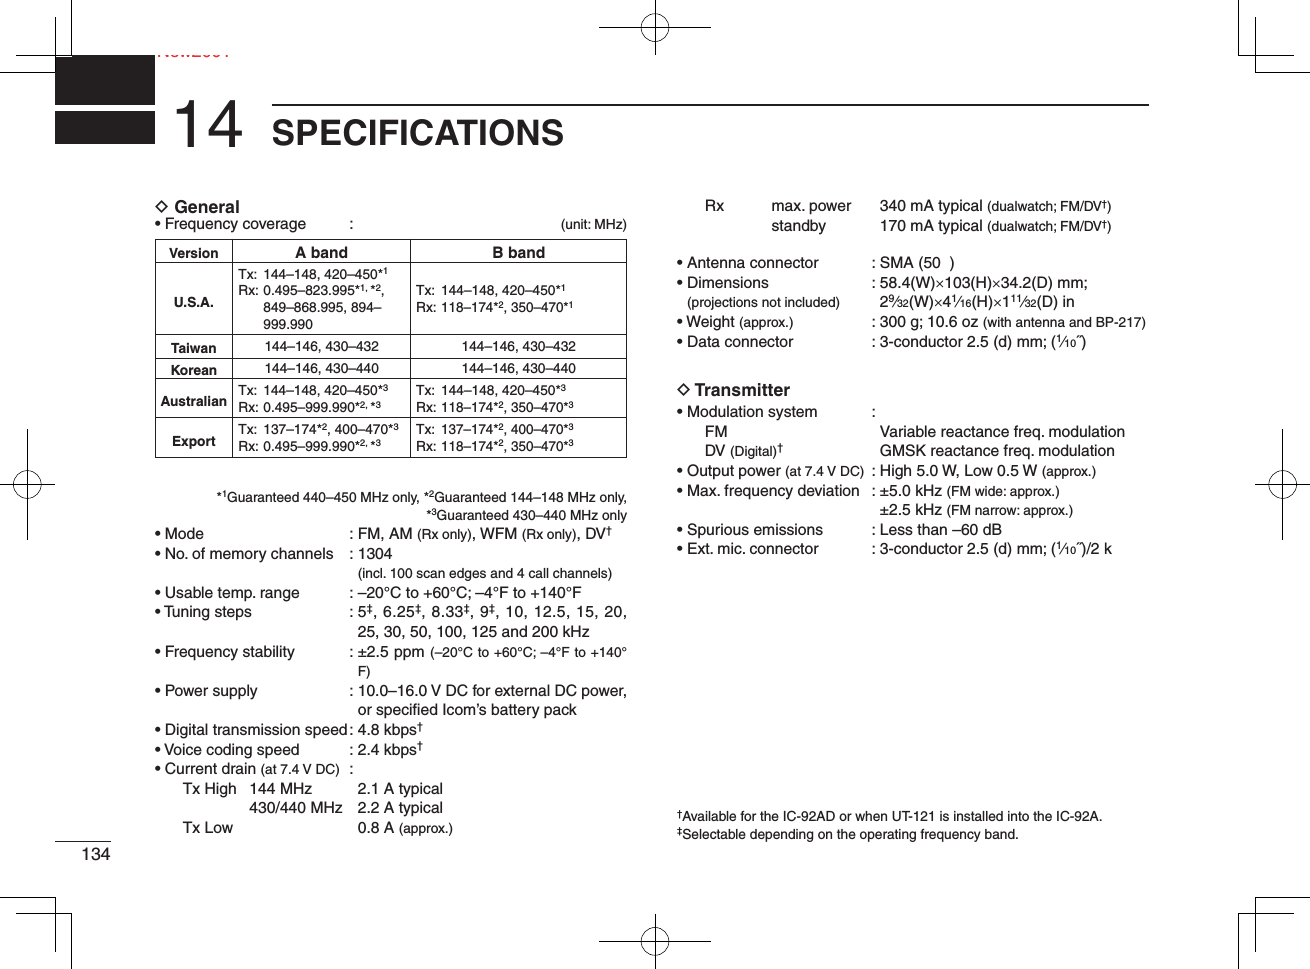
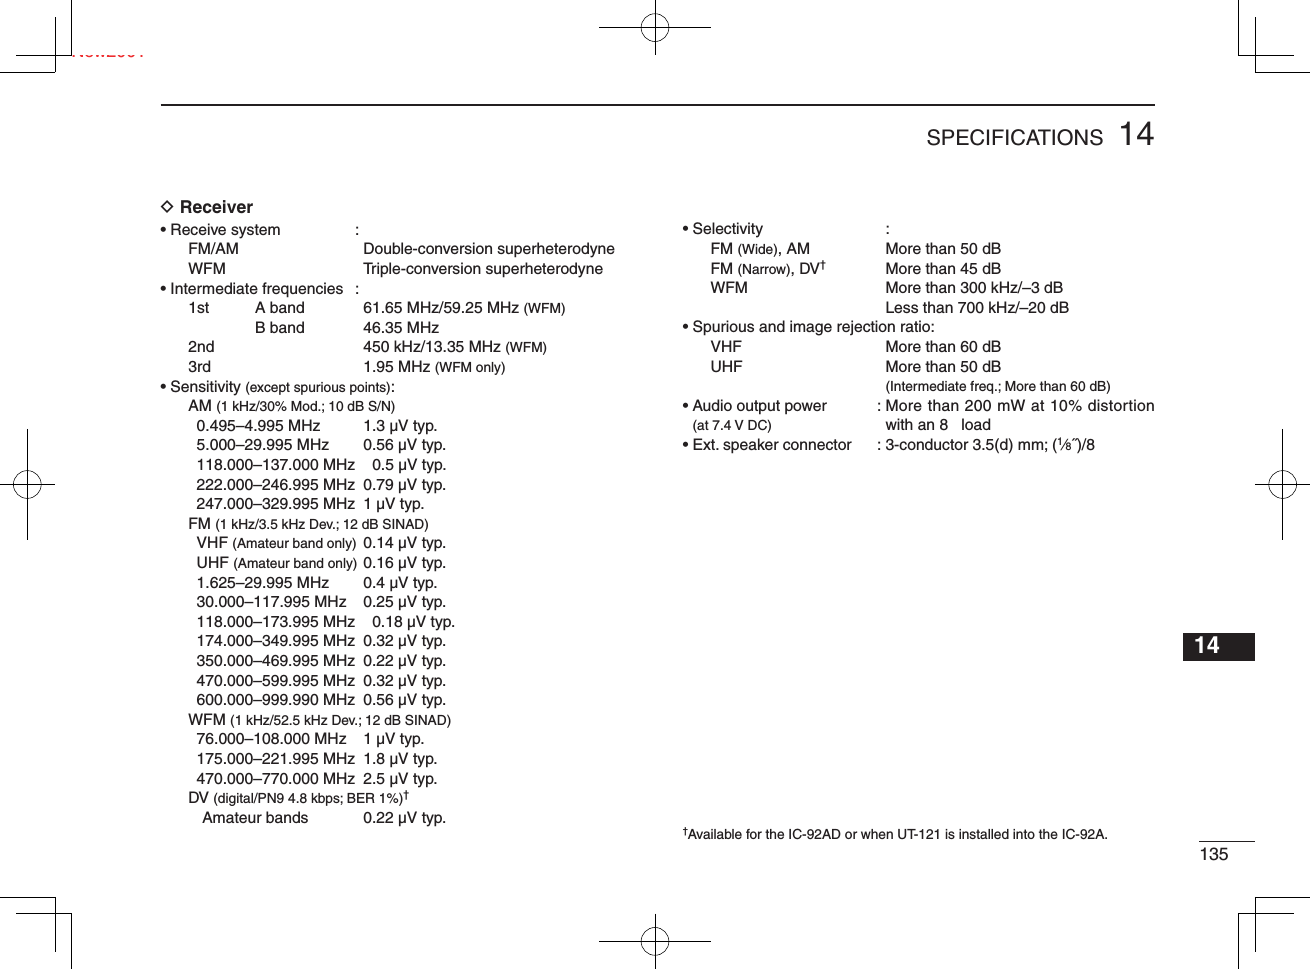
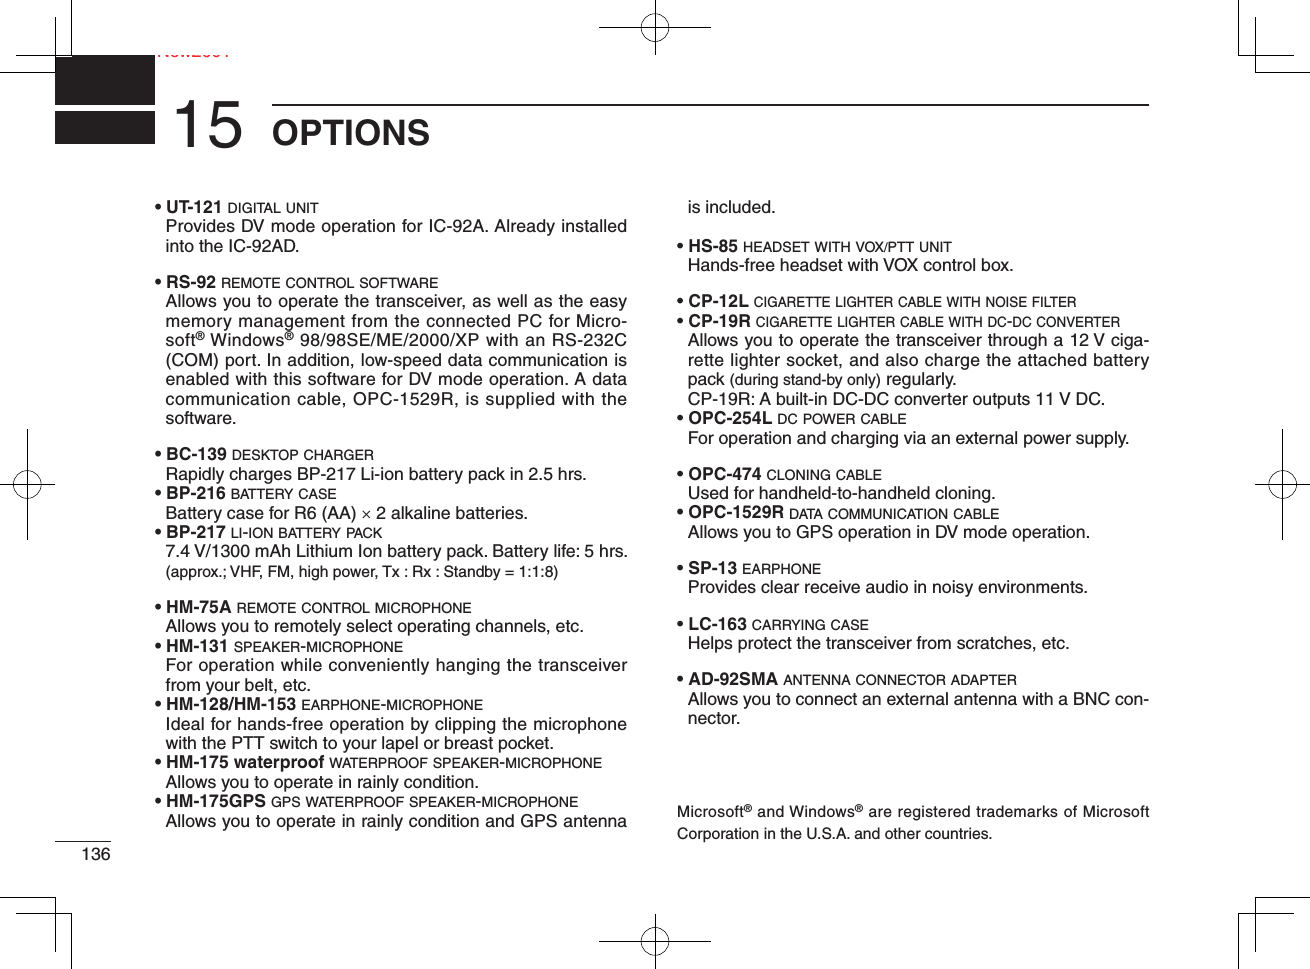
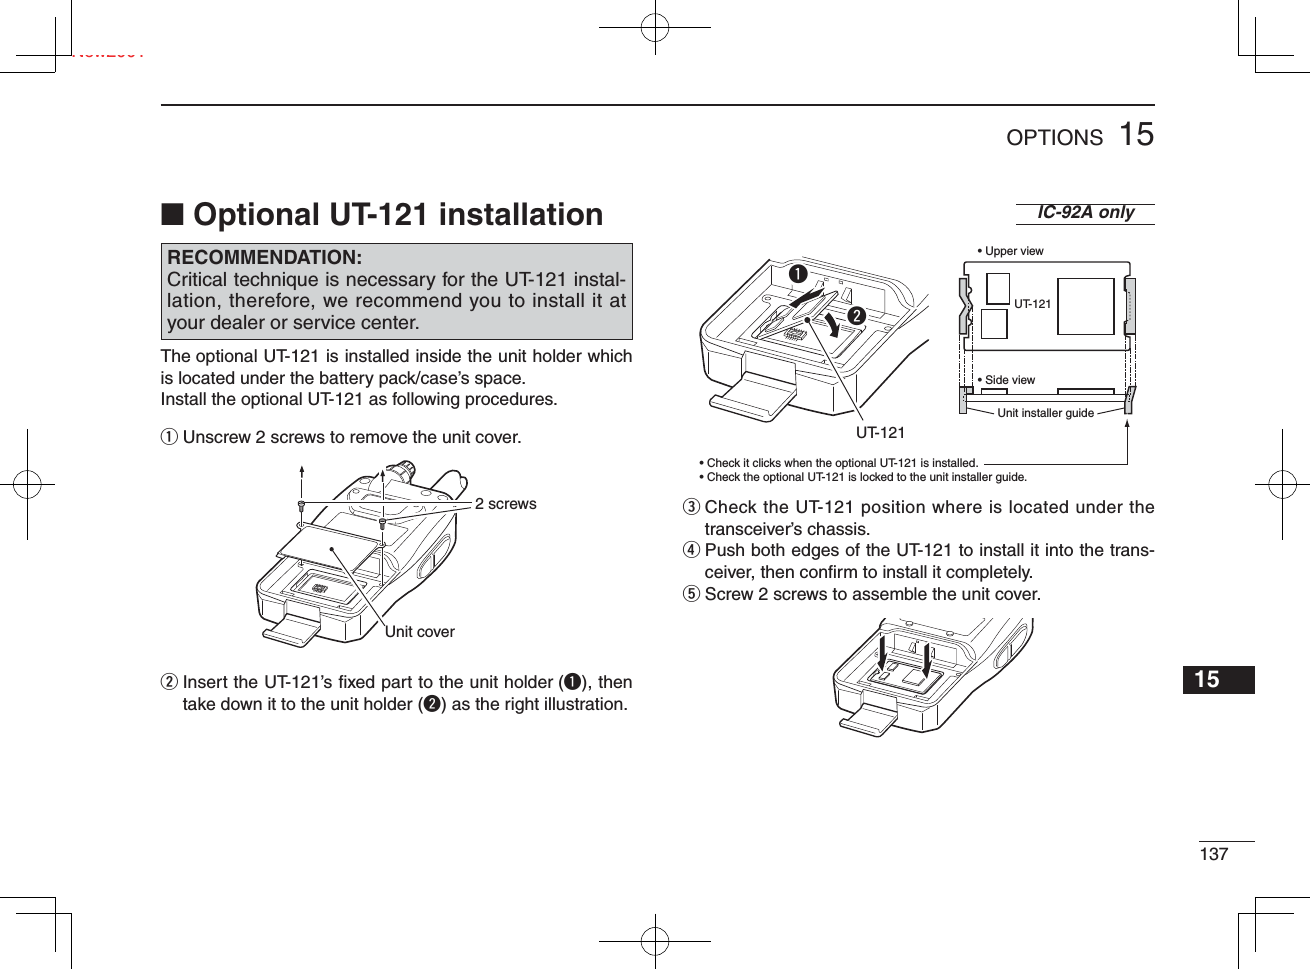
![The optional HM-75A allows you to remotely select operat-ing frequencies, memory channels, etc. Remote control functions can be selected from 3 settings. These can be selected with “MIC SIMPLE MODE” in set mode. (p. 90)The HM-75A has a lock switch on the backside to prevent accidental frequency changes, etc. Be sure to turn power OFF when plugging the HM-75A to the [DATA/MIC/SP] jack.• NORM-1: (default)• NORM-2: • SIMPLE: VFO mode cannot be selected via the microphone when SIMPLE mode is selected. SIMPLE mode can select only 3 channels and is useful for group operations during touring, etc.13815 OPTIONSNew2001■ Optional HM-75A REMOTE CONTROL MICROPHONE [A] Selects band. [B] Toggles VFO mode and memory mode. [Y] Frequency or memory channel “UP”. [Z] Frequency or memory channel “DOWN”. [A] Toggles the monitor function. [B] Toggles VFO mode and memory mode. [Y] Frequency or memory channel “UP”. [Z] Frequency or memory channel “DOWN”. [A] Toggles the monitor function. [B] Selects call channel C0. [Y] • Selects memory channel 000 in memory mode. • Volume “UP” while operating the monitor function. [Z] • Selects memory channel 001 in memory mode. • Volume “DOWN” while operating the monitor function.❮MENU screen❯ ➪ ❮SET MODE❯ ➪ ❮MIC SIMPLE MODE❯ (Push [MENU/LOCK]) (Rotate [DIAL]†, then push [ï](5)†.)AOFF ONLOCKBPTT switchTransmit LEDEarphone jackMicrophoneSpeaker†[DIAL] ↔ [ ](2)/[](8) [ ](5) ↔ [ ](6)Ne](https://usermanual.wiki/ICOM-orporated/306600/User-Guide-882334-Page-142.png)
![13915OPTIONSNew200112345678910111213141516171819When connecting the optional HM-174 WATERPROOF SPEAKER-MICROPHONE, HM-175GPS GPS WATERPROOF SPEAKER-MICROPHONE or PC-1799 DATA COMMUNICATION CABLE, OPC-1797 CONNECTION CABLE to the [DATA/SP/MIC] jack, follow the procedure below.• Connecting to the [DATA/SP/MIC] jackq Remove the rubber cap. from the [DATA/SP/MIC] jack.w Set the connector's fl at face and the [DATA/SP/MIC] jack's flat face to same direction, (Verifing square mark) then insert it tighten.e Rotate fix screw clockwise tighten to fix the connected cable.• Disconnecting from the [DATA/SP/MIC] jackq Rotate fix screw counter-clockwise to loose the con-nected cable.w Disconnect the cable from the [DATA/SP/MIC] jack.e Put the rubber cap tighten to the [DATA/SP/MIC] jack..■ Connecting to the [DATA/SP/MIC] jack CAUTION!:Turn power OFF the transceiver before connecting/disconnecting cable to/from the [DATA/SP/MIC] jack..Rubber cap[DATA/SP/MIC] jack[DATA/SP/MIC] jack (Upside view)Flat faceTriangular markConnector (Side view)Flat faceTriangular markRotate the fix screw tighten.No Sound from the inside speaker when connecting OPC-1797.](https://usermanual.wiki/ICOM-orporated/306600/User-Guide-882334-Page-143.png)