ICOM orporated 325100 VHF Amateur Transceiver User Manual IC 2300H 0 indd
ICOM Incorporated VHF Amateur Transceiver IC 2300H 0 indd
UserManual.wiki
>
ICOM orporated
>
325100 User Manual
User Manual
Navigation menu
Upload a User Manual
Namespaces
Wiki Guide
HTML
PDF
Info
Views
User Manual
Discussion / Help
Navigation
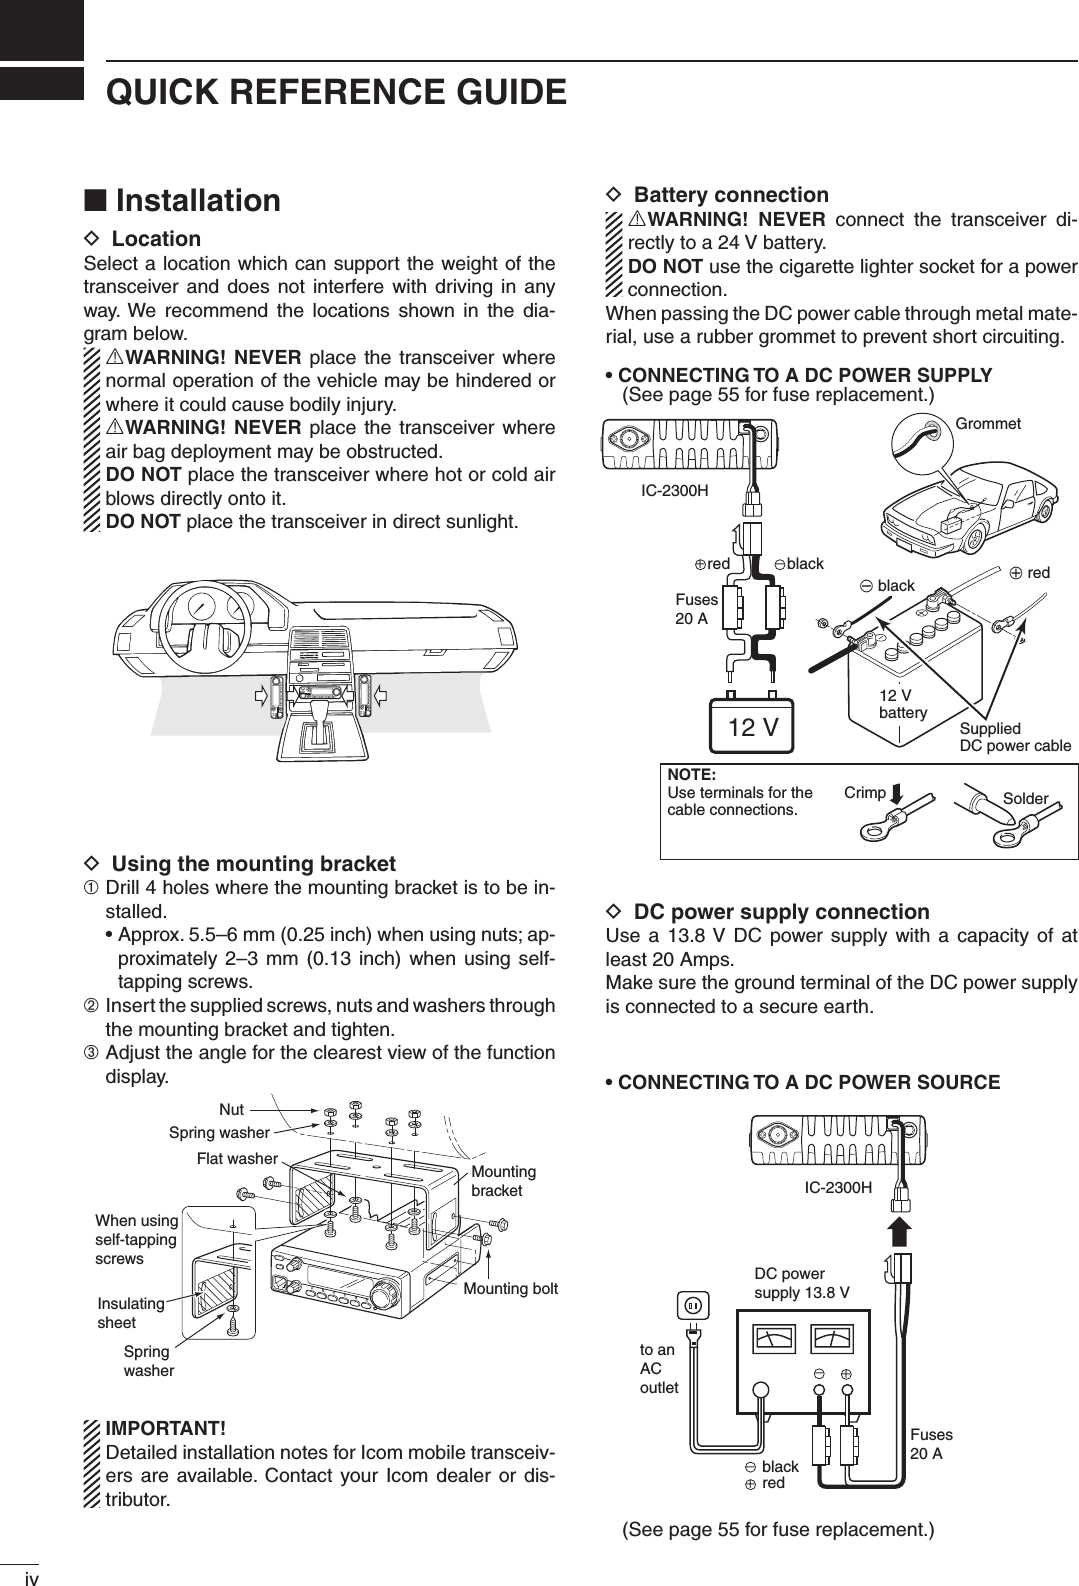
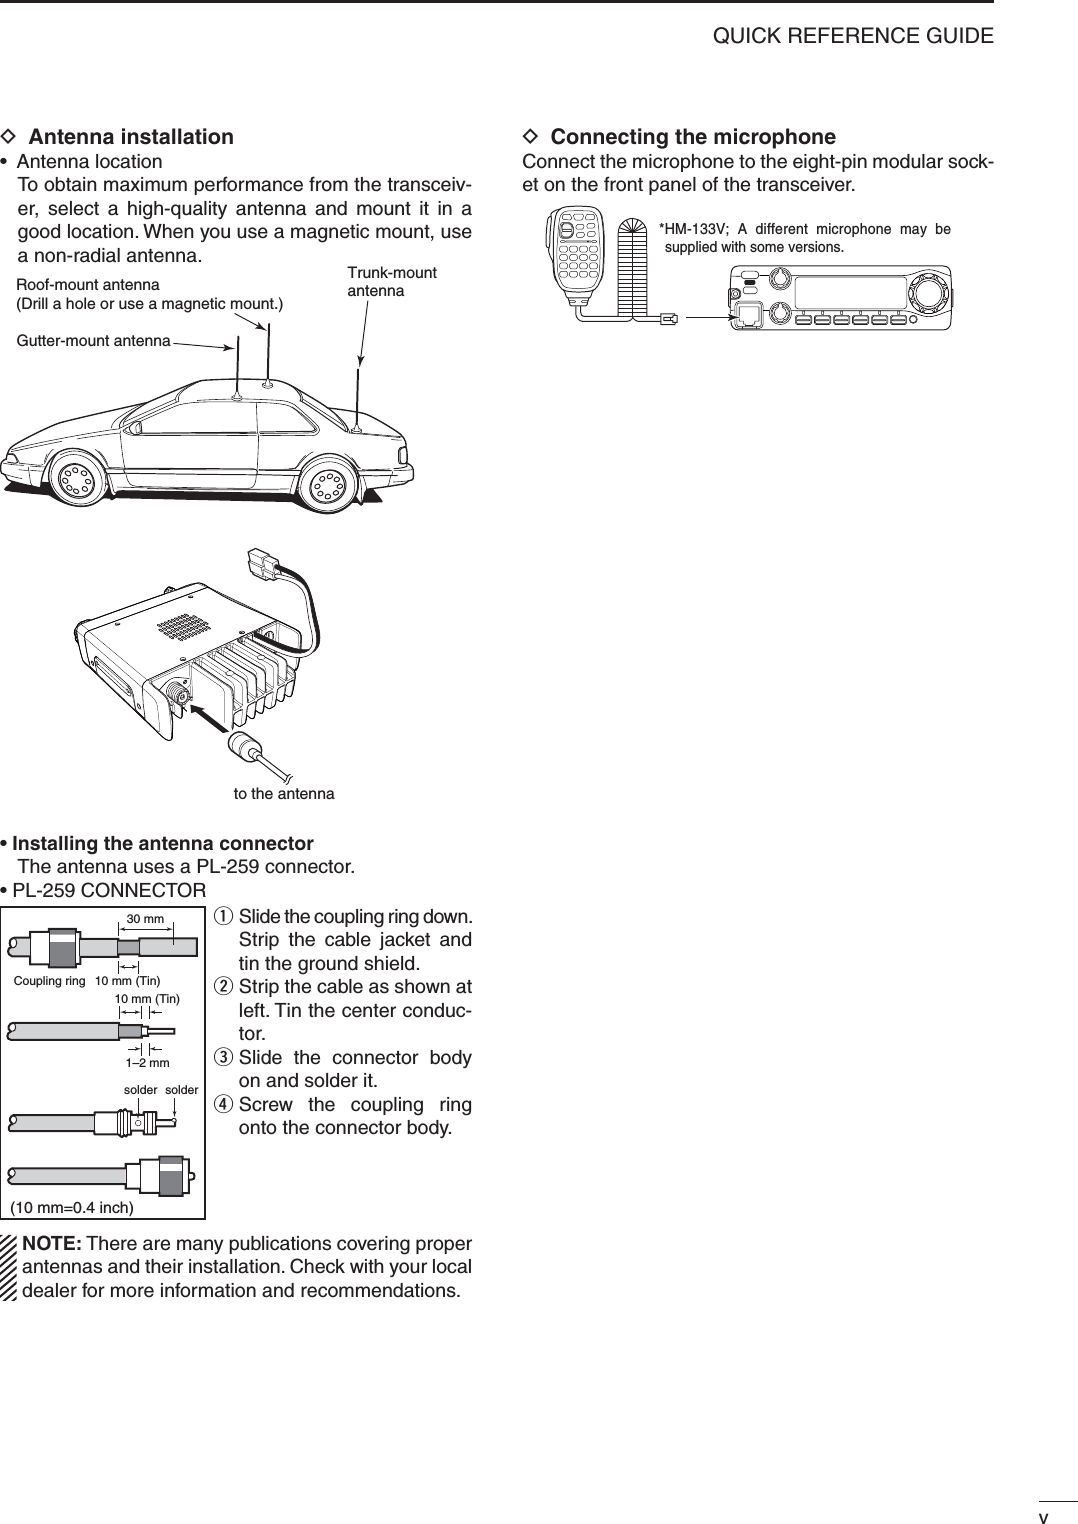
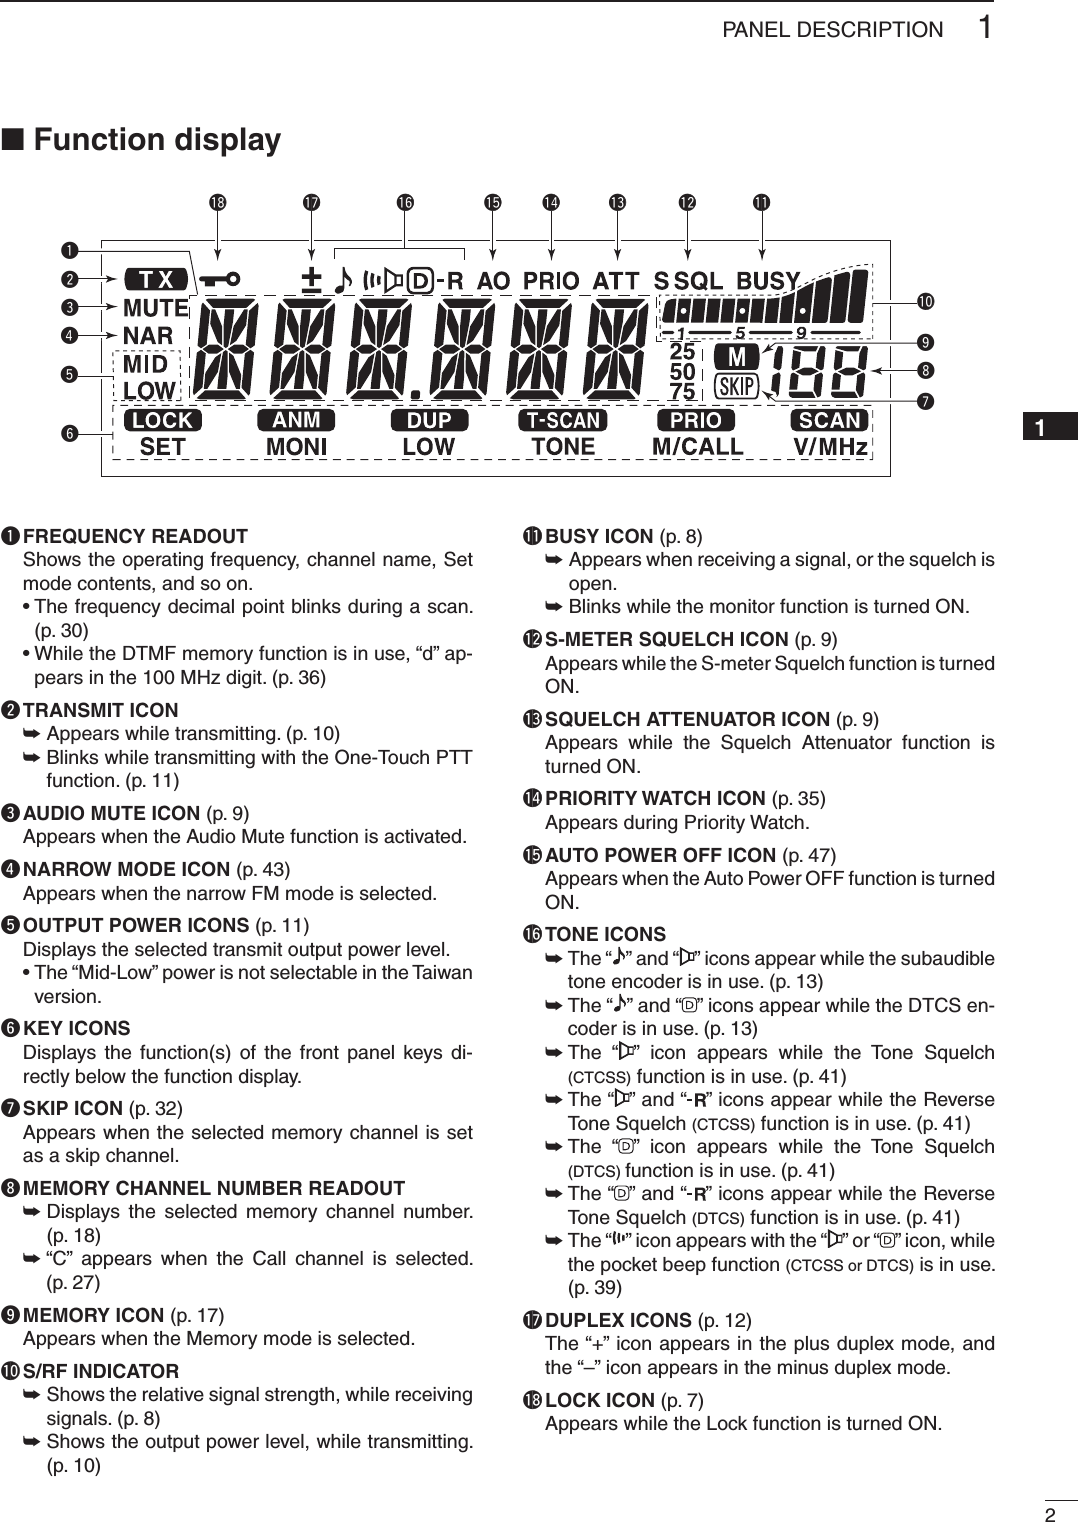
![iiiTABLE OF CONTENTSFOREWORD ......................................................................................... iIMPORTANT .......................................................................................... iEXPLICIT DEFINITIONS ....................................................................... iSUPPLIED ACCESSORIES .................................................................. iOPTIONS .............................................................................................. iFCC INFORMATION ............................................................................. iPRECAUTION ...................................................................................... iiTABLE OF CONTENTS ....................................................................... iiiQUICK REFERENCE GUIDE ...................................................... IV–VII ■ Installation ................................................................................... iv ■ Your fi rst contact .......................................................................... vi ■ Repeater operation ..................................................................... vi ■ Programming memory channels ................................................ vii1 PANEL DESCRIPTION ............................................................... 1–4 ■ Front panel ................................................................................... 1 ■ Function display ........................................................................... 2 ■ Rear panel ................................................................................... 3 ■ Microphone (HM-133V) ................................................................ 3 ■ Microphone keypad ...................................................................... 42 SETTING A FREQUENCY .......................................................... 5–7 ■ Preparation .................................................................................. 5 ■ Using the tuning dial .................................................................... 5 ■ Using the keypad ......................................................................... 5 ■ Using the [Y] or [Z] keys ............................................................. 5 ■ Tuning step selection .................................................................... 6 ■ Lock functions .............................................................................. 73 BASIC OPERATION .................................................................. 8–14 ■ Receiving ..................................................................................... 8 ■ Monitor function ........................................................................... 8 ■ Audio mute function ..................................................................... 9 ■ Squelch attenuator ....................................................................... 9 ■ S-meter squelch ........................................................................... 9 ■ Transmitting ................................................................................ 10 ■ Selecting output power ............................................................... 11 ■ One-touch PTT function ............................................................. 11 ■ Accessing a repeater ................................................................. 12 ■ Subaudible tones ....................................................................... 134 REPEATER SETTING ............................................................. 15–16 ■ Frequency offset ......................................................................... 15 ■ Repeater lockout ........................................................................ 15 ■ Reversed duplex function ........................................................... 16 ■ Auto repeater ............................................................................. 165 MEMORY OPERATION ........................................................... 17–26 ■ General description .................................................................... 17 ■ Programming a memory channel ............................................... 17 ■ Memory channel selection ......................................................... 18 ■ Copying memory contents ......................................................... 19 ■ Programming channel names ..................................................... 21 ■ Memory clearing ........................................................................ 22 ■ Memory bank setting .................................................................. 23 ■ Memory bank selection .............................................................. 24 ■ Transferring bank links ............................................................... 25 ■ Erasing bank links ...................................................................... 266 CALL CHANNEL OPERATION ............................................... 27–28 ■ Call channel selection ................................................................ 27 ■ Copying Call channel contents ................................................... 27 ■ Programming a Call channel ...................................................... 287 SCAN OPERATION ................................................................. 29–33 ■ Scan types ................................................................................. 29 ■ Scan start/stop ........................................................................... 30 ■ Scan edges programming .......................................................... 31 ■ Skip channel setting ................................................................... 32 ■ Scan Resume function ............................................................... 338 PRIORITY WATCH .................................................................. 34–35 ■ Priority watch types .................................................................... 34 ■ Priority watch operation ............................................................. 359 DTMF MEMORY ENCODER ................................................... 36–38 ■ Programming a DTMF code ....................................................... 36 ■ Transmitting a DTMF code ......................................................... 37 ■ DTMF TX speed ......................................................................... 3810 POCKET BEEP AND TONE SQUELCH ................................. 39–42 ■ Pocket beep operation ............................................................... 39 ■ Tone/DTCS squelch operation ................................................... 41 ■ Tone scan ................................................................................... 4211 OTHER FUNCTIONS .............................................................. 43–53 ■ Set mode .................................................................................... 43 ■ Initial Set mode .......................................................................... 47 ■ Weather channel operation ........................................................ 50 ■ Microphone keys ........................................................................ 51 ■ Partial reset ................................................................................ 52 ■ All reset ...................................................................................... 52 ■ Data cloning ............................................................................... 5312 SPECIFICATIONS ......................................................................... 5413 MAINTENANCE ............................................................................ 55 ■ Troubleshooting .......................................................................... 55 ■ Fuse replacement ...................................................................... 5512345678910111213](https://usermanual.wiki/ICOM-orporated/325100/User-Guide-1590283-Page-4.png)
![viQUICK REFERENCE GUIDE■ Your fi rst contactNow that you have your IC-2300H installed in your car or shack, you are probably excited to get on the air. We would like to take you through a few basic operation steps. 1. Turning ON the transceiverBefore turning ON your IC-2300H, make sure the au-dio volume and squelch level controls are set to 9–10 o’clock.Set both [VOL] and [SQL] to the 9–10 o’clock position.[VOL][SQL]Although you have purchased a brand new transceiver, some settings may have changed from the factory de-faults because of the QC process. The Partial Rest is recommended to start with factory default settings.[ ][SCAN] (V/MHz)➥ While holding down [V/MHz], hold down [ ] for 1 sec-ond to reset the CPU.2. Tune the desired frequency[DIAL] will allow you to set the frequency you want to op-erate on. Page 6 explains how to set the tuning speed.[DIAL]Using the HM-133VYou can directly enter the frequency with the HM-133V keypad. LOCKSETANMMONIDUPLOWT-SCANTONEPRIOM/CALLSCANV/MHzDIGITAL PRIO AO BUSYMUTENARMIDLOWLOCKSETANMMONIDUPLOWT-SCANTONEPRIOM/CALLSCANV/MHzDIGITAL PRIO AO BUSYMUTENARMIDLOWLOCKSETANMMONIDUPLOWT-SCANTONEPRIOM/CALLSCANV/MHzDIGITAL PRIO AO BUSYMUTENARMIDLOWLOCKSETANMMONIDUPLOWT-SCANTONEPRIOM/CALLSCANV/MHzDIGITAL PRIO AO BUSYMUTENARMIDLOW[i.e.]: Setting the frequency to 145.3625 MHz.PushPushPushPush■ Repeater operation1. Setting duplex Hold down [DUP] (LOW) for 1 second one or more times to select minus duplex or plus duplex.• The USA version has an Auto Repeater function, therefore, setting duplex is not required.LOCKSETANMMONIDUPLOWT-SCANTONEPRIOM/CALLSCANV/MHzDIGITAL PRIO AO BUSYMUTENARMIDLOW2. Repeater tone If accessing the repeater, requires a subaudible tone, push [TONE] one or more times until “ ” appears.LOCKSETANMMONIDUPLOWT-SCANTONEPRIOM/CALLSCANV/MHzDIGITAL PRIO AO BUSYMUTENARMIDLOWUsing the HM-133VPlus or minus duplex selection and the repeater tone setting can easily be made using the HM-133V.Push [DUP–] for minus duplex; [DUP+] for plus duplex selection, then push [FUNC] , and then [DUP–] to turn ON the repeater tone.LOCKSETANMMONIDUPLOWT-SCANTONEPRIOM/CALLSCANV/MHzDIGITAL PRIO AO BUSYMUTENARMIDLOWLOCKSETANMMONIDUPLOWT-SCANTONEPRIOM/CALLSCANV/MHzDIGITAL PRIO AO BUSYMUTENARMIDLOWLOCKSETANMMONIDUPLOWT-SCANTONEPRIOM/CALLSCANV/MHzDIGITAL PRIO AO BUSYMUTENARMIDLOWPushPush , then Push](https://usermanual.wiki/ICOM-orporated/325100/User-Guide-1590283-Page-7.png)
![ViiQUICK REFERENCE GUIDEThe IC-2300H has a total of 207 memory channels for storing often used operating frequencies, repeater set-tings, and so on. Memories include 6 scan edges and 1 Call channel. 1. Setting the frequencyIn the VFO mode, set the desired operating frequency, repeater, tone and tuning steps, and so on.2. Selecting the memory channel Push [S.MW], and then rotate [DIAL] to select the de-sired memory channel.• The “ ” icon and memory channel number blink.3. Writing a memory channelHold down [MW] (S.MW) for 1 second to program.• 3 beeps sound• The memory channel number automatically increases when continuing to hold down [MW] (S.MW) after pro-gramming.Using the HM-133Vq In the VFO mode, set the desired operating frequen-cy, offset and direction, tone settings, and so on.w Push [FUNC] then [MW] . • The “ ” icon and memory channel number blink.e Push [Y] or [Z] to select the desired memory chan-nel.r Push [FUNC] then hold down [MW] for 1 sec-ond to save the setting. • 3 beeps sound • The memory channel number automatically increas-es when you continuing to hold down [MW] after programming.■ Programming memory channelsLOCKSETANMMONIDUPLOWT-SCANTONEPRIOM/CALLSCANV/MHzDIGITAL PRIO AO BUSYMUTENARMIDLOW[S.MW] (MW) [DIAL]LOCKSETANMMONIDUPLOWT-SCANTONEPRIOM/CALLSCANV/MHzDIGITAL PRIO AO BUSYMUTENARMIDLOWPush , then](https://usermanual.wiki/ICOM-orporated/325100/User-Guide-1590283-Page-8.png)
![q POWER KEY [ ] Hold down for 1 second to turn power ON or OFF.w MEMORY WRITE KEY [S.MW MW] (p. 17) ➥ Push to enter the memory write mode. ➥ Hold down for 1 second to program a selected memory channel. • Continue to hold down the key to automatically increment the memory channels.e MICROPHONE CONNECTOR Connect the supplied microphone here. r VOLUME CONTROL [VOL] (p. 8) Rotate to adjust the audio level.t SQUELCH CONTROL [SQL] (p. 8) Rotate to adjust the squelch level. • The S-meter squelch or attenuator squelch is ac-tivated, when you rotate [SQL] clockwise from the center position. (p. 9) Squelch isopen.Squelch attenuator orS-meter squelchSquelch threshold Shallow DeepNoise squelchy SET•LOCK KEY [SET LOCK] ➥ Push to enter to the Set mode. (p. 43) ➥ Hold down for 1 second to turn the Lock function ON or OFF. (p. 7)u MONITOR•CHANNEL NAME KEY [MONI ANM] ➥ Push to turn the monitor function ON or OFF. (p. 8) ➥ Push to turn the channel names or number ON or OFF, in the memory and Call channel modes. (p. 21)i OUTPUT POWER•DUPLEX KEY [LOW DUP] ➥ Push to toggle the output power. (p. 11) ➥ Hold down for 1 second to select the minus du-plex, plus duplex or simplex operation. (p. 12)o TONE•TONE SCAN KEY [TONE T-SCAN] ➥ Push to select the tone function. (pp. 39, 41) ➥ Hold down for 1 second to start the Tone Scan. (p. 42)!0 MEMORY/CALL•PRIORITY KEY [M/CALL PRIO] ➥ Push to select and toggle memory, Call and weather channel* modes. (pp. 18, 27, 50) *For only USA versions. ➥ Hold down for 1 second to start the priority watch. (p. 34)!1 VFO/MHz TUNING•SCAN KEY [V/MH z SCAN] ➥ Push to select the VFO mode. (p. 5) • In the VFO mode, push to select the tuning step. (p. 5) ➥ Hold down for 1 second to start a scan. (p. 29) • Push to cancel the scan while scanning.!2 BANK•OPTION KEY [BANK OPT] ➥ Push to select the memory bank while in the memory mode. (p. 23) ➥ Hold down for 1 second to enter the Option Set mode. (p. 36)!3 TUNING DIAL [DIAL] ➥ Sets the operating frequency (p. 5), memory channel. (p. 18) ➥ Sets the item in the Set mode. (p. 43) ➥ Changes the scanning direction. (p. 30)D Microphone connector (front panel view)qi q +8 V DC output (Max. 35 mA)w Channel up/downe 8 V control INr PTTt GND (microphone ground)y MIC (microphone input)u GNDi Data INS.MWSQLVOLMWBANKOPTFunction display (p. 2)!0oiuyqwert!3!1 !21PANEL DESCRIPTION1Front panel ■](https://usermanual.wiki/ICOM-orporated/325100/User-Guide-1590283-Page-9.png)
![31PANEL DESCRIPTIONq ANTENNA CONNECTOR [ANT] Connect a 50 : antenna with a PL-259 connector, through a 50 : coaxial cable.w POWER RECEPTACLE [DC13.8V] Connect a 13.8 V DC ±15% power source with the supplied DC power cable. NOTE: DO NOT use a cigarette lighter socket as a power source, when operating in a vehicle. The plug may cause voltage drops and ignition noise may be superimposed onto the transmit or receive audio.e SPEAKER JACK [SP] Connect a 4 : speaker here. • Audio output power is more than 3.5 W.■ Microphone (HM-133V)q VFO/LOCK KEY [VFO/LOCK] ➥ Push to select the VFO mode. (p. 5) ➥ Hold down for 1 second to turn the Lock function ON or OFF. (p. 7)w PTT SWITCH ➥ Hold down to transmit; release to receive. ➥ Toggles between transmitting and receiving while the One-Touch PTT function is in use. (p. 11)e UP/DOWN KEYS [Y] or [Z] ➥ Push either key to change the operating frequen-cy, memory channel, mode setting, and so on. (pp. 5, 18, 43) ➥ Hold down either key for 1 second to start scan-ning. (p. 30)r ACTIVITY INDICATOR ➥ Lights red while any key, except [FUNC] and [DTMF-S] , is pushed, or while transmitting. ➥ Lights orange while the Microphone Keypad Lock function is activated. ➥ Lights green while the One-Touch PTT function is in use.t KEYPAD (p. 4) ➥ Push to activate various functions. y FUNCTION INDICATOR ➥ Lights orange while [FUNC] is activated—indicating the secondary function of keys can be accessed. ➥ Lights green when [DTMF-S] is activated—DTMF signals can be transmitted using the key-pad.u FUNCTION KEY [FUNC] (p. 4)i DTMF MEMORY SELECT KEY [DTMF-S] (p. 37)o FUNCTION KEYS [F-1] or [F-2] (p. 51) Program and re-call your desired transceiver set-ting.!0 BANK/OPTION KEY [BANK/OPTION] ➥ Push to select the memory bank option, when in the memory mode. (p. 24) ➥ Hold down for 1 second to enter the Option Set mode.!1 MEMORY/CALL KEY [MR/CALL] ➥ Push to select the memory mode. (p. 18) ➥ Hold down for 1 second to select the Call channel. (p. 27)ewq■ Rear panelqertMic elementyuio!0!1w](https://usermanual.wiki/ICOM-orporated/325100/User-Guide-1590283-Page-11.png)
![41PANEL DESCRIPTION■ Microphone keypadKEY FUNCTION SECONDARY FUNCTION ( +key) OTHER FUNCTIONOpens and closes the squelch. (p. 8) Turns the channel names or number display ON or OFF, in the memory mode. (p. 21) After pushing [DTMF-S] , transmits the appropriate DTMF code. (pp. 14, 37)When the DTMF memory encoder is activated, push [0] to [9] to transmit the appropriate DTMF memory contents. (p. 37)Starts and stops scanning. (p. 30) Starts and stops tone scanning. (p. 42)Starts and stops priority watch. (p. 35) Turns the One-Touch PTT function ON or OFF. (p. 11)Selects high output power. (p. 11) Turns the DTCS squelch ON. (p. 41)Selects mid output power. (p. 11) Turns ON the DTCS pocket beep function. (p. 39)Selects low output power. (p. 11) Turns ON the DTMF memory encoder function. (p. 37)Selects the minus duplex mode. (p. 12) Turns ON the subaudible tone encoder. (p. 13)Selects the plus duplex mode. (p. 12) Turns ON the CTCSS pocket beep function. (p. 39)Selects the simplex mode. (p. 12) Turns the Tone Squelch function ON. (p. 41)Adjusts the audio level. (p. 8) Sends a 1750 Hz tone signal while held down. (p. 14)➥ Cancels frequency entry. (p. 5)➥ Cancels the scan or priority watch. (pp. 30, 35)➥ Exit the Set mode. (p. 43)➥ Selects a memory channel programming mode. (p. 17)➥ Advances the memory channel number when continuously held down after programming is completed. (p. 17)➥ Enters the Set mode. (p. 43)➥ Selects the next item in the Set mode.(p. 43)Turn OFF the DTMF memory mode. (p. 37)➥ Sets the keypad for numeral input. (p. 5)➥ Selects the previous item in the Set mode. (p. 43)Turns OFF the subaudible tone encoder, pocket beep or CTCSS/DTCS tone squelch. (pp. 13, 39, 41)Adjusts the squelch level. (p. 8) Mutes the audio. (p. 9)• The Mute function is released when any opera-tion is performed.Adjusts the audio level. (p. 8) Sends a 1750 Hz tone signal for 1 second. (p. 14)Adjusts the squelch level. (p. 8) Locks the digit keys on the keypad (including the [A] to [D], [#] and [M] keys. (p. 7)• Lights orange while the Microphone Keypad Lock function is activated.1002345678910111213](https://usermanual.wiki/ICOM-orporated/325100/User-Guide-1590283-Page-12.png)
![5SETTING A FREQUENCY2Preparation ■D Turning power ON/OFF➥ Hold down [ ] for 1 second to turn the power ON or OFF.D VFO mode selectionThe IC-2300H has 2 basic operating modes; VFO mode and memory mode.➥ Push [V/MH z] to select the VFO mode. • Push [M/CALL] to select the memory mode.Using the HM-133V➥ Push [VFO] to select the VFO mode.Using the dial ■➥ Rotate [DIAL] to set the frequency. • If necessary, push [V/MH z] to select the VFO mode. • The frequency changes according to the selected tuning step. (p. 6) • Push [V/MH z] one or more times, to toggle the frequency step between 1 MHz and 10 MHz, if de-sired.If the scan starts:• Holding down [SCAN] (V/MHz) for 1 second will start a scan. Push [V/MH z] again to cancel it.z If necessary, push [VFO] to select the VFO mode.x Push [ENT] to activate the keypad for numerical input.c Push 6 keys to input the frequency. • When a digit is mistakenly input, push [ENT] to clear the input, and then re-enter from the 1st digit. • Push [CLR] to clear the input digits and recall the previous frequency.➥ Push [Y] or [Z] to select the desired frequency. • Holding down [Y] or [Z] for 1 second activates a scan. If a scan has started, push [Y] or [Z] again or push [CLR] to cancel it.Hold down [ ] for 1 second.LOCKSETANMMONIDUPLOWT-SCANTONEPRIOM/CALLSCANV/MHzDIGITAL PRIO AO BUSYMUTENARMIDLOWLOCKSETANMMONIDUPLOWT-SCANTONEPRIOM/CALLSCANV/MHzDIGITAL PRIO AO BUSYMUTENARMIDLOWPush [V/MHz] to select the VFO mode.VFO modePush [M/CALL] to select the memory mode.Memory modeLOCKSETANMMONIDUPLOWT-SCANTONEPRIOM/CALLSCANV/MHzDIGITAL PRIO AO BUSYMUTENARMIDLOWRotate [DIAL] to set the frequency.In the VFO modeLOCKSETANMMONIDUPLOWT-SCANTONEPRIOM/CALLSCANV/MHzDIGITAL PRIO AO BUSYMUTENARMIDLOWThe 1 MHz tuning step is selectedPush [V/MHz] to toggle the tuning step.LOCKSETANMMONIDUPLOWT-SCANTONEPRIOM/CALLSCANV/MHzDIGITAL PRIO AO BUSYMUTENARMIDLOWLOCKSETANMMONIDUPLOWT-SCANTONEPRIOM/CALLSCANV/MHzDIGITAL PRIO AO BUSYMUTENARMIDLOWLOCKSETANMMONIDUPLOWT-SCANTONEPRIOM/CALLSCANV/MHzDIGITAL PRIO AO BUSYMUTENARMIDLOWLOCKSETANMMONIDUPLOWT-SCANTONEPRIOM/CALLSCANV/MHzDIGITAL PRIO AO BUSYMUTENARMIDLOW[EXAMPLE]: Setting the frequency to 145.3625 MHz.PushPushPushPushUsing the keypad on the HM-133V ■Using ■[Y] or [Z] on the HM-133V](https://usermanual.wiki/ICOM-orporated/325100/User-Guide-1590283-Page-13.png)
![62SETTING A FREQUENCY■ Tuning step selectionThe tuning step is the smallest selectable frequency increment you can set the operating frequency. The fol-lowing tuning steps are selectable.• 5 kHz • 6.25 kHz • 10 kHz • 12.5 kHz • 15 kHz • 20 kHz • 25 kHz • 30 kHz • 50 kHz NOTE: For convenience, select the tuning step that matches the frequency intervals of the repeaters in your area.q If necessary, push [V/MH z] to select the VFO mode.w Push [SET] to enter the Set mode.e Push [SET] or [MONI] one or more times, until “TS” appears, as shown to the right.r Rotate [DIAL] to select the desired tuning step.t Push any key, other than [SET] or [MONI], to save the entry and exit the Set mode.Using the HM-133Vz If necessary, push [VFO] to select the VFO mode.x Push [SET] to enter the Set mode.c Push [SET] or [ENT] one or more times until “TS” appears.v Push [Y] or [Z] to select the desired tuning step.b Push [MW] to save the entry and exit the Set mode.LOCKSETANMMONIDUPLOWT-SCANTONEPRIOM/CALLSCANV/MHzDIGITAL PRIO AO BUSYMUTENARMIDLOW15 kHz tuning step1002345678910111213](https://usermanual.wiki/ICOM-orporated/325100/User-Guide-1590283-Page-14.png)
![72SETTING A FREQUENCY■ Lock functionsUse the Lock function to prevent accidental channel changes and unnecessary function access. The IC-2300H has two different lock functions.D Lock functionThis function electronically locks [DIAL] and the key-pad. This function can be used together with the Micro-phone Lock function.➥ Hold down [LOCK] (SET) for 1 second to turn the Lock function ON or OFF. • [PTT], [MONI], [VOL] and [SQL] can be used, even while the Frequency Lock function is ON. TONE-1, TONE-2, DTMF tones or DTMF memory contents can also be transmitted from the micro-phone.Using the HM-133V➥ Hold down [LOCK] for 1 second to turn the Lock function ON or OFF.D Microphone Keypad LockThis function electronically locks the microphone key-pad.➥ Push [FUNC] then [16KEY-L] to turn the Microphone Keypad Lock function ON or OFF. • The activity indicator lights orange, while the Micro-phone Keypad Lock function is activated. • [PTT], [VFO/LOCK] , [MR/CALL] , [BANK/OPTION] , [Y], [Z], [F-1] , [F-2] , [DTMF-S] and [FUNC] on the microphone can be used. • All keys on the transceiver can be used. • When the transceiver's power is turned OFF, the Keypad Lock function is also turned ON.LOCKSETANMMONIDUPLOWT-SCANTONEPRIOM/CALLSCANV/MHzDIGITAL PRIO AO BUSYMUTENARMIDLOWAppearsHold down [LOCK] (SET) for 1 second.LOCKSETANMMONIDUPLOWT-SCANTONEPRIOM/CALLSCANV/MHzDIGITAL PRIO AO BUSYMUTENARMIDLOWAppearsHold down for 1 second. LOCKSETANMMONIDUPLOWT-SCANTONEPRIOM/CALLSCANV/MHzDIGITAL PRIO AO BUSYMUTENARMIDLOWPush , then .](https://usermanual.wiki/ICOM-orporated/325100/User-Guide-1590283-Page-15.png)
![8BASIC OPERATION3■ Receivingq Hold down [ ] for 1 second to turn ON the power.w Rotate [VOL] to adjust the audio level. ➥ Push [MONI] to open the squelch, and then rotate [VOL] to adjust the audio level.e Set the squelch level. ➥ First, rotate [SQL] fully counterclockwise, and then rotate [SQL] clockwise until the noise just disappears.r Set the operating frequency. (p. 5)t When you receive a signal, the squelch opens and audio can be heard. • The “BUSY” icon appears, and the S/RF indicator shows the relative strength of the received signal.Using the HM-133V The audio level can also be adjusted by pushing [VOLY] or [VOLZ] .The squelch level can also be adjusted by pushing [SQLY] or [SQLZ] .■ Monitor functionThis function is used to listen to weak signals without disturbing the squelch setting, or to manually open the squelch, even when the tone squelch is in use.➥ Push [MONI] to open the squelch. • The “BUSY” icon blinks. • Push [MONI] again to cancel the function.Using the HM-133V➥ Push [MONI] to open the squelch. • Push [MONI] again to cancel the function. NOTE: When the squelch adjustment is set to too far clockwise (12 –17 o’clock position), the S-meter squelch or squelch attenuator is activated. To moni-tor weak signals, deactivate the S-meter squelch or squelch attenuator function. See page 9 for details.LOCKSETANMMONIDUPLOWT-SCANTONEPRIOM/CALLSCANV/MHzDIGITAL PRIO AO BUSYMUTENARMIDLOWPush [MONI] to open the squelch.LOCKSETANMMONIDUPLOWT-SCANTONEPRIOM/CALLSCANV/MHzDIGITAL PRIO AO BUSYMUTENARMIDLOWPush to open the squelch.LOCKSETANMMONIDUPLOWT-SCANTONEPRIOM/CALLSCANV/MHzDIGITAL PRIO AO BUSYMUTENARMIDLOWAudio levelPush / to adjust the audio level.LOCKSETANMMONIDUPLOWT-SCANTONEPRIOM/CALLSCANV/MHzDIGITAL PRIO AO BUSYMUTENARMIDLOWSquelch levelPush / to adjust the squelch level.LOCKSETANMMONIDUPLOWT-SCANTONEPRIOM/CALLSCANV/MHzDIGITAL PRIO AO BUSYMUTENARMIDLOWAppears when receiving a signal.](https://usermanual.wiki/ICOM-orporated/325100/User-Guide-1590283-Page-16.png)
![93BASIC OPERATION■ Audio mute functionThis function temporarily mutes the audio without dis-turbing the volume setting.➥ Push [FUNC] then [SQLY D(MUTE)] to mute the audio. • The “MUTE” icon appears. • Push [CLR] to cancel the function.■ Squelch attenuatorThe transceiver has an RF attenuator related to the squelch level setting. Approximately 20 dB of attenua-tion is obtained at the maximum setting.Turn ON the Squelch Attenuator function:q Push [ ] to turn OFF the power.w While holding down [LOCK] (SET), hold down [] for 1 second to turn ON the power and enter the Initial Set mode.e Push [SET] or [MONI] one or more times, to select the “SQL” item.r Rotate [DIAL] to select “AT” (Attenuator).t Push [] to exit the Initial Set mode.y Rotate [SQL] clockwise further than the 12 o’clock position, to activate the squelch attenuator. • The attenuation level can be adjusted up to 20 dB (approximately), between the 12 o’clock and fully clockwise positions. • When setting the squelch from the microphone, the level greater than ‘18’ activates the squelch attenuator. NOTE: When using with the Monitor function. The squelch attenuator functions even when the Monitor function is in use. It is recommended to set [SQL] between 10 and 12 o’clock (7 to 17 level when it is set using the HM-133V).■ S-meter squelchThe transceiver has an S-meter squelch. The S-meter squelch allows you to set minimum signal level needed to open the squelch.Turn ON the S-meter Squelch function:q Push [ ] to turn OFF the power.w While holding down [LOCK] (SET), hold down [] for 1 second to turn ON the power and enter the Initial Set mode.e Push [SET] or [MONI] one or more times, to select the “SQL” item.r Rotate [DIAL] to select “SS” (S-meter squelch).t Push [] to exit the Initial Set mode.y Rotate [SQL] clockwise further than the 12 o’clock position, to activate the S-meter squelch.LOCKSETANMMONIDUPLOWT-SCANTONEPRIOM/CALLSCANV/MHzDIGITAL PRIO AOMUTENARMIDLOWLOCKSETANMMONIDUPLOWT-SCANTONEPRIOM/CALLSCANV/MHzATT AONARMIDLOWWhile the squelch attenuator is turned ON.([DIAL] is set between the 12 o’clock and fully clockwise positions.)AppearsLOCKSETANMMONIDUPLOWT-SCANTONEPRIOM/CALLSCANV/MHzS SQLNARMIDLOWWhile the S-meter squelch is turned ON.([DIAL] is set between the 12 o’clock and fully clockwise positions.)AppearsLOCKSETANMMONIDUPLOWT-SCANTONEPRIOM/CALLSCANV/MHzDIGITAL PRIO AO BUSYMUTENARMIDLOWAppearsMutePush then .LOCKSETANMMONIDUPLOWT-SCANTONEPRIOM/CALLSCANV/MHzDIGITAL PRIO AOMUTENARMIDLOWS-meter squelch1002345678910111213](https://usermanual.wiki/ICOM-orporated/325100/User-Guide-1590283-Page-17.png)
![103BASIC OPERATION■ TransmittingCAUTION: Transmitting without an antenna will dam-age the transceiver. NOTE: To prevent interference, listen on the channel before transmitting by opening the squelch. To open the squelch, rotate [DIAL] counterclockwise or push [SQLZ] on the microphone.q Set the operating frequency. (p. 5) • Adjust the output power if desired. See below for the details.w Hold down [PTT] to transmit. • The “$” icon appears. • The S/RF indicator shows the output power level. • The One-Touch PTT function can be used. See page 11 for details.e Speak into the microphone at your normal voice level. • DO NOT hold the microphone too close to your mouth, or speak too loudly. This may distort the signal.r Release [PTT] to receive.LOCKSETANMMONIDUPLOWT-SCANTONEPRIOM/CALLSCANV/MHzDIGITAL PRIO AOMUTENARMIDLOWOutput power levelSelected output powerAppearsIMPORTANT! (for 65 W transmission): The IC-2300H has a built-in current detector circuit which protects the power amplifi er from excessive cur-rent fl ow. When excessive current fl ow is detected, the circuit automatically reduces the transmit output power to approximately 25 watts. The IC-2300H has a thermal detector circuit too, which protects the power amplifi er from excessive heat. As the temperature increases, the circuit automatically re-duces the transmit output power to approximately 10 to 20 watts.](https://usermanual.wiki/ICOM-orporated/325100/User-Guide-1590283-Page-18.png)
![113BASIC OPERATIONLOCKSETANMMONIDUPLOWT-SCANTONEPRIOM/CALLSCANV/MHzDIGITAL PRIO AO BUSYMUTENARMIDLOW■ Selecting output powerThe IC-2300H has 4* output power levels to suit your operating requirements. Lower output powers during short-distance communications may reduce the pos-sibility of interference to other stations and will reduce current consumption.*The Taiwan version has only 3 output power level options.➥ Push [LOW] one or more times to select the output power. • The output power can be changed even while transmitting.• OUTPUT POWER (approximately)USA, Export Taiwan KoreaHigh:65 W 24 W 50 WMid:25 W 10 W 25 WMid-Low:10 W – 10 WLow:5 W 5 W 5 WUsing the HM-133V➥ Push [HIGH] for high output power; [MID] for mid-low output power (push again for mid output power); and [LOW] for low output power. • When using the microphone, output power can be changed only while receiving.■ One-touch PTT functionThe PTT switch can be operated as a one-touch PTT switch (each push switches between transmit and re-ceive). Using this function you can transmit without holding down the PTT switch.To prevent accidental continuous transmissions with this function, the transceiver has a time-out timer. See page 48 for details.z Push [FUNC] then [PTT-M] to turn ON the One-Touch PTT function. • The activity indicator lights green.x Push [PTT] to transmit and push again to receive. • Two beeps sound when transmit starts, and a long beep sounds when returning to receive. • The “$” icon blinks while the One-Touch PTT function is ON.c Push [FUNC] then [PTT-M] to turn OFF the One-Touch PTT function. • The activity indicator goes out.LOCKSETANMMONIDUPLOWT-SCANTONEPRIOM/CALLSCANV/MHzDIGITAL PRIO AOMUTENARMIDLOWThe selected output power is displayed here.(If “High” is selected, no icon is displayed.) 1002345678910111213](https://usermanual.wiki/ICOM-orporated/325100/User-Guide-1590283-Page-19.png)
![123BASIC OPERATION■ Accessing a repeaterq Set the receive frequency (repeater output frequen-cy). (p. 5)w Set the frequency offset in the Set mode. (p. 15)e Hold down [DUP] (LOW) for 1 second, once or twice, to select the minus duplex or the plus duplex mode. • The “–” or “+” icon appears to represent the fre-quency offset direction. • For only USA versions: When the Auto Repeater function is ON (p. 16), steps w and e are not necessary. r Push [TONE] one or more times to turn ON the sub-audible tone encoder, depending on the repeater requirements. • The “ ” icon appears • The 88.5 Hz tone frequency is set as the default. But some repeaters may require a different tone frequency to access. Refer to page 13 for setting the tone frequency.t Hold down [PTT] to transmit. • The displayed frequency automatically changes to the transmit frequency (repeater input frequency). • If “OFF” appears, confi rm that the frequency offset is correctly set. (p. 15)y Release [PTT] to receive.u Push [MONI] to check whether you can directly re-ceive the signal from the other station.i To return to the simplex mode, hold down [DUP] (LOW) for 1 second, once or twice, to clear the “–” or “+” icon.o To turn OFF the subaudible tone encoder, push [TONE] one or more times until no tone icon ap-pears.Using the HM-133Vz Set the receive frequency (repeater output frequen-cy). (p. 5)x Set the frequency offset in the Set mode. (p. 15)c Push [DUP–] to select the minus duplex mode, or push [DUP+] to select the plus duplex mode.v Push [FUNC] then [TONE] to turn ON the subaudible tone encoder, depending on the repeat-er requirements. • Refer to page 13 for setting the tone frequency. • When the repeater requires a different tone sys-tem, see page 14.b Hold down [PTT] to transmit.n Release [PTT] to receive.m Push [MONI] to check whether you can directly receive the signal from the other station., Push [SIMP] to return to the simplex mode. • The “+” or “–” icon disappears.. To turn OFF the subaudible tone encoder, push [FUNC] then [T-OFF] .LOCKSETANMMONIDUPLOWT-SCANTONEPRIOM/CALLSCANV/MHzDIGITAL PRIO AO BUSYMUTENARMIDLOWAppears.Push [DUP] (LOW) to select the duplex mode.LOCKSETANMMONIDUPLOWT-SCANTONEPRIOM/CALLSCANV/MHzDIGITAL PRIO AO BUSYMUTENARMIDLOWAppearsPush [TONE] to turn ON the subaudible tone encoder.LOCKSETANMMONIDUPLOWT-SCANTONEPRIOM/CALLSCANV/MHzDIGITAL PRIOAO BUSYMUTENARMIDLOWLOCKSETANMMONIDUPLOWT-SCANTONEPRIOM/CALLSCANV/MHzDIGITAL PRIO AO BUSYMUTENARMIDLOWWhile transmitting(The displayed frequency changes to the transmit frequency)While receivingLOCKSETANMMONIDUPLOWT-SCANTONEPRIOM/CALLSCANV/MHzDIGITAL PRIO AO BUSYMUTENARMIDLOWLOCKSETANMMONIDUPLOWT-SCANTONEPRIOM/CALLSCANV/MHzDIGITAL PRIO AO BUSYMUTENARMIDLOWPushAppearsPush ,then .Appears[i.e.]: Select the minus duplex mode, and then turn ON the subaudible tone encoder.[i.e.]: Select the plus duplex mode, and then turn ON the subaudible tone encoder.](https://usermanual.wiki/ICOM-orporated/325100/User-Guide-1590283-Page-20.png)
![133BASIC OPERATION■ Subaudible tones (Encoder function)D Subaudible tonesq Select the channel that you want to set the subaudible tone to, such as the VFO, memory or Call channel. • The subaudible tone frequency or code is indepen-dently programmed into each mode or channel.w Push [SET] to enter the Set mode.e Push [SET] or [MONI] one or more times until the “ ” icon and “Ct” (for the CTCSS), the “ ” icon and “dt” (for the DTCS) or the “ ” icon and “rt” (for the re-peater tone) appear.r Rotate [DIAL] to select the desired subaudible fre-quency or code.t Push any key other than [SET] or [MONI], to save the entry and exit the Set mode. NOTE: The subaudible tone encoder frequency can be temporarily set in a memory or Call channel. However, when another memory channel or VFO mode is select-ed, the set frequency is cleared. To store the tone fre-quency permanently, overwrite the channel information.Using the HM-133Vz Select the mode or channel that you want to set the subaudible tones to, such as the VFO, memory or Call channel. • The subaudible tone frequency or code is indepen-dently programmed into each mode and channel.x Push [SET] to enter the Set mode.c Push [SET] or [ENT] one or more times until the “ ” icon and “Ct” (for the CTCSS), the “ ” icon and “dt” (for the DTCS) or the “ ” icon and “rt” (for the repeater tone) appear.v Push [Y] or [Z] to select and set the desired subau-dible tone frequency or code. • Push and hold [Y] or [Z] to sequentially change the tones or codes.b Push [CLR] to save the entry and exit the Set mode.LOCKSETANMMONIDUPLOWT-SCANTONEPRIOM/CALLSCANV/MHzDIGITAL PRIO AO BUSYMUTENARMIDLOWLOCKSETANMMONIDUPLOWT-SCANTONEPRIOM/CALLSCANV/MHzDIGITAL PRIO AO BUSYMUTENARMIDLOWLOCKSETANMMONIDUPLOWT-SCANTONEPRIOM/CALLSCANV/MHzDIGITAL PRIO AO BUSYMUTENARMIDLOWSetting the tone frequencySetting the repeater tone frequencySetting the DTCS code67.069.371.974.477.079.782.585.488.591.594.897.4100.0103.5107.2110.9114.8118.8123.0127.3131.8136.5141.3146.2151.4156.7159.8162.2165.5167.9171.3173.8177.3179.9183.5186.2189.9192.8196.6199.5203.5206.5210.7218.1225.7229.1233.6241.8250.3254.1• Subaudible tone frequency list (unit: Hz)1002345678910111213](https://usermanual.wiki/ICOM-orporated/325100/User-Guide-1590283-Page-21.png)
![143BASIC OPERATIOND DTMF tonesq When “d” is displayed in the 100 MHz digit, fi rst can-cel the DTMF memory encoder. (p. 37)w Push [DTMF-S] , then push the keys of the de-sired DTMF digits. • The function indicator lights green. • 0–9, A–D, M(E) and #(F) are selectable. • Push [DTMF-S] again to return to the normal keypad mode. • The transceiver has ten DTMF memory channels for autopatch operation. See page 36 for details.D 1750 Hz toneThe microphone has 1750 Hz tone capability, used as a ring tone when calling, and so on.z Push [FUNC] . • The function indicator lights orange.x Push [TONE-1] to transmit a 1750 Hz tone call signal for 1 second (approximately); hold down [TONE-2] to continuously transmit a 1750 Hz tone call signal. • The function indicator automatically goes out.then push the desired keys.Push ,Push ,then or .](https://usermanual.wiki/ICOM-orporated/325100/User-Guide-1590283-Page-22.png)
![15REPEATER SETTING4■ Frequency Offset When communicating through a repeater, the transmit frequency is shifted up or down from the receive fre-quency.q Push [SET] to enter the Set mode.w Push [SET] or [MONI] until the “±” icon and the fre-quency offset appear.e Rotate [DIAL] to set the desired frequency offset. • Push [V/MHz] one or more times, to toggle the fre-quency step between 1 kHz and 1 MHz.r Push any key other than [SET] or [MONI], to save the selection and exit the Set mode.Using the HM-133V z Push [SET] to enter the Set mode.x Hold down [SET] or [ENT] until the “±” icon and the frequency offset appear.c Push [Y] or [Z] to set the desired offset. • The frequency cannot be directly entered using the keypad.v Push [CLR] to save the selection and exit the Set mode.■ Repeater LockoutThis function helps prevent interference to other sta-tions by inhibiting transmitting when a signal is re-ceived. The transceiver has two inhibiting conditions, repeater and busy.q Push [ ] to turn OFF the power.w While holding down [SET], push [] to turn ON the power and enter the Initial Set mode.e Push [SET] or [MONI] until “RLO” appears.r Rotate [DIAL] to select the Repeater Lockout func-tion option of “RP,” “BU” or “OFF.” • “OF”: The Repeater Lockout function is OFF. • “RP”: Transmit is inhibited when a signal with an un-matched subaudible tone is received. • “BU”: Transmit is inhibited when a signal is re-ceived.t Push [ ] to save the selection and exit the Initial Set mode.LOCKSETANMMONIDUPLOWT-SCANTONEPRIOM/CALLSCANV/MHzDIGITAL PRIO AO BUSYMUTENARMIDLOWLOCKSETANMMONIDUPLOWT-SCANTONEPRIOM/CALLSCANV/MHzDIGITAL PRIO AO BUSYMUTENARMIDLOWPush to enter the Set mode,LOCKSETANMMONIDUPLOWT-SCANTONEPRIOM/CALLSCANV/MHzDIGITAL PRIO AO BUSYMUTENARMIDLOWThe Repeater Lockout function OFF (default)[ ][SET]](https://usermanual.wiki/ICOM-orporated/325100/User-Guide-1590283-Page-23.png)
![■ Reversed Duplex functionWhen the reversed duplex function is ON, the receive frequency shifts. (The transmit frequency shifts in normal duplex mode.) An example receive and transmit frequency is shown in the table below with the following settings:Input frequency : 145.30 MHzOffset direction : – (Negative)Offset frequency : 0.6 MHzq Push [SET] to enter the Set mode.w Push [SET] or [MONI] one or more times until “REV” appears.e Rotate [DIAL] to turn the reversed duplex mode ON or OFF.r Push any key other than [SET] or [MONI], to save the selection and exit the Set mode.Using the HM-133Vz Push [SET] to enter the Set mode.x Push [SET] or [ENT] until “REV” appears.c Push [Y] or [Z] to turn the reversed duplex mode ON or OFF.v Push [CLR] to save the selection and exit the Set mode.■ Auto repeater (Only USA versions)The USA version automatically activates the repeater settings (DUP– or DUP+ and tone encoder ON/OFF), when the operating frequency falls within the general repeater output frequency range, and deactivates them when outside of the range. DSetting the Auto Repeater function ON/OFFq Push [ ] to turn OFF power.w While holding down [LOCK] (SET), hold down [ ] to turn ON the power and enter the Initial Set mode.e Push [SET] until “RPT” appears as shown below.r Rotate [DIAL] to turn the Auto Repeater function to “R1,” “R2” or OFF. • “R1”: auto repeater is ON, tone encoder is OFF. • “R2”: auto repeater is ON, tone encoder is ON.t Push [] to exit the Initial Set mode.Frequency range and offset direction D Frequency range Duplex direction 145.200–145.495 MHz “–” appears 146.610–146.995 MHz 147.000–147.395 MHz “+” appears164REPEATER OPERATION Reversed OFF ON Rx frequency 145.30 MHz 144.70 MHz Tx frequency 144.70 MHz 145.30 MHzLOCKSETANMMONIDUPLOWT-SCANTONEPRIOM/CALLSCANV/MHzDIGITAL PRIO AO BUSYMUTENARMIDLOWLOCKSETANMMONIDUPLOWT-SCANTONEPRIOM/CALLSCANV/MHzDIGITAL PRIO AO BUSYMUTENARMIDLOWThe reversed duplex mode: OFF The reversed duplex mode: ONLOCKSETANMMONIDUPLOWT-SCANTONEPRIOM/CALLSCANV/MHzDIGITAL PRIO AO BUSYMUTENARMIDLOWPush to enter the Set mode.LOCKSETANMMONIDUPLOWT-SCANTONEPRIOM/CALLSCANV/MHzDIGITAL PRIO AO BUSYMUTENARMIDLOWLOCKSETANMMONIDUPLOWT-SCANTONEPRIOM/CALLSCANV/MHzDIGITAL PRIO AO BUSYMUTENARMIDLOWAuto repeater function is turned OFF.Auto repeater function is ON,tone encoder is ON.1002345678910111213LOCKSETANMMONIDUPLOWT-SCANTONEPRIOM/CALLSCANV/MHzDIGITAL PRIO AO BUSYMUTENARMIDLOWThe duplex icon blinks while the Reversed Duplex function is turned ON.](https://usermanual.wiki/ICOM-orporated/325100/User-Guide-1590283-Page-24.png)
![■ General descriptionThe transceiver has 207 memory channels including 6 scan edge memory channels (3 pairs), and 1 Call chan-nel. These channels can be individually programmed with: • Operating frequency (p. 5)• Duplex direction (p. 12) and offset (p. 15)• Subaudible tone or tone squelch and tone frequency (pp. 13, 39–41)• Skip setting* (p. 32)In addition, a total of 10 memory banks; A to J, are se-lectable for use by groups, and so on.*except for scan edge memory channels. Programming a memory channel ■The VFO settings, including the Set mode contents such as subaudible tone frequency, and so on, can be programmed into a memory channel.q Set the desired frequency in the VFO mode.w Push [S.MW]. • The “ ” icon and the memory channel number blink.e Rotate [DIAL] to select the memory channel to be programmed. • If the selected channel is blank, only the memory channel number is displayed.r Hold down [MW] (S.MW) for 1 second to program. • 3 beeps sound. • The memory channel number increases, when continuing to hold down [MW] (S.MW) after pro-gramming.✔CONVENIENTMemory programming can be performed in several ways. Example; Programming the memory channel to the same (or different) memory channel, memory chan-nel to the Call channel, and so on.Using the HM-133Vz Set the desired frequency in the VFO mode.x Push [FUNC] , and then push [MW] . • The “ ” icon and the memory channel number blink.c Push [Y] or [Z] to select the memory channel to be programmed. (direct numeric input cannot be used.)v Push [FUNC] , and then hold down [MW] for 1 second to program. ➥ 3 beeps sound and the VFO contents (including the subaudible tone frequency, and so on.) are programmed. ➥ The memory channel number increases, when continuing to hold down [MW] after program-ming.17[i.e.]: Programming 145.870 MHz into memory chan-nel 20 via the front panel.[i.e.]: Programming 145.870 MHz into the memory channel 20, using the microphone.5LOCKSETANMMONIDUPLOWT-SCANTONEPRIOM/CALLSCANV/MHzDIGITAL PRIO AO BUSYMUTENARMIDLOWLOCKSETANMMONIDUPLOWT-SCANTONEPRIOM/CALLSCANV/MHzDIGITAL PRIO AO BUSYMUTENARMIDLOWLOCKSETANMMONIDUPLOWT-SCANTONEPRIOM/CALLSCANV/MHzDIGITAL PRIO AO BUSYMUTENARMIDLOWLOCKSETANMMONIDUPLOWT-SCANTONEPRIOM/CALLSCANV/MHzDIGITAL PRIO AO BUSYMUTENARMIDLOWLOCKSETANMMONIDUPLOWT-SCANTONEPRIOM/CALLSCANV/MHzDIGITAL PRIO AO BUSYMUTENARMIDLOWLOCKSETANMMONIDUPLOWT-SCANTONEPRIOM/CALLSCANV/MHzDIGITAL PRIO AO BUSYMUTENARMIDLOWPush [V/MHz].Rotate [DIAL] to set the frequency.Push [S.MW].Rotate [DIAL] to select the memory channel to be programmed.Hold down [S.MW] for 1 second. Beep Beep BeepLOCKSETANMMONIDUPLOWT-SCANTONEPRIOM/CALLSCANV/MHzDIGITAL PRIO AO BUSYMUTENARMIDLOWLOCKSETANMMONIDUPLOWT-SCANTONEPRIOM/CALLSCANV/MHzDIGITAL PRIO AO BUSYMUTENARMIDLOWLOCKSETANMMONIDUPLOWT-SCANTONEPRIOM/CALLSCANV/MHzDIGITAL PRIO AO BUSYMUTELOCKSETANMMONIDUPLOWT-SCANTONEPRIOM/CALLSCANV/MHzDIGITAL PRIO AO BUSYMUTENARMIDLOWLOCKSETANMMONIDUPLOWT-SCANTONEPRIOM/CALLSCANV/MHzDIGITAL PRIO AO BUSYMUTENARMIDLOWLOCKSETANMMONIDUPLOWT-SCANTONEPRIOM/CALLSCANV/MHzDIGITAL PRIO AO BUSYMUTENARMIDLOWBeep Beep BeepPush .Push .Push , and then .Push / .Push , and then hold down for 1 second.MEMORY OPERATION](https://usermanual.wiki/ICOM-orporated/325100/User-Guide-1590283-Page-25.png)
![185MEMORY OPERATION■ Memory channel selectionUsing the tuning dial Dq Push [M/CALL] once or twice to select the memory mode. • The “ ” icon appears.w Rotate [DIAL] to select the desired memory channel. • Only programmed memory channels can be se-lected.D Using [Y] or [Z] on the HM-133Vz Push [MR] to select the memory mode.x Push [Y] or [Z] to select and set the desired mem-ory channel. • Pushing [Y] or [Z] for 1 second activates a scan. If a scan starts, push [CLR] to stop it.D Using the keypad on the HM-133Vz Push [MR] to select the memory mode.x Push [ENT] to activate the keypad for numerical input.c Push three appropriate numeric keys to input a channel number. • Push only 1 appropriate digit key, [1] , [2] or [3] , and then push [M] or [#] to select the scan edge channels. “M” and “#” can be used for “A” and “B” respectively.LOCKSETANMMONIDUPLOWT-SCANTONEPRIOM/CALLSCANV/MHzDIGITAL PRIO AO BUSYMUTENARMIDLOWLOCKSETANMMONIDUPLOWT-SCANTONEPRIOM/CALLSCANV/MHzDIGITAL PRIO AO BUSYMUTENARMIDLOWAppearsPush [M/CALL] to select the memory mode. Memory channel numberRotate [DIAL] to select the desired memory channel. Selected memory channelLOCKSETANMMONIDUPLOWT-SCANTONEPRIOM/CALLSCANV/MHzDIGITAL PRIO AO BUSYMUTENARMIDLOWLOCKSETANMMONIDUPLOWT-SCANTONEPRIOM/CALLSCANV/MHzDIGITAL PRIO AO BUSYMUTENARMIDLOWAppearsPush to select the memory mode. Memory channel numberPush to select the desired memory channel. Selected memory channel/LOCKSETANMMONIDUPLOWT-SCANTONEPRIOM/CALLSCANV/MHzDIGITAL PRIO AO BUSYMUTENARMIDLOWLOCKSETANMMONIDUPLOWT-SCANTONEPRIOM/CALLSCANV/MHzDIGITAL PRIO AO BUSYMUTENARMIDLOWLOCKSETANMMONIDUPLOWT-SCANTONEPRIOM/CALLSCANV/MHzDIGITAL PRIO AO BUSYMUTENARMIDLOWLOCKSETANMMONIDUPLOWT-SCANTONEPRIOM/CALLSCANV/MHzDIGITAL PRIO AO BUSYMUTENARMIDLOWAppearsMemory channel numberPush . Push to select the memory mode. Push , and then push . Selected memory channel[i.e.]: Selecting memory channel 2.[i.e.]: Selecting memory channel 2.[i.e.]: Selecting memory channel 2.1002345678910111213](https://usermanual.wiki/ICOM-orporated/325100/User-Guide-1590283-Page-26.png)
![■ Copying memory contentsThis function copys a memory channel’s contents to the VFO, another memory or Call channel. This function is useful when searching for signals around the memory channel frequency, and for easy recalling the frequency offset, subaudible tone frequency, and so on.D Memory/Call channel➪VFOq Select the memory or Call channel to be copied.w Hold down [MW] (S.MW) for 1 second to copy the selected memory or Call channel contents to the VFO. • The VFO mode is automatically selected.Using the HM-133Vz Select the memory or Call channel to be copied.x Push [FUNC] , and then hold down [MW] for 1 second, to copy the contents of selected memory or Call channel to the VFO. • The VFO mode is automatically selected.195MEMORY OPERATION[i.e.]: Copying memory channel 30 contents to the VFO.[i.e.]: Copying memory channel 30 contents to the VFO.LOCKSETANMMONIDUPLOWT-SCANTONEPRIOM/CALLSCANV/MHzDIGITAL PRIO AO BUSYMUTENARMIDLOWLOCKSETANMMONIDUPLOWT-SCANTONEPRIOM/CALLSCANV/MHzDIGITAL PRIO AO BUSYMUTENARMIDLOWLOCKSETANMMONIDUPLOWT-SCANTONEPRIOM/CALLSCANV/MHzDIGITAL PRIO AO BUSYMUTENARMIDLOWPush [M/CALL] to select the memory mode.Rotate [DIAL] to select the memory channel.Hold down [MW] (S.MW) for 1 second.VFO modeLOCKSETANMMONIDUPLOWT-SCANTONEPRIOM/CALLSCANV/MHzDIGITAL PRIO AO BUSYMUTENARMIDLOWLOCKSETANMMONIDUPLOWT-SCANTONEPRIOM/CALLSCANV/MHzDIGITAL PRIO AO BUSYMUTENARMIDLOWLOCKSETANMMONIDUPLOWT-SCANTONEPRIOM/CALLSCANV/MHzDIGITAL PRIO AO BUSYMUTENARMIDLOWVFO modePush to select the memory mode.Select the memory channel.Push , and then hold down for 1 second.](https://usermanual.wiki/ICOM-orporated/325100/User-Guide-1590283-Page-27.png)
![205MEMORY OPERATIOND Memory/Call channel➪Call/memory channelq Select the memory or Call channel to be copied.w Push [S.MW]. • The “ ” icon and “– –” indication blink.e Rotate [DIAL] to select the target memory channel. • “C” blinks when the Call channel is selected. • Scan edge channels; 1A/1b, 2A/2b, 3A/3b, are also selectable.r Hold down [MW] (S.MW) for 1 second, to copy the contents of selected memory or Call channel to the target memory. • The targeted memory and copied contents are dis-played.Using the HM-133Vz Select the memory or Call channel to be copied.x Push [FUNC] , and then push [MW] . • The “ ” icon and “– –” indication blink, and the VFO frequency is displayed.c Push [Y] or [Z] to select the target memory channel. • “C” blinks when the Call channel is selected. • Scan edge channels can also be selected. • The keypad cannot be used for setting the chan-nel.v Push [FUNC] , and then hold down [MW] for 1 second to copy the contents of selected memory or Call channel to the target memory. • The targeted memory and copied contents are dis-played.[i.e.]: Copying memory channel 30 contents to chan-nel 31.[i.e.]: Copying memory channel 30 contents to chan-nel 31.LOCKSETANMMONIDUPLOWT-SCANTONEPRIOM/CALLSCANV/MHzDIGITAL PRIO AO BUSYMUTENARMIDLOWLOCKSETANMMONIDUPLOWT-SCANTONEPRIOM/CALLSCANV/MHzDIGITAL PRIO AO BUSYMUTENARMIDLOWLOCKSETANMMONIDUPLOWT-SCANTONEPRIOM/CALLSCANV/MHzDIGITAL PRIO AO BUSYMUTENARMIDLOWLOCKSETANMMONIDUPLOWT-SCANTONEPRIOM/CALLSCANV/MHzDIGITAL PRIO AO BUSYMUTENARMIDLOWSelect the memory channel.Rotate [DIAL] to select the target channel.Hold down [MW] (S.MW) for 1 second.Push [S.MW].LOCKSETANMMONIDUPLOWT-SCANTONEPRIOM/CALLSCANV/MHzDIGITAL PRIO AO BUSYMUTENARMIDLOWLOCKSETANMMONIDUPLOWT-SCANTONEPRIOM/CALLSCANV/MHzDIGITAL PRIO AO BUSYMUTENARMIDLOWLOCKSETANMMONIDUPLOWT-SCANTONEPRIOM/CALLSCANV/MHzDIGITAL PRIO AO BUSYMUTENARMIDLOWLOCKSETANMMONIDUPLOWT-SCANTONEPRIOM/CALLSCANV/MHzDIGITAL PRIO AO BUSYMUTENARMIDLOWPush / to select the target channel.Push , and then hold down for 1 second.Select the memory channel.Push , and then push .1002345678910111213](https://usermanual.wiki/ICOM-orporated/325100/User-Guide-1590283-Page-28.png)
![215MEMORY OPERATION■ Programming channel names Each memory channel and the Call channel can be programmed with an alphanumeric channel name, for easy recognition. Names can be a maximum of 6 char-acters— see the table to the right, for the selectable characters.q Push [M/CALL] to select the memory mode.w Rotate [DIAL] to select the desired memory channel.e Hold down [ANM] (MONI) for 1 second to switch the channel name display. • Two beeps sound. • The name is displayed, if programmed.r Push [SET] to enter the channel name programming mode.t Rotate [DIAL] to select a character. • The selected character blinks.y Push [SET] or [MONI] to move the cursor to the left or right.u Repeat steps t and y, until the desired channel name is completed.i Push any key other than [SET] or [MONI], to pro-gram the name and exit the channel name program-ming mode. • To switch to the frequency display, hold down [MONI] (ANM) for 1 second again. IMPORTANT!: While the channel name display mode is selected, and when [SET] is pushed, the channel name programming mode is always ac-cessed. To access the Set mode, cancel the channel name display by holding down [MONI] (ANM) for 1 second.Using the HM-133Vz Select the memory or Call channel to be assigned the memory name.x Push [FUNC] , and then push [ANM] . • The name is displayed, if programmed.c Push [SET] .v Push [Y] or [Z] to select the desired character. • The selected character blinks.b Push [SET] or [ENT] to move the cursor to the left or right.n Repeat steps v and b until the desired channel names are completed.m Push [MW] to program the name and exit the channel name programming mode., If desired, push [FUNC] , and then push [ANM] to return to the frequency display.(1)(B)(L)(V)(+) (,) (.)(2)(C)(M)(W)(–)(3)(D)(N)(X)(=)(4)(E)(O)(Y)(✱)(5)(%) (&) (’)(F)(P)(Z)(/)(]) (^)(:) (;) (<) (>) (?) (@) ([) (\)(6)(G)(Q)(space)(7)(()(H)(R)())(8)(I)(S)(!) (”) (#) ($)(9)(J)(T)(0)(A)(K)(U)[i.e.]: Programming “CLUB” into memory channel 5.PRIOM/CALLSCANV/MHzPRIO AO BUSYLOCKSETANMMONIDUPLOWT-SCANTONEPRIOM/CALLSCANV/MHzDIGITAL PRIO AO BUSYMUTENARMIDLOWSETANMMONIDUPLOWPRIOM/CALLSCANV/MHzPRIO AO BUSYLOCKSETANMMONIDUPLOWMUTENARMIDLOWLOCKSETANMMONIDUPLOWT-SCANTONEPRIOM/CALLSCANV/MHzDIGITAL PRIO AO BUSYMUTENARMIDLOWLOCKSETANMMONIDUPLOWT-SCANTONEPRIOM/CALLSCANV/MHzDIGITAL PRIO AO BUSYMUTENARMIDLOWPush any other keys than [SET] or [MONI].Select memory channel 5, and then hold down [ANM] (MONI) for 1 second.Rotate [DIAL] to select the character, and then push [SET] or [MONI] to move the cursor.Repeat until the name is complete.Push [SET].Channel name display(The name is displayed, if programmed.)[i.e.]: Programming “CLUB” into memory channel 5.PRIOM/CALLSCANV/MHzPRIO AO BUSYLOCKSETANMMONIDUPLOWT-SCANTONEPRIOM/CALLSCANV/MHzDIGITAL PRIO AO BUSYMUTENARMIDLOWSETANMMONIDUPLOWPRIOM/CALLSCANV/MHzPRIO AO BUSYLOCKSETANMMONIDUPLOWMUTENARMIDLOWLOCKSETANMMONIDUPLOWT-SCANTONEPRIOM/CALLSCANV/MHzDIGITAL PRIO AO BUSYMUTENARMIDLOWLOCKSETANMMONIDUPLOWT-SCANTONEPRIOM/CALLSCANV/MHzDIGITAL PRIO AO BUSYMUTENARMIDLOWSelect memory channel 5, push then .Push .Push / to select the character, and then push or to move the cursor.Repeat until the name is complete.Channel name display(The name is displayed, if programmed.)Push .](https://usermanual.wiki/ICOM-orporated/325100/User-Guide-1590283-Page-29.png)
![22■ Memory clearingContents of programmed memories can be cleared (blanked).q Push [V/MH z] to select the VFO mode.w Push [S.MW]. • The “ ” icon and the memory channel number blink.e Rotate [DIAL] to select the memory channel to be cleared. • Memory channels not yet programmed are blank.r Push [S.MW], and then sequentially hold down [MW] (S.MW) again for 1 second ☞ This operation must be performed within 1.5 seconds. • 3 beeps sound, and then the memory channel is cleared. • The “ ” icon and memory channel number blink. • When clearing the Call channel, the current VFO contents are automatically re-programmed into the Call channel.t Push any key other than [S.MW], to return to the VFO mode. NOTE: Be careful!— the contents of cleared memo-ries CANNOT be recalled.Using the HM-133Vz Push [VFO] to select the VFO mode.x Push [FUNC] , and then push [MW] .c Push [Y] or [Z] to select the memory channel to be cleared. • The “ ” icon and channel number blink. • Memory channels not yet programmed are blank.v Push [FUNC] then [MW] , and then push [FUNC] then hold down [MW] for 1 second. ☞ This operation must be performed within 1.5 seconds. • 3 beeps sound, and then the memory channel is cleared. • The “ ” icon and memory channel number blink. • When clearing the Call channel, the current VFO conditions are automatically re-programmed into the Call channel.b Push [CLR] , to return to the VFO mode.[i.e.]: Clearing memory channel 20.[i.e.]: Clearing memory channel 20.LOCKSETANMMONIDUPLOWT-SCANTONEPRIOM/CALLSCANV/MHzDIGITAL PRIO AO BUSYMUTENARMIDLOWLOCKSETANMMONIDUPLOWT-SCANTONEPRIOM/CALLSCANV/MHzDIGITAL PRIO AO BUSYMUTENARMIDLOWLOCKSETANMMONIDUPLOWT-SCANTONEPRIOM/CALLSCANV/MHzDIGITAL PRIO AO BUSYMUTENARMIDLOWLOCKSETANMMONIDUPLOWT-SCANTONEPRIOM/CALLSCANV/MHzDIGITAL PRIO AO BUSYMUTENARMIDLOWLOCKSETANMMONIDUPLOWT-SCANTONEPRIOM/CALLSCANV/MHzDIGITAL PRIO AO BUSYMUTENARMIDLOWPush [V/MHz] to select the VFO mode.Push [S.MW].Rotate [DIAL] to select the memory channel.Push [S.MW], and within 1.5 seconds, hold down [MW] (S.MW) for 1 second again.Push any key other than [S.MW].LOCKSETANMMONIDUPLOWT-SCANTONEPRIOM/CALLSCANV/MHzDIGITAL PRIO AO BUSYMUTENARMIDLOWLOCKSETANMMONIDUPLOWT-SCANTONEPRIOM/CALLSCANV/MHzDIGITAL PRIO AO BUSYMUTENARMIDLOWLOCKSETANMMONIDUPLOWT-SCANTONEPRIOM/CALLSCANV/MHzDIGITAL PRIO AO BUSYMUTENARMIDLOWLOCKSETANMMONIDUPLOWT-SCANTONEPRIOM/CALLSCANV/MHzDIGITAL PRIO AO BUSYMUTENARMIDLOWLOCKSETANMMONIDUPLOWT-SCANTONEPRIOM/CALLSCANV/MHzDIGITAL PRIO AO BUSYMUTENARMIDLOWPush to select the VFO mode.Push then .Rotate to select the memory channel.Push then , and within 1.5 seconds, push then hold down for 1 second again.Push ./5MEMORY OPERATION1002345678910111213](https://usermanual.wiki/ICOM-orporated/325100/User-Guide-1590283-Page-30.png)
![235MEMORY OPERATION■ Memory bank settingq Push [M/CALL] to select the memory mode, and then rotate [DIAL] to select the desired memory channel.w Push [SET] to enter the Set mode.e Push [SET] or [MONI] until “BAK” appears. • “– –” indication blinks.r Rotate [DIAL] to select the desired bank to be set.t Push any key other than [SET] or [MONI] to assign the channel into the selected bank and exit the Set mode.Using the HM-133Vz Push [MR] , and then select the desired memory channel using [Y], [Z] or keypad.x Push [SET] to enter the Set mode.c Push [SET] or [ENT] until “BAK” appears. • “– –” indication blinks.v Push [Y] or [Z] to select the desired bank to be set.b Push [MW] to assign the channel into the se-lected bank and exit the Set mode.LOCKSETANMMONIDUPLOWT-SCANTONEPRIOM/CALLSCANV/MHzDIGITAL PRIO AO BUSYMUTENARMIDLOWLOCKSETANMMONIDUPLOWT-SCANTONEPRIOM/CALLSCANV/MHzDIGITAL PRIO AO BUSYMUTENARMIDLOWPush [SET].Push [SET] or [MONI] to select the “BAK” item.Rotate [DIAL] to select the desired bank.LOCKSETANMMONIDUPLOWT-SCANTONEPRIOM/CALLSCANV/MHzDIGITAL PRIO AO BUSYMUTENARMIDLOWLOCKSETANMMONIDUPLOWT-SCANTONEPRIOM/CALLSCANV/MHzDIGITAL PRIO AO BUSYMUTENARMIDLOWLOCKSETANMMONIDUPLOWT-SCANTONEPRIOM/CALLSCANV/MHzDIGITAL PRIO AO BUSYMUTENARMIDLOWPush .Push or to select the “BAK” item.Rotate to select the desired bank.LOCKSETANMMONIDUPLOWT-SCANTONEPRIOM/CALLSCANV/MHzDIGITAL PRIO AO BUSYMUTENARMIDLOW/[i.e.]: Setting memory channel 1 to bank “A."[i.e.]: Setting memory channel 1 to bank “A."](https://usermanual.wiki/ICOM-orporated/325100/User-Guide-1590283-Page-31.png)
![245MEMORY OPERATION■ Memory bank selectionThe IC-2300H has a total of 10 banks (A to J). Regular memory channels; 0 to 199, and scan edges; 1A to 3B can be assigned into the desired bank for easy memory management.q Push [M/CALL] to select the memory mode.w Push [BANK] to select the memory bank mode. • The “ ” icon and the bank letter blink.e Rotate [DIAL] to select the desired bank, “A” to “J." • Banks that contain no memory channels are skipped. r Push [BANK] to set the bank. • The bank letter stops blinking.t Rotate [DIAL] to select the desired memory channel. • The channel number is not displayed in the memory bank mode.y To return to the regular memory mode, push [BANK] twice.Using the HM-133Vz Push [MR] to select the memory mode.x Push [BANK] to select the memory bank mode. • The “ ” icon and the bank letter blink.c Push [Y] or [Z] to select the desired bank, A to J. • Banks that contain no memory channels are skipped. v Push [MW] to set the bank. • The bank letter stops blinking.b Push [Y] or [Z] to select the desired memory chan-nel. • The channel number is not displayed in the memory bank mode.n To return to the regular memory mode, push [BANK] , and then push [CLR] .LOCKSETANMMONIDUPLOWT-SCANTONEPRIOM/CALLSCANV/MHzDIGITAL PRIO AO BUSYMUTENARMIDLOWPush [BANK] to select the memory bank mode.Push [BANK] again to set the bank.Rotate [DIAL] to select the desired bank.LOCKSETANMMONIDUPLOWT-SCANTONEPRIOM/CALLSCANV/MHzDIGITAL PRIO AO BUSYMUTENARMIDLOWLOCKSETANMMONIDUPLOWT-SCANTONEPRIOM/CALLSCANV/MHzDIGITAL PRIO AO BUSYMUTENARMIDLOWLOCKSETANMMONIDUPLOWT-SCANTONEPRIOM/CALLSCANV/MHzDIGITAL PRIO AO BUSYMUTENARMIDLOWPush to select the memory bank mode.Push to set the bank.Push to select the desired bank.LOCKSETANMMONIDUPLOWT-SCANTONEPRIOM/CALLSCANV/MHzDIGITAL PRIO AO BUSYMUTENARMIDLOWLOCKSETANMMONIDUPLOWT-SCANTONEPRIOM/CALLSCANV/MHzDIGITAL PRIO AO BUSYMUTENARMIDLOW/[i.e.]: Selecting the memory bank “A."[i.e.]: Selecting the memory bank “A."1002345678910111213](https://usermanual.wiki/ICOM-orporated/325100/User-Guide-1590283-Page-32.png)
![255MEMORY OPERATION■ Transferring bank linksThe link between a memory channels and it's assigned bank can be transferred to another bank.q Push [M/CALL] to select the normal memory mode. • The “ ” icon and the channel number appear.w Push [BANK] to select the memory bank mode. • The “ ” icon and the bank letter blink.e Rotate [DIAL] to select the desired bank, A to J. • Banks that contain no memory channels are skipped. r Push [BANK] to set the bank. • The bank letter stops blinking.t Rotate [DIAL] to select the desired memory channel to transfer.y Push [SET] to enter the Set mode.u Push [SET] or [MONI] until “BAK” appears. • Bank initial appears.i Rotate [DIAL] to select the destination bank.o Push any key other than [SET] or [MONI] to transfer and exit the Set mode.Using the HM-133Vz Push [MR] to select the memory mode.x Push [BANK] , push [Y] or [Z] to select the desired memory bank, and then push [CLR] to select the bank.c Push [Y] or [Z] to select the desired bank link to be transferred.v Push [SET] to enter the Set mode.b Push [SET] or [ENT] until “BAK” appears. • Bank initial appears.n Push [Y] or [Z] to select the destination bank.m Push [CLR] to transfer and exit the Set mode.LOCKSETANMMONIDUPLOWT-SCANTONEPRIOM/CALLSCANV/MHzDIGITAL PRIO AO BUSYMUTENARMIDLOWLOCKSETANMMONIDUPLOWT-SCANTONEPRIOM/CALLSCANV/MHzDIGITAL PRIO AO BUSYMUTENARMIDLOWDIGITAL PRIO AO BUSYPush [BANK] to select the memory bank mode.Push [SET] to enter the Set mode.Push [SET] or [MONI] to select the “BAK” item.Rotate [DIAL] to select the bank to be transffered.(Or, select “- -” to erase.)Rotate [DIAL] to select the desired bank.Push any key other than [SET] or [MONI].LOCKSETANMMONIDUPLOWT-SCANTONEPRIOM/CALLSCANV/MHzDIGITAL PRIO AO BUSYMUTENARMIDLOWLOCKSETANMMONIDUPLOWT-SCANTONEPRIOM/CALLSCANV/MHzDIGITAL PRIO AO BUSYMUTENARMIDLOWLOCKSETANMMONIDUPLOWT-SCANTONEPRIOM/CALLSCANV/MHzDIGITAL PRIO AO BUSYMUTENARMIDLOWLOCKSETANMMONIDUPLOWT-SCANTONEPRIOM/CALLSCANV/MHzDIGITAL PRIO AO BUSYMUTENARMIDLOWLOCKSETANMMONIDUPLOWT-SCANTONEPRIOM/CALLSCANV/MHzDIGITAL PRIO AO BUSYMUTENARMIDLOWDIGITAL PRIO AO BUSYPush to select the memory bank mode.Push to enter the Set mode.Push .Push to select the “BAK” item.Push to select the bank to be transffered.(Or, select “- -” to erase.)Push to select the desired bank.LOCKSETANMMONIDUPLOWT-SCANTONEPRIOM/CALLSCANV/MHzDIGITAL PRIO AO BUSYMUTENARMIDLOWLOCKSETANMMONIDUPLOWT-SCANTONEPRIOM/CALLSCANV/MHzDIGITAL PRIO AO BUSYMUTENARMIDLOWLOCKSETANMMONIDUPLOWT-SCANTONEPRIOM/CALLSCANV/MHzDIGITAL PRIO AO BUSYMUTENARMIDLOW///[i.e.]: Transffering the link of bank A to bank C.[i.e.]: Transffering the contents of bank A to bank C.](https://usermanual.wiki/ICOM-orporated/325100/User-Guide-1590283-Page-33.png)
![265MEMORY OPERATION[i.e.]: Erasing the link of bank “A."1002345678910111213■ Erasing bank linksThe link between a memory channel and it's assigned bank can be erased. INFORMATION: Even if the memory bank links are erased, the memory channel contents remain pro-grammed.q Push [M/CALL] to select the normal memory mode. • The “ ” icon and the channel number appear.w Push [BANK] to select the memory bank mode. • The “ ” icon and the bank letter blink.e Rotate [DIAL] to select the desired bank, “A” to “J." • Banks that contain no memory channels are skipped. r Push [BANK] to set the bank. • The “ ” icon and bank letter stop blinking.t Rotate [DIAL] to select the desired memory channel to delete.y Push [SET] to enter the Set mode.u Push [SET] or [MONI] until “BAK” appears. • The bank letter also appears.i Rotate [DIAL] to select “– –.”o Push any key other than [SET] or [MONI] to erase the selected memory channel link and then exit the Set mode.Using the HM-133Vz Push [MR] to select the memory mode.x Push [BANK] , push [Y] or [Z] to select the de-sired memory bank, and then push [CLR] .c Push [Y] or [Z] to select the desired bank link to be erased.v Push [SET] to enter the Set mode.b Push [SET] or [ENT] until “BAK” appears. • Bank initial appears.n Push [Y] or [Z] to select “– –.”m Push [CLR] to erase and exit the Set mode.LOCKSETANMMONIDUPLOWT-SCANTONEPRIOM/CALLSCANV/MHzDIGITAL PRIO AO BUSYMUTENARMIDLOWDIGITAL PRIO AO BUSYLOCK ANM DUPT-SCANPRIOSCANDIGITAL PRIO AO BUSYMUTENARMIDLOWPush [BANK] to select the memory bank modePush [SET] to enter the Set mode.Rotate [DIAL] to select “– –.”Rotate [DIAL] to select the desired bank.Push [SET] or [MONI] to select the “BAK” item.LOCKSETANMMONIDUPLOWT-SCANTONEPRIOM/CALLSCANV/MHzDIGITAL PRIO AO BUSYMUTENARMIDLOWLOCKSETANMMONIDUPLOWT-SCANTONEPRIOM/CALLSCANV/MHzDIGITAL PRIO AO BUSYMUTENARMIDLOWLOCKSETANMMONIDUPLOWT-SCANTONEPRIOM/CALLSCANV/MHzDIGITAL PRIO AO BUSYMUTENARMIDLOWLOCKSETANMMONIDUPLOWT-SCANTONEPRIOM/CALLSCANV/MHzDIGITAL PRIO AO BUSYMUTENARMIDLOWDIGITAL PRIO AO BUSYPush to select the memory bank mode.Push to enter the Set mode.Push to select the “BAK” item.Push to select “– –.”Push to select the desired bank.LOCKSETANMMONIDUPLOWT-SCANTONEPRIOM/CALLSCANV/MHzDIGITAL PRIO AO BUSYMUTENARMIDLOWLOCKSETANMMONIDUPLOWT-SCANTONEPRIOM/CALLSCANV/MHzDIGITAL PRIO AO BUSYMUTENARMIDLOW///[i.e.]: Erasing the link of bank A.](https://usermanual.wiki/ICOM-orporated/325100/User-Guide-1590283-Page-34.png)
![27CALL CHANNEL OPERATION6■ Call channel selection➥ Push [M/CALL] once or twice to select the Call channel. • “C” appears instead of a memory channel number. • Push [M/CALL] to return to the memory mode, or push [V/MH z] to select the VFO mode.Using the HM-133V➥ Hold down [CALL] for 1 second to select the Call channel. • Push [MR] to select the memory mode, or push [VFO] to select the VFO mode.■ Copying Call channel contentsThe contents of Call channel can be copied to another channel or to the VFO.q Push [M/CALL] one or more times to select the Call channel. • “C” appears.w To copy the Call channel contents to a Memory channel, push [MW] (S.MW), and then rotate [DIAL] to select the memory channel to be copied. • The “ ” icon and memory channel number blink.e Hold down [MW] (S.MW) for 1 second to copy. • If channel names have been programmed into the Call channel, the names are also copied. • To copy to the VFO, hold down [MW] (S.MW) for 1 second.Using the HM-133Vz Hold down [CALL] for 1 second to select the Call channel.x Push [FUNC] , then [MW] , and then push [Y] or [Z] to select the memory channel to copy the contents.c Push [FUNC] , then hold down [MW] for 1 second to copy when a momentary push was used in the previous step. • If channel names have been programmed into the Call channel, the names are also copied. • To copy to the VFO, push [FUNC] , and then hold down [MW] for 1 second.✔INFORMATIONWhen the VFO mode is selected from the Call channel, a small “c” appears instead of memory channel number.LOCKSETANMMONIDUPLOWT-SCANTONEPRIOM/CALLSCANV/MHzDIGITAL PRIO AO BUSYMUTENARMIDLOWAppearsPush [M/CALL] once or twice to select the Call channel.LOCKSETANMMONIDUPLOWT-SCANTONEPRIOM/CALLSCANV/MHzDIGITAL PRIO AO BUSYMUTENARMIDLOWLOCKSETANMMONIDUPLOWT-SCANTONEPRIOM/CALLSCANV/MHzDIGITAL PRIO AO BUSYMUTENARMIDLOWAppearsHold down for 1 second to select the Call channel.LOCKSETANMMONIDUPLOWT-SCANTONEPRIOM/CALLSCANV/MHzDIGITAL PRIO AO BUSYMUTENARMIDLOWLOCKSETANMMONIDUPLOWT-SCANTONEPRIOM/CALLSCANV/MHzDIGITAL PRIO AO BUSYMUTENARMIDLOWLOCKSETANMMONIDUPLOWT-SCANTONEPRIOM/CALLSCANV/MHzDIGITAL PRIO AO BUSYMUTENARMIDLOWLOCKSETANMMONIDUPLOWT-SCANTONEPRIOM/CALLSCANV/MHzDIGITAL PRIO AO BUSYMUTENARMIDLOWPush [S.MW]. Rotate [DIAL] to select the memory channel. Hold down [S.MW] for 1 second. The selected memory channel.LOCKSETANMMONIDUPLOWT-SCANTONEPRIOM/CALLSCANV/MHzDIGITAL PRIO AO BUSYMUTENARMIDLOWLOCKSETANMMONIDUPLOWT-SCANTONEPRIOM/CALLSCANV/MHzDIGITAL PRIO AO BUSYMUTENARMIDLOWLOCKSETANMMONIDUPLOWT-SCANTONEPRIOM/CALLSCANV/MHzDIGITAL PRIO AO BUSYMUTENARMIDLOWPush then .Push to select the memory channel. Push , then hold down for 1 second. /The selected memory channel.[i.e.]: Copying the Call channel (145.000 MHz) to memory channel 2.[i.e.]: Copying the Call channel (145.000 MHz) to memory channel 2.](https://usermanual.wiki/ICOM-orporated/325100/User-Guide-1590283-Page-35.png)
![286CALL CHANNEL OPERATION■ Programming a Call channelOperating frequency, duplex setting, subaudible tone setting (tone encoder or tone squelch ON/OFF and its frequency) and channel names can be also pro-grammed into the Call channel.q Push [V/MH z] to select the VFO mode, and set the desired frequency.w Push [MW] (S.MW).e Rotate [DIAL] to select the Call channel • The “ ” icon and “C” blink.r Hold down [MW] (S.MW) for 1 second • 3 beeps sound, and then the transceiver automati-cally returns to the VFO mode.Using the HM-133Vz Set the desired frequency in the VFO mode. ➥ Push [VFO] to select the VFO mode. ➥ Set the frequency. ➥ Set other data as desired.x Push [FUNC] , and then [MW] .c Push [Y] or [Z] to select the Call channel.v Push [FUNC] then [MW] for 1 second to pro-gram. • 3 beeps sound, and then the transceiver automati-cally returns to the VFO mode.LOCKSETANMMONIDUPLOWT-SCANTONEPRIOM/CALLSCANV/MHzDIGITAL PRIO AO BUSYMUTENARMIDLOWLOCKSETANMMONIDUPLOWT-SCANTONEPRIOM/CALLSCANV/MHzDIGITAL PRIO AO BUSYMUTENARMIDLOWLOCKSETANMMONIDUPLOWT-SCANTONEPRIOM/CALLSCANV/MHzDIGITAL PRIO AO BUSYMUTENARMIDLOWLOCKSETANMMONIDUPLOWT-SCANTONEPRIOM/CALLSCANV/MHzDIGITAL PRIO AO BUSYMUTENARMIDLOWLOCKSETANMMONIDUPLOWT-SCANTONEPRIOM/CALLSCANV/MHzDIGITAL PRIO AO BUSYMUTENARMIDLOWLOCKSETANMMONIDUPLOWT-SCANTONEPRIOM/CALLSCANV/MHzDIGITAL PRIO AO BUSYMUTENARMIDLOWPush then hold down for 1 second. Push to set the frequency.Push to select the VFO mode.Push , and then push .Push / until large “C” appears.Beep Beep BeepLOCKSETANMMONIDUPLOWT-SCANTONEPRIOM/CALLSCANV/MHzDIGITAL PRIO AO BUSYMUTENARMIDLOWLOCKSETANMMONIDUPLOWT-SCANTONEPRIOM/CALLSCANV/MHzDIGITAL PRIO AO BUSYMUTENARMIDLOWLOCKSETANMMONIDUPLOWT-SCANTONEPRIOM/CALLSCANV/MHzDIGITAL PRIO AO BUSYMUTENARMIDLOWLOCKSETANMMONIDUPLOWT-SCANTONEPRIOM/CALLSCANV/MHzDIGITAL PRIO AO BUSYMUTENARMIDLOWLOCKSETANMMONIDUPLOWT-SCANTONEPRIOM/CALLSCANV/MHzDIGITAL PRIO AO BUSYMUTENARMIDLOWLOCKSETANMMONIDUPLOWT-SCANTONEPRIOM/CALLSCANV/MHzDIGITAL PRIO AO BUSYMUTENARMIDLOWHold down [MW] (S.MW) for 1 second. Rotate [DIAL] to set the frequency.Push [V/MHz] to select the VFO mode.Push [M/CALL], and then push [S.MW].Rotate [DIAL] until large “C” appears.Beep Beep Beep[i.e.]: Programming 145.120 MHz into the Call channel using the microphone.[i.e.]: Programming 145.120 MHz into the Call channel.1002345678910111213](https://usermanual.wiki/ICOM-orporated/325100/User-Guide-1590283-Page-36.png)
![307SCAN OPERATION■ Scan start/stopPreparation DIf desired, set the scan resume option (p. 33), program the scan edges (p. 31), program 2 or more memory channels (p. 17), set the skip channels (p. 32).Operation Dq Select the mode or bank. For full/programmed scan: ➥ Push [V/MH z] to select the VFO mode. For memory scan: ➥ Push [M/CALL] to select the memory mode. For bank scan: ➥ Push [BANK], and then rotate [DIAL] to select the desired bank.w Set the squelch to the point where the noise is just muted.e Hold down [SCAN] (V/MHz) for 1 second to start the scan. • Rotate [DIAL] to change the scanning direction. • The scan type blinks in the memory channel read-out.r Push [SET] to switch between a full scan and a pro-grammed scan (P1, P2 and P3). • Push [V/MH z] to cancel the scan.Using the HM-133Vz Select the mode or bank. For a full/programmed scan: ➥ Push [VFO] to select the VFO mode. For a memory scan: ➥ Push [MR] to select the memory mode. For a bank scan: ➥ Push [BANK] , and then push[Y] or [Z] to select the desired bank.x Set the squelch to the point where noise is just mut-ed.c Push [SCAN] to start the scan. • Hold down [Y] or [Z] for 1 second also starts the scan.v Push [SET] to switch between a full scan and programmed scan (P1, P2 and P3).b Push [SCAN] or [CLR] to stop the scan.LOCKSETANMMONIDUPLOWT-SCANTONEPRIOM/CALLSCANV/MHzDIGITAL PRIO AO BUSYMUTENARMIDLOWDuring memory scanHold down [SCAN] (V/MHz) for 1 second.Push [M/CALL].LOCKSETANMMONIDUPLOWT-SCANTONEPRIOM/CALLSCANV/MHzDIGITAL PRIO AO BUSYMUTENARMIDLOWLOCKSETANMMONIDUPLOWT-SCANTONEPRIOM/CALLSCANV/MHzDIGITAL PRIO AO BUSYMUTENARMIDLOWLOCKSETANMMONIDUPLOWT-SCANTONEPRIOM/CALLSCANV/MHzDIGITAL PRIO AO BUSYMUTENARMIDLOWLOCKSETANMMONIDUPLOWT-SCANTONEPRIOM/CALLSCANV/MHzDIGITAL PRIO AO BUSYMUTENARMIDLOWLOCKSETANMMONIDUPLOWT-SCANTONEPRIOM/CALLSCANV/MHzDIGITAL PRIO AO BUSYMUTENARMIDLOW• During a full scan• During a programmed scan• During a memory or bank scanScan edge channel display.• P1 stands for 1A/1b• P1 to P3 are selectable when they are programmed, and switched with [SET].Push [SET] to select a full, band or programmed scan (P1, P2 and P3) in sequence.LOCKSETANMMONIDUPLOWT-SCANTONEPRIOM/CALLSCANV/MHzDIGITAL PRIO AO BUSYMUTENARMIDLOWDuring memory scanPush .Push .LOCKSETANMMONIDUPLOWT-SCANTONEPRIOM/CALLSCANV/MHzDIGITAL PRIO AO BUSYMUTENARMIDLOWLOCKSETANMMONIDUPLOWT-SCANTONEPRIOM/CALLSCANV/MHzDIGITAL PRIO AO BUSYMUTENARMIDLOW[i.e.]: Starting a memory scan.[i.e.]: Starting a memory scan.1002345678910111213](https://usermanual.wiki/ICOM-orporated/325100/User-Guide-1590283-Page-38.png)
![317SCAN OPERATION■ Scan edges programmingScan edges can be programmed in the same manner as memory channels. Scan edges are programmed into scan edges, 1A/1b to 3A/3b, in memory channel sheet.q Set the desired edge frequency in the VFO mode:w Push [MW] (S.MW). • The “ ” icon and channel number blink.e Rotate [DIAL] to select one of scan edge channels, 1A, 2A or 3A.r Hold down [MW] (S.MW) for 1 second to store it. • 3 beeps sound and the transceiver automatically returns to the VFO mode. • Scan edge 1b, 2b or 3b is automatically selected when continuing to hold down [MW] (S.MW) after programming.t To program a frequency for the other pair of scan edges, the 1b, 2b or 3b, repeat steps q through r. • If the same frequency is programmed into a pair of scan edges, the programmed scan cannot start.Using the HM-133Vz Set the desired frequency in the VFO mode.x Push [FUNC] , and then [MW] .c Push [Y] or [Z] to select the scan edge channels, 1A, 2A or 3A.v Push [FUNC] , and then hold down [MW] for 1 second to program. • 3 beeps sound and the VFO mode is automatically selected. • The memory channel number advances to the next scan edge channel, 1b, 2b or 3b, when continuing to push [MW] after programming.b To program a frequency for the other scan edge channels, repeat steps z to v.LOCKSETANMMONIDUPLOWT-SCANTONEPRIOM/CALLSCANV/MHzDIGITAL PRIO AO BUSYMUTENARMIDLOWLOCKSETANMMONIDUPLOWT-SCANTONEPRIOM/CALLSCANV/MHzDIGITAL PRIO AO BUSYMUTENARMIDLOWLOCKSETANMMONIDUPLOWT-SCANTONEPRIOM/CALLSCANV/MHzDIGITAL PRIO AO BUSYMUTENARMIDLOWLOCKSETANMMONIDUPLOWT-SCANTONEPRIOM/CALLSCANV/MHzDIGITAL PRIO AO BUSYMUTENARMIDLOWLOCKSETANMMONIDUPLOWT-SCANTONEPRIOM/CALLSCANV/MHzDIGITAL PRIO AO BUSYMUTENARMIDLOWLOCKSETANMMONIDUPLOWT-SCANTONEPRIOM/CALLSCANV/MHzDIGITAL PRIO AO BUSYMUTENARMIDLOWPush [V/MHz].Rotate [DIAL] to set the frequency.Push [S.MW].Rotate [DIAL] to select the scan edge channel.Hold down [MW] (S.MW) for 1 second.Beep Beep Beep[i.e.]: Programming 145.300 MHz into scan edge 1A.LOCKSETANMMONIDUPLOWT-SCANTONEPRIOM/CALLSCANV/MHzDIGITAL PRIO AO BUSYMUTENARMIDLOWLOCKSETANMMONIDUPLOWT-SCANTONEPRIOM/CALLSCANV/MHzDIGITAL PRIO AO BUSYMUTENARMIDLOWLOCKSETANMMONIDUPLOWT-SCANTONEPRIOM/CALLSCANV/MHzDIGITAL PRIO AO BUSYMUTENARMIDLOWLOCKSETANMMONIDUPLOWT-SCANTONEPRIOM/CALLSCANV/MHzDIGITAL PRIO AO BUSYMUTENARMIDLOWLOCKSETANMMONIDUPLOWT-SCANTONEPRIOM/CALLSCANV/MHzDIGITAL PRIO AO BUSYMUTENARMIDLOWLOCKSETANMMONIDUPLOWT-SCANTONEPRIOM/CALLSCANV/MHzDIGITAL PRIO AO BUSYMUTENARMIDLOWBeep Beep BeepPush .Push then .Push / .Push then hold down for 1 second.Push .[i.e.]: Programming 145.800 MHz into scan edge 1b.](https://usermanual.wiki/ICOM-orporated/325100/User-Guide-1590283-Page-39.png)
![327SCAN OPERATION■ Skip channel settingThe memory skip function speeds up scanning by not scanning those memory channels set as skip channels. Set skip channels as follows.q Push [M/CALL] to select the memory mode, and then select the memory channel to be skipped.w Push [SET] to enter the Set mode.e Push [SET] or [MONI] until “CHS” appears.r Rotate [DIAL] to select “ON." • “~” appears : The channel is skipped while scan-ning.t Push any key other than [SET] or [MONI], to exit the Set mode.Using the HM-133Vz Push [MR] to select the memory mode, and then push [Y] or [Z] to select the channel to be skipped.x Push [SET] to enter the Set mode.c Push [SET] or [ENT] until “CHS” appears.v Push [Y] or [Z] to select “ON."b Push [CLR] to save the selection and exit the Set mode. NOTES: The Set mode cannot be accessed when memory names are displayed. To set the skip option, return to the frequency display by holding down [MONI] (ANM) on the front panel for 1 second, or push [FUNC] then [MONI] (on the HM-133V) to cancel the channel name display, and then set the Skip function as described above.[i.e.]: Setting memory channel 20 as the skip channel.LOCKSETANMMONIDUPLOWT-SCANTONEPRIOM/CALLSCANV/MHzDIGITAL PRIO AO BUSYMUTENARMIDLOWLOCKSETANMMONIDUPLOWT-SCANTONEPRIOM/CALLSCANV/MHzDIGITAL PRIO AO BUSYMUTENARMIDLOWThe memory channel 20 is set as a skip channel.Push [SET] or [MONI] to select the “CHS” item.Rotate [DIAL] to select “ON.”Push [SET] to enter the Set mode.LOCKSETANMMONIDUPLOWT-SCANTONEPRIOM/CALLSCANV/MHzDIGITAL PRIO AO BUSYMUTENARMIDLOWLOCKSETANMMONIDUPLOWT-SCANTONEPRIOM/CALLSCANV/MHzDIGITAL PRIO AO BUSYMUTENARMIDLOWLOCKSETANMMONIDUPLOWT-SCANTONEPRIOM/CALLSCANV/MHzDIGITAL PRIO AO BUSYMUTENARMIDLOWThe memory channel 20 is set as a skip channel.Push to select the “CHS” item.Push to select “ON.”Push to enter the Set mode.LOCKSETANMMONIDUPLOWT-SCANTONEPRIOM/CALLSCANV/MHzDIGITAL PRIO AO BUSYMUTENARMIDLOW//1002345678910111213[i.e.]: Setting memory channel 20 as the skip channel, using the HM-133V.](https://usermanual.wiki/ICOM-orporated/325100/User-Guide-1590283-Page-40.png)
![337SCAN OPERATION■ Scan Resume functionVarious pause and timer options can be selected with the Scan Resume function. The selected resume op-tion is also used for Priority Watch. (p. 35)q Push [SET] to enter the Set mode.w Push [SET] or [MONI] until “SCT” or “SCP” ap-pears.e Rotate [DIAL] to set the desired timer: • “SCP-2”–"SCP-20” : The scan pauses for 2 to 20 seconds, when a signal is received. • “SCP-HO” : When a signal is received, the scan pauses until it disappears. • “SCT-0”–"SCT-5” : The scan pauses, then re-sumes 0 to 5 seconds after the signal disappears. • “SCT-HO” : The scan continues to pause, even if the signal disappears.r Push any keys other than [SET] or [MONI] to exit the Set mode. Using the HM-133Vz Push [SET] to enter the Set mode.x Push [SET] or [ENT] until “SCT” or “SCP” appears.c Push [Y] or [Z] to select the scan resume option. • See step e above for details.v Push [CLR] to exit the Set mode. NOTE: The Set mode cannot be accessed when memory names are displayed. To set the scan re-sume option, return to the frequency display by hold-ing down [MONI] (ANM) on the front panel for 1 sec-ond, or push [FUNC] then [MONI] (on the HM-133V) to cancel the channel name display, and then set the option as described on above.LOCKSETANMMONIDUPLOWT-SCANTONEPRIOM/CALLSCANV/MHzDIGITAL PRIO AO BUSYMUTENARMIDLOWWhen a signal is received, the scan pauses until it disappears.LOCKSETANMMONIDUPLOWT-SCANTONEPRIOM/CALLSCANV/MHzDIGITAL PRIO AO BUSYMUTENARMIDLOWThe scan will resume 5 seconds after the signal disappears.](https://usermanual.wiki/ICOM-orporated/325100/User-Guide-1590283-Page-41.png)
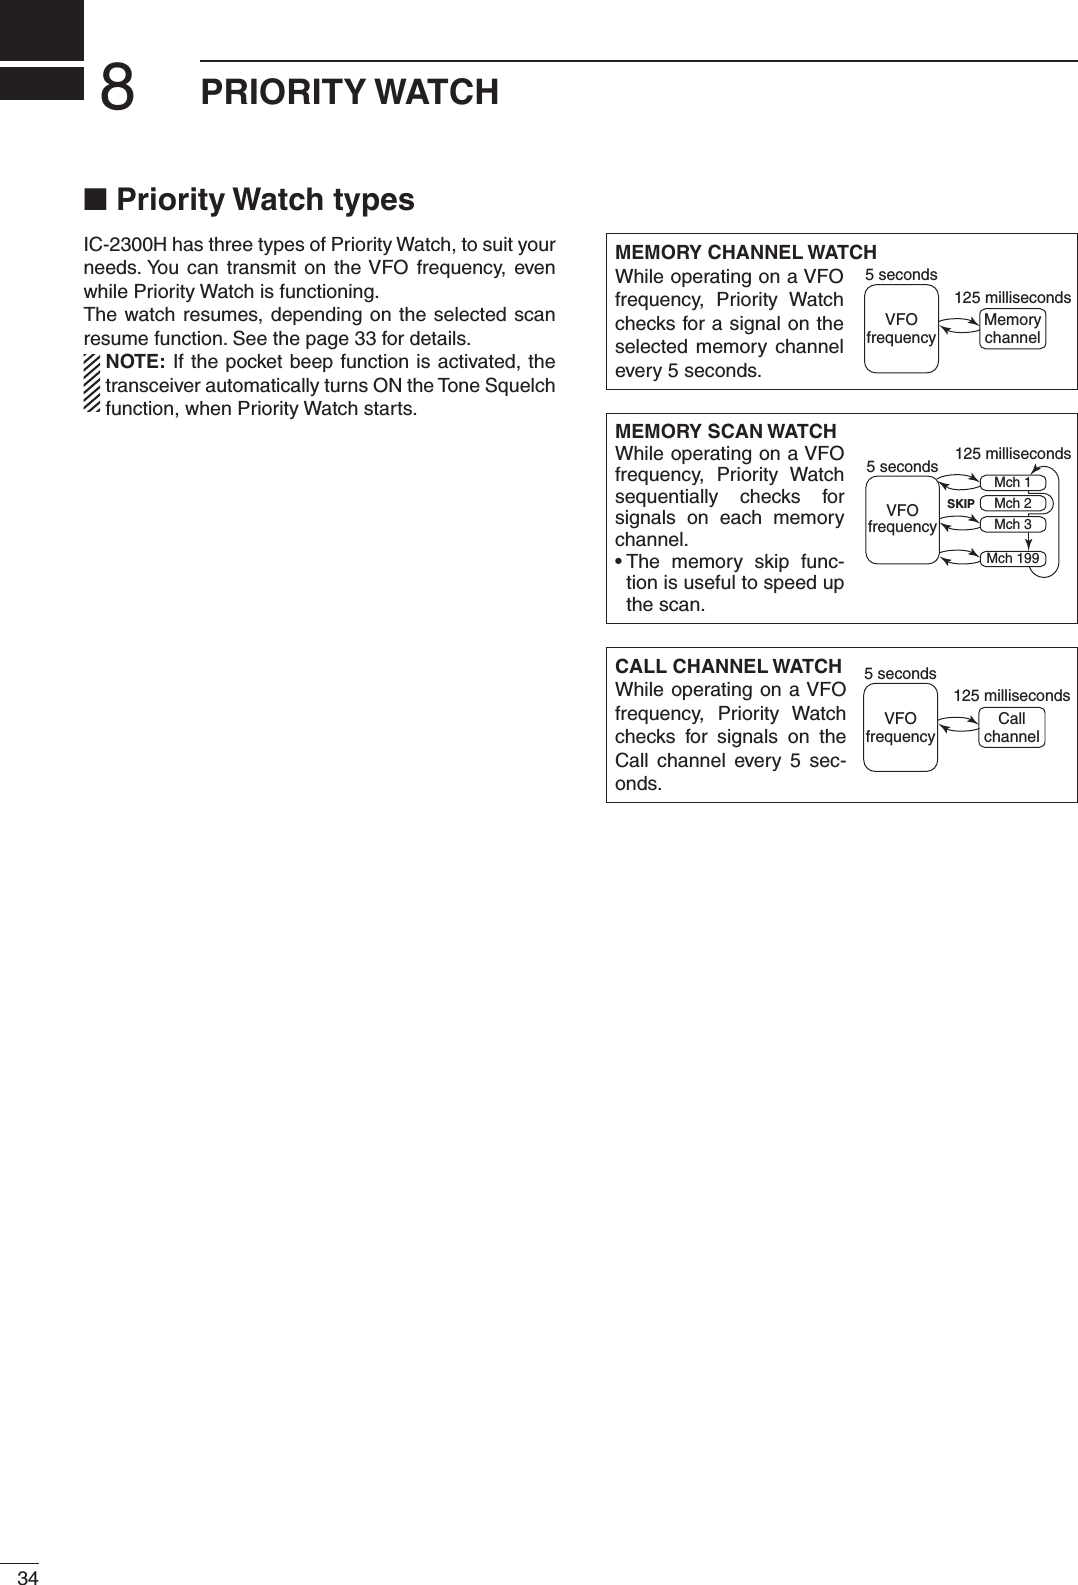
![358PRIORITY WATCH■ Priority watch operationq Select the VFO mode, and then set the operating frequency.w Set the watching channel. For a memory channel watch: Push [M/CALL] to select the memory mode, and then rotate [DIAL] to select the desired memory channel. For a memory scan watch: Select the memory mode, and then hold down [SCAN] (V/MHz) for 1 second to start the memory scan. For a Call channel watch: Push [M/CALL] once or twice, to select the Call channel.e Hold down [M/CALL] (PRIO) for 1 second to start the priority watch. • The “PRIO” icon appears. • The transceiver checks the memory channel or Call channel every 5 seconds. • When a signal is received on the priority channel, the watch pauses. • The watch resumes depending on the selected scan resume condition. (p. 33) • When the watch is paused, push [M/CALL] to man-ually resume it.r Push [M/CALL] to cancel the Priority Watch. • The transceiver automatically returns to the VFO mode.Using the HM-133Vz Select the VFO mode, and then set the operating frequency.x Set the watching channel. For a memory channel watch: Push [MR] then [Y] or [Z], to select the desired memory channel. For a memory scan watch: Push [MR] , and then push [SCAN] to start the memory scan. For a call channel watch: Hold down [CALL] for 1 second to select the Call channel.c Push [PRIO] to start the watch. • The transceiver checks the memory or Call channel every 5 seconds. • The watch resumes depending on the selected scan resume option. (p. 33) • When the watch is paused, push [PRIO] or [CLR] , to manually resume it.v Push [CLR] to cancel the watch.Push [M/CALL].The watch checks for a signal on memory channel 20, every 5 seconds.Rotate [DIAL] to select the desired memory channel.Hold down [PRIO] (M/CALL) for 1 second.LOCKSETANMMONIDUPLOWT-SCANTONEPRIOM/CALLSCANV/MHzDIGITAL PRIO AO BUSYMUTENARMIDLOWLOCKSETANMMONIDUPLOWT-SCANTONEPRIOM/CALLSCANV/MHzDIGITALPRIO AO BUSYMUTENARMIDLOWLOCKSETANMMONIDUPLOWT-SCANTONEPRIOM/CALLSCANV/MHzDIGITAL PRIO AO BUSYMUTENARMIDLOWLOCKSETANMMONIDUPLOWT-SCANTONEPRIOM/CALLSCANV/MHzDIGITAL PRIO AO BUSYMUTENARMIDLOWLOCKSETANMMONIDUPLOWT-SCANTONEPRIOM/CALLSCANV/MHzDIGITALPRIO AO BUSYMUTENARMIDLOWPush .The watch checks for a signal on memory channel 20, every 5 seconds.Push to select the desired memory channel.Push .LOCKSETANMMONIDUPLOWT-SCANTONEPRIOM/CALLSCANV/MHzDIGITAL PRIO AO BUSYMUTENARMIDLOWLOCKSETANMMONIDUPLOWT-SCANTONEPRIOM/CALLSCANV/MHzDIGITALPRIO AO BUSYMUTENARMIDLOWLOCKSETANMMONIDUPLOWT-SCANTONEPRIOM/CALLSCANV/MHzDIGITAL PRIO AO BUSYMUTENARMIDLOWLOCKSETANMMONIDUPLOWT-SCANTONEPRIOM/CALLSCANV/MHzDIGITAL PRIO AO BUSYMUTENARMIDLOWLOCKSETANMMONIDUPLOWT-SCANTONEPRIOM/CALLSCANV/MHzDIGITALPRIO AO BUSYMUTENARMIDLOW/[i.e.]: The memory channel watch on memory channel 20.[i.e.]: The memory channel watch on memory channel 20.1002345678910111213](https://usermanual.wiki/ICOM-orporated/325100/User-Guide-1590283-Page-43.png)
![36DTMF MEMORY ENCODER9■ Programming a DTMF codeDTMF codes are used for autopatching, controlling other equipment, and so on. IC-2300H has up to 16 DTMF memory channels (d0–dF) for up to 24 digits often-used DTMF codes .q Hold down [OPT] (BANK) for 1 second to enter the Option Set mode.w If necessary, push [SET] or [MONI] to select “DTM."e Rotate [DIAL] to turn ON the DTMF encoder.r Push [BANK] to enter the DTMF memory mode. • The DTMF memory channel display blinks. • If desired, push [BANK] again to return to the Op-tion Set mode.t Rotate [DIAL] to select a desired blank DTMF mem-ory channel. • The DTMF memory channel display blinks.y Push [SET] or [MONI] to enter the DTMF memory programming mode. • The fi rst digit (– –) blinks.u Rotate [DIAL] to select the desired character.i Push [MONI] to set the character and select the next digit. • Push [SET] to move the cursor to the left, push [MONI] to move the cursor to the right.o Repeat steps u and i, to set the desired DTMF code sequence. • When the 6th character is set, the indicator displays the next blank digit group.!0 Push any key other than [SET] or [MONI], to save the channel and exit the DTMF memory program-ming mode.Using the HM-133Vz Hold down [OPTION] for 1 second to enter the Option Set mode.x If necessary, push [MR] to select “DTM.” c Push [Y] to turn ON the DTMF encoder.v Push [SET] to enter the DTMF memory mode. • If desired, push [OPTION] to return to the Op-tion Set mode.b Push [Y] or [Z] to select a desired blank DTMF memory channel. • The DTMF memory channel display blinks.n Sequentially push the keys (0–9 or A to F), to set the desired DTMF code sequence. A: [A] B: [B] C: [C] D: [D] E: [M] F: [#] • When the 6th character is set, the indicator displays the next blank digit group.m Push [Y] or [Z] to save the channel., Push [VFO] to exit the DTMF memory program-ming mode.LOCKSETANMMONIDUPLOWT-SCANTONEPRIOM/CALLSCANV/MHzDIGITAL PRIO AO BUSYMUTENARMIDLOWLOCKSETANMMONIDUPLOWT-SCANTONEPRIOM/CALLSCANDIGITAL PRIO AO BUSYMUTENARMIDLOWLOCKSETANMMONIDUPLOWT-SCANTONEPRIOM/CALLSCANDIGITAL PRIO AO BUSYMUTENARMIDLOWLOCKSETANMMONIDUPLOWT-SCANTONEPRIOM/CALLSCANDIGITAL PRIO AO BUSYMUTENARMIDLOWLOCKSETANMMONIDUPLOWT-SCANTONEPRIOM/CALLSCANDIGITAL PRIO AO BUSYMUTENARMIDLOWLOCKSETANMMONIDUPLOWT-SCANTONEPRIOM/CALLSCANDIGITAL PRIO AO BUSYMUTENARMIDLOWPush any key other than [SET] or [MONI].Push [SET], and then rotate [DIAL].Rotate [DIAL] to turn ON the DTMF encoder.Rotate [DIAL].Hold down [OPT] (BANK) for 1 second.Push [BANK].Repeat until the code is complete.LOCKSETANMMONIDUPLOWT-SCANTONEPRIOM/CALLSCANV/MHzDIGITAL PRIO AO BUSYMUTENARMIDLOWLOCKSETANMMONIDUPLOWT-SCANTONEPRIOM/CALLSCANDIGITAL PRIO AO BUSYMUTENARMIDLOWLOCKSETANMMONIDUPLOWT-SCANTONEPRIOM/CALLSCANDIGITAL PRIO AO BUSYMUTENARMIDLOWLOCKSETANMMONIDUPLOWT-SCANTONEPRIOM/CALLSCANDIGITAL PRIO AO BUSYMUTENARMIDLOWLOCKSETANMMONIDUPLOWT-SCANTONEPRIOM/CALLSCANDIGITAL PRIO AO BUSYMUTENARMIDLOWLOCKSETANMMONIDUPLOWT-SCANTONEPRIOM/CALLSCANDIGITAL PRIO AO BUSYMUTENARMIDLOWPush .Push to turn ON the DTMF encoder.Push to select the desired blank channel.Push once or twice.Push .Sequentially push ./[i.e.]: Programming “5428AB453” into the DTMF mem-ory channel “d4.”[i.e.]: Programming “54A2F” into the DTMF memory channel “d4.”](https://usermanual.wiki/ICOM-orporated/325100/User-Guide-1590283-Page-44.png)
![379DTMF MEMORY ENCODER■ Transmitting a DTMF codeAutomatic transmission (DTMF memory) Dq Hold down [OPT] (BANK) for 1 second to enter the Option Set mode.w If necessary, push [SET] or [MONI] to select “DTM.”e Rotate [DIAL] to turn ON the DTMF encoder.r Push [BANK] to enter the DTMF memory mode. • The DTMF memory channel display blinks. • If desired, push [BANK] again to return to the Op-tion Set mode.t Rotate [DIAL] to select a desired blank DTMF mem-ory channel. • The DTMF memory channel display blinks.y Push any key other than [SET] or [MONI], to save the selection and exit the DTMF memory mode. • “d” appears in the 100 MHz digit.u Push [PTT]. • The selected DTMF code is transmitted.D Transmitting a DTMF memory using the HM-133Vz Push [FUNC] then [DTMF] to turn ON the DTMF memory encoder. • “d” appears in the 100 MHz digit.x Push [DTMF-S] to turn ON the DTMF memory direct selection. • The function LED on the microphone lights green.c Push a desired DTMF channel number. • The selected DTMF code is automatically transmit-ted without pushing [PTT]. NOTE: When the pushed channel number is not as-signed a DTMF code, the previously transmitted DTMF memory code is transmitted.v Push [DTMF-S] again to turn OFF the DTMF memory direct selection. • The function LED on the microphone goes out.b Push [FUNC] then [D-OFF] to turn OFF the DTMF memory encoder.D Manual transmission using the HM-133Vz If necessary, push [FUNC] then [D-OFF] to turn OFF the DTMF memory encoder.x Push [DTMF-S] to turn ON the DTMF direct se-lection. • The function LED on the microphone lights green.c Push one of A to F keys, and then push the desired DTMF keys; 0–9 or A to F. A: [A] B: [B] C: [C] D: [D] E: [M] F: [#] • Automatically transmits without pushing [PTT]. • The fi rst code entered may not be transmitted because transmitting takes 400 milliseconds to start. Then the DTMF code transmission starts from the 2nd code.v Push [DTMF-S] again to turn OFF the DTMF direct selection. • The function LED on the microphone goes out.[i.e.]: Transmitting the DTMF code in the DTMF mem-ory channel “d4.”[i.e.]: Transmitting the DTMF code in the DTMF mem-ory channel “d4.”[i.e.]: Transmitting the DTMF code “54A2F.”LOCKSETANMMONIDUPLOWT-SCANTONEPRIOM/CALLSCANV/MHzDIGITAL PRIO AO BUSYMUTENARMIDLOWLOCKSETANMMONIDUPLOWT-SCANTONEPRIOM/CALLSCANV/MHzDIGITAL PRIO AO BUSYMUTENARMIDLOWLOCKSETANMMONIDUPLOWT-SCANTONEPRIOM/CALLSCANDIGITAL PRIO AO BUSYMUTENARMIDLOWLOCKSETANMMONIDUPLOWT-SCANTONEPRIOM/CALLSCANV/MHzDIGITAL PRIO AO BUSYMUTENARMIDLOWTransmitting the DTMF code.Rotate [DIAL] to turn ON the DTMF encoder, and then push [BANK].Rotate [DIAL], and then push any key other than [SET] or [MONI].Push [PTT].Hold down [OPT] (BANK) for 1 second.BeepBeepBeepLOCKSETANMMONIDUPLOWT-SCANTONEPRIOM/CALLSCANV/MHzDIGITAL PRIO AO BUSYMUTENARMIDLOWLOCKSETANMMONIDUPLOWT-SCANTONEPRIOM/CALLSCANV/MHzDIGITAL PRIO AO BUSYMUTENARMIDLOWLOCKSETANMMONIDUPLOWT-SCANTONEPRIOM/CALLSCANV/MHzDIGITAL PRIO AO BUSYMUTENARMIDLOWPush then .Push , and then push a desired DTMF channel number.Transmitting the DTMF code.BeepBeepBeepLOCKSETANMMONIDUPLOWT-SCANTONEPRIOM/CALLSCANV/MHzDIGITAL PRIO AO BUSYMUTENARMIDLOWPush and then, sequentially push .Transmitting the DTMF code.BeepBeepBeep1002345678910111213](https://usermanual.wiki/ICOM-orporated/325100/User-Guide-1590283-Page-45.png)
![389DTMF MEMORY ENCODER■ DTMF TX speed The transmitting speed of DTMF code can be set to ac-commodate your operating needs.q Hold down [] for 1 second to turn OFF the power.w While holding down [LOCK] (SET) and [] for 1 second, to turn ON the power to enter the Initial Set mode.e Push [SET] or [MONI] until “DTD” appears.r Rotate [DIAL] to select the desired transmitting speed, as shown in the table below.t Push [] to exit the Initial Set mode.cps=characters/second DISPLAY INTERVAL SPEED DTD- 1 100 milliseconds 5.0 cps DTD- 2 200 milliseconds 2.5 cps DTD- 3 300 milliseconds 1.6 cps DTD- 5 500 milliseconds 1.0 cpsLOCKSETANMMONIDUPLOWT-SCANTONEPRIOM/CALLSCANV/MHzDIGITAL PRIO AO BUSYMUTENARMIDLOWThe display shows the fastest DTMF speed is selected.](https://usermanual.wiki/ICOM-orporated/325100/User-Guide-1590283-Page-46.png)
![3910POCKET BEEP AND TONE SQUELCH■ Pocket beep operationThis function uses subaudible tones as calling, and can be used as a “common pager” to inform you that some-one has called while you were away from the trans-ceiver.D Waiting for a call from the specifi c stationq Set the operating frequency.w Push [SET] to enter the Set mode.e Set the tone frequency, or DTCS code and DTCS polarity.r Push any key other than [SET] or [MONI] to exit the Set mode.t Push [TONE] one or more times until “ ” or “ ” is displayed, to respectively turn ON the pocket beep with tone squelch or DTCS squelch.y When a signal with the matched tone is received, beep tones and the “ ” icon blinks. • The beeps sound for 30 seconds and the “ ” icon blinks. To manually stop the beeps and blinking, push any key. When the beep tones are not manu-ally stopped, the “ ” icon continues blinking until [PTT] is pushed.u Push [PTT] to answer. • The “ ” icon disappears and automatically cancels the pocket beep function.i Push [TONE] one or more times until the “ ” icon or the “ ” icon disappears, to cancel the tone or the DTCS Squelch function.Using the HM-133Vz Set the operating frequency.x Push [SET] to enter the Set mode.c Set the tone frequency, or DTCS code and DTCS polarity. • Push [CLR] to exit the Set mode.v Push [FUNC] , and then push [TSQLS] or [DTCSS] , to respectively turn ON the pocket beep with tone squelch or DTCS squelch.b When the matched tone is received, the transceiver emits the beep tones for 30 seconds and the “ ” icon blinks.n Push [PTT] to replay, or push [CLR] to stop the beeps and fl ashing. • The “ ” icon automatically disappears and cancels the pocket beep function.m To cancel the tone squelch or DTCS Squelch func-tion, push [FUNC] then [T-OFF] . • The “ ” icon or “ ” icon disappears LOCKSETANMMONIDUPLOWT-SCANTONEPRIOM/CALLSCANV/MHzDIGITAL PRIO AO BUSYMUTENARMIDLOWLOCKSETANMMONIDUPLOWT-SCANTONEPRIOM/CALLSCANV/MHzDIGITAL PRIO AO BUSYMUTENARMIDLOWLOCKSETANMMONIDUPLOWT-SCANTONEPRIOM/CALLSCANV/MHzDIGITAL PRIO AO BUSYMUTENARMIDLOWLOCKSETANMMONIDUPLOWT-SCANTONEPRIOM/CALLSCANV/MHzDIGITAL PRIO AO BUSYMUTENARMIDLOWLOCKSETANMMONIDUPLOWT-SCANTONEPRIOM/CALLSCANV/MHzDIGITAL PRIO AO BUSYMUTENARMIDLOWLOCKSETANMMONIDUPLOWT-SCANTONEPRIOM/CALLSCANV/MHzDIGITAL PRIO AO BUSYMUTENARMIDLOWLOCKSETANMMONIDUPLOWT-SCANTONEPRIOM/CALLSCANV/MHzDIGITAL PRIO AO BUSYMUTENARMIDLOWPush [SET] to enter the Set mode.Push [TONE] one or more times to turn ON the Pocket Beep function.When a signal with the matched tone is received...Push [SET] or [MONI] to select the item, and then rotate [DIAL] to set the option or value.Appears when the pocket beep with tone squelch is activated.Appears when the pocket beepwith DTCS squelch is activated.Setting the tone frequency Setting the DTCS codeSetting the DTCS polarityBeep Beep BeepPush any key other than [SET] or [MONI] to exit the Set mode.LOCKSETANMMONIDUPLOWT-SCANTONEPRIOM/CALLSCANV/MHzDIGITAL PRIO AO BUSYMUTENARMIDLOWLOCKSETANMMONIDUPLOWT-SCANTONEPRIOM/CALLSCANV/MHzDIGITAL PRIO AO BUSYMUTENARMIDLOWLOCKSETANMMONIDUPLOWT-SCANTONEPRIOM/CALLSCANV/MHzDIGITAL PRIO AO BUSYMUTENARMIDLOWLOCKSETANMMONIDUPLOWT-SCANTONEPRIOM/CALLSCANV/MHzDIGITAL PRIO AO BUSYMUTENARMIDLOWLOCKSETANMMONIDUPLOWT-SCANTONEPRIOM/CALLSCANV/MHzDIGITAL PRIO AO BUSYMUTENARMIDLOWLOCKSETANMMONIDUPLOWT-SCANTONEPRIOM/CALLSCANV/MHzDIGITAL PRIO AO BUSYMUTENARMIDLOWPush to enter the Set mode.Push then or to turn ON the Pocket Beep function.Push to select the item, and then push to set the option or value.Appears when the pocket beep with tone squelch is activated.Appears when the pocket beepwith DTCS squelch is activated.Setting the tone frequency Setting the DTCS codeSetting the DTCS polarity/Push to exit the Set mode./1002345678910111213](https://usermanual.wiki/ICOM-orporated/325100/User-Guide-1590283-Page-47.png)
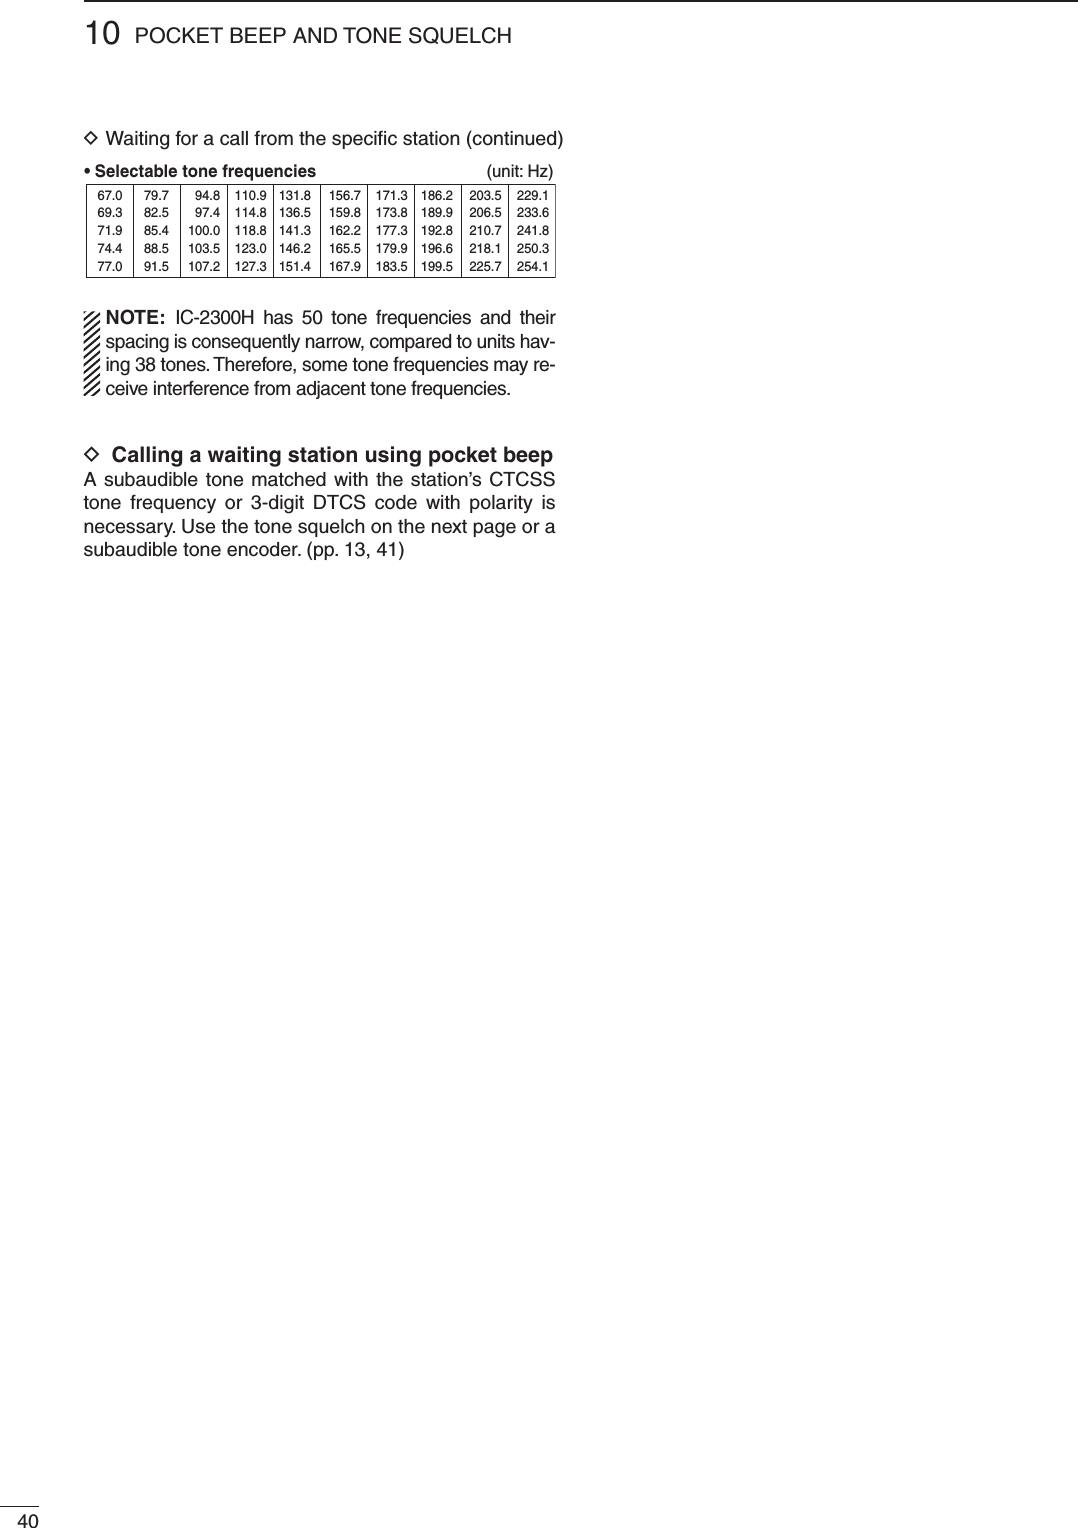
![4110POCKET BEEP AND TONE SQUELCH■ Tone/DTCS squelch operationThe tone squelch or DTCS squelch opens when a sig-nal with the same pre-programmed subaudible tone or DTCS code is received.The reverse tone or DTCS squelch is convenient when you want to ignore the specifi c signal. The transceiver closes the squelch when a signal with the same pre-programmed subaudible tone or code is received.q Set the operating frequency.w Push [SET] to enter the Set mode.e Set the tone frequency, or DTCS code and DTCS polarity.r Push any key other than [SET] or [MONI] to exit the Set mode.t Push [TONE] one or more times to select the de-sired tone or code. - “ ” : Tone squelch - “ ” : DTCS squelch - “ ” : Reverse tone squelch - “ ” : Reverse DTCS squelchy Operate the transceiver in the normal way; push [PTT] to transmit; release [PTT] to receive. • To manually open the squelch, push [MONI]. When the tone or DTCS is in use: When a matched tone is received, the squelch opens and audio is heard. • If the signal includes an unmatched tone, the squelch does not open. However, the S/RF meter shows the signal strength. When the reverse tone or DTCS is in use: When a matched tone is received, the squelch re-mains closing. • If the signal includes a matched tone, the squelch does not open. However, the S/RF meter shows the signal strength.u To cancel the tone or DTCS squelch, push [TONE] one or more times, until the tone icon disappears.Using the HM-133Vz Set the operating frequency.x Program the CTCSS tone frequency or DTCS code in the Set mode. (p. 46)c Push [FUNC] then [TSQL] or DTCS] , to turn ON the tone squelch or DTCS squelch.v When a matched tone is received, the squelch opens and audio is heard. • If the signal includes an unmatched tone, the squelch does not open. However, the S/RF meter shows the signal strength. • To manually open the squelch, push [MONI] .b Operate the transceiver in the normal way ;push [PTT] to transmit; release [PTT] to receive.n To cancel the tone squelch, push [FUNC] then [T-OFF] . • The “ ” icon or “ ” icon disappears LOCKSETANMMONIDUPLOWT-SCANTONEPRIOM/CALLSCANV/MHzDIGITAL PRIO AO BUSYMUTENARMIDLOWLOCKSETANMMONIDUPLOWT-SCANTONEPRIOM/CALLSCANV/MHzDIGITAL PRIO AO BUSYMUTENARMIDLOWLOCKSETANMMONIDUPLOWT-SCANTONEPRIOM/CALLSCANV/MHzDIGITAL PRIO AO BUSYMUTENARMIDLOWLOCKSETANMMONIDUPLOWT-SCANTONEPRIOM/CALLSCANV/MHzDIGITAL PRIO AO BUSYMUTENARMIDLOWLOCKSETANMMONIDUPLOWT-SCANTONEPRIOM/CALLSCANV/MHzDIGITAL PRIO AO BUSYMUTENARMIDLOWLOCKSETANMMONIDUPLOWT-SCANTONEPRIOM/CALLSCANV/MHzDIGITAL PRIO AO BUSYMUTENARMIDLOWPush [SET] to enter the Set mode.Push [TONE] one or more times to turn ON the tone squelch or DTCS.Push [SET] or [MONI] to select the item, and then rotate [DIAL] to set the option or value.Appears when the tone squelch is activated.Appears when the DTCS squelch is activated.Setting the tone frequency Setting the DTCS codeSetting the DTCS polarityPush any key other than [SET] or [MONI] to exit the Set mode.LOCKSETANMMONIDUPLOWT-SCANTONEPRIOM/CALLSCANV/MHzDIGITAL PRIO AO BUSYMUTENARMIDLOWLOCKSETANMMONIDUPLOWT-SCANTONEPRIOM/CALLSCANV/MHzDIGITAL PRIO AO BUSYMUTENARMIDLOWLOCKSETANMMONIDUPLOWT-SCANTONEPRIOM/CALLSCANV/MHzDIGITAL PRIO AO BUSYMUTENARMIDLOWLOCKSETANMMONIDUPLOWT-SCANTONEPRIOM/CALLSCANV/MHzDIGITAL PRIO AO BUSYMUTENARMIDLOWLOCKSETANMMONIDUPLOWT-SCANTONEPRIOM/CALLSCANV/MHzDIGITAL PRIO AO BUSYMUTENARMIDLOWLOCKSETANMMONIDUPLOWT-SCANTONEPRIOM/CALLSCANV/MHzDIGITAL PRIO AO BUSYMUTENARMIDLOWAppears when the tone squelch is activated.Appears when the DTCS squelch is activated.Push to enter the Set mode.Push then or to turn ON the tone squelch or DTCS.Push to select the item, and then push to set the option or value.Setting the tone frequency Setting the DTCS codeSetting the DTCS polarity/Push to exit the Set mode./1002345678910111213](https://usermanual.wiki/ICOM-orporated/325100/User-Guide-1590283-Page-49.png)
![4210 POCKET BEEP AND TONE SQUELCH■ Tone scanBy monitoring a signal that is being operated with the pocket beep, tone or DTCS Squelch function turned ON, you can determine the tone frequency or DTCS code necessary to open the squelch.q Set the channel to be checked for a tone frequency or code.w Push [TONE] one or more times to select the tone type to be checked. • One of the icons “ ,” “ ” or “ ” appear.e Hold down [T-SCAN] (TONE) for 1 second to start the tone scan. • Rotate [DIAL] to change the scanning direction.r When the CTCSS tone frequency or DTCS code is detected, the squelch opens and the detected tone frequency is temporarily programmed into the mem-ory or Call channel. • The scan pauses when a CTCSS tone frequency or DTCS code is detected. • The detected CTCSS tone frequency or DTCS code is used for the tone encoder or decoder, depending on the tone condition or type selected in step w. - No icon : Cannot be used for operation. - “ ” : CTCSS tone encoder - “ ”+“ ” : DTCS tone encoder - “ ” : CTCSS tone encoder/decoder - “ ” : DTCS tone encoder/decodert Push [V/MH z] to cancel the scan.Using the HM-133Vz Set the channel to be checked for a tone frequency.x Select the tone type to be checked. • Push [FUNC] then push; [TONE] for repeat-er tone; [TSQL] for tone squelch; [DTCS] for DTCS squelch.c Push [FUNC] then [T-SCAN] to start the tone scan.v When the tone frequency is matched, the squelch opens and the tone frequency is programmed into the selected memory or Call channel.b Push [CLR] to cancel the scan. NOTE: The detected tone frequency is temporarily programmed when a memory or Call channel is se-lected. However, this will be cleared when the memory or Call channel is re-selected.LOCKSETANMMONIDUPLOWT-SCANTONEPRIOM/CALLSCANV/MHzDIGITAL PRIO AO BUSYMUTENARMIDLOWLOCKSETANMMONIDUPLOWT-SCANTONEPRIOM/CALLSCANV/MHzDIGITAL PRIO AO BUSYMUTENARMIDLOWLOCKSETANMMONIDUPLOWT-SCANTONEPRIOM/CALLSCANV/MHzDIGITAL PRIO AO BUSYMUTENARMIDLOWLOCKSETANMMONIDUPLOWT-SCANTONEPRIOM/CALLSCANV/MHzDIGITAL PRIO AO BUSYMUTENARMIDLOWDuring CTCSS tone scanPush [TONE] one or more times to select the tone type.Hold down [T-SCAN] (TONE) for 1 second.AppearsLOCKSETANMMONIDUPLOWT-SCANTONEPRIOM/CALLSCANV/MHzDIGITAL PRIO AO BUSYMUTENARMIDLOWLOCKSETANMMONIDUPLOWT-SCANTONEPRIOM/CALLSCANV/MHzDIGITAL PRIO AO BUSYMUTENARMIDLOWLOCKSETANMMONIDUPLOWT-SCANTONEPRIOM/CALLSCANV/MHzDIGITAL PRIO AO BUSYMUTENARMIDLOWLOCKSETANMMONIDUPLOWT-SCANTONEPRIOM/CALLSCANV/MHzDIGITAL PRIO AO BUSYMUTENARMIDLOWDuring CTCSS tone scanPush then to select the tone type.Push then .Appears[i.e.]: Checking for the tone frequency on the 145.680 MHz.[i.e.]: Checking for the tone frequency on the 145.680 MHz.](https://usermanual.wiki/ICOM-orporated/325100/User-Guide-1590283-Page-50.png)
![4311OTHER FUNCTIONS■ Set mode• Set mode operationq Push [SET] to enter the Set mode.w Push [SET] or [MONI] to select the desired item.e Rotate [DIAL] to set the option or value.r Push any key other than [SET] or [MONI], to exit the Set mode.Using the HM-133Vz Push [SET] to enter the Set mode.x Push [SET] or [ENT] , to select the desired item.c Push [Y] or [Z] to select the option or value.v Push [CLR] to exit the Set mode.Set the backlight brightness.Set the Auto Dimmer brightness.Select the subaudible tone needed to access the repeater.Select the CTCSS tone frequency for the tone squelch function.Set the DTCS code for DTCS squelch operation.Set the Transmit and Receive DTCS polarity.Set the duplex frequency offset.Turn the Reverse Duplex function ON or OFFSet the VFO tuning step.Select the scan pause timer option.Select the scan resume options of a pause.• Auto dimmer• Display dimmerSet mode itemsp. 46p. 46p. 46p. 46p. 46p. 46p. 46p. 46p. 46p. 45p. 45• Repeater tone frequency• Tone squelch frequency• DTCS code• DTCS polarity• Frequency offset• Tuning step• Reverse mode• Scan resume timer• Scan stop timer: [SET]: [MONI]†Appears only when accessing the Set mode from the memory mode.SETMONISETMONISETMONISETMONISETMONISETMONISETMONISETMONISETMONISETMONISETMONI12345678910111213(Continued on page 44)](https://usermanual.wiki/ICOM-orporated/325100/User-Guide-1590283-Page-51.png)
![4411 OTHER FUNCTIONSSelect the display backlight color.Adjust the LCD contrast.Turns the TX inhibit function ON or OFF.Turns the Skip function ON or OFF.Assign the desired memory and scan edge channels.Assign the desired banks for a continuous banks scan.Set both the transmission and reception passband.Set the microphone sensitivity.Turn the weather Alert function ON or OFF.• Weather alert (For only the USA version.)p. 45p. 45p. 45p. 45p. 45p. 46p. 46p. 45p. 45• Display color• Display contrast• Channel skip setting†• Bank link function†• MIC gain• Bank setting†• Wide/Narrow• Transmit permission: [SET]: [MONI]†Appears only when accessing the Set mode from the memory mode.SETMONISETMONISETMONISETMONISETMONISETMONISETMONISETMONISETMONISet mode (continued) ■](https://usermanual.wiki/ICOM-orporated/325100/User-Guide-1590283-Page-52.png)
![4511OTHER FUNCTIONSDisplay dimmer DSet the backlight brightness to between 1 (Dark) and4 (Bright; default).LOCKSETANMMONIDUPLOWT-SCANTONEPRIOM/CALLSCANV/MHzDIGITAL PRIO AO BUSYMUTENARMIDLOWAuto dimmer DSet the Auto Dimmer brightness. The Auto Dimmer function automatically reduces the backlight brightness if no operation has been performed for 5 seconds. • “ATD OF” (default) : Auto Dimmer function is turned OFF. The backlight is continuously ON, while the transceiver is turned ON.• “AT OF” : The backlight automatically turns OFF if no operation has been per-formed for 5 seconds.• “AT D1” – “AT D3” : The backlight lights with the level 1 (Dark) to 3 (Bright), if no opera-tion has been performed for 5 sec-onds.LOCKSETANMMONIDUPLOWT-SCANTONEPRIOM/CALLSCANV/MHzDIGITAL PRIO AO BUSYMUTENARMIDLOWDisplay color DSelect the display backlight color from Amber (default), Yellow or Green.LOCKSETANMMONIDUPLOWT-SCANTONEPRIOM/CALLSCANV/MHzDIGITAL PRIO AO BUSYMUTENARMIDLOWLOCKSETANMMONIDUPLOWT-SCANTONEPRIOM/CALLSCANV/MHzDIGITAL PRIO AO BUSYMUTENARMIDLOWAmber (default) YellowLCD contrast DAdjust the LCD contrast.Adjustable level: 1 (the lowest contrast) to 4 (the high-est contrast).LOCKSETANMMONIDUPLOWT-SCANTONEPRIOM/CALLSCANV/MHzDIGITAL PRIO AO BUSYMUTENARMIDLOWContrast level “2” (default)Transmit permission DSelect “OFF” to inhibit transmitting on the channel.This function can be independently set for each memo-ry channel, Call channel and VFO.LOCKSETANMMONIDUPLOWT-SCANTONEPRIOM/CALLSCANV/MHzDIGITAL PRIO AO BUSYMUTENARMIDLOWLOCKSETANMMONIDUPLOWT-SCANTONEPRIOM/CALLSCANV/MHzDIGITAL PRIO AO BUSYMUTENARMIDLOWTransmit is permitted. (default) Transmit is inhibited.Channel skip setting DTurns the Skip function ON (skip) or OFF.This item appears only when the Set mode is accessed from the memory mode.LOCKSETANMMONIDUPLOWT-SCANTONEPRIOM/CALLSCANV/MHzDIGITAL PRIO AO BUSYMUTENARMIDLOWLOCKSETANMMONIDUPLOWT-SCANTONEPRIOM/CALLSCANV/MHzDIGITAL PRIO AO BUSYMUTENARMIDLOWScans the memory channel during memory or bank scan. (default)Skips the memory channel during a memory or bank scan.Memory bank setting DAssign the desired memory channels and scan edge channels to the memory bank, for easy memory man-agement. 10 banks, Bank-A to Bank-J, are selectable.This item appears only when the Set mode is accessed from the memory mode.LOCKSETANMMONIDUPLOWT-SCANTONEPRIOM/CALLSCANV/MHzDIGITAL PRIO AO BUSYMUTENARMIDLOWLOCKSETANMMONIDUPLOWT-SCANTONEPRIOM/CALLSCANV/MHzDIGITAL PRIO AO BUSYMUTENARMIDLOWNot assigned (default) Assigned to the bank AMemory bank link function DThe transceiver has 10 banks, A to J. Regular memory channels 0 to 199, and scan edge channels 1A to 3B, can be assigned into the desired bank for easy memory management. The link function has a continuous banks scan that scans all contents in the selected banks during the scan.This item appears only when the Set mode is accessed from the memory mode.LOCKSETANMMONIDUPLOWT-SCANTONEPRIOM/CALLSCANV/MHzDIGITAL PRIO AO BUSYMUTENARMIDLOWLOCKSETANMMONIDUPLOWT-SCANTONEPRIOM/CALLSCANV/MHzDIGITAL PRIO AO BUSYMUTENARMIDLOWBank link OFF (default) Bank link ON• Setting the Bank linkq Rotate [DIAL] to turn ON the Memory Bank Link function.w Push [SET] or [MONI] to select the desired bank to be linked.LOCKSETANMMONIDUPLOWT-SCANTONEPRIOM/CALLSCANV/MHzDIGITAL PRIO AO BUSYMUTENARMIDLOWLOCKSETANMMONIDUPLOWT-SCANTONEPRIOM/CALLSCANV/MHzDIGITAL PRIO AO BUSYMUTENARMIDLOWe Rotate [DIAL] to select “ON” to link the bank.r Repeat steps w and e, to set the links.Wide/Narrow setting DSet both the transmission and reception passband width to wide or narrow.This setting can be independently set for each memory channel, Call channel and VFO. LOCKSETANMMONIDUPLOWT-SCANTONEPRIOM/CALLSCANV/MHzDIGITAL PRIO AO BUSYMUTENARMIDLOWLOCKSETANMMONIDUPLOWT-SCANTONEPRIOM/CALLSCANV/MHzDIGITAL PRIO AO BUSYMUTENARMIDLOWWide (default) Narrow1002345678910111213](https://usermanual.wiki/ICOM-orporated/325100/User-Guide-1590283-Page-53.png)
![4611 OTHER FUNCTIONSMicrophone sensitivity DSet the microphone sensitivity to High (HI) or Low (LO) to suit your preference.Higher value makes the microphone more sensitive to your voice.(default: Depending on the transceiver versions)LOCKSETANMMONIDUPLOWT-SCANTONEPRIOM/CALLSCANV/MHzDIGITAL PRIO AO BUSYMUTENARMIDLOWLOCKSETANMMONIDUPLOWT-SCANTONEPRIOM/CALLSCANV/MHzDIGITAL PRIO AO BUSYMUTENARMIDLOWHigh sensitivity Low sensitivity Repeater tone DSelect the subaudible tone needed to access the re-peater. A total of 50 tone frequencies (67.0–254.1 Hz) are selectable. (default: 88.5 Hz)LOCKSETANMMONIDUPLOWT-SCANTONEPRIOM/CALLSCANV/MHzDIGITAL PRIO AO BUSYMUTENARMIDLOWTone squelch frequency DSelect the CTCSS tone frequency to use for the Tone Squelch function.A total of 50 tone frequencies (67.0–254.1 Hz) are se-lectable. (default: 88.5 Hz)LOCKSETANMMONIDUPLOWT-SCANTONEPRIOM/CALLSCANV/MHzDIGITAL PRIO AO BUSYMUTENARMIDLOW• Selectable subaudible tone frequencies 67.069.371.974.477.079.782.585.488.591.594.897.4100.0103.5107.2110.9114.8118.8123.0127.3131.8136.5141.3146.2151.4156.7159.8162.2165.5167.9171.3173.8177.3179.9183.5186.2189.9192.8196.6199.5203.5206.5210.7218.1225.7229.1233.6241.8250.3254.1DTCS code DSet the DTCS code (both encoder and decoder) for DTCS squelch operation. A total of 104 codes are se-lectable. (default: 023)LOCKSETANMMONIDUPLOWT-SCANTONEPRIOM/CALLSCANV/MHzDIGITAL PRIO AO BUSYMUTENARMIDLOWWeather alert function D U.S.A. versions onlyTurn the Weather Alert function ON or OFF.LOCKSETANMMONIDUPLOWT-SCANTONEPRIOM/CALLSCANV/MHzDIGITAL PRIO AO BUSYMUTENARMIDLOWLOCKSETANMMONIDUPLOWT-SCANTONEPRIOM/CALLSCANV/MHzDIGITAL PRIO AO BUSYMUTENARMIDLOWWeather alert OFF (default) Weather alert ONDTCS polarity DSet the Transmit and Receive DTCS polarity to “NN,” “NR,” “RN” or “RR.” (default: NN)LOCKSETANMMONIDUPLOWT-SCANTONEPRIOM/CALLSCANV/MHzDIGITAL PRIO AO BUSYMUTENARMIDLOW DFrequency offset DSet the duplex frequency offset between 0 and 20 MHz. In the duplex mode, the transmit frequency shifts up or down from the receive frequency by the offset amount. (default: Depending on the transceiver versions)LOCKSETANMMONIDUPLOWT-SCANTONEPRIOM/CALLSCANV/MHzDIGITAL PRIO AO BUSYMUTENARMIDLOWReverse function DTurn the Reverse Duplex function ON or OFF (default).When the Reverse Duplex function is ON, the receive and transmit frequencies are reversed.LOCKSETANMMONIDUPLOWT-SCANTONEPRIOM/CALLSCANV/MHzDIGITAL PRIO AO BUSYMUTENARMIDLOWLOCKSETANMMONIDUPLOWT-SCANTONEPRIOM/CALLSCANV/MHzDIGITAL PRIO AO BUSYMUTENARMIDLOWOFF: Normal duplex (default) ON: Reversed duplexTuning step DSet the VFO tuning step to 5, 6.25, 10, 12.5, 15, 20, 25, 30 or 50 kHz. (default: Depending on the transceiver versions)LOCKSETANMMONIDUPLOWT-SCANTONEPRIOM/CALLSCANV/MHzDIGITAL PRIO AO BUSYMUTENARMIDLOWScan pause timer DSelect the scan pause timer option.When receiving a signal, the scan pauses according to the scan Pause Timer. (default: SCP-10)• “SCP-2”–“SCP-20” : When receiving a signal, the scan pauses for 2 to 20 seconds (set in 2 seconds steps).• “SCP-HO” : When a signal is received, the scan pauses until it disappears.LOCKSETANMMONIDUPLOWT-SCANTONEPRIOM/CALLSCANV/MHzDIGITAL PRIO AO BUSYMUTENARMIDLOWScan resume timer DSet the scan resume options of a pause after the re-ceived signal disappears. (default: SCT-2)• “SCT-0” : The scan resumes immediately after the signal disappears.• “SCT-1”–“SCT-5” : The scan resumes 1 to 5 sec-onds after the signal disappears.• “SCT-HO” : The scan remains paused ac-cording to the Pause Timer, even if the signal disappears. Rotate [DIAL] to resume the scan.LOCKSETANMMONIDUPLOWT-SCANTONEPRIOM/CALLSCANV/MHzDIGITAL PRIO AO BUSYMUTENARMIDLOW](https://usermanual.wiki/ICOM-orporated/325100/User-Guide-1590283-Page-54.png)
![4711OTHER FUNCTIONS■ Initial Set mode The Initial Set mode is accessed at power ON, and al-lows you to set seldom-changed settings. In this way, you can “customize” the transceiver to suit your prefer-ence and operating style.Entering the Initial Set mode Dq While holding down [SET], hold down [ ] for 1 sec-ond to enter the Initial Set mode.w Push [SET] or [MONI] to select the desired item.e Rotate [DIAL] to set the option or value.r Push [] to exit the Initial Set mode.Initial Set mode itemsp. 48p. 49p. 48p. 49p. 49p. 49p. 48p. 48p. 48p. 48p. 48: [SET]: [MONI]LOCKSETANMMONIDUPLOWT-SCANTONEDIGITALMUTENARMIDLOWLOCKSETANMMONIDUPLOWT-SCANTONEDIGITALMUTENARMIDLOWLOCKSETANMMONIDUPLOWT-SCANTONEDIGITALMUTENARMIDLOWLOCKSETANMMONIDUPLOWT-SCANTONEDIGITALMUTENARMIDLOWLOCKSETANMMONIDUPLOWT-SCANTONEDIGITALMUTENARMIDLOWLOCKSETANMMONIDUPLOWT-SCANTONEDIGITALMUTENARMIDLOWLOCKSETANMMONIDUPLOWT-SCANTONEDIGITALMUTENARMIDLOWLOCKSETANMMONIDUPLOWT-SCANTONEDIGITALMUTENARMIDLOWLOCKSETANMMONIDUPLOWT-SCANTONEDIGITALMUTENARMIDLOWLOCKSETANMMONIDUPLOWT-SCANTONEDIGITALMUTENARMIDLOWLOCKSETANMMONIDUPLOWT-SCANTONEDIGITALMUTENARMIDLOW• Key-touch beepTurn the confirmation beeps ON (default) or OFF. Inhibit continuous transmissions longer than the set time period.Automatically turns the transceiver’s power OFF.Set the transmission lockout capability.Set the squelch delay.Set the squelch type.Turn the Tone Burst function ON or OFF.Set the DTMF sending rate.Set the display type for memory mode operation.Turn the Voltage display function ON or OFF.Turns the Auto Repeater function ON or OFF. • Time-out timer• Auto repeater (For only the USA version.)• Auto power OFF• Repeater lockout• Squelch delay• Squelch type• Tone burst• DTMF speed• Display type• Voltage display1002345678910111213[ ][SET]](https://usermanual.wiki/ICOM-orporated/325100/User-Guide-1590283-Page-55.png)
![4811 OTHER FUNCTIONSKey-touch beep DTurn the confi rmation beeps ON (default) or OFF.LOCKSETANMMONIDUPLOWT-SCANTONEPRIOM/CALLSCANV/MHzDIGITAL PRIO AO BUSYMUTENARMIDLOWTime-out timer DTo prevent accidental prolonged transmission, the transceiver has a time-out timer. The function inhibits continuous transmissions longer than the set time pe-riod (1–30 minutes).• TOT-OF : Turns OFF the function. (default)• TOT-1–30 : The transmission is cut OFF after the set time period ends. LOCKSETANMMONIDUPLOWT-SCANTONEPRIOM/CALLSCANV/MHzDIGITAL PRIO AO BUSYMUTENARMIDLOWLOCKSETANMMONIDUPLOWT-SCANTONEPRIOM/CALLSCANV/MHzDIGITAL PRIO AO BUSYMUTENARMIDLOWAuto repeater D U.S.A. version onlyThe Auto Repeater function automatically turns the duplex setting and tone encoder ON or OFF when the operating frequency falls within or outside of the general repeater output frequency range (145.200–145.495 MHz, 146.610–146.995 MHz and 147.000–147.395 MHz). The offset and repeater tone frequencies are not changed by the Auto Repeater function; reset these frequencies, if necessary.• OF : The Auto Repeater function is OFF.• R1 : Activates for duplex only. (default)• R2 : Activates for duplex and tone.LOCKSETANMMONIDUPLOWT-SCANTONEPRIOM/CALLSCANV/MHzDIGITAL PRIO AO BUSYMUTENARMIDLOWLOCKSETANMMONIDUPLOWT-SCANTONEPRIOM/CALLSCANV/MHzDIGITAL PRIO AO BUSYMUTENARMIDLOWAuto power OFF DThe transceiver can be automatically turned OFF, when no key operation is performed for the specifi ed time pe-riod. 30 min., 1 hour, 2 hours and OFF (default) are se-lectable. The time period is retained, even if the transceiver is turned OFF by the auto power OFF function. To cancel the function, select “OF” (OFF).LOCKSETANMMONIDUPLOWT-SCANTONEPRIOM/CALLSCANV/MHzDIGITAL PRIO AO BUSYMUTENARMIDLOWLOCKSETANMMONIDUPLOWT-SCANTONEPRIOM/CALLSCANV/MHzDIGITAL PRIOAO BUSYMUTENARMIDLOWRepeater lockout DSet the transmission lockout (temporary transmission inhibit) capability.• OF : No lockout is activated. (default)• RP : The repeater lockout is turned ON.• BU : The busy lockout is turned ON.LOCKSETANMMONIDUPLOWT-SCANTONEPRIOM/CALLSCANV/MHzDIGITAL PRIO AO BUSYMUTENARMIDLOWLOCKSETANMMONIDUPLOWT-SCANTONEPRIOM/CALLSCANV/MHzDIGITAL PRIO AO BUSYMUTENARMIDLOWBusy lock-out setting Repeater lock-out settingSquelch delay DSet the squelch delay to short or long. The delay pre-vents the squelch from repeatedly opening and closing, while receiving the same signal.• S : Short squelch delay. (default)• L : Long squelch delay.LOCKSETANMMONIDUPLOWT-SCANTONEPRIOM/CALLSCANV/MHzDIGITAL PRIO AO BUSYMUTENARMIDLOWLOCKSETANMMONIDUPLOWT-SCANTONEPRIOM/CALLSCANV/MHzDIGITAL PRIO AO BUSYMUTENARMIDLOWShort squelch delay setting Long squelch delay settingSquelch type DSet the squelch type to OFF (Noise squelch), S-meter Squelch or Squelch Attenuator.• OF : Noise squelch (default)• SS : S-meter squelch The S-meter squelch allows you to set a mini-mum signal level needed to open the squelch. Rotate [SQL] to adjust the S-meter squelch lev-el. The S-meter is automatically activated when [SQL] is rotated further than the 12 o'clock posi-tion.• AT : Squelch Attenuator The attenuator is automatically activated when [SQL] is rotated further than the 12 o'clock posi-tion. Approximately 20 dB of attenuation is ob-tained at the maximum setting.LOCKSETANMMONIDUPLOWT-SCANTONEPRIOM/CALLSCANV/MHzDIGITAL PRIO AO BUSYMUTENARMIDLOWLOCKSETANMMONIDUPLOWT-SCANTONEPRIOM/CALLSCANV/MHzDIGITAL PRIO AOMUTENARMIDLOWS-meter squelchNoise squelch (default)](https://usermanual.wiki/ICOM-orporated/325100/User-Guide-1590283-Page-56.png)
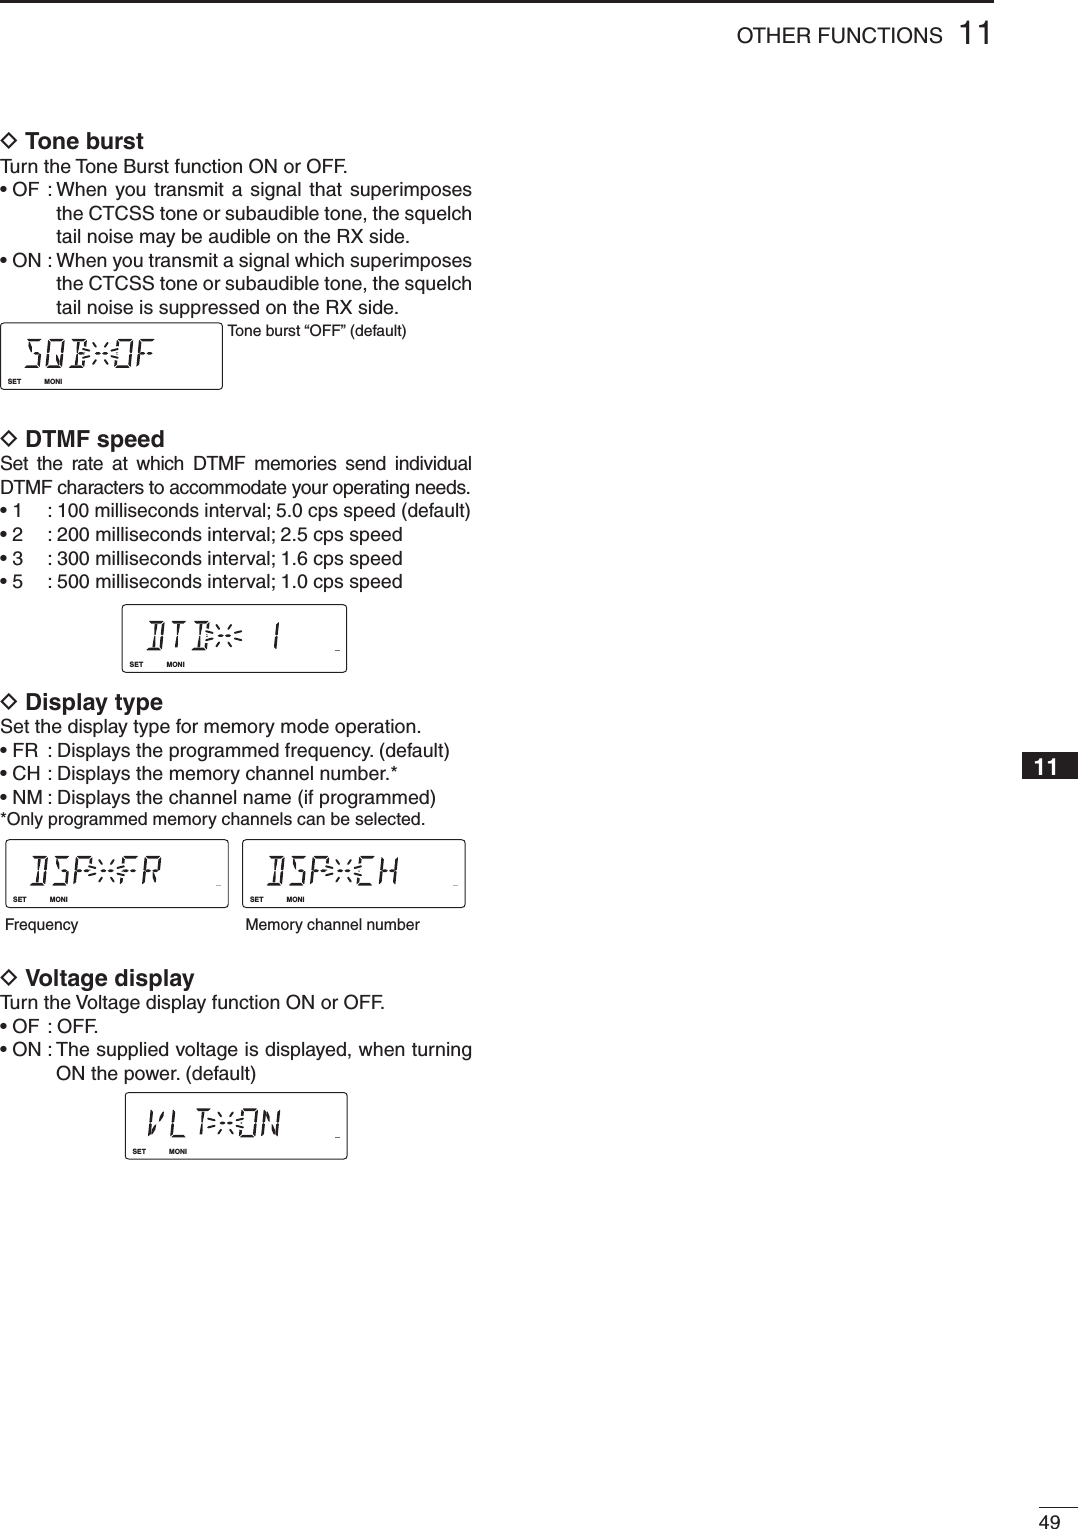
![5011 OTHER FUNCTIONSWeather channel operation ■Weather channel selection Dq Push [M/CALL] one or more times to select the weather channel group. w Rotate [DIAL] to select the desired weather chan-nel. e Push [M/CALL] to select the memory mode, or push [V/MH z] to select the VFO mode.Weather Alert function DNOAA broadcast stations transmit weather alert tones before important weather announcements. When the Weather Alert function is turned ON, the transceiver checks the selected weather channel every 5 seconds. for an announcement. When the alert signal is detect-ed, the “AL.T” and the WX channel are displayed al-ternately and a beep tone sounds until the transceiver is operated. The selected (used) weather channel is checked periodically during standby or while scanning.q Select the desired weather channel.w Push [SET] to enter the Set mode.e Push [SET] or [MONI] to select the weather alert item, and then rotate [DIAL] to select “ON."r Push any key other than [SET] or [MONI] to save the selection and exit the Set mode.t Set the desired stand-by mode. • Select the VFO, memory channel or Call channel. • Scan or priority watch operation can be also se-lected.y When the alert is detected, a beep sounds and the following will be displayed.LOCKSETANMMONIDUPLOWT-SCANTONEPRIOM/CALLSCANV/MHzDIGITAL PRIO AO BUSYMUTENARMIDLOWWeather channel numberLOCKSETANMMONIDUPLOWT-SCANTONEPRIOM/CALLSCANV/MHzDIGITAL PRIO AO BUSYMUTENARMIDLOWLOCKSETANMMONIDUPLOWT-SCANTONEPRIOM/CALLSCANV/MHzDIGITAL PRIO AO BUSYMUTENARMIDLOWAlternately displays above indications.When the weather alert is detected: NOTE: While receiving a signal on a frequency other than the weather channel, the receiving audio will be momentarily interrupted approximately every 5 sec-onds, when the alert function is turned ON. This is caused by the WX alert function. To cancel these in-terruptions, turn OFF the Wweather Alert function in the Set mode. (Only USA versions)](https://usermanual.wiki/ICOM-orporated/325100/User-Guide-1590283-Page-58.png)
![5111OTHER FUNCTIONS■ Microphone keys[F-1] and [F-2] on the supplied HM-133V memorize the transceiver settings. The [UP] and [DOWN] keys on the standard or optional mi-crophone (other than the HM-133V) can be assigned func-tions like the function keys on the transceiver’s front panel.[F-1] and [F-2] keys on HM-133V DThe following functions can be assigned to the micro-phone's [F-1] and [F-2] keys.Operating conditions:• Operating frequency• Repeater settings (offset direction and offset, tone ON/OFF and frequency)• Tone/DTCS squelch (ON/OFF, frequency/code and polarity)• Transmit output power setting➥ Programming the function Set the desired function, and then hold down [F-1] or [F-2] for 1 second. • 3 beeps sound.➥ Re-calling the function Push [F-1] or [F-2] .Set mode items:• Setting the Set mode items• Setting the Initial Set mode items (except “Display Type”)➥ Programming the function q Set the desired item in the Set mode, and then exit the mode. w Push [FUNC] , and then hold down [F-1] or [F-2] for 1 second. • 3 beeps sound.➥ Re-calling the function Push [FUNC] , then [F-1] or [F-2] .When turning ON the transceiver's power, the following functions are pre-assigned to [UP] or [DN] on micro-phones other than HM-133V.[UP] : Channel up; hold down for 1 second to start the scan, push again to stop it.[DN] : Channel down; hold down for 1 second to start the scan, push again to stop it.➥ Assigning a functionq Turn OFF the power.w While holding down the desired key on the trans-ceiver and either [UP] or [DN] keys on the micro-phone, turn ON the power. • The function is assigned to the key.➥ Clearing an assignmentq Turn OFF the power.w While holding down the desired [UP] or [DN] key on the microphone, turn ON the power.1002345678910111213 [UP] and [DN] keys on a microphones other than the HM-133V D](https://usermanual.wiki/ICOM-orporated/325100/User-Guide-1590283-Page-59.png)
![5211 OTHER FUNCTIONS■ Partial reset If you want to reset the VFO frequency, VFOsettings and Set mode items to their default values, without clearing the memory contents, you can do a partial reset of the transceiver's CPU. ➥ While holding down [V/MHz], hold down [ ] for 1 sec-ond to turn ON the power. • The CPU is partially reset.■ All Reset The function display may, at rare times, display errone-ous information (for example when fi rst applying pow-er). This may be externally caused by static electricity or other factors.In such case, fi rst turn OFF the power, wait a few sec-onds, then turn ON the power again.If the problem persists, perform the following proce-dure. IMPORTANT!: All Rest CLEARS all memory contents and resets all values in the CPU to default. A Partial Reset can also be done that will not clear memory content, but may not solve the problem. q Turn OFF the power, if the transceiver is ON.w While holding down [SET] and [S.MW], hold down [] for 1 second to turn ON the power. • The transceiver is totally reset.[ ] [SCAN] (V/MHz)[ ][MW] (S.MW)[LOCK] (SET)](https://usermanual.wiki/ICOM-orporated/325100/User-Guide-1590283-Page-60.png)
![5311OTHER FUNCTIONS■ Data cloningCloning allows you to quickly and easily transfer the programmed contents from one transceiver to another, or data from a personal computer to a transceiver, us-ing the optional CS-2300H CLONING SOFTWARE.D Cloning between two transceiversq Connect the master and sub-transceivers using the OPC-474 cloning cable through the speaker jack. • The master transceiver is used to send data to the sub-transceiver.w Enter the cloning mode as following. For the master transceiver: While holding down [M/CALL] (PRIO), hold down [] for 1 second to turn ON the power. For the sub-transceiver: Hold down [] 1 second to turn ON the power. • “CLONE” appears and the transceivers enter the cloning standby mode.e Push [S.MW] on the master transceiver. • “CL OUT” appears on the master transceiver’s display and the S/RF meter shows that data is being transferred to the sub-transceiver. • “CL IN” appears on the sub-transceiver’s display and the S/RF meter shows that data is being received from the master transceiver.r When the cloning is fi nished, turn OFF both trans-ceiver's power, and then turn ON the power again to exit the cloning mode.D Cloning using a PCData can be transferred to and from a PC, using the optional CS-2300H CLONING SOFTWARE and OPC-478 (RS-232C type) or OPC-478UC (USB type) CLON-ING CABLE. Consult the CS-2300H CLONING SOFTWARE HELP fi le for details.Cloning error D NOTE: DO NOT push any key on the sub-transceiver while cloning. This will cause an error.When the display to the right appears, a cloning error has occurred.In this case, both transceivers automatically return to the clone standby mode. Please follow the cloning pro-cedures again.PCto the USB portto the RS-232C portOPC-478OPC-478UCorLOCKSETANMMONIDUPLOWT-SCANTONEPRIOM/CALLSCANV/MHzDIGITAL PRIO AO BUSYMUTENARMIDLOWPush [S.MW] to start cloning (master transceiver).While cloningLOCKSETANMMONIDUPLOWT-SCANTONEPRIOM/CALLSCANV/MHzDIGITAL PRIO AO BUSYMUTENARMIDLOWWhile holding down [PRIO] (M/CALL) for 1 second, turn ON the power.During cloning modeLOCKSETANMMONIDUPLOWT-SCANTONEPRIOM/CALLSCANV/MHzDIGITAL PRIO AO BUSYMUTENARMIDLOW1002345678910111213](https://usermanual.wiki/ICOM-orporated/325100/User-Guide-1590283-Page-61.png)
![54M GENERAL• Frequency coverage : (unit: MHz) USA Tx: 144–148/Rx: 136–174* Export Tx: 136–174*/Rx: 136–174* Taiwan, Korea Tx/Rx: 144–146 *Guaranteed: 144–148 MHz range only.• Type of emission : FM• Number of memory channels : 207 (incl. 6 scan edges and 1 Call)• Scan types : Full, Program, Priority, Memory channel, Bank, Skip, Tone scans• Frequency resolution : 5, 6.25, 10, 12.5, 15, 20, 25, 30, 50 kHz• Operating temperature range : –10°C to +60°C; +14˚F to +140˚F• Frequency stability : ±3 ppm (–10°C to +60°C)• Power supply requirement : 13.8 V DC ±15%• Current drain (at 13.8 V DC: approximately): Transmit at 65 W 11 A ( less than 9 A at 24 W for the Taiwan version) Receive standby 0.4 Amax. audio 1.5 A• Antenna connector : SO-239 (50 :)• Dimensions (proj. not included) : 140.0(W)×40.0(H)×118.0(D) mm; 5.5(W)×1.6(H)×4.6(D) in• Weight (approximately) : 1.1 kg; 2.4 lbM TRANSMITTER• Modulation system : Variable reactance frequency mod.• Output power (approximately) :• Max. frequency deviation : ±5.0 kHz (Wide)/±2.5 kHz (Narrow)• Spurious emissions : Less than –60 dBc • Microphone connector : 8-pin modular (600 :)M RECEIVER• Receive system : Double-conversion superheterodyne• Intermediate frequencies : 1st: 46.35 MHz, 2nd: 450 kHz• Sensitivity (at 12 dB SINAD) : Less than 0.18 μV• Squelch sensitivity : Less than 0.13 μV (threshold)• Selectivity : [Wide] More than ±6 kHz/6 dBLess than ±14 kHz/60 dB [Narrow] More than ±3 kHz/6 dBLess than ±9 kHz/55 dB• Spurious and image rejection : More than 60 dB• AF output power (at 13.8 V DC) : More than 3.5 W (4.5 W typical) (at 10% distortion with a 4 : load)• External speaker connector : 3-conductor 3.5 (d) mm (1/8 inch)/4 :All stated specifi cations are subject to change without notice or obligation.USA, Export Taiwan KoreaHigh:65 W 24 W 50 WMid:25 W 10 W 25 WMid-Low:10 W – 10 WLow:5 W 5 W 5 WSPECIFICATIONS12](https://usermanual.wiki/ICOM-orporated/325100/User-Guide-1590283-Page-62.png)
![5513MAINTENANCETroubleshooting ■■ Fuse replacementIf the fuse is blown or the transceiver stops functioning, fi nd the source of the problem if possible, repair the problem and then replace the damaged fuse with a new rated one (FGB 20 A), as shown at right.20 A fusePROBLEM POSSIBLE CAUSE SOLUTION REF.No power comes on. • Power connector has a poor contact.• Polarity of the power connection is re-versed.• Blown fuse.• Check the connector pins.• Re-connect the power cable observing the proper polarity. Replace the fuse if blown.• Check the cause, repair it, then replace the fuse following the instruction below.p. iv––No sound comes from the speaker.• Volume is too low.• The audio mute function is activated.• Squelch is set too tight.• A selective call or Squelch function is activated such as pocket beep or tone squelch.• Rotate [VOL] clockwise.• Push any switch or key to deactivate it.• Set the squelch level to the threshold.• Turn OFF the those functions.p. 8p. 9p. 8pp. 39, 41Sensitivity is low and only strong signals are audible.• Antenna feedline or the antenna con-nector solder has a poor contact or is shorted.• Squelch attenuator function is activated.• Check, and if necessary, replace the feedline or re-solder the antenna connector.• Set [SQL] to between the 10 and 12 o’clock position.• Turn OFF the S-meter squelch or squelch at-tenuator.p. vp. 8p. 9No direct contact possible with other stations.• The other station is using tone squelch.• The transceiver is set to duplex.• Set the appropriate tone frequency or code, and then turn ON the tone or DTCS squelch.• Select the simplex mode.p. 41p. 12Repeater cannot be ac-cessed. • Wrong frequency offset is programmed.• Wrong subaudible tone frequency is pro-grammed.• Correct the frequency offset.• Correct the subaudible tone frequency.p. 15p. 13Frequency cannot be set.• The frequency lock function is activated.• Priority watch is paused on the watching frequency.• Turn the function OFF.• Cancel the watch.p. 7p. 35Frequency cannot be set using the microphone.• The frequency lock function is activated.• Priority watch is paused on the watching frequency.• Turn the function OFF.• Cancel the watch.p. 7p. 35Some memory channels cannot be selected using the microphone keypad.• The input channel number has not yet been programmed.• Rotate [DIAL] to check whether the channel has been programmed or not.–Scan does not start. • The squelch is open.• Only one memory channel is programmed or other channels are set as skip channels.• Priority watch is activated.• Set the squelch to the threshold point.• Program other memory channels or cancel the memory skip function in the desired chan-nels.• Cancel the watch.p. 8pp. 17, 32p. 35Transmission is automatically cut off.• Time-out timer is activated. • Turn OFF the timer. p. 48Transmission continues even when the PTT is released.• One-touch PTT function is activated. • Turn OFF the function. p. 11The function display shows erroneous information.• The CPU is malfunctioning. • Reset the CPU. p. 521002345678910111213If your transceiver seems to be malfunctioning, please check the followings before sending it to the service center.](https://usermanual.wiki/ICOM-orporated/325100/User-Guide-1590283-Page-63.png)