ICON Time Systems 08101 13.56 MHZ RFID TIME ATTENDANCE User Manual USERS MANUAL
ICON Time Systems 13.56 MHZ RFID TIME ATTENDANCE USERS MANUAL
USERS MANUAL

PRODUCT USER GUIDE
www.icontime.com | 1.800.847.2232
Table of Contents
Introduction
Home Page
PART I: Setting Up Your System
Step 1: Setting Up Your Preferences
Pay Preferences
Punch Preferences
Device Preferences
Alert Preferences
Step 2: Setting Up Your Employees
Edit an Employee
Step 3: Setting Up Alerts
PART II: Managing Your System
Viewing and Running Reports
Add a New Punch
Edit a Punch
Attendance Report
TimeCard Report
Roster Report
Backup and Restoring Data
Creating a Backup
Restoring a Backup
Updating Your Software
PART III: Appendix
A: Product U
pg
rades
Page 1 of 41Product User Guide
3/28/2008file://X:\I\ICON_TIME\346AUT8\Extra346AUT8\FCC%20Documentation%203\Use...

B: Employee Time Clock
C: Summary of Rounding Rules
D: Minutes to Decimal Conversion Chart
E: Alert Examples
F: Frequently Asked Questions
G: FCC Part 15
Page 2 of 41Product User Guide
3/28/2008file://X:\I\ICON_TIME\346AUT8\Extra346AUT8\FCC%20Documentation%203\Use...

Introduction
The employee time clock and Web-based software is a system that integrates with your computer
through your Web browser. It is important to understand and familiarize yourself with how this system
works so that you can set it up quickly and easily. Your system includes the following features:
zThe employee time clock and Web browser (your computer) are directly linked after you log in.
zImportant alerts will appear on the Home page. Alert rules and preferences can be established in
the Alerts Setup portion of the program. Employee activity can be monitored in real-time.
zReal-time editing is accomplished through links on your report screens and from the main tool
bar. If you place your mouse cursor over an editable link, your mouse cursor will turn into a
pointing finger and the link will be underlined. Simply click on the link to bring up a new window
or to make a selection. Data is edited directly from your report screens and updated immediately
in the employee time clock.
zThe system is compatible with all operating systems if an ethernet based connection is used. If a
USB or serial port connection is used, drivers are installed that are only compatible with
Windows XP or later versions of Windows.
zThe employee time clock contains a built in proximity badge reader. Badges can be purchased and
assigned to employees. This allows employees to enter their original ID number on the keypad or
swipe an assigned badge to clock IN and OUT.
zEnhanced, consecutive day overtime rules are provided for employers that calculate consecutive
day overtime. This is also referred to as "California Overtime".
zOptional upgrades can be purchased and easily added to your system that will provide many
important and convenient features. See the Appendix for more details.
zThe basic system is preprogrammed with 25 employee ID numbers. Employees can immediately
start punching IN and OUT after the clock is powered on. But in order to get detailed and
meaningful reports, it is required that you set up your employee time clock preferences and
em
p
lo
y
ee
p
references first.
Page 3 of 41Product User Guide
3/28/2008file://X:\I\ICON_TIME\346AUT8\Extra346AUT8\FCC%20Documentation%203\Use...
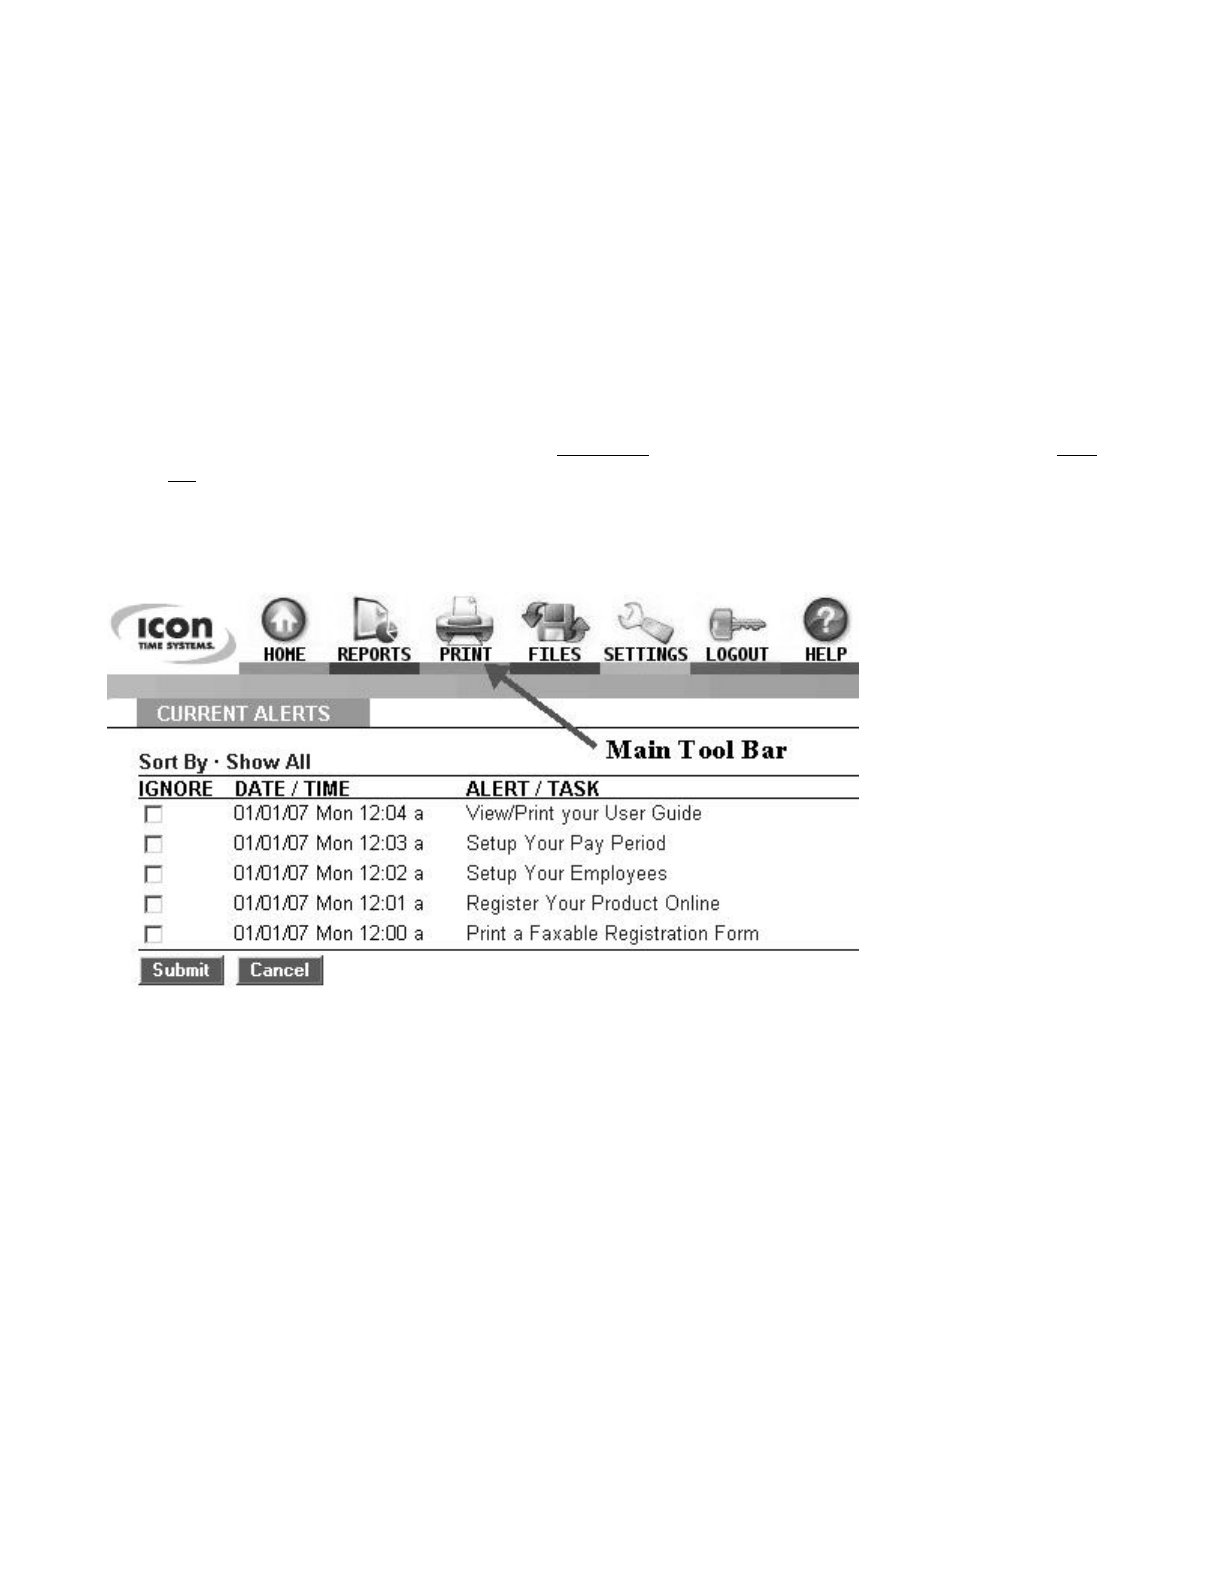
Home Page
The Home page displays important alerts and reminders regarding your employees and software
configuration.
zThe main tool bar at the top of the Home page provides links to different software configuration
options.
zThe Current Alerts list displays important system alerts or alerts that you have setup in the
program and the time and date they occurred.
zClick on the alert link in the ALERT/TASK list to view details on the alert. Select the IGNORE
check box to hide the alert. Click on the Show All link to display hidden alerts. Click on the Sort
By link to sort alerts by date or ID#.
zWhen setting up the system for the first time, it is important to print and read this user guide.
Also, make sure you register your product.
NOTE: Before attempting to run reports for the first time, follow the Preference set up steps that
follow. To
p
rint this user
g
uide, select the File\Print o
p
tion from
y
our Web browser window.
Page 4 of 41Product User Guide
3/28/2008file://X:\I\ICON_TIME\346AUT8\Extra346AUT8\FCC%20Documentation%203\Use...
PART I: Setting Up Your System
Step 1: Setting up your Preferences
Pay Tab:
zPayroll Preferences - From the Home page, go to the Preferences section by clicking on the
Setup Your Pay Period link in the Alert/Task list or select Preferences from the Settings icon on
the main tool bar.
{Pay Period Type - From the drop-down window, select your pay period type. The choices
are weekly, bi-weekly, semi-monthly, and monthly.
If you select semi-monthly, two additional date windows will appear. Manually enter the
two days your pay periods will start during the month. In this example, the dates are set to
the 1st and the 15th. Enter the corresponding dates in the Last, This, and Next Pay Start
windows. An example is shown below. You cannot enter a date past the 28th for a semi-
monthly starting date.
{Last Pay Start - Single-click in the date window to bring up the Date Picker calendar.
Tip: Use the Date Picker to graphically enter dates.
o Use the << >> arrows to select the
year.
o Use the < > arrows to scroll to the
previous or next month, respectively.
o Click on the day of the month in the
calendar.
o Click on [Close] to hide the calendar.
Page 5 of 41Product User Guide
3/28/2008file://X:\I\ICON_TIME\346AUT8\Extra346AUT8\FCC%20Documentation%203\Use...

{This Pay Start - Repeat the previous step and enter the correct starting date for this pay
period. The system will advance pay periods automatically. You should not have to change
any dates once they have been established.
{Next Pay Start - Repeat the previous step and enter the correct starting date for the next
pay period.
{Day Start - Enter the day change time. Use the format h:mma/p. For example, enter 2:00a
for 2:00am. This is the physical day start used for reports. In general, simply leave the entry
at default - 12:00a. Let's say you have set the day start to 7:00a and an employee clocks IN
at 6:45am on August 27th. The IN and OUT punch will appear on a report for the time
period through August 26th but will be time stamped as occurring on August 27th.
Tip: Use the Time Picker arrows to adjust time for any time fields in the program.
{Week Start - Using the drop-down window, select the day your payroll week starts.
Weekly overtime and weekly reports will be calculated starting on this day.
zOvertime Preferences - Select overtime rules for your company.
{Day OT1 After - Enter the number of hours in a day that must be worked before Overtime
1 is calculated. Overtime 1 is automatically calculated at "time-and-a-half" (hours are
multiplied by 1.5). Enter "99" if you don't pay daily overtime.
{Week OT1 After - Enter the number of hours in a week that must be worked before
Overtime 1 is calculated. Enter "99" if you don't pay weekly overtime.
{Consecutive Day OT - Leave this setting on "No" in the drop-down window unless your
state requires consecutive day overtime calculations. For example, California is one state
that requires this setting. Enhanced overtime and consecutive day overtime features are
available as an upgrade. See the Rules Pack upgrade section of the Appendix for details.
Punch Tab:
zPunch Preferences - Select the Punch tab to enter your punch and rounding rules.
{Rounding Type - Select the rounding rule in the drop-down window used by your
company. Choices are None, 15 minute, 15 minute slant, and 10th hour. Select None if
you want to calculate to the exact minute when your employees are punching IN and OUT.
Go to the Appendix to review details on different rounding options and examples.
{Automatic Punches become IN at - Enter the number of hours that must pass before the
next automatic punch automatically becomes an IN punch. This is convenient if the
employee has forgotten to punch OUT the day before. Automatic punch entry is also known
as "Swipe and Go". The employee time clock will record every punch as an IN punch.
Ever
y
other
p
unch will be calculated as an IN
p
unch b
y
the
p
ro
g
ram and on
y
our re
p
orts.
Page 6 of 41Product User Guide
3/28/2008file://X:\I\ICON_TIME\346AUT8\Extra346AUT8\FCC%20Documentation%203\Use...

This setting does not affect validated and non-validated punches.
{Flag edits on Reports - Check this box if you want punch edits to be flagged with an "E"
on reports.
{Reject Like Punches within - If an employee accidentally tries to enter the same type of
punch at the clock within the minutes specified, the second punch will be ignored.
Device Tab:
zDevice Preferences - Select the Device tab in the Preferences window to configure the employee
time clock and default report rules.
{System Information - Important information such as your Database Version, Software
Version, and employee time clock Serial Number will appear at the top of this section.
{Supervisor Code - To secure your employee time clock, enter a unique 6-digit security
code. This code is needed when accessing Supervisor Mode on the employee time clock.
The default supervisor code is "00 00 00".
{Lock Keypad - Select this check box to prevent keypad entry of PIN numbers to punch IN
and OUT at the employee time clock. This will allow employees only to scan badges at the
employee time clock. See the Appendix for proximity badge upgrade options.
{Use Daylight Savings - Select this check box if you want the clock to automatically move
the time ahead or back for daylight savings.
{Default Attendance Report To - From the drop-down window, select the default time
frame to view when you open the Attendance Report screen.
{Default TimeCard Report To - From the drop-down window, select the default time frame
to view when you open the TimeCard Report screen.
{Refresh Home Page - Enter in minutes, how often the alerts on the Home Page should be
refreshed. If the system seems to be running slowly, enter a larger number for the refresh
time.
Alerts Tab:
zAlert Preferences: Select the Alerts tab in the Preferences window to setup the alert notices
displayed on the Home page.
NOTE: Alerts will not immediately update on the Home Page. The Home page will be
updated based on your time setting for the "Check Alerts Every" option described below.
{Alert Low Hours at - If an em
p
lo
y
ee works a shift that is less than the hours s
p
ecified, an
Page 7 of 41Product User Guide
3/28/2008file://X:\I\ICON_TIME\346AUT8\Extra346AUT8\FCC%20Documentation%203\Use...

alert will be generated. Enter "0" to disable the alert.
{Alert High Hours at - If an employee works a shift that is more than the hours specified,
an alert will be generated. Enter "99" to disable the alert.
{Alert Maximum Time at - This is the maximum time for which a punch pair will be
allocated. For example, if you enter "24", any employee that forgets to punch OUT the day
b
efore or that has a shift duration of more than a day will have a maximum of only 24 hours
assigned to the punch pair, and an alert will be generated.
{Alert Day Overtime OT at - This is used in combination with the Day OT1 established in
Overtime Preferences. If you have Day OT1 set to 8 hours and Alert Day Overtime OT
set to 2 hours, an alert will be posted to the Home page when the employee reaches 8-2 = 6
hours worked for the day.
{Alert Week Overtime OT at - This is used in combination with the Week OT1 established
in Overtime Preferences. If you have Week OT1 set to 40 hours and Alert Week
Overtime OT set to 8 hours, an alert will be posted to the Home page when the employee
reaches 40-8 = 32 hours worked for the week.
{Check Alerts Every - Enter the time in minutes. New alerts will be checked and posted to
the Home page based on the time entered. If the system seems to be running slowly, enter a
larger number in this window.
{Update Employee Hours Every - Enter in minutes how often punch information from the
employee time clock is updated on your report screen. If the system seems to be running
slowly, enter a larger number in this window.
User Tab:
zUser Field Preferences - This is an optional upgrade. See the Appendix for details.
NOTE: Make sure you click the Submit buttons to save your changes and
immediatel
y
u
p
date
y
our clock's database.
Page 8 of 41Product User Guide
3/28/2008file://X:\I\ICON_TIME\346AUT8\Extra346AUT8\FCC%20Documentation%203\Use...
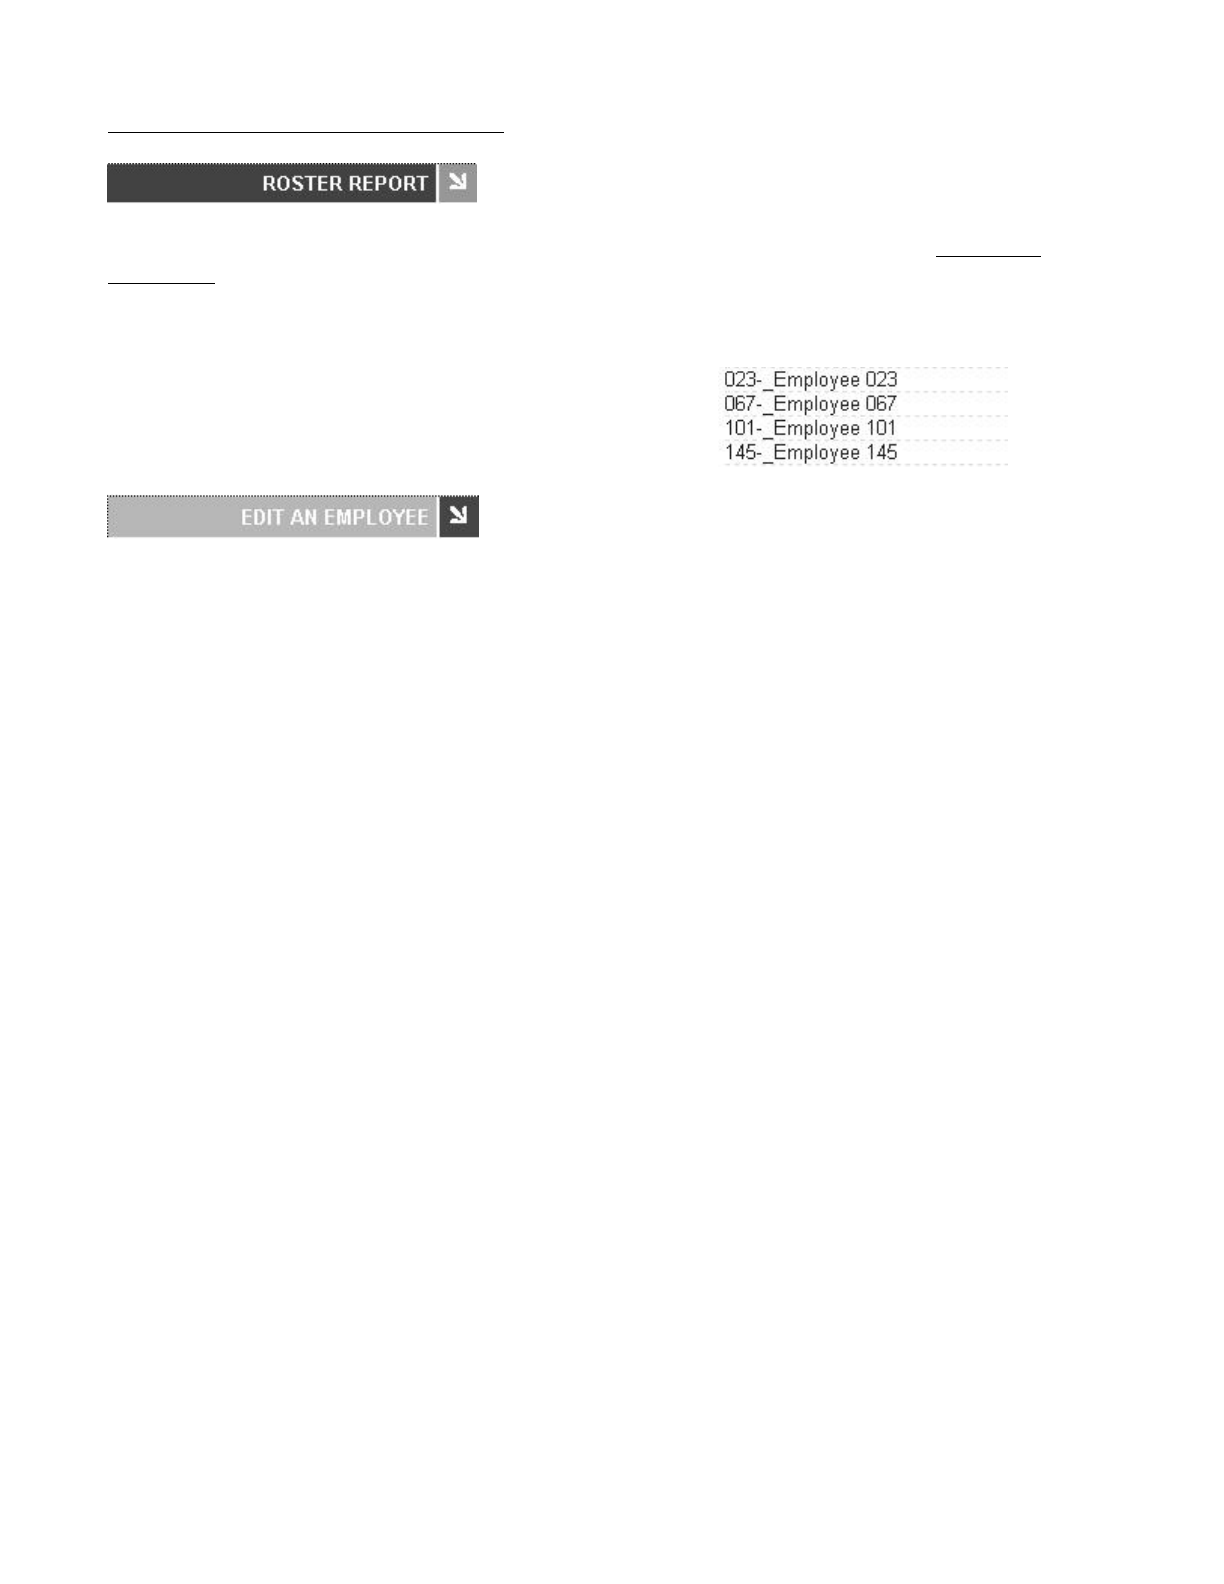
Step 2: Setting up your Employees
Setup Employees: From the Home page, go to the Roster Report by clicking on the Setup your
Employees link in the Alert/Task list or select Roster Report from the Reports icon on the main tool
bar. Refer to the Viewing and Running Reports, Roster Report section of this manual for detailed
information on overtime calculations on this screen.
zEdit an Employee - Follow the instructions below to set up your employees properly in the Edit
an Employee screen.
{First Name - Enter the first name of the employee.
{Middle Initial- Enter the middle initial of the employee.
{Last Name - Enter the last name of the employee.
{Display Name - Enter how you want the name to display on the employee time clock.
{Address - Enter Address/contact information in this window.
{PIN/Badges - Displays the employee ID number used by the employee at the employee
time clock.
{Active - All employees default to an active status. Deselect this check box to make the
employee inactive and to remove their name from the Roster Report . This will also
remove the employee ID number from the employee drop-down window in the Add a New
Punch screen and any other drop-down window that lists employees.
{Wage - Enter an employee wage if you would like wages calculated on your reports.
{Entry Method - This is important. This determines the procedure for punching IN and
OUT by the employee at the employee time clock. Select the desired method from the drop-
down window.
NOTE: Refer to the Employee Time Clock section in the Appendix for employee
time clock options and specific instructions on using the employee time clock by
managers and employees
Validated - IN and OUT will dis
p
la
y
under the em
p
lo
y
ee's name at the em
p
lo
y
ee
NOTE: Each employee listed in the Roster report is a Web
link. Click on the employee name to display and modify
information for this employee.
Page 9 of 41Product User Guide
3/28/2008file://X:\I\ICON_TIME\346AUT8\Extra346AUT8\FCC%20Documentation%203\Use...

time clock. The employee is required to choose the correct button at that time - either
IN or OUT. If IN is blinking on the display, the employee is required to punch IN. If
OUT is blinking on the display, the employee is required to punch OUT. For
example, if an employee forgot to clock OUT the day before, they will have to punch
OUT and then punch IN for the current shift. The punch information can be edited in
the software so that the proper OUT time and date is recorded for your reports.
Non Validated - IN and OUT will display under the employee's name at the
employee time clock. The employee is required to choose the correct button at that
time - either IN or OUT. Either entry will be accepted by the employee time clock.
Automatic - This is also known as "Swipe and Go". After the employee enters their
ID number, the display on the employee time clock shows the employee name and the
message "Entry Recorded". The employee is not allowed to make any other selections
at the employee time clock. This provides a simple and quick method for the
employee at the employee time clock. The employee time clock records every punch
as an IN punch. Every "other" punch is considered an IN punch by the program. You
cannot make any lunch override or hours adjustments to these type of punches. See
the Add a New Punch section for details.
{Lunch Enabled - Select this check box to deduct a lunch. The deducted time for lunch is
setup in the Lunch Length window. Lunch Enabled is usually used if the employees DO
NOT manually punch OUT for lunch.
{Lunch At - Enter the number of hours the employee is required to work before the lunch
period is automatically deducted from the employee's shift for the day.
{Lunch Length - Enter the amount of time in minutes to deduct for lunch.
{Purge Punches - Click on the Delete all punches for this employee link to delete all
punches for the employee. You will get a final dialog box to approve the deletion of
punches. Click OK to delete the employee's punches from the employee time clock, or
select Cancel to keep the punches.
Step 3: Setting up Alerts
Enter Alert Setup: From the main tool bar, select Settings and Alert Setup.
zAlert Setup - Follow the instructions below to set up alerts to be posted on the Home page.
NOTE: To disable an alert, deselect the check box in the far left column. This will prevent
the alert from being posted to the Home Page. Disable the alerts that you will not be using.
This will speed up system performance. For each alert item there is a drop-down window in
the Lifetime column. If an alert is posted to the Home pa
g
e, it will be automaticall
y
removed
based on the Lifetime
(
time duration
)
y
ou have chosen on this screen.
Page 10 of 41Product User Guide
3/28/2008file://X:\I\ICON_TIME\346AUT8\Extra346AUT8\FCC%20Documentation%203\Use...
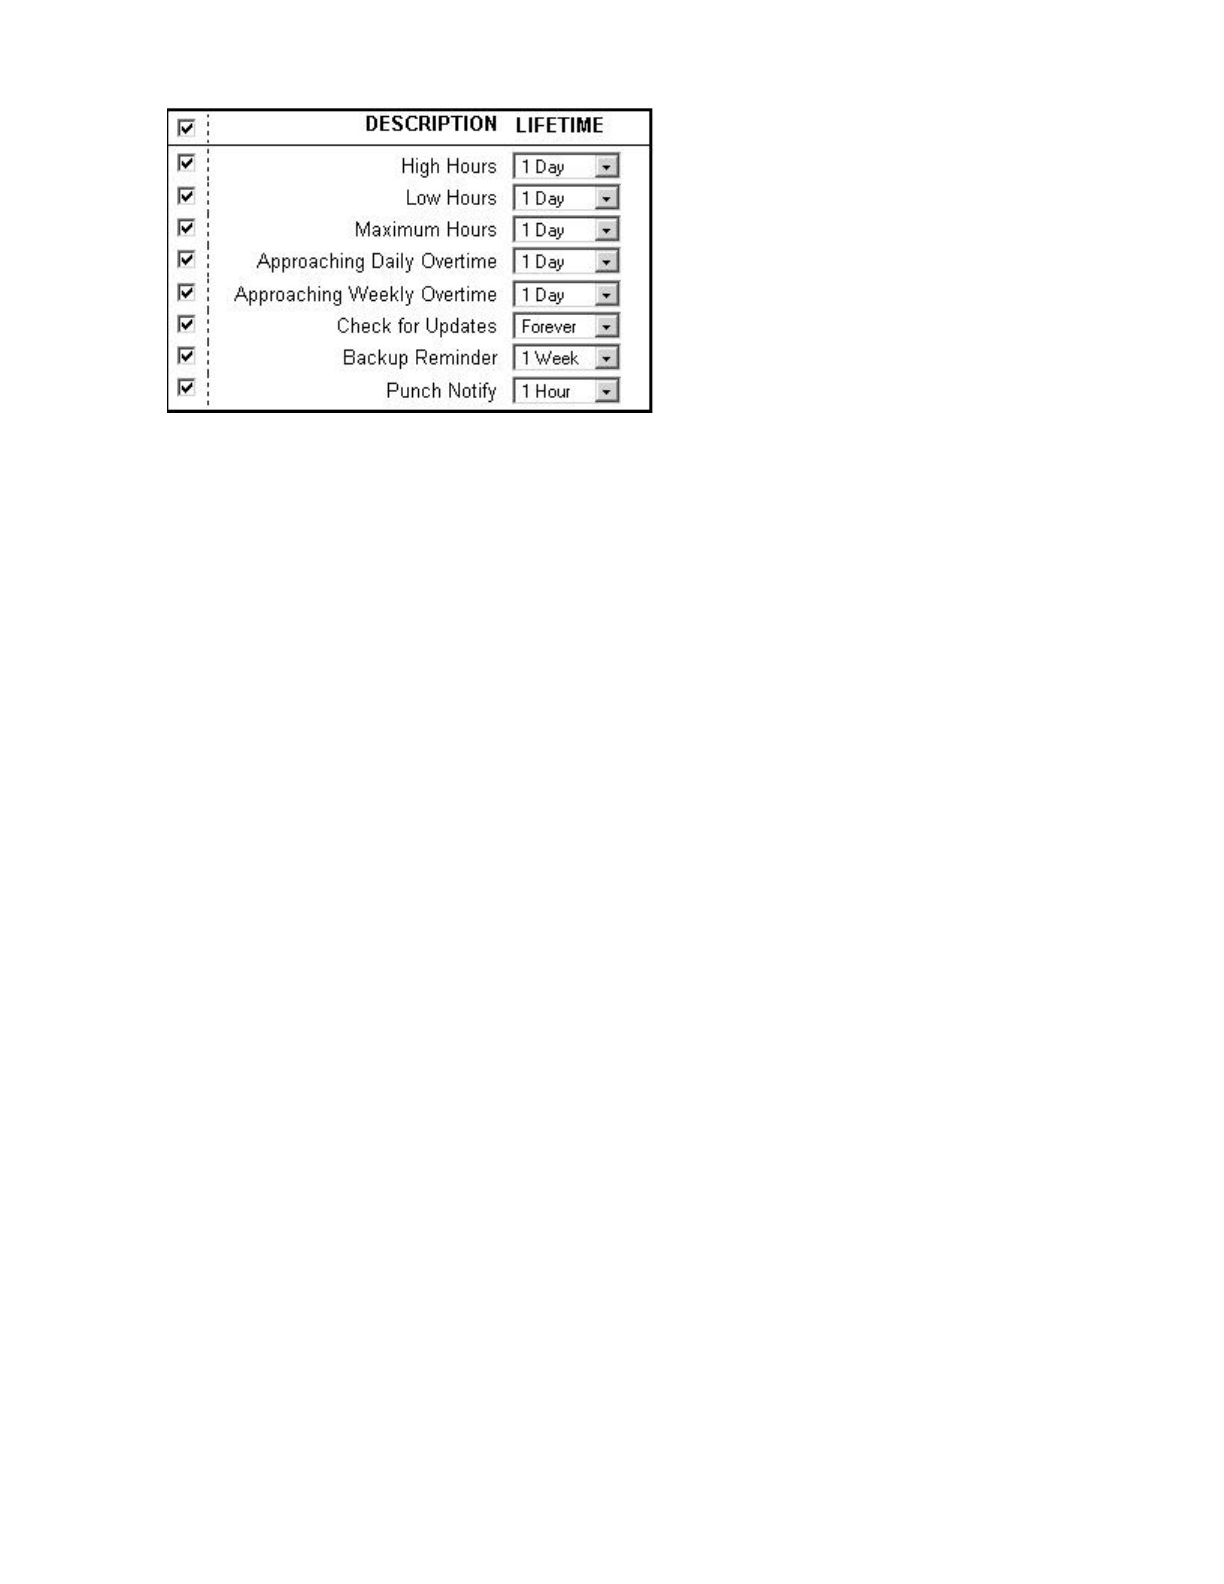
{High Hours - An alert will be posted if the "Alert High Hours" has been reached. These
hours were established in the Settings\Preferences\Alerts tab in the previous section of the
user guide.
{Low Hours - An alert will be posted if the "Alert Low Hours" has not been reached.
These hours were established in the Settings\Preferences\Alerts tab.
{Maximum Hours - An alert will be posted if the "Alert Maximum Time" has been
reached. These hours were established in the Settings\Preferences\Alerts tab.
{Approaching Daily Overtime - An alert will be posted if the "Alert Day Overtime" has
been reached. These hours were established in the Settings\Preferences\Alerts tab.
{Approaching Weekly Overtime - An alert will be posted if the "Alert Week Overtime"
has been reached. These hours were established in the Settings\Preferences\Alerts tab.
{Check for Updates - This will post a reminder to the Home page to check for new updates.
{Backup Reminder - This will post an alert to the Home page to remind you to backup your
data.
{Punch Notify - This will post an alert to the Home page when employees punch IN our
OUT.
Page 11 of 41Product User Guide
3/28/2008file://X:\I\ICON_TIME\346AUT8\Extra346AUT8\FCC%20Documentation%203\Use...
PART II: Managing Your System
Viewing and Running Reports
Select a report option: From the main tool bar, select the Reports icon and the report to view or edit.
NOTE: Punch information will update based on the time setting entered for "Update Employee
Hours Every" in Settings\Preferences\Alert Preferences. Select the Refresh link at the top of the
report screen to view punch information that may have been updated.
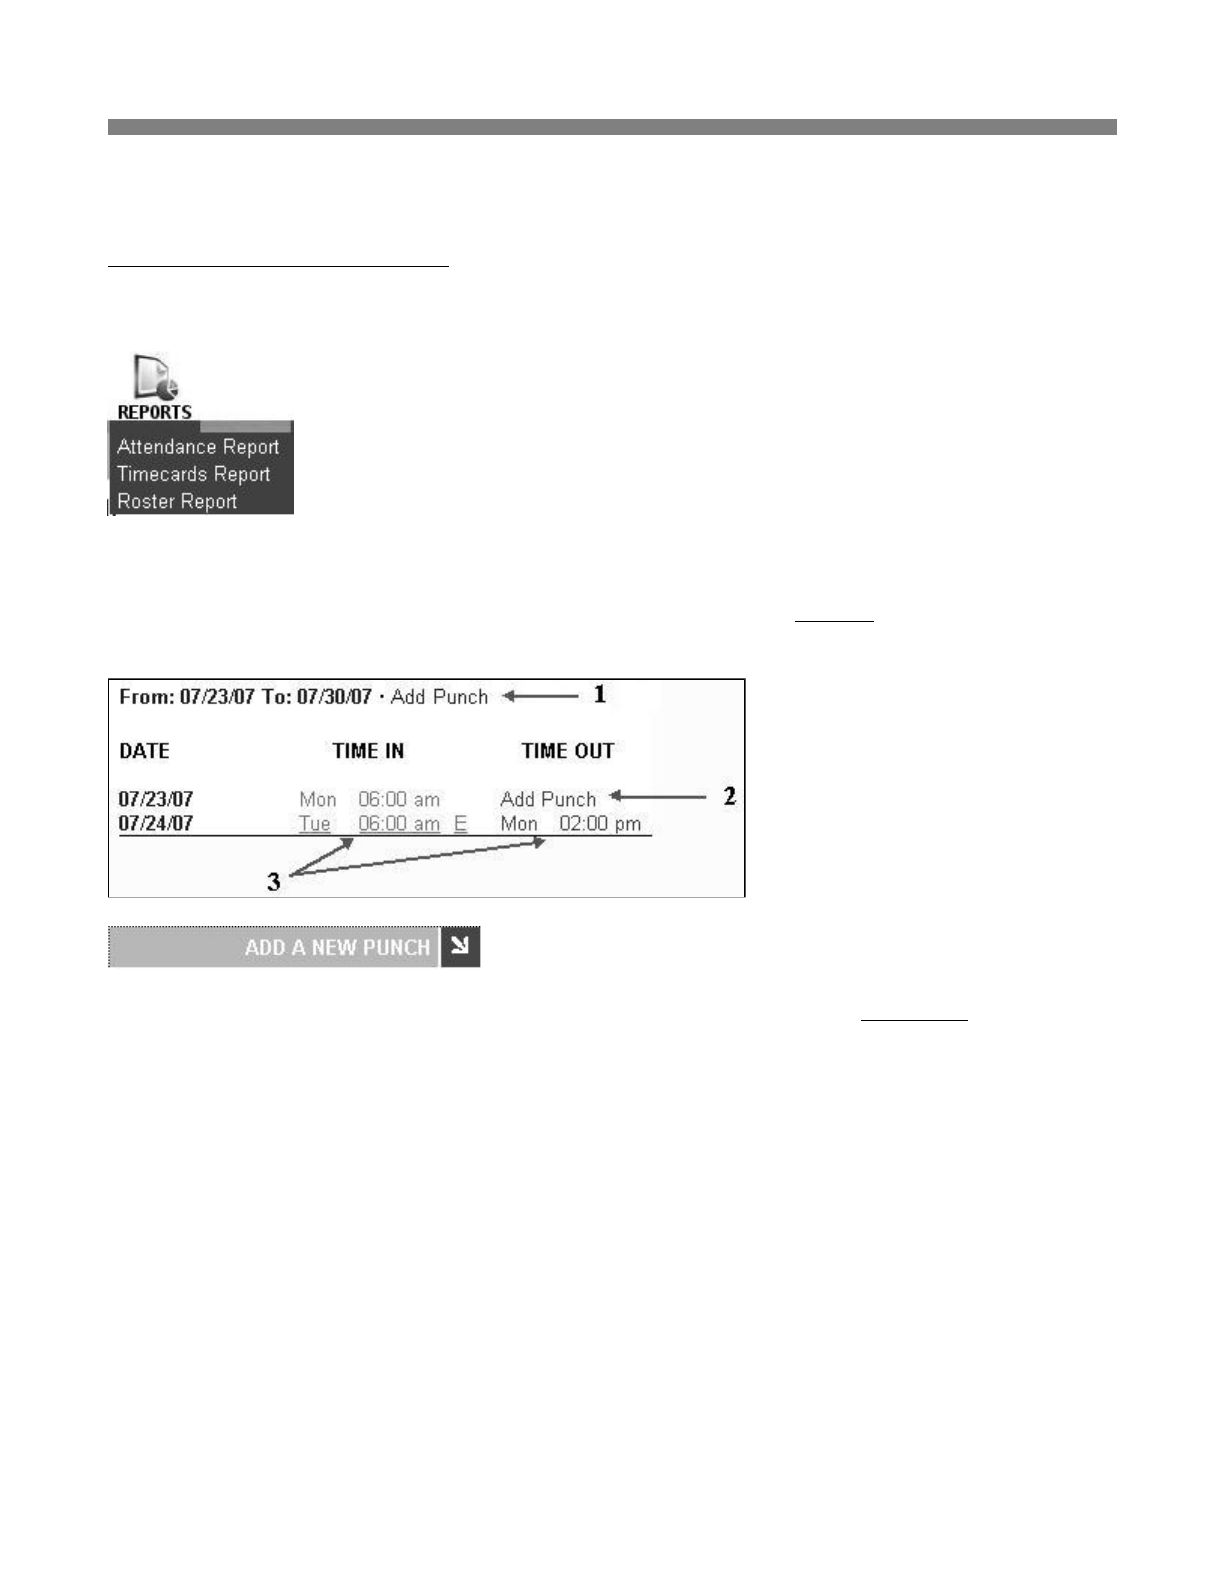
Add Punch: From the Attendance or TimeCard Report screen, click on the Add Punch link at the top
of the report. See "1" in the illustration above.
zEmployee - Select the employee to receive the added punch in the drop-down window. The
employee will not appear in the list if they have been set to inactive in the Edit an Employee
screen.
zType - Select the type of punch.
{IN - Create an IN punch.
{OUT - Create an OUT punch
{Automatic - This will enter a punch opposite to the previous punch. The punch will become
an IN punch if the automatic punch duration time that was set up in punch preferences has
elapsed.
NOTE: When adding or editing an Automatic punch, change the punch type from
Automatic to OUT if
y
ou would like to edit lunch or ad
j
ustment hours. In other words,
Page 12 of 41Product User Guide
3/28/2008file://X:\I\ICON_TIME\346AUT8\Extra346AUT8\FCC%20Documentation%203\Use...

you cannot do a lunch override or adjustment hours to an automatic punch.
zDate - Use the Date Picker to choose the date.
zTime - Type in the time for the punch in hh:mma/p format. For example, enter 07:00a for 7:00
am. Use the Time Picker to select time also.
zLunch - If the punch type is OUT, you will have the option to enter an additional lunch deduction
for the shift in the Lunch window.
zADJ - If the punch type is OUT, you will have the option to enter an additional time adjustment to
the shift. You can enter positive or negative values to adust time for the shift. For example, let's
say you have setup daily overtime to accrue after 8 hours. The employee has worked 8 hours but
you want to give them 1 extra hour for coming in for that day. Enter 1.00 in the ADJ window and
click the Submit button. This will cause the employee to accrue overtime since 8 hours has all
ready been worked. The adjustment will be applied to OT1. The following will be posted to the
report:
Let's say you have daily overtime set to accrue after 8 hours and an employee has worked 8.27
hours for the shift. You did not give the employee permission to work overtime, so .27 hours will
be deducted from the shift. Enter -.27 in the ADJ window and click the Submit button. This will
subtract this amount from the total hours worked for the day. This will adjust the time worked to 8
hours without any OT1 accrued. The following will be posted to the report:
Adding a punch to complete a punch pair: You may come across an IN or OUT punch on a certain
day that does not have a matching punch. To complete the punch pair, click on the Add Punch link on
the Report screen to bring up the Add a New Punch screen. Follow the steps described in the Add a
New Punch section to add a punch for the current employee. See "2" in the illustration at the beginning
of this section.
Edit a Punch: From the Attendance or TimeCard Report screen, click on the actual IN or OUT time
you want to edit. Each punch entry in the Time IN and Time OUT columns of the report is a link. See
"3" in the illustration at the beginning of this section.
zFollow the instructions in the Add Punch section to properly edit the time and properties for the
selected punch.
zFlags - If an alert exception has occurred for an existing punch pair, there will be a flag code or
codes for the OUT
p
unch in the Edit a Punch screen. Review the Exce
p
tions descri
p
tion in the
Page 13 of 41Product User Guide
3/28/2008file://X:\I\ICON_TIME\346AUT8\Extra346AUT8\FCC%20Documentation%203\Use...
Attendance Report section below.
NOTE: If you see an "E" next to a punch in the report, this indicates the punch was
manually edited in the software.
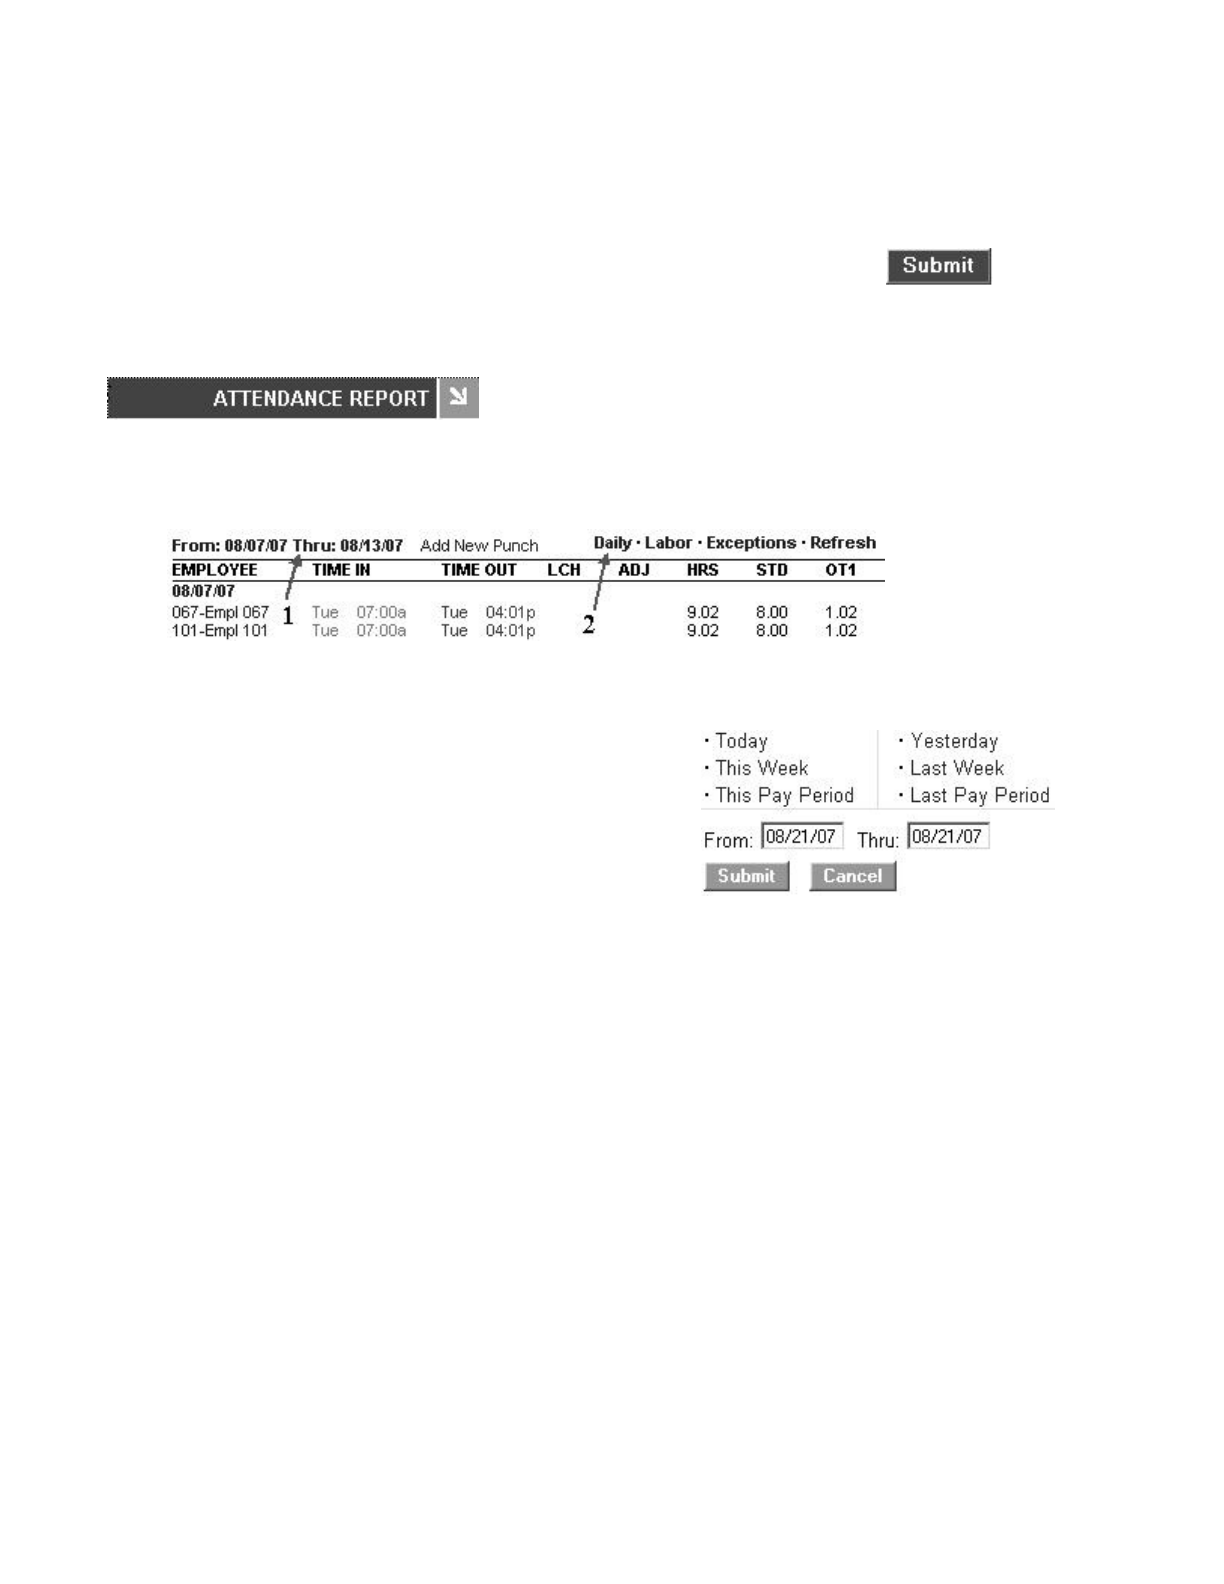
zAttendance Report - View or edit attendance information for a chosen day or time period for all
employees. Refer to the illustration below.
{Select a time period for the report - Click on the date link at the top of the Report screen
as shown by "1" in the illustration above.
{Viewing additional details - Each item shown by "2" in the first illustration above is a link
to display additional information on the Report screen.
Daily - Click on this link to show total hours worked for each day. This is convenient
if the employee clocks IN and OUT multiple times during the day.
Labor - Click on this link to view labor costs if you have entered employee wages.
Exceptions - Click on this option to view only punch exceptions in the report. Click
again to bring back the original report.
H: An "H" in the exception column indicates the punch pair has reached the
Alert High Hours established in Settings\Preferences\Alert Preferences.
L: An "L" in the exception column indicates the punch pair is below the Alert
Low Hours setup in Settings\Preferences\Alert Preferences.
M: An "M" in the exception column indicates the punch pair has reached the
Alert Maximum Time setup in Settings\Preferences\Alert Preferences.
O: An "O" in the exception column indicates the punch pair has been updated
with a specific lunch deduction in the Edit a Punch screen.
Refresh - Click on this option to update the Attendance Report screen with any
recent
p
unches from the em
p
lo
y
ee time clock.
Make sure you click the Submit buttons to save your changes and
immediatel
y
u
p
date
y
our clock's database.
o Click on the time period to display
on the report.
o Enter a date or use the Date Picker
for a custom date range in the
From/Thru Windows.
o Click on the Submit button after
entering custom dates.
Page 14 of 41Product User Guide
3/28/2008file://X:\I\ICON_TIME\346AUT8\Extra346AUT8\FCC%20Documentation%203\Use...
Editing employee information - Simply click on the employee name in the
Employee column of the report to edit employee details. Refer to the "Edit an
Employee" section earlier in this manual.
Editing punch information - Simply click on an IN or OUT punch in the Time IN
or Time OUT column to edit the punch. Refer to the "Edit a Punch" section earlier
in this manual. An "E" next to the punch indicates that the punch was edited.
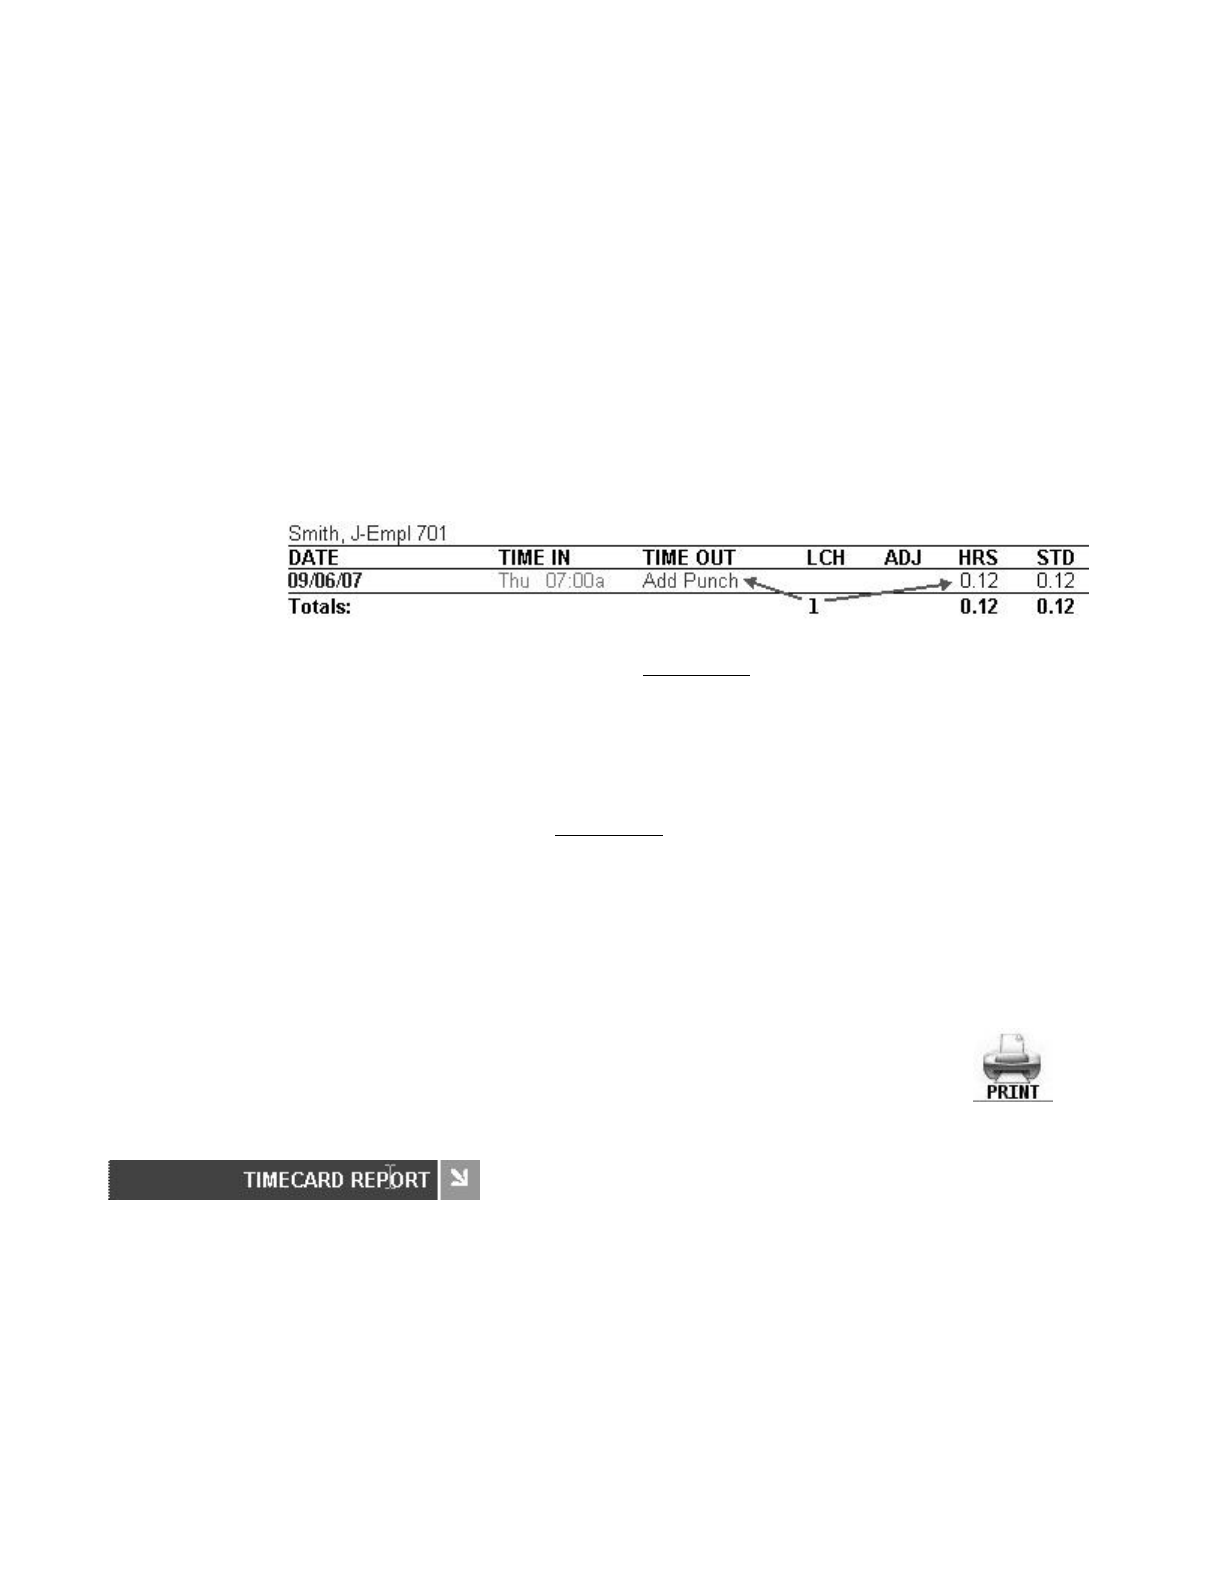
NOTE: The program will report the time elapsed since the IN punch occurred if
there is no matching OUT punch. An example is shown below. Employee 701
clocked IN at 7:00am. The current time on the employee time clock is 7:07am.
Thus .12 minutes have elapsed since the employee clocked IN. Hours will
continue to accrue until the employee clocks OUT, the punch is edited, or the
"Alert Maximum Time at" value has been reached.
Adding a new punch - Click on the Add Punch link at the top of the report to create
new punch entries for an employee. Be sure to select the correct employee from the
drop-down window in the Add a New Punch screen.
Adding a punch to complete a punch pair: For example, you may come across an
IN or OUT punch on a certain day that does not have a matching punch. To complete
the punch pair, click on the Add Punch link on the Report screen to bring up the Add
a New Punch screen. Follow the steps described in the previous section to add a
punch for the current employee.
Viewing hourly totals for a specific day - Simply click on the date link in the
Employee column of the report. Click again to hide the information.
zTimecard Report - View or edit timecard information for a chosen day or time period for a
selected employee or all employees.
NOTE: The procedure for viewing and editing Timecard reports is the same as it is for the
Attendance report except for a couple of additional items. Please refer to the instructions
and details in the previous section also.
Printing Reports: Select the Print icon from the main tool bar to print
your report. Some browsers and computers may print differently
depending on the font size and margin settings. The report may print
better using narrower margins. Check your browser's print preferences
to ad
j
ust
p
rint mar
g
ins.
Page 15 of 41Product User Guide
3/28/2008file://X:\I\ICON_TIME\346AUT8\Extra346AUT8\FCC%20Documentation%203\Use...
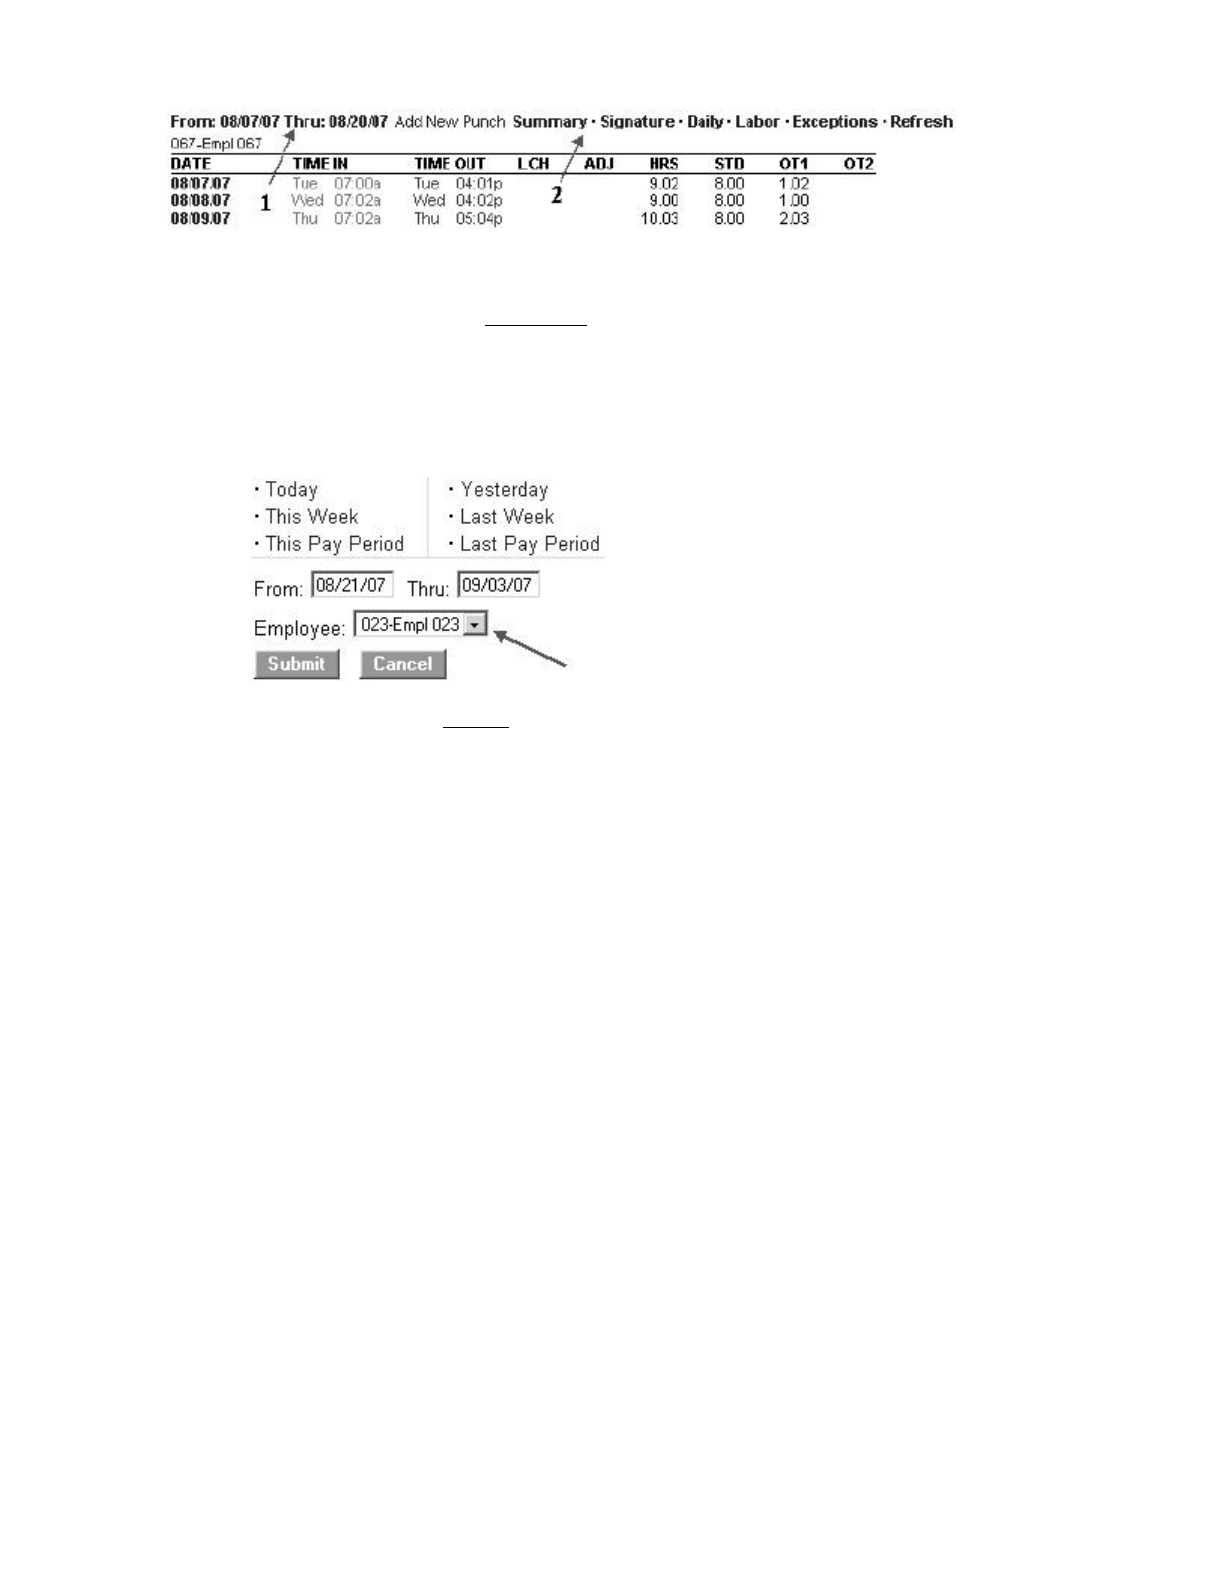
{Select a time period for the report - Click on the date link at the top of the Timecard
Report screen as shown by "1" in the illustration above. In the date selection window
shown below, click on the pay period link for the time period you would like to view or
enter custom date ranges in the From\Thru date windows.
{Select an employee - For the Timecard report, you have the additional option of choosing
a specific employee, or ALL employees, to view in the report. Remember to select the
Submit button to save your selection.
{Export - Click on the Export link at the top of the report to save the report in comma-
delimited (CSV) format. Click the Save button in the File Download window, choose a
name for the file and a location to save the file. The CSV file can be opened in a text editor
or Excel for editing.
{Viewing additional details - Each item shown by "2" in illustration above is a link to
display additional information on the Report screen.
Summary - Click on this option to display only the hourly totals for each employee
for the pay period. The individual punch hours will be hidden.
Signatures - Click on this option to display an employee signature line. When you
print out time cards, this line will appear on the time card.
Daily - Click on this option to show total hours worked for each day. This is
convenient if the employee clocks IN and OUT multiple times during the day.
Labor - Click on this option to view labor costs if you have entered employee wages.
Exceptions - Click on this option to view only punch exceptions in the report.
H: An "H" in the exception column indicates the punch pair has reached
the Alert High Hours established in Settings\Preferences\Alert
Preferences.
L: An "L" in the exception column indicates the punch pair is below the
Alert Low Hours established in Settings\Preferences\Alert
Preferences.
M: An "M" in the exception column indicates the punch pair has reached
the Alert Maximum Time established in Settings\Preferences\Alert
Preferences.
O: An "O" in the exception column indicates the punch pair has been
updated with a specific lunch deduction in the Edit a Punch screen.
Page 16 of 41Product User Guide
3/28/2008file://X:\I\ICON_TIME\346AUT8\Extra346AUT8\FCC%20Documentation%203\Use...
Refresh - Click on this option to update the Timecard Report screen with recent
punches from the employee time clock.
Editing employee information - Simply click on the employee name in the report to
edit employee details. Refer to the "Edit an Employee" section earlier in this
manual.
Editing punch information - Simply click on an IN or OUT punch in the Time IN
or Time OUT column to edit the punch. Refer to the "Edit a Punch" section earlier
in this manual. An "E" next to the punch indicates that the punch has been edited.
NOTE: The program will keep track of the time elapsed since the IN punch
occurred if there is no matching OUT punch in that same row.
Adding a new punch - Click on the Add Punch link at the top of the report to create
new punch entries for the employee. Be sure to select the correct employee from the
drop-down window in the Add a New Punch screen.
Adding a punch to complete a punch pair: You may come across an IN or OUT
punch on a certain day that does not have a matching punch. To complete the punch
pair, click on the Add Punch link on the Report screen to bring up the Add a New
Punch screen. Follow the steps described above to add a punch for the current
employee.
Viewing hourly totals for a specific day - Simply click on the date link in the Date
column of the report. Click again to hide the information.
NOTE: Each employee time card will print on a separate sheet of paper when
batch printing "all" employees.
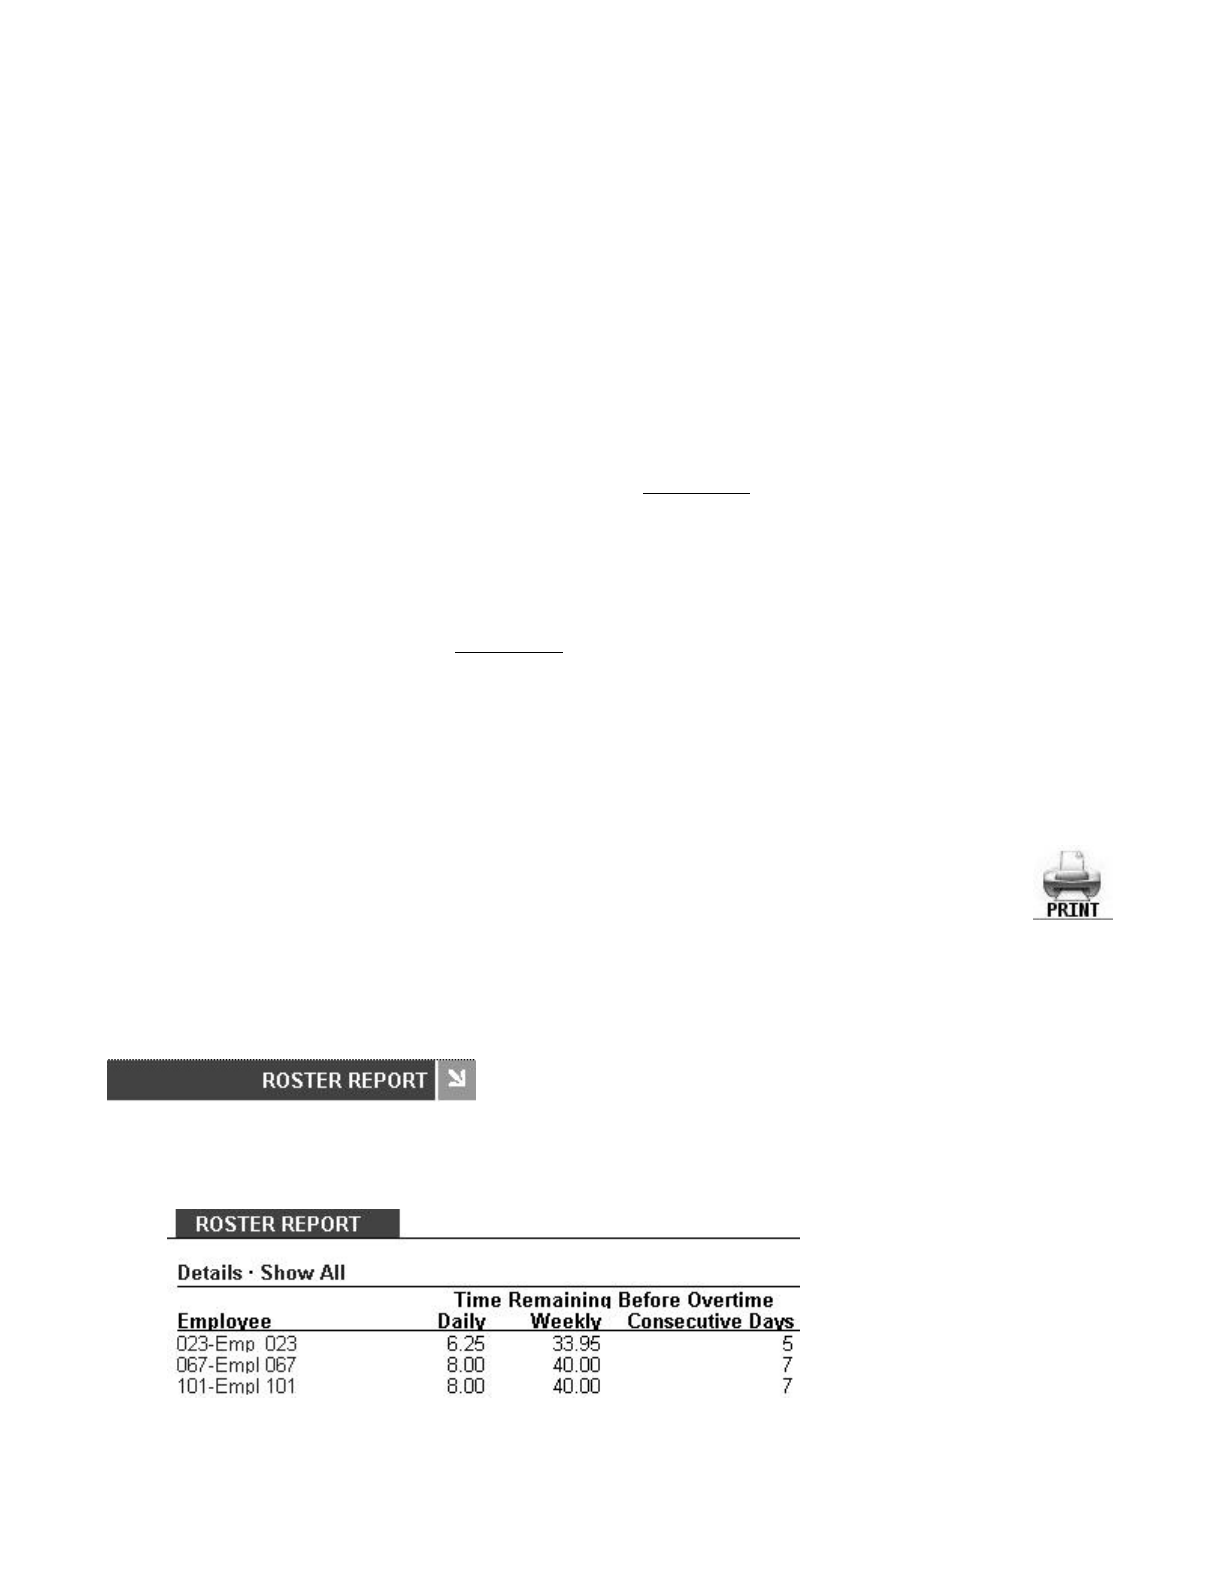
zRoster Report - View and edit employee information. The basic system comes with 25
preprogrammed employee ID numbers.
{Edit employee information - In the Roster Report screen, click on the employee name or
number in the Em
p
lo
y
ee column. This will brin
g
u
p
the Edit an Em
p
lo
y
ee screen. Please
Printing Reports: Select the Print icon from the main tool bar to print
your report. Some browsers and computers may print differently
depending on the font size and margin settings. The report may print
better using narrower margins. Check your browser's print preferences
to ad
j
ust
p
rint mar
g
ins.
Page 17 of 41Product User Guide
3/28/2008file://X:\I\ICON_TIME\346AUT8\Extra346AUT8\FCC%20Documentation%203\Use...

refer to the "Edit an Employee" section earlier in this manual for details on editing
employees.
{View employee details - Click on the Details link at the top of the Roster Report screen to
view or print details for all employees at once.
{Viewing Inactive Employees - If an employee is not marked as active in the Edit an
Employee screen, they will not show on the Roster Report. Select the Show All link at the
top of the report to view all employees, active or inactive.
{Time Remaining Before Overtime - The Daily column will display the number of hours
left in the day before the employee will start earning daily overtime. The default value for
daily overtime is established in the Day OT1 After window in the
Settings\Preferences\Pay tab section of the program. The time remaining before overtime
will decrease through the day until the employee punches OUT or the value reaches 0.
Overtime is accumulating when 0 is reached.
{Time Remaining Before Overtime - The Weekly column will display the number of hours
left in the week before the employee will start earning weekly overtime. The default value
for weekly overtime is established in the Week OT1 After window in the
Settings\Preferences\Pay tab section of the program. The time remaining before overtime
will decrease through the week until the value reaches 0. Overtime is accumulating when 0
is reached.
{Time Remaining Before Overtime - The Consecutive Days column will display the
number of days left in the work week before the employee will start earning consecutive
day overtime. The default value for consecutive day overtime is established in the
Consecutive Day OT window in the Settings\Preferences\Pay tab section of the program.
If Consecutive Day OT is set to NO, this column will be blank.
Printing Reports: Select the Print icon from the main tool bar to print a
list of your employees. Employee details will also print on the report if
they are made visible in the Roster Report screen. Some browsers and
computers may print differently depending on the font size and margin
settings. The report may print better using narrower margins. Check
y
our browser's
p
rint
p
references to ad
j
ust
p
rint mar
g
ins.
Page 18 of 41Product User Guide
3/28/2008file://X:\I\ICON_TIME\346AUT8\Extra346AUT8\FCC%20Documentation%203\Use...
Backup and Restoring Data
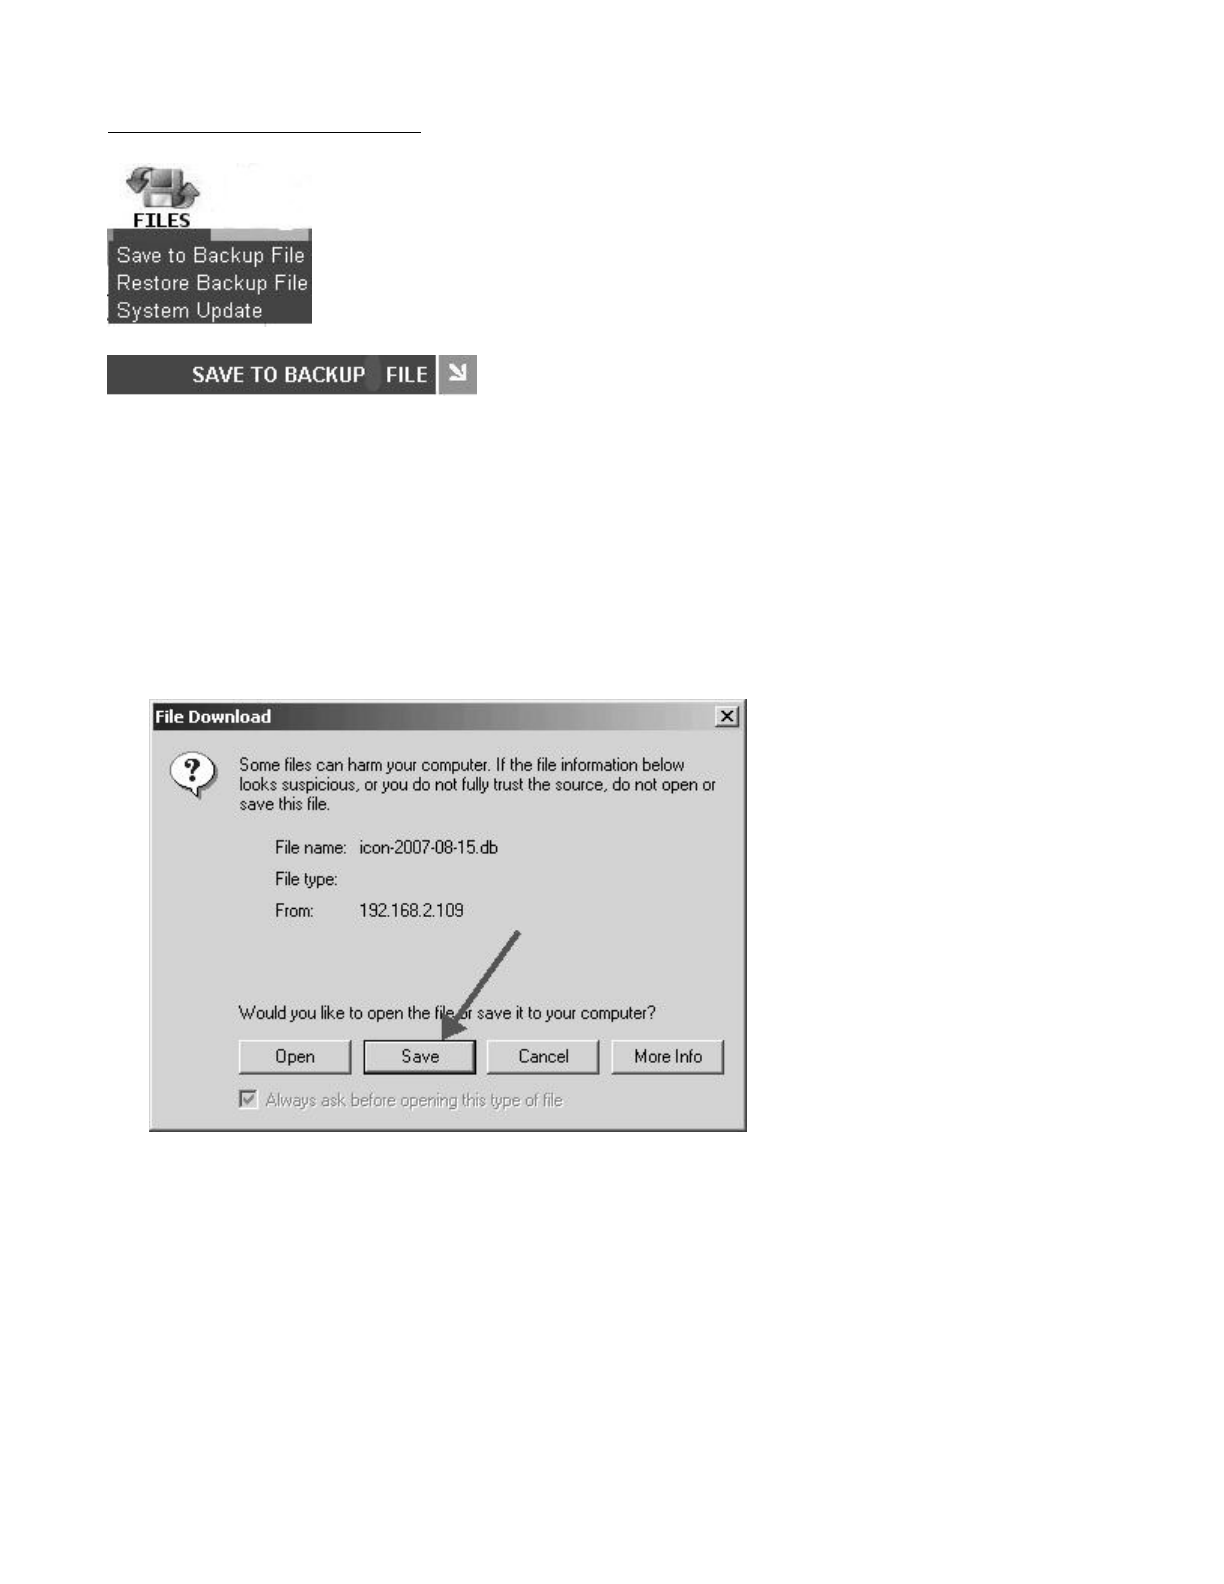
Creating a Backup: From the main tool bar, select the Files icon and then the Save to Backup File
option from the drop-down menu. Click the Submit button in the Save to Backup File screen. This will
create a backup (current copy) of your database and it will be saved to a location on your computer.
zSaving a file - Click the Save button in the File Download window when it appears.
Page 19 of 41Product User Guide
3/28/2008file://X:\I\ICON_TIME\346AUT8\Extra346AUT8\FCC%20Documentation%203\Use...
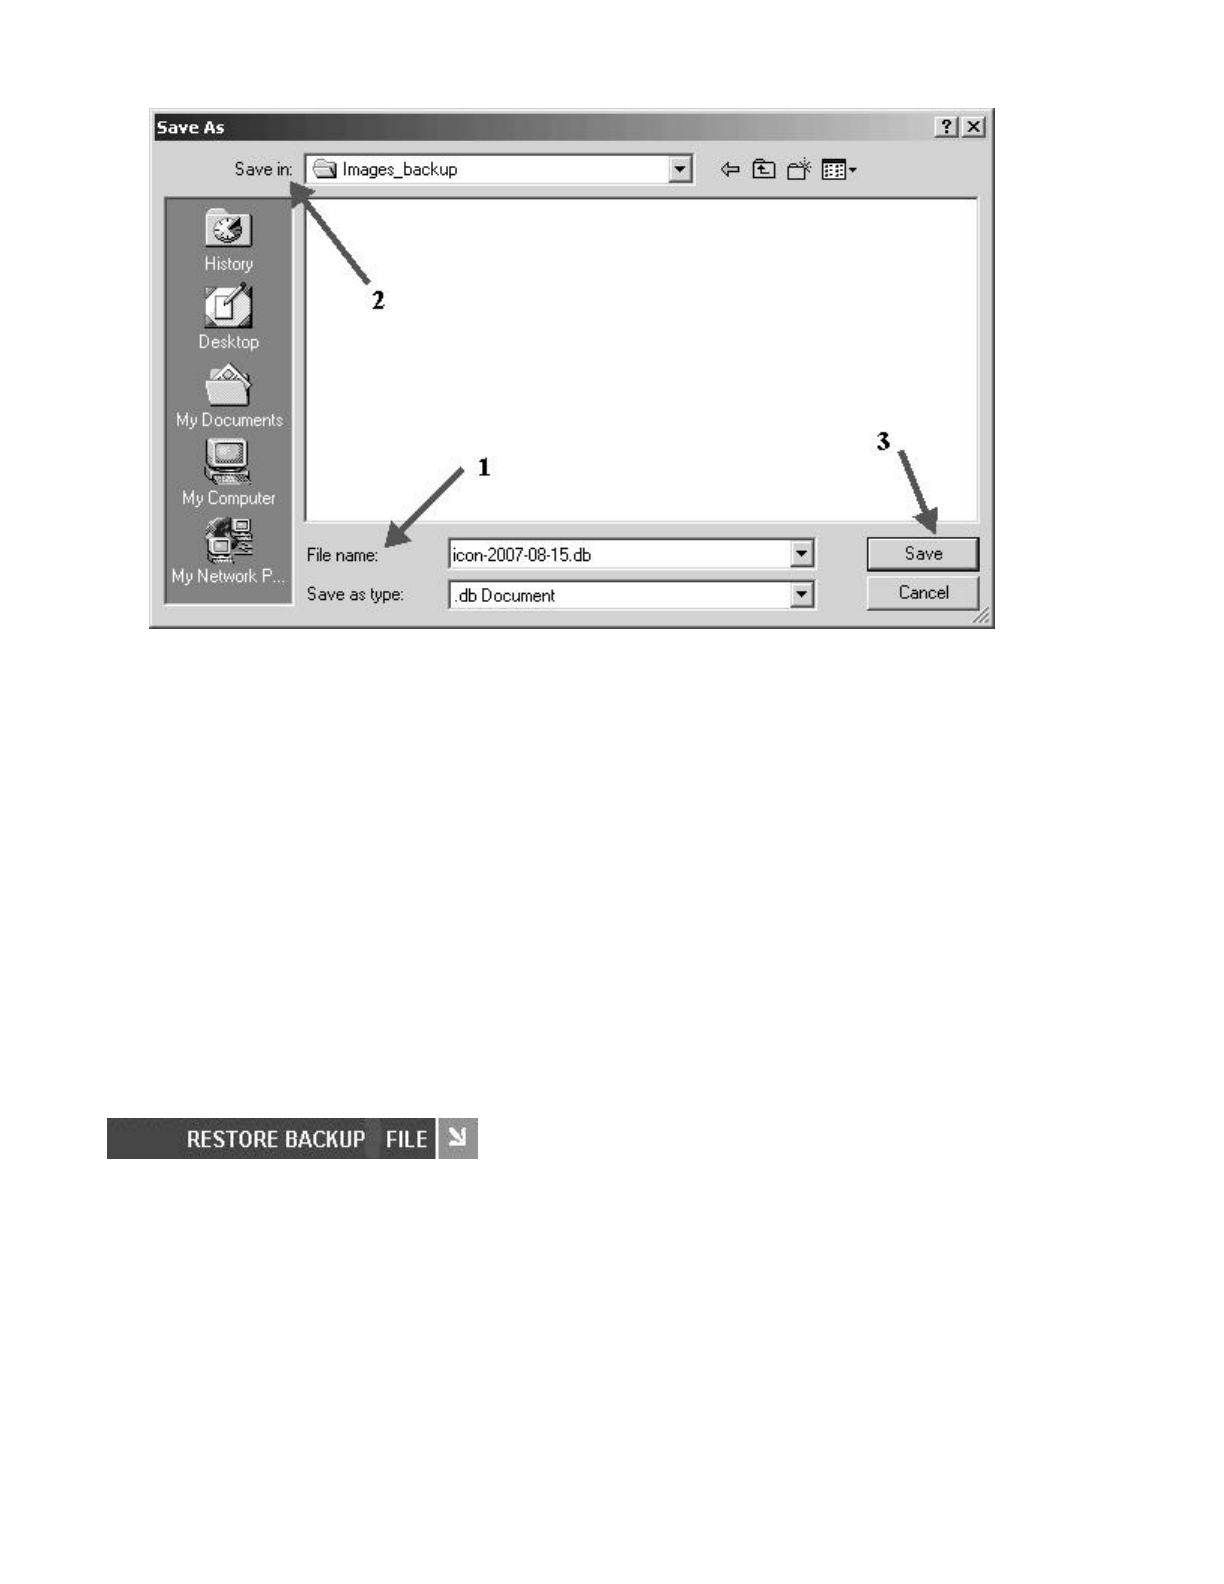
1. A file name is automatically assigned for you. The file name includes the current date for easy
reference. For example, a typical file name might be icon-2007-08-15.db. If you prefer a different
file name, enter this name in the File name window.
2. Browse to the directory to save the file in the Save in window.
3. Click the Save button to save the file. The current data from the clock is transferred and saved to a
file on your computer. After the download is complete click on the Close button.
zRemoving Old Data - At this point, you have the option to remove older punches from the
employee time clock. You can remove any data prior to the previous pay period. You cannot
remove the current or last pay period punches from the clock. Press the Cancel button if you do
NOT want to remove any information from the clock. Else, enter a date in the Delete Punches
window and click Submit to purge the clock of prior punches. Removing data periodically will
help improve system performance.
WARNING: Restoring a backup file will OVERWRITE the current data on the clock. Create a
CURRENT backup of your data before attempting to restore and view "historical" data.
Restoring a Backup: From the main tool bar, select the Files icon and then the Restore Backup File
option from the drop-down menu.
zCurrent Password - Enter your system password.
zUpload file - Click the Browse button and browse to the location of your backup file. Select the
file in the Choose File window and click the O
p
en button.
Page 20 of 41Product User Guide
3/28/2008file://X:\I\ICON_TIME\346AUT8\Extra346AUT8\FCC%20Documentation%203\Use...
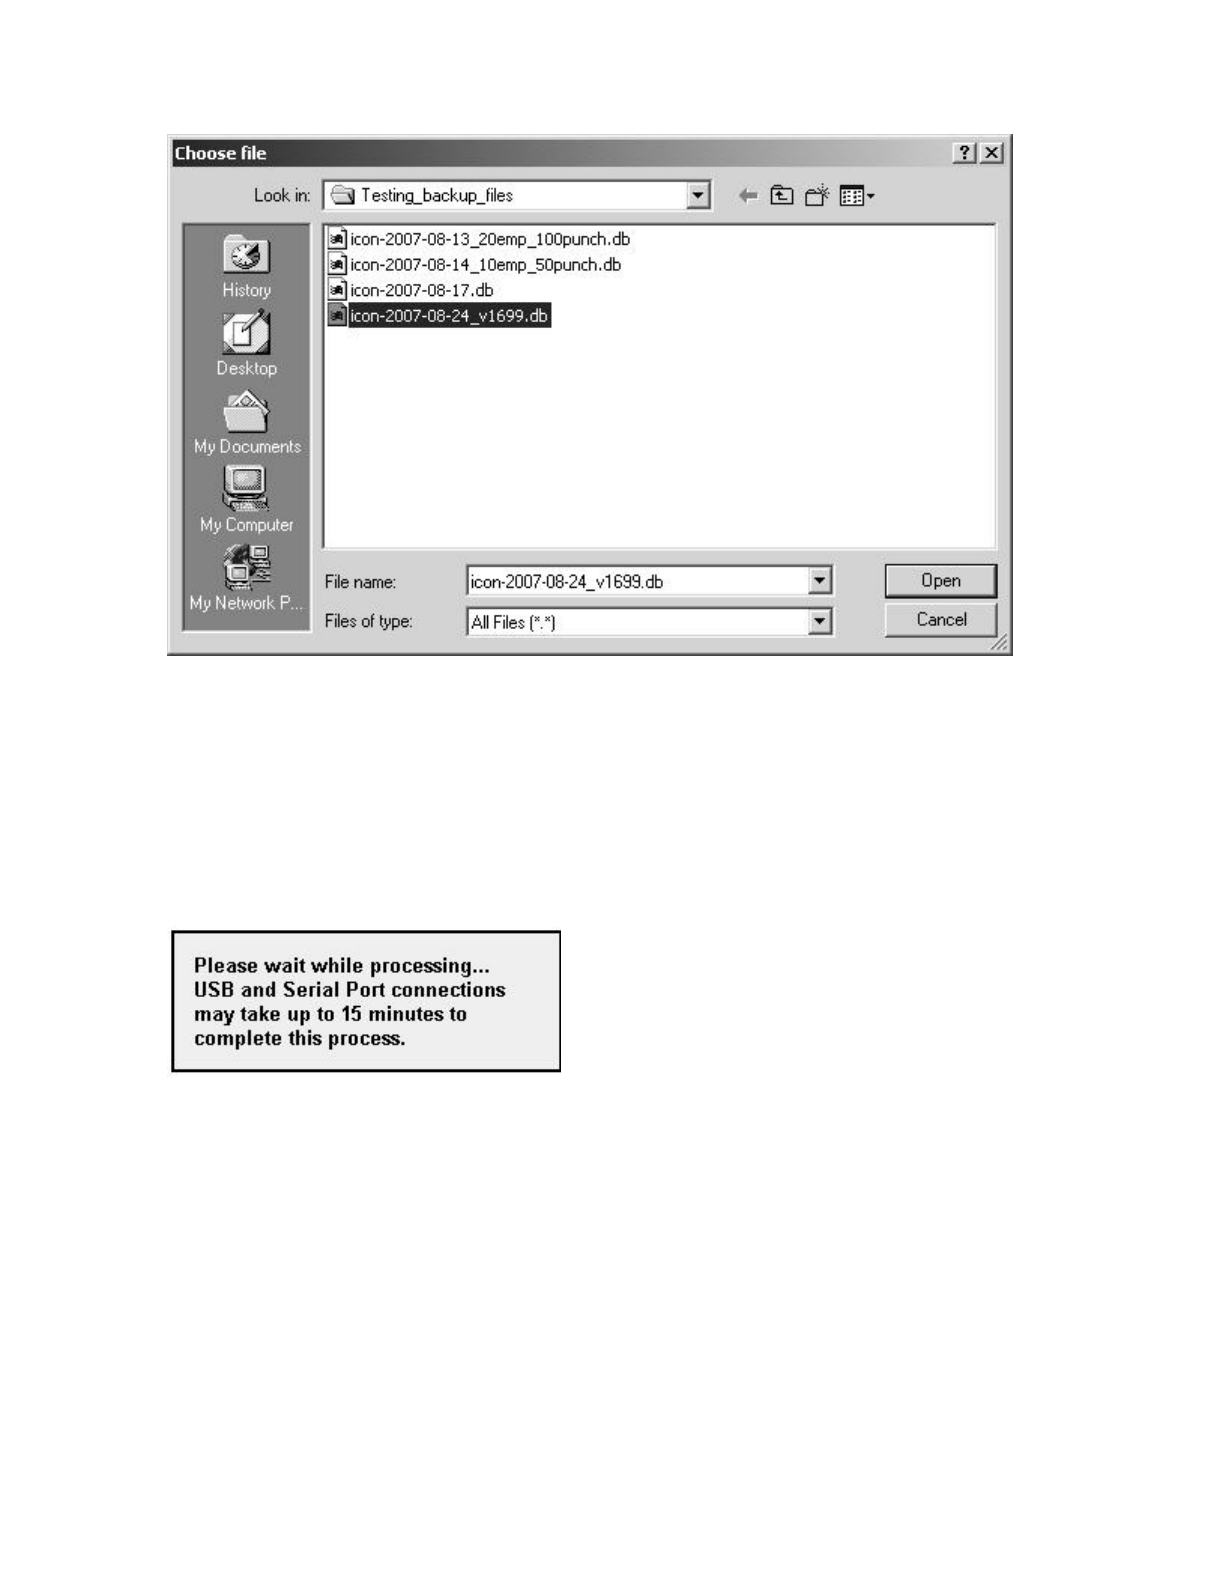
zRestore the Backup - Click the Submit button in the Restore Backup File screen to restore the
backup file. A warning message will display reminding you that your current data will be
overwritten at the employee time clock. Click the OK button to continue.
NOTE: It ma
y
take several minutes to restore a backup file especiall
y
if
y
ou are usin
g
a USB
or serial port connection. The employee time clock will display a "Please Wait" and then a
"Performing Restore" message. After the restore is complete, you will be required to log
back into the software to view the backup information.
Using a USB Memory Stick for Backup and Restore -
zTo Create a Backup using a memory stick -
{Plug the storage device into the bottom of the employee time clock.
{Go into Supervisor Mode on the employee time clock.
{Press the arrow button until you get to the DOWNLOAD BACKUP command. Press the
ENTER button.
{The clock will display "Backing up data" and "Backup complete".
{NOTE: The backup file saved on the USB memory stick is called backup.db. This file can
b
e renamed and transferred to a folder on
y
our main com
p
uter.
Page 21 of 41Product User Guide
3/28/2008file://X:\I\ICON_TIME\346AUT8\Extra346AUT8\FCC%20Documentation%203\Use...

zTo Restore a Backup using a USB memory stick -
{Copy the file to the memory stick. Rename the file to backup.db. The name must be in all
lower case. Connect the storage device to the bottom of the employee time clock.
{Go into Supervisor Mode on the employee time clock.
{Press the arrow button until the RESTORE BACKUP command appears and press ENTER.
{If the file is found, the display will show "restoring data", "performing restore", and the
clock will reboot. Wait for the clock to reboot. Log into the employee time clock to view
your data.
Updating your software: Occasionally, new updates will be available or needed for your employee
time clock system. The system automatically alerts you to check for updates unless you have changed
this preference in Settings\Alerts Setup. First, download the update from www.icontime.com. To do a
system update, select the Files icon and System Update from the main tool bar.
zCurrent Password - Enter your current system password.
zUpload File - Browse to the location of the update file. Click the Submit button.
NOTE: The following message box will appear. Please be patient. The upgrade may take
awhile to complete.
Printing Reports and Screens
Change Password
Chan
g
in
g
the S
y
stem Password: From the main tool bar, select the Settin
g
sicon and Chan
g
e
Printing: Select the Print icon from the main tool bar to print the
current report or page that is displayed in your Web browser. Some
browsers and computers may print differently depending on the font
size and margin settings. The report may print better using narrower
margins. Check your browser's print preferences to adjust print
mar
g
ins.
Page 22 of 41Product User Guide
3/28/2008file://X:\I\ICON_TIME\346AUT8\Extra346AUT8\FCC%20Documentation%203\Use...

Password to change the security password for the software.
zCurrent Password - Enter the default or current password.
zNew Password - Enter a new password.
zConfirm New Password - Enter the new password again to confirm the change. Click on the
Submit button to save your changes.
Logout
Help
Logging Off: If you need to leave your computer unattended, you can
logout of the software. Select the Logout icon from the main tool bar to
exit out of the program. At the Login screen, enter your Username and
Password to lo
g
back into the s
y
stem.
Getting Help: Select the Help icon from the main tool bar to access this
user guide.
Page 23 of 41Product User Guide
3/28/2008file://X:\I\ICON_TIME\346AUT8\Extra346AUT8\FCC%20Documentation%203\Use...
PART III: Appendix
A: Employee Time Clock Upgrades
Contact the Icon Time System's sales department at 1-800-847-2232 option 3 for upgrade pricing
and information. Current upgrades available are:
zRTC1000
zMobility
zCustomize
zDepartments
zRules Pack
zProximity Cards
zEmployee Capacity Options
NOTE: It is recommended that you make a backup of your data before performing any upgrades.
RTC1000: This upgrade adds 25 additional employees to the system for a total of 50 employees. This
upgrade also allows the addition of notes in the employee, punches, and department screens.
Departments is an additional option that can be purchased.
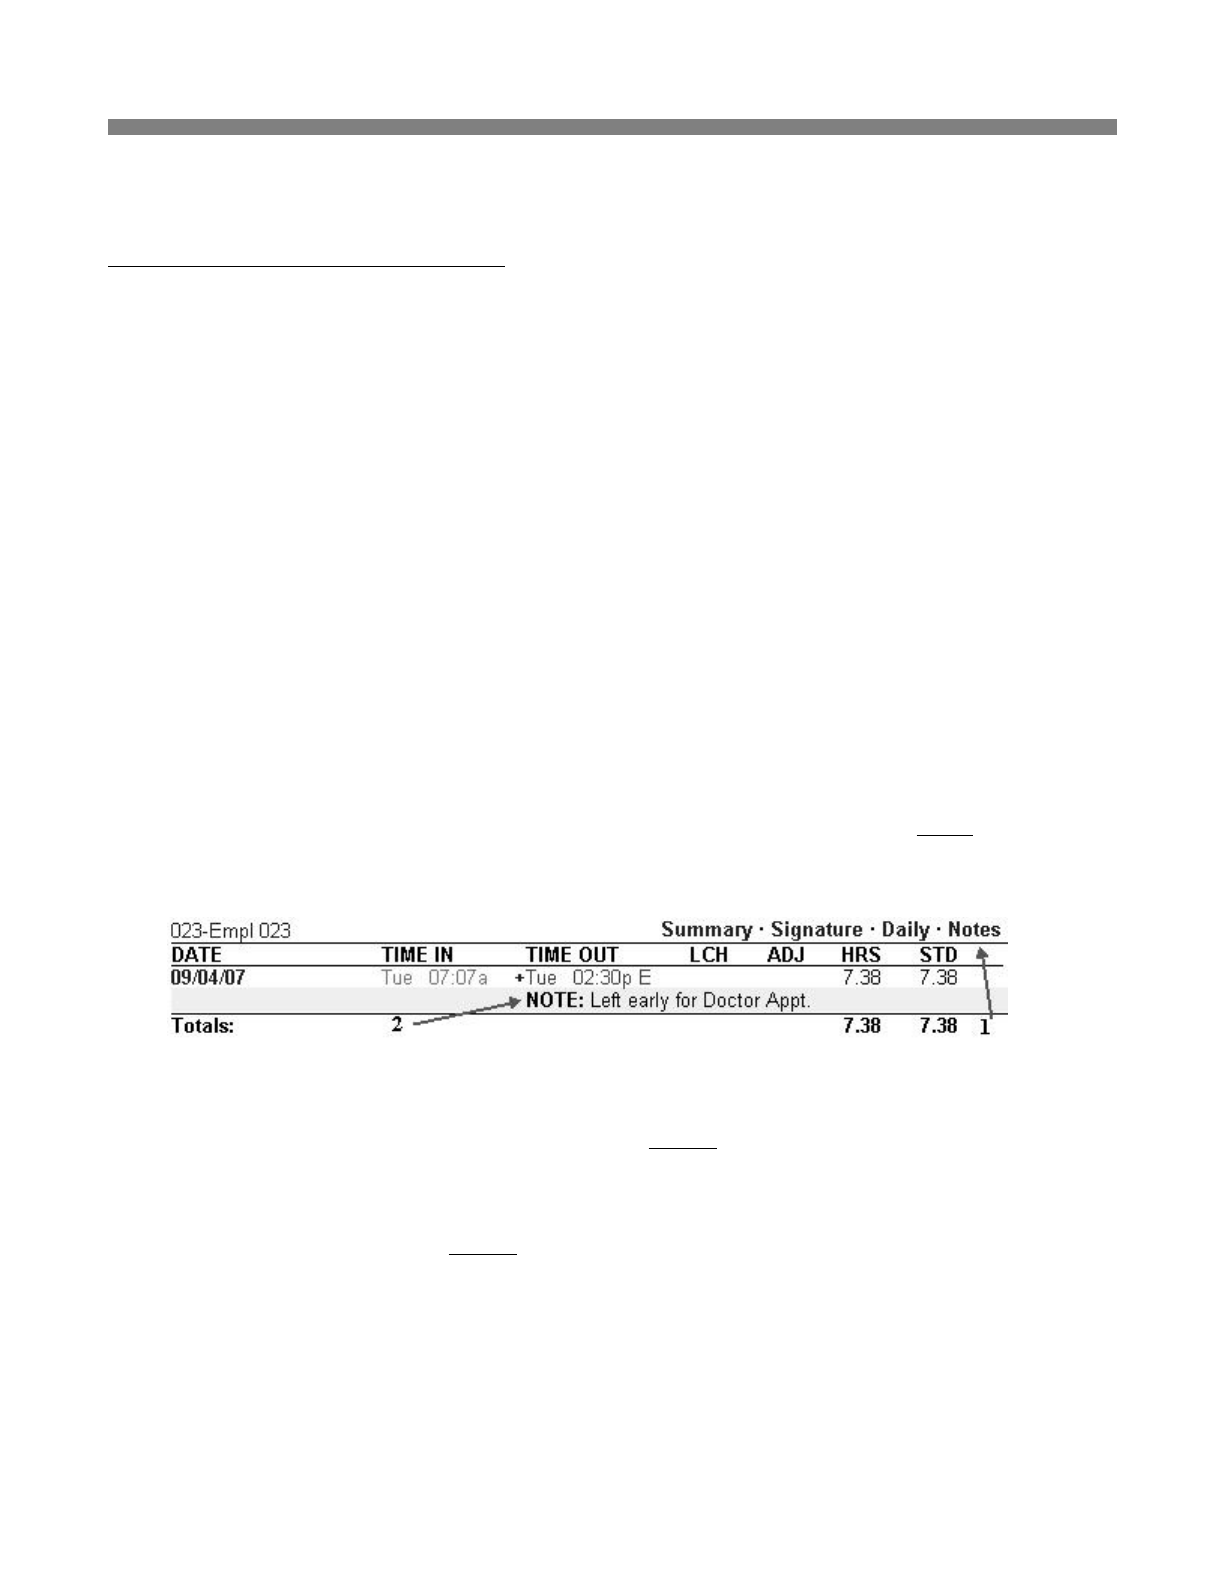
zAdding Notes to Punches - Click on an existing IN or OUT punch in the Attendance or
Timecard Report. A Note window will appear at the bottom of the Edit a Punch screen. Enter a
brief note associated with the punch. To view the note on the report, click the Notes link at the top
of the report. A "+" symbol next to a punch indicates a note is attached to that punch. Notes are
added in the same manner to new punches in the Add a New Punch screen.
zAdding Notes to Employees - Click on the employee name in any of the available reports. A
Note window will appear below the Address window in the Edit an Employee screen. Employee
notes will appear on the Roster Report when the Details link is selected at the top of that report.
zAdding Notes to Departments - If you have purchased the Department upgrade, you can add
notes in the Edit a Department screen. Department notes will appear in the department section of
the Roster Report when the Details link for that section is selected. Review the Department
upgrade section in this Appendix for more details.
Mobility: This upgrade adds email alert capability to your program and a Secure Server SSL option.
Alerts Setup - From the main tool bar, select Settings and Alerts Setup. There will be three
additional column fields available: E-mail, Repeat, and Recipient.
Page 24 of 41Product User Guide
3/28/2008file://X:\I\ICON_TIME\346AUT8\Extra346AUT8\FCC%20Documentation%203\Use...
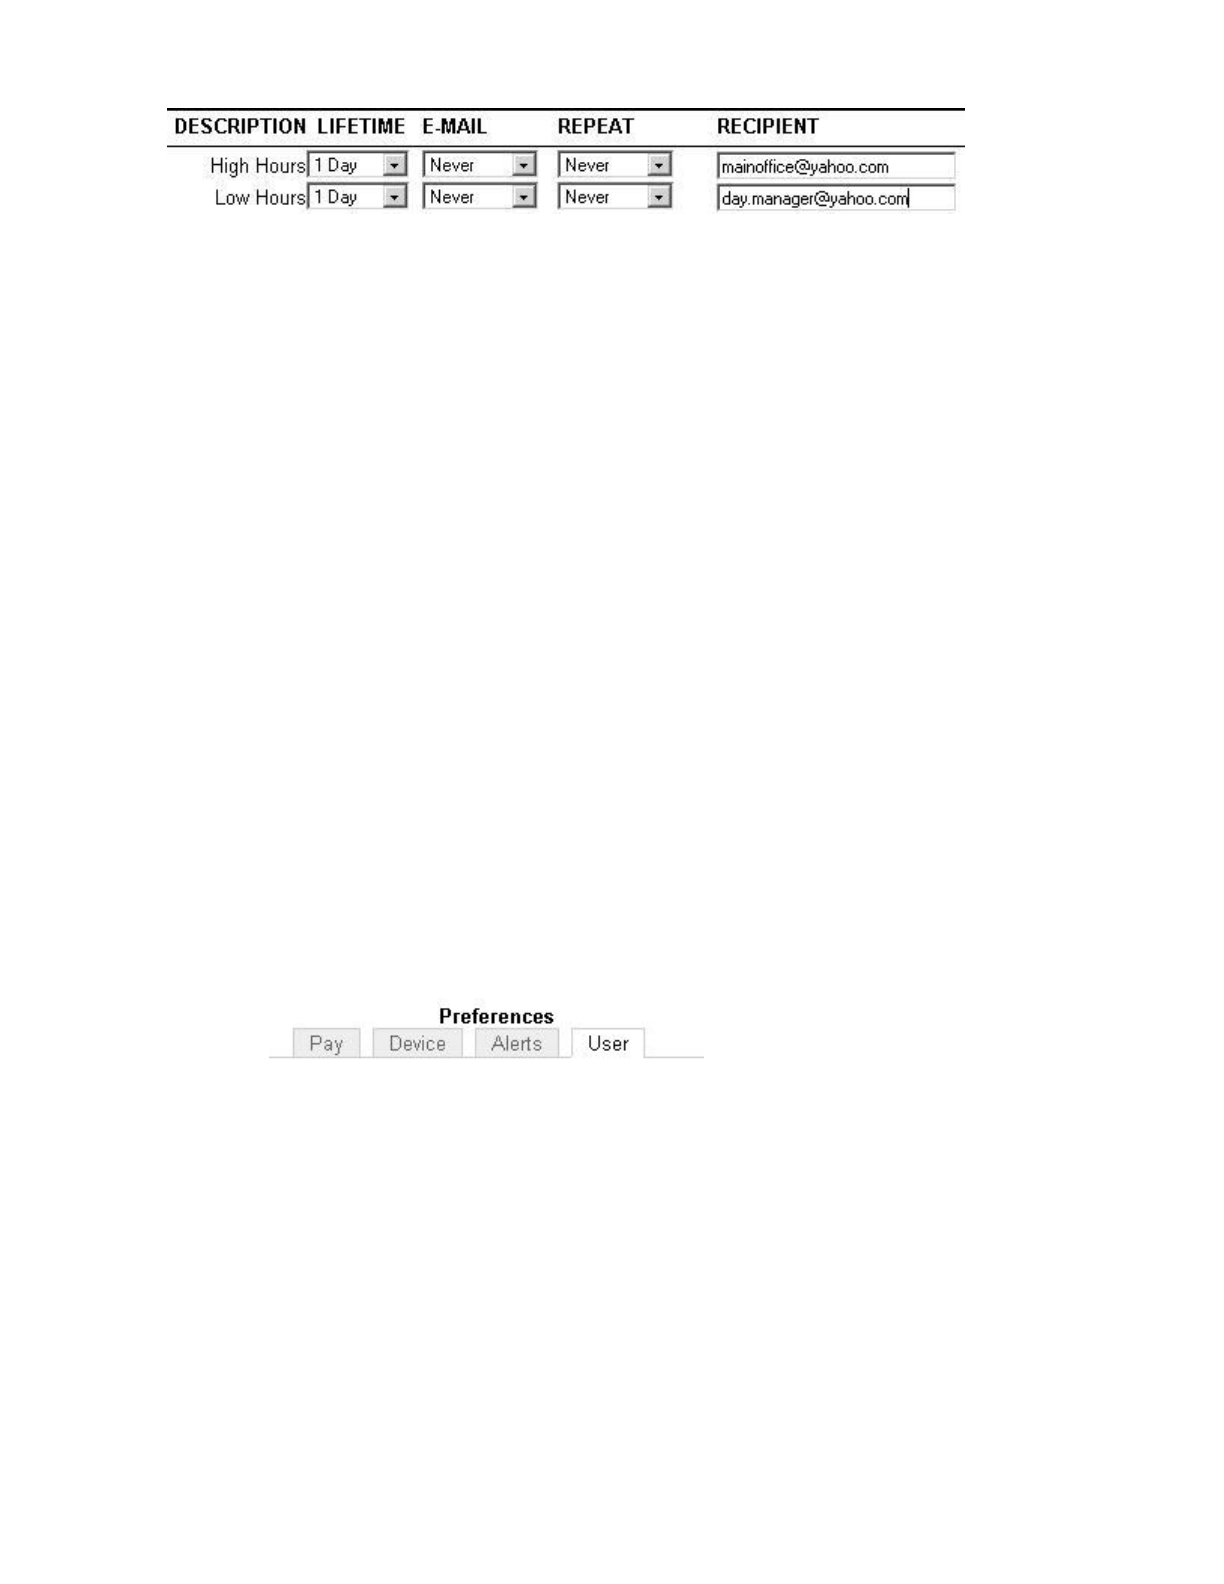
zE-mail - From the drop-down window for each alert, select how soon an email alert message
should be generated.
zRepeat - From the drop-down window for each alert, select how often you would like an alert
email to be resent.
zRecipient - Enter the email address that you would like to receive the email alert. Enter multiple
addresses in the same window by placing a space between each recipient.
zSMTP Address - From the main tool bar, select the Settings Preferences/Device tab. Enter your
complete SMTP email server address. You should have this information, else contact your service
provider for this information
zUse SSL Server - From the main tool bar, select the Settings Preferences/Device tab. Select the
check box to use secure server options.
zAlert From Address - From the main tool bar, select the Settings Preferences/Device tab. Enter
the email address that you want to appear in the FROM Window in your email. You can leave this
at default. It does not need to be changed.
zEmail Domain Name - From the main tool bar, select the Settings Preferences/Device tab. Enter
your email domain name. In general, you can leave this at default. It does not need to be changed.
Customize: This upgrade adds user fields, customized PIN numbers, and custom system prompts to
your employee time clock.
zUser Fields - This allows you to enter additional property fields to your employees, departments,
or system. These additional fields will appear on the appropriate screen and reports.
zUser Field Preferences - From the main tool bar, select the Settings icon and Preferences. Select
the User tab in the Preferences window to create additional user fields that can be used on your
reports. You can create up to 10 additional user field names.
{Title for User 1 - Enter a custom title for User field 1. Repeat this step for User fields 2
through 10 if you need additional fields assigned in the program.
{Assign User 1 to - Using the drop-down window, assign your User field to either the
System, Employee, or Department section of the program. Leave the setting at "None" if
you are not going to use a particular user field. For example, you can create a User 1 field
called "Phone Number" and Assign User 1 to "Employee". This will create a Phone
number field in the Edit an Employee screen for all of your employees. Repeat this step for
Assign User fields 2 through 10 if you need additional fields assigned in the program.
zCustomize PIN Numbers - this added feature allows you to customize employee ID numbers, as
well as, the option to use from 3 to 9 digits for the Employee ID number length. From the main
tool bar, select the Settin
g
s icon and Preferences. Select the Device tab.
Page 25 of 41Product User Guide
3/28/2008file://X:\I\ICON_TIME\346AUT8\Extra346AUT8\FCC%20Documentation%203\Use...
{PIN Number Length - Enter the number of digits that employees will use to punch IN and
OUT at the employee time clock.
{Updating an Employee ID number - Select the employee from the Roster report screen.
The PIN/Badges field can now be edited in the Edit an Employee screen. Enter the new ID
number for the employee in this field. You can now also enter a Display ID for the
employee. This can be any number. For example, a payroll ID number can be used. This
number will appear on your reports. Select the Submit button to save your updates.
NOTE: Certain ID numbers may not work if you increase the PIN number length and
then decrease it at a later time. For example, if you increase the PIN number length
from 3 to 4 digits, employee ID 023 will become 0023 and 067 will become 0067. If you
change ID number 0067 to 1067, you will have to manually change the ID number
back to 067 in the Edit an Employee screen if you go back to a 3 digit PIN number
length. Any PIN number with leading zeroes such as 0023 will revert to 023 and work
properly at the employee time clock.
{System Prompt 1, 2, and 3 - You can enter 3 different default messages to display on the
employee time clock.
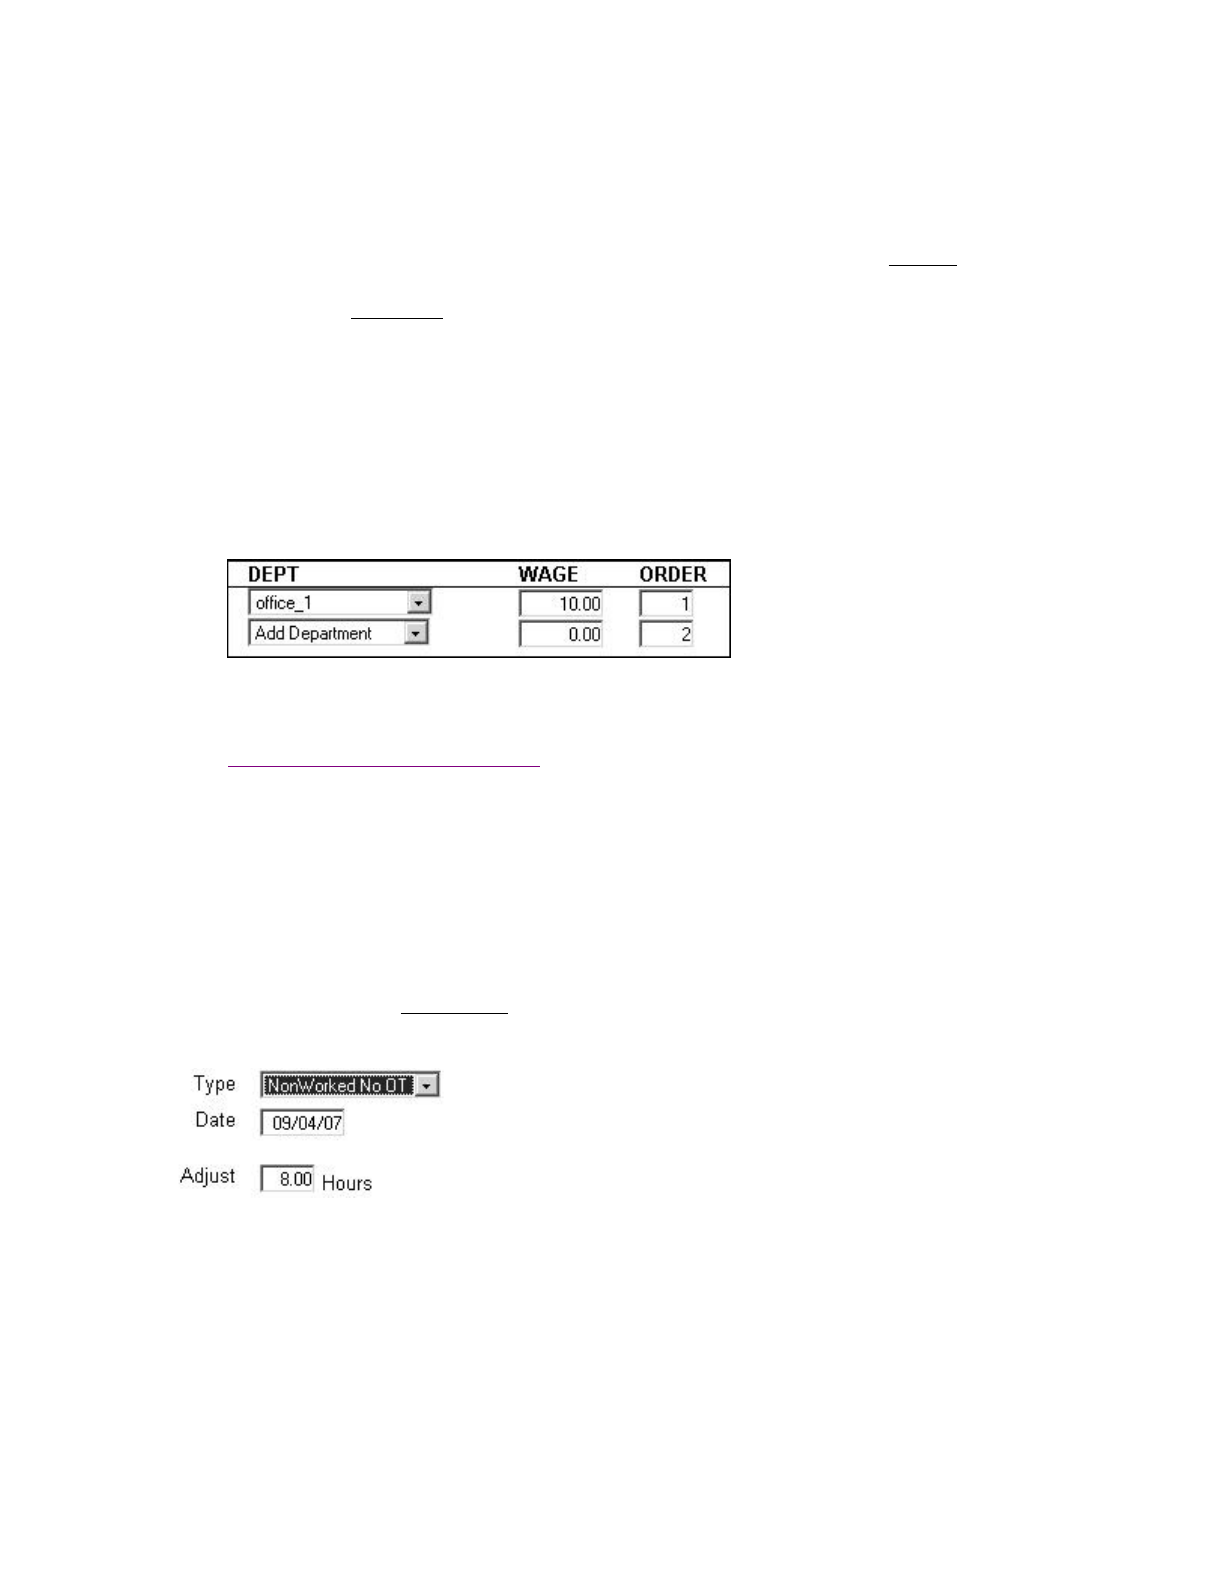
Departments: This upgrade adds 32 departments to the system. Departments can be assigned to
employees as needed. Employees will automatically be assigned to the first department after doing the
upgrade.
Setting up your Department Preferences
Enter Department Preferences: Select Roster Report from the Reports icon on the main tool bar.
Scroll down to the department section and click on a department name in the Departments column.
zEdit a Department - Follow the instructions below to set up your departments.
{Active - All departments default to an active status. Deselect this check box if you would
like the de
p
artment to be hidden from in the Roster Re
p
ort and the de
p
artment dro
p
-down
Page 26 of 41Product User Guide
3/28/2008file://X:\I\ICON_TIME\346AUT8\Extra346AUT8\FCC%20Documentation%203\Use...
windows.
{Department Name - Enter a custom name for the department. Click the Submit button to
save the changes. The name will be updated in the Roster report.
{Displaying department details in the Roster report - Click on the Details link at the top
of the department section of the Roster report to view details for all your departments.
Click on the Show All link to view all active and inactive departments.
{Adding Departments for an employee - Select an employee from the Roster Report to
access the Edit an Employee screen. Select a department from the drop-down window.
Another similar window will appear to allow you to choose more departments. Enter a
Wage for the employee if you are tracking labor costs. Different wages can be assigned to
different departments. The Order column allows you to choose the order the departments
will display at the time clock. Give the department used most by the employee the lowest
order number to save time when punching IN at the employee time clock.
{Department Reports - The department upgrade will allow you to run reports based on
departments. From the main tool bar, select Reports and Department Report. Review the
Viewing and Running Reports section in the main user guide for instructions on editing
information in the department report.
Rules Pack: This upgrade activates the use of Revision Zones, enhanced Overtime Preferences, and
N
on-Worked Hours for your punches.
zEntering Non-Worked Hours - This allows you to enter paid hours such as vacation, sick, or
holiday time. Select the Add Punch link at the top of the Attendance or Timecard Report
screen.
{Type - In the Add New Punch screen, select NonWorked NO OT from the drop-down
window if these hours are not to be included in overtime calculations, else select
NonWorked W/OT.
{Date - Enter the date for the NonWorked hours.
{Adjust - Enter the total hours for the day and click the Submit button. The punch will
appear on a report as shown below.
Page 27 of 41Product User Guide
3/28/2008file://X:\I\ICON_TIME\346AUT8\Extra346AUT8\FCC%20Documentation%203\Use...
NOTE: An alert will be posted to the Home page if a non-worked punch is entered in
the report screen. You can attach a note to the punch identifying the reason for the
entry if you have purchased the RTC1000 upgrade package.
zEntering Revision Zones - If you do not have the Department upgrade, revision zones will
appear in the Settings\Preferences\Punch tab. Revision zones will be global for all employees.
From the main tool bar, select the Settings icon, Preferences, and go to the Punch tab.
NOTE: If you also installed the Department upgrade, revision zones can be set for each
department. Go to Reports\Roster Report and click on a Department in that section of the
report. Follow the instructions below to create revision zones in the Edit a Department
screen.
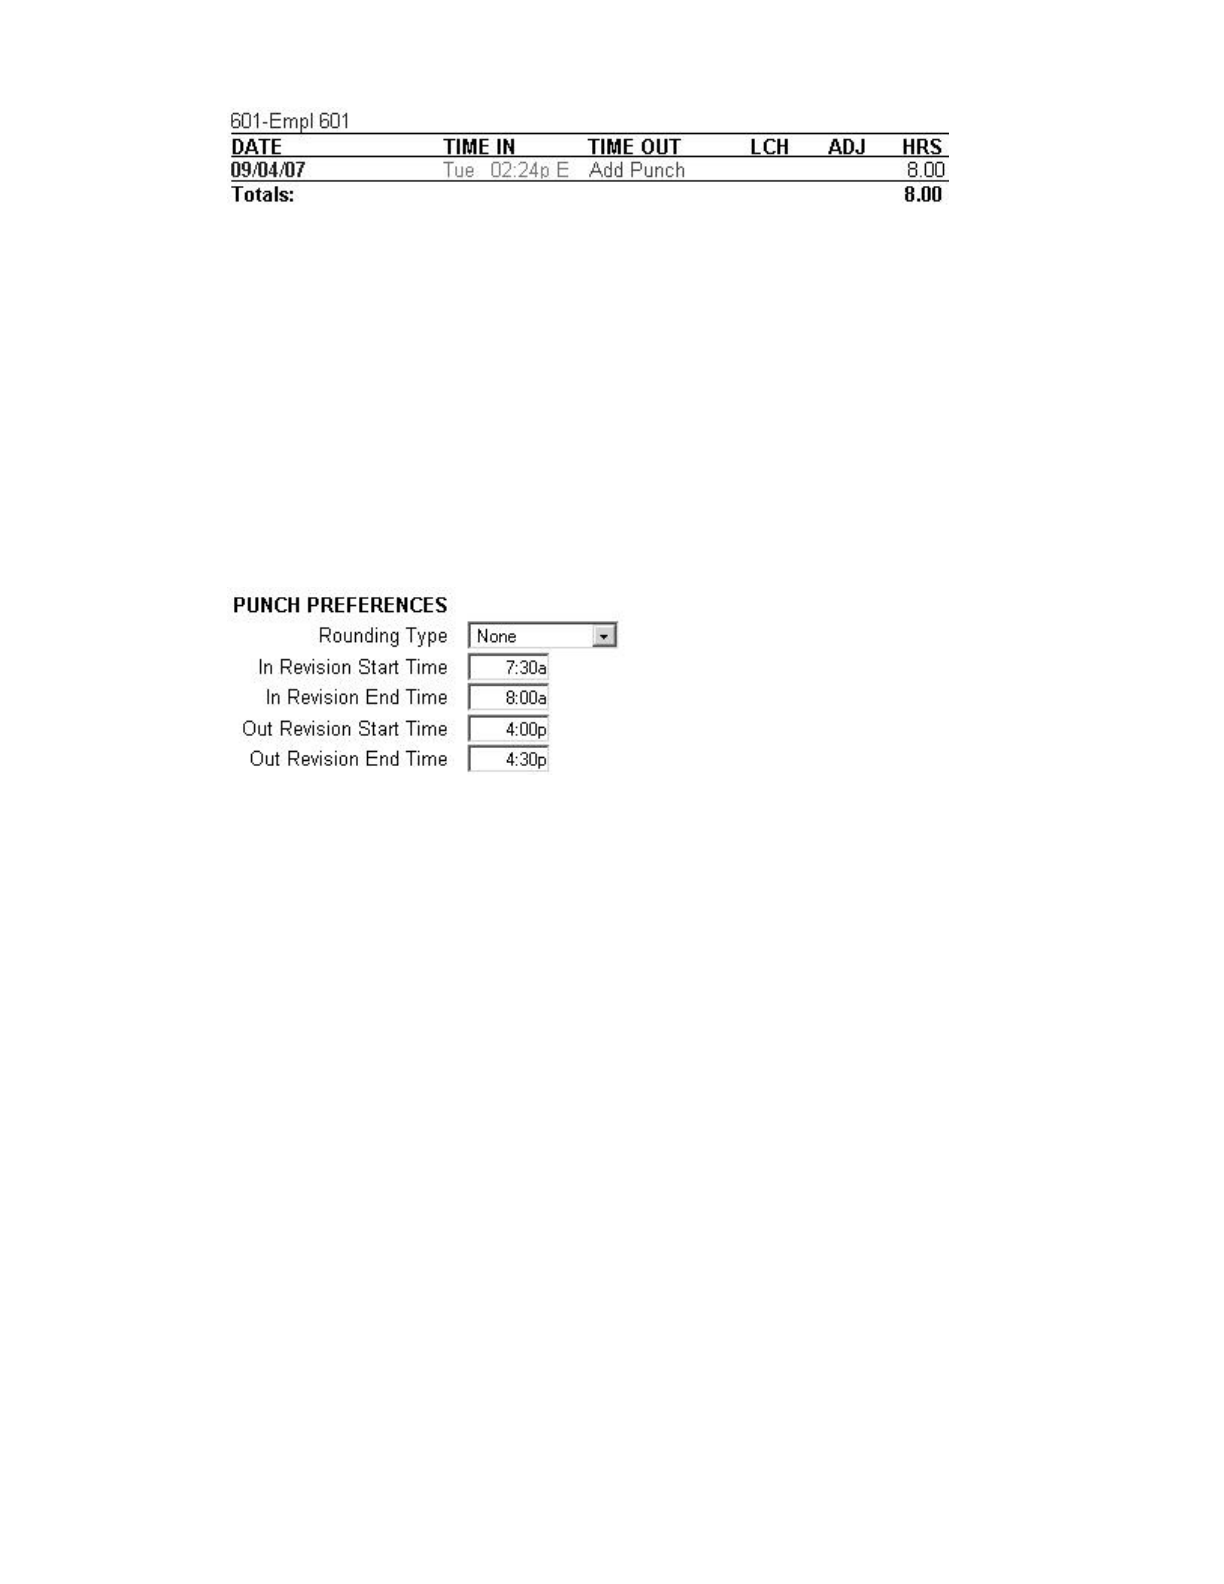
{In Revision Start Time - Enter a time in hh:mm:a/p format - for example 7:30a. If an
employee clocks IN between the In Revision Start and End Time, the shift start time will
be rounded to the In Revisions End time.
{In Revision End Time - Enter a time in hh:mm:a/p format - for example 8:00a. Using the
previous example, if an employee clocks IN between 7:30am and 8:00am, the "shift start"
time will be rounded to 8:00am.
{Out Revision Start Time - Enter a time in hh:mm:a/p format - for example 4:00p.
{Out Revision End Time - Enter a time in hh:mm:a/p format - for example 04:30p. If an
employee clocks OUT between the Out Revision Start and End Time, the shift end time
will be rounded back to the Out Revision Start time.
zEntering Overtime Preferences - From the main tool bar, select the Settings icon, Preferences,
and go to the Pay tab. The following additional features will be available:
{Day OT2 After - Enter the number of hours that must be worked in a day before Overtime
2 (OT2) is calculated. This is usually calculated as "double-time". Enter "99" to disable this
option.
{Week OT2 After - Enter the number of hours that must be worked in a week before
Overtime 2 (OT2) is calculated. This is usually calculated as "double-time". Enter "99" to
disable this o
p
tion.
Page 28 of 41Product User Guide
3/28/2008file://X:\I\ICON_TIME\346AUT8\Extra346AUT8\FCC%20Documentation%203\Use...

{Consecutive Day OT1 After - This is used with the Consecutive Day OT Trigger setting.
For example, if the Consecutive Day OT is set Yes and the Consecutive Day OT After is
set to 7 days, employees will receive Overtime 1 on the seventh consecutive day of work. If
the Consecutive Day OT1 After setting is set to 1 hour, the first hour worked on the
seventh day is considered straight time and the rest of the hours will be Overtime 1 (OT1).
{Consecutive Day OT2 After - Refer to the previous example. If this entry is set to 8 hours,
employees will receive Overtime 2 on the seventh consecutive day of work for any hours
over 8 hours in the day.
{OT1 Multiplier - Enter the pay rate for Overtime 1 (usually 1.5).
{OT2 Multiplier - Enter the pay rate for Overtime 2 (usually 2.0).
Page 29 of 41Product User Guide
3/28/2008file://X:\I\ICON_TIME\346AUT8\Extra346AUT8\FCC%20Documentation%203\Use...

Proximity Badges: The employee time clock has a proximity badge reader installed. The employee
will have the option to use their original PIN number or they can simply swipe their assigned badge to
p
unch IN or OUT. Contact Icon Time System's sales department to order badges.
zAssigning a badge to an employee - This is done at the employee time clock. Press the
Supervisor Mode(lock) key in the lower left of the keypad. Enter the security code. The default is
"00 00 00". Press the up arrow until you see "Assign Badges" on the display of the clock. Press
the Enter key. The clock will display "Choose Employee". Use the Up\Down keys to find the
desired employee. When you find the employee, press the Enter key and wave the badge near the
keypad of the clock. An "Assigned" message will be displayed. The badge is now activated.
NOTE: To reassign a currently used badge: Select the new employee in the Assign Badges
menu and wave the badge. A "Badge All Ready Assigned" Message will appear. Press the
Enter key to reassign the badge or select the Clear key to cancel.
If a badge has been assigned to an employee, a window with a string of numbers will appear
in the Edit an Employee screen just below the PIN/Badges field. This number is the badge's
"identification number" and cannot be edited.
Employee Capacity Options: This upgrade allows you to add more employees to the employee
time clock. O
p
tions available are 50, 100, 250, or 500 em
p
lo
y
ees.
Page 30 of 41Product User Guide
3/28/2008file://X:\I\ICON_TIME\346AUT8\Extra346AUT8\FCC%20Documentation%203\Use...
B: Employee Time Clock
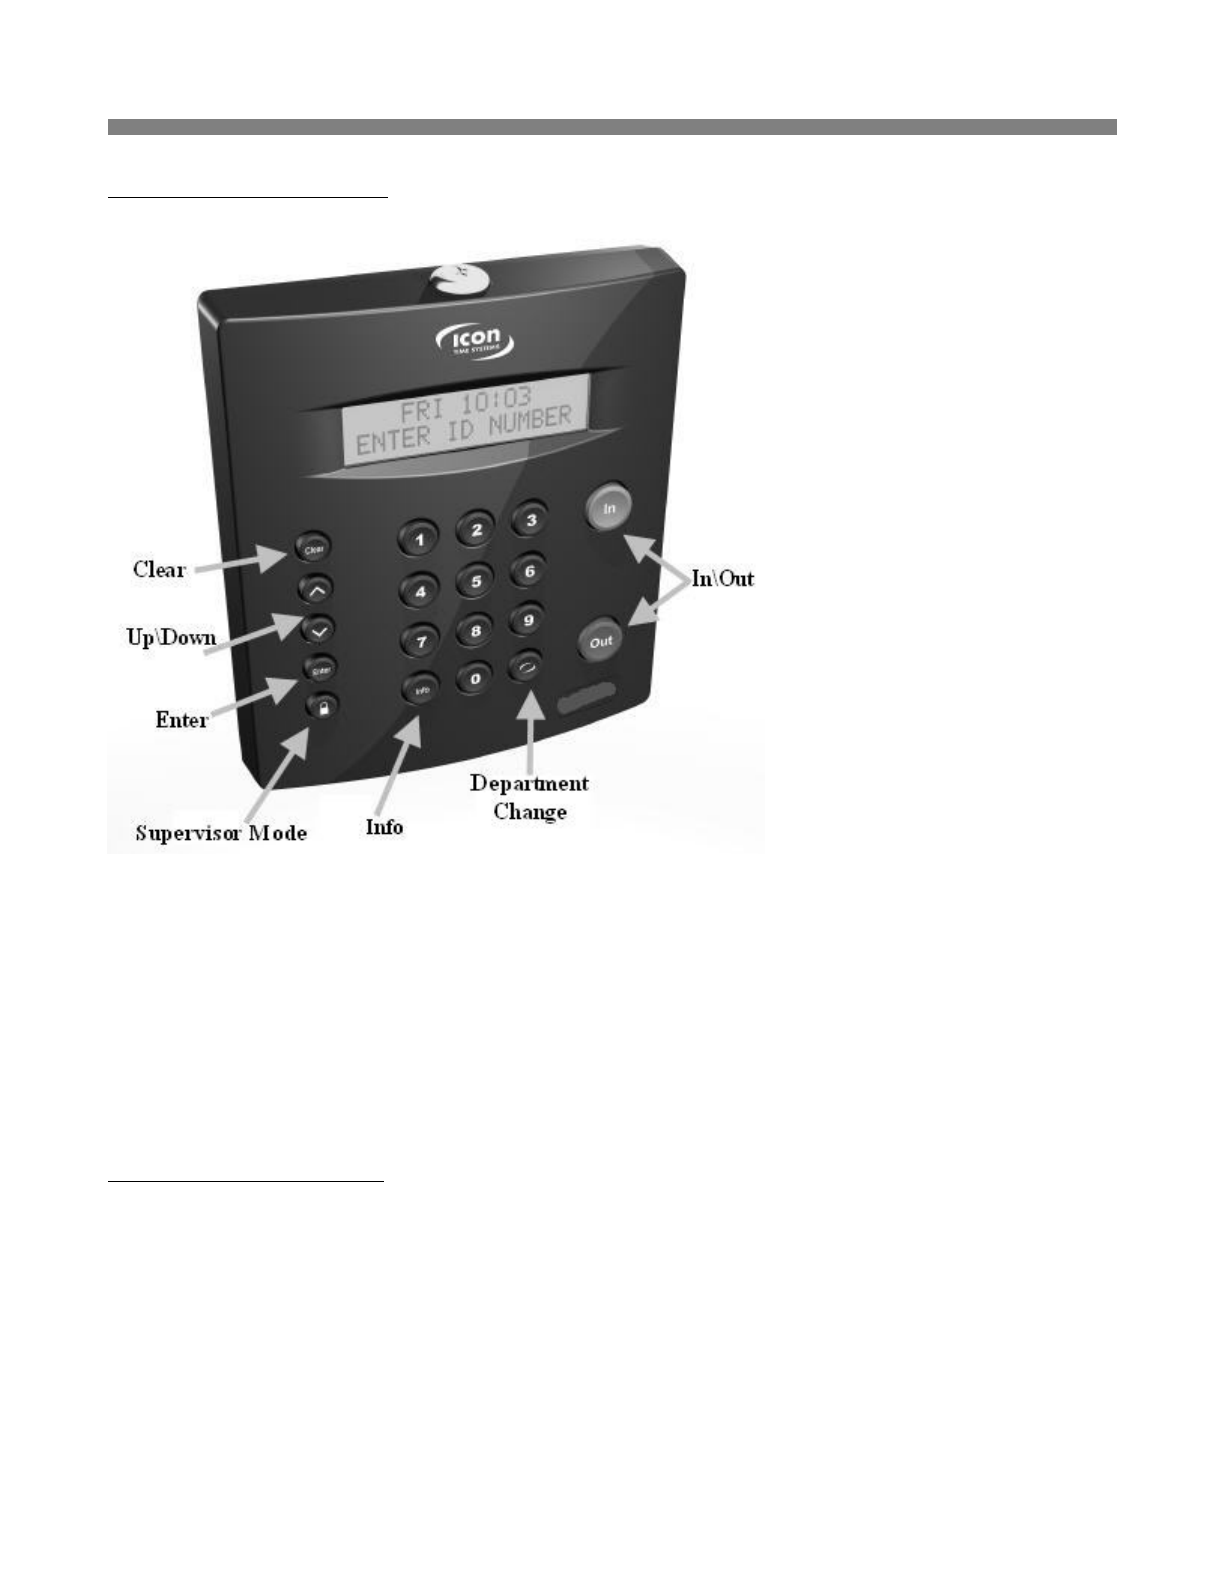
Function Keys: The following is a summary of the employee time clock function keys.
zClear - Returns user to the previous menu option.
zUp\Down - Used to scroll through menu options.
zEnter - Selects and saves menu options.
zSupervisor Mode - Allows supervisor to access employee time clock options.
zInfo - Displays daily and weekly hourly totals for the employee.
zDepartment Change - Used to select departments if this upgrade has been installed.
zIn\Out - Used by employees to punch IN or OUT for their work shift.
Management Functions:
There are certain options that can be set at the employee time clock by a supervisor. To go into
Supervisor Mode, press the Supervisor Mode(lock) key on the keypad and enter your six-digit security
code. The default is "00 00 00". A custom security code can be created in the program. See the Device
Preferences section in the user guide for more details. Use the Up\Down keys to scroll through the
options. The options are described below.
zAssign Badges - If you have purchased proximity badges, press Enter to assign a badge to an
employee. The clock will display "Choose Employee". Use the Up\Down arrow keys to find the
desired em
p
lo
y
ee. When
y
ou find the em
p
lo
y
ee,
p
ress the Enter ke
y
and wave the bad
g
e near the
Page 31 of 41Product User Guide
3/28/2008file://X:\I\ICON_TIME\346AUT8\Extra346AUT8\FCC%20Documentation%203\Use...

keypad of the clock. An "Assigned" message will display. The badge is now activated and the
employee can use the badge to punch IN and OUT.
NOTE: To reassign a currently used badge: Select the new employee in the Assign Badges
menu and wave the badge. A "Badge All Ready Assigned" Message will appear. Press the
Enter key to reassign the badge or select the Clear key to cancel.
zSet Date and Time - Press Enter at this menu option to change or set the date and time on the
employee time clock. Use the Up\Down keys to select the current month and then press Enter.
Follow the same procedure to set the day and year. If a mistake is made, press the Clear key to go
back a step. Follow the same procedure to set the correct time on the clock. When you are done,
the employee time clock will display "Date/Time Set Successfully".
zView IP Address - Press the Enter key to view the IP address assigned to the employee time
clock. This is the address that is entered in the address window of your Web browser to access the
employee time clock. To set a static IP address, press the Enter key again and type in the
complete IP address. Do not change the IP Address if your clock is connected to a network and
your DHCP server has automatically assigned an IP address to the employee time clock.
zReset Password - Press the Enter key to reset the password in the program interface back to the
default "admin". You will have one more chance to change your mind. Press the IN key to reset
the password, or the Clear key to cancel the procedure.
zDisplay Serial # - Press the Enter key to view your employee time clock's serial number. This
information will be needed if you choose to purchase upgrades for your system or need to update
the software on your employee time clock. Serial number information is also displayed in the
Settings\Preferences\Device tab of the program.
zEnable Upgrade - Press the Enter key and enter the 9-digit code given to you by our sales
department or reseller to activate additional features on the employee time clock.
zErase All Memory - This will clear all data off of the employee time clock and reset the clock to
factory defaults. Press the Enter key. You will have one last chance to change your mind. The
clock will display "This will erase all memory" and then "Erase All Memory". Press the IN
key to erase the clock or select the Clear key to cancel the procedure.
NOTE: After all clock functions have been set and checked, press the Clear ke
y
to exit out o
f
Supervisor Mode.
Employee Functions:
The procedure used by the employee to punch IN and OUT at the employee time clock may vary
slightly depending on the entry method selected in the "Edit an Employee" section of the program.
Review the "Edit an Employee" section of the user guide for more information.
zValidated - If the employee's entry method is set to Validated, the employee will walk up to the
employee time clock and enter their employee ID number. The employee's "display name" will
appear on the first line of the employee time clock display. The words IN and OUT will display
on the second line of the dis
p
la
y
. One of these selections will be flashin
g
. The em
p
lo
y
ee must
Page 32 of 41Product User Guide
3/28/2008file://X:\I\ICON_TIME\346AUT8\Extra346AUT8\FCC%20Documentation%203\Use...

press the corresponding key on the employee time clock for the entry to be accepted. After signing
OUT, the total hours worked by the employee for the shift will display after a couple of seconds.
zNon-Validated - If the employee's entry method is set to Non-Validated, the employee will walk
up to the employee time clock and enter their employee ID number. The employee's "display
name" will appear on the first line of the employee time clock display. The words IN and OUT
will display on the second line of the display. The employee must press either the IN or OUT key
on the keypad depending on whether they are starting or ending their shift. After signing OUT, the
total hours worked by the employee for the current shift will display after a couple of seconds.
zAutomatic - This method is also known as "Swipe and Go". If the employee's entry method is
set to Automatic, the employee will walk up to the employee time clock and enter their employee
ID number. The clock will simply display their ID number and "Entry Recorded". The
employee will not be allowed to make any other selections at the employee time clock. This
provides a simple and quick method for punching IN and OUT at the employee time clock. The
employee time clock will record every punch as an IN punch. Every other punch will be
calculated as an IN punch by the program and on your reports. You cannot make any lunch
override or hours adjustments to these type of punches. See the Add a New Punch section for
details.
zProximity Badges - If you have purchased proximity badges and assigned them to employees, the
employee simply waves the badge within an inch of the keypad. The same entry methods
described above apply with badges.
zViewing Hours Worked - If the employee's entry method is set to Validated or Non-Validated,
the Info key on the keypad can be used to view the time of the last punch, current punch hours,
weekly hours, and daily hours worked. Enter the employee ID number or wave the badge. When
the employee's name appears on the display of the clock, press the Info key. The date and time of
the last punch will display. Press the Up\Down keys, to scoll through the hours information. Press
the Clear key to quickly exit out of this mode.
zChanging Departments - This requires the department upgrade. Employees must be assigned to
more than one department.
{Multiple Department Assignments - Employees assigned to multiple departments will see
the letters "DC" displayed between the IN and OUT prompts on the employee time clock.
After pressing the IN key, the employee will be prompted to choose a department. Use the
Up\Down keys to choose the desired department. Press the Enter key to punch IN at that
department.
{Department Change Key - This is a quick method to change departments. If an employee
needs to punch OUT of one department and IN to another department, simply enter the
employee ID number or wave a badge. Press the Department Change key. The employee
will be prompted to choose a department. Use the Up\Down keys to choose the desired
department. Press the Enter key to punch IN at that department. The employee will
automatically be punched OUT of the previous department.
{NOTE: Employees that are assigned the automatic entry method in the program will
not be able to choose de
p
artments at the em
p
lo
y
ee time clock.
Page 33 of 41Product User Guide
3/28/2008file://X:\I\ICON_TIME\346AUT8\Extra346AUT8\FCC%20Documentation%203\Use...
C: Rounding Rules
There are four different rounding rules available in the Punch Preferences section of the program.
zNone - Punch duration is based on the actual time registered on the employee time clock. The
program calculates totals to 1/100th of an hour.
z15 Minute - Rounds and calculates punches from the nearest quarter of an hour, with the split
occurring in the middle of each quarter hour. This is often referred to as 7/8 rounding.
{In other words: 7 minutes 59 seconds rounds back. and 8 minutes 00 seconds rounds
forward.
{Example: A punch at 7:52a would calculate as 7:45a.
A punch at 7:53a would calculate as 8:00a.
z15 Minute Slant - Quarter hour rounding similar to above except the break point occurs on the
5th minute or 10th minute depending on whether it is an IN punch or an OUT punch. (10/5 split
on IN punch, 5/10 split on OUT punch.)
{In other words: On an IN punch, 4 minutes 59 seconds after the quarter hour rounds back
and 5 minutes 00 seconds rounds forward to the next quarter hour. On an OUT punch, 9
minutes 59 seconds after the quarter hour rounds back, and 10 minutes 00 seconds rounds
forward to the next quarter hour.
{Examples: An IN punch at 7:49a would calculate as 7:45a.
An IN punch at 7:50a would calculate as 8:00a
An OUT punch at 5:09p would calculate as 5:00p.
An OUT punch at 5:10p would calculate as 5:15p.
z10th Hour - Tenths of hour's calculation (no rounding occurs). This selection calculates punches
from the tenth hour point and advances each six minutes.
{In other words:
{Example: An In punch at 7:30a would calculate as 7.5a.
An Out
p
unch at 4:05
p
would calculate as 4.0
p
.
Page 34 of 41Product User Guide
3/28/2008file://X:\I\ICON_TIME\346AUT8\Extra346AUT8\FCC%20Documentation%203\Use...

D: Minutes to Decimal Conversion Chart
Minutes Decimal
Hours Minutes Decimal
Hours
01 .02 31 .52
02 .03 32 .53
03 .05 33 .55
04 .07 34 .57
05 .08 35 .58
06 .10 36 .60
07 .12 37 .62
08 .13 38 .63
09 .15 39 .65
10 .17 40 .67
11 .18 41 .68
12 .20 42 .70
13 .22 43 .72
14 .23 44 .73
15 .25 45 .75
16 .27 46 .77
17 .28 47 .78
18 .30 48 .80
19 .32 49 .82
20 .33 50 .83
21 .35 51 .85
22 .37 52 .87
23 .38 53 .88
24 .40 54 .90
25 .42 55 .92
26 .43 56 .93
27 .44 57 .94
28 .45 58 .95
29 .46 59 .96
30 .50 60 1.00
Page 35 of 41Product User Guide
3/28/2008file://X:\I\ICON_TIME\346AUT8\Extra346AUT8\FCC%20Documentation%203\Use...

E: Alert Examples
zMonitoring Employees Approaching Daily Overtime - Let's say you pay daily overtime for
employees that work over 8 hours per day. You may want to monitor your employees to ensure
that they do not work overtime without your approval.
{Set Daily Overtime Preferences - Make sure you have entered your Day OT1 Overtime
Preferences in the Setting\ Preferences\Pay tab. In this example, it is assumed to be 8
hours.
{Enter Alert Preferences - To post an alert to the Home page if the employee is within 2
hours of working overtime for the day, select the Settings\ Preferences\Alerts tab. Enter
"2.00" in the Alert Day Overtime OT at window. In the Check Alerts Every window,
enter "1" minute. Do the same in the Update Employee Hours Every window. The
program will check for any new punches on the clock every 1 minute and check for new
alerts every 1 minute. You can adjust these settings to suit your needs.
{Enter Daily Overtime Duration - From the main tool bar, select Settings\Alerts Setup.
Since daily overtime is being monitored, make sure the Approaching Daily Overtime
checkbox is selected in the first column. From the drop-down window, select a Lifetime of
"1 Day".
{Summary of Behavior - If an employee has worked 6 hours or more, an alert will be
posted to the home page warning that they are approaching or have reached daily overtime.
Daily Overtime alerts will automatically be removed from the Home page at the end of
every day.
zMonitoring Employees Approaching Weekly Overtime - Let's say you pay weekly overtime
for employees that work over 40 hours per week. You may want to monitor your employees to
ensure that they do not work overtime without your approval.
{Set Weekly Overtime Preferences - Make sure you have entered your Week OT1
Overtime Preferences in the Setting\ Preferences\Pay tab. In this example, it is assumed
to be 40 hours.
{Enter Alert Preferences - To post an alert to the Home page if the employee is within 8
hours of working overtime for the week, select the Settings\ Preferences\Alerts tab. Enter
"8.00" in the Alert Week Overtime OT at window. In the Check Alerts Every window,
enter "1" minute. Do the same in the Update Employee Hours Every window. The
program will check for any new punches on the clock every 1 minute and check for new
alerts every 1 minute. You can adjust these settings to suit your needs.
{Enter Weekly Overtime Duration - From the main tool bar, select Settings\Alerts Setup.
Since weekly overtime is being monitored, make sure the Approaching Weekly Overtime
check box is selected in the first column. From the drop-down window, select a Lifetime of
"1 Day".
{Summar
y
of Behavior - If an em
p
lo
y
ee has worked 32 hours or more, an alert will be
Page 36 of 41Product User Guide
3/28/2008file://X:\I\ICON_TIME\346AUT8\Extra346AUT8\FCC%20Documentation%203\Use...

posted to the home page warning that they are approaching or have reached weekly
overtime. Weekly Overtime alerts will automatically be removed from the Home page at
the end of every day.
zMonitoring Employees that Forgot to punch OUT the Day Before - Do the following if you
want to check alerts in the morning to review a list of employees that forgot to punch OUT on the
previous day.
{Enter Alert Preferences - To post an alert to the Home page if the employee has a punch
duration of more than 24 hours, select the Settings\ Preferences\Alerts tab. Enter "24", or a
smaller value if needed, in the Alert Maximum Time at window. If the employee forgets
to punch OUT, the actual time elapsed since the IN punch is tracked by the program and can
be used to trigger this alert setting.
{Enter Maximum Hours Duration - From the main tool bar, select Settings\Alerts Setup.
Make sure the Maximum Hours check box is selected in the first column. Select "1 Day"
for the Lifetime.
{Summary of Behavior - If an employee forgot to punch OUT the day before and 24 hours
has elapsed, an alert will be posted to the Home page warning that they have reached
Maximum Hours. Punches and alerts will be checked and posted every 1 minute. Maximum
Hour alerts will automaticall
y
be removed from the Home
p
a
g
e at the end of ever
y
da
y
.
Page 37 of 41Product User Guide
3/28/2008file://X:\I\ICON_TIME\346AUT8\Extra346AUT8\FCC%20Documentation%203\Use...

F: Frequently Asked Questions
1. I added a new punch for an employee but I do not see it on my report. What could be wrong?
The report screen will default to the original time frame after the punch is added. The punch was
probably added into a different time frame. Click on the date link to select and view the proper
time frame. If you were viewing ALL employees in the Timecard report, you will be brought
back to a Timecard report for that specific employee. From the date link, you will need to select
ALL employees to view the original report.
2. I have added a wage amount for my employee(s) but labor is displaying $0.00 on my reports.
What could be wrong?
The labor rate will not automatically update if the punches are all ready existing on your reports.
To update labor totals, click on each IN punch on the report screen and simply click the SUBMIT
button in the Edit a Punch screen.
3. The program seems to be responding slowly. What can I do to improve system performance?
{When editing punches, select an Attendance Report, click on the date link, and select the
specific date of the punches you are trying to edit. Edit punches according to a specific date,
as opposed to, a date range or pay period.
{In the Settings\Preferences\Alerts tab, enter a larger time duration value for the Check
Alerts Every and Update Employee Hours Every options.
{In the Settings\Alerts Setup screen, disable any alerts that you don't really need or want to
monitor.
{Periodically purge older punches from the employee time clock and remove punches for ex-
employees. Make a backup before removing information that you may want to review at a
later date.
4. How do I determine the software version of my employee time clock?
To check your software version - Go to Settings\Preferences\Device tab in your browser
window. The version number is at the top of this tab. Go to our Web site to check for any updates:
http://www.icontime.com/support/downloads.asp and follow the directions on the Web page to
update to the latest SB-100PRO or RTC1000 version.
5. How do I accss my employee time clock remotely over the internet?
We cannot provide specific instructions on how to do this. There are many different routers and
internet providers. The basic outline on what needs to be done can be found in KB0075 on our
Web site:
htt
p
://www.icontime.com/su
pp
ort/fa
q_
view.as
p
?Rank=27
Page 38 of 41Product User Guide
3/28/2008file://X:\I\ICON_TIME\346AUT8\Extra346AUT8\FCC%20Documentation%203\Use...

G: FCC Part 15
This equipment has been tested and found to comply with the requirements for a Class B digital device
under Part 15 of the Federal Communications Commission (FCC) rules.
These requirements are intended to provide reasonable protection against harmful interference in a
residential installation. This equipment generates, uses, and can radiate radio frequency energy and, if
not installed and used in accordance with the instructions, may cause harmful interference to radio
communications. However, there is no guarantee that interference will not occur in a particular
installation.
If this equipment does cause harmful interference to radio or television reception, which can be
determined by turning the equipment off and on, the user is encouraged to try to correct the interference
by one or more of the following measures:
zReorient or relocate the receiving antenna.
zIncrease the separation between the equipment and receiver.
zConnect the equipment into an outlet on a circuit different from that to which the receiver is
connected.
zConsult the dealer or an experienced technician for help.
Changes or modifications to this equipment not expressly approved by the party responsible for
compliance could void the user's authority to operate the equipment.
To ensure safety of users, the FCC has established criteria for the amount of radio frequency energy that
can be safely absorbed by a user or bystander according to the intended usage of the product. This
p
roduct has been tested for com
p
liance with the FCC criteria.
Page 39 of 41Product User Guide
3/28/2008file://X:\I\ICON_TIME\346AUT8\Extra346AUT8\FCC%20Documentation%203\Use...

ICON TIME SYSTEMS, INC., An Oregon Corporation
N
otice: The information contained in their document is subject to change without notice.
ICON TIME SYSTEMS MAKES NO WARRANTY OF ANY KIND WITH REGARD TO THIS
MATERIAL, INCLUDING, BUT NOT LIMITED TO, THE IMPLIED WARRANTIES OF
MERCHANTABILITY AND FITNESS FOR A PARTICULAR PURPOSE. ICON TIME SYSTEMS
shall not be liable for errors contained herein, or for incidental consequential damages in connection
with the furnishing, performance, or use of this material.
ONE-YEAR LIMITED WARRANTY
ICON TIME SYSTEMS PRODUCTS
ICON TIME SYSTEMS will repair and exchange parts for your unit free of charge in the U.S.A. in the
event of a defect in materials or workmanship, as follows:
PARTS
N
ew or comparable rebuilt parts in exchange for defective parts for one (1) year beginning on the date o
f
delivery.
LABOR
Mail-in service for one (1)year beginning on the date of delivery.
SERVICE
To request warranty service, ICON TIME SYSTEMS must be contacted within the warranty period. If
ICON TIME SYSTEMS decides a product requires service, ICON TIME SYSTEMS will issue a Return
Material Authorization Number (RMA). Products must be shipped back to ICON TIME SYSTEMS
adequately insured, in their original packaging or equivalent, with shipping charges prepaid. Risk of loss
or damage during shipping to ICON TIME SYSTEMS is the sender's responsibility. Return shipping
costs of the repaired or replaced unit will be paid by ICON TIME SYSTEMS.
This warranty is extended only to the original purchaser. A purchase receipt or other proof of date of
original purchase will be required before warranty work is rendered.
This warranty only covers failures due to defects in materials or workmanship that occur during normal
use. It does not cover failures due to damage which occurs in shipment, or failures which are caused by
p
roducts not supplied by ICON TIME SYSTEMS, or failures which result from accident, misuse, abuse,
neglect, mishandling, misapplication, alteration, faulty installation, modification or service by anyone
other than a factory service center, or damage that is attributable to acts of God.
ICON TIME SYSTEMS SHALL NOT BE LIABLE FOR INCIDENTAL OR CONSEQUENTIAL
DAMAGES RESULTING FROM THE USE OF THIS PRODUCT, OR ARISING OUT OF ANY
BREACH OF THIS WARRANTY. DURATION OF IMPLIED WARRANTIES, IF ANY, IS
LIMITED TO ONE (1)YEAR. Some states do not allow the exclusion of limitation of incidental or
consequential damages, or limitations on how long an implied warranty lasts, so the above exclusions or
limitations may not apply to you.
This warrant
y
g
ives
y
ou s
p
ecific le
g
al ri
g
hts and
y
ou ma
y
also have other ri
g
hts that var
y
from state to
Page 40 of 41Product User Guide
3/28/2008file://X:\I\ICON_TIME\346AUT8\Extra346AUT8\FCC%20Documentation%203\Use...

state.
If a problem with your ICON TIME SYSTEMS unit develops during the warranty period, contact ICON
TIME SYSTEMS SERVICE DIVISION, 15201 NW Greenbrier Parkway, Suite A1, Beaverton, Oregon
97006
There are no other express warranties except as listed above.
This document contains proprietary information that is protected by copyright. All rights are reserved.
N
o part of the document may be photocopied, reproduced, or translated to another language without the
p
rior written consent of Icon Time Systems, Inc.
Copyright © ICON TIME SYSTEMS, INC. 2007
All other trademarks belong to their respective owners.
Icon Time Systems 15201 N.W. Greenbrier Parkway, Suite A1 Beaverton, Oregon 97006 971.249.1700
Printed in U.S.A. Au
g
ust 2007
Page 41 of 41Product User Guide
3/28/2008file://X:\I\ICON_TIME\346AUT8\Extra346AUT8\FCC%20Documentation%203\Use...