ICU Medical 16026 Symbiq One Channel Infusion System User Manual mds PHXopsmanual
Hospira, Inc. Symbiq One Channel Infusion System mds PHXopsmanual
UserManual.wiki
>
ICU Medical
>
16026 User Manual
>
User Manual Part 1
Contents
1.
User Manual Part 2
2.
User Manual Part 1
3.
User Manual Part 3
User Manual Part 1
Navigation menu
Upload a User Manual
Namespaces
Wiki Guide
HTML
PDF
Info
Views
User Manual
Discussion / Help
Navigation
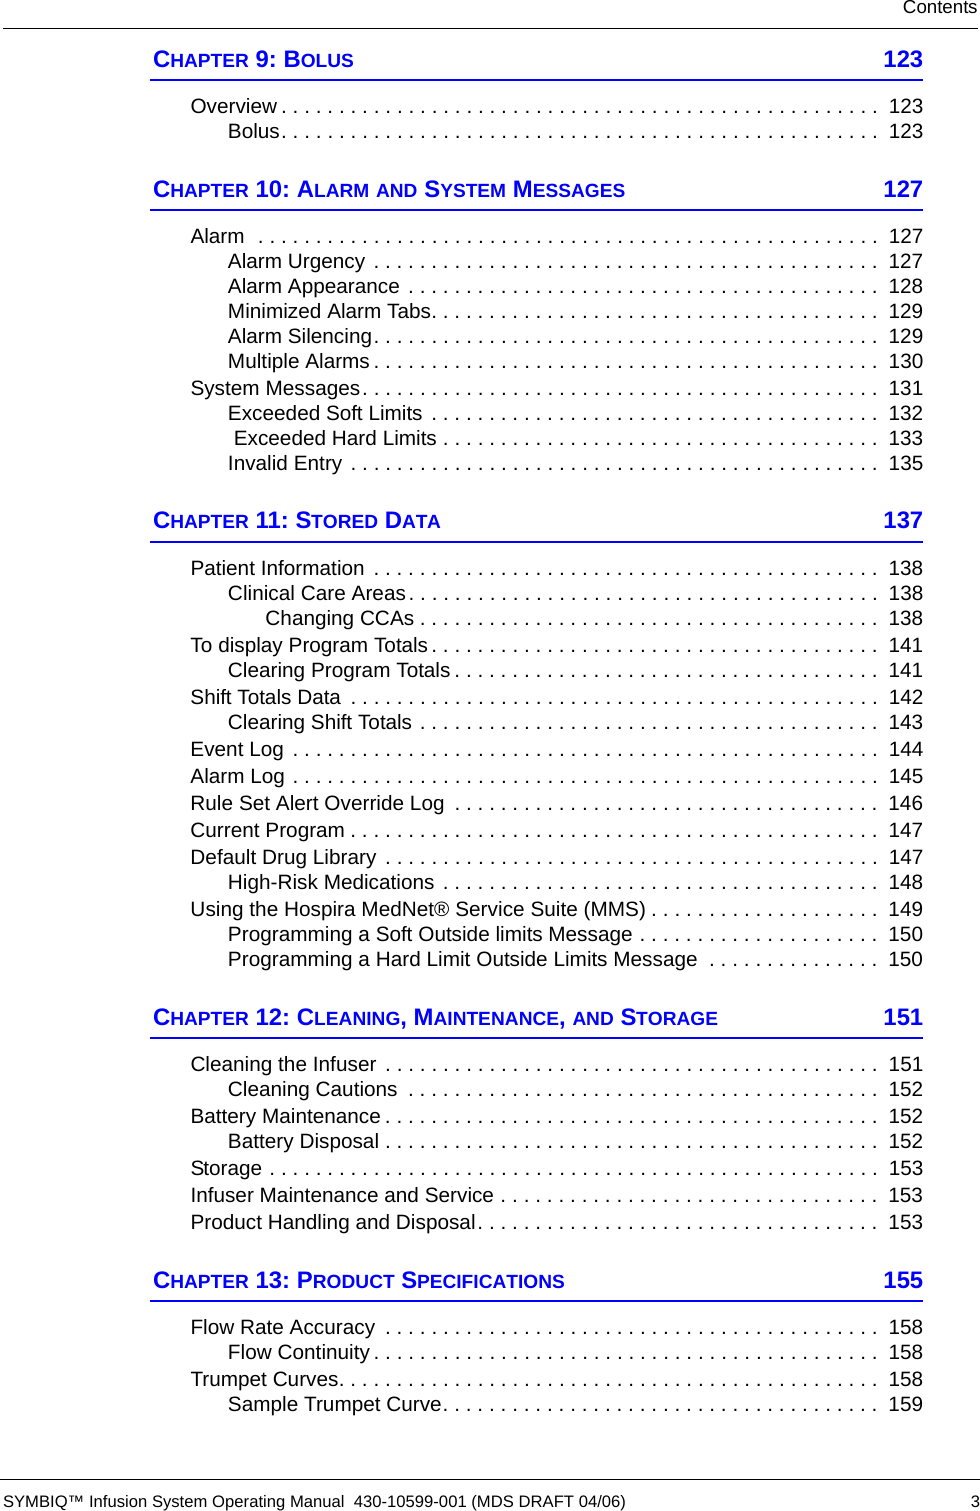
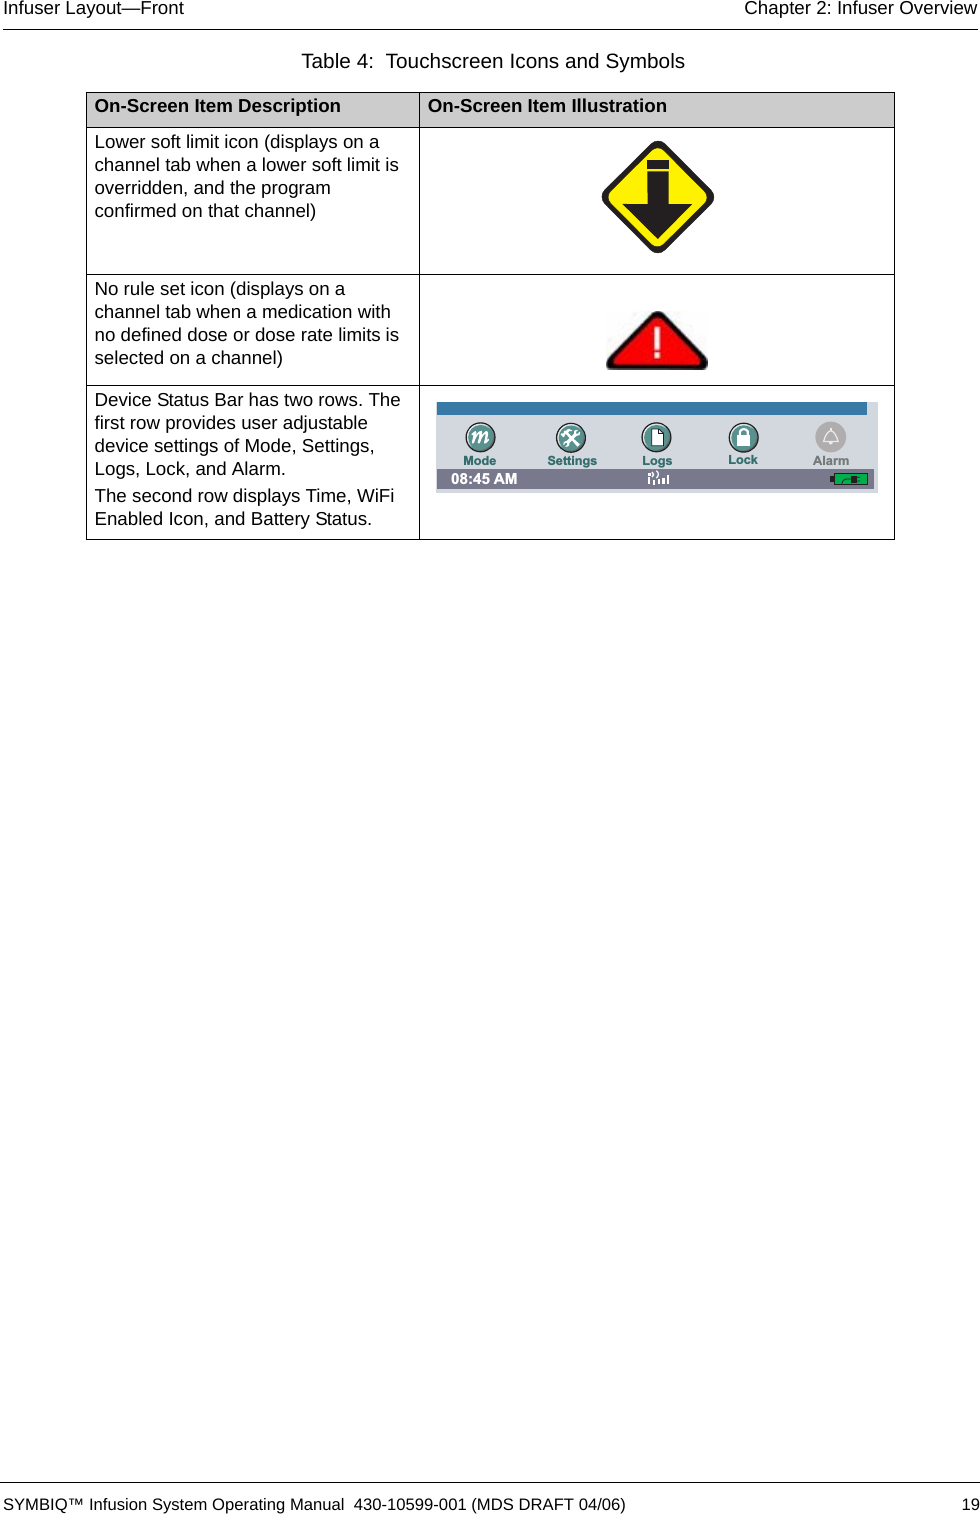
![SYMBIQ™ Infusion System Operating Manual 430-10599-001 (MDS DRAFT 04/06) System Operating ManualFor List Number 16026-04 (One-Channel Infuser)The SYMBIQ™ Infusion System is designed for use by health care professionals. The Hospira Customer Support hotline is available 24 hours a day (in the USA) to provide consultation and technical assistance regarding the SYMBIQ™ Infusion System.FRefer to the Device Development Document for complete specifications and restrictions.Hospira Technical Support Operations1-800-241-4002To order additional copies of this manual(P/N 430-10599-001), call 1-877-946-7747LOAD / EJECTSTOPACPOWEREmergencyStopOn/Off09:57 AMPress Tab A to display Near Viewing Delivery screen.A13.1 mL / hr13.1mL / hr103 mL103mLVTBI[ 400 mg / 250 mL ]DOPamineRateSettings Logs LockModeICUAlarmDOPamine](https://usermanual.wiki/ICU-Medical/16026.User-Manual-Part-1/User-Guide-660066-Page-1.png)

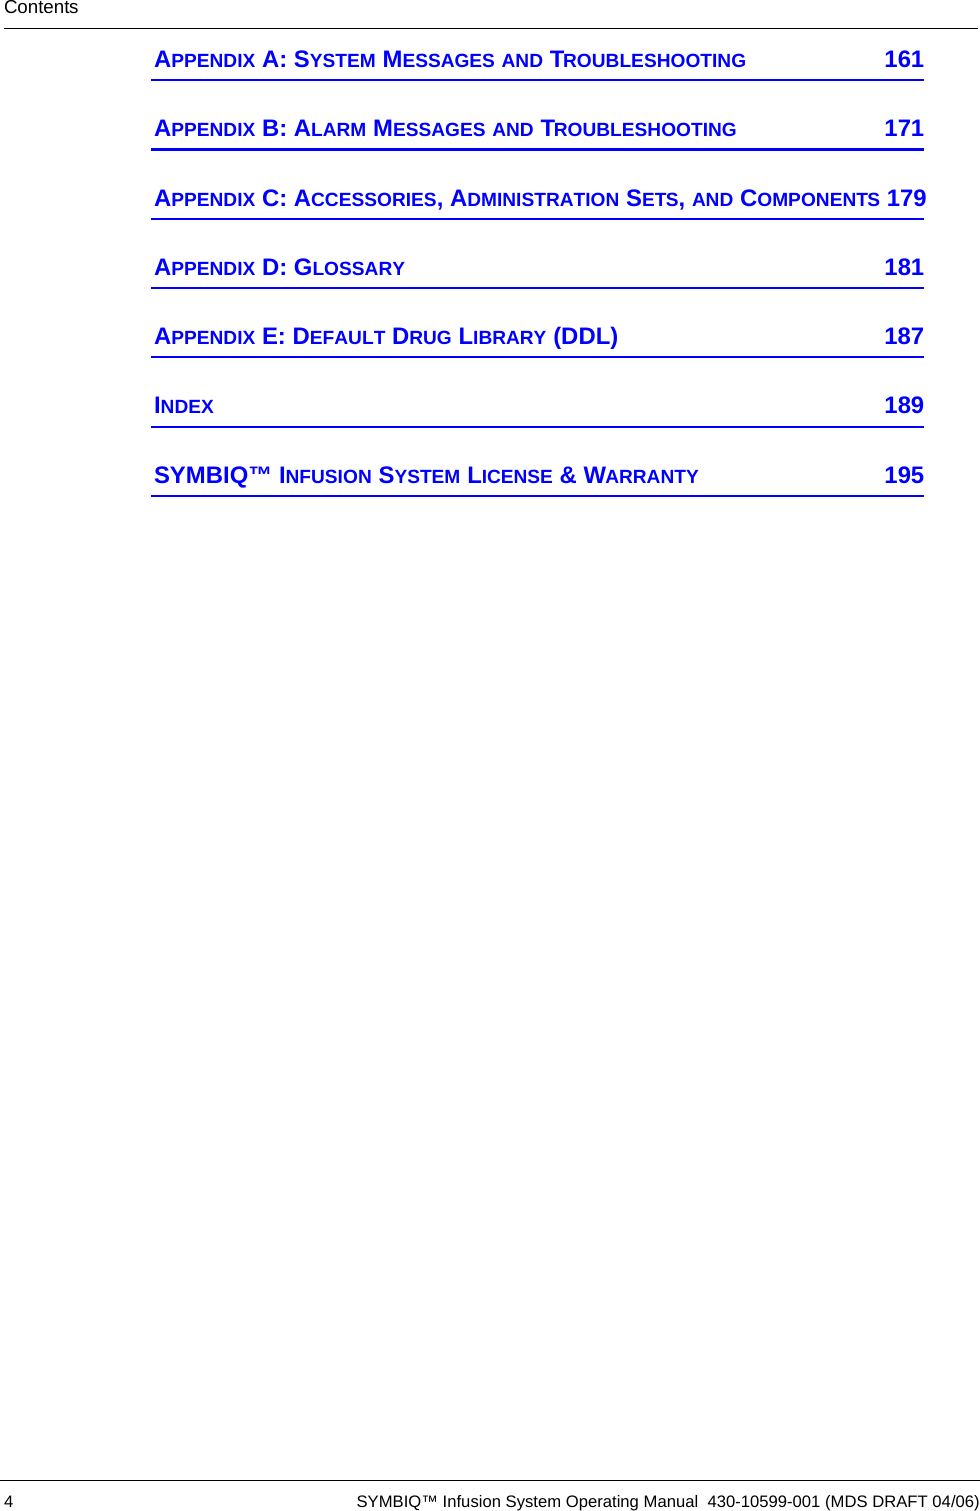


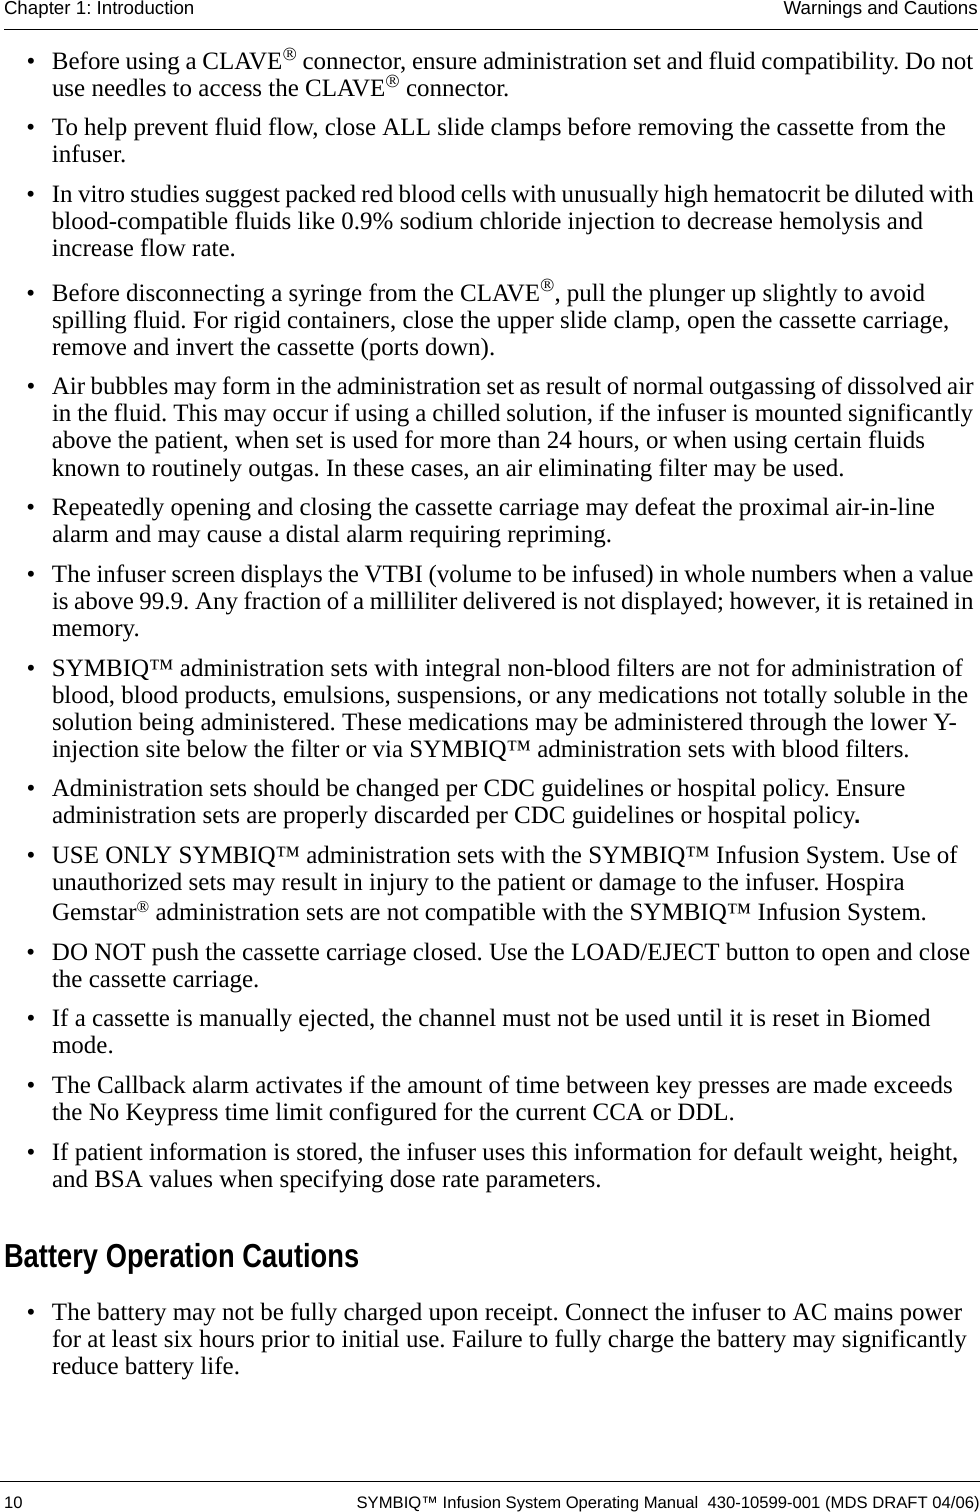

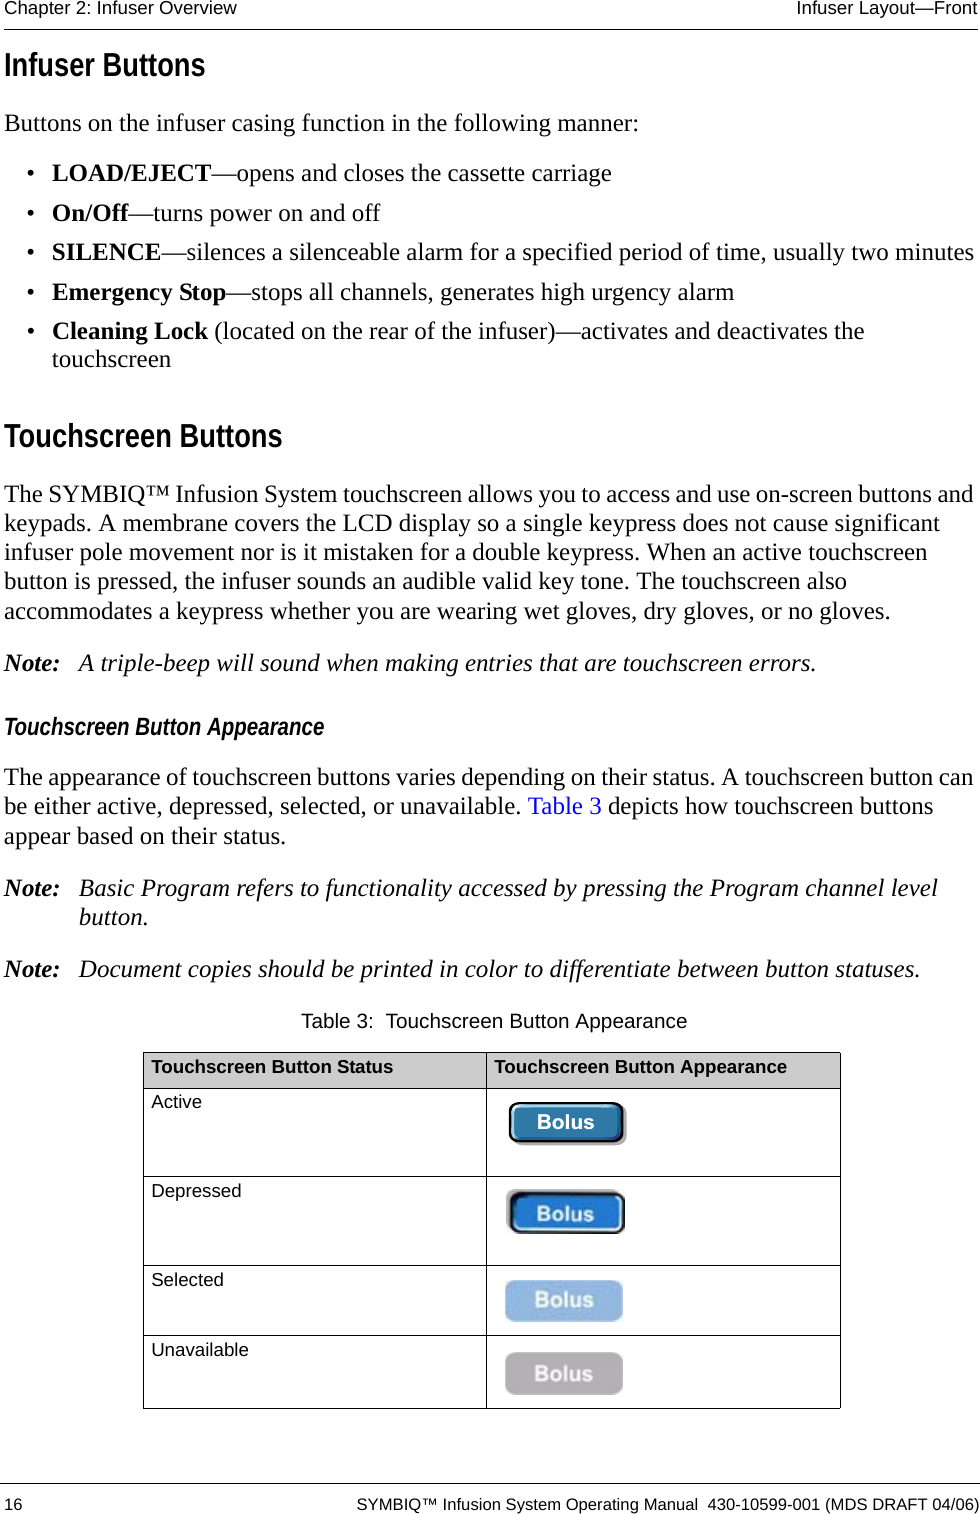
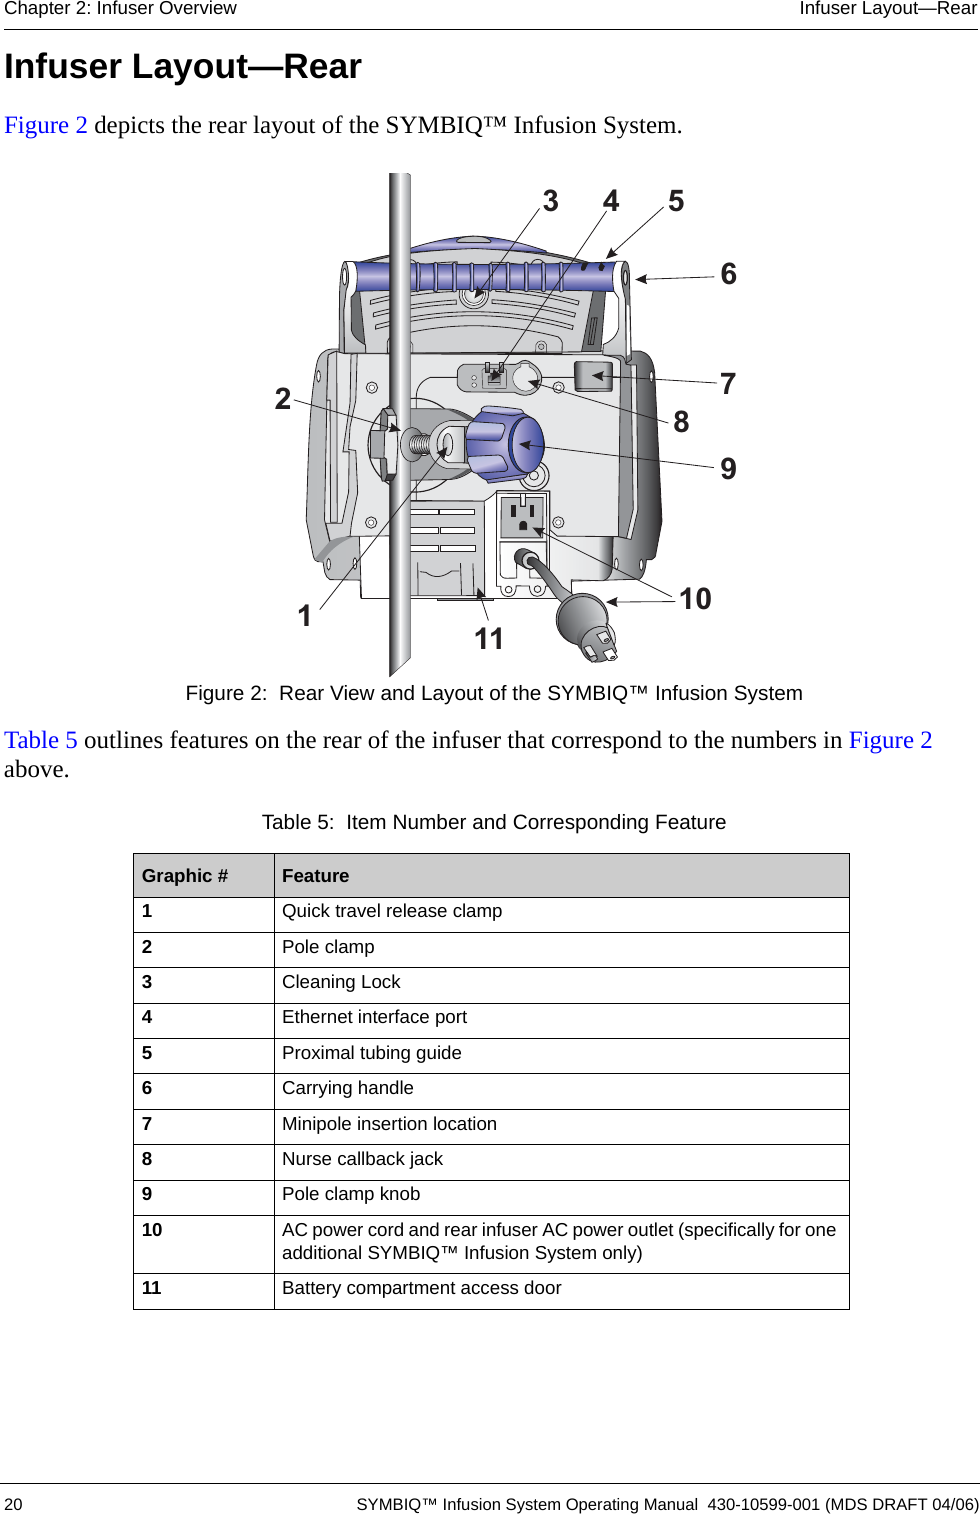
![SYMBIQ™ Infusion System Operating Manual 430-10599-001 (MDS DRAFT 04/06) 15Chapter 2: Infuser Overview Chapter 2 describes the SYMBIQ™ Infusion System layout (front, rear, and bottom), infuser buttons and touchscreen buttons, touchscreen icons and symbols, and the features that control the infuser.Many features of the SYMBIQ infuser system are configurable through the Hospira MedNet® software. For details on facility-defined configuration, contact the facility software administrator. Infuser Layout—FrontFigure 1 depicts the front of a one-channel SYMBIQ™ Infusion System and the infuser touchscreen. Figure 1: Front View and Touchscreen of the SYMBIQ™ Infusion SystemTable 2 outlines the buttons and touchscreen elements that correspond to the numbers in Figure 1 above. Table 2: Item Number and Corresponding FeatureGraphic # Feature Graphic # Feature1Distal tubing guide 8SILENCE button2Cassette carriage 9Emergency Stop button3Cassette loader housing 10 CCA/Patient Information button4Channel Identifier tab 11 Channel-level therapy buttons5Proximal tubing guide 12 Programming screen6Cassette LOAD/EJECT button 13 Help/status text area7On/Off button 14 Battery indicator/AC power indicator1011121314STOPPOWEREmergencyStopodelete all entries. Options toto continue.Advancedkg / min1351mL/hrmLhh:mmineCULogs LockAlarm400 mg / 250 mL ]PiggybackNextCancelTitration7610411121314239518LOAD / EJECTSTOPACPOWEREmergencyStopOn/Off11:24 AMPress fields to edit. Clear to delete all entries. Options toedit program settings. Next to continue.AProgramRate(Calculated)DoseAdvancedInfusion5mcg/kg/min13.110307:51VTBITime(Calculated)mL/hrmLhh:mmDOPamineICUSettings Logs LockModeOptionsClearAlarm[ 400 mg / 250 mL ]PiggybackBolusNextCancelTitration0mL /hr0mL](https://usermanual.wiki/ICU-Medical/16026.User-Manual-Part-1/User-Guide-660066-Page-17.png)
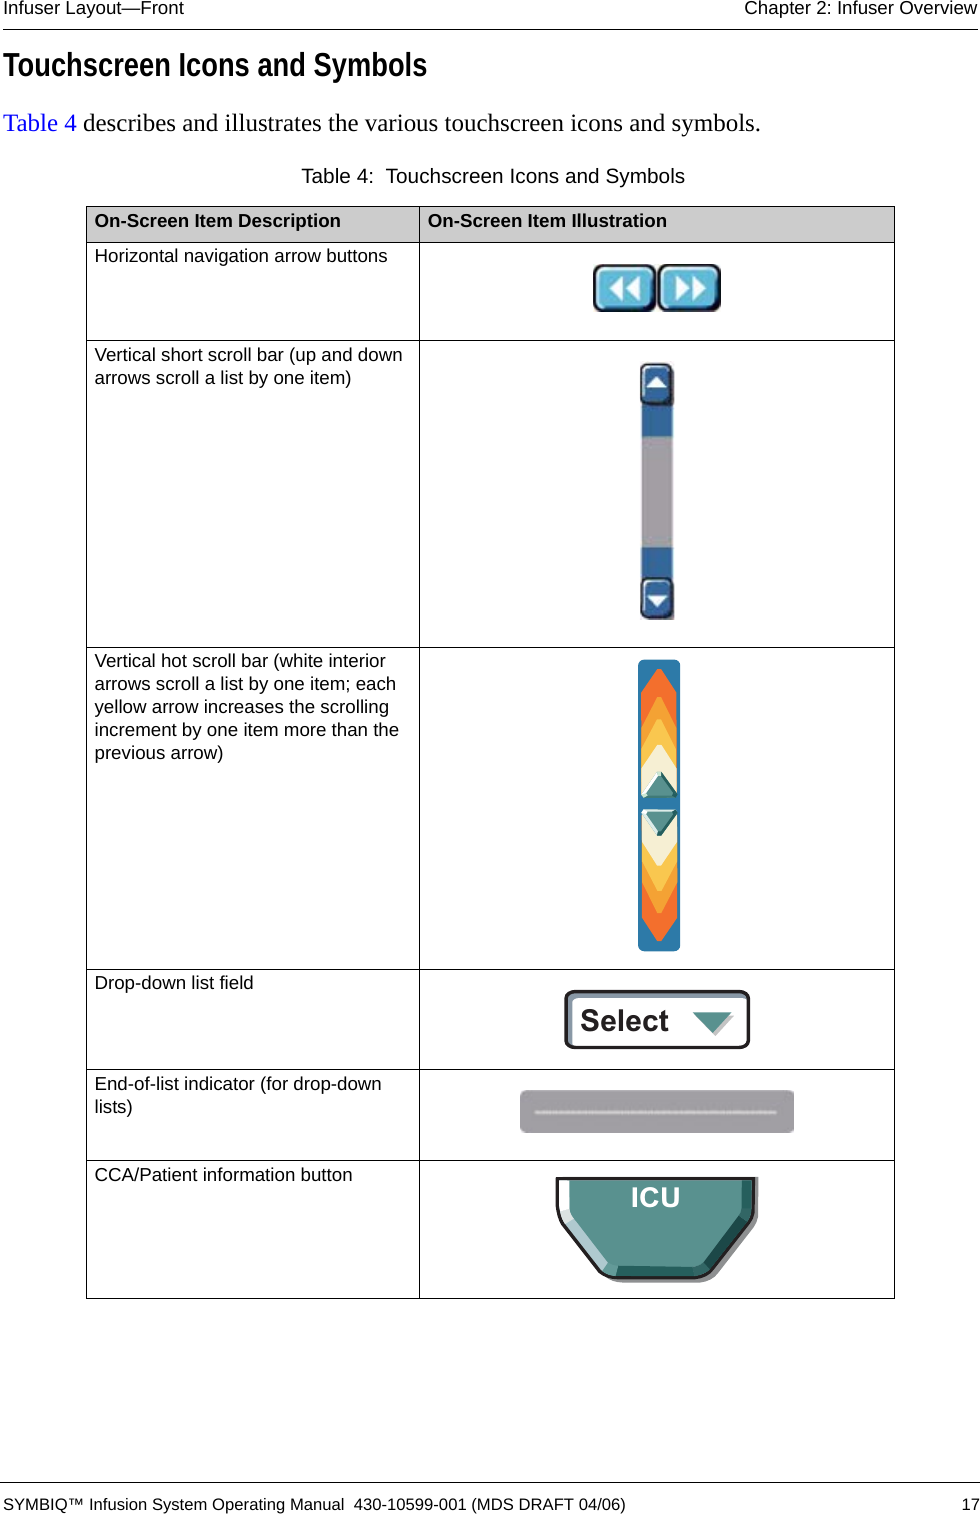


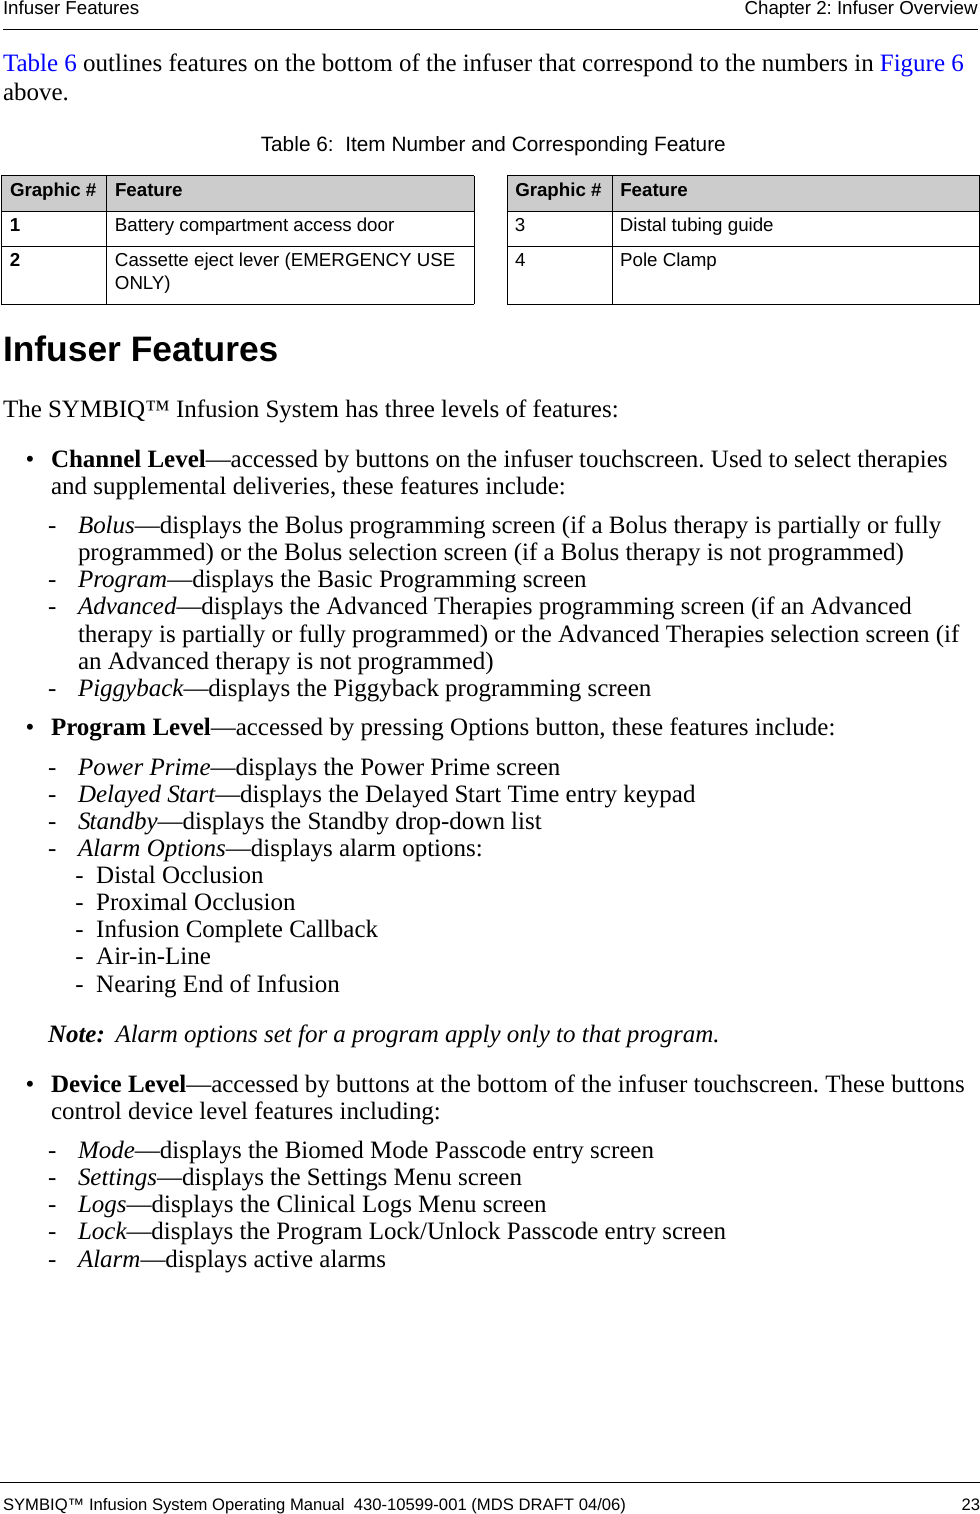
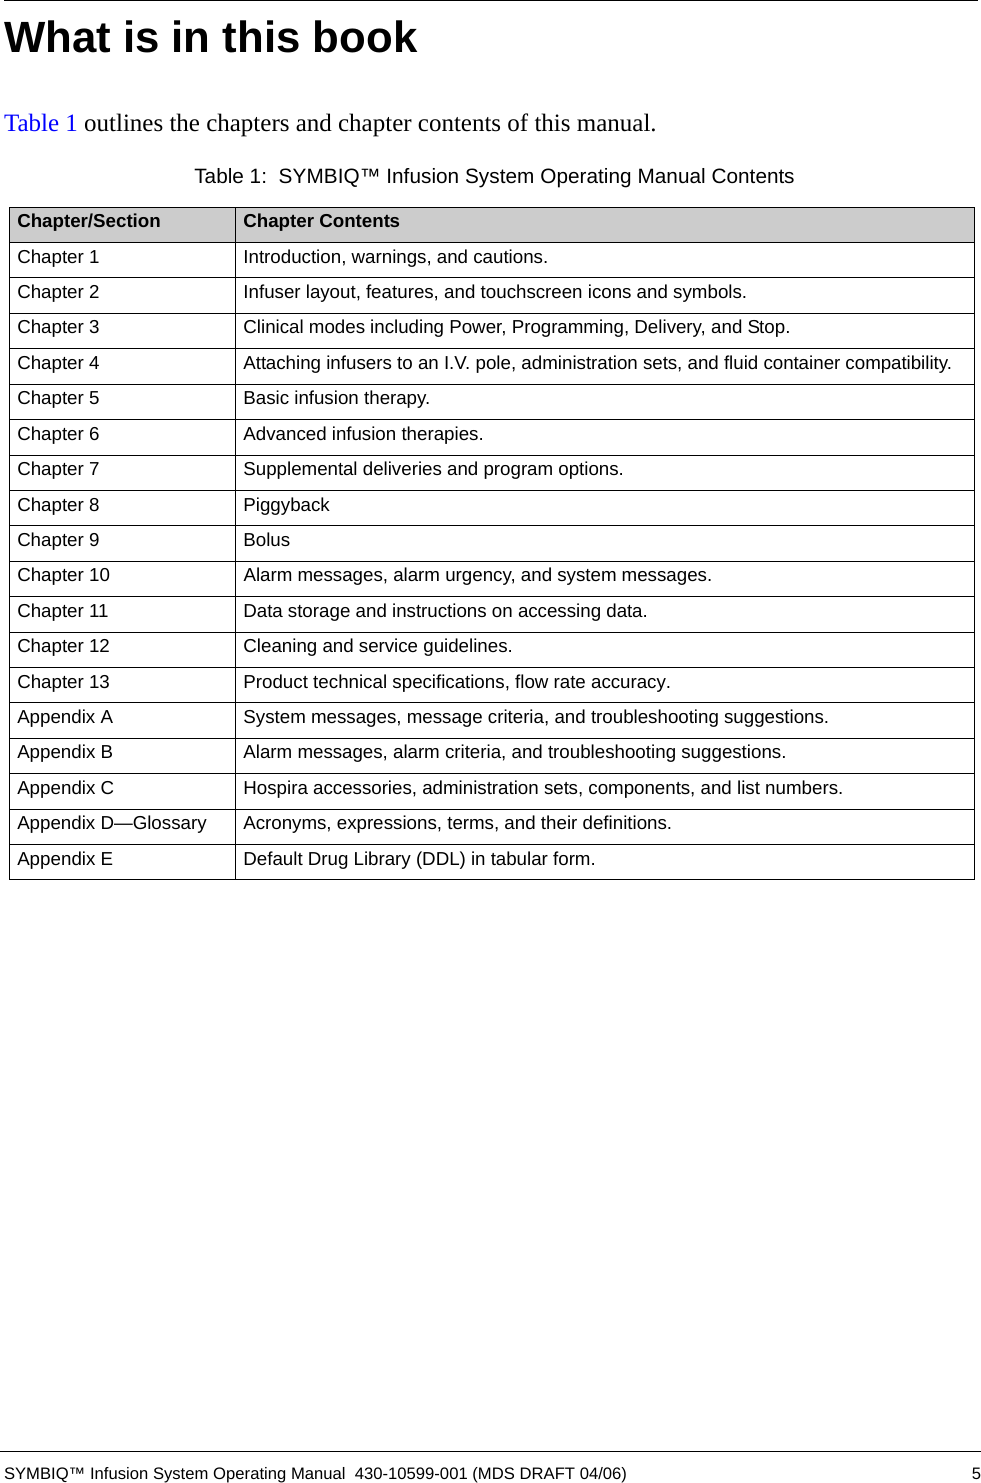
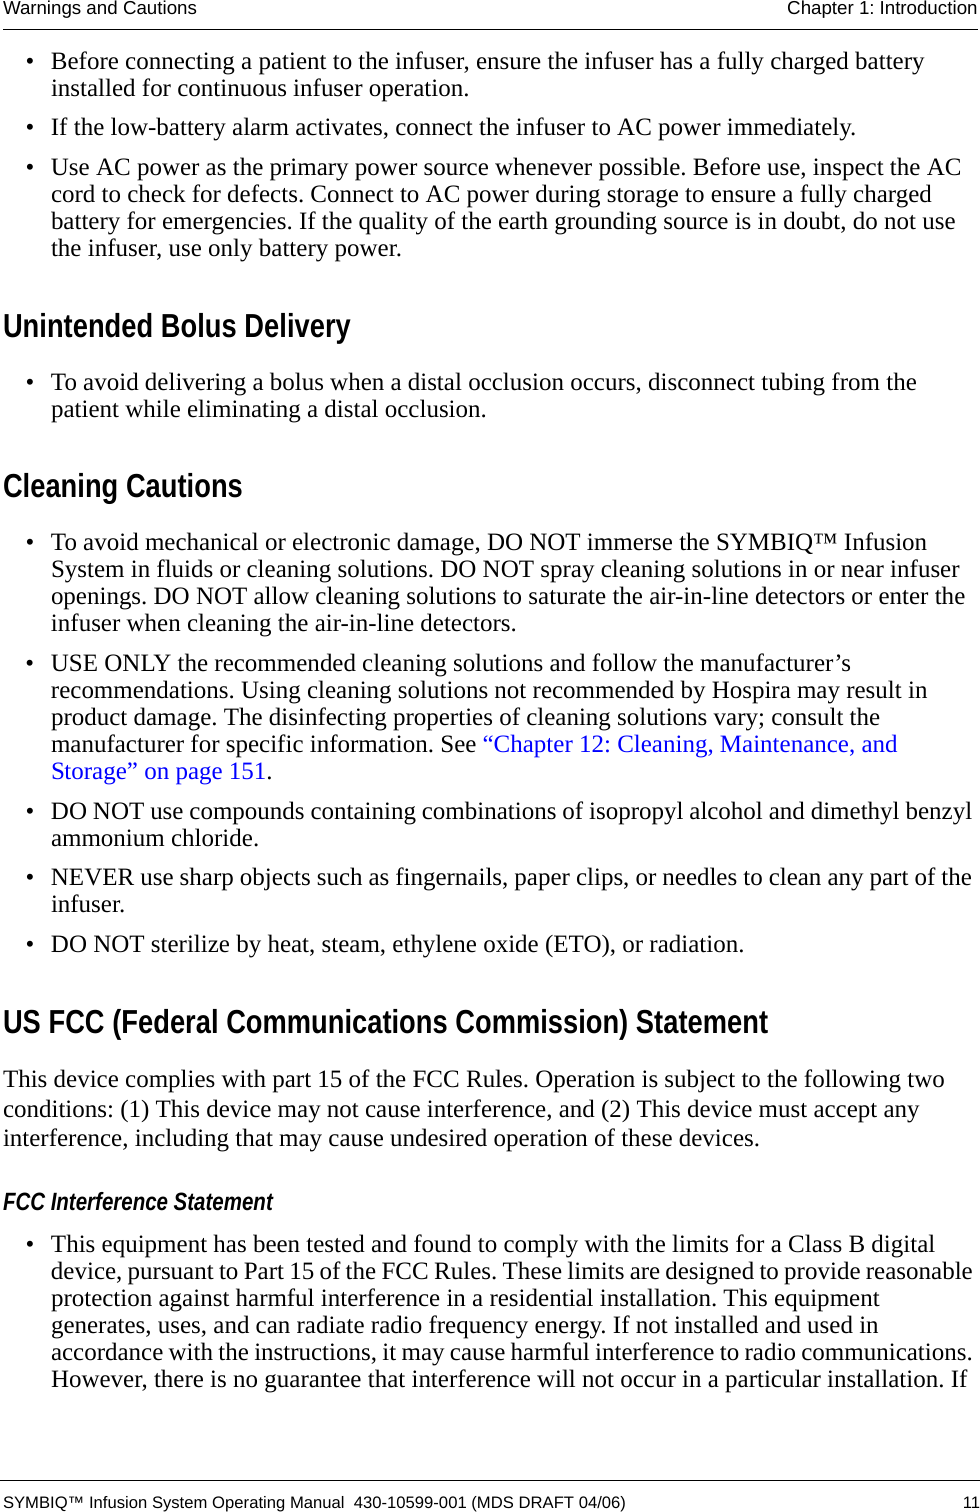
![24 SYMBIQ™ Infusion System Operating Manual 430-10599-001 (MDS DRAFT 04/06)Chapter 2: Infuser Overview Infuser FeaturesChannel Level FeaturesChannel level features are accessed via buttons across the top of the touchscreen as depicted in Figure 7. The default channel level screen is the Basic Program screen. Figure 7: Channel Level FeaturesUse channel level buttons to access Bolus, Program, Advanced, and Piggyback programming screens when available. Channel Feature AvailabilitySelecting a channel level feature affects the availability of other channel level features. For example, entering a single value on the Basic Program screen deactivates the Advanced button until the Basic program is cleared. Similarly, entering a single value on an Advanced program screen deactivates the Program button until the Advanced program is clearedThe Piggyback button is only available for a channel with a confirmed Basic program that has a VTBI greater than zero.For more information on programming therapies, see “Chapter 5: Program (Basic) Therapy” on page 71, “Chapter 7: Advanced Therapies” on page 87, and “Chapter 8: Program Options” on page 105.12:45 PMAProgramPiggybackRateDoseInfusion5mcg/kg/min13.110307:51VTBITimemL / hrmLhh:mmDOPaminePress fields to edit. Clear to delete all entries. Options toedit program settings. Next to continue.BolusAdvancedICUNextOptionsClearSettings Logs LockModeCancelTitrationAlarm0mL/hr0mL(Calculated)(Calculated)[400 mg / 250 mL]](https://usermanual.wiki/ICU-Medical/16026.User-Manual-Part-1/User-Guide-660066-Page-26.png)
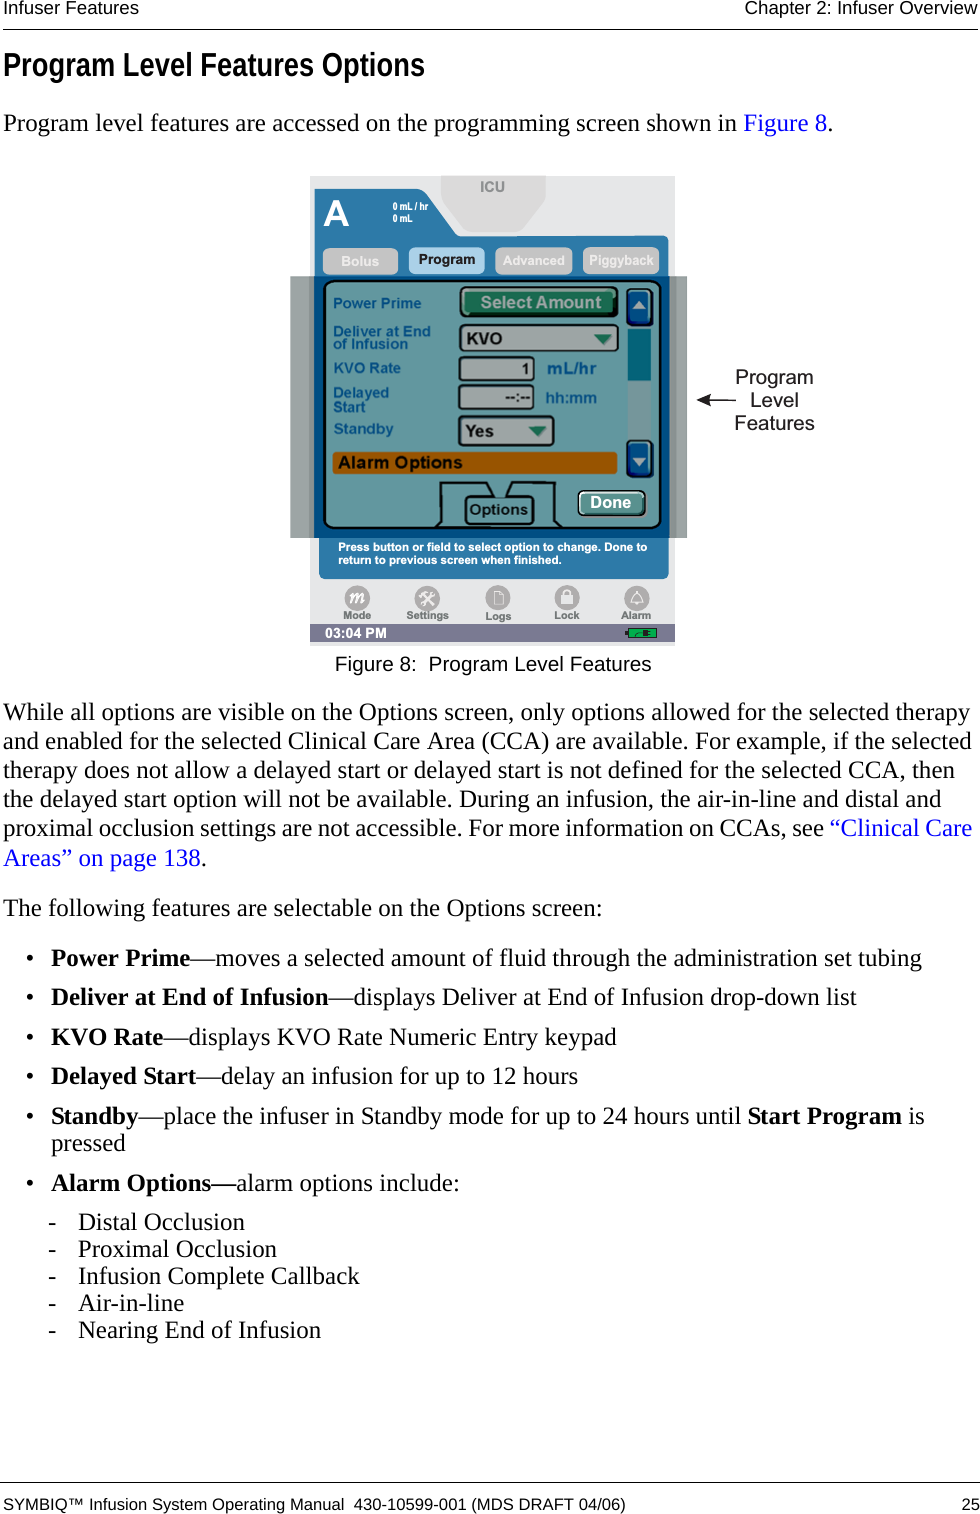
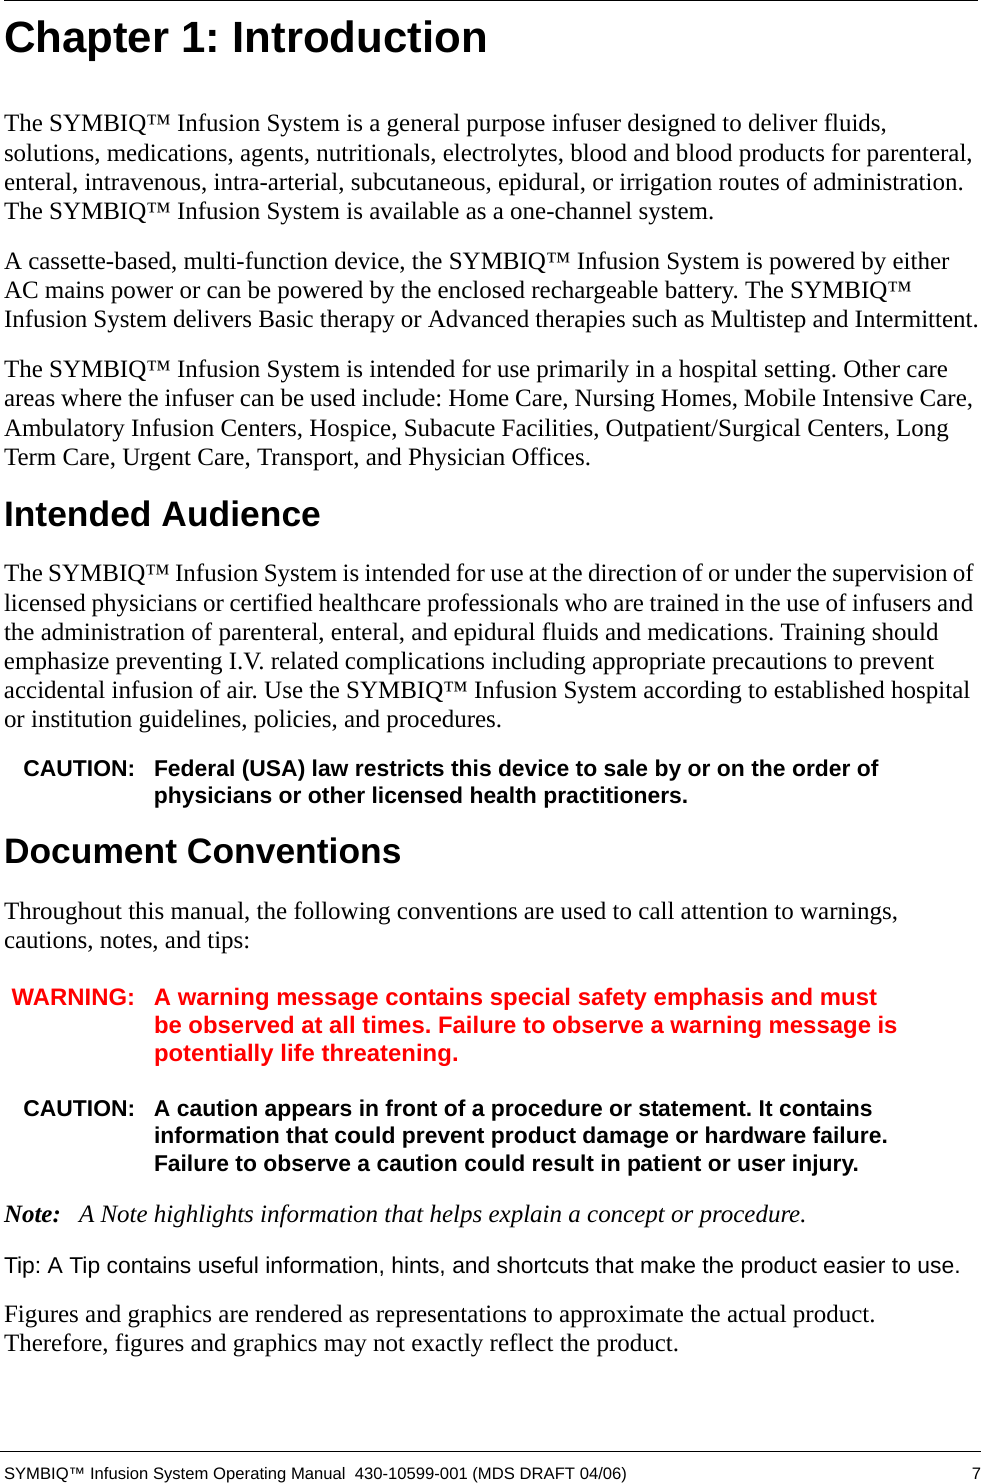
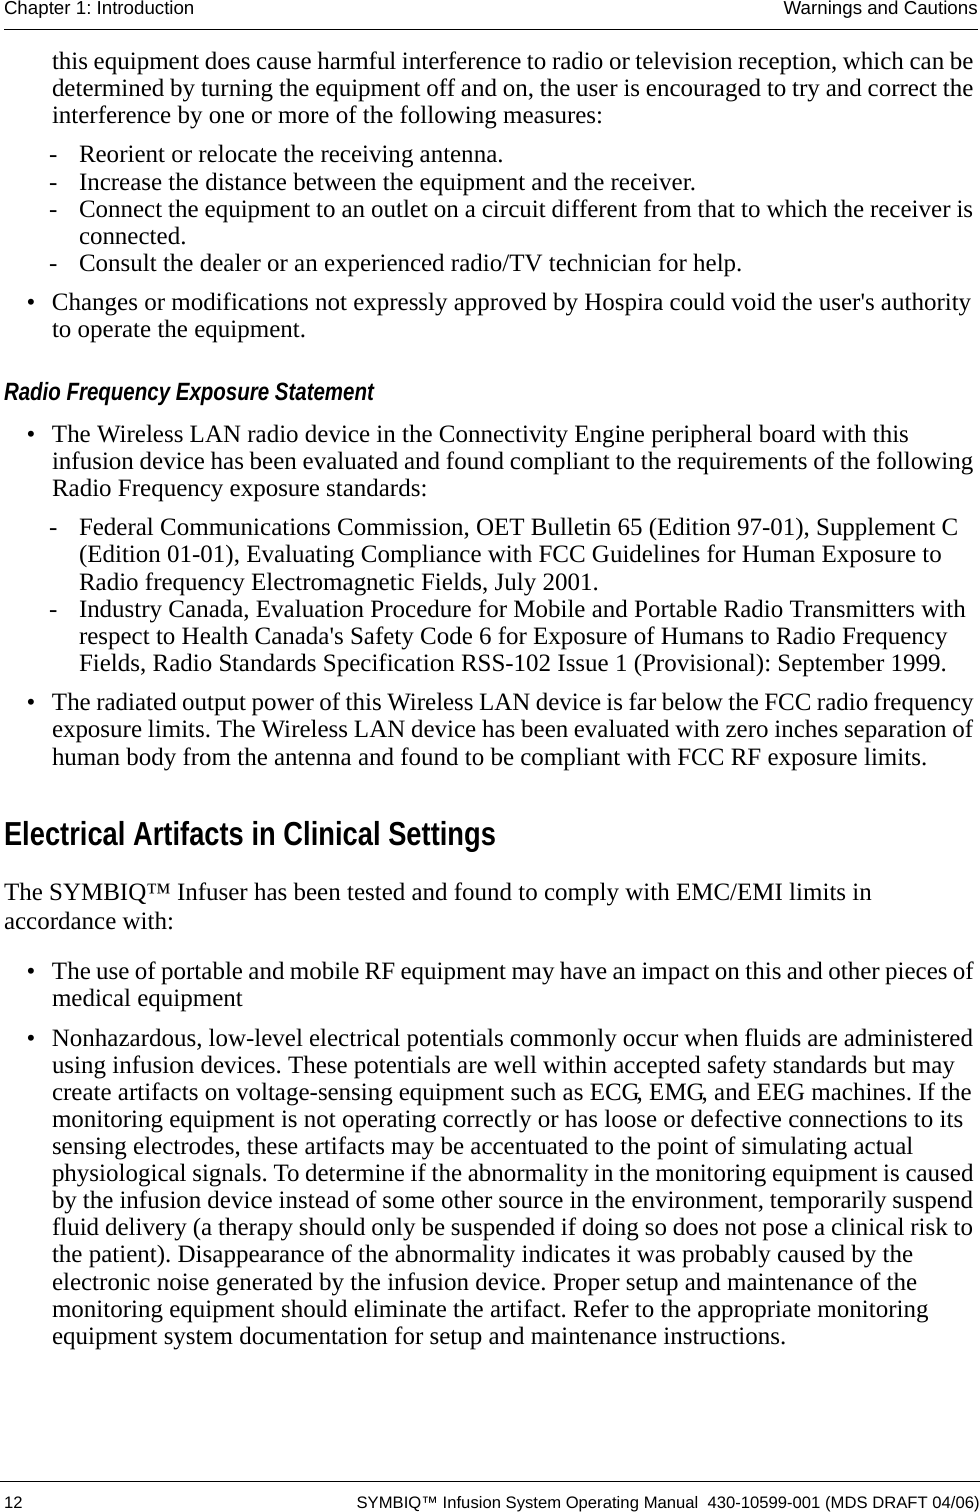
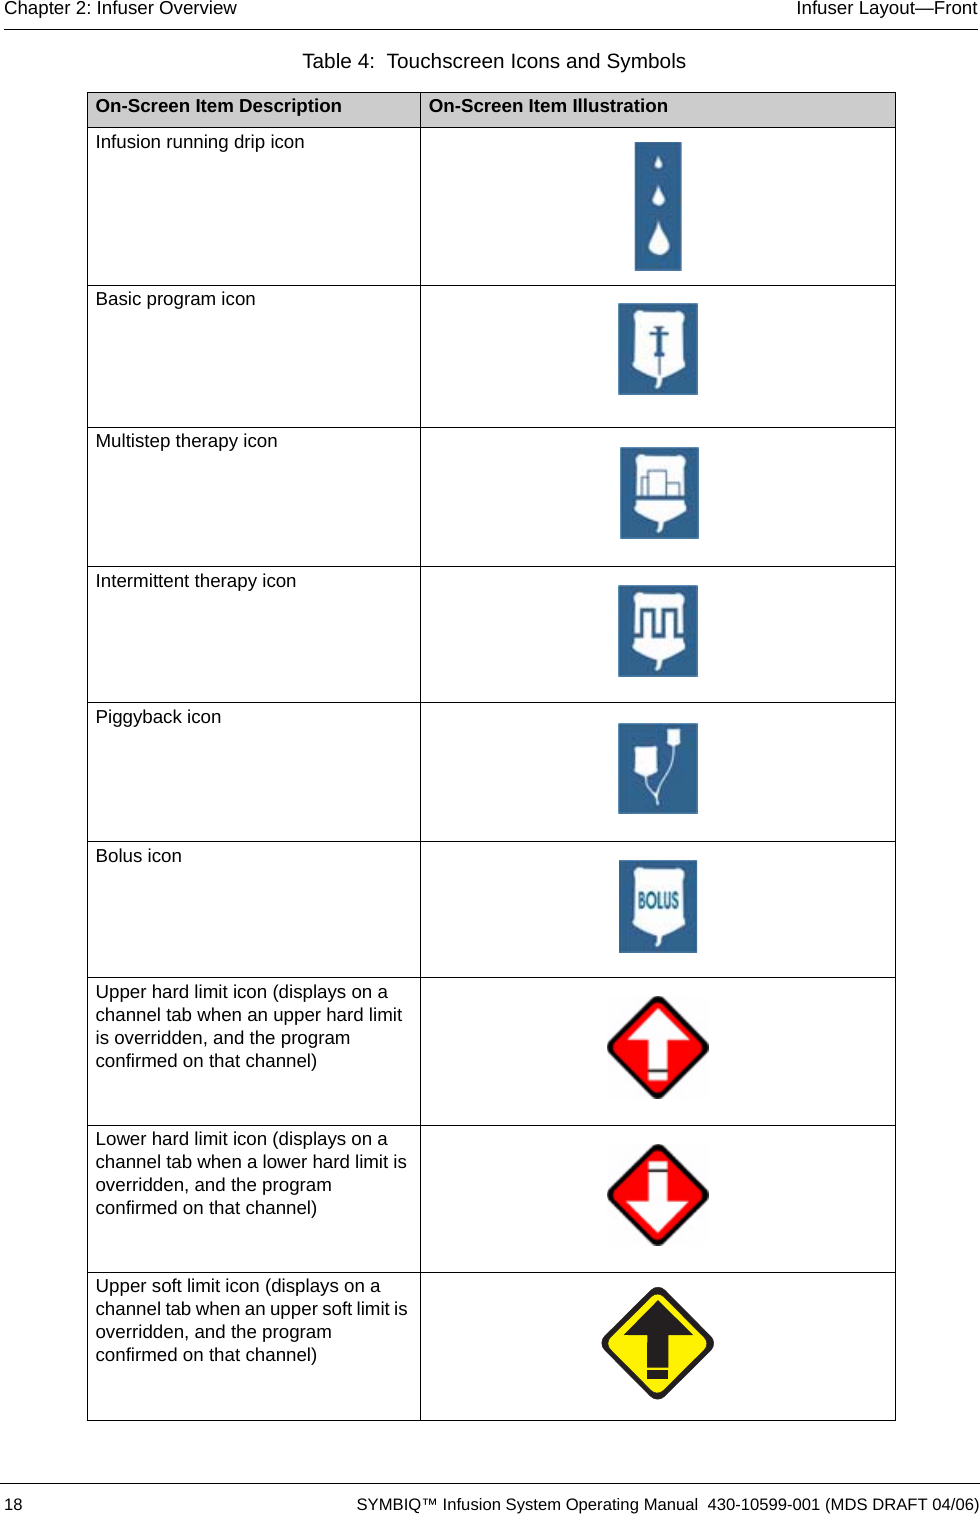
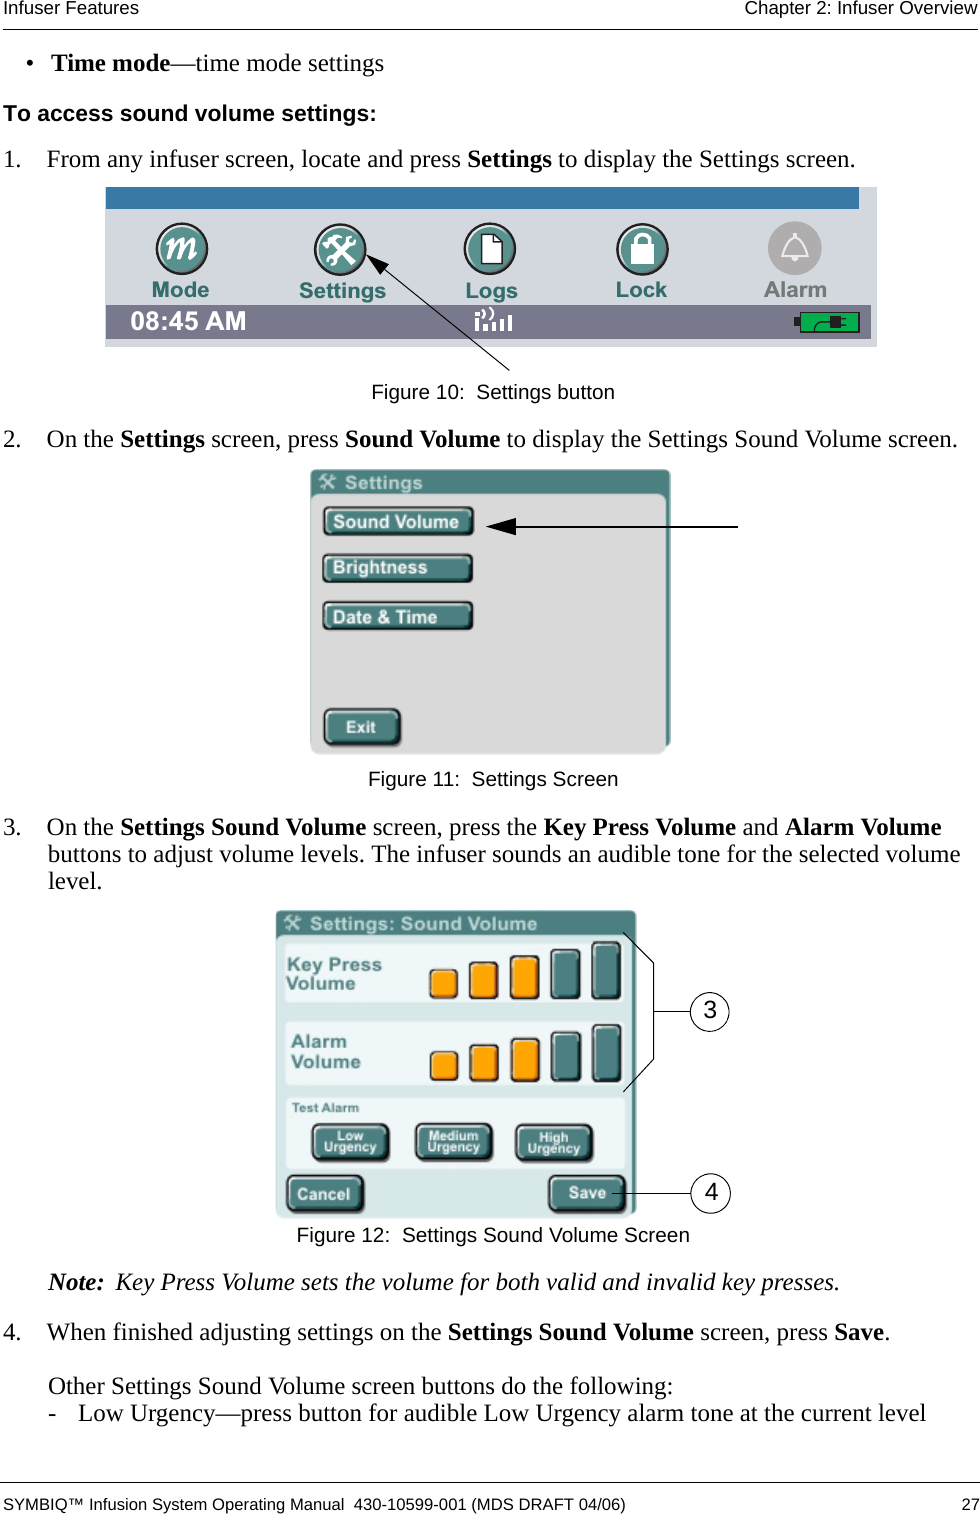
![26 SYMBIQ™ Infusion System Operating Manual 430-10599-001 (MDS DRAFT 04/06)Chapter 2: Infuser Overview Infuser FeaturesDevice Level FeaturesDevice level features are accessed via buttons across the bottom of the infuser touchscreen (Figure 9). Figure 9: Device Level FeaturesDevice level buttons are used to access the following features:•Mode—displays the Biomed Mode Passcode Entry screen—if not in Delivery Mode and no other device-level button is currently selected•Settings—adjusts key press and alarm volumes, screen brightness, and time mode settings•Logs—displays clinical logs including:- Program Totals- Shift Totals- Event Log-Alarm Log- Rule Set Alert Override Log- Current ProgramFor more information on Logs, refer to “Chapter 11: Stored Data” on page 137.•Lock—displays the Program Lock/Unlock Passcode Entry screenSettingsUse the settings button to access and adjust the infuser settings:•Sound Volume—keypress volume and alarm volume•Screen—screen brightness12:45 PMAProgramPiggybackRateDoseInfusion5mcg/kg/min13.110307:51VTBITimemL / hrmLhh:mmDOPaminePress fields to edit. Clear to delete all entries. Options toedit program settings. Next to continue.BolusAdvancedICUNextOptionsClearSettings Logs LockModeCancelTitrationAlarm0mL/hr0mL(Calculated)(Calculated)[400 mg / 250 mL]](https://usermanual.wiki/ICU-Medical/16026.User-Manual-Part-1/User-Guide-660066-Page-28.png)
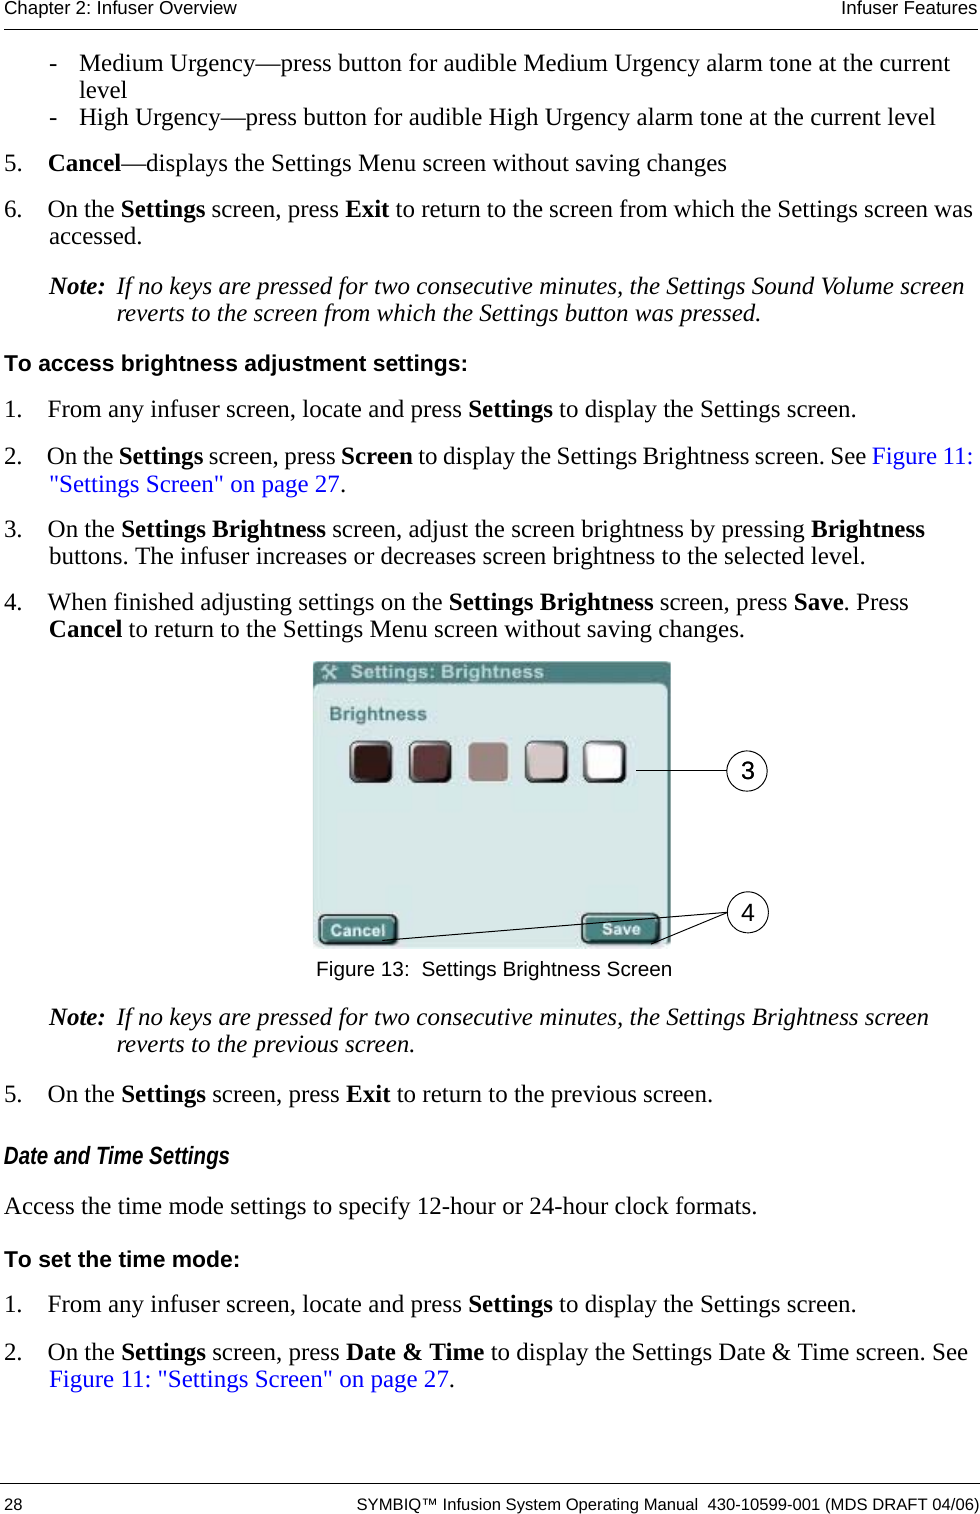
![30 SYMBIQ™ Infusion System Operating Manual 430-10599-001 (MDS DRAFT 04/06)Chapter 2: Infuser Overview Infuser FeaturesYou cannot start or stop a therapy while the program lock is active using on-screen buttons. However, pressing Stop Program on the touchscreen or pressing Emergency Stop does not deactivate the program lock. With the program lock active, you can access the following infuser features:• screen navigation • brightness and volume control• logs and program parameters• touchscreen Stop Program button• Emergency Stop button• view shift/program totalsWith the Program Lock active, program-related fields and features related are not available. To access program-related fields and features you must first de-activate the Program Lock.To activate the program lock:1. From any infuser screen, locate and press Lock. The Enter Code dialog box displays. Figure 16: Accessing the Program Lock02:30 PMPress Stop to end infusion. Program button to edit program.AdvancedDELIVERING PROGRAMDOPamineDose: 5 mcg / kg / minVTBI: 24.6 mLTime: 00:04 hh:mmVolume infused: 0.4 mL[ 400 mg / 250 mL]StopProgram ARate: 13.1 mL /hrSettings Logs LockModePiggybackProgramBolusICUAlarmADOPamine13.1 mL / hr24.6 mL](https://usermanual.wiki/ICU-Medical/16026.User-Manual-Part-1/User-Guide-660066-Page-32.png)
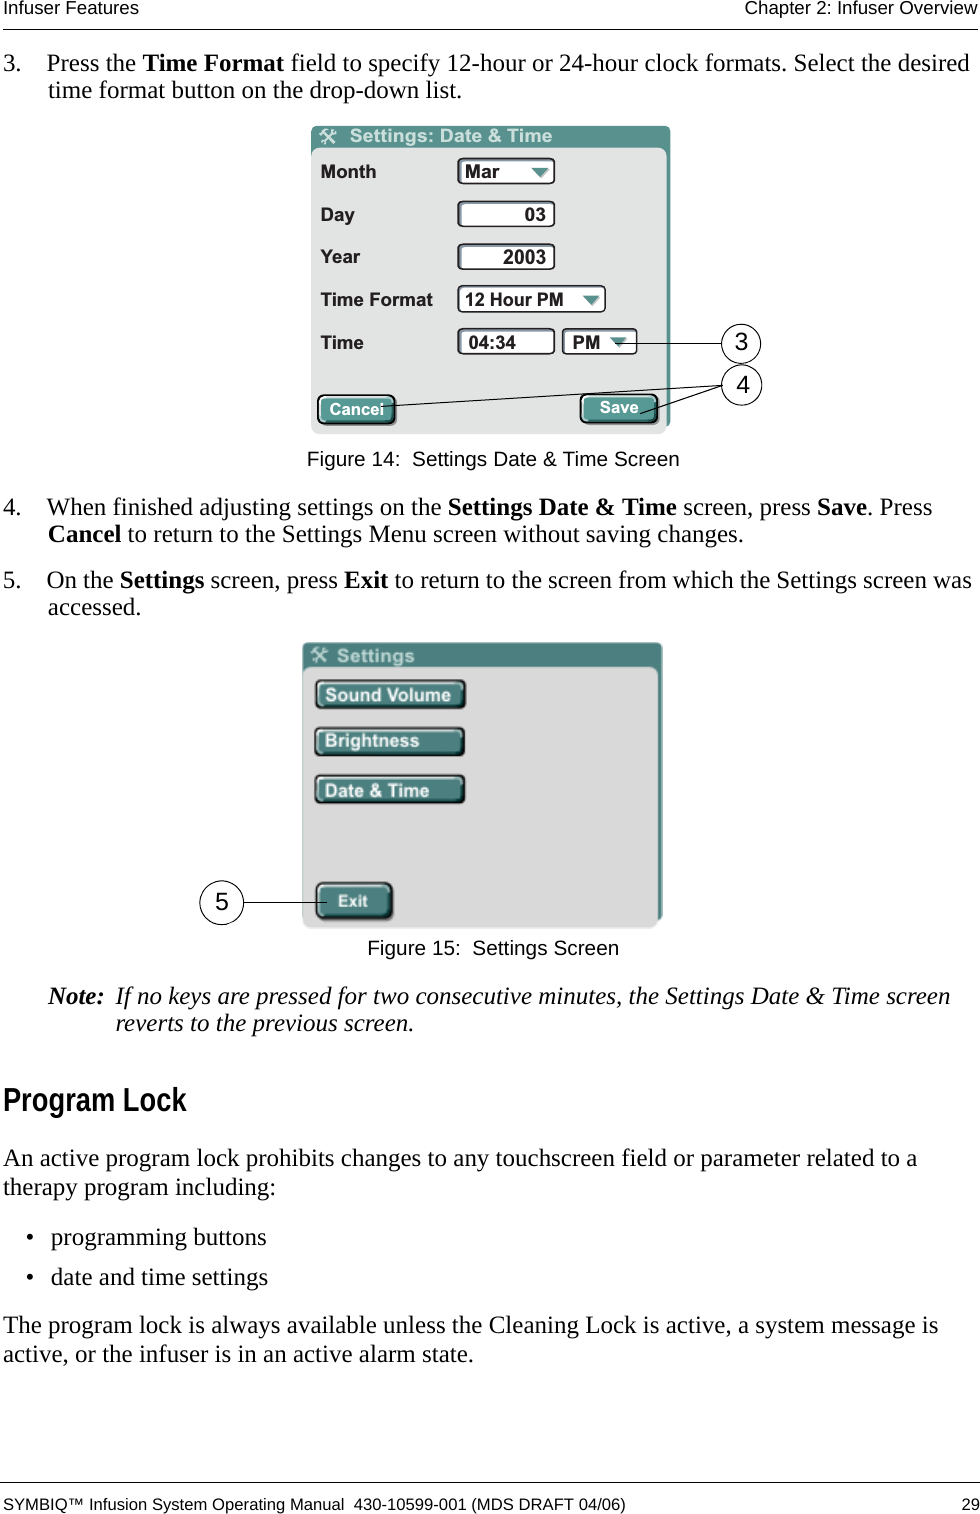
![Infuser Features Chapter 2: Infuser Overview SYMBIQ™ Infusion System Operating Manual 430-10599-001 (MDS DRAFT 04/06) 312. On the Enter Code dialog box, use the touchscreen keypad to key in a valid passcode, and then press Enter. Press Cancel to return to the previous screen. Figure 17: Enter Code Dialog Box (Activating)Note: See authorized facility personnel for password.3. The screen from which the program lock was accessed displays with the program lock activated. Figure 18: Program Lock ActivatedNote: Entering an invalid passcode three consecutive times activates the Invalid Passcode system message for each attempt. Entering an invalid passcode a fourth time closes the Enter Code dialog box and displays the screen from which the program lock was accessed without activating the program lock.To deactivate the program lock:1. On the touchscreen, locate and press Lock. The Enter Code dialog box displays.11:23 AMAProgramPiggybackActivating the program lock will prohibitthe user from changing program-relatedsettings.Enter CodeDELIVERING PROGRAM[400 mg / 250 mL]DOPamineModeSettings LogsTo activate program lock, Press number buttons forpasscode; then Enter. Cancel to exit.1 3 42AdvancedBolusCancel EnterICULockAlarm13.1 mL / hr24.6 mLDOPamine10:32 AMLockAlarmSettings LogsMode](https://usermanual.wiki/ICU-Medical/16026.User-Manual-Part-1/User-Guide-660066-Page-33.png)
![32 SYMBIQ™ Infusion System Operating Manual 430-10599-001 (MDS DRAFT 04/06)Chapter 2: Infuser Overview Infuser Features2. On the Enter Code dialog box, use the touchscreen keypad to key in a valid passcode, and then press Enter. Press Cancel to return to the previous screen. Figure 19: Enter Code Dialog Box (Deactivating)3. The screen from which the program lock was accessed displays with the program lock deactivated. Figure 20: Program Lock DeactivatedNote: Entering an invalid passcode three consecutive times activates the Invalid Passcode system message for each attempt. Entering an invalid passcode a fourth time closes the Enter Code dialog box and displays the screen from which the program lock was accessed without deactivating the program lock.11:23 AMAProgramPiggybackUnlocking the Infuser will allow the userto change program-related settings.Enter CodeDELIVERING PROGRAM[400 mg / 250 mL]DOPamineModeSettings LogsTo unlock, Press number buttons for passcoade; then EnterCancel to exit.1 3 42AdvancedBolusCancel EnterICULockAlarm13.1 mL / hr24.6 mLDOPamine02:30 PMPress Stop to end infusion. Program button to edit program.AdvancedDELIVERING PROGRAMDOPamineDose: 5 mcg / kg / minVTBI: 24.6 mLTime: 00:04 hh:mmVolume infused: 0.4 mL[ 400 mg / 250 mL]StopProgram ARate: 13.1 mL /hrSettings Logs LockModePiggybackProgramBolusICUAlarmADOPamine13.1 mL / hr24.6 mL](https://usermanual.wiki/ICU-Medical/16026.User-Manual-Part-1/User-Guide-660066-Page-34.png)
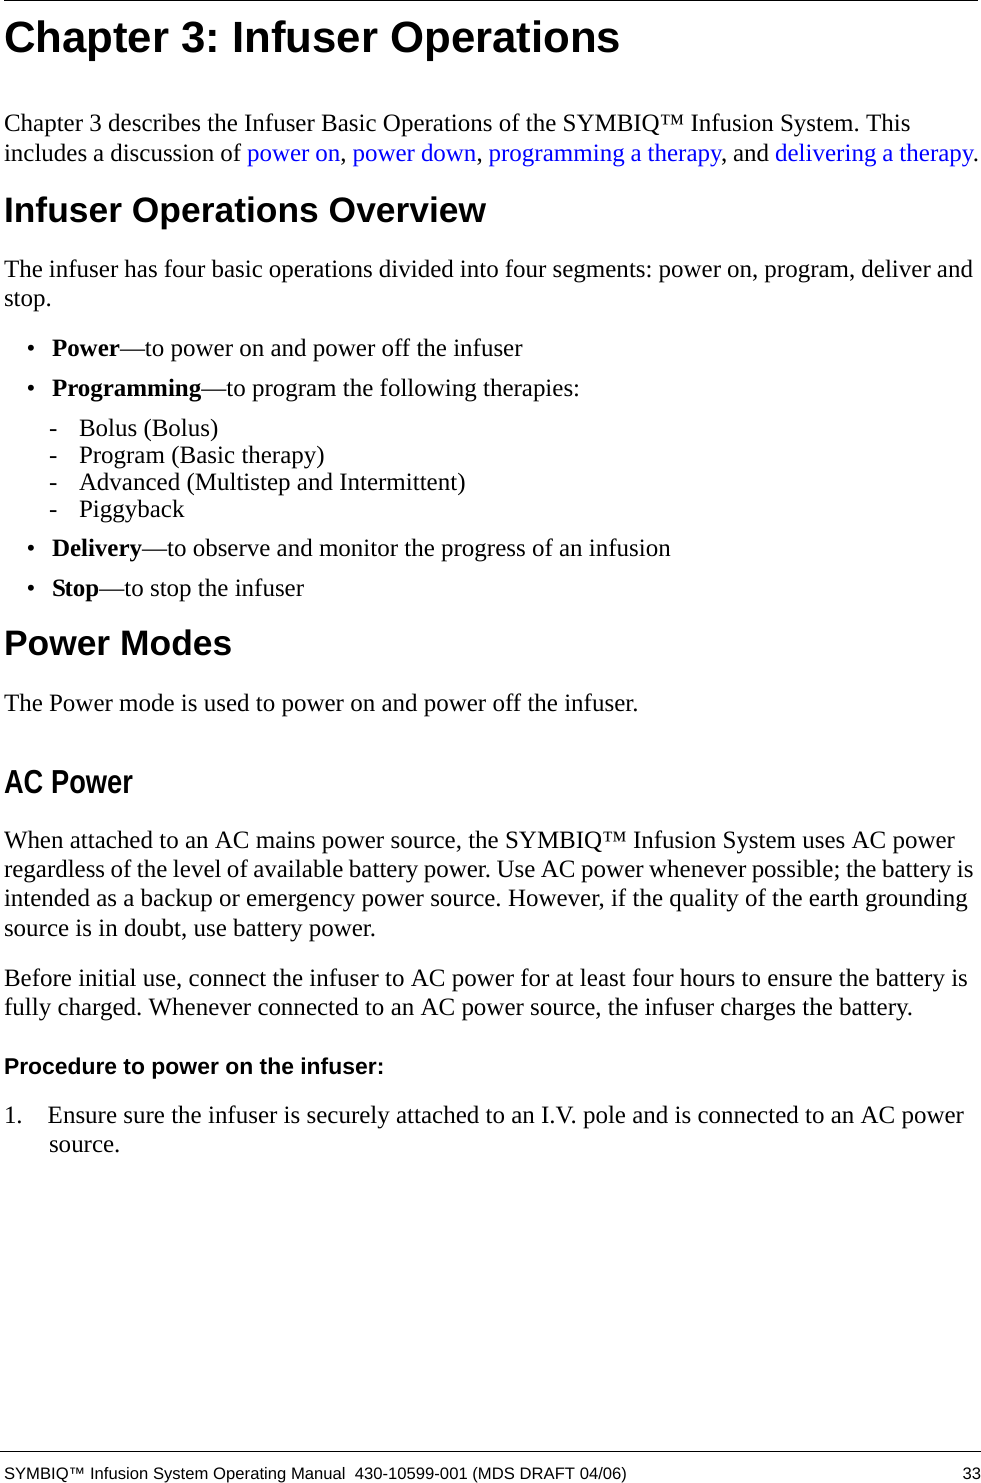
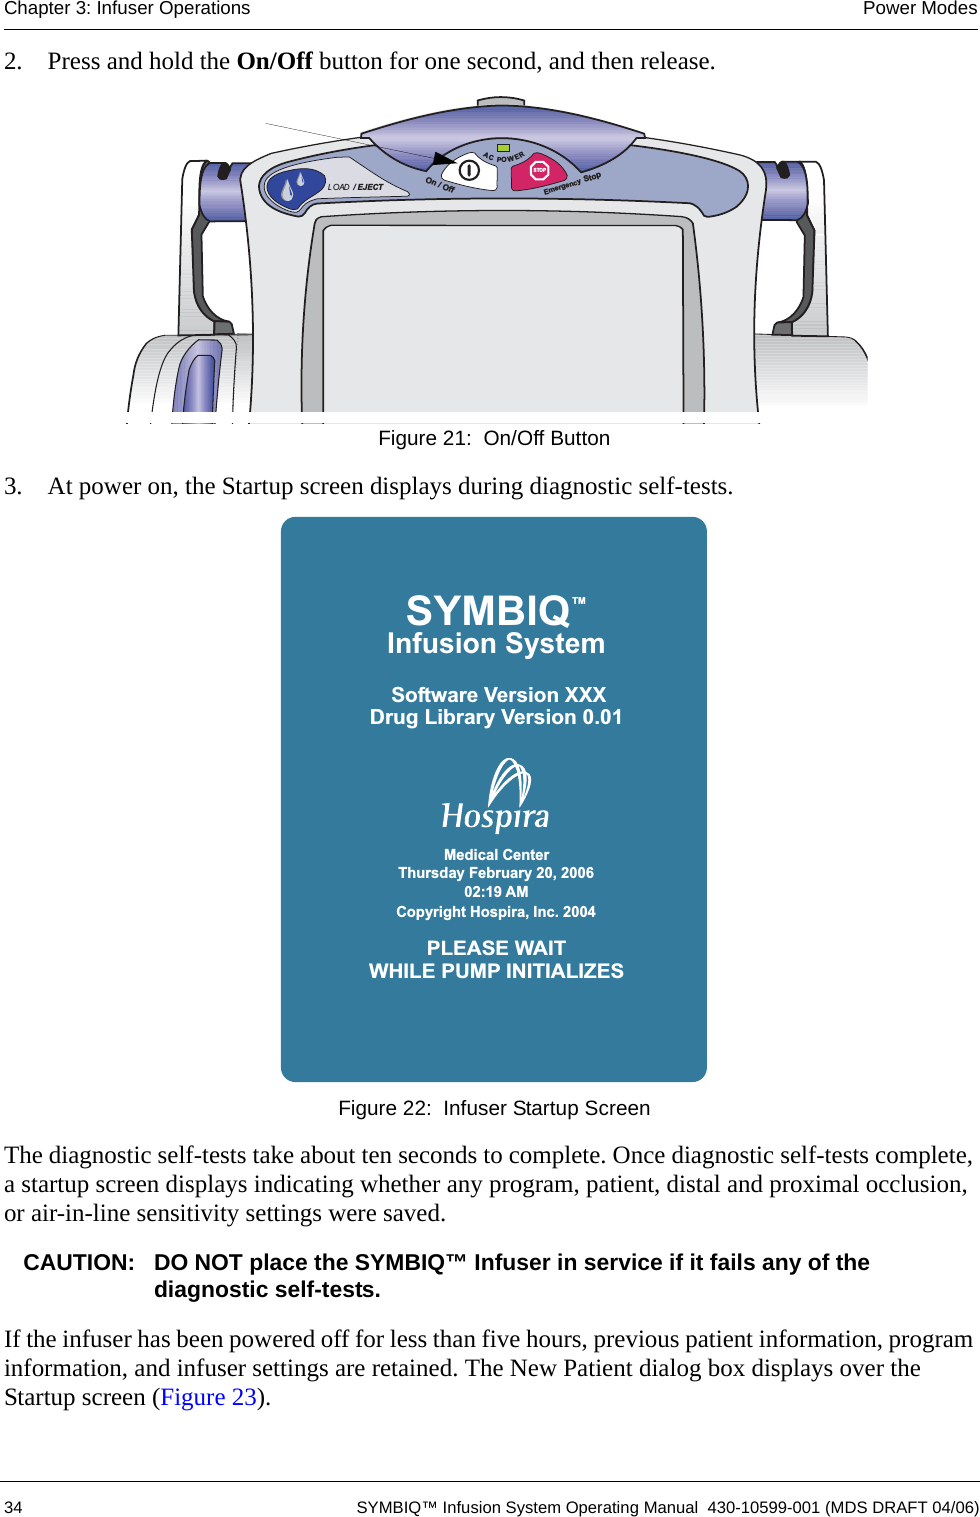
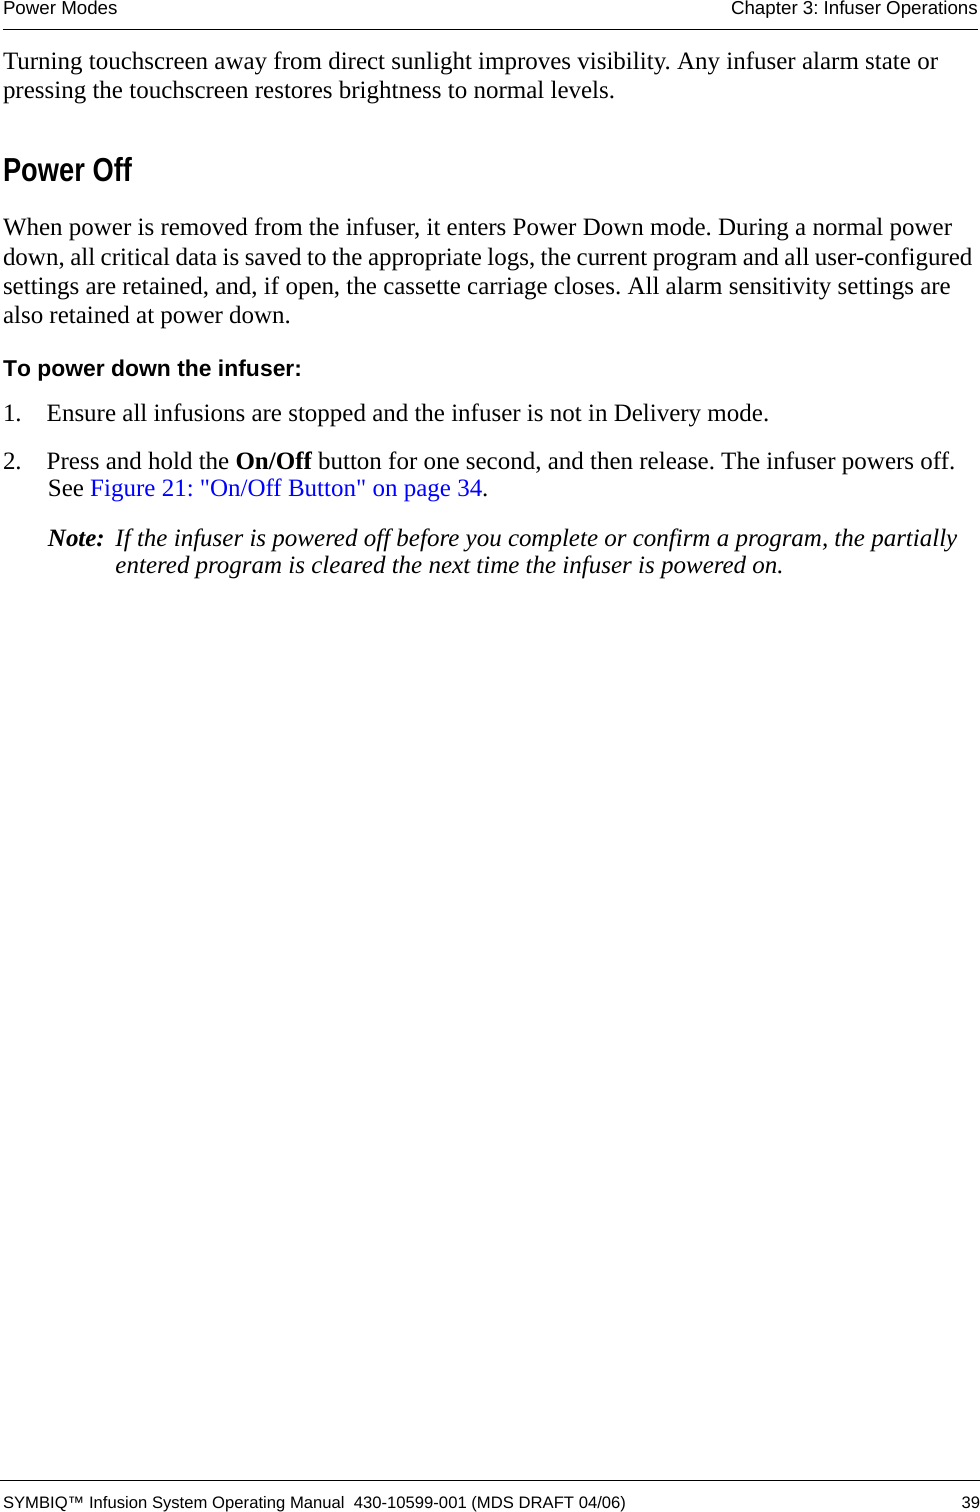
![38 SYMBIQ™ Infusion System Operating Manual 430-10599-001 (MDS DRAFT 04/06)Chapter 3: Infuser Operations Power ModesDo not use a SYMBIQ™ Infusion System without a properly functioning battery installed. If no battery is detected at power on, the No Battery system message activates (Figure 26). In this case, remove the infuser from service until a properly functioning battery can be installed. Figure 26: No Battery System Message CAUTION: Before use, ensure the infuser has a functional battery installed. Use of a properly installed and functional battery helps ensure the infuser operates properly.A/C Power LEDThe A/C power LED (Figure 27) is located on the front of the infuser just above the On/Off and Emergency Stop buttons. When using AC power with a fully-charged battery, the A/C power LED is lit green. When using A/C power with the battery charging, the A/C power LED flashes. When using battery power only, the power LED is off. Figure 27: Location of A/C Power LEDTouchscreen VisibilityIf no keystrokes or button presses are made for a CCA-defined period of time (the default is two minutes), the infuser enters Power Saving mode. Power Saving mode is marked by an 80% reduction in touchscreen brightness. AProgramPiggybackRateDoseInfusion5mcg/kg/min13.110307:51VTBITimemL / hrmLhh:mmDOPamineBolusAdvancedICUNextOptionsClearCancelTitration0mL/hr0mL(Calculated)(Calculated)[400 mg / 250 mL]NO BATTERY DETECTEDBattery removed or shorted. In the event of AC powerloss, infusion will stop.Press hereto minimize.00:00:09LOAD / EJECTSTOPACPOWEREmergencyStopOn/Off](https://usermanual.wiki/ICU-Medical/16026.User-Manual-Part-1/User-Guide-660066-Page-40.png)
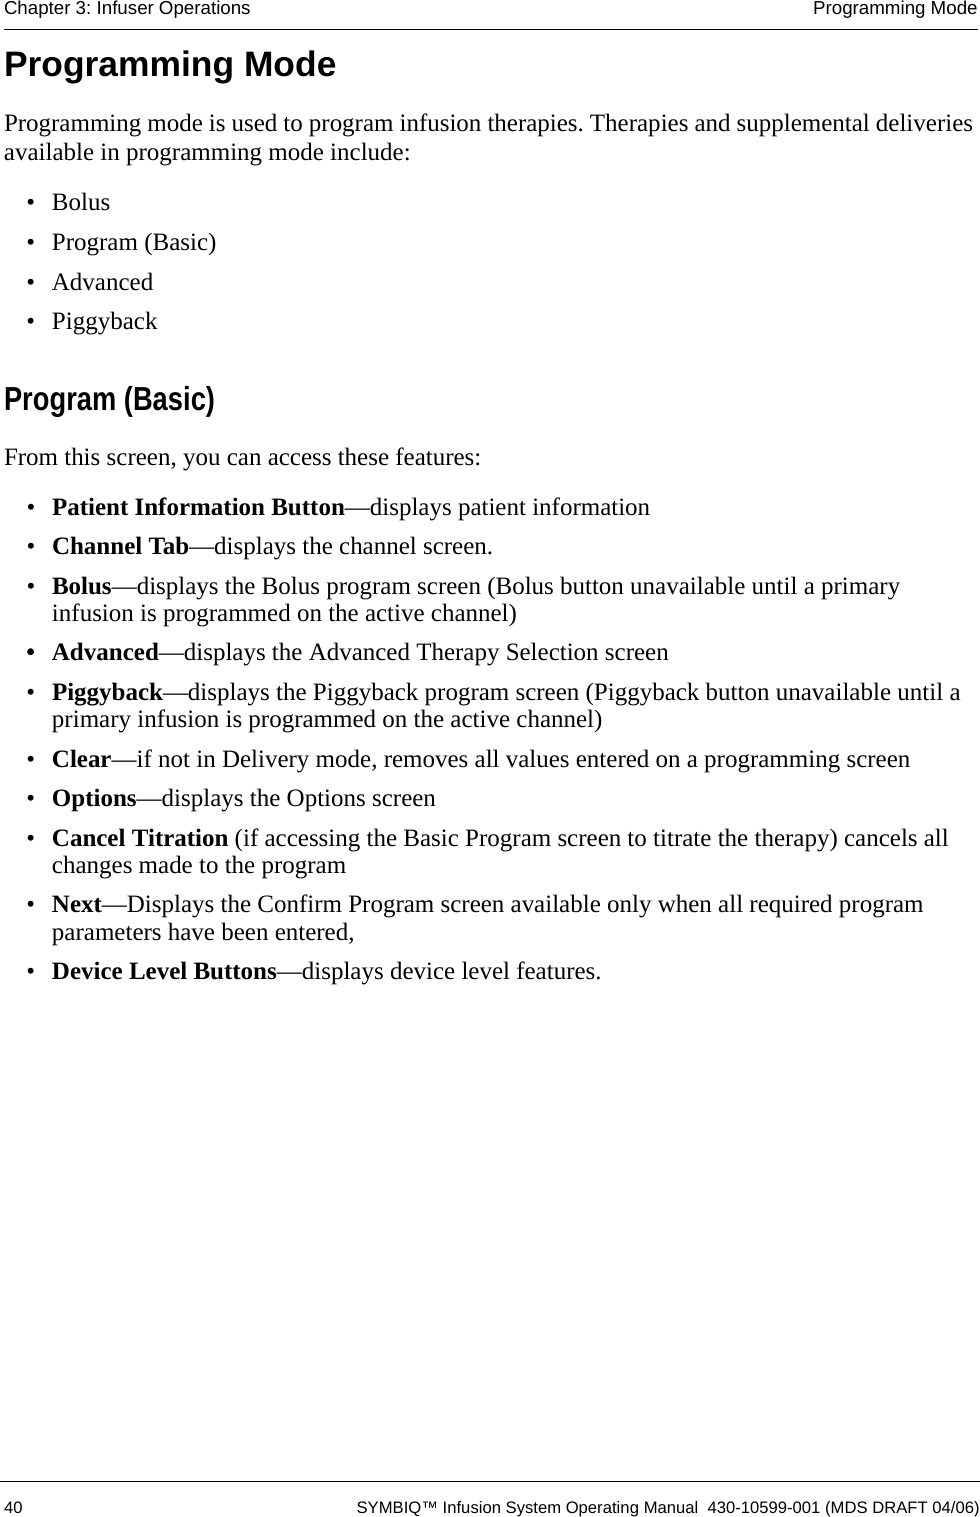
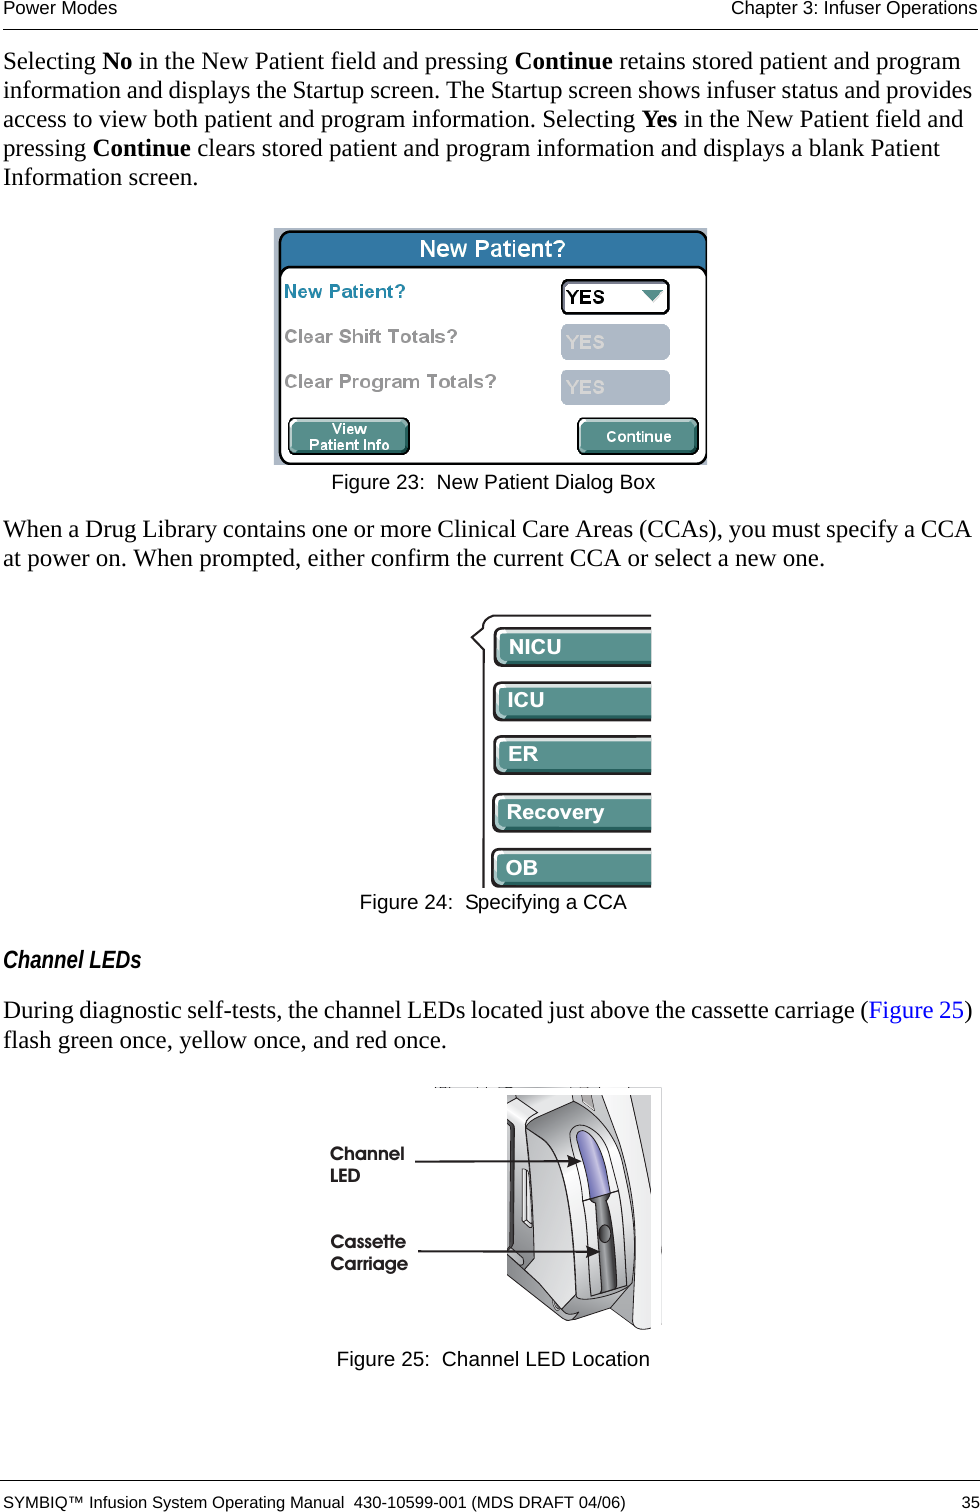
![Delivery Mode Chapter 3: Infuser Operations SYMBIQ™ Infusion System Operating Manual 430-10599-001 (MDS DRAFT 04/06) 41Delivery ModeTwo types of screens display during Delivery mode—Near Viewing and Far Viewing. A Near Viewing Delivery screen is shown in Figure 28. Figure 28: Near Viewing Delivery ScreenThe Near Viewing Delivery screen displays medication name (if enabled in the selected CCA), concentration, dose rate (if applicable), time remaining, VTBI, volume infused, infusion status for advanced therapies, and alarm name for the highest priority alarm if in an alarm state. On the Near Viewing Delivery screen, both VTBI and Volume Infused values display with one decimal place for values up to 100.Note: The Near Viewing Delivery Screen shall only display the Dose label and value if a dose is programmed.The Far Viewing screen (Figure 29) is designed to have the rate and VTBI readable from a distance of 15 feet. In addition, the pump displays medication name (if enabled in the selected CCA), concentration, and, if in an alarm state, the alarm name for the highest priority alarm. On 02:30 PMPress Stop to end infusion. Program button to edit program.AdvancedDELIVERING PROGRAMDOPamineDose: 5 mcg / kg / minVTBI: 24.6 mLTime: 00:04 hh:mmVolume infused: 0.4 mL[ 400 mg / 250 mL]StopProgram ARate: 13.1 mL /hrSettings Logs LockModePiggybackProgramBolusICUAlarmADOPamine13.1 mL / hr24.6 mL](https://usermanual.wiki/ICU-Medical/16026.User-Manual-Part-1/User-Guide-660066-Page-43.png)
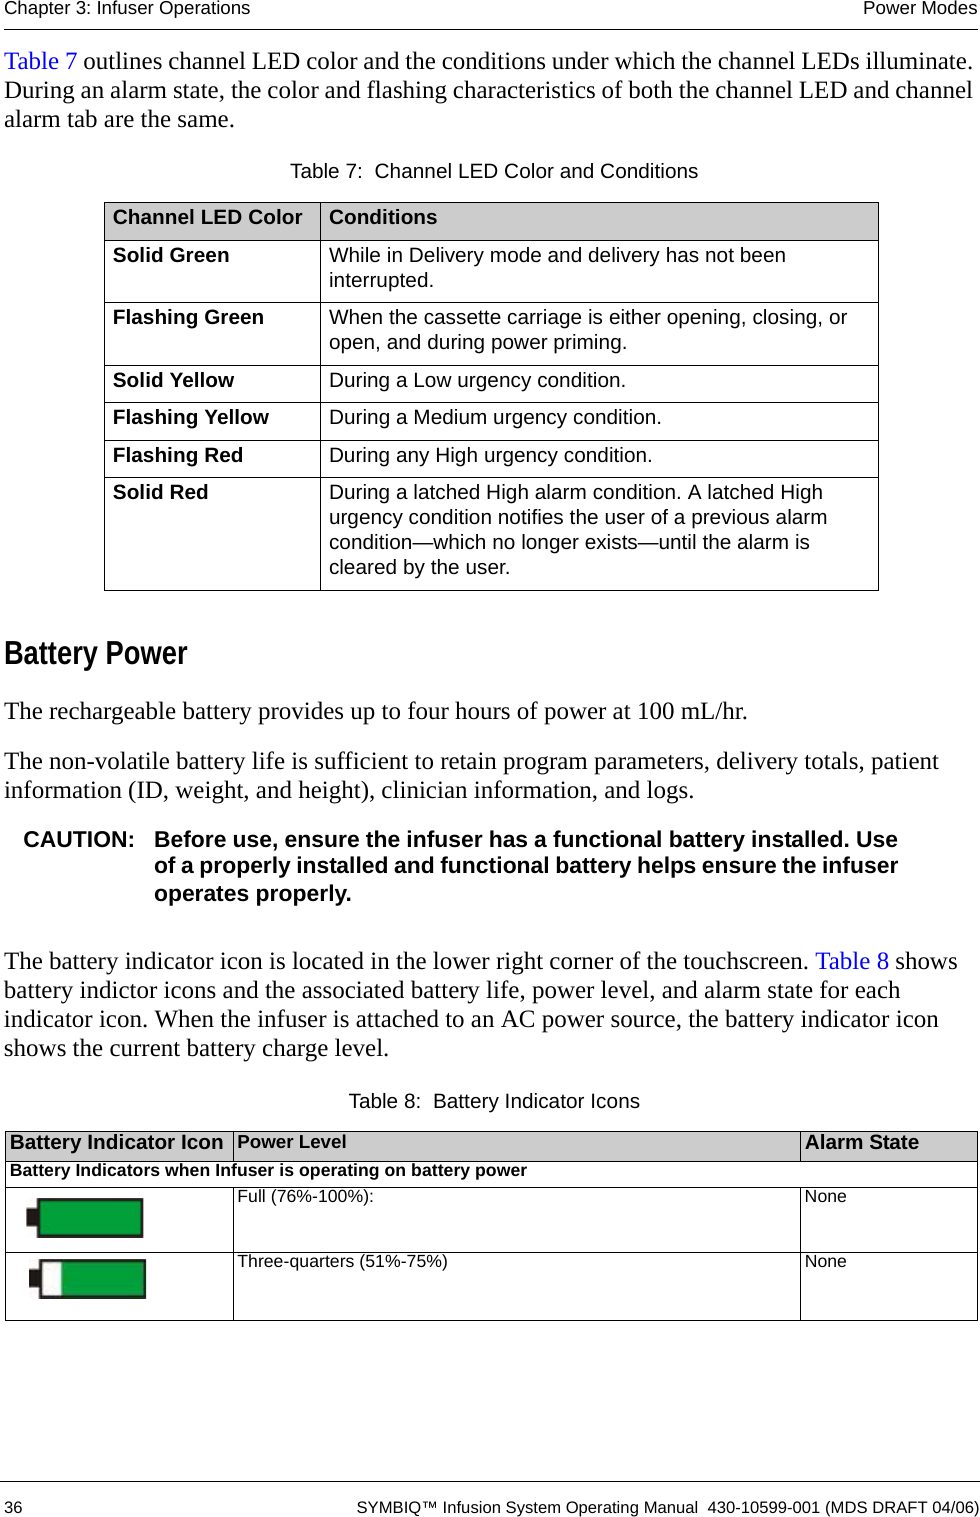
![42 SYMBIQ™ Infusion System Operating Manual 430-10599-001 (MDS DRAFT 04/06)Chapter 3: Infuser Operations Stop Modethe Far Viewing Delivery screen, VTBI values display with one decimal place for values less than 100. For values greater than or equal to 100, values display with no decimal. Figure 29: Far Viewing Delivery ScreenPressing LOAD/EJECT while in delivery mode does not eject the cassette; to eject a cassette, the infuser must be in Stop mode.Once the infuser completes a programmed therapy, the End of Infusion alarm activates. The infuser transitions to a KVO (Keep Vein Open) delivery rate. Pending on programming, the infuser continues to deliver at programmed rate or transitions to KVO.Stop ModeThe SYMBIQ™ Infusion System stops in one of five ways:1. Pressing Stop Program on the touchscreen.2. Pressing Emergency Stop on the front of the infuser stops all channels. Figure 30: Emergency Stop Button08:47 AMPress Tab A to display Near Viewing Delivery screen.ARateVTBImLmL / hr[400 mg / 250 mL]DOPamine13.1196.ICUSettings Logs LockAlarmADOPamineMode13.1 mL / hr96.1 mLLOAD / EJECTSTOPACPOWEREmergencyStopOn/OffAAdvancedDELIVERING PROGRAMDOPamineICUBolusA!DOPamineProgram Piggyback](https://usermanual.wiki/ICU-Medical/16026.User-Manual-Part-1/User-Guide-660066-Page-44.png)
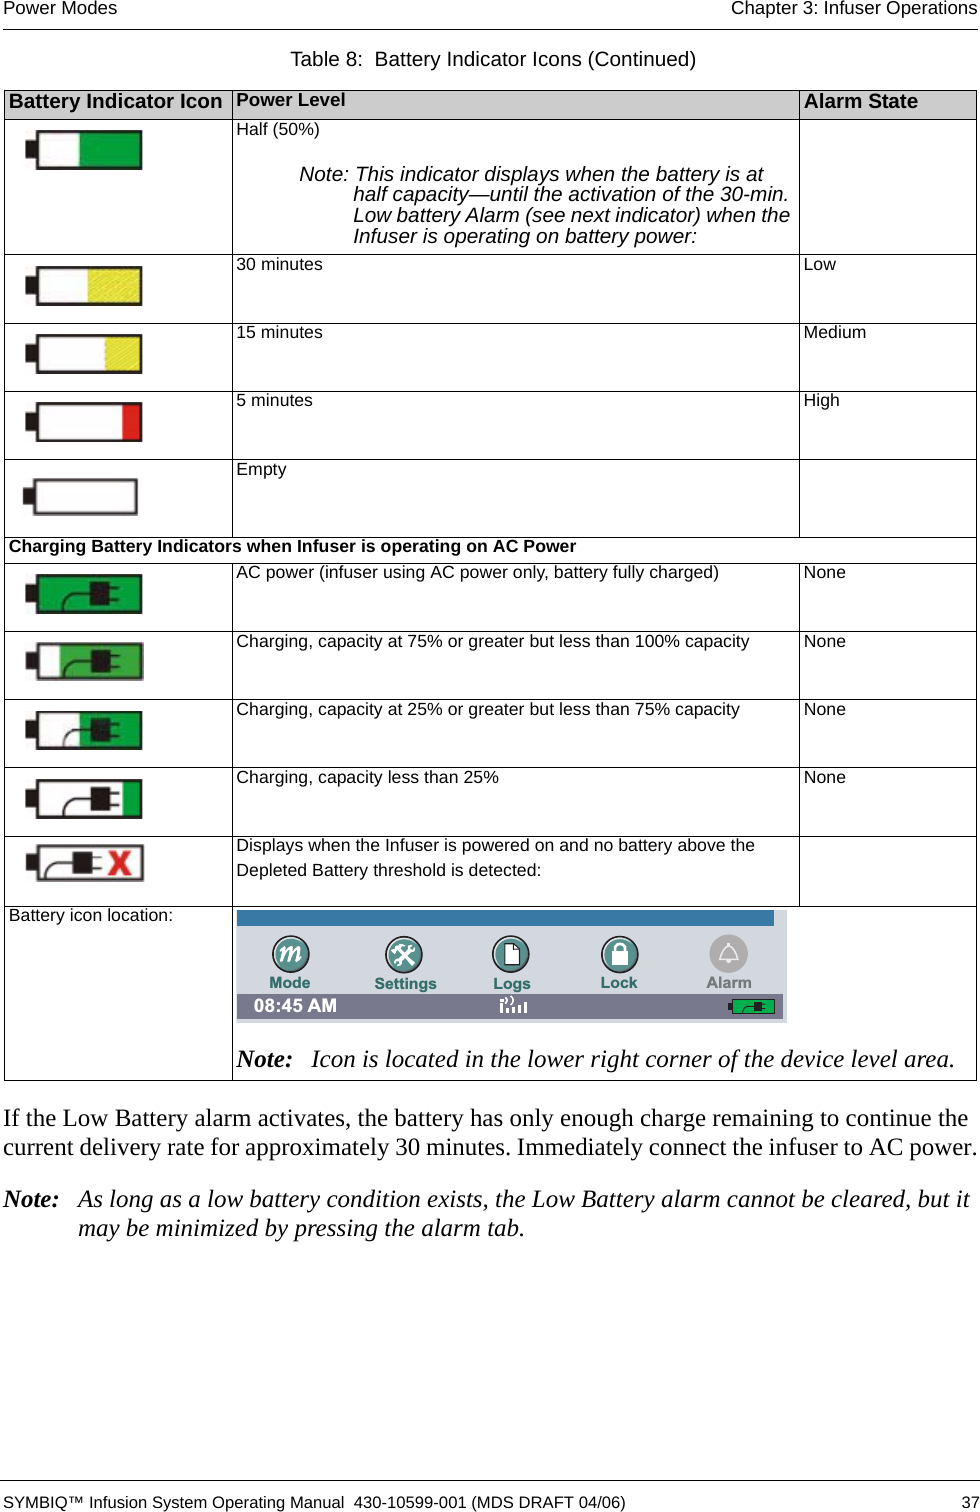
![Stop Mode Chapter 3: Infuser Operations SYMBIQ™ Infusion System Operating Manual 430-10599-001 (MDS DRAFT 04/06) 433. An active alarm state will stop the infusion.4. When a programmed VTBI completes and there is no KVO.5. A bolus is complete and Stop Infusion has been selected on the bolus setup screen.When a delivery is manually stopped (by pressing Stop Program) and the VTBI has not completely delivered, the Stop mode screen shows STOPPED across the banner as in Figure 31. Figure 31: Stop Mode Screen—Manual Stop in a Basic ProgramWhen a therapy is stopped due to an alarm state including Emergency Stop, the Stop mode screen shown in Figure 32 displays. Figure 32: Stop Mode Screen—Alarm State09:33 AMPress Start to resume infusion. Program button to view oredit program.AdvancedRate:Dose13. mL /hr15mcg/kg/minSTOPPED PROGRAMRepeat?Bolus ProgramPiggybackICUSettings Logs LockModeDOPamine[400 mg / 250 mL]VTBIVolume InfusedTime Remaining:105 mL0mL08:00 hh:mmStartProgram AAlarmADOPamine13.1 mL / hr105 mLPress Start to resume infusion. Program button to view oredit program.AdvancedSTOPPED PROGRAMBolus ProgramPiggybackICUStartProgram AADOPamineEmergency Stop button pressed.Infusion(s) stopped.Press here toclear alarm.EMERGENCY STOP00:00:09Rate:Dose13. mL /hr15mcg/kg/minRepeat?DOPamine[400 mg / 250 mL]VTBIVolume InfusedTime Remaining:105 mL0mL08:00 hh:mm13.1 mL / hr105 mL](https://usermanual.wiki/ICU-Medical/16026.User-Manual-Part-1/User-Guide-660066-Page-45.png)
![44 SYMBIQ™ Infusion System Operating Manual 430-10599-001 (MDS DRAFT 04/06)Chapter 3: Infuser Operations Stop ModeWhile in Stop mode, you can:• access the current programmed therapy• access the lock/unlock functionality• access programming mode to start a new program or change a current program• start a programmed therapy or continue the current therapy• select a new CCA• update patient informationNote: The Stop Mode Screen shall only display the Dose label and value if a dose is programmed.To stop the infuser using the touchscreen Stop Program button:1. If the Far Viewing screen is active, touch it to display the Near Viewing screen.2. On the Near Viewing screen, locate and press Stop Program. Figure 33: Stop Program Button3. To resume infusing, press Start Program.To stop the infuser using the Emergency Stop button:Note: In an Emergency, use Emergency Stop to stop all channels. Otherwise, use Stop Program on the touchscreen to stop individual channels.1. Locate the Emergency Stop button on the front of the infuser. See Figure 30: "Emergency Stop Button" on page 42.2. Press and release Emergency Stop. All active programs stop infusing and a high urgency alarm sounds.02:30 PMPress Stop to end infusion. Program button to edit program.AdvancedDELIVERING PROGRAMDOPamineDose: 5 mcg / kg / minVTBI: 24.6 mLTime: 00:04 hh:mmVolume infused: 0.4 mL[ 400 mg / 250 mL]StopProgram ARate: 13.1 mL /hrSettings Logs LockModePiggybackProgramBolusICUAlarmADOPamine13.1 mL / hr24.6 mL](https://usermanual.wiki/ICU-Medical/16026.User-Manual-Part-1/User-Guide-660066-Page-46.png)
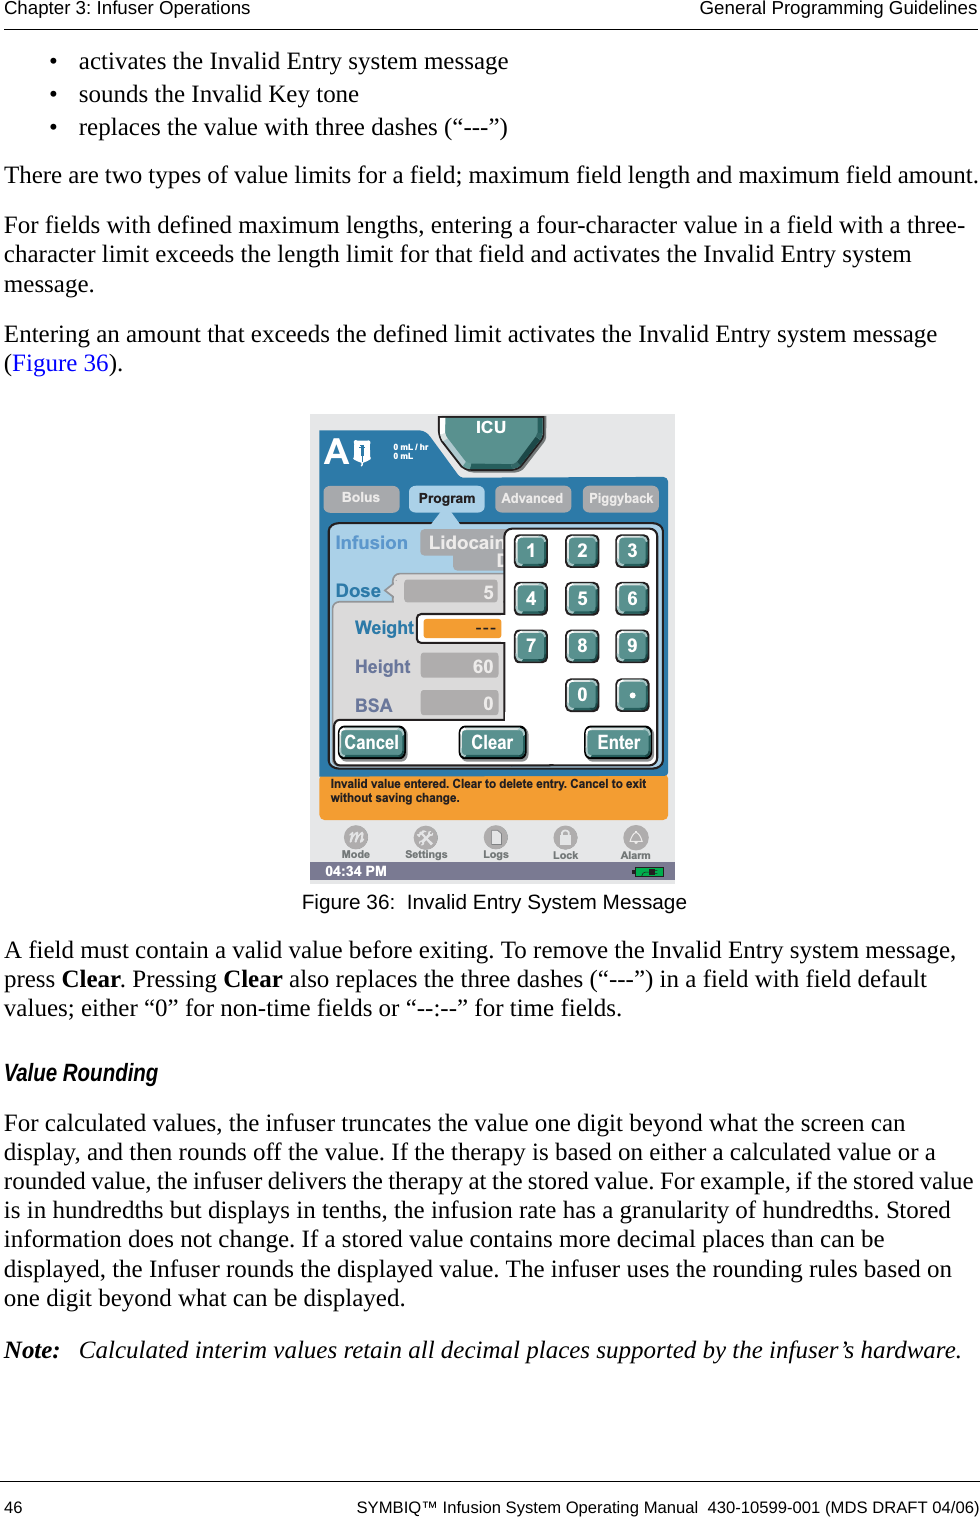
![General Programming Guidelines Chapter 3: Infuser Operations SYMBIQ™ Infusion System Operating Manual 430-10599-001 (MDS DRAFT 04/06) 453. Press Start Program on the touchscreen to resume the therapy. Figure 34: Touchscreen Start Program ButtonGeneral Programming GuidelinesIf the infuser is powered off before you complete or confirm a program, the partially entered program is cleared the next time the infuser is powered on. If a change is made to a program during an infusion but is neither canceled nor confirmed, a Callback alarm activates. Calculated ValuesCalculated values for a given field display on the touchscreen as shown in Figure 35. Figure 35: Calculated Field Value A calculated value that either exceeds the current maximum medication delivery rate or the maximum volumetric rate for the selected CCA activates a warning message.Invalid Value HandlingEntering a value in a field that exceeds a value limit defined for that field the following occurs:Press Start to resume infusion. Program button to view oredit program.AdvancedSTOPPED PROGRAMBolus ProgramPiggybackICUStartProgram AADOPamineEmergency Stop button pressed.Infusion(s) stopped.Press here toclear alarm.EMERGENCY STOP00:00:09Rate:Dose13. mL /hr15mcg/kg/minRepeat?DOPamine[400 mg / 250 mL]VTBIVolume InfusedTime Remaining:105 mL0mL08:00 hh:mm13.1 mL / hr105 mLRate100(Calculated)50005:00VTBITimemL / hrmLhh:mmNextOptionsClear](https://usermanual.wiki/ICU-Medical/16026.User-Manual-Part-1/User-Guide-660066-Page-47.png)