ICU Medical 20791 Hospira MedNet 802.11a/b/g Wireless Upgrade Module User Manual 430 11541 001
Hospira, Inc. Hospira MedNet 802.11a/b/g Wireless Upgrade Module 430 11541 001
Contents
- 1. User manual
- 2. User Manual
User manual

Hospira MedNet 802.11 a/b/g Wireless
Upgrade Module
Connectivity Engine (CE)
Configuration Guide
Includes
*Hospira MedNet® Plug ‘n Play Module (List 20677 & 20791-04-77)
For Use with Plum A+ Infusers (Lists 11971, 12391, 20679 & 20792-04)
*Hospira MedNet® Software (List 16033-04)
430-11541-001

430-11541-001 CE Configuration Guide
©Hospira, Inc.
This document and the subject matter disclosed herein are proprietary information.
Hospira retains all the exclusive rights of dissemination, reproduction, manufacture, and sale.
Any party using this document accepts it in confidence, and agrees not to duplicate it in whole
or in part nor disclose it to others without the written consent of Hospira.
CE Configuration Guide i 430-11541-001
Change History
Part Number Description of Change
430-11541-001
(Rev. 01/07)
Original issue

CHANGE HISTORY
430-11541-001 ii CE Configuration Guide
This page intentionally left blank.
CE Configuration Guide 430-11541-001
Contents
INTRODUCTION TO THE MEDNET WIRELESS MODULE - - - - - - - - - - - - - - - - - - - - 1
FCC INFORMATION - - - - - - - - - - - - - - - - - - - - - - - - - - - - - - - - - - - - - - - 1
US FCC (FEDERAL COMMUNICATIONS COMMISSION) STATEMENT - - - - - - - - - - - - - - 1
FCC INTERFERENCE STATEMENT - - - - - - - - - - - - - - - - - - - - - - - - - - - - - - 1
RADIO FREQUENCY EXPOSURE STATEMENT - - - - - - - - - - - - - - - - - - - - - - - - - 1
GUIDANCE ON EMC COMPATIBILITY - - - - - - - - - - - - - - - - - - - - - - - - - - - - - 2
INSTALLING THE HOSPIRA MEDNET® PLUG ’N PLAY MODULE (LIST 20677-04) - - - - - - - 3
To Replace the Module, proceed as follows: - - - - - - - - - - - - - - - - - - - - 3
CONFIGURATION GUIDE - - - - - - - - - - - - - - - - - - - - - - - - - - - - - - - - - - - - 4
GENERAL NOTES - - - - - - - - - - - - - - - - - - - - - - - - - - - - - - - - - - - - - - 4
SCOPE - - - - - - - - - - - - - - - - - - - - - - - - - - - - - - - - - - - - - - - - - - - 4
ASSUMPTIONS - - - - - - - - - - - - - - - - - - - - - - - - - - - - - - - - - - - - - - - 4
INTRODUCTION - - - - - - - - - - - - - - - - - - - - - - - - - - - - - - - - - - - - - - - 4
SCREENS - - - - - - - - - - - - - - - - - - - - - - - - - - - - - - - - - - - - - - - - - - 5
STATUS PROPERTIES SCREEN - - - - - - - - - - - - - - - - - - - - - - - - - - - - - - - - 5
ETHERNET PROPERTIES - - - - - - - - - - - - - - - - - - - - - - - - - - - - - - - - - - - 6
WIRELESS PROPERTIES - WIRELESS ENABLED - - - - - - - - - - - - - - - - - - - - - - - - 6
WIRELESS ENABLED- DHCP ENABLED - - - - - - - - - - - - - - - - - - - - - - - - - - - 8
SECURITY - - - - - - - - - - - - - - - - - - - - - - - - - - - - - - - - - - - - - - - - - 10
WEP - - - - - - - - - - - - - - - - - - - - - - - - - - - - - - - - - - - - - - - - - - - 11
WPA PERSONAL - - - - - - - - - - - - - - - - - - - - - - - - - - - - - - - - - - - - - - 12
WPA ENTERPRISE - - - - - - - - - - - - - - - - - - - - - - - - - - - - - - - - - - - - - 13
WPA ENTERPRISE - AUTHENTICATION TYPE - - - - - - - - - - - - - - - - - - - - - - - - - 14
CERTIFICATES - - - - - - - - - - - - - - - - - - - - - - - - - - - - - - - - - - - - - - - 15
HMSS (HOSPIRA MEDNET® SERVER SUITE) - - - - - - - - - - - - - - - - - - - - - - - - - 16
SERVICE - - - - - - - - - - - - - - - - - - - - - - - - - - - - - - - - - - - - - - - - - - 16
ADMINISTRATION - - - - - - - - - - - - - - - - - - - - - - - - - - - - - - - - - - - - - 17
FINISH CONFIGURATION - - - - - - - - - - - - - - - - - - - - - - - - - - - - - - - - - - 17
WIRELESS LAN DEVICE SPECIFICATIONS - - - - - - - - - - - - - - - - - - - - - - - - - - - 18

CE Configuration Guide 1 430-11541-001
Introduction to the MedNet Wireless Module
The Hospira MedNet 802.11 a/b/g Wireless Upgrade Module is designed as an upgrade
module for Hospira Plum A+ Infusion Systems (Lists 20792, 20679, 12391 & 11791). The
host units are mobile infusion devices designed to be employed in the medical care envi-
ronment. The wireless functionality afforded to the host units from the upgrade module
include the ability to download drug library information for simultaneously operating
hosts without requiring a physical connection and the time spent visiting the rooms they
occupy.
FCC Information
US FCC (Federal Communications Commission)
Statement
• This device complies with part 15C, 15E of the FCC Rules. Operation is subject to
the following two conditions: (1) This device may not cause interference, and (2)
This device must accept any interference, including that may cause undesired
operation of these devices.
FCC Interference Statement
• This equipment has been tested and found to comply with the limits for a Class B
digital device, pursuant to Part 15C, 15E of the FCC Rules. These limits are designed
to provide reasonable protection against harmful interference in a residential
installation. This equipment generates, uses, and can radiate radio frequency energy.
If not installed and used in accordance with the instructions, it may cause harmful
interference to radio communications. However, there is no guarantee that
interference will not occur in a particular installation. If this equipment does cause
harmful interference to radio or television reception, which can be determined by
turning the equipment off and on, the user is encouraged to try and correct the
interference by one or more of the following measures:
- Reorient or relocate the receiving antenna.
- Increase the distance between the equipment and the receiver.
- Connect the equipment to an outlet on a circuit different from that to which the
receiver is connected.
- Consult the dealer or an experienced radio/TV technician for help.
• Changes or modifications not expressly approved by Hospira could void the user's
authority to operate the equipment.
Radio Frequency Exposure Statement
• The Wireless LAN radio device in the Connectivity Engine peripheral board with this
infusion device has been evaluated and found compliant to the requirements of the
following Radio Frequency exposure standards:
- Federal Communications Commission, OET Bulletin 65 (Edition 97-01),
Supplement C (Edition 01-01), Evaluating Compliance with FCC Guidelines for
Human Exposure to Radio frequency Electromagnetic Fields, July 2001.
430-11541-001 2 CE Configuration Guide
- Industry Canada, Evaluation Procedure for Mobile and Portable Radio
Transmitters with respect to Health Canada's Safety Code 6 for Exposure of
Humans to Radio Frequency Fields, Radio Standards Specification RSS-102
Issue 1 (Provisional): September 1999.
• The radiated output power of this Wireless LAN device is far below the FCC radio
frequency exposure limits. The Wireless LAN device has been evaluated with zero
inches separation of human body from the antenna and found to be compliant with
FCC RF exposure limits.
Guidance on EMC Compatibility
• There is a shared responsibility between manufacturers, customers and users to
ensure that Medical Equipment and Systems are designed and operated as intended.
Medical electrical equipment needs special precautions regarding electromagnetic
compatibility and needs to be installed and used according to the electromagnetic
compatibility information provided in this manual.
• The device is suitable for use in all establishments, including domestic
establishments. If extended operation during power mains interruption is needed, use
battery power.
• Always manage the electromagnetic environment.
• The guidance included in this manual provides information needed to:
- Determine the device’s suitability for use in the intended environment.
- Manage the electromagnetic environment to permit the device to perform as
intended without disturbing other equipment.
• Separate the device from all other electronic equipment. If the device must be used
near other electrical equipment, monitor the equipment to ensure there is no
electromagnetic interference.
• Devices should not be used adjacent to or stacked with other equipment. If the device
must be used adjacent to or stacked with other equipment, monitor the devices to
verify normal operation.
• USE ONLY components specifically labeled for use with the Plum A+ Infusion
System to help ensure the device operates as intended.
• If you suspect external RF sources or other equipment are influencing device
operation, contact the biomedical engineering department for additional guidelines
concerning electromagnetic immunity.
• Contact the biomedical engineering department for additional information in the
technical service manual concerning operating devices near RF sources.
• This device has been tested with the Hospira Plum A+ Infusion System and found to
comply with the International Standard IEC 60601-1-2 Edition 2.1 Electromagnetic
Compatibility (EMC) of Medical Electrical Equipment.
CE Configuration Guide 3 430-11541-001
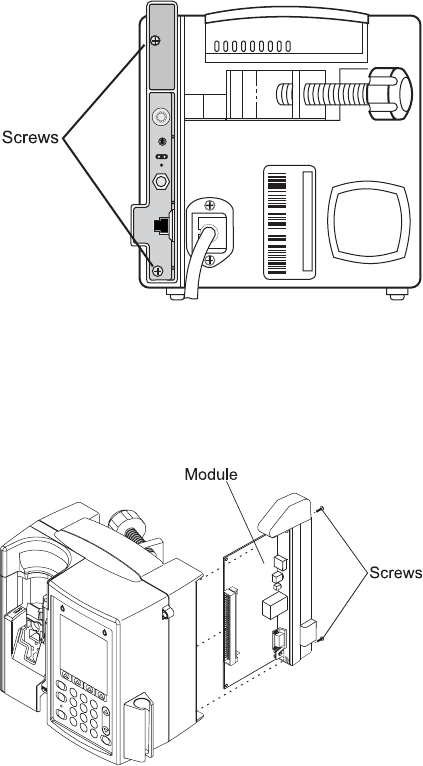
Installing the Hospira MedNet® Plug ’n Play
Module (List 20677-04)
Note: For use with Hospira Plum A+ Infusers with software version 10.3 and
higher.
Note: The recommended tool for this procedure is a No. 2 Phillips screwdriver.
CAUTION: CAUTION: Use proper ESD grounding techniques when handling
components. Wear an antistatic wrist strap and use an ESD-protected workstation.
Store the PWA in an antistatic bag before placing it on any surface.
To Replace the Module, proceed as follows:
1. Press [ON/OFF] to power the infuser
OFF.
2. Disconnect the infuser from AC
power.
CAUTION: Infuser must be
powered off for at least 2 minutes
prior to removing the module.
3. Carefully place the infuser face down.
4. Using a No. 2 Phillips screwdriver,
remove the two screws from the
module (one in the upper left corner
and one in the lower left corner). Refer
to Figure 1.
5. Carefully pull the module away from the infuser.
Note: Note: When removing the module, note the placement guides the peripheral
PWA rests between.
6. Install the replacement module in the
exact reverse order of removal using
the screws and lock washers included
with the replacement module. Refer
to Figure 2.
Note: Note: Verify the module is
placed properly between the guides
and fits correctly into the CPU PWA.
7. Connect the infuser to AC power.
8. To verify successful module
replacement, power ON the infuser
and let the system perform its
self-tests. The screen will display an
E453 Malfunction.
9. Power the infuser OFF, and then ON
again.
10. If upgrading from version 12.x, The infuser is ready for operation.
11. If upgrading from version 10.x or 11.x:
a) Enter the serial number.
b) Power the infuser OFF, and then ON again. The infuser is ready for operation.
Figure 1. Remove Screws
Figure 2. Insert Module
430-11541-001 4 CE Configuration Guide
Configuration Guide
General Notes
This document is a general guide for using the CE Configuration Tool.
Note: Please refer to the Installation and Configuration Guide and the User Guide for
proper use, warnings and cautions associated with the Hospira MedNet®
Software.
The application software is a web page server that resides in the CE. From the server on
which HMSS resides, access the infuser Status screen by entering:
https://infuserIPaddress:8443
Note: The default IP address for the infuser is 192.168.0.100 and the Netmask is
255.255.0.0
Scope
The scope of this document is to outline the functionality of the CE Configuration web
page that displays in the Microsoft® Internet Explorer Version 6 browser window.
This document does not address the functionality of the browser in which the web page
displays, nor does it address specific topics related to Ethernet, TCP/IP, Internet, or wire-
less security and authentication.
Assumptions
The user has a working knowledge of the following terms, features, concepts and facili-
ties:
• Operation of Microsoft® Windows
• Operation of Microsoft® Internet Explorer Version 6 browser
• Basic understanding of Ethernet, IP addresses, MAC Addresses,
Subnet Masks, Gateways, DHCP, DNS, Domains
• Basic understanding of HTTP including Basic Authentication, SSL,
user IDs, and passwords
• Basic understanding of other Ethernet protocols including Telnet, FTP,
TCP, UDP
• URL formats including protocol and port specifications
• Security configuration including WEP, SSID, Access Points,
Authentication Types
Introduction
The following is information provided for general use:
• A navigation menu is displayed on the left side of the page
• The Tab key has no effect on the navigation menu items (i.e., it will not
select or highlight them)
• Unless otherwise specified, “alphanumeric characters” include all
upper- and lower-case letters and numbers

CE Configuration Guide 5 430-11541-001
• In this document, “character” refers to all upper- and lower-case letters,
numbers, punctuation marks, symbols (i.e., 8-bit character codes
between 32 and 126 inclusive)
Screens
Note: Hovering your mouse over such fields as Identity or Password will activate a
tooltip with admissible characters.
Status Properties Screen
Screen Function
Status Current status of the CE
Ethernet Properties Ethernet properties settings
Wireless Properties Wireless properties settings
Wireless Security
Properties Wireless security properties settings
Certificates Wireless certificates properties settings
HMSS Properties Hospira MedNet® Server Suite properties
Service Properties Service settings
Administration Administration settings
Finish Configuration Confirmation and results
Configuration Results Configuration results
Field/Button Content/Action
Device Status Device Name: value entered on HMSS Screen
Device Type: Device Type connected to
CE App Version: CE version string
CE System Version: CE system string
Ethernet If Ethernet interface is active: IP Address, Subnet Mask, MAC
Address
If WLAN interface is active: (Interface is down)
Wireless LAN WLAN Interface is Active: IP Address, Subnet Mask, MAC
Address, WEP Enabled, Access Point, SSID, Current Channel,
Signal Quality Level, Noise Level, Frequency Band, Transmit
Power, Power Save
WLAN Interface is not active: (Interface is down)
HMSS HMSS Host/ URL or IP Address
Status: Connected, "Not responding", "(Status is not available)”
Pump Status: Connected, "Not responding", "(Status is not available)"
Refresh Updates all Status sections with current values
Next Displays the Ethernet Properties screen

430-11541-001 6 CE Configuration Guide
Ethernet Properties
Wireless Properties - Wireless Enabled
Field/Button Content/Action
MAC Address (Not configurable, READ ONLY)
Device MAC address
Default: factory default MAC address
Use DHCP Unchecked: Displays IP Address, Subnet Mask, Gateway fields,
DNS1, DNS2, and Domain
Checked: Hides IP Address, Subnet Mask, Gateway fields,
DNS1, DNS2, and Domain
Default: unchecked
IP Address (available when
DHCP is unchecked) IP Address of the device
Default: 192.168.0.100
Subnet Mask (available
when DHCP is unchecked) Subnet Mask of the device
Default: 255.255.0.0
Gateway (available when
DHCP is unchecked) Gateway Host Name or IP Address
Default: Blank
DNS1 (available when
DHCP is unchecked) Primary DNS IP Address
Default: Blank
DNS2 (available when
DHCP is unchecked) -
Optional field
Secondary DNS IP Address
Default: Blank
Domain (available when
DHCP is unchecked) Domain name
Alphanumeric 1-255 characters and the following 3 characters:
Period (.), hyphen (-), underscore (_)
Default: Blank
Previous Displays the previous screen
Reset Allows you to reconfigure the current page only
Finish Displays the Finish Configuration screen and should only be
clicked when all the variables have been entered
Next Displays the following screen
Field/Button Content/Action
Wireless Enabled Checked: Enables Wireless Capability and displays the rest of the
fields and checkboxes on the screen
Unchecked: Disables Wireless Capability and hides the rest of
the fields and checkboxes on the screen
Default: Checked

CE Configuration Guide 7 430-11541-001
Use DHCP Unchecked: Displays IP Address, Subnet Mask, Gateway fields,
DNS1, DNS2 and Domain
Checked: Hides IP Address, Subnet Mask, Gateway fields,
DNS1, DNS2 and Domain
Default: unchecked
IP Address (DHCP is
unchecked) IP Address of the device
Default: 192.168.0.100
Subnet Mask (DHCP is
unchecked) Subnet Mask of the device
Default: 255.255.0.0
Gateway (DHCP is
unchecked) Gateway Host Name or IP Address
Default: Blank
DNS1 (DHCP is
unchecked)- Optional field Primary DNS IP Address
Default: Blank
DNS2 (DHCP is
unchecked)- Optional field Secondary DNS IP Address
Default: Blank
Domain (DHCP is
unchecked) Domain name
Alphanumeric 1-255 characters and the following 3 characters:
Period (.), hyphen (-), underscore (_)
Default: Blank
SSID Alphanumeric, space, and the following characters:
~ ! @ # % ^ & * ( ) _ { } | : < > ` - = ; ' , . /
2-32characters
Additionally, the following three characters cannot be the first
character: ! # ;
Frequency 802.11b (2.4GHz)
802.11b/802.11g (2.4GHz)
802.11g (2.4GHz)
802.11a (5GHz)
Auto
Default: Auto (The "Auto" option is comprised of 802.11a, 802.11b
and 802.11g.)
Note: Selecting Auto prompts a sequential search and may be slower
802.11B Preamble Long
Short
Default: Long
Power Save Continuous Access Mode
Maximum Power Save
Default: Maximum Power Save
Field/Button Content/Action

430-11541-001 8 CE Configuration Guide
Wireless Enabled- DHCP Enabled
Transmit Power 100% (maximum), 75%, 50%, 25%, 12%, 6%, 4%, 2%, 1%
(lowest)
Default: 100%
Note: 100%=50 mW; 50%=25 mW; 25%=12.5 mW; Minimum=1 mW
Country List of countries
Default: United States
Note: Selecting a country from the drop-down list, adjusts automatically
the frequency and channels.
Previous Displays the previous screen
Reset Allows you to reconfigure the current page only
Finish Displays the Finish Configuration screen and should only be
clicked when all the variables have been entered
Next Displays the following screen
Field/Button Content/Action
Wireless Enabled Checked: Enables Wireless Capability and displays the rest of the
fields and checkboxes on the screen
Unchecked: Disables Wireless Capability and hides the rest of
the fields and checkboxes on the screen
Default: Checked
Use DHCP Unchecked: Displays IP Address, Subnet Mask, Gateway fields,
DNS1, DNS2 and Domain
Checked: Hides IP Address, Subnet Mask, Gateway fields,
DNS1, DNS2 and Domain
Default: unchecked
Renew Lease on Wireless
AP Association Unchecked: Disables DHCP lease renewal on wireless AP
change
Checked: Enables DHCP lease renewal on wireless AP change
Default: unchecked
SSID Alphanumeric, space, and the following characters:
~ ! @ # % ^ & * ( ) _ { } | : < > ` - = ; ' , . /
2-32 characters
Additionally, the following three characters cannot be the first
character: ! # ;
Field/Button Content/Action

CE Configuration Guide 9 430-11541-001
Frequency 802.11b (2.4GHz)
802.11b/802.11g (2.4GHz)
802.11g (2.4GHz)
802.11a (5GHz)
Auto
Default: Auto (The "Auto" option is comprised of 802.11a, 802.11b
and 802.11g)
Note: Selecting Auto prompts a sequential search and may be slower.
Applies if the frequency does not include 802.11b
802.11B Preamble Long
Short
Default: Long
Power Save Continuous Access Mode
Maximum Power Save
Default: Maximum Power Save
Transmit Power 100% (maximum), 75%, 50%, 25%, 12%, 6%, 4%, 2%, 1%
(lowest)
Default: 100%
Note: 100%=50 mW; 50%=25 mW; 25%=12.5 mW; Minimum=1 mW
Country List of countries
Default: United States
Note: Selecting a country from the drop-down list, adjusts automatically
the frequency and channels.
Previous Displays the previous screen
Reset Allows you to reconfigure the current page only
Finish Displays the Finish Configuration screen and should only be
clicked when all the variables have been entered
Next Displays the following screen
Field/Button Content/Action

430-11541-001 10 CE Configuration Guide
Security
Important: Security settings, such as identify, password, etc. should conform
to your infrastructure.
Field/Button Content/Action
Security Disabled
WEP
WPA Personal
WPA Enterprise
When WEP is selected, displays Authentication Type, Key Length,
WEP Keys 0 - 3, and Default Key fields
When WPA Personal is selected, displays Shared Key field
When WPA Enterprise is selected, displays Authentication Type
and Validate Server Cert objects and fields
Default: Disabled

CE Configuration Guide 11 430-11541-001
WEP
Note: If the information is entered incorrectly, an error message will pop-up indicating
what fields needs changing and display the parameters.
Field/Button Content/Action
Security Disabled
WEP (Static only)
WPA Personal
WPA Enterprise
When WEP is selected, displays Authentication Type, Key Length,
WEP Keys 0 - 3, and Default Key fields
When WPA Personal is selected, displays Shared Key field
When WPA Enterprise is selected, displays Authentication Type
and Validate Server Cert objects and fields
Default: Disabled
Authentication Type (WEP
selected) Open
Shared
Default: Open
Key Length WEP 40 (40 + 24/10 hex digits)
WEP 104 (104 + 24/26 hex digits)
WEP Key 0
(Required field if this WEP
key number is selected in
the "Default Key" field)
10 or 26 hex digits
Default: Blank
WEP Key 1
(Required field if this WEP
key number is selected in
the "Default Key" field)
10 or 26 hex digits
Default: Blank
WEP Key 2
(Required field if this WEP
key number is selected in
the "Default Key" field)
10 or 26 hex digits
Default: Blank
WEP Key 3
(Required field if this WEP
key number is selected in
the "Default Key" field)
10 or 26 hex digits
Default: Blank
Default Key 0, 1, 2, 3
Previous Displays the previous screen
Reset Allows you to reconfigure the current page only
Finish Displays the Finish Configuration screen and should only be
clicked when all the variables have been entered
Next Displays the following screen

430-11541-001 12 CE Configuration Guide
WPA Personal
Field/Button Content/Action
Security Disabled
WEP
WPA Personal
WPA Enterprise
When WPA Personal is selected, displays Shared Key field
Default: Disabled
Encryption Protocol WPA2-CCMP/AES (requires appropriate hardware for access
points)
WPA1-TKIP
Default: WPA2-CCMP/AES
Shared Key 64 (hex) character shared key value or an 8 - 63 ASCII character
pass-phrase
Note: An invalid entry will prompt an error message and display the field
requirements
Previous Displays the previous screen
Reset Allows you to reconfigure the current page only
Finish Displays the Finish Configuration screen and should only be
clicked when all the variables have been entered
Next Displays the following screen

CE Configuration Guide 13 430-11541-001
WPA Enterprise
Note: WPA Enterprise requires an authentication server. We support Free Radius and
Cisco ACS.
Note: No format checking is performed at the time a file is uploaded.
Field/Button Content/Action
Security Disabled
WEP
WPA Personal
WPA Enterprise
When WPA Enterprise is selected, displays Authentication Type
and Validate Server Cert objects and fields
Default: Disabled
Encryption Protocol WPA2-CCMP/AES (requires appropriate hardware for access
points)
WPA1-TKIP
Default: WPA2-CCMP/AES
Authentication Type
(see table below for fields
available according to
settings)
EAP-TLS (Default setting)
EAP-TTLS (FreeRadius only)
EAP-PEAP
EAP-FAST (Cisco ACS only)
Previous Displays the previous screen
Reset Allows you to reconfigure the current page only
Finish Displays the Finish Configuration screen and should only be
clicked when all the variables have been entered
Next Displays the following screen

430-11541-001 14 CE Configuration Guide
WPA Enterprise - Authentication Type
The software shall support the following file type for WPA Authentication:
• FAST PAC File - FAST Protected Access Credential (PAC) file
Authentication Type: Field/Content
EAP-TLS (Default) Identity
Validate Server Cert
Note: Placing a checkmark in the box next to Validate Server Cert:
enables the server certificate validation. If checked, a Client Certificate
and an appropriate CA Certificate should be uploaded on the Certificates
page
EAP-TTLS Protocol:
• EAP-MSCHAPv2
• EAP-MD5
•PAP
• CHAP
• MSCHAP
• MSCHAPv2
Identity
Password
Confirm Password
Anonymous identity (Optional)
Validate Server Cert (Optional)
Note: Placing a checkmark in the box next to Validate Server Cert:
enables the server certificate validation. If checked, an appropriate CA
Certificate should be uploaded on the Certificates page
EAP-PEAP Peap Inner Protocol:
• EAP-MSCHAPv2
• EAP-MD5
Identity
Password
Confirm Password
Anonymous identity (Optional)
Validate Server Cert (Optional)
Note: Placing a checkmark in the box next to Validate Server Cert:
enables the server certificate validation. If checked, an appropriate CA
Certificate should be uploaded on the Certificates page
EAP-FAST Identity
Password
Confirm Password
Anonymous identity (Optional)
PAC File (Selecting Upload accesses the pop-up Browse
feature)
Important: Verify the ACS server’s system configuration has the
AP EAP request timeout set at 180 and the AP Activity
Timeout “unknown (non-cisco)” default is set at 220
(seconds)

CE Configuration Guide 15 430-11541-001
Certificates
This category is optional and will depend upon your network configuration.
The software shall support the following file types for WPA authentication:
• CA Certificate - PEM, DER
• Client Certificate - PEM, DER
• Private Key File - PEM, DER, PFX
Field/Button Content/Action
Client Certificate Default Hospira Certificate
User Specified Certificate
Default: Hospira Certificate
Client Certificate (User
Specified Certificate
selected)
Private Key File (upload/browse feature)
Password
Confirm Password
Certificate File (upload/browse feature)
Note: A “Success” message appears once the file is loaded and the file
information displays. If the transfer fails, an error message displays
CA Certificates Active Certificates
Add Certificate (upload/browse feature)
Note: The software shall allow up to three CA Certificates to be active at
one time
Previous Displays the previous screen
Reset Allows you to reconfigure the current page only
Finish Displays the Finish Configuration screen and should only be
clicked when all the variables have been entered
Next Displays the following screen

430-11541-001 16 CE Configuration Guide
HMSS (Hospira MedNet® Server Suite)
Service
Telnet and FTP are enabled by default in order to generate the configuration.
Note: We recommend turning off both Telnet and FTP before putting the pump into
production and disabling HTTP access to the device (Port 8008).
Field/Button Content/Action
HMSS HostIP Address Server IP address or hostname
Format: alphanumeric and the following (3) characters: Period (.),
hyphen (-), underscore (_). The first character must be an
alpha-character and the last character may not be a hyphen (-)
character. A valid IP address is of the form "xxx.xxx.xxx.xxx"
where xxx is a number between 0 and 255.
HMSS SSL Enabled Checked: Enables SSL mode during HMSS communications
Unchecked: Disables SSL mode during HMSS communications
Default: unchecked
Important: The appropriate port needs to be opened for outbound
traffic. Port 8443 or 8080 for device to HMSS and Port
80 or 443 for HMSS to device
Device Name Device unique ID
1-255 characters or less
Note: We recommend using 15 characters or less. Using more than 15
characters may affect HMSS report layouts
Default: device00 (must be renamed - cannot be saved)
Device Type (READ ONLY) Hospira Plum A+ or
Hospira Plum A+(CE) or
Hospira PCA or
Hospira Symbiq
Previous Displays the previous screen
Reset Allows you to reconfigure the current page only
Finish Displays the Finish Configuration screen and should only be
clicked when all the variables have been entered
Next Displays the following screen
Field/Button Content/Action
Telnet Enabled Checked: The CE Telnet service on port 23 is enabled
Unchecked: The CE Telnet service is disabled
FTP Enabled Checked: The CE FTP service on port 21 is enabled
Unchecked: The CE FTP service is disabled
Non-Secure Configuration
Access (HTTP) Enabled Checked: The non-secure HTTP access to the web configuration
pages is enabled on port 8008
Unchecked: HTTP access to the web is disabled

CE Configuration Guide 17 430-11541-001
Note: Web configuration access to the device using HTTPs (SSL) is always enabled.
Administration
Finish Configuration
Note: You may want to verify some or all of the previous screens to ensure the
information is entered correctly. It may take up to 5 minutes to activate the
changes.
The Configuration Successful screen displays. If a configuration error occurred, you will
be prompted to use the menu to return to a page of your choice.
Close the browser and remove the Ethernet cable is you wish to test the infuser on wireless
mode. The computer will reboot in a few seconds.
Previous Displays the previous screen
Reset Allows you to reconfigure the current page only
Finish Displays the Finish Configuration screen and should only be
clicked when all the variables have been entered
Next Displays the following screen
Field/Button Content/Action
Web User Web log in username. Format: ASCII, 1-31 characters. Colon (:) is
not allowed
Default: admin
Web Password Web password. Format: ASCII, 1-20 characters
Default: admin
Confirm Password Confirms the password entered displaying as a dot for each
character
Note: An error message displays if the confirmed password does not
match the web password
Previous Displays the previous screen
Reset Allows you to reconfigure the current page only
Finish Displays the Finish Configuration screen and should only be
clicked when all the variables have been entered
Next Displays the following screen
Field/Button Content/Action
Previous Displays the previous screen
Finish Commits the configuration changes to the device
Field/Button Content/Action
430-11541-001 18 CE Configuration Guide
Wireless Lan Device Specifications
Standards: IEEE802.11a/b/g
Transmit Power: 802.11 b/g: 17.6 dBm
802.11 a: 19 dBm
Antenna: Integrated surface mount antenna

430-11541-001-END CE Configuration Guide
For technical assistance, product return authorization, and to order parts, accessories, or manuals within
the United States, contact Hospira Technical Support Operations.
1-800-241-4002
For additional services and technical training courses, visit the website at www.hospira.com.
For technical assistance and services outside the United States, contact the local Hospira sales office.
CAUTION: Federal (USA) law restricts this infuser to sale by or on the order of a physician or other
licensed practitioner.
Plum A+, LifeCare PCA and Symbiq are registered trademarks of Hospira, Inc. Microsoft and Windows are
not trademarks or registered trademarks of Hospira, Inc. The Symbiq infusion system uses components and
technologies protected by U.S. Patent Numbers USD500326; USD515205; US5989222; US519175;
US5462256; US5586868; US5816779; US5681285. Other patents pending.
This document and the subject matter disclosed herein are proprietary information. Hospira retains all the
exclusive rights of dissemination, reproduction, manufacture, and sale. Any party using this document
accepts it in confidence, and agrees not to duplicate it in whole or in part nor disclose it to others without
the written consent of Hospira.
DUT INFORMATION
FCC ID: STJ-20791
IC No: 5627A-20791
Certifications: FCC Part 15.247, 15.407
IC RSS-210, RSS-102
Device Name: Hospira MedNet 802.11 a/b/g Wireless Upgrade Module
Note: For use with Hospira PlumA+ Infusion system
Model Nos Covered: 20791-04-77, 20677-04-77
Note: Above two device model numbers are based on the same assembly. Device Model 20791-04-XX is
meant for use in models 20792-04-XX and 20679-04-XX of PlumA+ Infusion System and device model
20677-04-XX is meant for use in models 12391-04-XX and 11971-04-XX Plum A+ Infusion Systems.
© Hospira, Inc.
Complies with limits for Class B digital device established
by FCC Rules, Part 15
Attention, consult accompanying documents.
C
C
F