IDT Technology PCR122R-01 Pluviometer with 433MHz Transmitter (433.92MHz Tx) User Manual
IDT Technology Limited Pluviometer with 433MHz Transmitter (433.92MHz Tx)
User Manual

EN
1
Wireless Rain Gauge
with Indoor / Outdoor Thermometer
Model: RGR126
User Manual
CONTENTS
Introduction ............................................................... 2
Product Overview ..................................................... 2
Front View .............................................................. 2
Back View............................................................... 3
LCD Display ........................................................... 3
Rain Gauge ............................................................ 4
Remote Thermo Sensor ......................................... 4
Getting Started .......................................................... 5
Main Unit ................................................................ 5
Rain Gauge ............................................................ 5
Thermo Sensor ...................................................... 6
Data Transmission ................................................. 7
Low Battery Warning ................................................ 8
Clock / Calendar Setting .......................................... 8
Set Clock and Calendar ......................................... 8
Rainfall ....................................................................... 8
Rainfall History ....................................................... 8
Total Rainfall ........................................................... 9
Rainfall Alarm ......................................................... 9
Temperature .............................................................. 9
Reset .......................................................................... 9
Precautions ............................................................... 9
Technical Specications ........................................ 11
About Oregon Scientic ........................................ 11
EU-Declaration of Conformity ............................... 12
FCC Statement ........................................................ 12
Declaration of Conformity ..................................... 13
EN
2
INTRODUCTION
Congratulations on purchasing the Oregon ScienticTM
Wireless Rain Gauge with Indoor / Outdoor Thermometer
(RGR126).
PRODUCT OVERVIEW
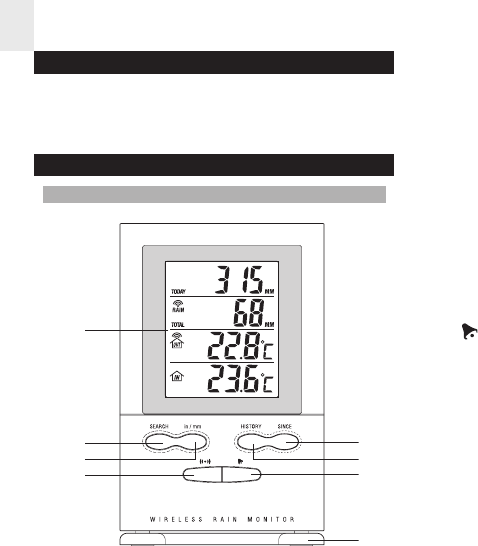
FRONT VIEW
1. FOUR-LINE LCD DISPLAY: For displaying the total
rainfall, current rainfall or rainfall history, indoor /
outdoor temperature and clock / calendar
2. SEARCH: Press and hold to enforce a search for
the rain gauge and remote thermo sensor
3. in-mm:Selects between inch and millimeter rainfall
measurement
4. ((.)): Displays the rain alarm setting; press and hold
to enter the rain alarm setting mode
5. SINCE: Toggles between displaying the start day or
start year for total rainfall; press and hold to clear
the previous rainfall start time and reset the rainfall
counter to start again
6. HISTORY: Toggles between rainfall history and daily
rainfall
7. : Enables or disables the rainfall alarm
8. Removable table stand: For securing the main unit
on a at surface
1
2
3
4
5
6
7
8
5
6
7
8
1
2
3
4
EN
3
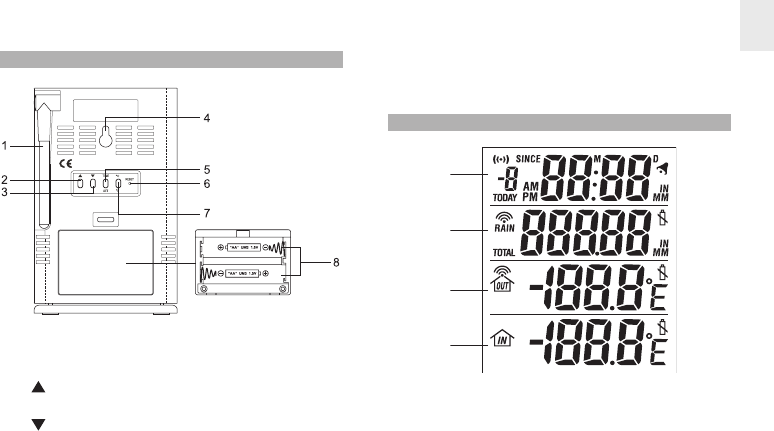
7. °C / °F button: Selects between °C and °F
8. Battery compartment
LCD DISPLAY
1. Today’s Rainfall, Rainfall History, Rainfall Alarm,
Start Date of Total Rainfall Record, Time / Date
2. Rain Gauge RF Reception Status, Total Rainfall
3. Thermo RF Reception Status, Outdoor Temp
4. Indoor Temp
BACK VIEW
1. ANTENNA: Receives radio signal from rain gauge
and remote thermo sensor
2. : Increases setting values; press and hold for
rapid increase
3. : Decreases setting values; press and hold for
rapid decrease
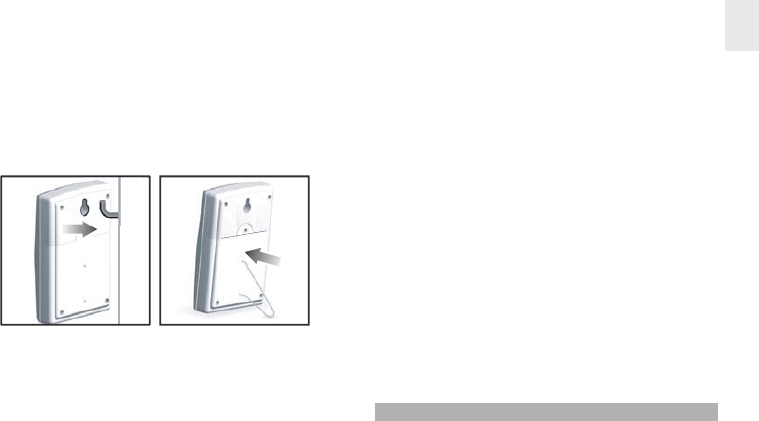
4. Wall mount hole
5. TIME / SET: Toggles among the time, day, year and
rainfall display; press and hold to enter the time
setting mode
6. RESET: Returns all settings to their default
values
1
2
3
4
EN
4
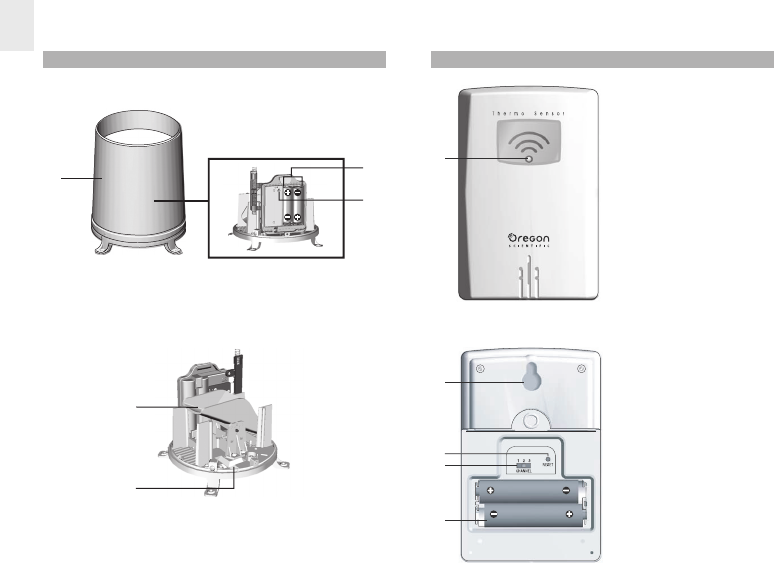
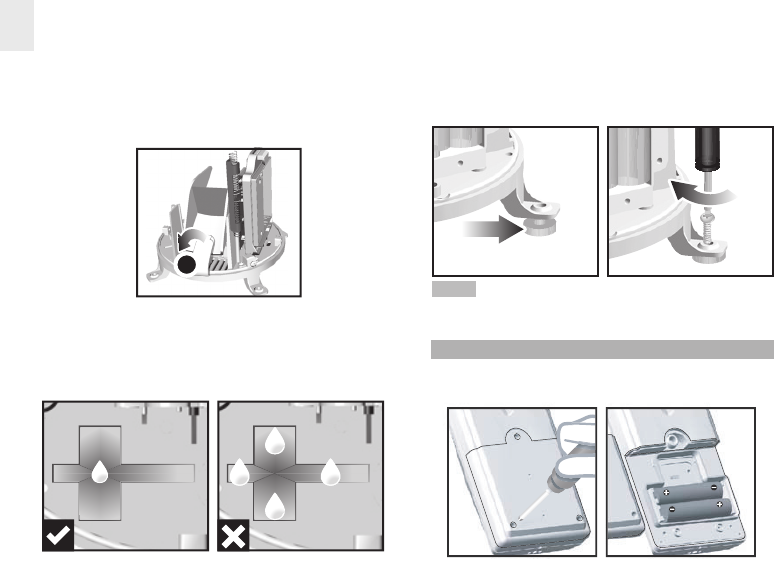
RAIN GAUGE
Base and funnel:
1. Rain gauge
2. Battery compartment
3. RESET button
1. Funnel
2. Indicator
REMOTE THERMO SENSOR
1. LED
1. Wall mount hole
2. RESET hole
3. CHANNEL switch
(1-3)
4. Battery
compartment
12
3
1
2
1
1
2
3
4
EN
5
Position the main unit, rain gauge, and thermo sensor
within effective range:
• Rain gauge - 100 meters / 328 feet
• Thermo sensor - 100 meters / 328 feet
IMPORTANT It is recommended that you follow the
sequence below when setting up the units:
1. Set up the main unit.
2. Set up the rain gauge, then press and hold SEARCH
on the main unit and wait until you receive a
signal.
3.
Set up the thermo sensor, then press and hold SEARCH
on the main unit and wait until you receive a
signal.
4. In the event that you do not obtain a signal from a
remote unit please repeat the process above.
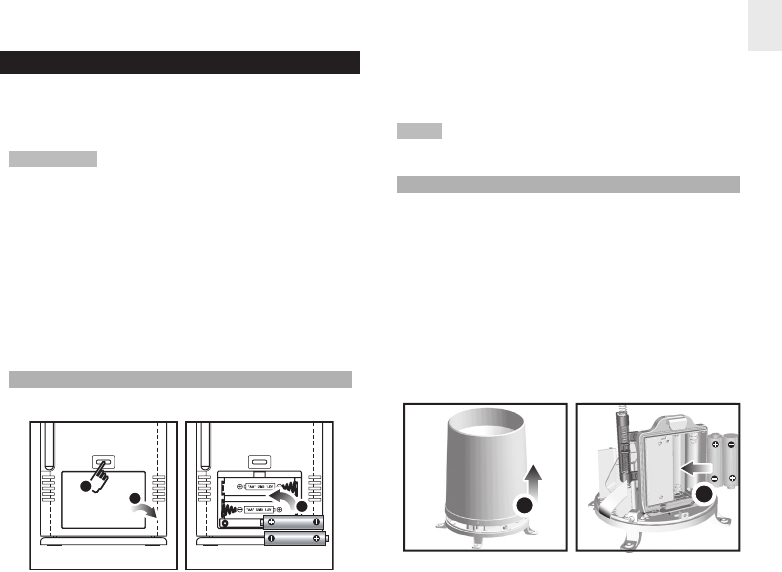
MAIN UNIT
1. Insert the batteries, matching the polarity (+ and -)
as shown in the battery compartment.
1
23
2. Press RESET, or press and hold SEARCH on the
main unit to initiate operation. The reception icon
on the main unit will blink while it is searching for
the sensor or rainfall gauge.
NOTE Every time the battery in the main unit is changed,
repeat installation before use.
RAIN GAUGE
The rain gauge collects rain and takes readings of rainfall
rate and the total rainfall over a period of time. The
sensor can remotely transmit data to the base station.
The base station and rain gauge should be positioned
within an effective range: about 100 meters (328 feet)
in an open area.
The rain gauge should be mounted horizontally about 1
meter (3 feet) from the ground in an open area away from
trees or other obstructions to allow rain to fall naturally
for an accurate reading.
To set up the Rain Gauge:
GETTING STARTED
2
1
EN
6
Water will pool to the center of the cross when the rain
gauge is level.
If water remains on 1-4, the gauge is not horizontal.
If necessary, adjust the level using the screw.
NOTE For best results, ensure the base is horizontal to
allow maximum drainage of any collected rain.E
THERMO SENSOR
1. Insert the batteries, matching the polarity (+ and -)
as shown in the battery compartment.
1. Remove screws and slide the cover off in an
upwards motion.
2. Insert the batteries (2 x UM-3 / AA), matching the
polarities (+ / -). Press RESET after each battery
change.
3. Remove the bre tape.
To ensure a level plane:
Put a few drops of water on the cross at the base of the
funnel to check the horizontal level.
3
1
23
4
EN
7
2. Set the channel switch to any channel. The switch
is located in the battery compartment.
3. Press RESET on the sensor.
4. Close the remote sensor battery compartment.
5. Secure the sensor in the desired location using the
wall mount or table stand.
For best results:
• Insert the batteries before you mount the sensor.
• Place the sensor out of direct sunlight and
moisture.
• Do not place the sensor more than 100 meters
(328 feet) from the main (indoor) unit.
• Position the sensor so that it faces the main
(indoor) unit, minimizing obstructions such as
doors, walls, and furniture.
• Place the sensor in a location with a clear view to
the sky, away from metallic or electronic objects.
• Position the sensor close to the main unit during
cold winter months as below-freezing temperatures
may affect battery performance and signal
transmission.
You may need to experiment with various locations to
get the best results.
Standard Alkaline batteries contain signicant amounts
of water. Because of this they will freeze in low
temperatures of approximately -12°C (10°F). Disposable
Lithium batteries have a much lower threshold for
temperature with an estimated freezing range of below
-40°C (-40°F).
Wireless ranges can be impacted by a variety of factors
such as extremely cold temperatures. Extreme cold
may temporarily reduce the effective range between the
sensor and the base station. If the unit’s performance
fails due to low temperature, the unit will resume proper
functioning as the temperature rises to within the normal
temperature range (i.e. no permanent damage will occur
to the unit due to low temperatures).
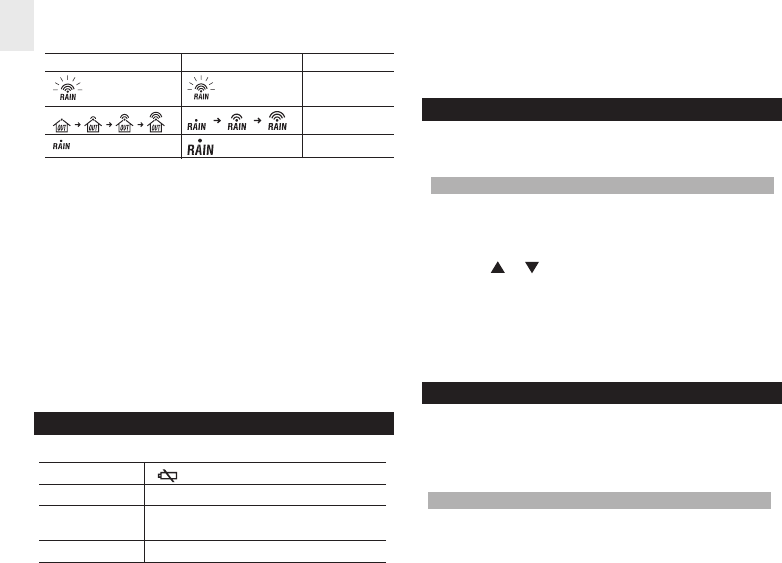
DATA TRANSMISSION
Data is sent from the remote thermo sensor approx.
every 78 seconds and every 94 seconds from the
rain gauge. The reception icon shows the status - see
table.
EN
8
THERMO SENSOR RAIN GAUGE DESCRIPTION
Searching
Connected
Disconnected
If without obvious reason the main unit display
shows that the thermo sensor or rainfall connector is
disconnected, press and hold SEARCH to enforce an
immediate search.
If that fails, check:
• The remote rain gauge and thermo sensor are still
in place.
• The batteries of the main unit, rain gauge, and
thermo sensor are still good. Replace them if
necessary.
• The transmission is within range and path is clear of
obstacles and interference. Shorten the distance if
necessary. Then press and hold SEARCH again.
LOW BATTERY WARNING
There are 3 low-battery indicators - see table.
UNIT LOCATION ON MAIN UNIT DISPLAY
Main Indoor Temperature Area
Remote Thermo Outdoor Temperature Area
Sensor
Rain Gauge Total Rainfall Area
Replace the batteries immediately when the respective
indicator lights up.
CLOCK / CALENDAR SETTING
Press TIME / SET to toggle among today’s rainfall, time,
date, and year.
SET CLOCK AND CALENDAR
1. Press TIME / SET to display the clock or
calendar.
2. Press and hold TIME / SET for two seconds.
3. Use or to set the desired value.
4. Press TIME / SET to conrm.
5. Repeat steps 3 and 4 to complete all settings.
6. The order of the settings is hour, minute, year, month
and day.
RAINFALL
Today’s rainfall appears on the 1st line of the display
and total rainfall is shown on the 2nd line. Press in /
mm to toggle between inches and millimeters as the
unit of measurement.
RAINFALL HISTORY
The rainfall history is displayed on the 1st line of the
LCD display. The main unit can record up to 9 days
of rainfall.
EN
9
The alarm will go off for one minute when the rainfall
reaches the preset value and the rain alarm indicator will
ash. A reminder beep will be emitted every minute. Once
the rain alarm is on the indicator will not stop ashing
unless is pressed or the rain alarm value is changed.
To stop the alarm and reminder beep, press any button
or change the rainfall alarm value.
To deactivate the alarm, press .
TEMPERATURE
The outdoor temperature is displayed on the 3rd line of
the LCD display. Use the °C / °F button to select between
Centigrade and Fahrenheit display units.
The indoor temperature is displayed on the 4th line of the
LCD display. Use the °C / °F button to select between
Centigrade and Fahrenheit display units.
RESET
This button should only be used when the unit is
operating in an unfavorable way. Use a blunt stylus
to hold down the button. All settings will return to their
default values.
PRECAUTIONS
This product is engineered to give you years of
satisfactory service if you handle it carefully. Here are
a few precautions:
Use HISTORY to display the record for a particular
day. The day of the record will be displayed with a
minus (-) sign.
Caution: Other sensors using the 433 MHz transmission
frequency may inuence the rainfall reading. Please
avoid placing those sensors too close to the unit.
TOTAL RAINFALL
The total rainfall is displayed on the 2nd line of the
LCD display.
To display the commencing date of the total rainfall
record, press SINCE. The date will appear on the 1st
line of the display. Press again to show the commencing
year.
To clear the existing commencing date and reset it to
start again, press and hold SINCE. The total rainfall will
now be equal to the today rainfall and the unit will start
again to collect the rainfall data.
RAINFALL ALARM
The rain alarm value can be displayed at any time by
pressing (( • )).
To set the rainfall alarm:
1. Press and hold (( • )) for two seconds.
2. Use or to set the desired value.
3. Press (( • )) to conrm. The alarm will be activated.
The rain alarm indicator will light up.

EN
10
• Placement of this product on wood surfaces with
certain types of nishes, such as clear varnish, may
result in damage to the nish. Consult the furniture
manufacturer’s care instructions for direction as to
the types of objects that may safely be placed on
the wood surface. Oregon Scientic shall not be
responsible for any damage to wood surfaces from
contact with this product.
• Do not immerse the unit in water.
• Do not clean the unit with abrasive or corrosive
materials. They may scratch the plastic parts and
corrode the electronic circuit.
• Do not subject the unit to excessive force, shock,
dust, temperature or humidity, which may result in
malfunction, shorter electronic life span, damaged
battery and distorted parts.
• Do not tamper with the unit’s internal components.
Doing so will invalidate the warranty on the unit
and may cause unnecessary damage. The unit
contains no user-serviceable parts.
• Only use fresh batteries as specied in the user’s
manual. Do not mix new and old batteries as the
old ones may leak.
• Oregon Scientic will not be held liable for any
bodily injury, death, property damages, or any
other claims of whatever nature resulting from
the misuse or negligence of the product, whether
intentional or unintentional.
• Oregon Scientic will not be responsible for any
deviations in the usage of the device from those
specied in the user instructions or any or repairs
of the product.
• Placement of this product on wood surfaces with
certain types of nishes, such as clear varnish, may
result in damage to the nish. Consult the furniture
manufacturer’s care instructions for direction as to
the types of objects that may safely be placed on
the wood surface. Oregon Scientic shall not be
responsible for any damage to wood surfaces from
contact with this product.
• Do not dispose this product as unsorted municipal
waste. Collection of such waste separately for
special treatment is necessary.
NOTE Features and accessories will not be available
in all countries. For more information, please contact
your local retailer.
EN
11
Power
Main unit 2 x UM-3 / AA 1.5V batteries
Rain gauge 2 x UM-3 / AA 1.5V batteries
Remote thermo sensor 2 x UM-4 / AAA 1.5V batteries
General
RF Transmission Frequency 433 MHz
RF Transmission Range Rain gauge - 100 meters
(unobstructed) (328 feet )
Remote thermo sensor - 100
meters (300 feet)
Temperature sensing cycle Around 78 seconds
Rainfall sensing cycle Around 94 seconds
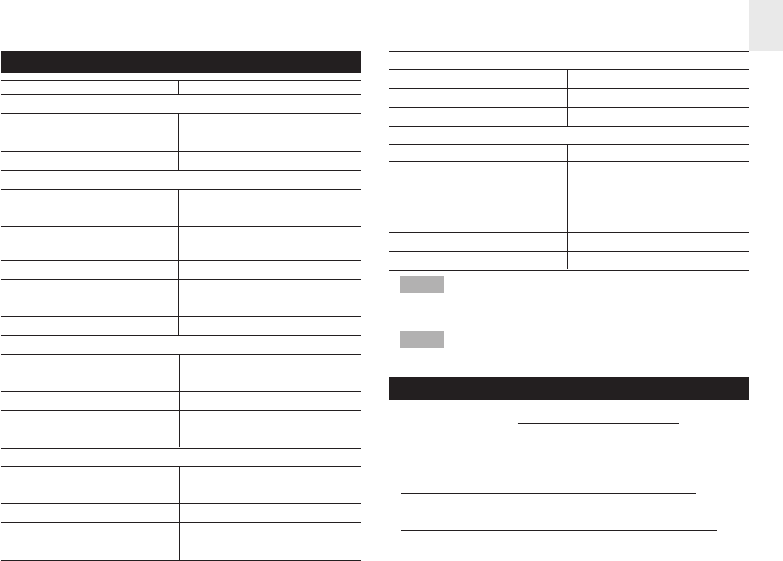
NOTE It is recommended that you use alkaline batteries
with this product for longer performance or lithium
batteries in temperatures below freezing.
NOTE Design and specications are subject to change
without notice.
ABOUT OREGON SCIENTIFIC
Visit our website (www.oregonscientic.com) to learn
more about Oregon Scientic products.
If you're in the US and would like to contact our Customer
Care department directly, please visit:
www2.oregonscientic.com/service/support.asp
For international inquiries, please visit:
www2.oregonscientic.com/about/international.asp
TECHNICAL SPECIFICATIONS
TYPE DESCRIPTION
Main Unit Dimensions
L x W x H 90 x 25 x 142 mm
(3.54 x 0.98 x 5.59 inches)
Weight (without battery) 173 g (6.1 oz)
Main unit
Display rainfall range (total) 0 - 25,400
(0 - 999.99 inch)
Display rainfall range 0 - 2,540 mm (0 - 99.99 inch)
(history / daily)
Rainfall resolution 1 mm (0.04 inch)
Operating range -5°C to +50°C
(23°F to 122°F)
Temperature resolution 0.1°C (0.2°F)
Remote Rain Gauge (PCR122)
Dimensions (L x W x H) 114 x 114 x 145 mm
(4.5 x 4.5 x 5.7 inches)
Weight (without battery) 241 g (8.5 oz)
Operating range 1.0°C to 60.0°C
(33.8°F to 140.0°F)
Remote Thermo Sensor (THN122N)
Dimensions (L x W x H) 92 x 60 x 20 mm
(3.6 x 2.4 x 0.79 inches)
Weight (without battery) 63 g (2.22 oz)
Proposed operating range -30°C to 60°C
(-22°F to 140°F)

EN
12
FCC STATEMENT
This device complies with Part 15 of the FCC Rules.
Operation is subject to the following two conditions: (1)
This device may not cause harmful interference, and
(2) This device must accept any interference received,
including interference that may cause undesired
operation.
WARNING Changes or modications not expressly
approved by the party responsible for compliance could
void the user’s authority to operate the equipment.
NOTE This equipment has been tested and found to
comply with the limits for a Class B digital device, pursuant
to Part 15 of the FCC Rules. These limits are designed
to provide reasonable protection against harmful
interference in a residential installation.
This equipment generates, uses and can radiate radio
frequency energy and, if not installed and used in
accordance with the instructions, may cause harmful
interference to radio communications. However, there
is no guarantee that interference will not occur in a
particular installation. If this equipment does cause
harmful interference to radio or television reception,
which can be determined by turning the equipment
off and on, the user is encouraged to try to correct
the interference by one or more of the following
measures:
• Reorient or relocate the receiving antenna.
COUNTRIES RTTE APPROVAL COMPLIED
All EU countries, Switzerland CH
and Norway N
EU-DECLARATION OF CONFORMITY
Hereby, Oregon Scientic, declares that this Wireless
Rain Gauge with Indoor / Outdoor Thermometer
(Model RGR126) is in compliance with the essential
requirements and other relevant provisions of Directive
1999/5/EC.
A copy of the signed and dated Declaration of Conformity
is available on request via our Oregon Scientific
Customer Service.

EN
13
• Increase the separation between the equipment
and receiver.
• Connect the equipment into an outlet on a
circuit different from that to which the receiver is
connected.
• Consult the dealer or an experienced radio / TV
technician for help.
DECLARATION OF CONFORMITY
The following information is not to be used as contact
for support or sales. Please visit our website at www2.
oregonscientic.com/service for all enquiries.
We
Name: Oregon Scientic, Inc.
Address: 19861 SW 95th Ave.,Talatin,
Oregon 97062 USA
Telephone No.: 1-800-853-8883
declare that the product
Product No.: RGR126
Product Name: Wireless Rain Gauge with
Indoor / Outdoor Thermometer
Manufacturer: IDT Technology Limited
Address: Block C, 9/F, Kaiser Estate,
Phase 1,41 Man Yue St.,
Hung Hom,
Kowloon,
Hong Kong
is in conformity with Part 15 of the FCC Rules.Operation
is subject to the following two conditions: 1) This device
may not cause harmful interference. 2) This device must
accept any interference received, including interference
that may cause undesired operation.