IDT Technology SE833 2.4GHz Speed and Distance Watch User Manual sz908
IDT Technology Limited 2.4GHz Speed and Distance Watch sz908
UserManual.wiki
>
IDT Technology
>
SE833 User Manual
Users Manual
Navigation menu
Upload a User Manual
Namespaces
Wiki Guide
HTML
PDF
Info
Views
User Manual
Discussion / Help
Navigation
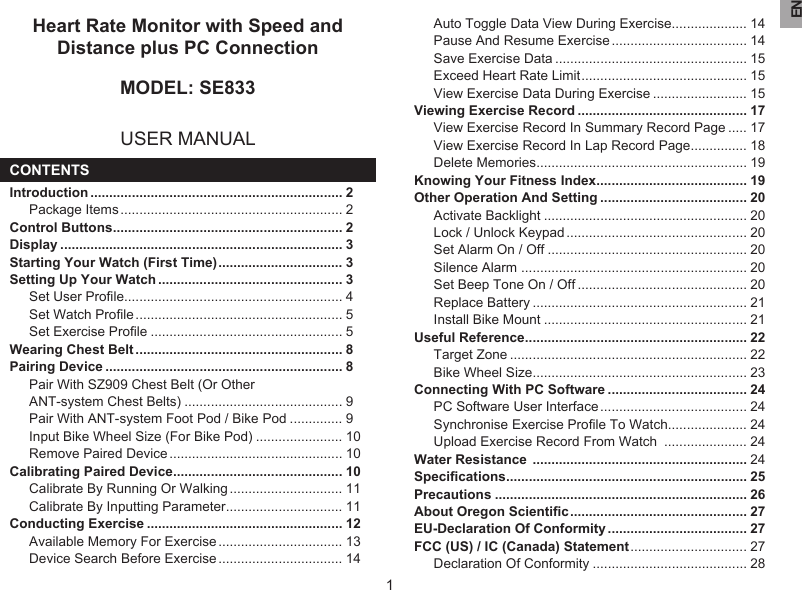
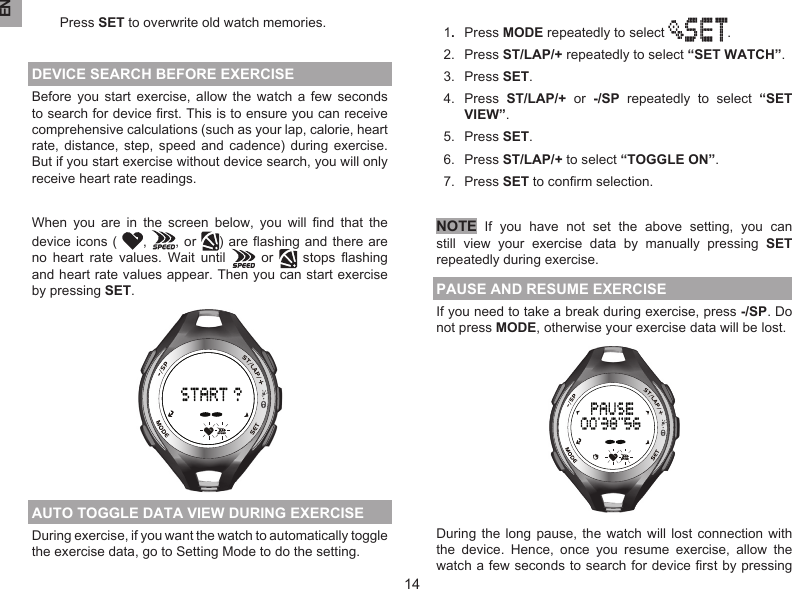
![EN62. Interval training on/off 2a If you set interval training to on, you have to set:v Number of interval (2-5)v Exercise time for each intervalv Rest time for each intervalv Target heart rate zone (1-5) [For details, refer to “TARGET ZONE” section in this manual]v Recovery timer on/offpress SETpress SETpress SETpress SETpress SETpress SETto toggle on or offinterval training on/offto increase valueto increase valueto increase valueto confirm setting; to next pageto next pageto next pageto confirm setting; to next pageto exitto decrease valueto exitto decrease valueto exitto exitto decrease valueto exitto exitto decrease valuenumber of intervalexercise time for each intervalrest time for each intervalto increase valueto next pagetarget heart rate zoneto toggle on or offto next pagerecovery timer on/off](https://usermanual.wiki/IDT-Technology/SE833/User-Guide-1211413-Page-6.png)
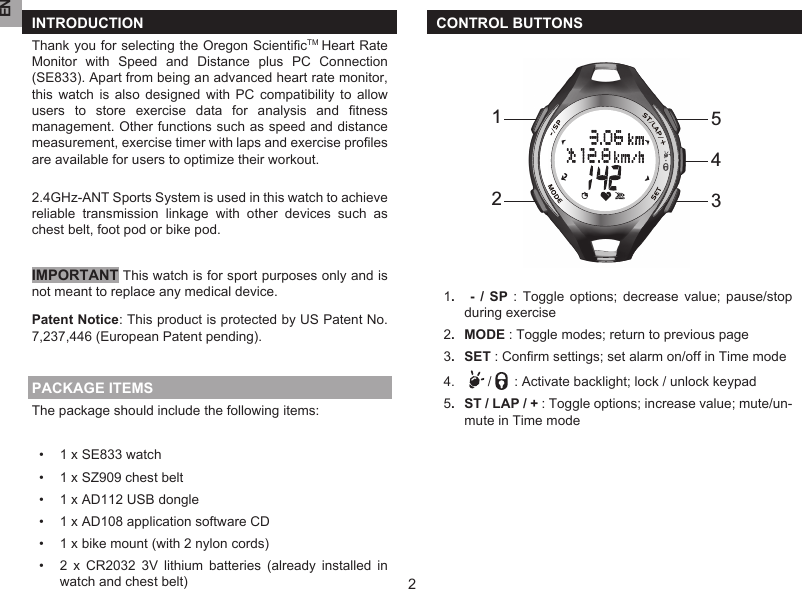
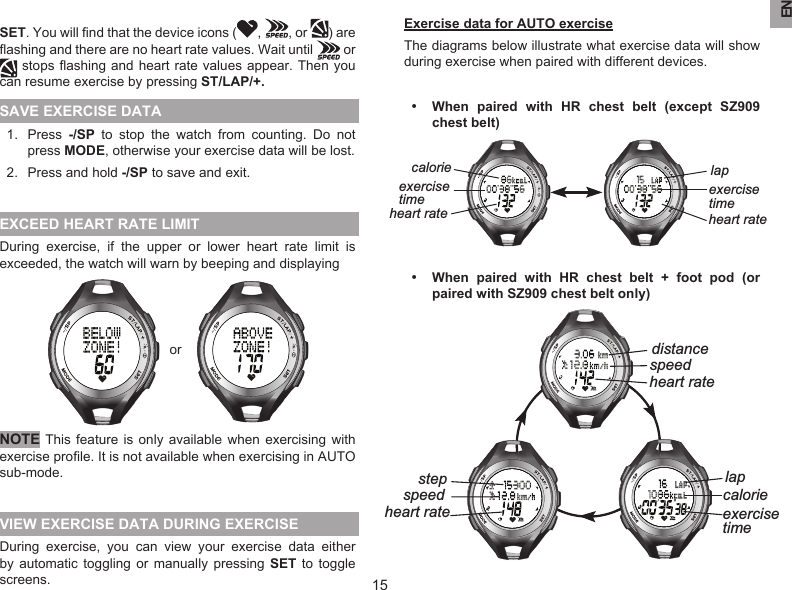
![EN72b If you set interval training to off, you have to set (for Cardio setting only):v Exercise time v Target heart rate zone (1-5) [For details, refer to “TARGET ZONE” section in this manual]v Recovery timer on/offpress SETpress SETpress SETto toggle on or offinterval training on/offto increase valueto increase valueto toggle on or offto next pageto next pageto confirm setting; to next pageto next pageto exitto exitto decrease valueto exitto exitto decrease valueexercise timetarget heart rate zonerecovery timer on/off2c If you set interval training to off, you have to set (for Run and Cycling setting only):v Exercise by distance or by timev Exercise distance or exercise timev Target heart rate zone (1-5) [For details, refer to “TARGET ZONE” section in this manual]v Recovery timer on/offpress SETpress SETpress SETpress SETto toggle on or offinterval training on/offto toggle by distance or by timeto increase valueto toggle on or offto next pageto next pageto next pageto exitto exitto decrease valueto decrease valueto exitto exitexercise by distance or by timeexercise distance; exercise timeto confirm setting; to next pagerecovery timer on/offto increase valueto next pageto exittarget heart rate zone](https://usermanual.wiki/IDT-Technology/SE833/User-Guide-1211413-Page-7.png)
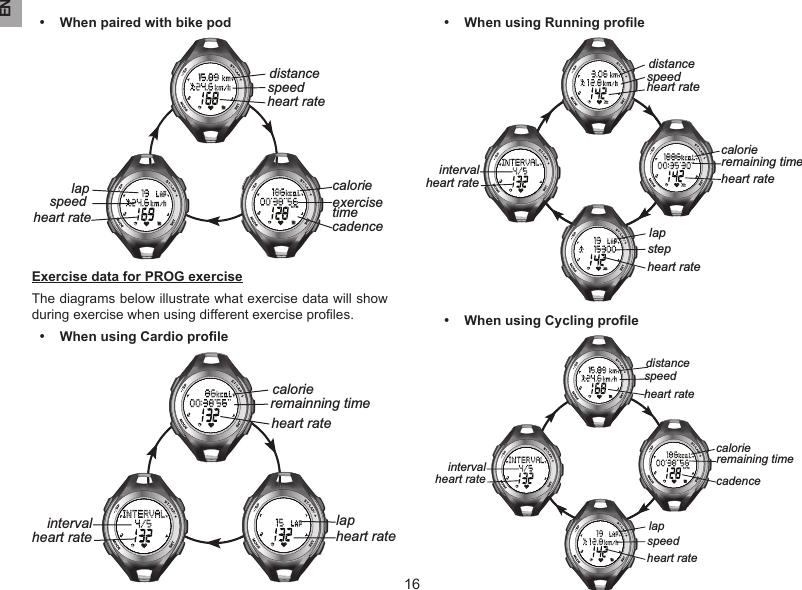


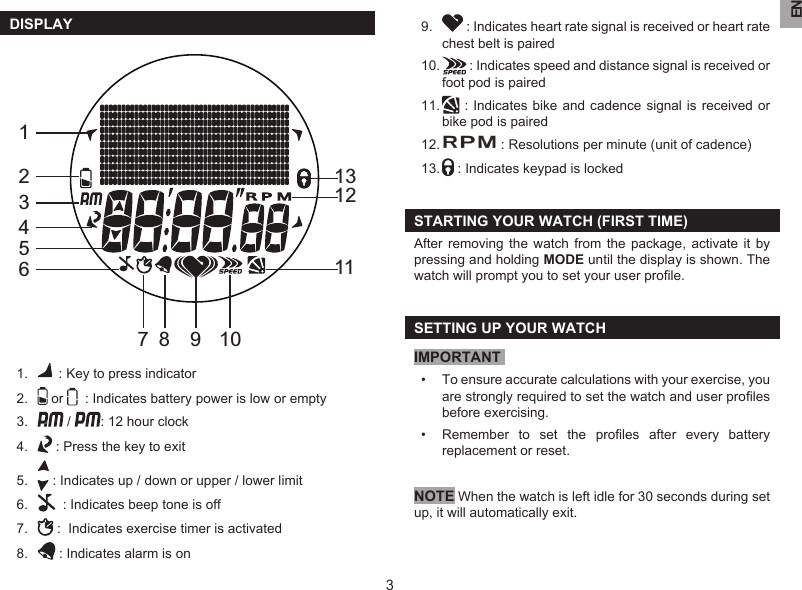
![EN23There are three categories of training as described in the table below.TRAINING CATEGORY MHR% DESCRIPTIONHealth Maintenance 65-78%This is the lowest training intensity level. It is good for beginners and those who want to strengthen their cardiovascular systems.Aerobic Exercise 65-85%Increases strength and endurance. It works within the body’s oxygen intake capability, burns more calories and can be maintained for a long period of time.Anaerobic Exercise 78-90%Generates speed and power. It works at or above the body’s oxygen intake capability, builds muscle and cannot be maintained for a long period of time.The upper and lower heart rate limits are calculated by multiplying your MHR by the percentages of the selected training category.For example:A 40-year-old training for basic health maintenance:• His upper heart rate limit [220 - 40(age)] x 78%• His lower heart rate limit [220 - 40(age)] x 65%IMPORTANT Always warm up before exercise and select the training category that best suits your physique. Exercise regularly, 20 to 30 minutes per session, three to four times a week for a healthier cardiovascular system.WARNING Determining your individual training category is a critical step in the process towards an efficient and safe training programme. Please consult your doctor or health professional to help you determine exercise frequency and duration appropriate for your age, condition and specific goals.BIKE WHEEL SIZEMatch the ETRTO or wheel size diameter printed on the wheel with the wheel size setting at the right hand column of the table below. Input the relevant wheel size setting number after bike pod is paired.ETRTOWheel size diameter (inches)Wheel size setting (mm)25-559 26 x 1.0 188423-571 650 x 23C 190935-559 26 x 1.50 194737-622 700 x 35C 195847-559 26 x 1.95 202220-622 700 x 20C 205152-559 26 x 2.0 205423-622 700 x 23C 207025-622 700 x 25C 208028-622 700 x 28 210132-622 700 x 32C 212642-622 700 x 40C 218947-622 700 x 47C 2220](https://usermanual.wiki/IDT-Technology/SE833/User-Guide-1211413-Page-23.png)