ILIFE TECHNOLOGY K707G Tablet with WLAN, WCDMA and Bluetooth User Manual User Guide
ILIFE TECHNOLOGY(HK) LIMITED Tablet with WLAN, WCDMA and Bluetooth User Guide
K707G User Guide update

1
K707G User Guide
TABLET OF CONTENT
Precautions........................................................................................................................................2
Main Functions...................................................................................................................................3
Product Details....................................................................................................................................4
Charging battery..................................................................................................................................5
How to use..........................................................................................................................................5
Storage & Micro SD............................................................................................................................6
Transferring Files................................................................................................................................6
Home Screen......................................................................................................................................7
Access Internet...................................................................................................................................8
Bluetooth Setting.................................................................................................................................9
Web Browser.......................................................................................................................................9
Setting...............................................................................................................................................11
Watch A Video...................................................................................................................................12
Listen to Music..................................................................................................................................13
View Your photo................................................................................................................................15
Using the camera..............................................................................................................................16
Explore Files......................................................................................................................................17
Other Applications............................................................................................................................19
Manage APPS...................................................................................................................................20
Manage Tasks...................................................................................................................................21
Trouble Tooling..................................................................................................................................21
Specifications....................................................................................................................................21

2
Precautions
This manual includes important information on safety precautions and corrects usage of this
product. To prevent any accident, please make sure that you have read this manual carefully before
you use this product.
Do not keep this product in a place with a high temperature, humidity or too much dust.
Especially that does not place this product in a car with all windows closed in summer, and keep
out of direct sunlight.
Avoid dropping or shocking this product heavily and avoid shaking the display violently,
otherwise, the display may be damaged or cannot play correctly.
Please choose a suitable volume. Avoid excessively high volume when using a headset. If you
feel any ear noise, please decrease the volume or stop using.
Do not break the connection suddenly when this player is conducting formatting, uploading or
downloading operations, otherwise there may be program errors.
This company will not undertake any responsibility for any memory loss due to product damage,
repairing or other reasons.
Do not disassemble this product by yourself and do not clean the surface of this product with
alcohol, thinner or benzene.
Do not use this product in a place where the using of electronic device is prohibited, such as on
a plane.
Do not use this product while driving a car or walking on a street, otherwise traffic accident may
occur.
※ This company reserves the right to make any improvement on this product. No further notice will
be provided on any variation on the specification and design of this product!
★ (This product has no water-proof function)

3
MAIN FUNCTIONS
7 inch capacitive touch screen display ,1280*800 pixel resolution;
Support HDMI by 2160P Video output
Support 3D video and 3D games
Support Bluetooth function
Support OTG function, without any host, you can connected it with any USB device directly to
transfer data.
Multiple network access methods, it can access to internet with WIFI function, Ethernet or 3G
funtion.
Support G-Sensor function, you can display the screen in horizontal or vertical mode.
Support installation and application of the APK application program, abundant software can
download and installation through the internet.
Business and entertainment function,abundant software such as e-mail,word, website browsing,
news, Instant messaging, financial, blog, games online, video online, stock market ,weather
report ,mobile TV, maps, fun software, etc. can be used.
Support MicroSD Card, with capacity up to 32GB;
Free style set, Power-saving setting, adjustable brightness and user-defined sleep power-off
time;
4
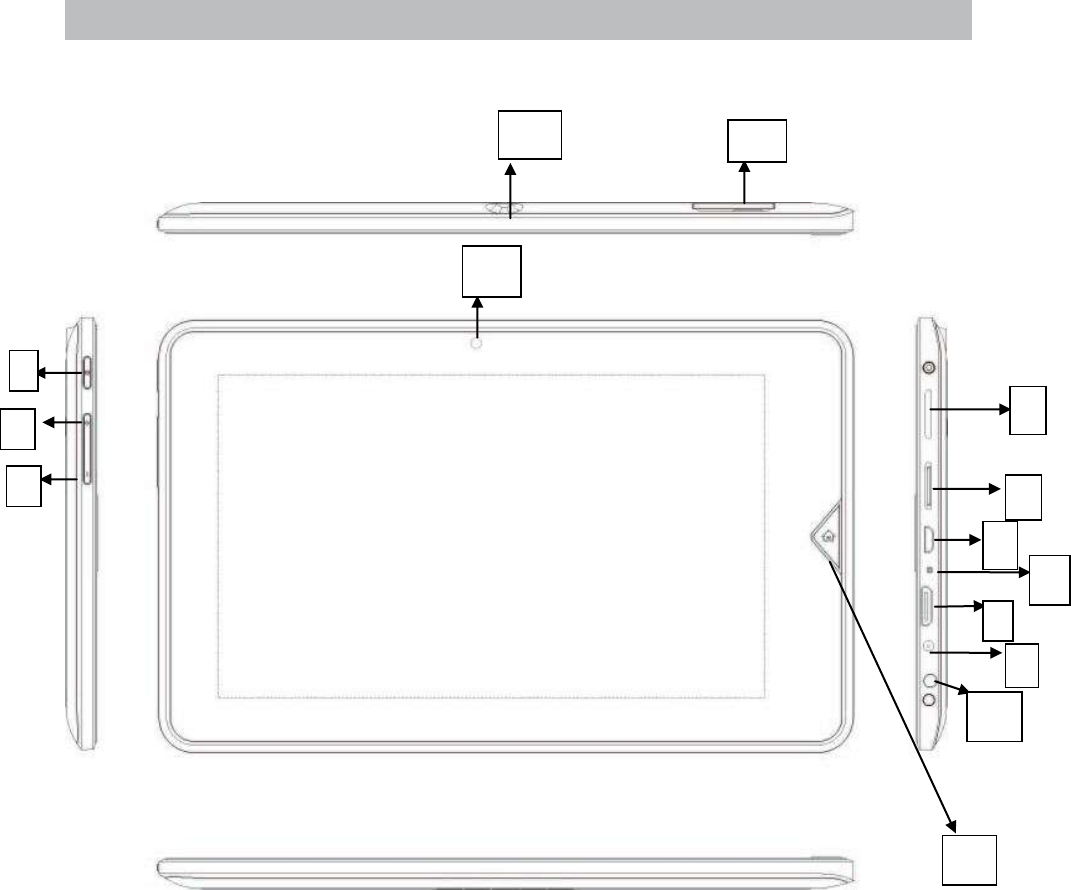
PRODUCT DETAILS
1. Power key
2. Volume +
3. Volume -
4. Speaker
5. MicroSD slot
6. USB port
7. Reset
8. HDMI port
9. DC in
10. Audio output
1
2
3
4
5
6
8
11
12
14
13
7
9
10
5
11. Home key
12. Back camera
13. Front camera
14. Sim card slot

6
CHARGING THE BATTERY
The device has a built-in rechargeable battery. No extra battery installation is
required ,just charge the device when it indicates low battery.
Charge the battery: connect the device to any standard wall outlet via the DC-IN port
using the power adaptor.
The device may with only a small amount of charge in the battery, so the first time you
use it we recommend you charge it for around 8 hours using the power adaptor
provided.

7
HOW TO USE
Turn on/off
To turn on/off the machine, press the POWER button for 3 seconds. To turn off ,select “Power off”
and confirm it.
Enable/disable screen
Once the machine is turned on, short press POWER button to turn off the screen, and you will save
energy. To turn on the screen, press POWER again
Note: The screen is locked when the screen is off, to unlock the screen, pull the lock icon from left to
right.
Operation of the touch screen
There are three ways to operate the screen of your tablet:
1. Touch & hold: Touch & hold an item on the screen by touching it and not lifting your finger until
an action occurs
2. Drag: Touch& hold an item for a moment and then, without lifting your finger, move your finger
on the screen until you reach the target position. For example, you can drag to reposition
shortcuts on the Home screen.
3. Swipe or slide: Quickly move your finger across the surface of the screen, without pausing when
you first touch (so don’t drag something instead). For example, you can slide a Home screen left
or right to view the other Home screens.
4. Pinch: In some apps(such as Maps, Brower, and Gallery),you can zoom in and out by placing
two fingers on the screen at once and pinching them together( to zoom out) or spreading them
apart(to zoom in)
Note: To avoid scratching or crushing, do not place objects on the touch screen surface.

8
STORAGE&MICROSD
To add a Micro SD card carefully insert it into the MicroSD cards slot with the label
facing the same way as the screen. You’ll feel a light “click” which means the card is
locked in place.
To remove it simply push the card inwards slightly until you feel a light “click”. Then
release the card, allowing it to “ pop out” and you can gently remove it.
Note: MicroSD card not included.
TRANSFERING FILES
Once the machine is turned on, the following screen will be displayed on your tablet
(1) Connecting the device to a computer with the supplied USB cable
(2) Once the connection is down, a mobile phone icon will appear on your computer. Now you can
copy files from the PC to the internal memory or the memory card.
9
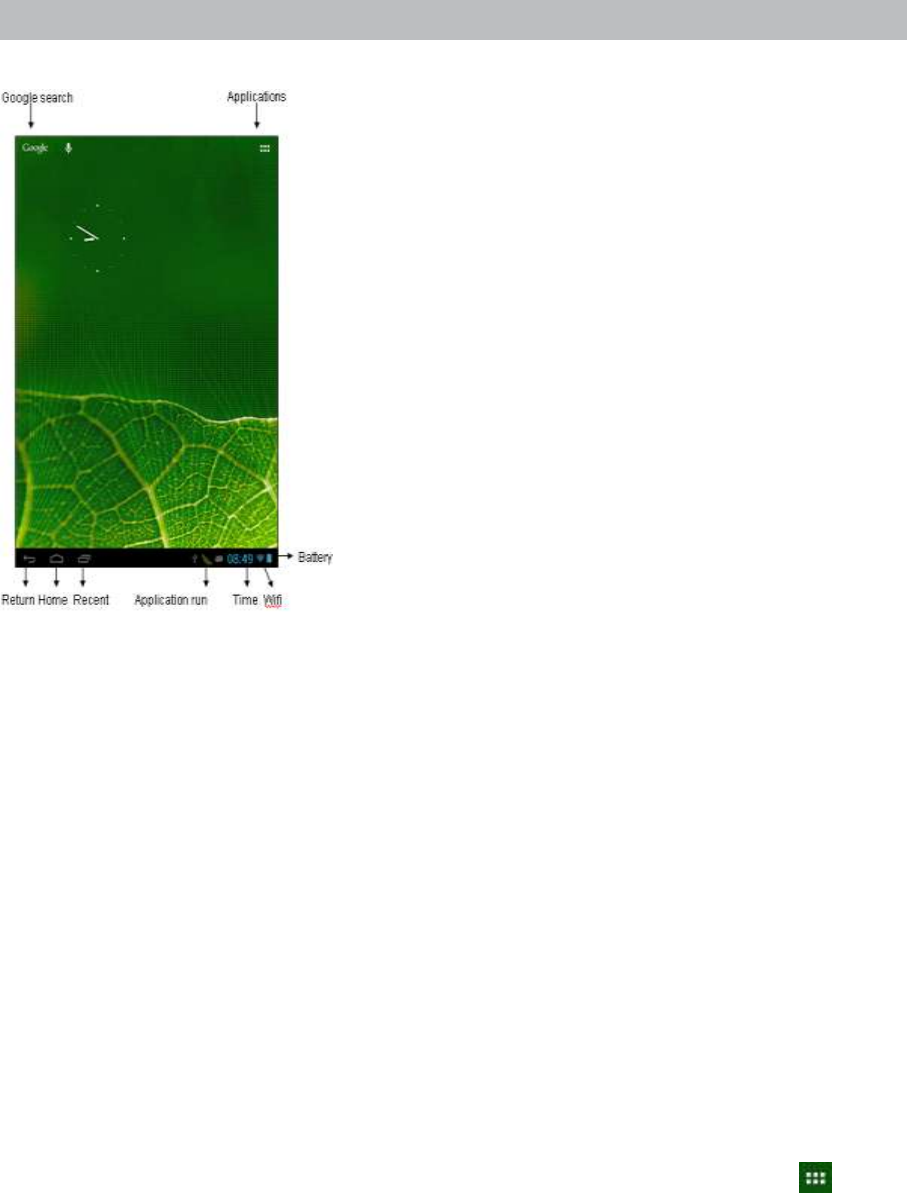
HOME SCREEN
Desk top-Overview
(1) Return: opens the previous screen you were working in, even if it was in a different app. Once
you back up to the Home screen, you can’t go back any further in your history.
(2) Home: opens Home. If you’re viewing a left or right Home screen, opens the central Home
screen.
(3) Recent apps: opens a list of thumbnail images of apps you’ve worked with recently. To open an
app, touch it. To remove a thumbnail from the list, wipe it to the right.
The extend home screen
The home screen consists five separate screens for positioning the shortcuts, widgets, etc. Slight
your finger from left or right to go to the extended screen.
Customizing Home Screen Items
(1) To add a Home screen item ( shortcut, widgets, etc.) You can tap the application icon to
display all the applications or widgets, then hold your tap on the item to place it on the home
page. (Note: If current Home screen has no enough room for a shortcut or widgets, you will be
prompted that is no more room)
(2) To move a Home screen item, hold your finger onto it to highlight it, then drag it to the desired
location and release it.

10
(3) To remove a Home screen item, hold your finger onto it to highlight it, then drag it to the recycle
bin and then release your finger.
Changing the Wallpaper
Tap the setting icon on the Home screen to open the setting menu and set your desired
wallpaper in the display submenu.
Display all the applications and widgets
The device has many useful pre-installed application / widgets, You can tap the Application Tab
to display them.
ACCESSING INTERNET
Make Wi-Fi connection
The device connects to the internet using a wireless broadband connections. You can connect using
a home network, or when you’re out and about using the many free hotspots that you can find in
coffee shops, libraries etc.
To connect to Wi-Fi please follow these simple instructions:
(1) Tap the Setting icon
(2) Slide the Wi-Fi button to the right so it’s in the “ON” position
(3) The device will scan the area and display a list of all available Wi-Fi hotspots. Choose a network
from the list, then tap “connect” to connect. If the hotspot is “password protected” you need to get
the password from your Internet Service Provider, or from your network administrator
Note:
1. The available network list is constantly refreshed automatically
2. When the Wi-Fi is enabled, the device will connect automatically to your configured networks
when they are in range.
3. If the unit reports “ no connection” or “ connection failed”…the most common cause of this is that
the Password was typed incorrectly. To try again, select your WIFI name, press Forget;turn the
WIFI off and on, to start the procedure again.
4. Once you have connection the first time, you not need to go through this procedure again as all
11
settings and connections are now written to the unit’s software.
3G function
Besides Wi-Fi connection, you can access internet by 3G. Before connecting 3G , you need to
disconnect Wi-Fi network and make sure the setting “ Mobile work”--"Modem power" is off. Insert
Sim card, then turn on "Modem power" again. And then the 3G network is enabled with 3G network
icon appearing at the bottom right of the screen. You can surf on the Internet freely now
3G calling function.
Pls use the phone Apps in the main menu, and dial the number, which you want to like a Mobile.
BLUETOOTH SETTING
Bluetooth on/off: Slide the Bluetooth button to the left or right.
Rename the Bluetooth: Touch the icon to rename it.
Detectability: Bluetooth device nearby can detect the Tabet,you can tap the name to disconnect
the detectability.
Search bluetooth device: Click “ SEARCH DEVICES” to search bluetooth device within 10m.
Pair and connection: After detecting the bluetooth service, input the PIN code to pair and
connect.
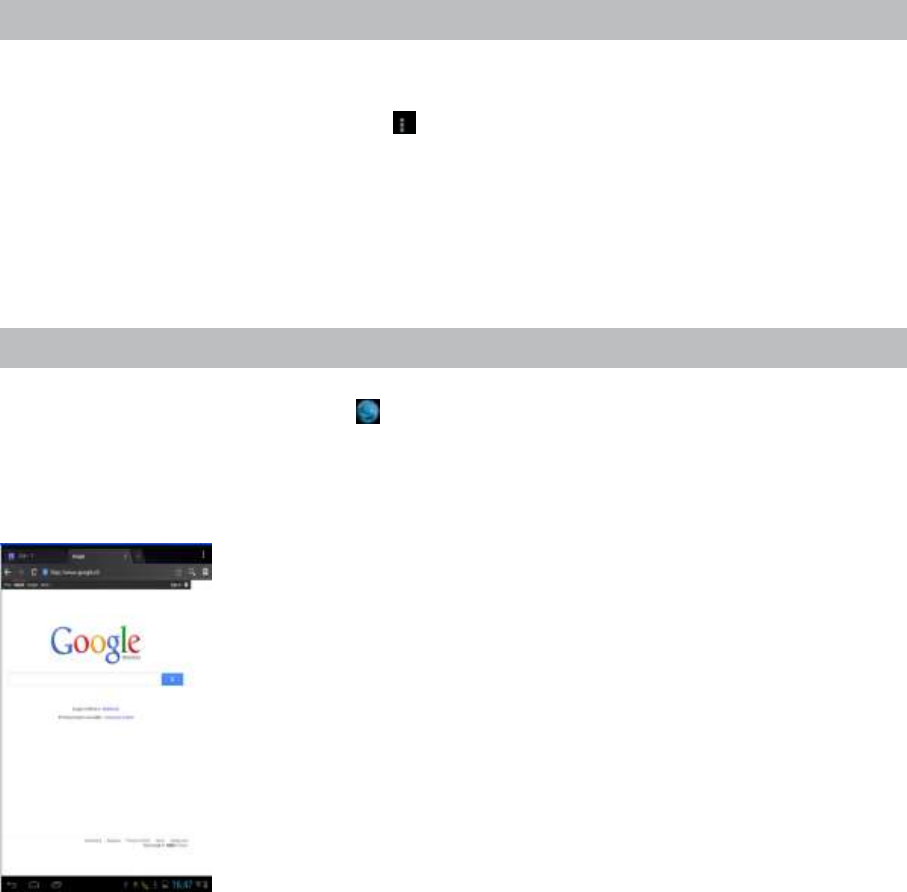
WEB BROWSER
On the application page, press the icon to connect to the Internet through the browser, input the
URL in the address bar .After opening the webpage , you can use finger to slip up and down, to scan
and check other part of website.
Bookmark manager

12
(1) setting webpage mark
In the browsing interface, if you want to add the current address as the bookmark, click icon “ ” ,
then you’ll see the following interface, click OK to confirm.
(2) Open bookmark
In the interface of browser, click “ ” to select “Bookmark”, select you wanted bookmark to open
the webpage.
(3) Edit bookmark
In the bookmark interface, press any bookmark, it will pop up the following menu, then you can edit
the bookmark.
Using the visual keyboard
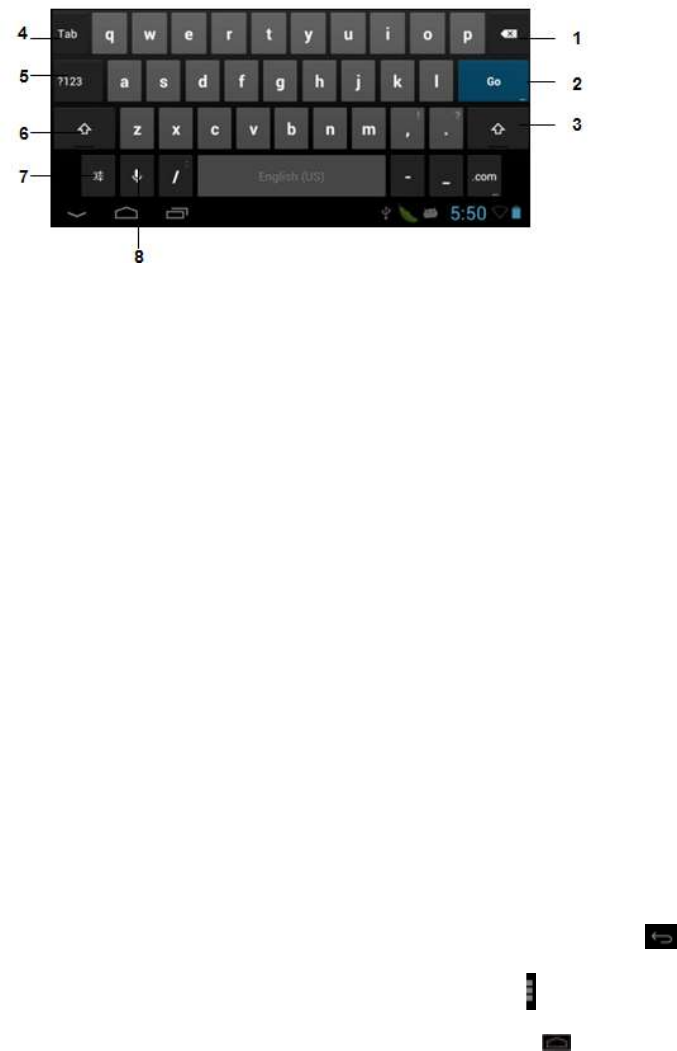
13
1---------Delete key
2---------Go to next step when you finished text entry
3-------- Switch between upper case and lower case
4---------Tab key
5---------Switch between text entry and digital input
6-------- Switch between upper case and lower case
7---------Press to set input language and Android keyboard
8---------Voice searching
Using the web browser
(1) You can scroll the screen up and down by tapping on the page and dragging it up or down (be
careful not to tap a link until you are ready!)
(2) To open a link, simply tap it
(3) To go back to the previous page that you browsed, tap the Back icon
(4) To display the available menu items, tap the Menu icon
(5) To go back directly to the Home screen, tap the Home icon .
14
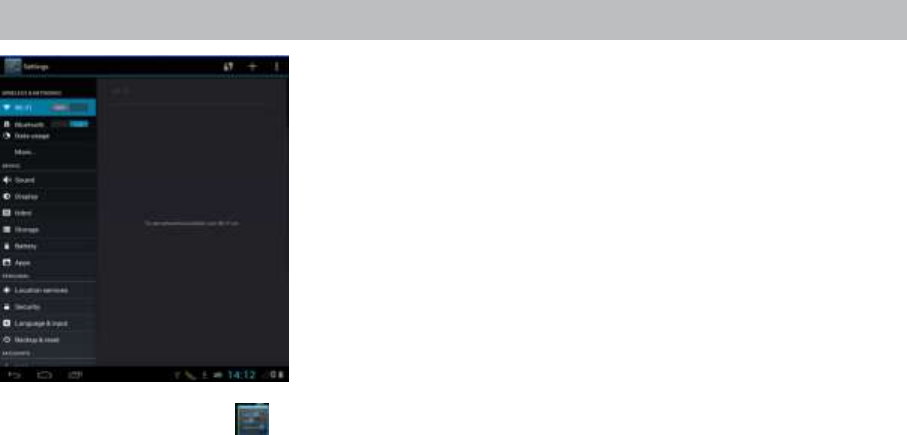
SETTINGS
On the home page, press to enter the system setting. You can then adjust the settings below.
Wifi: Access the WIFI management interface
Bluetooth : Access Bluetooth interface
Data usage: Check data usage
Sound: Adjust sound settings
Display: Adjust screen settings
HDMI: Adjust HDMI settings
Storage: Check storage space
Battery: Check battery usage
Applications: Manage all applications
Location services: Control google’s search
Security: Set password/screen lock
Language & input: Set up input parameters
Backup & reset: Backup the unit/ Reset it
Add account : Add corporate, email or google account
Date and time: Set the time and date
Accessibility: Set talkback
Developer options: Set desktop backup password, USB debugging etc.
About Tablet: Specs of this device
15
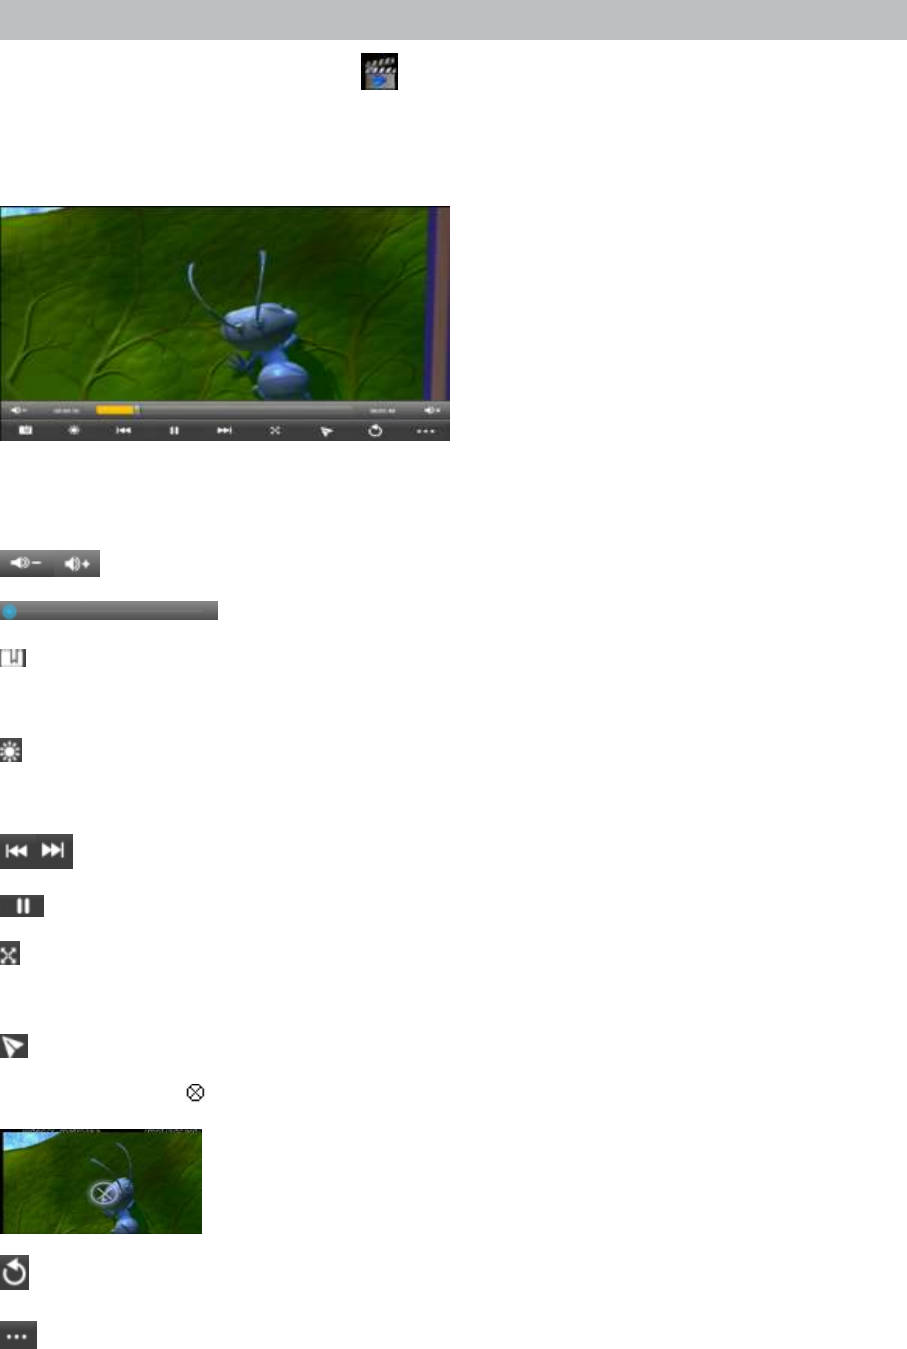
WATCH A VIDEO
On the application page, press the icon to access the interface of the video player. Slide your
finger across the screen from up to down to scroll the list of files and press one of the files to start
playing.
The icons in the toolbar above are all the functions of the video playback:
: Press to decrease or increase the volume.
: To visualize the playback time or to move to a specific point of the video.
: Set bookmark, the video will playback from the bookmark everytime if one has been set, delete
the bookmark in setttings
: Adjust the screen brightness, click this button to adjust screen brightness, 5 levels brightness
provided.
: Prec/Fast Backward, short click to playback next video, long click to fast forward
: Pause/Play, click to pause the video while playing, click for playback to continue
: Adjust the screen size, click this button to adjust screen size, there are four modes, original size,
full screen, 16:9 and 4:3
: Click to display the video in a separated widow, shown as following,,press the window around
2 seconds, the icon “ “ will show, slightly press the icon, the video will be deleted.
:Click this button to return video files display interface
: Video settings
16
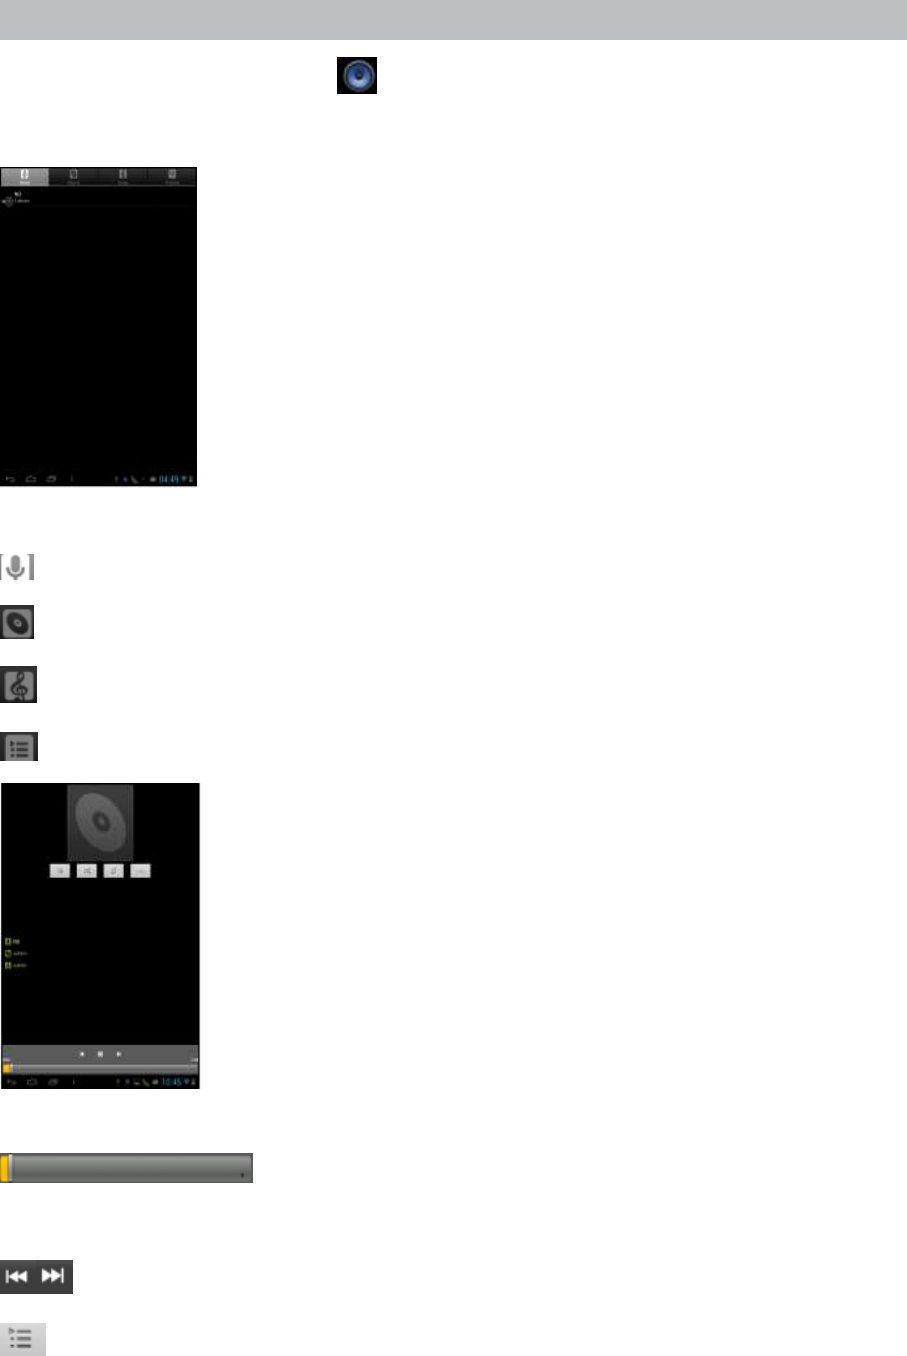
LISTEN TO MUSIC
On the application page, press icon to access the music player interface. Slide your finger
across the screen from up to down to scroll the list of files and press one of the files to start playing.
: Press to sort the songs by singer
: Press to sort the songs by album
: Press to display all the audio files on the screen
:Press to see the recently added titles
The icons in the toolbar above are functions of the audio playback:
: To visualize the playback time or to move to a specific point of the
audio file.
: Short click to playback previous/next music, long click to fast backward/forward
: Press the display the list of audio files
17
: Press to enable or disable the shuffle.
: Press to set the repeat mode, repeat all, repeat one or deactivate
: Press to display LRC
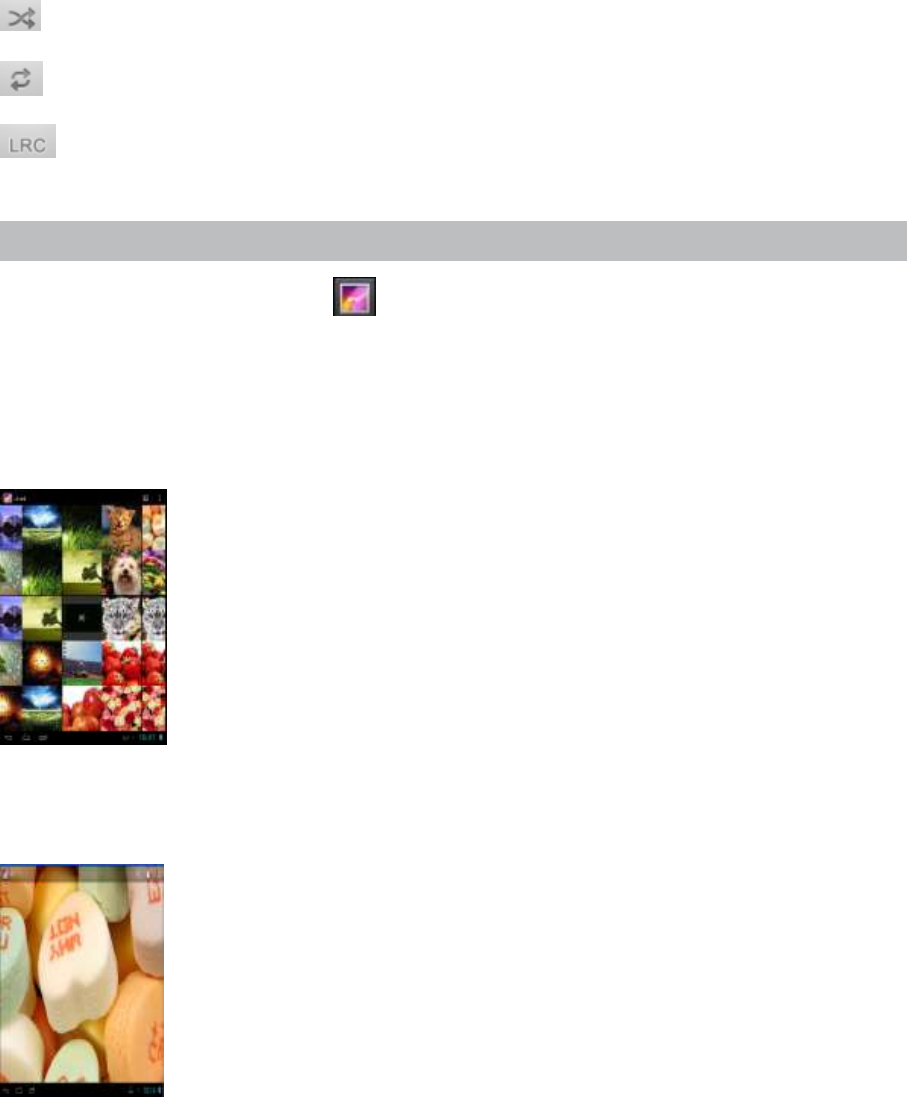
VIEW YOUR PHOTOS
On the applications page, press icon to access the picture player interface.
Viewing Photos
(1) Photos should be listed in thumbnail. You can slide your finger on the screen left or right to browse
photos.
(2) Tap a photo thumbnail to view the photo in full screen.
(3) To display the previous/next picture, slide your finger on the screen
(4) To zoom in or out the picture, pinch your finger on the picture
Display menu
When you are viewing the picture, you can tap on the screen or the Menu icon to show a menu.
18
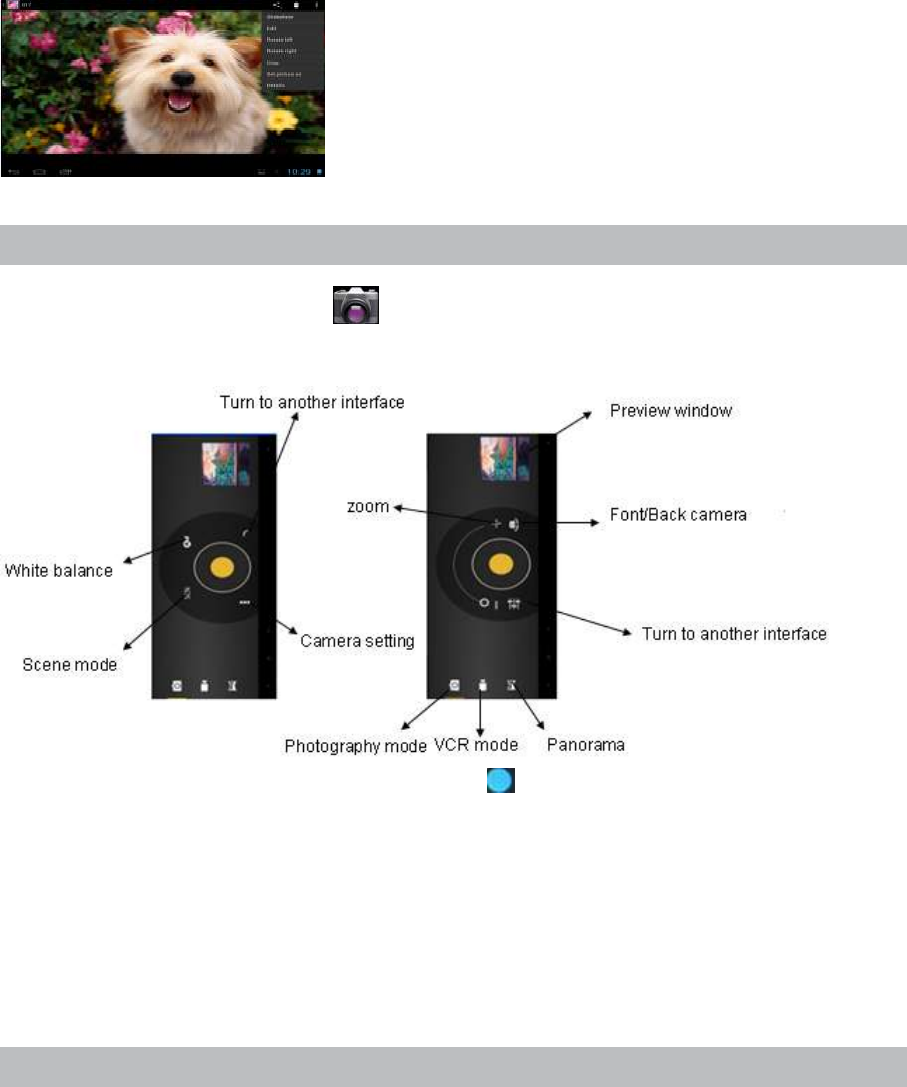
USING THE CAMERA
On the applications page, press icon to access the camera interface. The camera interface is
displayed below:
To start making video clips, tap on the Start/Stop button to start video recording.
Tap on the Start/Stop button again to stop video recording or photographing.
The video clip / photo can be previewed in the Preview Window.
To play the video clip that you have made, enter the Video Player, and then tap the video.
To view the photo that you have taken, enter the Photo Viewer mode, and then tap the photo.
EXPLORING FILES
You can explore files and folders with Explorer application
Using the Explorer
(1) Navigate through Files and Folders
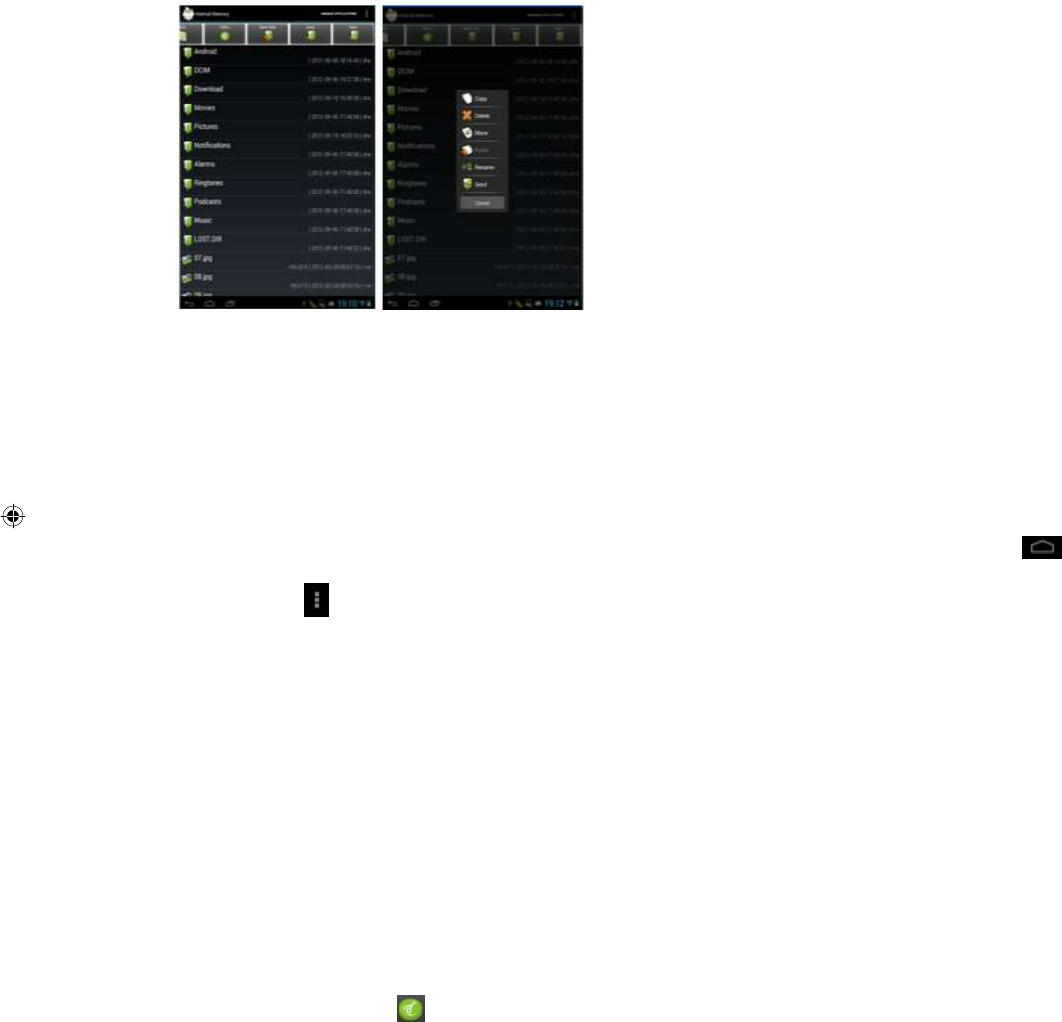
19
Tap the Explorer icon in the application page to launch the File Explorer.
You can drag your finger up and down to scroll the file list up and down.
To open a file or folder, tap the file
You can go back or forward one level in the interface by tapping on the Back icon or Next icon
You can go back one level in the directory by tapping on the LevelUp button .
Wherever you are in the interface, you can go back directly to the Home screen by tapping
Tapping can hide/display the toolbar.
Tap the Home icon to go to the root directory.
Copy/Move Files and Folders
(1) In the file list, scroll up and down by sliding your finger to select the file/folder that you want to
copy or move.
(2) Hold the selected file/folder until a pop-up menu appears.
(3) Select “Copy” or “Move” from the pop-up menu.
(4) Navigate to the location where you wish to copy or move the file/folder to
(5) Select the Editor icon from the toolbar and then choose “Paste.”
Delete Files and Folders
(1) In the file list, scroll up and down the list by sliding finger to select the file/folder that you want to
delete.
(2) Hold the selected file/folder until a pop-up menu appears.
(3) Select “Delete” from the pop-up menu, then select “Delete” to confirm or “Cancel” to quit.
Rename Files and Folders
(1) In the file list, scroll up and down the list by sliding finger to select the file/folder that you want to
rename.

20
(2) Hold the selected file/folder until a pop-up menu appears.
(3) Select “Rename” from the pop-up menu.
(4) Tap the input field to display the virtual keyboard, and then choose letters from the virtual
keyboard to rename the file/folders.
(5) Tap “OK” to confirm the new name.
Select Multiple Items
You can select more than one file or folder together.
(1) In the top toolbar, tap the Multi icon “ ”
(2) Tap the files/folders you want to choose. The file/folder name turns red when selected. (To
deselect the file/folder, tap it again.)
(3) Once you finished selection, you can delete, copy or move the selected files by tapping on the
Editor icon .
OTHER APPLICATIONS
Some useful small apps have been preinstalled in this device, such as Calculator, Calendar, Sound
Recorder, Playstore etc.. They are easy to use, thus no detailed instructions are necessary for these
apps. Please always follow the actual operation of your device.
MANAGING APPS
You can manage your applications of the device easily.
There are number of useful apps pre-installed in the device as it is produced at the factory, and you can
copy some from other resources, download or purchase them over the internet.
Download or purchase applications
With your device, you can visit an apps store or E-market website that provides you plenty of free
apps to download. For those apps that are not free, you will have to pay for them if you want to have
them.
Install applications
You can install applications following these steps:
(1) Open the Explorer application, then find the app you want to install.
(2) Tap the app you want to install to start installation. However, for the sake of security, the device
may prompt you that there is possibility of attack risk if you install and run some apps whose
sources are not guaranteed. In this case, you shall turn to the Settings menu and select

21
Security to check the “Unknown sources” before you go on with the installation.
(3) Once the installation is completed, you can find the icon of the app in the apps screen. It is
ready for running.
Uninstall applications
(1) Tap the Settings shortcut in the Home Screen to display setting menus.
(2) Select “Apps”.
(3) Tab on the application that you want to uninstall.
(4) Tab on “Uninstall” to uninstall the application.
(5) You can simply tap and hold on an app icon to jump to the Home Screen, then drag it to the
dustbin icon to uninstall it.
Note:
(1) You cannot uninstall the pre-installed applications, but you can deactivate or stop them
(2) Make sure all apps you have copied or downloaded to your device are in the .apk format.
(3) Some applications developed for Android mobile might not run properly in the device. Please
consult the respective software developer for further information.
MANAGING TASKS
The device can handle multiple tasks at the same time. For example, you can view photos while
listening to music. Multitasking is helpful but inefficient if too many tasks are running. In order to save
system memory and enhance system performance, you can end some tasks that you don’t use at the
moment.
(1) Tap the to show applications that you used recently.
(2) Hold your tap on the application that you want to stop, and then select “Remove from list”.
(3) Besides, you can open the Setting menu and select Apps to manage the tasks
TROUBLE SHOOTING
Reset the device
(1) In the event that the device freezes, you can force the device to shut down by pressing and holding
the Power button for a few seconds.
(2) If the Power button does not reset your device, use the “ pinhole reset” button, located in right side
of the device
22
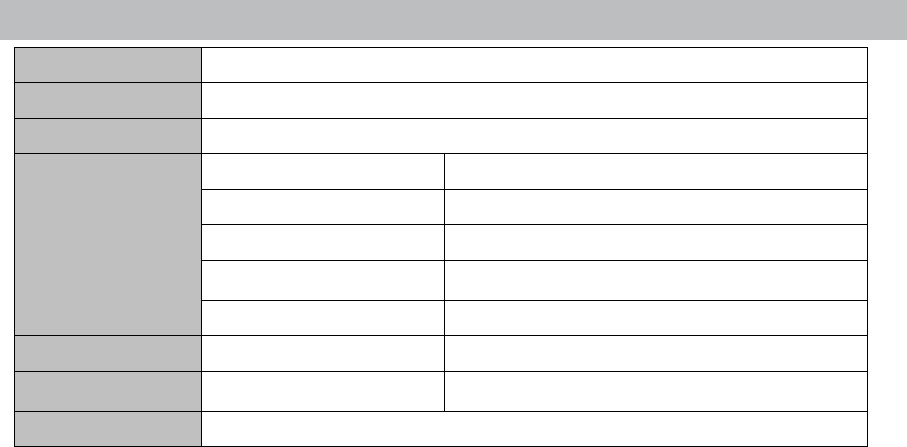
SPECIFICATIONS
Dimension
197.3*122.8*8.6mm
Display
7.0 inch, capatitive touch-screen display, 1280*800
PC connection
High speed USB 2.0
configuration
CPU
Rockchip 3066
Processor
Cotex A9 @1.6Ghz
Ram
DDRIII 1GB
TF card
1GB-32GB(should buy)
operating system
Android 4.1
Access network
Wifi
802.11 b/g/n
Audio parameter
SNR
>=90dB
OS supported
Windows2000/XP/Vista/WIN7/MAC
FCC STATEMENT
This device complies with Part 15 of the FCC Rules. Operation is subject to the following two
conditions:
(1) This device may not cause harmful interference.
(2) This device must accept any interference received, including interference that may cause undesired
operation.
Warning: Changes or modifications not expressly approved by the party responsible for compliance
could void the user's authority to operate the equipment.
NOTE: This equipment has been tested and found to comply with the limits for a Class B digital device,
pursuant to Part 15 of the FCC Rules. These limits are designed to provide reasonable protection
against harmful interference in a residential installation.
This equipment generates uses and can radiate radio frequency energy and, if not installed and used in
accordance with the instructions, may cause harmful interference to radio communications.
However, there is no guarantee that interference will not occur in a particular installation. If this
equipment does cause harmful interference to radio or television reception, which can be determined
by turning the equipment off and on, the user is encouraged to try to correct the interference by one or
more of the following measures:
Reorient or relocate the receiving antenna.
Increase the separation between the equipment and receiver.
Connect the equipment into an outlet on a circuit different from that to which the receiver is connected.
Consult the dealer or an experienced radio/TV technician for help.
RF warning statement:
The device has been evaluated to meet general RF exposure requirement. The device can be used
in portable exposure condition without restriction.
This device and its antenna( s) must not be co-located or operation in conjunction with any other
antenna or transmitter.
SAR Information:
The exposure limit set by the FCC for wireless portable device employs a unit of measurement known
as the Specific Absorption Rate (SAR).
The SAR is a measure of the rate of absorption of RF energy by the human body expressed in units of
watts per kilogram (W/kg).
The FCC requires wireless phones to comply with a safety limit of 1.6 watts per kilogram (1.6 W/ kg).
For body worn operation, this model tablet has been tested and meets the FCC RF exposure guidelines,
the maximum scaled SAR value is 0.535W/kg, compliance with the FCC limits.
This Device must not be co-located or operating in conjunction with any other antenna or transmitter.