INFOMARK IMW-C910W WiMAX & WiFi Dual CPE User Manual
Infomark Co., Ltd. WiMAX & WiFi Dual CPE
INFOMARK >
user manual
IMW-C910W
User Manuel
Table of list
Chapter 1. Attention ................................................................................................................................................ 4
Chapter 2. Introduction & Requirements ........................................................................................................ 4
Introduction of goods ......................................................................................................................................... 4
What is the IMW-C910W? .......................................................................................................................... 4
System Requirements. ................................................................................................................................. 4
Specification ..................................................................................................................................................... 4
The points of name & Components list ...................................................................................................... 5
Components List in the package. ............................................................................................................. 5
Points of name & Function .......................................................................................................................... 5
Chapter 3. How to use the IMW-C910W ........................................................................................................ 7
Power ON/OFF .................................................................................................................................................... 7
How to charge battery ....................................................................................................................................... 7
Setting of the WiFi AP ....................................................................................................................................... 8
Setting with Window XP ............................................................................................................................... 8
Setting with Window 7 .................................................................................................................................. 9
Setting with Mac OS ...................................................................................................................................... 9
Setting of USB (RNDIS) ................................................................................................................................ 10
Setting with Window XP ............................................................................................................................ 10
Setting with Window 7 ............................................................................................................................... 11
Chapter 4 Configuring CM ................................................................................................................................ 12
Connect to Web CM (Web Connection Manager) .............................................................................. 12
Start CM .......................................................................................................................................................... 12
Input ID/Password ....................................................................................................................................... 12
Description of Web User Interface ............................................................................................................ 12
Introduction .................................................................................................................................................... 12
Home Menu ................................................................................................................................................... 13
LAN settings ....................................................................................................................................................... 15
WiMAX Configuration ..................................................................................................................................... 18
Parametric Data description .................................................................................................................... 18
Network Information description ............................................................................................................ 19
Device Information ...................................................................................................................................... 20
Frequency Setting ....................................................................................................................................... 20
Authentication Setting ................................................................................................................................ 21
Administration setting................................................................................................................................. 22
Status description ........................................................................................................................................ 22
Firmware information ................................................................................................................................. 23
Administration setting................................................................................................................................. 23
Upgrade description ................................................................................................................................... 24
USB Driver description .............................................................................................................................. 2 4
Reboot button description ........................................................................................................................ 24

Chapter 1. Attention
Don’t use in high humidity place.
Use in the clean place.
Install on the safe place without dropping.
Don’t use and keep around electromagnetic waves.
Don’t put the goods on heavy things.
Don’t install and use in the Sun lights directly.
Don’t throw or dismantle the goods.
Don’t heat the goods and battery.
Protect the goods from pets and children.
Don’t put the goods and battery in the water.
Don’t hold power adaptor in the wet hands.
Chapter 2. Introduction & Requirements
Introduction of goods
What is the IMW-C910W?
IMW-C910W is a very inventive product for Portable Mobile WiMAX & WiFi Dual
CPE(Customer Premises Equipment) enabling solution of the problem of lack in user
terminals possible to use Mobile WiMAX service.
When IMW-C910W is left in pocket or bag with its power on in the area where Mobile WiMAX
service is available, user can make concurrent connection to many WiFi terminals by using
WiFi transmitted by IMW-C910W, so it enables free use of wireless internet in any area.
IMW-C910W included WiFi AP support Mobile WiMAX Service through WiFi can be
supported portable devices (Laptop, Desktop, PDA and Smart Phone etc.)
System Requirements.
User’s device will be installed WiFi (IEEE 802.11b/g/n) LAN Card or module.
The PC will be Installed USB port.
Specification
Items Description
WiMAX WiMAX Standard Compliance IEEE 802.16e-2005
Air Interface Internal Antenna(0dBi)
Max output Power 23dBm
WiFi Network Standard IEEE 802.11 b/g/n(HT20)
Frequency/Channels 2.4GHz/11Ch.
Power Battery Built-in Li-Polymer(3.7V/1520mA)
Adaptor 5V / 2A
Dimension / Weight 67.0mm x 67.0mm x 12.5mm/56g
The points of name & Components list
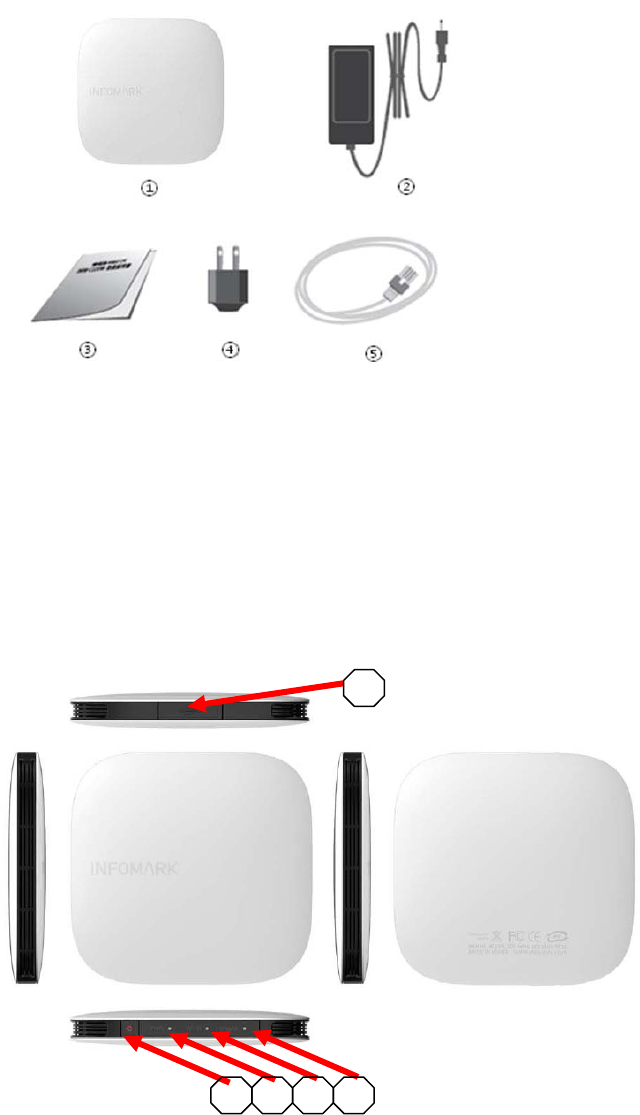
Components List in the package.
① IMW-C910W
② Adaptor [5V / 2A] (Optional)
③ User’s Manual
④ Plug
⑤ USB Cable
Points of name & Function
① USB Port : Battery charging and Tethered operation
② Power button: Power turn Om/Off
1
2
3
4
5

③ Battery Status : battery status and power (Color : Yellow / Green / Red)
④ WiFi Status: WiFi On/Off Status USB Port : (Color : Green)
⑤ WiMAX Status: WiMAX Signal strength (Color : Yellow / Green / Red)
LED Status Scenario
WiMAX Signal LED
Off Power Off
Yellow LED On and Off Frequency scanning or ready
Red LED On and Off Connecting with WiMAX network
Red LED On WiMAX signal level 1
Yellow LED On WiMAX signal level 2 ~ 3
Green LED On WiMAX signal level 4 ~ 5
WiFi LED
WiFi AP turn On Green color
Power LED
Remained battery (100% ~ 60%) Green color
Remained battery (60% ~ 30%) Yellow color
Remained battery (30% ~ 0%) Red color
Battery charging Red color
Battery full charging Green color
Chapter 3. How to use the IMW-C910W
Power ON/OFF
Power ON : Push the power button for 3 Seconds.
Power OFF : Push and hold the power button for 20 Seconds.
How to charge battery
The built-in battery can be charged from either USB cable or wall Charger (Optional)

Setting of the WiFi AP
Notice : Configuration of WiFi AP has to be set to “Obtain IP address and DNS sever address
automatically”.
Setting with Window XP
<Start><Connect to><Wireless Network Connection> Choose WiFi AP of IMW-C910W in the
list
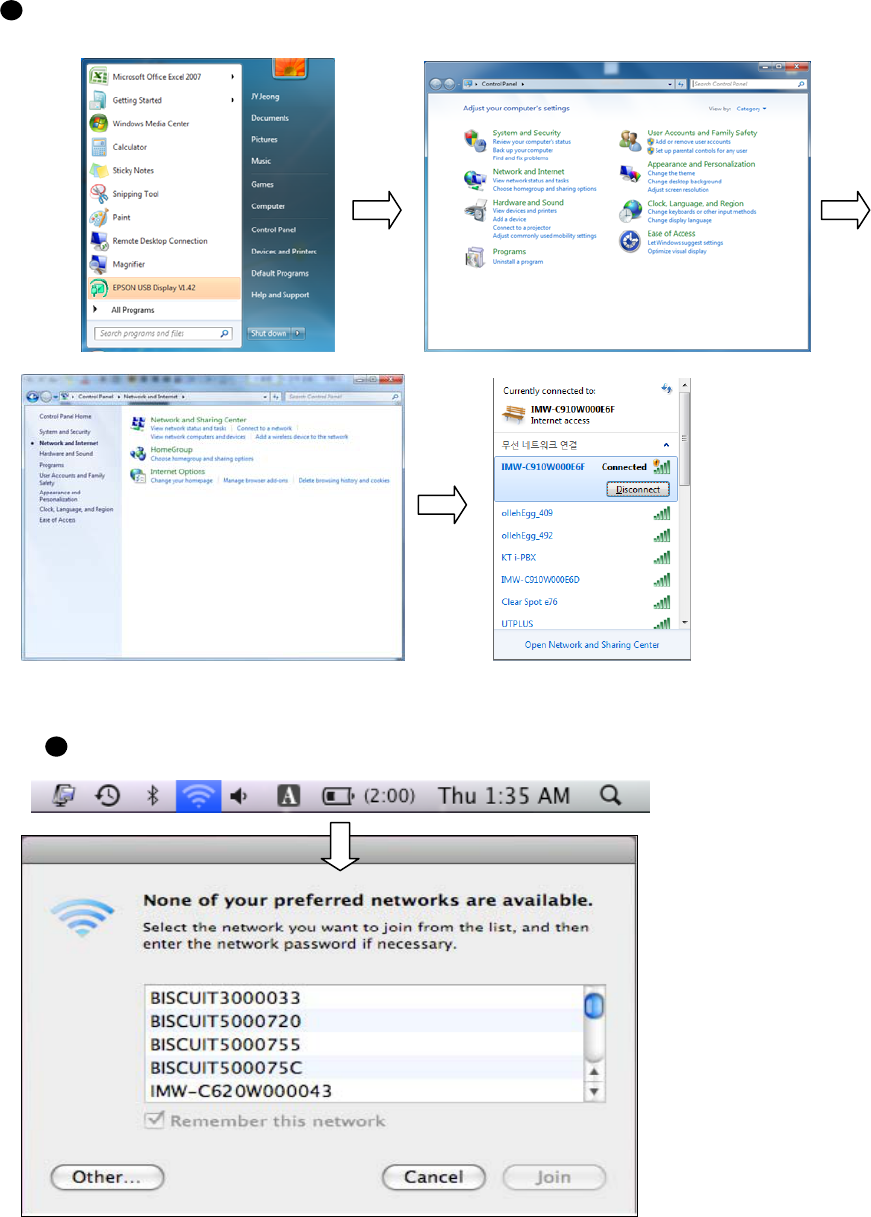
Setting with Window 7
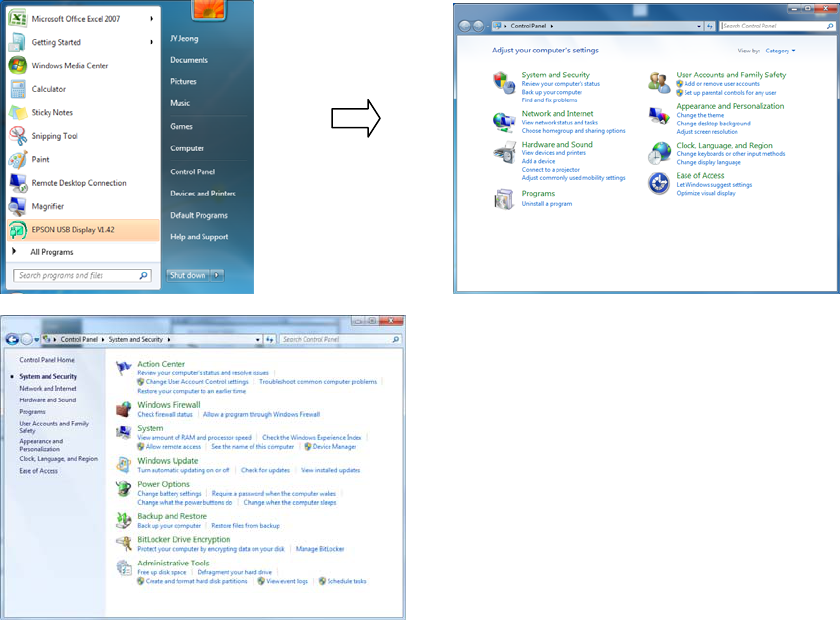
<Start><Control Panel><Network and Internet><Connect to Network>
Choose the WiFi AP of IMW-C910W in the list
Setting with Mac OS
Click the wireless Icon on the menu Choose the WiFi AP of IMW-C910W in the list
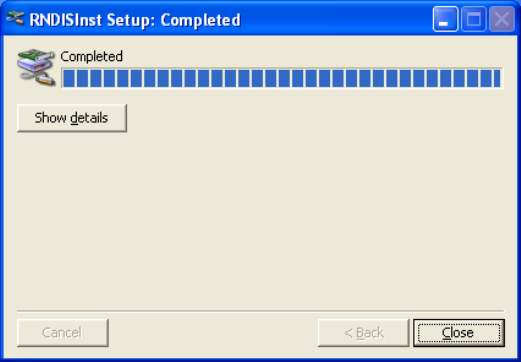
Setting of USB (RNDIS)
Notice :
1. Your PC connected to web server of IMW-C910W through WiFi.
2. Driver of RNDIS can down load from web sever of IMW-C910W.
3. Refer to USB Driver Page No. XX for download.
Setting with Window XP
1. IMW-C910W should be connected with PC by USB cable.
2. Below is each step of RNDIS installation.
Setting with Window 7
1. IMW-C910W should be connected with PC by USB cable.
2. Below is each step of RNDIS installation.
<Start><Control Panel><Network and Internet><Connect to Network>
Chapter 4 Configuring CM
Connect to Web CM (Web Connection Manager)
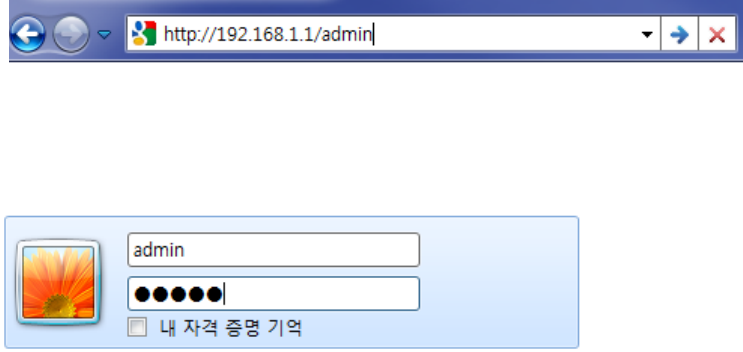
Start CM
- Use web browser to connect Web CM
- Type Address 192.168.1.1/admin
※ Microsoft Internet Explorer is recommended
Input ID/Password
- A Pop-up window will requests for specific ID and Password to enter into Web CM
ID : admin / Password : admin
Description of Web User Interface
Introduction
This is to describe user interface of Biscuit
① Main Menu
Main Menu help user to choose settings of LAN/WLAN, WiMAX frequency, Authentications,
Device management.
② Sub Menu
Sub Menu shows detail categories of Main Menu
③ Main Window
Main Window shows status of device or setting parameters
④ Help Display
It shows additional description of Main Window
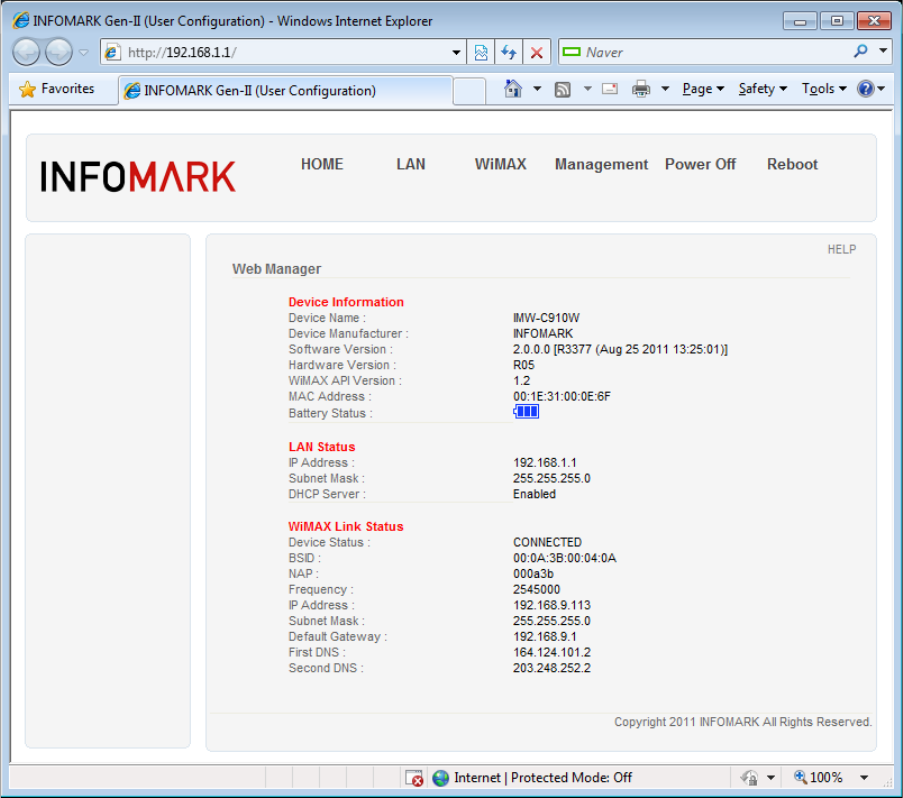
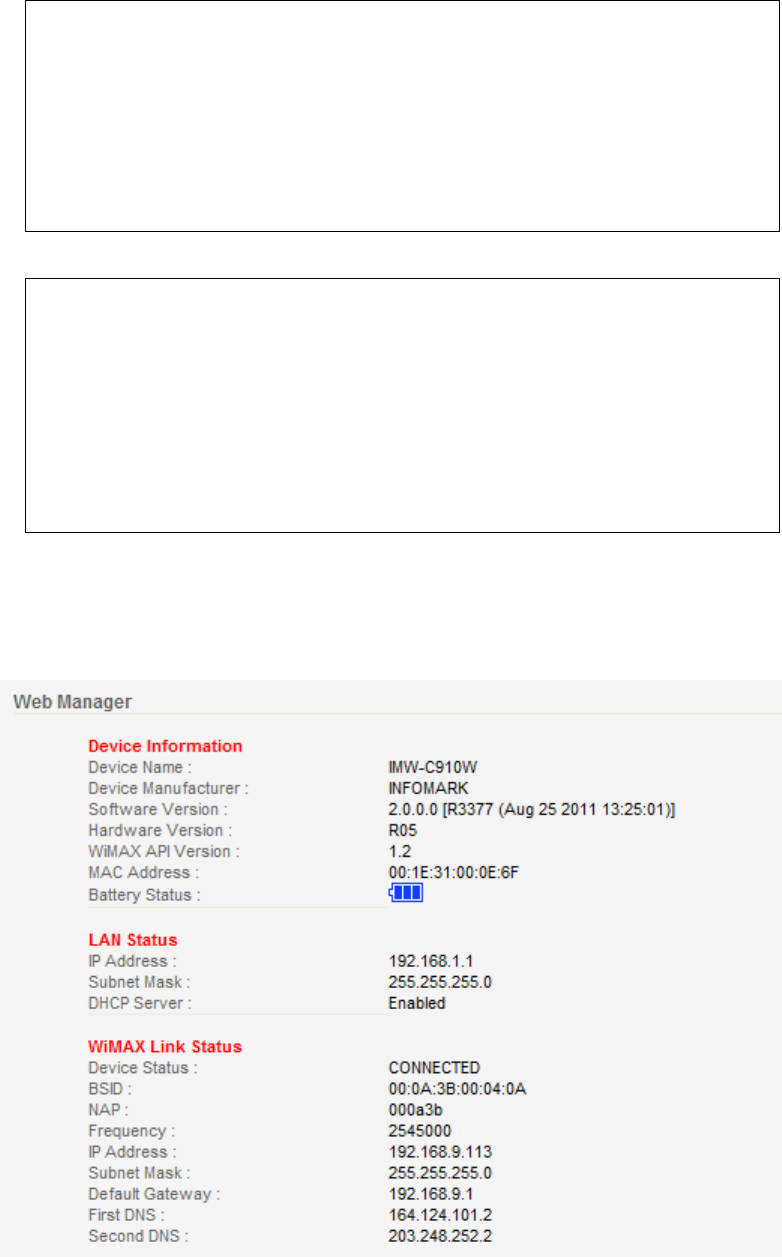
Home Menu
① Device Information
It shows description of Device such as name of device, manufacturer, software version,
hardware version, API version and MAC address
② LAN information
It shows IP Address, Subnet Mask and setting of DHCP Server
③ WiMAX status information
It shows connection status of WiMAX and Network
LAN settings
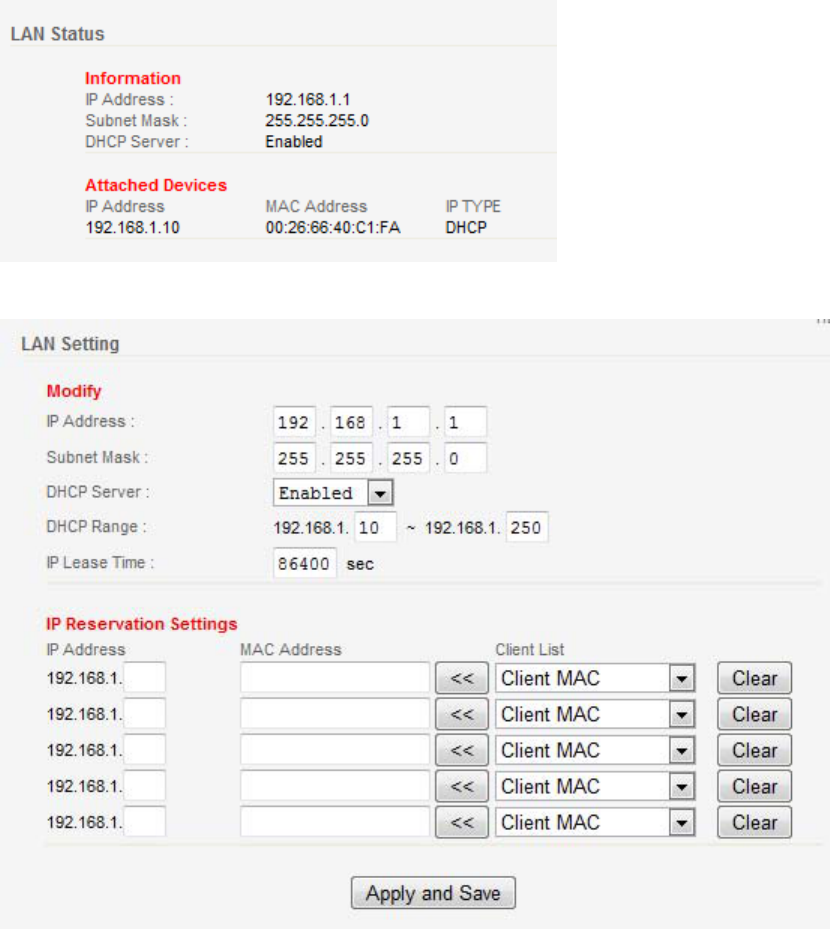
① LAN Status
It shows web address of local area network information.
② LAN Setting
- Local IP Address:
Input desired IP address that user want to use for Local Area Network
- Subnet Mask:
Input subnet mask to allocated IP address
- DHCP Server:
When DHCP is ‘Disabled’, please set IP address of client with static address.
For example, when the IP address is set as 192.168.1.1, set the client address as follow.
IP Address: from 192.168.1.2 to 192.168.1.253
Subnet Mask” 255.255.255.0
Gateway IP: 192.168.1.1
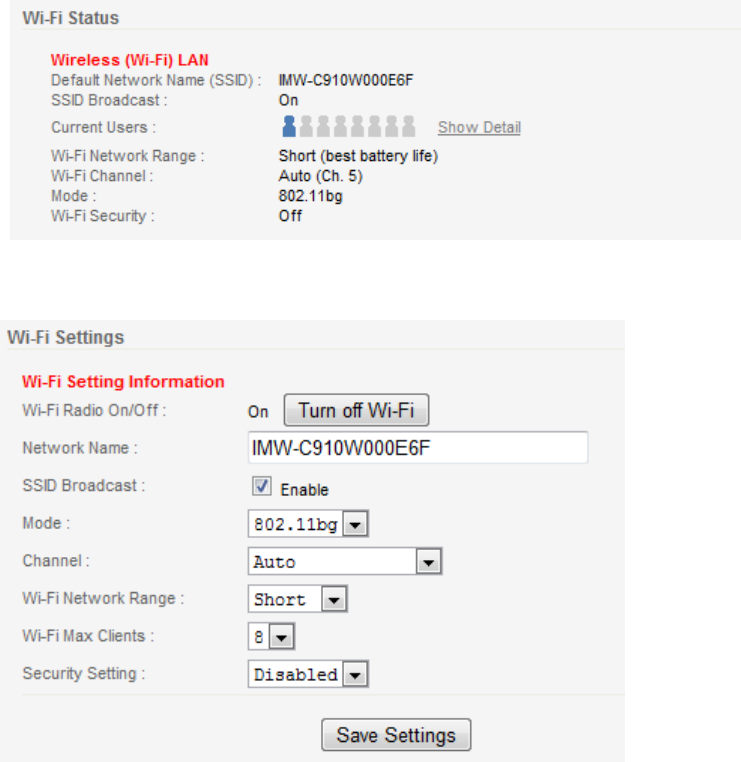
③ WiFi Status
It shows Wi-Fi’s SSID, Channel and Tx Power
④ WiFi Setting
- Network Name:
User can set preferred name of network name
The device comes with SSID of ‘IMW-C910W‘. This SSID can be changed as preferred.
- Security Setting:
Default setting of Security is ‘Disabled’. If changed, ‘Apply and Save’ button should be
clicked.
- WEP (Wired Equivalent Privacy): is a deprecated algorithm to secure IEEE 802.11 wireless
networks. Wireless networks broadcast messages using radio and are thus more
susceptible to eavesdropping than wired networks.
This Device provides 64/128 bit encryption for network protection.
- Authentication type: In case of selecting WEP, default setting is ‘Auto’.
▶ Auto : This support both open system and shared key.
▶ Open System: Open system allow link to all clients but permit communication to
clients that have same WEP key.
▶ Shared Key: Shared Key allow link and communication to clients that have identical
shared key as AP.
- Key Length: For user convenience, select 64bit or 128 bit encryption.
- Key Pass Phrase: WEP Key is generated automatically. Input random character to
generate key. Please make a separate note the key in order to connect
to the device.
- WPA: The WPA protocol implements the majority of the IEEE 802.11i standard, and was
intended as an intermediate measure to take the place of WEP while 802.11i was prepared.
This Device provides WPA, WPA2 and USB both.
- WPA Type : This Device provides WPA, WPA2.
▶ WPA(Wi-Fi Protected Access) : WPA protocol implements the majority of the IEEE
802.11i standard. WPA is based on TKIP(Temporal
Key Integrity Protocol) and it provide higher security of
wireless communication.
▶ WPA2 : AES(Advanced Encryption Standard) use additional encryption algorithm and
it comply with WAP.
▶ Use Both: It provide both WPA and WPA2 and it is default value when selecting WPA.
- Encryption: It is to encrypt Unicast packets and support Auto, TKIP, AES-CCMP.
Default is Auto.
- Key Pass Phrase: Input WPA key value to blank and click ‘Apply and Save’
.
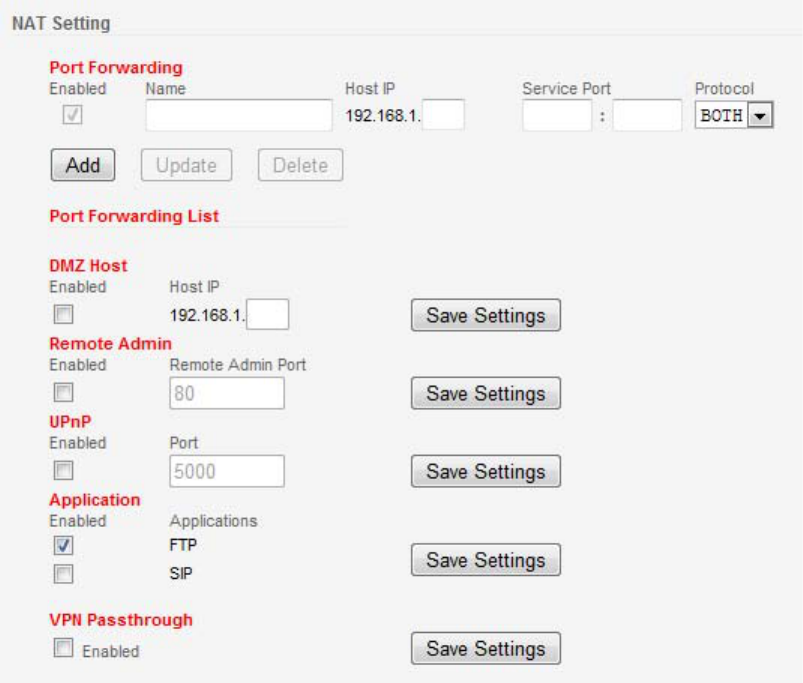
⑤ NAT Setting
● Port Forwarding setting:
Port forwarding is the practice of forwarding a TCP/IP packet in a network address translator
gateway to a predetermined network port on a host within a masqueraded, typically private
network based on the port number on which it was received from the originating host. The
technique is used to permit communications by external hosts with services provided within a
private local area network.
● Port Forwarding List :
● DMZ Host :
● Remote Admin :
WiMAX Configuration
The parameter of WiMAX configuration are listed as Parametric Data, Network Info, Device Info,
Frequency and Authentication
Parametric Data description
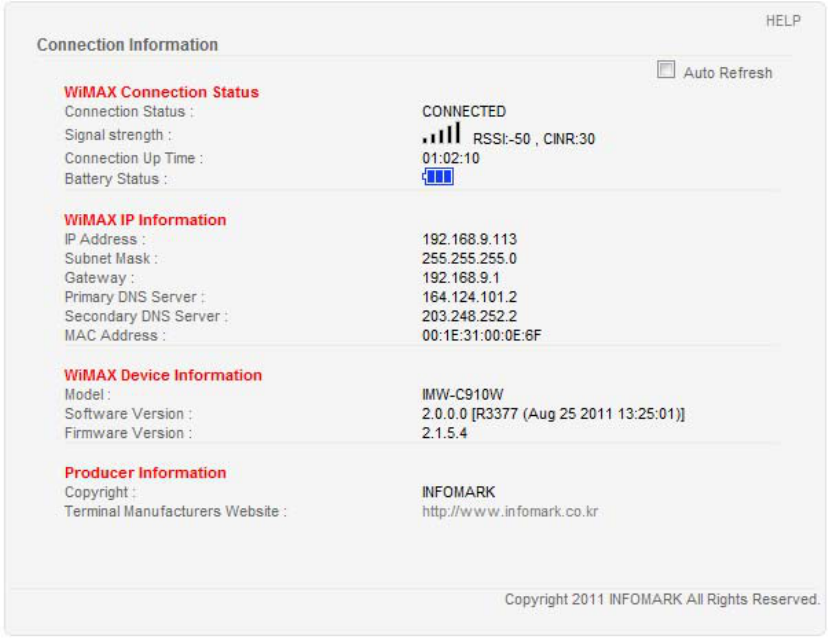
● Auto Refresh: When check box of enable is marked, real time values of WiMAX will be
shown.
● Reset stat: This function initialize WiMAX monitoring value with ‘Reset stat’ button.
● Link Status Info
- Device State: It shows current status of WiMAX connection.
- Freq: It shows current connection frequency.
- BSID: It shows BSID of connected WiMAX BS.
- Tx Power: It shows output power of device.
- RSSI: It stands for Receive Signal Strength Indicator. (Higher value states bad
signal)
- CINR: It stands for carrier to interference ratio. (Lower value states more noise)
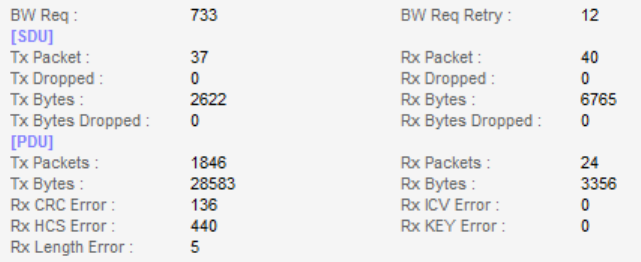
● MAC Statistics Information
- This indicates Tx/Rx Packet information
● PHY Status
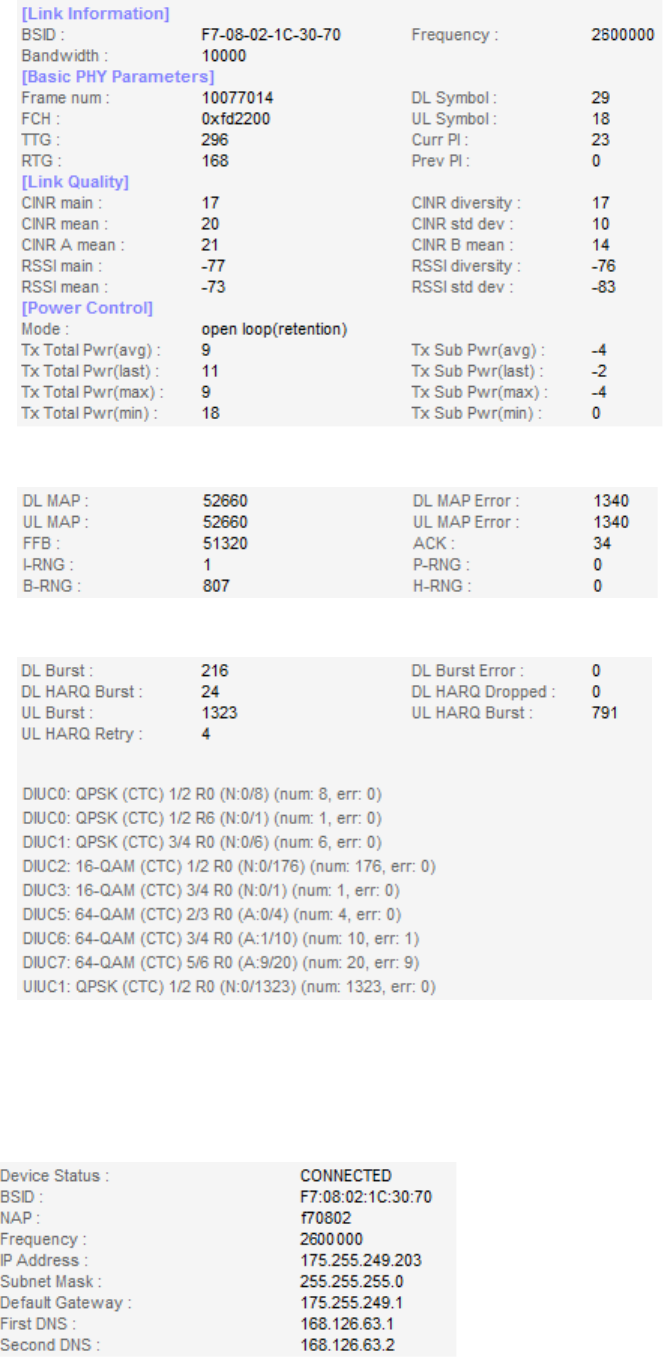
- This indicates antenna level information of device
● PHY Statistics Information
- This indicates statistics of antenna level of device.
● PHY Burst Statistics Information
- This indicates modulation information of device.
Network Information description
● Auto Refresh : When check box is enabled, Network and MAC status of device in
monitored in real time.
● WiMAX Link Status
- Device Status: This indicates connection status of WiMAX device.
- BSID: This indicates BSID of WiMAX network.
- NAP(Network Access Provider): This indicates operator’s ID.
- Frequency: This indicates connected frequency.
- IP Address: This indicates Static IP Address acquired from BS.
- Subnet Mask: This indicates Static Subnet Mask acquired from BS.
- Default Gateway: This indicates Gateway acquired from BS.
- First DNS: This indicates the first DNS acquired from BS.
- Second DNS: This indicates second DNS acquired from BS.
● Service Flow
- This indicates QoS status information of device in detail.
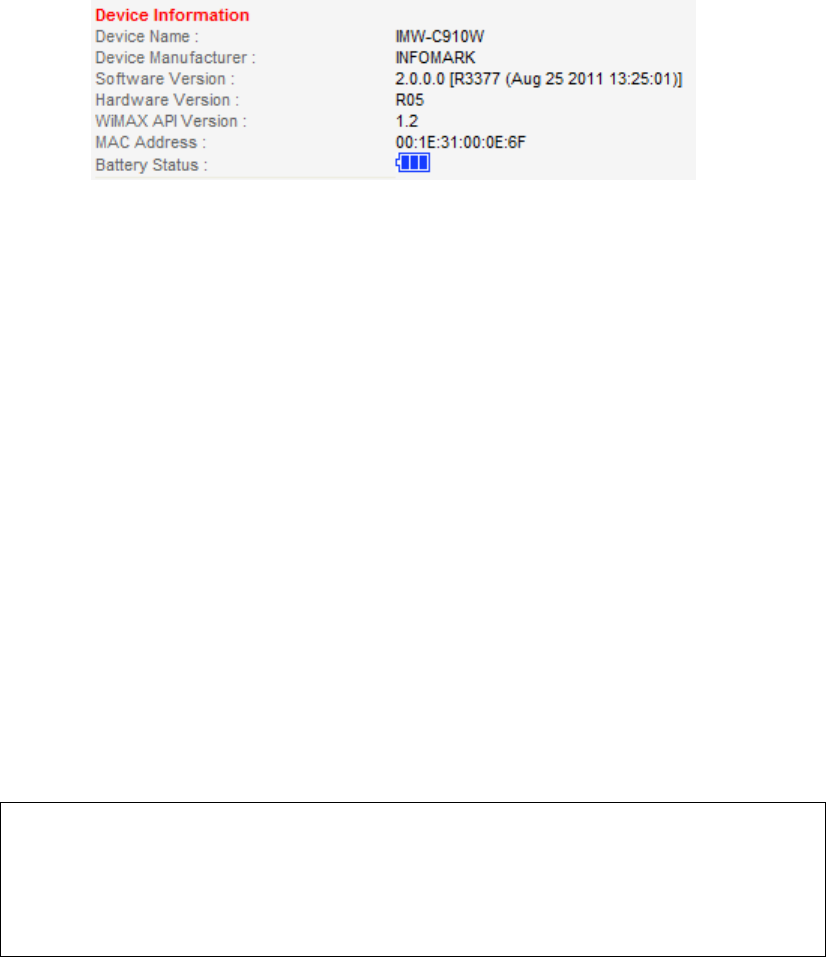
Device Information
● Device Information
- Device Name: This indicates model name of device.
- Device Manufacturer: This indicates manufacturer of device.
- Software Version: This indicates firmware information of device.
- Hardware Version: This indicates hardware version of device..
- MiMAX API Version: This indicates WiMAX Common API Version.
- MAC Address: This indicates MAC address of device.
Frequency Setting
① No: Please register frequency that desiered to be used in sequenc.
② First Freq.(kHz): Please register the first frequency NAP operator’s range.
③ Last Freq.(kHz): Please register last frequency NAP operator’s range.
④ Next Freq.(kHz): Please register step of frequency range.
⑤ Bandwidth(kHz): Please register bandwidth of NAP operator’s frequency.
⑥ FFTSize: Please register FFTSize of NAP
⑦ After all through from ① to ⑥, click ‘M/ADD’ for modification or add.
⑧ this indicates registered frequency list of device.
⑨ In order to remove selected frequency, click ‘DEL’ button.
※ Example of frequency register
- Bandwidth of NAP : 5MHz,10MHz
- NAP의 FFTSize : 1024
1. ① Type 1 to register No1 (To modify pre-exist No, inout same No. to modify)
2. ② Input 2500000 as starting frequency
3. ③ Input 2650000 for last frequency
4. ④ Input step of frequency as 20000, (Increase in 20MHz steps)
5. ⑤ Input Bandwidth as 10000.
6. ⑥ Input FFTSize as 1024
7. Select ⑦
8. Select ‘Reboot’ in main window
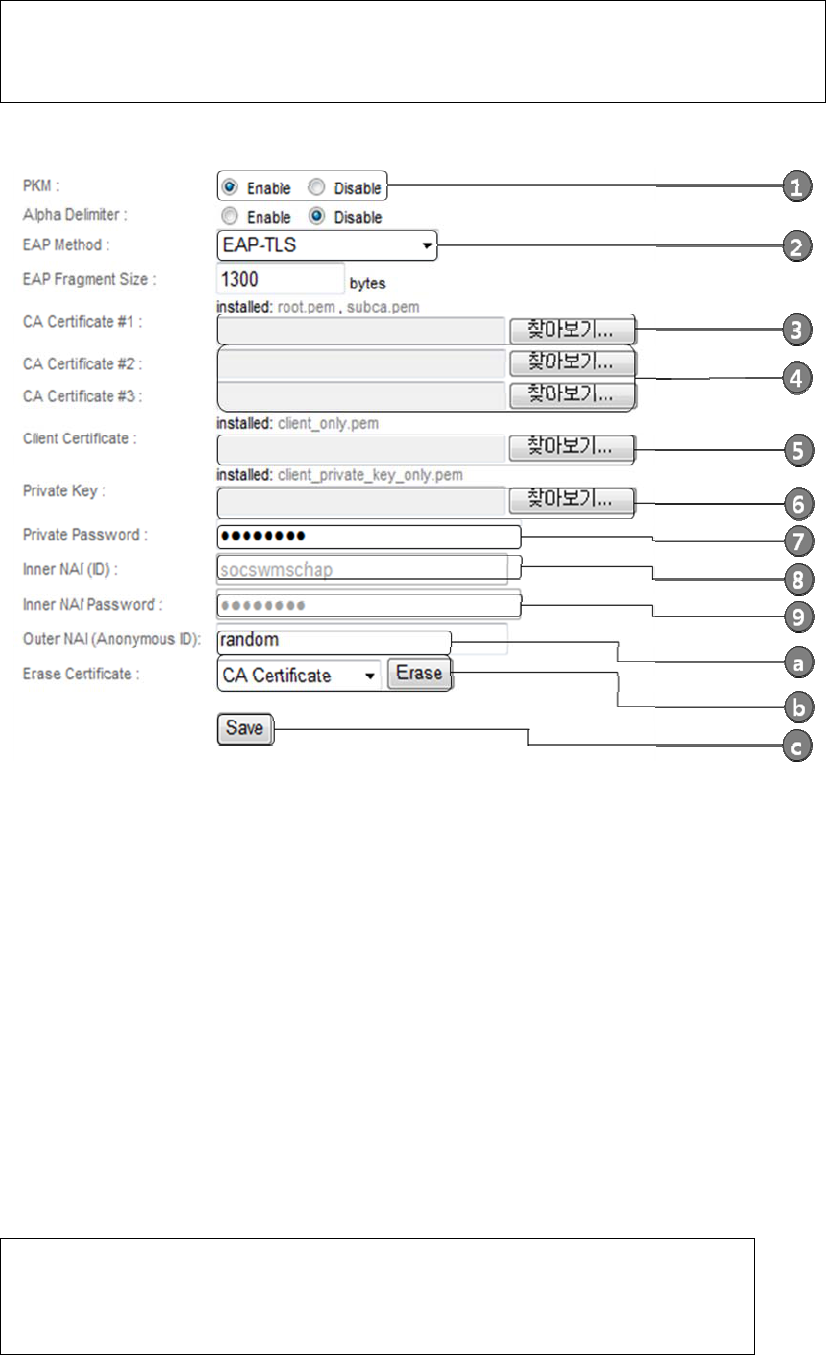
Authentication Setting
① PKM: Please select if the certificate is desited to be used..
② EAP Method: When PKM is available, select the authenticiation method as EAP-AKA/EAP-
TLS/EAP-TTLS.
③ CA Certificate #1: Register certificate in Root CA.
④ CA Certificate #2/#3: Regisger #2 and #3 certificate in Sub CA successively.
⑤ Client Certificate: Register Client Certificate
⑥ Private Key: Register Private Key Certificate
⑦ Private Password: Input Private Password accuired from NAP
⑧ Inner NAI (ID): Input Inner NAI (ID) accuired from NAP.
⑨ Inner NAI Password: Input NAI Password accuired from NAP.
Outer NAI (Anonymous ID): ⓐInput Outer NAI accuried from NAP.
Erase Certificate:ⓑ In order to erase certificate (CA Certificate, Client Certificate, Private Key
Certificate), slelct and click ‘Erase’ to remove.
ⓒClick Save to store the configuration.
※ Example: EAP-AKA
1. Select ① as Enable
2. ② Select EAP-AKA
3. Select ⓒ to save configuration
4. Click ‘Reboot’ in main window
(Warning: This EAP-AKA works with UICC include version of device.
※ Example: EAP-TLS
1. Select ① as Enable
2. ② Select EAP-TLS
3. ③ Register Root CA Certificate
4. In case there is Sub CA Certificate, register in ④
5. ⑤ Register Client Certificate file
6. ⑦ Input private password
7. ⓐ input Outer NAI (Anonymous ID)
(ex:random@infomark.co.kr or MAC Address@infomark.co.kr)
8. Select ⓒ to save configuration
9. Click ‘Reboot’ in main window
※ Example: EAP-TTLS
1. Select ① as Enable
2. ② Select EAP-TTLS/MSCHAPV2 (Select TTLS provided from NAP)
3. In case there is Root CA Certificate, register with ③
4. In case there is Sub CA Certificate, register with ④
5. Input inner NAI (ID) with .⑧
6. Input inner NAI password with ⑨
7. ⓐ input Outer NAI (Anonymous ID)
(ex:random@infomark.co.kr or MAC Address@infomark.co.kr)
8. Select ⓒ to save configuration
8. Select ⓒ to save configuration
9. Click ‘Reboot’ in main window
Administration setting
Items of Administrator settings are consist of Status, Firm info., Administration, Upgrade and
USB Driver
Status description
①Device information
- This provides model name, manufacturer and version of software and hardware
LAN② setting information
- This provides IP Address, Subnet Mask and DHCP Server setting information
WiMAX③ status information
- This provides WiMAX connection status information.
Firmware information
- kernel version: This indicates version of device OS
- rootfs version: This indicates system file version
- firmware version: This indicates software (firmware) version
- WCM version: This indicates Web CM version
Administration setting
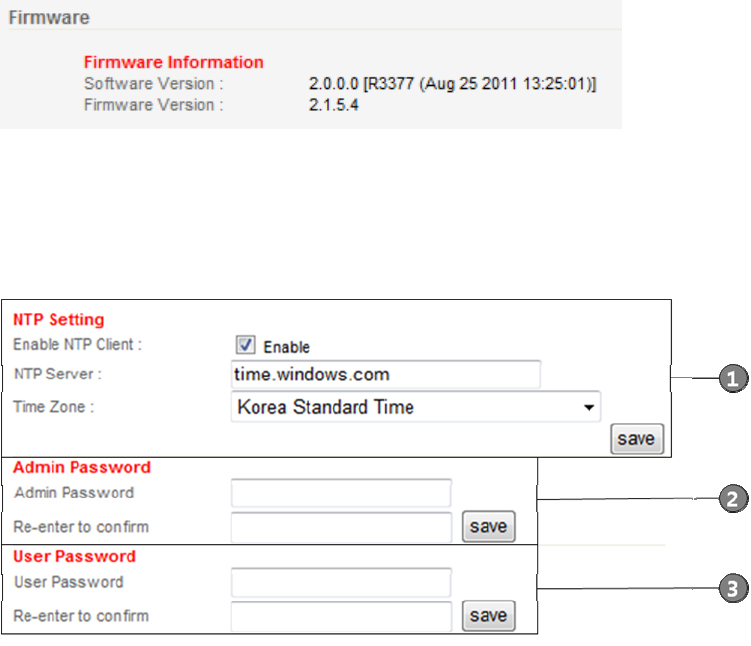
NTP Setting①
- Enable NTP Client: In case of using NTP Client, enable check box of Enable NTP
client
- NTP Server: Input URL of NTP Server URL
- Time Zone: Select Time Zone
- Click save to store the configuratio.
Admin Password②
- Item to change Web CM Password of Web CM of Admin
- Used to enter URL of http://192.168.1.1/admin/
- Enter same password twice
- Click ‘save’ to store configuration
User Password③
- Item to change Web CM Password of Web CM of User
- Used to enter URL of http://192.168.1.1
- Enter same password twice
- Click ‘save’ to store configuration
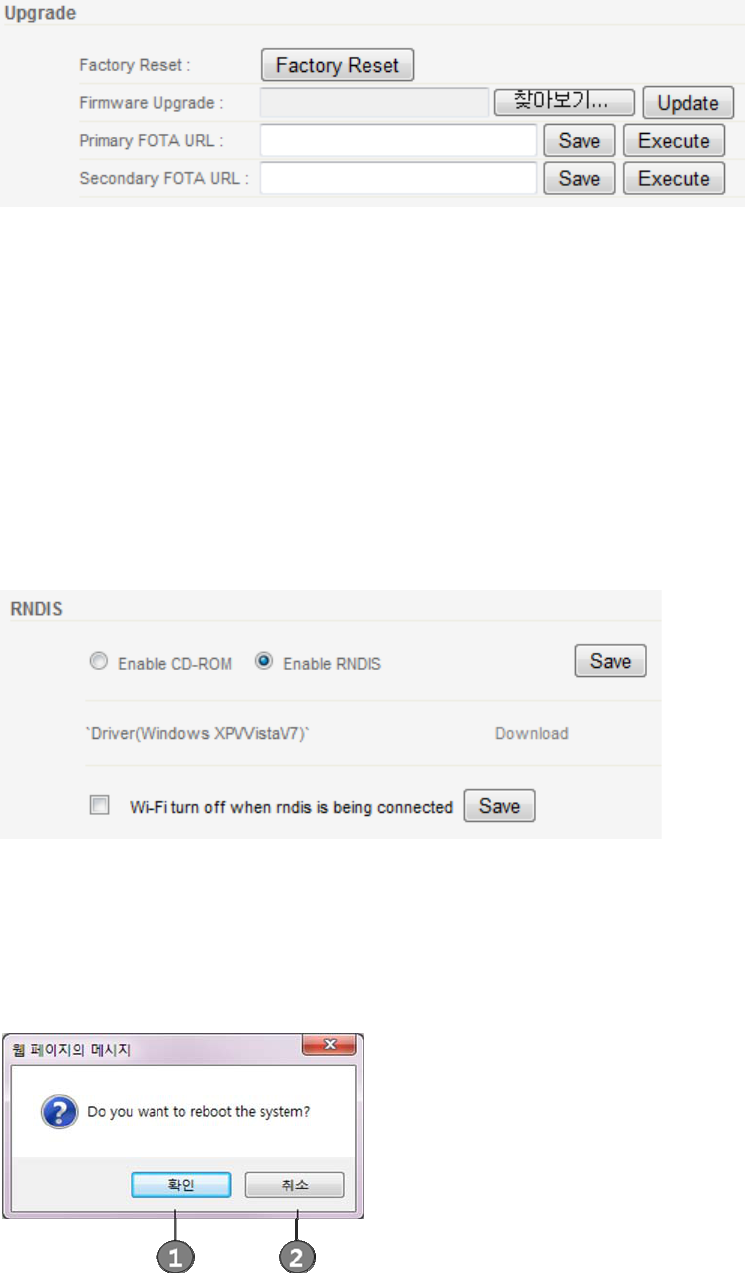
Upgrade description
①This is to return to factory default configuration.
②Device supports firmware update with binary file
- When check box of Keep WiMAX config files is selected, the previous configuration
will remain after update
- After selecting file and click ‘update’ to start upgrade
③Device supports zImage file update
④ Device supports ramdisk.jffs file update
⑤Device supports Parameter bin file update
⑥Device supports VPOS bin file update
FOTA URL ⑦setting
- FOTA URL: Input URL of the site and save click to restore
- When Enable Auto Upgrade is checked, device will compare the firmware version
and on server and update if the firmware is new.
-
USB Driver description
① This is driver file when USB is used on Windows XP/Vista/7
② When used only with RNDIS, select checkbox of Wi-Fi off and save.
③ Reboot system in main window
※ This will make Wi-Fi off with reboot.
Reboot button description
This is to reboot device when all parameter is set
① Reboot system
② Cancel reboot