User Manual

User Guide English (3–7)
Guía del usuario Español (8–11)
Guide d’utilisation Français (12–15)
Guida per l’uso Italiano (16–19)
Benutzerhandbuch Deutsch (20–23)
A
ppendi
x
English (24–26)

2

3
User Guide (English)
Introduction
Box Contents
Black & Blue
Power Cable
USB Cable
Euroblock
(3) Bluetooth antennas
User Guide
Rack Ears (attached to unit)
Safety & Warranty Manual
Support
For the latest information about this product (documentation, technical specifications, system
requirements, compatibility information, etc.) and product registration, visit rane.com.
For additional product support, visit rane.com/support.
4
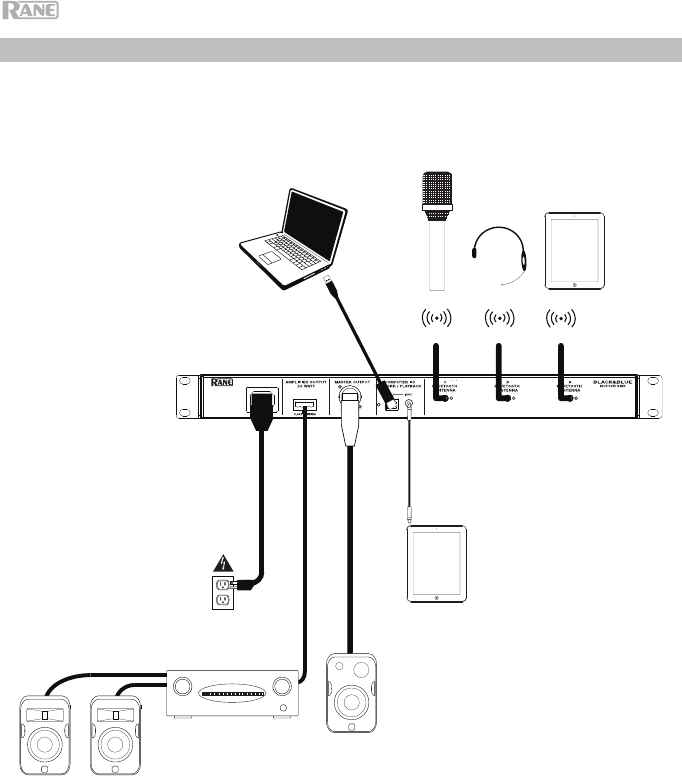
Setup Diagram
Items not listed under Introduction > Box Contents are sold separately.
Compute
r
Bluetooth
Sources
Tablet
Loudspeaker
Powe
r
Bluetooth
A
ntennas
Amplifier
Loudspeake
r
s
4 - 8 @ 70 V and 100 V
5
Application Examples
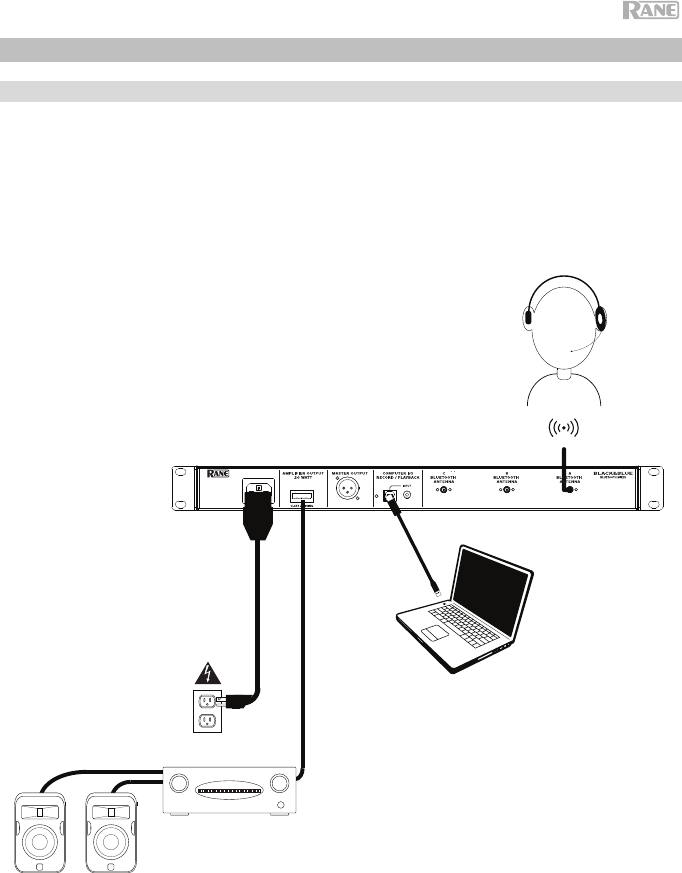
Meeting Room
This example shows:
- a head-worn Bluetooth microphone paired to Bluetooth input A
- the Amplifier output connected to full-range speakers
- the Mix button is depressed to monitor a mix of the Bluetooth A and Computer sources
Bluetooth
microphone
Computer
Power
Loudspeakers
4 - 8 @ 70 V and
100 V
Amplifier
6
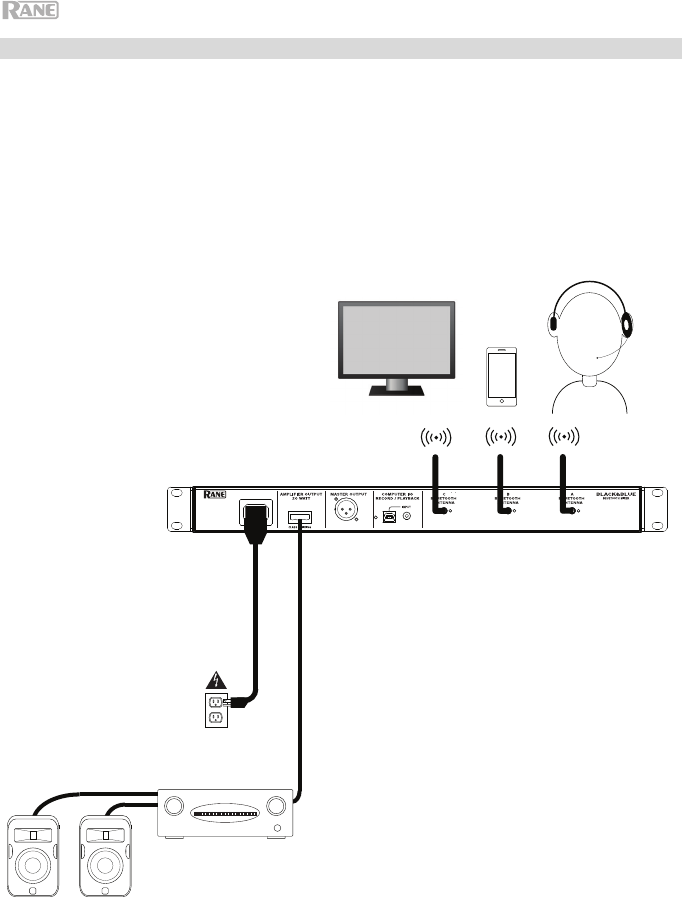
Coffee Bar
This example shows:
- a head-worn Bluetooth microphone paired to Bluetooth input A
- a smartphone paired to Bluetooth input B
- a TV with a Bluetooth transmitter paired to Bluetooth input C
- the Amplifier output connected to full-range speakers
Smartphone
TV with Bluetooth
transmitter
Bluetooth
microphone
Power
Loudspeakers
4 - 8 @ 70 V and 100 V
Amplifier
7
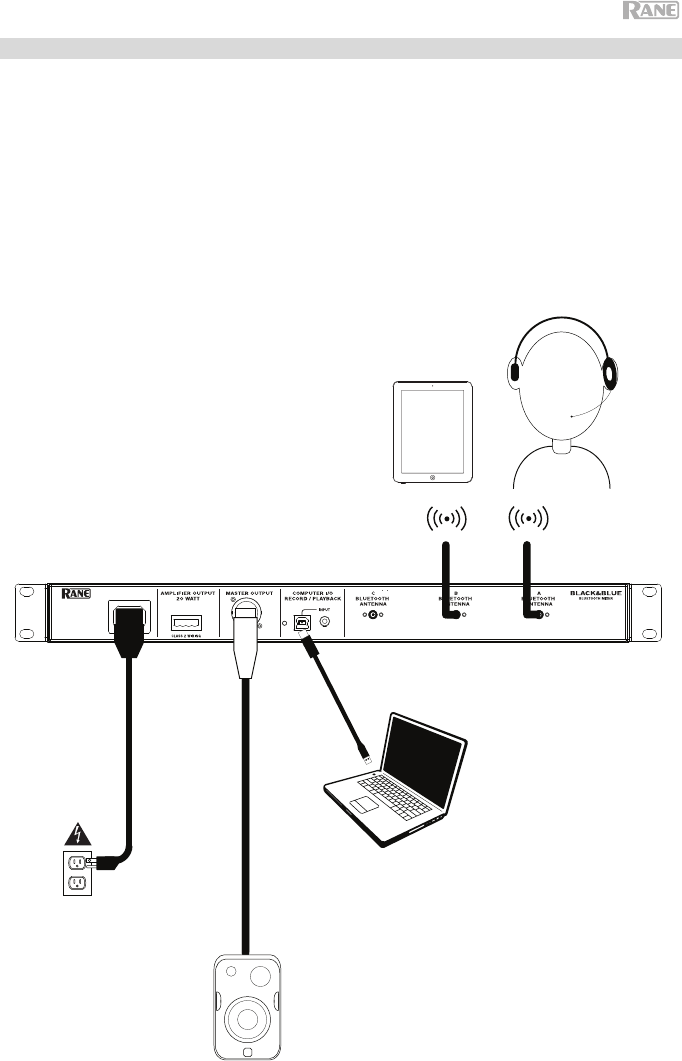
Trade Show
This example shows:
- a tablet streaming music paired to Bluetooth input B
- a head-worn Bluetooth microphone paired to Bluetooth input A
- the USB port connected to a laptop to record a presentation
- the Master output connected to a powered speaker
- the Mix button is depressed to monitor a mix of the Bluetooth A and B sources
Loudspeaker
Power
Computer
Tablet
Bluetooth
microphone

8
Features
Front Panel
1. Bluetooth Signal LED: This LED will illuminate green when the Bluetooth signal
exceeds -40 dBFS.
2. Input Level Knob: Turn this knob to adjust the input signal level for the
individual Bluetooth channels.
3. Pairing LED: This LED flashes when the Pair button is pressed and held for 3
seconds and is lit solid when paired to a Bluetooth source.
4. Pair Button: Press and hold this button for 3 seconds to pair to a Bluetooth
source. Press and hold this button to disconnect from a Bluetooth source.
5. Computer Signal LED: This LED will illuminate green when the computer USB
signal exceeds -40 dBFS.
6. Computer Level Knob: Turn this knob to adjust the level for the computer USB
playback or the 1/8” (3.5 mm) TRS input.
7. Listen To Knob: Turn this knob to select which input signal (Bluetooth A, B, C,
or Computer) is sent to the Master output or Amplifier output.
8. Mix LED: This LED illuminates yellow when Mix mode is selected.
9. Mix Button: Depress this button to monitor a mix of the Bluetooth A, B, C, and
Computer sources.
10. Low EQ: Adjust this knob to increase or decrease the low (bass) frequencies
for the 1/8” (3.5 mm) input and Bluetooth sources.
11. High EQ: Adjust this knob to increase or decrease the high (treble) frequencies
for the 1/8” (3.5 mm) input and Bluetooth sources.
12. Signal LED: This LED illuminates green when the master volume exceeds -40
dBFS, illuminates yellow when the signal exceeds -10 dBFS, and illuminates
red when the signal exceeds 0 dBFS. If the LED illuminates red, adjust the
Input Level knob to get a strong signal without “clipping” or distortion.
13. Master Volume Knob: Turn this knob to increase or decrease the signal level
sent to the Master output, Amplifier output, and USB port.
14. Power LED: This LED illuminates yellow when the unit is powered on.
9
1
2
3
4
1
2
3
4
1
2
3
4
5
67
8
10
10
11
11
12
12
13
13
14
14
12 34
5
67
9
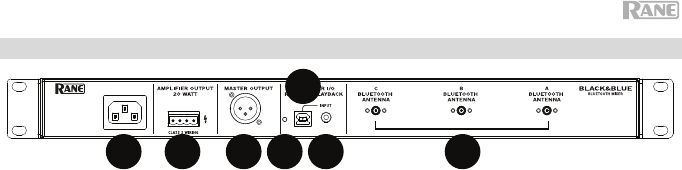
Rear Panel
1. Power Input: Connect the included power cable here.
2. Power Amplifier Output: This sends the main/master signal to your amplifier.
Connect this to your amplifier using a properly wired 4-pin Euroblock connector
and speaker wire. See the section Operation > Euroblock Setup for more
information.
Note: This output is always summed to a mono signal.
3. Master Output: Connect this balanced mono XLR output to a powered
speaker.
Note: This output is always summed to a mono signal.
4. USB LED: This LED will illuminate when the USB port is connected to a
computer’s USB port.
5. USB Port: Use the included USB cable to connect to a computer’s USB port
for audio playback and recording.
Note: This output is always summed to a mono signal.
6. 1/8” (3.5 mm) TRS Input: Connect a line-level device such as a smartphone,
tablet, CD player, etc. here.
Note: Connecting to this jack disconnects USB input (playback). USB output
(recording) is unaffected. This allows for recording of three Bluetooth signals
and the 1/8" (3.5 mm) TRS input to the computer using the USB port.
7. Bluetooth Antenna: Connect the 3 included Bluetooth antennas here for
pairing to Bluetooth sources.
9
1
2
3
4
1
2
3
4
1
2
3
4
5
67
8
10
11 12
13
14
1 2 3 4
5
6 7

10
Operation
Pairing Bluetooth Sources
1. Connect the 3 included Bluetooth antennas to the connectors on Black & Blue’s
rear panel.
2. Power on Black & Blue. The power LED will illuminate solid.
3. Press and hold the Pair button for 3 seconds for the particular Bluetooth input
you desire to connect to for your Bluetooth source. The Pair LED will flash.
4. Pair your Bluetooth source to Black & Blue.
a. Smartphone: open Bluetooth settings in your smartphone, find RA08-A,
and connect. The pair LED on Black&Blue will be lit solid once connected.
b. Bluetooth headset mic: turn on the headset mic. The mic LED will flash
quickly when searching for Black & Blue. When paired successfully, the
mic LED will flash slowly and Black&Blue’s pair LED will be lit solid.
Note: If the mic connects with a different Bluetooth source (for example, RA08-A)
which is not desired, press the search button on the Bluetooth headset mic and
connect to the next Bluetooth source (RA08-B or RA08-C).
Note: Repeat the above steps to connect to the other Bluetooth inputs.
Selecting Sources
1. Connect the included Bluetooth antennas to the connectors on Black & Blue’s
rear panel.
2. Press and hold the Pair button(s) for 3 seconds to connect to your Bluetooth
source(s).
3. Use the included USB cable to connect Black & Blue's USB port to an available
USB port on your computer.
4. Adjust the Listen To knob to choose whether to monitor Bluetooth A, B, C, or
Computer. Press the Mix button to monitor a mix of all sources from the Master
output or Power Amplifier output.
5. Turn the Master Volume knob to adjust the signal level sent to the Master
output and Power Amplifier output.
11
Recording
1. Connect the included USB cable from Black & Blue's USB port to an available
USB port on your computer.
2. See the section Computer Setup > Setting Black & Blue as the Default
Recording Device to set Black & Blue as the default recording device.
3. On your computer, open your favorite recording software.
Note: To listen to music while it’s playing, listen through your computer's
speakers, or connect Black & Blue's Master output to an amplifier or powered
speakers.
Playback
You can listen to the music on your computer through Black & Blue. See the section
Computer Setup > Setting Your Computer’s Soundcard as the Default
Playback Device before playing back your computer music.
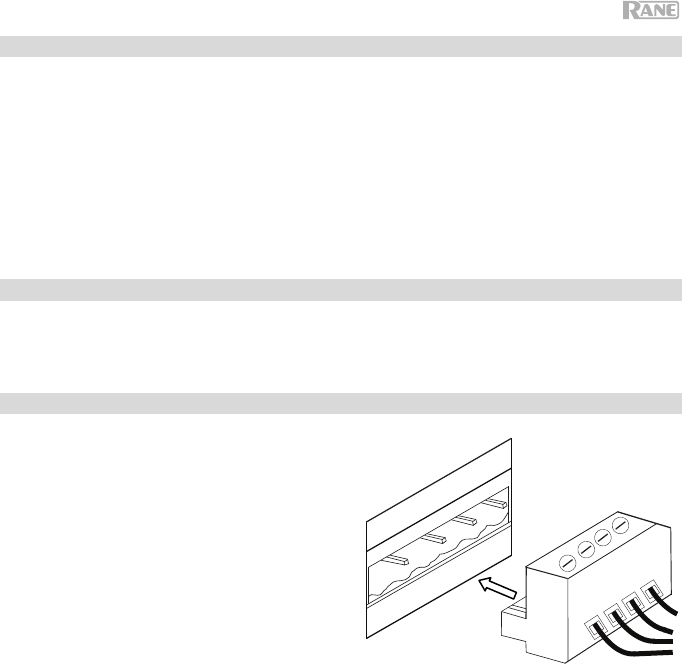
Euroblock Setup
1. Connect a device to the 1/8” (3.5
mm) TRS Input or pair your
Bluetooth source to Black&Blue.
2. Twist the speaker wire to form a tight
strand and insert this into the
appropriate port, pushing the wire
until it is secured inside. To
disconnect a wire, use a small
screwdriver to press in the spring
above the insert port while pulling out
the wire.
3. Attach the Euroblock connector to the
Amplifier Output on Black&Blue.
4. Make sure all Level knobs are set to “0”.
5. Connect the included power cable from the power input to a power outlet;
power on Black&Blue.
6. Adjust the individual channel input Level knobs and the Master Volume knob
to get a strong signal without distortion or “clipping”.
7. Adjust the Low EQ and High EQ knobs to further control the frequencies of the
sound.

12
Computer Setup
Setting Black & Blue as the Default Recording Device
• Windows XP: Click Start Menu Control Panel (or Settings Control Panel in Classic View)
Sound and Audio Devices. Click the Audio tab and under Sound recording, select USB Audio
Codec as the default device. Select Properties and click the Advanced tab to select the Default
Format, 44100 Hz or 48000 Hz.
• Windows Vista: Click Start Menu Control Panel (or Settings Control Panel in Classic View)
Hardware and Sound Sound. Click the Recording tab and select USB Audio Codec as the default
device. Select Properties and click the Advanced tab to select the Default Format, 44100 Hz or 48000
Hz.
• Windows 7: Click Start Menu Control Panel Sound. Click the Recording tab and select USB
Audio Codec as the default device. Select Properties and click the Advanced tab to select the Default
Format, 44100 Hz or 48000 Hz.
• Windows 8: From the Start Menu, click the lower-left corner of the screen to bring yourself to the
Desktop. In the bottom-right corner of the Taskbar, locate the Volume Control "Speaker" icon. Right-
click the speaker and select Playback Devices. In the Windows Sound control panel select the
Recording tab. If USB Audio Codec does not have a green "check mark" symbol next to it, right-click
it and select "Set as Default Device". Select Properties and click the Advanced tab to select the
Default Format, 44100 Hz or 48000 Hz.
• Windows 10: Click Start Menu Control Panel (or Settings Control Panel in Classic View)
Hardware and Sound Sound. In the Windows Sound control panel select the Recording tab. If
USB Audio Codec does not have a green "check mark" symbol next to it, right-click it and select "Set
as Default Device". Select Properties and click the Advanced tab to select the Default Format,
44100 Hz or 48000 Hz.
• Mac OS X 10.4-10.11: Click the upper-left "apple" icon then click System Preferences Sound.
Click the Input tab. From the menu, select USB Audio Codec as the device. Under Format, select
44100 Hz or 48000 Hz.
Setting Black & Blue as the Default Playback Device
• Windows XP: Click Start Menu Control Panel (or Settings Control Panel in Classic View)
Sound and Audio Devices. Click the Audio tab and under Sound playback, select USB Audio
Codec.
• Windows Vista: Click Start Menu Control Panel (or Settings Control Panel in Classic View)
Hardware and Sound Sound. Click the Playback tab and select USB Audio Codec.
• Windows 7: Click Start Menu Control Panel Sound. Click the Playback tab and select USB
Audio Codec as the default device.
• Windows 8: From the Start menu, click the lower-left corner of the screen to bring yourself to the
Desktop. In the bottom-right corner of the Taskbar, locate the Volume Control "Speaker" icon. Right-
click the speaker and select Playback Devices. The Windows Sound control panel should appear set
on the Playback tab. If USB Audio Codec does not have a green "check mark" symbol next to it, right-
click it and select "Set as Default Device".
• Windows 10: Click Start Menu Control Panel Sound. Click the Playback tab and select USB
Audio Codec as the default device.
• Mac OS X 10.4-10.11: Click the upper-left "apple" icon then click System Preferences Sound.
Click the Output tab. From the menu, select USB Audio Codec as the device.
13
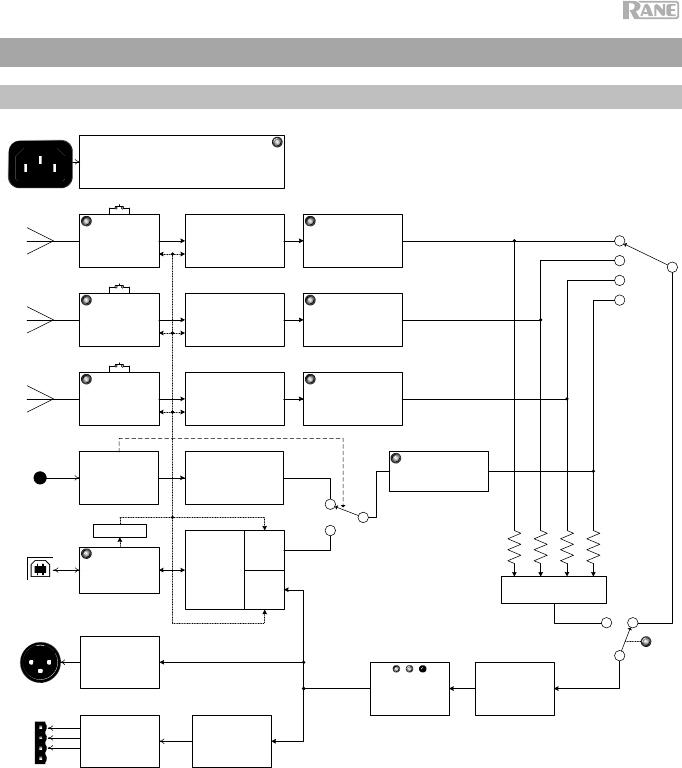
Appendix (English)
Block Diagram
PAIR
UNIVERSAL AC MAINS
POWER SUPPLY
&
POINT OF LOAD REGULATORS
BLUETOOTH 4.0
A
BLUETOOTH 4.0
B
BLUETOOTH 4.0
C
USB 2.0
CLASS COMPLIANT
INPUT
MINI TRS
(sum T/R)
MASTER OUTPUT
XLR
CLASS-D
AMP MODULE
20W
D/A
D/A
D/A
BUFFER
USB 2.0
CONTROLLER
D/A
INPUT BUFFER
LEVEL CONTROL
SIG
INPUT BUFFER
LEVEL CONTROL
SIG
INPUT BUFFER
LEVEL CONTROL
SIG
A/D SUM
MASTER TONE
LOW/HIGH
PAIR
PAIR
MASTER LEVEL
SIG/OL
INPUT BUFFER
LEVEL CONTROL
SIG
CLK MST
XFMR
100 V
70V
4

14
Technical Specifications
Bluetooth
Specifications
Version:
Profile:
Range:
Maximum Transmission Power:
Frequency:
Connectors (1) 1/8” (3.5 mm) TRS input
(1) USB Type-B port
(1) IEC power cable input
(1) XLR output
(3) Bluetooth antenna connectors
Inputs/Outputs Amplifier Output: Mono, 20W. 4 @ 70 V and 100 V
XLR Balanced Output: Frequency Response: 20 Hz – 20 kHz
THD+N: < 0.05%
3.5 mm TRS Unbalanced Input: THD+N < 0.05%
Frequency Response: 20 Hz – 20 kHz
USB: 44.1 kHz, 24 bit
Power power cable
Connection: IEC
Voltage: 100–240VAC, 50/60 Hz
Consumption: 40 W
Dimensions
(width x depth x height)
Weight
Specifications are subject to change without notice.
Bluetooth range is affected by walls, obstructions, and movement. For optimal performance, place the
product in the center of the room so it is unobstructed by walls, furniture, etc.
Trademarks & Licenses
Rane is a trademark of inMusic Brands, Inc., registered in the U.S. and other countries.
The Bluetooth word mark and logos are registered trademarks owned by Bluetooth SIG, Inc. and any use of
such marks by Rane is under license.
All other product names, company names, trademarks, or trade names are those of their respective owners.

15
rane.com
Compliance Manual v1.0
English
FCC Radiation Exposure Statement: This equipment complies
with FCC radiation exposure limits set forth for an uncontrolled
environment. Maintain a distance of at least 8 inches / 20
centimeters of separation between the transmitter’s radiating
structure(s) and your body or other people nearby.
Español
Declaración sobre exposición a las radiaciones según
normas de la FCC: Este equipo cumple los límites de
exposición a la radiación establecidos por la FCC para un
ambiente no controlado. Mantenga una distancia de al menos 20
centímetros / 8 pulgadas entre la(s) estructura(s) de los
transmisores que irradian radiofrecuencias y su cuerpo u otras
personas en las cercanías.
Français
Énonce sur l’exposition au rayonnement de la FCC : Cet
équipement est conforme aux limites d’exposition au
rayonnement de fréquence radio de la FCC établies pour un
environnement non contrôlé. Une distance d'au moins 20
centimètres doit être maintenue entre les éléments rayonnants
de l'émetteur et le corps de l'utilisateur ou les personnes se
trouvant à proximité.
Italiano
Dichiarazione FCC relativa all’esposizione alle radiazioni:
questa attrezzatura è conforme con i limiti per l’esposizione a
radiazioni stabiliti dalla normativa FCC per un ambiente non
controllato. Mantenere una distanza minima di 20 centimetri tra
la struttura irradiante del trasmettitore e il proprio corpo o le altre
persone nelle vicinanze.
Deutsch
FCC-Strahlenbelastungserklärung: Dieses Gerät entspricht
den FCC-Strahlenbelastungsgrenzwerten für eine unkontrollierte
Umgebung. Halten Sie einen Abstand von mindestens 20 cm
zwischen der strahlenden Senderstruktur und Ihrem Körper bzw.
anderen Personen in der Nähe ein.
v1.0

Important Safety Instructions
& Warranty Information
English ( 3 – 7 )
Instrucciones importantes de seguridad
e información de la garantía
Español ( 8 – 11 )
Instructions importantes de sécurité
et informations de garantie
Français ( 12 – 15 )
Istruzioni importanti di sicurezza
e le informazioni della garanzia
Italiano ( 16 – 19 )
Wichtige Sicherheitsanweisungen
und Garantieinformationen
Deutsch ( 20 – 23 )
2
Rane is a registered trademark of inMusic Brands, Inc., registered in the U.S. and other countries.
NEMA® is the registered trademark and service mark of the National Electrical Manufacturers Association.
All other product names, company names, trademarks, or trade names are those of their respective owners.

3
Product Warranty
(for products purchased in the U.S.A.)
1. What is covered and for how long?
All Products: inMusic Brands, Inc. (“inMusic”) warrants to the original purchaser that Rane products and all other
accessories are free from defects in material and workmanship under normal use and service for the period commencing
upon the date of purchase from an authorized Rane dealer and continuing for the following period of time after that date
for one (1) year. inMusic warrants factory-refurbished merchandise to be free of material and operational defects for a
period of ninety (90) days from the original date of retail sale. This refurbished merchandise warranty is not transferable.
2. What is not covered? This Limited Warranty is conditioned upon proper use of the product by the purchaser. This
Limited Warranty does not cover: (a) damage caused by improper installation or improper connection to any peripheral;
(b) damage caused by an external electrical fault; (c) damage from use of parts not manufactured or sold by Rane; (d)
product purchased from anyone other than an Rane authorized dealer; (e) modifications to product not approved in
writing by Rane; (f) equipment that has the serial number removed or made illegible; (g) normal cosmetic and
mechanical wear; (h) damage or loss during transit to an Authorized Rane Repair Center; or (i) units that are purchased
and/or located outside of the continental USA.
3. What are inMusic’s obligations? During the applicable warranty period, Rane will repair or replace, at Rane’s sole
option, without charge to the purchaser, any defective component part of the product. To obtain service under this
Limited Warranty, purchaser must first contact Rane and obtain a return merchant authorization (“RMA”) number.
Purchaser must then return the product to Rane in an adequate container for shipping, accompanied by purchaser’s
sales receipt or comparable proof of sale showing the date of purchase, the serial number of the product, and the
seller’s name and address. To obtain an RMA number and assistance on where to return the product, contact Rane
customer service at 401-659-8192. Upon receipt, Rane will repair or replace the defective products. Rane may, at
Rane’s sole option, use rebuilt, reconditioned, or new parts or components when repairing any product or replace a
product with a rebuilt, reconditioned, new or comparable product. Repaired products will be warranted for a period
equal to the remainder of the original Limited Warranty on the original product or for 90 days, whichever is longer. All
replaced parts, components, boards, and equipment become the property of Rane. If Rane determines that any
product is not covered by this Limited Warranty, purchaser must pay all parts, shipping, and labor charges for the
repair or return of such product.
4. What are the limits on inMusic’s liabilities? THE WARRANTIES GIVEN IN THIS LIMITED WARRANTY, TOGETHER
WITH ANY IMPLIED WARRANTIES COVERING RANE PRODUCTS, INCLUDING WITHOUT LIMITATION ANY
WARRANTIES OF MERCHANTABILITY OR FITNESS FOR A PARTICULAR PURPOSE, ARE LIMITED TO THE
DURATION OF THIS LIMITED WARRANTY. EXCEPT TO THE EXTENT PROHIBITED BY APPLICABLE LAW, INMUSIC
OR RANE SHALL NOT BE LIABLE FOR ANY SPECIAL, INCIDENTAL, CONSEQUENTIAL, INDIRECT OR SIMILAR
DAMAGES, LOSS OF PROFITS, DAMAGES TO PURCHASER’S PROPERTY, OR INJURY TO PURCHASER OR
OTHERS ARISING OUT OF THE USE, MISUSE OR INABILITY TO USE ANY RANE PRODUCT, BREACH OF
WARRANTY, OR NEGLIGENCE, INCLUDING BUT NOT LIMITED TO INMUSIC’S OR RANE’S OWN NEGLIGENCE,
EVEN IF INMUSIC, RANE, OR THEIR AGENTS HAVE BEEN ADVISED OF SUCH DAMAGES, OR FOR ANY CLAIM
BROUGHT AGAINST PURCHASER BY ANY OTHER PARTY. THIS LIMITED WARRANTY IS THE COMPLETE
WARRANTY FOR RANE PRODUCTS, AND IS GIVEN IN LIEU OF ALL OTHER EXPRESS WARRANTIES. THIS LIMITED
WARRANTY SHALL NOT EXTEND TO ANYONE OTHER THAN THE ORIGINAL PURCHASER OF THIS PRODUCT AND
STATES PURCHASER’S EXCLUSIVE REMEDY. IF ANY PORTION OF THIS LIMITED WARRANTY IS ILLEGAL OR
UNENFORCEABLE BY REASON OF ANY LAW, SUCH PARTIAL ILLEGALITY OR UNENFORCEABILTY SHALL NOT
AFFECT THE ENFORCEABILITY OF THE REMAINDER OF THIS LIMITED WARRANTY WHICH PURCHASER
ACKNOWLEDGES IS AND WILL ALWAYS BE CONSTRUED TO BE LIMITED BY ITS TERMS OR AS LIMITED AS THE
LAW PERMITS.
This Limited Warranty allocates risk of product failure between purchaser and Rane, and Rane’s product pricing reflects
this allocation of risk and the limitations of liability contained in this Limited Warranty. The agents, employees,
distributors, and dealers of Rane are not authorized to make modifications to this Limited Warranty, or make additional
warranties binding on Rane or inMusic. Accordingly, additional statements such as dealer advertising or presentation,
whether oral or written, do not constitute warranties by Rane or inMusic and should not be relied upon.
5. How does state law apply to this warranty? SOME STATES DO NOT ALLOW THE EXCLUSION OR LIMITATIONS OF
INCIDENTAL OR CONSEQUENTIAL DAMAGES OR HOW LONG AN IMPLIED WARRANTY LASTS, SO THE ABOVE
LIMITATIONS OR EXCLUSIONS MAY NOT APPLY TO PURCHASER.
This Limited Warranty gives you specific legal rights. You may also have other rights, which vary from one jurisdiction to another.
Please record the serial number of your unit as shown on the back of the chassis as well as the name of the dealer from
whom you purchased the unit. Retain this information and your original purchase receipt for your records. Go to our website
rane.com to register your product with us.
Model: Purchased From:
Serial Number: Date of Purchase:

4
Product Warranty
(for products purchased outside of the U.S.A.)
1. inMusic Brands, Inc. (“inMusic”) warrants to the original purchaser that Rane products are free from
defects in material and workmanship under normal use and service for the period commencing upon
the date of purchase from an authorized Rane dealer and continuing for the following period of time
after that date for (1) Year.
2. This Limited Warranty is conditioned upon proper use of the product by the purchaser.
This Limited Warranty does not cover: (a) defects or damage resulting from accident, misuse, abuse,
neglect, unusual physical or electrical stress, modification of any part of the product, or cosmetic
damage; (b) equipment that has the serial number removed or made illegible; (c) all plastic surfaces and
other externally exposed parts that are scratched or damaged due to normal use; (d) defects or damage
from improper testing, operation, maintenance, installation, adjustment, or service of the products.
3. During the applicable warranty period, Rane will repair or replace, at Rane’s sole discretion, without
charge to the purchaser, any defective component part of the product. Rane may, at Rane’s sole
discretion, use rebuilt, reconditioned, or new parts or components when repairing any product or
replace a product with a rebuilt, reconditioned, new or comparable product.
4. THE WARRANTIES GIVEN IN THIS LIMITED WARRANTY, TOGETHER WITH ANY IMPLIED
WARRANTIES COVERING RANE PRODUCTS, INCLUDING WITHOUT LIMITATION ANY WARRANTIES
OF MERCHANTABILITY OR FITNESS FOR A PARTICULAR PURPOSE, ARE LIMITED TO THE
DURATION OF THIS LIMITED WARRANTY. EXCEPT TO THE EXTENT PROHIBITED BY APPLICABLE
LAW, INMUSIC OR RANE SHALL NOT BE LIABLE FOR ANY SPECIAL, INCIDENTAL,
CONSEQUENTIAL, INDIRECT OR SIMILAR DAMAGES, LOSS OF PROFITS, DAMAGES TO
PURCHASER’S PROPERTY, OR INJURY TO PURCHASER OR OTHERS ARISING OUT OF THE USE,
MISUSE OR INABILITY TO USE ANY RANE PRODUCT, BREACH OF WARRANTY, OR NEGLIGENCE,
INCLUDING BUT NOT LIMITED TO INMUSIC’S OR RANE’S OWN NEGLIGENCE, EVEN IF INMUSIC,
RANE, OR ITS AGENTS HAVE BEEN ADVISED OF SUCH DAMAGES, OR FOR ANY CLAIM BROUGHT
AGAINST PURCHASER BY ANY OTHER PARTY. THIS LIMITED WARRANTY IS THE COMPLETE
WARRANTY FOR RANE’S PRODUCTS, AND IS GIVEN IN LIEU OF ALL OTHER EXPRESS
WARRANTIES. THIS LIMITED WARRANTY SHALL NOT EXTEND TO ANYONE OTHER THAN THE
ORIGINAL PURCHASER OF THIS PRODUCT AND STATES PURCHASER’S EXCLUSIVE REMEDY. IF
ANY PORTION OF THIS LIMITED WARRANTY IS ILLEGAL OR UNENFORCEABLE BY REASON OF
ANY LAW, SUCH PARTIAL ILLEGALITY OR UNENFORCEABILTY SHALL NOT AFFECT THE
ENFORCEABILITY OF THE REMAINDER OF THIS LIMITED WARRANTY WHICH PURCHASER
ACKNOWLEDGES IS AND WILL ALWAYS BE CONSTRUED TO BE LIMITED BY ITS TERMS OR AS
LIMITED AS THE LAW PERMITS.
This Limited Warranty allocates risk of product failure between purchaser and Rane, and Rane’s product
pricing reflects this allocation of risk and the limitations of liability contained in this Limited Warranty. The
agents, employees, distributors, and dealers of Rane are not authorized to make modifications to this
Limited Warranty, or make additional warranties binding on Rane or inMusic. Accordingly, additional
statements such as dealer advertising or presentation, whether oral or written, do not constitute warranties
by Rane or inMusic and should not be relied upon. Some jurisdictions do not allow limitations on how long
an implied warranty lasts, so the above limitation may not apply to you. This warranty gives you specific
legal rights, and you may also have other rights which vary under local laws.
Please record the serial number of your unit as shown on the back of the chassis as well as the name of the
dealer from whom you purchased the unit. Retain this information and your original purchase receipt for
your records. Go to our website rane.com to register your product with us.
Model: Purchased From:
Serial Number: Date of Purchase:
5
Return Information
• A return merchant authorization number must be obtained from your local Rane representative. For your
representative go to rane.com.
• A copy of the original sales receipt must also be included for the equipment to be repaired under warranty.
• The faulty equipment must be packed in its original packaging.
• One additional outer layer of packaging must be included to ensure product safety. Failure to do so may
inadequately protect the equipment in transit and therefore jeopardize the warranty.
• Rane will not accept COD shipments and no call tags will be issued for merchandise return.
• Rane will not return repaired merchandise to customers by priority service except by written request at
the customer’s cost. Requests must be submitted in writing with returned merchandise.
• The defective Rane equipment should be sent freight prepaid with the return merchant authorization number
printed clearly on the outer packaging and original sales receipt enclosed to your local service center.
Very Important
Please read this section before connecting this unit to your system:
For optimum performance:
• All slide faders are subject to wear. Excessive force can wear out the faders quickly. User-replaceable
slide faders are not covered by our warranty.
• Never use spray cleaners on the slide controls. Residues cause excessive dirt build-up and this will void
your warranty. In normal use, slide controls can last for many years. If they malfunction (usually because
of a dirty or dusty environment), consult a professional technician.
• Always make sure that AC power is off while making any connections.
• Use appropriate cables throughout your system. Do not use excessively long cables (i.e. over 32 feet / 10
meters). Be sure plugs and jacks are tightly mated. Loose connections can cause hum, noise, or
intermittents that could easily damage your speakers. Make the input and output connections with readily
available low-capacitance stereo cables. Cable quality makes a big difference in audio fidelity and “punch.”
See your Rane dealer or an electronics or audio specialist store if you are not sure which cables to use.
• Never attempt to make any adjustments other than those described in this manual, or repairs. Take the
unit to your dealer or to an authorized Rane service center.
• Always remember: turn amps on last and off first. Begin with master faders or volume controls on
minimum and the amplifier gain/input control(s) down. Wait 8–10 seconds before turning up the volume.
This prevents transients which may cause severe speaker damage.
• Use restraint when operating controls. Try to move them slowly. Rapid adjustments could damage
equipment due to amplifier clipping.
• Avoid amplifier “clipping” at all costs: this occurs when the red LEDs (usually on the front panel of most
professional power amplifiers) start flashing. “Clipping” is when the power amplifier is distorting and
working beyond its limits. Amplifier distortion is the main cause of speaker failure.
• To prevent fire or shock hazard, do not expose the unit to rain or moisture. Never place cans of beer,
soda, glasses of water or anything wet near or on top of the unit!
• Headphone outputs can be set to levels which can cause damage to your ears. Use caution.
• This unit may contain a microcomputer for signal processing and control functions. In very rare situations,
severe interference, noise from an external source, or static electricity may cause it to lockup. In the unlikely
event that this should happen, turn off the unit, wait at least five seconds, and then turn it back on again.
• Under rare circumstances, if this product is exposed to electromagnetic interference during use, there
may be a slight drop in signal-to-noise ratio.
• Intended electromagnetic environments: residential, commercial, light industrial, urban outdoors.
6
Important Safety Instructions
1. Read and keep these instructions. Heed all warnings and follow all Instructions.
2. Do not use this apparatus near water.
3. Clean only with dry cloth.
4. Do not block any ventilation openings. Install in accordance with the manufacturer’s instructions. Do not install this equipment in a
confined or “boxed-in” space such as a bookcase or similar unit, and maintain good ventilation conditions. The ventilation should
not be impeded by covering the ventilation openings with items such as newspaper, tablecloths, curtains, etc.
5. Do not install near any heat sources such as radiators, heat registers, stoves, or other apparatus (including amplifiers) that produce
heat. Do not place exposed flame sources such as lighted candles on the apparatus.
6. Do not defeat the safety purpose of the polarized or grounding-type plug. A polarized plug has two blades with one wider than the
other. A grounding type plug has two blades and a third grounding prong. The wide blade or the third prong is provided for your
safety. If the provided plug does not fit into your outlet, consult an electrician for replacement of the obsolete outlet.
7. Protect the power cord from being walked on or pinched particularly at plugs, convenience receptacles, and the point where they
exit from the apparatus.
8. Only use attachment/accessories specified by the manufacturer.
9. Use only the cart, stand, tripod, bracket or table specified by the manufacturer, or sold with the apparatus (if applicable).
When a cart is used, use caution when moving the cart/apparatus combination to avoid injury from tip-over.
10. Unplug this apparatus during lightning storms or when unused for long periods of time.
11. Refer all servicing to qualified service personnel. Servicing is required when the apparatus has been damaged in any way, such as
power-supply cord or plug is damaged, liquid has been spilled or objects have fallen into the apparatus, the apparatus has been
exposed to rain or moisture, does not operate normally, or has been dropped.
12. Power Sources: This product should be connected to a power supply only of the type described in these operating instructions, or
as marked on the unit.
13. Internal/External Voltage Selectors (if applicable): Internal or external voltage selector switches, if any, should only be reset and re-
equipped with a proper plug for alternative voltage by a qualified service technician. Do not attempt to alter this yourself.
14. Water and Moisture: This product should be kept away from direct contact with liquids. The apparatus shall not be exposed to
dripping or splashing and that no objects filled with liquids, such as vases, shall be placed on the apparatus.
15. Caution (if applicable): Danger of explosion if battery is incorrectly replaced. Replace only with the same or equivalent type.
Batteries (a battery pack or an installed battery) shall not be exposes to excessive heat such as sunshine, fire, etc.
16. Where the mains plug or an appliance coupler is used as the disconnect device, the disconnect device shall remain readily operable.
17. Protective earthing terminal (if applicable): The apparatus should be connected to a mains socket outlet with a protective
earthing connection.
• Denmark (Danmark): Apparatets stikprop skal tilsluttes en stikkontakt med jord, som giver forbindelse til stikproppens jord.
• Finland (Suomi): Laite on liitettävä suojakoskettimilla varustettuun pistorasiaan.
• Norway (Norge): Apparatet må tilkoples jordet stikkontakt.
• Sweden (Sverige): Apparaten skall anslutas till jordat uttag.
18. (If applicable) This symbol means the equipment is a Class II or double-insulated electrical appliance. It has been designed
in such a way that it does not require a safety connection to electrical earth.
19. Warning (if applicable): Provide an earthing connection before the mains plug is connected to the mains. When disconnecting the
earthing connection, be sure to disconnect it after pulling the mains plug out from the mains.
20. This apparatus is for professional use only. Intended operational climate: tropical, moderate.
21. When moving or not using the appliance, secure the power cord (e.g., wrap it with a cable tie). Be careful not to damage the power
cord. Before using it again, make sure the power cord has not been damaged. If the power cord has been damaged at all, bring
the unit and cord to a qualified service technician for repair or replacement as specified by the manufacturer.
22. Warning (if applicable): Excessive sound pressure (high volumes) from headphones can cause hearing loss.
23. Warning (if applicable): Please refer to any important information (e.g., electrical, safety, etc.) printed on the exterior bottom
enclosure or rear panel before installing or operating the product.
Service Instructions
• Disconnect power cord before servicing.
• Replace critical components only with factory parts or recommended equivalents.
• For AC line powered units: Before returning repaired unit to user, use an ohmmeter to measure from both AC plug blades to all
exposed metal parts. The resistance should be more than 2,000,000 ohms.
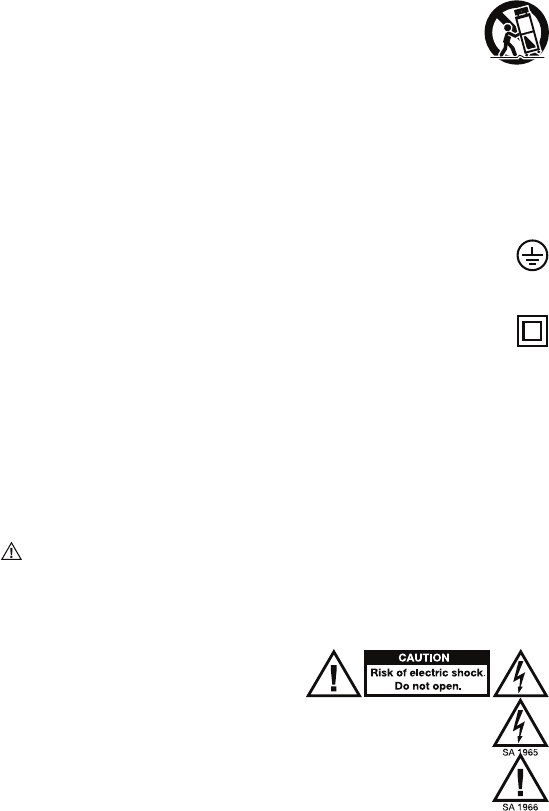
Safety Notices
CAUTION: TO REDUCE THE RISK OF ELECTRIC SHOCK, DO NOT REMOVE ANY
COVER. NO USER- SERVICEABLE PARTS INSIDE. REFER SERVICING TO QUALIFIED
SERVICE PERSONNEL ONLY.
DANGEROUS VOLTAGE: The lightning flash with arrowhead symbol within the
equilateral triangle is intended to alert the user to the presence of un-insulated “dangerous voltage” within the product’s
enclosure that may be of sufficient magnitude to constitute a risk of electric shock.
INSTRUCTIONS: The exclamation point within the equilateral triangle is intended to alert the user to the presence of
important operating and maintenance (servicing) instructions in the literature accompanying this appliance.
WARNING: To reduce the risk of fire or electrical shock, do not expose this appliance to rain or moisture. Electrical
equipment should NEVER be kept or stored in damp environments.
CAUTION (for U.S.A. & CANADIAN models only): TO PREVENT ELECTRIC SHOCK DO NOT USE THIS (POLARIZED) PLUG WITH AN
EXTENSION CORD, RECEPTACLE OR OTHER OUTLET UNLESS THE BLADES CAN BE FULLY INSERTED TO PREVENT BLADE EXPOSURE.

7
NOTICE CONCERNING LASER PRODUCTS: DANGER: INVISIBLE LASER RADIATION WHEN OPEN AND INTERLOCK FAILED OR
DEFEATED. AVOID DIRECT EXPOSURE TO BEAM. USE OF CONTROLS OR ADJUSTMENTS OTHER THAN THOSE SPECIFIED
HEREIN MAY RESULT IN HAZARDOUS RADIATION EXPOSURE.
NOTICE CONCERNING FCC REGULATIONS: You are cautioned that changes or modifications not expressly approved by the part
responsible for compliance could void the user’s authority to operate the equipment. This equipment has been tested and found to
comply with the limits for a Class B digital device, pursuant to Part 15 of the FCC rules. These limits are designed to provide
reasonable protection against harmful interference in a residential installation. This equipment generates uses and can radiate radio
frequency energy and, if not installed and used in accordance with the instructions, may cause harmful interference to radio
communications. However, there is no guarantee that interference will not occur in a particular installation. If this equipment does
cause harmful interference to radio or television reception, which can be determined by turning the equipment off and on, the user is
encouraged to try to correct the interference by one or more of the following measures: (a) reorient or relocate the receiving antenna;
(b) move this unit; (c) increase the separation between the equipment and receiver; (d) connect the equipment into an outlet on a
circuit different from that to which the receiver is connected; (e) be sure that all cables are properly shielded, using a choke or ferrite
where appropriate; or (f) consult the dealer or an experienced radio/television technician for help.
This device complies with Part 15 of the FCC rules. Operation is subject to the following two conditions: (1) this device may not cause
harmful interference, and (2) this device must accept any interference received, including interference that may cause undesired operation.
FCC RF Radiation Exposure Statement: This equipment complies with FCC radiation exposure limits set forth for an uncontrolled
environment. End users must follow the specific operating instructions for satisfying RF exposure compliance. This transmitter must
not be co-located or operating in conjunction with any other antenna or transmitter.
For Canadian models:
• This device complies with Industry Canada licence-exempt RSSs. Operation is subject to the following two conditions: (1) this device may not
cause interference, and (2) this device must accept any interference, including interference that may cause undesired operation of the device.
• Under Industry Canada regulations, this radio transmitter may only operate using an antenna of a type and maximum (or lesser) gain
approved for the transmitter by Industry Canada. To reduce potential radio interference to other users, the antenna type and its gain should
be so chosen that the equivalent isotropically radiated power (e.i.r.p.) is not more than that necessary for successful communication.
• This radio transmitter (identify the device by certification number, or model number if Category II) has been approved by Industry
Canada to operate with the antenna types listed below with the maximum permissible gain and required antenna impedance for
each antenna type indicated. Antenna types not included in this list, having a gain greater than the maximum gain indicated for
that type, are strictly prohibited for use with this device.
• This unit does not exceed the Class B limits for radio noise emission from digital apparatus set out in the radio interference
regulations of the Canadian Department of Communications.
ESD/EFT Warning: This unit may contain a microcomputer for signal processing and control functions. In very rare
situations, severe interference, noise from an external source, or static electricity may cause it to lock up. In the unlikely event
that this should happen, turn off the unit, wait at least five seconds, and then turn it back on again. The pins of connectors
identified with this ESD warning symbol should not be touched.
For best audio quality, avoid using this device in a high RF-radiated environment. In an environment with radio frequency interference,
the unit may malfunction and resume normal operation after removal of the interference.
For 240-volt use in U.K., use NEMA®-style 240-volt plug. For other countries use proper plug for local outlet.
Double-Insulated: When servicing use only identical replacement parts.
Correct Disposal of This Product: This marking indicates that this product should not be disposed with other household wastes
throughout the EU. To prevent possible harm to the environment or human health from uncontrolled waste disposal, recycle it
responsibly to promote the sustainable reuse of material resources. To return your used device, please use the return and collection
systems or contact the retailer where the product was purchased. They can take this product for environmentally safe recycling.
Disposal of Batteries (if applicable):
• Never dispose of any types of batteries in fire or near excessive heat or direct sunlight. Overheated batteries can rupture or explode.
• If you are unsure of how or where to dispose of a battery, refer to your local ordinances for the proper location, method, etc.
• Alkaline batteries & lithium button cell batteries: You can safely dispose of alkaline and lithium button cell batteries with
normal household waste. They do not pose a health or environmental risk during normal use or disposal. (Alkaline batteries are
composed primarily of common metals like steel, zinc, and manganese.)
Do not dispose of large amounts of alkaline or lithium button cell batteries in a group. Used batteries are often not completely
“dead.” Grouping them together can bring these “live” batteries into contact with one another, creating safety risks. To avoid this,
insulate each battery with tape or other non-conductive material to ensure it does not discharge.
Proven cost-effective and environmentally safe recycling processes are not yet universally available for alkaline and lithium button
cell batteries. Some communities offer recycling or collection of these batteries. For more information, refer to your local
ordinances or contact your local government.
• Lead-acid batteries: Dispose of lead-acid batteries by bringing them to an electronic waste center or recycling center, or
dispose of them in accordance with your local ordinances. (Rechargeable lead-acid batteries are the same type used in
automobiles and should be disposed of in a similar fashion.)
California Proposition 65 Warning: This product may contain chemicals known to the State of California to cause cancer and birth
defects or other reproductive harm. (California law requires this warning to be given to customers in the State of California.)
General Note on the Declaration of Conformity: We hereby declare that this device is in accordance
with the essential requirements of the European Directive 1999/5/EC. The full EU declaration of
conformity can be requested at the following address:
inMusic GmbH
Harkortstr. 12 - 32
40880 Ratingen
GERMANY

8
Garantía del producto
(para productos adquiridos fuera de EE.UU.)
1. inMusic Brands, Inc. (“inMusic”) garantiza al comprador original que todos los productos de Rane están libres
de defectos de material y de mano de obra bajo su uso y servicio normal por el período que comienza en la
fecha de compra en un vendedor autorizado por Rane y que continúa durante el tiempo que sigue a esa fecha
por un (1) año.
2. Esta Garantía Limitada está condicionada al uso adecuado del producto por parte del comprador.
Esta Garantía Limitada no cubre: (a) defectos o daños que resultan de accidentes, el uso incorrecto, abuso,
negligencia, estrés físico o eléctrico fuera de lo común, modificación de cualquier parte del producto o daño
cosmético; (b) equipos que tienen el número de serie retirado o ilegible; (c) todas las superficies de plástico y otras
partes expuestas externamente que han sido rayadas o dañadas debido a su uso normal; (d) defectos o daños
debido a pruebas, operación, mantenimiento, instalación, ajustes o reparación incorrectos de los productos.
3. Durante el período de garantía aplicable, Rane reparará o cambiará, a su sola discreción, sin costo para el
comprador, cualquier componente defectivo del producto. Rane puede, bajo su sola discreción, usar
repuestos o componentes nuevos, reconstruidos o renovados al reparar cualquier producto o cambiar un
producto con un producto nuevo, reconstruido, renovado o comparable.
4. LAS GARANTÍAS OTORGADAS EN ESTA GARANTÍA LIMITADA, JUNTO CON CUALQUIER OTRA GARANTÍA
IMPLÍCITA QUE CUBRA LOS PRODUCTOS DE RANE, INCLUYENDO PERO NO LIMITANDO NINGUNA
GARANTÍA DE COMERCIO O DE UTILIDAD PARA UN PROPÓSITO EN PARTICULAR, ESTÁN LIMITADAS A LA
DURACIÓN DE ESTA GARANTÍA LIMITADA. SALVO EN LA MEDIDA EN QUE LO PROHÍBAN LAS LEYES
APLICABLES, INMUSIC O RANE NO SERÁ RESPONSABLE POR NINGÚN DAÑO ESPECIAL, ACCIDENTAL,
CONSECUENTE, INDIRECTO O SIMILAR, PÉRDIDA DE GANANCIAS, DAÑOS A LA PROPIEDAD DEL
COMPRADOR O LESIONES AL COMPRADOR Ó A OTROS RESULTANTES DEL USO, EL USO INCORRECTO O
LA INCAPACIDAD DE USAR UN PRODUCTO DE RANE, INCUMPLIMIENTO DE GARANTÍA O NEGLIGENCIA,
INCLUYENDO PERO NO LIMITADA A LA PROPIA NEGLIGENCIA DE INMUSIC O RANE, AUNQUE INMUSIC,
RANE O SU AGENTE HAYAN SIDO ADEVERTIDOS DE TALES DAÑOS O POR CUALQUIER DEMANDA
PRESENTADA CONTRA EL COMPRADOR POR CUALQUIER OTRA PARTE. ESTA GARANTÍA LIMITADA ES LA
GARANTÍA COMPLETA PARA LOS PRODUCTOS DE RANE Y SE DA A CAMBIO DE TODAS LAS DEMÁS
GARANTÍAS ESCRITAS. ESTA GARANTÍA LIMITADA NO ALCANZARÁ A NINGUNA OTRA PERSONA QUE NO
SEA EL COMPRADOR ORIGINAL DEL PRODUCTO Y ESTABLECE UNA REPARACIÓN EXCLUSIVA PARA EL
COMPRADOR. SI ALGUNA PARTE DE ESTA GARANTÍA LIMITADA ES ILEGAL O INEXIGIBLE DEBIDO A
ALGUNA LEY, TAL ILEGALIDAD PARCIAL O INEXIGIBILIDAD NO AFECTARÁ AL CUMPLIMIENTO DEL RESTO
DE ESTA GARANTÍA LIMITADA QUE EL COMPRADOR RECONOCE Y RECONOCERÁ SIEMPRE COMO
LIMITADA POR SUS TÉRMINOS O TAN LIMITADA COMO LO PERMITA LA LEY.
Esta Garantía Limitada distribuye el riesgo de fallos del producto entre el comprador y Rane y los precios de los
productos de Rane reflejan esta distribución de riesgos y las limitaciones de las responsabilidades contenidas en
esta Garantía Limitada. Los agentes, empleados, distribuidores y vendedores de Rane no están autorizados para
hacer modificaciones a esta Garantía Limitada o para hacer garantías adicionales vinculantes para Rane o inMusic.
Por lo tanto, las declaraciones adicionales como la publicidad o presentaciones de los vendedores, sea oral o por
escrito, no constituyen garantías por Rane o inMusic y no debieran ser fiables. Algunas jurisdicciones no permiten
limitaciones en cuanto a la duración de una garantía implícita, por lo que puede que la limitación anterior no le
aplique a usted. Esta garantía le otorga derechos legales específicos y podría también disponer de otros derechos
que varían bajo las leyes municipales.
Por favor, escriba el número de serie de su unidad tal y como aparece en la parte trasera del chasis y también el
nombre del vendedor que se lo vendió. Conserve esta información y su recibo de compra original para su
referencia. Visite nuestro sitio Web rane.com para registrar su producto.
Modelo: Comprado en:
Número de serie: Fecha de compra:
9
Información sobre devoluciones
• Debe obtenerse un número de autorización de devolución (RMA) del representante local de su fabricante. Para
información sobre su representante, visite rane.com.
• Debe incluirse una copia del recibo original para que pueda repararse el equipo en garantía.
• En caso de un equipo defectuoso, este debe ser embalado en su embalaje original.
• Debe incluirse una capa de adicional de embalaje exterior para asegurar la seguridad del producto. En caso de
que no se siga este procedimiento, el equipo podría estar desprotegido en tránsito y, por tanto, se podría poner
en peligro la garantía.
• Rane no aceptará envíos COD (contra reembolso) y no se ofrecerá petición de servicio (call tag) para mercancías
devueltas.
• Rane no devolverá mercancía reparada a los clientes mediante servicio prioritario, a menos que exista una petición
por escrito a expensas del cliente. Las peticiones deben ser dirigidas por escrito junto con la mercancía devuelta.
• El equipo defectuoso debería ser enviado al servicio de reparación local, con los gastos de transporte
pagados por adelantado junto con un número de autorización de devolución (RMA) impreso con claridad en el
embalaje externo y el recibo de compra original.
Muy importante
Por favor, lea esta sección antes de conectar la unidad con su sistema
Para el funcionamiento óptimo:
• Todos los atenuadores se pueden desgastar. La fuerza excesiva del utilizador puede desgastar rápidamente el
atenuador. Los atenuadores cambiados por el utilizador no son items con garantía.
• Nunca utilice los productos de limpieza en los controles de atenuadores. Los residuos causan la acumulación
excesiva de suciedad y ésto anulará su garantía. Si los controles se hacen amenudo la unidad puede duran
muchos años. Si funcionan incorrectamente (generalmente debido a un ambiente sucio o polvoriento) consulte a
un técnico profesional.
• Sea siempre seguro de que la corriente alterna esté apagada mientras se hace cualquier conexión.
• Utilice los cables adecuados a través de su sistema. No utilice los cables excesivamente largos (por ejemplo
más de 10 metros / 32 pies). Sea seguro que los enchufes están conectados firmemente. Las conexiones flojas
pueden causar un ronquido, ruido o los intermitentes pueden dañar fácilmente sus altavoces. Haga las
conexiónes de entrada y salida con los cables disponibles de estereofonia de bajo-capacitancia. La calidad del
cable hace la gran diferencia en la fidelidad audio y poder. Vea su Rane distribuidor o un especialista en
electrónica o en audio si usted no está seguro de los cables que tiene que utilizar.
• Nunca procure reparar cualquier ajuste con excepción de los escritos en este manual, o lleve la unidad a su
distribuidor o a un centro de servicio autorizado Rane.
• Recuerde siempre: encienda los amplificadores en el último y apaguelos primero. Comience con los
atenuadores principales o los controles de volumen en mínimo y el control(es) del amplificador gain/input tiene
que estar al cero. Espera 8–10 segundos antes de subir el volumen. Esto previene a corrientes transeúntes que
puedan causar un daño grave a los altavoces.
• Utilice con cuidado los controles. Intente moverlos lentamente. Los ajustes rápidos podían dañar el equipo
debido al truncamiento de amplificador.
• Evite el “truncamiento” del amplificador a toda costa: esto ocurre cuando los LED rojos (generalmente en el
panel delantero de la mayoría de los amplificadores de potencia profesionales) comienzan a parpadear. El
“truncamiento” es cuando el amplificador de poder tuerce y funciona más allá de sus límites. La distorsión
dentro del amplificador es la causa principal de la destrucción del altavoz.
• Para prevenir el peligro de fuego o de choque, no exponga la unidad a la lluvia o a la humedad. Nunca coloque
las latas de cerveza, soda, los cristales de agua o cualquier cosa que puede mojar, cerca o encima de la unidad!
• Las salidas de los auriculares se pueden fijar en niveles que puedan causar daño a sus oídos. Tenga cuidado.
• Este producto puede contener un microprocesador para el procesamiento de las señales y las funciones de
control. En situaciones excepcionales, las interferencias acusadas, el ruido de una fuente externa o la
electricidad estática pueden hacer que se bloquee. En el caso poco probable de que esto suceda, apagar el
producto, esperar cinco segundos y volver a encenderlo.
• En raras circunstancias, si este producto se expone a la interferencia electromagnética durante el uso, puede
producirse una ligera disminución de la relación señal-ruido.
• Ambientes electromagnéticos previstos: residencial, comercial, industria liviana y exteriores urbanos.
10
Instrucciones importantes de seguridad
1. Lea y conserve estas instrucciones. Preste atención a las advertencias y siga todas las instrucciones.
2. No use este equipo cerca de agua.
3. Límpielo sólo con un paño seco.
4. No bloquee las aberturas de ventilación. Instale el equipo de acuerdo con las instrucciones del fabricante. No instale este equipo
en un espacio confinado o “dentro de una caja” tal como una biblioteca o una unidad similar, y mantenga buenas condiciones de
iluminación. No debe impedirse la ventilación cubriendo las aberturas correspondientes (si es aplicable) con elementos tales como
periódicos, manteles, cortinas, etc.
5. No instale el equipo cerca de fuentes de calor tales como radiadores, aberturas de entrada de calefacción, calefactores u otros
aparatos (incluidos amplificadores) que generen calor. No coloque fuentes de llamas vivas tales como velas encendidas en el aparato.
6. No anule la función de seguridad del enchufe tipo polarizado o con conexión a tierra. Un enchufe polarizado tiene dos patillas, una
más ancha que la otra. Un enchufe de tipo de conexión a tierra tiene dos patillas y una clavija de puesta a tierra. La patilla ancha o
la tercera clavija son para su seguridad. Si el enchufe provisto no entra en su tomacorriente, consulte a un electricista y solicítele
el reemplazo del tomacorriente obsolete.
7. Proteja el cable de alimentación de modo que no lo pisen ni quede estrangulado, particularmente en los enchufes, tomacorrientes
y el punto donde sale del equipo.
8. Use sólo agregados y accesorios especificados por el fabricante.
9. Use sólo el carrito, soporte, trípode, ménsula o mesa especificados por el fabricante o vendidos con el equipo (si es
aplicable). Si usa un carrito, tenga cuidado al mover la combinación de carrito/equipo para evitar que se vuelque y
produzca lesiones.
10. Desenchufe este equipo durante las tormentas eléctricas o cuando no lo use por períodos prolongados.
11. Solicite todo servicio a personal de servicio calificado. Se requiere servicio cuando el equipo se dañó de cualquier manera, por
ejemplo si se dañaron el cable o el enchufe de alimentación, si se derramó líquido o cayeron objetos dentro del equipo, si el
mismo estuvo expuesto a la lluvia o la humedad, si no funciona normalmente o se dejó caer.
12. Suministro eléctrico: Conecte este producto solamente a un suministro eléctrico del tipo que se describe en estas instrucciones
de operación o según se indique en la unidad.
13. Selectores de voltaje interno/externo (si es aplicable): Los conmutadores selectores de voltaje interno y externo, si existen, solo
deben ser reconfigurados y reequipados con un enchufe adecuado para voltaje alternativo por un técnico cualificado. No intente
modificar esto usted mismo.
14. Agua y humedad: Este producto se debe mantener fuera del contacto directo con los líquidos. El aparato no debe ser expuesto al
goteo o a la salpicadura y ningun objeto lleno de líquidos, como serián los floreros, debe ser colocados cerca del aparato.
15. Precaución (si es aplicable): Peligro de la explosión si la batería se substituye incorrectamente. Substituir solamente por el mismo
o el tipo equivalente. Las baterías (un bloque de baterías o una batería instalada) no se deben exponer a calor excesivo, tal como
la luz solar, el fuego, etc.
16. Cuando se usa el enchufe del suministro eléctrico o el acoplador de un artefacto como dispositivo de desconexión, el mismo debe
permanecer listo a operar.
17. Terminal de conexión a tierra de protección (si es aplicable): El artefacto debe conectarse a un tomacorriente del
suministro eléctrico con una conexión a tierra de protección.
18. (Si es aplicable) Este símbolo significa que el equipo es un artefacto eléctrico Clase II o de doble aislamiento. Está
diseñado de manera tal que no requiere una conexión de seguridad a la tierra eléctrica.
19. Precaución (si es aplicable): Antes de conectar el cable de alimentación a la corriente eléctrica, consiga una conexión a tierra. Además,
a la hora de desconectar esta toma de tierra, asegúrese de hacerlo después de haber extraído el cable de alimentación del chasis.
20. Este aparato es para uso profesional únicamente. Climas de funcionamiento previstos: tropical, moderado.
21. Cuando traslade o no use el artefacto, sujete el cable de alimentación (por ejemplo, envuélvalo con un precinto). Tenga cuidado
de no dañar el cable de alimentación. Antes de usarlo nuevamente, asegúrese de que el cable de alimentación no esté dañado. Si
dicho cable presenta algún daño, lleve la unidad y el cable a un técnico de servicio calificado para reparación o reemplazo según
lo especifique el fabricante.
22. Advertencia (si es aplicable): La presión sonora excesiva (altos volúmenes) de los auriculares puede causar pérdidas de audición.
23. Advertencia (si es aplicable): Antes de instalar u operar el producto, consulte toda la información importante (como la relativa a
electricidad, seguridad, etc.) impresa en la envuelta inferior exterior o el panel trasero.
Las instrucciones de servicio
• Desconecte el cable eléctrico antes de empezar el servicio.
• Substituya los componentes críticos solamente por las piezas de la fábrica o las piezas equivalentes recomendadas.
• Para las unidades accionadas por CA: Antes de devolver la unidad reparada al utilizador, utilice un ohmímetro para medir entre las
dos láminas del enchufe de CA y todas las partes expuestas. La resistencia tiene que ser más de 2,000,000 ohms.
Señales de advertencia
PRECAUCIÓN: PARA REDUCIR EL RIESGO DE DESCARGA ELÉCTRICA NO QUITE
NINGUN TAPADERO. DENTRO DE LA UNIDAD NO HAY COMPONENTES ÚTILES
PARA EL UTILIZADOR. PARA EL SERVICIO SE DEBE DIRIGIRSE SOLAMENTE AL
PERSONAL DE SERVICIO CUALIFICADO.
VOLTAJE PELIGROSO NO AISLADO: La seña de relámpago con la punta de la flecha dentro del triángulo equilátero está
puesto para alertar al utilizador de la presencia del “voltaje peligroso no aislado” dentro del recinto de producto que puede
tener la magnitud suficiente de correr un riesgo de descarga eléctrica.
INSTRUCCIONES: El signo de exclamación, dentro del triángulo equilátero, es para alertar el utilizador de la presencia de las
instrucciones importantes de funcionamiento y de mantenimiento (servicio) en la literatura que acompaña este dispositivo.

11
ADVERTENCIA: Para reducir el riesgo de incendio o descarga eléctrica, no exponga este aparato a la lluvia o a la humedad. Los
equipos eléctricos NUNCA deberían guardarse o almacenarse en ambientes húmedos.
SOLO PARA LOS MODELOS DE LOS EE.UU. Y CANADÁ: PARA EVITAR DESCARGAS ELÉCTRICAS, NO UTILICE ESTE ENCHUFE
(POLARIZADO) CON UN CABLE DE EXTENSIÓN, RECEPTÁCULO U OTRA TOMA DE CORRIENTE A MENOS QUE LAS PALAS DEL
ENCHUFE PUEDAN SER INSERTADAS POR COMPLETO PARA EVITAR SOBREEXPOSICIÓN.
AVISO SOBRE LOS PRODUCTOS LÁSER: PELIGRO: RADIACIÓN LÁSER INVISIBLE CUANDO ESTÁ ABIERTO Y EL BLOQUEO
FALLA O ES INUTILIZABLE. EVITE LA EXPOSICIÓN DIRECTA AL HAZ. EL USO DE CONTROLES O AJUSTES NO ESPECIFICADOS
AQUÍ PUEDE RESULTAR EN LA RADIOEXPOSICIÓN PELIGROSA.
AVISO SOBRE LAS REGULACIONES DEL FCC (Federal Communications Commission): Este equipo genera y usa energía de
radiofrecuencia y puede causar interferencia en la recepción de radio y de televisión si no la opera estrictamente según los
procedimientos detallados en este manual de operación. Esta unidad cumple con las reglas de aparatos informáticos de Clase B en
conformidad con las especificaciones en la Subparte J o Parte 15 de las Reglas FCC, que están diseñadas para proporcionar una
protección razonable contra tal interferencia en una instalación residencial. Sin embargo, no existen garantías de que no ocurrirá una
interferencia en una instalación específica. Si la unidad causa interferencia en alguna recepción de radio o de televisión, intente
reducirla realizando uno o más de los siguientes métodos: (a) reposicione la otra unidad y/o su antena, (b) mueva esta unidad, (c) deje
más espacio entre esta unidad y la(s) otra(s) unidad(es), (d) enchufe esta unidad a una toma de corriente alterna diferente para que
esté en un circuito diferente al de los demás equipos o (e) asegúrese que todos los cables estén blindados correctamente, usando un
inductor o ferrite cuando sea adecuado. Esta nota está en conformidad con la Sección 15.838 de las Reglas de FCC.
Declaración sobre exposición a las radiaciones de RF según normas de la FCC: Este equipo cumple los límites de exposición a la
radiación establecidos por la FCC para un ambiente no controlado. Los usuarios finales deben seguir las instrucciones de operación
específicas para satisfacer las normas sobre exposición a la RF. Este transmisor no debe colocarse en el mismo lugar ni operarse en
conjunto con ninguna otra antena o transmisor.
Advertencia ESD/EFT: Este producto puede contener un microprocesador para el procesamiento de las señales y las
funciones de control. En situaciones excepcionales, las interferencias acusadas, el ruido de una fuente externa o la
electricidad estática pueden hacer que se bloquee. En el caso poco probable de que esto suceda, apagar el producto,
esperar cinco segundos y volver a encenderlo.
Para obtener la mejor calidad de audio, evite usar este dispositivo en ambientes con radiaciones intensas de RF. En un ambiente con
interferencia de radiofrecuencia, la unidad puede funcionar incorrectamente y reanudar el funcionamiento normal después de la
desaparición de la interferencia.
Esta unidad no excede los límites de la Classe B para la emisión de ruidos radioeléctricos de aparatos digitales incluidos en las
regulaciones de perturbación radioeléctrica del Departamento de comunicaciones de Canadá (Canadian Department of Communications).
Para el uso de 220 voltios en U.K., use un enchufe de 220 voltios de estilo NEMA®. Para otros países, use el enchufe adecuado para la
toma de corriente local.
Doble aislamiento: Para la reparación, utilice solo repuestos idénticos.
Disposición final correcta de este producto: Esta marca indica que ese producto no debe desecharse junto con otros
desperdicios domésticos en toda la Unión Europea. Para evitar posibles daños al medio ambiente o a la salud humana debidos a la
disposición final sin control de los residuos, recíclelo responsablemente a fin de promover la reutilización sustentable de los recursos
materiales. Para devolver su producto usado, use los sistemas de devolución o recolección o póngase en contacto con el comercio
minorista donde adquirió dicho producto. El mismo puede recibir este producto para un reciclado ambientalmente seguro.
Disposición final de pilas (si aplica):
• Nunca deseche pilas de ningún tipo en el fuego o cerca de fuentes de calor excesivo o luz solar directa. Las pilas
sobrecalentadas pueden romperse o explotar.
• Si no está seguro de cómo o dónde desechar una pila, consulte la ubicación, método, etc. apropiados en sus reglamentos locales.
• Pilas alcalinas y baterías de celda de litio tipo botón: Puede desechar las pilas alcalinas y las pilas de celda de litio tipo botón
junto con los desechos normales del hogar. No presentan un riesgo a la salud o al medioambiente durante el uso o disposición
final normal. (Las pilas alcalinas están compuestas principalmente de metales comunes tales como acero, zinc y manganeso).
No deseche grandes cantidades de pilas alcalinas o pilas de celda de litio tipo botón en grupo. Las pilas usadas a menudo no
están completamente “agotadas”. Si se agrupan, estas pilas “activas” pueden entrar en contacto entre sí y crear riesgos para la
seguridad. Para evitar esto, aísle cada pila con cinta u otro material no conductor para asegurarse de que no se descargue.
No se dispone aún a nivel universal de procesos de reciclaje probados, rentables y seguros para el medio ambiente aplicables a
las pilas alcalinas y a las pilas de celda de litio tipo botón. Algunas comunidades ofrecen el reciclado o recolección de estas
pilas. Para obtener más información, consulte sus reglamentos locales o contacte a su gobierno local.
• Baterías de plomo-ácido: Deseche las pilas de plomo-ácido llevándolas a un centro de residuos electrónicos o a un centro de
reciclaje, o deséchelas de acuerdo a sus reglamentos locales. (Las pilas de plomo-ácido recargables son del mismo tipo que las
que se usan en los automóviles y deben desecharse de la misma manera).
Advertencia de la Proposición 65 de California: Este producto puede contener sustancias químicas que el Estado de California
reconoce que pueden causar cáncer y defectos de nacimiento u otros daños reproductivos. (La ley de California requiere que esta
advertencia sea dada a los clientes en el Estado de California.)
Observación general sobre la declaración de conformidad: Por el presente declaramos que este
dispositivo se encuentra en conformidad con los requisitos esenciales de la Directiva Europea
1999/5/EC. La declaración de conformidad completa de la UE se puede solicitar a la siguiente dirección:
inMusic GmbH
Harkortstr. 12 - 32
40880 Ratingen
A
LEMANI
A

12
Garantie du produit
(pour les produits achetés à l’extérieur des États-Unis d’Amérique)
1. inMusic Brands, Inc. (« inMusic ») garantit à l’acheteur initial que les produits Rane sont exempts de tout défaut
de matériel ou de main-d’œuvre sous des conditions normales d’utilisation pour une période d’un (1) an à
compter de la date de l’achat effectué chez un distributeur Rane autorisé.
2. La présente garantie limitée ne s’applique que sous une utilisation adéquate du produit par l’acheteur.
La présente garantie limitée ne couvre pas les éléments suivants : (a) les défectuosités ou les dommages
découlant d’un accident, d’un usage abusif, d’une mauvaise utilisation, de négligence, de contraintes
physiques, électriques inhabituelles, de modification de l’une ou l’autre partie du produit ou dommages d’ordre
esthétique; (b) un équipement dont le numéro de série a été supprimé ou rendu illisible; (c) toutes les surfaces
de plastique et autres pièces exposées qui sont égratignées ou endommagées à la suite d’un usage normal; (d)
les défectuosités ou les dommages découlant d’essais, d’une utilisation, d’un entretien, d’une installation,
réglage ou réparation inadéquat des produits.
3. Au cours de la période de garantie applicable, Rane réparera ou à remplacera, à sa seule discrétion et sans
frais pour l’acheteur, tous composant défectueux du produit. Rane peut, à sa seule discrétion, utilisée des
pièces ou composants neufs, remis en état ou remis à neuf lors de la réparation de tous produits ou encore de
remplacer ledit produit par un produit neuf, comparable, remis en état ou remis à neuf.
4. LES GARANTIES ACCORDÉES DANS LE CADRE DE LA PRÉSENTE GARANTIE LIMITÉE, AINSI QUE TOUTES
LES GARANTIES IMPLICITES COUVRANT LES PRODUITS RANE, INCLUANT SANS LIMITATION TOUTES
GARANTIE DE QUALITÉ MARCHANDE OU DE CONVENANCE À UN USAGE PARTICULIER, ET SONT
LIMITÉES À LA DURÉE DE LA PRÉSENTE GARANTIE LIMITÉE. SAUF DANS LA MESURE INTERDITE PAR
LES LOIS APPLICABLES, INMUSIC OU RANE NE POURRA ÊTRE TENUE POUR RESPONSABLE DE TOUS
DOMMAGES SPÉCIAUX, INDIRECTS, CONSÉCUTIFS OU AUTRES DOMMAGES SIMILAIRES, DE TOUTES
PERTES DE BÉNÉFICES, DE DOMMAGES AUX BIENS DE L’ACHETEUR OU DE BLESSURES À L’ACHETEUR
OU À DES TIERS DÉCOULANT DE L’UTILISATION, DE L’USAGE ABUSIF OU DE L’INCAPACITÉ D’UTILISER
TOUS PRODUIT RANE, D’UN NON-RESPECT DE GARANTIE, OU DE NÉGLIGENCE, INCLUANT MAIS NON
LIMITÉE À LA NÉGLIGENCE, MÊME SI INMUSIC, RANE OU SES AGENTS ONT ÉTÉ AVISÉS DE LA
POSSIBILITÉ DE TELS DOMMAGES, OU DE TOUTE RÉCLAMATION DÉPOSÉE CONTRE L’ACHETEUR PAR
UNE AUTRE PARTIE. CETTE GARANTIE LIMITÉE CONTIENT L’ENTIÈRE GARANTIE POUR LES PRODUITS
RANE ET DEMEURE À LA PLACE DE TOUTE AUTRE GARANTIE EXPRÈS. LA PRÉSENTE GARANTIE LIMITÉE
NE POURRA S’ÉTENDRE À TOUTE PERSONNE AUTRE QUE LE PREMIER ACHETEUR ET ÉNOUNCE LES
RECOURS EXCLUSIFS DE L’ACHETEUR. SI UNE PARTIE DE LA PRÉSENTE GARANTIE LIMITÉE EST
ILLÉGALE OU INAPPLICABLE EN RAISON D’UNE LOI, LADITE PARTIE ILLÉGALE OU INAPPLICABLE
N’AURA AUCUN EFFET SUR L’APPLICABILITÉ DU RESTE DE LA GARANTIE LIMITÉE, QUE L’ACHETEUR
RECONNAÎT COMME ÉTANT ET DEVANT TOUJOURS ÊTRE JUGÉE LIMITÉE PAR SES MODALITÉS OU
DANS LA MESURE PERMISE PAR LA LOI.
La présente garantie limitée partage le risque des défectuosités de produit entre l’acheteur et Rane, et les prix de
Rane reflètent ce partage de risque et les limitations de responsabilité contenues dans la présente garantie limitée.
Les agents, employés, distributeurs et marchands de Rane ne sont pas autorisés à apporter des modifications à la
présente garantie limitée, ni à offrir des garanties additionnelles pouvant lier Rane ou inMusic. En conséquence, les
déclarations supplémentaires comme la publicité ou les représentations des marchands, verbales ou écrites, ne
constituent pas des garanties de Rane ou d’inMusic et n’ont aucun effet. Certaines juridictions ne permettent pas
de limitations sur la durée d’une garantie tacite, il se peut donc que les limitations ci-dessus ne s’appliquent pas à
votre cas. La présente garantie vous confère des droits spécifiques, il se pourrait que vous ayez d’autres droits,
lesquels peuvent varier d’une juridiction à l’autre.
Veuillez inscrire le numéro de série de votre appareil tel qu’il est indiqué au dos du châssis ainsi que le nom du
marchand d’où vous l’avez acheté. Conservez cette information ainsi que votre facture originale afin de pouvoir les
consulter ultérieurement. Allez sur notre site Internet rane.com pour enregistrer votre produit.
Modèle : Détaillant :
Numéro de série : Date d’achat :
13
Politique de retour de marchandise
• Vous devez d’abord obtenir un numéro d’autorisation de retour de marchandise (RMA) de votre représentant autorisé.
Pour obtenir les coordonnées de votre représentant autorisé vous pouvez aller au site Internet rane.com.
• Vous devez faire parvenir une copie de la facture originale du produit pour lequel vous demandez une réparation
sous garantie.
• Le produit défectueux pour lequel vous demandez une réparation sous garantie doit être emballé dans son
emballage original.
• Pour assurer la sécurité du produit, ajoutez un emballage supplémentaire. À défaut de respecter cette condition,
le produit pourrait être inadéquatement protégé pour le transport et pourrait compromettre la garantie.
• Rane n’accepte aucune livraison contre remboursement (COD) et aucune étiquette de rappel ne sera délivrée
pour le retour de marchandise.
• Rane ne renvoie pas la marchandise réparée aux clients par service prioritaire, à moins qu’une demande soit
faite par écrit et que les frais soient à la charge du client. Les demandes doivent être faites par écrit et soumises
avec la marchandise retournée.
• Les produits défectueux doivent être retournés au centre de service le plus près avec le fret payé d’avance, le
numéro d’autorisation de retour de marchandise (RMA) indiqué clairement sur l’emballage ainsi que la facture
originale du produit.
Tres important
Lisez cette section avant de connecter cette unité au système.
Pour une performance optimale :
• Tous le potentiomètres de réglage qui sont sujets à l’usure doivent être utilisés. La force excessive peut
rapidement faire sortir de l’usage le potentiomètre de réglage. Les potentiomètres de l’utilisateur ne sont pas
des parties de la garantie.
• N’utilisez jamais de sprays nettoyants sur les potentiomètres de réglage. Les résidus causent une agglomération
de saleté et cela peut annuler votre garantie. Si on l’utilise normalement le potentiomètre de réglage peut
fonctionner pendant plusieurs années. En cas de mal fonctionnement (d’habitude causé par un environnement
sale ou poussiéreux) consultez un technicien professionnel.
• Soyez sûrs que la source d’alimentation n’est pas branché quand vous faites des connections.
• Utilisez des câbles propres dans tout le système. N’utilisez pas des câbles trop longues (i.e. plus de 10 mètres /
32 pieds). Soyez sûrs que les câbles et les prises sont connectées durablement. Sinon ils peuvent causer du
bruit ou des intermittences qui peuvent faire des dommages aux haut-parleurs. Faites les connexions input et
output avec des câbles stéréo de capacité réduite. La qualité du câble fait la différence dans la fidélité audio.
Consultez un représentant Rane ou un spécialiste en électronique ou audio si vous avez des doutes quand vous
choisissez les câbles.
• N’essayez jamais de faire des ajustements ou réparations autres que ceux décrits dans ce manuel. Amenez
votre unité à votre dealer dans un Centre Service Rane autorisé.
• Rappelez-vous : connectez dernierement les amplificateurs et debranchez les en premier. Commencez avec
les potentiomètres de réglage master ou les contrôleurs de volume sur le minimum de l`amplificateur. Attendez de
8 à 10 secondes avant d’élever le volume. Cela prévient les éventuels dommages causés sur le haut-parleur.
• Usez de la restriction en opérant les contrôles. Essayez de les bouger doucement. Les ajustements rapides
peuvent causer du dommage à l’équipement dû au coupage d’amplificateur.
• Evitez à tout coût les coupures de l’amplificateur : cela apparaît quand les LEDs rouges (d’habitude sur la façade
des amplificateurs professionnels) commencent a faire des flashes. Les « coupures » arrivent quand
l’amplificateur fonctionne sous ses limites. La distorsion des amplificateurs est la principale cause du mal
fonctionnement du haut-parleur.
• Pour éviter le feu ou les chocs, n’exposez pas l’unité à la pluie ou à l’humidité. Ne placez jamais de boîtes de
bière, soda ou des verres d’eau près ou sur l’unité!
• Les niveaux des casques peuvent être réglés à un niveau qui peut causer des dommages à vos oreilles. Utilisez
– les avec précaution.
• Ce produit peut contenir un micro-ordinateur pour le traitement des signaux et les fonctions de contrôle
Rarement, des graves interférences, du bruit provenant d’une source extérieure ou l’électricité statique peuvent
le bloquer. Si cet événement très rare se produit, débranchez le produit, attendez cinq secondes au moins puis
branchez de nouveau l’appareil.
• Sous certaines conditions, lorsque ce produit est utilisé en présence d’interférences électromagnétiques, il
pourrait y avoir une augmentation des bruits parasitaires.
• Environnements électromagnétiques destinés : milieux résidentiels, commerciaux, industriels légers et extérieurs
urbains.
14
Instructions importantes de sécurité
1. Lire et conserver les instructions qui suivent. Respecter tous les avertissements et suivre toutes les instructions fournies.
2. Ne pas utiliser cet appareil à proximité des sources d’eau.
3. Nettoyer seulement avec un chiffon doux sec.
4. Ne pas obstruer les orifices de ventilation. Installer conformément aux instructions du fabricant. Cet appareil ne doit pas être
installé dans un endroit confiné tel qu’une bibliothèque ou un meuble fermé. Veillez à ce que la ventilation soit adéquate. Veillez à
ne pas bloquer les orifices de ventilation (le cas échéant) avec des journaux, nappes, rideaux, etc.
5. Ne pas installer près des sources de chaleur telles que radiateurs, les registres de chaleur, poêles ou autres appareils (y compris les
amplificateurs) qui génèrent de la chaleur. Ne pas placer de sources de flammes nues telles que des chandelles allumées sur l’appareil.
6. Ne pas casser l’élément de sécurité de la fiche polarisée ou de mise à la terre. Une fiche polarisée est dotée de deux lames, une
étant plus large que l’autre. Une fiche de mise à la terre est dotée de deux lames et d’une broche de mise à la terre. La lame plus
large ou la troisième broche est pour votre sécurité. Si la fiche ne s’insère pas dans la prise murale, consulter un électricien pour
qu’il vienne remplacer la prise adéquate.
7. Protéger le câble d’alimentation de sorte à ne pas pouvoir marcher dessus ou à coincer les fiches au niveau des connexions et au
point de sortie de l’appareil.
8. N’utiliser que des accessoires recommandés par le fabricant.
9. Utiliser uniquement un socle, un support, un trépied, une console ou une table recommandés par le fabricant ou
vendus avec l’appareil (le cas échéant). Lorsqu’un socle est utilisé, déplacer l’ensemble appareil-socle avec soin
pour éviter de le faire basculer.
10. Débrancher l’appareil durant les orages ou lorsque non utilisé pendant de longues périodes.
11. Confier la réparation à du personnel technique qualifié. Faire réparer lorsque l’appareil est endommagé; lorsque le câble ou la fiche
d’alimentation est endommagé, lorsqu’on a renversé du liquide ou si des objets sont tombés dans l’appareil, lorsque l’appareil a
été exposé à de la pluie ou à de l’humidité, si l’appareil ne fonctionne pas normalement, ou lorsqu’il est tombé.
12. Sources d’alimentation : Cet appareil doit être alimenté uniquement par le type de source de courant indiqué dans le guide
d’utilisation, ou tel qu’indiqué sur le produit.
13. Sélecteurs de tension interne/externe (le cas échéant) : Les sélecteurs de tension interne ou externe, s’il y en a, doivent être
réinitialisés et équipés avec une fiche adéquate par un technicien qualifié. Ne jamais tenter de modifier ceci vous-même.
14. Eau et humidité : Ce produit dot être placé loin du contact direct avec des liquides. L’appareil ne doit pas être exposé à graisse ou
gouttes et les objets remplis, comme les vases ne doivent être placés sur l’appareil.
15. Attention (le cas échéant) : Danger d’explosion si la batterie est inexactement remplacée. Remplacer seulement avec la même
chose ou le type équivalent. Les piles (un bloc-piles ou une pile) ne doivent pas être exposées à une chaleur excessive comme la
lumière directe du soleil, le feu, etc.
16. Lorsqu’une prise de branchement ou un coupleur d’appareils est utilisé comme dispositif de débranchement, ce dispositif de
débranchement devra demeurer pleinement fonctionnel avec raccordement à la masse.
17. Borne de terre de protection (le cas échéant) : Par mesure de sécurité, l’appareil doit être branché à une prise de courant
comprenant une borne de mise à la terre.
18. (Le cas échéant) Ce symbole signifie que l’appareil est de classe II ou possède une double isolation électrique. Il est conçu
de manière à ce que l’utilisation d’une prise de terre ou de masse n’est pas requise.
19. Attention (le cas échéant) : Veuillez vous assurer que l’appareil soit mis à la terre avant de connecter la fiche au secteur. De la
même façon, assurez-vous que la terre soit déconnectée en dernier lorsque vous déconnectez la prise du secteur.
20. Cet appareil est destiné à un usage professionnel. Climat opérationnel prévu : tropical, modéré.
21. Veillez à toujours fixer le câble d’alimentation lors du déplacement de l’appareil ou lorsqu’il n’est pas utilisé. Veillez à ne pas
endommager le câble d’alimentation. Vérifiez toujours le câble d’alimentation avant d’utiliser l’appareil. Si le câble d’alimentation
est endommagé de quelconque façon, faites vérifier l’appareil et le câble d’alimentation par un technicien qualifié recommandé par
le fabricant afin de les faire réparer ou replacer.
22. Mise en garde (le cas échéant) : Une pression sonore excessive (volume élevé) provenant du casque d’écoute peut entraîner une
perte auditive.
23. Mise en garde (le cas échéant) : Veuillez vous reporter aux importantes informations (p. ex., informations électriques, de sécurité,
etc.) imprimées sur le dessous ou le panneau arrière de l’unité avant de procéder à son installation ou à son utilisation.
Instructions de service
• Déconnectez l’appareil avant le service.
• Remplacez les components seulement avec des components de la fabrique ou avec des équivalents recommandés.
• Pour les unités AC (courant alternatif), avant de retourner l’unité réparé, utilisez un ohmmètre pour mesurer la résistance
d’isolement (mesure entre les 2 broches de la prise de courant). La résistance devrait être supérieure à 2.000.000 ohms.
Avis de sécurité
CAUTION : POUR REDUIRE LE RISQUE DE CHOQUE ELECTRIQUE N’ELOIGNEZ PAS
LA COUVERTURE. PAS DE COMPONENTS UTILISABLES AU SERVICE A L’INTERIEUR.
DEMANDEZ SERVICE SEULEMENT AU PERSONNEL QUALIFIE.
VOLTAGE DANGEREUX : Quand le flash avec le symbole d’une flèche dans le triangle équilatéral est allumé il signale la
présence d’un « voltage dangereux » dans le produit qui est suffisant pour constituer un risque de choc électrique.
INSTRUCTIONS : Le signe d’exclamation dans le triangle équilatéral signale à l’utilisateur la présence des instructions
importantes pour le fonctionnement et la maintenance de ce produit.
MISE EN GARDE : Afin de réduire les risques d’incendie ou d’électrocution, ne pas exposer cet appareil à la pluie ou à
l’humidité. Tout équipement électrique ne devrait jamais être placé ou remisé dans un environnement humide.
POUR LES MODÈLES AMÉRICAINS ET CANADIENS SEULEMENT : POUR ÉVITER TOUT RISQUE ÉLECTROCUTION, NE PAS
UTLISER CETTE FICHE POLARISÉE AVEC UN PROLONGATEUR, UNE PRISE DE COURANT OU UNE AUTRE SORTIE DE COURANT,
SAUF SI LES LAMES PEUVENT ÊTRE INSERRÉES À FOND SANS EN LAISSER AUCUNE PARTIE À DÉCOUVERT.

15
AVIS CONCERNANT LES PRODUITS LASER : DANGER : RADIATION INVISIBLE QUAND L’APPAREIL EST OUVERT OU QUE LE
VERROUILLAGE EST EN PANNE OU DÉSACTIVÉ. ÉVITER UNE EXPOSITION DIRECTE AU RAYON. L’UTILISATION DE COMMANDES
OU DE RÉGLAGES AUTRES QUE CELLES INDIQUÉES CI-DESSUS PEUVENT AVOIR COMME CONSÉQUENCE UNE EXPOSITION
DANGEREUSE DE RADIATION.
AVIS CONCERNANT LA RÉGLEMENTATION FCC (Commission Fédérale américaine des Communications ou CCE): Cet équipement
génère et utilise de l’énergie sur des fréquences radio et peut causer des interférences à la réception des programmes radio et télévision si
vous ne l’utilisez pas dans une stricte concordance avec les procédures détaillées dans ce guide de fonctionnement. Cette unité est
conforme aux normes de Classe B en accord avec les spécifications des sous paragraphe J ou de l’article 15 de la réglementation FCC, qui
sont désignées à offrir une protection raisonnable contre de telles interférences dans une installation résidentielle. Toutefois, il n’est pas
garanti qu’aucune interférence n’apparaisse dans des installations particulières. Si l’unité cause des interférences avec la réception de la
radio ou de la télévision, vous pouvez essayer de les corriger en utilisant une ou plusieurs des mesures suivantes : (a) repositionnez l’autre
appareil et/ou son antenne, (b) déplacez cet appareil, (c) éloignez cet appareil le plus loin possible de l’autre appareil, (d) branchez cet
appareil dans une autre prise AC, de cette façon, ils seront sur des circuits différents ou (e) assurez vous que tous les câbles soient blindés
à l’aide d’une bobine d’arrêt ou ferrite, où nécessaire. Cet avis est conforme à l’article 15.838 de la réglementation FCC.
Le présent appareil est conforme aux l’article 15 de la réglementation FCC. L’exploitation est autorisée aux deux conditions
suivantes : (1) l’appareil ne doit pas produire de brouillage, et (2) l’utilisateur de l’appareil doit accepter tout brouillage
radioélectrique subi, même si le brouillage est susceptible d’en compromettre le fonctionnement.
Énonce sur l’exposition au rayonnement de fréquence radio de la FCC : Cet équipement est conforme aux limites d’exposition au
rayonnement de fréquence radio de la FCC établies pour un environnement non contrôlé. L’utilisateur final doit suivre les instructions
de fonctionnement spécifiques afin d’être conforme aux exigences d’exposition au rayonnement de fréquence radio. Cet émetteur ne
doit pas être placé ou utilisé avec une autre antenne ou un autre émetteur.
Pour les modèles Canadiens :
• Le présent appareil est conforme aux CNR d’Industrie Canada applicables aux appareils radio exempts de licence. L’exploitation
est autorisée aux deux conditions suivantes : (1) l’appareil ne doit pas produire de brouillage, et (2) l’utilisateur de l’appareil doit
accepter tout brouillage radioélectrique subi, même si le brouillage est susceptible d’en compromettre le fonctionnement.
• Conformément à la réglementation d’Industrie Canada, le présent émetteur radio peut fonctionner avec une antenne d’un type et
d’un gain maximal (ou inférieur) approuvé pour l’émetteur par Industrie Canada. Dans le but de réduire les risques de brouillage
radioélectrique à l’intention des autres utilisateurs, il faut choisir le type d’antenne et son gain de sorte que la puissance isotrope
rayonnée équivalente (p.i.r.e.) ne dépasse pas l’intensité nécessaire à l’établissement d’une communication satisfaisante.
• Le présent émetteur radio (identifier le dispositif par son numéro de certification ou son numéro de modèle s’il fait partie du
matériel de catégorie I) a été approuvé par Industrie Canada pour fonctionner avec les types d’antenne énumérés ci-dessous et
ayant un gain admissible maximal et l’impédance requise pour chaque type d’antenne. Les types d’antenne non inclus dans cette
liste, ou dont le gain est supérieur au gain maximal indiqué, sont strictement interdits pour l’exploitation de l’émetteur.
• Cet appareil n’excede pas les limites de la Classe B pour les émissions des fréquences radio à partir d’un appareil numérique
établit par le Ministère des communications.
Avertissement ESD/EFT : Ce produit peut contenir un micro-ordinateur pour le traitement des signaux et les fonctions de contrôle
Rarement, des graves interférences, du bruit provenant d’une source extérieure ou l’électricité statique peuvent le bloquer. Si cet
événement très rare se produit, débranchez le produit, attendez cinq secondes au moins puis branchez de nouveau l’appareil.
Pour une meilleure qualité audio, évitez d’utiliser cet appareil dans un environnement irradié de fréquences radio. Lorsqu’utilisé en
présence d’interférences aux fréquences radio électriques, l’appareil pourrait défaillir et reprendre un fonctionnement normal une fois
les interférences supprimées.
Utilisez une prise de modèle NEMAMD de 220 volts pour utiliser avec une tension secteur de 220V au U.K. Pour les autres pays, utliser
une prise secteur adéquate pour cette tension de secteur.
Double isolation : Lors de réparation, utilisez uniquement des pièces de remplacement identiques.
Mise au rebut convenable de ce produit : Ce repère indique que ce produit ne doit pas être mis au rebut dans l’UE avec
d’autres ordures ménagères. Afin d’éviter tout dommage potentiel pour l’environnement ou la santé humaine résultant d’une
élimination incontrôlée des déchets, recyclez-le de façon responsable afin de promouvoir la réutilisation durable des
ressources matérielles. Pour remettre votre appareil usagé, veuillez utiliser les systèmes de remise et de collecte ou contacter
le vendeur où le produit a été acheté. Ceux-ci pourront assurer le recyclage écologique de ce produit.
Élimination des piles (le cas échéant) :
• Ne jamais jeter de piles d’aucun type au feu ou à proximité de toute source de chaleur excessive ou de la lumière directe du
soleil. Les piles surchauffées peuvent se rompre ou exploser.
• En cas d’incertitude sur la façon appropriée et l’endroit où disposer des piles, se reporter aux réglementations locales afin d’en
savoir plus sur l’emplacement et la méthode appropriée.
• Piles alcalines et piles au lithium de type bouton : Les piles alcalines et les piles au lithium de type bouton peuvent être
éliminées en toute sécurité avec les ordures ménagères. Ces piles ne représentent aucun risque pour la santé ou pour
l’environnement lorsqu’elles sont utilisées et recyclées normalement. (Les piles alcalines sont composées principalement de
métaux courants comme l’acier, le zinc et le manganèse.)
Il est important de ne pas disposer de grandes quantités de piles alcalines et de piles au lithium de type bouton en même temps.
Les piles usagées ne sont souvent pas entièrement déchargées. Regrouper des piles usagées peut créer un risque de contact et
compromettre la sécurité. Pour éviter cela, isoler les contacts de chaque pile avec du ruban adhésif ou un autre matériel non-
conducteur afin de s’assurer qu’elle ne se décharge pas.
Des procédés de recyclage rentables et écologiques pour les piles alcalines et les piles au lithium de type bouton ne sont pas
encore accessibles partout. Certaines communautés offrent le recyclage ou la collecte de ces types de piles. Pour plus
d’informations, se reporter aux réglementations locales ou communiquer avec l’administration locale.
• Piles au plomb : Disposer des piles au plomb en les apportant à un centre de recyclage ou de récupération des déchets
électroniques, ou conformément aux réglementations locales. (Les piles au plomb rechargeables sont du même type que les
batteries utilisées dans les automobiles et doivent être disposées de la même façon.)
Note générale sur la déclaration de conformité : Nous déclarons par la présente que cet appareil
est conforme à toutes les exigences essentielles de la Directive 1999/5/CE du Parlement européen
et du Conseil. Une copie du texte intégral de la déclaration de conformité UE est disponible sur
demande à l’adresse suivante :
inMusic GmbH
Harkortstr. 12 - 32
40880 Ratingen
A
LLEMAGNE

16
Garanzia del prodotto
(per prodotti acquistati al di fuori degli Stati Uniti)
1. inMusic Brands, Inc. (“inMusic”) garantisce all’acquirente originale che i prodotti Rane sono esenti da
difetti di materiale e di fabbricazione in normali condizioni d’uso e manutenzione, e per il periodo di
garanzia avente inizio a decorrere dalla data di acquisto presso un rivenditore autorizzato Rane per il
termine di un (1) anno.
2. La presente Garanzia Limitata è valida a fronte di un uso appropriato del prodotto da parte dell’acquirente.
La presente Garanzia Limitata non copre: (a) difetti o danni derivanti da cause accidentali, uso improprio o
eccessivo, negligenza, stress elettrico o fisico abnorme, modifiche di parti del prodotto, o danni apparenti;
(b) apparecchiature il cui numero di serie è stato rimosso o reso illeggibile; (c) tutte le superfici in plastica e
altre parti esterne rigate o danneggiate a causa del normale utilizzo; (d) difetti o danni derivanti da
operazioni improprie di test, utilizzo, manutenzione, installazione, regolazione o revisione del prodotto.
3. Nel periodo di garanzia applicabile, Rane provvederà, a sua discrezione, a riparare o a sostituire
qualsiasi componente difettosa facente parte del prodotto, senza addebito a carico dell’acquirente.
Rane può, a sua discrezione, utilizzare parti o componenti ricostruiti, revisionati o nuovi per la
riparazione del prodotto, o sostituire un prodotto con un altro ricostruito, revisionato, nuovo o simile.
4. LE GARANZIE FORNITE NELLA PRESENTE GARANZIA LIMITATA, E QUALSIASI ALTRA GARANZIA
IMPLICITA CHE COPRA I PRODOTTI RANE, INCLUSO E SENZA LIMITAZIONI QUALSIASI GARANZIA
DI COMMERCIABILITÀ O IDONEITÀ AD UNO SCOPO PARTICOLARE, SONO LIMITATE ALLA DURATA
DELLA PRESENTE GARANZIA LIMITATA. ECCETTUATA LA SFERA DI COMPETENZA PROIBITA DAL
DIRITTO VIGENTE, INMUSIC O RANE NON SARÀ RITENUTA RESPONSABILE PER EVENTUALI DANNI
SPECIALI, ACCIDENTALI, SECONDARI, INDIRETTI O SIMILI, DANNO PER PERDITA O MANCATO
GUADAGNO, DANNI ALLE PROPRIETÀ DELL’ACQUIRENTE, LESIONI ALL’ACQUIRENTE O AD ALTRI
IN SEGUITO ALL’UTILIZZO, AL CATTIVO UTILIZZO O ALL’IMPOSSIBILITÀ DI UTILIZZARE UN
PRODOTTO RANE, VIOLAZIONI DI GARANZIA, O NEGLIGENZA, INCLUSA MA NON LIMITATA LA
NEGLIGENZA DI INMUSIC O RANE, ANCHE NEL CASO IN CUI INMUSIC, RANE O IL SUO
RAPPRESENTANTE SIANO STATI AVVERTITI DELLA POSSIBILITÀ DI TALI DANNI, O PER QUALSIASI
ALTRA PRETESA AVANZATA NEI CONFRONTI DELL’ACQUIRENTE DA PARTE DI TERZI. LA
PRESENTE GARANZIA LIMITATA È ESCLUSIVA PER I PRODOTTI RANE, E SOSTITUISCE OGNI
ALTRA GARANZIA ESPRESSA. LA PRESENTE GARANZIA LIMITATA È RIVOLTA ESCLUSIVAMENTE
ALL’ACQUIRENTE ORIGINALE DEL PRODOTTO E COSTITUISCE IL RIMEDIO ESCLUSIVO DEL
CLIENTE. L’EVENTUALE INVALIDITÀ O INESEGUIBILITÀ DI PARTE DELLA PRESENTE GARANZIA
LIMITATA NON INFICERÀ IN NESSUN CASO L’ESEGUIBILITÀ DI OGNI ALTRA PARTE DELLA
GARANZIA CHE L’ACQUIRENTE RICONOSCE ESSERE LIMITATA DAI PROPRI TERMINI O DAI
TERMINI CONSENTITI DALLA LEGGE.
La presente Garanzia Limitata distribuisce il rischio di guasto del prodotto tra l’acquirente e Rane, e il costo
dei prodotti Rane rispecchia questa distribuzione del rischio e le limitazioni di responsabilità indicate in
questa Garanzia. Gli agenti, impiegati, distributori, e i rivenditori di Rane non sono autorizzati ad apportare
modifiche alla presente Garanzia Limitata, o fornire ulteriori garanzie vincolanti per Rane o inMusic. Di
conseguenza, ulteriori affermazioni quali promozioni o presentazioni del rivenditore, sia in forma scritta che
verbale, non dovranno essere interpretati come specifica garanzia da parte di Rane o inMusic. Alcune
giurisdizioni non consentono la limitazione della durata delle garanzie implicite; in tal caso le limitazioni di
cui sopra non saranno applicabili. Questa garanzia fornisce all’utente diritti specifici e, in alcuni casi, altri
diritti che variano a seconda della giurisdizione.
Riportate il numero di serie, indicato sul retro della vostra unità, e il nome del rivenditore presso il quale
avete acquistato l’apparecchio. Conservate queste informazioni e la vostra ricevuta di acquisto per vostra
referenza. Recatevi sul sito rane.com per la registrazione del prodotto.
Modello: Acquistato presso:
Numero di serie: Data di acquisto:
17
Informazioni per la restituzione
• Ottenere dal rappresentante locale del fabbricante un numero di autorizzazione per la restituzione (RMA). Per
reperire il vostro rappresentante locale recarsi sul sito rane.com.
• Allegare una copia della ricevuta d’acquisto originale all’apparecchiatura in garanzia da riparare.
• L’apparecchio difettoso va imballato nel suo imballaggio originale.
• Per garantire la sicurezza del prodotto è necessario includere un ulteriore strato esterno di imballaggio. In caso
contrario, l’apparecchiatura in transito potrebbe non essere adeguatamente protetta, mettendo perciò a
repentaglio la garanzia.
• Rane non accetta spedizioni in contrassegno (COD) e non verranno emessi bollettini di consegna per le merci
restituite.
• Rane non restituirà la merce riparata a mezzo di corriere espresso, a meno di espressa richiesta da parte del
cliente e a carico del richiedente stesso. La richiesta, scritta, dev’essere allegata alla merce restituita.
• L’apparecchiatura difettosa dev’essere inviata al vostro centro servizi locale, spese pagate anticipatamente,
con il numero di autorizzazione per la restituzione (RMA) stampato chiaramente sull’imballaggio esterno e la
ricevuta di vendita originale allegata.
Molto importante
Per favore leggere questa sezione prima di collegare questa unità al suo sistema.
Per dei risultati ottimi:
• Tutti i potenziometri di regolazione si possono usare. La forza eccessiva può usare il potenziometro più
rapidamente. I potenziometri di regolazione sostituiti dall’utilizzatore non costituiscono oggetti garantiti.
• Non utilizzare mai dei pulitori spray sui potenziometri di regolazione. I residui producono la raccolta eccessiva
dello sporco e questo annullerà la sua garanzia. Utilizzati normalmente, i potenziometri di regolazione possono
resistere per molti anni. Se essi non funzionano bene (di solito a causa di un ambiente sporco e con polvere) si
deve consultare un tecnico professionista.
• Assicurarsi sempre che alimentazione si trova nella posizione OFF mentre si fà qualsiasi connessione.
• Utilizzare i cavi adeguati nell’ambito del suo sistema. Non utilizzare dei cavi eccessivamente lunghi (per esempio
superiori a 10 metri / 32 piedi). Assicurarsi che le spine e le prese sono fortemente collegate. Le connessioni
larghe possono produrre dei rumori o delle intermittenze che possono danneggiare molto facilmente ai diffusori.
Le connessioni di entrata e di uscita (input e output) si devono fare con i cavi stereo di bassa capacità disponibili.
La qualità dei cavi fare sia grande la differenza nella fedeltà audio e nel potere. Consultare il suo rappresentante di
Rane o uno specialista in elettronica o audio se non si è sicuri dei cavi che si devono scegliere.
• Non provare mai di fare altre modifiche o riparazioni che quelle descritte in questo manuale. Si deve portare
l’unità al suo rappresentante o a un Centro Service autorizzato di Rane.
• Non dimenticare: collegare gli amplificatori ultimamente e spegnerli prima di tutto. Si deve cominciare con i
potenziometri di regolazione master (principali) o con i controlli di volume al minimo (in giù) e con il controllo (i
controlli) di guadagno / entrata in giù (al minimo). Si deve aspettare 8-10 secondi prima di aumentare il volume.
Questo fatto previene i correnti transitori che possono produrre dei disturbi gravi ai diffusori.
• Fare attenzione al manneggiare i controlli. Provare di spostarli lentamente. Gli aggiustamenti rapidi possono
deteriorare l`impianto a causa del “clipping” dell’amplificatore.
• Evitare a tutti i costi il “clipping” degli amplificatori : questo appare quando le SPIE rosse (di solito collocate sulla
tabella frontale della maggior parte degli amplificatori professionali) cominciano a fare dei flash. Il “clipping”
accade quando l’amplificatore di potere disturba e funziona oltre i suoi limiti. Le distorsioni dell’amplificatore
costituiscono la principale causa di distruzione dei diffusori.
• Per prevenire il fuoco o il rischio di shock elettrico, non esporre l’unità alla pioggia o all’umidità. Mai collocare
delle scatole di birra, delle bevande rinfrescanti, dei bicchieri d’acqua o qualsiasi altro oggetto umido vicino
all’unità o su di essa!
• Le uscite delle cuffie possono essere regolate a livelli in grado di produrre delle lesioni alle orrecchie. Si deve
fare attenzione a questo aspetto.
• Il prodotto può contenere un microcomputer per l’elaborazione dei segnali e le funzioni di controllo. In occasioni
estremamente rare esso può bloccarsi a causa di interferenze intense, di disturbi provenienti da una sorgente
esterna o dell’elettricità statica. In questi casi improbabili, spegnere il prodotto e attendere almeno cinque
secondi, quindi riaccenderlo.
• In rari casi, se il prodotto viene esposto a interferenze elettromagnetiche durante l’uso, si può verificare una
leggera caduta nel rapporto segnale rumore.
• Ambienti elettromagnetici previsti: residenziale, commerciale, industriale leggero, esterno urbano.
18
Istruzioni importanti di sicurezza
1. Leggere attentamente e conservare le istruzioni. Tenere conto delle avvertenze e seguire attentamente le istruzioni.
2. Non servirsi dell’apparecchio vicino all’acqua.
3. Pulire unicamente con un panno bagnato.
4. Non bloccare le aperture deputate alla ventilazione. Installare secondo le istruzioni del produttore. Non installare questa attrezzatura in
un’area confinata o “chiusa”, come ad esempio all’interno di uno scaffale o simili, e mantenere buone condizioni di ventilazione. La
ventilazione non deve essere ostruita coprendo le aperture di ventilazione (si applicabile) con articoli quali giornali, tovaglie, tende, ecc.
5. Non installare vicino a sorgenti di calore quali radiatori, diffusori di aria calda, fornelli o altri dispositivi (inclusi amplificatori) che
producono calore. Non collocare fonti di fiamma libera quali candele accese sull’apparecchio.
6. Non aggirare lo scopo di sicurezza della spina polarizzata o da messa a terra. Una spina polarizzata presenta due lame di cui una è
più ampia dell’altra. Una spina con messa a terra presenta due lame ed un terzo dente per la messa a terra. La lama ampia o il
terzo dente sono forniti per la vostra sicurezza. Se la spina in dotazione non è adatta alla vostra presa, consultare un elettricista
per la sostituzione della presa obsoleta.
7. Proteggere il cavo di alimentazione in modo che non ci si cammini sopra o che non rimanga impigliato, in particolare a livello della
spina, dei ricettacoli e del punto in cui esce dall’apparecchio.
8. Servirsi unicamente degli accessori specificati dal produttore.
9. Servirsi unicamente del carrello, supporto, treppiede, mensola o tavolo specificato dal produttore o venduto con il
dispositivo (si applicabile). Se si utilizza un carrello, prestare attenzione al momento di spostare l’insieme carrello-
dispositivo per evitare infortuni dovuti a rovesciamento.
10. Scollegare il dispositivo dalla corrente elettrica durante temporali con fulmini o se inutilizzato per lunghi periodi.
11. Affidare la manutenzione unicamente ad apposito personale qualificato. La manutenzione è necessaria nel caso in cui il dispositivo
sia stato danneggiato in qualsiasi modo, ad esempio per danni al cavo di alimentazione o alla spina, nel caso in cui acqua o altri
liquidi siano stati versati nell’apparecchio o in caso di caduta di oggetti al suo interno, nel caso in cui il dispositivo sia stato
esposto a pioggia o umidità, non funzioni normalmente o sia stato fatto cadere.
12. Sorgenti di alimentazione: il prodotto va collegato unicamente a sorgenti di alimentazione del tipo descritto in queste istruzioni per
l’uso, o come indicato sull’apparecchio.
13. Selettori di voltaggio interno/esterno (si applicabile): gli interruttori di selezione del voltaggio interno o esterno, se presenti, devono
essere unicamente azzerati ed equipaggiati con una spina adeguata per il voltaggio alternato da un tecnico della manutenzione
qualificato. Non cercare di effettuare questo tipo di operazione da soli.
14. Acqua e umidità: Questo prodotto deve essere mantenuto lontano dal contatto diretto con liquidi. L’apparecchio non deve essere
esposto alla spruzzatura o al versamento dei liquidi, e gli oggetti che contengono liquidi, come per esempio i vasi, non devono
essere collocati sull’apparecchio.
15. Attenzione (si applicabile): pericolo dell’esplosione se la batteria è sostituita in modo errato. Sostituire soltanto con lo stesso o il
tipo equivalente. Le batterie (un gruppo batterie o una batteria installata) non devono essere esposte a fonti di eccessivo calore
quali la luce diretta del sole, fuoco, ecc.
16. Quando una spina di rete o un accoppiatore dell’apparecchio vengono utilizzati per scollegare il dispositivo, questi devono
rimanere accessibili e prontamente utilizzabili.
17. Terminale di protezione di messa a terra (si applicabile): l’apparecchio deve essere collegato ad una presa elettrica dotata
di un collegamento a terra di protezione.
18. (Si applicabile) Questo simbolo indica che l’attrezzatura è un apparecchio elettrico di classe II o a doppio isolamento. È
stata concepita in modo tale da non richiedere un collegamento di sicurezza a terra.
19. Attenzione (se applicabile): Prima di collegare la spina alla rete elettrica, assicurarsi che la presa disponga di messa a terra. Inoltre,
nel disconnettere la connessione con messa a terra, assicurarsi di aver precedentemente scollegato la spina dalla rete elettrica.
20. Questo apparecchio è stato concepito unicamente per un uso professionale. Clima operativo previsto: tropicale, temperato.
21. Al momento di trasferire l’apparecchio o in caso di mancato utilizzo dello stesso, fissare il cavo di alimentazione (ad es.
avvolgendolo con una fascetta serracavi). Prestare attenzione a non danneggiare il cavo di alimentazione. Prima di riutilizzarlo,
assicurarsi che il cavo non sia danneggiato. In caso di danni a livello del cavo di alimentazione, portare l’apparecchio e il cavo
stesso ad un tecnico di assistenza qualificato affinché venga riparato o sostituito come specificato dal produttore.
22. Avvertenza (si applicabile): un’eccessiva pressione audio (alto volume) proveniente dalle cuffie può causare danni all’udito.
23. Avvertenza (si applicabile): fare riferimento a qualsiasi informazione importante (ad es. in materia di collegamenti elettrici e sicurezza)
stampata sulla parte inferiore esterna dell’alloggiamento o sul pannello posteriore prima di installare o utilizzare il prodotto.
Istruzioni di service
• Togliere l’apparecchio dalla presa prima della riparazione.
• Sostituire i componenti critici soltanto con pezzi di fabbrica o con pezzi equivalenti raccomandati.
• Per le unità alimentate con corrente alternativa (AC): Prima di ritornare l’unità riparata all’utilizzatore si deve utilizzare un ohmetro
per misurare fra i due connettori della spina di corrente alternativa (AC) e tutte le parti esposte dell’unità. La resistenza dovrebbe
essere di più di 2.000.000 Ohm.
Precauzioni per la sicurezza
AVVERTENZA : PER RIDURRE IL RISCHIO DI SHOCK ELETTRICO NON SI DEVE
SPOSTARE NESSUN COPERCHIO. NON ESISTONO DELLE PARTI UTILI PER
L’UTILIZZATORE NELL’INTERIORE. PER IL SERVICE RIVOLGERSI SOLTANTO AL
PERSONALE SERVICE QUALIFICATO.
TENSIONI PERICOLOSE: Quando il pulsante con il simbolo di un lampo terminato con una freccia nell’interiore di un
triangolo equilatero è acceso, esso avverte l’utilizzatore sulla presenza delle “tensioni pericolose” non isolate dell’interiore
della carcassa del prodotto e questo fatto può avere una magnitudine sufficiente per costituire un rischio di shock elettrico.
19
ISTRUZIONI: Il punto esclamativo dell’interiore di un triangolo equilatero ha lo scopo di avvertire l’utilizzatore sulla
presenza di alcune istruzioni importanti di funzionamento e di manutenzione (di service) di questo dispositivo.
AVVERTENZA: Per ridurre il rischio di incendio o di scossa elettrica, non esporre questo apparecchio alla pioggia o
all’umidità. L’equipaggiamento elettrico non deve MAI essere mantenuto o riposto in ambiente umido.
ESCLUSIVAMENTE PER MODELLI USA & CANADESI: PER PREVENIRE SCOSSE ELETTRICHE NON UTILIZZARE QUESTA PRESA
(POLARIZZATA) CON UNA PROLUNGA, O ALTRE PRESE DI CORRENTE A MENO CHE LE LAMINETTE NON POSSANO ESSERE
INSERITE A FONDO EVITANDO DI RIMANERE ESPOSTE.
NOTA RIGUARDANTE PRODOTTI CHE IMPIEGANO RAGGI LASER: PERICOLO: RAGGI LASER INVISIBILI IN CASO DI APERTURA
DELL’APPARECCHIO E DI GUASTO O DI ANNULLAMENTO DEGLI INTERRUTTORI. EVITARE L’ESPOSIZIONE DIRETTA AL FASCIO. L’USO
DI FUNZIONI O RIPARAZIONI NON DESCRITTE NEL PRESENTE MANUALE È A RISCHIO DI ESPOSIZIONE A RADIAZIONI PERICOLOSE.
NOTA RIGUARDANTE LE REGOLAMENTAZIONI FCC: Quest’attrezzatura genera e utilizza energia in radiofrequenza e può causare
interferenze nella ricezione della radio o della televisione nel caso in cui non venga utilizzata nello stretto rispetto delle procedure
specificate in questo manuale di istruzioni. Questa unità è conforme ai limiti relativi ai dispositivi digitali di Classe B in conformità con le
specifiche indicate nel Capitolo J o Parte 15 delle Regolamentazioni FCC, designati al fine di fornire una ragionevole protezione contro le
interferenze dannose nelle installazioni domestiche. Comunque, non esiste alcuna garanzia che le interferenze non si verificheranno in
un’installazione particolare. Se questa apparecchiatura causa interferenze dannose alla ricezione della radio o della televisione, si
consiglia di provare a ridurle utilizzando una o più delle seguenti procedure: (a) riposizionare l’altra unità e/o la sua antenna, (b) spostare
questa unità, (c) aumentare la distanza tra i due apparecchi, (d) collegare l’apparecchiatura alla spina utilizzando un circuito diverso da
quello al quale è attaccato l’altro equipaggiamento o (e) assicurarsi che tutti i cavi siano debitamente schermati, servendosi di un
dispositivo d’impedenza o di ferrite laddove appropriati. Questa nota è conforme alla Sezione 15.838 delle Regolamentazioni FCC.
Dichiarazione FCC relativa all’esposizione alle radiazioni RF: Questa attrezzatura è conforme con i limiti per l’esposizione a
radiazioni stabiliti dalla normativa FCC per un ambiente non controllato. Gli utenti finali devono rispettare le istruzioni operative
specifiche per rispettare la conformità all’esposizione alle radiazioni RF. Questo trasmettitore non deve essere situato nei pressi né
utilizzato congiuntamente ad altre antenne o trasmettitori.
Avvertenza ESD/EFT: Il prodotto può contenere un microcomputer per l’elaborazione dei segnali e le funzioni di controllo. In
occasioni estremamente rare esso può bloccarsi a causa di interferenze intense, di disturbi provenienti da una sorgente esterna o
dell’elettricità statica. In questi casi improbabili, spegnere il prodotto e attendere almeno cinque secondi, quindi riaccenderlo.
Per garantire la migliore qualità audio, non utilizzare questo dispositivo in un ambiente caratterizzato da un’elevata radiazione in radio-
frequenza. In un ambiente che presenta interferenze di radiofrequenze, l’apparecchio può accusare un malfunzionamento e riprenderà
il funzionamento normale in seguito all’eliminazione dell’interferenza.
Questo apparecchio non eccede i limiti di Classe B nell’emissione di rumori radio da parte di un apparecchio digitale, come dichiarato
nelle regolamentazioni sulle interferenze radio del Dipartimento Canadese delle Comunicazioni.
Per l’impiego a 220-volt negli U.K., utilizzare prese NEMA® da 220 volt. Per l’impiego negli altri paesi utilizzare una presa idonea
all’impianto locale.
Doppio isolamento: Per la manutenzione utilizzare solo parti di ricambio identiche.
Smaltimento corretto del prodotto: Questo simbolo indica che nell’Unione Europea questo prodotto non deve essere
smaltito insieme ai rifiuti domestici. Per evitare possibili danni ambientali o alla salute causati da uno smaltimento
incontrollato dei rifiuti, riciclarli in maniera responsabile in modo da promuovere il riutilizzo sostenibile delle risorse materiali.
Per rendere il dispositivo usato, servirsi degli appositi sistemi di reso e raccolta, oppure contattare il rivenditore presso il
quale è stato acquistato il prodotto. Questi può ritirare il prodotto per garantirne il riciclaggio ecocompatibile.
Smaltimento delle batterie (se applicabile):
• Non smaltire mai le batterie gettandole nel fuoco né sottoporle a un calore eccessivo o esporle alla luce diretta del sole. Le
batterie surriscaldate si possono fissurare o esplodere.
• In caso di dubbi su come smaltire le batterie, fare riferimento alle ordinanze locali in materia per conoscere i luoghi e i metodi più
adeguati, ecc.
• Batterie alcaline e batterie a bottone al litio: le batterie a bottone alcaline e al litio possono essere smaltite in maniera sicura
con i propri rifiuti domestici. Non rappresentano un rischio per la salute o ambientale durante il normale utilizzo o lo smaltimento.
(Le batterie alcaline sono composte principalmente da metalli comuni quali acciaio, zinco e manganese.)
Non gettare grandi quantità di batterie a bottone alcaline o al litio contemporaneamente. Le batterie usate spesso non sono
completamente “esaurite”. Raggruppare batterie usate può portare queste batterie “vive” a contatto l’una con l’altra, creando un rischio
per la sicurezza. Per evitare ciò, isolare ciascuna batteria con nastro o altri materiali non conduttivi per garantire che non si scarichi.
Comprovati processi di riciclaggio economici e sicuri dal punto di vista ambientale non sono ancora universalmente disponibili
per le batterie a bottone alcaline e al litio. Alcune comunità offrono servizi di riciclaggio o di raccolta di tali batterie. Per maggiori
informazioni, fare riferimento alle proprie ordinanze locali o rivolgersi alla propria amministrazione locale.
• Batterie al piombo-acido: smaltire le batterie al piombo-acido portandole a un centro di raccolta di rifiuti elettronici o presso un
centro di riciclaggio, oppure smaltirle in conformità con le proprie ordinanze locali. (Le batterie ricaricabili al piombo-acido sono
dello stesso tipo di quelle utilizzate nelle automobili e devono essere smaltite in maniera simile.)
Nota generica in merito alla dichiarazione di conformità: Con il presente documento si dichiara
che il dispositivo è conforme con i requisiti essenziali contenuti nella Direttiva Europea 1999/5/EC.
La dichiarazione completa di conformità UE può essere richiesta al seguente indirizzo:
inMusic GmbH
Harkortstr. 12 - 32
40880 Ratingen
GERMANIA

20
Produktgarantie
(für Produkte, die außerhalb der USA erworben werden)
1. inMusic Brands, Inc. („inMusic“) garantiert dem Erstkäufer, dass Rane Produkte vom Material und der
Herstellung her und bei normalem Gebrauch und Wartung beginnend mit dem Datum des Kaufs von einem
autorisierten Rane-Händler für eine dem Kaufdatum folgende Zeit von einem (1) Jahr einwandfrei sind.
2. Diese eingeschränkte Garantie ist für den sachgemäßen Gebrauch des Produktes durch den Käufer gültig.
Diese eingeschränkte Garantie deckt die folgenden Fälle nicht ab: (a) Defekte oder Beschädigungen welche durch
Unfall, unsachgemäßen Gebrauch, Missbrauch, Nachlässigkeit, unübliche physische oder elektrische Kräfte,
Veränderungen eines Teils des Produktes oder Schönheitsfehler; (b) Geräte, bei welchen die Seriennummer
entfernt oder unleserlich gemacht wurde; (c) Kratzer und Beschädigungen durch normalen Gebrauch aller
Plastikoberflächen und offen liegenden Teile; (d) Defekte oder Beschädigungen, welche durch unsachgemäßes
Testen, Betrieb, Wartung, Installation, Einstellung oder Kundendienst des Produktes hervorgerufen wurden.
3. Innerhalb der rechtmäßigen Garantiezeit repariert oder ersetzt Rane, bei völliger Entscheidungsfreiheit durch Rane,
jegliches schadhafte Bestandteil des Produktes ohne den Käufer finanziell zu belangen. Es steht im Ermessen von
Rane, rekonstruierte, überholte oder neue Teile oder Bestandteile zur Reparatur eines Produktes zu verwenden, oder
ein Produkt mit einem rekonstruierten, überholten, neuen oder vergleichbar Produkt zu ersetzen.
4. DIE GARANTIEN, WELCHE IN DIESER EINGESCHÄNKTEN GARANTIE ENTHALTEN SIND, ZUSAMMEN MIT
JEGLICHEN IMPLIZIERTEN GARANTIEN, WELCHE DIE PRODUKTE VON RANE ABDECKEN,
INSBESONDERE AUCH UNEINGESCHRÄNKTE VERTRIEBSGARANTIEN ODER VERWENDUNGSGARANTIEN,
BESCHRÄNKEN SICH AUF DIE LAUFZEIT DIESER EINGESCHRÄNKTEN GARANTIE. MIT AUSNAHME DER
VON ANZUWENDENDER RECHTSPRECHUNG UNTERSAGTEN BESTIMMUNGEN IST INMUSIC ODER RANE
NICHT VERANTWORTLICH FÜR JEDWEDIGE SPEZIELLE, ZUFÄLLIGE, FOLGE-, INDIREKTE ODER
ÄHNLICHE SCHÄDEN, DEM VERLUST VON EINKOMMEN, BESCHÄDIGUNG DES EIGENTUMS DES
KÄUFERS, ODER VERLETZUNG DES EIGENTÜMERS ODER ANDERER DURCH DEN GEBRAUCH,
MISSBRAUCH ODER SACHUNKUNDIGKEIT IM GEBRAUCH EINES PRODUKTS VON RANE,
GARANTIEVERLETZUNG, NACHLÄSSIGKEIT, EINGESCHLOSSEN, ABER NICHT BESCHRÄNKT AUF
NACHLÄSSIGKEIT DURCH INMUSIC ODER RANE, SOGAR DANN, WENN INMUSIC, RANE ODER DEREN
VERTRETER ÜBER SOLCHE SCHÄDEN BENACHRICHTIGT IN KENNTNIS GESETZT WURDE ODER FÜR
JEDWEDIGEN RECHTSANSPRUCH, WELCHER VON ANDEREN PARTEIEN GEMACHT WIRD. DIESE
EINGESCHRÄNKTE GARANTIE IST DIE VOLLSTÄNDIGE GARANTIE FÜR ALLE RANE PRODUKTE UND
ERSETZT ALLE ANDERS AUSGEDRÜCKTEN GARANTIEN. DIESE GARANTIE ERSTRECKT SICH AUF
NIEMANDEN SONST ALS DEN ERSTKÄUFER DIESES PRODUKTES UND REGELT DIE ABHILFE FÜR DEN
KÄUFER ABSCHLIESSEND. SOLLTE EIN TEIL DIESER EINGESCHRÄNKTEN GARANTIE UNRECHTMÄßIG
SEIN ODER VOM GESETZ HER UNVOLLSTRECKBAR SEIN, BERÜHRT DIESE TEILWEISE
UNRECHTMÄßIGKEIT ODER UNVOLLSTRECKBARKEIT DIE VOLLSTRECKBARKEIT DER RESTLICHEN
GARANTIE NICHT, WELCHE, DER KÄUFER ERKENNT DIES AN, WIRD IMMER ALS IN SICH SELBST ODER
DURCH GESETZESVORGABEN ALS EINGESCHRÄNKT AUSGELEGT WERDEN.
Diese eingeschränkte Garantie teilt das Risiko des Produktversagens zwischen dem Käufer und Rane, und die
Produktpreisgestaltung von Rane reflektiert diese Risikoaufteilung und die Einschränkungen der Verpflichtungen
welche in dieser eingeschränkten Garantie enthalten sind. Den Vertretern, Beschäftigten, Groß- und Einzelhändlern
von Rane ist es nicht gestattet, Veränderungen dieser eingeschränkten Garantie vorzunehmen oder zusätzliche
Garantien, welche Rane oder inMusic verpflichten, anzufertigen. In diesem Sinne stellen zusätzliche Aussagen wie
Händlerreklame oder Präsentation, ob in Wort oder Schrift, keine Garantien von Rane oder inMusic dar und sollten
nicht als Verlässlich behandelt werden. Einige Gesetzgeber erlauben den Ausschluss oder die Beschränkung von
zufälligen oder Folgeschäden oder die Gültigkeitsdauer einer implizierten Garantie nicht, in diesen Fällen gelten die
oben gemachten Einschränkungen oder Ausschlüsse für den Kunden nicht. Diese eingeschränkte Garantie gibt Ihnen
bestimmte Rechte und sie haben möglicherweise auch andere Rechte, welche örtlich unterschiedlich sind.
Bitte notieren Sie sowohl die Seriennummer Ihres Geräts wie auf der Rückseite des Gehäuses angegeben als auch
den Namen des Händlers, bei dem Sie das Gerät erworben haben. Bewahren Sie diese Informationen und Ihren
Kaufbeleg für Ihre Akten auf. Besuchen Sie unsere Webseite rane.com um Ihr Produkt bei uns zu registrieren.
Modell: Gekauft von:
Seriennummer: Kaufdatum:
21
Informationen zur Rücksendung
• Sie müssen bei Ihrer örtlichen Niederlassung des Herstellers eine Rücksendezulassungsnummer (RMA) einholen. Eine
Liste von örtlichen Niederlassungen finden Sie auf der Webseite rane.com.
• Für das Gerät, welches unter Garantie zu reparieren ist, muß eine Kopie des Originalverkaufsscheins beigelegt werden.
• Das fehlerhafte Gerät muß in seine Originalverpackung verpackt werden.
• Eine weitere Außenverpackung muß aus Gründen der Produktsicherheit angebracht werden. Nachlässigkeiten können zu
unzureichendem Schutz des Produkts während des Transports und damit zur Gefährdung der Garantierechte des
Kunden führen.
• Rane akzeptiert keine COD-Lieferungen und Rückgabescheine zur Rückgabe der Ware warden nicht ausgestellt.
• Rane schickt reparierte Waren an Kunden nicht durch Eilversand zurück, es sei denn, der Kunde hat dies schriftlich
verlangt und trägt die Kosten. Anträge dieser Art müssen den zurückgesandten Waren beigelegt werden.
• Das fehlerhafte Gerät sollte mit im voraus bezahlter Frachtgebühr und der Rücksendezulassungsnummer (RMA) gut
sichtbar auf der äußeren Verpackung angebracht und unter Beilage des Originalverkaufsscheins an Ihre örtliche
Kundendienstniederlassung geschickt werden.
Sehr Wichtig
Lesen Sie bitte diesen Abschnitt, bevor Sie das Gerät an Ihr System anschließen.
Für optimale Leistungen:
• Alle Schieberegler unterstehen der Abnutzung. Übermäßige Kraftanwendung kann zu einer vorzeitigen Abnutzung des
Schiebereglers führen. Für durch den Benutzer ersetzte Schieberegler kann keine Haftung übernommen werden.
• Benutzen Sie keine Sprayreiniger für die Schieberegler. Die Rückstände verursachen die übermäßige Ansammlung von
Schmutz und dieses wird Ihre Garantie annullieren. Bei normaler Benutzung können Schieberegler viele Jahre
betriebsfähig bleiben. Bei unsachgemäßem Funktionieren (gewöhnlich wegen schmutziger oder staubiger Umgebung)
wenden Sie sich an einen Fachmann.
• Versichern Sie sich immer, dass der AC Power-Schalter in Position Off (aus) ist, während Sie jedwelche Anschlüsse machen.
• Benutzen Sie passendes Leitungskabel in ihrem gesamten Stromnetz. Benutzen Sie keine allzu langen Versorgungskabel
(z.B. über 10 Meter / 32 Fuß). Versichern Sie sich, dass die Stecker fest in den Steckdosen angeschlossen sind. Lockere
Anschlüsse können Summen, Zusatzgeräusche oder Unterbrechungen verursachen, die Ihre Lautsprecher sehr leicht
beschädigen können. Ein- und Ausgangsschlüsse sollten durch Stereokabel mit niedrigem Wechselstromwiderstand
(Kapazitanz) erfolgen. Kabelqualität kann einen großen Unterschied in Klangtreue und -kraft ausmachen. Wenden Sie sich
an Ihren Rane-Händler oder an den Elektro- und Audio-Fachhandel, um eine diesbezügliche Entscheidung zu treffen.
• Versuchen Sie nicht, irgendwelche sonstige Veränderungen oder Reparaturen am Gerät zu unternehmen als jene, die in
diesem Handbuch beschrieben sind. Bringen Sie das Gerät zu Ihrem Händler oder zu einem autorisierten Rane Service
Center.
• Vergessen Sie nicht: Schalten sie Verstärker zuletzt ein und zuerst aus. Beginnen Sie den Betrieb des Gerätes mit den
Schiebereglern und Lautstärkereglern auf Minimum und dem Verstärker-Input in niedrigster Position. Warten Sie 8-10
Sekunden, bevor Sie die Lautstärke aufdrehen. Dies verhindert Transiente, die zur Schädigung der Lautsprecher führen können.
• Betätigen Sie die Regler mit Vorsicht. Versuchen Sie, diese langsam zu bewegen. Schnelle Bewegungen können das
Gerät durch „clipping“ („Abhacken“) des Verstärkers beschädigen.
• Vermeiden Sie ein „clipping“ des Verstärkers um jeden Preis: dies geschieht wenn die roten LED-Anzeigen (gewöhnlich
an der Vorderseite der meisten professionellen Verstärker angebracht) zu blinken beginnen. Durch „clipping“ entsteht
eine verzerrte Wiedergabe durch den Verstärker, der überfordert ist. Verstärkerverzerrung ist die Hauptursache für
Schädigung von Lautsprechern.
• Für die Vorbeugung von Brand oder Stromschlag stellen Sie das Gerät nicht im Regen oder in feuchter Umgebung auf.
Stellen Sie niemals Bierdosen, Soda, Wassergläser oder sonstige nasse Gegenstände auf das Gerät!
• Die Ausgänge der Kopfhörer können auf Lärmpegel eingestellt werden, die Ihre Ohren beschädigen können. Seien Sie vorsichtig!
• Dieses Gerät enthält einen Mikrocomputer für die Signalverarbeitung und die Bedienfunktionen. In sehr seltenen Fällen
können starke Interferenzen, Rauschen von externen Quellen oder elektrostatische Aufladung Funktionsstörungen
hervorrufen. Schalten Sie das Gerät in diesem unwahrscheinlichen Fall aus, warten Sie mindestens fünf Sekunden und
schalten Sie das Gerät dann wieder ein.
• Wenn dieses Produkt beim Gebrauch elektromagnetischen Interferenzen ausgesetzt ist, kann es in seltenen Fällen zu
leichten Verlusten beim Signal-Rausch-Verhältnis kommen.
• Bestimmungsgemäße elektromagnetische Umgebungen: Wohngebiete, Gewerbegebiete, Leichtindustriegebiete, städtische
Außenbereiche.
22
Wichtige Sicherheitsanweisungen
1. Lesen Sie diese Hinweise und heben Sie diese Hinweise auf. Beachten Sie alle Warnhinweise und folgen Sie diese Hinweise.
2. Verwenden Sie das Gerät nicht in der Nähe von Wasser.
3. Verwenden Sie zur Reinigung ein trockenes Tuch.
4. Belüftungsöffnungen dürfen nicht verdeckt werden. Stellen Sie das Gerät den Hinweisen des Herstellers folgend auf. Installieren
Sie dieses Gerät nie in engen oder abgeschlossenen Bereichen wie etwa in einem Bücherregal oder ähnlichem. Sorgen Sie für
gute Belüftungsbedingungen. Die Belüftungsöffnungen (falls zutreffend) dürfen nicht mit Gegenständen wie Zeitungen,
Tischdecken, Vorhängen usw. abgedeckt und blockiert werden.
5. Betrieben Sie das Gerät nicht in der Nähe von Hitzequellen, wie Radiatoren, Wärmegebläsen, Öfen oder anderen, Hitze
produzierenden Geräten (wie Verstärkern). Platzieren Sie keine offenen Flammen, wie eine brennende Kerze, auf das Gerät.
6. Beseitigen Sie nicht die Sicherheitsvorkehrungen an den Stromversorgungen. Das gilt insbesondere für die Erdung von
Kaltgerätenetzkabeln. Wenn ein Netzstecker oder ein Netzteil nicht in die Steckdose passt, ziehen Sie einen Elektriker zu Rate.
7. Schützen Sie das Netzkabel vor unbeabsichtigtem Betreten und vor Beschädigungen durch Einklemmen der Stecker, des
Kabelmantels und besonders der Stelle, an dem das Kabel das Gerät verlässt.
8. Verwenden Sie ausschließlich das durch den Hersteller zugelassene Zubehör.
9. Verwenden Sie nur Wagen, Ständer, Stative, Einbauhilfen oder Tische, die vom Hersteller empfohlen werden oder
die zu Ihrem Gerät mitgeliefert werden (falls zutreffend). Bewegen Sie einen Wagen, auf dem das Gerät steht,
vorsichtig, um ein Herabstürzen zu verhindern.
10. Trennen Sie die Stromverbindung des Gerätes während Gewittern oder wenn Sie das Gerät eine längere Zeit nicht
verwenden wollen.
11. Wenden Sie sich zu Servicezwecken an qualifiziertes Servicepersonal. Service ist dann notwendig, wenn das Gerät in irgendeiner
Art und Weise beschädigt wurde. Dazu gehört zum Beispiel eine Beschädigung des Netzteils oder des Netzkabels, in das Innere
des Gerätes eingedrungene Flüssigkeiten oder Gegenstände, Fehlfunktionen, nachdem das Gerät Regen oder Feuchtigkeit
ausgesetzt war oder wenn das Gerät nicht richtig funktioniert.
12. Stromquellen: Dieses Produkt sollte nur an eine in dieser Betriebsanleitung beschriebenen oder einer auf dem Gerät
gekennzeichneten Stromquelle angeschlossen werden.
13. Interne/Externe Spannungswahlschalter (falls zutreffend): Schalter für die interne/externe Spannung sollten, falls vorhanden,
ausschließlich durch Fachpersonal zurückgesetzt und mit entsprechenden Anschlusskabeln für alternative Spannungsquellen
versorgt werden. Versuchen Sie nicht, diese Einstellungen selbst zu verändern.
14. Wasser und Feuchtigkeit: Dieses Produkt muss vor dem direkten Kontakt mit Flüssigkeiten geschützt werden. Das Gerät darf nicht
bespritzt oder beschüttet werden und Gegenstände, die Flüssigkeiten enthalten, wie etwa Vasen oder Gläser, sollten nicht auf das
Gerät gestellt werden.
15. Vorsicht (falls zutreffend): Gefahr der Explosion, wenn Batterie falsch ersetzt wird. Nur mit gleichen oder der gleichwertigen Art
ersetzen. Die Batterien (Batterie-Pack oder installierter Akku) dürfen nie zu starker Wärme durch Sonneneinstrahlung, Feuer usw.
ausgesetzt werden.
16. In Fällen, in denen der Hauptstecker oder ein Gerätekoppler dazu verwendet werden, das Gerät auszustecken, müssen
diese Aussteckvorrichtungen weiterhin funktionstüchtig bleiben.
17. Schutzerdungsklemme (falls zutreffend): Das Gerät muss an eine Netzsteckdose mit Schutzleiter angeschlossen werden.
18. (Falls zutreffend) Dieses Symbol gibt an, dass es sich um ein Gerät der Schutzklasse II oder um ein doppelt isoliertes
Elektrogerät handelt. Es wurde so konzipiert, dass es ohne Sicherheitsverbindung zur Erde auskommt.
19. Vorsicht (falls zutreffend): Stellen Sie einen Erdungsanschluss her, bevor Sie den Netzstecker in die Netzsteckdose stecken.
Unterbrechen Sie den Erdungsanschluss erst, nachdem Sie den Netzstecker aus der Netzsteckdose gezogen haben.
20. Dieses Gerät dient dem professionellen Gebrauch. Beabsichtigtes Betriebsklima: tropisch, mäßig.
21. Sichern Sie das Netzkabel, wenn Sie das Gerät bewegen oder länger nicht benutzen (Verwenden Sie beispielsweise einen
Kabelbinder). Achten Sie darauf, das Netzkabel nicht zu beschädigen. Bevor Sie es wieder in Betrieb nehmen, achten Sie darauf,
dass das Netzkabel nicht beschädigt wurde. Wenn das Netzkabel beschädigt wurde, bringen Sie das Gerät und das Netzkabel
nach Angabe des Herstellers zu einem qualifizierten Service-Techniker zur Reparatur oder um ein Ersatzmodell anzufordern.
22. Warnung (falls zutreffend): Übermäßiger Schalldruck (hohe Lautstärke) von Kopfhörern kann zu Gehörschäden führen.
23. Warnung (falls zutreffend): Bitte beachten Sie alle wichtigen Informationen (z.B. zu Elektronik und Sicherheit etc.), die auf der
Unterseite oder Rückseite des Gehäuses angebracht sind, bevor Sie das Produkt installieren oder in Betrieb nehmen.
Serviceanweisungen
• Ziehen Sie das Anschlusskabel vor der Störungsbeseitigung aus der Steckdose.
• Ersetzen Sie die betroffenen Bestandteile nur mit Originalkomponenten oder mit gleichwertig empfohlenen Ersatzteilen.
• Für mit Wechselstrom (AC) betriebenen Einheiten: Benützen Sie vor der Rückgabe des reparierten Gerätes an den Benutzer ein
Ohmmeter, um den Widerstand zwischen den beiden Anschlüssen des Wechselstromsteckers und den Außenseiten des Gerätes
zu messen. Der Widerstand muss mehr als 2.000.000 Ohm sein.
Sicherheitshinweise
ACHTUNG: UM DAS RISIKO EINES STROMSCHLAGS ZU VERMINDERN,
ENTFERNEN SIE KEINE ABDECKUNGEN. KEINE DURCH BENUTZER WARTBARE
BESTANDTEILE ENTHALTEN. FÜR WARTUNGSARBEITEN WENDEN SIE SICH NUR
AN QUALIFIZIERTES SERVICE-PERSONAL.
GEFÄHRLICHER SPANNUNG: Das Symbol eines schwarzen Blitzes innerhalb eines gleichseitigen Dreiecks soll den
Benutzer vor unisolierter „gefährlicher Spannung“ im Inneren des Gerätes warnen, die gegebenenfalls kräftig genug sein,
um einen Stromschlag zu verursachen.
ANWEISUNGEN: Das Ausrufezeichen inmitten eines gleichseitigen Dreiecks soll den Benutzer auf wichtige Betriebs- und
Wartungsanweisungen aufmerksam machen, die in der Begleitbroschüre dieses Gerätes enthalten sind.

23
WARNUNG: Um das Risiko von Feuer oder Stromschlag zu vermindern, setzen Sie dieses Gerät nicht Regen oder Feuchtigkeit aus.
Elektrische Geräte sollten niemals in feuchten Umgebungen aufbewahrt oder gelagert werden.
NUR FÜR MODELLE IN DEN USA & KANADA: UM STROMSCHLAG ZU VERMEIDEN; VERWENDEN SIE DIESEN (POLARISIERTEN)
STECKER NICHT MIT EINEM VERLÄNGERUNGSLKABEL, MEHRFACHSTECKDOSE ODER EINER ANDEREN STROMQUELLE; ES SEI
DENN, DIE STECKERZAPFEN KÖNNEN VOLLSTÄNDIG EINGESTECKT WERDEN UM EIN FREILASSEN DES ZAPFENS ZU VERMEIDEN.
HINWEIS IM BEZUG AUF LASER-PRODUKTE: GEFAHR: UNSICHTBARE LASERSTRAHLUNG, FALLS DAS GERÄT GEÖFFNET
WIRD UND INTERLOCK AUSGEFALLEN IST ODER BETRIEBSUNFÄHIG GEMACHT WURDE. VERMEIDEN SIE DIREKTE
BESTRAHLUNG DURCH DEN STRAHL. DIE VERWENDUNG VON ANDEREN ALS DEN HIER SPEZIFIZIERTEN BEDIENELEMENTEN
ODER EINSTELLUNGEN KANN GESUNDHEITSSCHÄDLICHE STRAHLUNG HERVORRUFEN.
HINWEIS IM ZUSAMMENHANG MIT FCC-VORSCHRIFTEN: Dieses Gerät produziert und verwendet Radiofrequenzwellen und kann
den Empfang von Radio und Fernsehen beeinträchtigen, falls es nicht genau den in dieser Betriebsanleitung geschilderten Verfahren
zufolge betrieben wird. Dieses Gerät geht mit den Regeln der Klasse B für Computer-Geräte konform, in Übereinstimmung mit den
Spezifikationen in Unterabschnitt J oder Teil 15 der FCC-Vorschriften, welche zum angemessenen Schutz vor solchen
Beeinträchtigungen in einer Wohngegend entworfen wurden. Es gibt jedoch keine Garantie, dass eine Beeinträchtigung bei einer
bestimmten Installation nicht auftritt. Falls das Gerät den Empfang von Radio oder Fernsehen beeinträchtigt, versuchen Sie, die
Beeinträchtigung durch eine der folgenden Maßnahmen zu vermindern: (a) Stellen Sie das Gerät an einen anderen Platz und/oder
richten Sie seine Antenne anders aus, (b) Stellen Sie dieses Gerät an einen anderen Platz, (c) Vergrößern Sie den Abstand zwischen
diesem und anderen Geräten, (d) Stecken Sie dieses Gerät in eine andere Steckdose, so dass es sich in einem von den anderen
Geräten verschiedenen Stromkreis befindet oder (e) Achten Sie darauf, dass Sie ein durch ein Eisendrahtnetz abgeschirmtes Kabel
verwenden. Dieser Hinweis ist im Einklang mit Abschnitt 15.838 der FCC-Vorschriften.
FCC-Strahlenbelastungserklärung: Dieses Gerät entspricht den FCC-Strahlenbelastungsgrenzwerten für eine unkontrollierte
Umgebung. Die Endbenutzer müssen die spezifischen Bedienhinweise befolgen, um die Bedingungen für die HF-Belastung
entsprechend einzuhalten. Dieser Sender darf nicht in der Nähe von - oder in Verbindung mit - einer anderen Antenne oder einem
Sender betrieben bzw. aufgestellt werden.
Dieses Gerät überschreitet nicht die Beschränkungen der Klasse B für Radiogeräuschabgabe von digitalen Geräten beschrieben in den
Radiostörvorschriften des Kanadischen Kommunikationsministeriums.
ESD/EFT-Warnung: Dieses Gerät enthält einen Mikrocomputer für die Signalverarbeitung und die Bedienfunktionen. In sehr
seltenen Fällen können starke Interferenzen, Rauschen von externen Quellen oder elektrostatische Aufladung
Funktionsstörungen hervorrufen. Schalten Sie das Gerät in diesem unwahrscheinlichen Fall aus, warten Sie mindestens fünf
Sekunden und schalten Sie das Gerät dann wieder ein.
Für beste Tonqualität, dieses Gerät nicht in Bereichen mit hoher Millimeterwellenstrahlung (RF-Strahlung) verwenden. In einer
Umgebung mit HF-Interferenzen kann es zu Fehlfunktionen des Geräts kommen. Werden diese Interferenzen beseitigt, nimmt das
Gerät den normalen Betrieb wieder auf.
Zur Verwendung mit 220 Volt in den U.K., benutzen Sie 220 Volt Stecker im NEMA®-Stil. In anderen Ländern verwenden Sie die für die
Steckdose passenden Stecker.
Doppelisoliert: Verwenden Sie bei der Wartung nur identische Ersatzteile.
Korrekte Entsorgung dieses Produkts: Diese Kennzeichnung gibt an, dass dieses Produkt innerhalb der EU nicht mit
anderem Haushaltsabfall entsorgt werden soll. Recyceln Sie das Produkt verantwortungsbewusst, um mögliche Schäden an
der Umwelt oder der menschlichen Gesundheit durch unkontrollierte Entsorgung zu vermeiden und um eine nachhaltige
Wiederverwertung von Materialressourcen zu fördern. Bitte nutzen Sie für die Rückgabe Ihres Altgerätes entsprechende
Rückgabe- und Sammelsysteme oder kontaktieren Sie den Händler, bei dem Sie die Ware erworben haben. Diese können
das Produkt auf umweltfreundliche Weise recyceln.
Entsorgung der Batterien (falls anwendbar):
• Batterien niemals in Feuer oder in der Nähe von übermäßiger Hitze oder direkter Sonneneinstrahlung entsorgen. Überhitzte
Batterien können platzen oder explodieren.
• Wenn Sie sich nicht sicher sind, wie und wo Sie Batterien entsorgen können, lesen Sie die örtlichen Vorschriften für den richtigen
Sammelplatz, Methode usw.
• Alkaline-Batterien & Lithium-Knopfzellen: Sie können Alkali- und Lithium-Knopfzellen im normalen Hausmüll entsorgen. Bei
normaler Verwendung oder Entsorgung stellen sie keine Gesundheits- oder Umweltrisiken dar. (Alkalibatterien bestehen
hauptsächlich aus gewöhnlichen Metallen wie Stahl, Zink und Mangan.)
Entsorgen Sie niemals eine größere Anzahl an Alkali- oder Lithium-Knopfzellen als Bündel. Gebrauchte Batterien sind häufig
nicht komplett leer. Das Bündeln könnte diese nicht ganz leeren Batterien in Kontakt zueinander bringen, wodurch
Sicherheitsrisiken entstehen können. Um dies zu vermeiden, isolieren Sie jede Batterie mit Klebeband oder anderem nicht
leitfähigem Material, um sicherzustellen, dass sie sich nicht entlädt.
Für Alkali- und Lithium-Knopfzellen sind allgemein noch keine kostengünstigen und erwiesen umweltfreundlichen Recycling-
Prozesse verfügbar. Einige Gemeinden bieten Recycling oder Sammlung dieser Batterien an. Für weitere Informationen sehen Sie
in Ihren lokalen Verordnungen nach oder wenden Sie sich an Ihre Lokalverwaltung.
• Blei-Säure-Batterien: Entsorgen Sie Blei-Säure-Batterien, indem Sie sie zur Entsorgungs- oder Recycling-Stelle bringen oder
entsorgen Sie sie gemäß örtlicher Vorschriften. (Dieselbe Art von wieder aufladbaren Blei-Säure-Batterien wird auch in
Automobilen verwendet und sollten in ähnlicher Weise entsorgt werden.)
A
llgemeinhinweis zur Konformitätserklärung: Hiermit erklären wir, daß sich dieses Gerät in
Übereinstimmung mit den grundlegenden Anforderungen der europäischen Richtlinie 1999/5/EG
befindet. Die vollständige EG Konformitätserklärung kann unter folgender Adresse angefordert werden:
inMusic GmbH
Harkortstr. 12 - 32
DE - 40880 Ratingen
rane.com
7-51-1383-A
W
orld Headquarters inMusic Brands, Inc.
200 Scenic View Drive
Cumberland, RI 02864
USA
Tel: 401-659-8192
Fax: 401-658-3640
U.K. Office inMusic Europe, Ltd.
Unit 3, Nexus Park
Lysons Avenue
Ash Vale
HAMPSHIRE
GU12 5QE
UNITED KINGDOM
Tel: 01252 896 040
Fax: 01252 896 021
German
y
Office inMusic GmbH
Harkortstr. 12 - 32
40880 Ratingen
GERMANY
Tel: 02102 7402 20150
Fax: 02102 7402 20011