INMUSIC TXP6 Battery-powered performance PA User Manual
INMUSIC BRANDS INC Battery-powered performance PA
UserManual.wiki
>
INMUSIC
>
TXP6 User Manual
User manual
Navigation menu
Upload a User Manual
Namespaces
Wiki Guide
HTML
PDF
Info
Views
User Manual
Discussion / Help
Navigation
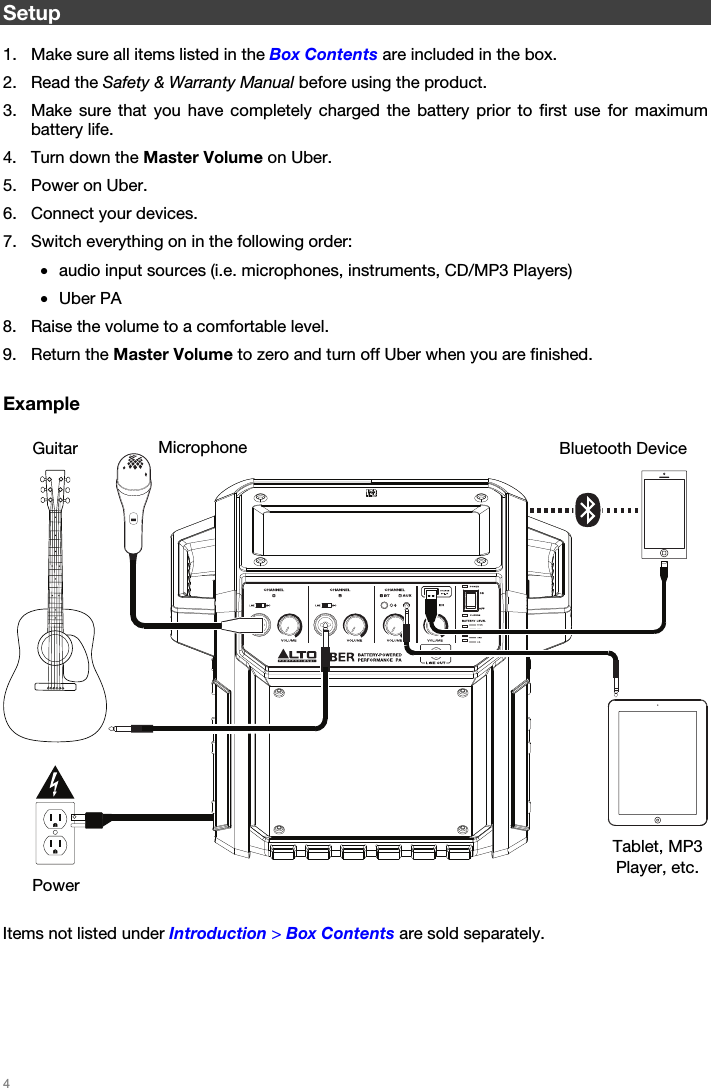
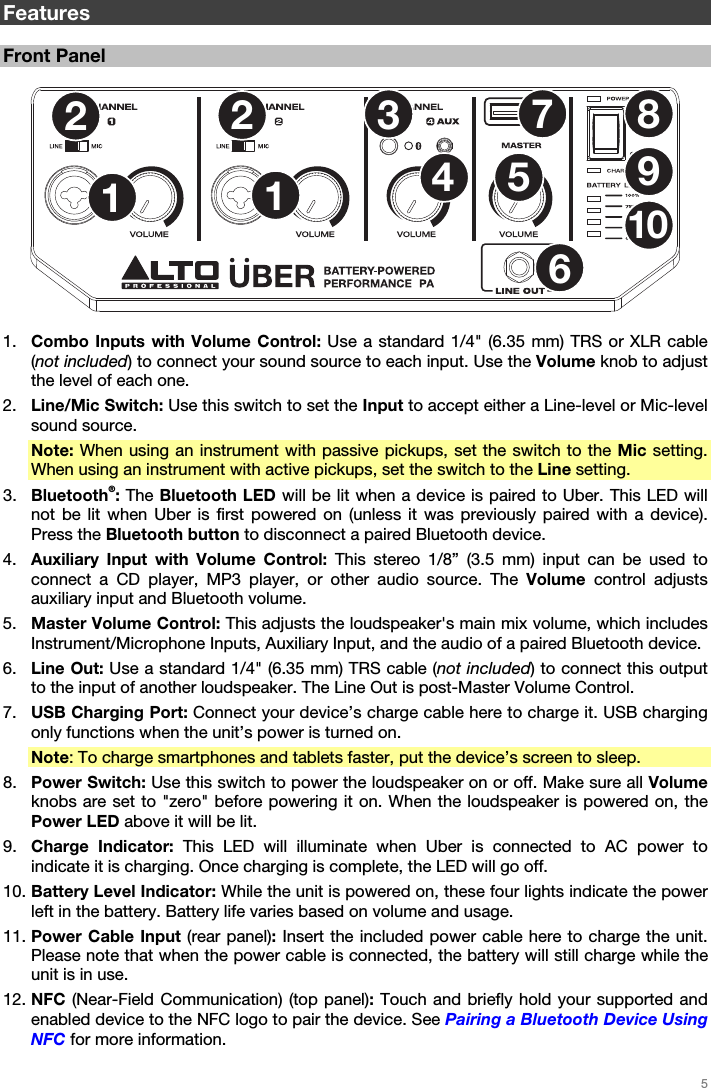

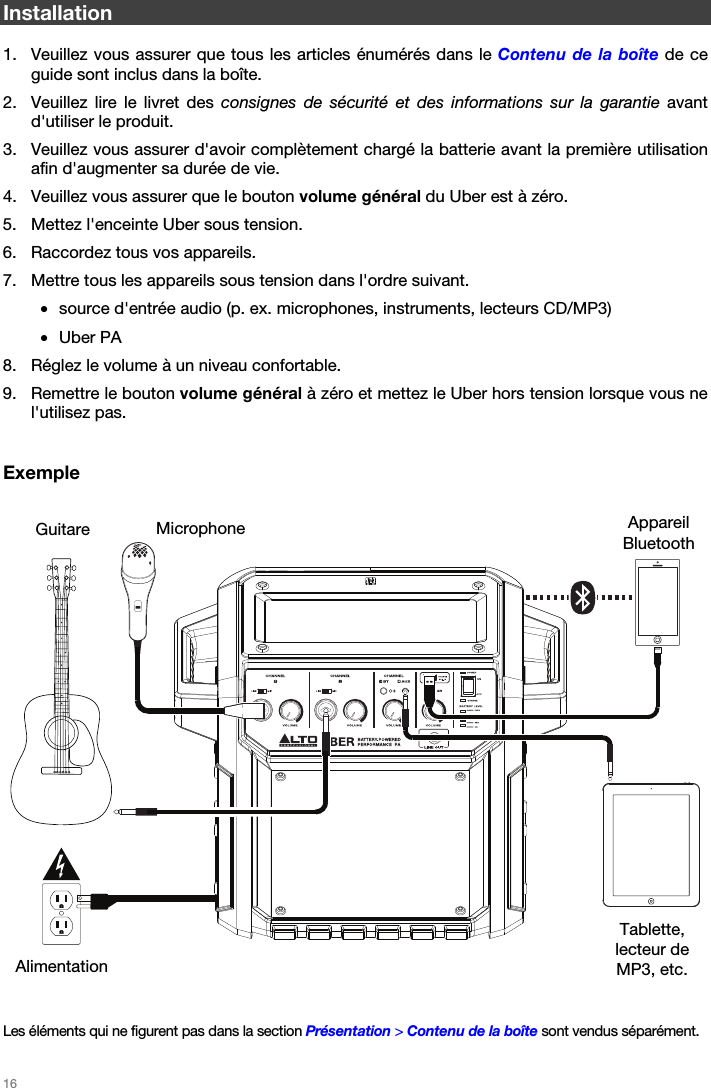
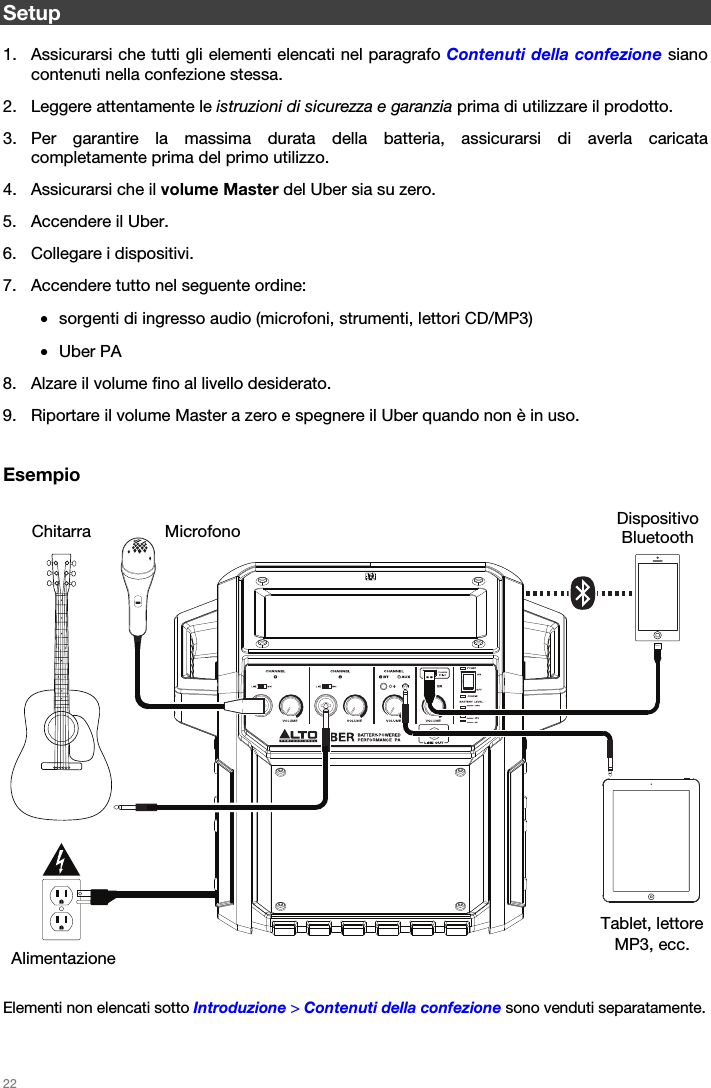
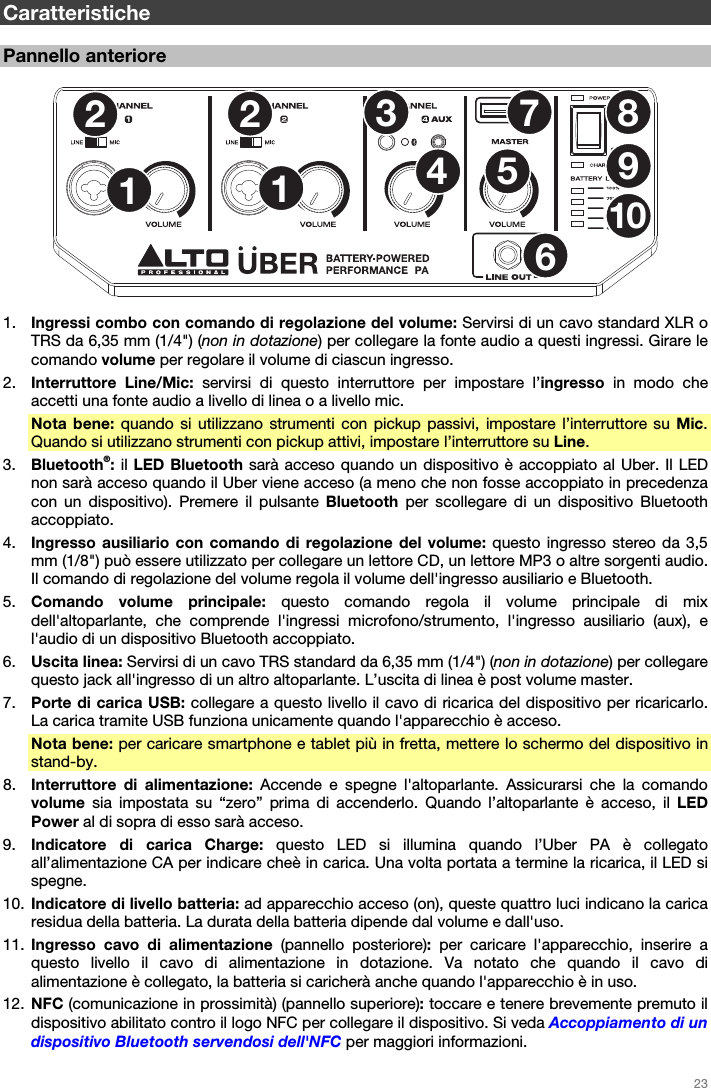
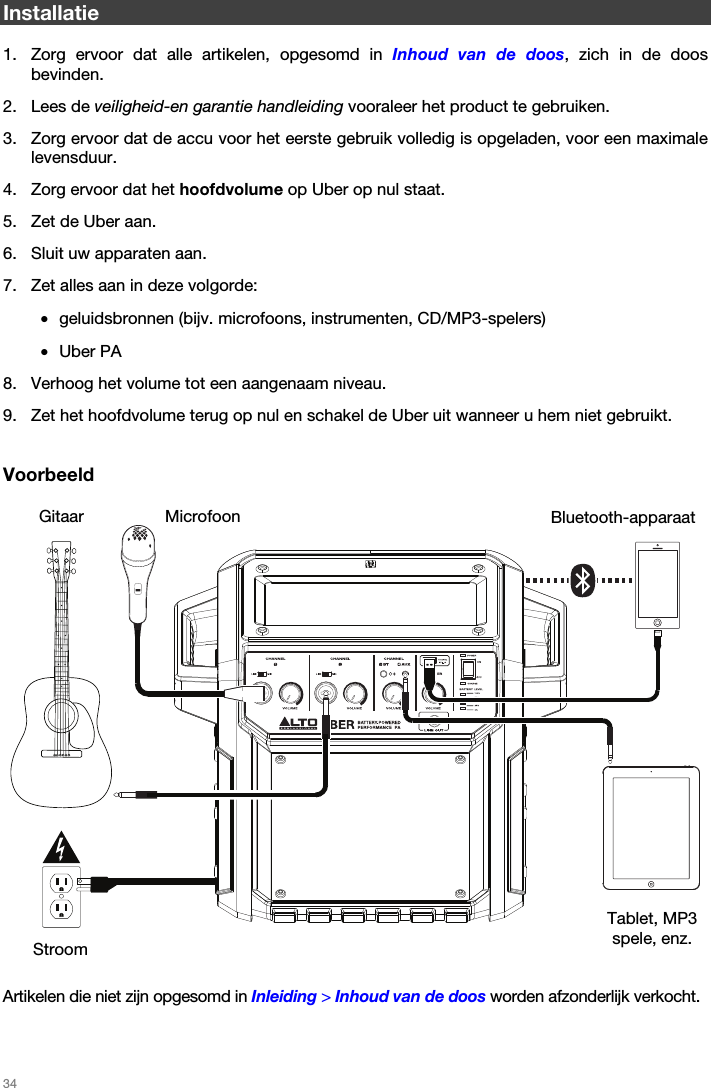
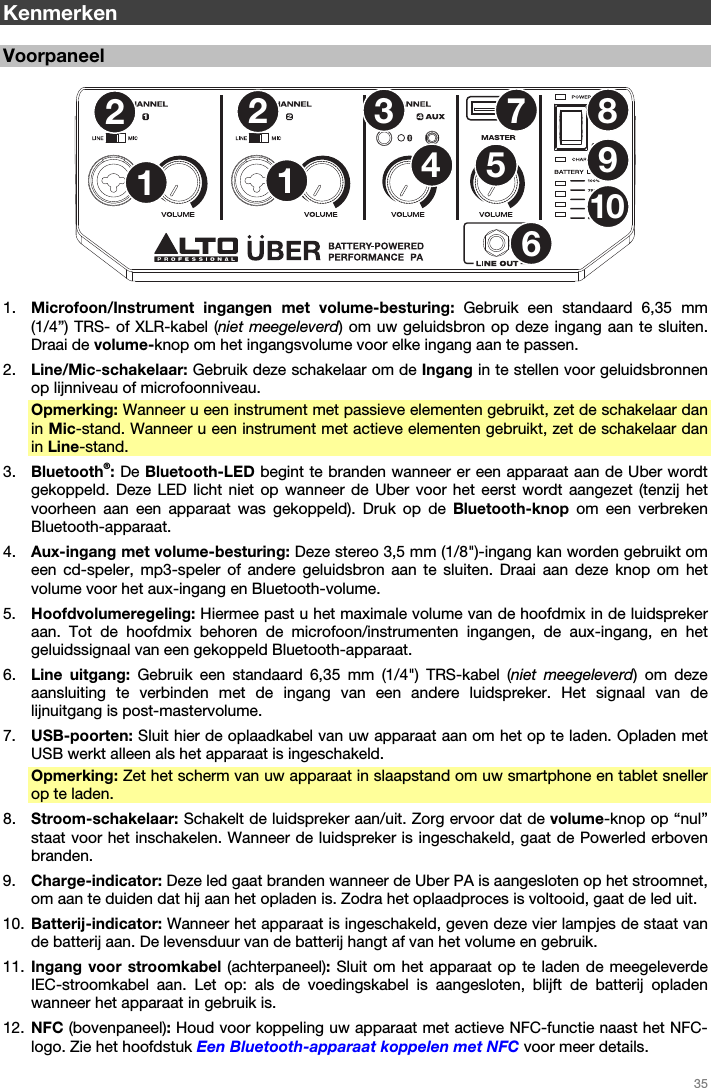
![17 Caractéristiques Panneau avant 1253467891210 1. Entrées combo avec commande de volume : Utilisez un câble de XLR ou TRS 6,35 mm (1/4 po) (non inclus) pour brancher une source audio à ces entrées. Le bouton volume permet d'ajuster le volume pour chacune des entrées. 2. Sélecteur Line/Mic : Utilisez ce sélecteur pour régler l'entrée pour une source à niveau ligne ou à niveau micro. Remarque : Si vous utilisez un instrument équipé de micros passifs, réglez le sélecteur sur Mic. Si vous utilisez un instrument équipé de micros actifs, réglez le sélecteur sur Line. 3. Bluetooth® : La DEL de Bluetooth sera allumée lorsqu'un périphérique est jumelé à l'Uber. Cette DEL ne sera pas allumée lorsque le Uber est d'abord alimenté (à moins qu'il ait été jumelé avec un périphérique auparavant). Appuyez sur le bouton pour Bluetooth le périphérique Bluetooth jumelé. 4. Entrée auxiliaire avec commande de volume : Cette entrée stéréo 3,5 mm (1/8 po) permet de brancher un lecteur CD, un lecteur MP3 ou autres sources audio. Commande de volume règle les niveaux de l'entrée auxiliaire et Bluetooth. 5. Volume général : Ce bouton permet de régler le volume du mix général qui comprend l'entrées microphone/instrument, l'entrée auxiliaire, et l'audio d'un périphérique Bluetooth jumelé. 6. Sortie ligne : Utilisez un câble TRS 6,35 mm (1/4 po) standard (non inclus) pour brancher cette sortie à l'entrée d'un autre haut-parleur. La sortie ligne est en aval du contrôle du volume principal. 7. Port de rechargement USB : Branchez le câble de rechargement de votre périphérique à cette prise pour le recharger. Le rechargement de la pile par la connexion USB fonctionne uniquement lorsque l'appareil est allumé. Remarque : Pour recharger plus rapidement vos smartphones et tablettes, mettez l'écran de votre périphérique en veille. 8. Interrupteur d'alimentation : Met l'hautparleur sous et hors tension. Assurez-vous que le bouton du volume soit complètement fermé (« zéro ») avant de mettre le haut-parleur sous tension. Lorsque l’enceinte est sous tension, la DEL Power située au-dessus est allumée. 9. Indicateur Charge : Cette DEL s’allume lorsque la Uber PA est branchée à l’alimentation secteur afin d’indiquer que le rechargement de la batterie est en cours. Une fois la batterie rechargée, la DEL s’éteint. 10. Indicateur de niveau de batterie : Lorsque l'appareil est sous tension, ces quatre témoins indiquent le niveau de batterie. La durée de vie de la pile dépend de l'utilisation de l'appareil et du réglage du niveau du volume. 11. Entrée d'alimentation (panneau arrière) : Branchez le câble d'alimentation inclus à cette entrée pour recharger l'appareil. Veuillez noter que lorsque le câble d'alimentation est branché, la batterie se recharge même lorsque l'appareil est utilisé. 12. NFC (communication en champ proche [CCP]) (panneau supérieur) : Touchez brièvement le logo CCP avec le périphérique équipé de la technologie CCP afin de le jumeler à l'appareil. Veuillez consulter la section Jumelage Bluetooth à l'aide de la technologie CCP afin d'en savoir plus.](https://usermanual.wiki/INMUSIC/TXP6/User-Guide-3660908-Page-17.png)