INVENTEC BESTA CA012 Electronic Dictionary User Manual
INVENTEC BESTA CO.,LTD Electronic Dictionary
User Manual
CD-920Cloud Dictionary
User Manual
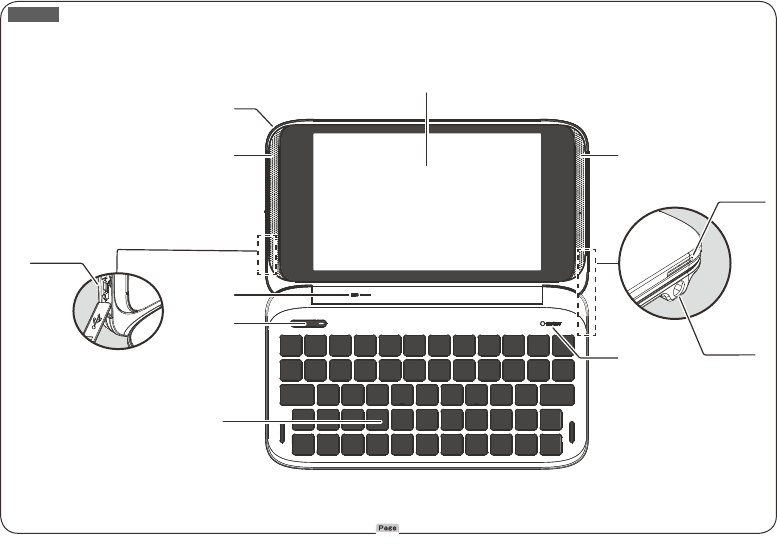
Layout
Screen
Keyboard
ON/OFF
Key
Speaker
(right)
RESET
Microphone
Speaker
(left)
LED
Micro SD
Slot
Earphone
Jack
USB Jack
1
BESTA CD-920 Cloud Dictionary
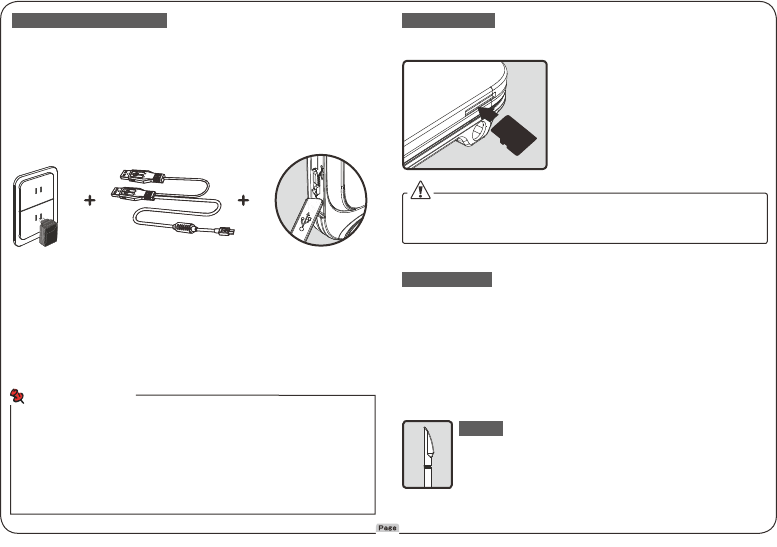
Power Source & Charger
Connect device with power source as the picture
1 below.
LED indicator stays orange, indicating that it is
charging.
• You can charge the device by connecting connector A with
computer USB port.
LED indicator light turns out
2 indicating that Charging is complete.
The full charging time is about
4 hours 30 minutes.
• The charging time will vary with the conditions of use and
temperature, if you are using while charging, charging time
will be extended.
Unplug the USB cable.
3
Micro SD Card
You can insert a Micro SD card to expand the memory.
Insert: switch off the device first.
Gently push the card into the card jack
until you hear a sound.
Remove
: switch off the device first.
Gently press the card until you hear a
sound.
Connector A
Connector B
• Main power is a rechargeable Li-batteries Inside.
• Rechargeable battery can be used repeatedly, but it will eventually
wear out. When the battery life is shortened, you should buy and
replace it with a new one.
• Do not disassemble the machine to replace the battery.
• It is good for the device to use the specified adaptor of the device.
• Please recycle batteries in accordance with local regulations.
Use of the battery
When transfer or open files on Micro SD, in order to avoid data loss
or abnormal of the data . Please make sure the power is off, before
inserting and removing card.
Power On/Off
Power Off: Long press ON/OFF key and then choose "Power off"
Interval: When the device is unused, please press ON/OFF key
gently. The screen enters power-saving mode.
Awakening: On power-saving mode, press ON/OFF key to
awaken this mode.
Power On: Long press ON/OFF key till the start-up picture is
shown.
Stylus
Stylus plugs in the pen slot.
Please pull the stylus out by your finger and put it
back to the slot to avoid loosing.
2
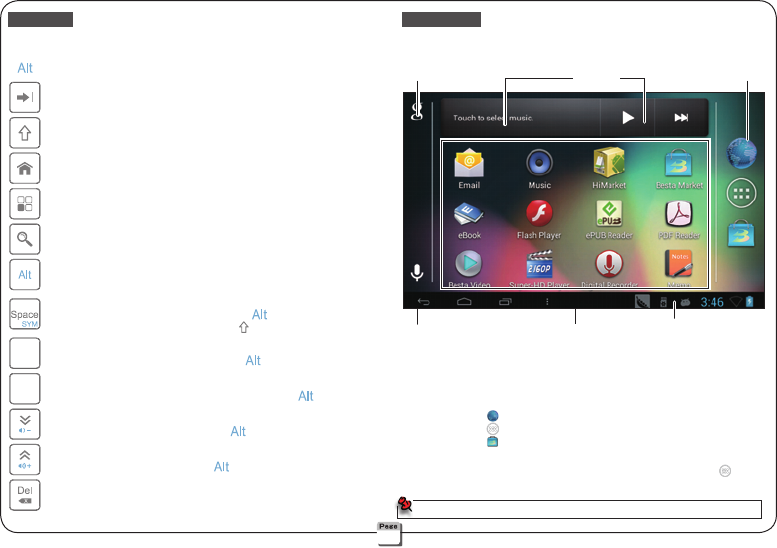
Keyboard
There are some function keys in the keyboard, some function keys
can be used alone, but other function keys need to be used with
[ ] key.
The same as Tab key of PC.
Switch between small and capital letters.
Back to the home page.
Open the function menu.
Open the search function.
Combine with other keys with blue sign.
輸入法 ˙Input a space.
˙Select the symbol method with [ ]
key
.
˙Select the input method with [] key.
發音
朗讀
˙Pronunciation.
˙Read the whole passage with [ ] key.
音節
正音
˙Pronounce syllable by syllable.
˙Open the pronunciation correction with [ ] key.
˙Page
down.
˙Turn down the volume with [ ] key.
˙Page up.
˙Turn up the volume with [ ] key.
Delete the selected string or letter.
Home Page
You could customize the wallpaper, widget, shortcut and
the number of home pages.
Search Open Google
search.
Voice Search Open Google
voice search.
Widget
Touch to open the application.
Status Bar Display status indicator and notice.
Tool Bar Open browser.
Open function menu.
Open BESTA Market.
* There are ve shortcuts in tool bar, you can
customize other four shortcuts except .
Shortcut
Touch to open the application.
The Home page will change with the update of the Android OS.
Voice Search
Widget Tool Bar
shortcut Status Bar
Search
3
Touch-control
It is good for the device to use the provided stylus.
Selection-tapping Choose the function on the screen and tap
it gently with the stylus. Make sure the stylus leave the screen
after tapping.
Long-tapping Open a new menu option or activate a selected
option.
Dragging Long tap and drag to move the option.
Sliding Fast slide the screen and then browse the option.
Zoom in/out Tap screen twice to zoom in/out the Web page and
picture.
Input When you want to input words,
the language toolbar will
be activated automatically in order to
input words
.
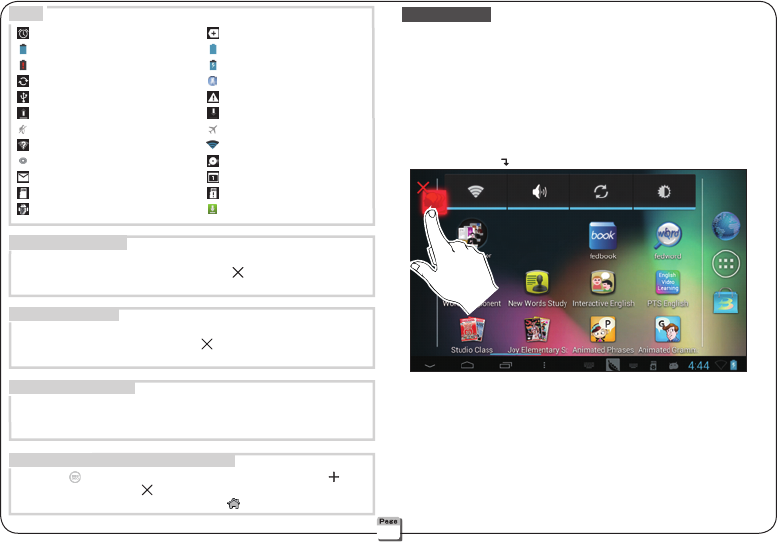
Customize shortcut
Long tap any shortcut to move it, you also can delete shortcut
by long tapping and dragging it to “ ╳”. Open the function
menu, you can long tap and drag the shortcut to home page.
Customize widget
Long tap any widget to move it, you also can delete widget by
long tapping and dragging it to “ ╳”. Open the widgets menu,
you can long tap and drag the widget to home page.
Customize wallpaper
Long tap empty area of home page to open a menu to choose
wallpaper from Besta Album, Live Wallpapers, Super-HD
Player, Wallpapers.
Customize the number of home pages
Long tap to view the content of screen preview, tap “ ” to
add home page, tap “ ╳” to delete home page. The screen is
set as the default desktop by tapping
.
Delete shortcut
Sign
Alarm More
Battery indicator Fully charged
Run out of power Charging
Data synchronization Input method
USB connection Mistake/caution
Uploading Downloading
Mute Airplane mode
You can connect Wi-Fi Status of Wi-Fi
Play MP3 Full storage
Mail notication Calendar event
Insert SD card SD card is removed
USB debugging Data updating
4
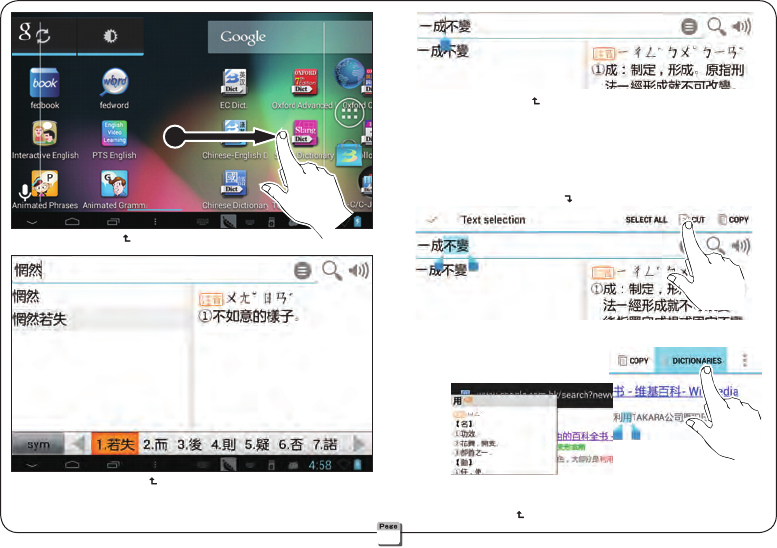
Slide to page up/down
Input words
Insert the word You can change the cursor position to change
the input position
Select words Long tap the words, a blue indicator will appear
on the screen to help you select words, slide blue indicator to set
the selected range.
When you select words, you can perform copy, cut, past and other
operations in the toolbar.
You can tap “DICTIONARIES"
in toolbar to search the selected
words in other dictionaries.
Insert the word
Copy the selected words
Search the selected words
5
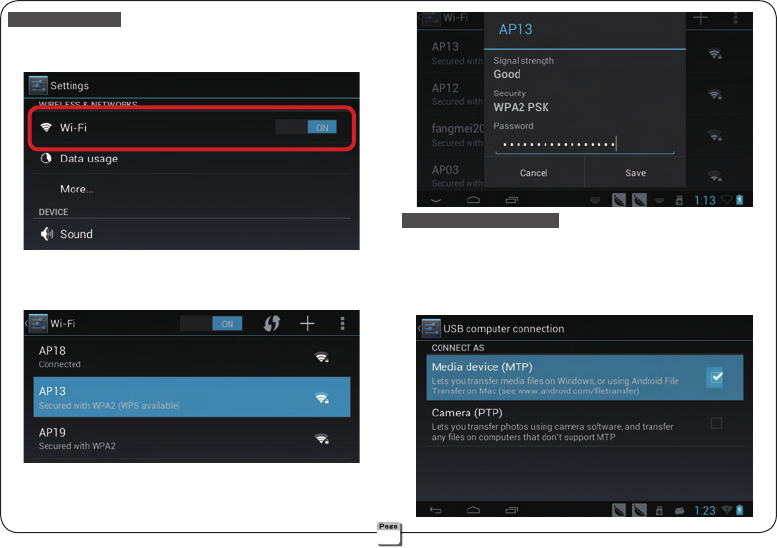
Wi-Fi & Networks
The device provides the Wi-Fi function.
Start Wi-Fi Start Wi-Fi in "Settings--Wireless & Networks".
Connect
➀ Click Wi-Fi, the device begins to search available networks
automatically.
➁ Choose the Wi-Fi network you want to connect
.
➂ If need password, you should input the password to connect.
➃ Choose and connect
。
USB Computer Connection
Please use specied USB cable to connect your device to
PC.
➀ Use specied USB cable to connect the device to PC.
➁ Tap status bar to select "Connected as a media device",
choose the Media device (MTP).
6
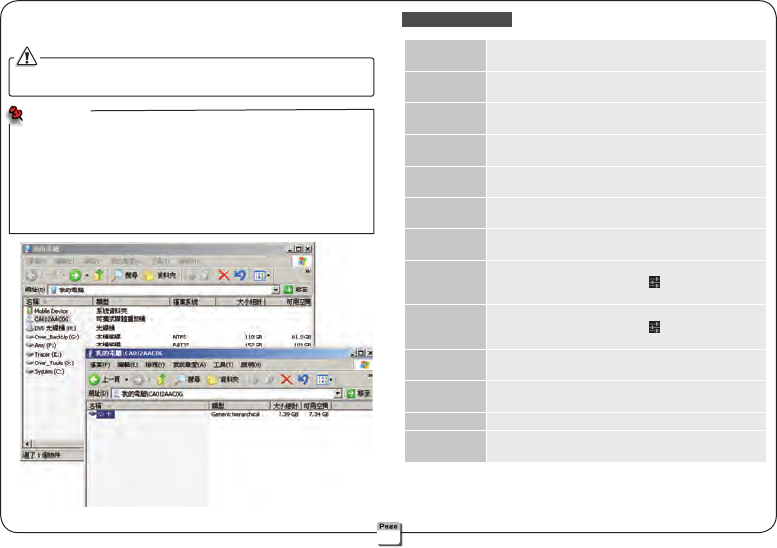
➂ Open the folder, to check and copy les to memory card.
➃ After data transfer completed, remove the USB connection.
In order to avoid abnormal or missing data, please strictly
operate the above instructions.
Common settings
Date & time Set date, time, time zone, time format, date
format in "Settings →Date & time"
Sound Set volumes, silent mode, system sounds in
"Settings →Sound"
Brightness Adjust brightness in "Settings--Display →
Brightness"
Sleep Adjust sleep time in "Settings--Display →
Sleep"
Screen lock Select screen lock type in
"Settings →Security → Screen lock"
Airplane
mode Long press ON/OFF key to set "Airplane mode"
Language Set system language in "Settings →Language
& input →Language"
Input
methods Set input methods in "Settings →Language &
input →Besta Input Method →Input
language"
Penup time Set penup time in "Settings →Language &
input →Besta Input Method →Handwriting
Setting →Penup Time"
Touch panel
calibration Reset the calibration parameter in "Settings →
Touch Panel Calibration"
Apps You can manage application and check storage
space in "Settings →Apps"
Battery Check battery status in "Settings →Battery"
USB
debugging Open USB debugging in "Settings →Developer
options"
• It will be able to automatically identify MTP device and install
the driver, if the computer's operating system is Windows 7 and
above.
• If the computer's operating system is Windows XP, it will be
able to identify MTP device after the Windows Media Player to be
upgraded to version 11 and above.
• After shut off the USB error budgeting model, it can be connected
to the computer by way of MTP.
MTP DRIVE
7

Maintenance
1. Keep it dry. Precipitation, humidity and liquid that
contains minerals will corrode electronic circuits.
2. Do not use or store it in dusty, dirty areas as its
detachable parts may be damaged.
3. Do not store it in hot areas. High temperatures can
shorten the life of electronic devices, damage batteries,
and melt certain plastics.
4. Do not store it in cold areas. When the device warms
up, moisture can form inside it, which may damage
electronic circuit boards.
5. Do not attempt to take the device apart. Improper
handling may damage the device.
6. Do not drop, knock or shake it. Improper handling may
cause damage to the liquid crystal panel.
7. Do not use harsh chemicals, cleaning solvents, or
strong deter gents to clean the device.
8. Do not paint it. Paint can clog the device's detachable
parts and cause it to malfunction.
Items
1. This equipment has been tested and found to comply
with the limits for a Class B digital device, pursuant to
part 15 of the FCC Rules. These limits are designed to
provide reasonable protection against harmful
interference in a residential installation. This equipment
generates, uses and can radiate radio frequency energy
and, if not installed and used in accordance with the
instructions, may cause harmful interference to radio
communications. However, there is no guarantee that
interference will not occur in a particular installation. If this
equipment does cause harmful interference to radio or
television reception, which can be determined by turning
the equipment off and on, the user is encouraged to try to
correct the interference by one or more of the following
measures:
--Reorient or relocate the receiving antenna.
--Increase the separation between the equipment and
receiver.
--Connect the equipment into an outlet on a circuit different
from that to which the receiver is connected.
--Consult the dealer or an experienced radio/TV technician
for help.
2. Modification, adjustment, and replacement of parts : Besta
is not responsible for unauthorized modification,
adjustment, and replacement of parts on this product. Any
such changes may void the warranty.
3. This device complies with part 15 of the FCC Rules.
Operation is subject to the following two conditions :
(1) This device may not cause harmful interference, and
(2) This device must accept any interference received,
including interference that may cause undesired operation.
4. SAR Exposure Statement This EUT is compliance with
SAR for general population/uncontrolled exposure limits in
and had been tested in accordance with the measurement
methods and procedures specified in OET 65. This
equipment should be installed and operated with minimum
distance 0cm between the radiator & your body.
This device and its antenna(s) must not be co-located or
operating in conjunction with any other antenna or
transmitter. The County Code Selection feature is disabled
for products marketed in the US.
For product available in the USA markets, only channel
1~11can be operated. Selection of other channels is not
possible.
8
Caution
To assure continued FCC compliance:
Any changes or modifications not expressly approved by the
grantee of this device could void the user's authority to operate the
equipment.