ION Audio IPA96 Compact High-Power PA System With Lights User Manual
ION Audio, LLC Compact High-Power PA System With Lights
User manual

Pro Glo 10
iPA96
Quickstart Guide English ( 3 – 8 )
2
This device complies with Industry Canada’s licence-exempt RSSs. Operation is subject to the following two
conditions:
(1) This device may not cause interference; and
(2) This device must accept any interference, including interference that may cause undesired operation of the
device.
Cet appareil est conforme aux CNR exemptes de licence d'Industrie Canada . Son fonctionnement est soumis
aux deux conditions suivantes :
( 1 ) Ce dispositif ne peut causer d'interférences ; et
( 2 ) Ce dispositif doit accepter toute interférence , y compris les interférences qui peuvent causer un mauvais
fonctionnement de l'appareil.
3
Quickstart Guide (English)
Introduction
1. Make sure all items listed in the Box Contents are included in the box. Look in the box
under the foam sheet for the power cable and microphone.
2. Read the safety instruction booklet before using the product.
3. Study the Connection Diagram.
4. Make sure all input devices such as microphones, CD players, or digital media players are
turned off and volume settings are set at “zero.”
5. Connect all devices as shown.
6. Switch everything on in the following order:
• Audio input sources (i.e. microphones, instruments, CD players)
• Pro Glow 10
7. When turning off, always reverse this operation:
• Pro Glow 10
• Any input devices
Box Contents
Pro Glow 10
Microphone with Cable
Remote Control
Power Cable (IEC)
Quickstart Guide
Safety Instructions & Warranty Information Booklet
Support
For the latest information about this product (system requirements, compatibility information,
etc.) and product registration, visit ionaudio.com.
For additional product support, visit ionaudio.com/support.
Caution: Do not expose Pro Glow 10 to rain or standing water.
4
Quick Setup
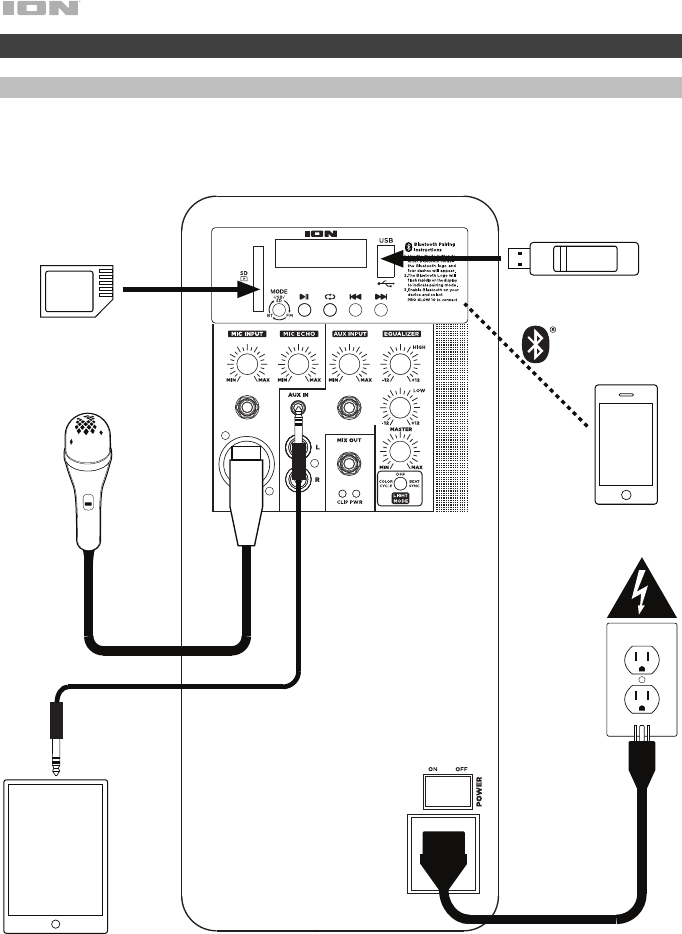
Connection Diagram
Items not listed under
Introduction > Box Contents
are sold separately.
Tablet
Microphones
SD Card
USB drive
Smartphone
Power
5
Features
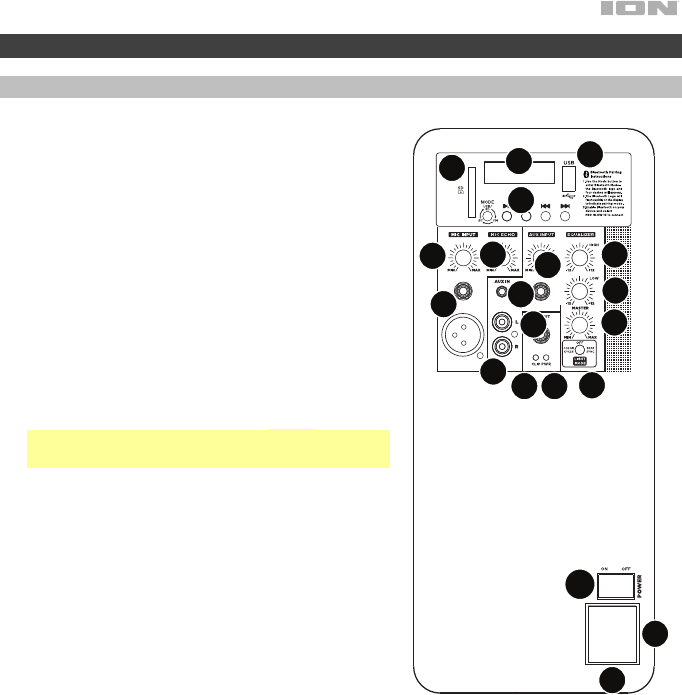
Rear Panel
1. Media Panel: Controls for the USB, SD, FM
radio, and Bluetooth sources. The Media Panel
Mode source symbol will illuminate when that
source is playing.
Note: A USB drive or SD card must contain
playable files in order for it to appear properly in
the media panel’s display. You can play MP3s,
WAVs, and WMA files.
2. USB Port: Connect your USB flash drive here to
play music.
3. SD Card Slot: Insert your SD card here to play
music.
4. Display: Displays the media panel modes for
USB, SD, FM radio, and Bluetooth.
Note: The display comes with a plastic protector
on it. Remove this for optimal viewing.
5. Mic Inputs (1/4”/6.35 mm & XLR): Connect a
dynamic microphone to the 1/4” (6.35 mm) or
XLR inputs. Control the volume of the inputs
using the Mic Input Volume knob.
6. Mic Input Volume: Turn this knob to adjust the
input volume of the Mic Input.
7. Aux Inputs (1/8”/3.5 mm and 1/4”/6.35 mm):
Connect a CD player, digital media player, or
other audio source to the 1/8” (3.5 mm) and 1/4”
(6.35 mm) stereo auxiliary inputs. Control the
volume using the Aux Input Volume knob.
8. RCA Inputs: Connect a CD player, digital media player, mixer, or other media source to
these inputs. Control the volume using the Aux Input Volume knob.
9. Aux Input Volume: Turn this knob to adjust the input volume of the Aux Input, XLR Input,
and RCA Inputs.
10. Mix Out (1/4” / 6.35 mm): Connect this output to another active (powered) speaker. The
level of the output is controlled by the Mic Input Volume, Aux Input Volume, and Master
Volume.
11. Mic Echo: Use this knob to add or remove an echo effect to the Mic Inputs.
12. High EQ: Increases or decreases the high (treble) frequencies for Mic Input, Line Input,
and Media Panel sources at a range between -12 dB to +12 dB.
13. Low EQ: Increases or decreases the low (bass) frequencies for Mic Input, Line Input, and
Media Panel sources at a range between -12 dB to +12 dB.
14. Master Volume: Turn this knob to adjust the overall output volume of the loudspeaker.
1
2
34
5
9
8
7
10
11 12
13
14
15 17
16
6
18
19
20
6
15. Clip LED: This LED will flash red if the signal from the inputs or media panel source is
clipping. If this happens, decrease the setting of the Mic Input Volume knob, Aux Input
Volume knob, or Master Volume knob.
16. Power LED: Indicates whether Pro Glow 10 is powered on or off.
17. Light Mode Button: Press this button to select how the lights on the front panel function:
• Color Cycle: The lights slowly glow and cycle through colors. Press and hold the light
mode button to freeze the lights on one color. This is the default mode when Pro Glow
10 is first powered on.
• Beat Sync: The lights react to the beat of the music.
• Off: The lights turn off.
18. Power Cable Input (IEC): Insert the included power cable here to power the unit.
19. Fuse: The orientation of the fuse holder determines the current voltage setting of Pro Glow
10. If the unit’s fuse is broken, remove the fuse holder and replace the broken fuse with
one with the same rating (printed on the fuse holder). Using a fuse with an incorrect rating
can damage the unit and/or fuse.
20. Power Switch: Turns Pro Glow 10 on or off.
Media Panel
Media Panel Functions:
MODE Mode: Switches modes from USB, SD, FM radio, or Bluetooth.
Note: A USB drive or SD card must contain playable files in order for it to appear
properly in the media panel’s display. You can play MP3s, WAVs, and WMA files.
Play/Pause: Play/pause the USB, SD, or Bluetooth source. Press and hold Play/Pause
for 2 seconds to begin the preset auto-store function. This jumps to the lowest station
(87.5) and then travels through the bandwidth to auto-store the strongest stations as
presets.
Repeat: Repeat all of the tracks (ALL), repeat all of the tracks in the folder (FOLd
)
,
repeat the current playing USB or SD track (OnE), or shuffle the track order (rAn).
Previous: Plays the previous USB, SD, or Bluetooth track. When listening to the FM
radio), press the button once to skip back through the FM stations and hold the button
down to seek back through the channel presets.
Next: Plays the next USB, SD, or Bluetooth track. When listening to the FM radio,
press the button once to tune the radio down one preset and hold the button down to
seek forward through the channel presets.
Note: In some apps, pressing the Previous ( ) or Next ( ) buttons may go to another
playlist or music genre.
7
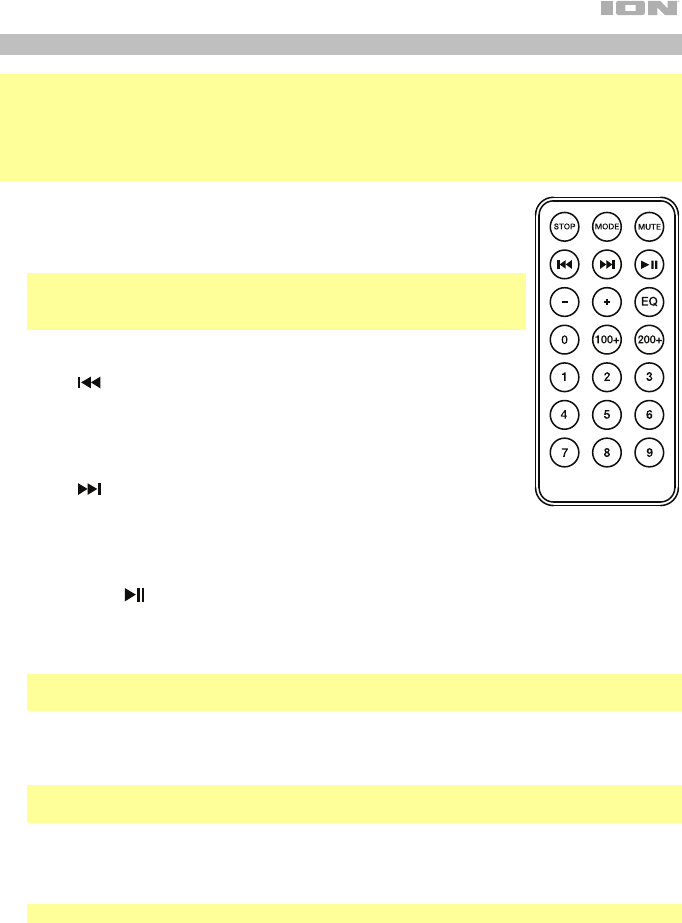
Media Panel Remote
Note: Aim the remote straight at the front of the speaker woofer. Room lighting and battery life
can affect the operating range of the remote control.
Note: In order to use the remote control for the first time, first pull out the tab attached to the
battery compartment. To change the remote battery, follow the diagram located on the back
of the remote. Use a 3 V DC CR2032 lithium button cell battery for replacement.
1. Stop: Stops the media panel source from playing.
2. Mode: Selects the media panel source: USB, SD, FM radio, or
Bluetooth.
Note: A USB drive or SD card must contain playable files in order for
it to appear properly in the media panel’s display. You can play
MP3s, WAVs, and WMA files.
3. Mute: Silences the music playback on media panel sources.
4. Prev ( ): Goes to the previous USB or SD card track. When
listening to Bluetooth sources, pressing Prev in some apps may go
to another playlist or music genre. When listening to the FM radio,
press the Prev button once to skip back through the FM stations
and hold the button down to seek back through the channel presets.
5. Next ( ): Advances to the next USB or SD card track. When
listening to Bluetooth sources, pressing Next in some apps may go
to another playlist or music genre. When listening to the FM radio,
press the Next button once to tune the radio down one preset and
hold the button down to seek forward through the channel presets.
6. Play/Pause (): Plays or pauses the USB, SD, or Bluetooth media panel source. Press
and hold Play/Pause for 2 seconds to begin the preset auto-store function. This jumps to
the lowest station (87.5) and then travels through the FM band to auto-store the strongest
stations as presets.
Note: Files are played from the USB or SD source first by alphabetical order of what is on
the root level, then alphabetical by folder, and then alphabetical by the track name.
7. Vol –: Decreases the media panel source volume.
8. Vol +: Increases the media panel source volume.
Note: The remote volume only affects the media panel source and works together with the
physical media panel volume knob on the unit’s rear panel.
9. EQ: Selects one of the following digital EQ presets to use with a media panel source: Bass
(BAS), Pop (POP), Rock (rOC), Jazz (JA2), Classical (CLA), Country (COU), No EQ (OFF,
factory default setting).
Note: The digital EQ only works for Bluetooth, USB flash drive, and SD card sources.
10. 100+: Jumps ahead by 100 tracks.
11. 200+: Jumps ahead by 200 tracks.
12. Number Keys: Provides channel selection for FM radio stations, and track selection for
USB and SD card sources.
8
Operation
Pairing a Bluetooth Device
1. Turn on your Bluetooth device.
2. Power on Pro Glow 10.
3. Use the Mode button to select Bluetooth mode, which appears as "bt" in the display. Pro Glow
10 will automatically go into pairing mode to search for Bluetooth devices. You will know you are
in pairing mode when the Bluetooth icon is flashing.
4. Navigate to your Bluetooth device’s setup screen, find Pro Glow 10, and connect. The
Bluetooth icon will remain solidly lit.
Note: Users should consider updating their device’s OS if experiencing trouble with pairing or
playing music.
5. To disconnect pairing, turn off Bluetooth on your device or select Forget this device from your
device.
Troubleshooting
If the sound is distorted: Try lowering the volume control of your sound source or musical
instrument. Also, try to reduce the overall volume of Pro Glow 10.
If there is too much bass: Try adjusting the tone or EQ control from Pro Glow 10 or your sound source
to lower the bass level. This will allow you to play the music louder before clipping (distortion) occurs.
If there is a high-pitched whistling noise when using a microphone: This is probably feedback.
Point the microphone away from the speaker.
If you can’t hear the microphone over the music volume: Turn down the music volume from your
source.
When I press Previous ( ) or Next ( ), it doesn’t increment to the next FM station: Short
presses of the button will jump to presets. Hold the button down to seek to the next station.
If the radio station channel is flashing: The unit is currently muted. Unmute to stop the flashing
and resume playback.
If the Bluetooth logo is flashing rapidly: The unit is currently in pairing mode.
If the Bluetooth logo is flashing slowly: A device is paired, but the music is muted. Unmute to stop
the flashing and resume playback.
The USB track number (Example: 001) is flashing slowly: The USB drive music playback is muted.
Unmute to stop the flashing and resume playback.
The LCD shows “NONE”: If a USB drive or SD card is already properly inserted, make sure it
contains playable files (MP3s, WAVs, and WMA files).