ION Audio ISP47 Outdoor BT SPKR w battery & Solar Panel User Manual
ION Audio, LLC Outdoor BT SPKR w battery & Solar Panel
User manual

Solar Stone
Quickstart Guide English ( 3 – 5 )
Appendix English ( 6 )

Quickstart Guide (English)
Introduction
Thank you for purchasing the ION Audio Solar Stone! Solar Stone simulates a natural rock finish that blends
into your landscaping, with a solar rechargeable battery-powered, water-resistant speaker. Equipped with
Bluetooth technology, you can listen to your favorite music wirelessly while working in the garden, hosting a
dinner party, or relaxing by the pool.
1. Make sure all items listed in the Box Contents are included in the box.
2. Read Safety & Warranty Manual before using the product
3. Make sure that you have completely charged the battery prior to first use for maximum battery life.
Box Contents
1 Solar Stone (if an individual speaker is purchased) or 2 Solar Stones (if purchased as a boxed pair)
Charging Adapter
User Guide
Safety & Warranty manual
Support
For the latest information about this product (system requirements, compatibility information, etc.) and
product registration, visit ionaudio.com.
Rechargeable Batteries
Rechargeable lead-acid batteries are the same type used in automobiles. As with your car battery, how you
use this battery has a significant impact on its lifespan. With proper use and treatment, a lead-acid battery
can last for years. Here are some recommendations for getting the longest life from the internal battery.
General Usage
Fully charge the battery before using it.
Charge the battery completely after each use.
Storage For best product longevity, do not store at exceedingly hot (greater than 90°F / 32°C) or
exceedingly cold (less than 32°F / 0°C) temperatures.
It is acceptable to leave your sound system plugged in. This will not overcharge the
battery.
If you leave the battery level low and do not charge it for 6 months, it may permanently
lose capacity.
Repair If the battery fails to charge, check your fuse near the power cable input. If your fuse is
intact and it still will not charge, contact ION Audio at ionaudio.com.
Disposal Bring the unit to a recycling center or dispose of in accordance with local ordinances.
Outdoor Use and Care
Though Solar Stone is water-resistant and able to tolerate splashing water, please review the tips below to
get the best performance from Solar Stone:
• Bring Solar Stone indoors during extreme cold, heavy rain, or melting snow.
• Please do not place Solar Stone in standing water.
• Please do not connect the charging adapter to Solar Stone in a wet environment.
• WARNING: Keep any non-water-resistant devices (phones, music players, etc.) in a dry place where
they will not be affected by water and cause a risk of electric shock.
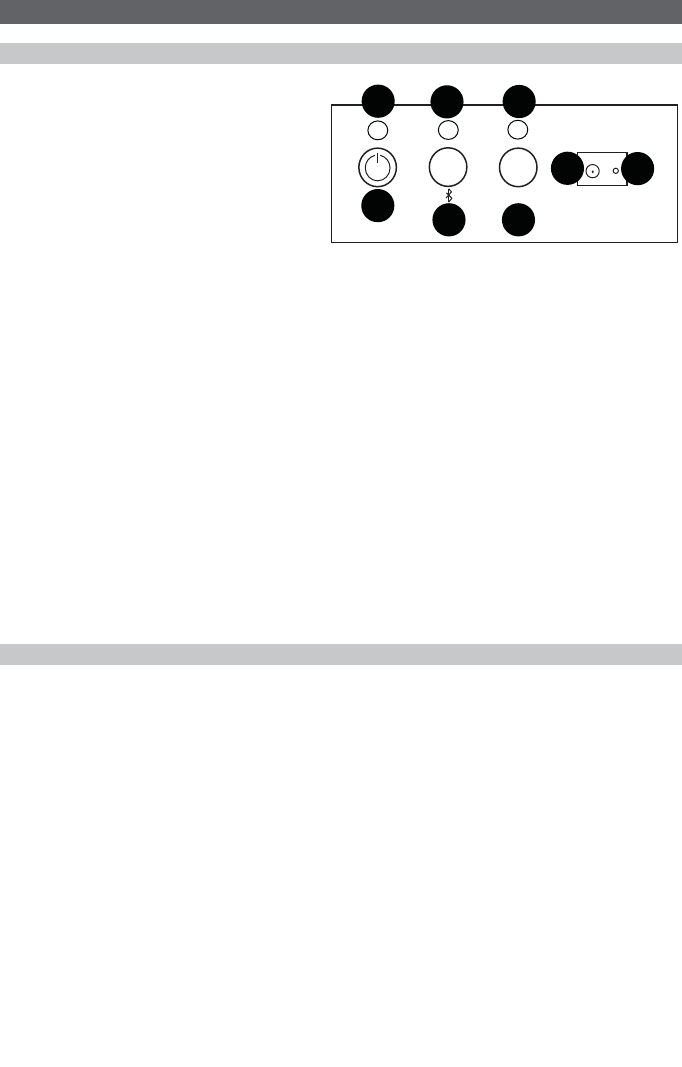
Features
Back Panel
1. Power – Hold this button to power
Solar Stone on and off.
2. Bluetooth Connect – Press this
button to begin Bluetooth connecting.
Note: Solar Stone will automatically
power off after 30 minutes if no audio
is playing.
3. Link – Press this button to link two
Solar Stone units together.
4. Charging Adapter Input – Insert the included charging adapter here to charge the Solar
Stone battery.
Solar Stone should be fully charged prior to first use for maximum battery life. Once fully
charged, Solar Stone’s solar panel can provide suitable power for limited daily use
without the need to connect the charging adapter.
5. Reset – If Solar Stone is working abnormally, shutdown the unit by placing a paperclip
into the Reset hole located on the bottom of Solar Stone, and gently push until the unit
turns off. Try this only after you have first attempted to reboot Solar Stone using the
power button.
6. Charging LED – This LED is solid red when the battery is charging and turns off when
the battery is fully charged/no adapter is connected.
7. Bluetooth LED – This LED slowly blinks blue when the speaker is powered on, blinks fast
while Bluetooth searching, and is solid when Bluetooth connected.
8. Link LED – This LED blinks fast when searching for another Solar Stone and is solid
when linked to another Solar Stone.
Bluetooth Connecting with Solar Stone
Connecting to one Solar Stone:
1. Power on Solar Stone by holding down the power button. You will hear “Power On” for
confirmation. *
2. Press the Bluetooth Connect button to enter Connecting Mode - the Bluetooth LED will
blink fast, and you will hear “Pairing” to indicate this. *
3. Navigate to your device’s Bluetooth setup screen, find Solar Stone, and connect. Solar
Stone LED will light up solid when it is connected and you will hear “Pairing successful,
connected” for confirmation. *
Note: If you experience trouble in connecting, select “Forget this Device” on your
Bluetooth device and try to connect again.
4. To disconnect, hold the Bluetooth Connect button on Solar Stone Bluetooth. You will
hear “Disconnected” for confirmation. *
5. If your Bluetooth device is not able to connect to Solar Stone Bluetooth, hold the
Bluetooth Connect button on the speaker to break previous Bluetooth connections and
reset the Bluetooth module.
2
1
3
4
5
LINK
78
6

Linking two Solar Stones to each other for stereo sound:
Note: Ensure that the speakers are not already Bluetooth connected in single mode. If either
of them is connected, hold the Bluetooth Connect button to disconnect and then follow the
steps below.
1. Power on each Solar Stone by holding down their power buttons. You will hear “Power
On” for confirmation. *
2. Press the Link button on each Solar Stone. The speakers will search for each other while
playing an intermittent tone. Once the stereo pair is successfully linked, you will hear
“Pairing successful, connected” followed by “Left channel” and “Right channel” on the
respective speakers. *
This process may take up to 2 minutes the first time two speakers are linked, but will only
take a few seconds if the speakers were previously linked.
Note: Solar Stones should be within 30 ft. (9 m) of each other to Link properly.
3. On the Left speaker, the Bluetooth LED will blink. Press the Bluetooth Connect button
to enter Bluetooth Pairing mode.
Note: The Left speaker will be the “master” speaker, and the unit from which the
Bluetooth range will be determined.
4. Navigate to your device’s Bluetooth setup screen, find Solar Stone, and connect. You
will hear “Connected” for confirmation. *
Note: If you experience trouble in connecting, select “Forget this Device” for Solar Stone
on your Bluetooth device and try to connect again.
5. To disconnect linking, hold the Link button on the “master” Solar Stone for 5 seconds.
You will hear “Disconnected” for confirmation. *
6. If your Bluetooth device is not able to connect to Solar Stone, hold the Bluetooth
Connect button on the speaker to break previous Bluetooth connections and reset the
Bluetooth module.
Note: When two speakers are linked, hold the power button on the “master” speaker to
turn both speakers off. If you want to only turn off the “slave” speaker, press and hold the
power button on that speaker. The speakers will relink automatically the next time they
are both powered on.
* Tip: If you would like to disable (or enable) the voice prompts, simultaneously press the
Bluetooth Connect and Link buttons.

Appendix (English)
Technical Specifications
Power Via power adapter or solar panel
Power adapter: 15 V DC, 2000 mA, center-positive
Solar panel: 1 W output
Battery Built-in rechargeable 12 V lead-acid battery
Battery Life Up to 50 hours *
Recharge Time 5.5 hours with AC adapter
Speaker Output 20 W (peak)
Driver 6.5 in.
Water-resistant Class IPX Level 4
Supported Bluetooth Profile A2DP
Bluetooth Range Up to 100 ft. / 30.5 m **
Linked Stereo Range Up to 30 ft. / 9 m ** between 2 linked Solar Stones
Specifications are subject to change without notice.
* Battery life may vary based on temperature, age, and volume usage of product.
** Available range is affected by walls, obstructions, and movement. For optimal performance,
place the product so it is unobstructed by walls, furniture, etc.
Trademarks & Licenses
ION Audio is a trademark of ION Audio, LLC, registered in the U.S. and other countries.
The Bluetooth word mark and logos are owned by the Bluetooth SIG, Inc. and any use of such
marks by ION Audio is under license.
All other product or company names are trademarks or registered trademarks of their
respective owners.
ionaudio.com
Compliance Version 1.0

This device complies with Part 15 of the FCC Rules. Operation is subject to the following two
conditions: (1) this device may not cause harmful interference, and (2) this device must accept any
interference received, including interference that may cause undesired operation.
Changes or modifications not expressly approved by the party responsible for compliance could
void the user's authority to operate the equipment
NOTE: This equipment has been tested and found to comply with the limits for a Class B digital
device, pursuant to Part 15 of the FCC Rules. These limits are designed to provide reasonable
protection against harmful interference in a residential installation. This equipment generates, uses
instructions, may cause harmful interference to radio communications. However, there is no
guarantee that interference will not occur in a particular installation. If this equipment does cause
harmful interference to radio or television reception, which can be determined by turning the
equipment off and on, the user is encouraged to try to correct the interference by one or more of
the following measures:
-- Reorient or relocate the receiving antenna.
-- Increase the separation between the equipment and receiver.
-- Connect the equipment into an outlet on a circuit different from that to which the receiver is
connected.
-- Consult the dealer or an experienced radio/TV technician for help.
This device complies with Industry Canada's licence-exempt RSSs. Operation is subject
to the following two conditions:
(1) This device may not cause interference; and
(2) This device must accept any interference, including interference that may cause
undesired operation of the device.
Cet appareil est conforme aux CNR exemptes de licence d'Industrie Canada . Son
fonctionnement est soumis aux deux conditions suivantes :
( 1 ) Ce dispositif ne peut causer d'interférences ; et
( 2 ) Ce dispositif doit accepter toute interférence , y compris les interférences qui
peuvent causer un mauvais fonctionnement de l'appareil.