ION Audio ISP64 Mountable Outdoor BT Speaker User Manual
ION Audio, LLC Mountable Outdoor BT Speaker
User manual

Quickstart Guide English ( 3 – 6 )
Guía de inicio rápido Español ( 7 – 10 )
Guide d'utilisation rapide Français ( 11 – 14 )
Guida rapida Italiano ( 15 – 18 )
Schnellstart-Anleitung Deutsch ( 19 – 22 )
Snelstartgids Nederlands ( 23 – 26 )
Appendix English ( 27 )
KEYSTONE

3
Quickstart Guide (English)
Introduction
Box Contents
(2) Keystone Speakers
(2) Wall Mounts
(2) Charging Adapters
(1) Remote Control
(8) 1.5” (38 mm) #10 Screws
Quickstart Guide
Safety & Warranty Manual
Support
For the latest information about this product (system requirements, compatibility information, etc.)
and product registration, visit ionaudio.com.
Rechargeable Batteries
Rechargeable lead-acid batteries are the same type used in automobiles. As with your car battery,
how you use this battery has a significant impact on its lifespan. With proper use and treatment, a
lead-acid battery can last for years. Here are some recommendations for getting the longest life from
the internal battery.
General Usage Fully charge the battery before using it.
Charge the battery completely after each use.
Storage For best product longevity, do not store at exceedingly hot (greater than 90°F /
32°C) or exceedingly cold (less than 32°F / 0°C) temperatures.
It is acceptable to leave your sound system plugged in. This will not overcharge
the battery.
If you leave the battery level low and do not charge it for 6 months, it may
permanently lose capacity.
Repair If the battery fails to charge, contact ION Audio at ionaudio.com.
Disposal Bring the unit to a recycling center or dispose of in accordance with local
ordinances.
Outdoor Use and Care
Though Keystone is water-resistant and able to tolerate splashing water, please review the tips
below to get the best performance from Keystone:
• Bring Keystone indoors during extreme weather.
• Please do not place Keystone in standing water.
• Please do not connect the charging adapter to Keystone in a wet environment.
• WARNING: Keep any non-water-resistant devices (phones, music players, etc.) in a dry place
where they will not be affected by water and cause a risk of electric shock.
4
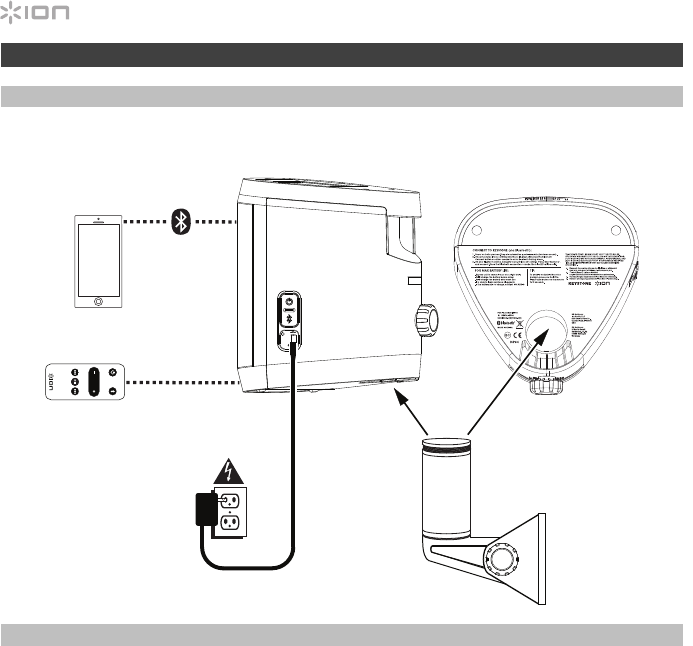
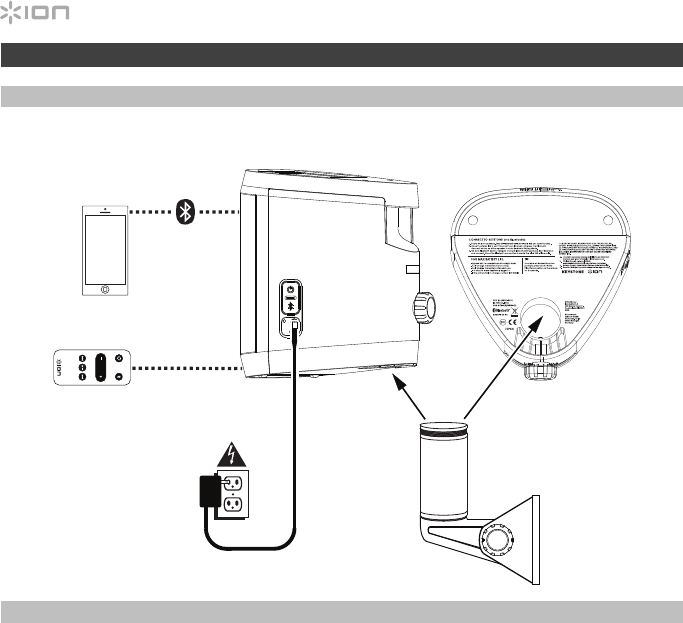
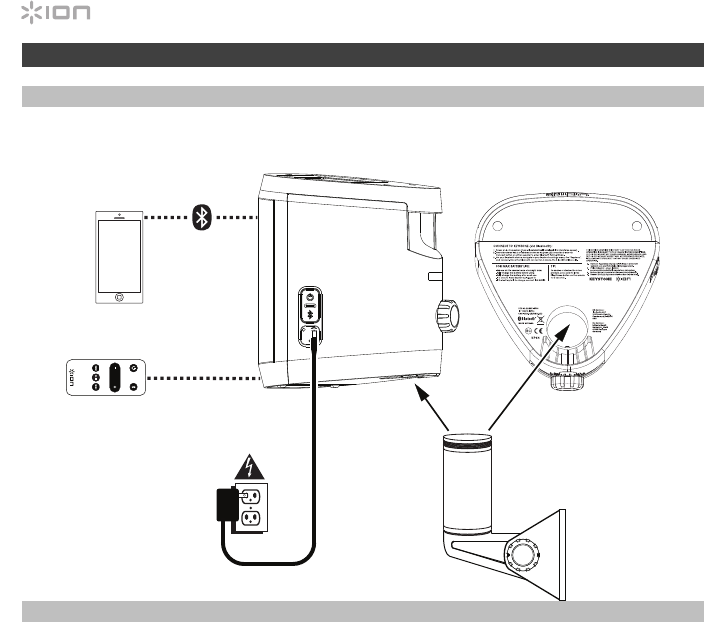
Quick Setup
Connection Diagram
Items not listed under Introduction > Box Contents are sold separately.
Installation
Keystone may be used freestanding or mounted. When used freestanding, the rubber feet on the
bottom of the speaker allow Keystone to sit comfortably on any flat surface. To mount Keystone
using the included wall mount, follow the instructions below. If using the solar panel to prolong
battery life between charges, place Keystone in an area that receives at least 3 hours of direct
sunlight a day for best results.
To use Keystone with the included wall mount, first inspect the area where you would like to install
the speakers. Confirm that the surface you are mounting Keystone on can safely hold the weight of
the speaker (8.4 lbs. / 3.8 kg). If you are unsure whether you can safely install Keystone in your
desired location, please consult a professional contractor.
To install the wall mount:
1. Insert screws into the 4 holes on the wall mount base. Fully tighten all screws so the wall mount
base is flush with the surface before placing the speaker on the mount. Do not use the included
screws to mount Keystone on surfaces such as concrete or drywall, as these may require special
tools and/or hardware.
2. Loosen the mount knob to adjust the angle of the mounting post. Once the desired angle is
achieved, tighten the mount knob, ensuring that the adjustment teeth are fully interlocked.
3. Loosen the speaker attachment knob on the back of Keystone enough to allow the unit to slide
onto the mounting post.
4. Slide Keystone onto the mount so that the mounting post is fully inserted into the mounting hole
on the bottom of the speaker. Make sure it is unobstructed on all sides for optimal performance.
5. Tighten the speaker attachment knob to secure Keystone to the wall mount at the desired
rotational orientation.
Bottom Panel
Side Panel
Smartphone,
tablet, etc.
Remote
Wall Mount
Power
VOL.

5
Bluetooth Connecting with Keystone
1. Power on each Keystone by pressing their power buttons. You will hear “Power On” for
confirmation. *
2. The speakers will automatically, wirelessly link for stereo sound. The speakers will search
for each other while playing an intermittent tone. Once the stereo pair is successfully
linked, you will hear “Pairing successful, connected” followed by “Left channel” and “Right
channel” on the respective speakers. *
This process may take up to 2 minutes the first time two speakers are linked. Speakers
that were previously linked will relink automatically in a few seconds if powered on in range
of one another.
Note: Keystone speakers should be within 30 ft. (9 m) of each other to Link properly.
3. When the stereo link is confirmed by the solid green LED, press the Bluetooth Connect
button on either speaker or the included remote to enter Bluetooth Pairing Mode.
Note: The Left channel will be the “master” speaker, and the unit from which the Bluetooth
range will be determined.
4. On your Bluetooth device, navigate to your Bluetooth settings menu, find Keystone, and
connect. Once the Bluetooth connection is made, the blue LED will be solid. You will hear
“Connected” for confirmation. *
Note: If you experience trouble in connecting, select “Forget this Device” for Keystone on
your Bluetooth device and try to connect again.
5. If your Bluetooth device is not able to connect to Keystone, hold the Bluetooth Connect
button on the speaker to break previous Bluetooth connections and reset the Bluetooth
module.
* Tip: If you would like to disable (or enable) the voice prompts, press and hold the
Play/Pause button on the remote for 3 seconds.
6
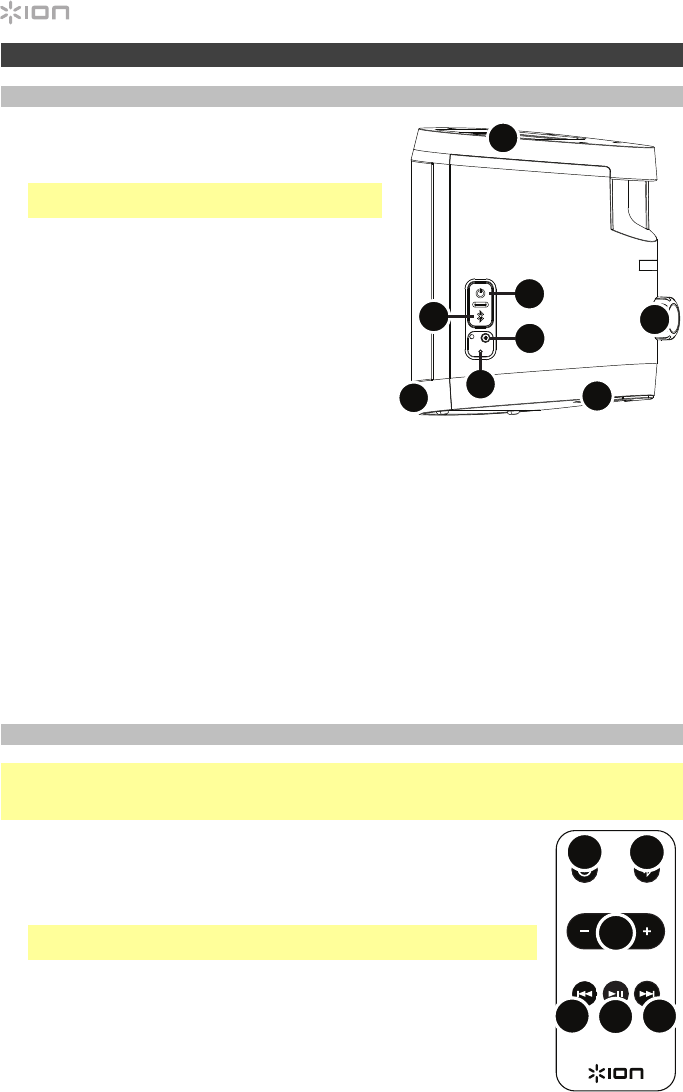
Features
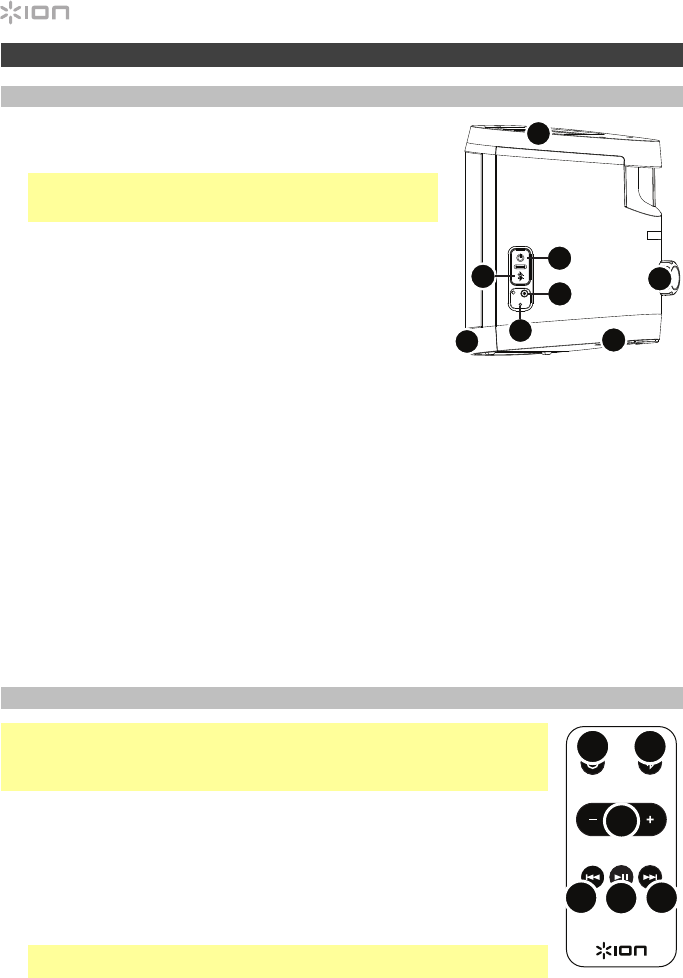
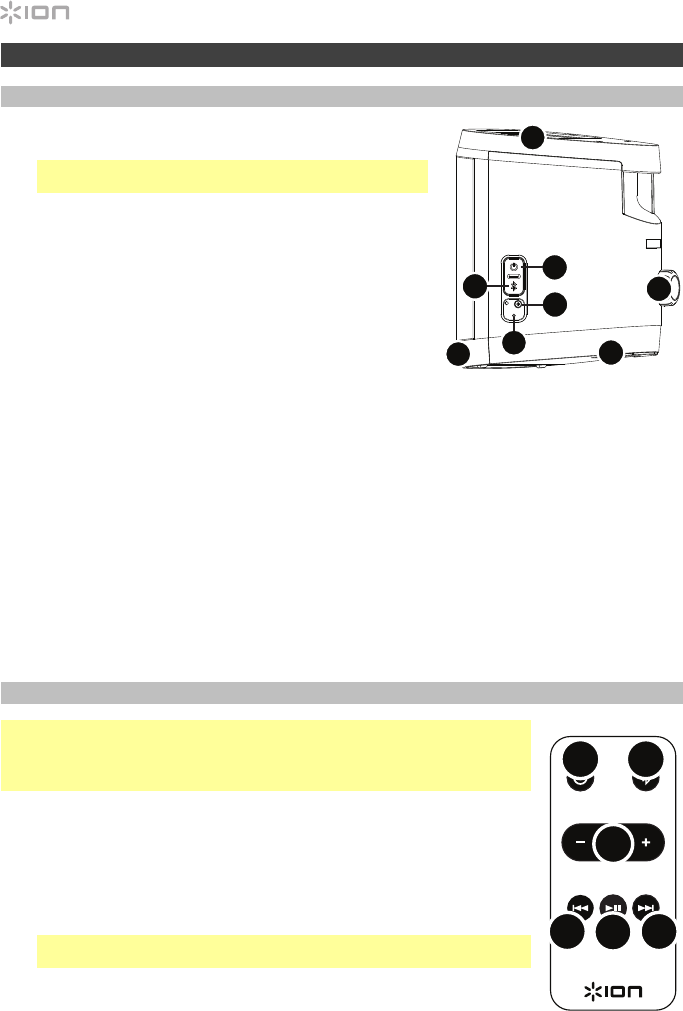
Speaker (Side View)
1. Charging Adapter Input: Insert the included
charging adapter here to charge the Keystone
battery.
Important: Keystone should be fully charged prior
to first use for maximum battery life.
2. Power: Press this button to turn on the Keystone.
Press and hold this button to power the unit off.
3. Bluetooth: Press this button to enter Bluetooth
Pairing mode. Press and hold to disconnect a
connected Bluetooth device.
Note: When Bluetooth is connected, Keystone will
automatically power off after 30 minutes if no audio
is playing.
4. Reset: If Keystone is working abnormally, shut
down the unit by placing a paper clip into the Reset
hole located on the Keystone control panel and
gently push until the unit turns off. Try this only after you have first attempted to reboot Keystone
using the Power button.
5. IR Receiver (Front): When using the remote, point it toward the IR Receiver located on the front
face of the speaker.
Note: If Keystone has not been used in a week, the IR Receiver will power down to conserve
battery. At this point, the remote will no longer communicate with the speaker. When this
happens, use the speaker’s Power button to turn on the unit and re-enable the IR Receiver.
6. Solar Panel (Top): Once fully charged, Keystone’s solar panel can provide suitable power for
typical daily use without the need to connect the charging adapter. Results will vary depending
on daily number of hours Keystone is exposed to direct sunlight.
7. Mount (Bottom): Insert the wall mount post here, and then tighten the Set Screw to secure the
speaker to it.
8. Attachment Knob (Back): This knob is used to secure Keystone to the wall mount post. Make
sure it is properly tightened.
Remote
Important: Before using the remote for the first time, remove the plastic pull tab from the battery
compartment to engage the battery.
When using the remote, point it toward the IR Receiver located on the front face of the speaker.
1. Power Button: Press this button to power the unit on and off.
2. Bluetooth Button: Press this button to enter Bluetooth Pairing mode.
3. Volume -/+: Press these buttons to decrease (-) or increase (+) the volume.
4. Play/Pause: Press this button to play or pause the streaming audio.
Tip: Press and hold this button for 3 seconds to disable (or enable) the
voice prompts.
5. Prev: Press this button to go to the previous track on your device.
Note: In some apps, pressing Prev may go to another playlist or music
genre.
6. Next: Press this button to advance to the next track on your device.
Note: In some apps, pressing Next may go to another playlist or music
genre.
VOL .
12
3
4
56
1
2
3
4
5
6
7
8

7
Guía de inicio rápido (Español)
Introducción
Contenido de la caja
(2) Altavoces Keystone
(2) Montajes para pared
(2) Adaptadores de carga
(1) Control remoto
(8) Tornillos nro. 10 de 38 mm (1,5 pulg.)
Guía de inicio rápido
Manual sobre la seguridad y garantía
Soporte
Para obtener la información más completa acerca de este product (los requisitos del sistema,
compatibilidad, etc) y registro del producto, visite ionaudio.com.
Baterías recargables
Las baterías de plomo-ácido recargables son del mismo tipo que se usa en los automóviles. Al igual
que con la batería del vehículo, la forma en que se usa tiene una influencia significativa en la
duración de su vida útil. Con un uso y tratamiento correctos, una batería de plomo-ácido puede
durar varios años. He aquí algunas recomendaciones para prolongar la vida útil de la batería interna.
Uso general Cargue completamente la batería antes de usarla.
Cargue la batería completamente después de cada uso.
Almacenamiento Para lograr la mayor longevidad del producto, no lo almacene a
temperaturas muy altas (superiores 32°C / 90°F) o muy frías (inferiores a 0°C
/ 32°F).
Es aceptable dejar su sistema de sonido enchufado. No sobrecargará la
batería.
Si deja que el nivel de la batería baje y no la carga durante 6 meses, puede
perder permanentemente su capacidad.
Reparación Si la batería no se carga, póngase en contacto con ION Audio en
ionaudio.com.
Disposición final Lleve la unidad a un centro de reciclaje o deséchela de acuerdo a las
ordenanzas locales.
Uso y cuidado a la intemperie
Aunque el Keystone es resistente al agua y capaz de tolerar salpicaduras, lea las sugerencias que se
incluyen a continuación para obtener el mejor rendimiento del Keystone:
• Traiga a los Keystone bajo techo durante condiciones meteorológicas extremas.
• No coloque el Keystone sobre agua estancada.
• No conecte el adaptador de carga al Keystone en un ambiente húmedo.
• ADVERTENCIA: Coloque los dispositivos no resistentes al agua (teléfonos, reproductores de
música, etc.) en un lugar seco donde no sean afectados por el agua y causen un riesgo de
electrocución.
8
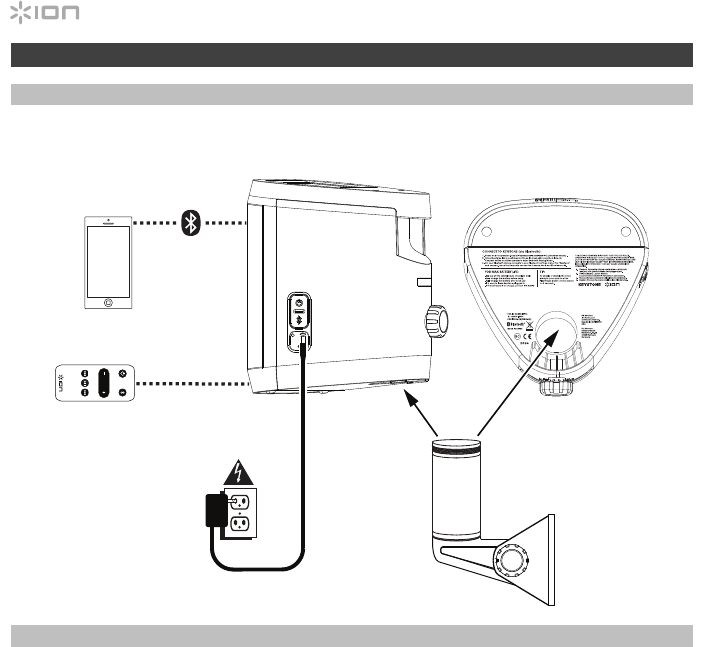
Instalación rápida
Diagrama de conexión
Los elementos que no se enumeran en Introducción > Contenido de la caja se venden por separado.
Instalación
Los Keystone pueden utilizarse apoyados o montados. Cuando los utilice apoyados, las patas de goma en
su parte inferior le permiten a los Keystone asentarse cómodamente en cualquier superficie plana. Para
montar los Keystone utilizando el montaje para pared incluido, siga las instrucciones a continuación. Si
utiliza el panel solar para prolongar la vida útil de la batería entre cargas, coloque los Keystone en un área
que reciba al menos 3 horas de luz solar directa para un mejor resultado.
Para utilizar los Keystone con el montaje para pared incluido, primero inspeccione el área en donde desea
instalar los altavoces. Asegúrese de que la superficie en la que está montando los Keystone pueda soportar
de forma segura el peso del altavoz (8,4 lbs. / 3,8 kg) Si no está seguro si podrá instalar los Keystone de
forma segura en la ubicación deseada, póngase en contacto con un contratista profesional.
Cómo instalar el montaje para pared:
1. Inserte los tornillos en los 4 orificios de la base del montaje para pared. Apriete completamente todos
los tornillos de manera que la base del montaje para pared quede al ras con la superficie antes de
colocar el altavoz en el montaje. No utilice los tornillos incluidos para montar los Keystone en
superficies tales como concreto o yeso, ya que puede que se requieran herramientas y tornillería
especiales.
2. Afloje la perilla de montaje para ajustar el ángulo de montaje del poste. Una vez alcanzado el ángulo
deseado, apriete la perilla de montaje, asegurándose de que los dientes de ajuste queden
completamente entrelazados.
3. Afloje la perilla de sujeción del altavoz en la parte trasera del Keystone lo suficiente para permitir que la
unidad se deslice hacia el poste de montaje.
4. Deslice el Keystone hacia el montaje de manera que el poste de montaje se inserte totalmente dentro
del orificio de montaje en la parte inferior del altavoz. Asegúrese de que permanezca sin obstrucciones
en todos sus lados para un desempeño óptimo.
5. Apriete la perilla de sujeción del altavoz para sujetar el Keystone al montaje para pared en la orientación
rotacional deseada.
Alimentación
Control remoto
Montajes para pared
Teléfono inteligente,
tableta, etc.
Panel lateral
Panel inferior
VOL.

9
Conexión Bluetooth con otro Keystone
1. Encender cada Keystone pulsando la botónes de encendido. Escuchará “Power On”
(Unidad encendida) como confirmación. *
2. Los altavoces se enlazarán automática e inalámbricamente para brindar un sonido
estéreo. Los altavoces se buscarán mutuamente mientras reproducen un tono
intermitente. Una vez que el par estéreo se enlaza exitosamente, escuchará “Pairing
successful, connected” (Apareamiento exitoso, conectado) seguido por “Left channel”
(Canal izquierdo) y “Right channel” (Canal derecho) en los altavoces respectivos. *
Este proceso puede llevar hasta 2 minutos la primera vez que se realiza el enlace. Los
altavoces que estuvieron enlazados previamente volverán a enlazarse automáticamente
en unos pocos segundos si se encienden estando dentro de sus mutuos alcances.
Nota: Los Keystone deben encontrarse a menos de 9 m (30 pies) de cada uno para
enlazarse correctamente.
3. Cuando se confirme el enlace estéreo al quedar el LED verde permanentemente
encendido, pulse el botón Connect Bluetooth (Conectar Bluetooth) en ambos altavoces o
el control remoto incluido para entrar al modo de apareamiento Bluetooth.
Nota: El canal izquierdo será el altavoz "maestro" y la unidad desde la cual se
determinará el rango de Bluetooth.
4. En su dispositivo Bluetooth, navegue hasta el menú de ajustes de Bluetooth busque
Keystone, y conéctese a él. Una vez realizada la conexión Bluetooth el LED se
encenderá permanentemente con luz azul. Escuchará “Connected” (Conectado) como
confirmación.*
Nota: Si experimenta problemas para conectarse, seleccione “Olvidar este Dispositivo”
(Forget this Device) para el Keystone en su dispositivo Bluetooth e intente conectarse
nuevamente.
5. Si su dispositivo Bluetooth no es capaz de conectarse al Keystone, mantenga pulsado el
botón Bluetooth Connect en el altavoz para cortar las conexiones Bluetooth anteriores y
reinicie el módulo Bluetooth.
* Consejo: Si desea desactivar (o activar) los avisos de voz, mantenga pulsado el botón
Play/Pause (reproducir/hacer pausa) en el control remoto durante 3 segundos.

10
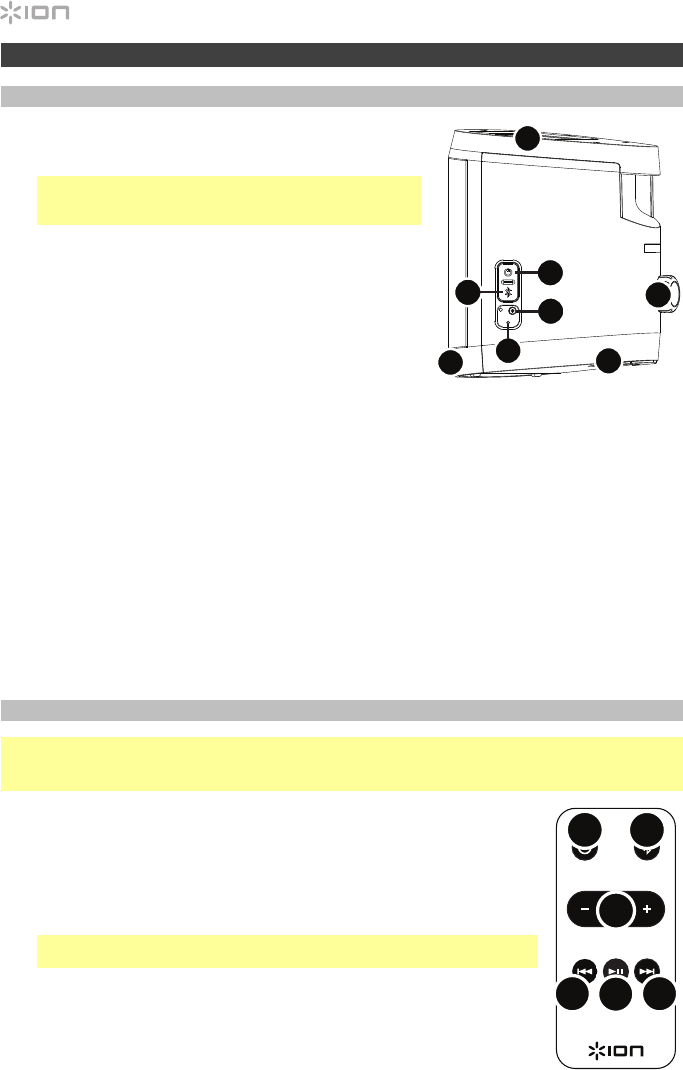
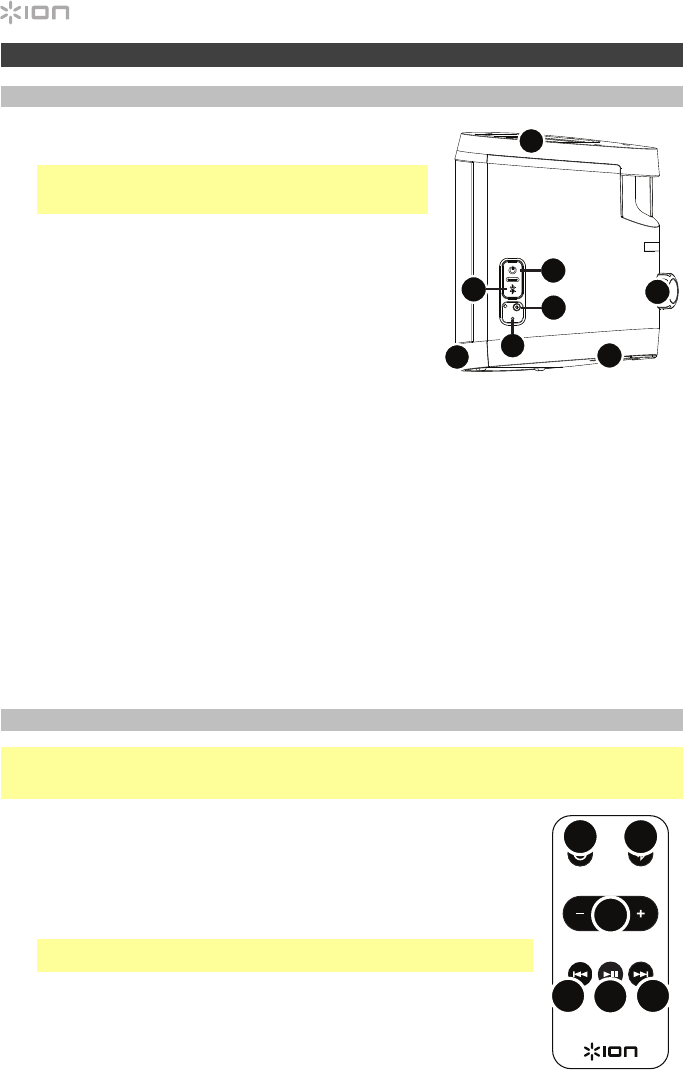
Características
Panel lateral
1. Entrada del adaptador de carga: Inserte aquí el
adaptador de carga incluido para cargar la batería del
Keystone.
Importante: El Keystone debe recargarse en su
totalidad antes del primer uso para maximizar la vida
útil de la batería.
2. Encendido: Pulsa este botón para encender la
Keystone. Mantenga pulsado este botón para apagar la
unidad.
3. Bluetooth: Pulse este botón para entrar al modo de
apareamiento de Bluetooth. Manténgalo pulsado para
desconectar un dispositivo Bluetooth apareado.
Nota: Cuando el Bluetooth esté conectado, el Keystone
se apagará luego de 30 minutos sin reproducir ningún
audio.
4. Receptor IR (frente): Al utilizar el control remoto, apúntelo hacia el receptor IR ubicado en la
cara delantera del altavoz.
Nota: Si un Keystone no se utiliza durante una semana, el receptor IR se apagará para
conservar la batería. En este punto, el control remoto no podrá comunicarse más con el
altavoz. Cuando esto suceda, utilice el botón Power (encendido) del altavoz para encender la
unidad y reactivar el receptor IR.
5. Panel solar (parte superior): Una vez cargado completamente, el panel solar del Keystone
puede brindar la potencia apropiada para el uso diario típico sin tener que conectar el
adaptador de carga. Los resultados pueden variar dependiendo de la cantidad de horas diarias
en las que el Keystone se expone a la luz solar directa.
6. Montaje (parte inferior): Inserte aquí el poste de montaje y luego apriete el tornillo de ajuste
para sujetar el altavoz a él.
7. Perilla de sujeción (parte trasera): Esta perilla se utiliza para sujeta el Keystone al poste de
montaje para pared. Asegúrese de que esté correctamente apretada.
Control remoto
Importante: Antes de usar el control remoto por primera vez, retire la lengüeta plástica del
compartimiento de la batería para que la batería haga contacto.
Al utilizar el control remoto, apúntelo hacia el receptor IR ubicado en la cara delantera del altavoz.
1. Botón de encendido: Pulse este botón para encender y apagar la
unidad.
2. Botón Bluetooth: Pulse este botón para entrar al modo de apareamiento
de Bluetooth.
3. Volumen -/+: Pulse estos botones para reducir (-) o aumentar (+) el
volumen.
4. Play/Pause (Reproducir/Pausa): Pulse este botón para reproducir o
poner en pausa la transmisión de audio.
Consejo: Mantenga pulsado este botón durante 3 segundos para
desactivar (o activar) los avisos de voz.
5. Prev (Anterior): Pulse este botón para pasar a la pista anterior en su
dispositivo.
Nota: En algunas aplicaciones, pulsar Prev puede cambiar la lista de
reproducción o género musical.
6. Next (Siguiente): Presione este botón para avanzar a la pista siguiente en su dispositivo.
Nota: En algunas aplicaciones, pulsar Next puede cambiar lista de reproducción o género
musical.
1
2
3
4
5
6
7
8
VOL .
12
3
4
56

11
Guide d'utilisation rapide (Français)
Présentation
Contenu de la boîte
(2) Enceintes Keystone
(
8
)
vis nº 10 de 38 mm
(2) Supports muraux Guide d'utilisation rapide
(2) Adaptateurs de rechargement Consignes de sécurité et informations concernant la garantie
(1) Télécommande
Assistance
Pour les dernières informations concernant ce produit (la configuration système minimale requise, la
compatibilité, etc) et l'enregistrement du produit, veuillez visitez le site ionaudio.com.
Piles rechargeables
Les piles au plomb rechargeables sont du même type que les batteries utilisées dans les
automobiles. Comme pour la batterie de votre automobile, la manière dont vous l'utilisez a un impact
direct sur sa durée de vie. Cependant, avec une bonne utilisation la pile au plomb peut avoir une
durée de vie de plusieurs années. Voici quelques recommandations pour prolonger au maximum la
durée de vie de la pile interne.
Utilisation générale Chargez complètement la batterie avant de l’utiliser.
Rechargez la batterie complètement après chaque utilisation.
Entreposage Pour optimiser la longévité du produit, ne pas entreposer dans des
températures extrêmement chaudes (supérieur à 32°C / 90°F) ou extrêmement
froides (moins de 0°C / 32°F).
Il est acceptable de laisser votre système audio branché. Cela ne surchargera
pas la batterie.
Si vous laissez le niveau de batterie s’affaiblir sans la recharger pendant 6
mois, elle risquerait de perdre sa capacité de charge de façon permanente.
Réparation Si la batterie ne parvient plus à se recharger, contactez ION Audio à
ionaudio.com.
Élimination Apportez l’appareil dans un centre de recyclage ou disposez selon les
règlements de votre municipalité.
Utilisation extérieure et entretien
Bien que le Keystone soit résistant à l'eau et tolère les éclaboussures, les conseils ci-dessous
qui vous permettront de tirer le maximum de votre Keystone :
• L’enceinte Keystone doit être rentrée à l'intérieur lors de conditions météorologiques extrêmes.
• Veuillez ne pas placer le Keystone dans l'eau stagnante.
• Veuillez ne pas utiliser l'adaptateur de rechargement avec le Keystone lorsqu’il se trouve dans
un environnement humide.
• MISE EN GARDE : Gardez tout appareil non étanche (téléphones, lecteurs, etc.) dans un
endroit sec à l’abri des éclaboussures et des risques de décharges électriques.
12
Panneau latéral Panneau inférieur
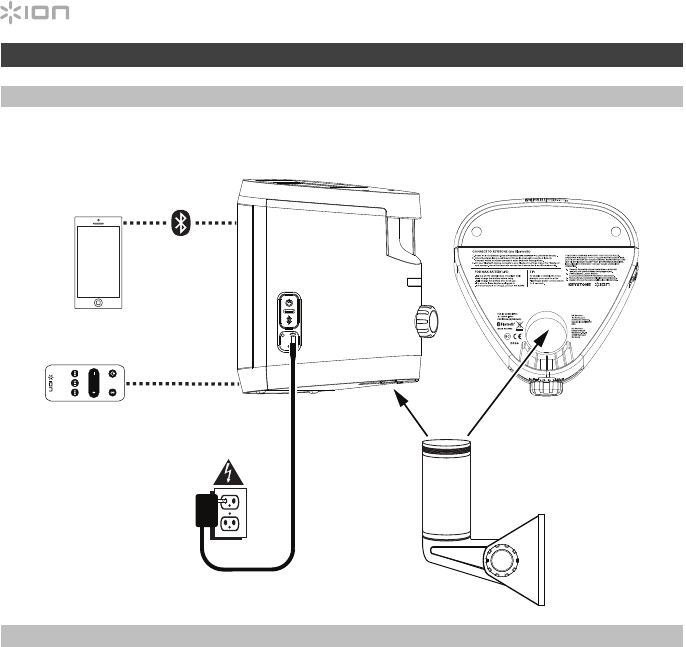
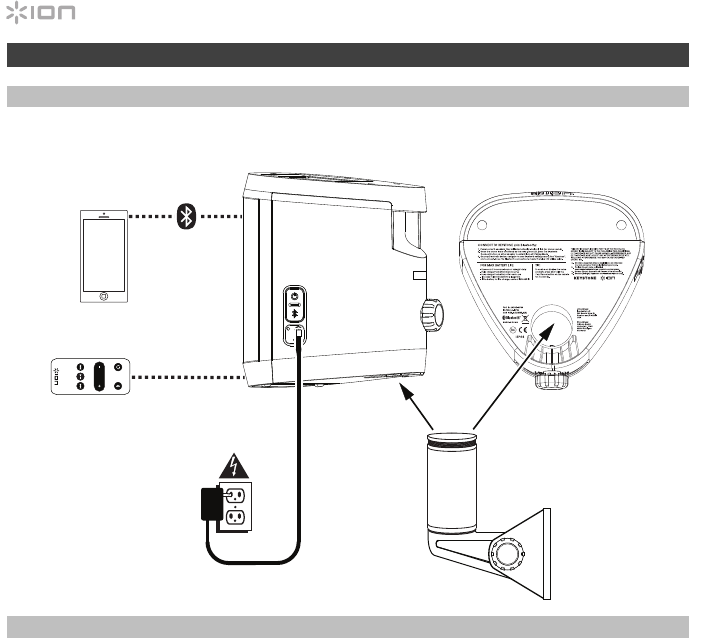
Démarrage rapide
Schéma de connexion
Les éléments qui ne figurent pas dans le Présentation > Contenu de la boîte sont vendus séparément.
Installation
L’enceinte Keystone peut reposer sur ses pieds ou être montée au mur. Les pieds en caoutchouc de
l’enceinte Keystone permettent de la poser sur n'importe quelle surface plane. Pour monter l’enceinte
Keystone au mur, utilisez le support mural fourni et suivez les instructions ci-dessous. Si vous désirez
utiliser le panneau solaire afin de prolonger l’autonomie de la batterie entre les charges, veuillez placer
l’enceinte Keystone dans un endroit qui est exposé à la lumière directe du soleil pendant au moins 3 heures
par jour.
Avant de procéder à l’installation murale de l’enceinte Keystone, veuillez d'abord inspecter l’emplacement
où vous souhaitez installer l’enceinte. Veuillez vous assurer que la surface de montage peut soutenir le
poids de l'enceinte en toute sécurité (3,8 kg). Si vous n’êtes pas certain de pouvoir installer l’enceinte à
l’emplacement désiré en toute sécurité, veuillez faire appel à un installateur professionnel.
Pour installer le support mural :
1. Insérez les vis dans les 4 trous de la base du support mural. Veuillez serrer toutes les vis du support
mural afin que la base du support soit au ras de la surface avant de placer l’enceinte sur le support.
Veuillez ne pas utiliser les vis fournies pour le montage de l’enceinte sur des surfaces comme le béton
ou les cloisons sèches, car celles-ci peuvent nécessiter des outils et/ou des matériaux spéciaux.
2. Desserrez le bouton du support afin d’ajuster l'angle de la tige de montage. Une fois l'angle désiré
obtenu, resserrez le bouton du support, en vous assurant que les dents de réglage soient entièrement
verrouillées.
3. Desserrez le bouton de fixation à l'arrière de l’enceinte Keystone suffisamment afin de permettre à
l'appareil de glisser sur la tige de montage.
4. Faites glisser l’enceinte Keystone sur le support de sorte que la tige de montage soit entièrement
insérée dans l’embase de fixation sous l’enceinte. Veuillez vous assurer que tous les côtés de l’enceinte
soient libres afin d’obtenir des résultats optimums.
5. Serrez le bouton de fixation afin de fixer l’enceinte Keystone sur le support mural selon l'orientation
souhaitée.
Télécommande
Smartphone,
tablette, etc.
Alimentation
Supports muraux
VOL.

13
Connexion Bluetooth à Keystone
1. Mettez sous tension chaque Keystone en appuyant sur les touches d'alimentation. Vous
entendrez le message de confirmation vocal « Power On ». *
2. Les deux enceintes se relient sans fil automatiquement afin de produire un son stéréo.
Les enceintes essayeront de se jumeler et émettront une tonalité intermittente. Une fois
que la connexion est établie, vous entendrez le message de confirmation vocal « Pairing
successful, connected » suivi de « Left channel » provenant de l’enceinte gauche et
« Right channel » provenant de l’enceinte droite. *
Cela peut prendre jusqu'à 2 minutes lors de la première connexion. Une fois la première
connexion établie, les enceintes prendront seulement quelques secondes à se
reconnecter lorsqu’elles se trouveront à proximité l’une de l’autre.
Remarque : Les enceintes Keystone doivent être à moins de 9 m l'une de l'autre pour se
connecter correctement.
3. Lorsque la DEL devient verte afin d’indiquer le lien stéréo, appuyez sur la touche de
connexion Bluetooth de chaque enceinte, ou sur la télécommande fournie, afin de lancer
le mode de jumelage Bluetooth.
Remarque : L’enceinte gauche sera l’enceinte « maître », et sera également l’enceinte à
partir de laquelle la portée Bluetooth sera déterminée.
4. Accédez au menu des réglages Bluetooth de votre appareil, recherchez Keystone, et
appuyez sur Connecter. Une fois que la connexion Bluetooth est établie, la DEL devient
bleue.
Remarque : Si la connexion ne peut être établie, sélectionnez « Oublier cet appareil »
pour la Keystone sur votre appareil Bluetooth et lancer à nouveau le jumelage.
5. Si votre appareil Bluetooth ne parvient pas à se jumeler à la Keystone, maintenez la
touche de connexion Bluetooth de l’enceinte afin de supprimer la connexion à d'autres
appareils Bluetooth et remettre à zéro le module Bluetooth.
* Astuce : Pour désactiver (ou activer) les messages vocaux, maintenez la touche pour
lancer/interrompre la lecture sur la télécommande enfoncée pendant 3 secondes.
14
Caractéristiques
Panneau latéral
1. Entrée pour adaptateur de rechargement : Insérez
l'adaptateur de rechargement inclus à cette entrée pour
recharger la batterie du Keystone.
Important : Veuillez vous assurer d'avoir complètement chargé
la batterie de l’enceinte Keystone avant la première utilisation
afin d’augmenter sa durée de vie.
2. Touche d’alimentation : Appuyez sur cette touche pour activer
Keystone. Maintenez cette touche enfoncée afin de mettre le
unité hors tension.
3. Bluetooth : Cette touche permet de passer au mode de
jumelage Bluetooth. Pour déjumeler un appareil Bluetooth,
maintenez cette touche enfoncée.
Remarque : Lorsqu'un appareil Bluetooth est connecté,
l’enceinte Keystone se met automatiquement hors tension après
30 minutes d’inactivité.
4. Réinitialisation : En cas de fonctionnement anormal, il est possible de faire une réinitialisation du
Keystone en enfonçant le bouton Reset sous l’appareil jusqu’à ce qu’il s’éteigne. N’essayez ceci que
lorsque vous avez tenté de redémarrer le Keystone à l’aide de la touche d’alimentation.
5. Récepteur infrarouge (partie avant) : Lorsque vous utilisez la télécommande, veuillez la pointer vers le
récepteur infrarouge situé sur la face avant de l’enceinte.
Remarque : Lorsque l’enceinte Keystone n'a pas été utilisée depuis plus d’une semaine, le récepteur
infrarouge s’éteint afin d’économiser la batterie. Lorsque ceci se produit, la télécommande ne
communique plus avec l’enceinte. Appuyez sur la touche d'alimentation de l’enceinte afin de mettre
l’appareil sous tension et de réactiver le récepteur infrarouge.
6. Panneau solaire (partie supérieure) : Une fois la batterie complètement rechargée, le panneau solaire
de l’enceinte Keystone peut fournir une puissance appropriée pour une utilisation quotidienne typique,
sans avoir besoin d'utiliser l’adaptateur de rechargement. Les résultats varient selon le nombre
d'heures quotidiennes auxquelles l’enceinte Keystone est exposée à la lumière directe du soleil.
7. Embase de fixation (partie inférieure) : Insérez la tige de montage du support dans l’embase et serrez
la vis pour fixer l’enceinte à la tige.
8. Bouton de fixation (partie arrière) : Ce bouton est utilisé afin de fixer l’enceinte Keystone à la tige de
montage du support mural. Veuillez vous assurer qu’il est suffisamment serré.
Télécommande
Important : Avant d’utiliser la télécommande pour la première fois, veuillez retirer la
languette en plastique du compartiment à pile.
Lorsque vous utilisez la télécommande, veuillez la pointer vers le récepteur infrarouge
situé sur la face avant de l’enceinte.
1. Touche d'alimentation : Cette touche permet de mettre l’appareil sous et hors
tension.
2. Touche Bluetooth : Cette touche permet de passer au mode de jumelage
Bluetooth.
3. Volume -/+ : Utilisez ces touches afin de diminuer (-) ou d’augmenter (+) le
volume.
4. Lancer/interrompre la lecture : Cette touche permet de lancer ou d’interrompre
la musique.
Astuce : Maintenez cette touche enfoncée pendant 3 secondes afin de désactiver
(ou d’activer) les messages vocaux.
5. Piste précédente : Cette touche permet de revenir à la piste précédente sur votre appareil.
Remarque : Dans certaines applications, la touche piste précédente permet de passer à la liste de
lecture ou au genre musical précédent.
6. Piste suivante : Cette touche permet de passer à la piste suivante sur votre appareil.
Remarque : Dans certaines applications, la touche piste suivante permet de passer à la liste de lecture
ou au genre musical suivant.
1
2
3
4
5
6
7
8
VOL .
12
3
4
56

15
Guida rapida (Italiano)
Introduzione
Contenuti della confezione
(2) Altoparlanti Keystone
(2) Dispositivi di montaggio a parete
(2) Adattatori di ricarica
(1) Telecomando
(8) Viti da 1,5” (38 mm) #10
Guida rapida
Istruzioni di sicurezza e garanzia
Assistenza
Per conoscere le ultime informazioni in merito a questo prodotto (i requisiti di sistema complete,
compatibilità, ecc) e per la registrazione del prodotto, recarsi alla pagina ionaudio.com.
Batterie ricaricabili
Le batterie ricaricabili al piombo-acido sono dello stesso tipo di quelle utilizzate nelle automobili.
Come nel caso della batteria dell'auto, la maniera in cui si utilizza questa batteria ha un notevole
impatto sulla sua vita utile. Con un utilizzo adeguato, una batteria al piombo-acido può durare per
anni. Ecco alcune raccomandazioni per garantire la massima durata dalla batteria interna.
Utilizzo generico
Caricare a fondo il prodotto prima dell'uso.
Caricare a fondo il prodotto prima di riporlo.
Come riporre
l’apparecchio
Per la massima longevità del prodotto, evitare di riporlo a temperature
eccessivamente elevate (superiori a 90°F/32°C) o eccessivamente fredde
(meno di 32°F/0°C).
L'impianto audio può essere lasciato collegato. Così facendo la batteria
non si sovraccarica.
Se si lascia il livello della batteria basso e non la si ricarica per 6 mesi,
potrebbe perdere capacità in via permanente.
Riparazioni Se la batteria non si carica, contattare il dipartimento parti di ricambio alla
pagina ionaudio.com.
Come eliminare
l’apparecchio
Recarsi con l’apparecchio presso un centro di riciclaggio oppure eliminarlo
in conformità con le normative locali.
Utilizzo all'aperto e cura
Sebbene il Keystone sia impermeabile e in grado di sopportare eventuali schizzi d'acqua, leggere
attentamente i consigli di cui sotto per ottenere le migliori prestazioni dal Keystone:
• Portare il Keystone all'interno in caso di maltempo.
• Non collocare il Keystone in acqua.
• Non collegare l'adattatore di ricarica al Keystone in un ambiente bagnato.
• Avvertenza: mantenere qualsiasi dispositivo non impermeabile (telefono, lettore musicale, ecc.)
in un luogo asciutto dove non sia interessato dall’acqua rischiando di causare scosse
elettriche.
16
Inizio rapido
Schema dei collegamenti
Elementi non elencati sotto Introduzione > Contenuti della confezione sono venduti separatamente.
Installazione
Il Keystone può essere utilizzato in via indipendente o installato. Quando utilizzato in modo indipendente, i
piedini in gomma posti sul fondo dell'altoparlante consentono al Keystone di essere collocato su qualsiasi
superficie uniforme. Per montare il Keystone servendosi dei dispositivi di montaggio in dotazione, procedere
come indicato nelle istruzioni seguenti. Se si desidera utilizzare il pannello solare per prolungare la durata
della batteria tra una carica e l'altra, collocare il Keystone in una zona che riceva almeno 3 ore di luce diretta
del sole per ottenere i migliori risultati.
Per utilizzare il Keystone con il dispositivo di montaggio a parete in dotazione, innanzitutto ispezionare l'area
dove si desidera installare l'altoparlante. Verificare che la superficie su cui ci si accinge a montare il
Keystone sia in grado di reggere in maniera sicura il peso dell'altoparlante (8,4 lb. / 3,8 kg). In caso di
dubbio in merito alla possibilità di installare il Keystone in maniera sicura nel punto desiderato, consultare
un professionista.
Per installare il dispositivo di montaggio a parete:
1. Inserire le viti nei 4 fori presenti alla base del dispositivo di montaggio. Stringere a fondo tutte le viti in
modo tale che la base del dispositivo di montaggio sia a livello con la superficie prima di collocarvi
l'altoparlante. Non servirsi delle viti in dotazione per montare il Keystone su superfici quali cemento o
cartongesso, in quanto possono richiedere attrezzi e/o viteria speciali.
2. Allentare la manopola di montaggio per regolare l'angolazione del supporto di montaggio. Una volta
ottenuta l'angolazione desiderata, stringere la manopola di montaggio, assicurandosi che i dentini di
regolazione siano perfettamente bloccati.
3. Allentare la manopola di fissaggio dell'altoparlante sul retro del Keystone a sufficienza da consentire
all'apparecchio di scorrere sul supporto di montaggio.
4. Far scorrere il Keystone sul supporto in modo tale che questo risulti interamente inserito nel foro di
montaggio posto sul fondo dell'altoparlante. Per ottenere prestazioni ottimali, assicurarsi che non sia
ostruito su tutti i lati.
5. Stringere la manopola di fissaggio per assicurare il Keystone al dispositivo di montaggio a parete
nell'orientamento desiderato.
Pannello laterale Pannello inferiore
Telecomando
Smartphone,
tablet, ecc.
Alimentazione
Wall Mount
VOL.

17
Collegamento Bluetooth con Keystone
1. Per accendere ciascun Keystone, premere i loro tasti di alimentazione. Si sentirà “Power
On” a conferma. *
2. Gli altoparlanti si collegheranno automaticamente, senza fili, per un suono stereo. Gli
altoparlanti si cercheranno a vicenda riproducendo un suono intermittente. Una volta che
la coppia stereo è collegata, si sentirà “Pairing successful, connected” (Collegamento
avvenuto, collegato), seguito da “Left channel” (Canale sinistro) e “Right channel” (Canale
destro) sui rispettivi altoparlanti.*
La prima volta che si collegano due altoparlanti, questo processo può richiedere fino a 2
minuti. Gli altoparlanti collegati in precedenza si ricollegheranno in pochi secondi se
accesi l'uno a portata dell'altro.
Nota bene: per collegarsi correttamente, i Keystone si devono trovare entro 9 m (30 ft.)
l'uno dall'altro.
3. Quando il collegamento stereo è confermato dal LED verde fisso, premere il tasto
Bluetooth Connect sull'altoparlante o sul telecomando in dotazione per entrare in
modalità di collegamento Bluetooth.
Nota bene: il canale di sinistra sarà l'altoparlante “master”, nonché l'unità dalla quale
sarà determinata la portata del Bluetooth.
4. Sul proprio dispositivo Bluetooth, navigare fino al menu impostazioni Bluetooth, trovare
Keystone e collegarlo. Una volta effettuato il collegamento Bluetooth, il LED sarà blu
fisso. Si sentirà “Connected” (Collegato) a conferma. *
Nota bene: in caso di problemi di collegamento, selezionare “Forget this Device”
(Dimentica questo dispositivo) per il Keystone sul dispositivo Bluetooth e cercare di
collegarlo di nuovo.
5. Se il dispositivo Bluetooth non è in grado di collegarsi al Keystone, tenere premuto il
tasto Bluetooth Connect a livello dell'altoparlante per interrompere precedenti
collegamenti Bluetooth e azzerare il modulo Bluetooth.
* Suggerimento: se si desidera disattivare (o attivare) i comandi vocali, tenere premuto il tasto
Play/Pause sul telecomando per 3 secondi.
18
Caratteristiche
Pannello laterale
1. Ingresso adattatore di carica: Inserire a questo livello
l’adattatore di ricarica in dotazione per caricare la batteria
del Keystone.
Importante: il Keystone deve essere caricato a fondo prima
del primo utilizzo per garantire il massimo della durata della
batteria.
2. Power: Premere questo tasto per accendere il Keystone.
Tenere premuto questo tasto per spegnere il unitá.
3. Bluetooth: premere questo tasto per entrare in modalità di
collegamento Bluetooth. Tenere premuto questo tasto per
scollegare un dispositivo Bluetooth collegato.
Nota bene: quando il Bluetooth è collegato, se non viene
riprodotto alcun audio, il Keystone si spegnerà
automaticamente dopo 30 minuti.
4. Reset: Se il Keystone funziona in maniera abnorme,
spegnere l’apparecchio collocando una graffetta nel foro di Reset situato sulla parte laterale del
Keystone, e premere delicatamente fino a quando l’apparecchio non si spegne. Provare questa
soluzione solo dopo aver prima tentato di riavviare il Keystone servendosi del tasto di alimentazione.
5. Ricevitore IR (anteriore): quando si utilizza il telecomando, puntarlo verso il ricevitore IR situato sulla
parte anteriore dell'altoparlante.
Nota bene: se il Keystone non è stato utilizzato per una settimana, il ricevitore IR si spegnerà per
risparmiare la batteria. A questo punto, il telecomando non comunicherà più con l'altoparlante.
Quando ciò accade, servirsi del tasto di accensione Power dell'altoparlante per accendere
l'apparecchio e abilitare nuovamente il ricevitore IR.
6. Pannello solare (parte superiore): una volta caricato a fondo, il pannello solare del Keystone
garantisce l'alimentazione adeguata a un utilizzo quotidiano tipo, senza la necessità di collegare
l'adattatore di ricarica. I risultati dipenderanno dal numero di ore in cui il Keystone è esposto alla luce
diretta del sole.
7. Dispositivo di montaggio (parte inferiore): inserire il supporto a parete a questo livello, quindi
stringere la vite Set per fissarvi l'altoparlante.
8. Manopola di fissaggio (retro): questa manopola serve a fissare il Keystone al supporto a parete.
Assicurarsi che sia ben stretta.
Telecomando
Importante: prima di utilizzare il telecomando per la prima volta, rimuovere la linguetta in plastica dallo
scomparto batterie per attivare la batteria stessa.
Quando si utilizza il telecomando, puntarlo verso il ricevitore IR situato sulla parte anteriore dell'altoparlante.
1. Tasto di alimentazione: premere questo tasto per accendere e spegnere
l’apparecchio.
2. Tasto Bluetooth: premere questo tasto per entrare in modalità di
collegamento Bluetooth.
3. Volume -/+: premere questi tasti per abbassare (-) o alzare (+) il volume.
4. Play/Pause: premere questo tasto per riprodurre o interrompere
momentaneamente la riproduzione di audio in streaming.
Suggerimento: tenere premuto questo tasto per 3 secondi per attivare (o
disattivare) i comandi vocali.
5. Prev: premere questo tasto per passare alla traccia precedente sul dispositivo.
Nota bene: in alcune app, la pressione del tasto Prev può far passare a
un'altra playlist o a un altro genere musicale.
6. Next: premere questo tasto per passare alla traccia successiva sul dispositivo.
Nota bene: in alcune app, la pressione del tasto Next può far passare a
un'altra playlist o a un altro genere musicale.
1
2
3
4
5
6
7
8
VOL .
12
3
4
56

19
Schnellstart-Anleitung (Deutsch)
Einführung
Lieferumfang
(2) Keystone-Lautsprecher
(2) Wandhalterungen
(2) Ladeadapter
(1) Fernbedienung
(8) 1,5” (38 mm) #10 Schrauben
Schnellstart-Anleitung
Sicherheitshinweise und Garantieinformationen
Kundendienst
Für aktuelledie neuesten Informationen zu diesem Produkt (Systemanforderungen, Informationen zur
Kompatibilität etc.) und zur Produktregistrierung besuchen Sie ionaudio.com.
Wiederaufladbare Batterien
Bei wiederaufladbaren Bleibatterien handelt es sich um die gleiche Art von Batterien, die in Autos
verwendet werden. Und wie bei Ihrer Autobatterie ist es auch für die Benutzungsdauer dieser
Batterie von äußerster Wichtigkeit, wie sie verwendet wird. Bei vorschriftsmäßigem Gebrauch und
richtiger Pflege kann eine Bleibatterie jahrelang halten. Lesen Sie die nachstehenden Empfehlungen,
um aus der eingebauten Batterie das Beste herauszuholen.
Allgemeine
Verwendung
Laden Sie den Akku vollständig auf, bevor Sie ihn verwenden.
Laden Sie den Akku nach jedem Gebrauch vollständig auf.
Aufbewahrung Lagern Sie das Produkt nie bei extrem warmen (mehr als 32°C / 90°F) oder
übermäßig kalten (weniger als 0°C / 32°F) Temperaturen, um die optimale
Langlebigkeit zu erzielen.
Sie können Ihr Sound-System angesteckt lassen. Der Akku wird dabei nicht
überladen.
Wenn Ihr Akku einen niedrigen Ladestand hat und Sie ihn 6 Monate lang nicht
aufladen, kann er dauerhaft an Kapazität verlieren.
Reparatur Wenn sich der Akku nicht aufladen lässt, kontaktieren Sie ION Audio über
ionaudio.com.
Entsorgung Bringen Sie das Gerät in ein Recyclingzentrum oder entsorgen Sie es
entsprechend lokaler Verordnungen.
Einsatz im Freien und Pflege des Produkts
Obwohl der Keystone wasserfest ist und Wasserspritzer vertragen kann, lesen Sie bitte die
folgenden Tipps für die optimale Performance Ihres Keystone:
• Bringen Sie Keystone bei extremen Wetterbedingungen ins Haus.
• Bitte platzieren Sie den Keystone nie in stehenden Gewässern.
• In einer nassen Umgebung schließen Sie bitte den Ladeadapter nicht an den Keystone an.
• Achtung: Bewahren Sie alle nicht wasserdichten Geräte (Handys, Musik-Player etc.) an einem
trockenen Ort auf, wo sie nicht von der Feuchtigkeit beeinträchtigt werden können und kein
Risiko durch Stromschläge besteht.
20
Schnelles Einrichten
Anschlussdiagramm
Teile, die nicht unter Einführung > Lieferumfang angegeben sind, sind separat erhältlich.
Montage
Keystone kann freistehend verwendet oder montiert werden. Durch die Gummifüße auf der
Lautsprecherunterseite kann Keystone bequem auf jeder ebenen Fläche freistehend aufgestellt werden. Um
Keystone mit der mitgelieferten Wandhalterung zu montieren, befolgen Sie die Anweisungen unten. Wenn
Sie das Solarpanel nutzen, um die Akkulaufzeit zu verlängern, stellen Sie Keystone an einen Ort, an dem das
Gerät mindestens 3 Stunden direkte Sonneneinstrahlung pro Tag erhält.
Um Keystone mit der mitgelieferten Wandhalterung zu verwenden, prüfen Sie zunächst den Montageort für
die Lautsprecher. Vergewissern Sie sich, dass die Oberfläche, auf der Sie Keystone montieren möchten, das
Gewicht des Lautsprechers (8,4 lbs. / 3,8 kg) sicher tragen kann. Wenn Sie sich nicht sicher sind, ob Sie
Keystone sicher an der gewünschten Position montieren können, konsultieren Sie bitte eine Fachkraft.
So montieren Sie die Wandhalterung:
1. Bringen Sie die Schrauben in die vier Löcher in der Wandhalterung ein. Ziehen Sie alle Schrauben fest,
so dass die Basis der Wandhalterung bündig mit der Oberfläche abschließt, bevor Sie die Lautsprecher
in die Halterung einsetzen. Verwenden Sie die mitgelieferten Schrauben nie für die Montage des
Keystone auf Oberflächen wie Beton oder Gipsplatten, da dies spezielle Werkzeuge und/oder Geräte
erfordert.
2. Lösen Sie die Feststellschraube, um den Winkel der Montagestütze einzustellen. Sobald der
gewünschte Winkel erreicht ist, ziehen Sie die Feststellschraube an, um sicherzustellen, dass die Zähne
komplett eingerastet sind.
3. Lösen Sie den Lautsprecherbefestigungsknopf auf der Rückseite des Keystone soweit, dass das Gerät
auf die Montagestütze gleiten kann.
4. Schieben Sie Keystone auf die Halterung, so dass die Montagestütze komplett in das Montageloch auf
der Unterseite des Lautsprechers eingeschoben ist. Achten Sie darauf, dass sie an keiner Seite
blockiert wird.
5. Ziehen Sie den Lautsprecherbefestigungsknopf an, um Keystone sicher an der Wand in der
gewünschten Drehausrichtung zu befestigen.
Seitenteil
Stromversorgung
Fernbedienung
Smartphone,
Tablet usw.
Wandhalterung
Bodenseite
VOL.

21
Bluetooth-Verbindung zum Keystone
1. Schalten Sie jeden Keystone ein, indem Sie Drücken ihre jeweiligen Ein-/Ausschalter. Sie
werden „Power On“ („Eingeschaltet“) als Bestätigung hören. *
2. Die Lautsprecher werden automatisch eine drahtlose Stereo-Sound-Verbindung
herstellen. Die Lautsprecher werden einander suchen, während Sie einen
intermittierenden Ton ausgeben. Sobald das Stereo-Paar erfolgreich verbunden ist, hören
Sie „Pairing successful, connected“ („Koppeln erfolgreich, Verbindung ist hergestellt“),
gefolgt von „Left channel“ („Linker Kanal“) und „Right channel“ („Rechter Kanal“) auf den
entsprechenden Lautsprechern. *
Wenn zwei Lautsprecher zum ersten Mal verbunden werden, kann dieser Vorgang bis zu
2 Minuten dauern. Lautsprecher, die zuvor verbunden wurden, werden in ein paar
Sekunden automatisch neu verbunden, wenn sie in Reichweite voneinander sind.
Hinweis: Keystones sollten sich innerhalb von 30 ft. (9 m) voneinander befinden, um eine
Verbindung korrekt herstellen zu können.
3. Wenn der Stereo-Link durch die durchgehend grün leuchtende LED bestätigt wird,
drücken Sie die Bluetooth-Verbindungstaste auf beiden Lautsprechern oder der
mitgelieferten Fernbedienung, um in den Bluetooth-Koppel-Modus zu gelangen.
Hinweis: Der linke Kanal wird der "Master"-Lautsprecher sein und das Gerät, von dem
die Bluetooth-Reichweite aus bestimmt wird.
4. Navigieren Sie auf Ihrem Bluetooth-Gerät in das Menü Bluetooth-Einstellungen, wählen
Keystone und stellen eine Verbindung her. Sobald die Bluetooth-Verbindung hergestellt
ist, wird die blaue LED durchgehend leuchten. Sie werden als Bestätigung „Connected“
(„Verbindung hergestellt“) hören. *
Hinweis: Wenn es zu Problemen bei der Verbindung kommt, wählen Sie am Bluetooth-
Gerät bei Keystone „Dieses Gerät ignorieren“ und versuchen es erneut.
5. Wenn Ihr Bluetooth-Gerät keine Verbindung mit dem Keystone herstellen kann, halten Sie
die Taste Bluetooth-Verbindung am Lautsprecher gedrückt, um frühere Bluetooth-
Verbindungen zu trennen und das Bluetooth-Modul zurückzusetzen.
* Tipp: Wenn Sie die Sprachanweisungen deaktivieren (oder aktivieren) möchten, halten Sie
die Wiedergabe/Pause-Taste auf der Fernbedienung 3 Sekunden lang gedrückt.
22
Funktionen
Seitenteil
1. Ladeadaptereingang: Stecken Sie den mitgelieferten
Ladeadapter hier an, um den Akku des Keystone aufzuladen.
Wichtig: Keystone sollte vor dem ersten Gebrauch für eine
maximale Akkulaufzeit voll aufgeladen werden.
2. Ein-/Ausschalter: Drücken Sie diese Taste, um den
Keystone einzuschalten. Halten Sie diese Taste gedrückt, um
den Einheit auszuschalten.
3. Bluetooth: Drücken Sie diese Taste, um in den Bluetooth-
Koppel-Modus zu gelangen. Halten Sie dies gedrückt, um ein
angeschlossenes Bluetooth-Gerät zu trennen.
Hinweis: Wenn Sie über Bluetooth verbunden sind, schaltet
sich Keystone automatisch nach 30 Minuten aus, wenn kein
Audiosignal wiedergeben wird.
4. Zurücksetzen: Wenn Ihr Keystone nicht ordnungsgemäß
funktioniert, schalten Sie das Gerät ab, indem Sie mit einer Büroklammer leicht in die Öffnung auf der
Seitenteil des Keystone drücken bis sich das Gerät ausschaltet. Bevor Sie dies tun, sollten Sie jedoch
versuchen, Ihren Keystone mit dem Ein-/Ausschalter auszuschalten und anschließend wieder
einzuschalten.
5. IR-Empfänger (Frontseite): Wenn Sie die Fernbedienung verwenden, richten Sie sie auf den IR-
Empfänger an der Frontseite des Lautsprechers.
Hinweis: Wenn Keystone eine Woche lang nicht verwendet wurde, schaltet sich der IR-Empfänger ab,
um den Akku zu schonen. Die Fernbedienung wird in diesem Fall nicht mehr mit dem Lautsprecher
kommunizieren. Wenn dies geschieht, verwenden Sie den Netzschalter des Lautsprechers, um das
Gerät einzuschalten und den IR-Empfänger wieder zu aktivieren.
6. Solarpanel (Oberseite): Sobald das Gerät einmal vollständig aufgeladen ist, liefert das Solarpanel des
Keystone genug Strom für den täglichen Gebrauch ohne den Ladeadapter anschließen zu müssen.
Dies variiert je nachdem, wie viele Stunden Keystone direkter Sonneneinstrahlung ausgesetzt wird.
7. Montagehalterung (Unterseite): Bringen Sie die Montagestütze hier ein und ziehen dann die
Stellschraube fest, um den Lautsprecher daran zu befestigen.
8. Befestigungsknopf (Rückseite): Dieser Knopf wird verwendet, um Keystone an der Montagestütze
zu befestigen. Stellen Sie sicher, dass er fest angezogen ist.
Fernbedienung
Wichtig: Bevor Sie die Fernbedienung zum ersten Mal verwenden, entfernen Sie
die Kunststofflasche aus dem Batteriefach, um die Batterie zu aktivieren.
Wenn Sie die Fernbedienung verwenden, richten Sie sie auf den IR-Empfänger an
der Frontseite des Lautsprechers.
1. Netzschalter: Mit dieser Taste schalten Sie das Gerät ein und aus.
2. Bluetooth-Taste: Drücken Sie diese Taste, um in den Bluetooth-Koppel-
Modus zu gelangen.
3. Lautstärke -/+: Mit diesen Tasten können Sie die Lautstärke verringern (-)
oder erhöhen (+).
4. Wiedergabe/Pause: Drücken Sie diese Taste, um das Audio-Streaming
wiederzugeben oder zu pausieren.
Tipp: Halten Sie diese Taste 3 Sekunden lang gedrückt, um die
Sprachanweisungen zu deaktivieren (oder zu aktivieren).
5. Zurück: Mit dieser Taste können Sie zum vorherigen Track auf Ihrem Gerät
springen.
Hinweis: In einigen Apps kann es sein, dass das Drücken von "Zurück" auf
eine andere Wiedergabeliste oder ein anderes Musik-Genre schaltet.
6. Weiter: Mit dieser Taste können Sie zum nächsten Track auf Ihrem Gerät springen.
Hinweis: In einigen Apps kann es sein, dass das Drücken von "Weiter" auf eine andere
Wiedergabeliste oder ein anderes Musik-Genre schaltet.
1
2
3
4
5
6
7
8
VOL .
12
3
4
56

23
Snelstartgids (Nederlands)
Introductie
Inhoud van de doos
(2) Keystone luidsprekers
(2) Muurbeugels
(2) Stroomadapter
(1) Afstandsbediening
(8) #10 schroeven van 38 mm
Snelstartgids
Veiligheids-en garantie handleiding
Ondersteuning
Voor de laatste informatie over dit product (systeemvereisten, compatibiliteitsinformatie, enz.) en
productregistratie, bezoek ionaudio.com.
Herlaadbare accu's
Oplaadbare loodzwavelzuuraccu's zijn van hetzelfde type dat gebruikt wordt in auto's. Zoals met de
accu van uw auto wordt de levensduur ervan in grote mate bepaald door uw gebruik ervan. Bij een
juist gebruik en behandeling kan een loodzwavelzuuraccu jaren meegaan. Hier zijn wat
aanbevelingen voor het zo lang mogelijk laten meegaan van de interne accu.
Algemeen
gebruik
Laad de accu voor gebruik volledig op.
Laad de accu na elk gebruik volledig op.
Opslag
V
oor een optimale levensduur mag u de accu niet in een te warme (meer dan
32°C / 90°F) of te koude omgeving (minder dan 0°C / 32°F) bewaren.
Uw geluidssysteem mag aangesloten blijven. Dat zal de accu niet overladen.
Als u het accuniveau laag houdt en 6 maanden lang niet herlaadt, dan kan zich
een permanent capaciteitsverlies voordoen.
Herstellen Als de accu niet wil opladen, neem dan contact op met ION Audio op
ionaudio.com.
Verwijdering Breng de accu naar een recyclagecentrum of verwijder hem conform de
plaatselijke wetgeving.
Gebruik buitenshuis en onderhoud
Hoewel de Keystone waterbestendig is en bestand is tegen opspattend water, vragen wij u toch de
tips hieronder te volgen voor optimale prestaties van uw Keystone:
• Breng de Keystone naar binnen bij slecht weer.
• De Keystone niet plaatsen in stilstaand water.
• Sluit in een natte omgeving de oplaadadapter niet aan op de Keystone.
• Waarschuwing: Bewaar alle apparaten die niet waterbestendig zijn (telefoons, muziekspelers,
enz.) op een droge plaats waar ze niet kunnen worden aangetast door water en een risico van
elektrische schokken kunnen veroorzaken.
24
Snelstart
Aansluitschema
Artikelen die niet zijn opgesomd in Introductie > Inhoud van de doos worden afzonderlijk verkocht.
Installatie
De Keystone mag zowel vrijstaand als opgehangen worden gebruikt. Bij vrijstaand gebruik zorgen de
rubberen luidsprekerpootjes ervoor dat de Keystone stevig op elk vlak oppervlak staat. Volg de instructies
hieronder om de Keystone op te hangen met de meegeleverde muurbeugels. Bij gebruik van het
zonnepaneel om de batterijduur tussen oplaadbeurten te verlengen, moet u voor een optimaal resultaat de
Keystone plaatsen op een plek die dagelijks minstens 3 uur rechtstreeks zonlicht ontvangt.
Wanneer u de Keystone gebruikt met de meegeleverde muurbeugel, moet u eerst de zone inspecteren waar
u de luidsprekers wilt installeren. Controleer of het oppervlak waar u de Keystone op monteert het gewicht
kan dragen van de luidspreker (3,8 kg). Als u er niet zeker van bent dat u de Keystone veilig kunt installeren
op de gewenste plaats, raadpleeg dan een professionele aannemer.
Installatie van de muurbeugel:
1. Steek schroeven in de 4 gaten op de montagesokkel. Draai alle schroeven stevig vast, zodat de
montagesokkel gelijkloopt met het oppervlak voor u de luidspreker op de beugel plaatst. De
meegeleverde schroeven niet gebruiken om de Keystone te monteren op oppervlakken als beton of
gipsplaten, aangezien hiervoor speciaal gereedschap en/of onderdelen nodig kunnen zijn.
2. Schroef de montageknop los om de hoek van de montagebeugel aan te passen. Schroef de
montageknop vast zodra de gewenste hoek is bereikt en controleer of de tandjes naar behoren in elkaar
grijpen.
3. Schroef de bevestigingsknop van de luidspreker op de achterkant van de Keystone voldoende los om
het apparaat op de montagebeugel te kunnen schuiven.
4. Schuif de Keystone op de montagebeugel, zodat de montagestijl volledig in de montageholte onderaan
de luidspreker is ingebracht. Voor een optimale werking: zorg ervoor dat hij langs alle kanten
obstakelvrij is.
5. Schroef de knop voor luidsprekerbevestiging vast om de Keystone stevig vast te maken op de
montagebeugel, met de gewenste rotatiehoek.
Zijpaneel
Afstandsbediening
Smartphone,
tablet, enz.
Voeding
Muurbeugels
Bodempaneel
VOL.

25
Verbinding over Bluetooth met Keystone
1. Zet op elke Keystone door op hun macht knoppen. U zult "Power On" horen als
bevestiging.*
2. De luidsprekers maken automatisch een draadloze verbinding voor stereogeluid. De
luidsprekers gaan naar elkaar op zoek terwijl met tussenpozen een geluidssignaal
weerklinkt. Zodra de koppeling van het stereopaar is geslaagd, hoort u "Pairing
succesful, connected" ("Koppeling geslaagd, verbonden"), gevolgd door "Left channel"
("Linkerkanaal") en "Right channel" ("Rechterkanaal") op de respectievelijke luidsprekers.
Bij een eerste keer dat 2 luidsprekers worden gekoppeld kan dit proces tot 2 minuten in
beslag nemen. Luidsprekers die al eerder waren gekoppeld zullen automatisch opnieuw
koppelen binnen enkele seconden nadat ze binnen elkaars bereik worden ingeschakeld.
Opmerking: Voor een goede koppeling moeten de Keystones zich binnen de 9 m (30 ft)
van elkaar bevinden.
3. Wanneer de stereoverbinding wordt bevestigd door een constant brandende groene led,
drukt u op de knop Bluetooth verbinden op een van de luidsprekers of de meegeleverde
afstandsbediening om de Bluetooth koppelingsmodus in te schakelen.
Opmerking: Het linkerkanaal is de 'master'-luidspreker en het apparaat van waar het
Bluetooth-bereik zal worden bepaald.
4. Navigeer op je Bluetooth-apparaat naar het menu Bluetooth-instellingen, zoek naar
Keystone en maak verbinding. Zodra er verbinding over Bluetooth is gemaakt, blijft de
blauwe led branden. U zult "Connected" horen als bevestiging.*
Opmerking: Als u problemen ondervindt bij het verbinden, selecteer dan "Dit apparaat
vergeten" ("Forget this device") voor Keystone op uw Bluetooth-apparaat en probeer
opnieuw verbinding te maken.
5. Als uw Bluetooth-apparaat geen verbinding kan maken met de Keystone, houd dan de
knop Bluetooth Verbinden op de luidspreker ingedrukt om de vorige Bluetooth-
verbindingen te verbreken en de Bluetooth-module opnieuw in te stellen.
* Tip: Als je de gesproken aanwijzingen wilt uitschakelen (of activeren), druk dan 3 seconden
lang de knop afspelen/pauzeren in.
26
Kenmerken
Zijpaneel
1. Ingang oplaadadapter: sluit hier de meegeleverde
oplaadadapter aan om de accu van de Keystone op te laden.
Belangrijk: De Keystone moet volledig opgeladen zijn voor
het eerste gebruik voor een maximale levensduur van de
batterijen.
2. Aan/uit: druk deze knop in om de Keystone aan te zetten.
Houd de knop om de eenheid uit te zetten.
3. Bluetooth: Druk op deze knop om de Bluetooth
koppelingsmodus te activeren. Druk op deze knop en houd
deze ingedrukt om de verbinding met een aangesloten
Bluetooth-apparaat te verbreken.
Opmerking: Bij een verbinding over Bluetooth, gaat de
Keystone na 30 automatisch uit als er geen audio wordt
afgespeeld.
4. Herinstellen: als de Keystone abnormaal werkt, zet dan het apparaat uit door een paperclip te
plaatsen in het Reset-gaatje zijpaneel de Keystone en zachtjes te duwen tot het apparaat uitgaat.
Probeer dit alleen nadat u eerst hebt geprobeerd om de Keystone met de aan/uitknop te heropstarten.
5. IR-ontvanger (Voorkant): Bij gebruik van de afstandsbediening: richt deze op de IR-ontvanger op de
voorkant van de luidspreker.
Opmerking: Als de Keystone een week lang niet is gebruikt, schakelt de IR-ontvanger zichzelf uit om
de batterij te sparen. Op dat moment is de communicatie tussen de afstandsbediening en de
luidspreker onderbroken. Als dat gebeurt, moet u de aan-/uitknop gebruiken om het apparaat aan te
zetten en de IR-ontvanger opnieuw te activeren.
6. Zonnepaneel (bovenkant): Eenmaal volledig opgeladen, kan het zonnepaneel van de Keystone
voldoende stroom leveren voor standaard dagelijks gebruik, zonder dat de luidspreker op de
oplaadadapter moet worden aangesloten. De resultaten zullen afhangen van het dagelijkse aantal uren
dat de Keystone aan rechtstreeks zonlicht is blootgesteld.
7. Bevestiging (onderkant): Plaats hier de montagestijl en schroef vervolgens de stelschroef vast om
de luidspreker er stevig aan vast te maken.
8. Bevestigingsknop (achterkant): Deze knop wordt gebruik om de Keystone te bevestigen aan de
montagestijl. Zorg ervoor dat deze naar behoren is vastgeschroefd.
Afstandsbediening
Belangrijk: Vooraleer de afstandsbediening voor het eerst te gebruiken, moet u het plastic lipje uit het
batterijvak verwijderen om de batterij te activeren.
Bij gebruik van de afstandsbediening: richt deze op de IR-ontvanger op de voorkant van de luidspreker.
1. Aan-/uitknop: Druk op deze knop om het apparaat aan en uit te zetten.
2. Bluetooth-knop: Druk op deze knop om de Bluetooth koppelingsmodus te
activeren.
3. Volume -/+: Druk op deze knoppen om het volume te verlagen (-) of verhogen
(+).
4. Afspelen/pauzeren: Druk op deze knop om de muziekstroom af te spelen of
te pauzeren.
Tip: Houd deze knop 3 seconden lang ingedrukt om de gesproken berichten
aan of uit te zetten.
5. Vorige: Druk op deze knop om naar het vorige nummer op uw apparaat te
gaan.
Opmerking: In sommige apps gaat de knop Vorige naar een andere playlist of
muziekgenre.
6. Volgende: Druk op deze knop om naar het volgende nummer op uw apparaat
te gaan.
Opmerking: In sommige apps gaat de knop Volgende naar een andere playlist of muziekgenre.
1
2
3
4
5
6
7
8
VOL .
12
3
4
56

27
Appendix (English)
Technical Specifications
Specifications are subject to change without notice.
Power Via power adapter or solar panel
Power adapter: 15 V DC, 2000 mA, center-positive
Solar panel: 1 W output
Batter
y
Built-in rechargeable 12 V lead-acid battery
Battery Life Up to 50 hours *
Recharge Time 8 hours with AC adapter; 120 hours with solar panel **
Speaker Output 80 W (40 W x 2)
Driver 4” woofer
1” tweeter
Frequency Response 70 Hz – 20 kHz
Water-resistant Class IPX4
Supported Bluetooth Profile A2DP
Bluetooth Range Up to 100 ft. / 30.5 m ***
Linked Stereo Range Up to 30 ft. / 9 m between 2 linked Keystones ***
Remote Control Range Up to 32.8 ft. / 10 m *** ****
Dimensions
(width x depth x height) 7.7" x 7.7" x 9.25"
19.5 cm x 19.5 cm x 23.5 cm
Weight 8.4 lbs.
3.8 kg
* Battery life may vary based on temperature, age, and volume usage of product.
** To determine if the Solar Panel is providing charge to the battery, press and hold the Bluetooth button on
the speaker (not on the remote) for 5 seconds. Once a tone is heard, release the button. If the tone
continues to play after release, then the solar panel is providing charge to the battery. If the tone does not
continue to play after release, the solar panel is not providing charge to the battery. To optimize solar
charge, expose panel to direct sunlight.
*** Available range is affected by walls, obstructions, and movement. For optimal performance, place the
product so it is unobstructed by walls, furniture, etc.
**** If the remote control sensor is exposed to direct sunlight, strong artificial light (like from an inverter-type
fluorescent lamp), or infrared light, the unit or remote control may not function properly.
Trademarks & Licenses
ION Audio is a trademark of ION Audio, LLC, registered in the U.S. and other countries.
The Bluetooth word mark and logos are owned by the Bluetooth SIG, Inc. and any use of such marks by
ION Audio is under license.
All other product or company names are trademarks or registered trademarks of their respective owners.
ionaudio.com
Manual Version 1.3
This device complies with Part 15 of the FCC Rules. Operation is subject to the following two
conditions: (1) this device may not cause harmful interference, and (2) this device must accept any
interference received, including interference that may cause undesired operation.
Changes or modifications not expressly approved by the party responsible for compliance could
void the user's authority to operate the equipment.
NOTE: This equipment has been tested and found to comply with the limits for a Class B digital
device, pursuant to Part 15 of the FCC Rules. These limits are designed to provide reasonable
protection against harmful interference in a residential installation. This equipment generates, uses
instructions, may cause harmful interference to radio communications. However, there is no
guarantee that interference will not occur in a particular installation. If this equipment does cause
harmful interference to radio or television reception, which can be determined by turning the
equipment off and on, the user is encouraged to try to correct the interference by one or more of
the following measures:
-- Reorient or relocate the receiving antenna.
-- Increase the separation between the equipment and receiver.
-- Connect the equipment into an outlet on a circuit different from that to which the receiver is
connected.
-- Consult the dealer or an experienced radio/TV technician for help.