ION Audio ISP69 Multicolor disc-shaped bluetooth speaker User Manual
ION Audio, LLC Multicolor disc-shaped bluetooth speaker
Contents
- 1. User manual
- 2. User manual part 1
User manual

Helios
Quickstart Guide English ( 2 – 6 )
Guía de inicio rápido Español ( 7 – 11 )
Guide d'utilisation rapide Français ( 12 – 16 )
Guida rapida Italiano ( 17 – 21 )
Schnellstart-Anleitung Deutsch ( 22 – 26 )
Snelstartgids Nederlands ( 27 – 31 )
Appendix English ( 32 – 35 )

2
Quickstart Guide (English)
Introduction
Box Contents
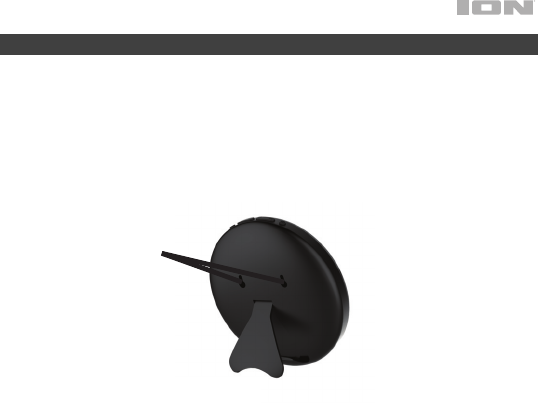
Helios
Micro-USB Cable
1/8” (3.5 mm) Stereo Aux Cable
Quickstart Guide
Support
For the latest information about this product (system requirements,
compatibility information, etc.) and product registration, visit ionaudio.com.
For complete warranty information, visit ionaudio.com/warranty.
3
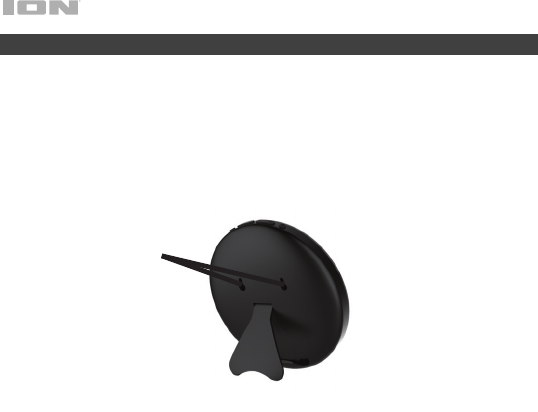
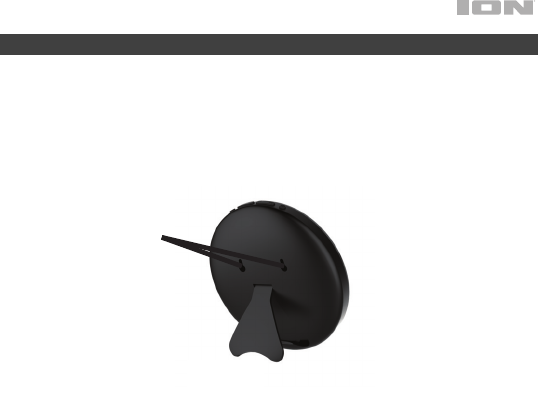
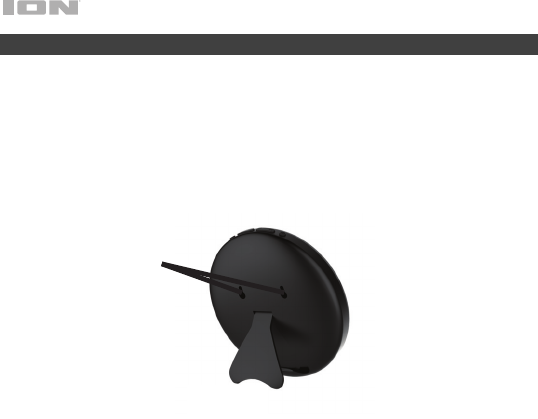
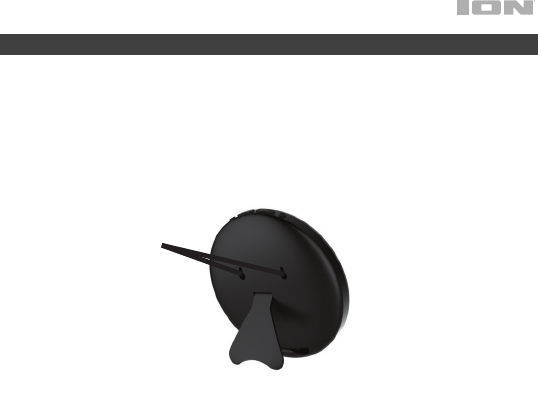
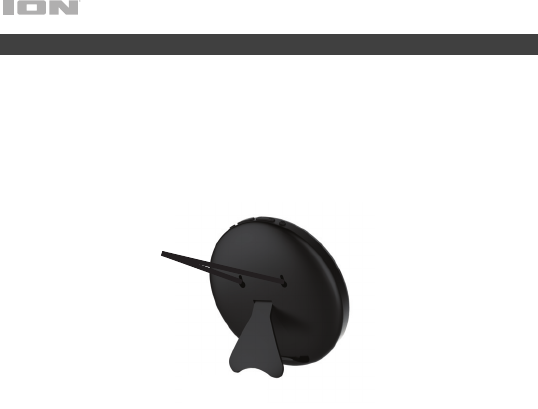
Quick Setup
Helios may be used freestanding or mounted. When used freestanding,
extend the kickstand on the back of the unit. The rubber foot on the
bottom of the speaker allows Helios to sit comfortable on any flat surface.
Helios can also be mounted to a wall using the keyhole slots on the back
of the unit.
Keyhole
Mounting
Slots
Kickstand
4
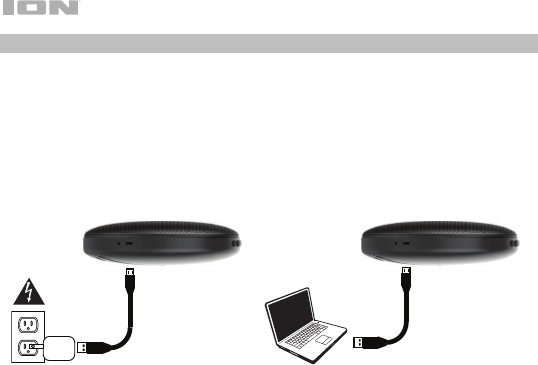
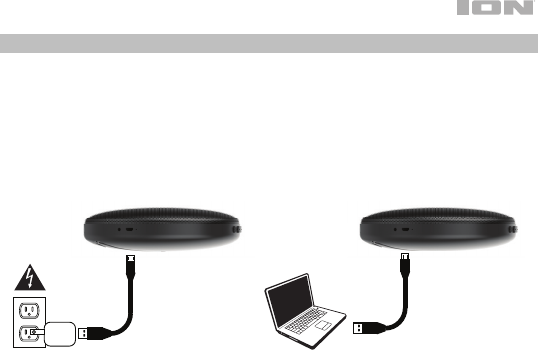
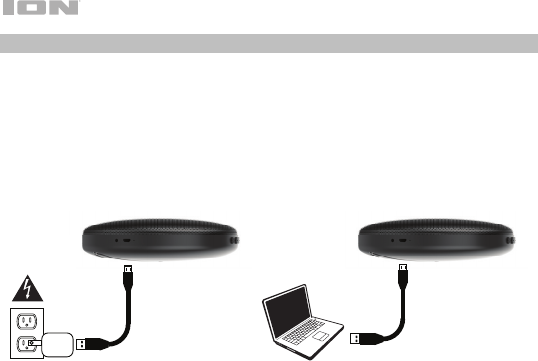
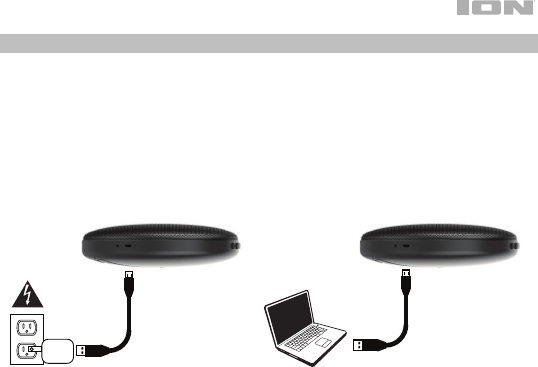
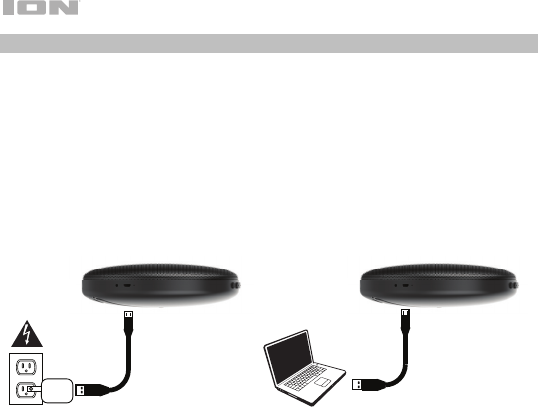
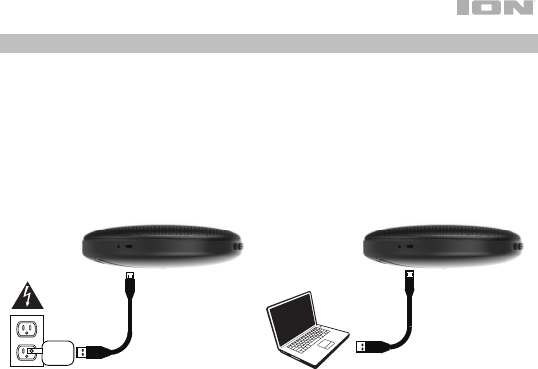
Charging Helios
If the LEDs appear dim, or if your music cuts out or fails to play, your
battery may require recharging.
Use the included micro-USB cable to connect Helios to (A) a USB power
adapter connected to a power outlet (not included), or (B) your computer
(powered on) for 5.5 hours.
(
A
)
(
B
)
5
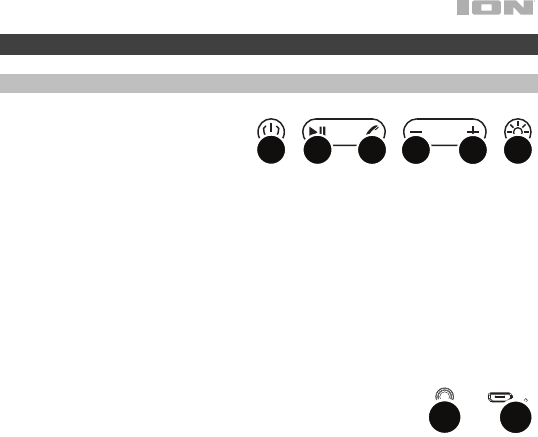
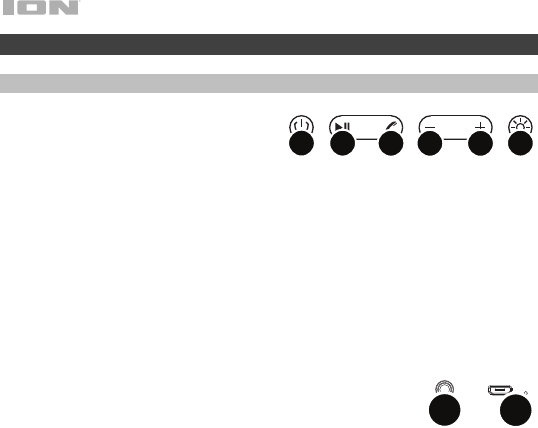
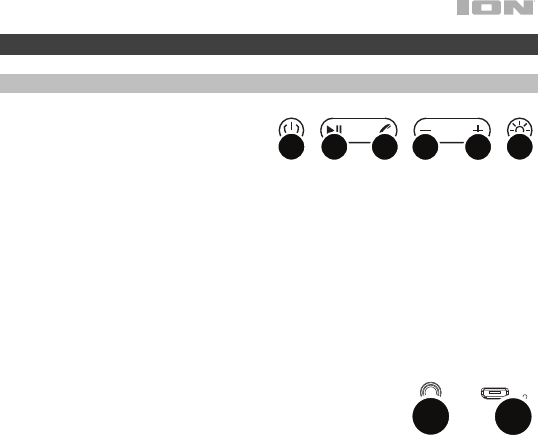
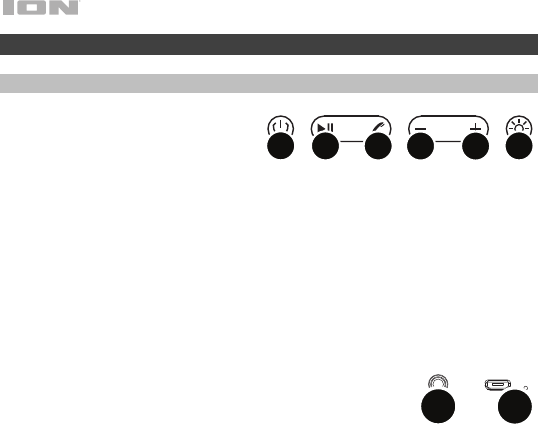
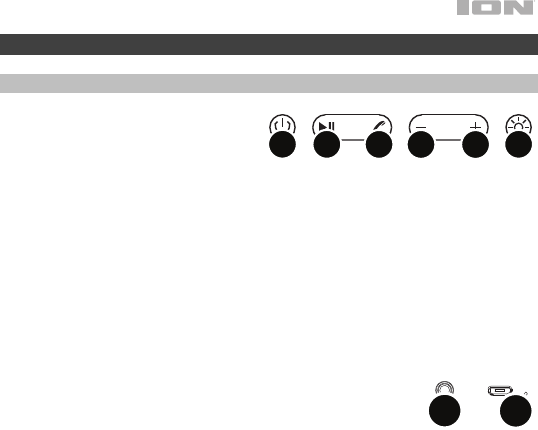
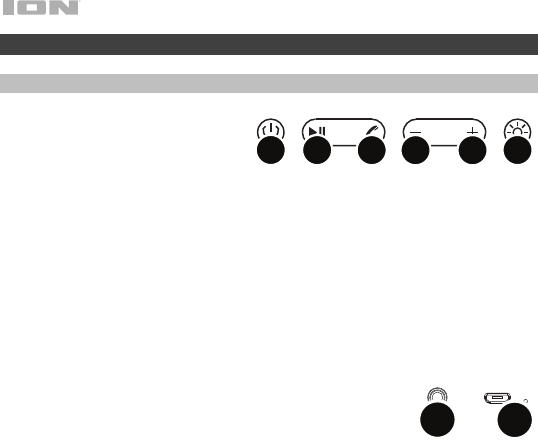
Features
Side Panel
1. Power: Hold this button to
power Helios on and off.
2. Play/Pause: Press this
button to start/pause music playback on a paired music device. Press
and hold this button for 2 seconds to disconnect Bluetooth.
3. Answer Call: Press this button to answer a call. To disconnect a
phone call, press and release the button.
4. –: Press this button to adjust the volume down.
5. +: Press this button to adjust the volume up.
6. Light Control: Press this button to switch between different LED
lighting modes. Press and hold this button for 2 seconds to enable
your connected smartphone's voice assistant (e.g. Siri®, Google®, etc).
This feature may not be compatible with all smartphones.
7. Micro-USB Port/Charging LED: Use the included
micro-USB cable to connect this port to a computer
USB port to charge Helios. The LED is solid red
when the battery is charging and turns off when the battery is fully
charged/no adapter is connected.
8. Auxiliary Input: This stereo 1/8” (3.5 mm) input can be used to
connect a smartphone, MP3 player, or other audio sources.
123456
7
8
6
Operation
Pairing a Bluetooth Device
1. Press and hold the Power button for 3 seconds to power on Helios.
2. Open Bluetooth settings on your music device (smartphone, tablet, etc.).
3. Connect to Helios.
Note: If your device requires a passcode or PIN, enter the number zero
(“0”) four times.
4. Play music and adjust the volume with the -/+ controls.
5. To disconnect the Bluetooth connection, hold the Play/Pause button for 2
seconds.
Answering Phone Calls
1. Press and release the Answer Call button.
2. Adjust the volume with the -/+ controls.
3. To disconnect a phone call, press and release the Answer Call button.
Standby Mode
Helios will power off after 15 minutes if no audio is playing and the LEDs are
not active.

7
Guía de inicio rápido (Español)
Introducción
Contenido de la caja
Helios
Cable micro-USB
Cable auxiliar estéreo de 3,5 mm (1/8 pulg.)
Guía de inicio rápido
Soporte
Para obtener la información más completa acerca de este product (los
requisitos del sistema, compatibilidad, etc) y registro del producto, visite
ionaudio.com.
Para obtener la información completa sobre la garantía, visite
ionaudio.com/warranty.
8
Instalación rápida
El Helios se puede utilizar apoyado o montado. Cuando lo utilice apoyado,
extienda el soporte de la parte trasera de la unidad. La pata de goma en la
parte inferior del altavoz le permite al Helios asentarse cómodamente en
cualquier superficie plana. El Helios también se puede montar contra una
pared utilizando las ranuras con forma de cerradura en la parte trasera de
la unidad.
Ranuras de
montaje con
forma de
cerradura
Soport
9
Cómo cargar el Helios
Si las LEDs se atenúan, o si la música se corta o no se reproduce, podría
ser necesario recargar la batería.
Use el cable micro-USB incluido para conectar el Helios a (A) un
adaptador de alimentación USB (no incluido) conectado a una toma de
corriente o (B) su ordenador (encendido) durante 5,5 horas.
(
A
)
(
B
)
10
Características
Panel lateral
1. Encendido: Mantenga pulsado este
botón para encender y apagar el
Helios.
2. Reproducir/Pausa: Pulse este botón para iniciar o poner en pausa la
reproducción de música en un dispositivo musical apareado. Mantega pulsado
este botón durante 2 segundos para desconectar el Bluetooth.
3. Atender llamadas: Pulse el botón para atender una llamada. Para finalizar una
llamada, pulse y suelte el botón.
4. –: Pulse este botón para disminuir el volumen.
5. +: Pulse este botón para aumentar el volumen.
6. Light Control (Control de luces): Pulse este botón para alternar entre los
diferentes modos de iluminación LED. Mantega pulsado este botón durante 2
segundos para activar el asistente de voz de su teléfono inteligente
(smartphone) conectado (por ej., Siri®, Google®, etc). Esta característica puede
no ser compatible con todos los teléfonos inteligentes.
7. Puerto de carga micro-USB/ LED de carga: Conecte el
cable micro-USB incluido para conectar el Helios a un
adaptador de alimentación USB conectado a su vez a una
toma de corriente o a su ordenador. Este LED se enciende
con luz roja permanente cuando se está cargando la batería y se apaga cuando
esta está totalmente cargada/no hay adaptadores conectados.
8. Entrada auxiliary: Esta entrada de 3,5 mm (1/8 pulg.) estéreo se puede usar
para conectar un smartphone, MP3 u otra fuente de audio.
123456
7
8
11
Funcionamiento
Cómo aparear un dispositivo Bluetooth
1. Mantenga pulsado el botón de encendido durante 3 segundos para
encender el Helios.
2. Abra la configuración Bluetooth en su dispositivo musical (teléfono
inteligente, tableta, etc.).
3. Conéctelo al Helios.
Nota: Si su dispositivo solicita un código de contraseña o PIN, ingrese el
número ("0") cuatro veces.
4. Reproduzca la música y ajuste el botónes de volumen -/+ del Helios.
5. Para desconectar la conexión Bluetooth, mantenga pulsado el botón de
reproducir/pausa durante 2 segundos.
Cómo contester llamadas
1. Pulse y suelte el botón atender-llamada.
2. Ajuste el volumen con los controles -/+.
3. Para finalizar una llamada, pulse y suelte el botón atender-llamada.
Modo de espera
El Helios se apagará tras 15 minutos sin reproducir ningún audio y sin ninguna
actividad en los LED.

12
Guide d'utilisation rapide (Français)
Présentation
Contenu de la boîte Assistance
Helios Pour les dernières informations concernant ce produit (la
configuration système minimale requise, la compatibilité,
etc) et l'enregistrement du produit, veuillez visitez le site
ionaudio.com.
Pour obtenir toutes les informations relatives à la
garantie, veuillez visiter le site ionaudio.com/warranty.
Câble micro-USB
Câble auxiliaire stéréo
3,5 mm
Guide d'utilisation rapide
Pour les modèles Canadiens :
• Le présent appareil est conforme aux CNR d’Industrie Canada applicables aux appareils radio exempts de
licence. L’exploitation est autorisée aux deux conditions suivantes : (1) l’appareil ne doit pas produire de
brouillage, et (2) l’utilisateur de l’appareil doit accepter tout brouillage radioélectrique subi, même si le
brouillage est susceptible d’en compromettre le fonctionnement.
• Conformément à la réglementation d'Industrie Canada, le présent émetteur radio peut fonctionner avec
une antenne d'un type et d'un gain maximal (ou inférieur) approuvé pour l'émetteur par Industrie
Canada. Dans le but de réduire les risques de brouillage radioélectrique à l'intention des autres
utilisateurs, il faut choisir le type d'antenne et son gain de sorte que la puissance isotrope rayonnée
équivalente (p.i.r.e.) ne dépasse pas l'intensité nécessaire à l'établissement d'une communication
satisfaisante.
• Le présent émetteur radio (identifier le dispositif par son numéro de certification ou son numéro de
modèle s'il fait partie du matériel de catégorie I) a été approuvé par Industrie Canada pour fonctionner
avec les types d'antenne énumérés ci-dessous et ayant un gain admissible maximal et l'impédance
requise pour chaque type d'antenne. Les types d'antenne non inclus dans cette liste, ou dont le gain est
supérieur au gain maximal indiqué, sont strictement interdits pour l'exploitation de l'émetteur.
• Cet appareil n’excede pas les limites de la Classe B pour les émissions des fréquences radio à partir
d’un appareil numérique établit par le Ministère des communications.
13
Démarrage rapide
L’enceinte Helios peut être posée sur table, par terre, ou montée au mur.
Pour la déposer sur une surface plane, déployez la béquille à l’arrière de
l’enceinte. Le pied en caoutchouc de l’enceinte permet de la poser sur
n'importe quelle surface plane. Vous pouvez également monter l’enceinte
Helios sur un mur en utilisant les orifices de montage arrière.
Orifices de
montage
Béquille
14
Rechargement de la batterie du Helios
Si les DEL apparaissent faibles, ou si la musique coupe ou ne joue pas, il
peut être nécessaire de recharger la batterie.
Utilisez le câble micro-USB inclus afin de brancher le Helios à (A) un
adaptateur d’alimentation USB (non inclus) branché à une prise secteur,
ou (B) à un ordinateur (sous tension) pendant 5,5 heures.
(
A
)
(
B
)
15
Caractéristiques
Panneau latéral
1. Touche d’alimentation : Maintenez
cette touche enfoncée afin de
mettre le Helios sous et hors
tension.
2. Lecture/pause : Cette touche permet de lancer la lecture ou de pauser la
musique sur l’appareil jumelé. Maintenez cette touche enfoncée pendant 2
secondes afin de supprimer la connexion Bluetooth.
3. D’appel-réponse : Appuyez sur la touche pour répondre à un appel. Enfoncez
puis relâchez la d'appel-réponse touche afin de mettre fin à un appel.
4. – : Utilisez cette touche pour diminuer le volume.
5. + : Utilisez cette touche pour augmenter le volume.
6. Mode d’éclairage : Cette touche permet de permuter entre les différents modes
d’éclairage DEL. Maintenez cette touche enfoncée pendant 2 secondes afin
d'activer l’assistant vocal de votre smartphone (Siri®, Google®, etc.). Cette
fonctionnalité peut ne pas être compatible avec tous les smartphones.
7. Port de rechargement micro-USB / DEL de
rechargement : Utilisez le câble micro-USB inclus afin
de brancher le Helios à un adaptateur d’alimentation USB
branché à une prise secteur ou à un ordinateur. Cette
DEL devient rouge lorsque la batterie est en rechargement et s'éteint lorsqu’elle
est entièrement rechargée ou lorsque l’adaptateur n’est pas branché.
8. Entrée auxiliaire : Cette entrée stéréo 3,5 mm (1/8 po) permettent de brancher
un lecteur de téléphone, un lecteur MP3 ou autres sources audio.
123456
7
8

16
Fonctionnement
Jumelage d'un appareil Bluetooth
1. Maintenez la touche d’alimentation enfoncée pendant 3 secondes afin de
mettre le Helios sous tension.
2. Accédez aux paramètres Bluetooth de votre lecteur de musique (smartphone,
tablette, etc.).
3. Connectez-le au Helios.
Remarque : Si votre appareil vous demande un mot de passe ou un NIP,
saisissez le numéro zéro (« 0 ») quatre fois.
4. Faites jouer de la musique et réglez la boutons volume -/+ du Helios.
5. Maintenez enfoncée la touche de d'appel-réponse pendant 2 secondes afin de
supprimer la connexion à l’appareil Bluetooth.
Répondre à un appel
1. Enfoncez puis relâchez la touche de d'appel-réponse.
2. Réglez le volume avec les commandes de volume -/+.
3. Enfoncez puis relâchez la touche de d'appel-réponse afin de mettre fin à un
appel.
Mode veille
L’enceinte Helios se met automatiquement hors tension lorsqu’aucun signal audio ne
joue et que les DEL sont éteintes durant plus de 15 minutes.

17
Guida rapida (Italiano)
Introduzione
Contenuti della confezione
Helios
Cavo micro-USB
Cavo aux stereo da 3,5 mm
Guida rapida
Assistenza
Per conoscere le ultime informazioni in merito a questo prodotto (i requisiti
di sistema complete, compatibilità, ecc) e per la registrazione del prodotto,
recarsi alla pagina ionaudio.com.
Per informazioni complete in merito alla garanzia, recarsi alla pagina
ionaudio.com/warranty.
18
Inizio rapido
Helios può essere utilizzato in via indipendente o installato. Quando si
utilizza in via indipendente, allungare il supporto sul retro dell'apparecchio.
Il piedino in gomma posto sul fondo dell'altoparlante consente all'Helios di
essere collocato comodamente su qualsiasi superficie uniforme. Helios
può anche essere montato a parete servendosi dei fori presenti sul retro
dell'apparecchio.
Fori di
montaggio
Cavallett
19
Ricarica del Helios
Se le LED appaiono offuscate o la musica salta o non suona, la batteria
deve essere ricaricata.
Servirsi del cavo micro-USB in dotazione per collegare il Helios a (A) un
adattatore di alimentazione USB (non in dotazione) collegato a una presa
elettrica o (B) al computer (acceso) per 5,5 ore.
(
A
)
(
B
)
20
Caratteristiche
Pannello laterale
1. Power: Tenere premuto questo
tasto per accendere e spegnare il
Helios.
2. Play/Pause: Premere questo pulsante per avviare/interrompere
momentaneamente la riproduzione della musica da un dispositivo accoppiato.
Tenere premuto questo tasto per 2 secondi per disattivare il Bluetooth.
3. Tasto di resposta: Premere il per rispondere a una chiamata telefonica. Per
scollegare una chiamata, premere e rilasciare il tasto.
4. –: premere questo tasto per abbassare il volume.
5. +: premere questo tasto per alzare il volume.
6. Controllo delle luci: premere questo tasto per commutare tra le diverse
modalità di illuminazione a LED. Tenere premuto questo tasto per 2 secondi per
abilitare l'assistente vocale dello smartphone collegato (ad es. Siri®, Google®,
ecc). Questa funzione potrebbe non essere compatibile con tutti gli smartphone.
7. Porta di ricarica micro-USB/LED di ricarica: Collegare il
cavo micro-USB in dotazione per collegare il Helios ad un
adattatore di alimentazione USB collegato ad una presa
elettrica o al computer. Questo LED è di colore rosso fisso
quando la batteria è in carica e si spegne quando la carica è completa o quando
non è collegato alcun adattatore.
8. Ingresso ausiliario: questo ingresso stereo da 3,5 mm (1/8”) può essere
utilizzato per collegare un smartphone, un lettore MP3 o altre sorgenti audio.
123456
7
8

21
Uso
Allineamento di un dispositivo Bluetooth
1. Premere e tenere premuto il tasto Power per 3 secondi per accendere il
Helios.
2. Aprire le impostazioni Bluetooth sul dispositivo musicale (smartphone,
tablet, ecc.).
3. Collegarlo allo Helios.
Nota: Se il dispositivo chiede un codice o PIN, inserire il numero zero ("0")
quattro volte.
4. Suonare la musica e regolare il volume pulsanti -/+ del Helios.
5. Per annullare il collegamento Bluetooth, tenere premuto il tasto
Play/Pause per 2 secondi.
Come rispondere alle telefonate
1. Premere e rilasciare il tasto di resposta.
2. Regolare il volume servendosi dei comandi volume -/+.
3. Per scollegare una chiamata, premere e rilasciare il tasto di resposta.
Modalità Standby
Helios si spegnerà dopo 15 minuti se non viene riprodotto alcun audio e i LED
non sono attivi.
22
Schnellstart-Anleitung (Deutsch)
Einführung
Lieferumfang
Helios
Micro-USB-Kabel
3,5 mm Stereo Aux-Kabel
Schnellstart-Anleitung
Kundendienst
Für aktuelledie neuesten Informationen zu diesem Produkt (System-
Anforderungen, Informationen zur Kompatibilität etc.) und zur Produkt-
Registrierung besuchen Sie ionaudio.com.
Für komplette Garantieinformationen, besuchen Sie ionaudio.com/warranty.
Allgemeinhinweis zur Konformitätserklärung: Hiermit erklären wir, daß sich dieses
Gerät in Übereinstimmung mit den grundlegenden Anforderungen der europäischen
Richtlinie 1999/5/EG befindet. Die vollständige EG Konformitätserklärung kann unter
folgender Adresse angefordert werden:
inMusic GmbH
Harkortstr. 12 - 32
40880 Ratingen
GERMANY
23
Schnelles Einrichten
Helios kann freistehend verwendet oder montiert werden. Wenn Sie das
Gerät freistehend verwenden, klappen Sie den Ständer an der Rückseite
heraus. Der Gummifuß an der Lautsprecherunterseite sorgt dafür, dass
Helios bequem auf jede ebene Fläche gestellt werden kann. Helios kann
mithilfe der Montagelöcher an der Geräterückseite auch an der Wand
montiert werden.
Montagelöcher
Ständer
24
Aufladen des Helios
Wenn die LEDs schwach erscheinen oder die Musikwiedergabe ausfällt
oder überhaupt nicht mehr funktioniert, muss wahrscheinlich der Akku
aufgeladen werden.
Verwenden Sie das mitgelieferte Micro-USB-Kabel, um den Helios (A) mit
einem USB-Netzteil (nicht im Lieferumfang enthalten), das in einer
Steckdose eingesteckt ist oder (B) mit Ihrem (eingeschalteten) Computer
für einen Zeitraum von 5,5 Stunden zu verbinden.
(
A
)
(
B
)
25
Funktionen
Seitenteil
1. Ein-/Ausschalter: Halten Sie
diese Taste gedrückt, um den
Helios ein- und auszuschalten.
2. Wiedergabe/Pause: Drücken Sie diese Taste, um die Musikwiedergabe auf
einem gekoppelten Musik-Player zu starten bzw. zu pausieren. Halten Sie diese
Taste 2 Sekunden lang gedrückt, um die Bluetooth-Verbindung zu trennen.
3. Ruftaste: Drücken Sie zum einen Anruf entgegen. Um einen Anruf zu trennen,
drücken Sie die Taste.
4. -: Drücken Sie diese Taste, um die Lautstärke zu reduzieren.
5. +: Drücken Sie diese Taste, um die Lautstärke zu erhöhen.
6. Lichteinstellungen: Drücken Sie diese Taste, um zwischen verschiedenen LED-
Lichtmodi zu wechseln. Halten Sie diese Taste 2 Sekunden lang gedrückt, um
den Assistenten Ihres angeschlossenen Smartphones (z.B. Siri®, Google® usw.)
zu aktivieren. Diese Funktion ist möglicherweise nicht mit allen Smartphones
kompatibel.
7. Micro-USB-Ladeanschluss/Lade-LED: Stecken Sie hier
das mitgelieferte micro-USB-Kabel ein, um den Helios mit
Ihrem Computer zu verbinden oder mit einem USB-Netzteil
zu verbinden, das in eine Steckdose gesteckt wird. Diese
LED leuchtet rot, wenn der Akku aufgeladen wird und erlischt, wenn der Akku
vollständig geladen ist/kein Adapter angeschlossen ist.
8. Aux-Eingang: Dieser 3,5 mm-Stereo-Eingang kann dazu verwendet werden,
smartphone, einen MP3-Player oder eine andere Audio-Quelle anzuschließen.
123456
7
8

26
Betrieb
Koppeln eines Bluetooth-geräts
1. Halten Sie den Ein-/Ausschalter 3 Sekunden lang gedrückt, um Helios
einzuschalten.
2. Öffnen Sie die Bluetooth-Einstellungen auf Ihrem Musikgerät (Smartphone,
Tablet etc.).
3. Stellen Sie eine Verbindung zum Helios her.
Hinweis: Wenn Ihr Gerät nach einem Passwort oder einer PIN fragt, geben Sie
viermal die Zahl Null ("0") ein.
4. Spielen Sie Ihre Musik und stellen den Lautstärkeregler -/+ am Helios Rocker
nach Wunsch ein.
5. Um die Bluetooth-Verbindung zu trennen, halten Sie die Taste
Wiedergabe/Pause 2 Sekunden lang gedrückt.
Anrufe entgegennehmen
1. Drücken Sie die Ruftatse entgegennehmen.
2. Stellen Sie die Lautstärke mit den Lautstärkereglern -/+.
3. Um einen Anruf zu trennen, drücken Sie die Ruftaste entgegennehmen.
Standby-Modus
Helios schaltet sich nach 15 Minuten aus, wenn keine Musik gespielt wird und die
LEDs nicht aktiv sind.

27
Snelstartgids (Nederlands)
Introductie
Inhoud van de doos
Helios
Micro-USB kabel
Stereo aux-kabel van 3,5 mm
Snelstartgids
Ondersteuning
Voor de laatste informatie over dit product (systeemvereisten,
compatibiliteitsinformatie, enz.) en productregistratie, bezoek ionaudio.com.
Voor technische ondersteuning, bezoek ionaudio.com/warranty.
28
Snelstart
De Helios mag zowel vrijstaand als opgehangen worden gebruikt. Bij
vrijstaand gebruik de kickstand achteraan het apparaat uittrekken. Het
rubberen voetje onderaan de luidspreker zorgt ervoor dat de Helios stevig
op elk vlak oppervlak staat. De Helios kan ook op een muur worden
gemonteerd met behulp van de sleutelgaten achteraan het apparaat.
Montagegaten
Staander
29
Helios opladen
Als de LED's een zwak licht lijken te geven of als de muziek uitvalt of niet
wilt afspelen, moet de accu mogelijk worden opgeladen.
Gebruik de meegeleverde micro-USB-kabel om Helios gedurende 5,5 uur
te verbinden met (A) een USB-stroomadapter (niet meegeleverd),
aangesloten op een stopcontact, of (B) uw pc (ingeschakeld).
(
A
)
(
B
)
30
Kenmerken
Zijpaneel
1. Aan/uit: druk deze knop in om
de Helios aan en uit te zetten.
2. Afspelen/pauzeren: Druk op
deze knop om op een gekoppeld muziekapparaat het afspelen van muziek te
starten/pauzeren. Druk lang indrukken op deze knop 2 seconden om de
Bluetooth-verbinding te verbreken.
3. Bellen-beantwoorden: Druk op deze knop om een oproep te beantwoorden.
Druk de knop in om een oproep af te breken.
4. -: Druk op deze knop om het volume zachter te zetten.
5. +: Druk op deze knop om het volume harder te zetten.
6. Lichtregeling: Druk op deze knop om te schakelen tussen de verschillende led-
modi. Druk lang indrukken op deze knop 2 seconden om de stemassistent van
uw smartphone te activeren (bv. Siri®, Google®, enz.). Deze functie is mogelijk
niet compatibel met alle smartphones.
7. Oplaadpoort met Micro-USB-ingang/Oplaad-LED:
Gebruik de meegeleverde micro-USB-kabel om Helios te
verbinden met een stopcontact, of uw pc. Deze LED gaat
rood branden wanneer de accu aan het opladen is en gaat
uit wanneer de accu volledig is opgeladen / er geen adapter is aangesloten.
8. Aux-ingang: Sluit op deze stereo 3,5 mm (1/8”)-ingang een mediaspeler,
smartphone of andere geluidsbron aan.
123456
7
8
31
Werking
Een Bluetooth-apparaat koppelen
1. Druk en houd de aan/uit-knop 3 seconden lang ingedrukt om de Helios
aan te zetten.
2. Open de Bluetooth-instellingen op uw muziekapparaat (smartphone,
tablet, enz.)
3. Maak verbinding met de Helios.
Opmerking: Als uw apparaat een wachtwoordcode of pincode vereist,
voer dan vier keer het nummer nul ('0') in.
4. Speel muziek af en Pas de volumeknop -/+ Helios aan.
5. Houd de knop Afspelen/Pauzeren 2 seconden lang ingedrukt om de
Bluetooth-verbinding te verbreken.
Een oproep beantwoorden
1. De knop Bellen-beantwoorden indrukken en loslaten.
2. Regel het volume met de bedieningsknop Volume -/+.
3. Druk de knop Bellen-beantwoorden in om een oproep af te breken.
Standby-modus:
De Helios gaat automatisch uit na 15 minuten als geen audio wordt afgespeeld
en de leds niet actief zijn.
32
Appendix (English)
Technical Specifications
Output Power 6W (2 x 3W peak)
Drivers 2 1.5” woofers
Supported Bluetooth Profile A2DP
Bluetooth Range Up to 100 feet / 30.5 meters *
Battery Battery life: ** Up to 7.5 hours
(LEDs only, no audio)
Up to 5.5 hours
(LEDs and audio at 50% volume)
Recharge time: 5.5 hours
Power Micro USB port for charging (power adapter sold separately).
You may use your tablet's/smartphone's 5V DC, 500mA USB
power adapter.
Dimensions
(width x depth x height) 6.93" x 6.93" x 1.69"
176 mm x 176 mm x 43 mm
Weight 1.04 lbs.
0.47 kg
Specifications are subject to change without notice.
* Bluetooth range is affected by walls, obstructions, and movement. For optimal performance,
place the product in the center of the room so it is unobstructed by walls, furniture, etc.
** Battery life may vary based on temperature, age, and volume usage of product.

33
Trademarks & Licenses
ION Audio is a trademark of ION Audio, LLC, registered in the U.S. and other countries. The
Bluetooth word mark and logos are owned by the Bluetooth SIG, Inc. and any use of such marks
by ION Audio is under license. Google is a registered trademark of Google Inc. Siri is a trademark
of Apple Inc., registered in the U.S. and other countries. All other product names, company names,
trademarks, or trade names are those of their respective owners.
Safety Notices
Read and follow these instructions, heed all warnings, and keep these instructions in a safe place
for future reference. Do not use this apparatus near water. This product should be kept away from
direct contact with liquids. The apparatus shall not be exposed to dripping or splashing and that no
objects filled with liquids, such as vases, shall be placed on the apparatus. Clean only with dry
cloth. Refer all servicing to qualified service personnel. Servicing is required when the apparatus
has been damaged in any way, such as power-supply cord or plug is damaged, liquid has been
spilled or objects have fallen into the apparatus, the apparatus has been exposed to rain or
moisture, does not operate normally, or has been dropped.
Notice Concerning FCC Regulations: You are cautioned that changes or modifications not
expressly approved by the part responsible for compliance could void the user’s authority to
operate the equipment. This equipment has been tested and found to comply with the limits for a
Class B digital device, pursuant to Part 15 of the FCC rules. These limits are designed to provide
reasonable protection against harmful interference in a residential installation. This equipment
generates uses and can radiate radio frequency energy and, if not installed and used in accordance
with the instructions, may cause harmful interference to radio communications. However, there is
no guarantee that interference will not occur in a particular installation. If this equipment does
cause harmful interference to radio or television reception, which can be determined by turning the
equipment off and on, the user is encouraged to try to correct the interference by one or more of
the following measures: (a) reorient or relocate the receiving antenna; (b) move this unit; (c)
increase the separation between the equipment and receiver; (d) connect the equipment into an
outlet on a circuit different from that to which the receiver is connected; (e) be sure that all cables
are properly shielded, using a choke or ferrite where appropriate; (f) consult the dealer or an
experienced radio/television technician for help.

34
This device complies with Part 15 of the FCC rules. Operation is subject to the
following two conditions: (1) this device may not cause harmful interference, and (2)
this device must accept any interference received, including interference that may
cause undesired operation.
FCC RF Radiation Exposure Statement: This equipment complies with FCC radiation exposure
limits set forth for an uncontrolled environment. End users must follow the specific operating
instructions for satisfying RF exposure compliance. This transmitter must not be co-located or
operating in conjunction with any other antenna or transmitter.
In an environment with radio frequency interference, the unit may malfunction and resume normal
operation after removal of the interference. For best audio quality, avoid using this device in a high
RF-radiated environment.
For Canadian models:
• This device complies with Industry Canada licence-exempt RSSs. Operation is subject to the
following two conditions: (1) this device may not cause interference, and (2) this device must
accept any interference, including interference that may cause undesired operation of the device.
• Under Industry Canada regulations, this radio transmitter may only operate using an antenna
of a type and maximum (or lesser) gain approved for the transmitter by Industry Canada. To
reduce potential radio interference to other users, the antenna type and its gain should be so
chosen that the equivalent isotropically radiated power (e.i.r.p.) is not more than that
necessary for successful communication.
• This radio transmitter (identify the device by certification number, or model number if Category
II) has been approved by Industry Canada to operate with the antenna types listed below with
the maximum permissible gain and required antenna impedance for each antenna type
indicated. Antenna types not included in this list, having a gain greater than the maximum gain
indicated for that type, are strictly prohibited for use with this device.
• This unit does not exceed the Class B limits for radio noise emission from digital apparatus
set out in the radio interference regulations of the Canadian Department of Communications.
35
Caution: Danger of explosion if battery is incorrectly replaced. Replace only with the same or
equivalent type. Batteries (a battery pack or an installed battery) shall not be exposed to excessive
heat such as sunshine, fire, etc.
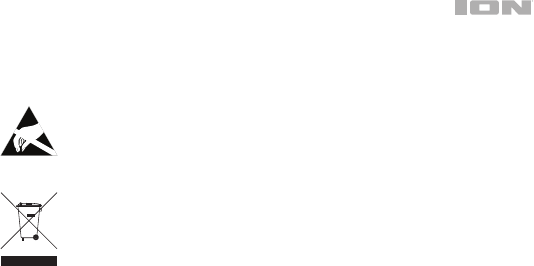
ESD/EFT Warning: This unit may contain a microcomputer for signal processing and
control functions. In very rare situations, severe interference, noise from an external
source, or static electricity may cause it to lock up. In the unlikely event that this should
happen, turn off the unit, wait at least five seconds, and then turn it back on again.
Correct Disposal of This Product: This marking indicates that this product should not
be disposed with other household wastes throughout the EU. To prevent possible harm
to the environment or human health from uncontrolled waste disposal, recycle it
responsibly to promote the sustainable reuse of material resources. To return your used
device, please use the return and collection systems or contact the retailer where the
product was purchased. They can take this product for environmentally safe recycling.
California Proposition 65 Warning: This product may contain chemicals known to the State of
California to cause cancer and birth defects or other reproductive harm. (California law requires this
warning to be given to customers in the State of California.)
ionaudio.com
Manual Version 1.0