ION Audio ISP90 Wireless Outdoor/Indoor Stereo Speakers User Manual
ION Audio, LLC Wireless Outdoor/Indoor Stereo Speakers
User manual

Insta Sound™
Quickstart Guide English ( 3 – 6 )
Guía de inicio rápido Español ( 7 – 10 )
Guide d’utilisation rapide Français ( 11 – 14 )
Guida rapida Italiano ( 15 – 18 )
Schnellstart-Anleitung Deutsch ( 19 – 22 )
Snelstartgids Nederlands ( 23 – 26 )
Appendix English ( 27 )

2
3
Quickstart Guide (English)
Introduction
Thank you for purchasing the Insta Sound. At ION, your entertainment is as important to us as
it is to you. That’s why we design our products with one thing in mind—to make your life more
fun and more convenient.
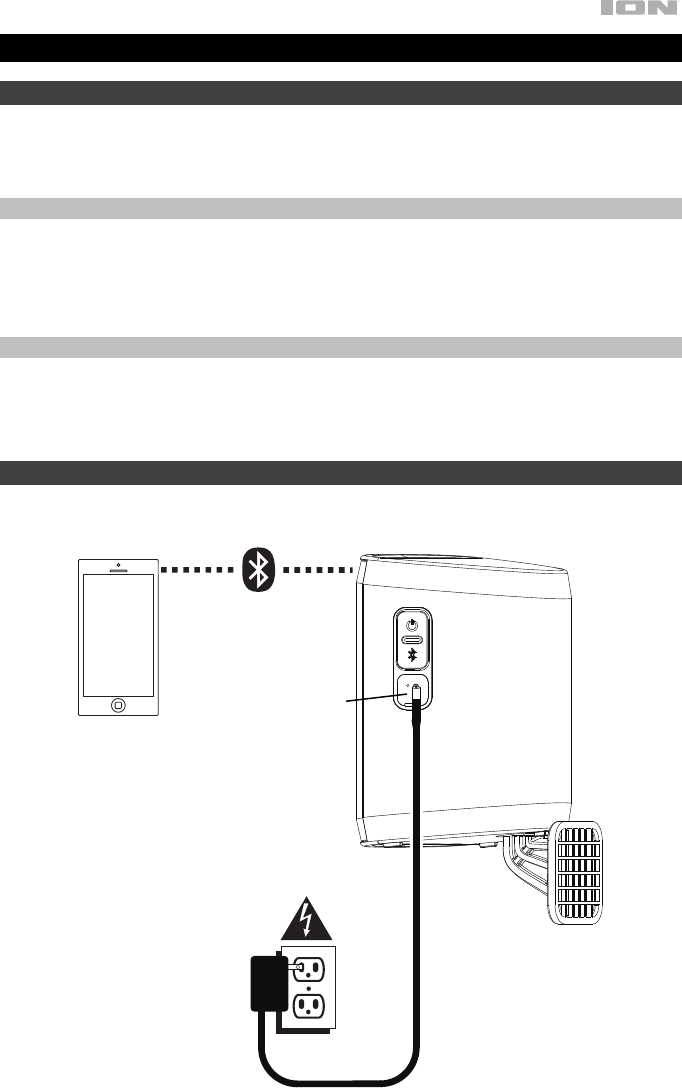
Box Contents
(2) Insta Sound Speakers (8) Screws
(2) Wall Mounts Quickstart Guide
(2) Charging Adapters Safety & Warranty Manual
Support
For the latest information about this product (documentation, technical specifications, system
requirements, compatibility information, etc.) and product registration, visit ionaudio.com.
For additional product support, visit ionaudio.com/support.
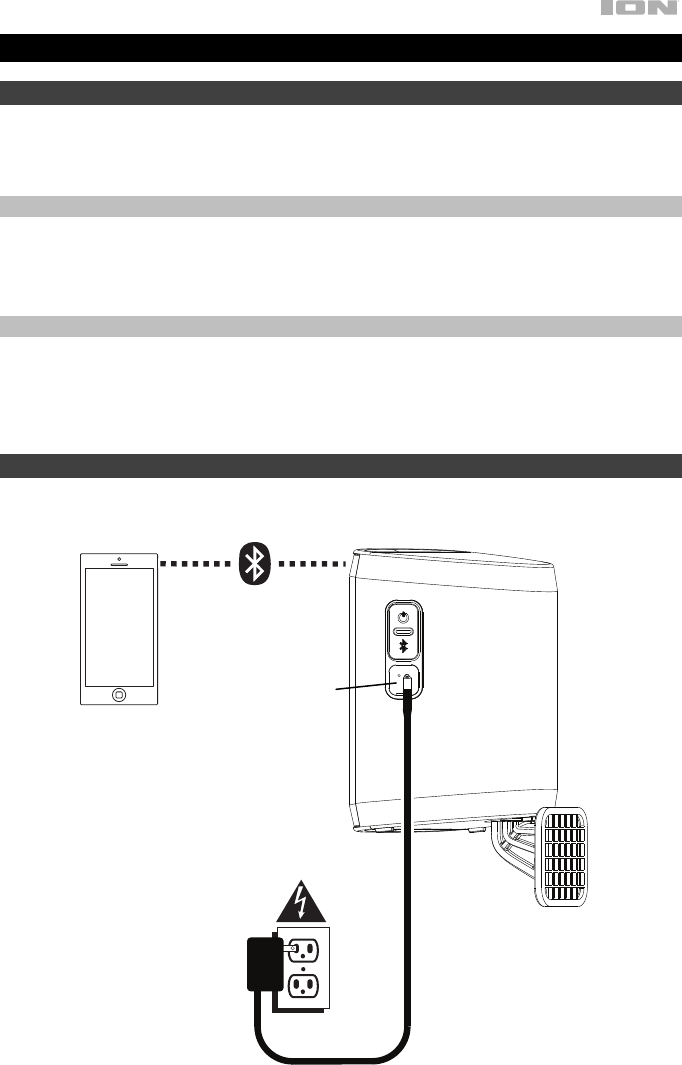
Setup
Items not listed under Introduction > Box Contents are sold separately.
Mounting
Post
Base
Bottom Panel
Side Panel
Smartphone,
tablet, etc.
Mounting
Post
Reset
Button
Charging
Adapter

4
Installation
Insta Sound may be used freestanding or mounted. When used freestanding, the feet on the
bottom of the speaker allow Insta Sound to sit comfortably on any flat surface. To mount Insta
Sound using the included wall mount, follow the instructions below.
To use Insta Sound with the included wall mount, first inspect the area where you would like to
install the speakers. Confirm that the surface you are mounting Insta Sound on can safely hold
the weight of the speaker. If you are unsure whether you can safely install Insta Sound in your
desired location, please consult a professional contractor.
To install the wall mount:
Note: It is recommended to install the mount so that the post is pointing straight up. Since the
speaker is designed to easily slide off/on the post, do not install with the post at an extreme
angle, parallel with the ground, or pointing towards the ground as the speaker will slide off of
the post and cause damage.
1. Insert screws into the 4 holes on the wall mount base. Fully tighten all screws so the wall
mount base is flush with the surface before placing the speaker on the mount. Do not use
the included screws to mount Insta Sound on surfaces such as concrete or drywall, as
these may require special tools and/or hardware.
2. Slide Insta Sound onto the mount so that the mount post is fully inserted into the
mounting hole on the bottom of the speaker. Make sure it is unobstructed on all sides for
optimal performance.
Note: The posts have notches that match up with the grooves at the base of the hole on the
speaker to help pivot/rotate the speaker to a fixed position/angle.
Outdoor Use and Care
Though Insta Sound is water-resistant and able to tolerate splashing water, please review the
tips below to get the best performance from Insta Sound:
• Insta Sound must only be used outdoors with power outlets or extension cords that are
rated for outdoor use.
• Bring Insta Sound indoors during extreme weather.
• Please do not place Insta Sound in standing water.
• Please do not connect the charging adapter to Insta Sound in a wet environment. Make
sure the charging adapter input, charging adapter, and power outlet are all completely dry
before making any connections.
• Make sure the connection between the prongs of the charging adapter and the power
outlet is secure and sealed according to your power outlet’s specifications.
• WARNING: Keep any non-water-resistant devices (phones, music players, etc.) in a dry
place where they will not be affected by water and cause a risk of electric shock.

5
Stereo-Link™ and Bluetooth Connecting to Insta Sound
1. Power on each Insta Sound by pressing and releasing their power buttons. You will hear
“Powering On” for confirmation. *
2. The 2 speakers will automatically initiate the wireless stereo linking process. The speakers
will search for each other indicated by their blinking yellow LEDs. Once the stereo pair is
successfully linked, you will hear “Connected”, the yellow LEDs will be solid, and the
“master” speaker’s blue LED will blink to indicate it is in Bluetooth pairing mode.
This process may take up to 2 minutes the first time two speakers are linked. Speakers
that were previously linked will relink automatically in seconds if powered on in range of
one another.
Note: Insta Sound speakers should be within 30 ft. (9 m) of each other to Link properly.
3. When the stereo link is confirmed by the solid yellow LED, the blue LED on the “master”
speaker will begin to blink to indicate that it is ready to pair with your Bluetooth device.
Note: The Left channel will be the “master” speaker, and the unit from which the Bluetooth
range will be determined.
4. On your Bluetooth device, navigate to your Bluetooth settings menu, find Insta Sound,
and connect. Once the Bluetooth connection is made, the blue LED will be lit solid. You
will hear “Paired” for confirmation.
Note: If you experience trouble in connecting, select “Forget this Device” for Insta Sound
on your Bluetooth device and try to connect again.
If your Bluetooth device is not able to connect to Insta Sound, while powered on, press
and hold the Bluetooth button for 2 seconds to break previous Bluetooth connections.
Press and hold the Reset button for 5 seconds to reset the device. This will clear the
memory of existing paired Bluetooth devices.
Single Speaker Mode
If you want to use only 1 Insta Sound speaker, you can enter Single Speaker mode. While the
unit is powered off, press and hold the Power button on the speaker. After the Insta Sound
powers on, while still holding the Power button, press and hold the Bluetooth button for 2
seconds. The yellow LED will be unlit, and the Blue LED will blink to confirm the speaker is
now in Single Speaker mode. Proceed to connect to Insta Sound in your Bluetooth device's
Bluetooth menu. To revert back to Stereo mode, power the speaker off then back on.
6
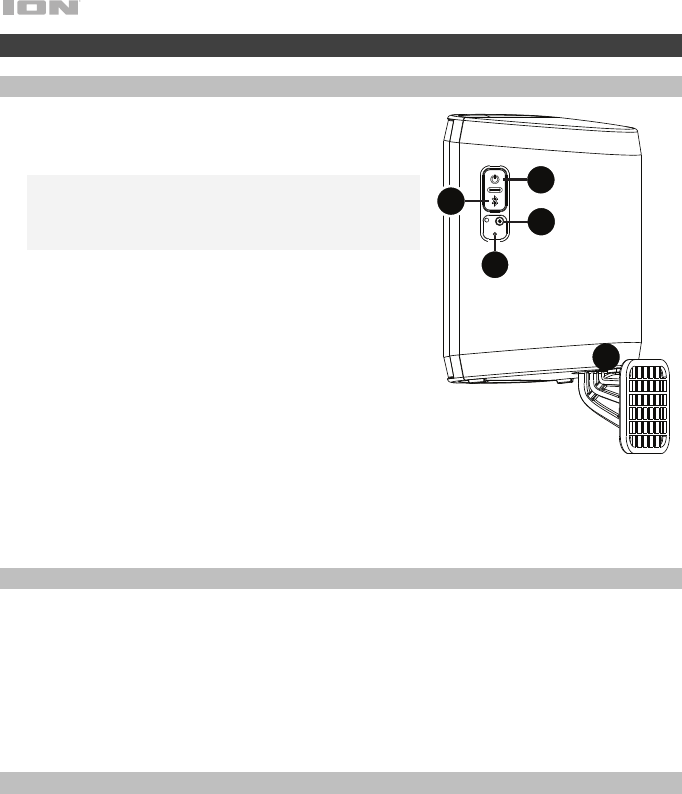
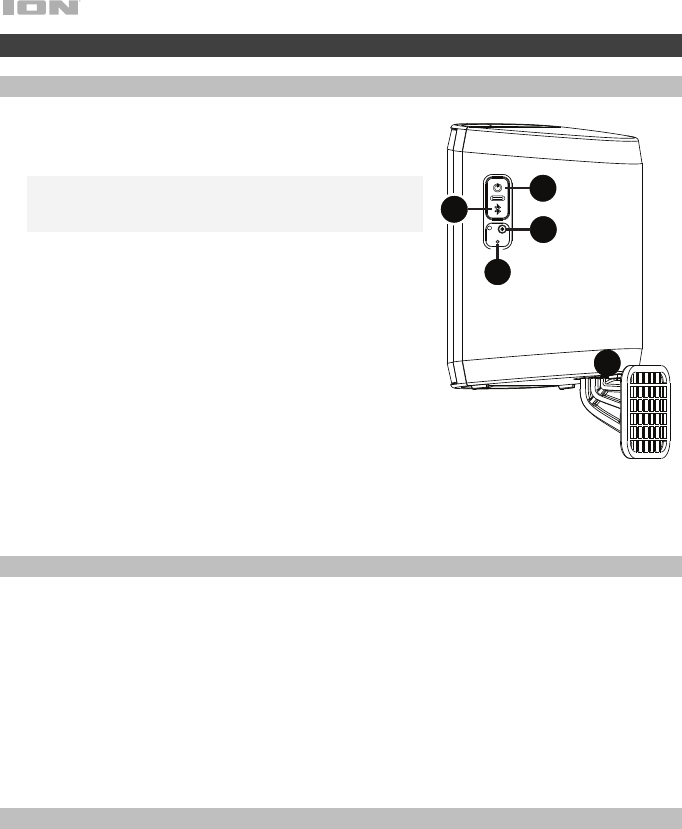
Features
Speaker (Side View)
1. Charging Adapter Input: Insert the included charging
adapter here to charge the Insta Sound battery.
Important: Insta Sound should be fully charged prior to
first use for maximum battery life.
2. Power: Press and release this button to power on Insta
Sound. Press and hold this button for 1 second to power
off Insta Sound.
3. Bluetooth: Press and hold this button to disconnect
current Bluetooth connections.
Note: Insta Sound will automatically power off after 15
minutes if no audio is playing.
4. Reset: If Insta Sound is working abnormally, shut down
the unit by pressing and holding the Reset button for 5
seconds. This will power the speaker off, and clear all
previous Bluetooth connections.
5. Mount: Insert the wall mount post here.
LED Activity
Blinking Blue LED = Bluetooth pairing mode
Solid Blue LED = Connected to a Bluetooth device
Blinking Yellow LED = Stereo-Linking mode
Solid Yellow LED = Both speakers are Stereo-Linked
Blinking Red LED = Battery is low and needs to be recharged
Solid Red LED = The Battery Charging LED will be lit while the unit is charging and the red
LED will turn off when charging has completed
Enabling/Disabling Voice Prompts
If you would like to disable or enable the voice prompts, while the speaker(s) is on, press the
Power button and the Bluetooth button simultaneously. With the voice prompts disabled,
LED feedback is still present.
5
1
2
3
4
7
Guía de inicio rápido (Español)
Introducción
Gracias por comprar el Insta Sound. En ION, su entretenimiento es tan importante para nosotros
como para usted. Por eso es que diseñamos nuestros productos con una sola cosa en mente—
hacer que su vida sea más divertida y cómoda.
Contenido de la caja
(2) Altavoces Insta Sound
(2) Montajes para pared
(2) Adaptadores de carga
(8) Tornillos
Guía de inicio rápido
Manual sobre la seguridad y garantía
Soporte
Para obtener la información más reciente acerca de este producto (documentación, especificaciones
técnicas, requisitos de sistema, información de compatibilidad, etc.) y registrarlo, visite
ionaudio.com.
Para obtener soporte adicional del producto, visite ionaudio.com/support.
Instalación
Los elementos que no se enumeran en Introducción > Contenido de la caja se venden por separado.
Teléfono inteligente,
tableta, etc.
Panel lateral
Panel inferior
Adaptador de
carga
Poste de
montaje
Base del poste
de montaje
Botón de
reinicio

8
Instalación
Los Insta Sound pueden utilizarse apoyados o montados. Cuando los utilice apoyados, las
patas en su parte inferior le permiten a los Insta Sound asentarse cómodamente en cualquier
superficie plana. Para montar los Insta Sound utilizando el montaje para pared incluido, siga
las instrucciones a continuación.
Para utilizar los Insta Sound con el montaje para pared incluido, primero inspeccione el área
en donde desea instalar los altavoces. Asegúrese de que la superficie en la que está
montando los Insta Sound pueda soportar de forma segura el peso del altavoz. Si no está
seguro si podrá instalar los Insta Sound de forma segura en la ubicación deseada, póngase en
contacto con un contratista profesional.
Cómo instalar el montaje para pared:
Nota: Se recomienda instalar el montaje de manera que el poste quede apuntando
verticalmente hacia arriba. Dado que el altavoz está diseñado para deslizarse con facilidad del
poste, no lo instale en un poste con un ángulo agudo, paralelo al piso o apuntando hacia el
piso ya que el altavoz podría zafarse del poste y causar daño.
1. Inserte los tornillos en los 4 orificios de la base del montaje para pared. Apriete
completamente todos los tornillos de manera que la base del montaje para pared quede al
ras con la superficie antes de colocar el altavoz en el montaje. No utilice los tornillos
incluidos para montar los Insta Sound en superficies tales como concreto o yeso, ya que
puede que se requieran herramientas y tornillería especiales.
2. Deslice el Insta Sound hacia el montaje de manera que el poste de montaje se inserte
totalmente dentro del orificio de montaje en la parte inferior del altavoz. Asegúrese de que
permanezca sin obstrucciones en todos sus lados para un desempeño óptimo.
Nota: Los postes tienen muescas que coinciden con las ranuras en la base del orificio del
altavoz para ayudar a pivotar/rotar el altavoz a una posición/ángulo fijo.
Uso y cuidado a la intemperie
Aunque el Insta Sound es resistente al agua y capaz de tolerar salpicaduras, lea las
sugerencias que se incluyen a continuación para obtener el mejor rendimiento del Insta
Sound:
• El Insta Sound sólo puede usarse en exteriores con tomas de corriente o cables de
prolongación aptos para el uso en exteriores.
• Traiga a los Insta Sound bajo techo durante condiciones meteorológicas extremas.
• No coloque el Insta Sound sobre agua estancada.
• No conecte el adaptador de carga al Insta Sound en un ambiente húmedo. Asegúrese de
que la entrada para el adaptador de carga, el adaptador de carga y la toma de corriente
estén completamente secos antes de realizar cualquier conexión.
• Asegúrese de que la conexión entre las espigas del adaptador de carga y la toma de
corriente quede segura y sellada de acuerdo a las especificaciones de su toma de
corriente.
• ADVERTENCIA: Coloque los dispositivos no resistentes al agua (teléfonos, reproductores
de música, etc.) en un lugar seco donde no sean afectados por el agua y causen un riesgo
de electrocución.

9
Conexión de Stereo-Link™ y Bluetooth con Insta Sound
1. Encienda cada Insta Sound pulsando y soltando sus botones de encendido. Escuchará
“Power On” (Unidad encendida) como confirmación.*
2. Los 2 altavoces iniciarán de forma automática el proceso de enlace estéreo inalámbrico.
Los altavoces se buscarán mutuamente indicándolo con sus LED amarillos intermitentes.
Una vez que el par estéreo esté exitosamente enlazado, escuchará "Connected"
(Conectado), los LED amarillos permanecerán encendidos constantemente y el LED azul
del altavoz "maestro" parpadeará para indicar que se encuentra en modo de
apareamiento Bluetooth.
Este proceso puede llevar hasta 2 minutos la primera vez que se realiza el enlace. Los
altavoces que estuvieron enlazados previamente volverán a enlazarse automáticamente en
unos pocos segundos si se encienden estando dentro de sus mutuos alcances.
Nota: Los Insta Sound deben encontrarse a menos de 9 m (30 pies) de cada uno para
enlazarse correctamente.
3. Cuando el enlace exterior sea confirmado por el LED amarillo permanente, el LED azul del
altavoz "maestro" comenzará a parpadear para indicar que está listo para aparearse con
su dispositivo Bluetooth.
Nota: El canal izquierdo será el altavoz "maestro" y la unidad desde la cual se determinará
el rango de Bluetooth.
4. En su dispositivo Bluetooth, navegue hasta el menú de ajustes de Bluetooth busque Insta
Sound, y conéctese a él. Una vez realizada la conexión Bluetooth el LED se encenderá
permanentemente con luz azul. Escuchará "Paired” (Apareado) como confirmación.
Nota: Si experimenta problemas para conectarse, seleccione “Olvidar este Dispositivo”
(Forget this Device) para el Insta Sound en su dispositivo Bluetooth e intente conectarse
nuevamente.
Si su dispositivo Bluetooth no es capaz de conectarse con Insta Sound, estando
encendido, mantenga pulsado el botón Bluetooth durante 2 segundos para desconectar
conexiones Bluetooth previas. Mantenga pulsado el botón Reset durante 5 segundos para
apagar el dispositivo. Esto borrará los dispositivos Bluetooth previamente apareados de la
memoria.
Modo de altavoz individual
Si sólo desea utilizar 1 altavoz Insta Sound, puede entrar al modo de altavoz individual. Con la
unidad apagada, mantenga pulsado el botón Power del altavoz. Una vez encendido el Insta
Sound, con el botón Power presionado, mantenga pulsado el botón Bluetooth durante 2
segundos El LED amarillo estará apagado y el LED azul parpadeará para confirmar que el
altavoz ahora se encuentra en modo de altavoz individual. Proceda a conectarse a Insta
Sound en el menú de Bluetooth de su dispositivo Bluetooth. Para regresar al modo estéreo,
apague el altavoz y luego enciéndalo.

10
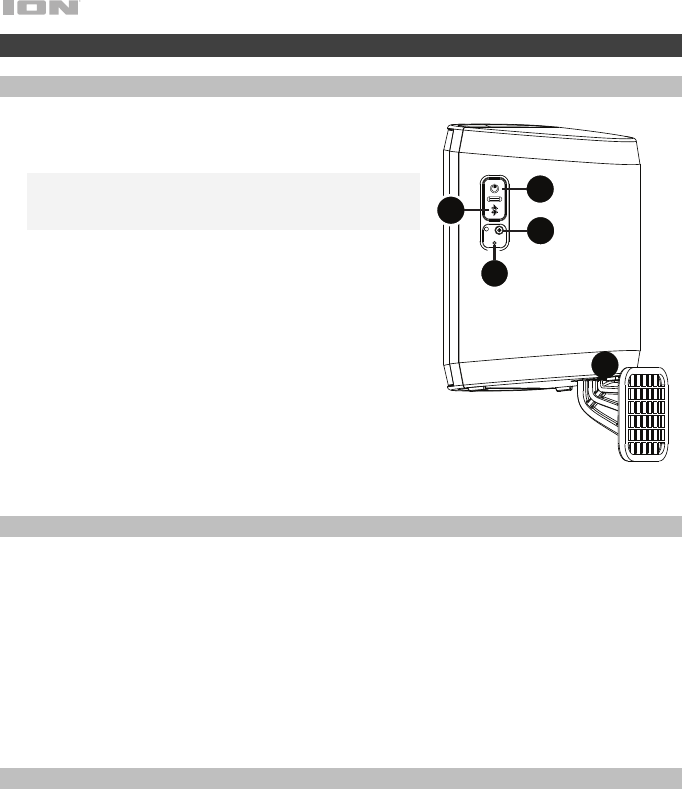
Características
Panel lateral
1. Entrada del adaptador de carga: Inserte aquí el
adaptador de carga incluido para cargar la batería del
Insta Sound.
Importante: El Insta Sound debe recargarse en su
totalidad antes del primer uso para maximizar la vida
útil de la batería.
2. Encendido: Pulse y suelte este botón para encender
el Insta Sound. Mantenga pulsado este botón durante
1 segundo para apagar el Insta Sound.
3. Bluetooth: Mantenga pulsado este botón para
desconectar las conexiones Bluetooth actuales.
Nota: El Insta Sound se apagará luego de 15 minutos
sin reproducir ningún audio.
4. Reinicio: Si el Insta Sound está funcionando de
forma anormal, apague la unidad manteniendo
pulsado el botón Reset durante 5 segundos. Esto
apagará el altavoz y borrará todas las conexiones
Bluetooth anteriores.
5. Montaje (parte inferior): Inserte aquí el poste de montaje.
Actividad del LED
LED azul intermitente = Modo de apareamiento de Bluetooth
LED azul permanente = Conectado a un dispositivo Bluetooth
LED amarillo intermitente = Modo de enlace estéreo
LED amarillo permanente = Ambos altavoces en enlace estéreo
LED rojo intermitente = La batería tiene poca carga y debe recargarse.
LED rojo permanente = El LED de batería en carga se enciende cuando la unidad se está
cargando y el LED rojo se apagará cuando la carga está completa
Activación/Desactivación de los avisos de voz
Si desea activar o desactivar los avisos de voz, con el/los altavoz(es) encendido(s), pulse el
botón Power y el botón Bluetooth simultáneamente. Cuando los avisos de voz están
desactivados, las indicaciones del LED siguen funcionando.
5
1
2
3
4
11
Guide d’utilisation rapide (Français)
Présentation
Merci d’avoir fait l’acquisition de l’enceinte Insta Sound. Chez ION, votre divertissement est aussi
important pour nous qu’il l’est pour vous. C’est pourquoi nous concevons nos produits avec une
seule chose en tête — rendre la vie plus amusante et plus pratique.
Contenu de la boîte
(2) Enceintes Insta Sound (8) vis
(2) Supports muraux Guide d'utilisation rapide
(2) Adaptateurs de rechargement Consignes de sécurité et informations concernant la
garantie
Assistance
Pour les toutes dernières informations concernant la documentation, les spécifications techniques, la
configuration requise, la compatibilité et l’enregistrement du produit, veuillez visiter ionaudio.com.
Pour de l’assistance supplémentaire, veuillez visiter ionaudio.com/support.
Démarrage
Les éléments qui ne figurent pas dans le Présentation > Contenu de la boîte sont vendus séparément.
Adaptateur de
rechargement
Tige de
montage
Base pour tige de
monta
g
e
Panneau
inférieur
Smartphone,
tablette, etc.
Panneau latéral
Touche de
réinitialisation

12
Installation
L’enceinte Insta Sound peut reposer sur ses pieds ou être montée au mur. Les pieds de
l’enceinte Insta Sound permettent de la poser sur n'importe quelle surface plane. Pour monter
l’enceinte Insta Sound au mur, utilisez le support mural fourni et suivez les instructions ci-
dessous.
Avant de procéder à l’installation murale de l’enceinte Insta Sound, veuillez d'abord inspecter
l’emplacement où vous souhaitez installer l’enceinte. Veuillez vous assurer que la surface de
montage peut soutenir le poids de l'enceinte en toute sécurité. Si vous n’êtes pas certain de
pouvoir installer l’enceinte à l’emplacement désiré en toute sécurité, veuillez faire appel à un
installateur professionnel.
Pour installer le support mural :
Remarque : Il est recommandé d’installer la base de manière à ce que la tige pointe vers le
haut. Comme l’enceinte est conçue pour glisser facilement de la tige, n’installez pas la tige à
un angle extrême, parallèle au sol, ou pointant vers le sol, car elle pourrait glisser de la tige et
causer des dommages.
1. Insérez les vis dans les 4 trous de la base du support mural. Veuillez serrer toutes les vis
du support mural afin que la base du support soit au ras de la surface avant de placer
l’enceinte sur le support. Veuillez ne pas utiliser les vis fournies pour le montage de
l’enceinte sur des surfaces comme le béton ou les cloisons sèches, car celles-ci peuvent
nécessiter des outils et/ou des matériaux spéciaux.
2. Faites glisser l’enceinte Insta Sound sur le support de sorte que la tige de montage soit
entièrement insérée dans l’embase de fixation sous l’enceinte. Veuillez vous assurer que
tous les côtés de l’enceinte soient libres afin d’obtenir des résultats optimums.
Remarque : Les tiges ont des encoches qui correspondent aux rainures sur la base du trou de
l’enceinte afin qu’elle puisse être pivoter/tourner selon une position ou un angle fixe.
Utilisation extérieure et entretien
Bien que le Insta Sound soit résistant à l'eau et tolère les éclaboussures, les conseils ci-
dessous qui vous permettront de tirer le maximum de votre Insta Sound :
• L’enceinte Insta Sound doit être utilisée à l’extérieur uniquement avec une prise secteur ou
un câble prolongateur qui sont conçus pour une utilisation extérieure.
• L’enceinte Insta Sound doit être rentrée à l'intérieur lors de conditions météorologiques
extrêmes.
• Veuillez ne pas placer le Insta Sound dans l'eau stagnante.
• Veuillez ne pas utiliser l'adaptateur de rechargement avec le Insta Sound lorsqu’il se
trouve dans un environnement humide. Veuillez vous assurer que l’entrée pour adaptateur
de rechargement, l’adaptateur de rechargement et la prise secteur soient tous
complètement secs avant d’effectuer tout raccordement.
• Veuillez vous assurer que la connexion entre les broches de l’adaptateur de rechargement
et la prise secteur est sécuritaire et scellée selon les spécifications de la prise secteur
utilisée.
• MISE EN GARDE : Gardez tout appareil non étanche (téléphones, lecteurs, etc.) dans un
endroit sec à l’abri des éclaboussures et des risques de décharges électriques.

13
Connexion Bluetooth et raccordement Stereo-Link™
1. Mettez chaque enceinte Insta Sound sous tension en appuyant et en relâchant sa touche
d’alimentation. Vous entendrez le message de confirmation vocal « Powering On ».*
2. Les deux enceintes lanceront automatiquement le processus de raccordement sans fil
stéréo. Elles essayeront de se connecter l'une à l'autre comme indiqué par le clignotement
de DEL jaunes. Une fois la connexion établie, vous entendrez le message de confirmation
vocal « Connected », les DEL jaunes cesseront de clignoter, et la DEL bleue de l’enceinte
« maître » clignotera afin d’indiquer qu’elle est en mode de jumelage Bluetooth.
Cela peut prendre jusqu'à 2 minutes lors de la première connexion. Une fois la première
connexion établie, les enceintes prendront seulement quelques secondes à se reconnecter
lorsqu’elles se trouveront à proximité l’une de l’autre.
Remarque : Les enceintes Insta Sound doivent être à moins de 9 m l'une de l'autre pour
se connecter correctement.
3. Lorsque le lien stéréo est établi, les DEL jaunes cessent de clignoter et la DEL bleue de
l’enceinte « maître » clignote afin d’indiquer que l'enceinte est prête à être jumeler à votre
appareil Bluetooth.
Remarque : L’enceinte gauche sera l’enceinte « maître », et sera également l’enceinte à
partir de laquelle la portée Bluetooth sera déterminée.
4. Accédez au menu des réglages Bluetooth de votre appareil, recherchez Insta Sound, et
appuyez sur Connecter. Lorsque la connexion Bluetooth est établie, la DEL bleue cesse de
clignoter. Vous entendrez le message de confirmation vocal « Paired ».
Remarque : Si la connexion ne peut être établie, sélectionnez « Oublier cet appareil » pour
la Insta Sound sur votre appareil Bluetooth et lancer à nouveau le jumelage.
Si votre appareil Bluetooth ne parvient pas à se jumeler à l’enceinte Insta Sound,
maintenez la touche de connexion Bluetooth de l’enceinte enfoncée alors qu’elle est sous
tension pendant 2 secondes afin de supprimer la connexion à d'autres appareils
Bluetooth. Maintenez la touche de réinitialisation enfoncée pendant 5 secondes. Ceci
permet de supprimer tous les appareils Bluetooth jumelés mémorisés.
Mode mono
Si vous souhaitez n’utiliser qu’une enceinte Insta Sound, vous pouvez utiliser le mode mono.
Alors que l’enceinte est hors tension, maintenez sa touche d’alimentation enfoncée. Tout en
maintenant la touche d’alimentation enfoncée, lorsque l’enceinte Insta Sound est sous
tension, enfoncez la touche Bluetooth pendant 2 secondes. La DEL jaune sera éteinte, et la
DEL bleue clignotera afin de confirmer que l’enceinte est en mode mono. Accédez à l'écran de
configuration de votre appareil Bluetooth et relancez le jumelage. Pour revenir en mode stéréo,
mettez l’enceinte hors tension et de nouveau sous tension.
14
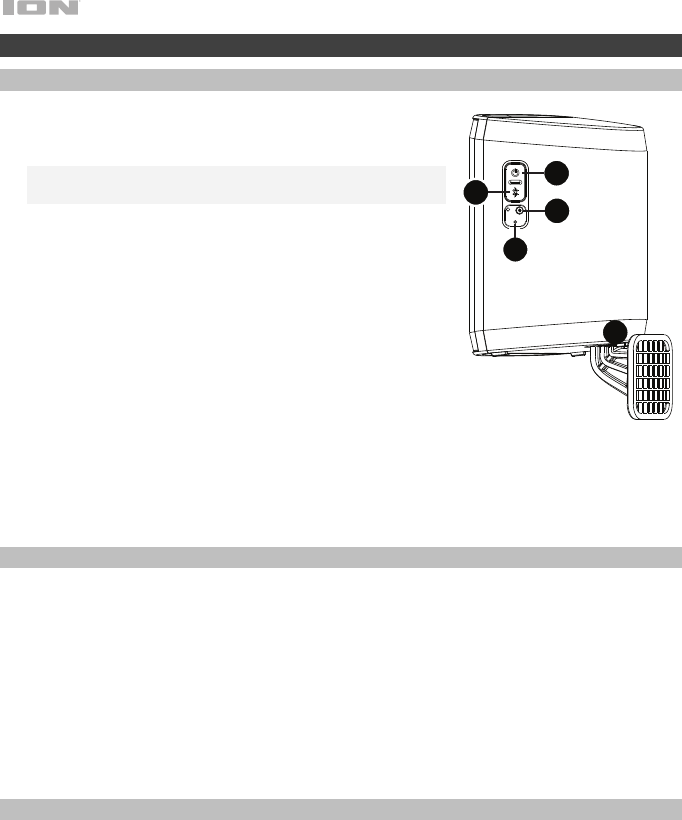
Caractéristiques
Panneau latéral
1. Entrée pour adaptateur de rechargement : Insérez
l'adaptateur de rechargement inclus à cette entrée
pour recharger la batterie du Insta Sound.
Important : Veuillez vous assurer d'avoir
complètement chargé la batterie de l’enceinte Insta
Sound avant la première utilisation afin d’augmenter
sa durée de vie.
2. Touche d’alimentation : Appuyer et relâcher cette
touche permet de mettre la Insta Sound sous tension.
Maintenir cette touche enfoncée pendant 1 seconde
permet de mettre la Insta Sound hors tension.
3. Bluetooth : Maintenir cette touche enfoncée permet
de supprimer les connexions Bluetooth.
Remarque : La Insta Sound se met automatiquement
hors tension lorsqu’aucun signal audio ne joue durant
plus de 15 minutes.
4. Réinitialisation : En cas de fonctionnement anormal,
mettez la Insta Sound hors tension en maintenant la
touche de réinitialisation enfoncée pendant 5 secondes. Ceci met l'enceinte hors tension
et supprime toutes les connexions Blutooth existantes.
5. Embase de fixation (partie inférieure) : Insérez la tige de montage du support dans
l’embase.
Légende des indicateurs DEL
DEL bleue clignotante = mode de jumelage
DEL bleue fixe = appareil Bluetooth jumelé
DEL jaune clignotante = mode raccordement Stereo-Link
DEL jaune fixe = raccordement Stereo-Link des deux enceintes établi
DEL rouge clignotante = La batterie est faible et a besoin d'être rechargée
Activation et désactivation des messages vocaux
Si vous souhaitez désactiver ou activer les messages vocaux, appuyez simultanément sur la
touche d’alimentation et la touche Bluetooth alors que l’enceinte ou les enceintes sont sous
tension. Lorsque les messages vocaux sont désactivés, les indicateurs DEL fonctionnent
toujours.
5
1
2
3
4
15
Guida rapida (Italiano)
Introduzione
Grazie per aver acquistato l’Insta Sound. Per noi di ION, il tuo divertimento è importante quanto lo è
per te. Ecco perché progettiamo i nostri dispositivi con un unico obiettivo in mente: rendere la tua
vita più comoda e divertente.
Contenuti della confezione
(2) Altoparlanti Insta Sound
(2) Dispositivi di montaggio a parete
(2) Adattatori di ricarica
(8) Viti
Guida rapida
Istruzioni di sicurezza e garanzia
Assistenza
Per le ultime informazioni in merito a questo prodotto (documentazione, specifiche tecniche, requisiti
di sistema, informazioni sulla compatibilità, ecc.) e per effettuarne la registrazione, recarsi alla pagina
ionaudio.com.
Per ulteriore assistenza sul prodotto, recarsi alla pagina ionaudio.com/support.
Configurazione
Elementi non elencati sotto Introduzione > Contenuti della confezione sono venduti separatamente.
Base del
supporto di
montaggio
Supporto di
montaggio
Pannello laterale
Pannello inferiore
Smartphone,
tablet, ecc.
Adattatore di
ricarica
Tasto reset

16
Installazione
Il Insta Sound può essere utilizzato in via indipendente o installato. Quando utilizzato in modo
indipendente, i piedini posti sul fondo dell'altoparlante consentono al Insta Sound di essere
collocato su qualsiasi superficie uniforme. Per montare il Insta Sound servendosi dei
dispositivi di montaggio in dotazione, procedere come indicato nelle istruzioni seguenti.
Per utilizzare il Insta Sound con il dispositivo di montaggio a parete in dotazione, innanzitutto
ispezionare l'area dove si desidera installare l'altoparlante. Verificare che la superficie su cui ci
si accinge a montare il Insta Sound sia in grado di reggere in maniera sicura il peso
dell'altoparlante. In caso di dubbio in merito alla possibilità di installare il Insta Sound in
maniera sicura nel punto desiderato, consultare un professionista.
Per installare il dispositivo di montaggio a parete:
Nota bene: si raccomanda di installare il dispositivo di montaggio in modo tale che il
montante sia rivolto verso l’alto. Poiché l’altoparlante è stato concepito per scorrere facilmente
sul montante, non installare il montante a un’angolazione estrema, parallelo al pavimento o
rivolto verso il terreno in quanto l’altoparlante scivolerebbe via dal montante stesso causando
possibili danni.
1. Inserire le viti nei 4 fori presenti alla base di montaggio. Stringere a fondo tutte le viti in
modo tale che la base del dispositivo di montaggio sia a livello con la superficie prima di
collocarvi l'altoparlante. Non servirsi delle viti in dotazione per montare il Insta Sound su
superfici quali cemento o cartongesso, in quanto possono richiedere attrezzi e/o viteria
speciali.
2. Far scorrere il Insta Sound sul montante in modo tale che questo risulti interamente
inserito nel foro di montaggio posto sul fondo dell'altoparlante. Per ottenere prestazioni
ottimali, assicurarsi che non sia ostruito su tutti i lati.
Nota bene: i montanti presentano delle tacche che corrispondono alle scanalature alla base
del foro sull’altoparlante per aiutare l’altoparlante a ruotare fino a una posizione/angolazione
fissa.
Utilizzo all'aperto e cura
Sebbene il Insta Sound sia impermeabile e in grado di sopportare eventuali schizzi d'acqua,
leggere attentamente i consigli di cui sotto per ottenere le migliori prestazioni dal Insta Sound:
• Il Insta Sound deve essere utilizzato unicamente all'aperto, con prese di alimentazione o
prolunghe dalla tensione nominale specifica per un utilizzo all'aperto.
• Portare il Insta Sound all'interno in caso di maltempo.
• Non collocare il Insta Sound in acqua.
• Non collegare l'adattatore di ricarica al Insta Sound in un ambiente bagnato. Assicurarsi
che l'ingresso dell'adattatore di carica, l'adattatore di carica stesso e la presa di
alimentazione siano completamente asciutti prima di effettuare qualsiasi collegamento.
• Assicurarsi che il collegamento fra i denti dell'adattatore di carica e la presa di
alimentazione sia sicuro e sigillato secondo le specifiche della propria presa di
alimentazione.
• Avvertenza: mantenere qualsiasi dispositivo non impermeabile (telefono, lettore musicale,
ecc.) in un luogo asciutto dove non sia interessato dall’acqua rischiando di causare scosse
elettriche.

17
Collegamento Stereo-Link™ e Bluetooth a Insta Sound
1. Accendere ciascun Insta Sound premendo e rilasciando i rispettivi tasti di accensione. Si
sentirà “Powering On” a conferma. *
2. I 2 altoparlanti avvieranno automaticamente il processo di collegamento stereo wireless.
La ricerca degli altoparlanti è indicata dai LED gialli lampeggianti. Una volta collegata la
coppia stereo si sentirà “Connected”, i LED gialli saranno fissi e il LED blu dell’altoparlante
“master” lampeggerà a indicare che si trova in modalità di collegamento Bluetooth.
La prima volta che si collegano due altoparlanti, questo processo può richiedere fino a 2
minuti. Gli altoparlanti collegati in precedenza si ricollegheranno automaticamente entro
pochi secondi se accesi l'uno a portata dell'altro.
Nota bene: per collegarsi correttamente, i Insta Sound si devono trovare entro 9 m (30 ft.)
l'uno dall'altro.
3. Quando il collegamento stereo è confermato dal LED giallo fisso, il LED blu
sull’altoparlante “master” inizierà a lampeggiare a indicare che è pronto a collegarsi con il
dispositivo Bluetooth.
Nota bene: il canale di sinistra sarà l'altoparlante “master”, nonché l'unità dalla quale sarà
determinata la portata del Bluetooth.
4. Sul proprio dispositivo Bluetooth, navigare fino al menu impostazioni Bluetooth, trovare
Insta Sound e collegarlo. Una volta effettuato il collegamento Bluetooth, il LED blu sarà
fisso. Si sentirà “Paired” (collegato) a conferma.
Nota bene: in caso di problemi di collegamento, selezionare “Forget this Device”
(Dimentica questo dispositivo) per il Insta Sound sul dispositivo Bluetooth e cercare di
collegarlo di nuovo.
Se il dispositivo Bluetooth non è in grado di collegarsi all’Insta Sound, quando è acceso,
tenere premuto il tasto Bluetooth per 2 secondi per interrompere collegamenti Bluetooth
precedenti. Tenere premuto il tasto Reset per 5 secondi per resettare il dispositivo. In
questo modo si cancella la memoria relativa ai dispositivi Bluetooth attualmente collegati.
Modalità altoparlante singolo
Se si desidera utilizzare 1 solo altoparlante Insta Sound, si può entrare in modalità Single
Speaker (altoparlante singolo). Ad apparecchio spento, tenere premuto il tasto Power
sull’altoparlante. In seguito all’accensione dell’Insta Sound, tenendo ancora premuto il tasto
Power, premere e tenere premuto il tasto Bluetooth per 2 secondi. Il LED giallo sarà spento e
il LED blu lampeggerà per confermare che l’altoparlante si trova ora in modalità Single
Speaker (altoparlante singolo). Collegare l’Insta Sound nel menu Bluetooth del dispositivo
Bluetooth. Per tornare alla modalità Stereo, spegnere l'altoparlante e riaccenderlo.
18
Caratteristiche
Pannello laterale
1. Ingresso adattatore di carica: Inserire a questo
livello l’adattatore di ricarica in dotazione per caricare
la batteria del Insta Sound.
Importante: il Insta Sound deve essere caricato a
fondo prima del primo utilizzo per garantire il
massimo della durata della batteria.
2. Power: Premere e rilasciare il tasto per accendere
l’Insta Sound. Tenere premuto questo tasto per 1
secondo per spegnere l’Insta Sound.
3. Bluetooth: Tenere premuto questo tasto per
annullare i collegamenti Bluetooth.
Nota bene: se non viene riprodotto alcun audio,
l’Insta Sound si spegnerà dopo 15 minuti.
4. Reset: Se l’Insta Sound funziona in maniera abnorme,
spegnere l’apparecchio premendo e tenendo premuto
il tasto Reset per 5 secondi. Questo spegnerà
l’altoparlante e cancellerà tutti i collegamenti
Bluetooth precedenti.
5. Dispositivo di montaggio: inserire il supporto a parete a questo livello.
Attività LED
LED blu lampeggiante = modalità di collegamento Bluetooth
LED Blu fisso = collegato a un dispositivo Bluetooth
LED giallo lampeggiante = modalità di collegamento stereo
LED giallo fisso = entrambi gli altoparlanti sono collegati in stereo
LED rosso lampeggiante = la batteria è scarica e deve essere ricaricata
LED rosso fisso = il LED rosso di ricarica della batteria sarà acceso mentre l'apparecchio si
sta caricando e si spegnerà quando la ricarica è completa.
Attivazione/disattivazione dei messaggi vocali
Se si desidera attivare o disattivare i messaggi vocali quando l’altoparlante è acceso, premere
contemporaneamente il tasto Power e il tasto Bluetooth. Anche quando i messaggi vocali
sono disattivati, il feedback dei LED è presente.
5
1
2
3
4

19
Schnellstart-Anleitung (Deutsch)
Einführung
Vielen Dank für den Kauf von Insta Sound. Ihre Unterhaltung ist uns bei ION genauso wichtig wie
Ihnen. Darum entwerfen wir unsere Produkte stets nur mit einem einzigen Ziel vor Augen: Ihr Leben
einfacher und unterhaltsamer zu machen.
Lieferumfang
(2) Insta Sound-Lautsprecher (8) Schrauben
(2) Wandhalterungen Schnellstart-Anleitung
(2) Ladeadapter Sicherheitshinweise und Garantieinformationen
Kundendienst
Für die neuesten Informationen zu diesem Produkt (Dokumentation, technische Daten,
Systemanforderungen, Informationen zur Kompatibilität etc.) und zur Produktregistrierung besuchen
Sie bitte: ionaudio.com.
Für zusätzlichen Produkt-Support besuchen Sie ionaudio.com/support.
Setup
Teile, die nicht unter Einführung > Lieferumfang angegeben sind, sind separat erhältlich.
Befestigungsstiftsockel
Befestigungsstift
Seitenteil
Smartphone,
Tablet usw.
Bodenseite
Ladeadapter
Rückstelltaste

20
Montage
Insta Sound kann freistehend verwendet oder montiert werden. Durch die füße auf der
Lautsprecherunterseite kann Insta Sound bequem auf jeder ebenen Fläche freistehend aufgestellt werden.
Um Insta Sound mit der mitgelieferten Wandhalterung zu montieren, befolgen Sie die Anweisungen unten.
Um Insta Sound mit der mitgelieferten Wandhalterung zu verwenden, prüfen Sie zunächst den Montageort
für die Lautsprecher. Vergewissern Sie sich, dass die Oberfläche, auf der Sie Insta Sound montieren
möchten, das Gewicht des Lautsprechers sicher tragen kann. Wenn Sie sich nicht sicher sind, ob Sie Insta
Sound sicher an der gewünschten Position montieren können, konsultieren Sie bitte eine Fachkraft.
So montieren Sie die Wandhalterung:
Hinweis: Es wird empfohlen, die Halterung so anzubringen, dass der Stift gerade nach oben zeigt. Da der
Lautsprecher darauf ausgelegt ist, leicht auf den Stift geschoben bzw. abgezogen zu werden, darf der Stift
nicht in einem extremen Winkel, parallel zum Boden oder auf den Boden weisend angebracht werden, weil
der Lautsprecher ansonsten vom Stift gleiten und Schäden verursachen könnte.
1. Bringen Sie die Schrauben in die vier Löcher in der Wandhalterung ein. Ziehen Sie alle Schrauben fest,
so dass die Basis der Wandhalterung bündig mit der Oberfläche abschließt, bevor Sie die Lautsprecher
in die Halterung einsetzen. Verwenden Sie die mitgelieferten Schrauben nie für die Montage des Insta
Sound auf Oberflächen wie Beton oder Gipsplatten, da dies spezielle Werkzeuge und/oder Geräte
erfordert.
2. Schieben Sie Insta Sound auf die Halterung, so dass die Montagestütze komplett in das Montageloch
auf der Unterseite des Lautsprechers eingeschoben ist. Achten Sie darauf, dass sie an keiner Seite
blockiert wird.
Hinweis: Die Stifte weisen Kerben auf, die zu den Rillen an der Basis des Lochs im Lautsprecher passen,
die dazu dienen, den Lautsprecher in eine feste Position/einen festgelegten Winkel zu schwenken bzw. zu
drehen.
Einsatz im Freien und Pflege des Produkts
Obwohl der Insta Sound wasserfest ist und Wasserspritzer vertragen kann, lesen Sie bitte die folgenden
Tipps für die optimale Performance Ihres Insta Sound:
• Insta Sound darf im Freien nur mit Steckdosen oder Verlängerungskabeln verwendet werden, die für
den Einsatz im Freien geeignet sind.
• Bringen Sie Insta Sound bei extremen Wetterbedingungen ins Haus.
• Bitte platzieren Sie den Insta Sound nie in stehenden Gewässern.
• In einer nassen Umgebung schließen Sie bitte den Ladeadapter nicht an den Insta Sound an. Stellen
Sie sicher, dass der Ladeadaptereingang, der Ladeadapter und die Netzsteckdose komplett trocken
sind, bevor Sie irgendwelche Verbindungen herstellen.
• Achten Sie darauf, dass die Verbindung zwischen den Kontakten des Ladeadapters und der Steckdose
sicher und bündig ist und den Spezifikationen der Steckdose entspricht.
• Achtung: Bewahren Sie alle nicht wasserdichten Geräte (Handys, Musik-Player etc.) an einem
trockenen Ort auf, wo sie nicht von der Feuchtigkeit beeinträchtigt werden können und kein Risiko
durch Stromschläge besteht.

21
Stereo-Link™- und Bluetooth-Verbindung mit Insta Sound
1. Schalten Sie die beiden Insta Sound-Geräte ein, indem Sie jeweils auf deren Netzschalter
drücken und diesen loslassen. Sie hören dann zur Bestätigung die Ansage „Powering On‟
(„Eingeschaltet‟). *
2. Die beiden Lautsprecher leiten dann automatisch das drahtlose Stereo-Linking-Verfahren
ein. Die Lautsprecher suchen einander, was sich darin äußert, dass auf beiden Geräten die
gelben LEDs blinken. Sobald das Stereopaar erfolgreich verbunden wurde, ertönt die
Ansage „ Connected‟ („Verbunden‟), blinken die gelben LEDs nicht mehr sondern sind
dauerhaft an und die blaue LED des „Master‟-Lautsprechers blinkt, um anzuzeigen, dass
er sich im Bluetooth-Pairing-Modus befindet.
Wenn zwei Lautsprecher zum ersten Mal verbunden werden, kann dieser Vorgang bis zu 2
Minuten dauern. Lautsprecher, die zuvor bereits miteinander verbunden waren, stellen
diese Verbindung automatisch innerhalb von Sekunden wieder her, sobald sie
eingeschaltet werden und sie sich in Reichweite befinden.
Hinweis: Insta Sound’s sollten sich innerhalb von 30 ft. (9 m) voneinander befinden, um
eine Verbindung korrekt herstellen zu können.
3. Wenn der Stereo-Link durch die dauerhaft gelbe LED bestätigt wird, beginnt die blaue LED
auf dem „Master‟–Lautsprecher zu blinken um anzuzeigen, dass dieser bereit ist, sich mit
Ihrem Bluetooth-Gerät zu koppeln.
Hinweis: Der linke Kanal wird der "Master"-Lautsprecher sein und das Gerät, von dem die
Bluetooth-Reichweite aus bestimmt wird.
4. Navigieren Sie auf Ihrem Bluetooth-Gerät in das Menü Bluetooth-Einstellungen, wählen
Insta Sound und stellen eine Verbindung her. Wenn der Stereo-Link durch die dauerhaft
gelbe LED bestätigt wird, beginnt die blaue LED auf dem „Master‟–Lautsprecher zu
blinken um anzuzeigen, dass dieser bereit ist, sich mit Ihrem Bluetooth-Gerät zu koppeln.
Hinweis: Wenn es zu Problemen bei der Verbindung kommt, wählen Sie am Bluetooth-
Gerät bei Insta Sound „Dieses Gerät ignorieren“ und versuchen es erneut.
Wenn Ihr Bluetooth-Gerät keine Verbindung mit Insta Sound herstellen kann, während es
eingeschaltet ist, drücken Sie auf die Bluetooth–Taste und halten Sie diese 2 Sekunden
lang gedrückt, um die bestehenden Bluetooth-Verbindungen zu unterbrechen. Dadurch
werden die bestehenden gekoppelten Bluetooth-Geräte aus dem Speicher gelöscht.
Einzellautsprecher-Modus
Wenn Sie nur einen Insta Sound-Lautsprecher verwenden wollen, können Sie den
Einzellautsprecher-Modus auswählen. Drücken Sie bei ausgeschaltetem Gerät auf den
Netzschalter auf dem Lautsprecher und halten Sie diesen gedrückt. Halten Sie den
Netzschalter gedrückt auch nachdem das Gerät sich eingeschaltet hat, und drücken Sie die
Bluetooth-Taste und halten Sie diese 2 Sekunden lang gedrückt. Die gelbe LED leuchtet nicht
und die blaue LED blinkt zur Bestätigung, dass sich der Lautsprecher nun im
Einzellautsprecher-Modus befindet. Nun können Sie damit fortfahren, über das Bluetooth-
Menü Ihres Bluetooth-Geräts eine Verbindung mit Insta Sound herzustellen. Wenn Sie zum
Stereomodus zurückkehren möchten, brauchen Sie den Lautsprecher nur aus- und dann
wieder einzuschalten.
22
Funktionen
Seitenteil
1. Ladeadaptereingang: Stecken Sie den mitgelieferten
Ladeadapter hier an, um den Akku des Insta Sound
aufzuladen.
Wichtig: Insta Sound sollte vor dem ersten Gebrauch für
eine maximale Akkulaufzeit voll aufgeladen werden.
2. Ein-/Ausschalter: Drücken Sie diese Taste und lassen
Sie sie los, um Insta Sound einzuschalten. Drücken Sie
diese Taste und halten Sie sie 1 Sekunde lang gedrückt,
um Insta Sound auszuschalten.
3. Bluetooth: Drücken Sie diese Taste und halten Sie sie
gedrückt, um die aktuellen Bluetooth-Verbindungen zu
unterbrechen.
Hinweis: Insta Sound schaltet sich nach 15 Minuten
automatisch aus, wenn kein Audio gespielt wird.
4. Zurücksetzen: Wenn Insta Sound nicht wie erwartet
funktioniert, sollten Sie das Gerät ausschalten, indem Sie
die Rücksetztaste drücken und 5 Sekunden lang
gedrückt halten. Dadurch wird der Lautsprecher ausgeschaltet und alle vorherigen
Bluetooth-Verbindungen gelöscht.
5. Montagehalterung (Unterseite): Bringen Sie die Montagestütze hier ein und ziehen dann
die Stellschraube fest, um den Lautsprecher daran zu befestigen.
LED-Aktivität
Blinkende blaue LED = Bluetooth-Pairing-Modus
Dauerhafte blaue LED = Mit einem Bluetooth-Gerät verbunden
Blinkende gelbe LED = Stereo-Linking-Modus
Dauerhafte gelbe LED = Beide Lautsprecher sind über Stereo-Link verbunden
Blinkende rote LED = Akkustand ist niedrig und muss aufgeladen werden
Dauerhafte rote LED = Die Akkulade-LED leuchtet auf, wenn das Gerät geladen wird und
schaltet sich nach Abschluss des Ladevorgangs wieder aus
Aktivieren/Deaktivieren von Sprachansagen
Wenn Sie die Sprachansagen aktivieren oder deaktivieren möchten, während der/die
Lautsprecher eingeschaltet ist/sind, drücken Sie gleichzeitig auf den Netzschalter und die
Bluetooth–Taste. Wenn die Sprachansagen deaktiviert sind, erhalten Sie aber trotzdem
Feedback über die LEDs.
5
1
2
3
4
23
Snelstartgids (Nederlands)
Introductie
Bedankt voor uw aankoop van de Insta Sound. Bij ION vinden wij entertainment even
belangrijk als u. Daarom ontwerpen wij onze producten met één doel voor ogen: u het leven
leuker en aangenamer maken.
Inhoud van de doos
(2) Insta Sound luidsprekers
(2) Muurbeugels
(2) Stroomadapter
(8) schroeven
Snelstartgids
Veiligheids-en garantie handleiding
Ondersteuning
Voor de laatste informatie over dit product (documentatie, technische specificaties, systeem
vereisten, informatie over compatibiliteit, enz.) en productregistratie, bezoek ionaudio.com.
Voor aanvullende productondersteuning naar ionaudio.com/support.
Opstelling
Artikelen die niet zijn opgesomd in Introductie > Inhoud van de doos worden afzonderlijk verkocht.
Staandervoet
Zijpaneel
Smartphone,
tablet, enz.
Oplaadad
Staander
Bodempaneel
Resettoets

24
Installatie
De Insta Sound mag zowel vrijstaand als opgehangen worden gebruikt. Bij vrijstaand gebruik
zorgen de luidsprekerpootjes ervoor dat de Insta Sound stevig op elk vlak oppervlak staat.
Volg de instructies hieronder om de Insta Sound op te hangen met de meegeleverde
muurbeugels.
Wanneer u de Insta Sound gebruikt met de meegeleverde muurbeugel, moet u eerst de zone
inspecteren waar u de luidsprekers wilt installeren. Controleer of het oppervlak waar u de Insta
Sound op monteert het gewicht kan dragen van de luidspreker. Als u er niet zeker van bent
dat u de Insta Sound veilig kunt installeren op de gewenste plaats, raadpleeg dan een
professionele aannemer.
Installatie van de muurbeugel:
Opmerking: Het wordt aanbevolen om de houder zo te installeren dat de staander recht
omhoog wijst. Omdat de luidspreker zo is ontworpen dat deze gemakkelijk van/op de
staander kan worden geschoven, mag deze niet met de staander in een extreme hoek worden
geïnstalleerd, evenwijdig met de grond of naar de grond gericht. De luidspreker kan hierdoor
immers van de staander schuiven en schade veroorzaken.
1. Steek schroeven in de 4 gaten op de montagesokkel. Draai alle schroeven stevig vast,
zodat de montagesokkel gelijkloopt met het oppervlak voor u de luidspreker op de beugel
plaatst. De meegeleverde schroeven niet gebruiken om de Insta Sound te monteren op
oppervlakken als beton of gipsplaten, aangezien hiervoor speciaal gereedschap en/of
onderdelen nodig kunnen zijn.
2. Schuif de Insta Sound op de montagebeugel, zodat de montagestijl volledig in de
montageholte onderaan de luidspreker is ingebracht. Voor een optimale werking: zorg
ervoor dat hij langs alle kanten obstakelvrij is.
Opmerking: De staanders hebben uitsparingen die overeenkomen met de groeven aan de
onderkant van het gat in de luidspreker om de luidspreker in een vaste positie/hoek te zetten.
Gebruik buitenshuis en onderhoud
Hoewel de Insta Sound waterbestendig is en bestand is tegen opspattend water, vragen wij u
toch de tips hieronder te volgen voor optimale prestaties van uw Insta Sound:
• Insta Sound mag buiten alleen worden gebruikt met stopcontacten of verlengsnoeren die
zijn goedgekeurd voor gebruik buitenshuis.
• Breng de Insta Sound naar binnen bij slecht weer.
• De Insta Sound niet plaatsen in stilstaand water.
• Sluit in een natte omgeving de oplaadadapter niet aan op de Insta Sound. Controleer of de
ingang van de oplaadadapter, de oplaadadapter en het stopcontact volledig droog zijn
voordat u verbinding maakt.
• Controleer of de verbinding tussen de stekker van de oplaadadapter en het stopcontact
veilig en vergrendeld is, in overeenstemming met de specificaties van uw stopcontact.
• Waarschuwing: Bewaar alle apparaten die niet waterbestendig zijn (telefoons,
muziekspelers, enz.) op een droge plaats waar ze niet kunnen worden aangetast door
water en een risico van elektrische schokken kunnen veroorzaken.

25
Insta Sounds verbinden via Stereo-Link™ en Bluetooth
1. Schakel elke Insta Sound in door hun aan-uitknoppen in te drukken en weer los te laten. U
hoort "Powering On" als bevestiging. *
2. De 2 luidsprekers starten automatisch het draadloze stereo koppelingsproces. De
luidsprekers zoeken naar elkaar, wat wordt aangegeven door hun knipperende gele leds.
Zodra het stereopaar succesvol is gekoppeld, hoort u "Connected". De gele leds blijven
branden en de blauwe led van de hoofdluidspreker knippert om aan te geven dat de
Bluetooth-koppelingsmodus actief is.
Bij een eerste keer dat 2 luidsprekers worden gekoppeld kan dit proces tot 2 minuten in
beslag nemen. Luidsprekers die eerder zijn gekoppeld, worden binnen enkele seconden
automatisch opnieuw gekoppeld als ze binnen elkaars bereik worden ingeschakeld.
Opmerking: Voor een goede koppeling moeten de Insta Sound’s zich binnen de 9 m (30
ft) van elkaar bevinden.
3. Als de stereokoppeling wordt bevestigd door de gele led, begint de blauwe led op de
hoofdluidspreker te knipperen om aan te geven dat deze klaar is om te koppelen met uw
Bluetooth-apparaat.
Opmerking: Het linkerkanaal is de 'master'-luidspreker en het apparaat van waar het
Bluetooth-bereik zal worden bepaald.
4. Navigeer op je Bluetooth-apparaat naar het menu Bluetooth-instellingen, zoek naar Insta
Sound en maak verbinding. Zodra een apparaat is aangesloten, blijft de blauwe led
branden. U hoort "Paired" als bevestiging.
Opmerking: Als u problemen ondervindt bij het verbinden, selecteer dan "Dit apparaat
vergeten" ("Forget this device") voor Insta Sound op uw Bluetooth-apparaat en probeer
opnieuw verbinding te maken.
Als uw ingeschakelde Bluetooth-apparaat geen verbinding kan maken met de Insta Sound,
druk dan 2 seconden lang de Bluetooth-knop om vorige Bluetooth-verbindingen te
verbreken. Druk 5 seconden lang de Reset-knop in om het apparaat opnieuw in te stellen.
Hiermee worden bestaande gekoppelde Bluetooth-apparaten uit het geheugen gewist.
Enkele luidsprekermodus
Als u slechts 1 Insta Sound-luidspreker wilt gebruiken, kunt u de Enkele luidsprekermodus
inschakelen. Houd terwijl het apparaat is uitgeschakeld de aan-uitknop op de luidspreker
ingedrukt. Houd nadat u de Insta Sound hebt ingeschakeld en terwijl u de aan-uitknop blijft
indrukken 2 seconden lang de Bluetooth-knop ingedrukt. De gele led brandt niet en de
blauwe led knippert om te bevestigen dat de luidspreker zich nu in Single Speaker-modus
bevindt. Maak nu in het Bluetooth-menu van uw Bluetooth-apparaat verbinding met de Insta
Sound. Als u wilt terugkeren naar de stereomodus, zet u de luidspreker eerst uit en vervolgens
weer aan.
26
Kenmerken
Zijpaneel
1. Ingang oplaadadapter: sluit hier de meegeleverde
oplaadadapter aan om de accu van de Insta Sound op
te laden.
Belangrijk: De Insta Sound moet volledig opgeladen
zijn voor het eerste gebruik voor een maximale
levensduur van de batterijen.
2. Aan/uit: Deze knop indrukken en loslaten om de Insta
Sound aan te zetten. Deze knop 1 seconde lang
indrukken en vasthouden om de Insta Sound uit te
zetten.
3. Bluetooth: Deze knop indrukken en vasthouden om
alle huidige Bluetooth-verbindingen te verbreken.
Opmerking: De Insta Sound wordt na 15 minuten
automatisch uitgeschakeld als er geen audio wordt
afgespeeld.
4. Herinstellen: Als de Insta Sound abnormaal werkt, zet
dan het apparaat af door de Reset-knop 5 seconden
lang ingedrukt te houden. Hierdoor wordt de
luidspreker uitgeschakeld en worden alle eerdere Bluetooth-verbindingen gewist.
5. Bevestiging (onderkant): Plaats hier de montagestijl en schroef vervolgens de
stelschroef vast om de luidspreker er stevig aan vast te maken.
Ledactiviteit
Knipperende blauwe led = Bluetooth-koppelingsmodus
Vaste blauwe led = Verbonden met een Bluetooth-apparaat
Knipperende gele led = Stereokoppelingsmodus
Continu brandende gele led = Beide luidsprekers zijn in stereo gekoppeld
Rode led knippert = De batterij is bijna leeg en moet worden opgeladen.
Continu brandende rode led = De led voor het opladen van de batterij gaat branden terwijl
het apparaat wordt opgeladen en gaat uit wanneer het opladen is voltooid
Gesproken aanwijzingen inschakelen/uitschakelen
Als u de gesproken aanwijzingen wilt uitschakelen of inschakelen terwijl de luidspreker(s)
is/zijn ingeschakeld, druk dan tegelijkertijd op de aan-uitknop en de Bluetooth-knop.
Wanneer u de gesproken aanwijzingen uitschakelt, blijft de ledfeedback aanwezig.
5
1
2
3
4

27
Appendix (English)
Technical Specifications
Power Via power adapter
Power adapter: 15 V, 2 A
Batter
y
Built-in rechargeable lithium ion battery
Battery Life 10 hours at 50% volume *
Recharge Time 5 hours
Speaker Output 40 watts peak total (20 watts peak per speaker)
Driver 4.0” / 102 mm woofer
0.75” / 19 mm tweeter
Frequency Response 75 Hz – 20 kHz (+/-3 dB)
Water-resistant Class IPX4
Supported Bluetooth Profile A2DP
Bluetooth Range Up to 100 ft. / 30.5 m **
Linked Stereo Range Up to 30 ft. / 9 m between 2 linked Insta Sounds **
Dimensions
(width x depth x height)
5.5” x 4.9” x 7.3” / 140 x 125 x 185 mm
Weight 2.87 lb.
1.3 kg
* Battery life may vary based on temperature, age, and volume usage of product.
** Available range is affected by walls, obstructions, and movement. For optimal performance, place the
product so it is unobstructed by walls, furniture, etc.
Trademarks & Licenses
ION Audio is a trademark of ION Audio, LLC, registered in the U.S. and other countries.
The Bluetooth word mark and logos are owned by the Bluetooth SIG, Inc. and any use of such marks by
ION Audio is under license.
All other product or company names are trademarks or registered trademarks of their respective owners.
ionaudio.com
Manual Version 1.0