IONX CMUE5-A Communications Manager Unit User Manual Working T4 Install
IONX LLC Communications Manager Unit Working T4 Install
UserManual.wiki
>
IONX
>
CMUE5 A User Manual
Exhibit D Users Manual per 2 1033 b3
Navigation menu
Upload a User Manual
Namespaces
Wiki Guide
HTML
PDF
Info
Views
User Manual
Discussion / Help
Navigation
![IONX Support Center 1-800-621-8442, supportcenter@ionxlive.com _____________________________________________________________________________________ 303350 Installation Manual E-Series CMU Confidential Revision Date: 9-July-18 Revision: H Process Owner: Engineering Page 4 of 47 2 Unpacking the CMU Required Tools/Materials Tool Name (Part No) Description 3/8” Magnetic Drive Socket Securing self-drilling screws T-27 Tamper-Resistant Torx driver Securing CMU to bracket If using a knife to cut the tape, do not let the blade extend more than ½ inch inside of the cardboard box. 2.1 Inspect shipping box/s to make sure there is no damage. 2.2 Carefully unpack the shipping box making sure to open the top of the box. There will be instruction guide/s for modules associated with the system order. 2.3 Open shipping box/s and verify that the internal contents match the shipping receipt. Contact IONX Support Center (Appendix C) in the event of any above problems. [WDL1] [This space left blank intentionally]](https://usermanual.wiki/IONX/CMUE5-A/User-Guide-4030162-Page-4.png)

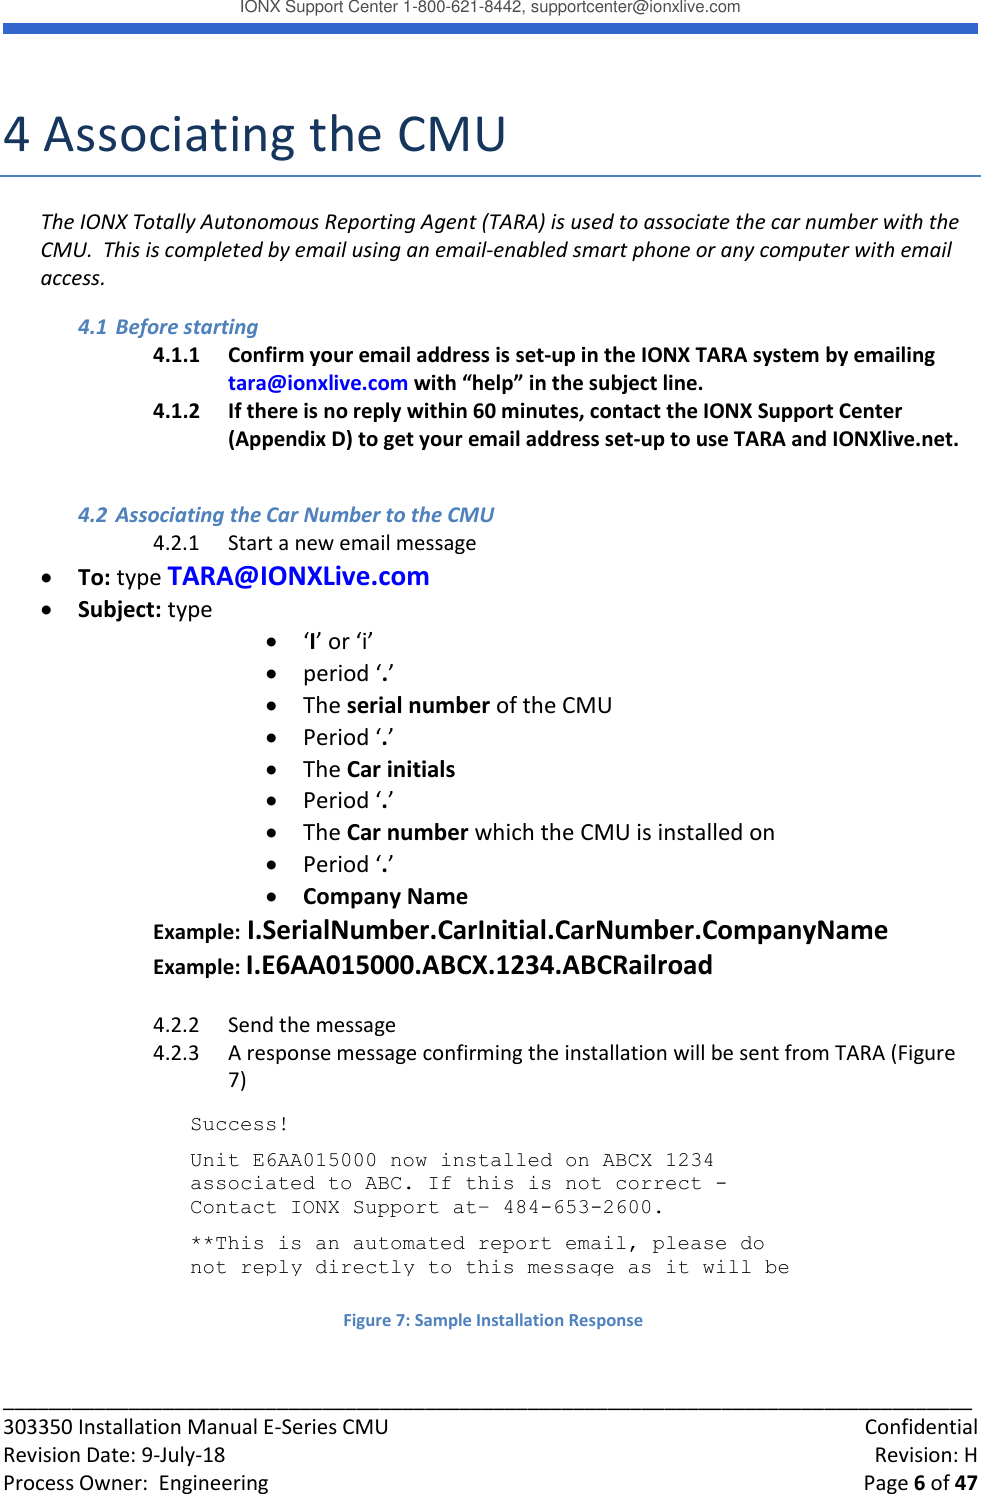
![IONX Support Center 1-800-621-8442, supportcenter@ionxlive.com _____________________________________________________________________________________ 303350 Installation Manual E-Series CMU Confidential Revision Date: 9-July-18 Revision: H Process Owner: Engineering Page 7 of 47 4.2.4 The CMU is associated with the car number. The installation is complete. The car now can be released into service. 4.3 For replacing a device on a car, start a new email message To: type TARA@IONXLive.net Subject: type o ‘R’ or ‘r’ o period ‘.’ o The serial number of the old replaced CMU o Period ‘.’ o The serial number of the new CMU being installed o Period ‘.’ o The Car initials o Period ‘.’ o The Car number which the CMU is installed on Example: R.OldSerialNumber.NewSerialNumber.CarInitial.CarNumber Example: R.E5AC011001.E4AB011000.ABCX.1234 4.3.1 An email response message confirming the replacement will be sent from TARA. 4.3.2 To see details of all TARA email service commands, go to Appendix C. 4.4 Using the TARA web site 4.4.1 Click on the link below and log in using the same credentials you use to access the IONX web site:- https://www.ionxlive.net/IonxLiveMassTARA/ Note: If you receive the error message ‘User is not a valid TARA user’, please contact IONX support to be added to the list of valid TARA users. [This space left blank intentionally]](https://usermanual.wiki/IONX/CMUE5-A/User-Guide-4030162-Page-7.png)
![IONX Support Center 1-800-621-8442, supportcenter@ionxlive.com _____________________________________________________________________________________ 303350 Installation Manual E-Series CMU Confidential Revision Date: 9-July-18 Revision: H Process Owner: Engineering Page 8 of 47 4.4.2 After logging in, you should see the following screen. This is the ‘Install’ tab and should be used if installing a device on a new car. If replacing a device on a car, please see the ‘Replace’ command instructions in section 6.3.3. [This space left blank intentionally]](https://usermanual.wiki/IONX/CMUE5-A/User-Guide-4030162-Page-8.png)
![IONX Support Center 1-800-621-8442, supportcenter@ionxlive.com _____________________________________________________________________________________ 303350 Installation Manual E-Series CMU Confidential Revision Date: 9-July-18 Revision: H Process Owner: Engineering Page 9 of 47 4.4.3 If installing only one device, fill in the serial number of the CMU to be installed, the car name and number (format ABCD 123456) and choose the customer name from the dropdown. Then press the ‘Install’ button. The following message should be displayed:- 'Success! Unit <Serial Number> is now installed on <Car Mark> associated to <Customer>. If this is not correct - Contact customer support at IONX - 484-653-2600.' If the above message is not displayed and an error message displayed which you do not understand, please capture the message and send to IONX Support for further investigation. Note that IONX installers will have access to all customers from the dropdown list. [This space left blank intentionally]](https://usermanual.wiki/IONX/CMUE5-A/User-Guide-4030162-Page-9.png)
![IONX Support Center 1-800-621-8442, supportcenter@ionxlive.com _____________________________________________________________________________________ 303350 Installation Manual E-Series CMU Confidential Revision Date: 9-July-18 Revision: H Process Owner: Engineering Page 10 of 47 4.4.4 If installing multiple devices, please use the section at the bottom of the page. Up to five (5) devices can be installed at one time. Success messages will be displayed for all installed devices and they will be removed from the table. Unsuccessful installs will still remain in the table for correction and error messages will be displayed for them. [This space left blank intentionally]](https://usermanual.wiki/IONX/CMUE5-A/User-Guide-4030162-Page-10.png)
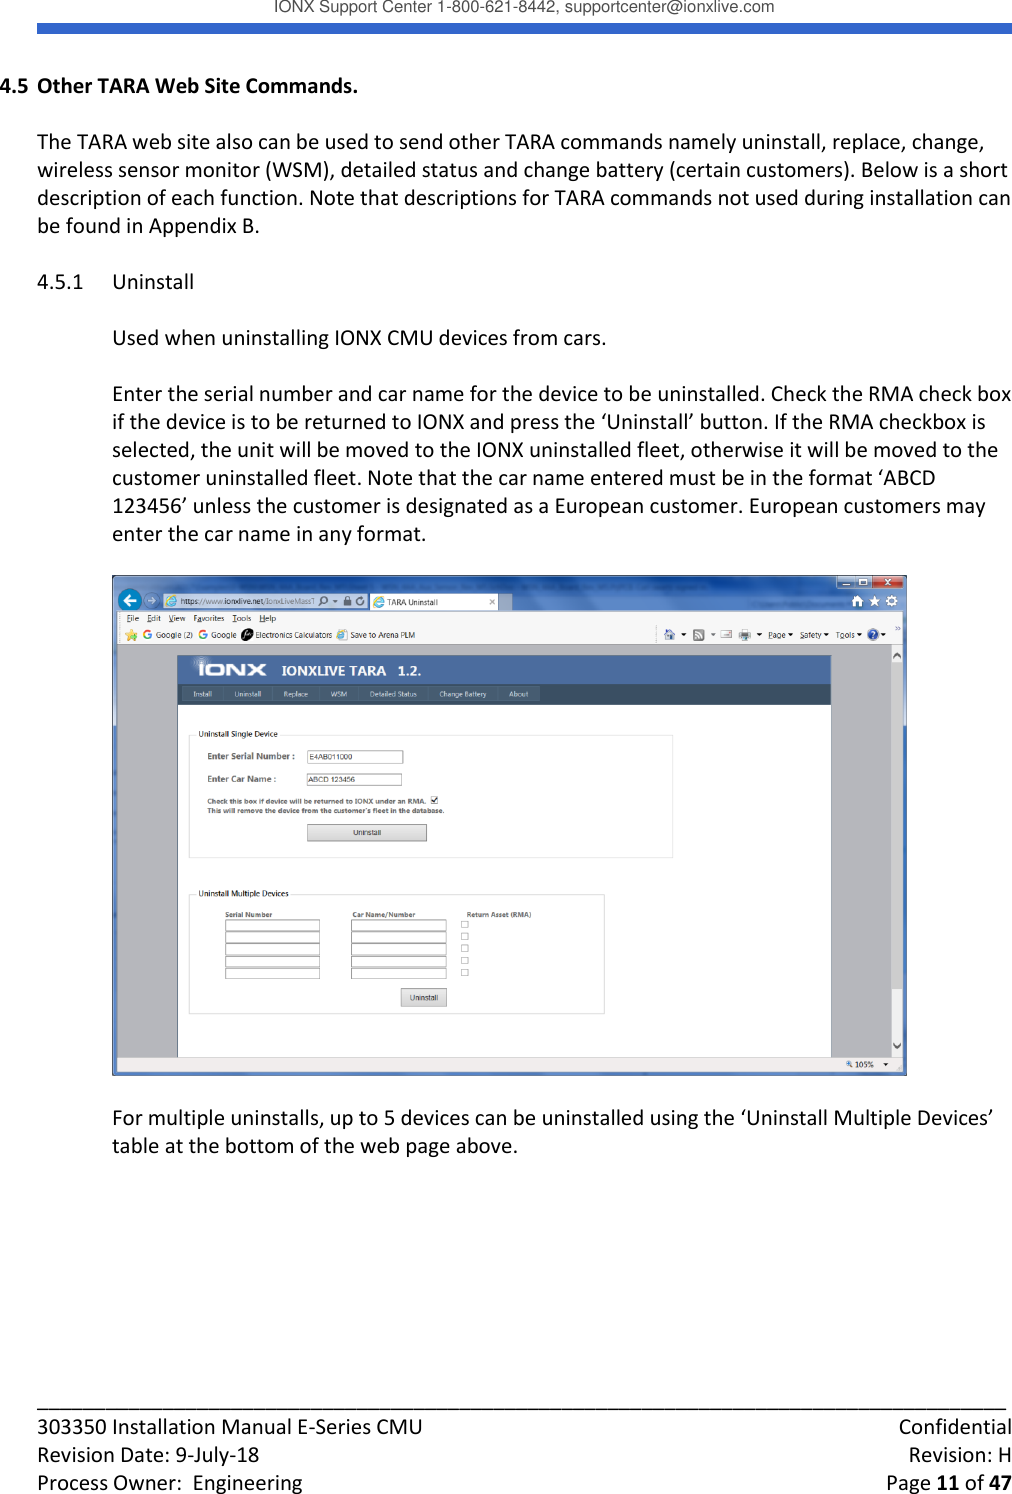
![IONX Support Center 1-800-621-8442, supportcenter@ionxlive.com _____________________________________________________________________________________ 303350 Installation Manual E-Series CMU Confidential Revision Date: 9-July-18 Revision: H Process Owner: Engineering Page 12 of 47 4.5.2 Change battery. See Appendix F. 4.5.3 Replace Used when replacing an IONX CMU device on a car with another IONX CMU. Enter old CMU serial number (to be replaced), new CMU serial number (replacement) and car name. Press the ‘Replace’ button. Note that the car name must be of the format ‘ABCD 123456’ unless the customer is designated as a European customer. [This space left blank intentionally]](https://usermanual.wiki/IONX/CMUE5-A/User-Guide-4030162-Page-12.png)
![IONX Support Center 1-800-621-8442, supportcenter@ionxlive.com _____________________________________________________________________________________ 303350 Installation Manual E-Series CMU Confidential Revision Date: 9-July-18 Revision: H Process Owner: Engineering Page 13 of 47 4.5.4 Wireless Sensor Monitor (WSM) – For information purposes only. Car sets are CMU devices plus Wireless Sensor Nodes (WSNs). WSM is used to determine if a CMU is awake and all WSNs have joined the network. Following the instructions on the web page and then enter the IONX CMU serial number and press the ‘Monitor’ button. A table of the WSNs (serial number, node number and status) for the car set should be displayed. [This space left blank intentionally]](https://usermanual.wiki/IONX/CMUE5-A/User-Guide-4030162-Page-13.png)
![IONX Support Center 1-800-621-8442, supportcenter@ionxlive.com _____________________________________________________________________________________ 303350 Installation Manual E-Series CMU Confidential Revision Date: 9-July-18 Revision: H Process Owner: Engineering Page 14 of 47 5 Miscellaneous Translations available upon request. Traductions disponibles sur demande. [This space left blank intentionally]](https://usermanual.wiki/IONX/CMUE5-A/User-Guide-4030162-Page-14.png)
![IONX Support Center 1-800-621-8442, supportcenter@ionxlive.com _____________________________________________________________________________________ 303350 Installation Manual E-Series CMU Confidential Revision Date: 9-July-18 Revision: H Process Owner: Engineering Page 15 of 47 Appendix A: Mechanicals A.1 E4S and E5S Dimensions Warning: Mounting bracket is required for CMU-E4S and CMU-E5S models when commissioning for use in potentially explosive atmosphere. IONX part number 302262, Isolation mount bracket for ExS, is approved for use in explosive atmosphere. Attention: Le support de montage est requis pour les modèles CMU-E4S et CMU-E5S lors de la mise en service pour une utilisation dans une atmosphère potentiellement explosive. Le numéro de pièce IONX 302262, support de montage d'isolation pour ExS, est approuvé pour une utilisation en atmosphère explosive. [This space left blank intentionally]](https://usermanual.wiki/IONX/CMUE5-A/User-Guide-4030162-Page-15.png)
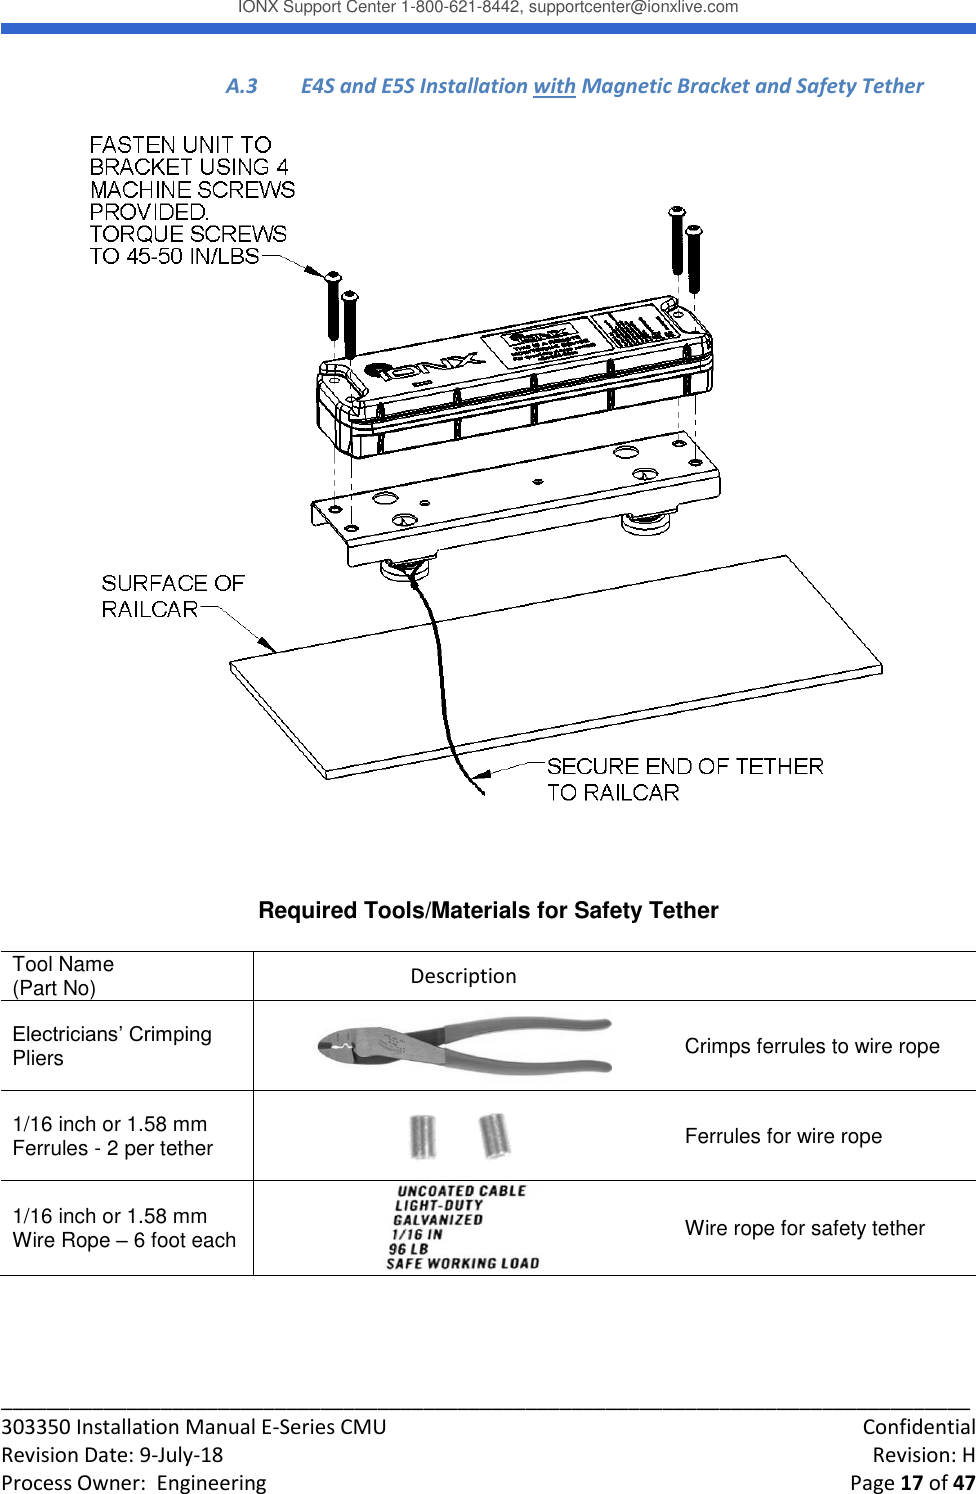
![IONX Support Center 1-800-621-8442, supportcenter@ionxlive.com _____________________________________________________________________________________ 303350 Installation Manual E-Series CMU Confidential Revision Date: 9-July-18 Revision: H Process Owner: Engineering Page 19 of 47 DIFFERENT TYPES OF PLIERS THAT CAN BE USED - SHOWS THE FERRULES IN EACH PLIER TYPE [This space left blank intentionally]](https://usermanual.wiki/IONX/CMUE5-A/User-Guide-4030162-Page-19.png)
![IONX Support Center 1-800-621-8442, supportcenter@ionxlive.com _____________________________________________________________________________________ 303350 Installation Manual E-Series CMU Confidential Revision Date: 9-July-18 Revision: H Process Owner: Engineering Page 22 of 47 [This space left blank intentionally]](https://usermanual.wiki/IONX/CMUE5-A/User-Guide-4030162-Page-22.png)
![IONX Support Center 1-800-621-8442, supportcenter@ionxlive.com _____________________________________________________________________________________ 303350 Installation Manual E-Series CMU Confidential Revision Date: 9-July-18 Revision: H Process Owner: Engineering Page 23 of 47 A.6 E4X, E5X and E6S Dimensions [This space left blank intentionally]](https://usermanual.wiki/IONX/CMUE5-A/User-Guide-4030162-Page-23.png)
![IONX Support Center 1-800-621-8442, supportcenter@ionxlive.com _____________________________________________________________________________________ 303350 Installation Manual E-Series CMU Confidential Revision Date: 9-July-18 Revision: H Process Owner: Engineering Page 24 of 47 A.7 E4X, E5X and E6S Installation with Bracket [This space left blank intentionally]](https://usermanual.wiki/IONX/CMUE5-A/User-Guide-4030162-Page-24.png)
![IONX Support Center 1-800-621-8442, supportcenter@ionxlive.com _____________________________________________________________________________________ 303350 Installation Manual E-Series CMU Confidential Revision Date: 9-July-18 Revision: H Process Owner: Engineering Page 26 of 47 A.9 E4X, E5X, and E6X Dome Mounted [This space left blank intentionally]](https://usermanual.wiki/IONX/CMUE5-A/User-Guide-4030162-Page-26.png)

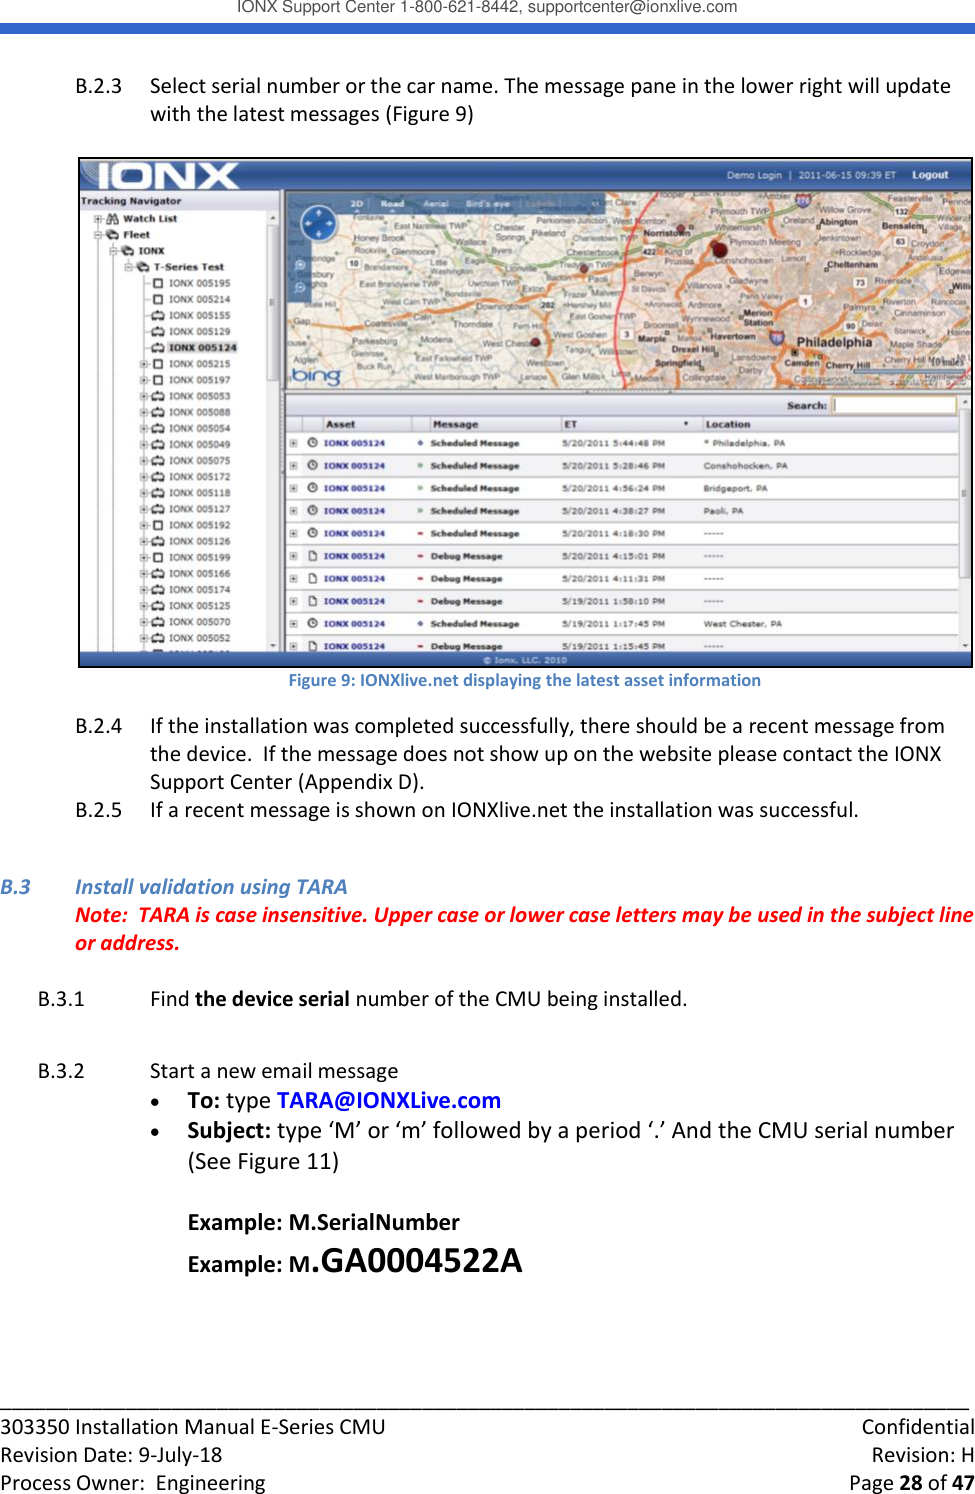
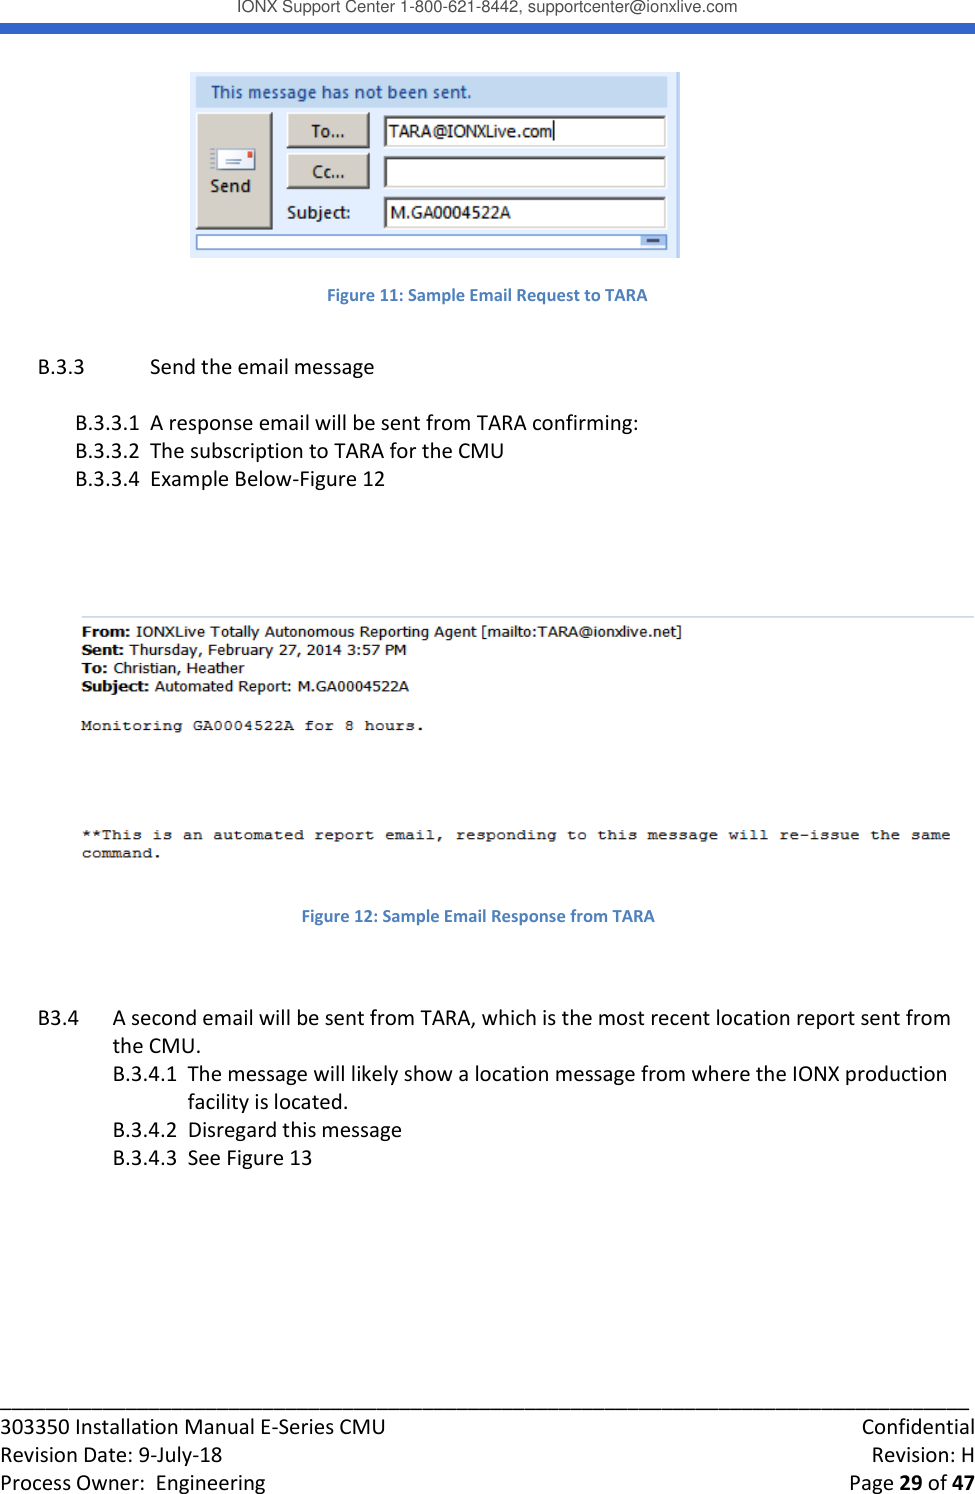
![IONX Support Center 1-800-621-8442, supportcenter@ionxlive.com _____________________________________________________________________________________ 303350 Installation Manual E-Series CMU Confidential Revision Date: 9-July-18 Revision: H Process Owner: Engineering Page 30 of 47 Figure 13: Sample TARA Message B.3.5 TARA now is configured to monitor the CMU. Repeat the process for all the CMUs being installed today B.3.6 The installation was successful if you find TARA emails for power up messages time stamped the same time the CMU was activated. [This space left blank intentionally]](https://usermanual.wiki/IONX/CMUE5-A/User-Guide-4030162-Page-30.png)

![IONX Support Center 1-800-621-8442, supportcenter@ionxlive.com _____________________________________________________________________________________ 303350 Installation Manual E-Series CMU Confidential Revision Date: 9-July-18 Revision: H Process Owner: Engineering Page 32 of 47 C.2.3 A response message confirming the installation will be sent from TARA. See example email in below: C.2.4 The CMU is associated with the car number. The installation is complete. The car now can be released into service. [This space left blank intentionally] Success! Unit 1234A has been replaced by E6AA015000 for ABCX.1234. If this has been done in error - Contact Customer Service at IONX - 484-653-2600. **This is an automated report email, responding to this message will re-issue the same command. Sample Installation Response](https://usermanual.wiki/IONX/CMUE5-A/User-Guide-4030162-Page-32.png)
![IONX Support Center 1-800-621-8442, supportcenter@ionxlive.com _____________________________________________________________________________________ 303350 Installation Manual E-Series CMU Confidential Revision Date: 9-July-18 Revision: H Process Owner: Engineering Page 33 of 47 Appendix D: General Information D1. IONX Support Center An IONX Customer Service Representative can be reached via the following communication methods: Phone (local): +1-484-653-2600, press 1 for Customer Service Phone (toll-free): +1-888-519-4050 Fax: +1-484-653-2601 Email: supportcenter@ionxlive.com D2. Forcing the CMU to call If there is a problem verifying messages on the website or through TARA, the CMU can be forced to call for 24 hours after removing the installation magnet. Place the installation magnet onto the indentation, where it was located, at the time of shipping for 30-seconds then remove. The CMU should send a report within 15-minutes. If TARA is active for the CMU and no reports are received by email or on the website, contact the IONX Support Center. [This space left blank intentionally]](https://usermanual.wiki/IONX/CMUE5-A/User-Guide-4030162-Page-33.png)
![IONX Support Center 1-800-621-8442, supportcenter@ionxlive.com _____________________________________________________________________________________ 303350 Installation Manual E-Series CMU Confidential Revision Date: 9-July-18 Revision: H Process Owner: Engineering Page 34 of 47 D4. Overview of CMU physical features [This space left blank intentionally] Intrinsic Safety Certification IONX Contact Information Reed Switch](https://usermanual.wiki/IONX/CMUE5-A/User-Guide-4030162-Page-34.png)
![IONX Support Center 1-800-621-8442, supportcenter@ionxlive.com _____________________________________________________________________________________ 303350 Installation Manual E-Series CMU Confidential Revision Date: 9-July-18 Revision: H Process Owner: Engineering Page 35 of 47 Appendix E: Trouble Shooting E1. Missed Wake-up Message If the wakeup message does not show up through TARA within 30-minutes of the magnet being removed, another message can be forced to be transmitted within 24 hours of the installation magnet being removed. See Appendix D3 –General Information on “Forcing the CMU to Call.” E2. Opening and closing the hatch is not triggering an alarm E.2.1 If CMU was not installed in its final position within the 5-minute mounting period window after removing the installation magnet, an open/close hatch will not trigger an alarm. Contact the IONX Support Center (Appendix D) so a Customer Service Representative can correct the home position of the CMU. E.2.2 The CMU configuration is not set correctly. The CMU may not have been configured to report open/close or tilt alarms inside facilities where authorized personal will typically be handling cars. Contact the IONX Support Center (Appendix D) so a Customer Service Representative can check the configuration of the CMU. E3. Unit does not appear on IONXlive.net E.3.1 If the asset does not appear on IONXlive.net it could be a limitation of the user’s login id. Contact the IONX Support Center (Appendix D) so a Customer Service Representative can check the permission level and adjust accordingly. E.3.2 Initially the asset will be shown on IONXlive.net as the CMU serial number. When the CMU is associated to an asset, the CMU serial number will be replaced by the car name. E4. Power up message missing on IONXlive.net If the CMU misses a power up message but has a recent message showing the current location, then the CMU is OK to install. [This space left blank intentionally]](https://usermanual.wiki/IONX/CMUE5-A/User-Guide-4030162-Page-35.png)
![IONX Support Center 1-800-621-8442, supportcenter@ionxlive.com _____________________________________________________________________________________ 303350 Installation Manual E-Series CMU Confidential Revision Date: 9-July-18 Revision: H Process Owner: Engineering Page 36 of 47 Appendix F: Battery Replacement Required Tools/Materials Tool Name (Part No) Description T-20 Torx driver with torque capability of 22-24 in/lbs 7.2V Power Supply or Wall Wart [This space left blank intentionally]](https://usermanual.wiki/IONX/CMUE5-A/User-Guide-4030162-Page-36.png)
![IONX Support Center 1-800-621-8442, supportcenter@ionxlive.com _____________________________________________________________________________________ 303350 Installation Manual E-Series CMU Confidential Revision Date: 9-July-18 Revision: H Process Owner: Engineering Page 37 of 47 Warning: Case can build up electrostatic charge. Clean the case by spraying with water. Do not use cloth to clean the CMU. Remove CMU to area known to be non-hazardous. Attention: Le boîtier peut accumuler une charge électrostatique. Nettoyez le boîtier en pulvérisant de l'eau. N'utilisez pas de chiffon pour nettoyer le CMU. Retirer la CMU dans une zone connue comme non dangereuse. Warning: Do not open CMU in potentially explosive atmosphere. ATTENTION: N'ouvrez pas la CMU dans une atmosphère potentiellement explosive. F.1. Turn the CMUS unit over and remove the 4 T-20 Torx screws (IONX P/N 300842) that hold the lid in place. See Figure F.1 below. Figure F.1 F.2. Carefully turn the unit over, being sure to hold the lid in place, as you do so. [This space left blank intentionally] T20 Screws (300842)](https://usermanual.wiki/IONX/CMUE5-A/User-Guide-4030162-Page-37.png)
![IONX Support Center 1-800-621-8442, supportcenter@ionxlive.com _____________________________________________________________________________________ 303350 Installation Manual E-Series CMU Confidential Revision Date: 9-July-18 Revision: H Process Owner: Engineering Page 39 of 47 F.4. Carefully lift the power cable from beside the main board and disconnect the battery. Figure F3. Figure F.3 F.5. Remove the battery pack, and set aside. WARNING: DO NOT PLACE USED HAZARDOUS BATTERY PACKS IN THE TRASH. THESE SHOULD BE TAKEN TO A RECYLCING FACILITY THAT CAN PROPERLY DISPOSE OF THEM. ATTENTION: NE PLACEZ PAS LES PACKS DE BATTERIE DANGEREUX UTILISES DANS LA POUBELLE. CES DERNIERS DOIVENT ETRE UTILISES DANS UNE INSTALLATION DE RECYCLAGE QUI PEUT LES DISPOSER CORRECTEMENT.. F.6. Connect a 7.2V power supply or wall wart to the power cable of the core module for a minimum of 5 minutes (preferably more) to pre-charge the core, and prevent errors once the new battery is connected. [This space left blank intentionally]](https://usermanual.wiki/IONX/CMUE5-A/User-Guide-4030162-Page-39.png)
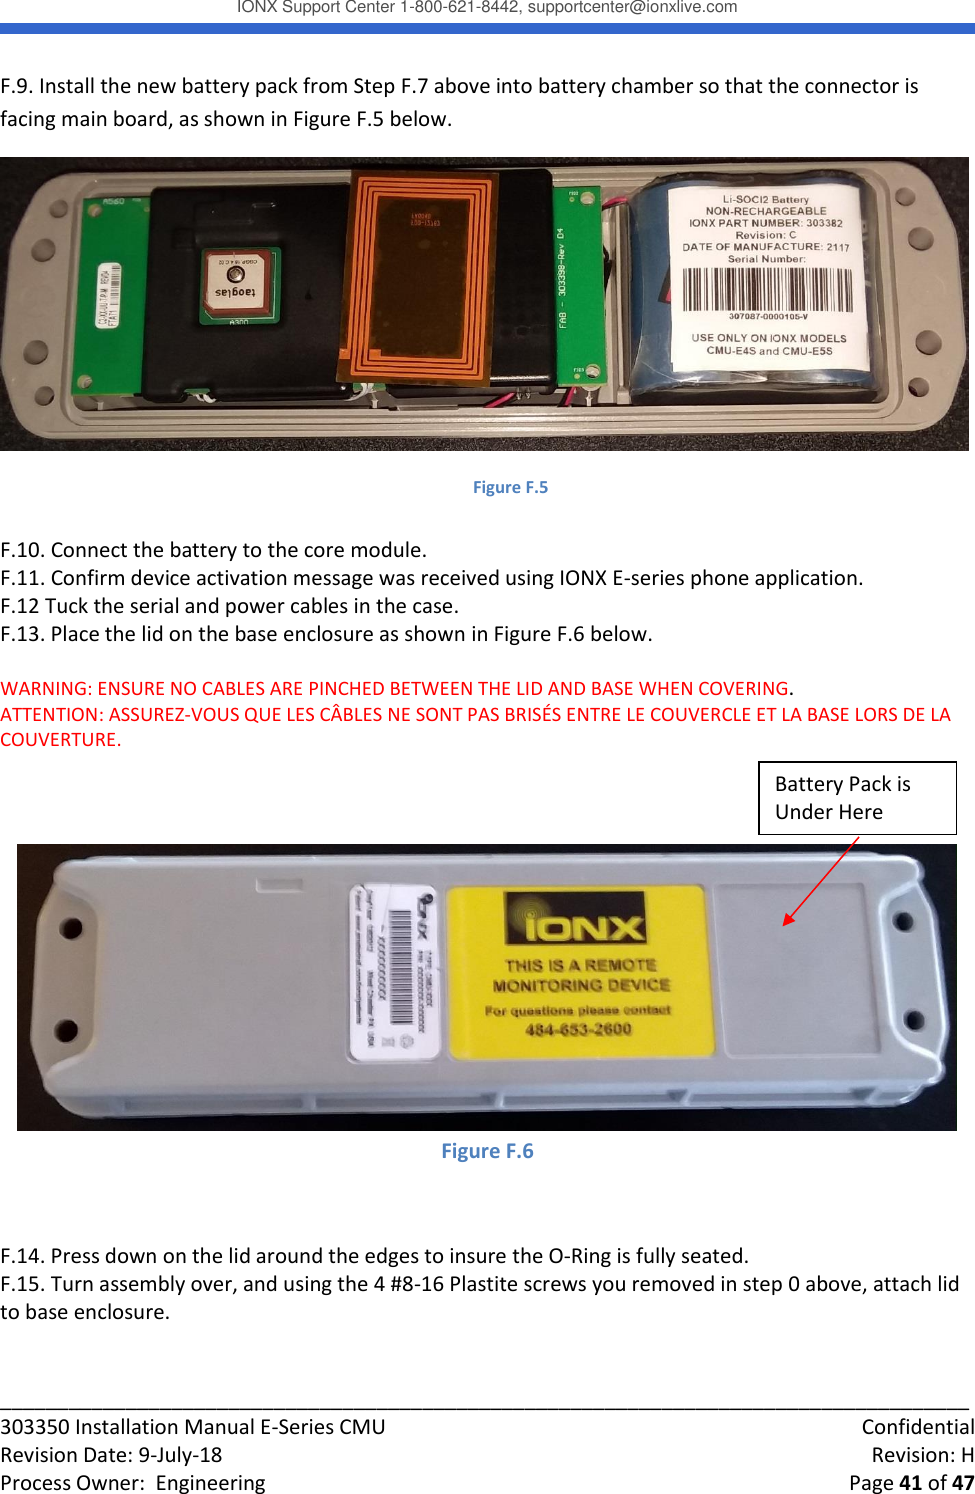
![IONX Support Center 1-800-621-8442, supportcenter@ionxlive.com _____________________________________________________________________________________ 303350 Installation Manual E-Series CMU Confidential Revision Date: 9-July-18 Revision: H Process Owner: Engineering Page 40 of 47 F.7. Disconnect the power supply and select a new battery pack to install. WARNING: BATTERY PACK 303382: USE ONLY ON IONX MODELS E4S and E5S. WARNING: BATTERY PACK 303406: USE ONLY ON IONX MODELS E4X, E5X, and E6X. ATTENTION: BATTERY PACK 303382: N'UTILISER QUE SUR LES MODÈLES IONX E4S et E5S. ATTENTION: BATTERY PACK 303406: À UTILISER UNIQUEMENT SUR LES MODÈLES IONX E4X, E5X et E6X. From your email account (the one you have registered for the IONXLive web site with), start a new email: Enter ‘TARA@ionxlive.net’ in the ‘To’ recipient text box. In the ‘Subject’ line of the email, enter the command for TARA in the following format: o B.CMUSerialNumber.OldBatterySerialNumber.NewBatterySerialNumber When done, press ‘Send’. See Figure F.4 below. Figure F.4 F.8. Within a few minutes, TARA will email back with either an error message or a message to say that the command was successful. If successful, continue with Step 0 below. If an error message is received, start over at Step 0 above. If the error message persists, contact IONX Customer Service at (800) 621-8442. [This space left blank intentionally]](https://usermanual.wiki/IONX/CMUE5-A/User-Guide-4030162-Page-40.png)
![IONX Support Center 1-800-621-8442, supportcenter@ionxlive.com _____________________________________________________________________________________ 303350 Installation Manual E-Series CMU Confidential Revision Date: 9-July-18 Revision: H Process Owner: Engineering Page 42 of 47 WARNING: SLOWLY TURN THE SCREWS COUNTER-CLOCKWISE UNTIL YOU FEEL THEM CLICK INTO THE EXISTING THREAD BEFORE TIGHTENING TO ENSURE HOLE IS NOT RE-THREADED. FAILURE TO DO THIS WILL STRIP THE THREADS. MISE EN GARDE: TOURNER LENTEMENT LES VIS DANS LE SENS ANTIHORAIRE JUSQU'À CE QUE VOUS VOUS SENTEZ CLIQUER DANS LE FILET EXISTANT AVANT DE LE SERRER POUR VOUS ASSURER QUE LE TROU NE SOIT PAS RETIRÉ. LE FAIT DE NE PAS FAIRE CECI FERMERA LES FILS.. F.16. Tighten screws to a torque of 22.0-24.0 in/lbs. [This space left blank intentionally]](https://usermanual.wiki/IONX/CMUE5-A/User-Guide-4030162-Page-42.png)
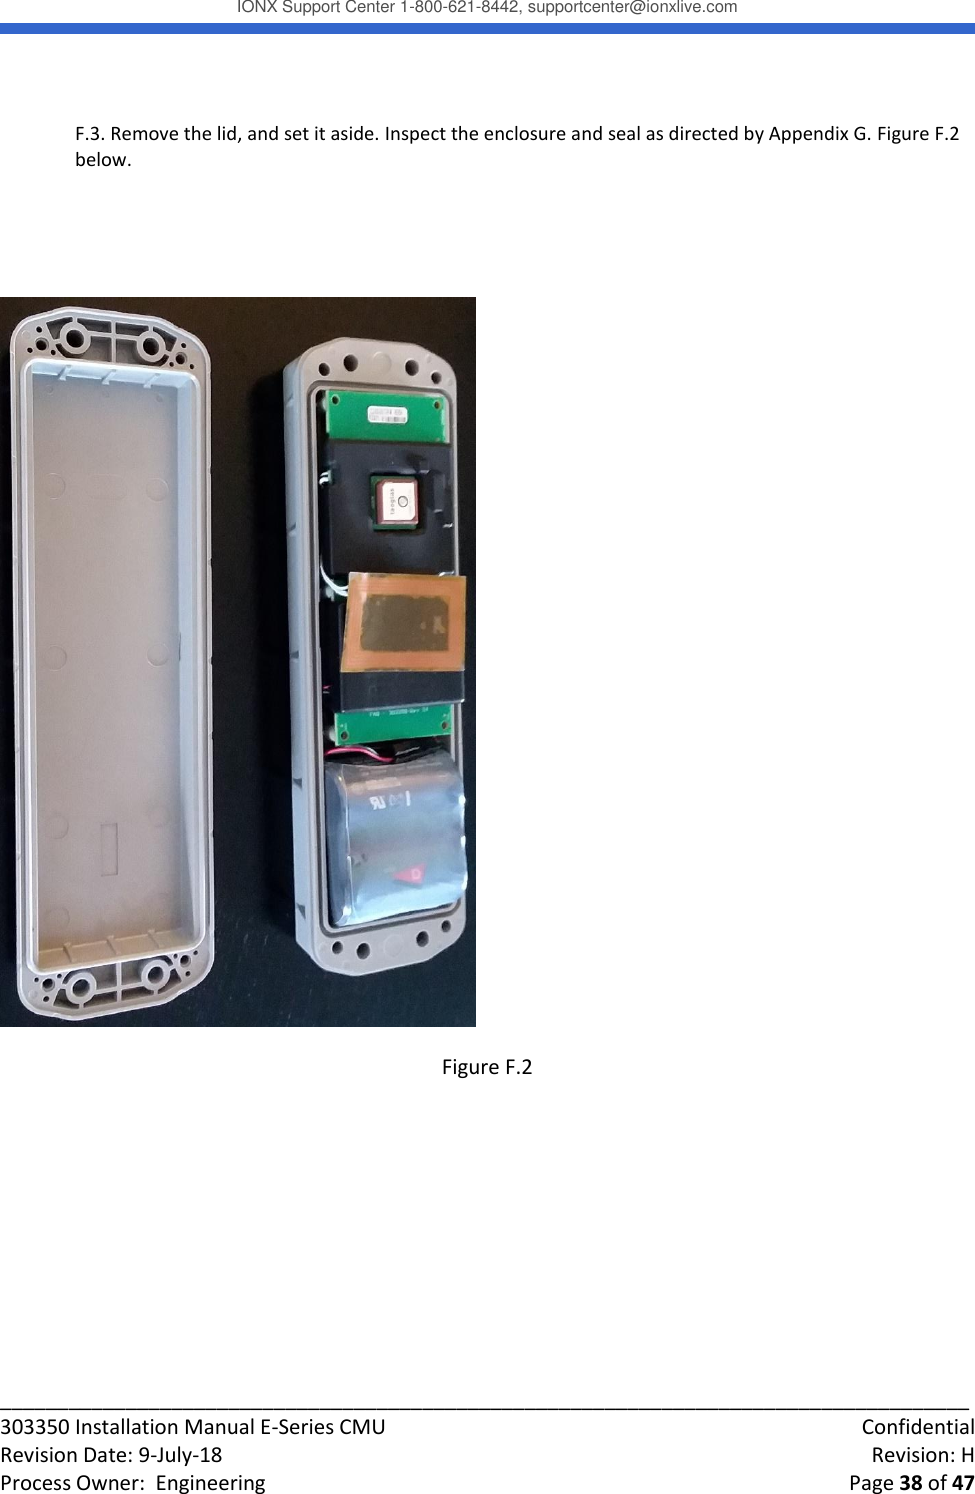
![IONX Support Center 1-800-621-8442, supportcenter@ionxlive.com _____________________________________________________________________________________ 303350 Installation Manual E-Series CMU Confidential Revision Date: 9-July-18 Revision: H Process Owner: Engineering Page 43 of 47 Appendix G: Inspection of Equipment for Return to Service G.1. Enclosure base and lid shall be free of cracks. G.2. Oring shall be free of cracks. If any part of the oring is removed, the oring gland must be cleaned to be free of particulates. G.3. Clean enclosure base top of oring surface with damp cloth. G.4. Clean enclosure lid oring bump out with damp cloth. G.5. Inspect power wires. Insulation shall be free of cracks. G.6 Inspect NFC antenna and wire. Both shall be free of cracks. G.7 Inspect circular Gore vent under enclosure base. Gore vent shall show no evidence of peeling, puncture or cracking. G.8 E6X version only: Inspect coax cable and antenna. Both shall be free of cracks. G.9 Replace any parts that fail inspection. [This space left blank intentionally]](https://usermanual.wiki/IONX/CMUE5-A/User-Guide-4030162-Page-43.png)
![IONX Support Center 1-800-621-8442, supportcenter@ionxlive.com _____________________________________________________________________________________ 303350 Installation Manual E-Series CMU Confidential Revision Date: 9-July-18 Revision: H Process Owner: Engineering Page 45 of 47 This device complies with Industry Canada’s license-exempt RSSs. Operation is subject to the following two conditions: (1) This device may not cause interference; and (2) This device must accept any interference, including interference that may cause undesired operation of the device. [This space left blank intentionally]](https://usermanual.wiki/IONX/CMUE5-A/User-Guide-4030162-Page-45.png)