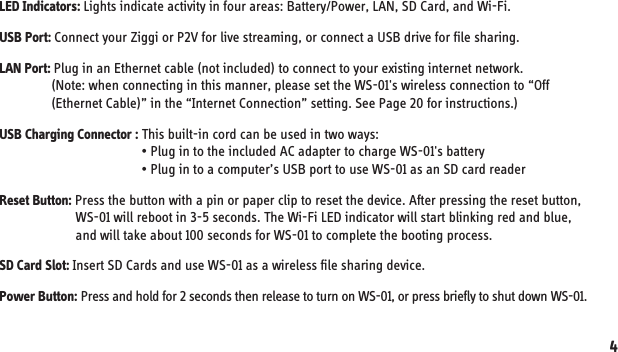
IPEVO CSAW-02IP Wireless Station for USB Cam User Manual WS01 QSG 0129

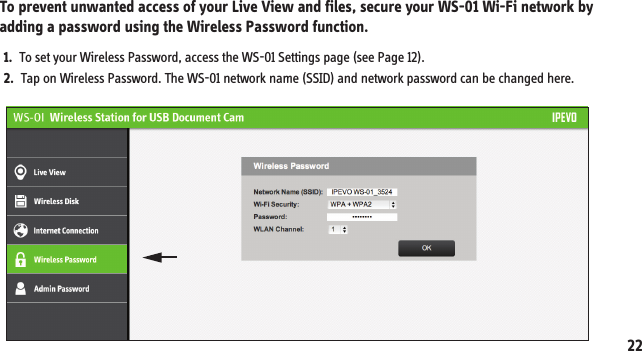
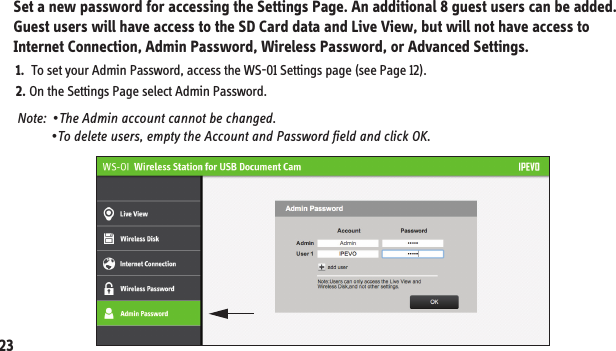
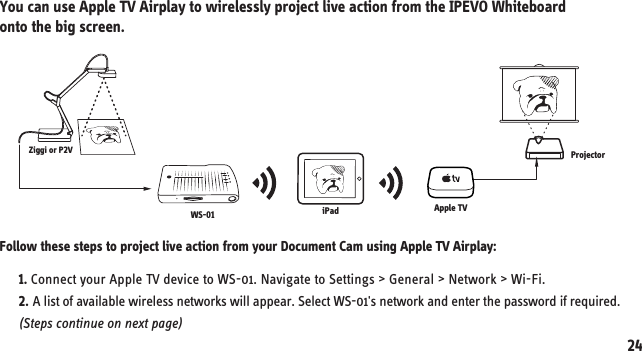
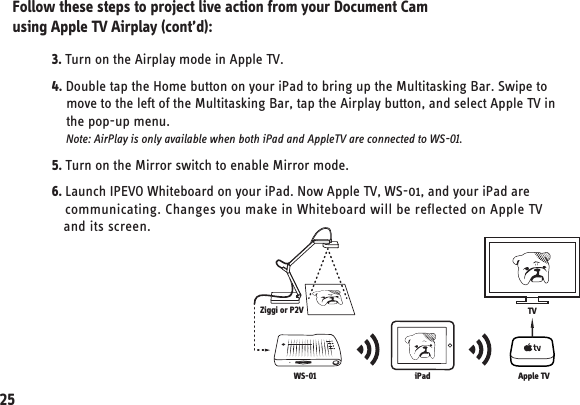
IPEVO corp. Wireless Station for USB Document Cam WS01 QSG 0129

Users Manual

Wireless Station for USB Document CamWS-01User Manual
Package ContentsYour package should contain the following:• Wireless Station and attached USB cord• 1.5m USB extension cable and AC power adapter• User Manual (this document) Congratulations on your purchase of the WS-01 Wireless Station for USB Document Cameras. This User Manual will help you get WS-01 set up right away.Note: This document will refer to the WS-01 Wireless Station for USB Document Cam as simply WS-01.Note: The WS-01 is intended to be used with one of IPEVO's USB document cameras — the Point 2 View, Ziggi or Ziggi HD — which are sold separately.1. Getting StartedWireless Station x 1 Extension cable &power adapter x 1User Manual x 11
• Stream live images from Ziggi or P2V to iPad, PC or Mac via Wi-Fi• Upgrade your Ziggi or P2V to a Wi-Fi enabled wireless document camera• Take advantage of the free Whiteboard App to further enhance your doc cam's use on the iPad • Use the station as a USB drive or USB card reader with the built-in SD card slot. You can    wirelessly share files on the WS-01 via Wi-Fi The WS-01 Wireless Station for USB Document Cam lets your IPEVO document camera —the Point 2 View, Ziggi or Ziggi HD — communicate wirelessly so you can do even more:Ziggi or P2VPC or MaciPad2. The Basics2WS-01
3. Getting to know your WS-01USB Charging ConnectorPower ButtonLED IndicatorsSD Card SlotReset ButtonUSB PortLAN Port3
LED Indicators: Lights indicate activity in four areas: Battery/Power, LAN, SD Card, and Wi-Fi.USB Port: Connect your Ziggi or P2V for live streaming, or connect a USB drive for file sharing.LAN Port: Plug in an Ethernet cable (not included) to connect to your existing internet network.                (Note: when connecting in this manner, please set the WS-01's wireless connection to “Off                (Ethernet Cable)” in the “Internet Connection” setting. See Page 20 for instructions.)USB Charging Connector : This built-in cord can be used in two ways:                                         • Plug in to the included AC adapter to charge WS-01's battery                                         • Plug in to a computer’s USB port to use WS-01 as an SD card readerReset Button: Press the button with a pin or paper clip to reset the device. After pressing the reset button,                       WS-01 will reboot in 3-5 seconds. The Wi-Fi LED indicator will start blinking red and blue,                       and will take about 100 seconds for WS-01 to complete the booting process.SD Card Slot: Insert SD Cards and use WS-01 as a wireless file sharing device.Power Button: Press and hold for 2 seconds then release to turn on WS-01, or press briefly to shut down WS-01.4
4. Understanding the LED indicatorsThe color (red or blue) and frequency (solid or blinking) of the WS-01's LED indicators will tell you more about the device's status.IndicatorBattery/PowerLANSD CardWIFI• Blue: Battery is normal with sufficient charge, or charging is complete• Red: Battery is charging• Blinking Red: Low battery. Please plug in the power adapter• Blue: Ethernet cable is connected• Blinking Blue: Data is transferring• LED Off: Ethernet cable is unplugged• Blue: SD Card is inserted and ready• Blinking Blue: SD Card data is transferring• LED Off: SD Card slot is emptyColor and Frequency• Red and Blinking Red: System is booting up• Blue: Wi-Fi is on / System is on• Blinking Blue: Data is being transferred via Wi-Fi• Blinking Red and Blue: System is shutting down5
Charge WS-01’s built-in battery prior to powering up the device for the first time. This ensures the battery will have sufficient power.5. Charging Your WS-011. Connect the built-in USB connector to the included     power adapter, then connect the power adapter     to an outlet.2. The battery/power LED indicator will stay red     while charging. When the battery is fully     charged, this indicator will turn blue.  3. The battery may also be charged by plugging the     built-in USB connector directly into a computer's     USB port. However, this method will take longer         than using the power adapter. 6Connect Adapterto WS-01Plug-InNote: Wi-Fi will be disabled when plugged into a computer’s USB port.
Battery Tips:Important Caution!• Charging to full will take approximately 6 hours, or more if you are using the WS-01 while charging. • The WS-01's 3300mAh battery will power the device for about 4 hours before requiring a charge.• A blinking red battery/power LED means your battery is low. Please recharge your device if so.Please do not attempt to use any power adapter other than the one included with your package. Using a different adapter may damage the WS-01 and will void the manufacturer warranty.7
WS-01 is compatible with iPad, PC and Mac, and can be installed following these steps:6. Setting Up Your WS-01SD CARDLAN/POWERConnect USB Cable8Turn onWIFI    1. Press the power button and hold for 2 seconds.     The Wi-Fi indicator will flash from red to blue. 2. Connect your Ziggi or P2V Document Camera to       the USB port on WS-01.21
7. Installing your WS-01IPEVO WS-01_3524SSID:MAC Address:0123456789ab25123B01234On iPad:1. Go to the Apple App Store on your iPad.     On App Store, search for and install the free    “IPEVO Whiteboard” app.93. Launch IPEVO Whiteboard and follow the     onscreen guide to access WS-01’s features.2. Hit “Settings” on your iPad and enter “Wi-Fi      Settings.” Browse the available connections      and connect to WS-01's SSID (SSID can be found on      the label located on the bottom of the device).Bottom of WS-01
4. a) Tap the Wireless Station icon and b) Select WS-01 under available wireless stations.     The menu bar next to Wireless Station should then expand once WS-01 is selected. a10b
5. Use the icons on the extended menu to view Live View, access data and settings.Live View: View the live feed from your Document CameraStorage:  Access files stored on WS-01 wirelesslySettings: Access the settings page11
10.10.10.1Enter IP addressOn Mac or PC:1. Browse your available wireless networks and     connect to WS-01's SSID (SSID can be found on     the label located on the bottom of the device).IPEVO WS-01_3524SSID:MAC Address:0123456789ab25123B012342. Launch your browser and connect to the IP     address of WS-01 by typing it into the address     bar. The default for this IP address is 10.10.10.1. 12Bottom of WS-01
3. Enter the login password at the prompt, which     by default is "admin".4. Click on "Live View" on the Settings page to     access the video stream and related options.13
5. In the top right-hand corner of the video stream window  is an icon with 4 arrows. Click this icon to     enlarge the video screen.14
On iPad: Using the IPEVO Whiteboard App to access Data Sharing 1. Connect to WS-01 (follow the steps on Page 9) and launch the IPEVO Whiteboard App.2. Select WS-01 under Wireless Stations (follow the steps on Page 10). 3. On the extended menu bar, tap the Disk icon to access files stored on WS-01.WS-01's SD Card slot and USB port allows you to insert SD cards or USB drives with curriculum to view and share via your browser or the IPEVO Whiteboard App. Additionally, files edited using Whiteboard can be saved to an installed SD card. 8. Using WS-01 for Data Sharing15
On Mac or PC: Using your Browser to access Data Sharing1. Click "Wireless Disk" on the Settings Page to access and manage the SD Card’s or USB Drive's data.     (See Page 12 for accessing the Settings Page.) 2. Click on the SD Card or USB Drive image.     File names, sizes, and last modified dates will be shown. 1216
3. Use the four icons above the file list to manage the data:Home: Return to the root directoryUp: Go up one level to the parent directoryDelete: Checkmarked files will be deleted Download: Download checkmarked files. This function is disabled when using iPadNote: for Delete and Download functions, click the white check boxes to the left of file names to mark files accordingly.Network 217
Your computer/iPad will lose its connection to the internet once you connect to WS-01. However, WS-01 will act as a bridge from your computer/iPad to your interent-enabled network.9. Connecting to the Internet with WS-01Generally, your iPad/Computer can access the internet via your Wi-Fi routerWith IPEVO WS-01,you can view the IPEVO Doc Cam from your iPad/Computer in real time. Plus, you can connect to the Internet by linking WS-01 to the Wi-Fi network you already use.Follow these simple steps to set up a Wi-Fi Internet connection for the WS-01.It will only take a minute.18
1.  Please make sure your iPad, Mac or PC is connected to WS-01. To connect WS-01, please follow the      steps starting on Page 8.  19In IPEVO WhiteboardIn your Browser2. Tap the Internet Connection icon on the WS-01 Settings Page. (To use the IPEVO Whiteboard App to access     the Settings page on iPad, a) tap the Wireless Station Icon, then b) select the Gear icon in the extended menu).Connecting to the internet with WS-01:ab
3. Under “Wireless Connection,” select “On.” If a wired connection is preferred, please select     “Off (Ethernet Cable)” and plug an Ethernet cable (not included) into the LAN port.4. A list of available Wi-Fi networks will appear. Select your network.Wireless 1Wireless 220
5. Enter the password for your network and click OK.6. A pop-up window will appear. Please click "Restart" to restart WS-01 and complete the process, or click     "Later" to manually restart WS-01 later. WS-01 will connect to your network in 30 seconds. Your device is     now connected to the Internet through WS-01.Note:  • If you are not returned to the WS-01 Settings Page after the 30 second countdown, please reconnect               your iPad to WS-01 by going to Settings > Wi-Fi > Select WS-01’s Network.           • WS-01 is unable to determine if your password is correct or if you have successfully connected to your             network. If you are unable to access the internet after restart, please check if the password is entered             correctly (case sensitive) and try again.21
To prevent unwanted access of your Live View and files, secure your WS-01 Wi-Fi network by adding a password using the Wireless Password function.  10. Securing your WS-01 Wireless Network1.  To set your Wireless Password, access the WS-01 Settings page (see Page 12).2.  Tap on Wireless Password. The WS-01 network name (SSID) and network password can be changed here.22
Set a new password for accessing the Settings Page. An additional 8 guest users can be added. Guest users will have access to the SD Card data and Live View, but will not have access to Internet Connection, Admin Password, Wireless Password, or Advanced Settings.11. Customizing Your Login Information Note:  •The Admin account cannot be changed.            •To delete users, empty the Account and Password field and click OK.1.  To set your Admin Password, access the WS-01 Settings page (see Page 12).2. On the Settings Page select Admin Password. 23
You can use Apple TV Airplay to wirelessly project live action from the IPEVO Whiteboard onto the big screen. 12. Using Apple TV Airplay24Ziggi or P2ViPadApple TVProjectorWS-01Follow these steps to project live action from your Document Cam using Apple TV Airplay:1. Connect your Apple TV device to WS-01. Navigate to Settings > General > Network > Wi-Fi.2. A list of available wireless networks will appear. Select WS-01's network and enter the password if required.(Steps continue on next page)
3. Turn on the Airplay mode in Apple TV. 4. Double tap the Home button on your iPad to bring up the Multitasking Bar. Swipe to     move to the left of the Multitasking Bar, tap the Airplay button, and select Apple TV in      the pop-up menu.     Note: AirPlay is only available when both iPad and AppleTV are connected to WS-01.5. Turn on the Mirror switch to enable Mirror mode.6. Launch IPEVO Whiteboard on your iPad. Now Apple TV, WS-01, and your iPad are    communicating. Changes you make in Whiteboard will be reflected on Apple TV    and its screen.25Follow these steps to project live action from your Document Cam using Apple TV Airplay (cont’d):Ziggi or P2ViPadWS-01 Apple TVTV
13. FAQ26• I forgot my network name (SSID) or Admin password.   Use a pin or paper clip to press the Reset button on WS-01 to reset the device. WS-01 will reboot   after 3-5 seconds. It takes about 100 seconds for WS-01 to complete the booting process. The   Default network name (SSID) can be found on the label located on the bottom of the device    (see Page 12), and the default password for Admin is "admin".• Can I stream video from WS-01 on multiple devices simultaneously?   Yes. But due to bandwidth limitations, it is not recommended to have more than 3 devices streaming    video from WS-01 simultaneously. Connecting to WS-01 with multiple devices may cause Live View to lag.• Some of my files in WS-01’s storage will not open.   Your file is not compatible with iOS/Safari. For more information on what file format is    supported, please refer to Apple's iOS Technology Overview.IPEVO WS-01_3524SSID:MAC Address:0123456789ab25123B01234Bottom of WS-01
• I am looking for more networks settings on WS-01.   Follow the steps on Page 12 to access WS-01 settings. Hit "Advanced Settings." You should find more    options under Advanced Settings. Please consult your internet administrators for Advanced Settings    regarding network connection.   27• I need to use static IP for all devices on my network setup. What do I do?   1. Follow the steps on Page 12 to access your WS-01 settings. Hit "Advanced Settings."   2. From there, go to Wired Network Setting > Mode > Fixed IP Address.   3. Enter the IP Address, Subnet Mask, Default Gateway and other settings in their       respective fields, and click OK.
• What is the battery life for different charge times?• Can I charge WS-01 via a computer's USB port?  Yes, but charging via a computer's USB port is slower than charging via AC adapter. WS-01's Wi-Fi   will be disabled when plugged into a USB port and will turn into an SD card reader.Charge Time2 hr1 hrBattery life1 hour2 hoursNote: Test results are for reference only. Actual battery life may vary accordingly.28
14. Troubleshooting· Make sure your doc cam is connected to the USB port of WS-01. · Make sure your iPad is connected to WS-01 via Wi-Fi. Follow the steps on Page 9. · Shut down the device and restart.· Remove the doc cam and then reconnect its USB cable.· Close and re-launch the IPEVO Whiteboard App.· Use a pin or paper clip to press the Reset button on WS-01 to reset the device. Wait 3-5 seconds   to allow WS-01 to reboot. Try connecting again after the reset.· Contact your Internet administrator for assistance.· If a reset does not resolve the problem, please contact IPEVO customer service.· Please ensure the password you're entering is correct.· Contact your Internet administrator for assistance.• The image from my document camera and WS-01 does not show up on IPEVO Whiteboard.• I've followed the steps on Pages 8 to 14 but I cannot connect to WS-01.• I am unable to connect WS-01 to my existing network. 29
· Press and hold the power button for 3 seconds then release to force shutdown of WS-01.• I cannot turn off my WS-01.· Go to the Internet Connection page (See Page 18), and click the "Refresh Network List" button.   See if your network name appears.· Shut down the device and restart. Search for your network after restarting. • WS-01 cannot find my Wi-Fi network.· Go to the Internet Connection page (See Page 18), and click the "Refresh Network List" button.   See if your network name appears.· Shut down the device and restart. Search for your network after restarting. • WS-01 cannot find my Wi-Fi network.30
3115. Federal Communication Commission Interference Statement. Reorient or relocate the receiving antenna.. Increase the separation between the equipment and receiver.. Connect the equipment into an outlet on a circuit different from that to which the receiver is connected.. Consult the dealer or an experienced radio/TV technician for help.This equipment has been tested and found to comply with the limits for a Class B digital device, pursuant to Part 15 of the FCC Rules. These limits are designed to provide reasonable protection against harmful interference in a residential installation.This equipment generates, uses and can radiate radio frequency energy and, if not installed and used in accordance with the instructions, may cause harmful interference to radio communications. However, there is no guarantee that interference will not occur in a particular installation. If this equipment does cause harmful interference to radio or television reception, which can be determined by turning the equipment off and on, the user is encouraged to try to correct the interference by one of the following measures:
32FCC Caution: To assure continued compliance, any changes or modifications not expressly approved by the party responsible for compliance could void the user's authority to operate this equipment. (Example - use only shielded interface cables when connecting to computer or peripheral devices).FCC Radiation Exposure StatementThis equipment complies with FCC RF radiation exposure limits set forth for an uncontrolled environment. This equipment should be installed and operated with a minimum distance of 20 centimeters between the radiator and your body.This transmitter must not be co-located or operating in conjunction with any other antenna or transmitter.The antennas used for this transmitter must be installed to provide a separation distance of at least 20 cm from all persons and must not be co-located or operating in conjunction with any other antenna or transmitter.Model: WS-01/ FCC ID: WKP-CSAW-02IPThis device complies with Part 15 of the FCC Rules. Operation is subject to the following two conditions:(1) This device may not cause harmful interference, and (2) This device must accept any interference received, including interference that may cause undesired operation.
Customer Service (International)Email: service@ipevo.comTel: +886-2-5550-8686Customer Service (USA)Email: cs@ipevo.comTel: +1-408-490-3085

Navigation menu