IPEVO CSW2-01IP Wireless Interactive Whiteboard System - IW2 User Manual
IPEVO corp. Wireless Interactive Whiteboard System - IW2
IPEVO >
User Manual
User Manual
for IW2 Interactive Whiteboard System
Download and install IPEVO IW2 software at
support.ipevo.com/IW2

Table of Contents
Package Contents.......................................................................1
The Basics................................................................................1
Two Ways to Use IW2................................................................2
How IW2 Works.........................................................................3
Getting to Know IW2.............................................................4-5
Installing IW2...................................................................... 6-15
Step 1: Software Installation............................................... 6
Step 2: Positioning the Sensor Cam.................................6-8
Step 3: Securing the Sensor Cam...................................8-10
Step 4: Connecting to the Computer...................................11
Step 5: Readying the Interactive Pen..................................12
Step 6: Calibration........................................................ 12-15
Using IW2...........................................................................16-17
Using IPEVO Annotator ......................................................18-21
FAQ...................................................................................22-23
Troubleshooting.................................................................24-25
1
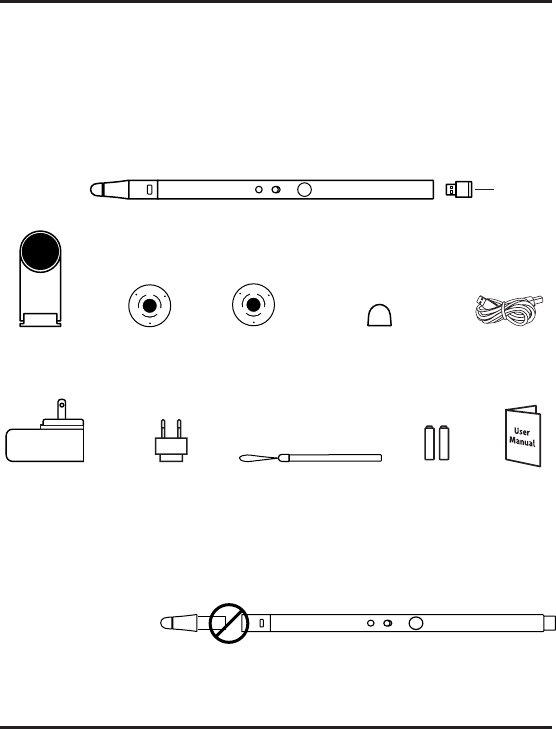
Package Contents
The Basics
Congratulations on your purchase of the IW2 Wireless Interactive
Whiteboard System. After a few simple steps, your system will be
calibrated and ready to use.
Your package should contain the following:
The IPEVO Wireless Interactive Whiteboard System, or IW2, turns your
large projector screen into an interactive touchscreen, giving you
the ability to easily draw and annotate for education and business.
Plus, because IW2 is compatible with many different kinds of soft-
ware, you’ll also be able to control your computer (and what’s on the
screen) at a distance. And this is all possible no matter what make and
model of projector you have.
User
Manual
2 AAA
Batteries
3.6 m Micro-USB
Cable
Replaceable Pen Cap
Wireless
Receiver
IW2 Interactive Pen
Tripod MountCeiling MountIW2 Sensor Cam
Warning: Disassembling the Interactive Pen tip may damage the Interactive Pen. Please do
not loosen or other disassemble the tip at any time.
Do not disassemble
Wrist Strap
Power Adapter Power Adapter
(For Europe)
2
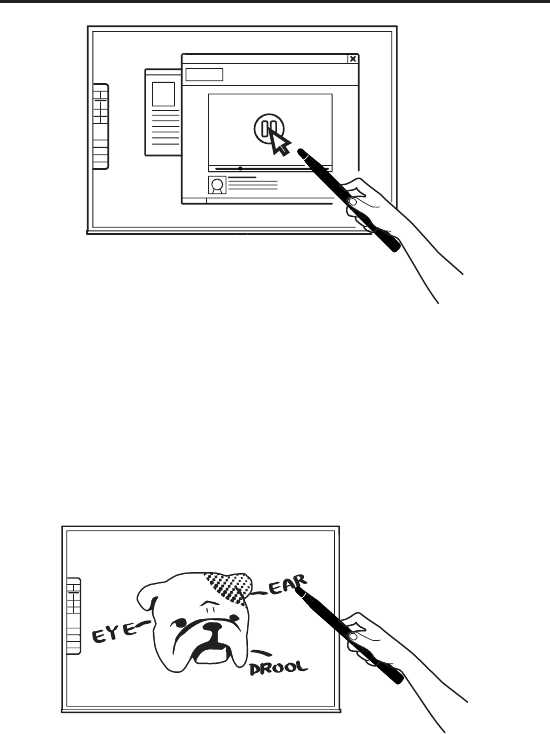
Two Ways to Use IW2
Use the Interactive Pen as a Computer Cursor
The Interactive Pen can behave like a mouse, transforming any surface
into a touchscreen. Use the Pen to intuitively perform the actions you’d
normally use your mouse to perform.
Note: The Interactive Pen can perform normal mouse actions including click, double click,
and drag. However, some actions are not executable with the Pen, such as hovering.
Annotate Your Text and Images
Using IPEVO Annotator, you can draw and write directly on your interac-
tive whiteboard. You can even draw on top of your document camera’s
live video feed. Engage your audience and clarify your material.
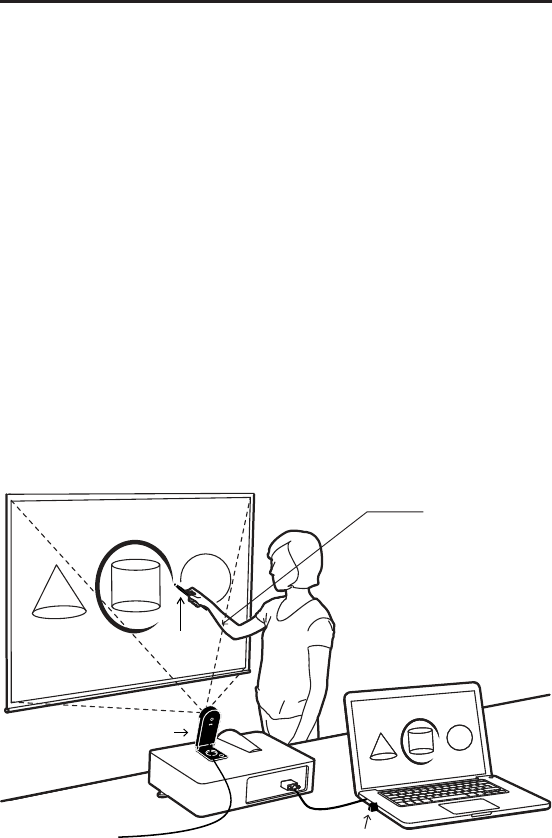
3
IW2 is made up of two devices: the Sensor Cam and the Interactive Pen
with Wireless Receiver. The Sensor Cam detects the physical location
of the Pen and sends this information wirelessly via the Wireless
Receiver to your computer, which then translates the Pen’s motion into
cursor motion. Wherever you move the Pen, the computer will move
its cursor in real time. You can also perform mouse clicks and drags
with the Pen.
In order for the Sensor Cam to send information wirelessly to the
computer, it needs to be paired with the computer via the Wireless
Receiver attached at the bottom of the Interactive Pen. By default, no
pairing action is required – the Sensor Cam and Wireless Receiver you
received are already paired. Just plug the Wireless Receiver into your
computer's USB port to start using IW2. However, if you are using a
replacement Wireless Receiver or Sensor Cam, you need to pair them
before use. To pair the Sensor Cam and the Wireless Receiver, please
follow the steps on Page 23.
How IW2 Works
Emits infrared signals on
contact or by pressing the
green button
Reads infrared signals and
sends them to your computer
INTERACTIVE PEN
SENSOR CAM
WIRELESS
RECEIVER
INTERACTIVE
PEN
SENSOR
CAM
4
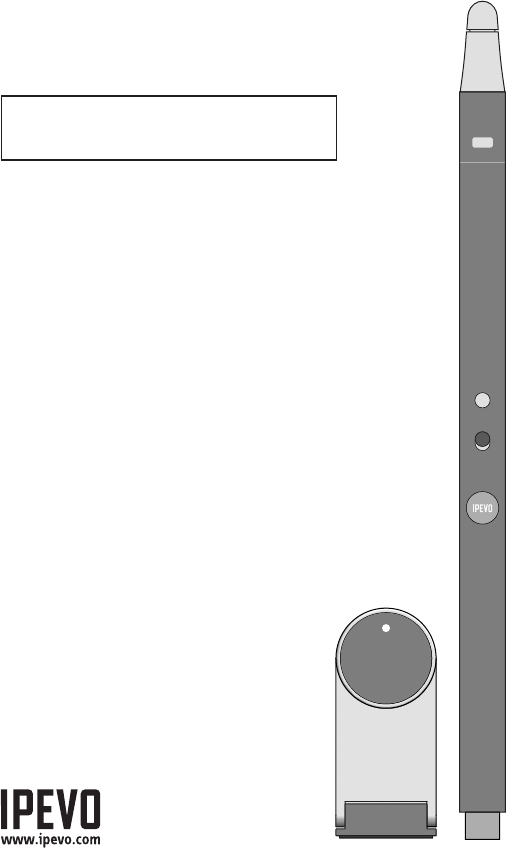
Getting to Know IW2
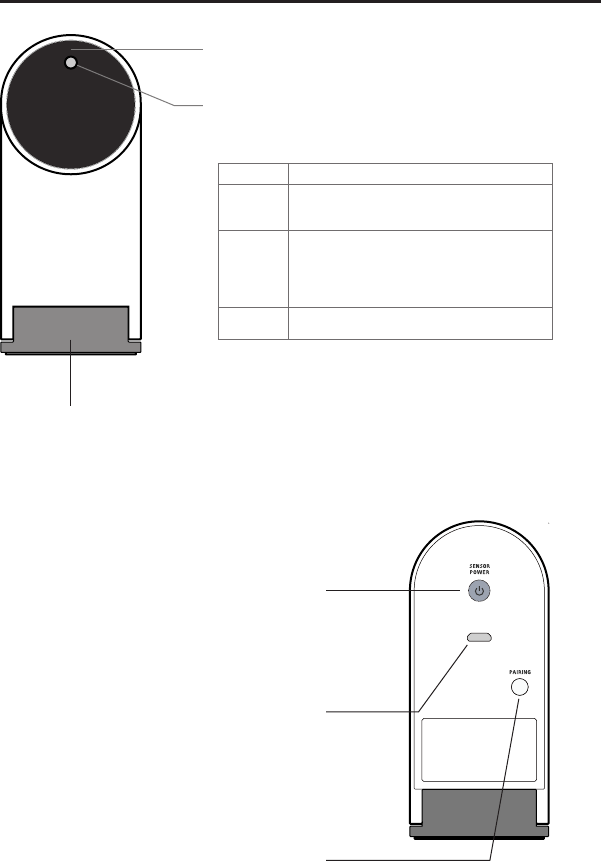
LED Indicator
Lights up when powered up and connected. Different colors
(solid and blinking) indicate various states.
Sensor Power Button
Press once to turn on Sensor Cam and enter Active Mode.
Press once again to enter Sleep Mode. To completely pow-
er off the Sensor Cam, please unplug the power adapter
from the outlet.
Lens
Detects signals emitted by the Interactive Pen.
Hinged Metal Base
Allows adjustment of the angle
of the Lens.
Micro-USB Port
Connect Micro-USB cable here.
Note: To power the Sensor Cam, connect the other end of the
Micro-USB cable to the power adapter and plug the adapter into
an outlet.
Pairing Button
Press for 5 seconds to enter pairing mode.
Note: Your devices are already paired by default. However, if you
need to pair the Sensor Cam and the Wireless Receiver, please
follow the steps on Page 23.
Green
Color States
The Sensor Cam is powered on and paired
with the Wireless Receiver.
The Sensor Cam is not paired with the Wireless
Receiver. Check that the Wireless Receiver
is plugged into your computer and that it’s
placed within 16 ft (5m) of the Sensor Cam.
Blinking
Orange
Orange The Sensor Cam is in Sleep Mode.
5
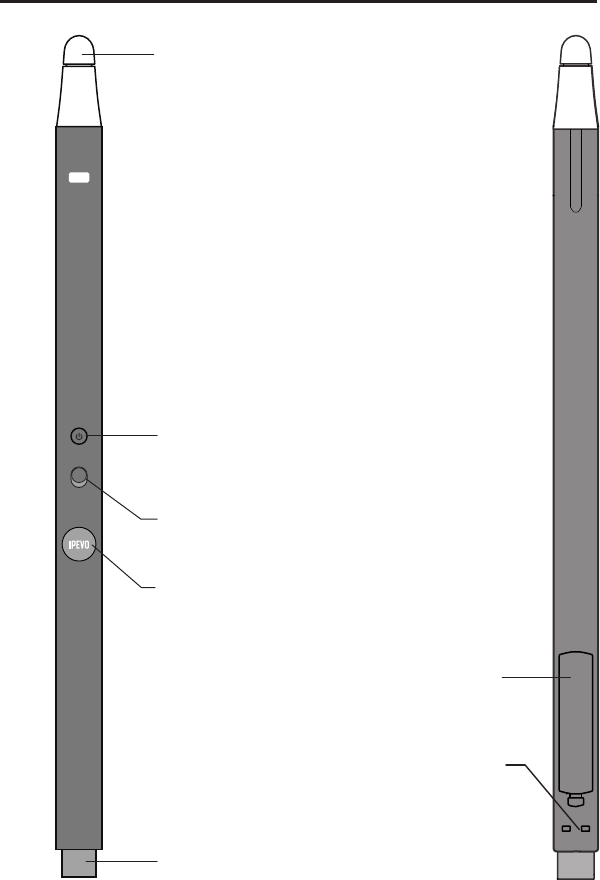
Contact Sensitive Tip
Send signals for left, right, and double mouse clicks. Brief
contact performs a left click while pressing in and holding for 2
seconds or longer performs a right click.
IPEVO Button
This is another way to perform mouse clicks. Press for a left click,
or press and hold for 2 seconds or longer for a right click.
Wrist Strap Attachment Holes
Attach the included wrist strap here.
Wireless Receiver
Detach this from the Interactive Pen and plug it into your
computer for a wireless connection between your computer and
the Sensor Cam.
Battery Cover
Open to reveal slots for 2 AAA batteries.
Power Switch
Turn the Interactive Pen on and off.
Sensor Power Button
Remotely power your Sensor Cam on or off. Press once for the
Sensor Cam to enter Active Mode. Press once again to enter
Sleep Mode.

6
Installing IW2
1. Software Installation
2. Positioning the Sensor Cam
IW2 requires IPEVO IW2 software to function.
Please visit the IPEVO website to download the latest version at:
support.ipevo.com/IW2
After downloading,
For PC:
•Double-click the downloaded file and follow the onscreen prompts to
complete the installation. An IW2 icon will appear at the bottom right-
hand side of the taskbar.
For Mac:
• Double-click the downloaded file. An IW2 icon will appear at the top
right-hand side of the status bar.
Note: After successful installation, an IW2’s Menu for the IW2 will automatically pop up. You
can close it by clicking once on the IW2 icon. If the IW2’s Menu does not appear, you can
start IW2 by navigating to:
PC (Windows 7 and below):
Start Menu -> Program files -> IPEVO -> IW2.
PC (Windows 8): Start Menu -> Apps -> IW2.
Mac: Applications-> IW2.
Proper position of the Sensor Cam is important for optimum operation.
Follow these guidelines to place the Sensor Cam:
• For most projectors, a good position for the Sensor Cam will be the
same location as the projector. One exception to this is if you are
using a short-throw projector. In that case, you will need to place
the Sensor Cam further away from the screen than the projector.
• Minimal distance from your screen depends on screen size. Place the
Sensor Cam according to the recommended distances in the chart on
the following page:
7
Screen Size 60” 70” 80” 100”
Minimal
Distance
8 ft
(243 cm)
9 ft
(275 cm)
10 ft
(305 cm)
11 ft
(335 cm)
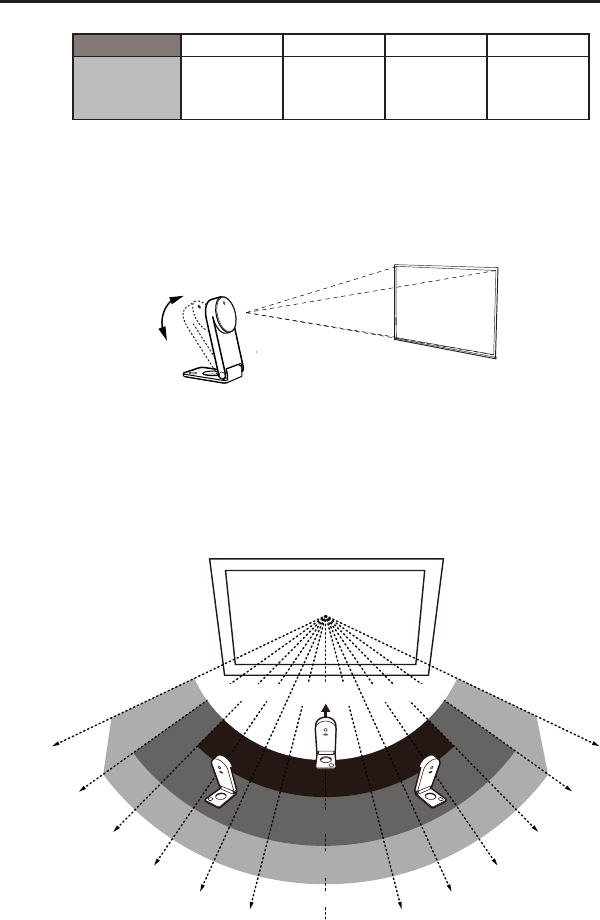
• The Sensor Cam should face directly at the projection screen.
Depending on your screen’s height, you may have to adjust the
Sensor Cam’s Lens to face upwards or downwards. Adjust the
hinged metal base to easily perform any such adjustments.
• The Sensor Cam is best placed opposite the center of the screen at
a straight-on angle. However, a straight-on angle is not required
for acceptable operation, and the Sensor Cam may be placed at
another angle if necessary. Please refer to the diagram below for
placement zones according to accuracy quality:
Projected screen
90°
Excellent
Good
Acceptable
Poor
Poor Poor
75°
65°
55°
45°
35°
25°
75°
65°
55°
45°
35°
25°
Sensor Cam
Unavailable Unavailable
8
Installing IW2 (cont’d)
As you can see:
• Accuracy is better when the Sensor Cam is closer to the center.
• Accuracy decreases as the angle increases.
• Larger screens require more distance between the screen and the
Sensor Cam.
Note: Please keep a clear path between the Sensor Cam and the projector screen to ensure
proper operation.
It’s important to make sure your Sensor Cam is steady and secure be-
fore use. There are three ways to secure your Sensor Cam, depending
on your setup:
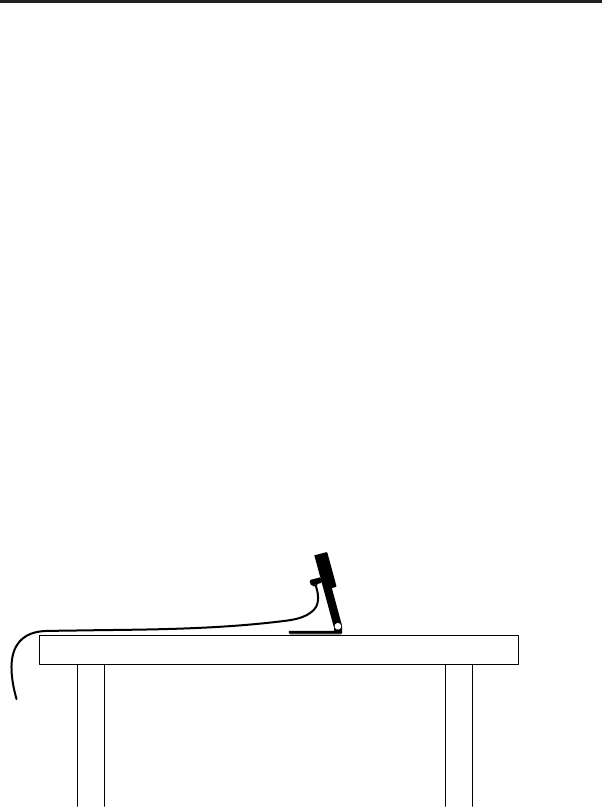
3. Securing the Sensor Cam
A. Place on a table or AV cart
Use a flat, smooth tabletop or an AV cart. Make sure nothing is block-
ing the Sensor Cam’s path to the screen surface. Adjust the angle of
the Sensor Cam to face directly at the center of the screen surface.
9
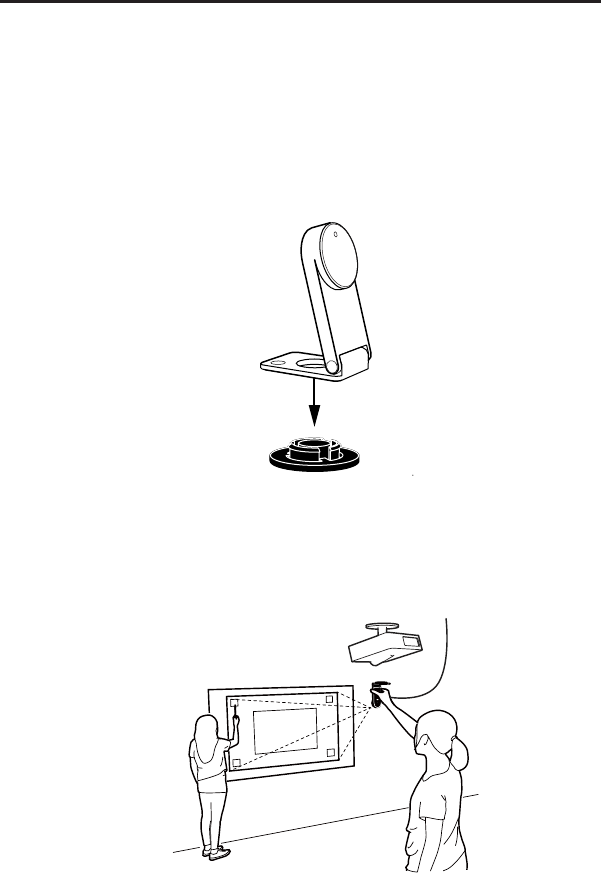
B. Use an upside-down ceiling mount
The Sensor Cam can be mounted upside-down onto the ceiling or ceil-
ing-mounted projector. To do so:
1. Align the hole on the base of the Sensor Cam with the circular peg of
the ceiling mount and push the Sensor Cam in. You will hear a slight
click when the Sensor Cam has settled into position.
2. Before affixing the mount to the ceiling, hold the Sensor Cam in an
area just below (by a few inches) where you intend to mount the
projector. Run the Sensor Cam Position Diagnosis (see Page 15) with
the Sensor Cam in this position to ensure maximum accuracy.
10
Installing IW2 (cont’d)
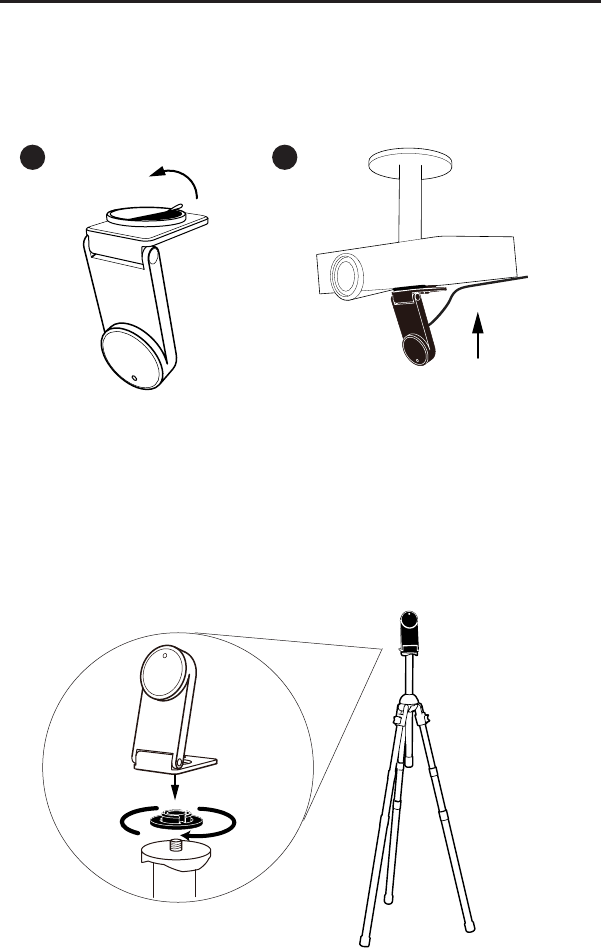
Note: The adhesive sticker of ceiling mount is extremely adhesive and should only be
applied once. The Sensor Cam can be detached without removing the ceiling mount. Simply
remove the Sensor Cam from the ceiling mount.
C. Use a tripod
The Sensor Cam comes with a tripod mount. Consider mounting the
Sensor Cam onto any standard tripod.
1 2
Remove the sticker
3. Ensure the mounting surface is clean and free of grit. Remove the
adhesive sticker from the bottom of the ceiling mount, and affix
the ceiling mount firmly onto the mounting surface.
11
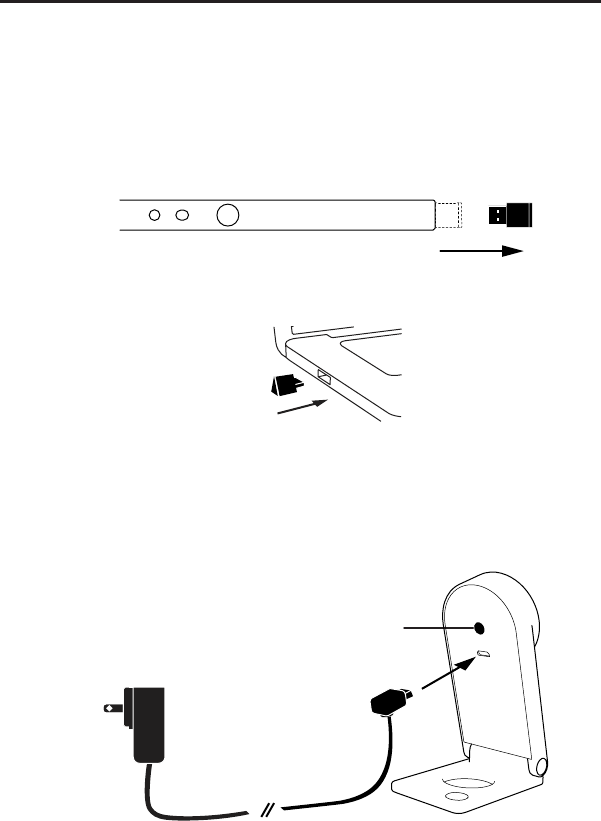
4. Connecting to the Computer
The Sensor Cam can be connected to your computer wirelessly via the
included Wireless Receiver. To do so:
1. Detach the Wireless Receiver from the bottom of the Pen.
2. Plug the Wireless Receiver into the USB port of your computer.
3. Power on the Sensor Cam by plugging the Micro-USB cable into the
Micro-USB port on the Sensor Cam. Then plug the other end of the
cable into the power adapter. Lastly, plug the power adapter into an
outlet.
4. The Sensor Cam's LED indicator will light up green once it is success-
fully connected to your computer.
Sensor Power Button
Power adapter
12
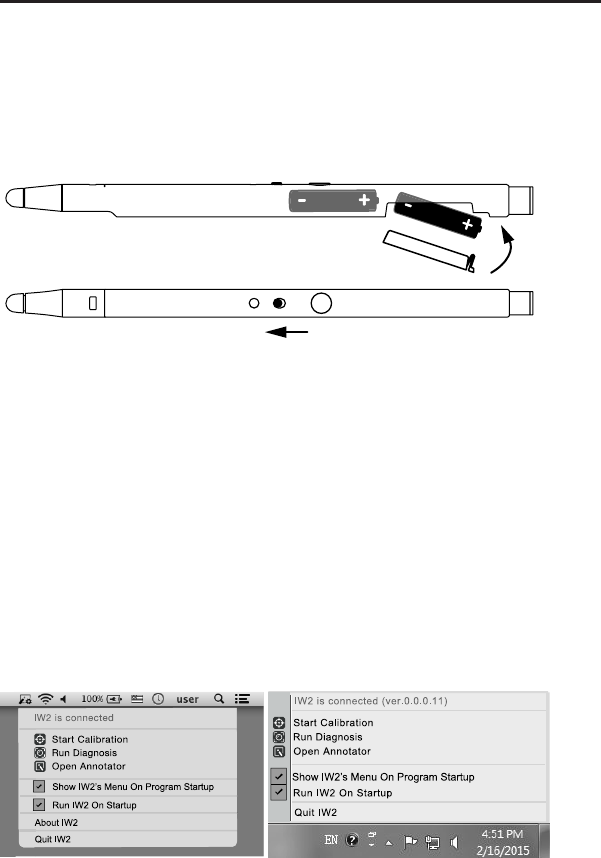
Remove the battery cover from the Interactive Pen and insert 2 AAA
batteries. Replace the cover. Attach the included wrist strap into the
attachment holes. Turn on the pen when ready to use.
5. Readying the Interactive Pen
Installing IW2 (cont’d)
6. Calibration
IW2 must be calibrated before use to ensure accurate operation. This
process only takes a couple of steps.
To start the calibration process, follow these steps:
PC and Mac:
Click on the IW2 icon located in the task bar or status bar. Choose “Start
Calibration” in the IW2’s Menu.
Note: The Interactive Pen must have batteries and be switched on for calibration and
operation.
Power on
You can disable auto pop up of the IW2’s Menu and/or auto startup of
IW2 by unchecking the respective boxes in the IW2’s Menu.
13
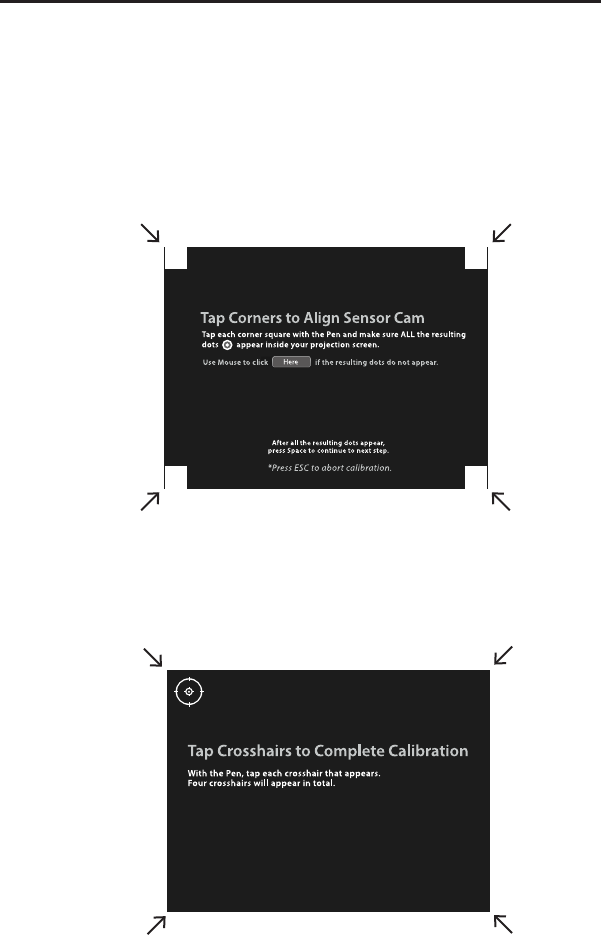
Step 2: Accuracy Check
With the Pen, tap each crosshair that appears. Four crosshairs will appear in
total. You MUST tap all four in order. Failing to do so may negatively impact
Pen accuracy.
Calibration Steps
Step 1: Sensor Cam Coverage Detection
Tap each corner square (in any order) with the Interactive Pen and make
sure ALL the resulting dots appear inside your projection screen. If not,
follow the instructions onscreen to reposition the Sensor Cam until all
dots are contained within the projection screen. Then, press Space to
continue.
14
Installing IW2 (cont’d)
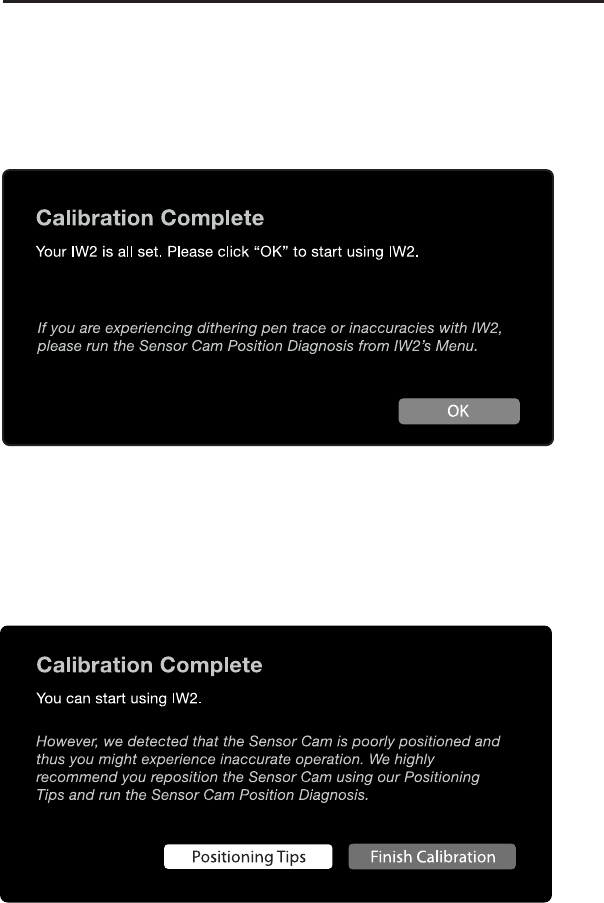
Step 3: Calibration Completed
After the process, you will be returned to your desktop and your IW2
will be ready for use.
However, if the system detected that the Sensor Cam is poorly positioned
and that there might be inaccuracies with IW2, follow the instructions
onscreen to improve its accuracy.

15
Sensor Cam Position Diagnosis
If you find that your pen trace is jumping (dithering), lagging, or
otherwise becoming inaccurate after a period of time, please run the
Sensor Cam Position Diagnosis and reposition the Sensor Cam according
to the suggestions given.
You can start the Sensor Cam Position Diagnosis by clicking on the IW2
icon located in the task bar or status bar and choosing "Run Diagnosis"
in the IW2’s Menu.
16
Using IW2
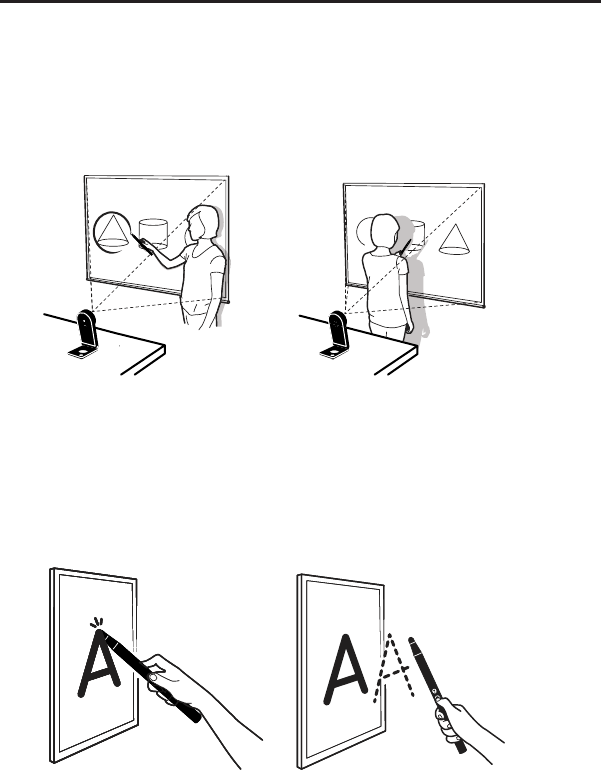
Controlling cursor movement
Simply move the Pen in front of the screen area, being careful not to
block the Pen’s path to the Sensor Cam with your body. The mouse
cursor will follow the Pen’s movement in real time.
Controlling the computer and applications
Mouse clicks can be performed both within the operating system and
in a wide variety of software applications. To do so, use either of two
methods:
Touch the contact-sensitive Pen
tip onto the screen surface.
Press the green button.
Bad
Good

17
A variety of mouse controls are possible using these methods:
Left click: Tap the tip onto the surface, or press the IPEVO button once.
Double click: Quickly tap the tip onto the surface twice, or press the
IPEVO button twice.
Right click: Press and hold the tip onto the surface, or press and hold
the IPEVO button. Hold for at least 2 seconds.
Click and drag: Press and hold the tip onto the surface, or press and
hold the IPEVO button. While doing so, move the Pen to the desired
spot.

18
IPEVO Annotator is a simple and intuitive screen annotation, record-
ing, image capturing and editing software that is a perfect match for
the IW2 Wireless Interactive Whiteboard System. With it, you can maxi-
mize your creativity and fully utilize the potential of your interactive
whiteboard. IPEVO Annotator is totally free to download and can be
used in combination with many other applications.
IPEVO Annotator is available at no charge in one of two places:
1. The Annotator’s website,
support.ipevo.com/Annotator (for both Mac and PC)
2. The Apple App Store (search for “IPEVO Annotator”)
After downloading,
For PC:
• Double-click the downloaded file and follow the onscreen prompts
to complete the installation. A desktop Annotator icon will appear.
• Start using Annotator by clicking on the icon.
For Mac:
• Double-click the downloaded file. An Annotator icon will appear.
• Start using Annotator by clicking on the icon.
If the Annotator icon does not appear, you can start IPEVO Annotator
by navigating to:
PC (Windows 7 and below):
Start Menu -> Program files -> IPEVO -> Annotator.
PC (Windows 8):
Start Menu -> Apps-> Annotator.
Mac: Applications-> Annotator.
Using IPEVO Annotator
19
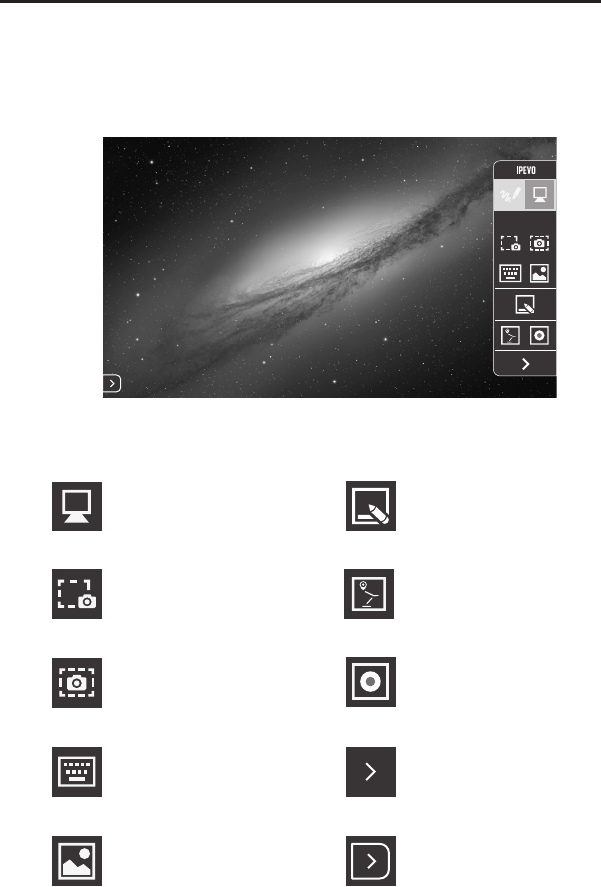
Tap to select Desktop
Mode.
Allows viewing and
managing of images taken
using IPEVO Annotator.
Allows toggling between
your screen and
whiteboards.
Allows recording of all
onscreen activites.
Hide the toolbar.
Save all of your current
screen as an image.
Save part of your current
screen as an image.
Use your connected IPEVO
doc cam’s live feed as your
background.
Display a touchscreen
keyboard.
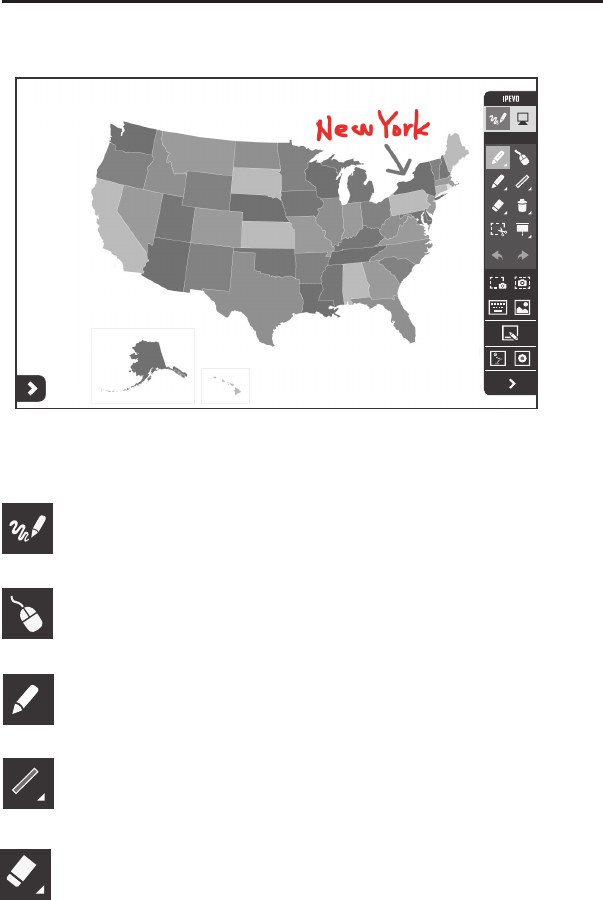
IPEVO Annotator offers two modes – Desktop Mode and Drawing
Mode. In just a tap, you can easily toggle between the two modes.
Desktop Mode
In Desktop Mode (Annotator's default mode), you can save and man-
age "whiteboards", the digital surfaces you draw and annotate on.
Clicking the rounded corner
arrow on either side of the
screen will show the toolbar
again on that side.
Desktop Mode
20
Using IPEVO Annotator (cont’d)
Tap to select Drawing Mode.
Select this tool to draw and annotate. Select the pulldown
menu to change color and thickness, or to apply effects.
Draw basic shapes such as rectangles or ovals. Select the
pulldown menu to change color and thickness.
Erase your drawings or annotations. Select the pulldown
menu to change the size of the eraser.
Allows normal control of other applications while your
drawings/annotations still appear on screen.
In Drawing Mode, you have access to a wide range of drawing tools to
annotate your material.
Drawing Mode
Drawing Mode

21
Clear all drawings and annotations at once.
Duplicates selected drawings and/or annotations for use on
your screen or whiteboard.
Highlights important sections on the screen while blocking the
rest to focus the attention of your audience.
Allows undoing and redoing of actions.

22
How do I quickly determine a good working distance between the
screen and the Sensor Cam?
Normally, the projector is a good location to place the Sensor Cam.
If you are using a short-throw projector, however, please refer to
Pages 6 and 7 for the recommended Sensor Cam distance guide-
lines.
Can I use rechargeable AAA batteries for the Interactive Pen?
Yes. Rechargeable alkaline batteries are recommended.
Can I use IW2 with my own software instead of IPEVO Annotator?
Yes. IW2 can be used with third-party image processing software
and whiteboards. Any mouse-based software should work fine.
Can I use IW2 with a TV or monitor instead of a projector?
Yes you can, but we do not recommend it due to the following
considerations:
1. The TV/monitor screen could be scratched over time from all the
Pen swipes.
2.The brightness of the TV/monitor can cause eye fatigue over long
sessions.
3. If the TV/monitor is not firmly mounted, it might move once you
start tapping, throwing off the calibration.
What should I do if the cursor is not pointing correctly and/or fol-
lowing the Interactive Pen correctly?
The cursor may lose accuracy if the screen resolution or screen ratio
has changed, or if the Sensor Cam has been moved. Please run the
calibration process again. See Pages 12~14.
Why is there no scrollbar in my browser or finder window in Mac
OS X when using IW2?
By default, the scrollbar is enabled only when a mouse is connected
to Mac. You can manually enable the scrollbar by going to System
Preferences -> General and set “Show scroll bars” to “Always”.
FAQ

23
How do I pair the Sensor Cam with the Wireless Receiver?
By default, your Sensor Cam is already paired with the Wireless Re-
ceiver that comes with it. That said, if you are using a replacement
Wireless Receiver or Sensor Cam, you need to pair them before use.
To pair your devices:
1. Place the Sensor Cam within 1.64 ft (50cm) of your computer (and
the Wireless Receiver).
2. Power up the Sensor Cam. The Sensor Cam LED indicator should
show a blinking Orange.
3. Press the Pairing Button for 5 seconds to enter pairing mode.
The Sensor Cam LED indicator should blink alternately between
Orange and Green.
4. Plug the Wireless Receiver into your computer's USB port. The
Sensor Cam LED indicator will blink Green three times before
changing to a solid Green, which lets you know the pairing was
successful.

24
When I tap on the corners during calibration, the dots don’t fall within
the projection screen.
Move the Sensor Cam closer to the area where the corresponding dots
do not appear. Or, move the Sensor Cam further away from the screen.
Run the calibration process again. See Pages 12-14.
The cursor on my screen is jumping around abnormally and I am not
able to control it.
Remove any strong light source or infrared equipment close to the
Sensor Cam, as these may interfere with the Sensor Cam.
During calibration, multiples spots appear or spots appear erratically.
1. Remove any strong light source or infrared equipment close to the
Sensor Cam, as these may interfere with the Sensor Cam.
2. Ensure the projector screen you are using is not made of highly re-
flective glass or metal. Such reflective materials affect Sensor Cam’s
operation.
The pen trace continually breaks when I write or draw with the Inter-
active Pen.
1. The Sensor Cam might be placed too far away from the screen. Move
the Sensor Cam closer to the screen and run the calibration process
again. See Pages 12-14.
2. Pen trace can only occur if the Sensor Cam’s vision field is not
blocked. Please do not draw or write with your body blocking the
Sensor Cam.
3. Replace the batteries in the Interactive Pen. Low batteries can have
an adverse affect on pen trace and accuracy.
The LED indicator of the Sensor Cam blinks alternately between Or-
ange and Green, and the pen trace continually breaks when I write or
draw with the Interactive Pen.
There might be interference between the wireless connection of the
Sensor Cam and the Wireless Receiver. Move the Sensor Cam within
16 ft (5m) of the Wireless Receiver, and check that the LED indicator on
Troubleshooting

25
the Sensor Cam changes to a solid Green before continuing using the
Interactive Pen.
My pen trace and pointing are inaccurate after I change screen reso-
lution.
Changing the screen resolution throws off the calibration. Please run
the calibration process after every resolution change. See Pages 12~14.
My pen and cursor lose accuracy every now and then.
Please make sure the Sensor Cam is positioned on a flat and stable
surface. A slight tip of the Sensor Cam may result in inaccurate oper-
ation.
I have the task bar set to hidden, and I can’t use the task bar with the
Interactive Pen.
Please uncheck the auto-hide option and position the task bar on the
screen when using IW2.

© 2015 IPEVO Inc. All rights reserved. IPEVO, IPEVO Annotator, IW2, the IPEVO logo,and other IPEVO marks are
owned by IPEVO Inc. and may be registered. All other trademarks are the property of their respective owners.
Customer Service (International)
Email: service@ipevo.com
Tel: +886-2-5550-8686
Customer Service (USA)
Email: cs@ipevo.com
Tel: 1 (408) 490 – 3085
For IPEVO IW2 FAQ, Software, Documents, please visit:
support.ipevo.com/IW2
Federal Communication Commission
Interference Statement
This equipment has been tested and found to comply with the
limits for a Class B digital device, pursuant to Part 15 of the FCC
Rules. These limits are designed to provide reasonable
protection against harmful interference in a residential
installation. This equipment generates, uses and can radiate
radio frequency energy and, if not installed and used in
accordance with the instructions, may cause harmful interference
to radio communications. However, there is no guarantee that
interference will not occur in a particular installation. If this
equipment does cause harmful interference to radio or television
reception, which can be determined by turning the equipment off
and on, the user is encouraged to try to correct the interference
by one or more of the following measures:
Reorient or relocate the receiving antenna.
Increase the separation between the equipment and receiver.
Connect the equipment into an outlet on a circuit different from
that to which the receiver is connected.
Consult the dealer or an experienced radio/TV technician for
help.
FCC Caution: Any changes or modifications not expressly
approved by the party responsible for compliance could void the
user's authority to operate this equipment.
This device complies with Part 15 of the FCC Rules. Operation is
subject to the following two conditions: (1) This device may not
cause harmful interference, and (2) this device must accept any
interference received, including interference that may cause
undesired operation.
This device and its antenna(s) must not be co-located or
operating in conjunction with any other antenna or transmitter.