IPRO TECHNOLOGY IPROSPEEDL Mobile Phone User Manual
HONG KONG IPRO TECHNOLOGY CO.,LIMITED Mobile Phone
Contents
- 1. User Manual
- 2. Users Manual
Users Manual
SPEED L
Mobile Phone
User Guide
- 1 -
Dear IPRO customer,
Congratulations on becoming a proud owner of IPRO product.
You have now joined the fraternity of millions of satisfied IPRO
customers spread across the globe.
IPRO Technologies is one of the fastest growing IT Hardware,
Mobile Phones and Electronics Company. A well established
brand, IPRO has kept pace with the technology needs of millions
of IT hardware & electronics consumers and has been serving
them with more than 300 user friendly, high quality, state-of-the
art yet simple products/solutions. The products have been in the
market since 1996 and conform to global standards.
Brand IPRO covers a wide range of computer peripherals and
accessories such as Computer Multimedia speakers, Cabinets,
Keyboards, Mouse, UPS, Add-on cards, Webcams, Headphones,
Laptop bags, etc. As a part of its diversification strategy, IPRO
also offers an interesting range of PCs, TFT-LCD Monitors,
Consumer Electronics (DVD Players), Home UPS & Mobile
Phones.
Every IPRO product goes through a rigorous process of sample
evaluation and approval before commercial launch. Customers
look upon the brand as a value-for-money & feature-rich offering,
supported by efficient after sales service.
We look forward to your patronage.
It would be our pleasure to receive feedback and suggestions
you may have for improvements in the product(s) you are using.
IPRO Technologies (I) Ltd

- 2 -
www.iprochina.com
Helpline No.
Tel: +86-0755-83496450
Fax: +86-755-83496050
Website: www.iprochina.com
SAFETY TIPS
Use of wireless hands-free system (headphone, headset)
with a low power Bluetooth emitter.
Keep your calls short or send a text message (SMS) (instead.
This advice applies especially to children, adolescents and
pregnant women.
Use cell phone when the signal quality is good.
People having active medical implants should preferably keep the
cell phone at least 15 cm away from the implant
- 3 -
Content
Your Phone ··············································································· - 5 -
Keypad Descr i p t i ons ······························································ - 5 -
Start to Use ··········································································· - 6 -
Charge the Battery ································································ - 6 -
Use Touch Sc reen ··································································· - 7 -
Make a C a l l ············································································· - 7 -
Answer a Ca l l ········································································· - 8 -
Eme r g e n c y S e r v i c e ·································································· - 8 -
Input Method ··········································································· - 8 -
1. Browser ··············································································· - 9 -
2. Calculator ········································································· - 9 -
3. Calendar ············································································· - 9 -
4. Camera ················································································· - 9 -
5. Clock ·················································································· - 9 -
6. Downloads ··········································································- 10 -
7. Email ·················································································- 10 -
8. Fi le Manager ····································································- 10 -
9. FM Radio ············································································- 11 -
10. Gal lery ············································································- 11 -
11. Google Service ·······························································- 11 -
12. Messages ··········································································- 11 -
13. Music ················································································- 12 -
14. Contact ············································································- 12 -
15. Phone ················································································- 12 -
- 4 -
16. Search ··············································································- 12 -
17. Settings ··········································································- 13 -
18. SIM Toolk it ····································································- 14 -
19. Sound Recorder ·······························································- 15 -
Widgets ···················································································- 15 -
Accessor i e s ············································································- 15 -
Care and Ma i n tenance ···························································- 15 -
Techn i ca l I n f o rmati o n ·························································- 17 -
FCC WARN ING ············································································- 22 -
- 5 -
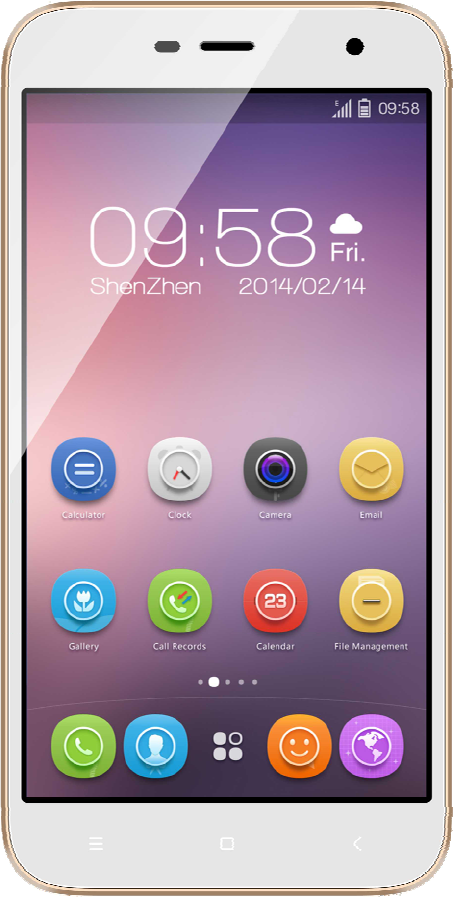
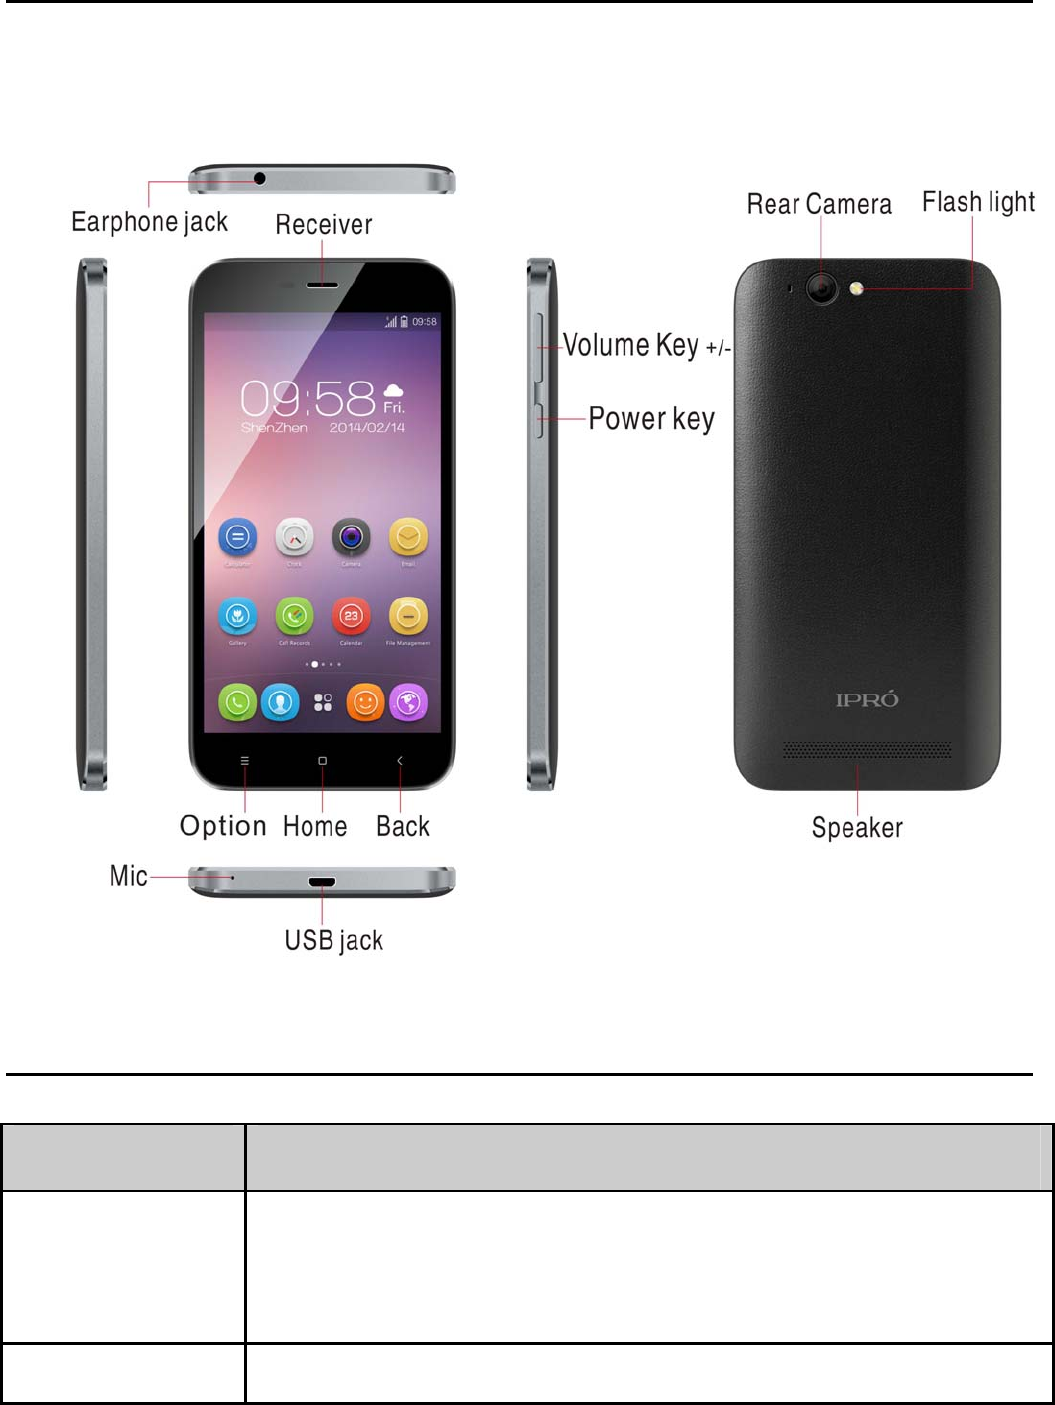
Your Phone
The phone appearance is shown as below. The picture is for reference only;
your phone may be different. Please take your actual phone as the standard.
Keypad Descr i pt i ons
Key Descr i p t i on
Power Key Long press the key to turn on the phone.
In the power on status, press the key to lock keypad and
screen; lon
g
press the ke
y
to show phone options.
Opt i on Key Press the key to enter option menu.

- 6 -
Key Descr i p t i on
Home Ke y Press the key to return to standby mode.
Back Key In the menu mode, press the key to go back to upper
menu.
Vo l ume Keys To adjust incoming call ringtone volume.
During a call, playing music, video, or listening to radio,
press the keys to adjust volume.
Start to Use
Install SIM Card and Battery
When you apply for a network, you will get a plug-in SIM card. SIM
(Subscriber Identity Module) card that contains phone number, service
projects and can be used to store phone numbers and personal
information.
Attent ion: Do not bend or scratch SIM card, do not let it contact with
static electricity, dust or water.
Keep all SIM cards where children cannot reach or touch.
Note: Keep the SIM card chip contacts face downward. Make the SIM card
fits card slot.
Remove S IM Ca rd
Note: If the phone is turned on, long press Power Key about 3 seconds until
it tips phone options and select Power off and then press OK to turn
off the phone.
Charge the Battery
1. Before charging, check the battery slot to ensure the battery has
been installed correctly.

- 7 -
2. Plug one end of the charger into phone.
3. Connect another end of the charger to the socket.
4. Start charging. It can be charged whether power on or power off.
▪ In power on state, when the battery icon on screen start rolling
means it is been charged. When the icon is full and stop rolling means
charge is completed.
▪ In power off state, the battery icon on screen start rolling means it is
been charged. When the icon is full and stop rolling means charge is
completed.
5. Unplug the charger from the socket.
6. Disconnect the charger and phone.
Use Touch Scr een
¾ Press: Use finger to press the desired option to confirm selection or
start an application.
¾ Long press: Long press the screen in current operation interface, icon,
or input area; you can open the option menu in current interface.
¾ Slide: Slide the finger on screen horizontally or vertically. For example,
slide the screen in standby mode or main menu horizontally to change
menu page.
¾ Drag: Use finger to long press desired item, drag it to anywhere on
screen. For example, you can drag the icon in main menu to standby
screen.
Make a C a l l
1. In standby mode or in main menu, press the dial icon to enter dial
panel, press numbers on screen to enter phone number.
2. Press dial icon at bottom and select SIM card to dial the number.
3. Press end icon to cancel the call.
- 7 -
z You need to unlock the phone if the keypad and screen is
locked.
z You can make calls through call log, contacts, and messages.
z During a call, press Volume Keys to adjust the volume.
z Your phone supports intelligent dial. When input numbers, the
phone will search the corresponding contact in phonebook or call
lo
g
.
Answer a Call
When there is an incoming call, you can:
▪ Drag the icon toward right to answer the call.
▪ Drag the icon toward left to decline the call.
▪ Drag the icon upward to reject the call with SMS.
Emergen c y S e r v i c e
You can call emergency service number directly without SIM card. Different
networks use different emergency numbers, please query your network
operator.
Input Method
Your phone has the built-in input method. In editing mode, long press “,…”,
to show Input opt ions and set input languages and Android keyboard
settings.
Input English
Press the on-screen keypad to enter corresponding letters.
Input Number
Press “?123”, you can input numbers directly by press the number icons.
Long press the letter icons with number, or after long press, slide finger to
the numbers to input.
Input Symbol
Press “?123” to enter symbol list. Press the desired symbol to input.

- 7 -
Long press “.…” to show symbol list, slide finger to the desired symbol to
input.
1. Browser
You can use your phone to access Wireless Application Protocol (WAP)
sites and use WAP-based services. To browse WAP pages, you must
subscribe to the data service from your service provider and configure your
phone's relevant settings.
Select the website list on screen or input URL in address bar to visit.
2. Ca l cu l a to r
The calculator can execute simple calculations. Slide the screen toward left
or right, you can change the calculator in Bas i c pane l and Advanced
pane l .
3. Ca l endar
In the calendar, you can check schedules for current month. It has alarm for
the date with schedule. Select one date to check all schedules for that day,
or you can edit or delete the schedules.
4. Camera
By using the camera application, you can take photos or records for around
people or events anytime. Press the Camera icon in main menu to enter.
Press the shoot icon or record icon to take photos or records.
Press the icons on screen or Option Key to set parameters of the camera
or recorder.
5. Clock
In the clock interface, you can check time and date. Press the alarm icon,

- 7 -
you can add new alarm clock or turn on/off existed alarm clocks.
In the clock interface, you can also press the icons to enter count down
function, stopwatch, cities settings, night mode, and settings.
6. Down loads
To check all downloads applications.
7. Ema i l
You can use Ema i l to send and receive emails.
Setup Ema i l Account
According to the tips on screen to input email address and password, and
press Next. You can press Manua l se tup to setup server information
manually.
Check Ema i l s
In the Inbox, select the email you want to check to enter. Press the icons
at bottom to delete, reply, add to favorite.
Compose and Send Ema i l
In the Inbox, press new mail icon to create new email. Input receiver email
address, subject, and content, and then press send icon to send the email.
Delete Accounts
In the Inbox, press Option Key to select Sett i ngs. Select the account
you want to delete and then select Remove account in the option list.
Press OK to confirm and delete the account.
8. File Manager
In this menu, you can select to check SD card and Phone storage.

- 7 -
9. FM R a d i o
Select FM R ad i o in the main menu and plug earphone to enter. Press
Power icon to turn on/off the radio. Press setting icon and select Search,
the phone will search available channels and save in the list. Press the
icons on screen to operate the FM radio.
10. Ga l l e r y
You can use Gallery to view or manage images and videos.
11. Goog l e S e r v i c e
Availability of Google applications, services, and features may vary
according to your country or carrier. Please follow local laws and
regulations to use them.
When you use a Google services such as Gma i l , Maps, Play Store, or
YouTube for the first time, and you may be prompted to sign in to your
Google account.
Ensure that your mobile phone has an active data connection (3G/GPRS)
before you sign in to your Google account.
If you already have a Google account, touch Exi s t i ng and enter your
username and password.
12. Messages
Select Messages in the main menu or standby mode to enter. Select new
message icon at left down corner to create new SMS or MMS and send.
1. Enter receiver’s number or add number from contacts.
2. Press “Type text message” to input message content.
3. If you want to send picture or video file, press + to add pictures,
videos and audio. The message will shift to multimedia message
automatically.
4. Press send icon and select SIM card to send the message.

- 7 -
13. Mus i c
Select Mus i c in main menu. Press Art ists, Albums, Songs, and
Playl ists at the top of screen to change category. Select one audio file
to play the music. Press the icons on screen to operate the audio player.
14. Contact
In the Contact, press search icon to search contact, press add new icon
to add new contact. Press Option Key to enter:
Delete Contact
Select one or more contacts, then press OK to delete all selected contacts.
Contacts t o D i spl a y
Select All contacts, contacts on SIM card, Phone, or Customize the
contacts to display.
Import/Export
Copy the contacts from SIM cards, phone, phone storage or SD card, and
then select location to copy.
Accounts
Select whether to Auto-sync app data.
Share V is ib le Contacts
Select one or more contacts, press OK and then share the selected
contacts via Bluetooth, Email, etc.
15. Phone
Press the icons on screen to input numbers in sequence. After inputting
numbers, press dial icon and select SIM card to dial. Press the icons at the
top screen, you can enter call log or contact.
16. Search

- 7 -
Input keyword in search bar, the phone will match applications or contacts
first. If there is no result, press the arrow icon on right to link to network and
search.
17. Sett ings
Wire l ess & Networks
In this menu, you can select and set SIM management, WI-FI ,
Bluetooth, Data usage, under More . . . - A i rp lane mode, VPN,
Tether i ng & po r tabl e h o tspo t , Mob i l e n e tworks, and USB
Internet.
z WI-F I
You can connect to a wireless LAN (WI-FI ), use it to access and download
with high speed.
In Menu/Set t i ngs/WIRELESS & NETWORKS , slide the icon beside
WI-F I toward right to turn on WI-FI . Press WI-FI to check available
WI-FI networks. Select one open network, you can access to the network
directly. If the network you selected is encrypted, you need to input
password.
z Bluetooth
The phone supports Bluetooth. It can exchange information between
devices including mobile phones wirelessly. Through Bluetooth, you can
sync phone and computer, exchange data with other Bluetooth devices,
and can connect to Bluetooth earphone.
In Menu/Set t i ngs/WIRELESS & NETWORKS , slide the icon beside
Bluetooth toward right to turn on Bluetooth and set. Before transmit data,
you may need to match with other Bluetooth devices.
Dev i ce
In this menu, you can set audio profiles and display, check storage and
battery, and manage apps.
Persona l

- 7 -
z Ges tu r e / Smar t A cce ss
Turn off screen, Specific letters in specified application.
z Loca t i on Access
Select whether to access to my location, or whether to use WI-FI &
mobile network location.
z Secur i ty
You can select SCREEN SECURITY, SIM CARD LOCK, PASSWORDS ,
DEV I CE ADM IN I STRAT I ON, and CREDENTIAL STORAGE in this menu.
z Language & I n pu t
Select and set Language, keyboard & input methods, speech, and
mouse/trackpad.
z Backup & Rese t
In this menu, select Factory data reset and then select Reset phone
to clear all data in the phone memory. Select DRM reset to delete all DRM
licenses.
Accounts
z Add Account
To add new account of Corporate, Email, or Google.
System
z Date & T ime
Set time and date for the phone.
z Schedu led Power On & Off
Set time to power on/off the phone automatically.
z Access i b i l i t y
To set accessibility functions for the phone.
z About Phone
To check status, legal information, etc.
18. SIM Toolkit
If your SIM card supports STK (SIM Tool Kit) function, the phone can

- 7 -
display different first level menu according to different STK card. This
function needs the network provider support. If user finds STK function
can’t operate normally, please contact the network provider. If the network
provider does not support this function, we do not claim any responsibility
whatsoever.
19. Sound Recorder
The phone supports sound record function, recorded files will be saved with
different quality.
Widgets
In the widgets list, you can select desired widget to add to idle screen.
Accessor i es
You can use accessories approved by our company, the other accessories
can be provided by the seller.
z Bat t e r y
We provide one kind of lithium battery with capacity.
z Trave ler charger
Useful charger can charge the mobile phone very quickly. Plug the charger
into the electrical plugs and connects the other side connects to the upper
side of the phone.
You can check the charging progress in the screen of the phone, it will not
power on automatically when charging.
Care and Ma in tenance
z Bat t e r y Ca r e
- 7 -
• Your device is powered by a rechargeable battery. When the power is
weak, please charge the battery. In order to extend the lifespan of the
battery, use all the battery's power before recharging.
• Unplug the charger from the electrical plug and the device when not in
use. Do not leave the battery connected to a charger more than a week.
Overcharging may shorten its lifespan.
• Extreme temperatures can affect the ability of your battery to charge.
Battery needs the fit temperature. If the surrounding temperature is over
40°C, the battery cannot be charged.
• Use the battery only for its intended purpose. Never use any charger or
battery that is damaged.
Do not short-circuit the battery. Accidental short-circuiting can occur when a
metallic object such as a coin, clip, or pen causes direct connection of the
positive (+) and negative (-) terminals of the battery. (These look like metal
strips on the battery.) Short-circuiting the terminals may damage the battery
or the connecting object.
• Leaving the battery in hot or cold places, such as in a closed car in
summer or a freezer in winter conditions, will reduce the capacity and
lifetime of the battery. Always try to keep the battery between 59°F and
77°F (15°C and 25°C). A hot or cold battery may not function temporarily,
even when the battery is fully charged.
• Battery performance is particularly limited in temperatures below freezing.
• Do not dispose of batteries in a fire! Dispose of batteries according to
local regulations. Please recycle when possible. Cellphones are not
considered household waste.
z Mobile phone maintenance
• Keep the device dry. Precipitation, humidity, and all types of liquids or
moisture can contain minerals that will corrode electronic circuits. If your
device does get wet, remove the battery and allow the device to dry
completely before replacing it.
• Do not use or store the device in dusty, dirty areas. Its moving parts and
electronic components can be damaged.

- 7 -
• Do not store the device in hot areas. High temperatures can shorten the
life of electronic devices, damage batteries, and warp or melt certain
plastics.
• Do not store the device in cold areas. When the device returns to its
normal temperature, moisture can form inside the device and damage
electronic circuit boards.
• Do not attempt to open the device other than as instructed in this guide.
• Do not drop, knock, or shake the device. Rough handling can break
internal circuit boards and fine mechanics.
• Do not use harsh chemicals, cleaning solvents, or strong detergents to
clean the device.
• Do not paint the device. Paint can clog the moving parts and prevent
proper operation.
• Use only the supplied or an approved replacement antenna. Unauthorized
antennas, modifications, or attachments could damage the device and may
violate regulations governing radio devices.
All of the above suggestions apply to your device, battery, charger, or any
enhancement. If any device is not working properly, take it to the nearest
authorized service facility for service.
Caut ion : The manufacturer assumes no respons ib i l i ty for
the consequences of the users does not comply w ith the
above suggest ions or m isuse of the phone .
Techn i ca l I n f ormat i on
Size Length: 154 mm ×Width: 78 mm ×Depth:9 mm
Networks: GSM 900/1800/850/1900 WCDMA B2/B5
FDD:
B2/B4 /B7
Model: Speed L
- 7 -
Weight: 170gram (with battery)
Lithium Battery
Model: Speed L
Nominal voltage: 4.35V
Nominal: 3.8V
Capacity rating: 2400 mAh
Continuous standby time*: 128hrs
Continuous calling time: 16hrs
* Depending on the network
The operation time of the battery depends on conditions such as:
• Transmitting power level
• Signal (distance between the phone and the base station)
• Network parameters defined by the operator
• Phone use (WAP, games, SMS)
• Charging procedure used
Exclusions:
Subject to the exclusions contained below:
1. Damage due to the improper use.
2. User does not follow the manual.
Explanation:
The company has the final right of the explanation for this document.
Software upgrades will not be announced.
A l l p i c t u r e s a r e f o r r e f e r e n c e o n l y i n t h e i n s t r u c t i o n b o o k ;
please refer to the actual phone.
Disclaimer
© IPRO. All rights reserved.
- 7 -
Features and specifications are subject to change without prior
notice. Certain mobile phone features may not be activated by
your service provider, and / or their network setting may limit the
feature's functionality. Services and some features such as
GPRS, email may be dependent on the network, SIM card, as
well as on the compatibility of the devices used and content
formats supported and may require network/service
subscription/solutions. Data transfers speeds are network
dependent. Always contact your service provider for details or
help. Talk and standby time is quoted in digital mode and are
approximate; battery performance and the signal reception
depend on network configuration, signal strength, type of SIM
card, operating temperature, features selected as well as voice,
data and other application usage pattern. The phones supports
Bluetooth, A2DP, in order for Bluetooth devices to communicate
with one another, they must utilize the same Bluetooth Profile. To
determine the profiles supported by other IPRO products, visit
www.IPROtechnologies.com, for other devices, contact their
respective manufacturers. Always demand for original IPRO
mobile phones to protect against buying tinkered and/or used,
refurbished or tampered phones. The warranty is applicable only
for IPRO phones; the company is not responsible for any loss or
theft. Always use IPRO original Enhancements (including
batteries) for safety. The use of any other type may invalidate
and approval or warranty applying to the mobile phone and may
be dangerous. The phone is designed to operate using Li-ion
batteries approved by the phone manufactures. Using non
approved batteries with the phone may result in poor
performance and damage to the phone or its enhancements. The
display and products visualization here are illustrative purposes
- 7 -
only; Display / color of the phone may differ from that shown on
the manual. All features, functionality and other product
specifications are based on the latest available information and
are correct at the time of printing; however such product
specifications are subject to change without notice. Copyrights
are reserved. IPRO is the trademark of IPRO TECHNOLOGIES
(INDIA) LTD. which is registered. The unauthorized copying of
copyrighted material is not legalized is inimical to the provisions
of the copyright laws of India and other countries.
INFORMATION UNDER E-WASTE ( M ANAG E MEN T AND HANDL I NG)
RULE S , 2 0 1 1
For disposal of e-waste, please call our helpline no. or visit our
website.
1. E-waste Helpline no. +86-0755-83496450
Weblink: www.iprochina.com
2. Do’s for disposal of product
a) Always drop your used electronic products, batteries, and
packaging materials after the end of their life in nearest
collection point or collection center
b) Separate the packaging material according to responsible
waste disposal options and sorting for recycling.
c) The battery can easily be removed from the product for
recycling.
3. Don’t of disposal of equipment

- 7 -
a) Never dump E-waste in garbage bins or municipal solid waste
stream.
b) Do not dispose of your product as unsorted municipal waste.
c) Do not throw used batteries into household waste.
d) Do not dispose damaged or leaking Lithium Ion (Li-Ion) battery
with normal household waste.
4. Information on the consequences of improper handling,
accidental breakage damage and improper recycling of the
end of life product.
a) If batteries are not properly disposed of, it can cause harm to
human health or the environment.
b) Placing of batteries or devices on or in heating devices, such
as microwave ovens, stoves, or radiators and improper
disposal of batteries may lead to explosion.
c) If the battery terminals are in contact with metal objects, it may
cause a fire.

- 7 -
FCC WARN ING
Specific Absorption Rate (SAR) information SAR tests are
conducted using standard operating positions accepted by the
FCC with the phone transmitting at its highest certified power
level in all tested frequency bands, although the SAR is
determined at the highest certified power level, the actual SAR
level of the phone while operating can be well below the
maximum value, in general, the closer you are to a wireless base
station antenna, the lower the power output.
Before a new model phone is a available for sale to the public, it
must be tested and certified to the FCC that it does not exceed
the exposure limit established by the FCC, Tests for each phone
are performed in positions and locations (e.g. at the ear and worn
on the body)as required by the FCC.
For body worn operation, this mobile phone has been tested and
meets the FCC RF exposure guidelines when used with an
accessory designated for this product or when used with an
accessory that contains no metal and that positions the handset a
minimum of 1.0cm from the body.
This device complies with part 15 of the FCC Rules. Operation is
subject to the following two conditions: (1) This device may not
- 7 -
cause harmful interference, and (2) this device must accept any
interference received, including interference that may cause
undesired operation. Any Changes or modifications not expressly
approved by the party responsible for compliance could void the
user’s authority to operate the equipment.
Note: This equipment has been tested and found to comply with
the limits for a Class B digital device, pursuant to part 15 of the
FCC Rules. These limits are designed to provide reasonable
protection against harmful interference in a residential installation.
This equipment generates uses and can radiate radio frequency
energy and, if not installed and used in accordance with the
instructions, may cause harmful interference to radio
communications. However, there is no guarantee that
interference will not occur in a particular installation. If this
equipment does cause harmful interference to radio or television
reception, which can be determined by turning the equipment off
and on, the user is encouraged to try to correct the interference
by one or more of the following measures:
--Reorient or relocate the receiving antenna.
--Increase the separation between the equipment and receiver.
--Connect the equipment into an outlet on a circuit different from
that to which the receiver is connected.
--Consult the dealer or an experienced radio/TV technician for
help.