IPRO TECHNOLOGY SUPERPAD MID User Manual super pad
HONG KONG IPRO TECHNOLOGY CO.,LIMITED MID super pad
Users Manual
Tablet User Manual
About super pad
Contents
Preface ..............................................................................................................................................4
Chapter 1 Desktop.............................................................................................................................6
1.1 Brief introduce ....................................................................................................................6
1.2 Status bar.............................................................................................................................7
1.3 Wallpaper ............................................................................................................................8
Chapter 2 Call ...................................................................................................................................9
2.1 Call......................................................................................................................................9
2.2 Call menu ............................................................................................................................9
2.3 Answered call....................................................................................................................10
2.4 Emergency call..................................................................................................................11
2.5 Contact list ........................................................................................................................11
2.6 Call records .......................................................................................................................12
2.7 Group ................................................................................................................................13
Chapter 3 Messaging.......................................................................................................................14
3.1 Message list.......................................................................................................................14
3.2 Edit message .....................................................................................................................15
Chapter 4 Mail ................................................................................................................................17
4.1 Login .................................................................................................................................17
4.2 Mail box ............................................................................................................................18
4.3 Menu .................................................................................................................................19
Chapter 5 Multi-media....................................................................................................................20
5.1 Gallery...............................................................................................................................20
5.2 Camera ..............................................................................................................................21
5.3 Music.................................................................................................................................22
5.4 Explore..............................................................................................................................23
Chapter 6 Other applications...........................................................................................................25
6.1 File management ...............................................................................................................25
6.2 FM Radio ..........................................................................................................................26
6.3 Apps ..................................................................................................................................26
6.4 Calculator..........................................................................................................................27
6.5 Analog clock .....................................................................................................................28
6.6 Sound recorder ..................................................................................................................28
6.7 News and weather .............................................................................................................29
6.8 Calendar ............................................................................................................................29
6.9 Downloads ........................................................................................................................30
6.10 Update .............................................................................................................................31
Chapter 7 Settings ...........................................................................................................................32
7.1 Wireless and network ........................................................................................................32
7.2 Device ...............................................................................................................................33
7.3 Personal.............................................................................................................................34
7.4 Accounts............................................................................................................................35
7.5 System...............................................................................................................................35
7.6 USB data line description..................................................................................................36

Preface
Welcome!
PLEASE READ THIS INFORMATION BEFORE USING THE TABLET TO MAKE A BETTER
USE OF YOUR TABLET. WE ARE NOT RESPONSIBLE FOR ANY DAMAGE DUE TO
YOUR MISUNDERSTANDING OF THIS INFORMATION AND MISACTTING.
We are endeavoring to improve our products and services and we reserve all the rights to revise
and change the description of this product and its software as well as this user’s manual without
obligation to notify any person of such revisions and changes.
This user’s manual is for your better use of this tablet but not an approval of any accessories. All
the pictures in this manual are for reference only. There may be slight difference between the
appearance of tablet and keys and contents of display used in this manual and those of your tablet.
Please refer to your tablet for actuality. Some features introduced in this manual are network or
subscription-dependent features. Please contact your service provider
Safety Information
Battery:
If a conductive material such touches the exposed terminal, short circuit may occur resulting in
property damage, bodily injury or burn. To avoid risk of leaking electricity, take care when
handling a charged battery particularly when placing it inside your pocket, purse or other container
with metal objects.
Keep your mobile device from water:
Keep your mobile device dry.
Use while driving
Always obey the laws and regulations on the use of mobile devices in the area where you drive.
Give full attention to driving and the road; use hand-free operation or earpiece if a call is needed.
Aircraft
Mobile device may cause harmful interference so turn off your mobile device before boarding an
airplane.
Blasting areas
Always obey the related limits and regulations and do not use your mobile device in blasting areas.
Turn off your mobile device in areas posted “turn off electronic devices”.
Potentially explosive atmospheres
Turn off your mobile device in the gas station and areas near fuel and chemical containers. Turn
off your mobile device in areas posted “turn off electronic devices”.
Medical devices
Turn off your mobile device whenever instructed to do so by posted signs near some medical
equipment. Mobile device may interfere with pacemakers, hearing aids and some other medical
transplanting equipment. Do not put your mobile device near pacemakers nor carry in the breast
pocket.
Accessories and battery
Read this information before using your mobile device otherwise may result in personal
injury or your device not complying with local laws.

Use the accessories, batteries and chargers approved by manufacturer. Use of batteries not
approved by manufacturer may cause injury.
Emergency calls
Turn on your tablet and keep it in service areas, dial emergency tablet numbers and then press
send key to make a call.
When losing your tablet
To avoid any economy damage, please inform the Tele-communication Company or agencies to
lock your SIM card when you lost your tablet.
When you inform the telecom company or agencies to lock your SIM card they need to know the
IMEI No. of your tablet, which you can find printed on the label on the back of your tablet when
taking off the battery. Please backup this number for future need
For safety consideration, you can make preventative measures such as set PIN Code for your SIM
card to prevent other persons using your SIM card without your permission.
Keep away from children
Keep the tablet, battery and charger away from children to avoid any personal injury.
Use and Care
To care for this mobile device, keep it away from:
Any kind of fluid
Keep the device away from water, rain, humidity, sweat or other moisture.
Extreme heat or cold
Avoid the temperature below -30℃ or above 50 .℃
Microwave
Don’t try to dry your tablet in a microwave oven.
Dust and dirt
Don’t expose your tablet to dust, dirt, sand, food or other inappropriate materials.
Cleaning solutions
Use only a dry soft cloth to clean your tablet. Don’t use alcohol or other cleaning
solutions.
Ground
Don’t drop your tablet.
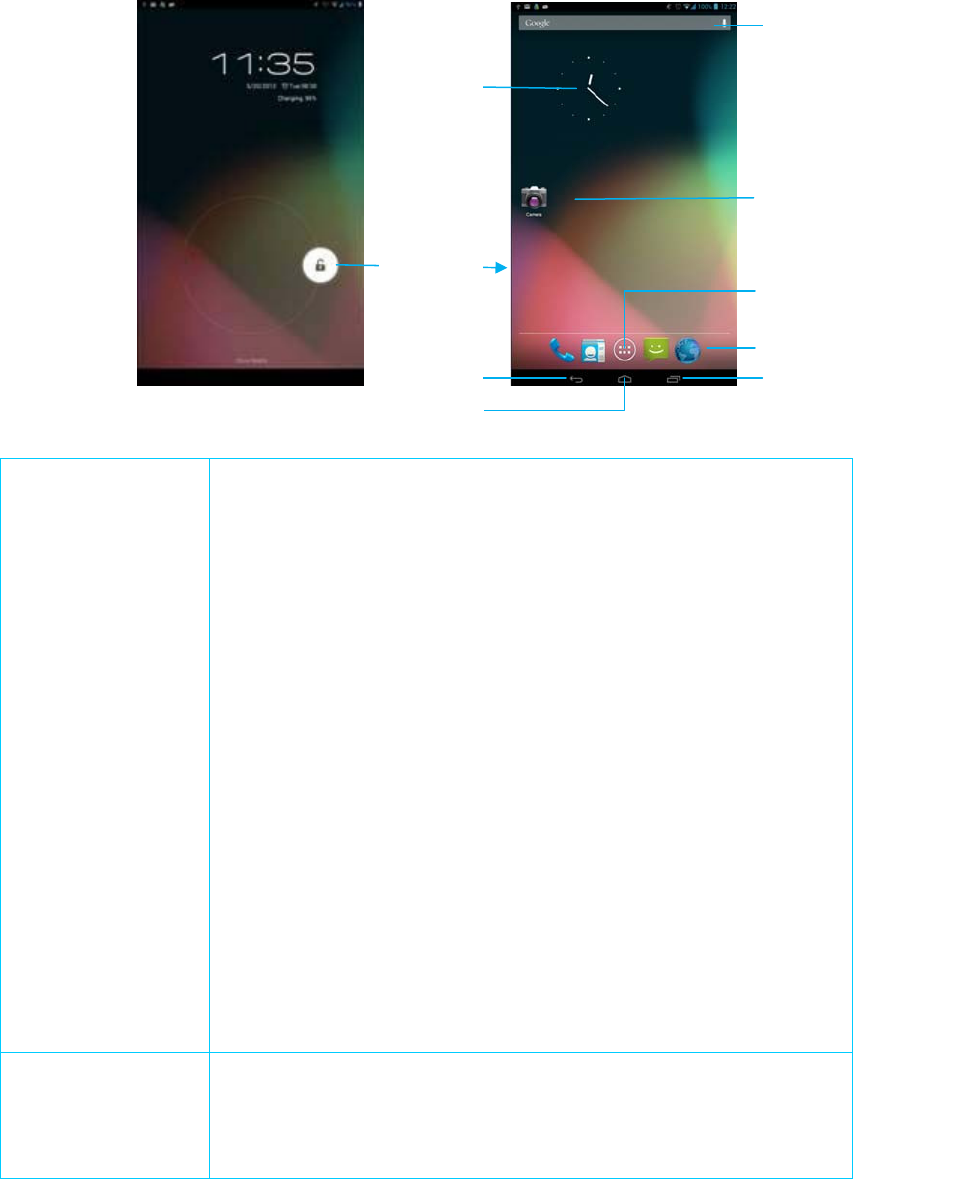
Chapter 1 Desktop
1.1 Brief introduce
Tablet KE YS: Home KEY:
Home key is located in the middle of the bottom of the tablet screen.
Touch it and system will default to come back to main interface.
Recent app key:
Recent app key is located in the right of the bottom of the tablet
screen. Touch it and system will pop-up the Recent app interface,
you can see running apps recently.
Back key:
Back key is located in the left of the bottom of the tablet screen.
Touch it to get back to the previous step.
Power key:
Power key is located above the right side of tablet. Long press
Power key can boot in shutdown case. Short press Power key in boot
case to shows the lock screen operation. Long press Power key,
tablet will enter into the tablet options interface, "Power off |
Airplane mode | mute mode | vibration mode | standard mode".
Voice key:
Voice key is located in the right side of tablet, mainly to adjust a
variety of media sound size.
Screen unlock: Remind:
Press power key to enter the lock screen, press power key again to unlock
the page.
Unlock:
Unloc
k
Analog
clock
Google search
Shortcut key
Enter to applications
Back
Home
Recent app
Permanent menu
Drag the screen lock icon to icon.
Status bar: Status bar is a black stripe on the top of the screen, the left displays
notification information, and the right displays connection status
icon.
Add widget:
: Get into the interface of adding widget in the main screen, long
press a widget to the desktop then let go can be added successfully.
Move desktop: Long press screen to move left and right.
Move icon: Long press the icon, icon will jump out of the desktop and become
big, drag the icon to another place. If you want to delete it, you can
drag to above shows the "X Remove" to remove it; If you want to
move icon to the other screen, move icon to the screen left or right,
the screen will automatically jump, and then select position to put.
1.2 Status bar
The top shows the open connections:
Show all connections, such as Bluetooth, WLAN, and GPS, slide left and right to view and
click to open or close the connection.
Notifications:
Display unhandled events and time, click the event into the corresponding event module
(such as: unread messages, music player).
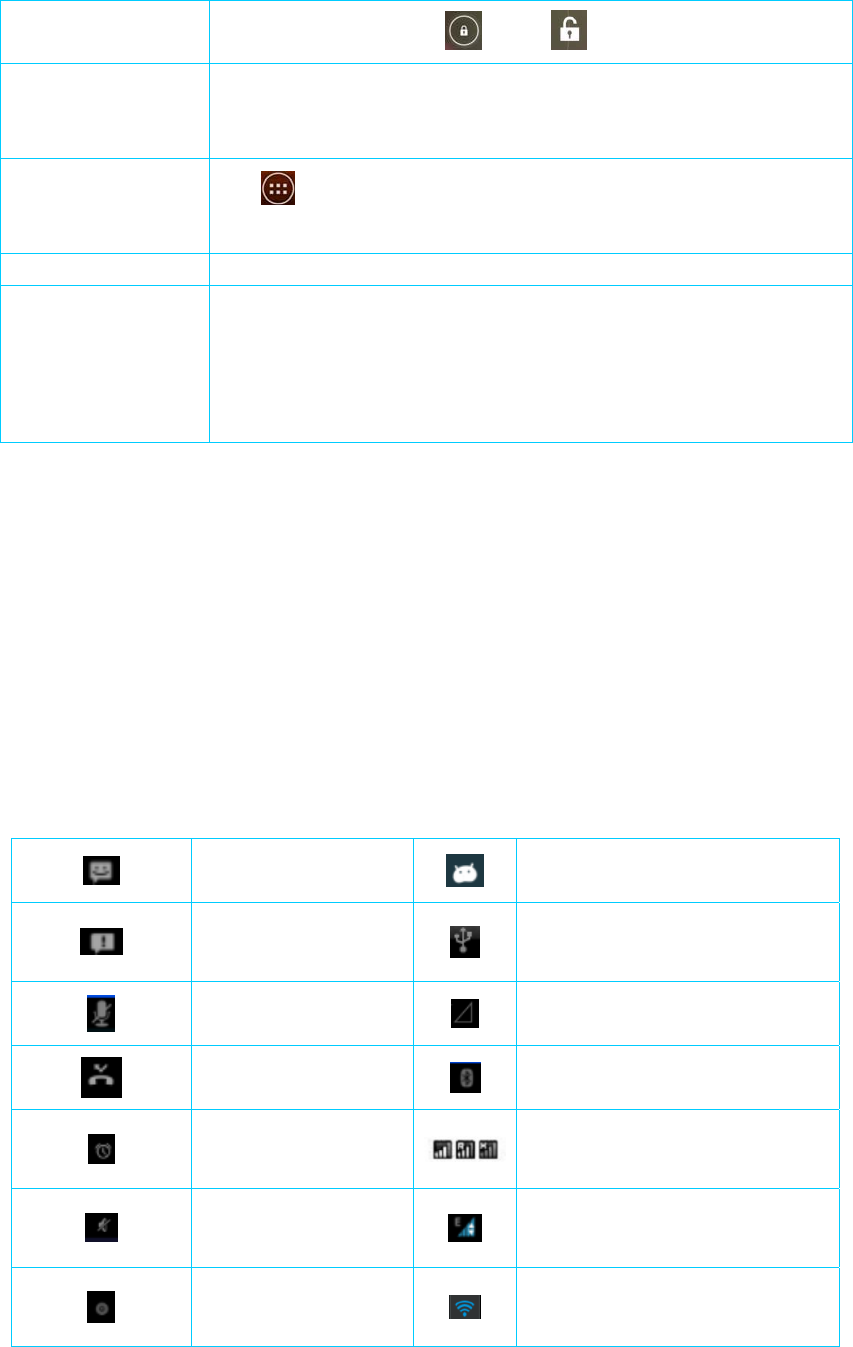
Status bar icons:
New message USB debugging connected
Fail to send message
Tablet has connected to the computer
via USB
Call process mute No SIM card
Missed call Bluetooth function
Alarm open
GSM information, roaming, no
signal
mute mode
EDGE service connecting, data
exchanging.
Playing the music
Wi-Fi service connected, network
available.
Event not done download
New mail Charging
Airplane mode Battery status sign
The speaker open
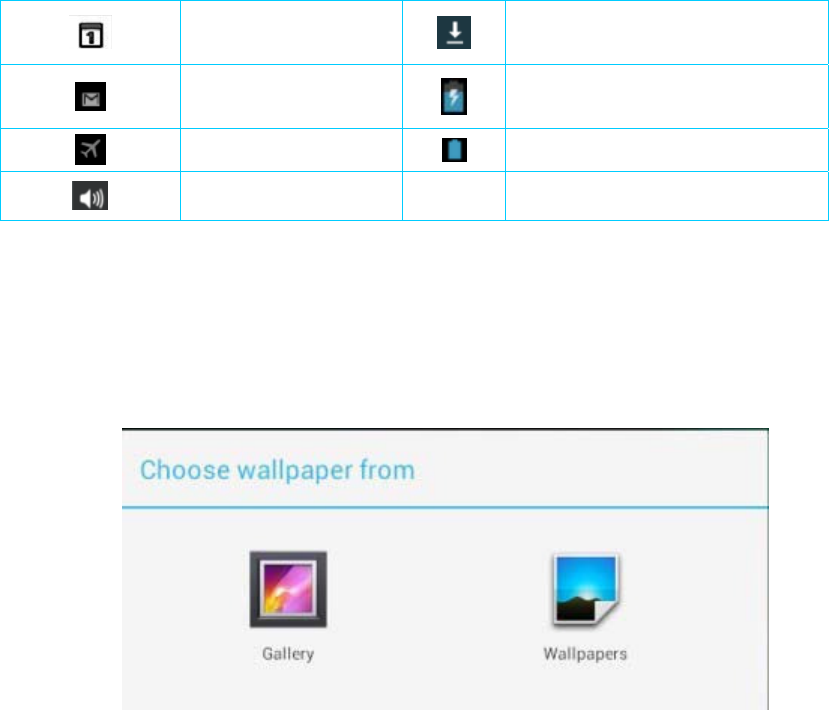
1.3 Wallpaper
In the IDLE interface, long press the blank can pop-up "choose the wallpaper source" dialog
box.
1.Gallery:Select from the storage card.
2.Wallpapers:Select system wallpaper.
Chapter 2 Call
Notice:
Whether you are in the service area and signal intensity display in status bar. More signal
numbers, more strong signal is.
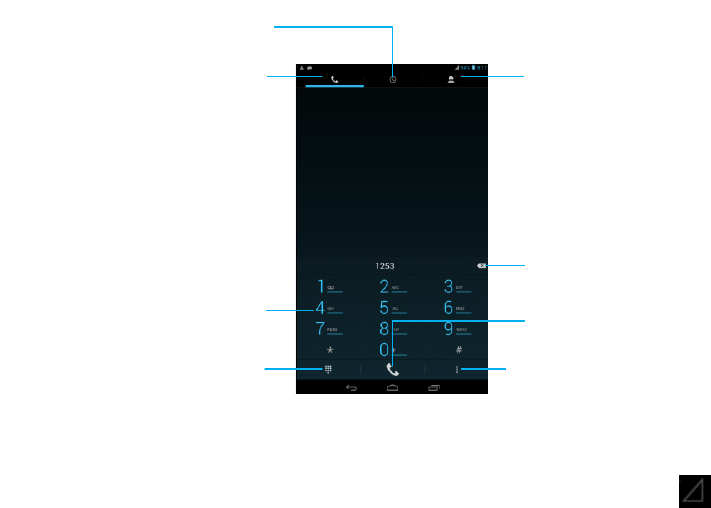
2.1 Call
There are many ways to call by call number: Call through contact list (contact selected call, can
also look at the interface of contact details to call); Call through group (the group contacts list,
select the contact call); Call by call records (through the call records, select the number to call);
Call via SMS; Call by telephone number shows in messages; Dial call. Following is detailed
explanation of how to use a dial call:
Input number by digital key (or click the dial above the matching number) and call.
If SIM card does not exist in the tablet, SIM card icon will display like , and you can't call.
If you input wrong numbers, short press backspace to delete one number and long press
backspace to delete all numbers.
Click call records icon to view recent incoming calls / outgoing calls.
Click Contacts icon to contact interface and select contact to dial.
Click Menu to choose Speed dial| People| Settings.
2.2 Call menu
Digital key
Dialer
Call records
Contacts
Backspace
Call
Menu
Show / hide the digital key
Keep: Press to keep you and each other from hearing the voice in the call, press again to
return.
Add call: Click to jump to dialer interface and you can add another call.
Call recording: Make a call recording during a call.
Conference call: Merge multiple calls to a telephone conference.
Contact head: If you have set contact head before, it will show in the call or answer the
phone.
Notice:
You can press "back" button on a return to use other programs during a call. For example,
you can view the calendar in a call. Choose "the call" in the notification bar to get back to
call interface from the other programs.
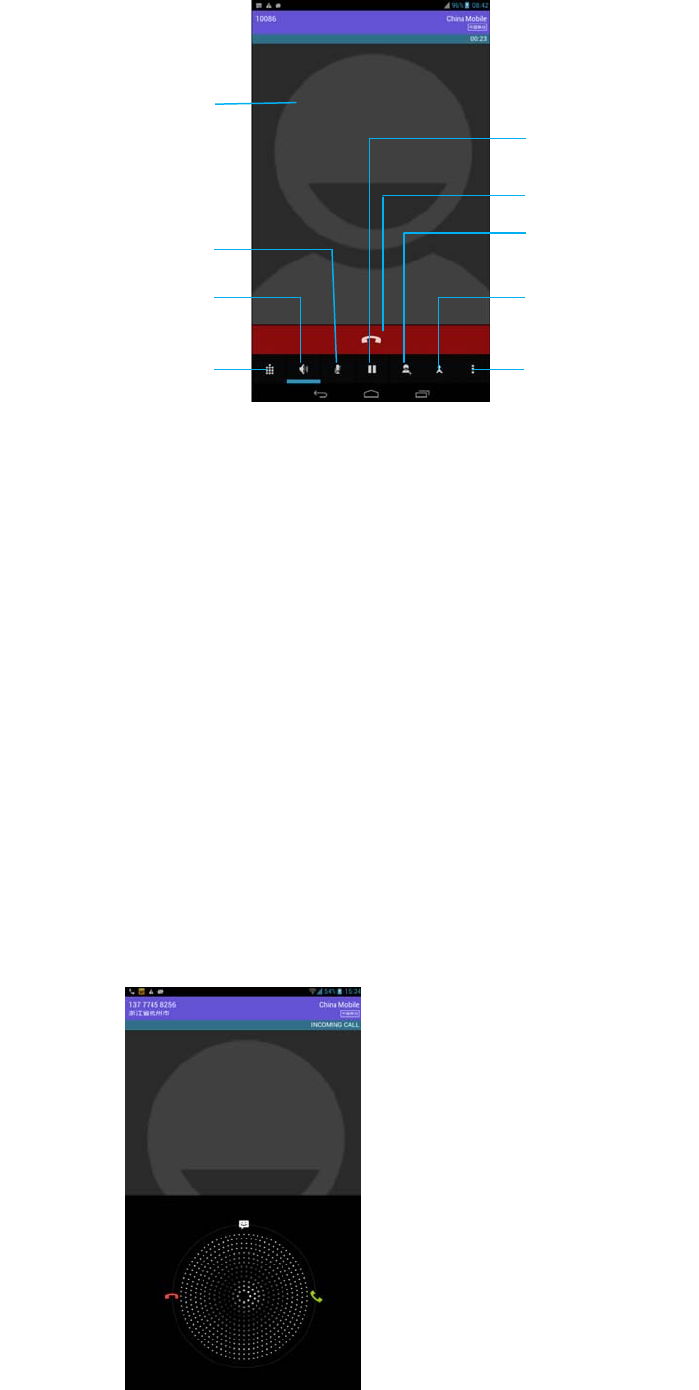
2.3 Answered call
When you receive a contact’s call you’ve stored, it will display the caller's name, telephone
number, number location. When you receive a contact’s call you’ve not stored, it will only display
phone number and number location.
Contact head
Hang up
Show the digital key
Hands-free
Mute
Keep
Add call
Conference call
Call recording
Answer the phone: Pull the ring right into icon to answer a call. If you are using a
headset, you can press the headset key to answer a call.
Reject calls: Pull the ring into icon to reject a call. If you are using a headset, you can
press the headset key to reject a call. Press power button to hold tablet silent and then
choose to answer or reject it.
Reject and send message: When you are not convenient to answer the call, pull the ring
into icon and then choose a message, tablet will automatically send the message to
inform the person.
2.4 Emergency call
In any country using digital GSM network, if you are in the range of the network (check
through inspecting tablet strip of the network signal intensity), you should be able to call the
emergency services, even without a SIM card.
Notice:
Sometimes, due to the influence of network environment or disturbance event, emergency
call may not be able to call.
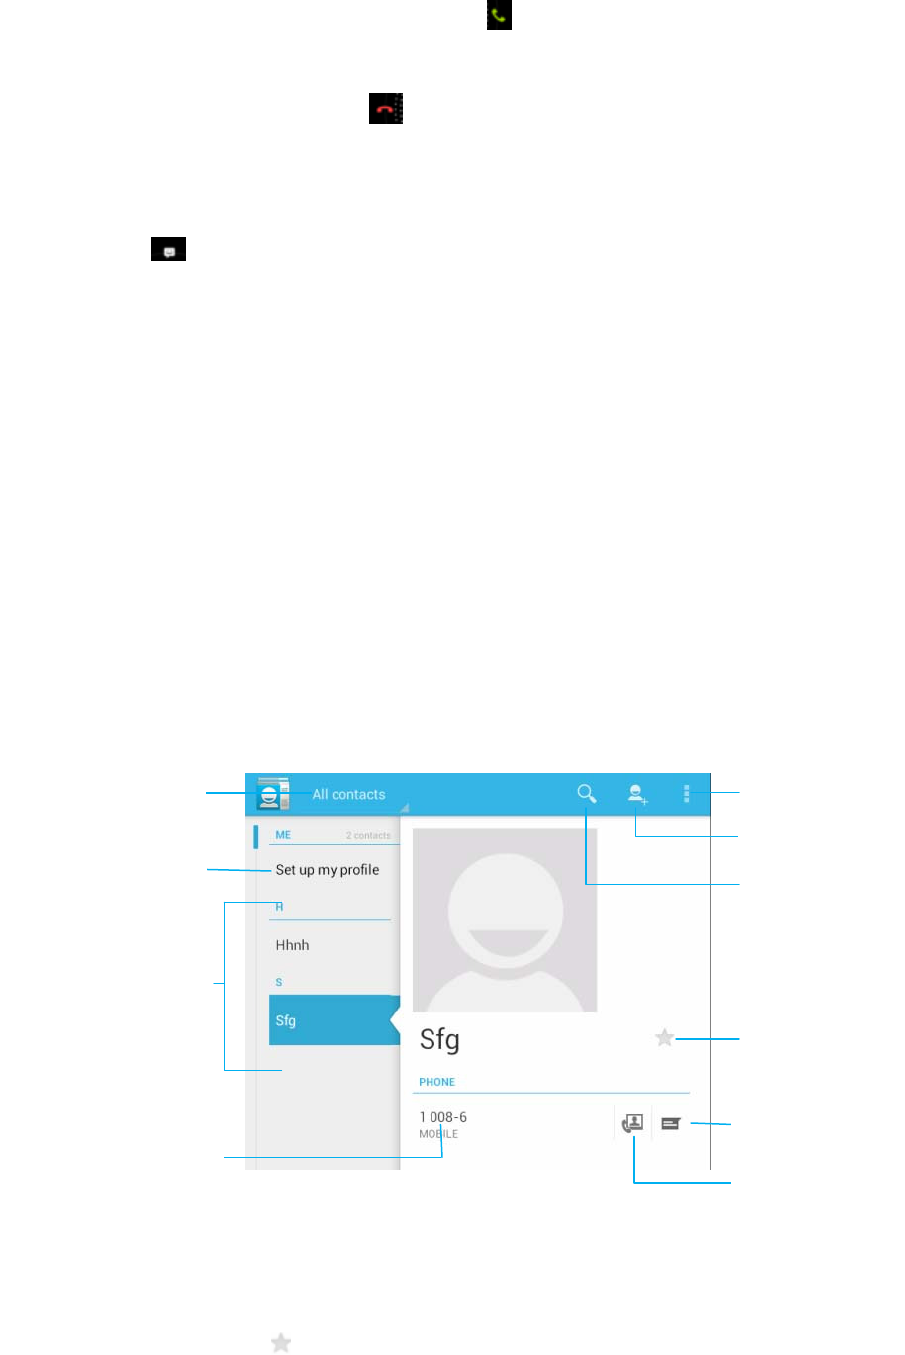
2.5 Contact list
Display option: Select contact list to show all contacts、favorites or groups.
Add contact: Add a contact to Tablet |SIM card |Google account.
Search contact: System will jump to the corresponding contacts if you enter something.
Favorites: Click icon to add a contact to your favorites.
Display option Menu
Master information
Contact list
Add contact
Search contact
Favorites
Message
Video call
Contact phone
Master information: Fill in owner information to the tablet.
Message: Click to enter into SMS edit interface to the contact.
Video call: Click to make a video call with the contact.
Contact list: Display contacts’ telephone dialing, click to show details.
Menu: Can do many operations.
Delete contact: Delete single or multiple contacts.
Import / export: Copy and paste contacts between tablet, internal memory and SIM card.
Accounts: Auto-sync app data.
Share visible contacts: Share visible contacts with others via Email/ Gmail/ MMS/ SD
Card/ SMS.
Share: Share one contact with others via Email/ Gmail/ MMS/ SD Card/ SMS.
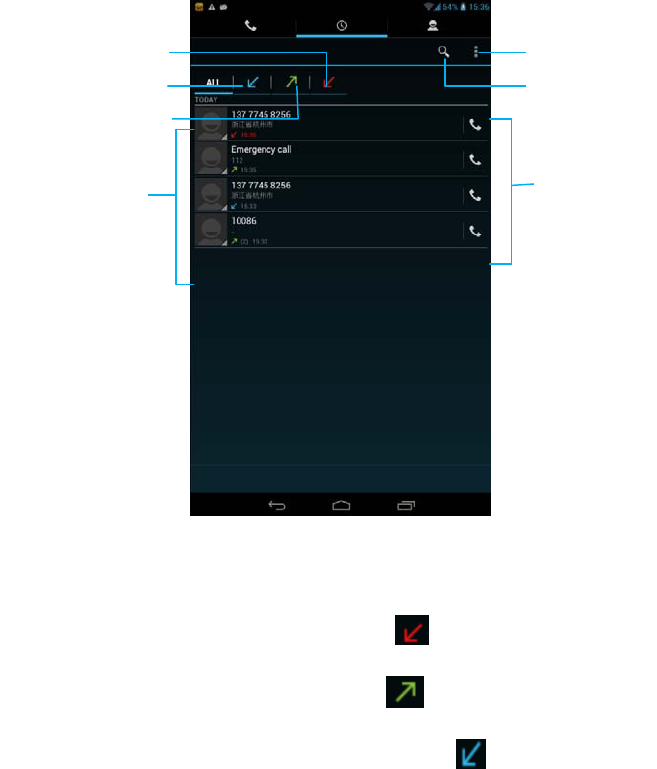
2.6 Call records
Tip: You can open the notification bar (or click call record interface). It will display missed
call number or name of the contact.
Missed call: Missed calls will display icon.
Dialed call: Dialed calls will display icon.
Answered call:Answered calls will display icon.
Menu: Click to call settings or delete call records.
Search: Search contact from contact list.
Speed dial: Click to speed dials the number.
Missed call
Answered call
Dialed call
Menu
Search
Call list Speed dial
Other operations:
You can do many other operations: edit number, send text messages, add a record to
contact list (display details), IP dial, delete call records, video calls.
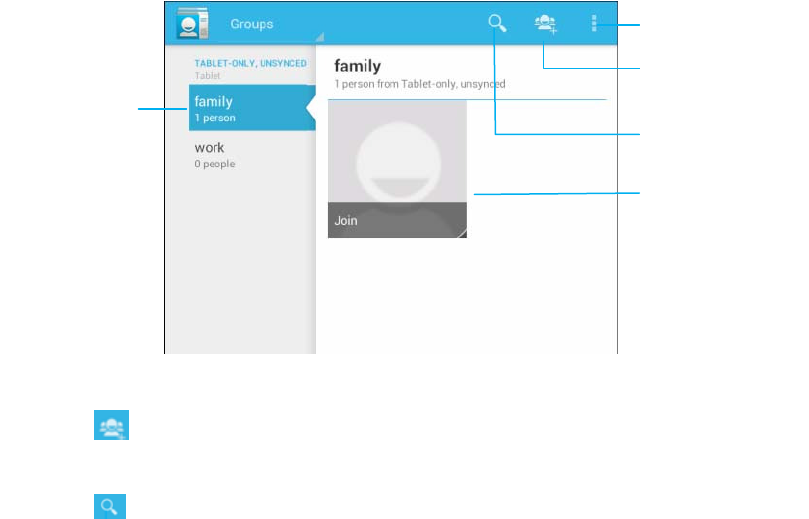
2.7 Group
1.add group
Click to add a group.
1.Search contacts
Click icon to search contacts.
1.Menu
Import / Export: Copy and paste contacts between tablet, internal memory and SIM
card.
Accounts: Auto-sync app data.
Share the visible contacts: Share contacts with others via Email/ Gmail/ MMS/ SD
Card/ SMS.
Edit: Modify group information.
Delete: Delete a group.
Add group
Search contacts
Menu
Group name
Group phone
Chapter 3 Messaging
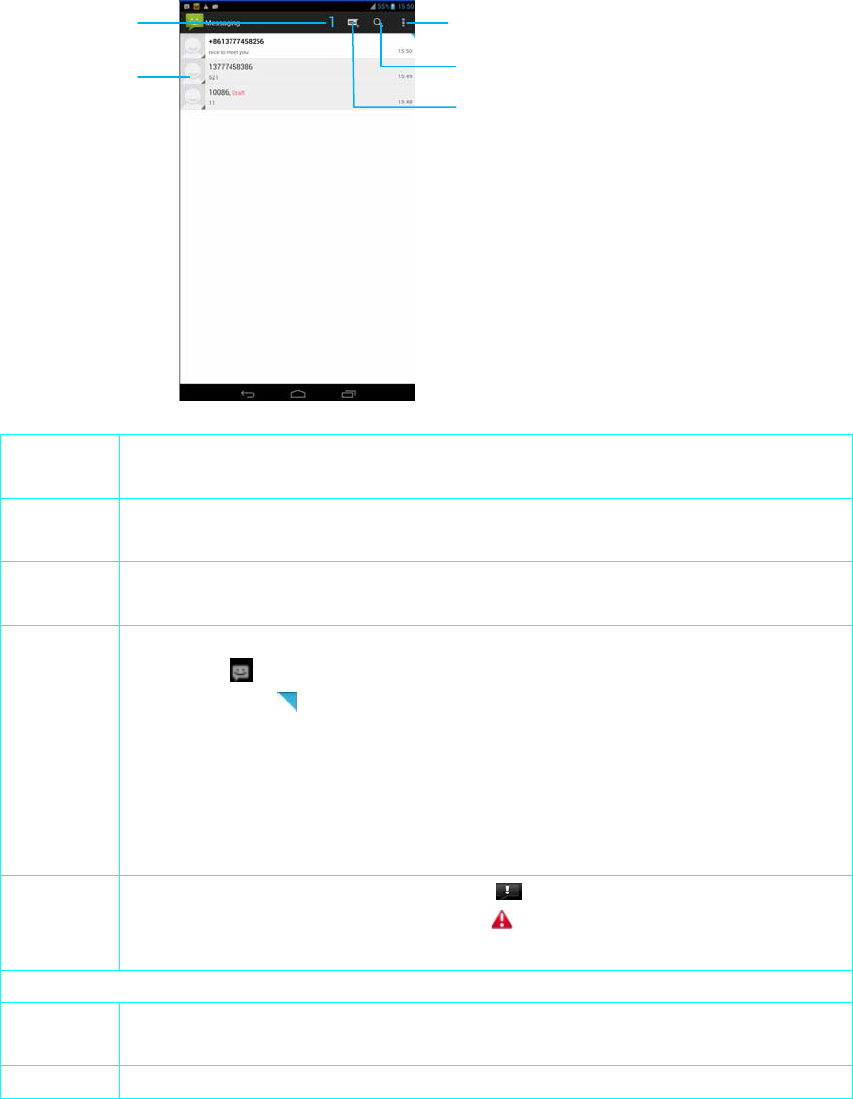
3.1 Message list
You can send and receive text messages in the network signal coverage area at any time. You
can use the tablet with the SMS function to send text messages to any number of recipients.
1 The number of unread messages:
Display the number of unread messages.
2 Search message:
Search message from all messages.
3 Create a new message:
Create a new message.
4 Message list:
It displays icon in the status bar when you received a message. Message list
interface displays icon when messages have not read.
Red font "draft": Draft content is stored in the message interface, and it can store
only the latest message of the current draft.
Click a contact head: If the contact haven’t stored before, you can add it to
contacts list. Otherwise you can view the contact details such as telephone number |
send message | video call | etc.
Other When you failed to send a message, a sign will show in the status bar. After
entering the message interface, long press flag to copy the message and you can
choose to resend the message.
5 Menu
Delete all
threads
Delete all threads.
Settings You can set many options.
1
2
3
5
4
◆Storage settings:
1、Delete old messages(delete old messages as limits are reached)
2、Text message limit(Set maximum number of messages to save)
3、Multimedia message limit(Set maximum number of messages to save)
◆Text message (SMS) settings:
1、Request delivery report
2、Manage SIM card messages
3、Edit quick text
4、SMS Service Center
5、SMS Storage location(Device/SIM card)
◆Multimedia message (MMS) settings:
1、Request deliver report
2、Request read report
3、Auto-retrieve
4、Roaming auto-retrieve
5、Creation mode(restricted mode/warning mode/free mode)
6、Size limit(100k/200k/300k)
7、Priority(high/normal/low)
◆Notification settings:
1、Display message notifications in status bar
2、Select ringtone
3.2 Edit message
Send SMS or MMS which includes photo, taking photo, video, taking video, audio, sound
recordings, slides etc.
1Message content operation
1. If message content includes phone number, e-mail, web site, click the URL address will
automatically in the Google browser to open the webpage, click on the telephone number
to call the number, click e-mail will enter to the email address edit message interface.
2. You can also long press in the text message, select "call XXX number, add the XXX mail
to contacts, send an email to XXX" operations in the pop-up options.
2Send MMS
Click icon to add attachments to a SMS, and then it will automatically changes to
send a MMS. After adding attachments you can also view, substitute, and delete
attachments. Tap to select a contact and click to send. You can also choose image or
video from Gallery and then click -- share -- Messaging, and then it will switch to
MMS editing interface.

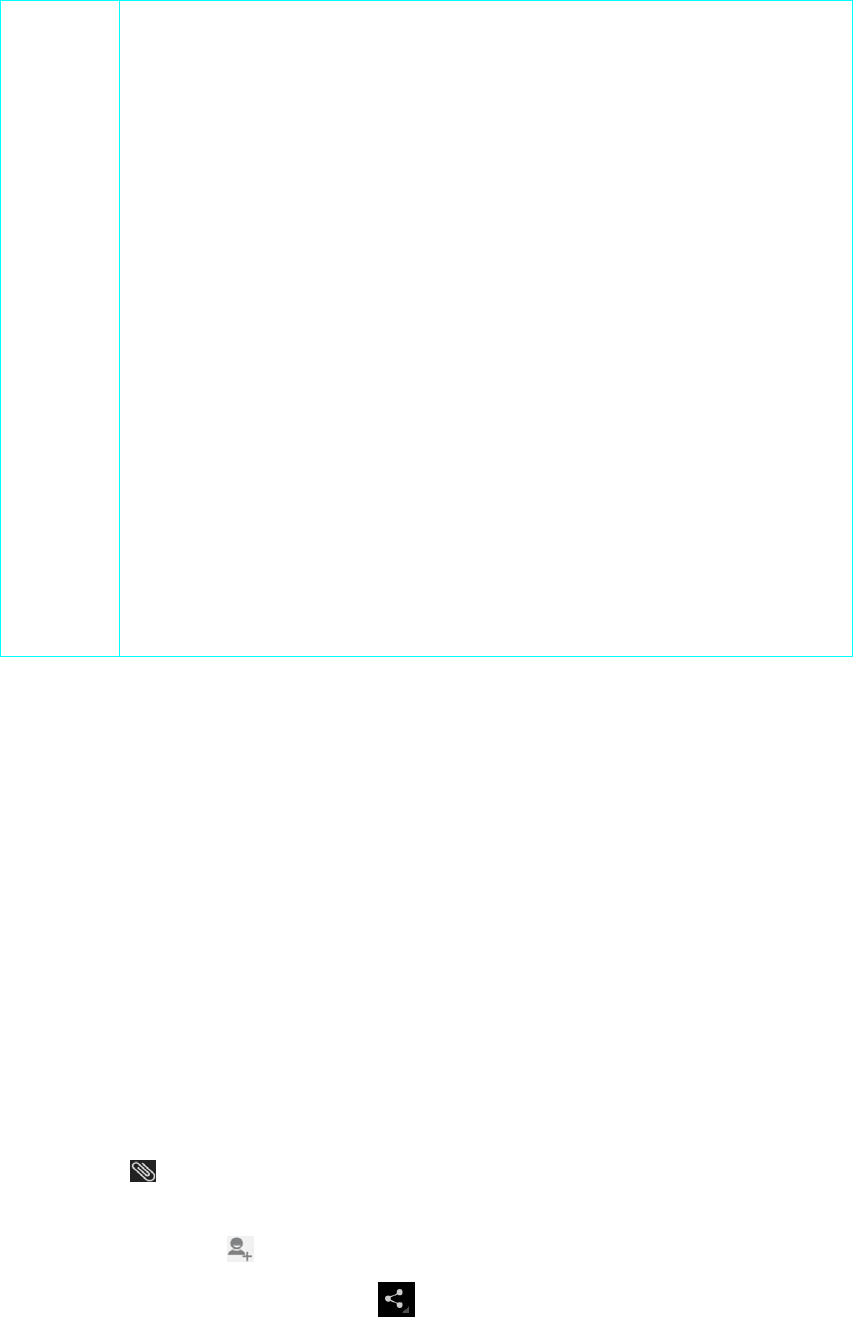
3Other
You will enter into the text editing interface when you reply a message. It will display other
functions after clicking icon.
Video call: Make a video call with the contact.
Add subject: Add a subject for the message.
Delete messages: Choose to delete messages.
Insert quick text:Select quick test which you can add in settings to insert.
Insert smiley: Select a smiley to insert.
Insert contact:Insert other contacts to the text message.
Notice:
MMS additional video and audio, pictures, slides cannot exceed the maximum value,
otherwise it will not be added.
Chapter 4 Mail
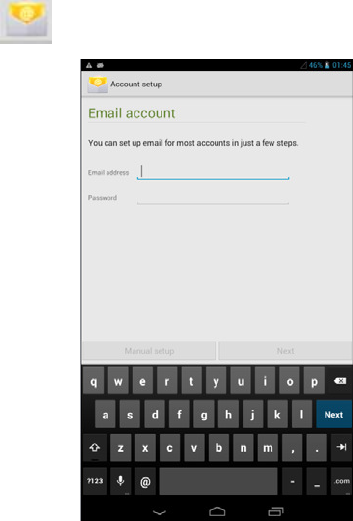
4.1 Login
Click icon to enter Email interface.
You can use your commonly used user name to login email. Enter user name and password,
click Manual setup and click next.
1. Click to enter the mail, enter the correct user name and password.
2. Click Manual setup.
3. Set up your mailbox server according to your mail type. click next after entering account
name and password.
4. Set account options by yourself and click next.
5. Now your account has set up, and email is on its way. You can give this account a name
and enter your name which is displayed on outgoing messages.
6.Click next to finish your account set.
Tip: Before you enter the account name and password, please confirm whether enable the
POP3 or IMAP option on the web webpage. The mailbox is generally use pop account, Gmail
mailbox using IMAP account. In general, it is recommended that you enter the account
password, click next, tablet will be automatically set.
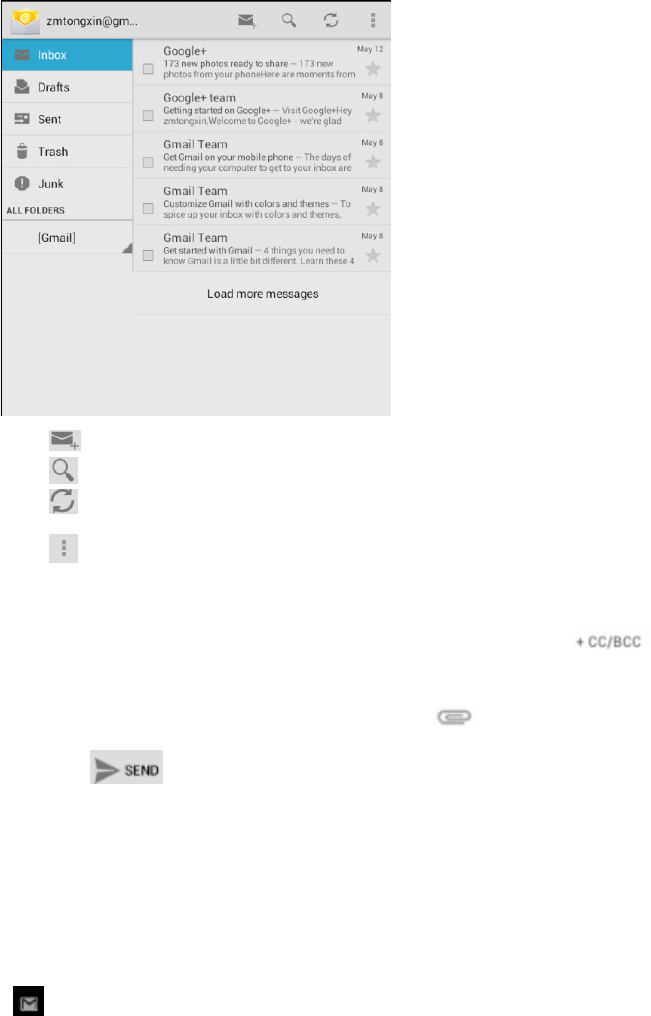
4.2 Mail box
You can send message to any email address of relatives and friends, and you can also send
message to a person or a group.
: Create a new mail editing interface.
: Search mail in your inbox.
: Refresh messages in inbox.
: Settings.
1Send mail
1. Enter one or more name or address in the recipient bar, press to add CC and
BCC object.
2. Enter a subject and the text content, you can press to add attachment.
3. Click icon to send mail.
Tip:
Click “cancel” after you entering the information to save a mail to drafts. Then you can
find the mail in the "draft", you can modify it and send.
2Read new mail
If you have set a reminder, when you receive a new mail, tablet will prompt sound and show
icon in the status bar, and the mail will appear at the top of your inbox. It is convenient and
timely for users to view.
3Add mail contacts
Click sender photo to pop-up a dialog to add the email address to your mail contacts.

4.3 Menu
Click to choose settings:
Add account: Add a new account.
General:
Auto-advance: Choose which screen to show after you delete a message.
Message text size: Message text size: Tiny| Small| Normal| Large| Huge.
Ask to show pictures: Pictures in messages won’t be shown automatically.
Always bcc myself: Always bcc myself when compose, reply and forward.
Auto download remaining: Auto download remaining body when scrolling down.
Account settings:
Account name: You can change your account name.
Your name: You can change your name.
Signature: Append text to messages you send.
Quick responses: Edit text that you frequently insert when composing emails.
Default account: Send email from this account by default.
Inbox check frequency: Choose inbox check frequency.
Sync email: Sync email for this account.
Download attachments: Auto-download attachments to recent messages via WI-FI.
Email notifications: Notify in system bar when email arrives.
Choose ringtone: Choose ringtone from media storage by default.
Vibrate: Also vibrate when email arrives.
Incoming settings/outgoing settings: Username/password/other server settings.
Remove account: Remove current account.
Chapter 5 Multi-media
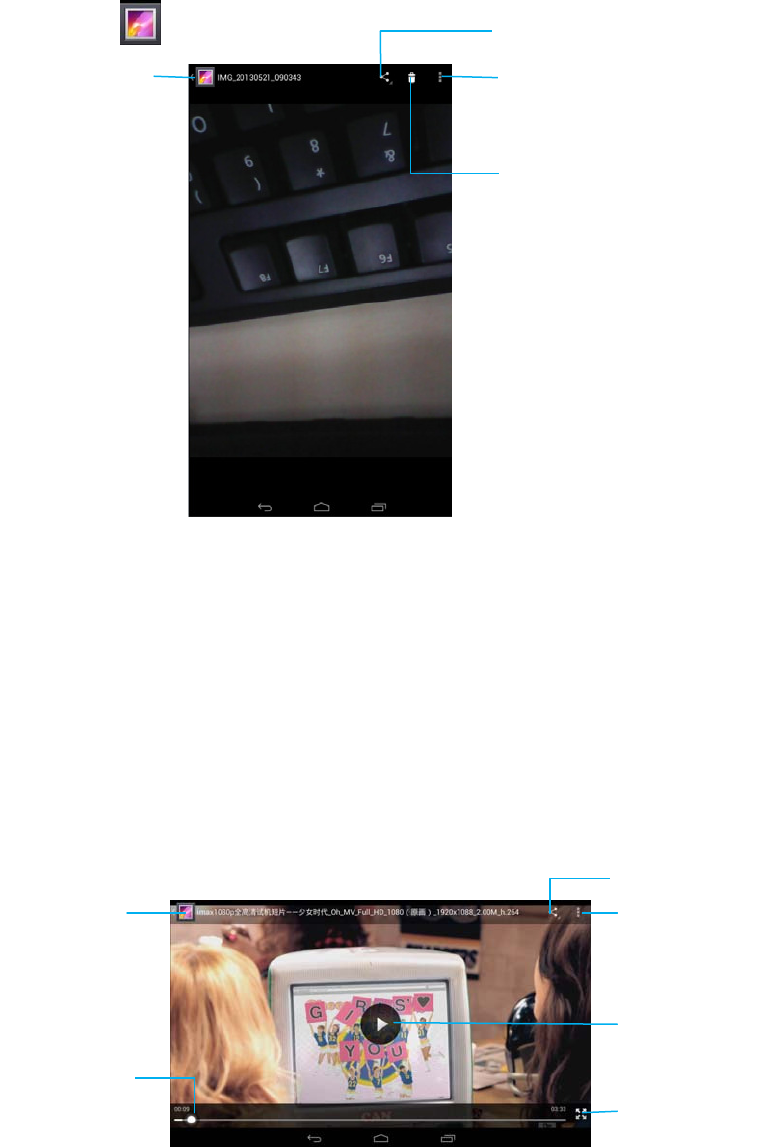
5.1 Gallery
Gallery: Click icon to enter gallery.
1Share
Share picture via messaging| Google+| Email| Gmail.
2Menu
Slideshow:Play all the pictures in the form of slide.
Edit:Modify pictures.
Rotate left/rotate right:Change the direction of a picture.
Crop:Choose part of a picture.
Set picture as:You can set picture as contact photo or wallpaper.
Details:Display information about pictures such as picture size and date.
Video:Short press video, system will play video by default built-in video player.
Share
Menu
Delete
Return
Return
Share
Menu
Play / pause
Full screen
Progress bar
1Share
Share a video via messaging |Google+| Email |Gmail.
2Menu
Stop: The video will come back to the starting point and stop.
Single/loop:Select single or loop to play video.
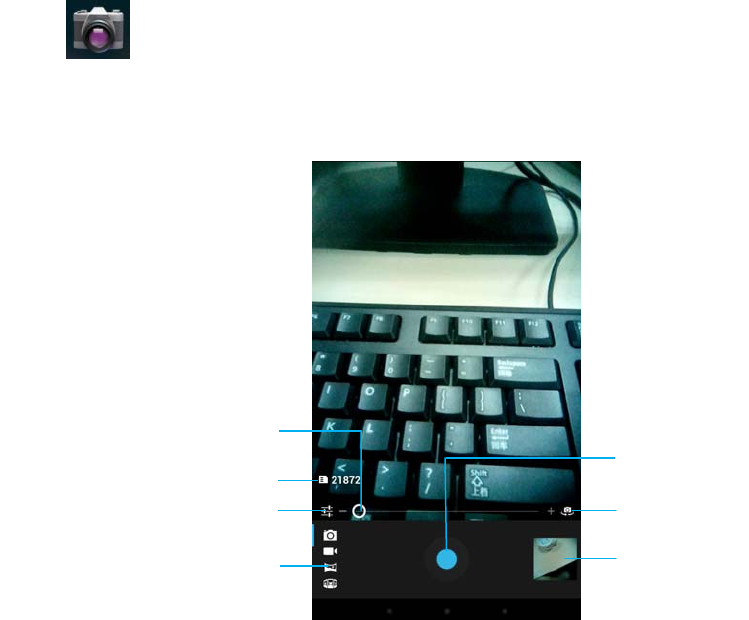
5.2 Camera
Click icon to camera interface. Camera can also be entered by other means (such as
adding attachment to text messages or in gallery).
1Photograph
2Video
Zoom in / out
Remaining pictures
Settings
Camera / video /360 °
panorama / limited panorama
Photograph
Switch
Gallery
3Settings
1、Camera mode
White balance: Automatic / incandescent lamp / solar / fluorescence / cloudy / light /
shadow / warm fluorescence
Color effect: No color / monochrome / Tan / film / water / Blue / blackboard
whiteboard
Scene mode: Automatic / night / sunset / party / portrait / landscape / night portrait /
theater / Beach / snow / shake / fire / movement
Camera settings: Face focusing / save location / exposure / self-timer timing /
sharpness / hue / saturation / brightness / contrast / picture size /ISO sensitivity /
metering mode / avoid flicker
2、Video mode
White balance: Automatic / incandescent lamp / solar / fluorescence / cloudy / light /
shadow / warm fluorescence
Color effect:No color / monochrome / Tan / film / water / Blue / blackboard
whiteboard
Delay time:1s/1.5s/2s/2.5s/3s/5s/10s.
Camera settings: Video quality / save location / anti-shake / mode / exposure / view
/ video / audio recording / sharpness / hue / saturation / brightness / contrast / avoid
flicker / recording mode
5.3 Music
Click icon to music player interface.
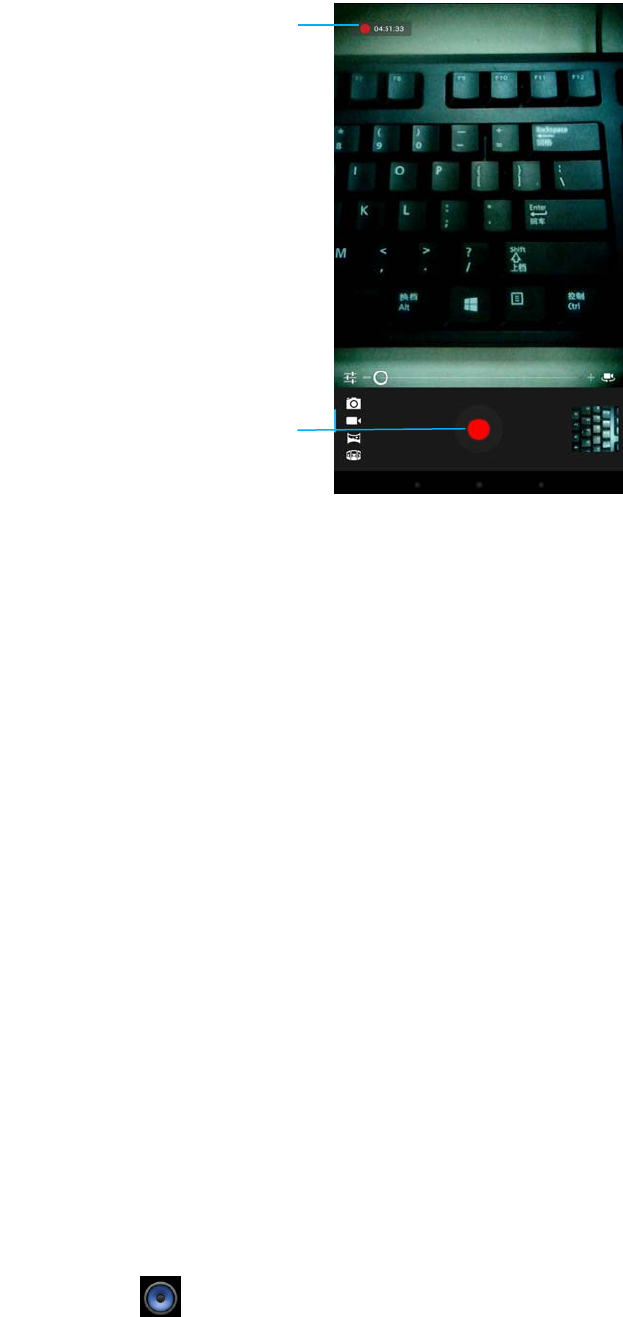
Shooting time / remaining time
Shoot/stop
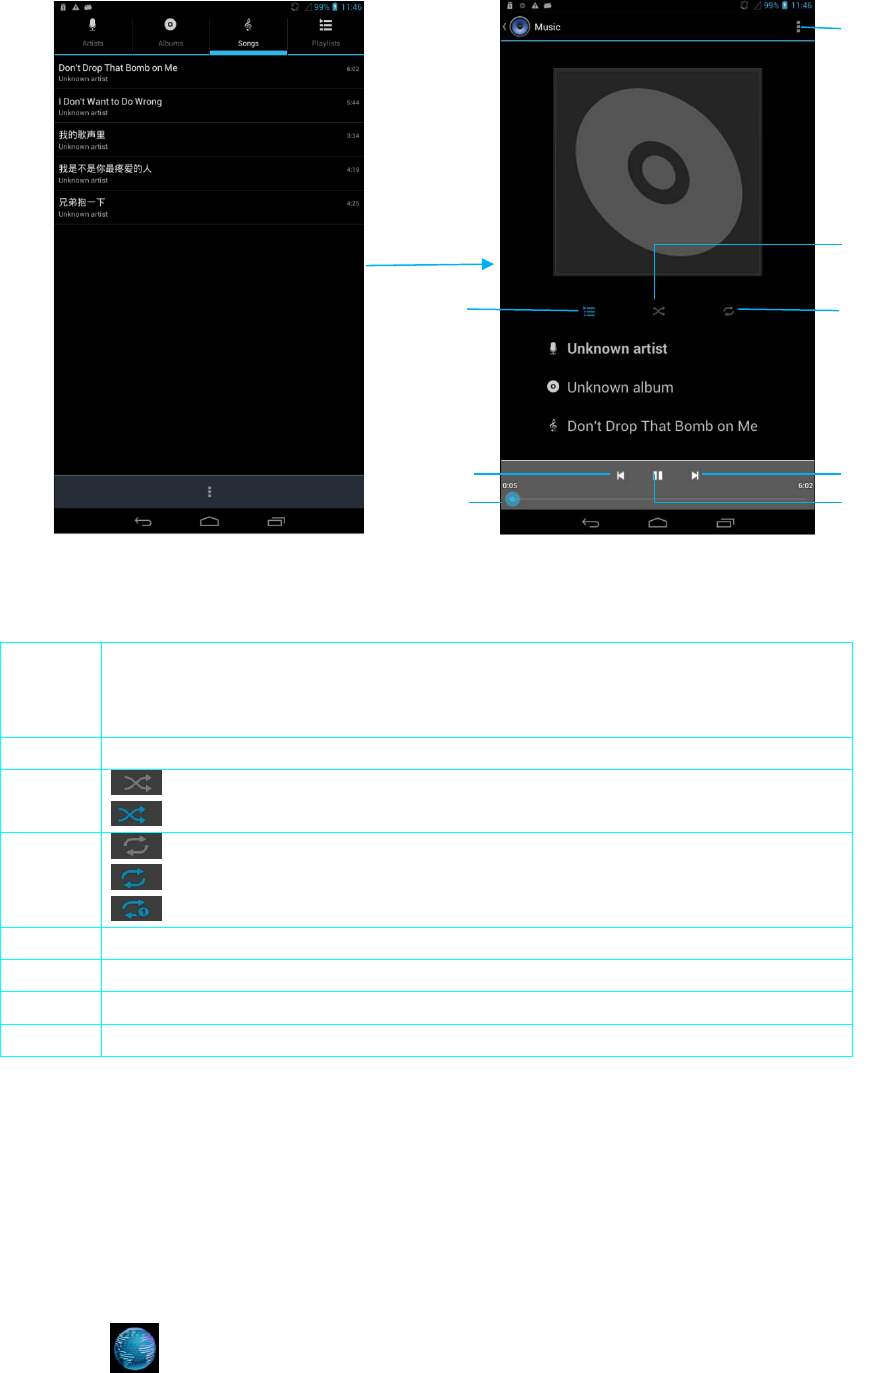
1 Menu:
You can make party shuffle, add to playlist, used as ringtone, delete, sound effects,
library, search and other operations.
2 Display a list of songs
3 :Close the random play.
:Open the random play.
4 :Close the repeat.
:Repeat all songs.
:Repeat current song.
5 Back
6 Next
7 Play/Pause
8 Progress bar
Notice:
Party shuffle is random selecting a part of the songs from the list to play. All play at random play
all songs of the list.
5.4 Explore
Click icon to explore interface.
Play
1
2
3
4
5
8
6
7
1.Basic operation
New window:
1、Click address bar, type a word or phrase that can describe the content you want to search,
and then press GO button or→| button to search;
2、When what you type is a list of bookmarks and history chat includes those letters, they will
display below.
Menu:
In the bookmarks page click on the upper right corner of the menu browser to popup a box:
Refresh: Refresh current page.
Forward: Go to the next address that just gone to.
Home: Open home page.
Close: Choose minimize or exit.
The new stealth tab: Open a new tab page and after the closure of stealth, there is no
historical record on the device.
Stored for offline reading: By saving webpage you can normally read this page in offline
mode.
Share the webpage: You can share with friends by sending links.
Search the webpage: Input content you want, the content related will display at the same
time, click or to choose the last and next content.
Request the desktop version website:
A new tab: Open a new tab
Webpage information: You can view name and address about the current page.
Setting: To set general, privacy and security, the auxiliary function, senior, bandwidth
management, laboratory
2. Browsing operation
Change screen direction: Tablet will automatically change the page orientation according to
the direction of tablet.
Browse the webpage:
1. You can use your finger sliding to any direction on the screen, browsing other areas of the
webpage.
2. You can open step by step of the links in the webpage.
3. You can choose a download link to download.
Browse pictures:
Long press the picture does not contain link in the webpage can view pictures, save the
picture, set as wallpaper, share links.
Pictures contains the link URL in the webpage:
Short press can directly open the corresponding link, long press can view pictures, save
the picture, set as wallpaper, share links.
Type in the text box: you can enter the information in a form or text box in many webpage.
Bring up the keyboard: Press text column shortly.
Submitting the column: Input text form on the page and please click "OK" to submit
the form
Hide keyboard: Light press to hide keyboard.
Copy / paste: Can copy and paste the text in the text box.
Chapter 6 Other applications
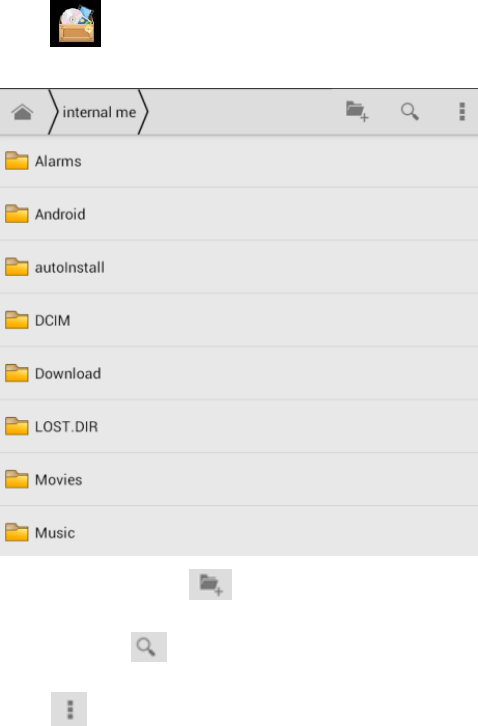
6.1 File management
Click icon to file management interface and then click internal memory.
Create folder:Click to create a new folder in the current menu.
Search:Click and enter what you want and search it in the SD card.
Click to pop-up function menu:
Select file or folder: Select file or folder you want.
Show hidden files:Show hidden files.
Sort:Sort by Type| Name (A-Z)| Size (big-small)| Time (new-old).
Long press file:Can select| copy| delete| shear| share| rename| details.
More:
Copy: Copy a file or folder and then paste it in appointed place.
Shear:Shear a file or folder and then paste it in appointed place.
Rename:Rename file or folder.
Share:Share file with others by Email| Gmail| Google+| Messaging.
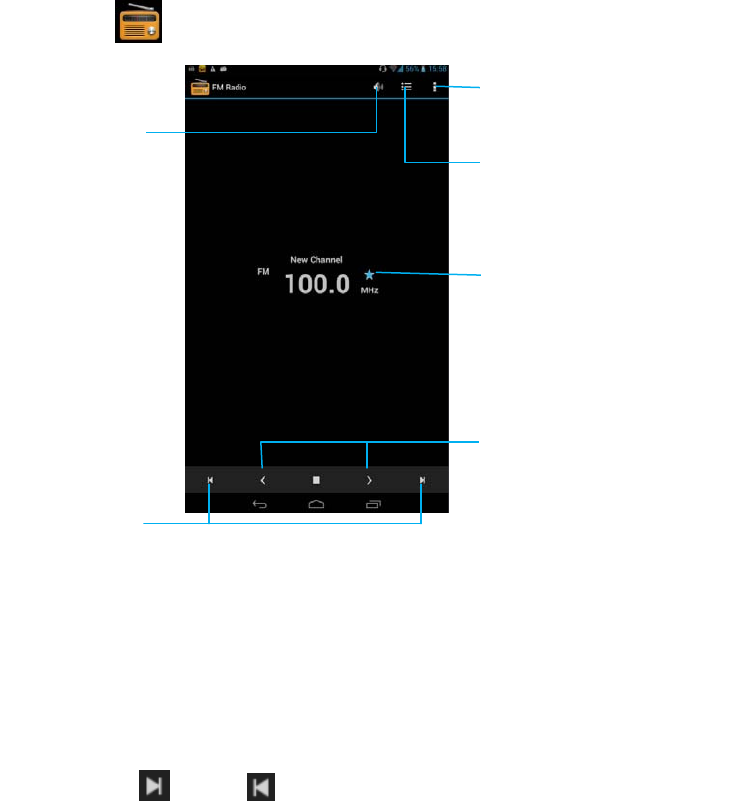
6.2 FM Radio
Tip: It should be put on a headphone or install the antenna to receive the radio.
Click icon to enter FM radio interface.
1: Search/RDS settings/Record FM/Exit:
Search: Search all the channels.
RDS settings: Set channel information and alternative frequency.
2: Pointer sliding forward or backward can get to a channel that is not sure to be received.
3: Click“ ”icon or“ ”icon,pointer forward or backward search to a channel that can be
received.
Note:
1. With an asterisk channel is a collected channel.
2. Channel has not been collected displays no asterisk before the channel, it is searched only
by using the search function.
6.3 Apps
Click Apps in settings, you can view all installed apps, uninstall the apps and manage internal
memory.
The speaker
/ earphone
1
Collection list of channel
Collection / cancel
collection channel
2
3
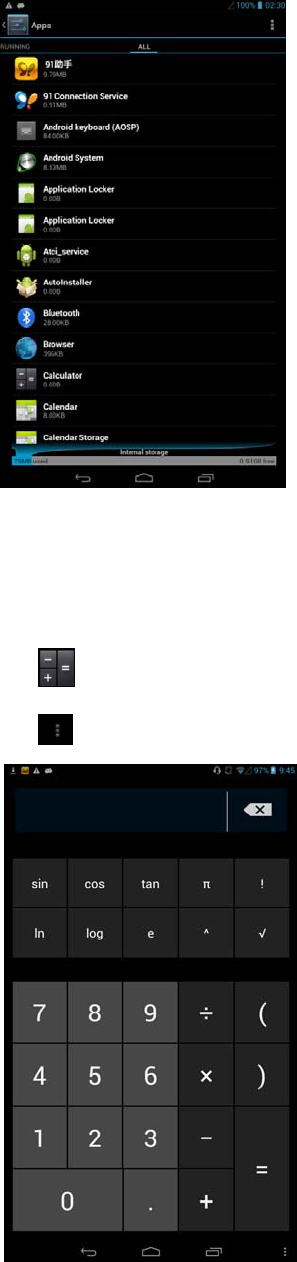
6.4 Calculator
Click icon to enter calculator interface.
Click and touch Clear History to clear history:
6.5 Analog clock
Click on the icon to enter the alarm settings, click the + button to add alarm clock, click option
to set the alarm clock, click settings, you can set the follows:
Remind in silent mode:Play alarm even when the device is in silent mode.
Alarm volume:Set the volume of alarms.
Snooze duration:Can set 5min|10min| 15min|20min|25min|30min,
Volume buttons:Set what these buttons do when pressed during an alarm.
Set default ringtone:Set default ringtone.
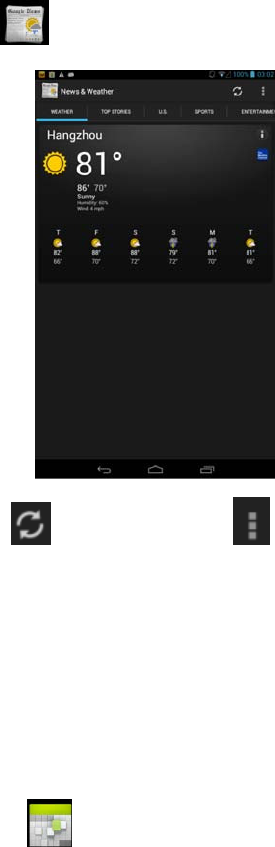
6.6 Sound recorder
Click icon to enter sound recorder interface.
: Select voice quality high |mid |low and select recording mode normal| meeting| lecture.
: Click to begin recording.
: Show recording file.
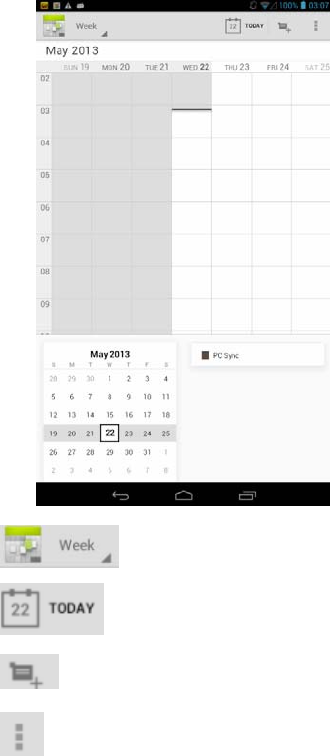
6.7 News and weather
Tip: Only WLAN or data connection is on can you search for news and weather.
Click icon to enter news and weather interface.
Click to refresh and click to settings:
Weather settings:Set location, units.
New settings:Choose topics, manage downloads.
Refresh settings:Set up auto-refresh, refresh interval.
App version:See the application version.
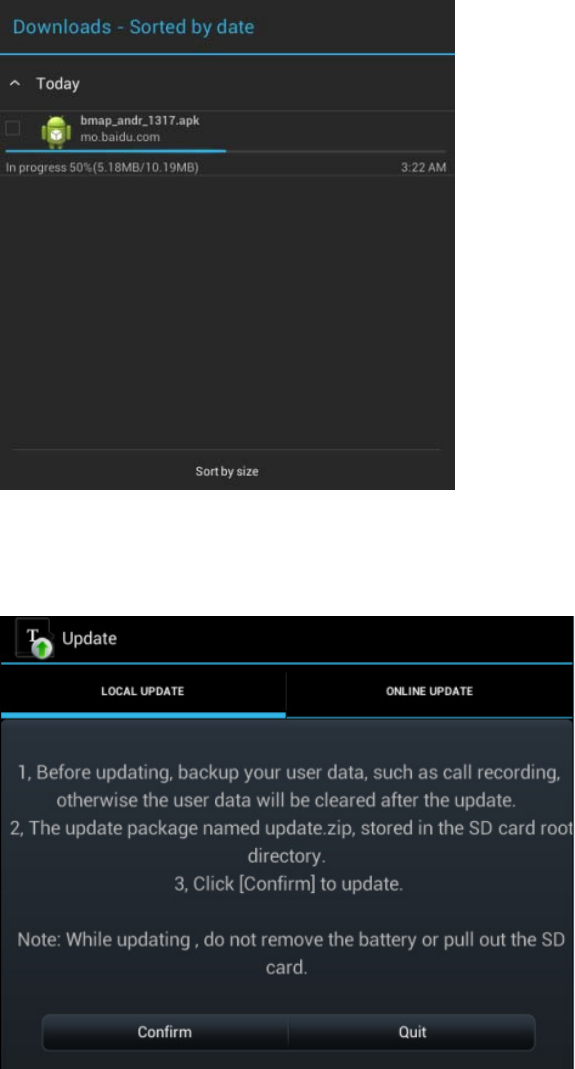
6.8 Calendar
Click icon to enter calendar interface.
: Can choose day |week |month |agenda to display calendar.
:Click to return current date.
: Add new activities, tablet will prompt when the time arrives.
:Can choose Refresh| Search| Hide controls| Clear events| Settings.
Tip: In calendar, grey shows the past time, white shows future time.
6.9 Downloads
Display the contents of tablet download, according to size or date sorting.
6.10 Update
For tablet users to upgrade system, it is divided into local update and upgrade online.
Note: Local update needs to upgrade package named “update.zip” stored in SD card root directory
Online update needs to maintain a smooth network.
Tablet should maintain adequate power in the process of upgrading.
Chapter 7 Settings
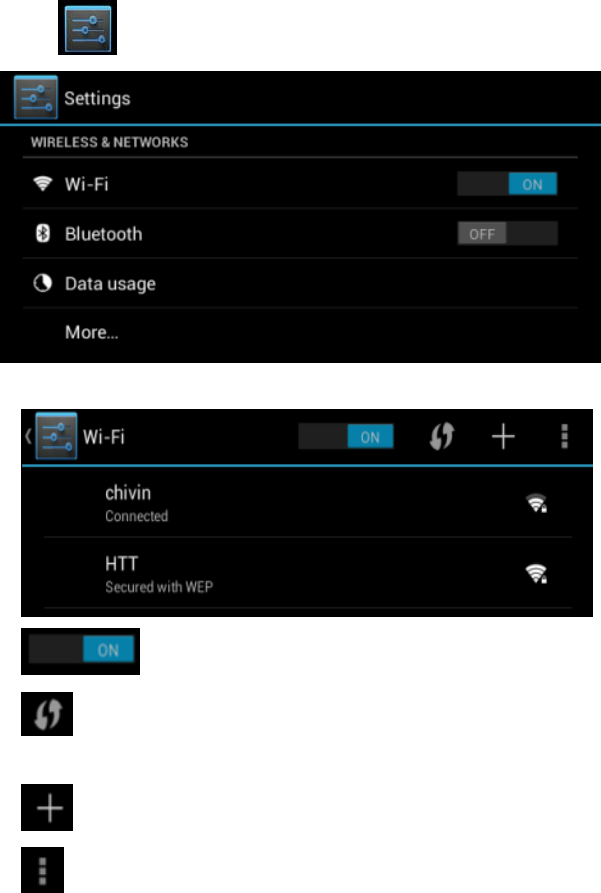
7.1 Wireless and network
Click icon to settings interface.
1Wi-Fi
: Open or close Wi-Fi.
: Press the Wi-Fi Protected Setup button on your router. It may be called “WPS” or
contain this symbol:
: Add a Wi-Fi.
: Scan| WPS Pin Entry| Wi-Fi Direct| Advanced. Click advanced to view Network
notification| Keep Wi-Fi on during sleep| Mac address| IP address.
2Bluetooth
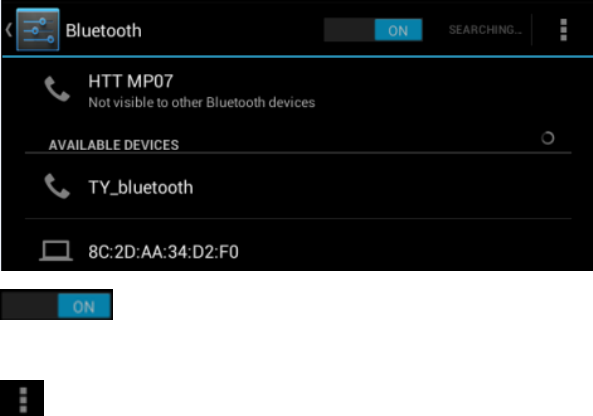
: Open or close Bluetooth.
: Rename tablet| Visibility timeout| Show received files| Advanced settings.
3Data usage
View SIM card data usage of a period time.
4More
Airplane mode: Choose tablet to airplane mode.
Tethering& portable hotspot: USB tethering| Portable Wi-Fi hotspot| Keep Wi-Fi hotspot
on| Set up Wi-Fi hotspot| Bluetooth tethering| Hotspot& tethering settings.
USB tethering: Share tablet network to computer so that computer can access network.
Portable Wi-Fi hotspot: Can open or close portable Wi-Fi hotspot.
Keep Wi-Fi hotspot: Always| Turn off when idle for 5 min| Turn off when idle for 10
min.
Set up Wi-Fi hotspot: Please ensure that you have opened the WLAN hot function
before setting it:Network SSID is showed as device name to others when they search you.
Click Security to use a pre-shared key (PSK) Wi-Fi secure access to WPA2 network
security technology configuration. If you enter the password, when a computer or other
equipment connects to the hotspot, it needs to enter the password. Choosing open in
Security can cancel password.
Mobile network settings: Set Data enabled| Data roaming| Preferred networks| Network
mode| Access point names| Network operators| Mobile data service preferred.
7.2 Device
1Audio profiles
Here are four profiles: General| Silent| Meeting| Outdoor.
General profile:
Vibrate: Vibrate devices for incoming calls.
Volum es:Set ringtone& notifications and alarm volumes.
Voice call ringtone:Set your default voice call ringtone.
Video call ringtone: Set your default video call ringtone.
Default notification:Set default notification.
Dial pad touch tones:Open/close dial pad touch tones.
Touch sounds:Open/close touch sounds.
Screen lock sound:Open/close Screen lock sound.
Vibrate on touch:Open/close vibrate on touch.
Silent: Silent only.
Meeting: Vibrate only.
Outdoor: Loudest ring and vibrate.
2Display
Brightness:Adjust screen brightness.
Wallpaper:Change desktop wallpaper.
Sleep:Adjust delay time before the screen automatically turns off, time can choose:
15sec| 30sec| 1min| 2min| 5min| 10min| 30min.
Font size:Adjust font size: small| normal| large| extra large.
3Storage
Display storage: Include preferred install location, default write disk, internal storage, internal
memory, SD card and external USB storage.
4Battery
Display battery percentage.
5App
Downloaded: Display apps that have been downloaded and show used storage and remaining
storage of internal storage.
Internal memory: Display apps that have been installed and show used storage and remaining
storage of internal memory.
Running: Display running apps and show used storage and remaining storage of RAM.
All: Display all apps and show used storage and remaining storage of internal storage.
7.3 Personal
1Location access
Access to my location:Let apps that have asked your permission use your location
information.
GPS satellites:
GPS EPO assistance: Use GPS assistance data (EPO) to speed up GPS positioning.
EPO settings: Click to modify EPO configurations.
A-GPS: GPS can speed up the fixed time of location with assistant data via wireless
data connection.
A-GPS settings: Set up A-GPS settings.
2Security
Screen lock: Choose screen lock: none| slide| face unlock| pattern| pin| password.
SIM card lock: Take the PIN code encryption protection of SIM card to prevent the
illegal use of it. After locking the SIM card, you must enter the PIN code after every
boot to unlock the SIM card, and then you can make or receive calls. Otherwise, users
can also cancel the SIM protection.
3Language& input
language: You can switch the language because multiple languages are supported.
Keyboard & input methods: Choose default keyboard and input methods.
Speech: Voice search.
Mouse/ Trackpad: Pointer speed.
4Backup & reset
Back up my data: Back up app data, Wi-Fi passwords and other settings to Google
servers.
Automatic restore:When reinstalling an app, restore backed up settings and data.
Factory data reset:Erases all data on tablet.
7.4 Accounts
Add account:
You can add Google account login, email account. You can use Google series applications, such
as maps, email, and play store if you have login Google accounts.
7.5 System
1Data & time
Tip: Automatic data& time has three options: Use network provided time| Use GPS
provided time| Off. Only choose Off option can you set date and time.
Set data:Set current data.
Select time zone:Select the current time zone.
Set time:Set current time.
Use 24-hour format: After selection, time format is 24 hours, otherwise is 12 hour
format.
2Scheduled power on & off
ON: Set a time, when the time comes, tablet will automatically boot.
OFF: Set a time, when the time comes, tablet will be prompted whether to shut down,
if there is no choice after 30 seconds, tablet will automatically shut down.
3Accessibility:
Auto-rotate screen: Adjust the screen to the actual direction.
Quick boot:When it is on, tablet can restart quickly for the power is not completely off.
4Developer options
We mainly use connected USB debugging, other options are for optimizing system.
5About tablet
Display System updates, status, model number, android version, baseband version, kernel
version, build number.
Status: Battery status, battery level, network, signal strength, mobile network type, service state,
roaming IMEI, IP address, Wi-Fi MAC address, Bluetooth address, uptime.
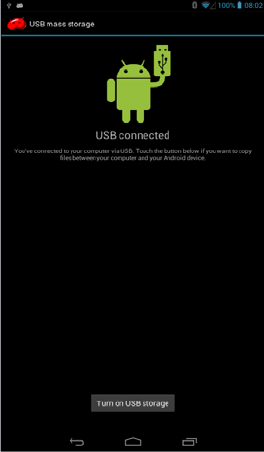
7.6 USB data line description
When using USB data line to connect tablet and the computer, tablet interface will jump out the
following interface:
Only after clicking to turn on the USB storage device can tablet interact with the computer,
otherwise they cannot interact. When you turn on USB storage, the icon will show turn off
USB storage, if you click it again on the tablet will stop interaction.
If the tablet interface does not jump out of the interface or you want to check whether they
have a connection, you can pull out the status bar and click USB has been linked icon in the
notification interface to enter the interface view.
If you need USB mode debugging, you can open tablet Settings>> Developer
options>>Debugging>>USB debugging, and then tablet will connect computer via USB data
line.
FCC Caution:
Any Changes or modifications not expressly approved by the party responsible for compliance
could void the user’s authority to operate the equipment.
This device complies with part 15 of the FCC Rules. Operation is subject to the following two
conditions: (1) This device may not cause harmful interference, and (2) this device must accept any
interference received, including interference that may cause undesired operation.
Note: This equipment has been tested and found to comply with the limits for a Class B digital
device, pursuant to part 15 of the FCC Rules. These limits are designed to provide reasonable
protection against harmful interference in a residential installation. This equipment generates
uses and can radiate radio frequency energy and, if not installed and used in accordance with
the instructions, may cause harmful interference to radio communications. However, there is
no guarantee that interference will not occur in a particular installation. If this equipment does
cause harmful interference to radio or television reception, which can be determined by turning
the equipment off and on, the user is encouraged to try to correct the interference by one or
more of the following measures:
—Reorient or relocate the receiving antenna.
—Increase the separation between the equipment and receiver.
—Connect the equipm ent into an outlet on a circu it different from that to which the re ceiver is
connected.
Specific Absorption Rate (SAR) information
SAR tests are conducted using standard operating positions accepted by the FCC with the
phone transmitting at its highest certified power level in all tested frequency bands, although
the SAR is determined at the highest certified power level, the actual SAR level of the equipment
while operating can be well below the maximum value, in general, the closer you are to a
wireless base station antenna, the lower the power output.
Before a new model phone is a available for sale to the public, it must be tested and certified to
the FCC that it does not exceed the exposure limit established by the FCC, Tests for each
phone are performed in positions and locations (e.g. at the ear and worn on the body)as
required by the FCC.
For body worn operation, this equipment has been tested and meets the FCC RF exposure
guidelines when used with an accessory designated for this product or when used with an
accessory that contains no metal and that positions the handset a minimum of 0 cm from the
body.