IRIS Interactive Horizons HANDTI-G Audience Interaction (AI) Wireless System User Manual 386149
IRIS Interactive Horizons, Inc. Audience Interaction (AI) Wireless System 386149
Preliminary Users Manual

© 2004, Audience Interaction, Inc. All rights reserved.
All brand names and product names are trademarks or registered trademarks of their respective holders.
Preliminary
Draft Version (01/04/04)
System Installation
and
Operation Manual
AI
Audience
Interaction
Inc.
AI
Audience
Interaction
Inc.
207 North 44th Street
Cody, WY 82414
www.audienceinteraction.com
sales@audienceinteraction.com
Phone: (307) 527-9357
Fax: (707) 222-1551
AI System Manual (Jan-04) Installation and Operation
ii
TABLE OF CONTENTS
FCC NOTICE ................................................................................................................................iii
1. INTRODUCTION ..................................................................................................................... 1
1.1 Packing List...................................................................................................................... 2
1.2 Quick Start Checklist........................................................................................................ 3
2. SYSTEM OVERVIEW.............................................................................................................. 4
2.1 Handsets.......................................................................................................................... 6
2.2 Base Stations................................................................................................................... 7
3. THEORY OF OPERATION ...................................................................................................... 9
4. SYSTEM CABLING ............................................................................................................... 11
5. AI SOFTWARE ......................................................................................................................12
5.1 Required Operating System Environment...................................................................... 12
5.2 USB Drivers ...................................................................................................................12
6. SYSTEM OPERATION .......................................................................................................... 16
6.1 Audience Response Software........................................................................................ 16
6.2 Normal AI System Operation ......................................................................................... 19
6.3 System Testing .............................................................................................................. 19
7. TROUBLESHOOTING........................................................................................................... 20
7.1 Basic Methodology.........................................................................................................20
7.2 Sample Configuration..................................................................................................... 21
7.3 Identifying Problem Scope ............................................................................................. 22
7.3.1 Individual Handset Problems ............................................................................... 22
7.3.2 Communication Channel Problems...................................................................... 23
7.3.3 Problem Areas in the Room.................................................................................24
7.3.4 Room-Level Problems.......................................................................................... 24
7.4 Handset Repair .............................................................................................................. 25
7.5 Base Station Repair ....................................................................................................... 28

AI System Manual (Jan-04) Installation and Operation
iii
FCC NOTICE
NOTE: This device complies with Part 15 of the FCC Rules. Operation is subject to the
following two conditions: (1) this device may not cause harmful interference; (2) this device must
accept any interference received including interference that may cause undesired operations.
Modification Warning
Changes or modifications made to this equipment not expressly approved by the manufacturer
may void the user's authority to use the equipment.
© 2004, Audience Interaction, Inc. All rights reserved.
All brand names and product names are trademarks or registered trademarks of their respective holders.
1. INTRODUCTION
The Audience Interaction wireless system allows you to implement audience interaction
technology for meetings, delegate voting, strategic planning, training, customer surveys, focus
groups, games shows and more. AI system hardware, Handsets and Base Station(s), allow
audience members to register their responses with your host computer running third-party
audience response software.
An AI system is Fleetwood
compatible at the interface of
the AI system with the host
computer. Although AI
Handsets communicate with
an AI Base Station using a
proprietary protocol, the AI
system communicates with
the host computer using the
Fleetwood Standard Reply®
protocol. Therefore, your third-
party audience response
software can be configured for
an AI system as it would be
for Fleetwood hardware.
This manual covers the
installation and operation of an
AI system including the
following information:
• System Overview — outlines major system components
• Theory of Operation — describes the vote collection process and interface with a
user-supplied host computer running third-party audience response software
• System Cabling — includes a cabling diagram for a USB Base Station
• AI Software —outlines the procedure for installing the drivers required with a
USB Base Station
• System Operation — describes procedures for configuring third-party audience response
software and normal system performance
• Troubleshooting — outlines procedures for troubleshooting the system
AI Handsets
12 3
4 5 6
7
8 9
*
.
-
0
#
AudienceI nte ract i on. com
12 3
4 5 6
7
8 9
*
.
-
0
#
AudienceI nter act i on. com
12 3
4 5 6
7
8 9
*
.
-
0
#
AudienceInt er act i on. com
12 3
4 5 6
7
8 9
*
.
-
0
#
AudienceI nter act i on. com
12 3
456
7
8 9
*
.
-
0
#
AudienceI nter act i on. com
AI
Base
Station
AI
Proprietary
Wi rel ess
Protocol
Fleetwood
Standard
Reply(R)
Protocol
Host
Computer
Fig. 1. System Communication

AI System Manual (Jan-04) Installation and Operation
2
1.1 Packing List
Depending on system size and options purchased, your AI system should include the following
items:
• AI Handsets
• AA batteries
• AI Base Station(s)
• USB cable(s) — 6-foot cable(s)
• USB cable ferrite(s) — one ferrite per USB cable
• AI software CD — includes USB drivers
• Carrying case(s) — optional, purchased separately
Note: With multiple Base Station configurations, each Base Station and
associated Handsets operate on one of 25 channels in the 902-928 MHz band.
AI System Manual (Jan-04) Installation and Operation
3
1.2 Quick Start Checklist
For those familiar with the basics of audience response software and the AI system, the
checklist below outlines the steps to get your AI system up and running quickly:
1. Cable the host computer — do not cable AI system hardware until step 3
2. Power the host computer — be sure boot sequence is complete before proceeding
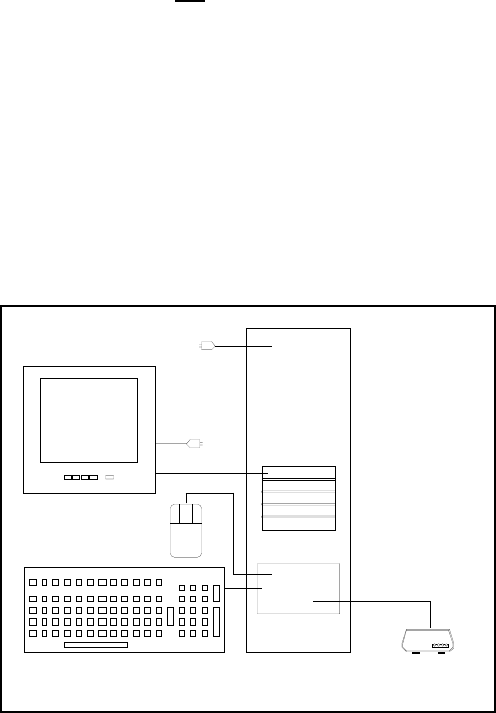
3. Install a ferrite on the USB cable — see diagram in Section 2.2, Base Stations
4. Cable the AI system — see diagram below
5. Install AI USB drivers — see Section 5.2, USB Drivers
6. Install and launch audience response software
7. Configure audience response software for the appropriate number of
Fleetwood-compatible keypads (multiples of 50 Handsets) — see Section 6.1,
Audience Response Software
8. Conduct test vote and troubleshoot any problems
KEYBOARD
MOUSE
MONITOR
USB
120 VAC
AI Base Station
(USB Model)
120 VAC
POWER
USB Cable
Host
Computer
(Rear View)
SERIAL
Fig. 2. Typical System Cabling

AI System Manual (Jan-04) Installation and Operation
4
2. SYSTEM OVERVIEW
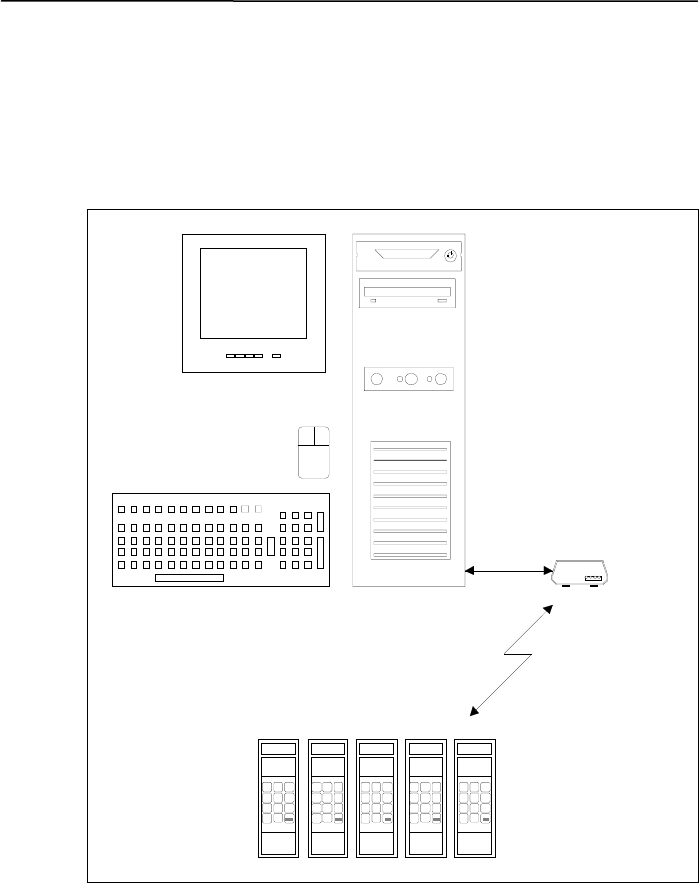
A starter AI system consists of up to 250 AI Handsets communicating with an AI Base Station.
Typically, the Base Station is located adjacent to the user-supplied host computer.
The host computer runs user-supplied audience response software in a Windows® environment
(Windows 98 or later). The Handsets and Base Station communicate on one of 25 available
channels in the 902-928 MHz band.
Host
Computer
AI Handsets
1 2 3
4 5 6
7
8 9
*
.
-
0
#
AudienceInt er act i on. com
1 2 3
4 5 6
7
8 9
*
.
-
0
#
AudienceI nter act i on. com
123
456
7
8 9
*
.
-
0
#
AudienceI nter act i on. com
12 3
4 5 6
7
8 9
*
.
-
0
#
AudienceI nte ract i on. com
12 3
4 5 6
7
8 9
*
.
-
0
#
AudienceI nter act i on. com
12 3
4 5 6
7
8 9
*
.
-
0
#
AudienceI nter act i on. com
1 2 3
4 5 6
7
8 9
*
.
-
0
#
AudienceInt er act i on. com
1 2 3
4 5 6
7
8 9
*
.
-
0
#
AudienceI nter act i on. com
12 3
4 5 6
7
8 9
*
.
-
0
#
AudienceInt er act i on. com
12 3
4 5 6
7
8 9
*
.
-
0
#
AudienceI nter act i on. com
AI Base Station
Fig. 3. AI System Overview — AI System Hardware and
User-supplied Host Computer

AI System Manual (Jan-04) Installation and Operation
5
The system is designed for reliable communication in an area 300 feet by 300 feet — assuming
central placement of the Base Station. Elevating the Base Station to improve
line-of-sight operation may result in a performance advantage. The diagram below illustrates a
typical system installation in a meeting room.
Note: Obstacles or interference may decrease the Handset range. For
mission-critical applications such as house-of-delegate parliamentary voting,
Handsets should be located within 125 to 150 feet of the supporting Base
Station.
Video
Projector
Projection Screen
Computer
Table
Audience
Seating
Area
150 - 200
Foot
Reliable
Range
Podium
Fig. 4. Typical Meeting Room Arrangement
AI System Manual (Jan-04) Installation and Operation
6
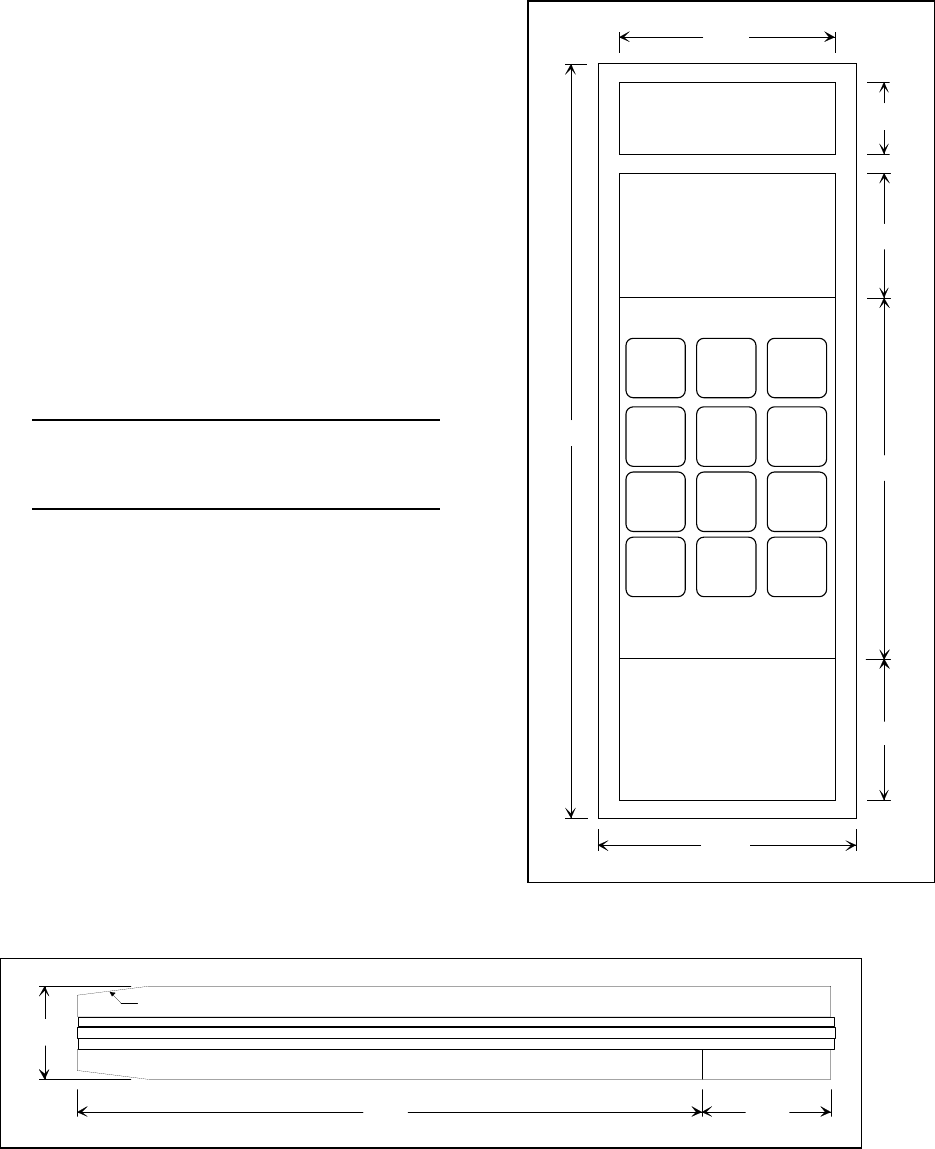
2.1 Handsets
AI Handsets feature a rugged, ergonomic, hand-held
molded plastic case.
AI Handsets are powered by two AA alkaline batteries.
A sliding cover on the bottom of the Handset provides
access to the battery compartment.
Handsets use power only when transmitting entered
responses and receiving Base Station
acknowledgments. Each keypress is indicated by a
tone response. Batteries provide sufficient power for
50,000+ responses before requiring replacement —
3 to 5 year battery life.
Note: Handsets include ample insert
space and can be customized to
“personalize” the product.
6.97"
2.00"
2.40"
0.67"
1 2 3
456
78 9
*
.
-0
#
clear
AudienceInteraction.com
1.31"
1.10"
3.38"
Fig. 5. AI Handset — Top View
0.85"
7°
5.77" 1.20"
Battery
Cover
Fig. 6. AI Handset — Side View
AI System Manual (Jan-04) Installation and Operation
7
2.2 Base Stations
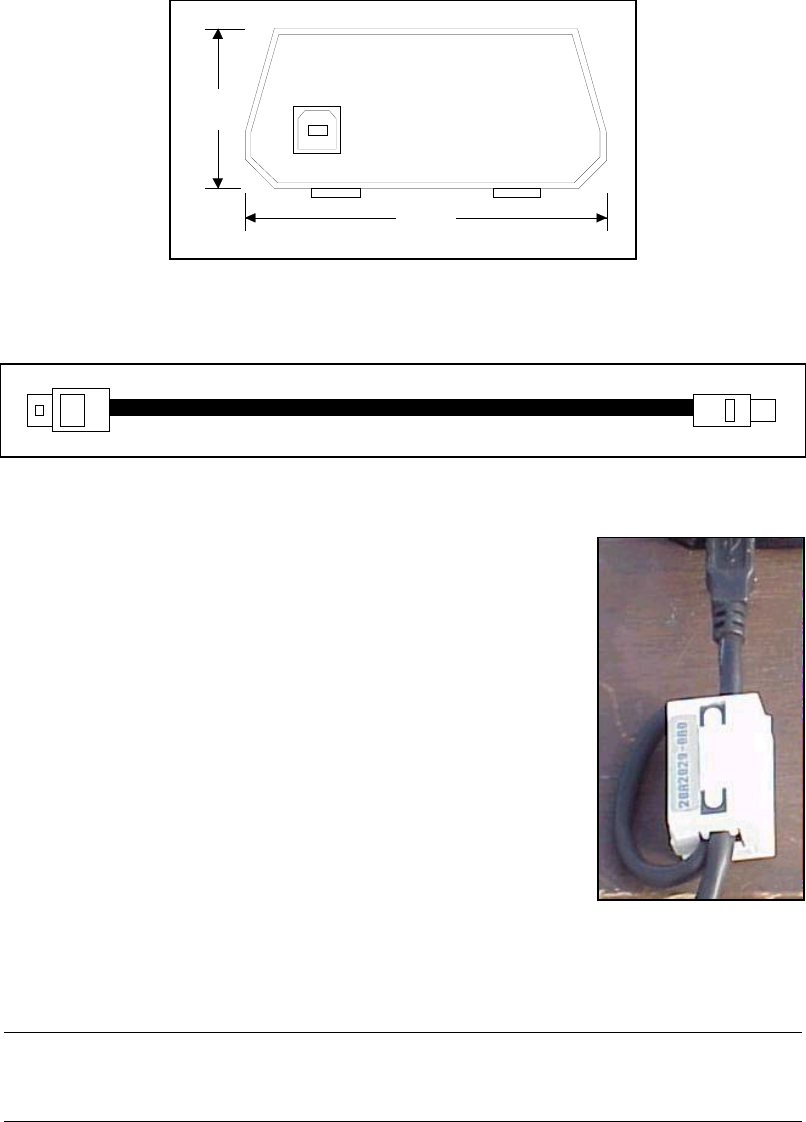
The Base Station communicates with and draws power from the host computer via a USB
cable.
Before you operate the system, the supplied ferrite must be
installed on the USB cable as shown here to minimize any
spurious emissions.
Note: A USB Base Station version is available currently. If a USB configuration
does not meet your needs, please inquire about other interface options that may
be available.
3.375"
1.500"
USB
In
Fig. 7. AI Base Station — Cabling End View
Fig. 8. USB Cable — Six-foot Cable Supplied
Fig. 9. Ferrite —
Installed on USB Cable

AI System Manual (Jan-04) Installation and Operation
8
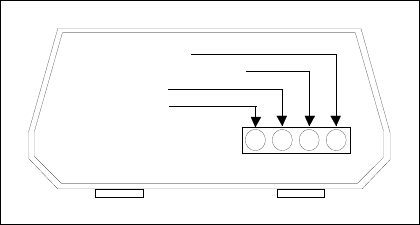
Base Stations feature four LED tally lights. The illumination patterns on the LEDs allow you to
confirm system operation and assist with troubleshooting.
For additional information on tally light function, refer to the System Operation section below.
LEDs
Fig. 10. AI Base Station — LED Tally Lights
AI System Manual (Jan-04) Installation and Operation
9
3. THEORY OF OPERATION
The diagram below illustrates a typical system configuration.
During the voting of an audience response question, the following sequence occurs:
• System operator “opens the vote” with the audience response software on the host
computer
• Audience response software generates a question display that is projected by the video
projector
• Audience members respond to the question by pressing keys on their Handsets
• Handsets register their votes with the supporting Base Station
• System operator “closes the vote” with the audience response software
• Audience response software polls the Base Station and generates a results display that
is projected to the audience
Host
Computer
AI Handsets
12 3
4 5 6
7
8 9
*
.
-
0
#
Audi enceI nt er act i on. com
12 3
4 5 6
7
8 9
*
.
-
0
#
AudienceInteraction.com
12 3
4 5 6
7
8 9
*
.
-
0
#
AudienceI nt eract i on.com
12 3
4 5 6
7
8 9
*
.
-
0
#
Audi enc eI nt e r ac t i on. c om
12 3
4 5 6
7
8 9
*
.
-
0
#
Audi enceInter acti on. com
AI Base Station
Video
Projector
Fig. 11. Typical System Configuration

AI System Manual (Jan-04) Installation and Operation
10
Handsets transmit audience votes using radio frequency (RF) signals to the supporting Base
Station. Handsets communicate with their supporting Base Station on one of 25 available
channels in the 902-928 MHz frequency range. Base Stations accumulate votes from
associated Handsets and pass them to the host computer via a USB cable.
Each Handset is assigned an identification (ID) number during manufacture. The supporting
Base Station identifies each Handset by its ID number. A total of 250 Handsets can be
managed by a given Base Station (ID 1 through ID 250).
Although the starter system shown above illustrates a single Base Station configuration, several
Base Stations can be used to expand the number of Handsets. Each Base Station requires a
USB port and operates on its own channel.
Note: When multiple Base Stations are used, they should be separated at least
18 inches to avoid interference. Base Stations should not be located near
metallic objects. When a Base Station is placed adjacent to the host computer,
place it on top of the computer case.
AI System Manual (Jan-04) Installation and Operation
11
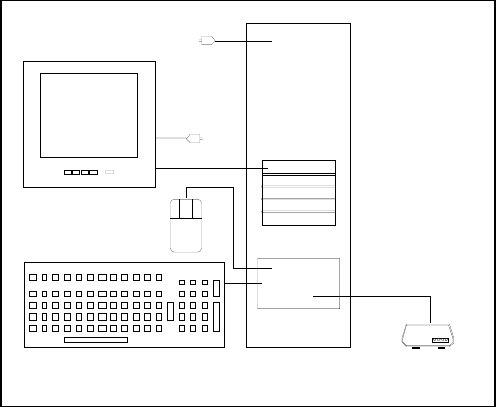
4. SYSTEM CABLING
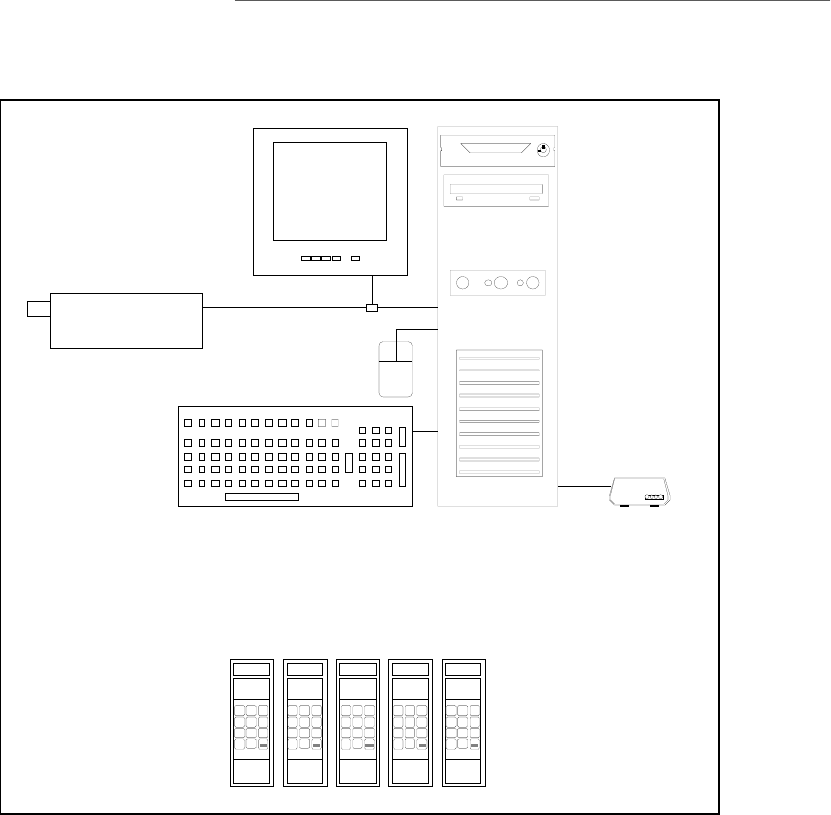
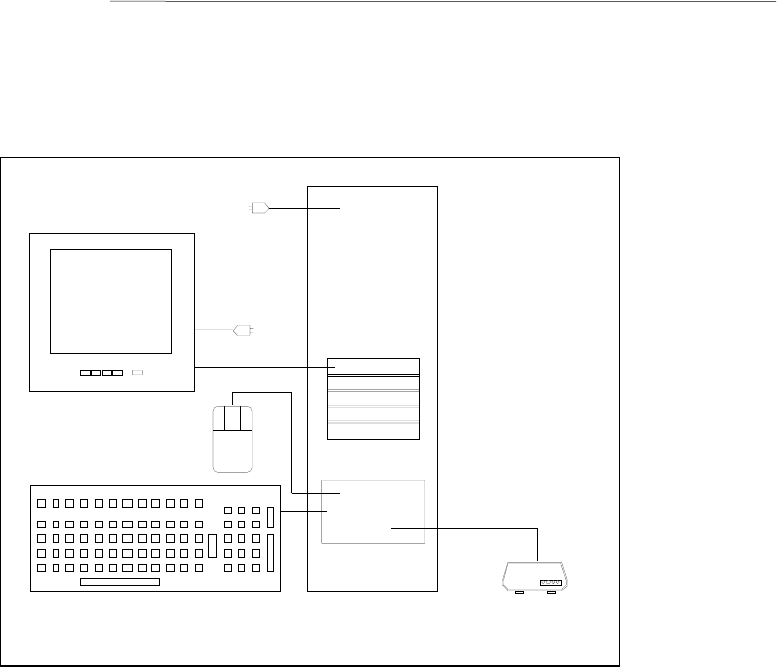
The diagram below illustrates typical Base Station cabling. The USB Base Station
communicates with and receives power from the host computer via a USB cable.
KEYBOARD
MOUSE
MONITOR
USB
120 VAC
AI Base Station
(USB Model)
120 VAC
POWER
USB Cable
Host
Computer
(Rear View)
SERIAL
Fig. 12. System Cabling
AI System Manual (Jan-04) Installation and Operation
12
5. AI SOFTWARE
Before you can use a USB Base Station, you must install the USB drivers on the AI software CD
as described below.
5.1 Required Operating System Environment
The AI system requires a Windows 98 (Second Edition) operating system environment or later.
The supplied USB files are XP certified.
5.2 USB Drivers
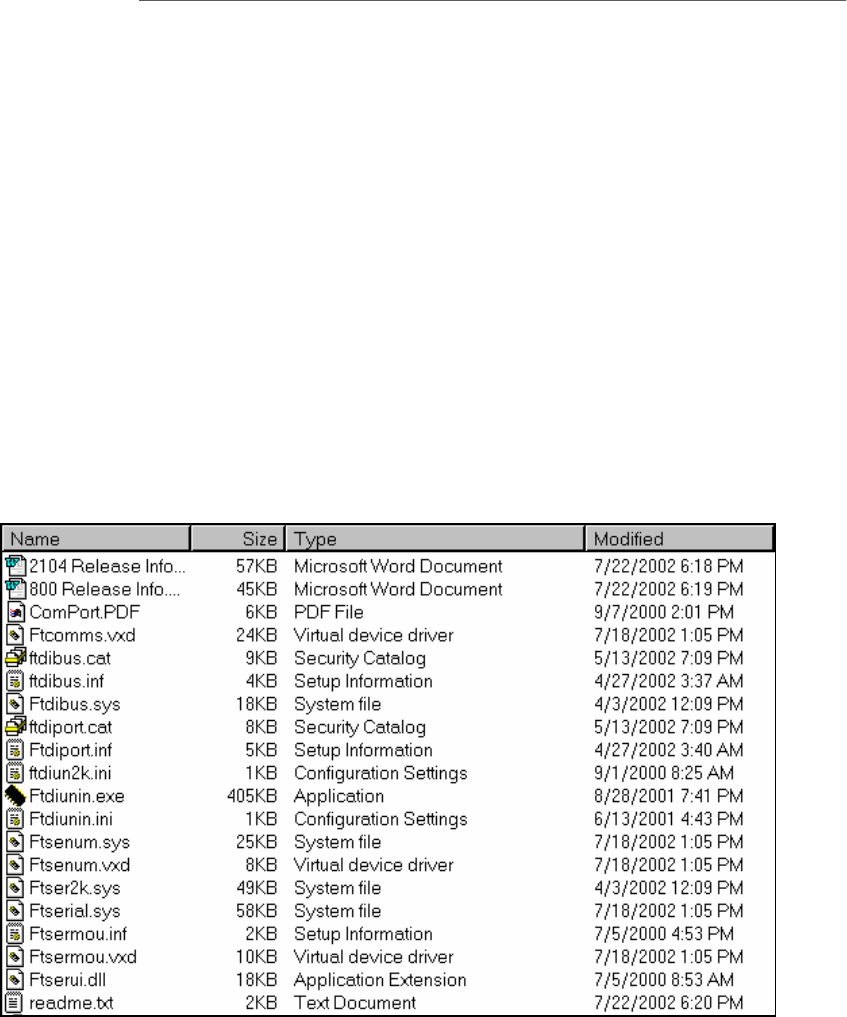
AI USB driver files are located on the AI Software CD in the \USB folder.
You must install the USB drivers before they can be used.
Fig. 13. USB Driver Files
AI System Manual (Jan-04) Installation and Operation
13
To install the USB driver files on the host PC, perform the following steps:
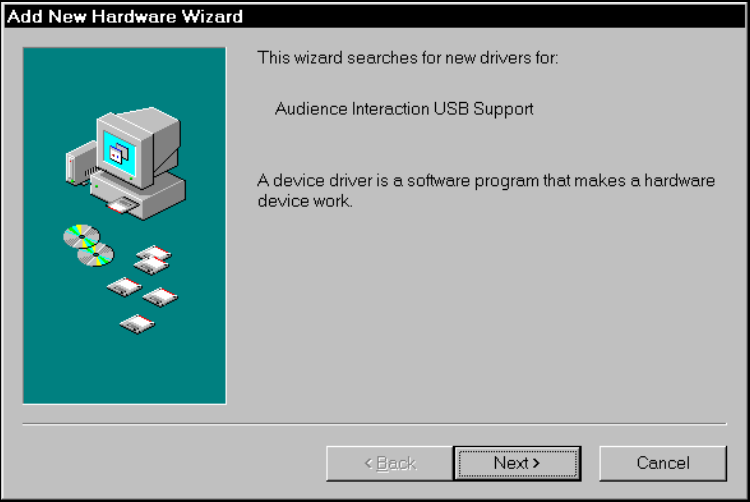
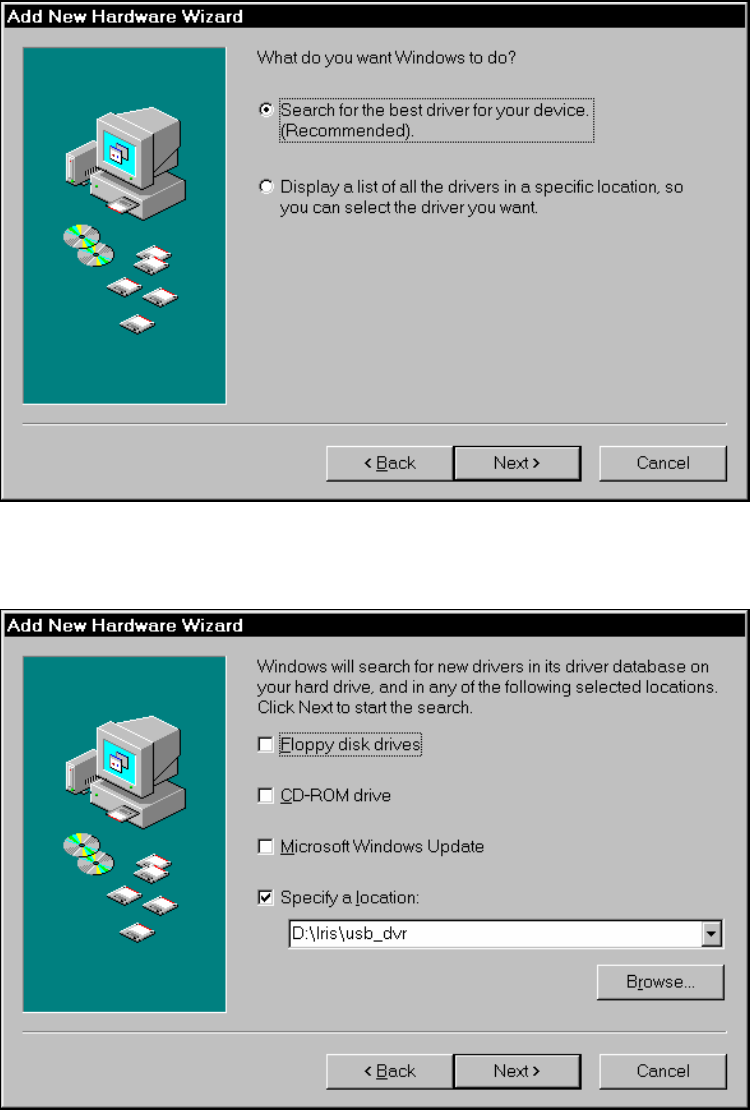
1. Connect the AI Base Station to a USB port on a powered host computer.
Windows will respond by displaying the first screen of the Add New Hardware Wizard
shown above. The installation wizard consists of five interactive screens. As you
complete these screens several progress messages will be displayed.
2. Click on Next.
Fig. 14. Add New Hardware Wizard — Screen 1
AI System Manual (Jan-04) Installation and Operation
14
3. Accept the default (Recommended) search option by clicking on Next.
4. Check the “Specify a location” box, use the Browse button to navigate to the folder
containing the USB driver files (D:\IRIS\USB_DVR in this example)
and click Next.
Fig. 15. Add New Hardware Wizard — Screen 2
Fig. 16. Add New Hardware Wizard — Screen 3

AI System Manual (Jan-04) Installation and Operation
15
5. Accept the USB driver location by clicking on Next.
6. Click Finish.
Fig. 17. Add New Hardware Wizard — Screen 4
Fig. 18. Add New Hardware Wizard — Screen 5

AI System Manual (Jan-04) Installation and Operation
16
Following the installation of the USB drivers, you should confirm the installation by noting the
illumination pattern on the Base Station tally lights. For additional information on tally lights,
refer to the System Operation section below.
6. SYSTEM OPERATION
The sections below describe the configuration of typical audience response software to
interface with an AI system. For additional information on configuring your audience response
software, refer to your user documentation. The characteristics of normal AI system operation
are also discussed. For information on AI system troubleshooting, refer to the Troubleshooting
section.
6.1 Audience Response Software
Before you can collect and display votes with the AI hardware, you must install and configure
your audience response software.
Note: The AI system is software-compatible with the communication protocol
used by Fleetwood Standard Reply® keypads. When you configure your
audience response software, select the "Fleetwood" or "Fleetwood Standard"
option as appropriate.

AI System Manual (Jan-04) Installation and Operation
17
Configuring audience response software usually involves the following:
• Selecting the type of keypad hardware being used — “Fleetwood” or
“Fleetwood Standard”
• Selecting the COM port to which the base station is attached — may be
detected automatically
• Identifying the number of keypads supported by the base station
Note: In general, audience response software packages support Fleetwood-
compatible Handsets in groups of 50. Therefore, you should configure your
package for one of the following groups depending on the number of Handsets
purchased:
Beginning Ending
Handset Handset
Number Number
1 50
1 100
1 150
1 200
1 250
Thus, if you purchased 125 Handsets (ID 1 through 125), you would configure
your audience response software for a Handset grouping 1 through 150.
AI System Manual (Jan-04) Installation and Operation
18
If your audience response software does not automatically detect the COM port to which the
Base Station is attached, you can identify the USB port number by performing the following
steps:
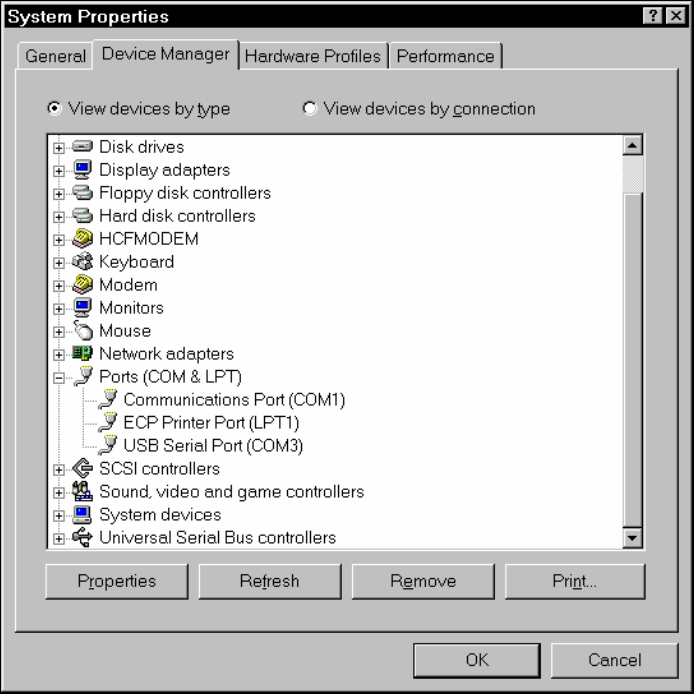
1. Attach the AI Base Station to a USB port
2. Navigate to the Windows Device Manager —
Start | Settings | Control Panel | System | Device Manager
3. Expand the Ports option by clicking on its “+” symbol
4. Note the USB Serial Port (COM3 in the example below)
Fig. 19. Identifying USB Serial Port Number
AI System Manual (Jan-04) Installation and Operation
19
6.2 Normal AI System Operation
After the system has been installed and powered successfully, the Base Station tally lights
should exhibit the following illumination pattern:
• The Power LED remains illuminated continuously
• The Report to Host LED flashes slowly
• The Rx LED illuminates whenever a key is pressed on a supported Handset
• The Tx LED flashes rapidly — the rapid flash can be difficult to see with bright lighting
6.3 System Testing
After the system has been installed as outlined in the Quick Start Checklist, it is important to
conduct several test votes. Final system testing is designed to confirm the proper operation of
all components in the current meeting environment — host computer, audience response
software, Base Station, Handsets and system cabling.
Power
Report to Host
Rx
Tx
Fig. 20. AI Base Station — LED Tally Lights

AI System Manual (Jan-04) Installation and Operation
20
7. TROUBLESHOOTING
This section focuses on system troubleshooting — procedures for identifying and repairing
problem components.
At this point, you should have accomplished the following:
• Powered the host computer
• Cabled the AI system
• Installed AI USB drivers
• Installed and launched the audience response software
• Configured the audience response software for an appropriate number of “Fleetwood” or
“Fleetwood Standard” hardware
• Conducted test votes
Successful system troubleshooting is based on several factors including:
• A systematic procedure
• Identification of problem scope
• Knowledge of component operation
7.1 Basic Methodology
It is important to approach troubleshooting in a systematic way, working on one component at a
time. Obviously, if you change two components before retesting, you cannot be sure which
change produced the solution. As soon as you check a component, perform a test vote to
confirm the resolution or continuation of the problem.
Various diagnostic aids are built into system components including LEDs on the Base Station.
AI System Manual (Jan-04) Installation and Operation
21
7.2 Sample Configuration
The illustration below of a sample USB configuration may be helpful in visualizing
troubleshooting procedures.
KEYBOARD
MOUSE
MONITOR
USB
120 VAC
AI Base Station
(USB Model)
120 VAC
POWER
USB Cable
Host
Computer
(Rear View)
SERIAL
Fig. 21. Typical System Cabling

AI System Manual (Jan-04) Installation and Operation
22
7.3 Identifying Problem Scope
The scope of a problem is an important factor in troubleshooting. For example, if a single
Handset is not functioning, your troubleshooting will focus at the Handset level. If an entire
channel is not functioning, the focus of your troubleshooting will include the supporting Base
Station, USB cable, USB port and audience response software configuration. If no votes are
received during a test vote or the pattern of votes is atypical, the host computer and audience
response software become the focus of your troubleshooting.
The sections below contain checklists for various types of problems. Each checklist describes a
problem and includes various things to check and things to try.
Problem: Problem description
Check: Things to check?
Try: Things to try
When a check reveals the source of the problem, the solution is generally self-evident. When
all checks fail to solve the problem, generally one of the listed things to try will resolve the
malfunction.
7.3.1 Individual Handset Problems
When a Handset fails to register a vote, perform the following:
Problem: Handset does not register a vote
Check: Batteries OK?
Check: Distance to supporting Base Station within reliable transmission range?
Try: Replace the Handset
Generally, replacing the Handset’s batteries will resolve most individual Handset problems.

AI System Manual (Jan-04) Installation and Operation
23
7.3.2 Communication Channel Problems
If you are using multiple Base Stations, it is good operating practice to install Handsets so that a
given channel serves a given section of the meeting room. Using this arrangement, problems
with a given section equate to problems with a given channel.
If all Handsets in a given section do not respond, the problem may relate to one or more of the
following:
• The supporting Base Station
• The connecting USB cable
• The audience response software configuration
• The USB port on the host computer
When Handsets on a given channel fail to register votes, perform the following:
Problem: A complete section (channel) does not register votes
Check: Base Station “Power” LED illuminated continuously
Check: Base Station “Report to Host” LED flashing slowly
Check: Base Station Rx LED illuminates after each Handset keypress
Check: Base Station Tx LED flashing rapidly (can be difficult to see)
Check: Base Station and Handsets using the same channel?
Check: USB cable connections tight?
Check: Base Stations separated at least 18 inches?
Check: Base Station near metallic objects?
Check: Audience response software configured properly?
Check: Distance to Base Station within reliable transmission range?
Check: USB port functional?
Try: Boot the host computer
Try: Boot the Base Station
Try: Replace the USB cable
Try: Replace the Base Station (same channel)
Note: You can check the functionality of a USB port by temporarily moving a
proven piece of equipment to the suspect port and retesting its functionality.

AI System Manual (Jan-04) Installation and Operation
24
7.3.3 Problem Areas in the Room
If a small number of adjacent Handsets do not respond, the problem may be related to their
location. The Handsets may be located beyond the reliable transmission range, or there may
be some form of radio frequency (RF) interference in that area of the room.
Note: To date, interference from other RF sources (such as wireless
microphones or video equipment) has not been a problem with AI system
hardware. Although rare, large metallic surfaces that may be concealed in walls
or partitions can present problems for RF signals.
This problem can also result from errors in the configuration of the audience response software.
For example, when the audience response software is configured for Handset
ID 1 through 50, but Handsets 1 through 75 are present.
When several adjacent Handsets on a given channel fail to register votes, perform the following:
Problem: A portion of a section does not register votes
Check: Distance to Base Station within reliable transmission range?
Check: Audience response software configured properly?
Check: Base Stations separated at least 18 inches?
Check: Base Station near metallic objects?
Try: Replace Handset(s)
7.3.4 Room-Level Problems
When an entire meeting room does not report any votes or the voting pattern is atypical, the
host computer and audience response software become the focus of the troubleshooting
activities. An atypical voting pattern usually occurs when the audience response software is
configured for fewer Handsets than actually installed in the meeting room.
In a multiple Base Station configuration where an entire meeting room fails to register votes,
perform the following:
Problem: The entire room does not register votes
Check: Audience response software configured properly?
Check: Host computer cabled properly?
Try: Boot the host computer
Note: For room-level problems with a single Base Station configuration, refer to
the communication channel problem checklist.
AI System Manual (Jan-04) Installation and Operation
25
7.4 Handset Repair
AI Handsets are rugged, highly reliable and should require little if any maintenance other than
periodic battery replacement. If the suggestions in the Troubleshooting sections above do not
resolve a malfunction, it may be worthwhile to open the Handset case. Most of the Handset
components are permanently installed and cannot be changed in the field. Although unlikely,
extremely rough handling might dislodge the batteries, the keypad connector or jumper.
Note: When a Handset does not function properly, the cause is usually battery-
related — either depleted or slightly dislodged batteries.
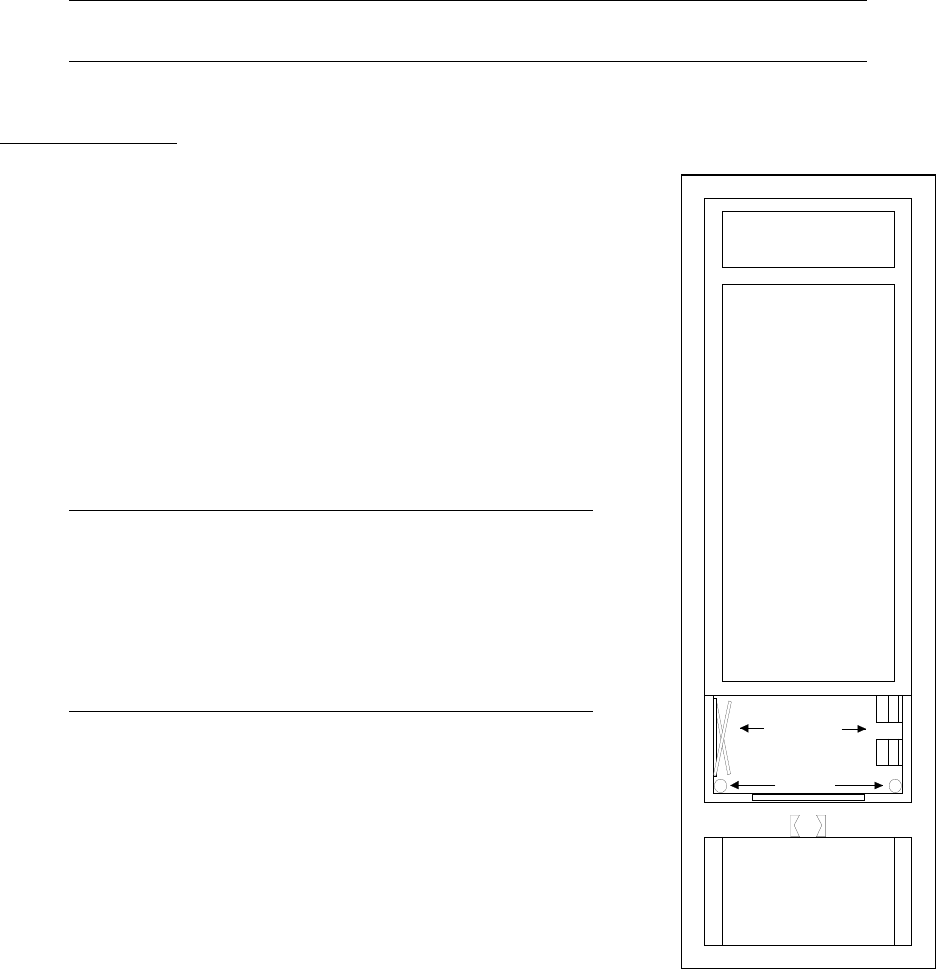
Opening the Case
To inspect Handset circuitry, open the case by performing the
following steps:
1. Turn the Handset over and slide the battery
compartment cover off.
2. Remove the AA batteries.
3. Remove the two screws joining the top and
bottom of the case.
Important: A discharge of static electricity from a
finger or other conductor may damage electronic
circuitry. In general, avoid touching pins, leads or
circuitry. Before handling any of the internal
components, be sure that you have discharged static
electricity by briefly touching a grounded metal
object.
AA
Battery Clips
+
-
Retaining
Screws
Fig. 22. Opening Battery
Compartment
AI System Manual (Jan-04) Installation and Operation
26
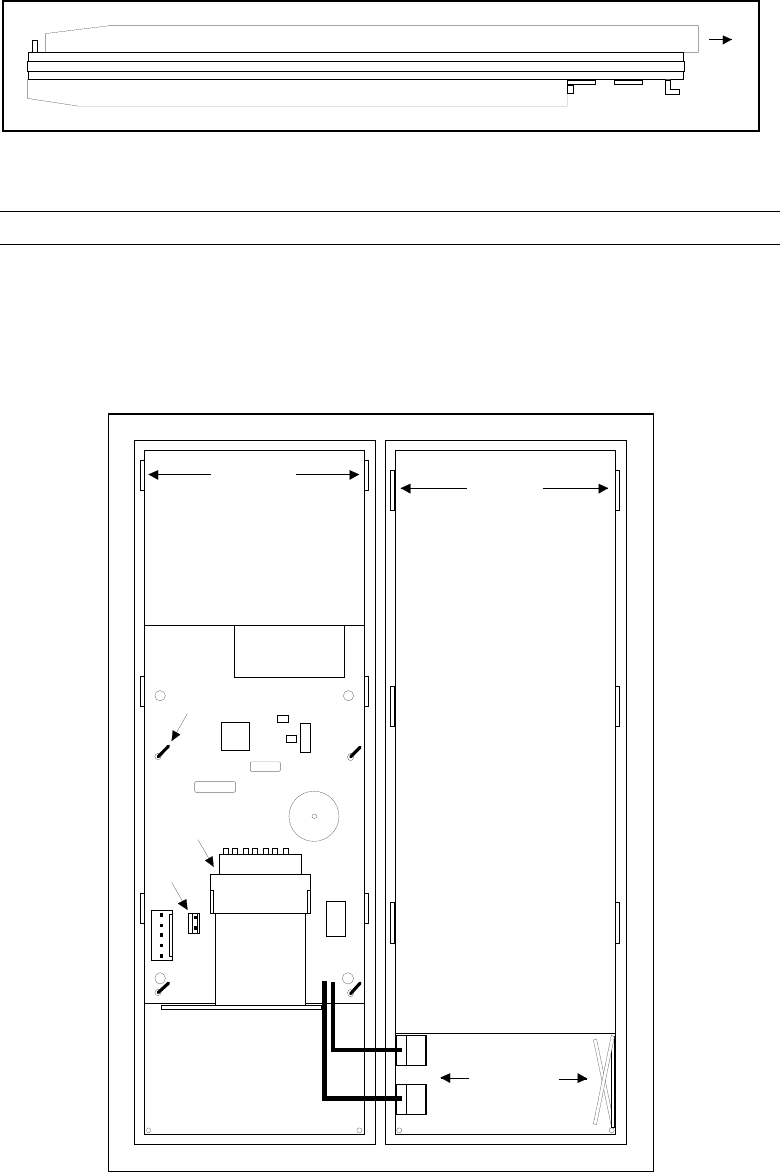
4. Grasping the top and bottom of the Handset, slide the top in the direction of the battery
compartment — approximately 3/16”.
Note: The top and bottom of the Handset are joined by two battery wires.
5. Gently separate the top and bottom of the Handset and position them along side of
each other as shown below.
Fig. 23. Opening Handset Case
AA
Battery Clips
Retaining
Clip
Sockets
Retaining
Clips
Jumper
Keypad
Connector
Keypad
Ribbon
Cable
-
+
+
-
Handset
Top
Handset
Bottom
Circuit Board
Retainer
Fig. 24. Handset — Case Open
AI System Manual (Jan-04) Installation and Operation
27
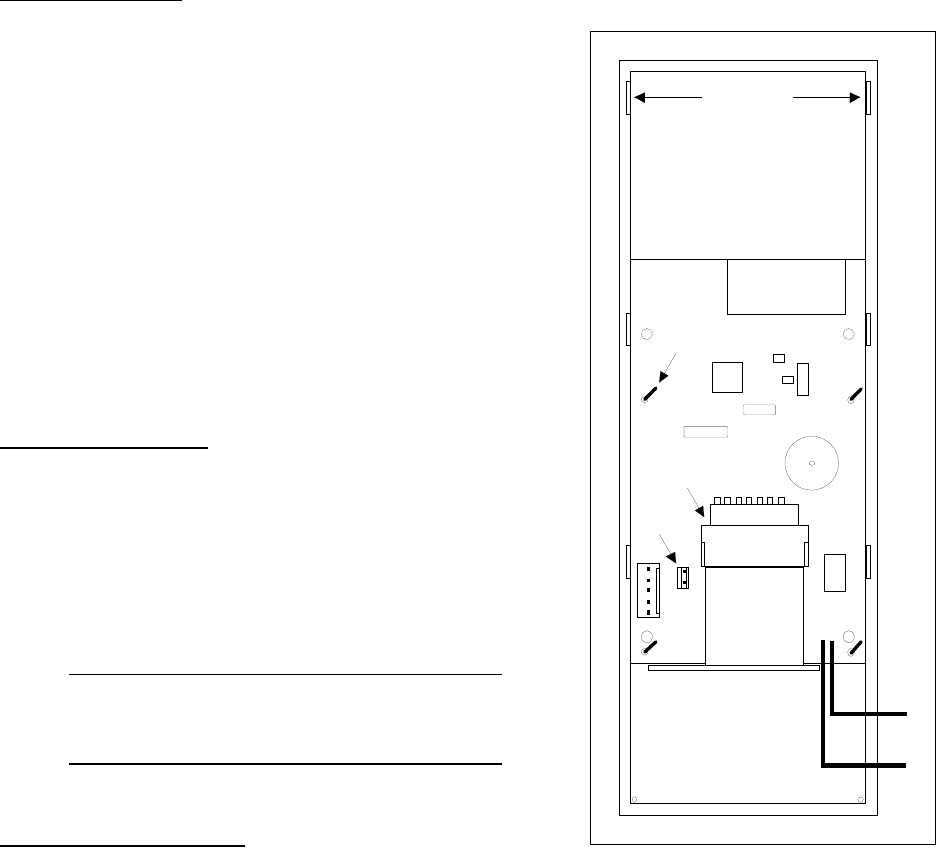
Diagnostic Checks
- Handset circuitry is mounted on a printed
circuit board. The circuit board is mounted
with four circuit board retainers. Make sure
the circuit board is firmly in place — gently
bend the circuit board retainers if necessary.
- Check that the jumper shown is in place.
If the jumper has become dislodged,
carefully reseat it.
- Check that the keypad ribbon cable is
securely joined to the keypad connector.
Assembling the Case
To assemble the Handset case, reverse the opening
procedure — join the top and bottom of the Handset,
make sure the battery wires are routed behind the
battery clips, install the case screws, install the
batteries and replace the battery compartment cover.
Note: When you install batteries in a
properly functioning Handset, you should
hear a short series of tones.
All Diagnostic Efforts Fail
If none of the troubleshooting and repair steps
overcome the malfunction, replace the Handset with a
spare (operating on the same channel) if available, label
the defective unit with a description of the problem and
contact Audience Interaction.
Retaining
Clips
Jumper
Keypad
Connector
Keypad
Ribbon
Cable
-
+
+
-
Handset
Top
Circuit Board
Retainer
Fig. 25. Handset Circuit Board

AI System Manual (Jan-04) Installation and Operation
28
7.5 Base Station Repair
AI Base Stations are highly reliable and should require little if any maintenance. If the
suggestions in the Troubleshooting sections above do not resolve a malfunction, it may be
worthwhile to open the Base Station case. Most of the Base Station’s components are
permanently installed and cannot be changed in the field. Although unlikely, extremely rough
handling may affect internal jumper settings.
Opening the Case
Important: Disconnect all cabling from the Base Station before opening the case.
Do not connect any cabling to the Base Station until the case is closed.
To inspect Base Station circuitry and jumper settings, open the case by performing the following
steps:
1. From the bottom of the Base Station, remove the four screws securing the cover.
2. Carefully lift the cover and remove the two end pieces if they are loose.
Important: A discharge of static electricity from a finger or other conductor may
damage electronic circuitry. In general, avoid touching pins, leads or circuitry.
Before handling any of the internal components, be sure that you have
discharged static electricity by briefly touching a grounded metal object.
AI System Manual (Jan-04) Installation and Operation
29
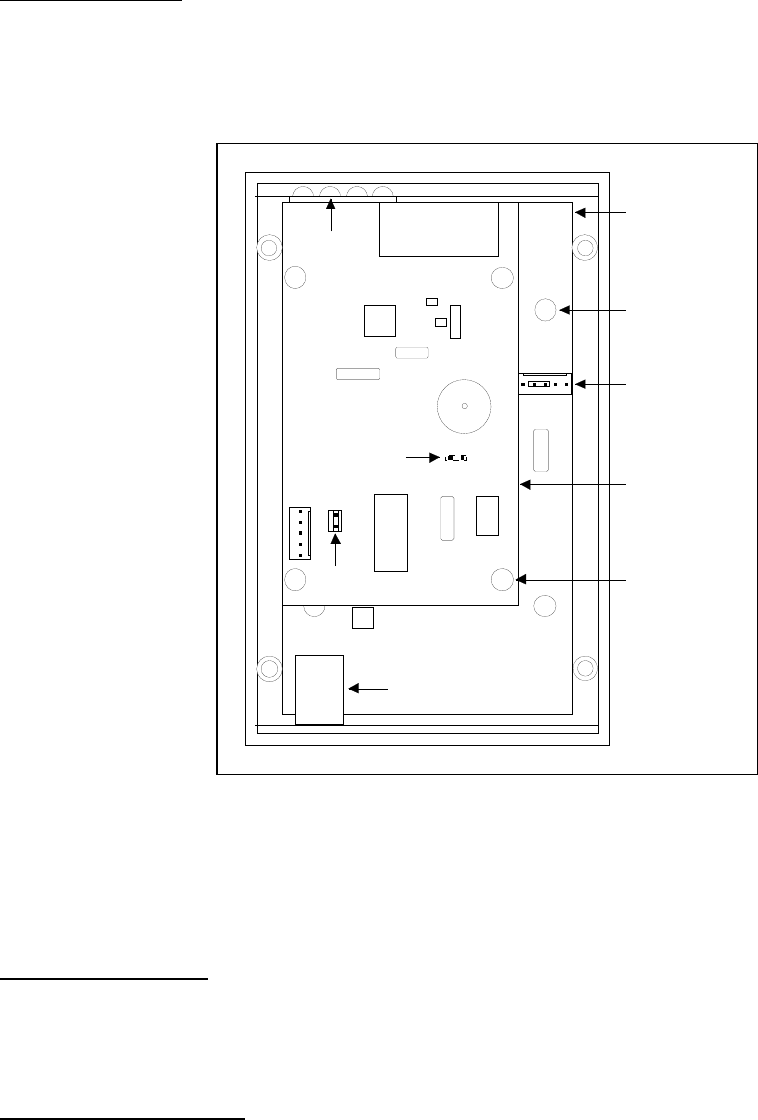
Diagnostic Checks
Base Station circuitry is mounted on two printed circuit boards — a motherboard (MB)
and a daughterboard (DB) suspended above. Each circuit board is mounted with four
screws.
Check the three jumper settings shown above — two on the motherboard and one on
the daughterboard. If any of the jumpers have become dislodged, carefully reseat
them.
Assembling the Case
To assemble the case, reverse the opening procedure — replace the end pieces, cover and
case screws.
All Diagnostic Efforts Fail
If none of the troubleshooting and repair steps overcome the malfunction, replace the Base
Station with a spare (operating on the same channel) if available, label the defective unit with a
description of the problem and contact Audience Interaction.
Jumper
(MB)
Jumper
(DB)
Jumper
Motherboard
(MB)
Daughterboard
(DB)
(MB)
Mounting
Screws
(MB)
Mounting
Screws
(DB)
Tally Lights
Antenna
USB Port
Fig. 26. Base Station — Cover Removed