IRIVER PPM12 AK70 MKII User Manual
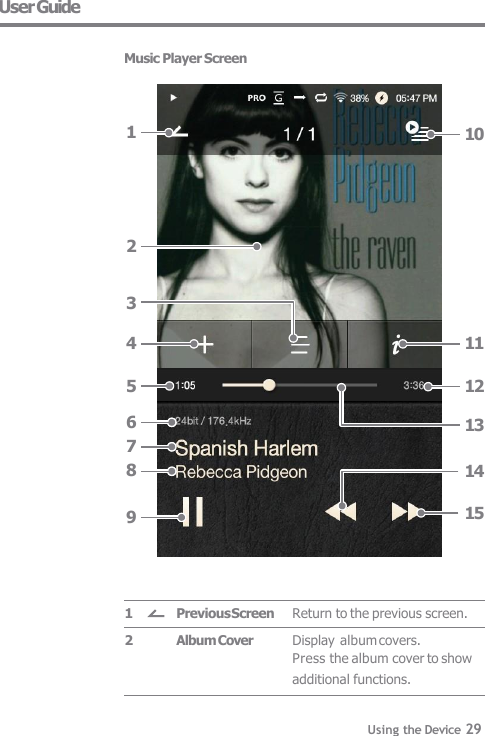
IRIVER LIMITED AK70 MKII
UserManual.wiki
>
IRIVER
>
PPM12 User Manual
User Manual
Navigation menu
Upload a User Manual
Namespaces
Wiki Guide
HTML
PDF
Info
Views
User Manual
Discussion / Help
Navigation
![User Guide PPM12 microSD Card Slot Cover Micro-USB Cable Protective Film: Protect the device and its screen. Micro-USB Cable: Connect the device to a computer or charge the device. Quick Start Guide: Basic overview of device functionality. Warranty Card: The warranty card is required for customer and technical support. Do not misplace the card. User Guide: The User Guide can be downloaded from the Astell&Kern website. [http://www.astellnkern.com/ > Support > Download]. MicroSD Card Slot Cover: The cover is used to protect the microSD card slot when not in use. It is installed on the product by default. Contents may be changed without prior notice to improve the performance or quality of the product. Package Contents Protective Film Quick Start Guide & Warranty Card Getting Started 2](https://usermanual.wiki/IRIVER/PPM12/User-Guide-3549225-Page-3.png)
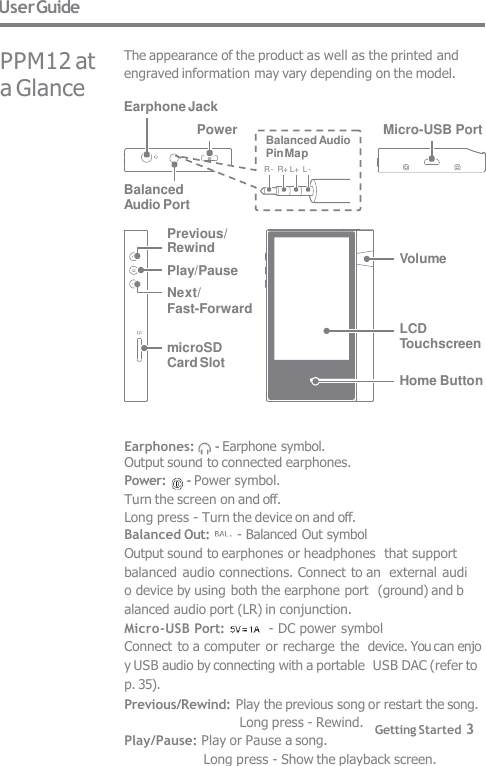
![This device has an automatic shutdown feature to reduce battery consumption. The device will turn off after a defined period if there is no user input. [ - Power Saving - Automatic Shutdown] (See p. 43) This device has an automatic timeout feature to reduce battery consumption. The screen will turn off after a defined period of time if there is no user input. [ - Power Saving - Screen Timeout] (See p. 43) Turn the Screen On/Off 1. While the screen is on, press the [ ] button to turn off the screen. 2. Press the [ ] button again to turn off the screen. Turn On/Off 1. Long-press the [ ] button to turn on the device. 2. While the device is on, long-press the [ ] button to display a shutdown confirmation message. 3. Press [Confirm] to turn off the device. Power Manage- ment User Guide Next/Fast-Forward: Skip to the next song. Long press: Fast-forward. LCD Touchscreen: Display with touch control. Volume: Control the volume by turning the wheel. microSD Card Slot: - microSD card slot symbol Insert a microSD card and access its files. Home Button: Show the home screen. Getting Started 4](https://usermanual.wiki/IRIVER/PPM12/User-Guide-3549225-Page-5.png)
![1. Connect the device to the PC using the supplied Micro USB cable. Charging starts. User Guide Reset Function 1. In cases of unexpected device failure or freeze, press the [ ] button for 12 seconds to force a shutdown. The device can be restarted after a shutdown. The device can be restarted after a shutdown. Resetting the device will not affect the stored data or time setting. Do not use the reset function while the product is in use. Doing so may corrupt the data on the device. Charging time: up to 8 hours (fully discharge, power OFF) You may have to turn on a computer to start charging depending on computer specifications. When charging via PC connection, the charging time may vary depending on whether the device is turned on or off. If a computer goes into standby/sleep mode, the device may not be charged depending on computer specifications. The built-in battery will gradually lose capacity over time according to the number of charges/discharges. Do not use any micro-USB cable other than the one supplied with the device. Doing so may cause a malfunction. Charging time: up to 4 hours (fully discharge, power OFF) When using a high-speed charger that is supported with various voltages such as 5V/9V/12V, the charging may not proceed normally and it may cause the product to malfunction. Getting Started 5 Charging using PC Charging using the adapter 1. Charging is possible by using the 5V 2A output adapter (sold separately). Charging](https://usermanual.wiki/IRIVER/PPM12/User-Guide-3549225-Page-6.png)
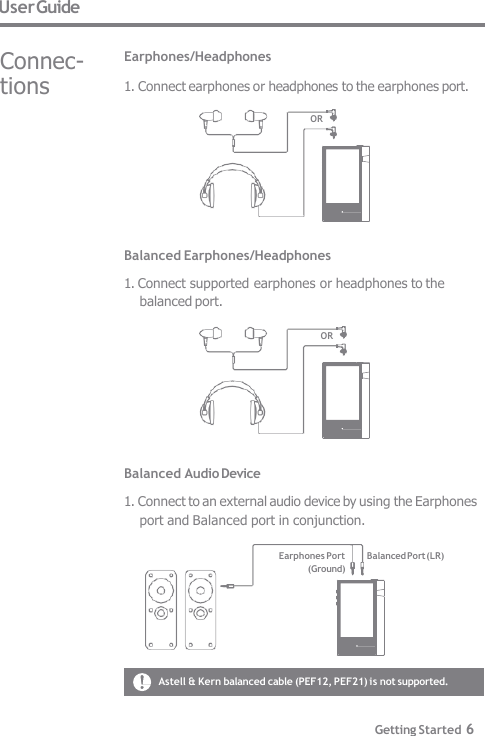
![User Guide Connecting to a Computer 1. Turn on the device and your PC. 2. Connect the device to your PC as a standard USB device by using a micro-USB cable. [ - Connect USB] Media Device (USB Drive): Transfer files from a PC to the device. DAC input: Listen to music located on a PC through the device. (See p. 34) Mac users need to download and install the MTP program from the Astell&Kern website. [http://www.astellnkern.com Support > Download] For an optimal connection, quit any unnecessary programs before connecting the device to the computer. Only use the micro-USB cable supplied with the device. Doing so may cause a malfunction. Windows XP users require Service Pack 2 and Windows Media Player 10 to be installed for the computer to recognize the USB device. Download necessary Service Packs and Windows Media Player from the Microsoft website. http://www.microsoft.com Disconnecting from the Computer 1. Verify that all operations are completed before attempting to disconnect the device from the computer. Disconnecting the device from the computer during an operation (e.g. file transfer) may corrupt data on the device. Getting Started 7](https://usermanual.wiki/IRIVER/PPM12/User-Guide-3549225-Page-8.png)
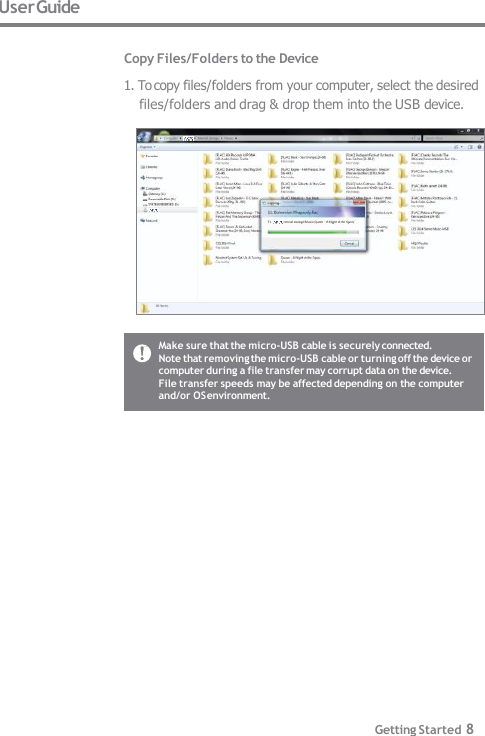
![Insert/Remove a microSD Card 1. Refer to the diagram and gently insert a microSD card into the microSD card slot. 2. To safely remove a microSD card, select [Safely remove SD card] from the Notification Bar or select [Unmount SD card] from [ - System Information]. 3. Gently press the microSD card to release it from the slot. User Guide Delete Files/Folders on the Device 1. Right-click the desired file/folder, and then select [Delete]. 2. Select [Yes] in the [Confirm File/Folder Deletion] window to delete the selected file/folder. Getting Started 9](https://usermanual.wiki/IRIVER/PPM12/User-Guide-3549225-Page-10.png)
![Refer to page 45 of the manual for more information on connecting to a wireless network. The firmware upgrade may not initialize if the battery level is too low. (A minimum battery level of 50% is required.) Moving to another screen during a file download will cancel the download. Do not disconnect from the wireless network while downloading a firmware upgrade. Doing so may cause data corruption and/or damage to the system. If an error occurs or the notice in the Notification Bar disappears during an upgrade, download the firmware update again through [ - Update - System Update]. User Guide Wi-Fi Update / OTA (Over-the-Air) 1. Connect to a wireless network. 2. When a new firmware version is available, the screen will display a Firmware Update Guide window. 3. Select [Update] and choose the items for update. 4. Follow the on-screen instructions and proceed with the firmware upgrade. Firmware Upgrade Getting Started 11](https://usermanual.wiki/IRIVER/PPM12/User-Guide-3549225-Page-12.png)
![To prevent damage, do not use a sharp object or use excessive force when touching the screen. Basic LCD Touchscreen Operations 1. This device features an LCD touchscreen that allows you to perform operations by touch. Interact with the device by touching the screen to access various features. User Guide Home Screen Using the Device 12 Return to the Home Screen 1. Press the [Home] button at any time to return to the Home Screen.](https://usermanual.wiki/IRIVER/PPM12/User-Guide-3549225-Page-13.png)
![User Guide Moving a list in the home screen 1. You can move the list by dragging the home screen [up] / [down]. Navigating Up/Down in a List 1. Scroll through the list by dragging the list screen [up] and [down]. Using the Device 13](https://usermanual.wiki/IRIVER/PPM12/User-Guide-3549225-Page-14.png)

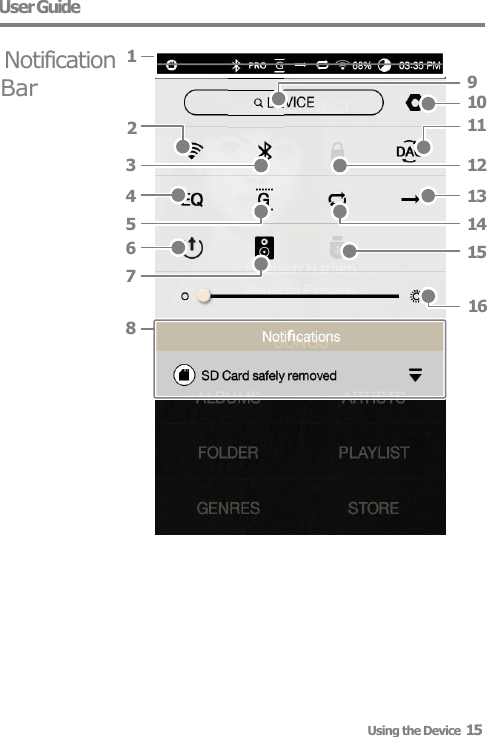
![User Guide Expand or collapse the notification bar by dragging the bar down or up, respectively. Press [ ] to turn Wi-Fi on or off. Press [ ] to turn Bluetooth on or off. Press [ ] to turn the EQ on or off. The most recent EQ settings are applied by default. Notification Bar Wi-Fi Bluetooth EQ 1 2 3 4 5 Gapless Press [ ] to turn Gapless Playback Playback on or off. 6 Line Out Turn Line Out on or off. 7 Wi-Fi Speakers Turn Wi-Fi speakers on or off. (Must be on the same network.) (The icon will become enabled when AK Connect is turned on.) 8 Notifications Display Notification contents are displayed in this area. 9 File Search Enter keywords to display a list of items containing the search terms. 10 Settings Displays a list of settings. Using the Device 16](https://usermanual.wiki/IRIVER/PPM12/User-Guide-3549225-Page-17.png)
![Long-press [ / / / / ] to move to the corresponding screen. User Guide Mode Screen Lock Play Mode Repeat Mode USB Audio Ripper Power Screen Brightness 11 12 13 14 15 16 PC Connection Select the appropriate mode Press [ ] to turn the screen lock on or off. The volume wheel is disabled when the screen lock icon is activated. Press [ ] to cycle through different play modes. :Sequential playback. :Shuffle playback. Press [ ] to cycle through different Repeat modes. :Repeat the entire playlist. :Repeat the current song. :Disable repeat. Please turn on or off USB audio output after connecting the device with the portable USB DAC (refer to p. 35). Turn the CD Ripper on or off. (Enabled when connected to the AK CD Ripper.) Use the adjustment bar to control the display brightness. when connected to a computer. DISK :USB drive mode for transferring media files. :Listen to music located on a PC through the device. Using the Device 17](https://usermanual.wiki/IRIVER/PPM12/User-Guide-3549225-Page-18.png)
![Refer to page 45 of the manual for more information on connecting to a wireless network. User Guide Purchasing Music 1. Connect to a wireless network. 2. Select [Store] from the home screen. 3. Select the desired store. 4. Check the user guide or help menu within each store for detailed information. Using the Device 18 connected to a wireless network. Purchasing Conveniently purchase music from the Store when Music from a Store](https://usermanual.wiki/IRIVER/PPM12/User-Guide-3549225-Page-19.png)
![System Requirements PC Minimum System Requirements OS : Windows XP, Windows 7/8/10 (32 & 64-bit) Mac Minimum System Requirements OS X 10.7 (Lion) or later User Guide MQS Streaming Server Installation 1. Visit the Astell&Kern website and download the server installer that corresponds to your operating system. [http://www.astellnkern.com > Support > Download]. 2. Run the downloaded installer and follow the on-screen instructions. 3. Check the User Guide within the program for detailed information on using the MQS Streaming Server. The PPM12 can access and play back music files stored on a computer on the same network as well as output sound through Astell&Kern speakers. AK CONNECT Connecting to the AK Connect Server 1. Turn on the server and connect to the same network as the PPM12. Run the MQS Streaming Server on your computer. 2. Turn on [AK Connect] from the device settings. 3. Press [AK Connect] from the home screen. Using the Device 19](https://usermanual.wiki/IRIVER/PPM12/User-Guide-3549225-Page-20.png)
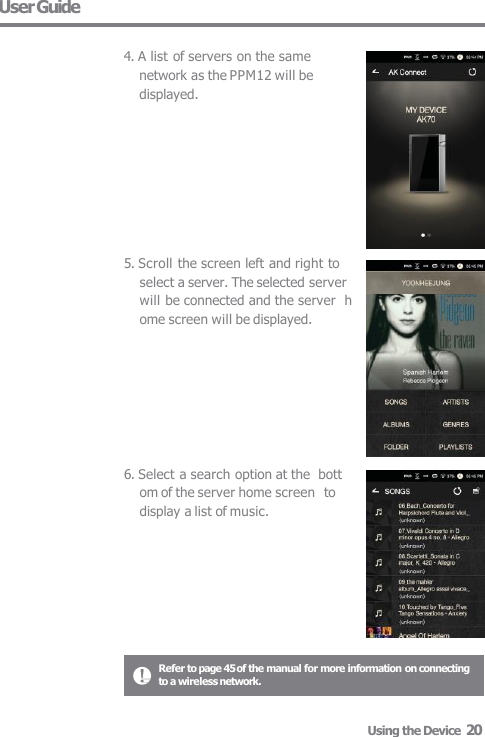
![User Guide Streaming and Downloading from the Music Server 1. Select a search option from the server Home Screen to display a list of music. 2. Select a song to begin streaming. 3.Press the [ ] button at the upper-right corner of the music list. 4. Select the desired music, and then press the [ ] button at the top of the screen to begin downloading. A message on the Notification Bar will indicate a completed download. Depending on network conditions, song loading may be slow or streaming may stutter. Server response may be slow when the server computer is under load. If you do streaming and download at the same time, it may slow down the device’s response time depending on the speed of Wi-Fi network or server. Terminating music streaming or pressing the item being downloaded within the Notification Bar will stop the downloading. Using the Device 21](https://usermanual.wiki/IRIVER/PPM12/User-Guide-3549225-Page-22.png)
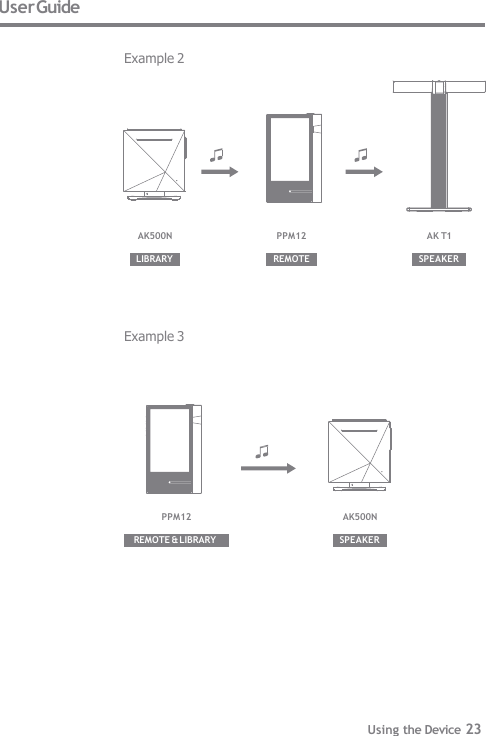
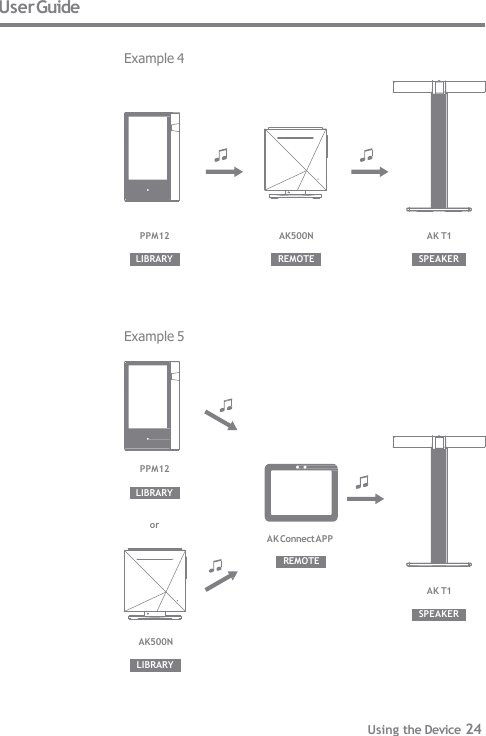
![User Guide Selecting Speakers 1. Turn on the speaker(s) to be connected, and then connect it to the same network as the PPM12. 2. Turn on [AK Connect] from the device settings. 3. Press [ ] from the notification bar to display a list of speakers available on the same network as the PPM12. 4. Scroll the screen left and right to select a speaker. The selected speaker will be connected, and music will be played back through the speaker. AK Connect Usage Examples Example 1 LIBRARY SPEAKER AK T1 PPM12 Using the Device 22](https://usermanual.wiki/IRIVER/PPM12/User-Guide-3549225-Page-23.png)
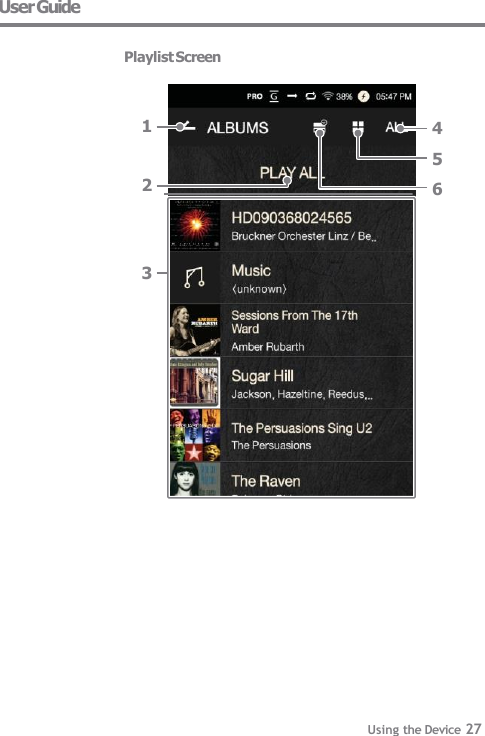
![User Guide Listening to Music Selecting Music 1. Select a search option at the bottom of the home screen to display the playlist. 2. Select a song from the list to begin playback. Listening to Music Press [ ] at the top of the music list to display music options. : Add the selected file after the current/last song of the current playlist. : Add the selected file to the playlist. : Copy the selected file. : Move the selected file. : Delete the selected file. Select an album cover from the home screen to begin playback. Turn the [Volume Wheel] to adjust the volume. Press [ ] during playback to pause and [ ] to resume playback. You can also pause/resume playback by pressing the [ ] button on the device. Press [ / ] during playback for the previous/next song. Play the previous/next song by pressing the [ / ] button on the device. Long-press [ / ] during playback to rewind/fast-forward. Rewind/fast-forward by pressing the [ / ] button on the device. Select [Folder] to search music by folder. Continuous Playback: Approximately 10 hours (Basis: FLAC, 16-bit, 44 kHz, unbalanced output, volume 80, EQ off, LCD off) Supported Formats: PCM [8~192kHz(8/16/24bit)], DSD 64/128 Using the Device 25](https://usermanual.wiki/IRIVER/PPM12/User-Guide-3549225-Page-26.png)
![User Guide Drag the progress bar to the desired location during playback. Press the [Home] button on the device to go to the Home Screen. Press the album cover during playback to display an additional screen. : Display the previous screen. : Display the current playlist. Press [ ] next to the playlist to edit the playlist order. Press [ ] at the top of the music list to display music options. : Add the selected file to the playlist. : Delete the selected file from the playlist. : Add the current song to the playlist. : Display lyrics for the current song. : Display current song information. Using the Device 26](https://usermanual.wiki/IRIVER/PPM12/User-Guide-3549225-Page-27.png)
![User Guide Playlist Manage- ment Using the Device 31 Creating a Playlist 1. Press [Playlist - Playlists] from the home screen to display a list of playlists. 2. Press [+] at the upper-right corner of the screen. 3. Enter a name for the playlist, and then press [Add] to create a new playlist. Adding a Song to a Playlist 1. Press [Playlists] to display a list of playlists. 2. Select a playlist and press [+ Add] to display a list of songs. 3. Select the desired song, and then press [+ Add] to add the song to the selected playlist.](https://usermanual.wiki/IRIVER/PPM12/User-Guide-3549225-Page-32.png)
![User Guide Removing a Song from a Playlist 1. Press [Playlists] to display a list of playlists. 2. Select the desired playlist, and then press [ ] at the top of the screen. 3. Select the desired song, and then press [ ] to remove the song from the selected playlist. Editing the Playlist Order 1. Press [ ] next to the playlist to modify the playlist order. Playing a Playlist 1. Press [Playlists] to display a list of playlists, and then press [ ] at the top of the screen. 2. Select the desired playlist for playback. 3. Press [ ] at the top of the screen to add the selected playlist after the current/last song of the current playlist. Using the Device 32](https://usermanual.wiki/IRIVER/PPM12/User-Guide-3549225-Page-33.png)
![User Guide Renaming a Playlist Deleting a Playlist 1. Press [Playlists] to display a list of playlists, and then press [ ] at the top of the screen. 2. Select the playlist to be deleted. 3. Press [ ] at the top of the screen to delete the selected playlist. ] 1. Press [Playlists] to display a list of playlists, and then press [ at the top of the screen. 2. Select a playlist to be renamed. 3. Press [ ] at the top of the screen to display a rename window. 4. Enter a name for the playlist, and then press [Rename] to save the playlist under a new name. Using the Device 33](https://usermanual.wiki/IRIVER/PPM12/User-Guide-3549225-Page-34.png)
![User Guide How to Use USB Audio You can enjoy USB audio by linking with a portable amp and DAC available in the market. How to Link Portable USB DAC 1. Connect the device’s micro USB jack with the portable USB DAC with dedicated cable. 2. Press [ ] after scrolling down the notification bar. 3. Once [ ] is activated, you can enjoy the music through the portable USB DAC’s audio output jack. How to Change USB Audio DSD Output Type You can change the output type of DSD data coming out of USB audio. 1. Select a DSD output type on [ - USB audio]. PCM: The device’s DSD is converted into PCM and comes out through USB audio. DoP: The device’s DSD is converted into DoP and comes out through USB audio. The micro USB cable that comes packaged with the device is available for power recharging only by connecting with the PC. For instructions on the dedicated cable, please refer to the manual of the portable USB DAC manufacturer. The portable USB DAC must be able to receive digital input through the micro USB’s OTG. Output may not be made properly depending on the digital input specs of the micro USB of the portable USB DAC. This is not a defect in the device and not a ground for exchange or refund. In the case of using DoP as a DSD output type, no sound may come out except noise depending on the specs of the portable USB DAC. Using the Device 35](https://usermanual.wiki/IRIVER/PPM12/User-Guide-3549225-Page-36.png)
![User Guide CD Ripping Connect the AK Ripper (sold separately) to rip CDs. Turning the AK Ripper On/Off 1. You can use the AK ripper once you connect the device with the AK ripper and press [ ] after scrolling down the notification bar. 2. While the AK Ripper is turned on, pull down the notification bar and press the CD ripping icon to stop the AK Ripper operation. Automatic CD Ripping 1. Connect the AK Ripper and insert a CD. 2. The metadata (ID3 tags) for the inserted CD will be retrieved via Gracenote. 3. CD ripping will begin automatically after the metadata has been retrieved. 4. When finished, press [OK] on the results prompt to complete automatic CD ripping. Manual CD Ripping 1. When the AK Ripper is connected and a CD is inserted, the [CD Ripping] menu will be activated on the home screen. 2. Press the [CD Ripping] menu and select the desired file format (FLAC or WAV). 3. The Gracenote database will be searched for matching CD metadata after the file format is selected. 4. When the database search is complete, press [Start] to begin CD ripping. 5. Rip only selected songs. Using the Device 36](https://usermanual.wiki/IRIVER/PPM12/User-Guide-3549225-Page-37.png)
![To search the Gracenote database, the PPM12 must be connected to the Internet via Wi-Fi. The database access time may vary depending on the network environment. Please note that metadata for certain CDs may not be available on the Gracenote database. You may not access the Home screen while CD ripping is in progress. The AK Connect service will be disabled during CD ripping. The service will automatically restart when CD ripping is completed. Music playback will be disabled during CD ripping, and tracks that have been ripped will not be available for playback until the entire CD has been ripped. You can set the desired file format and ripping speed from the [ - CD Ripping] menu. Several attempts at correction will be made for data with errors when the feature is enabled under [ - CD Ripping - Error Correction]. Please note that the CD ripping speed will be affected when this feature is enabled. User Guide CD Ripping Results : Indicates that CD ripping is complete, or that although an error occurred, CD ripping was successfully completed via error correction. : Indicates that the song currently being ripped can be canceled via user input. : Indicates that CD ripping failed due to a scratch on the CD or other similar reasons. Also indicates that CD ripping was canceled due to user interruption. Using the Device 37](https://usermanual.wiki/IRIVER/PPM12/User-Guide-3549225-Page-38.png)
![User Guide Using Bluetooth Connect a Bluetooth device to listen to music wirelessly. Turning Bluetooth On/Off A Bluetooth device must be paired with the PPM12 prior to use. Refer to the Bluetooth device's instruction manual for details. 1. Select [ ] from the Notification Bar, or select [On/Off] from [ - Bluetooth]. Bluetooth Pairing 1. Select the appropriate Bluetooth device from the list of available devices. Terminating a Bluetooth Connection 1. Press the connected Bluetooth device and confirm the message prompt to disconnect the device. Using the Device 38](https://usermanual.wiki/IRIVER/PPM12/User-Guide-3549225-Page-39.png)
![Bluetooth Support Specifications Profile: A2DP, aptX Device performance may be affected during Hi-Fi playback. (48 kHz or lower is recommended.) Do not turn off the device while connected to Bluetooth. Power cycle the Bluetooth device in case of malfunction. Pairing methods may differ for each individual Bluetooth device. Always refer to the respective instruction manual for details. When connecting the product to a Bluetooth device, the distance between the two must be within 20 cm. Audio quality will degrade with longer distances, and the pairing may disconnect at a distance of 2 m (6.5 ft) or more. (Distances may vary depending on device and environment.) Crosstalk may be heard while using Bluetooth. For multipoint devices, make the necessary connections prior to use. Car audio Bluetooth connections are not supported. Malfunction, noise, and other undesirable effects may occur due to the device's battery level and the environment. If signal interference affects data transmission. (e.g. holding the device while wearing a Bluetooth device, holding the device while holding another electronic device, etc.) If the device or Bluetooth headset's radio transmitters are touching parts of the body. If the transmission strength is affected by walls, corners, partitions, etc. If devices using the same frequencies cause interference. (e.g. medical devices, microwave ovens, Wi-Fi, etc.) Areas with an excessive amount of interference or weak signals. (e.g. elevators, underground, etc.) User Guide Removing a Bluetooth Pairing 1. Press [ ] to the right of the paired device to be redirected to the settings screen. 2. Select [Remove Pairing] to complete the process. Using the Device 39](https://usermanual.wiki/IRIVER/PPM12/User-Guide-3549225-Page-40.png)
![User Guide Settings Set up the device according to the user's needs. The settings menu may vary depending on the firmware version. Setup 1. Select [ ] from the home screen notification bar. 2. Select the desired item for setup. Wi-Fi Change wireless network settings and turn Wi-Fi on or off. Bluetooth Connect a Bluetooth device to listen to music wirelessly. Refer to page 45 of the manual for more information on setting a wireless network. Refer to [Using Bluetooth] on page 38 of the manual for more information on setting up a Bluetooth connection. AK CONNECT Set whether to use AK Connect. Using the Device 40](https://usermanual.wiki/IRIVER/PPM12/User-Guide-3549225-Page-41.png)
![Gapless Playback Play the next song without any interruptions/silence. Gapless playback is only supported between two files with identical bit rates, sample rates, and channels. Line Out Turn Line Out on or off. Enabling Line Out and pressing [Line Out] on the volume control window will lock the volume level at maximum. User Guide Equalizer Set the equalizer according to the user's preferences. Pro EQ: EQ Preset recommended by professionals. User EQ: Adjust the frequencies according to the user's preferences. Display Balanced Out You can display Balanced Out on the volume screen. Do not use earphones with the Line Out feature enabled. Doing so may cause permanent hearing loss. Supported Formats for EQ: PCM [8 – 192 kHz (8/16/24-bit)] DSD [64/128] Using the equalizer may negatively affect device performance. Refer to pages 46 - 48 of the manual for more information on using the equalizer. Using the Device 41](https://usermanual.wiki/IRIVER/PPM12/User-Guide-3549225-Page-42.png)
![The default folder is set when using AK Connect to download files. When [Select Folder] is selected, the user is prompted to choose a download folder each time a file is downloaded. User Guide Language Select the display language. Supported languages: English, Korean, Japanese, Chinese (Simplified/Traditional), French, Russian, German Keyboard Select the keyboard language. Supported languages: English, Korean, Japanese, Chinese (Simplified/Traditional), Russian Power Automatic Shutdown: The device will turn off after a defined period if there is no user input. Screen Timeout: The screen will turn off after a defined period when there is no user input. Sleep Timer: Music playback will stop, and the device will turn off after a defined period. USB Connection Media Device (USB Drive): Connect to a computer to transfer media files. DAC Input: Listen to music located on a PC through the device. Download Select a folder for downloaded files. Using the Device 43](https://usermanual.wiki/IRIVER/PPM12/User-Guide-3549225-Page-44.png)

![to a Wireless Network 2. Select the desired AP to connect to the wireless network. Additional information (encryption key, index, etc.) may be required depending on the network settings. 3. Long-press the network name and select [Network Settings] to edit specific network settings. User Guide Connecting Connecting to a Network 1. Long-press [ ] from the Notification Bar or select [ - Wi-Fi] to display a list of access points (AP). Networks requiring browser or other additional certifications are not supported. Channels 1 through 13 are supported (but channels 12 and 13 are not supported for FCC) Using the Device 45](https://usermanual.wiki/IRIVER/PPM12/User-Guide-3549225-Page-46.png)
![User Guide Equalizer Setup Equalizer Setup 1. Long-press [EQ] from theNotification Bar, or turn onthe feature from [ - Equalizer].2. Press [Pro] from the drop-downlist and select [Add New]. Using the Device 46 3. Enter a name for the customEQ settings and select [Add].](https://usermanual.wiki/IRIVER/PPM12/User-Guide-3549225-Page-47.png)
![Reset Equalizer 1. Select the desired EQ setting and select [Reset] to revert the EQ to its default settings. Using the Device 47 User Guide 4. Adjust the frequencies according to the user's preferences.](https://usermanual.wiki/IRIVER/PPM12/User-Guide-3549225-Page-48.png)
![User Guide Delete Equalizer 1. Select [Delete] and choose the desired EQ setting for deletion. 2. Press [Confirm] to complete process. Using the Device 48 Rename Equalizer 1. Select [Rename] and enter a new name for the EQ setting.2. Press [Rename] to complete the process.](https://usermanual.wiki/IRIVER/PPM12/User-Guide-3549225-Page-49.png)
![User Guide 2. The device will not charge when connected to a computer via USB cable.Use a USB port on the back of the computer, and checkthat the USB port is functioning properly.Check that the USB cable is connected correctly. 3. The computer won't recognize the device or an erroroccurs when connected. Use a USB port on the back of the computer. Check that the USB cable is connected correctly. For Windows XP, verify that Service Pack 2 (or higher)and Windows Media Player 10 (or higher) are installed. Check if the device connects properly on a different computer. 4. The screen turns off repeatedly. The screen turns off automatically after a defined periodto reduce battery consumption. Set the time at [ - Power Saving - Screen Timeout]. 5. The screen does not display images properly. Check the screen for debris. 6. There is no sound, or there is static/interference. Check that the volume setting is above [0]. Check that the earphones are plugged in properly, andmake sure debris isn't obstructing the port connection.Check if the music file is corrupted. Verify that the audio settings have been properly set.(Balanced out, line out, etc.) 7. A file does not play, or the product is unstable when acertain file is used. The following may occur due to the condition of the file:Playback is unstable or difficult. The product may not work normally. The file may sound different from a computer. There may be a difference in the performance of playback or other functions. There may be differences in the playable specs. A file conversion or use of a different file is recommended. Miscellaneous 51](https://usermanual.wiki/IRIVER/PPM12/User-Guide-3549225-Page-52.png)
![User Guide Specifi- cations 64GB[NAND] Windows 7,8,10(32/64bit) MAC OS X 10.7. and up General Specifications Storage Capacity Built-in Memory External Memory microSD (Max. 128 GB) x 1 Battery Capacity 2,500mAh 3.7V Li-Polymer Battery Supported OS Supported OS Model PPM12 Body Color Misty Mint Body Material Aluminum Display 3.3-inch WVGA (480x800) Touch Screen Supported Audio WAV, FLAC, WMA, MP3, OGG, APE (Normal, High, Fast), Formats AAC, ALAC, AIFF, DFF, DSF Sampling Rate FLAC, WAV, ALAC, AIFF : 8kHz ~ 192kHz (8/16/24bits per Sample) DSD : DSD64, Stereo/ DSD128, Stereo Output Level Unbalance 2.3 Vrms/ Balance 2.3 Vrms (Condition No Load) DAC Cirrus Logic CS4398 x 2 (Dual DAC) Decoding Support up to 24bit / 192kHz Bit to Bit Decoding Input Type-B micro-USB Input (Charging & data transfer (PC & Mac)) / Connection Mode: MTP (Media Device) Outputs Phones (3.5 mm) / Balanced Out (2.5 mm, only 4-pole supported) Wi-Fi 802.11 b/g/n (2.4 GHz) Bluetooth V4.0 (A2DP, AVRCP, aptX) Dimensions 2.47" (62.8mm) x 3.81" (96.8mm) x 0.60" (15.2mm) Weight 5.26oz(149g) Feature Enhancements Firmware Upgrade Supported (OTA) Operating Temperature -10℃ ~ + 50℃ (14℉ ~ 122℉) Miscellaneous 54](https://usermanual.wiki/IRIVER/PPM12/User-Guide-3549225-Page-55.png)
