ISAW Camera ISE1W ISAW-E1W User Manual
ISAW Camera Inc. ISAW-E1W Users Manual
Users Manual
Any Changes or modications not expressly approved by the party responsible for compliance could void
the user’s authority to operate the equipment.
This device complies with part 15 of the FCC Rules. Operation is subject to the following two conditions:
(1) This device may not cause harmful interference, and (2) this device must accept any interference
received, including interference that may cause undesired operation.
FCC Radiation Exposure Statement:
This equipment complies with FCC radiation exposure limits set forth for an uncontrolled environment.This
transmitter must not be co-located or operating in conjunction with any other antenna or transmitter.
Note: This equipment has been tested and found to comply with the limits for a Class B digital device,
pursuant to part 15 of the FCC Rules. These limits are designed to provide reasonable protection against
harmful interference in a residential installation. This equipment generates uses and can radiate radio
frequency energy and, if not installed and used in accordance with the instructions, may cause harmful
interference to radio communications. However, there is no guarantee that interference will not occur in a
particular installation. If this equipment does cause harmful interference to radio or television reception,
which can be determined by turning the equipment o and on, the user is encouraged to try to correct the
interference by one or more of the following measures:
- Reorient or relocate the receiving antenna.
- Increase the separation between the equipment and receiver.
- Connect the equipment into an outlet on a circuit dierent from that to which the receiver is connected.
- Consult the dealer or an experienced radio/TV technician for help.
Air / Wing
+ Please visit our website to download our multi-language manual
www.isawcam.com
- You can select basic settings and detailed setting options through the user setup menu.
1. Press SETUP to enter the user setup menu.
2. User setup menu is divided into four categories (video, photo, My Tune, settings)
3. Press and hold MODE to move category.
4. Press SETUP and MODE to browse that category.
5. Press REC to select and conrm the setting option within the sub-menu.
- The LCD will ash the low battery icon when the battery is too low and almost depleted.
- The camera will save the le, if it is recording, and then turn o.
Then, you must recharge your battery.
- It will take about 150 minutes to fully charge the battery via USB.
- You can use an AC charging adapter (optional accessory) for a quicker recharge.
1. Turn o the camera.
2. Connect the camera USB port to your computer via USB cable.
3. The blue LED will be on and the battery will start recharging.
4. The LED will be o when the battery is fully charged.
- Turn on the ‘WiFi’ on your camera - WiFi signal is activated
- WiFi is ready to connect
- ‘ISAW Viewer ll’ is not connected to camera.
- Setup WiFi connection between
the camera and the smartphone.
- Enter ‘ WiFi Setup’ of smartphone.
- Select ‘iCam_YYXXXXXX’ in WiFi setting.
- The default password is ‘1234567890’
- Run ‘ISAW Viewer ll’ application on your
smartphone.
- Tap ‘Connect’ in the application to
connect your ISAW camera.
- The smartphone screen will display the
live screen of the camera.
- Control the camera through the control
panel of the smartphone application.
- Show LIVE screen display
- Start/Stop video recording
- Start/Stop photo shooting
- File viewer
- File download
- User settings
With the WiFi function of ISAW Cameras, you can control the camera with your smartphone.
- Compatible with iOS ver. 6.0 or higher, Android OS Jelly Bean or higher.
- Before you connect the camera, download the ‘ISAW Viewer ll’ application on your smartphone.
- Search for ‘ISAW VIEWER ll’ in iPhone App Store or Google Play Store
* While your smartphone is connected to the camera, camera button operation will be disabled.
*‘ISAW VIEWER ll’ will be upgraded with more features as further updates are released.
- Super Slim Action camera
- Full HD 1080p 30fps professional video quality
- 40m waterproof housing (Included in Wing only)
- High precision digital CMOS sensor with maximum 12MP photo resolution
- 150° wide-angle eld of view
- 1.5” built-in LCD view nder
- Built-in WiFi with enhanced application viewer
- Versatile recording resolution (1080p / 960p / 720p)
- Time lapse video, time lapse photo
- Burst shot photos (max. 10 consecutive photo shots)
- Multi langage menu (Eng, Esp, Fra, Deu)
- Rechargeable Li-ion battery
- Battery running time : max. 100 minutes of continuous recording
(* recording time may vary, depends on environmental condition.)
- Recharging time : 150 minutes
- Easy graphical user interface in LCD display
- If the camera is connected to a computer or an AC adapter while it is powered o,
the camera starts to recharge the battery.
- If the camera is connected to a computer while it is powered on, the camera
changes to le-transfer mode.
- While the camera is connected to an AC adapter or a car charger for recharge,
the camera can record while it is recharging.
1. Turn on your ISAW Camera.
2. Connect the camera to a computer via a USB cable.
3. The camera LCD will display ‘USB Ready’.
4. Go to ‘my computer’ in the PC.
5. Locate ‘removable disc’.
6. Double click ‘DCIM’ folder and search video or photo les.
- You can always nd the latest rmware updates of ISAW products on the website.
www.isawcam.com
- Firmware upgrade may not possible if the battery is too low.
Recharge the battery up to two third of the gauge for a safer upgrade.
1. Format the memory card, and copy the rmware le to the root directory of the Micro SD card.
2. Insert the Micro SD into ISAW Cameras and turn the camera on.
3.
The rmware upgrade will start automatically, and the camera will turn o when upgrade is nished.
( *Do NOT turn o the device or remove the battery during the rmware upgrade. )
USER’S Manual
ENGLISH / ESPAÑOL / FRANÇAIS / DEUTSCH
PORTUGUêS / русский / ITALIANO
한국어 / 中国 / 日本
ENGLISH
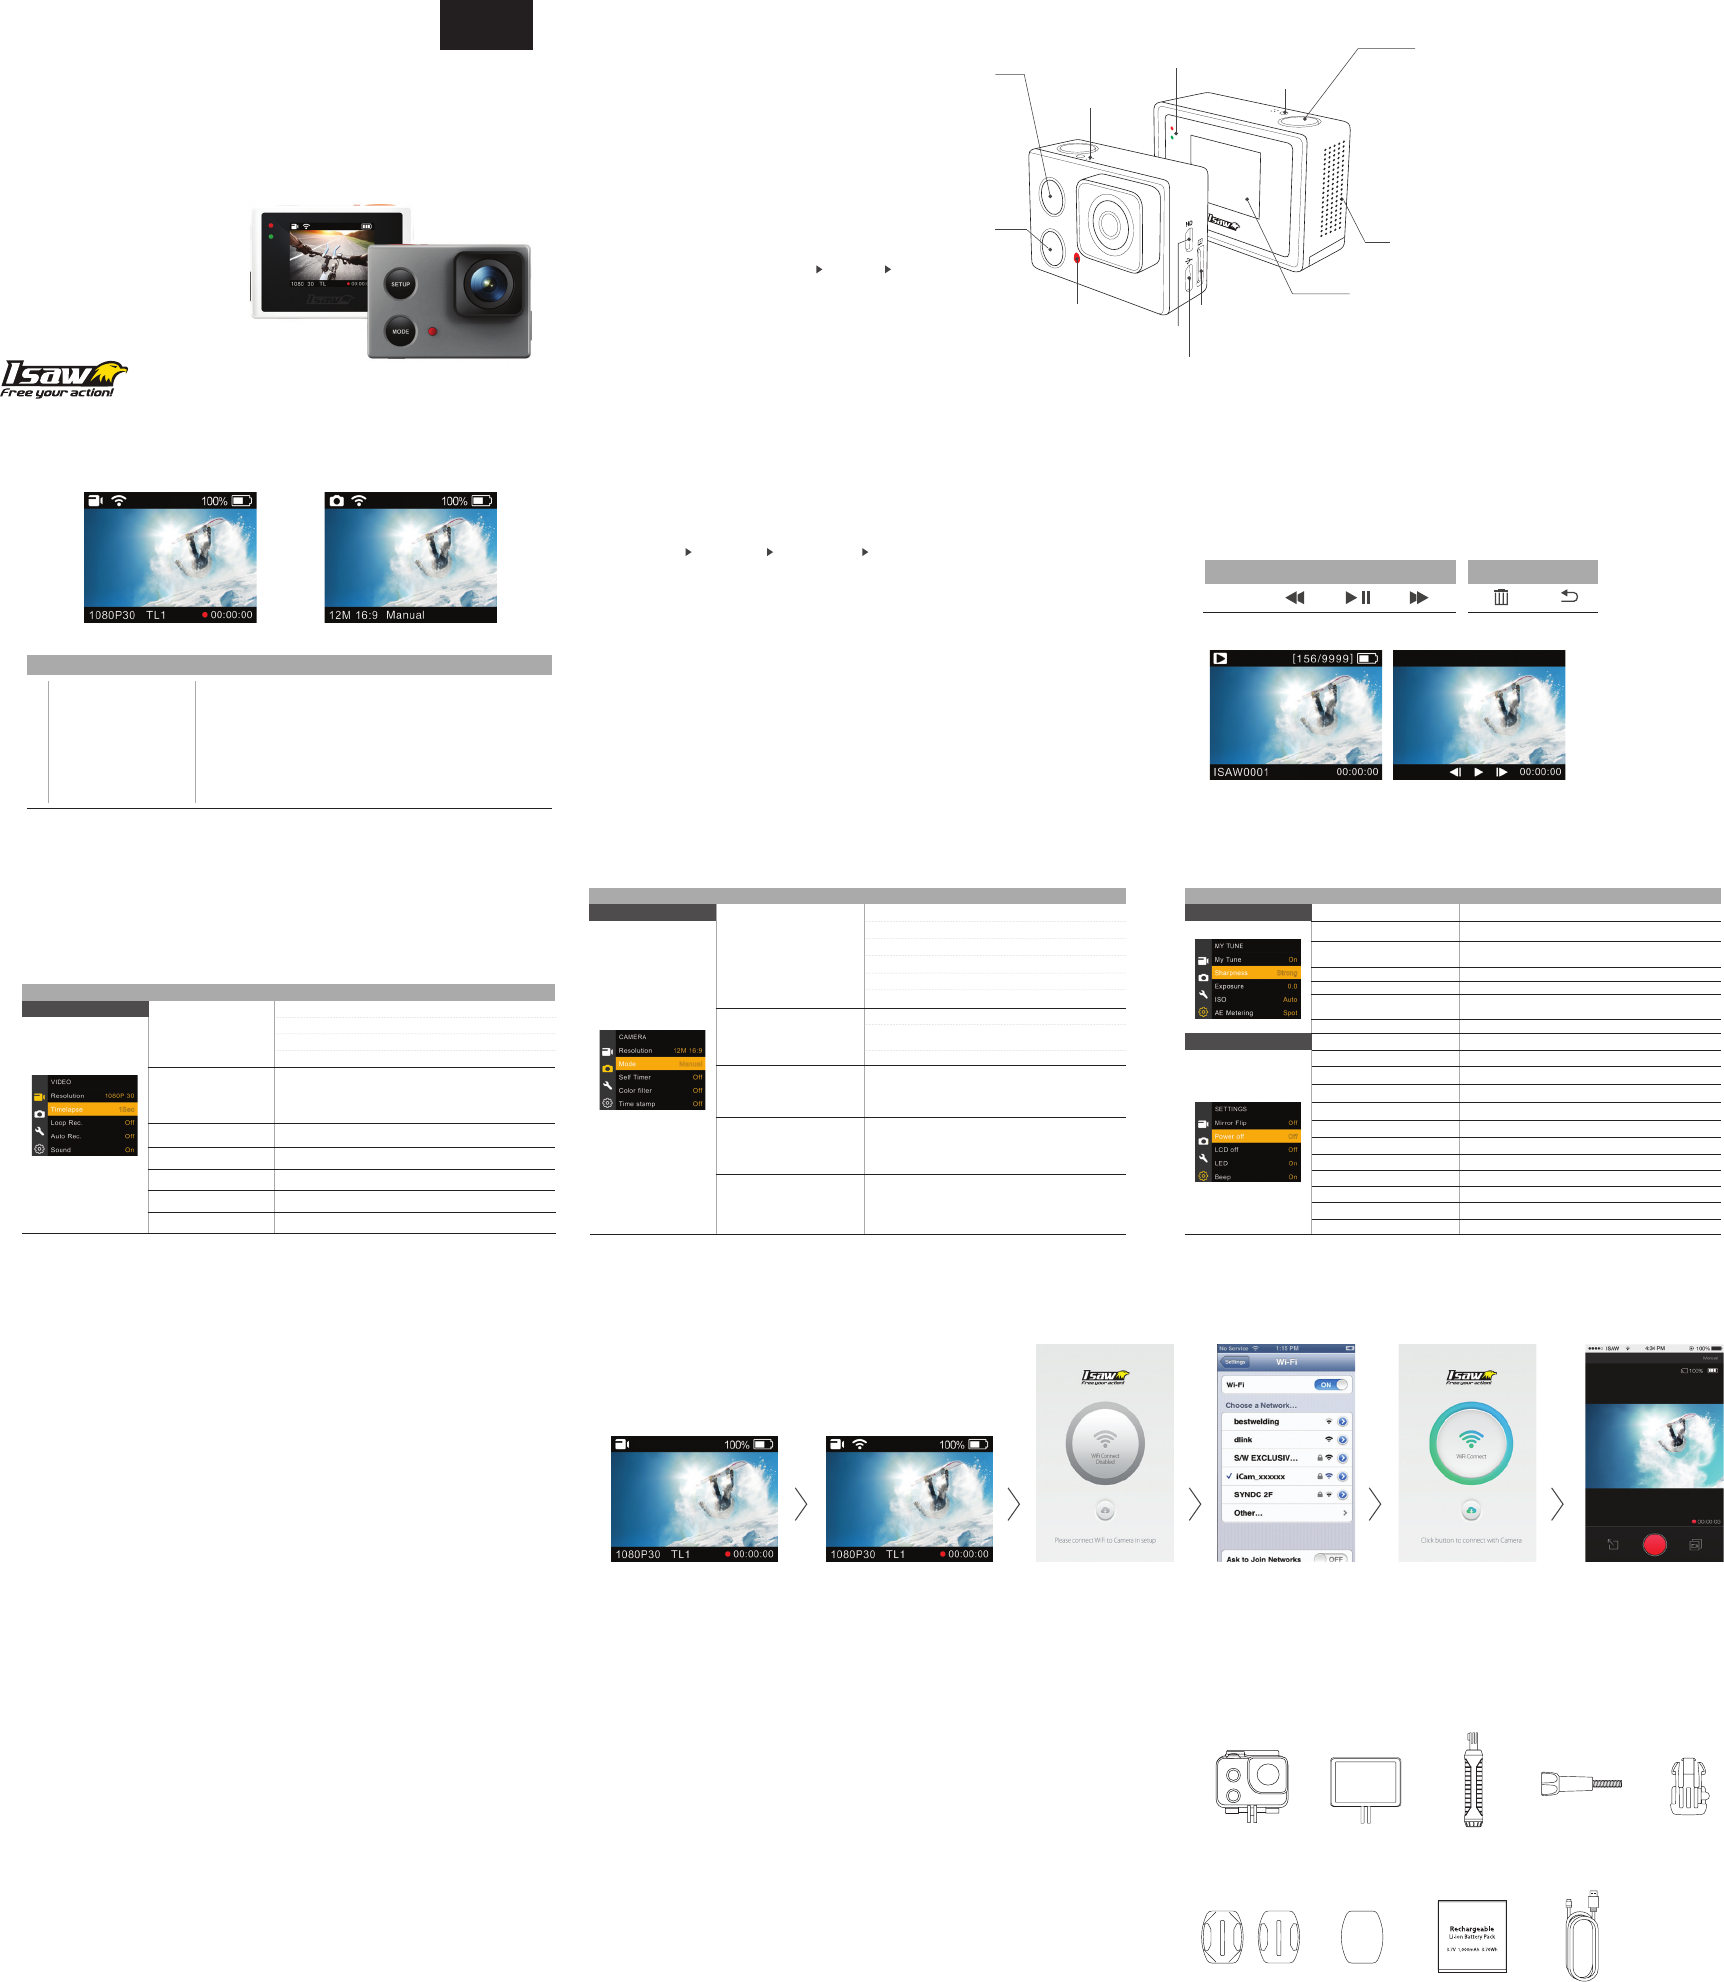
2. LCD icons
7. User setup menu
8. Recharging the battery
14. Package Includes
10. Connect your ISAW Camera to a smartphone
9. Smartphone control
13. Features and specications11. Transferring data to a computer
12. Firmware Update (www.isawcam.com)
1 1
5 6 7 5 6
2 23 34 4
Description
Description Description
Function
Function Function
Sub menu
Sub menu Sub menu
Open frameWaterpoof housing Hand grip
(in ISAW Wing only) (in ISAW Wing only) (Wing - 2ea, Air - 1ea)
Screw
Release buckle
Battery
Flat & Curved
adhesive mount
USB cable
Adhesive tape
Resolution
Mic
Color lters
Time Stamp
Auto start
Time lapse
Loop Rec.
Language
Time
Power o
Beep
LED
LCD o
Information
TV
Mirror Flip
Format
Delete all
Default
My Tune
Sharpness
Exposure
ISO
WDR
AE Metering
Video
Photo My Tune
Settings
960P 1280 x 960 30fps
1080P 1920 x 1080 30fps
+2, +1.7, +1.3, +1, +0.7, +0.3, 0, -0.3, -0.7, -1, -1.3, -1.7, -2
center, average, spot
English, French, Spanish, German
Set the current time (YYMMDD:HHMM)
Off / 3m / 5m / 10m
On /Off
On /Off
Off / 1m / 5m / 10m
NB : New settings and parameters are added via updates of the firmware. Make sure to use the latest firware for an optimal experience.
Check www.isawcam.com for the latest firmware updates.
Shows the current S/W version
Choose frequency PAL (50Hz) or NTSC (60hz)
On /Off (Flips the image vertically)
Cancel / Confirm (Delete all files and format SD card)
Cancel / Confirm (Delete files under ‘DCIM’ folder only)
Cancel / Confirm
When turned on, below settings will be restored to their last value. Turn off to set to auto.
Strong, Normal, Soft
720P 1280 x 720 60fps
720P 1280 x 720 30fps
Resolution
White balance
Color lters
Time Stamp
Self timer
12M 4608 x 2592 16:9
8.5M 3840 x 2160 16:9
5M 3072 x 1728 16:9
7.3M 3648 x 2048 16:9
3M 2304 x 1296 16:9
2M 1920 x 1080 16:9
Capture options
Burst : Take 10 photos with a single press of the button
Manual
Time lapse 3s, 5s, 10s, 15s, 30s, 60s
Shoot in Vivid colors, Natural colors, Sepia filter, Black &White
On / Off
Delays the photo by the selected time: 2s, 10s.
Auto, Daylight, Cloudy, Tungsten lamp, Fluorescent lamp
Loop 1m, 3m, 5m
Time lapse 1s, 2s, 3s, 5s, 10s, 15s, 30s
Take pictures at the selected interval to create an accelerated video.
Take pictures at the selected interval to create an accelerated video.
On / Off. If ON, sound will be captured and added to the video recording.
Set the correction of the exposure
ISO 50, 100, 200, 400, 800, 1600
On /Off
Set the white balance to a different type of light
Shoot in Vivid colors, Natural colors, Sepia filter, Black &White
On / Off
On / Off. If ON, starts to record after the selected time when the camera is switched on (1s, 5s, 10s)
Power On/O
LED
LED
LED
USB
HDTV OUT
LCD
Speaker
Micro SD slot
Internal MIC
Setup button
Mode button
Recording On/O
WiFi On/O
Select menu in setup mode On/O
Press this button and hold for 2 seconds to
turn on or turn off the camera
Press this button to enter/exit the setup menu
Press this button to change camera mode
Press this button to browse the setup categorymenu
Mode changes as Video Mode Photo Mode Playback mode in turn
Press this button to take photo or
to start or stop recording
Press this button to browse the setup menu
Press this button and hold for 2 seconds to turn on or turn off the WiFi
In the setup menu, press this button to
confirm the selected menu
+ The blue LED is on when the battery is charging.
1. Name of parts
1) Open the battery cover and insert an ISAW Li-ion battery.
2) Insert a SD card into the SD card slot.
3) Press the power button and hold 2 seconds.
4) The camera turns on and the LCD monitor shows the camera image.
5) Mode changes as
( Video mode Photo mode Playback mode Video mode) in turn.
- Press MODE hold to change to playback mode
- You can view recorded videos or photos through the LCD screen of the camera.
1. In playback mode, press SETUP to choose a le to view.
2. Press REC to view the le.
3. While the le is playing you can use the control panel by pressing:
- While the camera is on, press REC to start recording videos as per the established settings.
- When the camera starts to record, the LED blinks and the LCD displays the recording time.
- Press REC again to stop the recording.
- You can choose various resolutions and recording options in the Video section of the User
setting menu section (see 7. User setup menu)
- While the camera is on, press MODE to change to photo camera mode.
- Press REC to take a photo.
- You can choose various photo sizes and capture options in the Photo section of the User
setting menu section (see 7. User setup menu)
- In time-lapse mode press REC to start the time-lapse and REC again to stop it.
3. Start the camera 6. Playback mode
4. Video recording
5. Photo shoot
Shows the current shooting mode (video or photo)
Shows the WiFi connection status
Shows the usable memory capacity in percentage (%)
Shows the battery capacity status option
While shooting videos or photos, it shows the current recording resolution
While shooting videos or photos, it shows the current shooting mode
While shooting videos or photos, it shows the current recording time
1
2
3
4
5
6
7
Mode
WiFi
Memory capacity
Battery
Resolution
Shooting mode
Recording Time
No.
DescriptionFunction
Button
Control
MODE(2s) SETUP SETUP (2s) MODEREC.
V106